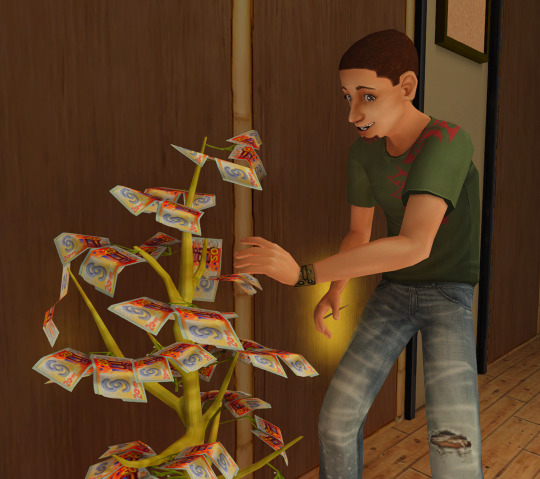
#might try ts2
Text


oh no, that's terrible. Kitty's gonna disown him if we don't get him out of that suit.

Did I really quit and reload my game just to recolor a sweater for him? Yes.
#TS2#Middleground#Suarez#Carlos Suarez#Kitty Suarez#by recolor I mean copy-paste the sweater texture onto this Deedee mesh#now I gotta try to hunt down some elder conversions of his skirts#Miles doesn't have his birthday until next round (I think--it might even be the one after that)
47 notes
·
View notes
Text


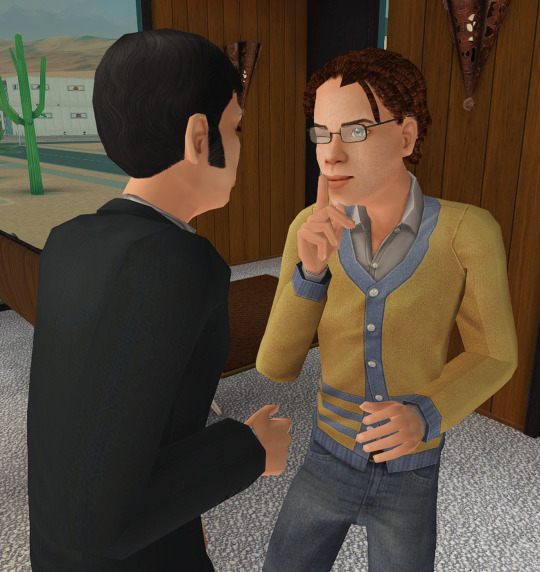
KAZUO KITANO : ❛ jackucho, i thought i told you to not call me after school hours. . . or general ? ❜
Kazuo regards Jackucho with a blend of exasperation and indifference. Jackucho's unrelenting crush on him, while flattering to a certain extent, often borders on intrusive and overwhelming. Kazuo's stoic and snide personality finds Jackucho's relentless pursuit to be more of a nuisance than anything else. He respects her tenacity but wishes she would understand his need for personal space and independence. While he appreciates the attention of his admirers, he believes that Jackucho's obsession with him has crossed a line. He feels that it's essential to maintain a level of mystique and detachment in order to uphold his "picture-perfect" image, and Jackucho's constant presence disrupts this carefully constructed facade. Despite his reservations, deep down, Kazuo may harbor a mixture of sympathy and confusion toward Jackucho, given his own complex personal history. However, he is unlikely to openly express these feelings, and his stoicism remains a barrier to forming a deeper connection with her.

In the chilling and nostalgic world of "The bay has eyes," Kazuo is the embodiment of the "picture-perfect jock" archetype, seemingly ripped from the pages of a 1980s or 1990s slasher flick. His athletic build and charming appearance make him the quintessential character to face the horrors of the bay. However, his stoic and snide demeanor often leads others to underestimate his intelligence and resourcefulness. Kazuo, true to his stereotype, starts off with a trusty baseball bat, a symbol of his jock status, although he's more than capable of using it to fend off threats.
As for his survival prospects, Kazuo doesn't die first, but he's not necessarily the final boy either. While he may endure for a considerable portion of the film, the "bay has eyes" verse has a way of keeping the audience on their toes, and his ultimate fate remains uncertain. His stats reflect his personality, with above-average physical strength and agility but lower charisma and awareness scores, given his stoic nature. Kazuo's character might appear to be a red herring at first, seemingly oblivious to the dangers lurking in the bay. However, as the story unfolds, his resourcefulness and ability to adapt begin to shine, revealing that there's more to this "picture-perfect" jock than meets the eye, making him an intriguing and complex character within the horror narrative.
#ts4#ts4 cas#ts4 screenshots#ts4 screenies#𝐕𝐎𝐋.𝟏; bay has eyes 📼#𝐕𝐎𝐋.𝟏; characters ( kazuo kitano ) 🏈#❝ ᵈᵘᵈᵉ... ʲᵃᶜᵏᵘᶜʰᵒ ⁱˢ ˢᵒ ᶠᵘᶜᵏⁱⁿᵍ ᵃⁿⁿᵒʸⁱⁿᵍ ❞#okay we're back !!!!#revamping the bay has eyes!#i saw windbrook's “slashed” and it gave me ideas to give off basic 80s/90s slasher feels#it's spooky month so im ready to give something this year < 3#Highly doubt anyone remembers- but kazuo is originally from my ts2 GP “furuya's empty shop” but hasnt been shown since-#Brought him back!#When he's the jock but quiet boy coded >>>>>#also trying out ChatGPT#damn i might never write again- YIKES#dropping Jackucho's profile next I FEARRRR#give me ideas for other characters for this!! i love yall input and i'm trying to get back into the feels since being gone for so long
25 notes
·
View notes
Text
i have been playing so much of the sims 2 and i am happy to inform you all that i have successfully gotten nervous subject and pascal curious to live out a happy and healthy marriage together
#sims 2#ts2#if you know me ofc i made myself and then for the first time created my own neighborhood#it's hard asf to make it look cohesive and nice but i did try my best#and yes that neighborhood was just forget-me-not valley slash forgotten valley from sosawl#i haven't made daryl on there yet but i promise i will#honestly... i kind of killed that shit in making the characters..#and.. i did play around with who gets together.. uh#....lets just say... there are so many gay couples u might not expect to be together#I LOVE IT THO AND THEY ALL HAVE CHEMISTRY IT MAKES SENSE !!!#should i be annoying and show that one.. i just might...#i guess another fun fact i do infact love the sims and its my new hyperfixation rn#obessed w the lore and characters rn too mostly#and mostly sims 2 btw ilysm the sims 2
3 notes
·
View notes
Photo

How most of my attempts to play today have gone 🙃🙃🙃🙃
#all afternoon i tried#moved them in and out of the house#i lost count of how many times it looked like this at loading#or just crashed#UGH#usually my solution is to move them into a fresh lot if it's this persistent but i really like their house#i might have to just try to duplicate it or something#sims 2#pink soup#ts2
41 notes
·
View notes
Photo

nooo ughhhh
#the sims 2#sims 2#ts2#learning to use Grid Adjuster for literally 1 single thing I might not even try again#because ughhhhhhhh lol#ONE more time#behind the scenes
14 notes
·
View notes
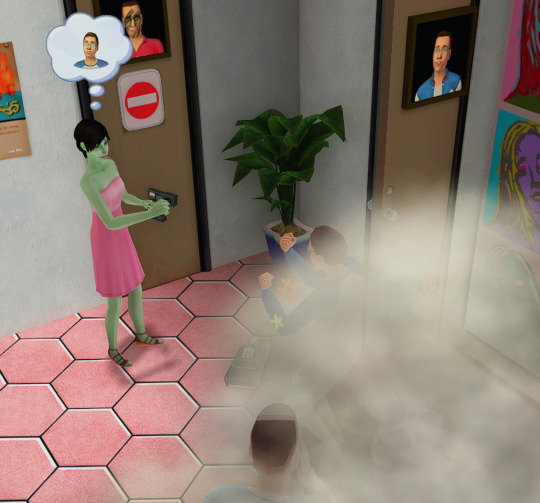
Text

uh oh lmao
#Isabella was off-lot on her double-date with Neil Cameron#There was pink soup when I came back#So I saved and quit#So uh#I might have broken my game?#Gonna try moving them to the family bin and replacing them#But first I have to figure out how to save the lot I spent HOURS building#Without the game selling all their furniture#uv#uv monty#ts2#uv veronaville
4 notes
·
View notes
Text
I put TotK on hold because I got my gaming PC set up and have been playing Bioshock (original) and the Sims
Which tells you how much TotK did NOT benefit from restarting BotW about a week before it came out. Not that I think it's bad per se, I think it's objectively a similar level it's just. Too similar. ADHD go bzzzzt (do not pass go do not collect $200).
Gonna maybe sit on this one for a couple months so I can come back to it and actually, like, enjoy it.
#i also lucked into a copy of Majora's mask (i think) for ds so maybe i try that first#itll be very different at least#the sims 4 takes so much fucking time to set up omfg#i also have ts2 installed so i might just..... play that instead....#i prefer to be pretty hands off so lets see if cluba are the solution
0 notes
Text
[TS3] Lot Population Mod
Update 7/18/23: Fixed issue that caused custom tuning to not take effect.
Download under the cut
Overview
This mod is an experiment that's been in my mind for a while now - Teleporting Sims into community lots as you send your Sims to them, or focus the camera on the lot, etc. Making the town feel more alive, and making it so that community lots are always populated. This makes it work more like a traditional open world game, in which characters are spawned based on camera distance, where you're looking at, etc.
Not only that, it also adds walkbys, much like TS2 or TS4. These are Sims that every once in a while spawn on a sidewalk, out of view, and walk across the screen, then go on their own way.
Now community lots will be filled with Sims.
Installation
2 flavors are available:
"ld_LotPopulation.package" - Default tuning, should make worlds very populated.
"ld_LotPopulation_Reduced.package" - Reduced tuning, should make worlds more lightly populated.
Simply drop the package of your choosing into your "Documents/Sims 3/Mods/Packages" folder.
All tunable values are documented in the XML. There are quite a few of them, but the most important one is probably the "kDemographicsMultiply" value.
Download
SFS / MTS / Patreon (Free)
More Technical Overview
In case you're curious about how it works more in depth, community lots have a population quota now. This quota depends on a ton of factors, such as time of day, weather, day of the week, demographics, etc. And is different across different lot types. For example, beaches will be booming during hot summer weekends, not so much if it's winter and snowing.
The amount of Sims that are teleported into lots tries to fill this quota. On top of that, Sims will also get pushed to visit lots to fill the quota, so if for example the camera is permanently facing a lot in a way that doesn't allow for Sims to subtly teleport to it without it being super obvious, the mod will push Sims to visit instead.
Sims are also chosen depending on a range of factors such as personality, age, occult status, etc. And they're placed on a "low priority" list for a while upon teleport. This way you won't see the same Sims everywhere.
Teleported and visiting Sims will also get appropriate outfits, needs and will immediately pick something to do, in order to make it more believable.
Walkbys use lot corners as reference when looking for sidewalks. So this feature is most effective with a decent amount of lots on the world.
There might be some lag every once in a while unfortunately. This is kind of necessary, as it tries to find spots that are actually routable to teleport Sims to, so that they're not stuck. If you find it particularly bad, you can try the reduced tuning version.
Source code: Github
Screenshots

1K notes
·
View notes
Text
Roblox Skyboxes as TS2 Hood Skies

it's been a while since i last uploaded something. this is something i've wanted to try for a while and turns out making custom skyboxes is way easier than i thought lol
most of these skyboxes are classic ones, but i included the modern-day one (modern, at least at the time i'm uploading these) because i think it's quite pretty! i can see myself using it in a neighborhood unironically
previews (taken without reshade)


>> DOWNLOAD LINK <<
just a little warning that i did use the less optimized version of lowedeus's skyboxes as a base, so these ones have a pretty huge texture size meaning you might get pink soup in your neighborhoods more often if you use these. if you don't know what i'm talking about, here is someone who optimized those skyboxes to make them work better with the engine. i might update these in the future, but it depends on whether the textures in-game become pixelated or not lol
all of these files were compressed by the compressorizer!
Credits:
GreatCheeseCakePersona for the tutorials and the original skyboxes
SimPE
The Textures Resource
ROBLOX for the original sky textures
#ts2#the sims 2#sims 2#sims#sims 2 hood deco#sims 2 skybox#sims 2 skyboxes#sims 2 download#roblox#sims 2 cc
212 notes
·
View notes
Text
To the beginner creators
I had a small conversation in one of my posts comments with someone (I'm not tagging you in case you don't want to be tagged, just in case that bothers you even if our discusion is publicly visible, but you'll know who you are), and remembered reading the same kind of worries several time in the past...
Looks like some of you are afraid to ask for help, or are afraid to annoy more advanced creators.
Let me tell you a few things :
Yes, people can be bothered if someone talks to them privately over and over and over. That might happen. But as long as you don't act like if you expect others to serve you, it should be fine !
TS2 is quite a nice community compared to many other video games community I've seen and left. It's one of the safest places I've ever been. Even if most of us are not even fluent in english and sometimes express ourselves badly. It's an helpful community with patience and very welcoming to the new ones, as long as they act with respect and kindness. We share our tips, we share our love for the game, we share our thoughts, our finds... We try to help each other when we have the time and the knowledge.
So please ask !
If someone on tumblr says you can reach them if you have a question, don't hesitate. If you're not sure, ask on MTS or GoS forums, where anyone who reads you and has the knowledge might help you.
You can also make a post on tumblr and if you have a few followers, ask them to reblog to help your question reach someone who has the answer. I did that several time and most of the time, I had help. I also help others myself when I can.
As you can see, there are a few options to ask without sending any private message to a specific person. Without taking the risk to bother people. Use those tools. We are all happy to help ❤️
168 notes
·
View notes
Text
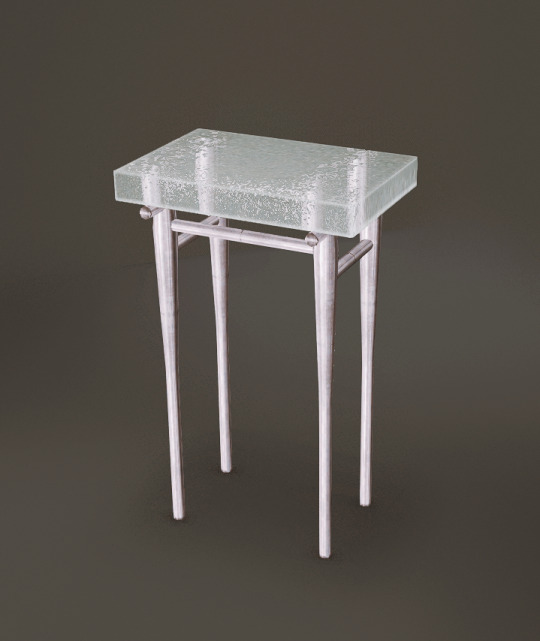


Adele's Ramsay Living for TS3
2 years ago, on a fateful evening, I decided to convert this set to TS3. Although this had already been converted, I had my reasons to do my own conversion. Long story short, there were things that I didn't like and things that I liked.
One thing that I liked in the previous conversion was the effort to make the table tops glass. So I experimented with the Basic Shower which is supposed to have frosted glass. I don't know why EA use horrible textures; when you replace the NormalMap with a proper frosted glass texture it looks amazing.
So, using this knowledge as a base, I worked on the frosted glass table tops and after countless failures, I finally managed to have the effect I wanted. The key is having the right values for UVSelector parameters in the shader.
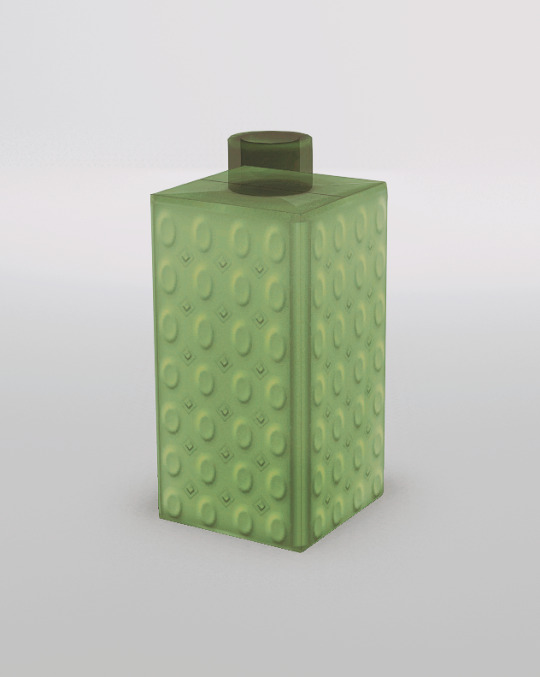
I also changed the textures for the bottle; tried to recreate it as a multiplier. Then made another version. Bottles are semi-transparent glass and recolourable. Don't ask me how I made them - I don't remember. But I if have to guess, there is this tutorial that I know of. The first part is about recolourable glass.
I wasn't feeling Adele's art for the painting. So, I used the recolours made by @timeparadoxsims. The artist is @len-yan and the art is amazing. If any of them want me to remove the painting from my downloads, I will do so but cry inwardly. 😢
I know people hate reading and just want to download but THIS IS IMPORTANT: Several items share textures. So you need to have the 'masters' in your game for the 'slaves' to work. I will group them and explain further.
The Loveseat is the master for the following objects: Armchair, Sofa, End Table (Solid Top), Coffee Table (Solid Top).
Loveseat, Armchair, Sofa -> 4 Channels - 2 presets with second being Adele's black overlay & metal and wood parts still CAStable.
Loveseat Polycount -> HLOD: 1746 MLOD: 702
Armchair Polycount -> HLOD: 1578 MLOD: 726
Sofa Polycount -> HLOD: 1962 MLOD: 1096
End Table, Coffee Table -> 3 Channels - 1 Preset
End Table Polycount -> HLOD: 710 MLOD: 444
Coffee Table Polycount -> HLOD: 1322 MLOD: 720
The Cushions for Loveseat is the master for following objects: The Cushion for Armchair, The Cushions for Sofa.
All Cushions -> 1 channel, 3 different multipliers - 5 Presets with 2 of them being overlays. You don't need moveobjects on to place them on their appropriate seating. If you use alt to place the seating you need to use alt to place the cushions as well.
Loveseat & Sofa Cushions Polycount -> HLOD: 160 MLOD: 80
Armchair Cushions Polycount -> HLOD: 80 MLOD: 40
The Glass Top End Table is the master for The Glass Top Coffee Table.
Both tables have 1 Channel & 1 Preset. Polys are same as the solid tops.
Decorative Bottles
Both have 1 Channel & 1 Preset.
Polycount -> HLOD: 242 MLOD: 119
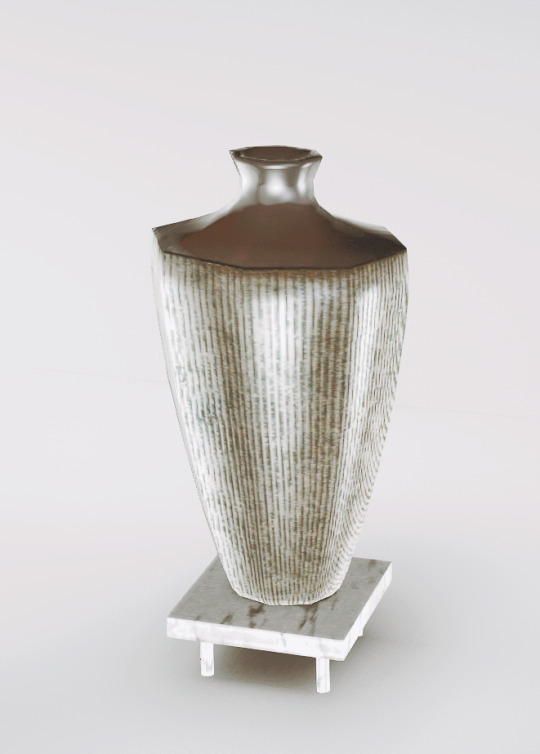
Decorative Vase
3 Channels - 2 Presets
Polycount -> HLOD: 446 MLOD: 344
Large Frame Painting
1 Channel - 18 Presets
Polycount -> HLOD: 82 MLOD: 64
I've also included the collection file which comes with its own icon for easy recognition. As always, I might have missed something; if you find anything weird don't hesitate to tell me so I can try and fix it. I hope you'll enjoy this beautiful set by talented Adele. Happy simming.
- Credits -
Adele for the meshes and textures.
@len-yan for the art.
@timeparadoxsims for the ts2 recolours
Google Fonts Montez, Kurale
Made with: SimPE, GIMP, s3oc, s3pe, Blender, Texture Tweaker 3, and TSRW
@pis3update @kpccfinds @xto3conversionsfinds
- DOWNLOAD -
:: MEDIAFIRE | SFS ::
119 notes
·
View notes
Note
this is in a similar vein to an ask you got recently but do you have any tips for those who are interested in sims 4 (or even other games like ts3 and ts2) storytelling? I write fanfiction but I think making sims 4 stories could be a fun venture. Anyway, thank you for your time! I love your stories so very much they're literally my hyperfixation!
Well, that makes two of us because it's literally my hyperfixation. I think I've shared bits of advice before, so some of this might sound familiar, but here are some things I think are important to remember (and I tried to be concise, I swear).
Write the story you want to write. Obviously, it's a great feeling when something takes off and people get invested. But if you pursue an idea only because you think Simblr will like it, you probably won't be inspired for long and it'll probably show. I've been very lucky with my story, but it didn't blow up overnight. Early on, I was thrilled to get double digit notes or one reblog or comment and was admittedly disappointed when I put a lot of effort into something and nobody seemed to notice. But I kept going because I was obsessed and wanted to see it through, and that's more true now than ever.
Start with low stakes and allow yourself to evolve. Before I was on Simblr, I made Sims stories with no poses or visual enhancements or fancy editing. I wrote them for myself, and I loved every minute of it, but they also gave me a solid foundation for the kind of storytelling I do now. Even after starting this blog, I eased myself into it. I learned how to use poses and Reshade, then moved on to more advanced editing techniques, then moved on to teaching myself to make poses and very basic CC. If you try to learn it all at once, you're more likely to give up because you're overwhelmed. Take your time and make peace with the fact that perfection isn't possible. Everyone's always learning!
Take advantage of the fact that Sims is a game. Even though I've been a creative writer for most of my life, I don't come up with fully-fleshed, elaborate Sims stories from scratch. It started off with my legacy and not wanting every generation to feel the same. I thought about gameplay I hadn't experienced yet and centered each generation's story around that. Even with HZID, I just wanted to make and play with vampires! That's it! Initially, I used a lot of gameplay to convey Helena's college experiences, and I still try to incorporate it when I can. It can really be a great base to spark your creativity if you don't know where to start.
Don't have a life outside your story. I'm joking. Kind of. I'm not a very social person and I don't like leaving my house if I don't have to. This leaves me with a lot of time for working on story things. Honestly, I could probably stand to work on it less. But for better or worse, I'm doing story-related things most nights and weekends, and even if I'm not doing anything, I'm thinking about it. It's probably mental illness, but we'll just call it passion. At the same time, it's also important to take breaks! If you're feeling burnt out, step away for a while. If you can't make yourself step away completely (raises hand), just edit the script or spin your blorbos around in CAS or something rather than going straight for posing a scene.
Follow and interact with other storytellers. This is probably the most important thing, and as someone who struggles with social anxiety it was the hardest for me to do. But I try to make a point of keeping up with other stories, commenting, and reblogging. Not only will the amazing talent of other writers inspire you, but you're building meaningful connections that make them more likely to want to interact with your story. There's no denying it feels amazing to watch your audience grow. But no one's going to see you if you don't make an effort to be seen, as scary as it can be. So try to be active in the community and support other storytellers the way you want to be supported!
#asks#i feel like this place has become essay central lately#but i am happy to share my (minimal) wisdom#even if most of what's happened on this blog feels like a happy accident tbh!
39 notes
·
View notes
Text
Updating... The Tattooer (ver. 3.4)!

Finally! Took me a while, huh. This is the updated version of the Tattooer project. It skips some steps, making the workflow much, much faster! Huge thanks to @applewatersugar for his
suggestion on how to bake textures while preserving the transparency. This is kind of a repost of the original Tattooer post, but it actually has some new stuff and a few changes here and there, so please take a look if you want to learn how to use this new version.
This is a series of Blender template files already set up to quickly bake textures from The Sims 4 to The Sims 2. The different Blender files will allow you to:
-Bake body textures from TS4 to TS2 (Female)
-Bake body textures from TS4 to TS2 (Male)
-Bake body textures from TS4 (Female) to TS2 (Male)
-Bake body textures from TS2 (Female) to TS2 (Male) [Bonus!]
-New! Bake face textures from TS4 to TS2 (Unisex) [Bonus!]
-Bake head textures from TS4 to TS2 (Face + Scalp) (Unisex) [Still experimental]
Check the file names to see which one is which, and the resolution of the baked texture it will give.
Everything you see in the render above was 100% converted using those Blender files.
Download here! SFS / GD
Update: Version 3.4.1 (27/08/2023) Fixed some issues on the shoulders for the AF-body-4t2-1024 and AF-body-4t2-2048 templates. Now the top straps on most converted underwear/swimwear should look right.
Update: Same version (13/12/2023) As requested, added a new spanish version of the included pdf guide!
These templates were made mainly to bake and convert tattoos, but there’s more you can do with them if you get creative. I have to say, these are NOT perfect. Results may vary depending on what you are trying to convert, so! With that in mind, this is all the stuff you will be able to convert almost seamlessly from TS4 to TS2:
-Tattoos.
-Other body details such as body hair, scars, freckles, supernatural/occult details…
-Body painted underwear and swimwear, as well as some other clothing that’s mostly painted on the body.
-Socks, stockings and maybe leggings.
-Even skintones! In some areas they will look weird, so I recommend editing and blending them with other existing TS2 skins.
-Makeup, eyebrows and beards. In the old version this was just a proof of concept, but now I’ve added a new Face file template which gives some pretty decent results!
-Hair scalps. Very useful when converting some hairs! Although keep in mind part of that texture might also need to be baked on the face mesh, you know, that hairline makeup stuff.
Got your attention? Nice! Editing some of the textures from TS4 to match the UV mapping in TS2 using a 2D editing program can be incredibly hard. That’s where texture baking in Blender comes to the rescue!
You will need to download Blender, at least version 3.4, but you could always use a newer version. It is only incompatible with versions older than 3.4.
-You can download Blender for free here.
-You will also need Sims 4 Studio to extract the original Sims 4 CC textures you want.
In the first version of these Blender files, there was a necessary step using Photoshop, but that’s no longer needed. However, there’s still a tiny extra step which requires resizing the newly baked texture on some of the high resolution templates, so you might need a 2D editing program like Photoshop. More on that later.
So, before we begin, let’s clear out some questions you might have. What the heck is this texture baking thing and what does it do? Well, let’s imagine you have a video projector and point an image into a blank wall. Then you pick up some brushes and start painting and copying that projected image in that wall. Texture baking is kinda like that when it comes to 3D models. You align two models and match them as closely as you can in shape and form, and once you adjust some parameters and values, Blender does the rest for you: it will give you a new texture for a new model with a different UV map. These files I’m sharing have everything already set up, so it’s a matter of plopping in that Sims 4 texture and you will get that new texture for TS2 in just a few clicks.
This tutorial assumes you know literally nothing about how to use Blender, so if you feel uncomfortable with it, worry no more! This will guide you with pictures showing where you need to click and explaining what is happening. For Sims 4 Studio and Photoshop the process might be a bit less detailed, but still this should be pretty beginner friendly. For this tutorial, I will use some tattoos as an example (properly credited at the end of the post). Alright, enough with the rambling. Let’s get started!
·EXTRACTING TEXTURES IN SIMS 4 STUDIO:
First things first, you will need to extract as pngs all the textures you want to convert from TS4 using Sims 4 Studio. It should be pretty straightforward. Just open the packages and export the Diffuse textures. Keep them organized in a folder for easy access.
·BAKING THE TEXTURES IN BLENDER:
PRELIMINARY STEP 1: CONFIGURING BLENDER’S GRAPHICS SETTINGS:
Open your preferred Blender file depending on what you’re going to bake and the desired resolution (in this example I’m going to use the AF-body-4t2-1024 file). Before we start messing around in Blender, there’s one thing you should set up. It is a onetime step, and once it’s done, you won’t need to do it again. So, does your computer have a dedicated graphics card? If you don’t know or you’re not sure, just skip to the next step. Configuring Blender so it uses your graphics card instead of your CPU will make the baking render much faster, so it is recommended you set it up correctly.
If your computer has a dedicated graphics card, click File (1) > Preferences (2) > and on the window that pops up click System (3) > and select CUDA and make sure your graphics card is there and tick it (4). I have an Nvidia Graphics card but your case may vary. Once you’re done, click on the tiny button on the bottom left corner and Save Preferences (5).

PRELIMINARY STEP 2: CHOOSING THE RENDERING DEVICE:
Click on the tiny camera button on the right, called Render Properties (1), and on Device (2) select GPU Compute if it’s not already selected. If you’re not sure if you have a graphics card or not, just select CPU. Then select the Material Properties tab (3) and Save your changes, either by pressing Ctrl + S, or clicking File (4) > Save (5). You might need to do this second step with the other Blender files, but once you have it done and saved, you won’t need to do this again. Okay, time to get into the good stuff!

·STEP 1: LOADING YOUR TS4 BASE TEXTURE:
In the Material Properties tab, click the folder icon that says Open (1) and on the window that pops up, navigate through your folders and select your first texture. To navigate easily, the 3 buttons on the top right (2) are for the display mode. They will show your files in list mode, vertical and horizontal, and the one on the right will display the file thumbnails, pretty useful if you want to easily preview your textures here. The icons on the left side (3) will let you go one folder back and forward, go to the parent directory, and refresh the folder in case you just dropped something new in there. Double click on the image you need and that will load the texture into the Sims 4 body model, named “ts4 body”.

·STEP 2: SETTING UP YOUR SELECTION AND BAKING THE TEXTURE:
On the top right of the screen, you will see the names of the 2 models in the scene. Hold the Ctrl key in your keyboard and left click on the “ts2 body” model (1). If you did it correctly, you should see “ts2 body” in a yellowish orange color, and right down below, “ts4 body” should look more like a red orange. If not, try again by clicking first on ts4 body, and then while holding Ctrl click again on ts2 body. Then switch to the Render Properties tab by clicking the tiny camera icon (2) and click Bake (3). Depending on your screen resolution, you might need to scroll down a bit with your mouse to see the Bake button. Wait a few seconds for it to finish. You will see the progress percentage down on the bottom of your screen. Don’t panic if you notice your computer fans start ramping up, that’s completely normal! As I said in the beginning, using your GPU will bake the textures much faster than the CPU.

·STEP 3: SAVING YOUR NEW TS2 TEXTURE:
Once it’s finished, switch to the UV Editing Mode by clicking “UV Editing” on the top of your screen. And there it is: your new texture! You might have to scroll up your mouse wheel a bit to zoom in and see it in all its glory on the left side of the screen. We’re still not done yet though. You need to save it to yet another new folder (always try to keep your stuff organized!).

You can save it by pressing Shift + Alt + S, or clicking on Image* (1) and then Save As… (2). That will pop a window where you’ll need to navigate again and save it somewhere. Give it a proper name (3) and hit Enter to save it… well, Enter doesn’t always work for me for some reason, so if that happens just click Save As Image (4). And that’s it! You’ve successfully converted your baked texture. Congrats!

·STEP 4: GOING BACK TO STEP 1:
Alright! If you’re done with your textures, you can close Blender without saving and call it a day. But let’s say you want to keep baking other swatches. In order to go back to step 1 and start the process once again, click Layout (1), go back to the Material Properties tab (2), select “ts4 body” (3) and click on the folder icon (4) to open and load your next swatch.

Then it’s just a matter of repeating the process from step 2. When you’re ready to move on, close Blender without saving. If you see a small check telling you it will save some images, make sure you uncheck it, so you will be able to use it again in the future from the starting point with no issues. I don’t think it really matters if you accidentally save your progress in these files, but I like to keep it clean and fresh so I can do the process where I left it from the beginning next time I open it. And in case you mess up and save somewhere, you can always just delete the .blend file and download the template files again.
In case you’d like a video tutorial on how to use these files, the amazing @platinumaspiration recorded this fantastic video showcasing the process! You can watch it here.
One final note: some of the baking .blend files save the textures with a resolution of 2048x2048 pixels, as clearly stated at the end of their file name. That’s way too overkill, because TS2 only properly supports up to 1024x1024 for most of its textures and you should always resize your final product to that max resolution (or lower if needed). I just made those 2048 versions because there might be some really tiny and slim details on some tattoos that might look a little too blurry when baked into a 1024 resolution texture, so for those cases use that if you want and then resize them using your 2D editing software of choice.
In Photoshop, in the Resample mode of the Image Size menu, there are a few options to choose. For the fine details, I like the Nearest Neighbor (hard edges) option, which, even if it looks a bit pixelated, it still preserves most of the texture and quality.

For anything else, I would just directly bake them using the 1024 versions in Blender (512 for the face and scalp).
And for the folks who feel comfortable playing around in Blender, this is just the beginning! Texture baking opens a LOT of possibilities, so feel free to move stuff around and edit the models to your liking! If you notice the baked textures look warped or stretched somewhere, or don’t like where some textures are placed in the S2 body, poke around that area moving stuff and then give it another try. The main objective of the baking process is keeping both overlapping models as close in shape as possible. You may also edit and save new copies of the templates, or make new ones from scratch using mine as a reference (keep a close look on those Baking settings and values, I think they work pretty well) and share them if you want to. Go ham, do whatever you want with them! I still have plans on making templates to convert body textures from Sims 3 to Sims 2, but for now it’s not on my priorities, so we’ll see when that happens.
Whew! Hope none of this was too confusing. Need help or have any issues with these? Please ask/message me here and I’ll be glad to help when I’m able to!
Credits for the CC used in the render demonstration:
-Skin by Sims3Melancholic.
-Eyes by Northern Siberia Winds.
-Eyebrows by PeachyFaerie.
-Tattoos by xtc.
-Top by SerenityCC.
And the Tattoo I used for the tutorial can be found here, by ValhallanSim.
Last but not least, a huge thanks to all the people who somehow contributed to make this project and update possible, either by doing initial testing, finding issues to fix, or teaching me new Blender tricks to make the workflow way faster and easier. So thanks again to @elvisgrace @moyokeansimblr and @applewatersugar on Tumblr! <3
And thank you for reading! Hope you have fun playing with this (not so) new toy hehe.
#tattooer project#tattooer update#ts2 tutorial#ts2 resources#ts2 blender#ts2 overlays#ts2 texture baking#4t2 conversion tutorial#this took me so LONG to update#im really sorry for the delay :(
335 notes
·
View notes
Text
all i wanted to do ALL I WANTED TO DO was make tank bear hug almeric in game. so i turned them into teens. then i wanted to turn the other housemates (aldric & stella) into teens...... THEN i thought hey. how about
lft if it was a boarding/high school and all the students were really cute and dorky teens. i guess. (long post) help me
* some pics have alt texts

THE NERDS ARE FIGHTINGGGG
did not mean for these two to be so 80s revival x y2k but im not complaining at all


because it's a lot im cramming the rest of the students under a readmore ☠️💔

oh my fucking GOD hes so kawayi. need him rn
HELLO? WHO THE FUCK IS THIS GUY? that's not mickey that's mikey


i tried to plastic surgery him to fix his broken template while trying to make him look like a younger version of himself but im not used to sculpting in ts2 😬 might give him his stubble back but i still think hes a cutie patootie otherwise


🎧🎶 CAN U SEE THE VISION CLEARLY..... THE FRAT BOYS ARE THE PRIMARY COLORS ☝️🤓💛❤️💙 please. i thought i was really funny and clever for that one. please clap. i am writing this at 2am

MIGHT change jasmine's fit too (i'd rather her look more punk than goth) but i really like her emo hair.. like it's literally her normal spacebuns with emo bangs. isn't that amazing


UGH DID THEY HAVE TO MAKE TEENS' EYES SO HUGE 🥺🥺 DUDE. THEY'RE BABIES.
FINALLY: student housing (literally never play these guys i dont care much for them and it shows in their designs but i did think blossom's was really cute)


worst part about this is that they age back up when you reload the lot (to my understanding - cause im stupid and didnt move them from la fiesta) so i'd have to age them back down again and potentially rechoose all their outfits ☠️☠️ noo thank you..
this beautified LFT campus is by @katatty their builds are SO AWESOME honest to god i audibly gasped when i saw how pretty the dorms were esp the one i put student housing in
haven't hit the photo limit yet so bonus aesthetic picture!! <3

#tank grunt#la fiesta tech#everyone. it's everyone man. i'm not tagging all that#FINE i'll tag my fav designs#dj verse#zoe zimmerman#sarah love#matthew hart#guy wrightley#mickey dosser#blossom moonbeam#ts2#sims 2#gameplay#la fiesta high? or la fiesta academy#depends on if we take the high school or boarding school route but im more inclined to the latter#not at all based on some other hyperfixation i have. .#. . . . .
84 notes
·
View notes
Text
TS2 Download: Bathroom Uses You, But Pretty
More Models for Pescado's Bathroom Uses You

If you use Pescado's Bathroom Uses You, but are sick of the "Red Army Surplus Toilet Paper," this might be for you.
I sighed longingly at Honeywell's TP holder from the Better Bath set and then Michelle's OFB deco addons until I decided to do something about it. Now, instead of one other mesh option, the original mod's Change Mesh menu includes those meshes.
It's not perfect. Design mode will allow you to change the holder colors for whatever recolors you have in game, but not the toilet paper roll. And the design thumbnails are of the original mesh, not the added ones, so you have to click through to find the color you want. If fixing that is possible, it's beyond me. I tried.
These are not standalone meshes. You'll need the originals in game. (They're included in the download.) If you choose a mesh through Change Mesh that you don't have, the object will become invisible and unclickable and you'll have to use the Stuck Object Remover to delete it. I left the original pricing and catalog sort of these objects unchanged. The BYU object can be found in Plumbing/Misc. In live mode, you'll have the option in the pie menu to change mesh.
All the credit for these objects goes to the creators, I just lumped them together.
Bathroom Uses You by Pescado (Probably does not care one bit, but thank you.)
Michelle's OFB wood and metal TP deco objects (Included with permission--thank you, Michelle!)
Honeywell's Better Bath Collection (Included with thanks.)
Huge thank you as well to ocelotekatl and whoward69 at Sims 2 Shenanigans for their patience and help with this!
I've tested this in game and haven't encountered any issues besides the ones mentioned. If you run into trouble with the meshes, let me know and I'll try to troubleshoot. This is a mod that affects how sims use bathrooms, so if you don't have it already, please run HCDU to check for conflicts. If you do have it already, replace the original with this one in your downloads folder.
Download: Simblr.cc | SFS
#my ts2 uploads#sims 2#ts2#sims 2 download#sims 2 cc#sims 2 custom content#ts2 download#ts2 cc#dl: deco#dl: bathroom
113 notes
·
View notes
Text


CC-Free Collection for Download: Carnival
This one is a little more subjective than my other collections, cause there isn't really a way to build a "real" carnival/circus/theme park in TS2 without using CC. But I want to try anyway lol.
That requires me to kinda just recontextualize all the random tacky/gaudy/hideous junk EAxis threw into every EP/SP, and make it actually useful, since carnivals are known for being all those things :P
I tried not to get too crazy with what I added, since 95% of all EAxis items could probably fit in if I really wanted them to lol. My main goal was bright colors, weird/loud patterns, a few industrial bits for that more rundown cheap looking carnival feel, and generally things you might actually use at a carnival (games, toys, food, etc.).
Just like before, the collection's sorted by the order things appear in the catalog (build walls, windows, etc. then buy seating, surfaces, etc.) I've also again included objects only useable with the buyable craftables & buyable reward object mods.
Where to install: My Documents > EA Games > The Sims 2 > Collections
DOWNLOAD: SFS | MF
Other CC-free collections: Alien, Grunge, Goth, Pink, Wild West
96 notes
·
View notes
Last Seen Blogs

hqjoon
𝕙𝕖𝕝𝕝 𝕥𝕠 𝕡𝕒𝕪.
visualagp
www.visualagp.tk

ofore1970-blog
Untitled

fotonvr
fotonVR
makadragontamer
president of the lurkers club