#mod_rewrite
Explore tagged Tumblr posts
Visit Tumblr Blog
Explore Tumblr blogs with no restrictions, modern design and the best experience.
Last Seen Tumblr Blogs


Fun Fact
Hackers stole 65M passwords from Tumblr in 2013.
Text
1 note
·
View note
Text
How LiteSpeed Improves Loading Speed
Website speed is a critical factor in user experience, SEO performance, and conversion rates. Faster-loading websites engage visitors better, reduce bounce rates, and rank higher in search results. LiteSpeed Web Server (LSWS) is engineered to optimize website speed with powerful technologies built into its core. This article provides a technical and practical look at how LiteSpeed improves website performance, its architectural strengths, and comparisons with other web servers like Apache and NGINX.
What Is LiteSpeed?
LiteSpeed is a high-performance web server software developed by LiteSpeed Technologies. It serves as a drop-in replacement for Apache, meaning it can use Apache configurations such as .htaccess and mod_rewrite while offering far superior performance.

Unlike traditional web servers that rely on process-based or thread-based architectures, LiteSpeed uses an event-driven approach. This enables it to handle thousands of simultaneous connections efficiently without consuming excessive resources. It’s widely used in shared, VPS, and dedicated hosting environments due to its scalability and speed.
LiteSpeed is compatible with major web hosting control panels like cPanel, Plesk, and DirectAdmin. It also integrates seamlessly with WordPress, Magento, Joomla, and other popular CMS platforms.
How LiteSpeed Improves Loading Speed
LiteSpeed's performance is not just theoretical. Numerous benchmarks and case studies show significant improvements in load time, server response, and concurrent user handling. Its technical foundation plays a pivotal role in enabling these advantages.

Event-Driven Architecture
Most traditional web servers like Apache use a process-based or threaded architecture. Each connection requires a dedicated process or thread, which leads to high memory usage under load.
LiteSpeed uses an event-driven, asynchronous model. It processes multiple connections within a single thread, significantly reducing memory consumption and CPU load.
For example, benchmarks by LiteSpeed Technologies show that LSWS handles over 2x more concurrent connections than Apache with the same hardware configuration [1]. This architecture is especially beneficial during traffic spikes, such as flash sales or viral content events.
Built-In Caching (LSCache)
LiteSpeed’s caching engine, LSCache, is built directly into the server core. Unlike third-party caching plugins that operate at the application level, LSCache works at the server level, making it faster and more efficient.
With LSCache enabled on WordPress, testing from WPPerformanceTester shows up to 75% reduction in page load times compared to uncached sites. This is because LSCache delivers prebuilt HTML pages directly to users, bypassing PHP execution and database queries.
LSCache also supports advanced features such as:
ESI (Edge Side Includes) for partial page caching
Smart purging rules
Private cache for logged-in users
Image optimization and critical CSS generation
These features make it suitable not only for static pages but also for dynamic, eCommerce-heavy platforms like WooCommerce or Magento.
Compression and Optimization
LiteSpeed supports GZIP and Brotli compression out of the box. These technologies reduce the size of files transmitted over the network, such as HTML, CSS, and JavaScript.
According to Google PageSpeed Insights, compressing assets can reduce page size by up to 70%, which directly improves load time. Brotli, developed by Google, provides even better compression rates than GZIP in many cases, and LiteSpeed uses it efficiently.
Additionally, LiteSpeed can minify JavaScript, CSS, and HTML, combine files to reduce HTTP requests, and enable lazy loading for images—all directly from the server level.
QUIC and HTTP/3 Support
LiteSpeed is one of the earliest web servers to fully support QUIC and HTTP/3, protocols developed by Google and later adopted by IETF.
QUIC is built on UDP instead of TCP, which reduces handshake latency and improves performance over poor network conditions. HTTP/3 inherits QUIC’s benefits and introduces faster parallel requests and better encryption handling.
When HTTP/3 is enabled, page loads feel snappier, especially on mobile devices and in regions with weaker connectivity. Cloudflare reported up to 29% faster page loads using HTTP/3 versus HTTP/2 [2].
LiteSpeed’s implementation ensures that your site is future-ready and delivers optimal performance even under challenging network environments.
LiteSpeed vs Apache and NGINX
Performance benchmarks consistently show that LiteSpeed outperforms both Apache and NGINX in various scenarios, especially under high traffic and dynamic content conditions.

Apache Comparison
Apache is widely used but is resource-heavy under load. When serving PHP applications like WordPress, Apache relies on external modules (e.g., mod_php) or handlers like PHP-FPM, which increase overhead.
LiteSpeed replaces these with LiteSpeed SAPI, a more efficient PHP handler. Benchmarks show that LiteSpeed can process 3x more PHP requests per second compared to Apache [3].
NGINX Comparison
NGINX is known for its speed with static files, but it lacks full .htaccess compatibility and requires more manual tuning for dynamic sites.
LiteSpeed combines Apache’s ease of configuration with NGINX’s speed and goes further by offering built-in caching and QUIC support. This makes it a more all-in-one solution for both static and dynamic content delivery.
Real-World Results
A hosting provider, NameHero, migrated over 50,000 sites from Apache to LiteSpeed. The result was an average decrease in load time by 40%, with no change in hardware configuration [4].
Another example is a WooCommerce store that used LiteSpeed Cache. Load times dropped from 4.2s to 1.2s after activation, significantly improving Core Web Vitals and user retention.
Website owners consistently report faster Time to First Byte (TTFB), better PageSpeed scores, and fewer server crashes during traffic peaks when using LiteSpeed.
Who Should Use LiteSpeed?
LiteSpeed is ideal for:
WordPress users who want faster page loads without complex configurations.
WooCommerce and Magento store owners needing efficient dynamic caching.
Web hosting providers looking to reduce server load and increase client satisfaction.
SEO-focused marketers who want better Core Web Vitals.
Developers who want Apache compatibility with modern performance.
LiteSpeed is available in both open-source (OpenLiteSpeed) and commercial versions. While OpenLiteSpeed is suitable for smaller projects, the enterprise version offers advanced features and full control panel integration.
Final Thoughts
LiteSpeed offers a clear performance advantage due to its architecture, built-in caching, modern protocol support, and optimization features. It helps websites load faster by minimizing server load, reducing latency, and delivering content more efficiently.
Whether you're a developer, site owner, or hosting provider, switching to LiteSpeed can result in measurable improvements in speed, stability, and scalability. In today’s performance-driven web ecosystem, LiteSpeed is a practical solution backed by real results and advanced engineering.
1 note
·
View note
Text
phpRank Nulled Script 14.0
Unlock Powerful SEO Insights with phpRank Nulled Script Are you looking to supercharge your SEO reporting capabilities without breaking the bank? The phpRank Nulled Script offers a powerful and professional-grade SEO reporting platform that helps you deliver premium-level insights for websites of all sizes. Best of all, you can download it for free right here and start using it without restrictions! What is phpRank Nulled Script? The phpRank Nulled Script is a robust, easy-to-use SEO reporting tool built for marketers, developers, and business owners who want accurate and real-time website analysis. This script allows you to run a white-label SEO report platform directly from your own server, offering a seamless experience for users looking for in-depth insights into search engine visibility, performance metrics, and optimization recommendations. Technical Specifications Platform: PHP 7.x+ Database: MySQL 5.x+ Framework: Custom-built, lightweight PHP framework Responsive Design: Fully mobile-optimized layout Dependencies: cURL, GD Library, mod_rewrite Top Features and Benefits of phpRank Nulled Script Comprehensive SEO Reports: Get keyword rankings, meta information, social stats, and backlink profiles in a single report. White Labeling: Customize the platform with your branding and colors to offer a personalized client experience. Multiple SEO Tools: Includes SERP analysis, keyword density checker, backlink checker, and website speed analysis. Multi-Language Support: Reach global audiences with built-in multilingual compatibility. Automated Updates: Automatically fetch and display real-time data from trusted SEO sources. How phpRank Nulled Script Can Benefit You Whether you’re a digital agency, freelancer, or entrepreneur, the phpRank Nulled Script gives you the competitive edge you need. It not only simplifies the reporting process but also enhances the value you deliver to clients by offering precise, easy-to-understand metrics. With phpRank, your analysis will go beyond the surface, giving you access to the core data that drives search engine performance. Popular Use Cases SEO Agencies: Deliver white-label reports to clients under your brand. Freelancers: Offer one-time or recurring SEO audits as a service. Website Owners: Monitor your own site’s SEO performance regularly. Developers: Integrate the script into larger platforms or dashboards. Easy Installation and Setup Installing the phpRank is a breeze. Simply upload the files to your web hosting server, configure the database settings, and you’re ready to go. No advanced coding knowledge is required. The script comes with an intuitive setup wizard that guides you step-by-step through the process. Frequently Asked Questions Is phpRank Nulled Script safe to use? Yes, the nulled version available on our site is thoroughly scanned and tested. However, always ensure you are using it on a secure server with up-to-date configurations. Can I customize the script? Absolutely. The phpRank Nulled Script is built with developers in mind, allowing for full customization of both appearance and functionality. Does this script require a monthly subscription? No, once installed, it’s completely free to use. You won’t be tied to any recurring fees or licensing costs. Where can I download it? You can download the phpRank Nulled Script for free directly from our site. No registration or hidden charges! Download phpRank Nulled Script Today If you’re ready to unlock the full potential of SEO reporting, the phpRank is your go-to solution. Powerful, easy to use, and completely free—this script empowers you to take your SEO services to the next level. Also, if you’re looking for enhanced site protection, don’t miss out on the iThemes Security Pro NULLED. It's the perfect companion tool to safeguard your site against vulnerabilities. For multilingual optimization, check out the WPML pro NULLED plugin to translate your content efficiently and reach a broader audience.
Don’t wait—equip your digital toolkit with the phpRank today and start delivering top-tier SEO insights effortlessly!
0 notes
Text
Membuat Docker Compose untuk CodeIgniter 4 dengan Apache, PostgreSQL, dan pgAdmin
Docker telah menjadi solusi populer dalam pengembangan aplikasi karena kemampuannya dalam mengelola lingkungan secara konsisten. Dalam artikel ini, kita akan membahas cara membuat Docker Compose untuk menjalankan CodeIgniter 4 dengan Apache, PostgreSQL, dan pgAdmin. Konfigurasi ini juga akan mengaktifkan ekstensi PHP intl, pgsql, dan mod_rewrite menggunakan Dockerfile untuk pengaturan yang lebih…
0 notes
Text
AWS WAFv2 For Hotlink Protection: Future Of Content Security

How to stop hotlinking with Amazon CloudFront, WAF, and referer checking.
AWS WAF Classic will be retired in September 2025. This update describes how to utilise the latest AWS WAF (WAFv2) to avoid hotlinking. Screenshots have been updated to reflect AWS WAF Management Console changes.
Hotlinking, also known as inline linking, is a kind of content leeching in which an unauthorised third-party website embeds links to resources referenced in a major website's HTML. Your website may be invoiced for third-party websites' content as they don't pay for hosting. Slow loading times, lost money, and legal issues may result.
Hotlinking may now be stopped using AWS WAF. AWS WAF, a web application firewall, integrates with Amazon CloudFront, a CDN, to protect your web apps from typical online vulnerabilities that can reduce application availability, security, and resource use.
Solution overview
There are several techniques to handle hotlinking. The Apache module mod_rewrite may verify the Referer header on your web server. You may then redirect the visitor to your site's home page or display a 403 Forbidden message.
If you utilise a CDN like CloudFront to speed up website delivery, web server Referer header validation is less useful. The CDN must validate additional requests for that content because they are unlikely to reach the origin web server, even if your web server verifies the headers (in this example, the referer). The CDN caches your stuff at the edge of its servers.
Figure 1: Cache request-response flow.Hit-and-miss cache encounters
Figure 1 shows the procedure:
A user client (1) requests from CloudFront edge point (2).
Edge locations try to return a cached file. This request is a cache hit if the cache replies.
The origin (3), which may be an Amazon S3 bucket, receives a request for a new copy of the object if there is a cache miss and the content is incorrect or not in the edge.
Cache hits prevent the origin from applying validation logic to the user's request since the edge server may fill the request without contacting the origin.
Two methods for solution implementation
This document provides two AWS WAF configurations to prevent hotlinking:
Transferring protected static assets (images or stylistic elements) to static.example.com ensures that you just need to check the Referer header.
Static files are in a directory on the same domain. This approach includes extending this example to check for an empty Referer header.
Your website structure and security needs will determine your strategy. The first approach lets you set up a Referer header check to guarantee that photo requests come from an allowlisted sub-domain, while the second way checks for an empty Referer header. The first technique prevents unaffiliated third-party sites from embedding image links, whereas the second allows users to share direct connections.
Terms
Key phrases from this post:
AWS WAFs use web ACLs tied to CloudFront distributions.
Each web ACL has one or more match criteria and rules.
Match conditions examine request headers or URIs for particular criteria using one or more filters.
The names of HTTP headers are not case-sensitive. Referer references the same HTTP header. However, HTTP headers are case-sensitive.
Requirements
A CloudFront distribution is needed to configure an AWS WAF web ACL. Configuring a CloudFront distribution with an S3 bucket origin is covered in Configure distributions.
Approach 1: Subdomain separation
This sample AWS WAF rule set comprises one rule, match condition, and filter. The match condition checks the Referer header for a given value. Traffic is allowed if the request meets rule conditions. If not, AWS WAF blocks traffic.
Due to the static files' subdomain (static.example.com) being accessible exclusively from example.com, you will restrict hotlinking for any file without a referral.
Approach 2: Domain-wide content with path filtering
The second technique filters by URL path and allows blank Referer headers. Create an AWS WAF web ACL with numerous rules and extra match criteria, which are filters. Instead than validating the Referer header once, the match condition validates it twice. First, check the request header. The URL-style Referer header is checked in the second validation.
Some people may prefer to share the photo URL directly. Accessing the picture directly in the browser can help avoid a negative user experience. This solution is better than the previous, which needed sub-domain picture requests.
You must also check the request route (/wp-content) for AWS WAF to protect multiple folders under a domain name.
In conclusion
AWS WAF, a web application firewall, monitors and manages HTTP(S) traffic to your protected web applications. Using the AWS WAF custom rule builder, you protected your website's Amazon S3 bucket content from hotlinking.
Preventing unauthorised third-party websites from connecting to your static content reduces bandwidth costs, user experience, and resource leeching. Two robust referrer check methods are described in this post. Following the least privilege approach, you may restrict AWS WAF rules to.jpg or.png image file extensions.
Referer checking prevents unaffiliated websites from utilising your bandwidth and backlinking to your images, but clever attacks can purposefully design a request to bypass it. Inconsistent referer header interpretation can also be caused by browser plugins, server-to-server queries that fake header data, or privacy-based web browsers. Recognise these anomalies and consider token authentication and signed URLs for private content protection.
Web browsers cannot detect changed Referer headers. Referer checking should be utilised with AWS WAF application protection rules, Bot Control, Fraud Control, and DDOS protection to secure online applications.
#technology#technews#govindhtech#news#technologynews#AWS WAF#Amazon S3#WAFv2#content delivery network#web ACL#HTTP
0 notes
Text
HTTPD
httpd stands for HyperText Transfer Protocol Daemon. It is a software program, or server, that handles the serving of web pages over the HTTP protocol. Most commonly, it refers to the Apache HTTP Server (apache2), one of the most widely used web servers.
Here’s what httpd does:
Web Server Functionality: It listens for incoming HTTP requests from web browsers or clients and responds with the requested resources, such as HTML pages, images, or other content.
Daemon: The term "daemon" refers to a background service that runs on a server. httpd works continuously, waiting for requests and serving them without requiring constant user intervention.
Apache HTTP Server: The most common httpd is Apache's web server software, which is responsible for serving static content (like HTML) as well as dynamic content generated by applications (using technologies like PHP, Python, or others).
Key Features of httpd (Apache HTTP Server):
Configuration: It can be configured using the httpd.conf file, where administrators can set parameters like port numbers, security rules, directories, etc.
Extensibility: Apache supports modules that extend its capabilities, such as SSL/TLS encryption (with mod_ssl), URL rewriting (mod_rewrite), and more.
Virtual Hosts: Apache can handle multiple websites (virtual hosts) on a single server, making it a powerful choice for shared hosting environments.
Basic Command (Linux):
To start the httpd service: sudo systemctl start httpd
To stop the httpd service: sudo systemctl stop httpd
To restart the service (after making changes to configuration): sudo systemctl restart httpd
httpd is essential for delivering web content and is a cornerstone of the internet's infrastructure.
for more details please visit
www.qcsdclabs.com,
www.hawkstack.com
0 notes
Text
Upload Zero – Pay Per Download Script With Key V3.0
https://themesfores.com/product/upload-zero-pay-per-download-script-with-key/ Upload Zero – Pay Per Download Script With Key V3.0 Suggest Hosting Verpex.com Hostinger.com FastComet.com HostArmada.com You can Earn money by using the script “Upload Zero” which Allows publishers to earn money from files and keep a share of the profit. The script has an admin panel where you can manage all users, files and ads, Etc… Features Admin Panel Dashboard Manage users Manage files Manage rates Referrals System Captcha System Pay Per Download System Premium Users Announcements System Customize the site Easy to install Requirements PHP 5.6+; MySQL version 4.0+ Database 1+ GB Free Space Apache Server with mod_rewrite enabled SSL certificate installed https://themesfores.com/product/upload-zero-pay-per-download-script-with-key/ #PHPScript #WordPressThemesandPluginWithLicenceKey
0 notes
Text
Unveiling the Top Cache Plugins for WordPress: Boost Your Website's Speed!

In the dynamic world of website optimization, caching plugins stand as the unsung heroes, enhancing site speed and user experience. WordPress, being the most popular content management system, offers a plethora of cache plugins, each claiming to be the best solution for your site's performance. But which cache plugin is truly the best in WordPress? Let's delve into the realm of caching plugins to uncover the answer.
Understanding the Significance of Cache Plugins
Before we delve into the specifics, let's grasp the importance of cache plugins. In essence, these plugins work by storing static copies of your website's pages, allowing for quicker retrieval when a user requests access. By doing so, they significantly reduce server load and enhance page loading times. This results in a smoother user experience and improved search engine rankings, as speed is a crucial factor in website performance.
Exploring the Leading Cache Plugins for WordPress
WP Rocket: Renowned for its simplicity and effectiveness, WP Rocket tops the list of cache plugins for WordPress. Its intuitive interface and powerful caching features make it a favorite among novice users and seasoned developers alike. With options for page caching, browser caching, and minification, WP Rocket ensures lightning-fast loading times without compromising functionality.
W3 Total Cache: As one of the most popular free cache plugins available, W3 Total Cache offers a comprehensive set of features for optimizing website performance. From CDN integration to database caching, this plugin covers all bases when it comes to caching. While it may seem daunting to configure for beginners, the extensive documentation and community support make the learning curve manageable.
WP Super Cache: Developed by Automattic, the team behind WordPress itself, WP Super Cache is a reliable choice for website caching. Its simple setup process and effective caching mechanisms make it suitable for websites of all sizes. With options for mod_rewrite caching and legacy caching, WP Super Cache ensures optimal performance without overwhelming users with unnecessary complexities.
Conclusion: Choosing the Right Cache Plugin for Your WordPress Website
In the realm of cache plugins for WordPress, the options can seem overwhelming. However, by understanding the specific needs of your website and evaluating the features offered by each plugin, you can make an informed decision. Whether you prioritize ease of use, advanced customization options, or compatibility with other plugins, there's a cache plugin out there that's perfect for you.
Boost your website's speed and optimize user experience by implementing the best cache plugin for WordPress today. With WP Rocket, W3 Total Cache, or WP Super Cache, you can take your website performance to new heights and leave your competitors in the dust.
Best Caching Plugins For WordPress
0 notes
Text
The Power of 301 Redirection: Enhance Your Website’s User Experience and SEO
In the world of website management, there are times when you need to make changes to your URLs, consolidate content, or move your website to a new domain. However, ensuring a smooth transition while preserving search engine rankings and providing a seamless user experience can be a challenge.
This is where the magic of 301 redirection comes into play. In this blog post, we will explore the concept of 301 redirection, its benefits, and how to implement it effectively.
People willing to pursue a career in the digital marketing field should join an authentic digital marketing institute for excelling the online business field.
In this article, we will discuss what a 301 redirect is, why it is important, and how to check the 301 redirects.

301 redirection is a method of permanently redirecting a web page or an entire website to a new location. When implemented correctly, a 301 redirect informs search engines and web browsers that the requested content has been permanently moved to a new URL. The “301” refers to the HTTP status code sent by the server, indicating the permanent nature of the redirect.
Benefits of 301 Redirection:
Preserve SEO Value: One of the primary advantages of 301 redirection is that it helps maintain the SEO value of the original URL. Search engines recognize the redirect and transfer the ranking signals, such as backlinks and authority, to the new location. This preserves your website’s visibility in search engine results and helps prevent a loss in organic traffic.
Seamless User Experience: Redirecting users to the new URL ensures a seamless browsing experience. Visitors who access the old URL are automatically redirected to the new location, eliminating the frustration of encountering broken links or outdated content. A positive user experience can increase engagement and encourage return visits.
Update External Links: If other websites have linked to your old URL, implementing a 301 redirect ensures that visitors coming from those links are directed to the new URL. This prevents them from encountering dead links, maintaining the flow of traffic and potential conversions.
If you’re looking for the best digital marketing course in Bangalore, look no further than World SEO Services.

Identify the URLs: Determine the specific web page or website that needs to be redirected and note down the old URL and the new destination URL.
Choose the Method:
Server-side Method: If you have access to server configuration files, such as .htaccess (Apache) or web.config (IIS), you can use server-side redirect methods like mod_rewrite or URL Rewrite to set up the 301 redirection.
CMS Plugin Method: Content management systems like WordPress offer plugins that simplify the process of setting up 301 redirects. Install a reliable redirection plugin and enter the old and new URLs to create the redirection.
Web-Based Control Panel Method: Some hosting providers offer web-based control panels that allow you to set up redirects without accessing server configuration files. Locate the relevant option in your control panel and enter the old and new URLs to create the 301 redirect.
3. Test and Monitor: After implementing the redirect, thoroughly test it by accessing the old URL in a web browser. Verify that it correctly redirects to the new location. Additionally, regularly monitor your website’s redirects to ensure they are functioning as intended.
301 redirection is a powerful tool in website management that enables you to seamlessly transition from old URLs to new ones while preserving SEO value and delivering an excellent user experience. By implementing 301 redirects correctly, you can maintain search engine rankings, update external links, and ensure visitors are directed to the most relevant content.
Remember to choose the appropriate method for your situation, test the redirects thoroughly, and monitor their performance to ensure ongoing success. With well-executed 301 redirects, you can navigate website changes effectively and set your website up for continued growth and success.
0 notes
Text
How to Enhance TYPO3 Environment Using TYPO3 Context

Are you familiar with TYPO3 Context and its potential to transform your digital environment?
In this article we will see a step-by-step tutorial on TYPO3 Context. This tutorial covers various practical aspects such as configuring databases, employing TypoScript conditions, setting up site configurations, navigating TYPO3-CLI, and more.
TYPO3 developers are actively engaged in automation and managing multiple TYPO3 environments, including development servers, production servers, and staging environments. TYPO3 CMS, for years, offered a developer-friendly TYPO3 Context configuration right out of the box.
What is the TYPO3 Application Context?
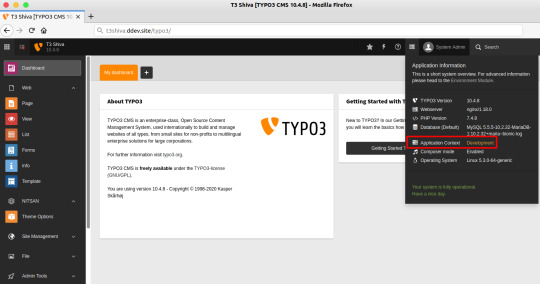
The TYPO3 Application Context refers to a configuration setting in TYPO3 CMS that defines the context or environment in which the TYPO3 application is currently operating. It helps TYPO3 developers manage various settings, configurations, and behavior based on the specific context, such as development, production, staging, or any other custom environment.
TYPO3 Application Context is a crucial feature for adapting the CMS to different deployment scenarios and ensuring smooth operation across various stages of a TYPO3 project.
What is the default TYPO3 Context?
Every request, whether executed via the command line or over HTTP, operates within a distinct application context. TYPO3 CMS offers precisely three predefined built-in contexts:
The TYPO3_CONTEXT Variable Dedicated environment variable which tells TYPO3 to define different context environments
What are the TYPO3 Contexts readily available by default?
1 . Production (Default) - Intended for live websites and production environments. 2 . Development - Designed for development purposes. 3 . Testing - Exclusively employed for internal TYPO3 core testing and should not be used for any other purpose.
How can we prepare the TYPO3 Context at Web-Server?
For this Discover the code snippets and setup options, including Option #1 using Apache’s SetEnv Directive, Option #2 with .htaccess or mod_rewrite, and even setting up TYPO3_Context without .htaccess
Find it all in our comprehensive guide 👉: How to Use TYPO3 Context to Improve Environment?
0 notes
Text
1 note
·
View note
Text
Apa itu WP Super Cache adalah salah satu pertanyaan yang sering muncul di kalangan pemilik website yang ingin lebih mengoptimalkan website mereka. Ini karena penggunaan tool caching selalu disarankan untuk meningkatkan kinerja website, menekan penggunaan bandwith, memaksimalkan pengalaman pengguna sekaligus menunjang SEO. Nah, apabila Anda juga sedang bertanya-tanya, silakan simak penjelasan di bawah. Apa Itu WP Super Cache: Pengertian, Fungsi dan Kelebihannya WP Super Cache adalah plugin untuk WordPress yang digunakan untuk konfigurasi cache. Plugin yang satu ini dikenal lebih sederhana dibanding kompetitornya, namun tetap mampu menjanjikan fungsionalitas yang ideal untuk berbagai jenis website, bahkan untuk menangani traffic tinggi sekalipun. Plugin ini cenderung mengutamakan kemudahan penggunaan, membuatnya ideal bagi para pemula. WP Super Cache ini dibuat oleh perusahaan yang juga memperkenalkan WordPress, yaitu Automattic. Tak mengherankan jika plugin ini kemudian mendukung sinkronisasi dengan Content Delivery Network (CDN) dengan optimal. Hal ini berkontribusi positif terhadap pilihan pengguna dalam menaikkan kecepatan memuat situs. Plugin ini berfungsi untuk membuat file statis HTML untuk ditampilkan ke pengunjung situs, menjadikannya sebagai opsi yang lebih efisien dibandingkan proses script PHP yang cenderung lebih lama dan membutuhkan biaya lebih. Menariknya, pengguna bisa memilih metode mana yang digunakan untuk menampilkan file yang sudah di-caching tersebut. Metode Yang Ditawarkan Metode yang ditawarkan pada plugin ini antara lain: Expert: opsi cara yang paling cepat demi kecepatan loading website meskipun traffic sedang mengalami peningkatan signifikan Simple: pilihan yang tak secepat Expert, namun masih memungkinkan file dinamis untuk ditampilkan WP-Cache caching: opsi percepatan yang dilakukan dengan manajemen log in user sehingga kunjungan pengguna lebih optimal Seperti yang sudah disebutkan sebelumnya, untuk menggunakan WP Super Cache ini setup yang perlu dilakukan oleh pengguna terbilang mudah saja. Hal ini dikarenakan opsi fitur yang sepertinya sudah disederhanakan. Wajar saja, karena plugin ini juga menyasar pengguna yang memiliki server dengan sumber daya yang terbatas. Segera setelah plugin diinstall dan diaktifkan, pengguna bisa mengakses plugin ini dari dashboard kemudian buka Settings lalu klik WP Super Cache. Setelah berada di pengaturan plugin WP Super Cache, akan ada 2 opsi untuk mengelola caching. Pengguna hanya perlu memilih opsi Caching On lalu klik pada Update Status. Kelebihannya Selain kemudahan dalam hal penggunaannya di atas, masih ada kelebihan lain yang bisa Anda pertimbangkan dari WP Super Cache ini, antara lain: Mendukung opsi untuk menentukan posisi pemuatan plugin di website yang memungkinkan Anda untuk memprioritaskan plugin tertentu Fitur extensive mod_rewrite, untuk caching statis yang jauh lebih cepat dibanding dengan caching melalui script PHP Kompresi halaman secara otomatis Mendukung penjadwalan cache Mendukung penggunaan sistem CDN Mendukung migrasi konfigurasi caching ke situs tambahan (fungsi export) Mendukung tampilan mobile Salah satu hal lain yang juga membuat plugin yang satu ini banyak dicoba oleh para pemula adalah biaya yang dikeluarkan. Untuk menggunakan plugin powerful yang ramah pemula ini, pengguna tidak perlu mengeluarkan biaya sama sekali. Gratis untuk memanfaatkan segala fitur, fungsi dan keandalan yang ditawarkan. Kesimpulan Sudah lebih memiliki gambaran tentang apa itu WP Super Cache, fungsi dan kelebihannya? Dengan karakteristiknya ini, tak salah jika kemudian plugin caching ini banyak direkomendasikan. Plugin ini dikenal mudah dipelajari dan digunakan, handal dan gratis sehingga layak untuk Anda pertimbangkan.
0 notes
Link
Welcome to our fast loading one page .htaccess cheat sheet with all major .htaccess rules listed.
We have no ads, no javascript. Just plain HTML (and a .css file), so it should load super fast. Coming here and a quick cmd+f/ctrl+f should be faster than finding the answer on stackexchange :) Also check out our PHP's DomDocument Cheatsheet
0 notes
Text
Shared Web Hosting For WordPress

WordPress is a well-liked blogging service. WordPress may also be used like a very effective website creation tool or Cms for countless sites. It's popular since it is easy.
You will find huge amounts of styles to select from, the majority are free and could be completely customized and installed rapidly. Additionally for this there are millions of plugins to boost hospedagem para wordpress abilities to select from. Many of these have the freedom and may be used to, among other activities, give a gallery, contact page or Google sitemap to your website.
The benefits of shared web hosting
Shared web hosting is really a standard hosting service where lots of websites reside on a single server. It's a adequate solution for a lot of small- to medium-sized websites and it is certainly the least expensive hosting solution.
Shared web hosting
A possible trouble with shared web hosting is that if the host puts a lot of sites on a single server. At these times the websites with that server is going to be slow. But fortunately, a great host won't do that.
One other issue with shared web hosting is the potential of having your email blacklisted. As you are discussing the server with countless people, it'll just take one bad cent who's delivering out junk e-mail to tar everybody delivering mail from that server with similar brush. The reply to this really is to route the mail through Google Apps for Business.
How to find a good shared host for wordpress
Initially you need to find a number that may supply the minimum needs for WordPress. They are PHP 5.2.4 or greater and MySQL 5. or greater. Further for this it's suggested that you employ a Linux host running the mod_rewrite Apache module (that is required for Search engine optimization-friendly URLs).
The easiest method to select a good shared host is to choose a number that's suggested by other WordPressers available. I've spent considerable time using the WordPress community during the last 5 year and hosts like JustHost, Bluehost and HostGator are continually pointed out as solid reliable shared hosts.
Apart from that here are a few more criteria to base them on:
Reliability: try to look for a number with higher uptimes. I can be difficult to obtain these details reliably however, you really don't wish to be coping with outages on the server regularly
Responsive 24/7 Technical Support: maybe you want to have the ability to contact support by telephone immediately or you would like online support?
Server software: you might want a number that provides cPanel along with a one-click WordPress install service like Fantastico
Space/CPU/Bandwidth: you're going to get that which you purchase so far as these factors are worried but it is good to take into consideration these
Cost: try to make sure you understand the exact monthly or yearly cost you have to pay. You might prefer to search around for coupons or purports to acquire some money off to begin with.
Selecting a shared host for the WordPress website is a very important decision to create. However if you simply select a reliable company with a lot of expertise with WordPress you will not go far wrong.
1 note
·
View note
Text
Траблшутинг OpenVK 2.0
Не загрузился CSS.
Необходимо включить модуль mod_rewrite
Bad Request при попытке входа
В файле chandler/MVC/Routing/Router.php изменить 92 строчку на $GLOBALS["csrfToken"] = true;
3 notes
·
View notes