#mysql_database
Explore tagged Tumblr posts
Visit Tumblr Blog
Explore Tumblr blogs with no restrictions, modern design and the best experience.
Last Seen Tumblr Blogs


Fun Fact
Tumblr’s website traffic is steadily declining.
Text
Database Automation
Database automation with Ansible can significantly streamline the management and deployment of databases. Here are some specific subtopics and tasks you could explore within database automation:
1. Database Installation and Configuration
Task: Automate the installation of MySQL/PostgreSQL.
Playbooks:
Install database packages.
Initialize the database.
Configure the database server (e.g., set up users, configure authentication, modify configuration files).
2. Automating Database Backups
Task: Set up automated backups for databases.
Playbooks:
Create backup scripts for MySQL/PostgreSQL.
Schedule regular backups using cron jobs.
Store backups in remote locations (e.g., S3, FTP servers).
3. Database Replication Setup
Task: Automate the setup of database replication.
Playbooks:
Configure master and replica databases.
Set up replication users and permissions.
Handle failover configurations and testing.
4. Automating Database Migrations
Task: Manage database schema changes and migrations.
Playbooks:
Apply schema changes using tools like Alembic or Flyway.
Rollback migrations in case of failures.
Version control database schema changes.
5. Database Performance Tuning
Task: Optimize database performance automatically.
Playbooks:
Apply performance tuning parameters to configuration files.
Set up monitoring and alerting for performance metrics.
Automate index creation and maintenance tasks.
6. User and Permission Management
Task: Automate the creation and management of database users and permissions.
Playbooks:
Create database users with specific permissions.
Automate role assignments.
Implement security best practices for database access.
7. Automating Database Security
Task: Enhance database security through automation.
Playbooks:
Apply security patches and updates.
Configure firewalls and access controls.
Monitor and log database activity for suspicious behavior.
8. Disaster Recovery Planning
Task: Automate disaster recovery processes.
Playbooks:
Automate backup and restore procedures.
Test failover and recovery plans regularly.
Ensure data integrity and consistency across backups.
Sample Playbook for MySQL Installation and Basic Configuration
- name: Install and configure MySQL
hosts: database_servers
become: yes
vars:
mysql_root_password: "securepassword"
mysql_database: "myappdb"
mysql_user: "myappuser"
mysql_password: "myapppassword"
tasks:
- name: Install MySQL server
apt:
name: mysql-server
state: present
- name: Start MySQL service
service:
name: mysql
state: started
enabled: yes
- name: Set root password
mysql_user:
name: root
password: "{{ mysql_root_password }}"
login_user: root
login_password: ''
host_all: yes
when: ansible_os_family == "Debian"
- name: Remove anonymous users
mysql_user:
name: ''
host_all: yes
state: absent
- name: Remove test database
mysql_db:
name: test
state: absent
- name: Create application database
mysql_db:
name: "{{ mysql_database }}"
state: present
- name: Create application user
mysql_user:
name: "{{ mysql_user }}"
password: "{{ mysql_password }}"
priv: "{{ mysql_database }}.*:ALL"
state: present
- name: Apply basic security settings
mysql_variables:
- name: bind-address
value: 0.0.0.0
- name: max_connections
value: 150
This is a basic example, but it can be expanded to include more complex configurations and tasks as needed. You can also explore using Ansible roles for better organization and reusability of your playbooks.
For more details www.qcsdclabs.com
#linux#redhatcourses#information technology#containerorchestration#kubernetes#dockerswarm#aws#docker#container#containersecurity
0 notes
Text
dockerでWP入れてみたけどError establishing a database connectionが出たから
wp-config.phpをいじって解決した。
ネットに落ちてる参考文献をコピペしてdockerでWPインストール ↓ どうにもデータベース接続確立エラーが出てしまうしphpmyadminにもアイパス合ってるのにログインできない。 ↓ ・wp-config.phpのDB_NAME, DB_USER, DB_PASSWORD, DB_HOSTをdocker-compose.ymlと合わせる。 ・DEBUGの記述を' 'からfalseかtrueに変更 define( 'WP_DEBUG', !!getenv_docker('WORDPRESS_DEBUG', ' ' ) ); ↓ define( 'WP_DEBUG', !!getenv_docker('WORDPRESS_DEBUG', false) );
で、エラーが直った。
docker-compose.yml
version: '3.7'
services: db: platform: linux/x86_64 image: mysql:5.7 volumes: # SQLデータを最新にする場合だけコメントイン - ./docker/db/sqls:/docker-entrypoint-initdb.d #本番DBとデータを合わせる場合に記述 # - db_data:/var/lib/mysql restart: always environment: MYSQL_ROOT_PASSWORD: root MYSQL_DATABASE: db_name # DB名 MYSQL_USER: userdayo # DBユーザー名 MYSQL_PASSWORD: passdayo # DBパスワード
wordpress: depends_on: - db image: wordpress:latest container_name: wp volumes: - ./wp:/var/www/html ports: - "8000:80" restart: always environment: WORDPRESS_DB_HOST: db:3306 WORDPRESS_DB_USER: userdayo # DBユーザー名 WORDPRESS_DB_PASSWORD: passdayo # DBパスワード WORDPRESS_DB_NAME: db_name # DB名 WORDPRESS_DEBUG : 1 #デバッグモードON
phpmyadmin: image: phpmyadmin:latest container_name: phpmyadmin_ingrid restart: always depends_on: - db ports: - 8888:80
volumes: db_data:
0 notes
Photo

Deploy laravel project with docker swarm We check three major step in this guide Setup laravel project with docker compose Deploy the stack to the swarm Create gitlab-ci Setup laravel project with docker compose we will explore the process of deploying a laravel project using docker swarm and setting up a CI/CD pipline to automate the deployment process. Now let’s start with containerize a laravel project with docker compose we need three separate service containers: An app service running PHP7.4-FPM; A db service running MySQL 5.7; An nginx service that uses the app service to parse PHP code Step 1. Set a env variable in project In root directory of project we have .env file now we need to update some variable DB_CONNECTION=mysql DB_HOST=db DB_PORT=3306 DB_DATABASE=experience DB_USERNAME=experience_user DB_PASSWORD=your-password Step 2. Setting up the application’s Docekrfile we need to build a custom image for the application container. We’ll create a new Dockerfile for that. Docker file FROM php:7.4-fpm # Install system dependencies RUN apt-get update && apt-get install -y \ git \ curl \ libpng-dev \ libonig-dev \ libxml2-dev \ zip \ unzip # Clear cache RUN apt-get clean && rm -rf /var/lib/apt/lists/* # Install PHP extensions RUN docker-php-ext-install pdo_mysql mbstring exif pcntl bcmath gd # Get latest Composer COPY --from=composer:latest /usr/bin/composer /usr/bin/composer # Set working directory WORKDIR /var/www Step 3. Setting up Nginx config and Database dump file In root directory create a new directory called docker-compose Now we need two other directories, a nginx directory and mysql directory So we have this two route in our project laravel-project/docker-compose/nginx/ laravel-project/docker-compose/mysql/ In nginx directory create a file called experience.conf we write nginx config in this file like: server { listen 80; index index.php index.html; error_log /var/log/nginx/error.log; access_log /var/log/nginx/access.log; root /var/www/public; location ~ \.php$ { try_files $uri =404; fastcgi_split_path_info ^(.+\.php)(/.+)$; fastcgi_pass app:9000; fastcgi_index index.php; include fastcgi_params; fastcgi_param SCRIPT_FILENAME $document_root$fastcgi_script_name; fastcgi_param PATH_INFO $fastcgi_path_info; } location / { try_files $uri $uri/ /index.php?$query_string; gzip_static on; } } In mysql directory create a file called init_db.init we write mysql initialization in this file like: DROP TABLE IF EXISTS `places`; CREATE TABLE `places` ( `id` bigint(20) unsigned NOT NULL AUTO_INCREMENT, `name` varchar(255) COLLATE utf8mb4_unicode_ci NOT NULL, `visited` tinyint(1) NOT NULL DEFAULT '0', PRIMARY KEY (`id`) ) ENGINE=InnoDB AUTO_INCREMENT=12 DEFAULT CHARSET=utf8mb4 COLLATE=utf8mb4_unicode_ci; INSERT INTO `places` (name, visited) VALUES ('Berlin',0),('Budapest',0),('Cincinnati',1),('Denver',0),('Helsinki',0),('Lisbon',0),('Moscow',1); Step 4. Creating a multi container with docker-compose We need a building three container that should share networks and data volumes. Ok so create a docker-compose file in root directory of project For craete a network for connecting services we define network in docker-compose file like this: networks: experience: driver: bridge App service: app: build: context: ./ dockerfile: Dockerfile image: travellist container_name: experience-app restart: unless-stopped working_dir: /var/www/ volumes: - ./:/var/www networks: - experience DB service: db: image: mysql:8.0 container_name: experience-db restart: unless-stopped environment: MYSQL_DATABASE: ${DB_DATABASE} MYSQL_ROOT_PASSWORD: ${DB_PASSWORD} MYSQL_PASSWORD: ${DB_PASSWORD} MYSQL_USER: ${DB_USERNAME} SERVICE_TAGS: dev SERVICE_NAME: mysql volumes: - ./docker-compose/mysql:/docker-entrypoint-initdb.d networks: - experience Nginx service: nginx: image: nginx:1.17-alpine container_name: experience-nginx restart: unless-stopped ports: - 8000:80 volumes: - ./:/var/www - ./docker-compose/nginx:/etc/nginx/conf.d networks: - experience So our docker-compose file be like this: version: "3.7" services: app: build: context: ./ dockerfile: Dockerfile image: travellist container_name: experience-app restart: unless-stopped working_dir: /var/www/ volumes: - ./:/var/www networks: - experience db: image: mysql:8.0 container_name: experience-db restart: unless-stopped environment: MYSQL_DATABASE: ${DB_DATABASE} MYSQL_ROOT_PASSWORD: ${DB_PASSWORD} MYSQL_PASSWORD: ${DB_PASSWORD} MYSQL_USER: ${DB_USERNAME} SERVICE_TAGS: dev SERVICE_NAME: mysql volumes: - ./docker-compose/mysql:/docker-entrypoint-initdb.d networks: - experience nginx: image: nginx:alpine container_name: experience-nginx restart: unless-stopped ports: - 8100:80 volumes: - ./:/var/www - ./docker-compose/nginx:/etc/nginx/conf.d/ networks: - experience networks: experience: driver: bridge Step 5. Running application with docker compose Now we can build the app image with this command: $ docker-compose build app When the build is finished, we can run the environment in background mode with: $ docker-compose up -d Output: Creating exprience-db ... done Creating exprience-app ... done Creating exprience-nginx ... done to show information about the state of your active services, run: $ docker-compose ps Well in these 5 simple steps, we have successfully ran our application. Now we have a docker-compose file for our application that needs for using in docker swarm. Let’s start Initialize docker swarm. After installing docker in your server *attention: To install Docker, be sure to use the official documentation install docker check docker information with this command: $ docker info You should see “swarm : inactive” in output For activate swarm in docker use this command: $ docker swarm init The docker engine targeted by this command becomes a manager in the newly created single-node swarm. What we want to use is the services of this docker swarm. We want to update our service like app with docker swarm, The advantage of updating our service in Docker Swarm is that there is no need to down the app service first, update the service, and then bring the service up. In this method, with one command, we can give the image related to the service to Docker and give the update command. Docker raises the new service without down the old service and slowly transfers the load from the old service to the new service. When running Docker Engine in swarm mode, we can use docker stack deploy to deploy a complete application stack to the swarm. The deploy command accepts a stack description in the form of a Compose file. So we down our docker compose with this command: $ docker-compose down And create our stack. ok if everything is ok until now take a rest Deploy the stack to the swarm $ docker stack deploy --compose-file docker-compose.yml For example : $ docker stack deploy --compose-file docker-compose.yml staging Probably you see this in output: Creating network staging_exprience Creating service staging_nginx failed to create service staging_nginx: Error response from daemon: The network staging_exprience cannot be used with services. Only networks scoped to the swarm can be used, such as those created with the overlay driver. This is because of “driver: bridge” for deploying your service in swarm mode you must use overlay driver for network if you remove this line in your docker compose file When the stack is being deployed this network will be create on overlay driver automatically. So our docker-compose file in network section be like this: networks: experience: And run upper command: $ docker stack deploy --compose-file docker-compose.yml staging For now you probably you see this error : failed to create service staging_nginx: Error response from daemon: The network staging_experience cannot be used with services. Only networks scoped to the swarm can be used, such as those created with the overlay driver. Get network list in your docker: $ docker network ls Output: NETWORK ID NAME DRIVER SCOPE 30f94ae1c94d staging_experience bridge local So your network has local scope yet because in first time deploy stack this network save in local scope and we must remove that by: $ docker network rm staging_experience After all this run command: $ docker stack deploy --compose-file docker-compose.yml staging Output: Creating network staging_experience Creating service staging_app Creating service staging_db Creating service staging_nginx Now get check stack by: $ docker stack ls Output: NAME SERVICES staging 3 And get service list by: $ docker service ls Output: If your REPLICAS is 0/1 something wrong is your service For checking service status run this command: $ docker service ps staging_app for example And for check detail of service run this command: $ docker service logs staging_app for example Output of this command show you what is problem of your service. And for updating your a service with an image the command you need is this: $ docker service update --image "<your-image>" "<name-of-your-service>" --force That's it your docker swarm is ready for zero down time deployment :))) Last step for have a complete process zero down time deployment is create pipeline in gitlab. Create gitlab-ci In this step we want create a pipeline in gitlab for build, test and deploy a project So we have three stage: stages: - Build - Test - Deploy Ok let’s clear what we need and what is going on in this step . We want update laravel project and push our change in gitlab create a new image of this changes and test that and after that log in to host server pull that updated image in server, and update service of project. For login to server we need define some variable in gitlab in your repository goto setting->CI/CD->VARIABLES Add variable Add this variables: CI_REGISTRY : https://registry.gitlab.com DOCKER_AUTH_CONFIG: { "auths": { "registry.gitlab.com": { "auth": "<auth-key>" } } } auth-key is base64 hash of “gitlab-username:gitlab-password” SSH_KNOWN_HOSTS: Like 192.168.1.1 ssh-rsa AAAAB3NzaC1yc2EAAAADAQABAAABgQCGUCqCK3hNl+4TIbh3+Af3np+v91AyW4+BxXRtHBC2Y/uPJXF2jdR6IHlSS/0RFR3hOY+8+5a/r8O1O9qTPgxG8BSIm9omb8YxF2c4Sz/USPDK3ld2oQxbBg5qdhRN28EvRbtN66W3vgYIRlYlpNyJA+b3HQ/uJ+t3UxP1VjAsKbrBRFBth845RskSr1V7IirMiOh7oKGdEfXwlOENxOI7cDytxVR7h3/bVdJdxmjFqagrJqBuYm30 You can see how generate ssh key in this post: generate sshkey SSH_PRIVATE_KEY: SSH_REMOTE_HOST: root@ This is your variables in gitlab. So let’s back to gitlab-ci In root directory of project create a new file .gitlab-ci.yml and set build stage set test stage And in the last set deploy stage like: stages: - Build - Test - Deploy variables: IMAGE_TAG: $CI_REGISTRY_IMAGE:$CI_COMMIT_REF_SLUG-$CI_COMMIT_SHORT_SHA build: stage: Build image: docker:20.10.16 services: - docker:dind script: - docker login -u $CI_REGISTRY_USER -p $CI_REGISTRY_PASSWORD $CI_REGISTRY - docker build --pull -f Dockerfile -t $IMAGE_TAG . - docker push $IMAGE_TAG preparation: stage: Test image: $IMAGE_TAG needs: - build script: - composer install artifacts: expire_in: 1 day paths: - ./vendor cache: key: ${CI_COMMIT_REF_SLUG}-composer paths: - ./vendor unit-test: stage: Test image: $IMAGE_TAG services: - name: mysql:8 alias: mysql-test needs: - preparation variables: APP_KEY: ${APP_KEY} MYSQL_ROOT_PASSWORD: ${MYSQL_ROOT_PASSWORD} MYSQL_DATABASE: ${MYSQL_DATABASE} DB_HOST: ${DB_HOST} DB_USERNAME: ${DB_USERNAME} DB_PASSWORD: ${DB_PASSWORD} script: - php vendor/bin/phpunit staging-deploy: stage: Deploy extends: - .deploy-script variables: APP: "stackdemo_app" STACK: "travellist-staging" only: - develop needs: - unit-test environment: name: stage .remote-docker: variables: DOCKER_HOST: ssh://${SSH_REMOTE_HOST} image: docker:20.10.16 before_script: - eval $(ssh-agent -s) - echo $IMAGE_TAG - echo "$SSH_PRIVATE_KEY" | tr -d '\r' | ssh-add - - mkdir -p ~/.ssh - chmod 700 ~/.ssh - echo "HOST *" > ~/.ssh/config - echo "StrictHostKeyChecking no" >> ~/.ssh/config - echo -n $CI_REGISTRY_PASSWORD | docker login -u $CI_REGISTRY_USER --password-stdin $CI_REGISTRY .deploy-script: extends: - .remote-docker script: - cp $develop_config /root/project/core - docker pull $IMAGE_TAG - docker service update --image "$IMAGE_TAG" "$APP" --force dependencies: [] Change something in your project and push to gitlab and wait for it To see all pipeline pass like this : And this is beautiful. https://dev.to/holyfalcon/deploy-laravel-project-with-docker-swarm-5oi
0 notes
Photo

Download ShoutOutNow - Codeigniter on Codecanyon [wpsm_ads1]
Description ShoutOutNow - Codeigniter :
Download ShoutOutNow - Codeigniter. The theme releases on Monday 23rd January 2017 By The author Junusme on Codecanyon. It’s makes use of with admin,bootstrap 4,codeigniter,login,fashionable,mysql database,php,register,responsive. Item Title: ShoutOutNow - Codeigniter Category: php-scripts/miscellaneous Price: $8 Author: Junusme Published Date: Monday 23rd January 2017 07:10:37 AM More Info / DownloadDemo [wpsm_ads2]
Have the chance to get a shoutout free of charge. This codeigniter script refreshes each hour and choose a random consumer to get a free shoutout.
http://sefainvest.com/webdesign/shoutoutnow/ Email: [email protected] Password: admin
[wpsm_ads1] More Info / DownloadDemo #ShoutOutNow #Codeigniter
#admin#All_Code_amp_plugin#bootstrap_4#Code_amp_plugin_Weekly_bestsellers#codeigniter#login#modern#mysql_database#php#PHP_scripts#PHP_scripts_Weekly_bestsellers#register#responsive#Weekly_bestsellers
0 notes
Photo
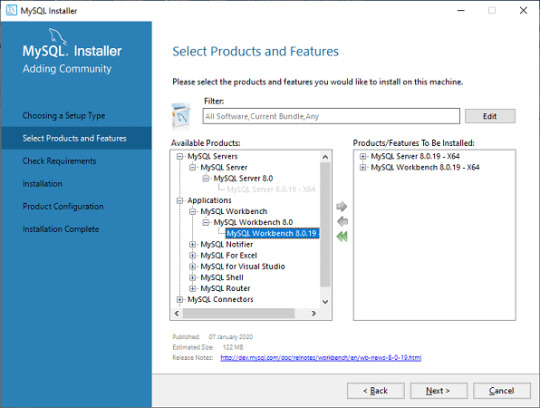
MySQL Workbench (Download and Installation)
0 notes
Text
github actions & docker-compose
何をしたか
ciでmysqlを使いたかった。
サービスコンテナのmysqlを利用したら文字コードで引っかかりまくって、設定もうまいこと行かなかったので、dockerを使う。
ディレクトリ構造は以下な感じ。
// tree . ├── .github │ └── workflows │ └── integrage.yml ├── db │ └── mysql │ └── init.d │ ├── ddl.sql │ └── dml.sql └── docker-compose.ci.yml
ci用のdocker-composeは以下で定義。
// docker-compose.ci.yml version: '3.5' services: db: image: mysql:5.7 container_name: sample_db_test environment: MYSQL_ROOT_PASSWORD: root MYSQL_DATABASE: sample MYSQL_USER: worker MYSQL_PASSWORD: password TZ: 'Asia/Tokyo' command: mysqld --character-set-server=utf8mb4 --collation-server=utf8mb4_unicode_ci volumes: - ./db/mysql/init.d:/docker-entrypoint-initdb.d ports: - 3306:3306 restart: always
github actionsのworkflowは以下。一部省略してます。
// .github/workflows/integrate.yml name: integrate on: ... env: ... jobs: static-check: name: StaticCheck runs-on: ubuntu-latest steps: ... test: name: Test runs-on: ubuntu-latest needs: [ static-check ] steps: ... # set up db - name: SetUp db run: | docker-compose -f docker-compose.ci.yml up -d sleep 15 # 起動待ち ... # Run test - name: Test run: | go test -v ./...
1 note
·
View note
Text
Semaphore is an open-source tool that provides a beautiful web interface to run ansible playbooks. This tool written in Go languages can be installed on Windows, Linux(x64, ARM, ARM64), and macOS systems. This tool comes in handy when your project has grown and you do not need to deploy it from the command line. The amazing features associated with Semaphore Ansible web UI are: Pure Go allows one to cross-compile it for several platforms. This is the main reason why it is preferred by DevOps. It allows one to run playbooks by schedule View detailed logs of any runs at any time Group playbooks to projects Easily manage environments, inventories, repositories, and access keys. You can use it to build, deploy and roll back if needed from the browser. Get notified about playbook runs It allows one to grant other users privileges to run playbooks In addition to the above features, Semaphore supports MySQL, PostgreSQL, and BoltDB. There are many ways one can install and use the Semaphore Ansible web UI. These include using Snap, package managers, binary files e.t.c. This guide offers a deep illustration of how to run the Semaphore Ansible web UI in Docker Container. Before you Begin. This guide requires one to have both the Docker engine and docker-compose installed. Docker can be installed on Linux systems using the aid from the guide below. How To Install Docker CE on Linux Systems Once the Docker Engine has been installed, add your system user to the Docker group with the command: sudo usermod -aG docker $USER newgrp docker Proceed and install Docker-compose with the dedicated guide: How To Install Docker Compose on Linux Verify the installation. $ docker-compose version Docker Compose version v2.4.1 Now start and enable docker to run on system boot. sudo systemctl start docker && sudo systemctl enable docker Step 1 – Provision the Semaphore Container. The container will contain two parts, i.e Database – (MySQL) for data storage Ansible Semaphore(latest image) Create the docker-compose file using the below commands: mkdir semaphore && cd semaphore vim docker-compose.yml Add the below lines to the file replacing variables where needed. version: '2' services: mysql: ports: - 3306:3306 image: mysql:5.6 container_name: mysql hostname: mysql environment: MYSQL_RANDOM_ROOT_PASSWORD: 'yes' MYSQL_DATABASE: semaphore_db MYSQL_USER: semaphore_user MYSQL_PASSWORD: StrongPassw0rd semaphore: ports: - 3000:3000 image: ansiblesemaphore/semaphore:latest container_name: semaphore environment: SEMAPHORE_DB_USER: semaphore_user SEMAPHORE_DB_PASS: StrongPassw0rd SEMAPHORE_DB_HOST: mysql SEMAPHORE_DB_PORT: 3306 SEMAPHORE_DB: semaphore_db SEMAPHORE_PLAYBOOK_PATH: /tmp/semaphore/ SEMAPHORE_ADMIN_PASSWORD: AdminPassword SEMAPHORE_ADMIN_NAME: admin SEMAPHORE_ADMIN_EMAIL: [email protected] SEMAPHORE_ADMIN: admin SEMAPHORE_ACCESS_KEY_ENCRYPTION: MflCLIUF5bn6Lgkuwy4BoAdIFhoZ4Ief2oocXmuZSjs= depends_on: - mysql In the file, replace: MYSQL_USER and SEMAPHORE_DB_USER with the desired database user. MYSQL_PASSWORD and SEMAPHORE_DB_PASS with the database password for the user SEMAPHORE_ADMIN_PASSWORD with the password for the admin user for Semaphore Ansible web UI SEMAPHORE_ACCESS_KEY_ENCRYPTION with the key to encrypt the access keys in your database. This key encryption can be generated using the command: $ head -c32 /dev/urandom | base64 MflCLIUF5bn6Lgkuwy4BoAdIFhoZ4Ief2oocXmuZSjs= Step 2 – Run Semaphore Ansible web UI in Docker Container Now with the container provisioned, we can run Semaphore using the command: docker-compose up -d Execution output: [+] Running 19/19 ⠿ semaphore Pulled 21.2s
⠿ 4e9f2cdf4387 Pull complete 0.9s ⠿ 8eba5c7ef78e Pull complete 1.3s ⠿ 4b2e0cc6dd21 Pull complete 18.3s ⠿ 5d4e24327603 Pull complete 18.4s ⠿ b53de92b8d36 Pull complete 18.9s ⠿ 8ada155f2bd8 Pull complete 19.2s ⠿ mysql Pulled 19.0s ⠿ 35b2232c987e Pull complete 5.1s ⠿ fc55c00e48f2 Pull complete 5.5s ⠿ 0030405130e3 Pull complete 6.2s ⠿ e1fef7f6a8d1 Pull complete 6.9s ⠿ 1c76272398bb Pull complete 7.6s ⠿ f57e698171b6 Pull complete 9.4s ⠿ f5b825b269c0 Pull complete 9.8s ⠿ dcb0af686073 Pull complete 10.4s ⠿ 27bbfeb886d1 Pull complete 15.6s ⠿ 6f70cc868145 Pull complete 15.9s ⠿ 1f6637f4600d Pull complete 16.3s [+] Running 3/3 ⠿ Network semaphore_default Created 0.3s ⠿ Container semaphore-mysql-1 Started 1.6s ⠿ Container semaphore-semaphore-1 Started 1.5s Verify if the containers are running with services exposed. $ docker ps CONTAINER ID IMAGE COMMAND CREATED STATUS PORTS NAMES ea51aeb59791 ansiblesemaphore/semaphore:latest "/sbin/tini -- /usr/…" 17 seconds ago Up 15 seconds 0.0.0.0:3000->3000/tcp, :::3000->3000/tcp semaphore abf873ba28c2 mysql:5.6 "docker-entrypoint.s…" 18 seconds ago Up 16 seconds 0.0.0.0:3306->3306/tcp, :::3306->3306/tcp mysql Step 3 – Secure Semaphore Ansible web UI with SSL certificates. This guide demonstrates how to secure the Semaphore Ansible web UI with Let’s Encrypt and Self-signed certificates. Begin by installing the Nginx web server. ##On RHEL/CentOS/Rocky Linux 8 sudo yum install nginx ##On Debian/Ubuntu sudo apt install nginx Proceed and create the virtual host file for Semaphore. sudo vim /etc/nginx/conf.d/semaphore.conf In the opened file, add the lines below:
upstream semaphore server 127.0.0.1:3000; server listen 80; server_name semaphore.example.com; client_max_body_size 0; chunked_transfer_encoding on; location / proxy_pass http://semaphore/; proxy_set_header Host $http_host; proxy_set_header X-Real-IP $remote_addr; proxy_set_header X-Forwarded-For $proxy_add_x_forwarded_for; proxy_set_header X-Forwarded-Proto $scheme; proxy_buffering off; proxy_request_buffering off; location /api/ws proxy_pass http://semaphore/api/ws; proxy_http_version 1.1; proxy_set_header Upgrade $http_upgrade; proxy_set_header Connection "upgrade"; proxy_set_header Origin ""; Save the file and proceed to generate SSL certificates. 1. Secure Semaphore Ansible web UI with Let’s Encrypt SSL. Let’s Encrypt is used to issue free trusted SSL certificates to a domain name for free. To be able to generate the SSL certificates, install the required packages. ##On RHEL 8/CentOS 8/Rocky Linux 8/Fedora sudo dnf install https://dl.fedoraproject.org/pub/epel/epel-release-latest-8.noarch.rpm sudo dnf install certbot python3-certbot-nginx ##On Debian/Ubuntu sudo apt install certbot python3-certbot-nginx Issue SSL certificates with the command: sudo certbot --nginx Proceed as below: Saving debug log to /var/log/letsencrypt/letsencrypt.log Enter email address (used for urgent renewal and security notices) (Enter 'c' to cancel): Enter a valid Email address here - - - - - - - - - - - - - - - - - - - - - - - - - - - - - - - - - - - - - - - - Please read the Terms of Service at https://letsencrypt.org/documents/LE-SA-v1.2-November-15-2017.pdf. You must agree in order to register with the ACME server. Do you agree? - - - - - - - - - - - - - - - - - - - - - - - - - - - - - - - - - - - - - - - - (Y)es/(N)o: y - - - - - - - - - - - - - - - - - - - - - - - - - - - - - - - - - - - - - - - - Would you be willing, once your first certificate is successfully issued, to share your email address with the Electronic Frontier Foundation, a founding partner of the Let's Encrypt project and the non-profit organization that develops Certbot? We'd like to send you email about our work encrypting the web, EFF news, campaigns, and ways to support digital freedom. - - - - - - - - - - - - - - - - - - - - - - - - - - - - - - - - - - - - - - - - (Y)es/(N)o: y Account registered. Which names would you like to activate HTTPS for? - - - - - - - - - - - - - - - - - - - - - - - - - - - - - - - - - - - - - - - - 1: semaphore.example.com - - - - - - - - - - - - - - - - - - - - - - - - - - - - - - - - - - - - - - - - Select the appropriate numbers separated by commas and/or spaces, or leave input blank to select all options shown (Enter 'c' to cancel): 1 Requesting a certificate for semaphore.example.com Performing the following challenges: http-01 challenge for semaphore.example.com .... Successfully received certificate. Certificate is saved at: a2enmod ssl That is it, you will have your certificate added to your Nginx config file. 2. Secure Semaphore Ansible web UI with Self-signed Certificates. In case you do not have an FQDN, you can generate Self-signed Certificates for your domain name/IP Address as below. Create a config file to be used to generate the certificates. $ vim semaphore_ssl.conf [req] default_bits = 2048 default_keyfile = semaphore_ssl.key distinguished_name = req_distinguished_name req_extensions = req_ext x509_extensions = v3_ca [req_distinguished_name] countryName = Country Name (2 letter code) countryName_default = KE stateOrProvinceName = State or Province Name (full name) stateOrProvinceName_default = Nairobi localityName = Locality Name (eg, city) localityName_default = Nairobi organizationName = Organization Name (eg, company)
organizationName_default = Computingforgeeks organizationalUnitName = organizationalunit organizationalUnitName_default = Development commonName = Common Name (e.g. server FQDN or YOUR name) commonName_default = Your_IP-Address commonName_max = 64 [req_ext] subjectAltName = @alt_names [v3_ca] subjectAltName = @alt_names [alt_names] DNS.1 = localhost DNS.2 = Your_IP-Address Generate the SSL certificates using OpenSSL as below: openssl req -x509 -nodes -days 365 -newkey rsa:2048 -keyout semaphore_ssl.key -out semaphore_ssl.crt -config semaphore_ssl.conf Press enter to the end and you will have an SSL certificate pair generated. Copy the certificates to the /etc/ssl/certs directory. sudo cp semaphore_ssl.crt /etc/ssl/certs/semaphore_ssl.crt sudo mkdir -p /etc/ssl/private/ sudo cp semaphore_ssl.key /etc/ssl/private/semaphore_ssl.key Now edit your Nginx config file as below. sudo vim /etc/nginx/conf.d/semaphore.conf Make the below changes to the file. upstream semaphore server 127.0.0.1:3000; server server_name semaphore.example.com; client_max_body_size 0; chunked_transfer_encoding on; location / proxy_pass http://semaphore/; proxy_set_header Host $http_host; proxy_set_header X-Real-IP $remote_addr; proxy_set_header X-Forwarded-For $proxy_add_x_forwarded_for; proxy_set_header X-Forwarded-Proto $scheme; proxy_buffering off; proxy_request_buffering off; location /api/ws proxy_pass http://semaphore/api/ws; proxy_http_version 1.1; proxy_set_header Upgrade $http_upgrade; proxy_set_header Connection "upgrade"; proxy_set_header Origin ""; listen 443 ssl; # managed by Certbot ssl_certificate /etc/ssl/certs/semaphore_ssl.crt; ssl_certificate_key /etc/ssl/private/semaphore_ssl.key; server if ($host = semaphore.example.com) return 301 https://$host$request_uri; listen 80; server_name semaphore.example.com; return 404; Save the file and restart Nginx. sudo systemctl restart nginx Step 4 – Access Semaphore Ansible web UI At this point, you will have Semaphore accessible via HTTPS. Allow HTTP and HTTPS through the firewall. ##For Firewalld sudo firewall-cmd --add-service=http --permanent sudo firewall-cmd --add-service=https --permanent sudo firewall-cmd --reload ##For UFW sudo ufw allow http sudo ufw allow https Now proceed and access the Semaphore Ansible web UI using the URL https://doamin_name Login using the admin user and password created. Proceed and create a project. Once a project has been created, the dashboard will be granted as below. Create a task template. A template is used to define how ansible will run the playbook. Creating a new template requires one to provide: Inventory Playbook filename Playbook repository Environment Vault password file Extra CLI arguments e.t.c The task template can be: Task Build Deploy A task simply runs the specified playbook. The build template is used to create artifacts. Here, you need to specify the start version of the artifact. The deploy template now deploys artifacts to the server. This is normally associated with the build template. Step 5 – Manage the Containers. In this guide, we have two containers that can be managed using the docker start and stop commands below: ##To stop docker stop semaphore docker stop mysql ##To start docker start semaphore docker start mysql ##To delete docker rm semaphore docker rm mysql These containers can be managed as system services. To be able to achieve this, we will create service files for each container. For MYSQL $ sudo vim /etc/systemd/system/mysql_container.service [Unit] Description=MySQL container [Service] Restart=always ExecStart=/usr/bin/docker start -a mysql
ExecStop=/usr/bin/docker stop -t 2 mysql [Install] WantedBy=local.target For Semaphore. $ sudo vim /etc/systemd/system/semaphore_container.service [Unit] Description=Semaphore container [Service] Restart=always ExecStart=/usr/bin/docker start -a semaphore ExecStop=/usr/bin/docker stop -t 2 semaphore [Install] WantedBy=local.target Reload the system daemon. sudo systemctl daemon-reload Start and enable the container services to run on boot. ##For MySQL sudo systemctl start mysql_container sudo systemctl enable mysql_container ##For Semaphore sudo systemctl start semaphore_container sudo systemctl enable semaphore_container Check the status of the service: $ systemctl status mysql_container semaphore_container ● mysql_container.service - MySQL container Loaded: loaded (/etc/systemd/system/mysql_container.service; enabled; vendor preset: disabled) Active: active (running) since Thu 2022-04-28 10:48:47 EDT; 1min 11s ago Main PID: 8906 (docker) Tasks: 5 (limit: 23682) Memory: 38.7M CGroup: /system.slice/mysql_container.service └─8906 /usr/bin/docker start -a mysql ● semaphore_container.service - Semaphore container Loaded: loaded (/etc/systemd/system/semaphore_container.service; enabled; vendor preset: disabled) Active: active (running) since Thu 2022-04-28 10:49:09 EDT; 49s ago Main PID: 8957 (docker) Tasks: 6 (limit: 23682) Memory: 19.4M CGroup: /system.slice/semaphore_container.service └─8957 /usr/bin/docker start -a semaphore That is it! Now you can easily deploy applications/services using semaphore Ansible web UI. I hope this was helpful
0 notes
Photo
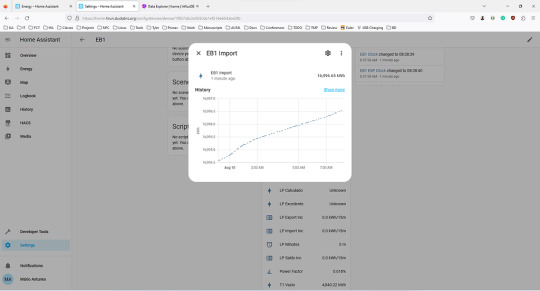
Energy dashboard missing some bars Recently I acquired a sensor for the electricity meter. The sensor page is in PT, but is a tasmota that was adjusted to the meters used in Portugal. It is connected through MQTT and I have the values in Home Assistant and the database: However, the energy dashboard has a strange behaviour: There are mentions of similar issues, but all appear to fix themselves after one update or by changing the browser. HomeAssistant is being deployed in an RPI4 with the following docker-compose: version: '3' services: homeassistant: container_name: homeassistant image: "ghcr.io/home-assistant/home-assistant:stable" restart: unless-stopped environment: - TZ=Europe/Lisbon volumes: - ./config/:/config - /etc/localtime:/etc/localtime:ro privileged: true network_mode: host depends_on: - mosquitto - mariadb - influxdb mosquitto: image: eclipse-mosquitto container_name: mosquitto volumes: - ./mosquitto:/mosquitto restart: unless-stopped network_mode: host mariadb: container_name: mariadb image: mariadb restart: unless-stopped ports: - "13306:3306/tcp" # So we can access the WebUI environment: - TZ=Europe/Lisbon - MYSQL_ROOT_PASSWORD=${MYSQL_ROOT_PASSWORD} - MYSQL_DATABASE=${MYSQL_HA_DATABASE} - MYSQL_USER=${MYSQL_HA_USER} - MYSQL_PASSWORD=${MYSQL_HA_PASSWORD} volumes: - ./mariadb/data:/var/lib/mysql - ./mariadb/config/:/etc/mysql/conf.d influxdb: container_name: influxdb image: influxdb restart: unless-stopped ports: - "8086:8086/tcp" # So we can access the WebUI environment: - TZ=Europe/Lisbon - DOCKER_INFLUXDB_INIT_MODE=setup - DOCKER_INFLUXDB_INIT_USERNAME=${INFLUXDB_USER} - DOCKER_INFLUXDB_INIT_PASSWORD=${INFLUXDB_PASSWORD} - DOCKER_INFLUXDB_INIT_ORG=${INFLUXDB_ORG} - DOCKER_INFLUXDB_INIT_BUCKET=${INFLUXDB_BUCKET} volumes: - ./influxdb/data:/var/lib/influxdb2 - ./influxdb/config/:/etc/influxdb2 ulimits: nofile: soft: 32768 hard: 32768 And the configuration file for home assistant is the following: # Loads default set of integrations. Do not remove. default_config: # Text to speech tts: - platform: google_translate automation: !include automations.yaml script: !include scripts.yaml scene: !include scenes.yaml http: use_x_forwarded_for: true trusted_proxies: - 127.0.0.1 - ::1 - 192.168.1.0/24 recorder: db_url: !secret mariadb purge_keep_days: 10 # default history: influxdb: api_version: 2 ssl: false host: 127.0.0.1 port: 8086 token: !secret influxdb_token organization: !secret influx_org bucket: homeassistant tags: source: HomeAssistant tags_attributes: - friendly_name default_measurement: units ignore_attributes: - icon exclude: # Customise to fit your needs entities: - zone.home domains: - persistent_notification - person Since the sensor values are in the database, I don’t think the issue is in the deployment. I also have no errors in the logs, nor issues in the statistics dev menu. Any idea? 2 posts - 2 participants Read full topic https://community.home-assistant.io/t/energy-dashboard-missing-some-bars/601366
0 notes
Text
Set up LAMP stack in a Pantahub device(RPI3 B+)
Step 1: Burn the RPI3 initial stable image into your sd card.
a) Download RPI3 image
Click to download: https://pantavisor-ci.s3.amazonaws.com/pv-initial-devices/tags/012-rc2/162943661/rpi3_initial_stable.img.xz
b) unxz the device image
Run $ unxz rpi3_initial_stable.img.xz
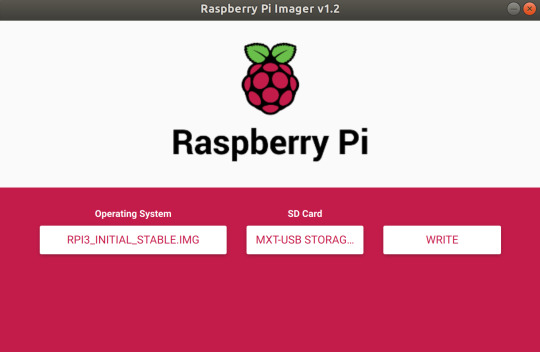
c) Burn image into sd card using Raspberry Pi Imager 1.2
Step 2: Boot your RPI3
a) Insert your sd card and supply the power

Step 3: Detect & Claim your device
a) Connect a LAN cable between your RPI3 & computer/Router.

b) Open your terminal & run $pvr scan

c) Claim your device
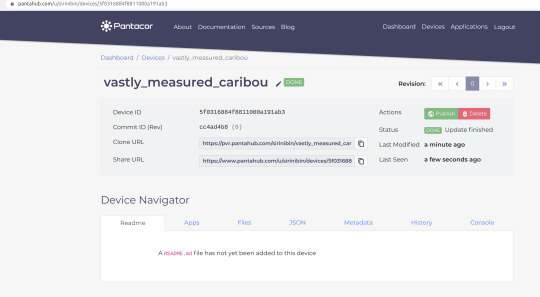
$ pvr claim -c grossly-pleasant-polliwog https://api.pantahub.com:443/devices/5f0316884f8811000a191ab3

d) Log into Panthub.com and check whether the newly claimed device appeared in the dashboard or not.

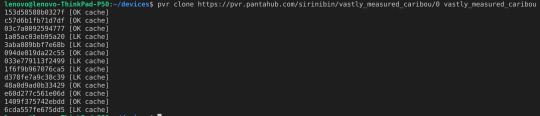
Step 4: Clone the device to your computer
$ pvr clone https://pvr.pantahub.com/sirinibin/vastly_measured_caribou/0 vastly_measured_caribou
Step 5: Add a new app named “apache-php” & Deploy to the device
a) Move to device root dir
`$ cd vastly_measured_caribou`
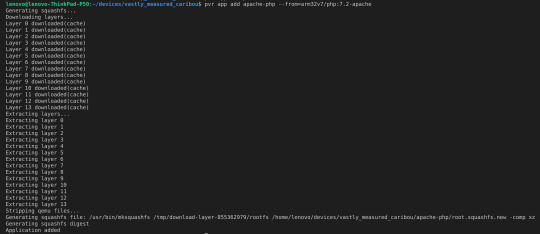
b) Add new app “apache-php” into the device
$ pvr app add apache-php --from=arm32v7/php:7.2-apache
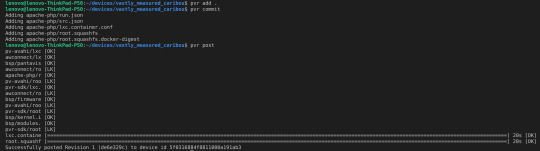
c) Deploy the changes to the device
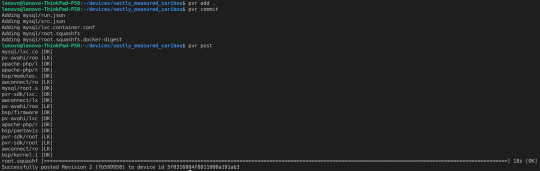
$ pvr add . $ pvr commit $ pvr post
d) Check the device status changes in Pantahub.com dashboard & wait for the status to become "DONE"
Status 1:

Status 2:

Status 3:

Status 4:

e) Verify the “apache-php” installation
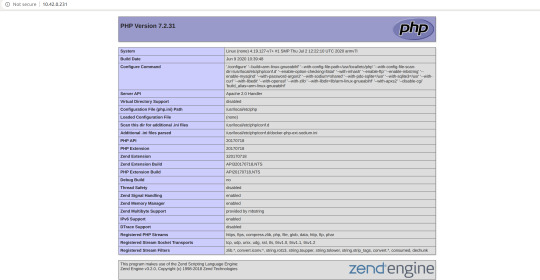
Access the device IP: http://10.42.0.231 in your web browser.

Now you can see that the Apache server is started serving on port 80 in your RPI3 device. But it is showing as “Forbidden” because there is nothing to serve.
Step 6: Serve a php script using the newly installed apache2.4 server
a) Add your ssh key to your device user meta data using pantahub.com dashboard
Note: the key name you should use is pvr-sdk.authorized_keys

b) SSH to the newly created app container “apache-php”
$ ssh -p 8222 [email protected]

c) Install vim editor
$ apt-get update $ apt-get install vim
d) Place a PHP script index.php inside the apache Document Root folder
$ cd /var/www/html $ vim index.php <?php phpinfo() ?>
e) Access your device IP: http://10.42.0.231/ in your web browser
Step 7: Add “mysql” app to the device & deploy the change
a) Add “mysql” app
$ pvr app add mysql --from=yobasystems/alpine-mariadb:arm32v7 --config-json=<(echo -n -e '{ "Env": [ "PATH=/usr/local/sbin:/usr/local/bin:/usr/sbin:/usr/bin:/sbin:/bin", "MYSQL_DATABASE=testdb", "MYSQL_USER=testuser", "MYSQL_PASSWORD=123", "MYSQL_ROOT_PASSWORD=123", "MYSQL_CHARSET=utf8", "MYSQL_COLLATION=utf8_general_ci" ] }')
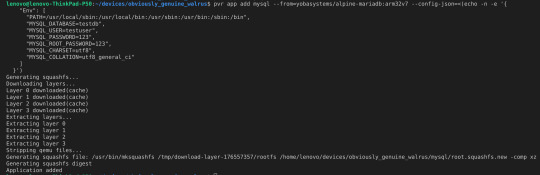
b) Deploy the changes
$ pvr add . $ pvr commit $ pvr post
Step 8: Add “adminer” app to the device for managing the mysql database
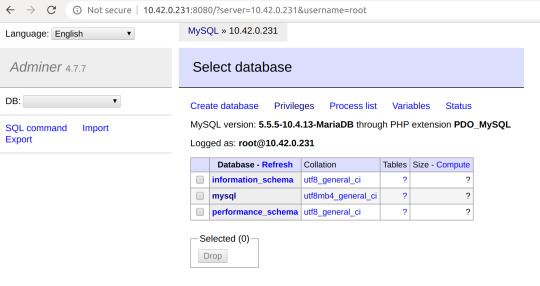
Adminer is a dashboard app which can be used to visually manage the mysql database
By default Adminer will be server through port 8080
a) Add “adminer” app
pvr app add adminer --from=arm32v7/adminer
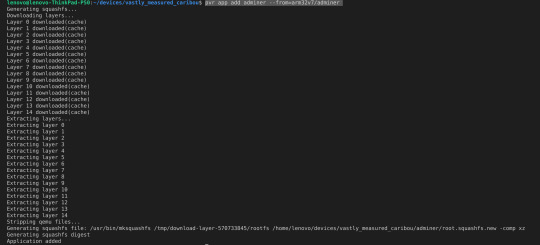
b) Deploy the changes
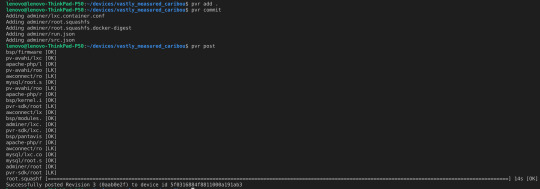
$ pvr add . $ pvr commit $ pvr post
c) Access the Adminer dashboard by using http://10.42.0.231:8080/

d) Log into the Adminer dasdhboard by entering the below mysql credentials
Server:10.42.0.231 Username:root Password:123
Now you can easily Create/update/delete mysql databases/tables through Adminer Now you can deploy your custom LAMP app source code into the dir: /var/www/html of docker image:arm32v7/php:7.2-apache and update docker image tag in src.json then run
pvr app update apache-php --from=arm32v7/php:<NewTag>
1 note
·
View note
Text
golang + mysql でホットリロード
環境
docker-compose 3.5
containers
golang: 1.14
mysql: 5.7
ファイル構成
最終的にこういう感じになる。
golang-project ├── binary │ └── app ├── cmd │ └── main.go ├── docker │ ├── go │ │ └── Dockerfile │ └── mysql │ ├── init.d │ │ └── ddl.sql │ └── my.cnf ├── docker-compose.yml ├── .realize.yaml ├── go.mod └── go.sum
ファイル内容
// gomodを単発で取得する $ docker run -v `pwd`:/go/src/app -w /go/src/app golang:1.14 go mod init app
# docker-compose.yml version: '3.5' services: api: depends_on: - db build: context: . dockerfile: ./docker/go/Dockerfile target: build container_name: sample_api environment: MYSQL_USER: worker MYSQL_PASSWORD: password MYSQL_DATABASE: sample MYSQL_HOST: db MYSQL_PORT: 3306 volumes: - .:/go/src/app ports: - 8080:8080 restart: always command: realize start db: image: mysql:5.7 container_name: sample_db environment: MYSQL_ROOT_PASSWORD: root MYSQL_DATABASE: sample MYSQL_USER: worker MYSQL_PASSWORD: password TZ: 'Asia/Tokyo' command: mysqld --character-set-server=utf8mb4 --collation-server=utf8mb4_unicode_ci volumes: # この辺は必要なら適宜 - ./docker/mysql/data:/var/lib/mysql - ./docker/mysql/my.cnf:/etc/mysql/conf.d/my.cnf - ./docker/mysql/init.d:/docker-entrypoint-initdb.d ports: - 3306:3306 restart: always
# docker/go/Dockerfile FROM golang:1.14-alpine as build WORKDIR /go/src/app ADD . . # realizeはgomodに対応していないらしい RUN apk update \ && apk add git \ && GO111MODULE=off go get github.com/oxequa/realize \ && go get -v ./... \ && go build -o ./binary/app ./cmd FROM alpine WORKDIR /app COPY --from=build /go/src/app . RUN addgroup go \ && adduser -D -G go go \ && chown -R go:go /app/app CMD ["./app"]
# .realize.yaml # 基本的に自動生成されるconfigと同じ. commandsのみことなる # 拡張子は、必ず yaml にする。(ymlだと適用されないっぽい) settings: legacy: force: false interval: 0s schema: - name: api path: . commands: install: status: true method: go build -o ./binary/app ./cmd run: status: true method: ./binary/app watcher: extensions: - go paths: - / ignored_paths: - .git - .realize - vendor
realize について
go get でエラーを起こした
go.mod利用して、かつ、GO111MODULE=onの状態でrealizeをgo getすると、以下エラーを吐かれる。
go: github.com/oxequa/realize imports gopkg.in/urfave/cli.v2: gopkg.in/urfave/[email protected]: parsing go.mod: module declares its path as: github.com/urfave/cli/v2 but was required as: gopkg.in/urfave/cli.v2 ERROR: Service 'api' failed to build: The command '/bin/sh -c go get github.com/oxequa/realize' returned a non-zero code: 1 make: *** [env-up] Error 1
関連のissueを読んだ気がするが、解決せんかった。
で、qiitaでgo modにそもそも対応してないぜ、みたいな記事を見た...どこだっけ...
インストールについては、以下みたいに別でやっちゃう方法もありそう?
// apline使った時はapkでパッケージ管理 RUN apk add --no-cache git \ && go get gopkg.in/urfave/cli.v2@master \ && go get github.com/oxequa/realize
参考はここ
最終的には、GO111MODULE=off go getにしてインストールした。 今回の場合はこれでも問題なかったので。GOPATH以下以外でこれをやろうとすると問題起きそう。
realize start が使えない
インストールされたが、realize startが使えなかった。というかうまく動作しなかった。
詳細に書くと、docker-compose.services.api.commandがrealize start --path="./cmd" --run --no-configだったときに動かなかった。
以下なエラーが吐かれます。
sample_api | [13:10:01][APP] : Watching 1 file/s 6 folder/s sample_api | [13:10:01][APP] : Install started sample_api | [13:10:01][APP] : Install sample_api | exec: not started
一応コンテナに入って確認すると、realizeコマンド自体はちゃんと入っていることが確認できた。
ここは、oxequa/realize/issues/217で解決。
--no-configを取っ払って、.realize.yaml(config)を作成。 以下が自動生成されるconfig
# .realize.yaml settings: legacy: force: false interval: 0s schema: - name: app path: . commands: run: status: true watcher: extensions: - go paths: - / ignored_paths: - .git - .realize - vendor
commands部分を編集
commands: install: status: true method: go build -o ./binary/api ./cmd run: status: true method: ./binary/api
最終的に、.realize.yaml(config)を新たに作成し、docker-compose.services.api.commandが、realize startだけになった。
小言
コンテナイメージだけど、golang-alpineでもよかったかなと思い始めている。
2020/08/19 goのイメージをalpineに修正した。マルチステージビルドに修正して、targetで絞っておる。
参考
https://github.com/oxequa/realize
https://qiita.com/y-ohgi/items/671de11f094f72a058b1
http://psychedelicnekopunch.com/archives/1723
https://github.com/oxequa/realize/issues/217
0 notes
Photo

Get Started With CRUD Operations in PHP MySQL Databases
In this article, we're going to explore how you could use a MySQL database to perform CRUD (create, read, update, and delete) operations with PHP. If you want to get your hands dirty with database connectivity in PHP, this article is a great starting point.
If you are just getting started with PHP, you probably realize that database connectivity is an essential feature that you'll need to get familiar with sooner or later. In most cases, a database is the backbone of any web application and holds the data of the application. So, as a PHP developer, you'll need to know how to deal with database operations.
In this article, we'll keep things simple and explore how to use the core mysqli functions. In upcoming articles of this series, we'll explore a couple of other ways to handle database connectivity.
Today, we'll go through the basics of database connectivity in PHP, and we'll use the MySQL database as our database back-end. Let's have a quick look at what we'll cover in this article:
how to set up a database connection
how to select a database
how to insert and update records
how to fetch records
how to delete records
I assume that you've a working installation of PHP and MySQL, and that you're aware of the basics of MySQL. Also, you'll need to make sure that the mysqli extension is enabled in your PHP installation, since we'll use it to do database operations with the MySQL database.
If you are not sure about the mysqli extension, you can check it using the phpinfo() function. In the phpinfo() output, you can check if there's a section titled mysqli. You should also see the MysqlI Support | enabled header if the mysqli extension is enabled.
There's also an easy way to check it using the CLI interface. You can run the following command to list all extensions that are enabled with your PHP set up.
$php -m
It should print a list of extensions, and if it contains the mysqli keyword, the mysqli extension is enabled.
Now that we're set up, let's start creating a database connection.
How to Set Up a Database Connection
In this section, we'll discuss how you can establish a database connection using the mysqli extension.
There are two ways you can use the mysqli extension, procedural and object-oriented, but we'll use the procedural way in this post to keep things simple. If you're curious about the object-oriented syntax, let me know your questions in the comment section and I'll be happy to answer them.
Firstly, let's go through the syntax of the mysqli_connect function which is used to set up a connection with the MySQL back-end.
<?php $connection_obj = mysqli_connect("{MYSQL_HOSTNAME}", "{MYSQL_USERNAME}", "{MYSQL_PASSWORD}", "{MYSQL_DATABASE}"); ?>
The mysqli_connect function takes four arguments and returns the connection object upon successful connection. Let's go through the each argument:
MYSQL_HOSTNAME: This should be replaced with the MySQL server's host-name or IP address. If you're working with the MySQL server in your local system, you can either use localhost or 127.0.0.1.
MYSQL_USERNAME: The username of your MySQL user.
MYSQL_PASSWORD: The password of your MySQL user.
MYSQL_DATABASE: The database that you want to connect to.
Upon successful connection, the $connection_obj contains the connection object. With this, you're ready to run queries against the database which was provided to the MYSQL_DATABASE argument.
On the other hand, if the connection is not successful, we can debug it as shown in the following snippet:
<?php $connection_obj = mysqli_connect("{MYSQL_HOSTNAME}", "{MYSQL_USERNAME}", "{MYSQL_PASSWORD}", "{MYSQL_DATABASE}"); if (!$connection_obj) { echo "Error No: " . mysqli_connect_errno(); echo "Error Description: " . mysqli_connect_error(); exit; } ?>
In the next section, we'll see how you can select a specific database using the connection object.
How to Select a Database
In the previous section, we discussed how to set up a database connection using the mysqli_connect function. In this section, we'll look at how to select a database once the MySQL connection is successful.
Of course, as we've already seen, you can always pass a database in the fourth argument of the mysqli_connect function itself. But, there's also another way you could do this in case you want to change a database after you've connected to MySQL. You can use the mysqli_select_db function to select a database to work with.
Let's revise the example discussed in the previous section to see how it can work.
<?php $connection_obj = mysqli_connect("{MYSQL_HOSTNAME}", "{MYSQL_USERNAME}", "{MYSQL_PASSWORD}"); if (!$connection_obj) { echo "Error No: " . mysqli_connect_errno(); echo "Error Description: " . mysqli_connect_error(); exit; } mysqli_select_db($connection_obj, "{MYSQL_DATABASE}"); ?>
As you can see, we've passed only three arguments in the mysqli_connect function, and that should give us a successful database connection. Instead of passing a database in the fourth argument, we select the database using the mysqli_select_db function.
The mysqli_select_db function takes two arguments: the connection object and the database you want to connect to.
How to Create (Insert) and Update Records
In the previous sections, we discussed how to set up a MySQL connection and select a database to work with. Now, we'll look at how to execute different types of queries against the selected database. First, let's look at how to insert and update records.
If you want to follow along with examples discussed in this article, you'll need to create the following MySQL table in your database. It's the table which we're going to use in all the examples form now on.
CREATE TABLE `employee` ( `id` int(11) NOT NULL AUTO_INCREMENT, `name` varchar(50) COLLATE utf8mb4_unicode_ci NOT NULL, `email` varchar(50) COLLATE utf8mb4_unicode_ci NOT NULL, `phone` varchar(50) COLLATE utf8mb4_unicode_ci NOT NULL, PRIMARY KEY (`id`) ) ENGINE=InnoDB DEFAULT CHARSET=utf8mb4 COLLATE=utf8mb4_unicode_ci;
Executing the above command in your MySQL database should create the employee table.
How to Create Records
To keep things simple, we'll initialize values that need to be inserted into the employee table in the beginning of the script. However, in most of the cases, these would come from user input in the $_POST variables submitted using a form.
<?php $connection_obj = mysqli_connect("{MYSQL_HOSTNAME}", "{MYSQL_USERNAME}", "{MYSQL_PASSWORD}", "{MYSQL_DATABASE}"); if (!$connection_obj) { echo "Error No: " . mysqli_connect_errno(); echo "Error Description: " . mysqli_connect_error(); exit; } // initialize variables for the insert query $name = 'John Smith'; $email = '[email protected]'; $phone = '541-754-1234'; // prepare the insert query $query = "INSERT INTO employee(`name`,`email`, `phone`) VALUES ('". mysqli_real_escape_string($connection_obj, $name) ."','". mysqli_real_escape_string($connection_obj, $email) ."','". mysqli_real_escape_string($connection_obj, $phone) ."')"; // run the insert query mysqli_query($connection_obj, $query); // close the db connection mysqli_close($connection_obj); ?>
In the above script, we've first initialized variables that we’re going to use in the insert query. Next, we've prepared the insert query and assigned it into the $query variable.
It's important to note that we've used the mysqli_real_escape_string function to escape string values that we’re going to use in the insert query. You must use this function when you’re dealing with string values submitted via $_POST variables. This ensures that your users don't inject malicious code into to your database queries.
Finally, we ran the insert query using the mysqli_query function. The mysqli_query function is used to run a query against the active database. To wrap things up, we used the mysqli_close function to close the active connection.
How to Update Records
In the previous section, we discussed how you can insert new records in the MySQL table. In this section, we'll see how you can update a record which already exists in the table.
I assume that there's already a record exists in the employee table, and the id of that record is 1. In the following example, we're going to update a record which has a value of 1 in the id column.
<?php $connection_obj = mysqli_connect("{MYSQL_HOSTNAME}", "{MYSQL_USERNAME}", "{MYSQL_PASSWORD}", "{MYSQL_DATABASE}"); if (!$connection_obj) { echo "Error No: " . mysqli_connect_errno(); echo "Error Description: " . mysqli_connect_error(); exit; } // initialize variables for the insert query $id = 1; $phone = '333-555-4444'; // prepare the insert query $query = "UPDATE employee SET `phone` = '". mysqli_real_escape_string($connection_obj, $phone) ."' WHERE `id` = '". (int) $id ."'"; // run the insert query mysqli_query($connection_obj, $query); // close the db connection mysqli_close($connection_obj); ?>
As you can see in the above example, we want to update the phone column of the employee table where id is 1. This is very similar to the insert query, except that we're using UPDATE instead of INSERT.
How to Retrieve Records
So far, we've discussed how to insert and update records in the MySQL table. In this section, we'll see how to retrieve (fetch) records from the MySQL table.
Take a look at the following example.
<?php $connection_obj = mysqli_connect("{MYSQL_HOSTNAME}", "{MYSQL_USERNAME}", "{MYSQL_PASSWORD}", "{MYSQL_DATABASE}"); if (!$connection_obj) { echo "Error No: " . mysqli_connect_errno(); echo "Error Description: " . mysqli_connect_error(); exit; } // prepare the select query $query = "SELECT * FROM employee"; // execute the select query $result = mysqli_query($connection_obj, $query) or die(mysqli_error($connection_obj)); // run the select query while ($row = mysqli_fetch_array($result, MYSQLI_BOTH)) { echo "ID:" . $row['id'] . "<br/>"; echo "Name:" . $row['name'] . "<br/>"; echo "Phone:" . $row['phone'] . "<br/>"; echo "Email:" . $row['email'] . "<br/>"; echo "<br/>"; } // close the db connection mysqli_close($connection_obj); ?>
The first thing that you need to do in order to fetch records from a database is to execute the select query using the mysqli_query function. Upon successful execution of the select query, the mysqli_query function returns the mysqli result object, and that's what we've stored in the $result variable above.
Next, we iterate over the result set using the mysqli_fetch_array function in a while loop. The mysqli_fetch_array function fetches a single row at a time from the mysqli result set.
The mysqli_fetch_array function takes two arguments—the result object and result type. The result type indicates what type of array will be returned from the mysqli_fetch_array function. It could be numeric, associative or both. It's an optional argument and you can pass one of these three values—MYSQLI_ASSOC, MYSQLI_NUM, or MYSQLI_BOTH. MYSQLI_ASSOC indicates that you want to access columns by their name, and MYSQLI_NUM indicates that you want to access columns by their column number.
If you pass the MYSQLI_NUM value in the second argument of the mysqli_fetch_array function, you can access columns as $row[0], $row[1] and so on. In our case, we've passed the MYSQLI_BOTH value, so we can access columns in both ways. If you want to access only associative values, you can use the mysqli_fetch_assoc function instead.
In the next and last section, we'll see how to delete records from a database.
How to Delete Records
In this section, we'll see how to delete records from a database.
Take a look at the following example.
<?php $connection_obj = mysqli_connect("{MYSQL_HOSTNAME}", "{MYSQL_USERNAME}", "{MYSQL_PASSWORD}", "{MYSQL_DATABASE}"); if (!$connection_obj) { echo "Error No: " . mysqli_connect_errno(); echo "Error Description: " . mysqli_connect_error(); exit; } // initialize variables for the delete query $id = 1; // prepare the insert query $query = "DELETE FROM employee WHERE `id` = '". (int) $id ."'"; // run the delete query mysqli_query($connection_obj, $query); // close the db connection mysqli_close($connection_obj); ?>
As you can see, it works pretty much the same as the insert and update queries. The mysqli_query function executes the DELETE query, and that eventually deletes the record from the employee table.
Conclusion
In this article, we explored how you can use the MySQL database with PHP. This article was intended to provide you with a basic knowledge of MySQL database connectivity in PHP to beginners. We saw how to go from setting up a database connection to executing different types of queries.
Feel free to post your feedback and queries using the feed below.
by Sajal Soni via Envato Tuts+ Code https://ift.tt/2QhD0yM
0 notes
Text
さまざまな機能追加が活発に行われているDockerのswarmモード
from http://knowledge.sakura.ad.jp/knowledge/11072/
最近Dockerが力を入れている機能の1つが、Dockerクラスタ環境を構築・運用するための機能であるswarmモードだ。本記事ではDocker 1.13以降で追加されたswarmモード関連の機能を紹介する。
記事前編では、Dockerの開発体制の変化や最近追加された新機能について紹介した。続いて今回は、最近機能強化が続いているDockerの「swarmモード」関連の新機能について紹介していこう。
Dockerの普及により、複数のマシンを組み合わせたクラスタ環境でDockerを利用してサービスを提供する構成が検討されるようになった。Dockerクラスタ構築を支援するKubernetesやCoreOSといったソフトウェアも登場している。Docker自体も、クラスタ構築ツールである「Docker Swarm」を提供していたが、Docker 1.12ではこの機能の一部がDocker本体に「swarmモード」として組み込まれた。これにより、追加のソフトウェアをインストール/設定することなしに、Docker本体だけでDockerクラスタを構築し、複数台のマシン上のDockerデーモンを連携させて容易にコンテナを分散稼動させたり、冗長性のある構成でのサービス運用が行えるようになっている(図1)。
図1 Dockerだけでクラスタを構成できるswarmモード
swarmモードの概要
Dockerのswarmモードは、「manager」ノードと「worker」ノードから構成される。managerノードはクラスタを管理するノードで、workerノードはコンテナを稼働させるノードだ。managerノードはworkerノードを兼ねることもできるので、1つのマシンだけでswarmモードを利用することも可能だ。
swarmモードを使ってクラスタを構成するには、まずmanagerノードで「docker swarm init」コマンドを実行してマネージャーを稼働させる。このとき、マシンに複数IPアドレスが割り当てられている場合は「–advertise-addr <IPアドレス>」オプションでほかのノードと通信するために使用するIPアドレスを指定する必要がある。
たとえば「192.168.1.10」というIPアドレスを使用する場合、次のようになる。
# docker swarm init --advertise-addr 192.168.1.10 Swarm initialized: current node (7aquw76ng1tbpll9yrya8d3ge) is now a manager. To add a worker to this swarm, run the following command: docker swarm join --token SWMTKN-1-40oas1mo53i4o172j3mokf3b67d2al9cqcnh5lyhw12togq7if-923xulrntakv3k3et4kkwrzrg 192.168.1.10:2377 To add a manager to this swarm, run 'docker swarm join-token manager' and follow the instructions.
docker swarm initコマンドを実行すると、クラスタに加入するためのコマンドおよびその引数がが表示されるので、これをworkerノード上でそのまま実行するだけでクラスタ内にノードを追加できる。たとえば上記の例の場合、次のようなコマンドをworkerノード上で実行する。
# docker swarm join --token SWMTKN-1-40oas1mo53i4o172j3mokf3b67d2al9cqcnh5lyhw12togq7if-923xulrntakv3k3et4kkwrzrg 192.168.1.10:2377 This node joined a swarm as a worker.
なお、swarmモードでは下記のポートを利用するので、ノード同士がこれらのポートにアクセスできるようファイアウォールの設定を行っておく必要がある。
2377/tcp 7946/tcp 7946/udp 4789/tcp 4789/udp
たとえばfirewalldを利用している場合、次のように実行することで一時的にこれらのポートを開放できる。
# for p in 2377/tcp 7946/tcp 7946/udp 4789/tcp 4789/udp; do firewall-cmd --zone=public --add-port $p;done
クラスタで稼働しているノードは、docker node lsコマンドで確認できる。次の例では、managerノードに加えて2つのworkerノードが稼働していることを確認できる。
# docker node ls ID HOSTNAME STATUS AVAILABILITY MANAGER STATUS 68p32lyf31fz46kku2r91noq4 centos02 Ready Active 7aquw76ng1tbpll9yrya8d3ge * fedora25 Ready Active Leader k9sxalugwyl9dvpj15yyym1cv centos01 Ready Active
swarmモードでは、「サービス(service)」という単位でコンテナの管理を行う。たとえばクラスタ上でコンテナを稼働させるには、docker service createコマンドを使用する。次の例は、「httpd」コンテナをクラスタ上で稼働させる例だ。ここで、「–replicas」はクラスタ内で稼働させるコンテナ数を指定するオプション、「–name」オプションはそのサービスを参照するための名前を指定するオプションだ。
# docker service create --replicas 1 --name httpd-test httpd
作成したサービスはdocker service lsコマンドで確認できる。
# docker service ls ID NAME MODE REPLICAS IMAGE PORTS ad3mz54z3v4i httpd-test replicated 1/1 httpd:latest
稼働しているサービスは、docker service rmコマンドで削除できる。
# docker service rm httpd-test
このほかswarmモードではレプリカ数の動的変更やコンテナのローリングアップデートといった機能も用意されている。詳しくは、公式ドキュメントのSwarm mode overviewを参照して欲しい。
デプロイ機能の強化
さて、Dockerではサービス提供に必要なコンテナの情報をファイルに記述し、その設定ファイルを元にコンテナを起動・設定する「Docker Compose」というツールが用意されている。Docker Composeについては、以前の記事(複数のDockerコンテナを自動で立ち上げる構成管理ツール「Docker Compose」)で紹介しているので、詳しくはそちらを参照して欲しいのだが、Docker 1.13ではDocker Composerの設定ファイル(composeファイル)を利用して、swarmモードを使って立ち上げたDockerクラウド上にコンテナをデプロイすることが可能になった。この機能は、「docker stack」コマンドから利用できる。
また、この機能の導入とともに、composeファイルの書式も拡張され、新たに「deploy」という設定セクションが追加された。必要に応じて設定を追加・修正した上で、swarmクラスタを構築した環境で次のように「docker stack deploy」コマンドを実行することで、クラスタ内でサービスを起動できる。
$ docker stack deploy <スタック名> --compose-file <composeファイル>
「docker stack」コマンドでは、「スタック」という単位でサービスを管理する。スタック名はそれらを識別するための名称で、任意のものが利用可能だ。
たとえば、次のcomposeファイル(今回は「wp-blog.yml」というファイル名とした)は、MySQLが稼働するmysqlコンテナと、WordPressが稼働するwordpressコンテナについて定義したものだ。
version: '3' services: mysql: image: mysql:5.7 environment: MYSQL_ROOT_PASSWORD: some_password MYSQL_DATABASE: wordpress MYSQL_USER: wordpress MYSQL_PASSWORD: wordpress_password wordpress: image: wordpress:4.5-apache environment: WORDPRESS_DB_USER: wordpress WORDPRESS_DB_PASSWORD: wordpress_password WORDPRESS_DB_NAME: wordpress ports: - 80:80
swarmモードで利用するcomposeファイルはバージョン3以降である必要があるため、「version」の部分を「3」に設定し、それ以外にも一部の値を変更しているが、このファイルは基本的には以前の記事で紹介したものと同一だ(バージョン番号については後述する)。
このファイルからクラスタにコンテナをデプロイする場合、次のように実行する。
# docker stack deploy wp-blog --compose-file wp-blog.yml Creating network wp-blog_default Creating service wp-blog_mysql Creating service wp-blog_wordpress
作成されているスタックは「docker stack ls」コマンドで確認できる。
# docker stack ls NAME SERVICES wp-blog 2
また、各スタックで稼動中のサービスやコンテナは「docker stack services <スタック名>」や「docker stack ps <スタック名>」で確認できる。
# docker stack services wp-blog ID NAME MODE REPLICAS IMAGE PORTS 2upz2n0b7l76 wp-blog_mysql replicated 1/1 mysql:5.7 w58rurzrccs6 wp-blog_wordpress replicated 1/1 wordpress:4.5-apache *:80->80/tcp
さらに、「docker stack ps <スタック名>」でどのコンテナがどのノード上で動いているかも確認できる。
# docker stack ps wp-blog ID NAME IMAGE NODE DESIRED STATE CURRENT STATE ERROR PORTS mtqtlmj77rl6 wp-blog_wordpress.1 wordpress:4.5-apache centos01 Running Running 2 minutes ago ddhn4n1vjzij wp-blog_mysql.1 mysql:5.7 fedora25 Running Running 2 minutes ago
なお、今回はホストの80番ポート経由でwordpressコンテナの80番ポートにアクセスできるよう設定している。swarmモードでは公開設定されたポートへのアクセスを自動的に適切なノードに転送する機能が提供されているので、たとえば今回の例では、「http://192.168.1.10/」「http://192.168.1.100/」「http://192.168.1.101/」のいずれでもwordpressコンテナにアクセスが可能だ。
スタックの削除は「docker stack rm」コマンドで行える(ドキュメント)。
# docker stack rm wp-blog Removing service wp-blog_mysql Removing service wp-blog_wordpress Removing network wp-blog_default
そのほかのswarmモード関連新機能
swarmモード関連の改善としてはそのほか、Docker 17.05でサービスのアップデートやロールバックを行う際に稼動中のコンテナを停止させてから新しいコンテナを立ち上げるか、それとも新しいコンテナを立ち上げてから稼動中のコンテナを停止させるのかを指定する「–update-order」や「–rollback-order」オプションが「docker service create」や「docker service update」コマンドに追加された。
さらに、Dockerfile中で指定された「ENTRYPOINT」を上書きして別のものを使用できるようにする「–entrypoint」オプションの導入や、「docer service update」コマンドにネットワークの追加/削除を行う「–network-add」および「–network-rm」オプションが追加されるといった機能追加も行われている。
Docker Composeファイルのアップデート
docker stackコマンドでDocker Composeの設定ファイルが利用できるようになったことに伴い、この設定ファイルのフォーマットもアップデートされている。
Composeファイルでは、ファイル内にバージョンを記述することで互換性を保つような仕組みになっている。現在の最新バージョンは3.3で、これはDocker 17.06以降で利用が可能だ。ちなみに3.0はDocker 1.13以降、2.0はDocker 1.10以降で利用できる。バージョン間の違いについてはドキュメントにもまとめられているが、バージョン1は「volumes」や「networks」、ビルド引数の設定機能がない。また、Docker Composer 1.6までのサポートとなっており、これ以降のバージョンではサポートされない可能性があるという。バージョン2ではバージョン1から大きく構造が変わっているため、現在バージョン1の設定ファイルを利用している場合、バージョン2の設定ファイルに早めに移行するほうが良いかもしれない。
バージョン2では「services」というキーが導入され、コンテナ関連の設定はこのキー以下に記述するようになった。また、ボリュームやネットワーク関連の設定を記述する「volumes」や「networks」などのキーも導入されている。
バージョン3ではswarmモードでのサポートを加えた一方、いくつかのオプションが削除され、またswarmモードでのデプロイ設定を記述する「deploy」キーが導入されている。
機密情報をコンテナに安全に受け渡す「docker secret」
Docker 1.13では、swarmモードでのみ利用できる機能として「Docker Secrets Management」という機能が導入された。
Dockerを使ってサービスを立ち上げる場合、パスワードや秘密鍵、証明書といったセキュリティに関わる情報はコンテナ内には格納せず、コンテナの起動時に外部から投入することが推奨される。単独のマシン上でコンテナを実行するのであれば、たとえばローカルのファイルをコンテナ内にマウントしたり、コンテナ起動時のオプション経由で機密情報を受け渡すことは容易だが、複数のマシンを使ったクラスタ環境ではこういった処理を行うために多少の工夫が必要となっていた。
Docker Secrets Managementでは、「docker secret」コマンドで機密情報の登録や管理などを行う仕組みになっている(ドキュメント)。たとえば「docker secret create <名称> <ファイル>」コマンドでは、指定したファイルの内容を指定した名称でシステムに登録できる。
登録された機密情報は、「docker service create」コマンドによるswarmモードでのサービスの起動時に明示的に使用する機密情報を「–secret=<名称>」オプションで指定することで、そのコンテナの「run/secrets/」ディレクトリ内にマウントされ利用可能になる。
設定ファイルなどを共有するための「docker config」
Docker 17.06では、設定ファイルをコンテナ内プロセスに渡すための機能も導入された。これらはDocker Secrets Managementと同様swarmモードでのみ利用可能で、あらかじめ登録しておいたファイルをコンテナ内の任意の場所にマウントできるというものになっている(ドキュメント)。
この機能は、「docker config」コマンド経由で操作が可能だ(ドキュメント)。まず「docker config create <名称> <ファイル>」コマンドで利用したいファイルを登録し、「docker service create」コマンドによるコンテナ起動時に「–config src=<名称>,target=<マウントパス>」オプションを追加することで、コンテナ内で指定した設定ファイルが指定したパスにマウントされる。
Dockerの実験的な機能
最後に、「実験的」(experimental)機能についても紹介しておこう。
Dockerでは、まずは実験的機能として新規機能を実装するケースがある。以前は実験的機能を利用するためにはDockerのビルド時に設定を行う必要があったが、Docker 1.13以降ではDockerが配布するバイナリにも実験的機能が組み込まれるようになり、Dockerデーモンの起動時に「–experimental」オプションを追加することでバイナリを独自ビルドすることなしに実験的な機能を利用できるようになった。
実験的機能が有効になっているかどうかは、「docker version」コマンドを実行で確認できる。「Experimental」が「true」となっていれば実験的機能が有効になっている。
# docker version Client: Version: 17.06.2-ce API version: 1.30 Go version: go1.8.3 Git commit: cec0b72 Built: Tue Sep 5 19:59:06 2017 OS/Arch: linux/amd64 Server: Version: 17.06.2-ce API version: 1.30 (minimum version 1.12) Go version: go1.8.3 Git commit: cec0b72 Built: Tue Sep 5 20:00:25 2017 OS/Arch: linux/amd64 Experimental: true
systemdでDockerデーモンを起動している場合、実験的機能を有効にするには次のような手順を踏めばよい。まず次のようにsystemdの設定ファイル「/lib/systemd/system/docker.service」を/etc/systemd/systemディレクトリ以下にコピーする。
# cp -i /lib/systemd/system/docker.service /etc/systemd/system
続いて、コピーした設定ファイル中の「ExecStart」行に「–experimental」オプションを追加する。
: [Service] Type=notify # the default is not to use systemd for cgroups because the delegate issues still # exists and systemd currently does not support the cgroup feature set required # for containers run by docker ExecStart=/usr/bin/dockerd --experimental ExecReload=/bin/kill -s HUP $MAINPID :
最後に「systemctl daemon-reload」コマンドを実行してsystemd設定ファイルの再読込を行い、続いてdockerデーモンをリスタートすればDockerで実験的機能が利用可能になる。
# systemctl daemon-reload $ systemstl restart docker
チェックポイント機能の導入
現在Dockerではいくつか実験的機能が導入されているが、最近導入された大きな実験的機能として「チェックポイント」機能がある。これは、稼動中コンテナの状態を一時的に記録する「チェックポイント」を作成・管理する機能だ。VirtualBoxやVMwareなどの仮想化ソフトウェアは、稼動中の仮想マシンの状態をストレージに保存して仮想マシンを一時停止させたり、任意のタイミングで再開する機能があるが、Dockerのチェックポイントもこれと同様の機能となる。
チェックポイントの作成は、「docker checkpoint create」コマンドで行える(ドキュメント)。作成されたチェックポイントの一覧は「docker checkpoint ls」コマンド、チェックポイントの削除は「docker checkpoint rm」コマンドで行える。
また、チェックポイントからのコンテナの復元は「docker start」コマンドを「–checkpoint」オプション付きで実行することで行える。
この機能はDocker 1.13で実験的機能(experimental)という位置付けで導入されており、Docker 17.06でもまだ実験的機能のままだ。そのため、デフォルトの設定では利用できないので注意したい。
「Moby」ベースや「Docker CE」になっても方向性に大きな変更はなし
さて、本記事では最近のDockerの状況や新機能について紹介してきた。商用版である「Docker EE」の登場や、コア部分の「Moby」プロジェクトへの移行という大きなトピックはあったものの、Docker自体の機能強化については順調に進んでおり、無償でのDockerの利用についても現時点では特に制限されることはない状況となっている。ひとまず、しばらくは安心してDockerを利用できる状況と言えるだろう。
http://knowledge.sakura.ad.jp/wordpress/wp-content/uploads/2017/09/swarm_mode-440x264.png
0 notes
Text
Peachpie - Open Source PHP Compiler to .NET and WordPress under ASP.NET Core
The Peachpie PHP compiler project joined the .NET Foundation this week and I'm trying to get my head around it. PHP in .NET? PHP on .NET? Under .NET? What compiles to what? Why would I want this? How does it work? Does it feel awesome or does it feel gross?
Just drink this in.
C:\Users\scott\Desktop\peachcon> type program.php <?php function main() { echo "Hello .NET World!"; } main(); C:\Users\scott\Desktop\peachcon> dotnet run Hello .NET World!
Just like that. Starting from a .NET SDK (They say 1.1, although I used a 2.0 preview) you just add their templates
dotnet new -i Peachpie.Templates::*
Then dotnet new now shows a bunch of php options.
C:\Users\scott\Desktop\peachcon> dotnet new | find /i "php" Peachpie console application peachpie-console PHP Console Peachpie Class library peachpie-classlibrary PHP Library Peachpie web application peachpie-web PHP Web/Empty
dotnet new peachpie-console for example, then dotnet restore and dotnet run. Boom.
NOTE: I did have to comment out his one line "<Import Project="$(CSharpDesignTimeTargetsPath)" />" in their project file that doesn't work at the command line. It's some hack they did to make things work in Visual Studio but I'm using VS Code. I'm sure it's an alpha-point-in-time thing.
It's really compiling PHP into .NET Intermediate Language!
You can see my string here:
But...why? Here's what they say, and much of it makes sense to me.
Performance: compiled code is fast and also optimized by the .NET Just-in-Time Compiler for your actual system. Additionally, the .NET performance profiler may be used to resolve bottlenecks.
C# Extensibility: plugin functionality can be implemented in a separate C# project and/or PHP plugins may use .NET libraries.
Sourceless distribution: after the compilation, most of the source files are not needed.
Power of .NET: Peachpie allows the compiled WordPress clone to run in a .NET JIT'ted, secure and manageable environment, updated through windows update.
No need to install PHP: Peachpie is a modern compiler platform and runtime distributed as a dependency to your .NET project. It is downloaded automatically on demand as a NuGet package or it can be even deployed standalone together with the compiled application as its library dependency.
PHP does have other VMs/Runtimes that are used (beyond just PHP.exe) but the idea that I could reuse code between PHP and C# is attractive, not to mention the "PHP as dependency" part. Imagine if I have an existing .NET shop or project and now I want to integrate something like WordPress?
PHP under ASP.NET Core
Their Web Sample is even MORE interesting, as they've implemented PHP as ASP.NET Middleware. Check this out. See where they pass in the PHP app as an assembly they compiled?
using Peachpie.Web; namespace peachweb.Server { class Program { static void Main(string[] args) { var host = new WebHostBuilder() .UseKestrel() .UseUrls("http://*:5004/") .UseStartup<Startup>() .Build(); host.Run(); } } class Startup { public void ConfigureServices(IServiceCollection services) { // Adds a default in-memory implementation of IDistributedCache. services.AddDistributedMemoryCache(); services.AddSession(options => { options.IdleTimeout = TimeSpan.FromMinutes(30); options.CookieHttpOnly = true; }); } public void Configure(IApplicationBuilder app) { app.UseSession(); app.UsePhp(new PhpRequestOptions(scriptAssemblyName: "peachweb")); app.UseDefaultFiles(); app.UseStaticFiles(); } } }
Interesting, but it's still Hello World. Let's run WordPress under PeachPie (and hence, under .NET). I'll run MySQL in a local Docker container for simplicity:
docker run -e MYSQL_ROOT_PASSWORD=password -e MYSQL_DATABASE=wordpress -p 3306:3306 -d mysql
I downloaded WordPress from here (note they have the "app" bootstrapper" that hosts .NET and then runs WordPress) restore and run.
It's early and it's alpha - so set your expectations appropriately - but it's surprisingly useful and appears to be under active development.
What do you think?
Be sure to explore their resources at http://www.peachpie.io/resources and watch their video of WordPress running on .NET. It's all Open Source, in the .NET Foundation, and the code is up at https://github.com/iolevel/ and you can get started here: http://www.peachpie.io/getstarted
Sponsor: Check out JetBrains Rider: a new cross-platform .NET IDE. Edit, refactor, test and debug ASP.NET, .NET Framework, .NET Core, Xamarin or Unity applications. Learn more and download a 30-day trial!
© 2017 Scott Hanselman. All rights reserved.
0 notes
Text
Setting up a workflow with Docker, GitHub, Travis and AWS
In this post, we are going to set up a workflow to test and deploy automatically a PHP app on Amazon Web Services Elastic Beanstalk.
The aim of this article is to set up a basic workflow using a few tools to automate our deployment process. First of all, we need to have an account on each of these platforms: GitHub, Docker Hub, Amazon Web Services (AWS) and Travis CI. We also need to have Docker and Git installed on our machine.
Basically, we are going to do the following things: use Docker to create our environment, develop our app, create a repository, commit and push everything to GitHub, let Travis CI do the tests, build a Docker image with our code and push everything to Elastic Beanstalk (EB).
Setting up the environment
To create our environment, we are going to use the PHP Docker Boilerplate from WebDevOps. We can clone the repository by simply use:
git clone https://github.com/webdevops/php-docker-boilerplate.git our-appt
Cloning webdevops/php-docker-boilerplate
We will just adjust a very few things. First, in the Dockerfile.production file, at the end of it, we are going to add this simple line:
COPY ./app/. /app/
Here, we are copying our app folder instead of sharing it with the host.
If we use another image, we may also need to expose ports and run a command when launching our container like so:
EXPOSE 80 EXPOSE 443 CMD ["supervisord"]
Initializing our project
We can now go to GitHub and create a new repository. After that, we can make our first commit:
git init git add . git commit –m "First commit" git remote add origin https://github.com/user/repository.git git push –u origin master
Initializing our repository
For our example, we create a really simple app using Composer. We must be sure to have the appropriate .gitignore file. A .dockerignore file could also be a good idea:
*.md .git* backup/* bin/* documentation/*
.dockerignore file example
We can now link our GitHub repository to Travis CI.
AWS / EB
We are now going to set a few things on AWS. First, we need to create a new application on EB. We can name it however we want. Then, we have to create new environment. Here, we need to select "Docker Multicontainers" for the platform option. We also need to enable VPC. We can then proceed.
When it is done, we need to assure that our instance profile can communicate with Amazon ECS. To be sure of this, we can attach the AWSElasticBeanstalkMulticontainerDocker policy to it. To set the instance profile, in the EB dashboard, we can go to Configuration > Instances settings. To attach a policy to a role, in the IAM dashboard, we can go to Roles, choose the concerned role and then attach the desired policy.
We also need to create a new user. If there is no available group, we have to create on first. When our user is created, we can request credentials. We need to be sure to keep the secret key somewhere because we won't be able to access it later.
Information we need
Before going any further, we need to be sure to have the following information:
Our app name (APP_NAME)
Our Docker username (DOCKER_USERNAME)
Our Docker repository name (DOCKER_REPOSITORY)
Our Docker password (DOCKER_PASSWORD - secure)
Our email adress used with Docker (DOCKER_EMAIL)
An image name (IMAGE_NAME)
The AWS bucket name (BUCKET_NAME)
Our deployment region (DEPLOYMENT_REGION)
The deployment bucket (DEPLOYMENT_BUCKET)
The deployment environment (DEPLOYMENT_ENV_NAME)
The deployment's id (DEPLOYMENT_ENV - secure)
Our AWS access key (AWS_ACCESS_KEY - secure)
Our AWS secret key (AWS_SECRET_KEY - secure)
Because we are using Travis CI, we can set these values in our Travis CI account in the settings sections of our project or put them in the .travis.yml file and encrypt the private ones with the following command (Travis CI gem need to be installed):
travis encrypt SOMEVAR=secretvalue --add
Docker Configuration
In case we would like to use a private repository on Docker Hub, we need to create a file named .dockercfg like so:
{ "https://index.docker.io/v1/": { "auth": "", "email": "" } }
.dockercfg file
The Amazon ECS container agent will use this file for authentication. Because Docker create a file with another format, we are going to feed this file later with the values that in the files generated by Docker.
Now we can create another file named Dockerrun.aws.json. This file will be used by EB to deploy our Docker containers. Here again, we are going to replace values in this file later.
{ "AWSEBDockerrunVersion": 2, "authentication": { "bucket": "", "key": ".dockercfg" }, "volumes": [ { "name": "storage", "host": { "sourcePath": "/var/data" } }, { "name": "app", "host": { "sourcePath": "/var/app/current/app" } } ], "containerDefinitions": [ { "name": "db", "image": "mysql:5.6", "essential": true, "memory": 512, "portMappings": [ { "hostPort": 3306, "containerPort": 3306 } ] "mountPoints": [ { "sourceVolume": "storage", "containerPath": "/var/lib/mysql" } ], "environment": [ { "name": "MYSQL_ROOT_PASSWORD", "value": "password" }, { "name": "MYSQL_DATABASE", "value": "my_db" } ] }, { "name": "app", "image": ":", "essential": true, "memory": 256, "portMappings": [ { "hostPort": 80, "containerPort": 80 } ], "links": [ "db" ], "mountPoints": [ { "sourceVolume": "app", "containerPath": "/var/www/html", "readOnly": true } ] } ] }
Dockerrun.aws.json file
We tell Travis CI what to do
Now, with the .travis.yml file, we can tell Travis CI what to do.
sudo: required language: php python: - "3.4" - "pypy-5.3.1" services: - docker before_install: # Install dependencies - gem update --system - sudo apt-get install -y python3.4 - sudo apt-get install --upgrade -y python-pip - sudo apt-get install jq - sudo pip install --user virtualenv # Create a virtual environment for AWS CLI - virtualenv my_py3 --python=/usr/bin/python3.4 - source my_py3/bin/activate - pip install --upgrade awscli - pip install --upgrade awsebcli # Set AWS information - aws configure set aws_access_key_id $AWS_ACCESS_KEY - aws configure set aws_secret_access_key $AWS_SECRET_KEY - aws configure set default.region $DEPLOYMENT_REGION - aws configure set metadata_service_timeout 1200 - aws configure set metadata_service_num_attempts 3 - aws configure list # Copy the docker-compose.production.yml file to docker-compose.yml file - cp docker-compose.production.yml docker-compose.yml # Build and create our containers - docker-compose up -d - docker ps -a before_script: # Install dependencies in the app container - docker-compose exec -T app composer self-update - docker-compose exec -T app composer install --no-interaction - docker-compose exec -T app composer dump-autoload -o script: # Run unit tests in the app container - docker-compose exec -T app vendor/bin/php-cs-fixer fix app --verbose - docker-compose exec -T app vendor/bin/phpunit --coverage-clover=coverage.xml after_success: # Stop containers and build our image - docker-compose stop - docker-compose build --no-cache # Send coverage information to Codecov (if needed) - bash <(curl -s https://codecov.io/bash) # Push image to Docker Hub and update EB environment - if [ "$TRAVIS_BRANCH" == "master" ]; then docker login -u="$DOCKER_USERNAME" -p="$DOCKER_PASSWORD"; docker tag $IMAGE_NAME $DOCKER_USERNAME/$DOCKER_REPOSITORY:$TRAVIS_BUILD_ID; docker push $DOCKER_USERNAME/$DOCKER_REPOSITORY:$TRAVIS_BUILD_ID; ./scripts/upload_image_to_elastcbeanstalk.sh $TRAVIS_BUILD_ID $DEPLOYMENT_BUCKET $DEPLOYMENT_ENV $APP_NAME $DEPLOYMENT_REGION $IMAGE_NAME $DEPLOYMENT_ENV_NAME $DOCKER_USERNAME $DOCKER_REPOSITORY $DOCKER_PASSWORD $DOCKER_EMAIL; fi notifications: email: false env: global: - APP_NAME=app_name - DOCKER_USERNAME=docker_username - DOCKER_REPOSITORY=docker_repository (here same as app_name) - IMAGE_NAME=image_name - BUCKET_NAME=bucket_name (here same as app_name) - DEPLOYMENT_REGION=us-east-2 (for example) - DEPLOYMENT_BUCKET=elasticbeanstalk-us-east-2-xxxxxxxxxxxx - DEPLOYMENT_ENV_NAME=env_name - DOCKER_EMAIL=docker_email - secure: some_secure_value - secure: some_secure_value - secure: some_secure_value - secure: some_secure_value
.travis.yml file
Let's recap what we are doing here:
We install the dependencies we need
We install AWS CLI in a virtual environment to avoid conflicts and set information
Create a docker-compose.yml file from the docker-compose.production.yml file
Start our containers
Install dependencies in the app container
Run tests in the app container
Build our image
If everything is alright and if we are on master branch, we push the image to Docker Hub and call our script to update the EB environment
EB environment
In our .travis.yml file, we call a script named upload_image_to_elastcbeanstalk.sh. Let's see what it is:
#! /bin/bash # Variables DOCKER_TAG=$1 DOCKERRUN_FILE="Dockerrun.aws.json" DOCKERCFG=".dockercfg" DOCKER_CONFIG="/home/travis/.docker/config.json" EB_BUCKET=$2 EB_ENV=$3 PREFIX="deploy/$DOCKER_TAG" APP_NAME=$4 DEPLOYMENT_REGION=$5 IMAGE_NAME=$6 DEPLOYMENT_ENV_NAME=$7 DOCKER_USERNAME=$8 DOCKER_REPOSITORY=$9 DOCKER_PASSWORD=${10} DOCKER_EMAIL=${11} DOCKER_IMAGE="$DOCKER_USERNAME/$DOCKER_REPOSITORY" # Generate dockercfg echo "::::: Creating .dockercfg file :::::" DOCKER_AUTH=($(sudo jq -r '.auths["https://index.docker.io/v1/"].auth' $DOCKER_CONFIG)) cat "$DOCKERCFG" \ | sed 's||'$DOCKER_AUTH'|g' \ | sed 's||'$DOCKER_EMAIL'|g' \ > $DOCKERCFG sleep 30 aws s3 cp $DOCKERCFG s3://$EB_BUCKET/.dockercfg sleep 30 echo "::::: Creating Dockerrun.aws.json file :::::" # Replace vars in the DOCKERRUN_FILE cat "$DOCKERRUN_FILE" \ | sed 's||'$EB_BUCKET'|g' \ | sed 's||'$DOCKER_IMAGE'|g' \ | sed 's||'$DOCKER_TAG'|g' \ > $DOCKERRUN_FILE sleep 30 aws s3 cp $DOCKERRUN_FILE s3://$EB_BUCKET/$PREFIX/$DOCKERRUN_FILE sleep 30 echo "::::: Creating new Elastic Beanstalk version :::::" # Run aws command to create a new EB application with label aws elasticbeanstalk create-application-version \ --region=$DEPLOYMENT_REGION \ --application-name $APP_NAME \ --version-label $DOCKER_TAG \ --source-bundle S3Bucket=$EB_BUCKET,S3Key=$PREFIX/$DOCKERRUN_FILE sleep 30 echo "::::: Updating Elastic Beanstalk environment :::::" aws elasticbeanstalk update-environment \ --environment-id $EB_ENV \ --environment-name $DEPLOYMENT_ENV_NAME \ --application-name $APP_NAME \ --version-label $DOCKER_TAG echo "::::: Removing file :::::" sleep 30 rm $DOCKERCFG rm $DOCKERRUN_FILE
upload_image_to_elastcbeanstalk.sh file
Let's recap what we are doing here:
We parse the file /home/travis/.docker/config.json and extract the "auth" value from it
We replace values in the .dockercfg and upload it on AWS S3
We replace values in Dockerrun.aws.json file and upload it on AWS S3
We create a new version for the application
We update the EB environment
We remove the configuration files
The end!
If everything is alright, our app will be deployed on AWS EB by the next push.
Test locally and fix problems
If we need to run our image locally, we can do the following thing:
docker pull username/repository:tag docker run --expose 80 -p 80:80 -it username/repository:tag
Or if we need to use sh:
docker run -ti username/repository:tag sh
To get console output from the instance, we can use the following command (awscli has to be installed; we may need to run aws configure first):
aws ec2 get-console-output --instance-id instance_id
Getting console output
We may also want to connect to our instance using SSH. To do so, we just have to use the following command (awsebcli has to be installed; we may need to run eb init first):
eb ssh --setup // If needed eb ssh environment-name
Using SSH
We can retrieve and display logs like so:
eb logs
Displaying logs
Further configuration and optimization
We may want to extend our configuration. For that, we can place some .config files in the .ebextentions folder. For example, we may need a script to clean unused images:
option_settings: - namespace: aws:elasticbeanstalk:command option_name: Timeout value: 1200 commands: docker_clean_containers: command: docker rm -v $(docker ps -a -q) ignoreErrors: true docker_clean_images: command: docker rmi $(docker images -q) ignoreErrors: true
Cleaning unused images - .ebextentions/docker.config
In our example, we also use a MYSQL container for our database. Using AWS RDS instead can be a reliable choice for production.
Conclusion
Setting up this whole process may seem to be quite a headache that involves many different tools. On the other hand, we have the opportunity to automate our deployment process while preserving control and security.
#git#github#travisci#docker#aws#eb#amazon web services#elastic beanstalk#php#deployment#continuous integration
0 notes
Text
http://docs.docker.jp/compose/wordpress.html
mkdir my_wp cd my_wp touch docker-compose.yml version: '2' services: db: image: mysql:5.7 volumes: - "./.data/db:/var/lib/mysql" restart: always environment: MYSQL_ROOT_PASSWORD: wordpress MYSQL_DATABASE: wordpress MYSQL_USER: wordpress MYSQL_PASSWORD: wordpress
wordpress: depends_on: - db image: wordpress:latest links: - db ports: - "8000:80" restart: always environment: WORDPRESS_DB_HOST: db:3306 WORDPRESS_DB_PASSWORD: wordpress
docker-compose up -d
docker-machine ip machineName http://machineIP:8000
0 notes
Text
Les meilleures commandes de Docker – Partie 3 : un WordPress en une seule commande
Vous l’attendiez encore plus que le précédent, il est là tout chaud. Voici le troisième article technique sur cette machine de guerre qu’est Docker. Si vous n’avez pas lu le premier ni le second, je vous conseille de les lire avant. Autrement il vous manquera les bases pour suivre ce nouveau TP.
Voici la liste des articles précédents :
Les meilleures commandes de Docker – Partie 1
Les meilleures commandes de Docker – Partie 2
L’objectif est toujours le même que précédemment : créer le plus rapidement possible un site stable de type WordPress. L’autre idée plus générale de ce TP est de vous apprendre à structurer, et à décrire correctement à Docker l’architecture dont vous avez besoin. Ainsi, celui-ci pourra créer automatiquement votre environnement, en une seule ligne de commande.
Pourquoi structurer son environnement ?
Imaginons que vous travaillez sur une application Web qui utilise le Framework Symfony avec une base de données PostgreSQL. Vous serez d’accord avec moi : tout installer à la main, c’est long et chronophage. Mais vous me direz : « il suffit de l’installer une seule fois, après on n’est plus embêtés ».
Je suis d’accord, mais imaginez qu’un nouveau développeur arrive dans votre équipe. Il faudra tout réinstaller de nouveau, alors qu’avec cette technique vous n’aurez qu’à lui donner le fichier de configuration ainsi que la commande qui va bien. Ainsi, le nouveau sera opérationnel en très peu de temps.
Poursuivons cette réflexion : lorsque l’application est prête à être mise en production, vous n’avez qu’à déployer le fichier de configuration, et relancer la commande.
Autre élément important : imaginez que Symfony passe à une nouvelle version très importante, qui corrige une multitude de failles critiques. Vous allez devoir changer de version. Or cela risque d’être l’enfer si vous le faites à la main. De plus, il faudrait isoler votre configuration de développement de celle des tests. Alors que vous pourriez modifier un fichier configuration et spécifier à Docker d’utiliser la nouvelle version de Symfony. Puis vous lancez la même ligne de commande, et vous pouvez tester comment votre code réagit en isolant l’environnement de développement et de tests. Ensuite, si vous devez continuer vos développements, vous pourrez facilement le faire en switchant de conteneurs.
Vous y gagnerez en efficacité et en stabilité sur vos postes et serveurs. Car même pour faire les migrations de version sur les serveurs de production, ce sera plus simple. Par exemple, si la nouvelle version de Symfony réagit mal, vous pouvez faire marche arrière et revenir à l’ancienne version sans problème.
Maintenant que je vous ai fait un teaser de folie, laissez-moi vous montrer comment faire de la magie avec Docker.
Nous allons utiliser la commande docker-compose qui permet de générer une suite d’images et de conteneurs pour faire tourner un environnent précis.
Mais avant de l’utiliser, il faut décrire ce dont on a besoin. Je vous rappelle que l’objectif est dobtenir un WordPress fonctionnel.
Ecriture du fichier de configuration (docker-compose)
Pour cela, nous avons besoin de créer un fichier qui se nomme :
docker-compose.yml
Vous avez dû vous rendre compte que l’extension est particulière. C’est du YAML : pour ceux qui ne connaissent pas ce format, il signifie YAML Ain’t Markup Language soit en français YAML n’est pas un langage de balisage. C’est un peu un mix entre le format CSV, JSON et XML.
Voici la structure de base que propose Docker :
version: '2' services: redis: image: "redis:alpine"
Lisons ligne par ligne les informations. Tout d’abord, on a le champ « version » : il indique le numéro de version du docker compose que vous souhaitez utiliser. En effet, en fonction de la version, on décrit différemment notre architecture.
Ensuite, on retrouve des services qui permettent de détailler la liste de vos systèmes. Un service peut être une image. Par exemple, les deux dernières lignes indiquent que l’on a besoin d’un service redis dont l’image est redis:alpine.
Je pense que vous avez compris le principe de description des services.
Revenons à notre problématique de base. Pour avoir un WordPress qui fonctionne bien, on a besoin d’une base de données MySQL et d’un WordPress. Donc je vous propose de l’écrire en mode YAML. Ensuite, on affinera notre fichier de configuration.
version: '2' services: base_de_donnees: image: mysql:latest wordpress: image: wordpress:latest
Ici, j’indique donc à Docker que j’ai besoin de la dernière version de MySql et de WordPress. Mais ce n’est pas suffisant, si vous lancez ce fichier cela ne fonctionnera pas. Car il faut indiquer à Docker que WordPress est lié au moteur MySQL. Pour cela, on utilise le mot-clé depends_on. Ce qui nous donne un nouveau fichier de configuration :
version: '2' services: base_de_donnees: image: mysql:latest wordpress: image: wordpress:latest depends_on: - base_de_donnees
Mais ce n’est pas tout. Si vous vous souvenez bien de l’article précédent, vous savez que pour WordPress et pour MySQL il y a des variables (des informations) à fournir pour que tout fonctionne bien. Pour rappel, la commande à utiliser pour obtenir un conteneur MySQL digne de ce nom est la suivante :
docker run --name some-mysql -e MYSQL_ROOT_PASSWORD=my-secret-pw -e MYSQL_DATABASE=wordpress -e MYSQL_USER=root -d mysql:8
On voit que l’on passe un mot de passe administrateur (root), un nom de base de donnée et le nom d’un user. On va faire sensiblement la même chose, à un paramètre près. Nous allons générer un utilisateur spécial pour WordPress afin d’éviter les risques d’intrusion ou d’injection dans la base de données par des hackers.
Pour faire passer ces différentes variables, on utilise le mot-clé environment. Ce qui donne le résultat suivant :
version: '2' services: base_de_donnees: image: mysql:latest environment: MYSQL_ROOT_PASSWORD: admin-mot-de-passe MYSQL_DATABASE: nom-base-de-donnee-wordpress MYSQL_USER: utilisateur-wordpress MYSQL_PASSWORD: mot-de-passe-wordpress wordpress: image: wordpress:latest depends_on: - base_de_donnees
C’est plutôt simple, non ? Donc vous avez bien compris que les valeurs « admin-mot-de-passe », »nom-base-de-donnee-wordpress », « utilisateur-wordpress » et « mot-de-passe-wordpress » sont modifiables. Mieux vaut choisir des mots de passe plutôt compliqués pour éviter de vous faire pirater votre base de données.
Passons maintenant à la configuration de WordPress. Pour que tout fonctionne bien, il faut spécifier à WordPress : le nom de la base de données, le mot de passe & le nom de l’utilisateur pour accéder à la base de données, ainsi que le nom de la base de données. Voici le résultat final :
version: '2' services: base_de_donnees: image: mysql:latest environment: MYSQL_ROOT_PASSWORD: admin-mot-de-passe MYSQL_DATABASE: nom-base-de-donnee-wordpress MYSQL_USER: utilisateur-wordpress MYSQL_PASSWORD: mot-de-passe-wordpress wordpress: image: wordpress:latest depends_on: - base_de_donnees environment: WORDPRESS_DB_HOST: base_de_donnees:3306 WORDPRESS_DB_PASSWORD: mot-de-passe-wordpress WORDPRESS_DB_USER: utilisateur-wordpress WORDPRESS_DB_NAME: nom-base-de-donnee-wordpress
J’attire votre attention sur la variable WORDPRESS_DB_HOST qui contient le nom du service lié. En gros, je dis a Docker de lier par son nom la base de données à WordPress. Il ne manque plus que la cerise sur le gâteau : mettre un nom sur nos deux conteneurs à l’aide de la propriété container_name. Puis rajouter un élément important : restart, que l’on va appliquer à always. Ce qui permet de redémarrer le conteneur s’il plante. A ce stade, je pourrais vous dire que le fichier ci-dessous est suffisant pour lancer un WordPress.
version: '2' services: base_de_donnees: container_name: mysql_server image: mysql:latest restart: always environment: MYSQL_ROOT_PASSWORD: admin-mot-de-passe MYSQL_DATABASE: nom-base-de-donnee-wordpress MYSQL_USER: utilisateur-wordpress MYSQL_PASSWORD: mot-de-passe-wordpress wordpress: container_name: my_wonderful_website image: wordpress:latest depends_on: - base_de_donnees restart: always environment: WORDPRESS_DB_HOST: base_de_donnees::3306 WORDPRESS_DB_PASSWORD: mot-de-passe-wordpress WORDPRESS_DB_USER: utilisateur-wordpress WORDPRESS_DB_NAME: nom-base-de-donnee-wordpress
Mais je préfère vous donner toutes les clés et vous laisser faire vos choix. Sur nos deux conteneurs, on peut rajouter un port cible. Par exemple si on veut que notre WordPress tourne sur le port 8010. On utilise la propriété ports, voici un exemple :
version: '2' services: base_de_donnees: container_name: mysql_server image: mysql:latest restart: always environment: MYSQL_ROOT_PASSWORD: admin-mot-de-passe MYSQL_DATABASE: nom-base-de-donnee-wordpress MYSQL_USER: utilisateur-wordpress MYSQL_PASSWORD: mot-de-passe-wordpress wordpress: container_name: my_wonderful_website image: wordpress:latest depends_on: - base_de_donnees ports: - "8010:80" restart: always environment: WORDPRESS_DB_HOST: base_de_donnees::3306 WORDPRESS_DB_PASSWORD: mot-de-passe-wordpress WORDPRESS_DB_USER: utilisateur-wordpress WORDPRESS_DB_NAME: nom-base-de-donnee-wordpress
Enfin, sachez que la propriété volumes vous permet d’échanger des fichiers entre votre conteneur Docker et votre système Windows. Si vous vous demandez à quoi cela peut servir, imaginez que vous devez mettre en production un site WordPress réalisé grâce à Docker. Comment récupérez-vous les fichiers PHP présents dans votre Docker ? Réponse : en utilisant la propriété volumes qui vous permettra de créer un pseudo dossier partagé. Voici comment faire :
version: '2' services: base_de_donnees: container_name: mysql_server volumes: - C:/docker/wordpress/mysql:/var/lib/mysql:rw image: mysql:latest restart: always environment: MYSQL_ROOT_PASSWORD: admin-mot-de-passe MYSQL_DATABASE: nom-base-de-donnee-wordpress MYSQL_USER: utilisateur-wordpress MYSQL_PASSWORD: mot-de-passe-wordpress wordpress: container_name: my_wonderful_website image: wordpress:latest depends_on: - base_de_donnees ports: - "8010:80" restart: always volumes: - C:/docker/wordpress/html:/var/www/html environment: WORDPRESS_DB_HOST: base_de_donnees::3306 WORDPRESS_DB_PASSWORD: mot-de-passe-wordpress WORDPRESS_DB_USER: utilisateur-wordpress WORDPRESS_DB_NAME: nom-base-de-donnee-wordpress
En gros, je dis à Docker de me donner un accès en lecture/écriture (rw) sur les fichiers présents dans le répertoire /var/lib/mysql du conteneur MySQL, dans mon répertoire C:/docker/wordpress/mysql. C’est la même technique pour WordPress. En même temps, cela me protège d’une suppression malencontreuse de mon conteneur, car en cas de suppression je conserve les fichiers stockés sur mon poste.
Voici donc votre fichier final ci-dessus. Il ne vous reste qu’à modifier les variables, ainsi que les chemins d’accès. Si vous n’avez pas envie de copier-coller les lignes, vous pouvez télécharger mon docker-compose.yml :
docker-compose.yml
Dernière étape : voici la commande simple à saisir pour créer les conteneurs :
docker-compose up -d
Voici le résultat :
Docker nous indique qu’il a créé un conteneur mysql_wordpress et un wordpress_enov. Pour vérifier que les conteneurs sont bien présents, vous pouvez ouvrir Kitematic.
Sur cette impression d’écran, on voit que les conteneurs my_wonderful_website et mysql_server sont actifs. Docker a repris le nom que j’avais indiqué dans mon fichier de configuration, grâce à la propriété container_name. On voit que les conteneurs sont actifs car les icônes sont vertes avec une forme de vague.
Un autre moyen de voir si tout va bien est d’aller faire un tour dans les dossiers partagés. Par exemple, si vous vous rendez dans le dossier WordPress que vous avez spécifié dans volumes, vous obtenez le résultat suivant :
A l’intérieur de ces dossiers, vous avez d’un côté les fichiers PHP de votre site WordPress, et de l’autre les fichiers de base de données :
La dernière étape de vérification consiste tout simplement à vous rendre sur votre site fraîchement créé.
Un conseil : faites très attention aux informations que vous renseignez dans la partie configuration. En effet, il faut que les informations de connexion à la base de données soient les mêmes que celles choisies dans votre docker-compose.yml.
J’espère que cet article vous a plu. C’est encore un cran plus haut, donc c’est normal si vous avez des questions. Alors n’hésitez pas et essayez de faire le TP par vous-même, voire même de rajouter d’autres conteneurs pour pimenter le tout. Puis partagez-les dans les commentaires pour donner des idées à la communauté. Je vous dis à très bientôt pour de nouvelles documentations techniques.
from Les meilleures commandes de Docker – Partie 3 : un WordPress en une seule commande
0 notes