#navigationView
Explore tagged Tumblr posts
Visit Tumblr Blog
Explore Tumblr blogs with no restrictions, modern design and the best experience.
Last Seen Tumblr Blogs


Fun Fact
Tumblr is used by 21% of adults online aged 18-29 years.
Text
Bc I hate tutorials and being taught shit I wanna do for fun, I’m currently knee deep trying to read documentation for swiftUI bc it’s been too long since I’ve done it.
But since I now have a computer that can handle running the preview without crashing (rip Mr. Smith mark I) I’ve decided to get back into it
Love that in trying to learn what NavigationView does. I immediately learn it’s been deprecated.
I found navigationview in THEIR CODE they generated for me. As an example.
#Sarah coding#y’all. update your little example content view files#amazing I adore gave me a good little chuckle ala ubsurd#I might be going slightly unhinged. as I often do when I decide to code. I can’t explain it#anyways sorry for the inevitable code chat that will happen since I am gunna be doing this for the next hour#I’m sure I’ll make zero progress
4 notes
·
View notes
Text
I'm starting 100 days of swift challenge!
Preparation Phase
1. Set Up Development Environment
• Install the latest version of macOS.
• Install Xcode from the App Store.
• Set up a free Apple Developer account.
• Familiarize yourself with Swift and basic programming concepts (optional but helpful).
2. Organize Resources
• Download CS193p course materials from Stanford’s website or iTunes U.
• Gather supplementary resources (Swift Playgrounds, Apple’s documentation).
Learning Phase: CS193p Modules
Week 1: Introduction & Basics
• Lecture: Introduction to SwiftUI.
• Build your first SwiftUI app (basic UI, text, and views).
• Practice: Experiment with modifiers like .font(), .padding().
Week 2: Views and State
• Lecture: Understanding Views and State.
• Implement a simple counter app using @State.
• Study declarative UI concepts.
Week 3: MVVM and Binding
• Lecture: Model-View-ViewModel (MVVM) in SwiftUI.
• Create a project using @State, @Binding, and @ObservedObject.
Week 4: Navigation and Lists
• Lecture: NavigationViews and List.
• Build a master-detail app.
• Practice creating dynamic lists with ForEach.
Week 5: Gestures and Animations
• Lecture: Gestures and Animations.
• Add drag, tap, and swipe gestures to a project.
• Create a simple animation using .animation().
Week 6: Persistence
• Lecture: Data persistence in SwiftUI.
• Build a project that saves user data locally (UserDefaults or CoreData).
• Explore FileManager for saving files.
Week 7: Networking
• Lecture: Fetching data from an API.
• Build an app that fetches and displays data using URLSession.
Week 8: Advanced Topics
• Lecture: Combine framework and more advanced SwiftUI concepts.
• Implement reactive programming principles in a small project.
Week 9-10: Wrap-Up
• Complete a capstone project consolidating learned concepts.
• Review lecture notes and rewatch key parts of the course for clarity.
Practice Phase
• Solve at least one Swift coding challenge daily on LeetCode or HackerRank.
• Follow Apple’s Human Interface Guidelines (HIG) while designing apps.
• Create mini-projects to reinforce each week’s concepts.
Final Phase: Build & Share
• Build a portfolio app showcasing your learning journey.
• Submit an app to the App Store (optional).
• Share progress and milestones on GitHub or a blog.
0 notes
Text
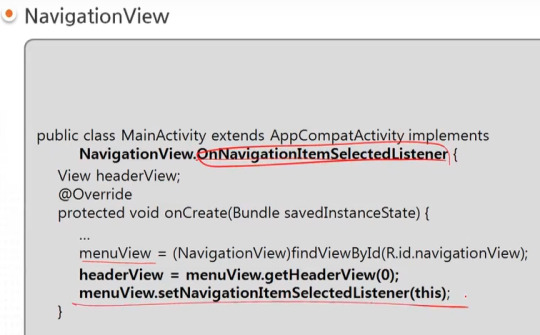
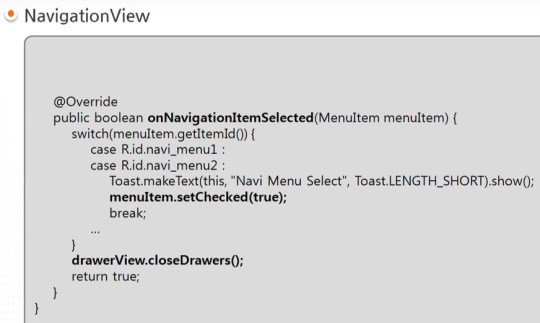
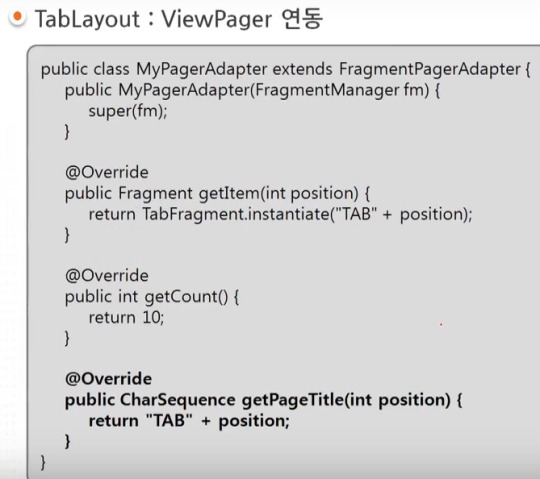
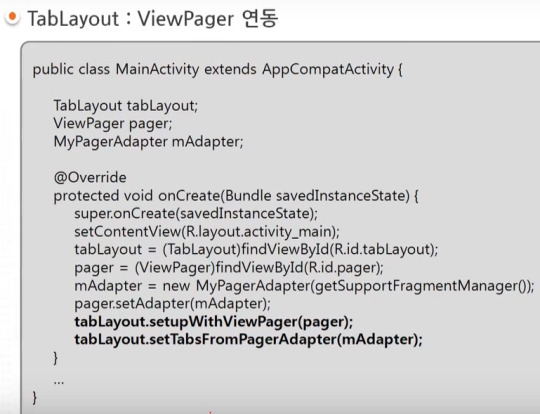
android 중급 11강 material design 2 tacademy
original source : https://youtu.be/7ep4effngGc
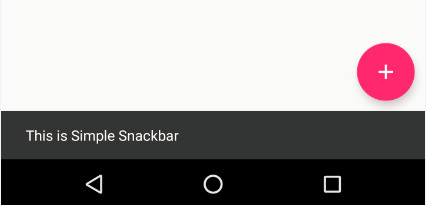
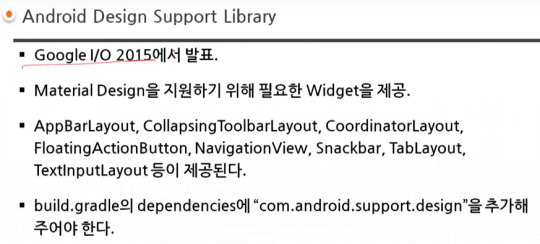
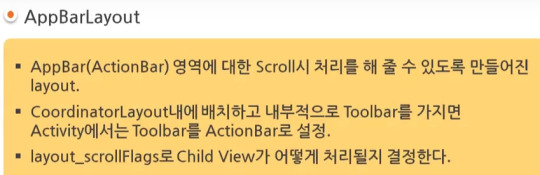
material design이 도입되면서 제공되는 새로운 widgets의 예를 보여주고 있다.
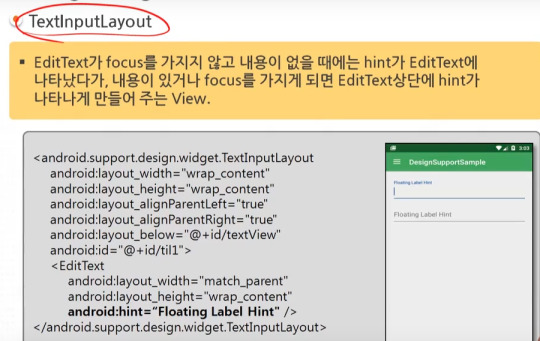
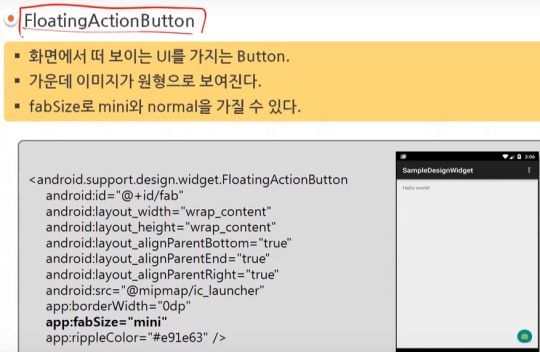
AppBarLayout 부터 TextInputLayout까지 모두 새로운 widgets에 해당한다.

=========================================================
.
.
drawer layout 과 navigation view , navigation drawer 비교
https://stackoverflow.com/questions/44176576/navigation-drawer-vs-navigation-view-which-is-best-and-what-is-the-diffrence

NavigationView를 DrawerLayout과 함께 사용한 방법을 아래서 보여주고 있다.

=========================================================
.
.


=========================================================
.
.

=========================================================
.
.
=========================================================
.
.
=========================================================
.
.

=========================================================
.
.
=========================================================
.
.
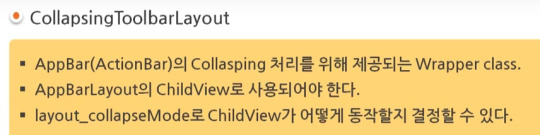
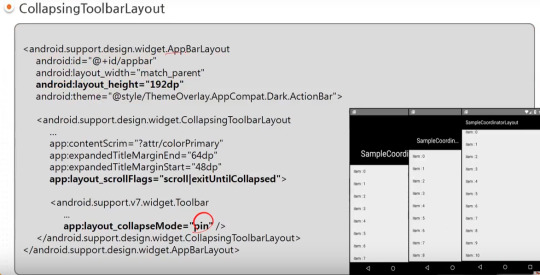
AppBarLayout과 CollapsingToolbarLayout 참고) 실제 예시 https://youtu.be/wCuM_di5M9Y?t=50

=========================================================
.
.
=========================================================
.
.


=========================================================
.
.
android studio 에서 blank activity template을 선택하는 경우 기본적으로 material design widgets이 어느 정도 설정되어서 시작된다.

#android#중급#11강#11#material#material design#tacademy#view#widget#navigationview#tablayout#textinputlayout#toast#snackbar#CollapsingToolbarLayout#AppBarLayout#CoordinatorLayout#tab
0 notes
Video
youtube
[PART - 2] SwiftUI Basics - Dynamic List And Details | NavigationView i...
0 notes
Text
SwiftUI — Exploring NavigationStack and Making it Useful
In this blog post explore how to use NavigationStack of SwiftUI.
We'll introduce you to SwiftUI's navigation stack and will compare it with NavigationView, and will show you how it's better compared to NavigationView.
We will also explore 5 scenarios that cover 95% of use cases. Feel free to jump around as needed.
Push screens: A ⮕ A — B Pop last screen: A — B ⮕ A Pop multiple screens: A — B — C — D ⮕ A — B Pop to root: A — B — C — D ⮕ A Update root: A ⮕ B
For full guide, visit canopas blog.
If you'd like to explore more about us, here are the links:
Website: https://canopas.com/ Blog: https://blog.canopas.com/ Twitter: https://twitter.com/canopassoftware GitHub: https://github.com/canopas
0 notes
Text
What you'll learn Implementing Material Design Feature at the end of this course will be a piece of cake for studentsThe concept of this awesome feature provided for Android App Development will be crystal clear.Material design is a comprehensive guide for visual, motion, and interaction design across platforms and devices. This course talks about all the important material design specifications, colors, design guidelines, and also using material widgets along with material themes and concepts. Curious about Android Material Design? This is the your final stop where you will get information regarding material design specifications and the related widgets being used with material design themes. The best part of this course is that you will learn to make several complete android demo apps from scratch - two major apps and several small apps - based on material design guidelines. Enhance your application user interface designing skills by implementing all new materialistic features introduced in Android Lollipop 5.0. Styling of Android Application is very important and one of the most critical feature in designing the app. To make this difficult task easy, I have come up with this course of Android Material Design, which begins with the basics of the material design and proceeds with covering some really complicated and most interesting stuffs like Android Material Design Animation. We will also dive into the material design support library and implement it in our demo applications. The topics we will be covering includes: 1. Material Design Themes and Colors Color PaletteMaterial Design ThemesMaintaining Backward CompatibilityExploring Tinting of Widgets 2. Material Design Toolbar Popup Menu or Overflow MenuContextual MenuToolbar Theme Customisation 3. Basic components of Android Material Design Floating Action ButtonSnackbarCoordinator Layout 4. Android Material Design Animation Ripple Effect: Touch FeedbackSlide Activity TransitionShared Element TransitionExplode Activity TransitionFade TransitionActivity Transition Overlaps 5. EditText with Floating Label Implementing Floating HintsValidation of TextFieldsValidation Error Resolution 6. AppbarLayout and CollapsingToolbarLayout Using AppBarLayout with Scroll FlagsHow to collapse Image along with CollapsingToolbarLayoutExploring various pin modes 7. RecyclerView and CardView Implementing RecyclerView in various orientationsUsing CardView to create list itemsAdding and Deleting an Item from RecyclerViewRecyclerView AnimationGrid, Staggered Grid Implementations 8. Navigation Drawer using NavigationView Inflate menu items in the Navigation Drawer using NavigationViewAdding dividers between the menu itemsGrouping the menu items under one category By the end of this series, you will be mastering the implementation of this features in your android app.Who this course is for:Students should have basic knowledge of Android Application Development. What are the basic components of an Android Application and the basic Hello World Program.
0 notes
Text
OMG NavigationView is deprecated! pic.twitter.com/hcCNPOmvwV
— Thomas Ricouard (@Dimillian) June 6, 2022
0 notes
Text
How to Build a Login Screen in SwiftUI
In WWDC 2019 Apple announced a completely new user interface development framework called SwiftUI. SwiftUI is a user interface toolkit that lets us design apps in a declarative way. There was lots of talk about whether we should use Storyboard or build UI programmatically. SwiftUI is the answer to all these questions. You can now develop the app's UI with a declarative Swift syntax.
No more storyboard, Interface Builder and Auto-layout
Earlier we used to develop user interfaces with storyboards, xib's and auto layout. But with SwiftUI, storyboard and auto-layout are completely out of the picture. Now the code editor is available with a preview canvas.
Migrating from UIKit to SwiftUI
If you've used UIKit before then you need to understand what's the UIKit component equivalent in SwiftUI. Many of the classes you know just by removing prefix UI but few have been renamed. Let's have a look at the list.
1. UIViewController: View
2. UITableViewController: List
3. UITabbarController: TabView
4. UINavigationController: NavigationView
5. UIAlertController: Alert
6. UIAlertController with style .actionSheet: ActionSheet
7. UILabel: Text
8. UITextField: TextField
9. UITextField with secure entry: SecureField
10. UISwitch: Toggle
11. UISlider: Slider
12. UIButton: Button
13. UIStackView with horizontal axis: HStack
14. UIStackView with vertical axis: VStack
15. UIImageView: Image
16. UISegmentedControl: SegmentedControl
17. UIStepper: Stepper
18. UIDatePicker: DatePicker
19. UIPickerView: Picker
20. UITabbar: TabView
21. UINavigationBar: NavigationView
22. UIScrollView: ScrollView
Creating Project:
Step 1 - Creating a new project with SwiftUI
Step 2 - Add the VStack in the View. It will act as Vertical StackView
Step 3 - Add title text as Login in the View and can set style to the Text.
Step 4 - Adding Image to the top of the Screen to show that its user's login and adding frame of width and height as shown below.
Fig 1 - Adding Image and Text
Step 5 - Adding Text Field for Phone Number and password with TestField and SecureField inside the VStack and Alignment to leading.
Step 6 - Adding placeholder to the textfield , Add Text and Value will be saved in the Variable.
Step 7 - Give Divider() for allowing space between two textfield and add style as required for the textfield to be displayed.
Step 8 - Adding padding to bottom and given 15.
Step 9 - Adding Button of forgot password inside the HStack to align the right corner of the screen with the Text as shown below.
Fig 2 - Adding Textfield and SecureField with Forget Password
Step 10 - Add a button with the title “Login” for clicking the login functionality inside the VStack.
Step 11 - In this button Action will be added inside the action closure function and can add text to the button (i.e Title) and Style the button as shown.
Fig 3 - Adding Button with Action and Text
Step 12 - Add a button which will have an action to move to SignUp Screen inside the HStack with spacing. Where the SignUp text will be clickable which we implement using Attribute text Similarly in SwiftUI it is implemented in Simple Way.
Fig 4 - "Don't have an Account ? Sign Up"
Final Result - Login Screen with PhoneNumber and Password using SwiftUI
Conclusion
SwiftUI is new to everyone and might take time to get stable as a framework. But SwiftUI is the future of iOS development. There are a lot of things to learn in SwiftUI.
0 notes
Text
Android NavigationView Using Kotlin With Example
Android NavigationView Using Kotlin With Example
In this article, we will learn about android NavigationView using Kotlin. We will go through various example that demonstrates how to use different attributes of NavigationView. For example, In this article, we will get answer to questions like – What is NavigationView? Why should we consider NavigationView while designing ui for any app? What are possibilities using NavigationView while…
View On WordPress
0 notes
Text
Week 407
Happy Thursday! Apple announced Tech Talks 2021, with live sessions and office hours for developers, between 25 October - 17 December. And every two weeks, a Tech Talks Digest will be published with the details of the latest developer events.
macOS Monterey now has a release date: 25 October. That’s next week. I mentioned this in issue 404 as well but in case that’s not found 😅, I’ll write it here again: don’t update to Monterey unless you’re ready to go all-in with Xcode 13, because Xcode 12 won’t work.
Marius Constantinescu
Tips from Twitter
Don’t initialize UIColors in a SwiftUI body: nice tip here from Luis Ascorbe. Another take could also be: remember to run Instruments every now and then on your app(s).
Articles
iOS Architecture at Lyft, by @ScottBerrevoets
Breaking down large pull requests, by @itsmeichigo
Debugging on iOS 15 with Xcode 12, by @hybridcattt
How do I customize the NavigationView in SwiftUI?, by @BigMtnStudio
Custom accessibility content in SwiftUI, by @mecid
What is a KeyPath in Swift, by @sarunw
How Sidebar works on iPad with SwiftUI, by @fassko
Business/Career
Expecting More from Your Career (and Less from Your Job), by @catehstn
Contributors
zntfdr, mecid, albertojauregui, sarunw, pmusolino
0 notes
Text
SwiftUI Custom Swipe Actions Tutorial
in SwiftUI a custom swipe action can be displayed when an row on a List is swiped. The action can be displayed left or right and can be displayed with a custom tint color and a system image.. In this tutorial some swipe actions can be triggered which will update the navigation title. This tutorial is built for iOS15 and Xcode 13, which can be download at the Apple developer portal.
Open Xcode and either click Create a new Xcode project in Xcode’s startup window, or choose File > New > Project. In the template selector, select iOS as the platform, select App template in the Application section and then click Next.
Enter SwiftUICustomSwipeActionsTutorial as the Product Name, select SwiftUI as Interface, SwiftUI App as Life Cycle and Swift as Language. Deselect the Include Tests checkbox and click Next. Choose a location to save the project on your Mac.
In the canvas, click Resume to display the preview. If the canvas isn’t visible, select Editor > Editor and Canvas to show it.
In the Project navigator, click to select ContentView.swift. Change the ContentView struct to
struct ContentView: View { // 1. @State private var action = "" var body: some View { NavigationView { List { ForEach(1..<6) { i in Text("Item \(i)") // 2. .swipeActions(edge: .leading, allowsFullSwipe: false) { Button { action = "Star" } label: { Label("Star", systemImage: "star.circle") } .tint(.yellow) } // 3. .swipeActions(edge: .trailing) { Button(role: .destructive){ action = "Trash" } label: { Label("Trash", systemImage: "trash.circle") } } // 4. .swipeActions(edge: .trailing) { Button{ action = "Flag" } label: { Label("Flag", systemImage: "flag.circle") } } } } // 5. .navigationTitle("\(action)") } } }
A propery array of action is declared and will be used for the navigation title
The swipeActions modifier contains a button with the star systemImage. The allowfullswipe parameter is used to auto select the action when a full swipe is inititated. Here this is disabled.
The swipeActions modifier contains a button with a trash systemImage. The destructive role display the action in a red color.
A blue button item is displayed containing the flag systemimage.
The navigationTitle is updated when the action is triggered.
Go to the Preview and select Live Preview. Swipe on a item from the List to initiate a custom action. The navigation Title will be updated with the corresponding Label title.
The source code of the SwiftUICustomSwipeActionsTutorial can be downloaded at the ioscreator repository on Github.
0 notes
Text
android NavigationView, DrawerLayout, Navigation drawer template 기본개념
https://youtu.be/kRSIWh4WlMc?t=365
DrawerLayout
의 사용예시를 보여준다. DrawerLayout은 화면 양 옆에서 서랍처럼 등장하는 추가 layout을 만들수 있게 해준다. 이는 단순히 layout의 구조만을 만든다. 양쪽에서 등장하는 내용과는 무관하다. 이 서랍에 해당하는 부분에 NavigationView를 만들어 넣으면 아래와 같이 만들수 있다.

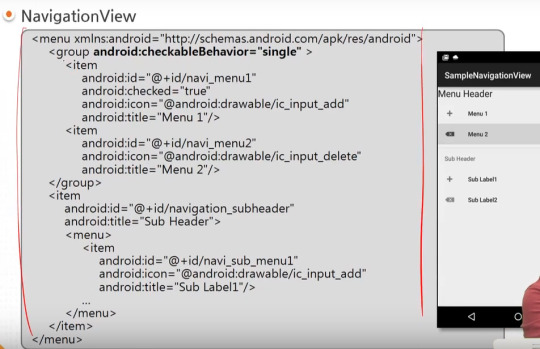
NavigationView
는 menu xml화일을 이용해서 navigation menu를 생성한다.
Navigation drawer template
은 아래 그림과 같이 android studio에서 주어지는 template이다.이를 통해 NavigationView, DrawerLayout 를 종합으로 사용한 구조를 만들수 있게 된다.

0 notes
Text
SwiftUI lists can get really slow, due to all the clever diffing that goes on for animation. There is a workaround (https://t.co/y1aE79yzVX), but it seems that it stops working if you put the list inside a NavigationView. Anyone else seen this? Anyone got a fix?
— Sam Deane (@samdeane) January 20, 2022
0 notes
Text
How to Build a Login Screen in SwiftUI
What is SwiftUI ?
In WWDC 2019 Apple announced a completely new user interface development framework called SwiftUI. SwiftUI is a user interface toolkit that lets us design apps in a declarative way. There was lots of talk about whether we should use Storyboard or build UI programmatically. SwiftUI is the answer to all these questions. You can now develop the app's UI with a declarative Swift syntax.
No more storyboard, Interface Builder and Auto-layout
Earlier we used to develop user interfaces with storyboards, xib's and auto layout. But with SwiftUI, storyboard and auto-layout are completely out of the picture. Now the code editor is available with a preview canvas.
Migrating from UIKit to SwiftUI
If you've used UIKit before then you need to understand what's the UIKit component equivalent in SwiftUI. Many of the classes you know just by removing prefix UI but few have been renamed. Let's have a look at the list.
1. UIViewController: View
2. UITableViewController: List
3. UITabbarController: TabView
4. UINavigationController: NavigationView
5. UIAlertController: Alert
6. UIAlertController with style .actionSheet: ActionSheet
7. UILabel: Text
8. UITextField: TextField
9. UITextField with secure entry: SecureField
10. UISwitch: Toggle
11. UISlider: Slider
12. UIButton: Button
13. UIStackView with horizontal axis: HStack
14. UIStackView with vertical axis: VStack
15. UIImageView: Image
16. UISegmentedControl: SegmentedControl
17. UIStepper: Stepper
18. UIDatePicker: DatePicker
19. UIPickerView: Picker
20. UITabbar: TabView
21. UINavigationBar: NavigationView
22. UIScrollView: ScrollView
Creating Project:
Step 1 - Creating a new project with SwiftUI
Step 2 - Add the VStack in the View. It will act as Vertical StackView
Step 3 - Add title text as Login in the View and can set style to the Text.
Step 4 - Adding Image to the top of the Screen to show that its user's login and adding frame of width and height as shown below. Read more..
0 notes
Text
Développeur Mobile Android/IOS/Hybrid
Le recruteur : MEGALOGI, une agence spécialisée dans le développement web et mobile, une expertise dans principalement : Création des sites web , Hébergement WEB, Nom de domaine, Référencement Web Naturel (SEO), Marketing Digital, Développement des ERP/CRM, Développement intranet/extranet, Développement des applications mobiles.
Poste a occuper : Compétences exigées:
– Une expérience >= 5 ans ; – Portfolio riche de réalisations ; – MVVM (model view view model ) – RxJava ; – NavigationView ; – ORM comme GreenDao (library for database) ; – JobScheduler ; – AndroidX librairies ; – Retrofit ( library for network) ; – Développement d’apps pour Tablette ; – Un excellent francais/anglais ;
Profil recherché : Missions: Développement dans différents projets d’applications mobiles (Android/Hybrid).
Mission principale: Le développement d’une application Android pour Tablette, qui diffuse de la publicité en rotation.
Secteur(s) d’activité :
Informatique / Internet / Multimedia
Métier(s) :
Informatique / Internet / Multimedia
Niveau d’expériences requis :
Senior (de 5 a 7 ans) / Confirmé (de 7 a 10 ans) / + 10 ans
Niveau d’études exigé :
BAC+3 / BAC+4 / BAC+5 et plus
Langue(s) exigée(s) :
Arabe / Francais / Anglais
L’offre a été publiée il y a 4 semaines avant sur le site.
Salaire:
de 8000 dh a 10 000 dh
https://ift.tt/3iPemQs
0 notes
Text
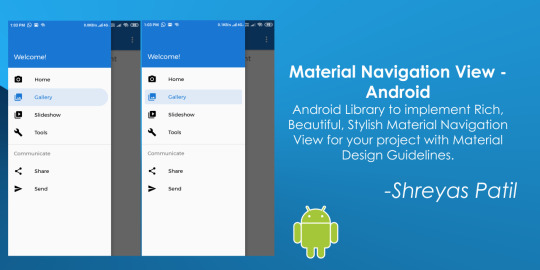
Material NavigationView - Android
📱Android Library to implement Rich, Beautiful, Stylish 😍 Material Navigation View for your project with Material Design Guidelines. Easy to use.
from The Android Arsenal https://ift.tt/2LcWWPt
0 notes