#navmeshagents
Explore tagged Tumblr posts
Visit Tumblr Blog
Explore Tumblr blogs with no restrictions, modern design and the best experience.
Last Seen Tumblr Blogs


Fun Fact
Tumblr was named as a finalist in Lead411’s New York City Hot 125 in Aug 2010.
Text
man this script has too many variables
public NavMeshAgent agent; public Collider[] herdColliders; public float sightRange; public int herdSeen; public float smallestDistance; public float tempX; public float tempY; public float tempZ; public float curX; public float curY; public float curZ; public float oldX; public float oldY; public float oldZ; public float finalX; public float finalY; public float finalZ; public Transform tempTrans; public Vector3 tempPos; public Vector3 oldPos; public Vector3 curPos; public Vector3 finalPos;
0 notes
Text
Progress! Menus! Hampsters! Cube delivery service!
Oops reads like an intro to the Restaurant at the End of the Universe (thanks for all the fish...). No! No, its a nice game! Hampsters are NOT on the Menu.
Last week our intrepid playtesters busted out all the moves. @spritersblock threw cubes off the catwalk; without them its not possible to finish the game (our tutor says = instant course fail). Then he jumped into the abyss below, and wandered off into the surrounding cave, making it an entirely different game (like Jim Carrey in the Truman Show).
So we tasked our trusty navmesh agents, the hampsters, with the dire responsibility of securing our passing grade: deliver crucial lost cubes to the right places so the player can finish the game. Now these being hampsters of very little brain, need explicit instructions via C# code...suffice to say I was ecstatic when they finally did what I wanted!
youtube
One problem: everything worked fine on Level 1, but on Level 2 the cubes slowly dropped below the hampster-agent, so when she dropped it at your feet it fell through the floor down to the level below. A “fail” by any measure. So I tentatively wandered over to our tutor Woody and said “When my hampsters deliver cubes...” He stopped me and said "I love this sentence already”.
I love being in an industry where weird sentences are a regular occurrence. Actual things friends have said: "Today I get to animate the avocado!”. Or.. “I can’t get the penny-farthing back inside the spaceship.”
“...and when she puts the cube down it falls through the floor". As teammate Jordan patiently explained, the obvious answer is to turn off gravity. Of course. As you do. Silly me.
So now you can still solve the puzzle even if you go a bit wild with what is clearly a "highly dangerous" cube. I hope you to keep it "This way up!".

PSA ...no actual hampsters were harmed in making this game.
I added theme music and ambient sounds (thanks John French's free audio asset download). And I made some UI based on freebie panels from GameMakers Toolkit (eg Credits page).

Then I made (Illustrator CC) some 'cube' panels (eg Pause Menu and Settings).

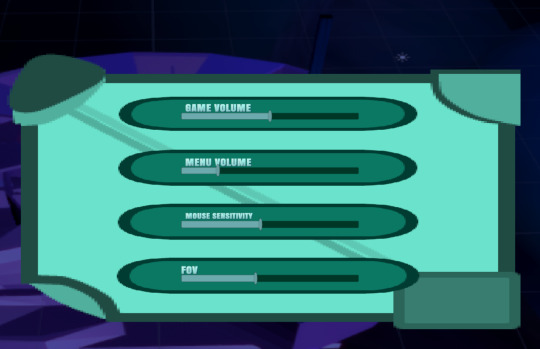
They might not be Picassos but all the buttons respond to hover and click, and function as advertised.
So the game basically functions & I am a much happier camper this week. Alpha launch in one week!
Clone. The Game.
#puzzle games#nzgamedev#game design#gameai#navmeshagents#npc#Unity3D#gamedev#indie games#indiedev#puzzles#devlog#devblog
0 notes
Text
Sprint 18
This sprint was a hugely productive one for me (and the group). My week began with baking the new map (for act 2). I applied settings for various objects depending on their proximity to the Boss battle, so that he doesn’t run straight into them.
Next I implemented a Coroutine called “Charging”. It simply uses some new booleans to pause the rest of the code, whilst Fillipe’s charging animation plays. During this time, the “chargeStats” bool alters his NavMeshAgent’s values, so that he moves faster, has a slower turn speed, etc.
Shortly after this, I noticed a problem - he was charging from melee range! To fix this I have added another radius range to him, that can be used as a condition for charging. This only enables him to charge when the player is a small distance away from him, making for no awkward moments during the fight.
Next up I got to work on the consequences of his charges (with the Butcher boss from Diablo 3 in mind). Firstly, I have used an OnTriggerEnter to determine what happens when the player gets hit by the charge. The code is not implemented yet, however the player will become stunned, take more damage for a brief period and a stunned effect will be shown on their screen. Secondly I worked on what happens when Fillipe charges straight into an ‘Obstacle’ (clever!). This now triggers his ‘isFailCharged’ animation, which knocks him onto the floor. After this he resumes to chasing the player. Of course, there is more to add/improve, but I am very happy with the progress being made on this so far.
Here is a clip of the updated charge:
https://twitter.com/cgf_dev/status/1246113359344349184
Note: This week I also worked with Kyle to smarten up some player script code, organising variables and disabling shoot functionality whilst the shotgun is reloading.
4 notes
·
View notes
Text
Movement time (Epic)
Hi Y'all today i did movement!
Following the same tutorial series I've watched to make selection of units, i basically tinkered with NavMeshAgents and NamMesh itself my blue cubes are now able to move to a place i point them at, might not seem like much but its a stride in my opinion.
Also here's GIF of said cubes moving, it's so breathtaking seeing your inanimate cubes suddenly becoming animated I'm telling Y'all:

Also today i had some Funny Unity Shenanigans™ as I've discovered that Unity can count to a maximum of 999 errors after which its just adds a + to convey how royally screwed the situation is

Anyway here's today's tutorial:
youtube
And with that I'd say that that would be it for today, just some good ol movement action, I hope y'all have a great day, peace!
1 note
·
View note
Video
tumblr
As my semester wraps up, I'm taking a short break from Picross (Alpha is done enough for now. I spent an afternoon making this narrative game engine, integrating Ink, instead of Yarn Spinner.
Basic script runner in a separate (additive) scene, using Unity NavMeshAgent to move, and using Cinemachine (ClearShot Group) to do camera switching for me (I have chosen poor camera locations in this demo, nevermind that). That's a lot of functionality with very little programming.
The only real system I've added is camera director. During conversations, I can process Tags that Ink supports to switch to specific named cameras.
0 notes
Link
Well, it certainly has been a while since my last upload; I pretty busy with the build that I didn’t have much time to record gameplay and write out a detailed synopsis. Anyways, in the essence of saving time I decided to combine both week 7 and 8 into one entry as they both involve Enemy AI and have a few overlap between them. Firstly, we have the addition of the NavMeshAgent to the Enemy AI, effectively replacing the old gameObject.transform locomotion method. By baking a NavMesh surface onto the environment, the Enemy AI is able to receive a destination and calculate the closet route while maneuvering through walls and obstacles. Interestingly enough, it also seems to be a lot smoother than the more rigid procedural transform method I used in it’s earlier version. Next, we have the ‘Investigate’ state, I briefly went over this in the Critique two weeks ago but I’ll go over it in more detail here. Essentially, if the AI is in an ‘Attack’ or ‘Chase’ state and he loses sight (the raycast from the enemy to the player is broken) then he will save the player’s last known location and travel towards it. If the player is within detection range and the enemy sees the player then the enemy will re-enter a ‘Chase’ or ‘Attack’ state. If the AI doesn’t detect the player by the time it reaches the destination then the investigation is marked as ‘complete’ and the AI calls the ReturnToSpawn method from the ‘Wander’ state. The next big implementation from week 7 was the ‘Aggro’ state. It’s not exactly a state per se but it works by forcing the AI into a ‘Chase’ state when it takes damage from the Player. It works off a coroutine timer that ‘de-aggroes’ after a set amount of time if it isn’t attacked again. Moving on to the implementations for week 8 we have the first enemy types, starting with the Overwatch, Medic, and Heavy. The Overwatch Type acts as a sort of recon-sniper that feeds information to nearby enemies. Essentially how he works is that once he detects and targets the player, he spherecasts and adds nearby enemies to a list and pushes them into a ‘Chase’ state. Furthermore, the recon also pushes its ‘Target’ reference to the enemies it ‘alerts’. As long as the Overwatch Type can see the player, then so too can the enemies, and if the Overwatch Type loses sight of the player then the alerted enemies will return a ‘Wander’ state and return to their original location. Next is the Medic Type, it acts as a healer that replenishes the HP of nearby enemies. The Medic Type takes the Linq implementations from the Overwatch Type a step further by adding nearby enemies to a list using the same method but it dynamically sorts them by current HP value with the lowest being the first in the list. If any enemy in the list has its current HP lower than its max HP then it stops attacking the player, rotates towards said enemy, and gradually replenishes its HP (visually depicted by a red placeholder line renderer). When every enemy is at full health then the Medic Type returns to an ‘Attack’ state. Furthermore, the Medic Type is able to dynamically switch between targets, for example, if a different enemy’s HP is lower than the one that it is currently healing then it will switch to said enemy. Finally, we have the Heavy Type. The Heavy Type is the prototype for how the boss AI mechanics will work as it works off of an ‘Attack Stack’. Essentially, the Heavy Type has three different attacks (Sweep Right, Sweep Left, and Attack Forward) that is added to a list (through delegates) and randomized through a Linq method. With every 8th attack, the Heavy Type’s gun will ‘jam’, returning a ‘blank’ action that allows the player a chance to counterattack while the Heavy Type can’t shoot. Furthermore, the Heavy’s attack works on coroutine timers; with the attacks themselves being set on a timer so they play out the entire animation/sequence and a short delay in between each attack. During these ‘delay’ phases the Heavy Type will rotate himself and his gun towards the player as he prepares his next attack. Indeed, that was a lot of stuff to go over, but the good news is that the Enemy AI is progressing at a good pace and is working as intended with little to go bugs. The next stage after this is to work on the melee system (on both the player and Enemy AI) and some more UI elements such as enemy health bars and pop up damage text.
0 notes
Photo

Workflow - Mixamo & Unity
In meinem Project “Interactive Virtual Arts” wird ein interaktives Template aus einer Unityschulung (Udemy) verwendet.
Die Enemy Charaktere des Templates haben folgende Eigenschaften (”K.I.”):
- Patrouillieren an Wegpunkten (Walking Animation) - Mainplayer Detection (Running Animation) - den Mainplayer angreifen (Combat: Melee Attack Animation + Mainplayer damage) - Enemy steckt nach Mainplayer Angriff Schaden ein (React Animation) - wird der Enemy besiegt, läuft die Dead Animation ab und einige Eigenschaften des Enemies werden deaktiviert - die Enemies haben einen Animations Controller mit C# gesteuerten Event-Interaktionen
Workflow
- Mixamo Character als FBX importieren - Texturen entpacken (zuvor ein Material-Ordner dafür anlegen; Normals “fixen”) Box Collider (als Trigger) erzeugen; Basiswerte 0,1,0 und 1,2,1 (Achtung: die Skalierungswerte von Mixamo Charakteren und eigenen sind z.T. abweichend); dann entsprechend den Collider für die Detection als langer Quader vergrößern) - Rigidbody hinzufügen - Animator (als Kopie von bestehenden Enemies) hinzufügen; vom Animation Controller eine Kopie erzeugen und diese im entspr. Slot zuweisen - den “NavCube” und Hitpoint als Kopie verwenden - Targets zuweisen (und im NavCube verzweigen) - Enemy Attack Script als Kopie zuweisen (Enemy Move die EnemyNumber anpassen; Patrol, den relevanten NavCube zuweisen (...da durch die Kopie die Verzweigung nicht stimmt) - die Mixamo Animation dem Animation Controller für jeden Character neu zuweisen (offenbar sind die Animation an das Mesh des Chars gebunden; leider kann man diese nicht auf jeden anderen Charakter übertragen - NavMeshAgent als Kopie zuweisen (Achtung: je nach “Skalierungsfaktor” des Character Meshes ist dieser zylindrische “Agent” in einer falschen Größe; z.B. extrem klein, dann ist zwischen der Figur und dem baked Navmesh der Umgebung kein korrekter Kontakt (Tipp: Obstacle Avoidance - Radius und Height lassen sich für den NavMeshAgent anpassen; eine Änderung verschiebt aber auch die Boxcollider, hier; die Figur muss letztlich auf dem Boden stehen; die Collider ggf. editieren, da der MeshAgent nicht separate bewegt werden kann); der NavMeshAgent wird nur dann sichtbar, wenn die Gizmos eingeschaltet und im Inspector dieser zylindirsche Agent aufgeklappt ist (kleine Cubes sind der Hitpoint und der NavCube, der lange Cube ist der Boxcollider, auf den der Enemy Boxcollider reagiert und den Mainplayer bei Überschneidung erkennt und angreift


0 notes
Text
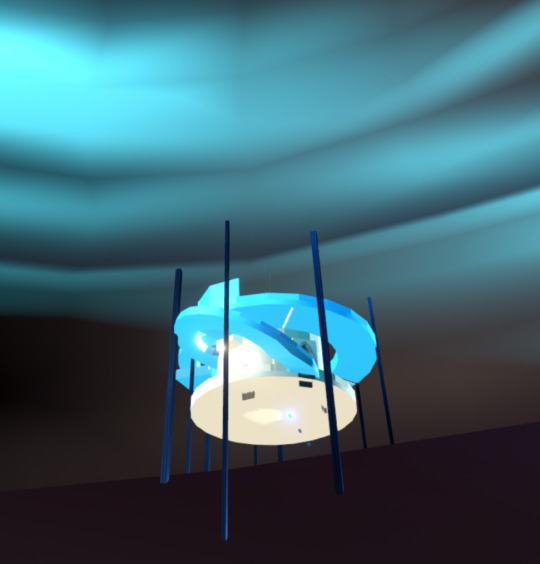
Candles Update #6: Sin AI (Part 2): NavMesh’n Around
Previously, I shared how Sin sensed the player. Now I want to cover how Sin gets around. It’s fairly straight forward: I use a NavMesh and NavMeshAgent -- which is all built into Unity (so my work is done). What’s not so simple is behavior. To imply behavior, I need Sin to patrol, respond to sounds, chase the player, and investigate last known locations. To simplify things, I’ve given Sin only one target--aptly named “Sin Target”.

Whenever I want Sin to go somewhere, I simply move his target to that location. So--if the Sin can see the player, Sin Target’s position becomes equal to the player’s position. Now Sin appears to chase the player, when really, he’s just chasing the same target toward which he’s always moving. But it’s also handy when dealing with Sin’s Patrols: In every room there is an empty object named after the room it’s placed in. I’ve put these all in a list, kept on Sin. They’re separated by floor.
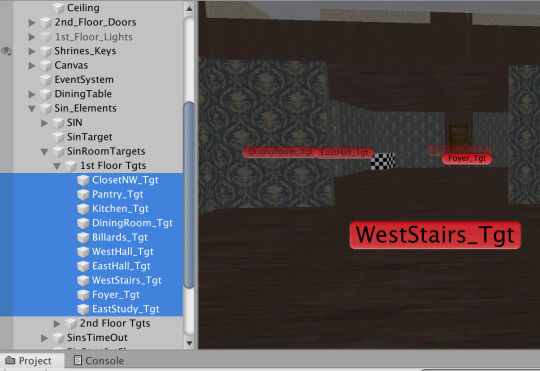
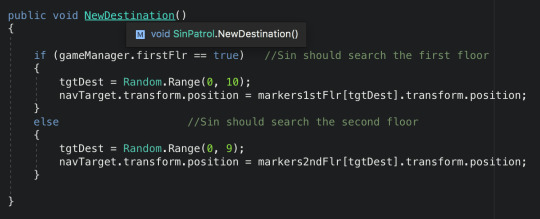
When Sin reaches a destination--the Sin Patrol script randomly chooses a new destination from the list. But, it is based on what floor the player is on. This keeps Sin relatively close.
I’ve considered creating routes for Sin--but we’ll see if it’s needed. Bonus topic: Sin Opens Doors There are lots of doors that the player can open and close. We can’t have Sin just passing through like a ghost, even though...he is...But then, why not just have him walk through walls? Anyway, I created a simple script to allow Sin to open doors when he tries to pass through them.
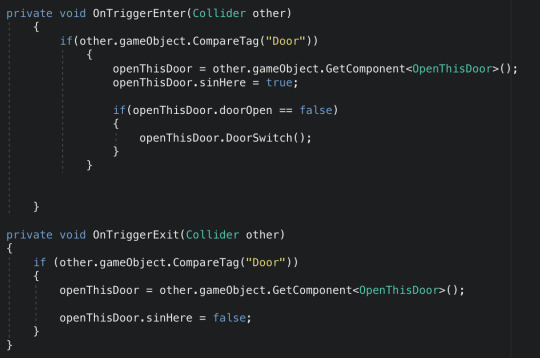
One of the little details I didn’t think of at first, I have to tell the doors that Sin is nearby--otherwise the player can shut the door on Sin’s face. And then Sin would appear to walk through it. So the line “openThisDoor.sinHere = true;” helps with that. Next--I’ll share Sin’s Brain.
0 notes
Text
Prototype - 01/07/2019
youtube
I have finally managed to add enemy movement into the prototype in a way which is satisfactory for the prototype. This was done using a NavMesh and a NavmeshAgent within the enemy Prefabs.
As can be seen, I have made it so that for some enemies, they walk towards you when you are within a certain radius from them. For others such as the enemies on the walls, they look at you all the time but do not follow you.
As the deadline is so near, instead of trying to add any more features, I will instead work on the final postmortem.
Takeaways from this assignment -Iteration is incredibly important -Prototyping is important too before moving onto the final production
0 notes
Text
Post 3 -Tutorials Part 2
Hello everyone and welcome to this week’s blog post. Today we will be continuing with the basic tutorials of how to use Unity.

First, we will be looking at Tweaking Components, so go on and start it up.
Once Unity loads up, we will start with learning how to set values to components. Now let us enter Play mode and see what the game level has in store for us.

As we can see, when our player steps on the red square, an enemy NPC comes rushing out. He is going so fast that our player can’t get through. Let’s do something about that. Exit Play Mode and we’ll take care of the trash.

Go to the Hierarchy Window and select the Enemy game object. From there Inspector window will open with the Enemy’s info. Here we are looking for it’s speed attribute in the NavMeshAgent component. This component is part of Unity’s built in AI system. When a game object has the NavMeshAgent component attached to it, it will use AI to interact with it’s environment. In the speed attribute set the speed to 1. This will allow us to change how fast the object goes around the environment, isn’t that useful.

Now let’s go into Play mode and try to get past the enemy now.

Great. The enemy is so slow we can go right past them without worry. However, now the door to the goal blocked a by a fast closing door, which is not very epic gamer style. Exit Play mode and let’s fix it.

Go back to the Hierarchy window and select the Automatic Doors Game Object and go to the Inspector window.

From there, we will be looking for the Time Until Close attribute which is under the Door component. This component is not a built-in component of Unity, it is a script made in code, which is something we will be doing in the next post. For now, set the Time Until Close attribute to 10 and enter Play Mode to see the results.

There we go. We made it to the goal, which is indeed an Epic Gamer moment.

With that the Tweaking Components tutorial is done. Next, we will do the final basic tutorial of Prefab Power. The excitement is overwhelming, so let’s jump right in.
A Prefab is a file that contains a Game Object that works in the way it is supposed to. By creating a Prefab, we can take that fully functioning Game Object and make copies of it. Before we get into how to make a Prefab, let’s enter Play Mode and see what we have to work with.

When we move our character to green triangle, we see the door object open to the goal. However, we cannot get over to the goal. With no ability to jump, we have to figure out a way to get through. Exit Play Mode and let’s do just that.

This time we will be going to the Project window. The Project window shows all the files that are used in the game, which are called assets, and let me tell you we got some nice assets. Anyway, assets cover things like models, audio, scripts and so on. Here in this window is where we will find the Prefabs. Now select the ramp Prefab.
From the Project window, we can drag a copy of the Prefab into our Scene view or the Hierarchy window. Doing this creates an instance of the Prefab. Now let’s try just that.

As you can see, by dragging the ramp Prefab into the empty space of the Hierarchy window, it placed it right into the Scene View for us. Now our character can gain the high ground over his former friend. *cough* Star Wars reference. Anyway, let us enter Play Mode and get the high ground.

We did it, we have the high ground, but another obstacle blocks our way. Looks we need another Prefab to block the laser. Exit Play Mode and let’s get down to business to defeat the Huns. *cough* Mulan reference.

Go back to the Project window and drag the PushableBox Prefab into the Hierarchy view. You’ll notice that the Prefab is not in the place we need it to be, so let’s fix that. For that we will be adjusting the values in the Transform component of the box. All Game Objects have a Transform component, which holds data about where the object is in the scene, how it is scaled, and how it is rotated.

In the Inspector window, go to the boxes position attribute and set the X value to -2.

From there we can see that the box moved to the right a little. Now let’s move it in the Y direction.


Change the Y value to be 2.5 and watch what happens. Now the box is floating in the air. Creepy right, well there is one more direction for this box to move and that is in the Z direction.


Now replace the Z value with 10 and the box will be in place to move it move it. *cough* Madagascar reference. Gosh guys I’m sorry about my coughs, must be coming down with something. Anyway, everything is set up, so let’s dive right into Play Mode.

Alright, we made it to the goal. Epic Gamer Moment achieved.
I hope this post was helpful in teaching about setting values to components and using Prefabs to get things done. Next weeks post is where we will be making some Unity scripts with C# in Visual Studio. I hope your looking forward to it. Until then I am the Programming Devil and May Your Heart Be Your Guiding Key.
0 notes
Text
Sprint 9
To begin this week’s sprint I wanted to improve the AI’s visual feedback further, so I continued where I left off - staggering. I have added in an additional stagger animation and randomised them so they do not get boring. After this, I have added another large feature to the game, ragdolls! The enemies now ragdoll upon death. The forces etc. can be improved in the near future, to create a really realistic death (charming!). I achieved this by setting kinematic to true for the whole object within the Start method. I then created a new method:

Here we go through each rigidbody in the children objects (body parts) and set their velocity and angular velocity to zero. This ensures no weird forces are applied when the AI dies. This is not complete however as I then needed a create a similar method that goes through each body part’s rigidbody and turn isKinematic on and off:

Next I have updated the Die method to remove all states from the AI, so they do not behave strangely. There are also a few lines to apply the ragdoll physics, such as enabling gravity on the AIs. A few other tweaks had to be figured out (took longer to realise than i’d like to admit!) such as disabling the navmeshagent component. I will be ending this blog here and completing some other fixes/smaller features, coming soon!
1 note
·
View note
Text
DevLog 2 Lost in a Forest
Scene Fusion: This week was integrating everyone’s assets. Kadin had modelled two terrains based on Kyle’s level design, and had put Kyle and Vinnie’s assets in. As you will see, the look and feel changed drastically from the gloomy night forest to a gorgeous sunset palette!
It was clearly going to take a long time for one person to place the whole forest and maze by himself so we got hold of Scene Fusion, which allows teams to work at the same time on a Unity scene. The free version only has two seats so we decided on Kadin and Kyle to work on that. Scene Fusion seems like a really good product on first blush; will keep you posted.
Navmesh: I made the dog a navmeshagent and created a path to some waypoints for the dog, triggered by the player reaching certain points in the game. The idea is that the dog is close enough to hear but far enough away to guide you to the start of the next level.
My navmesh and audio stuff was not exporting due to Unity version differences (grr!). Also navmeshing all the terrain and assets noticeably slowed my computer (see pic of horrendous navmesh). The (invisible) dog only has to walk a simple path.

I considered a few options (scripting the dog’s path, pathing the dog straight through the terrain direct to the waypoints), but tried Matt Payne’s (our tutor’s) suggestion: a probuilder path rapidly pulled out along the terrain. This was fast, easy and resulted in a simple navmesh that cost a lot less computation, and meant the dog was not barking from midair at some points and followed the logical route.
I also sourced some native bird sounds (the Ruru, native morepork) for the point in the game where night falls.
For your viewing pleasure, a quick demo of the dog as a cube running along the navmesh. In the final game, neither of these assets will be visible.
youtube
Til next time my thousands of faithful followers!
0 notes
Text
I added this new code into enemy AI script for enemy attack, and I Bold the script that I have added into script
using System.Collections; using System.Collections.Generic; using UnityEngine; using UnityEngine.AI; using UnityEngine.SceneManagement; [RequireComponent(typeof(NavMeshAgent))] public class Enemy : LivingEntity { public Transform pathHolder; public EnemyProjectile projectile; private GameObject player; private bool playerLocked; public GameObject muzzle; public float fireTimer; private bool shotReady; public float timeToLive; private void OnDrawGizmos() { } NavMeshAgent pathfinder; Transform target; protected override void Start() { base.Start(); pathfinder = GetComponent<NavMeshAgent>(); target = GameObject.FindGameObjectWithTag("Player").transform; StartCoroutine(UpdatePath()); gameObject.GetComponent<EnemyAiFollowPath>().enabled = false; //timeBtwShots = startTimeBtwShots; shotReady = true; Destroy(projectile, timeToLive); } private void Update() { //shooting detecting enemies; if (playerLocked) { transform.LookAt(target); if (shotReady) { Shoot(); } } } void Shoot() { Transform _bullet = Instantiate(projectile.transform, muzzle.transform.position, Quaternion.identity); _bullet.transform.rotation = muzzle.transform.rotation; shotReady = false; StartCoroutine(FireRate()); } IEnumerator FireRate() { yield return new WaitForSeconds(fireTimer); shotReady = true; } private void OnTriggerEnter(Collider other) { if(other.tag == "Player") { player = other.gameObject; playerLocked = true; } } }
0 notes
Text
Again, since player and zombie are both rigid body, the zombie’s position could never reaches the player’s position. Although I have already stopped update the NavMeshAgent’s destination when the zombie is close enough, the zombie would unavoidably push the player back a bit when it first reaches the player (due to the fact that its destination is set to the player’s position).
The trick to solve this problem is to calculate the zombie’s heading and subtract a unit vector of that from the player’s position. So that the zombie’s position would just be somewhere near the player, rather than the central position of the player.
here’s the code:

0 notes
Text
11/15

今日やったこと
キャラクターの動きにNavMeshAgentをついてこさせる。
アニメーションのTransformPositoin情報をUnity上で編集し、キャラクターの上下左右移動をアニメーションをプログラムでばらばらにして用意し、それをアニメーション側から呼び出すという方法でぴったり(?)つけることに成功した。
ブロックに上り降りる所まで成功。しかし、このブロックを置いた後につなげた後はどうするのか?など、いろいろ問題は残っている。意外と簡単だと思っていた部分にかなり時間をとられてしまった・・・
0 notes
Video
tumblr
Weeks 7, 8
For weeks 7, 8 I joined Cade and Justin’s True World project. I was assigned to do the A* Pathfinding for the convoys that Braden was working on. When I began, I looked at the A* algorithm, which involves G-values, H-values, and F-values. Basically, I learned that the G-cost was the total value of the distance in units to the end point. H-cost is the value for the distance from the starting position, and F-cost was the G-cost + H-cost. A* runs these values and continually checks the lowest F-cost until it find the path to the end point. I tried to program this by following a tutorial(which didn’t work) and i got everything except the actual path to work. From here, i decided to do more research by going to the unity manual.I found that they have a built in A* algorithm which is used in combination with the NavMesh feature under the Navigation tab that you add with AI. From this part of the manual, i was able to create a fully working pathfinding script of which one game object would translate slowly toward another game object until it was at its exact location. When we added this to the convoy, it worked but the physics that we wanted on the hovercraft did not work any more. Now, Cade and Braden have discovered a way to make it work, which is being implemented right now. After i finished adding th pathfinding to the convoy, I now have the part of doing the resource management by creating a grid with nodes. I just started this. For weeks 7 and 8, I learned the A* algorithm and how to use NavMesh, NavMeshAgents, and NavMeshObstacles.
0 notes