#nhair simulation
Text
- ABOUDIAMOND Animation Studio - www.youtube.com/@aboudiamond
0 notes
Text
Creating Expressive Characters: Rigging Best Practices

Rigging is the unsung hero of 3D animation. It’s the invisible art that gives life to characters, allowing them to move, emote, and interact with their virtual world. In this blog post, we’ll delve into rigging best practices that elevate your characters from stiff puppets to expressive beings. Whether you’re a beginner or a seasoned animator, these tips will enhance your rigging skills and bring your characters to life.
1. Understanding Character Anatomy
Before diving into rigging, understand the anatomy of your character. Study how joints connect, where muscles flex, and how bones move. This knowledge informs your rigging decisions and ensures natural movement.
Rigging the Spine
Use a hierarchical spine rig with controls for each vertebra.
Add squash-and-stretch attributes for flexibility during animations.
Facial Rigging
Rig facial muscles (brows, lips, cheeks) individually.
Blend shapes (morph targets) allow precise facial expressions.
2. Creating Custom Control Rigs
Control rigs are your animator’s toolbox. Let’s explore advanced techniques:
NURBS Curves and Custom Shapes
Create custom NURBS curves as control handles.
Attach them to joints for intuitive manipulation.
IK/FK Switching
Implement IK/FK (inverse kinematics/forward kinematics) switching.
Seamlessly switch between posing (FK) and natural movement (IK).
3. Enhancing Facial Expressions
The face is the canvas of emotions. Rigging expressions adds depth to characters:
Joint-Based Facial Rigging
Use joints for basic facial movements (smiles, blinks).
Combine with blend shapes for nuanced expressions.
Rigging Eyes and Eyelids
Rigging eyes involves aim controllers and eyelid joints.
Simulate eye blinks and squints for realism.
4. Simulating Secondary Motion
Lifelike animations go beyond primary movements. Let’s explore secondary motion:
Cloth Simulations
Rig clothing with cloth simulations (nCloth, Marvelous Designer).
Achieve realistic folds, wrinkles, and draping.
Hair Dynamics
Rig hair with dynamic simulations (nHair, XGen).
Add wind forces for natural hair movement.
Conclusion:
Enroll in our 3D Animation Course in Hyderabad and take your skills to the next level. Whether you’re a beginner or an experienced animator, our expert instructors will guide you toward animation excellence.
0 notes
Text
Character Modeling...p1
I started working on my characters for my short film for school (technically starting early-- maybe a good thing, maybe not...)
Luckily I get free/cheap licenses for these expensive programs that are required to even function as a 3D artist with my tuition (which is way more expensive than those licenses ever would have been...)
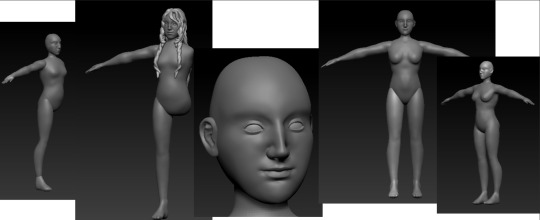
Anyway-- to start, I modeled a character in zbrush. I save a lot of backups, so I can go back and see most of the steps of my process (pics below)
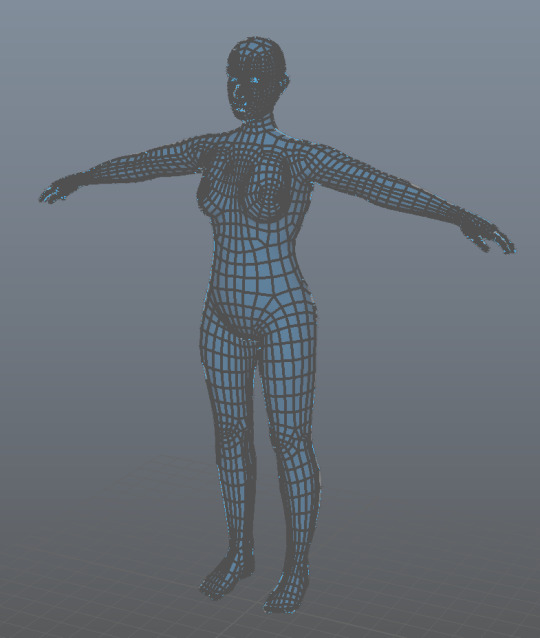
Then I brought the highres mesh into maya, did a little retop fun where I zoned out for like 3-5 hours as I made my cute little loops and such:
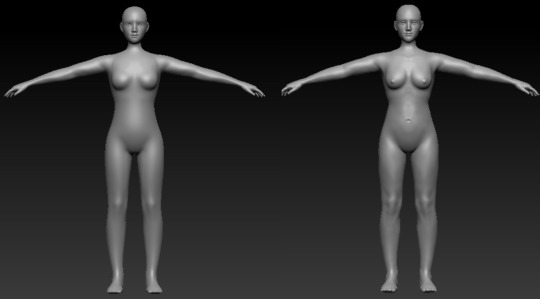
Then the whole operation was brought back to zbrush for that sweet sweet projection action to then bake maps in substance...(lowres(subdivided a ton but pre-projection) vs highres mesh below)
So I imported the maya retopologized file into substance, baked my mesh, and got to work painting by hand <3 (base color display on left, material display on right)
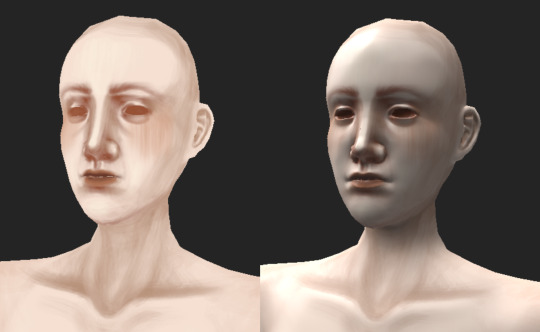
She's beautiful! For my first real attempt at painting textures, I think it looks pretty good, if a bit scary without... hair and eyes and such.
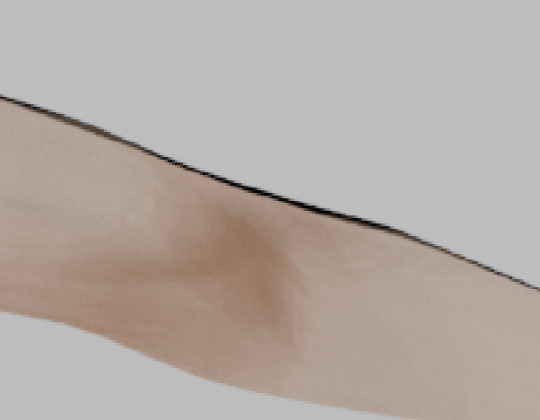
And I'm realizing the retop job I did might not have enough topology, especially since I'm planning on using her for a short film, so I didn't really need to worry about having too many verts or anything, especially since she has soo few that I can see issues around the edges of the geometry where (I'm assuming) the normal maps are adding shadows to where the geometry oversteps the map, for example this black line on her arm:
But I'm not even sure if I'm going to use the normal maps anyway because I want to experiment with trying to make the renders look painted/flat (rip to all that sculpting work... at least it helped me figure out how to paint details in substance even if I don't end up using the map)
...
So onto hair! I wanted dynamic hair so her gorgeous locks could blow in the simulated wind, and I wanted her to have curly hair. When I looked up how to use nHair in maya, I saw people recommend xgen. I have some limited experience in xgen thanks to one class of one course I took last semester, but really I had to relearn it through a YouTube video (thank you J Hill on Youtube! linked at end of post). It seems like I might've gotten rid of the file that had my xgen attempt so I don't have a picture to show, but... my girl was balding, and xgen wasn't letting me create maps because of issues with the file paths that I coudn't resolve despite going through the path and not finding any issues?? so I gave up. I tried to mess around with it for a bit, but really xgen wouldn't have fit the style I was going for anyway. I wanted chunky hair that I could paint textures for. To fix the mess I made, I would've needed time, and though it would've been good practice and a learning experience, I really wanted to focus on finishing my project following the intended aesthetic than branching out and forgetting about my original goal. So, raincheck xgen. We'll meet again on another day. To make up for no xgen pics, heres a screenie from the file I do have where I tried paint effects on my hair curves:

lol.
I wanted the hair curly anyway, and I didn't really want to use paint effect hair so... onwards:
Then I saw a video on using curve warp deformers for hair (GGP_Animation on Youtube) which was a cool introduction to something in maya I didn't even know existed (plugin wasn't even loaded on my machine) but I realized that if I had the curves and wanted curly hair, I could just make a sweep mesh that followed the curves! So I did, and then followed ANOTHER tutorial (CG MAGUS on Youtube) on how to make dynamic hair to figure out which option in the nHair menu I should choose ^.^ and finally! the curves were moving! --But the sweeps weren't... So I saved the preset I had made for them and applied it to the NEW hair system curves-- and finally, she had beautiful dynamic curls (ignore the eyes--temporary, just a quick 3-color ramp on spheres).
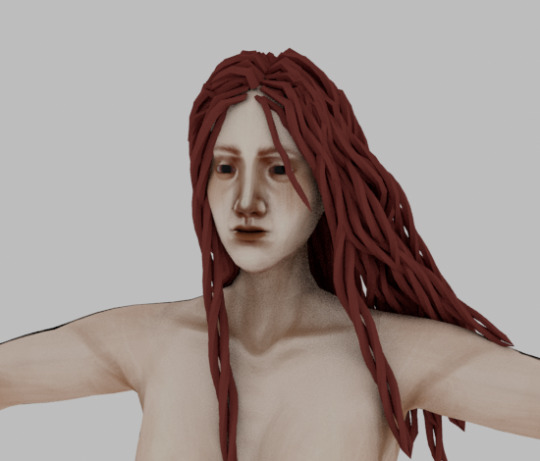
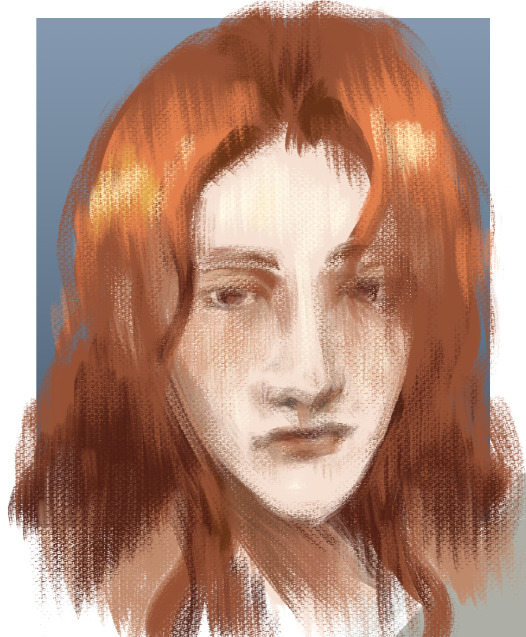
Just kidding, they're kinda ugly lol :,) but that's hopefully just because it's just a generic aistandardsurface shader with no texture. I'm going to repaint the texture on the scalp so even if it shows through it doesn't look like her hair is thinning. I'm also planning on using flair renderer (linked below), so I have to pay for that and do some testing with it to figure out how I can get the final look I'm going for. Concept portrait design below:
youtube
youtube
youtube
1 note
·
View note
Video
vimeo
Simulation Demo Reel
#maya#autodeskmaya#rigging#car rigging#dog rigging#quadruped rigging#facial rigging#cloth simulation#qualoth#nhair simulation#nhair#xgen#xgen IGS#hair simulation#simulation#3D#3D rigging#3D animation#showreel#demo reel
0 notes
Photo

Guest session by Mr. Shiv SundarSr.Character Fx TD at Sony Pictures Imageworks Canada.
On 29th July 2019 @ 11AM #exclusively from #ArenaAnimationKammanahalli.
Experienced in Character Effects for about 14 years now.software: Maya for cloth,hair,fur and rigid body work,Houdini cloth and Hair sim.solver used: nCloth , qualoth, syflex,marvelous for creating realistic simulation and cloth development.Grooming: nhair,shave and hair, yeti and xgen.Handling shot work, development task, environment asset setup for cloth, flesh simulation, fracture setup and rigid bodies are my some of primary skills.
Movie and Ridefilm Credits:
#CaptainMarvel
#SpiderMan in SpiderVerse ( Animated Feature)
#Avengers infinity wars (2018)
#BossBaby ( Animated feature film)
#Kungfupanda 3 ( Animated feature film)
#Penguins of Madagascar 2014 (Animated feature film)
#Rango (Animated Feature)
#Transformers 3 Dark of the moon
#Transformers Ride 3D
#BattleShip
#Avengers
#Clonewars Episode Sesson 5 ,6
#IceAge ride film
#Batman Tv series
#Sultan The Warrior (Animated Feature)
#ChubbChubbs
#HairyScary
#Camelu
#TwinPrinces.
#captainmarvel#spiderman#avengers#bossbaby#kungfupanda#penguins#rango#transformers#battleship#clonewars#iceage#batman#sultanthewarrior#chubbchubbs#hairyscary#camelu#twinprincess
1 note
·
View note
Quote
Autodesk has released Maya 2020: the latest update on its 3D modelling, animation, visual effects and 3D rendering software. I've been using Maya for almost two decades now. I remember the days when you needed a Silicon Graphics machine to run it, which was expensive enough, but coupled with the price of a Maya licence you had to spend a small fortune. I'm not sure if the unobtainable price made it a more desirable application, but everyone I knew wanted to work with it.
Thankfully, prices dropped over the years and now Maya is much more affordable, although many still think it's too expensive, especially when compared to other applications like Blender and Cinema 4D (both of which appear, along with Maya, on our guide to the best 3D modelling software).
Since its early days, Autodesk has released updates annually. These usually saw new tools and features being added to its arsenal; these features were welcome additions, but were often aimed more at higher-end animation and simulation work.
Over the past few years, maybe even longer, we have seen a shift in the direction Autodesk have taken with the updates. They are now more focused on improving existing systems and implementing features voted on by the community. This has transformed Maya into a much better, all-round application which continues to evolve and improve in a more focused way.
With Maya 2020, Autodesk continue this trend of listening to their users to implement much-needed quality-of-life features. They also enlisted Blue Sky Studios to help mold the animation tools, which have also seen a huge upgrade in this release.
Maya 2020: Features and performance
Autodesk boast over 60 new animation features, with the biggest being improvements to the animation cache playback. Originally introduced in 2019, cache playback allowed animators to view their work in real time with little or no need for constant playblasts. This was the idea anyway, but it came with limitations. The first was a lack of dynamics support, so it couldn't be used alongside these systems. Image planes still relied on legacy systems, so they were slow and hogged memory, and it wasn't as efficient when used with dense geometry.
These issues have all been addressed and make for a smoother experience. Dynamics support is included, using a new layered evaluation system. nParticles, nCloth and nBodies are now supported, with nHair, Bifrost FX and muscle systems coming later.
High-resolution geometry or subdivision surface models that used Smooth Mesh were not efficient enough in 2019. They used a lot of memory and were slow to cache. In 2020, the base mesh is stored while smoothing is now handled on the GPU.
Speaking of the GPU, another big update this year is Arnold 6 with full GPU rendering support, based on the NVIDIA OptiX ray-tracing engine. This has been in beta for a while but it's nice to see a full release. I've been using this more and more since I installed 2020 – it's so fast, although I am running an NVIDIA Quadro RTX 4000 so I'm not sure how it would run on lower-end cards. I no longer need to render to see model and shader updates, as they are visible in the viewport in, almost, real time.
Finally, Maya has the ability to retopologise the densest of models
On the modelling side of things, Autodesk have given us Remesh and Retopology tools. "It's about time!" I hear you scream. When combined, these tools will enable clean, quad-based topology but it has limitations. As good as the resulting models are, there are no options to dictate edge flow, so for game art there would still be a lot of clean-up needed.
Animators can now see past and future movement with the new ghosting preview tool
It seems Autodesk are now taking full advantage of the GPU as it's being used on many other tools to help speed up workflow. The Proximity Wrap tool, which is new to Maya, is an advanced version of the Wrap tool. It too uses the GPU to help calculate how the influenced geometry manipulates the surface model, making for smoother interactions. I'm looking forward to experimenting with this on future facial rigs and custom muscle systems.
With Maya 2020, animation has seen significant improvements, as has rigging
While we are on the subject of rigging, another new addition I am personally excited about is the introduction of matrix-driven workflows. These are a series of nodes and attributes that make rigs cleaner and less cluttered. With the offsetParentMatrix attribute, constraints could be used less and less, meaning the art of rigging is more streamlined.
The one issue I do have with the new rigging tools is they aren't backwards compatible. I have many clients who still use Maya 2017 and 2018, so for me, these shiny new nodes aren't an option just yet.
Should you upgrade to Maya 2020?
There is so much to be excited about with this release, and I haven't even covered the modelling and speed improvements. All in all, Maya 2020 is an essential upgrade if you're an animation studio. With all the new updates, it could save you a lot of time on your projects.
http://damianfallon.blogspot.com/2020/04/maya-2020-review.html
0 notes
Text
Weekly Summary
Week 10 – 01/04 – 07/04
· Development
I spent a few days working on the gibbon animation. I managed to include rotation joints without losing the animation thanks to my well-structured rig system.
I also applied the last changes to the groom and sent it to Alastair for review.
· Area for Development / Thoughts
Smooth out the animation and correct any mesh deformations.
Research more on Nhair simulations.
I’m a little stressed right now considering university is closed during Easter, one of my friends said I could work on his computer during that time so I hope it will be able to handle hair simulations.
0 notes
Text
Prof. Josh Planz
This day, Prof. Josh attended as the adviser. He suggested me keep updating knowledge and never I using an old fashion software to reduce efficiency. The
nHair system I used to generate the hair was out of date already. He told me that the disadvantages of this hair system. It had
extremely low simulating efficiency and terrible performance on the root of hair, commercial
projects no longer used such kind of technique any more. Additionally, the textures of my
animation might be too simplification, the materials on dumpling and the ground of my
animation even tend to a kind of similarity. Nevertheless, the architecture and background
should have more details. The advice from Prof. Josh revealed that my work was lack of details
on background and needed to be rebuilt the hair system on character.
0 notes
Video
vimeo
NISSAN - Stronger For Longer - VFX Breakdown from Wayne Osborne on Vimeo.
Here is a VFX Breakdown from Blackbird.la for the work we need on this Nissan Navara spot. We used Yeti for the fur and Golaem crowd system for the distant wildebeests. The foreground animals were hand keyed animated, with simulated muscle and nHair dynamics for the long mane, beard and tail. It was rendered in Arnold. Dust FX was a combination of Houdini and Maya Fluids.
0 notes
Video
Tutorials - nhair deformed Yeti grooms - part1 from Mario Reitbauer on Vimeo.
We discuss a technique to deform your Yeti based hair styling by guiding grooms.
This way you are not forced to use guide nodes to groom your hair and you are still able to choose between corrective grooms and nhair simulation on a shot base.
0 notes
Text
Weekly Summaries
Week 1 – 28/01 – 03/02
· Development
This week I've planned out my Personal Portfolio project, completed the Personal Proposal Form for submission and finished the animation for Haseya's turntable.
· Strengths
Finished the animation faster than anticipated which gives me more time to focus on making the cloth simulations and hair look good
Planed the structure of my projects.
· Area for Development
Create a Schedule in the form of a Timesheet that can be updated as I progress on my work
Simulate the cloth on the gloves as well, to cover the animation of the wrists.
Plan out the pipeline for the animation of the hair.
Research on fur simulations and Nhair Dynamics
0 notes
Last Seen Blogs

autorasissy
Sissy J.

b0xedmilk
Vex/Adrian

mybolognahasafirstname
Untitled

jaxonwri
BBALLSHORtADDICTION
the-satellite
I'm Going to the Stars Tonight!