#node_modules
Explore tagged Tumblr posts
Visit Tumblr Blog
Explore Tumblr blogs with no restrictions, modern design and the best experience.
Last Seen Tumblr Blogs


Fun Fact
The most popular pages on Tumblr are about Minecraft, GIFs, and David J. Peterson.
Text

my BROTHERS-- 😭😭😭
i-- i gotta review the code of three other people to complete this course? what? :')
edit- extracting the files is gonna take me longer than actually looking at them. 😭
#ooc#why why WHY 🥹#the instructions explicitly said to NOT include the node_modules folder#no wonder it's taking ages to extract
10 notes
·
View notes
Text
Mini React.js Tips #2 | Resources ✨

Continuing the #mini react tips series, it's time to understand what is going on with the folders and files in the default React project - they can be a bit confusing as to what folder/file does what~!
What you'll need:
know how to create a React project >> click
already taken a look around the files and folders themselves

What does the file structure look like?
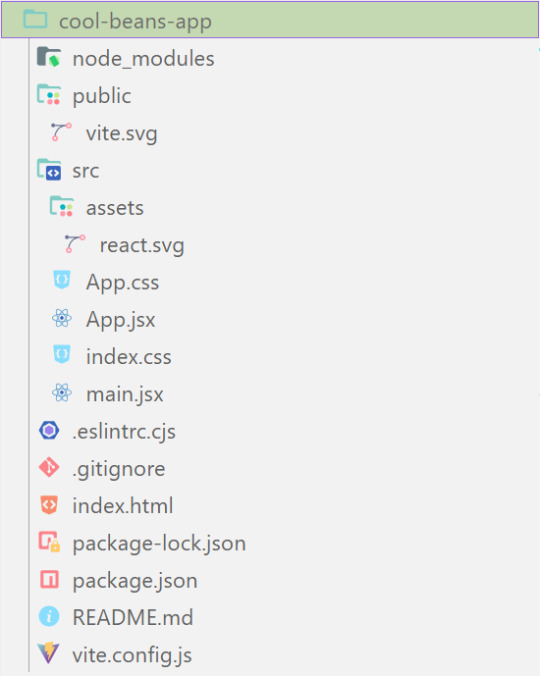
✤ node_modules folder: contains all the dependencies and packages (tools, resources, code, or software libraries created by others) needed for your project to run properly! These dependencies are usually managed by a package manager, such as npm (Node Package Manager)!
✤ public folder: Holds static assets (files that don't change dynamically and remain fixed) that don't require any special processing before using them! These assets are things like images, icons, or files that can be used directly without going through any additional steps.
✤ src folder: This is where your main source code resides. 'src' is short for source.
✤ assets folder: This folder stores static assets such as images, logos, and similar files. This folder is handy for organizing and accessing these non-changing elements in your project.
✤ App.css: This file contains styles specific to the App component (we will learn what 'components' are in React in the next tips post~!).
✤ App.jsx: This is the main component of your React application. It's where you define the structure and behavior of your app. The .jsx extension means the file uses a mixture of both HTML and JavaScript - open the file and see for yourself~!
✤ index.css: This file contains global styles that apply to the entire project. Any styles defined in this file will be applied universally across different parts of your project, providing a consistent look and feel.
✤ main.jsx: This is the entry point of your application! In this file, the React app is rendered, meaning it's the starting point where the React components are translated into the actual HTML elements displayed in the browser. Would recommend not to delete as a beginner!!
✤ .eslintrc.cjs: This file is the ESLint configuration. ESLint (one of the dependencies installed) is a tool that helps maintain coding standards and identifies common errors in your code. This configuration file contains rules and settings that define how ESLint should analyze and check your code.
✤ .gitignore: This file specifies which files and folders should be ignored by Git when version-controlling your project. It helps to avoid committing unnecessary files. The node_modules folder is typically ignored.
✤ index.html: This is the main HTML file that serves as the entry point for your React application. It includes the necessary scripts and links to load your app.
✤ package.json: A metadata file for your project. It includes essential information about the project, such as its name, version, description, and configuration details. Also, it holds a list of dependencies needed for the project to run - when someone else has the project on their local machine and wants to set it up, they can use the information in the file to install all the listed dependencies via npm install.
✤ package-lock.json: This file's purpose is to lock down and record the exact versions of each installed dependency/package in your project. This ensures consistency across different environments when other developers or systems install the dependencies.
✤ README.md: This file typically contains information about your project, including how to set it up, use it, and any other relevant details.
✤ vite.config.js: This file contains the configuration settings for Vite, the build tool used for this React project. It may include options for development and production builds, plugins, and other build-related configurations.
Congratulations! You know what the default folders and files do! Have a play around and familiarise yourself with them~!
BroCode’s 'React Full Course for Free’ 2024 >> click
React Official Website >> click
React's JSX >> click
The basics of Package.json >> click
Previous Tip: Tip #1 Creating The Default React Project >> click
Stay tuned for the other posts I will make on this series #mini react tips~!
#mini react tips#my resources#resources#codeblr#coding#progblr#programming#studyblr#studying#javascript#react.js#reactjs#coding tips#coding resources
25 notes
·
View notes
Text
GitHub and Git Commands: From Beginner to Advanced Level

Git and GitHub are essential tools for every developer, whether you're just starting or deep into professional software development. In this blog, we'll break down what Git and GitHub are, why they matter, and walk you through the most essential commands, from beginner to advanced. This guide is tailored for learners who want to master version control and collaborate more effectively on projects.
GitHub and Git Commands
What Is Git?
Git is a distributed version control system created by Linus Torvalds. It allows you to track changes in your code, collaborate with others, and manage your project history.
What Is GitHub?
GitHub is a cloud-based platform built on Git. It allows developers to host repositories online, share code, contribute to open-source projects, and manage collaboration through pull requests, issues, and branches
Why Learn Git and GitHub?
Manage and track code changes efficiently
Collaborate with teams
Roll back to the previous versions of the code
Host and contribute to open-source projects
Improve workflow through automation and branching
Git Installation (Quick Start)
Before using Git commands, install Git from git-scm.com.
Check if Git is installed:
bash
git --version
Beginner-Level Git Commands
These commands are essential for every new user of Git:
1. git init
Initialises a new Git repository.
bash
git init
2. git clone
Clones an existing repository from GitHub.
bash
git clone https://github.com/user/repo.git
3. git status
Checks the current status of files (modified, staged, untracked).
bash
git status
4. git add
Stage changes for commit.
bash
git add filename # stage a specific file git add . # stage all changes
5. git commit
Records changes to the repository.
bash
git commit -m "Your commit message"
6. git push
Pushes changes to the remote repository.
bash
git push origin main # pushes to the main branch
7. git pull
Fetches and merges changes from the remote repository.
bash
git pull origin main
Intermediate Git Commands
Once you’re comfortable with the basics, start using these:
1. git branch
Lists, creates, or deletes branches.
bash
git branch # list branches git branch new-branch # create a new branch
2. git checkout
Switches branches or restores files.
bash
git checkout new-branch
3. git merge
Merges a branch into the current one.
bash
git merge feature-branch
4. git log
Shows the commit history.
bash
git log
5. .gitignore
Used to ignore specific files or folders in your project.
Example .gitignore file:
bash
node_modules/ .env *.log
Advanced Git Commands
Level up your Git skills with these powerful commands:
1. git stash
Temporarily shelves changes not ready for commit.
bash
git stash git stash apply
2. git rebase
Reapplies commits on top of another base tip.
bash
git checkout feature-branch git rebase main
3. git cherry-pick
Apply the changes introduced by an existing commit.
bash
git cherry-pick <commit-hash>
4. git revert
Reverts a commit by creating a new one.
bash
git revert <commit-hash>
5. git reset
Unstages or removes commits.
bash
git reset --soft HEAD~1 # keep changes git reset --hard HEAD~1 # remove changes
GitHub Tips for Projects
Use Readme.md to document your project
Leverage issues and pull requests for collaboration
Add contributors for team-based work
Use GitHub Actions to automate workflows
Final Thoughts
Mastering Git and GitHub is an investment in your future as a developer. Whether you're working on solo projects or collaborating in a team, these tools will save you time and help you maintain cleaner, safer code. Practice regularly and try contributing to open-source projects to strengthen your skills.
Read MORE: https://yasirinsights.com/github-and-git-commands/
2 notes
·
View notes
Text
So I knew node_modules was huge, but rust build (target) directory is on a whole new level. I have a relatively new project here with 25GB in size.
3 notes
·
View notes
Text
Customer sends a test project which isn't working to get it fixed.. .
They've zipped the fuckin node_modules folder too...aaahhhhhhhhhhhhhh
2 notes
·
View notes
Text
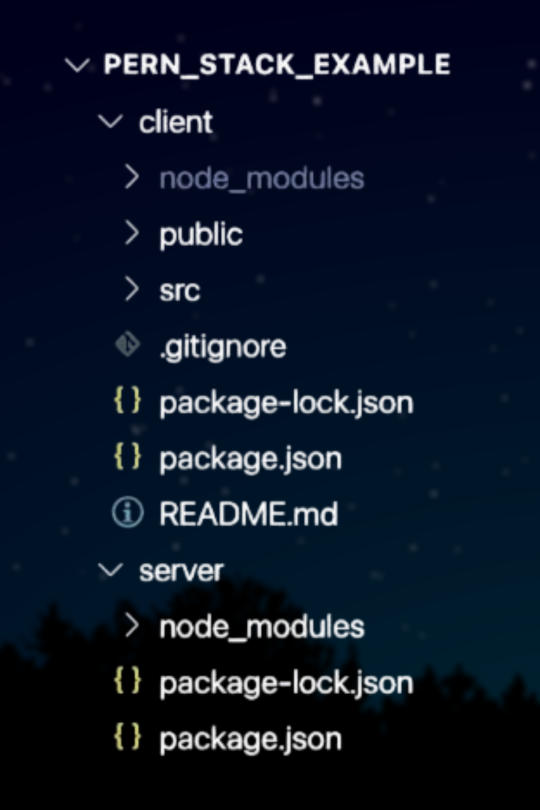
𝗛𝗼𝘄 𝘁𝗼 𝗣𝗿𝗼𝗽𝗲𝗿𝗹𝘆 𝗦𝘁𝗿𝘂𝗰𝘁𝘂𝗿𝗲 𝘆𝗼𝘂𝗿 𝗣𝗘𝗥𝗡 𝗦𝘁𝗮𝗰𝗸 𝗣𝗿𝗼𝗷𝗲𝗰𝘁 👀 📁 pern-project/ ├── 📁 client/ (Frontend - React) │ ├── 📁 public/ │ │ ├── 📄 index․html │ │ └── 📄 favicon․ico │ ├── 📁 src/ │ │ ├── 📁 components/ │ │ │ ├── 📄 Navbar․tsx │ │ │ ├── 📄 Footer․tsx │ │ │ └── 📄 Loader․tsx │ │ ├── 📁 pages/ │ │ │ ├── 📄 Home․tsx │ │ │ ├── 📄 Dashboard․tsx │ │ │ └── 📄 Profile․tsx │ │ ├── 📁 services/ │ │ │ └── 📄 api․ts │ │ ├── 📁 context/ │ │ │ └── 📄 AuthContext․tsx │ │ ├── 📁 utils/ │ │ │ └── 📄 validators․ts │ │ ├── 📁 styles/ │ │ │ └── 📄 globals․css │ │ ├── 📄 App․tsx │ │ ├── 📄 index․tsx │ │ └── 📄 routes․tsx │ ├── 📄 tsconfig․json │ ├── 📄 vite.config․ts (or webpack.config.js) │ ├── 📄 package․json │ └── 📄 .env ├── 📁 server/ (Backend - Node.js + Express) │ ├── 📁 controllers/ │ │ ├── 📄 authController․js │ │ └── 📄 userController․js │ ├── 📁 routes/ │ │ ├── 📄 authRoutes․js │ │ └── 📄 userRoutes․js │ ├── 📁 models/ │ │ ├── 📄 User․js │ │ └── 📄 Post․js │ ├── 📁 middlewares/ │ │ ├── 📄 authMiddleware․js │ │ └── 📄 errorHandler․js │ ├── 📁 config/ │ │ ├── 📄 db․js │ │ └── 📄 env․js │ ├── 📄 server․js │ ├── 📄 package․json │ ├── 📄 .env │ └── 📄 .gitignore ├── 📁 database/ (PostgreSQL Setup) │ ├── 📄 init․sql │ └── 📄 seed․sql ├── 📁 docs/ │ └── 📄 http://README․md ├── 📄 LICENSE └── 📄 .gitignore 𝗘𝘅𝗽𝗹𝗮𝗻𝗮𝘁𝗶𝗼𝗻 𝗼𝗳 𝗞𝗲𝘆 𝗗𝗶𝗿𝗲𝗰𝘁𝗼𝗿𝗶𝗲𝘀 \/ 📁 𝗰𝗹𝗶𝗲𝗻𝘁/ – 𝗙𝗿𝗼𝗻𝘁𝗲𝗻𝗱 Contains the React app with components, pages, context, services, styles, and config files. 📁 𝘀𝗲𝗿𝘃𝗲𝗿/ – 𝗕𝗮𝗰𝗸𝗲𝗻𝗱 Includes Express code: routes, controllers, models, middlewares, and configs. 📁 𝗱𝗮𝘁𝗮𝗯𝗮𝘀𝗲/ – 𝗣𝗼𝘀𝘁𝗴𝗿𝗲𝗦𝗤𝗟 Holds SQL files to create and seed the database. 📁 𝗱𝗼𝗰𝘀/ – 𝗗𝗼𝗰𝘂𝗺𝗲𝗻𝘁𝗮𝘁𝗶𝗼𝗻 Stores project docs like README and API notes. 📄 𝗟𝗜𝗖𝗘𝗡𝗦𝗘 Specifies the project’s open-source license. 📄 .𝗴𝗶𝘁𝗶𝗴𝗻𝗼𝗿𝗲 Lists files Git should skip (e.g., node_modules, .env). Read More + Download PDF on how to get started with the PERN Stack \/ https://lnkd.in/gtZ6FQbR Thank you for reading :) Like + Follow @connectedaeroo to show your support for the content👍
0 notes
Photo

#純靠北工程師8nd
----------
跟大家示範正確的 docker 用法, 把 ./node_modules:/var/www/node_modules 掛 volumn, 本機要先安裝 nodejs, 然後需要在專案根目錄下 npm install, 才可以下 docker compose up 順利啟動, 大家的 nodejs 版本都不同,真棒的 docker 使用法。
----------
💖 純靠北工程師 官方 Discord 歡迎在這找到你的同溫層!
👉 https://discord.gg/tPhnrs2
----------
💖 全平台留言、文章詳細內容
👉 https://init.engineer/cards/show/11209
0 notes
Text
my computer begging for mercy as it copies its seventh node_modules folder:
0 notes
Text
Automated Visual Regression Testing With Playwright
New Post has been published on https://thedigitalinsider.com/automated-visual-regression-testing-with-playwright/
Automated Visual Regression Testing With Playwright
Comparing visual artifacts can be a powerful, if fickle, approach to automated testing. Playwright makes this seem simple for websites, but the details might take a little finessing.
Recent downtime prompted me to scratch an itch that had been plaguing me for a while: The style sheet of a website I maintain has grown just a little unwieldy as we’ve been adding code while exploring new features. Now that we have a better idea of the requirements, it’s time for internal CSS refactoring to pay down some of our technical debt, taking advantage of modern CSS features (like using CSS nesting for more obvious structure). More importantly, a cleaner foundation should make it easier to introduce that dark mode feature we’re sorely lacking so we can finally respect users’ preferred color scheme.
However, being of the apprehensive persuasion, I was reluctant to make large changes for fear of unwittingly introducing bugs. I needed something to guard against visual regressions while refactoring — except that means snapshot testing, which is notoriously slow and brittle.
In this context, snapshot testing means taking screenshots to establish a reliable baseline against which we can compare future results. As we’ll see, those artifacts are influenced by a multitude of factors that might not always be fully controllable (e.g. timing, variable hardware resources, or randomized content). We also have to maintain state between test runs, i.e. save those screenshots, which complicates the setup and means our test code alone doesn’t fully describe expectations.
Having procrastinated without a more agreeable solution revealing itself, I finally set out to create what I assumed would be a quick spike. After all, this wouldn’t be part of the regular test suite; just a one-off utility for this particular refactoring task.
Fortunately, I had vague recollections of past research and quickly rediscovered Playwright’s built-in visual comparison feature. Because I try to select dependencies carefully, I was glad to see that Playwright seems not to rely on many external packages.
Setup
The recommended setup with npm init playwright@latest does a decent job, but my minimalist taste had me set everything up from scratch instead. This do-it-yourself approach also helped me understand how the different pieces fit together.
Given that I expect snapshot testing to only be used on rare occasions, I wanted to isolate everything in a dedicated subdirectory, called test/visual; that will be our working directory from here on out. We’ll start with package.json to declare our dependencies, adding a few helper scripts (spoiler!) while we’re at it:
"scripts": "test": "playwright test", "report": "playwright show-report", "update": "playwright test --update-snapshots", "reset": "rm -r ./playwright-report ./test-results ./viz.test.js-snapshots , "devDependencies": "@playwright/test": "^1.49.1"
If you don’t want node_modules hidden in some subdirectory but also don’t want to burden the root project with this rarely-used dependency, you might resort to manually invoking npm install --no-save @playwright/test in the root directory when needed.
With that in place, npm install downloads Playwright. Afterwards, npx playwright install downloads a range of headless browsers. (We’ll use npm here, but you might prefer a different package manager and task runner.)
We define our test environment via playwright.config.js with about a dozen basic Playwright settings:
import defineConfig, devices from "@playwright/test"; let BROWSERS = ["Desktop Firefox", "Desktop Chrome", "Desktop Safari"]; let BASE_URL = "http://localhost:8000"; let SERVER = "cd ../../dist && python3 -m http.server"; let IS_CI = !!process.env.CI; export default defineConfig( testDir: "./", fullyParallel: true, forbidOnly: IS_CI, retries: 2, workers: IS_CI ? 1 : undefined, reporter: "html", webServer: command: SERVER, url: BASE_URL, reuseExistingServer: !IS_CI , use: baseURL: BASE_URL, trace: "on-first-retry" , projects: BROWSERS.map(ua => ( name: ua.toLowerCase().replaceAll(" ", "-"), use: ...devices[ua] )) );
Here we expect our static website to already reside within the root directory’s dist folder and to be served at localhost:8000 (see SERVER; I prefer Python there because it’s widely available). I’ve included multiple browsers for illustration purposes. Still, we might reduce that number to speed things up (thus our simple BROWSERS list, which we then map to Playwright’s more elaborate projects data structure). Similarly, continuous integration is YAGNI for my particular scenario, so that whole IS_CI dance could be discarded.
Capture and compare
Let’s turn to the actual tests, starting with a minimal sample.test.js file:
import test, expect from "@playwright/test"; test("home page", async ( page ) => await page.goto("/"); await expect(page).toHaveScreenshot(); );
npm test executes this little test suite (based on file-name conventions). The initial run always fails because it first needs to create baseline snapshots against which subsequent runs compare their results. Invoking npm test once more should report a passing test.
Changing our site, e.g. by recklessly messing with build artifacts in dist, should make the test fail again. Such failures will offer various options to compare expected and actual visuals:
We can also inspect those baseline snapshots directly: Playwright creates a folder for screenshots named after the test file (sample.test.js-snapshots in this case), with file names derived from the respective test’s title (e.g. home-page-desktop-firefox.png).
Generating tests
Getting back to our original motivation, what we want is a test for every page. Instead of arduously writing and maintaining repetitive tests, we’ll create a simple web crawler for our website and have tests generated automatically; one for each URL we’ve identified.
Playwright’s global setup enables us to perform preparatory work before test discovery begins: Determine those URLs and write them to a file. Afterward, we can dynamically generate our tests at runtime.
While there are other ways to pass data between the setup and test-discovery phases, having a file on disk makes it easy to modify the list of URLs before test runs (e.g. temporarily ignoring irrelevant pages).
Site map
The first step is to extend playwright.config.js by inserting globalSetup and exporting two of our configuration values:
export let BROWSERS = ["Desktop Firefox", "Desktop Chrome", "Desktop Safari"]; export let BASE_URL = "http://localhost:8000"; // etc. export default defineConfig( // etc. globalSetup: require.resolve("./setup.js") );
Although we’re using ES modules here, we can still rely on CommonJS-specific APIs like require.resolve and __dirname. It appears there’s some Babel transpilation happening in the background, so what’s actually being executed is probably CommonJS? Such nuances sometimes confuse me because it isn’t always obvious what’s being executed where.
We can now reuse those exported values within a newly created setup.js, which spins up a headless browser to crawl our site (just because that’s easier here than using a separate HTML parser):
import BASE_URL, BROWSERS from "./playwright.config.js"; import createSiteMap, readSiteMap from "./sitemap.js"; import playwright from "@playwright/test"; export default async function globalSetup(config) // only create site map if it doesn't already exist try readSiteMap(); return; catch(err) // launch browser and initiate crawler let browser = playwright.devices[BROWSERS[0]].defaultBrowserType; browser = await playwright[browser].launch(); let page = await browser.newPage(); await createSiteMap(BASE_URL, page); await browser.close();
This is fairly boring glue code; the actual crawling is happening within sitemap.js:
createSiteMap determines URLs and writes them to disk.
readSiteMap merely reads any previously created site map from disk. This will be our foundation for dynamically generating tests. (We’ll see later why this needs to be synchronous.)
Fortunately, the website in question provides a comprehensive index of all pages, so my crawler only needs to collect unique local URLs from that index page:
function extractLocalLinks(baseURL) let urls = new Set(); let offset = baseURL.length; for(let href of document.links) if(href.startsWith(baseURL)) let path = href.slice(offset); urls.add(path); return Array.from(urls);
Wrapping that in a more boring glue code gives us our sitemap.js:
import readFileSync, writeFileSync from "node:fs"; import join from "node:path"; let ENTRY_POINT = "/topics"; let SITEMAP = join(__dirname, "./sitemap.json"); export async function createSiteMap(baseURL, page) await page.goto(baseURL + ENTRY_POINT); let urls = await page.evaluate(extractLocalLinks, baseURL); let data = JSON.stringify(urls, null, 4); writeFileSync(SITEMAP, data, encoding: "utf-8" ); export function readSiteMap() try var data = readFileSync(SITEMAP, encoding: "utf-8" ); catch(err) if(err.code === "ENOENT") throw new Error("missing site map"); throw err; return JSON.parse(data); function extractLocalLinks(baseURL) // etc.
The interesting bit here is that extractLocalLinks is evaluated within the browser context — thus we can rely on DOM APIs, notably document.links — while the rest is executed within the Playwright environment (i.e. Node).
Tests
Now that we have our list of URLs, we basically just need a test file with a simple loop to dynamically generate corresponding tests:
for(let url of readSiteMap()) test(`page at $url`, async ( page ) => await page.goto(url); await expect(page).toHaveScreenshot(); );
This is why readSiteMap had to be synchronous above: Playwright doesn’t currently support top-level await within test files.
In practice, we’ll want better error reporting for when the site map doesn’t exist yet. Let’s call our actual test file viz.test.js:
import readSiteMap from "./sitemap.js"; import test, expect from "@playwright/test"; let sitemap = []; try sitemap = readSiteMap(); catch(err) test("site map", ( page ) => throw new Error("missing site map"); ); for(let url of sitemap) test(`page at $url`, async ( page ) => await page.goto(url); await expect(page).toHaveScreenshot(); );
Getting here was a bit of a journey, but we’re pretty much done… unless we have to deal with reality, which typically takes a bit more tweaking.
Exceptions
Because visual testing is inherently flaky, we sometimes need to compensate via special casing. Playwright lets us inject custom CSS, which is often the easiest and most effective approach. Tweaking viz.test.js…
// etc. import join from "node:path"; let OPTIONS = stylePath: join(__dirname, "./viz.tweaks.css") ; // etc. await expect(page).toHaveScreenshot(OPTIONS); // etc.
… allows us to define exceptions in viz.tweaks.css:
/* suppress state */ main a:visited color: var(--color-link); /* suppress randomness */ iframe[src$="/articles/signals-reactivity/demo.html"] visibility: hidden; /* suppress flakiness */ body:has(h1 a[href="/wip/unicode-symbols/"]) main tbody > tr:last-child > td:first-child font-size: 0; visibility: hidden;
:has() strikes again!
Page vs. viewport
At this point, everything seemed hunky-dory to me, until I realized that my tests didn’t actually fail after I had changed some styling. That’s not good! What I hadn’t taken into account is that .toHaveScreenshot only captures the viewport rather than the entire page. We can rectify that by further extending playwright.config.js.
export let WIDTH = 800; export let HEIGHT = WIDTH; // etc. projects: BROWSERS.map(ua => ( name: ua.toLowerCase().replaceAll(" ", "-"), use: ...devices[ua], viewport: width: WIDTH, height: HEIGHT ))
…and then by adjusting viz.test.js‘s test-generating loop:
import WIDTH, HEIGHT from "./playwright.config.js"; // etc. for(let url of sitemap) test(`page at $url`, async ( page ) => checkSnapshot(url, page); ); async function checkSnapshot(url, page) // determine page height with default viewport await page.setViewportSize( width: WIDTH, height: HEIGHT ); await page.goto(url); await page.waitForLoadState("networkidle"); let height = await page.evaluate(getFullHeight); // resize viewport for before snapshotting await page.setViewportSize( width: WIDTH, height: Math.ceil(height) ); await page.waitForLoadState("networkidle"); await expect(page).toHaveScreenshot(OPTIONS); function getFullHeight() return document.documentElement.getBoundingClientRect().height;
Note that we’ve also introduced a waiting condition, holding until there’s no network traffic for a while in a crude attempt to account for stuff like lazy-loading images.
Be aware that capturing the entire page is more resource-intensive and doesn’t always work reliably: You might have to deal with layout shifts or run into timeouts for long or asset-heavy pages. In other words: This risks exacerbating flakiness.
Conclusion
So much for that quick spike. While it took more effort than expected (I believe that’s called “software development”), this might actually solve my original problem now (not a common feature of software these days). Of course, shaving this yak still leaves me itchy, as I have yet to do the actual work of scratching CSS without breaking anything. Then comes the real challenge: Retrofitting dark mode to an existing website. I just might need more downtime.
#:has#ADD#amp#APIs#approach#Article#Articles#background#browser#bugs#Capture#challenge#chrome#code#Color#command#comparison#comprehensive#content#continuous#continuous integration#course#CSS#css-tricks#dance#Dark#dark mode#data#deal#desktop
0 notes
Text
I Love Javascript :)
Daily Blogs 343 - Oct 13th, 12.024
Spent the night configuring ESLint to make my JavaScript code very strict in this new project.
And I love, I love, that you actually need a node_modules folder with 350 dependencies to a fucking linting configuration.
what. the. fuck?
Today's artists & creative things Music: Fuck the Moon Fly Me to the Moon Cover - by Coward
© 2024 Gustavo "Guz" L. de Mello. Licensed under CC BY-SA 4.0
1 note
·
View note
Text
How to deploying Laravel projects on a live server – Complete Step-by-Step Guide
Learn How to deploying Laravel projects on a live server with this comprehensive guide. Step-by-step instructions on setting up hosting, configuring files, and deploying your Laravel app smoothly.Read Laravel Docs
How to deploying Laravel projects on a live server, you’ll need to follow a structured process. Here’s a step-by-step guide to help you:

1. Purchase Domain and Hosting
Make sure you have a domain and a hosting plan. Most shared hosting plans (like cPanel-based ones) or a VPS will work for Laravel, but ensure your server supports PHP and MySQL and meets Laravel’s requirements (PHP version, required extensions, etc.).
2. Prepare Your Laravel Project
Make sure your Laravel project is working locally.
Run the following command to clear any cached configuration and to optimize the project:
php artisan cache:clear
php artisan config:clear
php artisan route:clear
php artisan view:clear
Set up your environment variables (.env file). Make sure they are correctly configured for the live server (e.g., database, mail, and app URL settings).
3. Zip and Upload Your Laravel Project
Compress your entire Laravel project folder (without the node_modules and vendor directories) into a .zip file.
Use FTP (with FileZilla or any other FTP client) or File Manager in cPanel to upload the .zip file to your server. Typically, upload the file to the public_html or a subdirectory within it if you want to run your Laravel app in a subdirectory.
4. Extract the Files
Once uploaded, use File Manager in your hosting control panel to extract the .zip file.
5. Set Up the Public Directory
By default, Laravel’s entry point is the public folder, which contains the index.php file. On a shared hosting server:
Move everything in the public folder (including the .htaccess and index.php files) to the root directory (usually public_html).
Edit the index.php file to update the paths:
Change:
require __DIR__.'/../vendor/autoload.php';
$app = require_once __DIR__.'/../bootstrap/app.php';
To:
require __DIR__.'/vendor/autoload.php';
$app = require_once __DIR__.'/bootstrap/app.php';
This ensures that Laravel can find the necessary files in the correct directory.
6. Set File Permissions
Ensure that the following directories are writable by the server:
/storage
/bootstrap/cache
Use the following command via SSH (if available) or through the hosting file manager:chmod -R 775 storage chmod -R 775 bootstrap/cache
7. Set Up a Database
Create a MySQL database and a user with privileges in cPanel (or via SSH if using VPS).
Update the .env file with your database credentials:
DB_HOST=localhost DB_DATABASE=your_database_name DB_USERNAME=your_database_username DB_PASSWORD=your_database_password
8. Install Composer Dependencies
If you have SSH access:
SSH into your server using a terminal or a tool like PuTTY.
Navigate to your project directory
cd /path/to/your/project
Run Composer to install the dependencies:
composer install --optimize-autoloader --no-dev
If you don’t have SSH access, you can run composer install locally, zip the vendor folder, and upload it to the server.
9. Run Migrations
If you have SSH access, run the following command to migrate the database:
php artisan migrate --force
If you don’t have SSH access, you can run the migrations locally and then export/import the database to the server via phpMyAdmin.
10. Set App Key
Generate a new application key if you haven’t already:php artisan key:generate
Ensure the key is set in the .env file:
Read Full Tutorials
0 notes
Text
VS Code, Angular and the npm error "minTimeout is greater than maxTimeout"
When running Angular in VS Code, and especially after you update your NodeJs, running npm operations can lock you out with this error: minTimeout is greater than maxTimeout If you go to this file: AppData\Roaming\npm\node_modules\npm\node_modules\retry\lib\retry.js You will see the error: if (opts.minTimeout > opts.maxTimeout) { throw new Error('minTimeout is greater than maxTimeout '…
0 notes
Text
CAS CS412 MEAN PS8: Simple Web App
Let’s extend our Angular skills. Requirements 0. Create a new branch, PS7, from PS6. Be sure that your .gitignore file has an entry to exclude /node_modules from being pushed to github. 1. Write a simple Angular application that queries the route that you created in PS6 using an Angular service: a. Use a validated form [require the input term and validate it is longer than 1 character] and a…
0 notes
Text
[node]npm install doesn't create node_modules directory
phải chạy lệnh: npm init
View On WordPress
0 notes
Text
this is the type of github issue that I subscribe to notifications for. and then when it gets resolved months later I'm just staring at the email like. what the hell was I possibly doing in which that was relevant.
0 notes