#nodejs microservice docker image
Explore tagged Tumblr posts
Visit Tumblr Blog
Explore Tumblr blogs with no restrictions, modern design and the best experience.
Last Seen Tumblr Blogs


Fun Fact
Hackers stole 65M passwords from Tumblr in 2013.
Video
youtube
Run Nodejs Microservices in Docker Container | Deploy MongoDB in Docker ... Full Video Link https://youtu.be/ltNr8Meob4g Hello friends, new #video on #nodejs #microservices in #docker #container with #mongodb in #docker #container #tutorial for #api #developer #programmers with #examples is published on #codeonedigest #youtube channel. @java #java #aws #awscloud @awscloud @AWSCloudIndia #salesforce #Cloud #CloudComputing @YouTube #youtube #azure #msazure #codeonedigest @codeonedigest #docker #dockertutorial #whatisdocker #learndocker #dockercontainer #nodejsmicroservice #nodejsmicroservicestutorial #nodejsmicroserviceexample #nodejsmicroserviceproject #nodejsmicroservicearchitecture #microservicemongo #nodejsmicroservicemongodb #nodejsmicroservicedocker #mongodbdocker #dockermongodb #nodejsmongoose #nodejsexpress #dockermicroservices #dockermicroservicesnodejs #dockermicroservicestutorial #dockermicroserviceexample #mongodb
#youtube#nodejs microservice in docker container#mongodb in docker container#nodejs microservices#microservice in docker container#nodejs microservice docker image#mongodb docker image#mongodb#docker#docker image#dockerfile#docker file#nodejs#nodejs module#express#nodejs express#nodejs mongoose#microservices
1 note
·
View note
Text
7 Open Source Projects You Should Know - JavaScript Edition
Overview
Hi everyone 👋🏼 In this article, I'm going to look at seven OSS repository that you should know written in JavaScript, interesting projects that caught my attention and that I want to share. Let's start 🤙🏼
1. Appwrite
Appwrite is an end-to-end backend server for Web, Mobile, Native, or Backend apps. You can easily integrate your app with user authentication, a database for storing and querying users and team data, storage and file management, image manipulation, Cloud Functions, and more services.
appwrite / appwrite
Your backend, minus the hassle.
Our Appwrite Init event has concluded. You can check out all the new and upcoming features on our Init website 🚀
Appwrite is a backend platform for developing Web, Mobile, and Flutter applications. Built with the open source community and optimized for developer experience in the coding languages you love.
English | 简体中文
Announcing Appwrite Cloud Public Beta! Sign up today!
Appwrite is an end-to-end backend server for Web, Mobile, Native, or Backend apps packaged as a set of Docker microservices. Appwrite abstracts the complexity and repetitiveness required to build a modern backend API from scratch and allows you to build secure apps faster.
Using Appwrite, you can easily integrate your app with user authentication and multiple sign-in methods, a database for storing and querying users and team data, storage and file management, image manipulation, Cloud Functions, and more services.
Find out more at: https://appwrite.io
Table of Contents:
Installation
…
View on GitHub
2. melonJS
melonJS is an HTML5 game engine that empowers developers and designers to focus on content. The framework provides a comprehensive collection of components and support for a number of third-party tools. It is an alternative to other JavaScript game engines such as Phaser 🤞
melonjs / melonJS
a fresh, modern & lightweight HTML5 game engine
melonJS 2
A fresh, modern & lightweight HTML5 game engine
melonJS 2 is a modern version of the melonJS game engine that was first released in 2011. It has been rebuilt entirely using ES6 class, inheritance and semantic, and bundled using esbuild for blazing fast build performance and provide modern features such as tree-shaking.
Note: migrating an existing project to melonJS 2 (version 10.0 and higher) will definitely break your game (ES6 semantic and inheritance, nodeJS event emitter, and no backward compatibility with deprecated legacy APIs), and you might want to read first this small step by step guide on upgrading to melonJS 2. If you are looking at the legacy version (9.x and lower) of melonJS, you can find it here under the legacy branch.
melonJS is open-source, licensed under the MIT License, and actively developed and maintained with the help of a small team of enthusiasts…
View on GitHub
3. GDevelop
GDevelop is another free, open-source game engine build from any platforms like PC or phone. The peculiarity of this game engine is that it is possible to create video games without using code, because it uses a logic system based on conditions and actions.
4ian / GDevelop
🎮 Open-source, cross-platform 2D/3D/multiplayer game engine designed for everyone.
GDevelop is a full-featured, no-code, open-source game development software. You can build games for mobile, desktop and the web. GDevelop is fast and easy to use: the game logic is built up using an intuitive and powerful event-based system.
Getting started
❔ I want to... 🚀 What to do Download GDevelop to make games Go to GDevelop website to download the app! Contribute to the editor Download Node.js and follow this README. Create/improve an extension Download Node.js and follow this README. Help to translate GDevelop Go on the GDevelop project on Crowdin or translate in-app tutorials.
Are you interested in contributing to GDevelop for the first time? Take a look at the list of good first issues, good first contributions or the "🏐 not too hard" cards on the Roadmap.
Overview of the architecture
Directory ℹ️ Description Core GDevelop core library, containing common tools to implement
…
View on GitHub
4. Egg.js
Egg.js is a simple library that allows you to easily add web easter eggs by watching the user's key strokes. It's simple to use and very funny 🤣
mikeflynn / egg.js
A simple javascript library to add easter eggs to web pages.
Egg.js
Egg.js is a simple JS library that has no prerequisites and allows you to easily add web easter eggs by watching the user's key strokes.
Example
It's really easy to use. Just include the egg.js file on the page...
<script type="text/javascript" src="https://cdnjs.cloudflare.com/ajax/libs/egg.js/1.0/egg.min.js"></script>
(Thanks to Cloudflare for hosting the library!)
...then use the addCode() function to add in your easter eggs. You need to pass it the character sequence to trigger the easter egg callback (which can either be in plain English or Javascript key codes), a function to trigger when it happens, and an optional set of metadata. Metadata can be anything from a string to an object.
var egg = new Egg(); egg .addCode("up,up,down,down,left,right,left,right,b,a", function() { jQuery('#egggif').fadeIn(500, function()
…
View on GitHub
5. API Vault
API Vault is a beautiful project written in JavaScript: it's an online platform that works as a gateway to a world of public APIs. You can also filter the APIs by category and find the one that's right for you 🖐
Exifly / ApiVault
Your gateway to a world of public APIs.
Prerequisites • How To Use • Credits • Contributing • Support • License
Click here to submit your API
Built with
Prerequisites
Before starting to use the software make sure you have docker installed.
How To Use
Clone the repository
git clone https://github.com/exifly/ApiVault
Set .env file
Inside root repository folder rename .env.dev file
cat .env.dev > .env
Inside /frontend folder rename .env.sample file
cd frontend cat .env.dev > .env
Same action inside /backend folder
cd backend cat .env.dev > .env
Client/Server side using Docker
# Go into the root folder cd ApiVault # Run docker docker-compose up
Important note:
On first docker-compose launch, your terminal could tell you:
database_dev | 2023-05-26 13:38:01.598 UTC [83] ERROR: relation "vault_api" does not exist at character 232 database_dev | 2023-05-26 13:38:01.598 UTC [83] STATEMENT: SELECT "vault_api"."id", "vault_api"."name", "
…
View on GitHub
6. sweetalert2
sweetalert2 is a beautiful, responsive, customizable, accessible replacement for JavaScript's popup boxes without external dependencies. Primarily designed for JavaScript projects, you can integrate it with the three big frontend frameworks: Angular, React, and Vue.
sweetalert2 / sweetalert2
✨ A beautiful, responsive, highly customizable and accessible (WAI-ARIA) replacement for JavaScript's popup boxes. Zero dependencies. 🇺🇦
A beautiful, responsive, customizable, accessible (WAI-ARIA) replacement for JavaScript's popup boxes. Zero dependencies.
Installation | Usage | Examples | Recipe gallery | Themes | React | Angular
Sponsors
For all questions related to sponsorship please get in touch with me via email [email protected]
Become a sponsor Kryptovaluutat DLX Plugins Tiago de Oliveira Stutz
Roboflow ZezeLife SERP Empire Real Spy Apps
Phone Tracking Apps Metal Raised Garden Bed
NSFW Sponsors
Important notice about the usage of this software for .ru
…
View on GitHub
7. Video.js
Video.js is a web video player built that supports HTML video and Media Source Extensions, as well as other playback techs like YouTube and Vimeo. It supports video playback on desktops and mobile devices. As with sweetalert2, you can integrate this library with the three JavaScript frameworks: Angular, React, and Vue.
videojs / video.js
Video.js - open source HTML5 video player
Video.js - HTML5 Video Player
Video.js is a web video player built from the ground up for an HTML5 world. It supports HTML5 video and Media Source Extensions, as well as other playback techs like YouTube and Vimeo (through plugins). It supports video playback on desktops and mobile devices. This project was started mid 2010, and the player is now used on over 50,000 100,000 200,000 400,000 700,000 websites.
Table of Contents
Quick Start
Contributing
Code of Conduct
License
Quick Start
Thanks to the awesome folks over at Fastly, there's a free, CDN hosted version of Video.js that anyone can use. Add these tags to your document's <head>:
<link href="//vjs.zencdn.net/8.3.0/video-js.min.css" rel="stylesheet"> <script src="//vjs.zencdn.net/8.3.0/video.min.js"></script>
For the latest version of video.js and URLs to use, check out the Getting Started page on…
View on GitHub
Conclusion
This list lists seven open source projects that are worth checking out, either to use them or even to contribute🖖 Happy coding!✨
1 note
·
View note
Link
Cloud-native applications are on the rise thanks to the scalability and flexibility they provide. However, this type of architecture has its own challenges. Implementing a CI/CD pipeline will solve most of them, like defining delivery procedures, delivering applications independently, and gaining observability of the numerous building blocks in a system are some of them. A CI/CD pipeline is the key to automating the steps of the software delivery process. This includes initiating code builds, running automated tests, and deploying to a testing or production environment. One CI/CD pipeline consists of multiple steps executed one after another or in parallel. There are two known pipeline syntaxes — Scripted and Declarative. The key difference between them is their flexibility. Although both syntaxes are based on Groovy DSL, the Scripted pipeline syntax is less restrictive. It also allows almost anything that can be done in Groovy. This means that the script can easily become hard to read and write. On the other hand, the Declarative syntax is more restrictive and provides a well-defined structure, which is ideal for simpler CI/CD pipelines. This syntax supports the “pipeline as code” concept. Therefore, you can write in a file that can be checked into a source control management system like Git. In order to make it more convenient for developers to set up a CI/CD pipeline, Microtica supports the Declarative syntax to define build procedures along with the source code.
Declarative CI/CD Pipelines
For the pipeline process to work, each component/microservice should have a file named microtica.yaml on the root level in its source code. This file contains the specification of the build process. During the build process, Microtica extracts the specification from the code. Then, it creates a state machine to drive the defined process. In order to ensure a single source of truth for pipeline specification, Microtica does NOT allow changes in the Build pipelines from the UI. Changes will only take effect from the YAML file provided in each source code repository. We find this very helpful in avoiding possible confusion of definition, maintenance, and, most importantly, debugging problems in the process.
Define a CI/CD pipeline
There are no limitations to the steps of the build pipeline that you can define. Here is one example of a microtica.yaml file that defines a build pipeline for NodeJS application. This pipeline executes three particular commands defined in the commands section.
Pipeline: StartAt: Build States: Build: Type: Task Resource: microtica.actions.cmd Parameters: commands: - npm install - npm test - npm prune --production sourceLocation: "$.trigger.source.location" artifacts: true End: true
Pipeline — the root key which defines the start of the pipeline section
StartAt — defines the first action of the pipeline
States — defines a list of states for the particular pipeline
Type — a type of pipeline action. Always set it to Task.
Resource — an action that the engine will use. Currently, we support microtica.actions.cmd, an action that executes bash scripting.
Parameters — a set of parameters that are given to the action
commands — a list of bash commands. Here, you define your custom scripts for build, test, code quality checks, etc.
sourceLocation — the location where the action can find the source code. You should NOT change this. Once pulled from the Git repository, Microtica stores the artifacts on a location specified by the user for the particular component/microservice. $.trigger.source.location defines that location.
artifacts — a value that defines that this build will produce artifacts which will be stored in S3 and used during deployment. Set this value should to false in case the artifact of the build is Docker image
End — defines that this is the last action in the pipeline.
Microtica supports bash commands for the execution action. In the future, we are planning to allow developers to define their own custom actions.
Getting a Docker image ready for deployment
Let’s create an extended pipeline from the example above, adding an additional step to prepare a Docker image for deployment:
Pipeline: StartAt: Build States: Build: Type: Task Resource: microtica.actions.cmd Parameters: environmentVariables: pipelineId: "$.pipeline.id" version: "$.commit.version" commands: - echo Starting build procedure... - npm install - npm test - echo Logging in to Amazon ECR... - $(aws ecr get-login --region $AWS_REGION --no-include-email) - echo Checking if repository exists in ECR. If not, create one - repoExists=`aws ecr describe-repositories --query "repositories[?repositoryName=='$pipelineId']" --output text` - if [ -z "$repoExists" ]; then aws ecr create-repository --repository-name $pipelineId; fi - awsAccountId=$(echo $CODEBUILD_BUILD_ARN | cut -d':' -f 5) - artifactLocation=$awsAccountId.dkr.ecr.$AWS_REGION.amazonaws.com/$pipelineId - echo Build Docker image... - docker build -t $pipelineId . - docker tag $pipelineId $artifactLocation:$version - docker tag $pipelineId $artifactLocation:latest - echo Push Docker image - docker push $artifactLocation sourceLocation: "$.source.location" artifacts: false End: true
In this example, we first inject environment variables in the step runtime with environmentVariables parameter ($.pipeline.id and $.commit.version are both provided by Microtica). The CI/CD pipeline in the latest example starts by executing necessary instructions to build and test the code. Once this is done, Microtica creates an ECR repository if it doesn’t already exist. Once we have the ECR repository in place, the last step is to build a new Docker image and then push it in the repository.
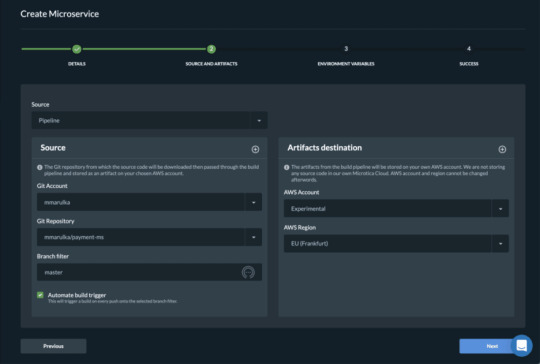
After you define the microtica.yaml file with the build pipeline, you can automate your build process in Microtica when you create the component or microservice with the wizard in the portal. This option will add a webhook to your repository. A webhook is a listener that triggers a build process whenever you push new code to your repository branch. This way, you can be sure that you’re always working with the newest changes. Building the Docker image gave us an artifact so we can deploy it in a Kubernetes cluster. You can do this from Microservice details — Add to Cluster, or in the Kubernetes Dashboard — Microservices — Deploy.

When you deploy your microservice in a Kubernetes Cluster you can select the scaling options. Moreover, you can also set up continuous delivery for your microservice.
Pipelines overview

Once you trigger a build manually or automatically, follow the build process in the portal and see the events in real-time. If the build fails, it will mark it with red on the screen and it will show the error in the logs. Follow all the pipelines for your components and microservices in the Pipelines overview page and track their status. Microtica will mark a pipeline as not healthy if there are several failed builds detected. From this page, you can access any build in the history of your project. More importantly, you can also and inspect the logs to find the problems.
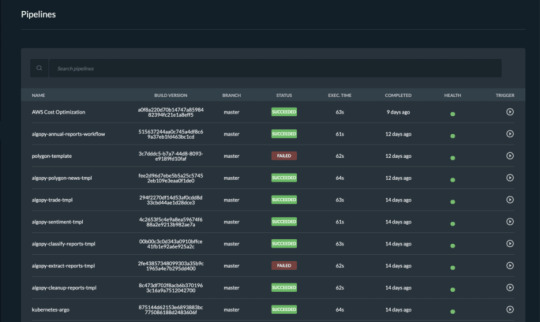
We are strong advocates for automated pipelines as they remove manual errors. Moreover, they are crucial for reliable and sustainable software delivery. They make software developers more productive, releasing them from the need to perform pipeline steps manually. Most importantly, they reduce the stress around new product releases.
0 notes
Text
持续部署微服务的实践和准则
当我们讨论微服务架构时,我们通常会和Monolithic架构(单体架构 )进行比较。
在Monolithic架构中,一个简单的应用会随着功能的增加、时间的推移变得越来越庞大。当Monoltithic App变成一个庞然大物,就没有人能够完全理解它究竟做了什么。此时无论是添加新功能,还是修复Bug,都是一个非常痛苦、异常耗时的过程。
Microservices架构渐渐被许多公司采用(Amazon、eBay、Netflix),用于解决Monolithic架构带来的问题。其思路是将应用分解为小的、可以相互组合的Microservices。这些Microservices通过轻量级的机制进行交互,通常会采用基于HTTP协议的服务。
每个Microservices完成一个独立的业务逻辑,它可以是一个HTTP API服务,提供给其他服务或者客户端使用。也可以是一个ETL服务,用于完成数据迁移工作。每个Microservices除了在业务独立外,也会有自己独立的运行环境,独立的开发、部署流程。
这种独立性给服务的部署和运营带来很大的挑战。因此持续部署(Continuous Deployment)是Microservices场景下一个重要的技术实践。本文将介绍持续部署Microservices的实践和准则。
实践:
使用Docker容器化服务
采用Docker Compose运行测试
准则:
构建适合团队的持续部署流水线
版本化一切
容器化一切
使用Docker容器化服务
我们在构建和发布服务的时候,不仅要发布服务本身,还需要为其配置服务器环境。使用Docker容器化微服务,可以让我们不仅发布服务,同时还发布其需要的运行环境。容器化之后,我们可以基于Docker构建我们的持续部署流水线:
上图描述了一个基于Ruby on Rails(简称:Rails)服务的持续部署流水线。我们用Dockerfile配置Rails项目运行所需的环境,并将Dockerfile和项目同时放在Git代码仓库中进行版本管理。下面Dockerfile可以描述一个Rails项目的基础环境:
FROM ruby:2.3.3 RUN apt-get update -y && \ apt-get install -y libpq-dev nodejs git WORKDIR /app ADD Gemfile /app/Gemfile ADD Gemfile.lock /app/Gemfile.lock RUN bundle install ADD . /app EXPOSE 80 CMD ["bin/run"]
在持续集成服务器上会将项目代码和Dockerfile同时下载(git clone)下来进行构建(Build Image)、单元测试(Testing)、最终发布(Publish)。此时整个构建过程都基于Docker进行,构建结果为Docker Image,并且将最终发布到Docker Registry。
在部署阶段,部署机器只需要配置Docker环境,从Docker Registry上Pull Image进行部署。
在服务容器化之后,我们可以让整套持续部署流水线只依赖Docker,并不需要为环境各异的服务进行单独配置。
使用Docker Compose运行测试
在整个持续部署流水线中,我们需要在持续集成服务器上部署服务、运行单元测试和集成测试Docker Compose为我们提供了很好的解决方案。
Docker Compose可以将多个Docker Image进行组合。在服务需要访问数据库时,我们可以通过Docker Compose将服务的Image和数据库的Image组合在一起,然后使用Docker Compose在持续集成服务器上进行部署并运行测试。
上图描述了Rails服务和Postgres数据库的组装过程。我们只需在项目中额外添加一个docker-compose.yml来描述组装过程:
db: image: postgres:9.4 ports: - "5432" service: build: . command: ./bin/run volumes: - .:/app ports: - "3000:3000" dev: extends: file: docker-compose.yml service: service links: - db environment: - RAILS_ENV=development ci: extends: file: docker-compose.yml service: service links: - db environment: - RAILS_ENV=test
采用Docker Compose运行单元测试和集成测试:
docker-compose run -rm ci bundle exec rake
构建适合团队的持续部署流水线
当我们的代码提交到代码仓库后,持续部署流水线应该能够对服务进行构建、测试、并最终部署到生产环境。
为了让持续部署流水线更好的服务团队,我们通常会对持续部署流水线做一些调整,使其更好的服务于团队的工作流程。例如下图所示的,一个敏捷团队的工作流程:
通常团队会有业务分析师(BA)做需求分析,业务分析师将需求转换成适合工作的用户故事卡(Story Card),开发人员(Dev)在拿到新的用户故事卡时会先做分析,之后和业务分析师、技术主管(Tech Lead)讨论需求和技术实现方案(Kick off)。
开发人员在开发阶段会在分支(Branch)上进行开发,采用Pull Request的方式提交代码,并且邀请他人进行代码评审(Review)。在Pull Request被评审通过之后,分支会被合并到Master分支,此时代码会被自动部署到测试环境(Test)。
在Microservices场景下,本地很难搭建一整套集成环境,通常测试环境具有完整的集成环境,在部署到测试环境之后,测试人员(QA)会在测试环境上进行测试。
测试完成后,测试人员会跟业务分析师、技术主管进行验收测试(User Acceptance Test),确认需求的实现和技术实现方案,进行验收。验收后的用户故事卡会被部署到生产环境(Production)。
在上述团队工作的流程下,如果持续部署流水线仅对Master分支进行打包、测试、发布。在开发阶段(即:代码还在分支)时,无法从持续集成上得到反馈,直到代码被合并到Master并运行构建后才能得到反馈,通常会造成“本地测试成功,但是持续集成失败”的场景。
因此,团队对仅基于Master分支的持续部署流水线做一些改进。使其可以支持对Pull Request代码的构建:
如上图所示:
持续部署流水线区分Pull Request和Master。Pull Request上只运行单元测试,Master运行完成全部构建并自动将代码部署到测试环境。
为生产环境部署引入手动操作,在验收测试完成之后再手动触发生产环境部署。经过调整后的持续部署流水线可以使团队在开发阶段快速从持续集成上得到反馈,并且对生产环境的部署有更好的控制。
版本化一切
版本化一切,即将服务开发、部署相关的系统都版本化控制。我们不仅将项目代码纳入版本管理,同时将项目相关的服务、基础设施都进行版本化管理。 对于一个服务,我们一般会为它单独配置持续部署流水线,为它配置独立的用于运行的基础设施。此时会涉及两个非常重要的技术实践:
构建流水线即代码
基础设施即代码
构建流水线即代码。通常我们使用Jenkins或者Bamboo来搭建配置持续部署流水线,每次创建流水线需要手动配置,这些手动操作不易重用,并且可读性很差,每次对流水线配置的改动并不会保存在历史记录中,也就是说我们无从追踪配置的改动。
在今年上半年,团队将所有的持续部署流水线从Bamboo迁移到了BuildKite,BuildKite对构建流水线即代码有很好的支持。下图描述了BuildKite的工作方式:
在BuildKite场景下,我们会在每个服务代码库中新增一个pipeline.yml来描述构建步骤。构建服务器(CI Service)会从项目的pipeline.yml中读取配置,生成构建步骤。例如,我们可以使用如下代码描述流水线:
steps: - name: "Run my tests" command: "shared_ci_script/bin/test" agents: queue: test - wait - name: "Push docker image" command: "shared_ci_script/bin/docker-tag" branches: "master" agents: queue: test - wait - name: "Deploy To Test" command: "shared_ci_script/bin/deploy" branches: "master" env: DEPLOYMENT_ENV: test agents: queue: test - block - name: "Deploy to Production" command: "shared_ci_script/bin/deploy" branches: "master" env: DEPLOYMENT_ENV: production agents: queue: production
在上述配置中,command中的步骤(即:test、docker-tag、deploy)分别是具体的构建脚本,这些脚本被放在一个公共的shared_ci_script代码库中,shared_ci_script会以git submodule的方式被引入到每个服务代码库中。
经过构建流水线即代码方式的改造,对于持续部署流水线的任何改动都会在Git中被追踪,并且有很好的可读性。
基础设施即代码。对于一个基于HTTP协议的API服务基础设施可以是:
用于部署的机器
机器的IP和网络配置
设备硬件监控服务(CPU,Memory等)
负载均衡(Load Balancer)
DNS服务
AutoScaling Service(自动伸缩服务)
Splunk日志收集
NewRelic性能监控
PagerDuty报警
这些基础设施我们可以使用代码进行描述,AWS Cloudformation在这方面提供了很好的支持。我们可以使用AWS Cloudformation设计器或者遵循AWS Cloudformation的语法配置基础设施。下图为一个服务的基础设施构件图,图中构建了上面提到的大部分基础设施:
在AWS Cloudformation中,基础设施描述代码可以是JSON文件,也可以是YAML文件。我们将这些文件也放到项目的代码库中进行版本化管理。
所有对基础设施的操作,我们都通过修改AWS Cloudformation配置进行修改,并且所有修改都应该在Git的版本化控制中。
由于我们采用代码描述基础设施,并且大部分服务遵循相通的部署流程和基础设施,基础设施代码的相似度很高。DevOps团队会为团队创建属于自己的部署工具来简化基础设施配置和部署流程。
容器化一切
通常在部署服务时,我们还需要一些辅助服务,这些服务我们也将其容器化,并���用Docker运行。下图描述了一个服务在AWS EC2 Instance上面的运行环境:
在服务部署到AWS EC2 Instance时,我们需要为日志配置收集服务,需要为服务配置Nginx反向代理。
按照12-factors原则,我们基于fluentd,采用日志流的方式处理日志。其中logs-router用来分发日志、splunk-forwarder负责将日志转发到Splunk。
在容器化一切之后,我们的服务启动只需要依赖Docker环境,相关服务的依赖也可以通过Docker的机制运行。
总结
Microservices给业务和技术的扩展性带来了极大的便利,同时在组织和技术层面带来了极大的挑战。由于在架构的演进过程中,会有很多新服务产生,持续部署是技术层面的挑战之一,好的持续部署实践和准则可以让团队从基础设施抽离出来,关注与产生业务价值的功能实现。
持续部署微服务的实践和准则,首发于文章 - 伯乐在线。
1 note
·
View note
Text
Kubernetes 101 - Concepts and Why It Matters
Docker Containers Changed How We Deploy Software
In the old days, software deployment was hard, time-consuming, and error-prone. To install an application, you need to purchase a number of physical machines and pay for CPU and memory than you might actually need. A few years later, virtualization was dominant. This saved you some costs as one powerful bare-metal server can host multiple machines. Thus, CPU and memory could be shared. In modern days, machines can be split into even smaller parts than virtual servers: containers. Containers became so popular only a few years ago. So, what exactly is a Linux container? And where does Docker fit?
applications inside virtual machines-1
A container provides a type of virtualization just like virtual machines. However, while a hypervisor provides a hardware isolation level, containers offer process isolation level. To understand this difference, let’s return to our example.
Instead of creating a virtual machine for Apache and another for MySQL, you decide to use containers. Now, your stack looks like below illustration.
applications inside docker containers
A container is nothing but a set of processes on the operating system. A container works in complete isolation from other processes/containers through Linux kernel features, such as cgroups, chroot, UnionFS, and namespaces,.
This means you’ll only pay for one physical host, install one OS, and run as many containers as your hardware can handle. Reducing the number of operating systems that you need to run on the same host means less storage, memory and CPU wasted.
In 2010, Docker was founded. Docker may refer to both the company and the product. Docker made it very easy for users and companies to utilize containers for software deployment. An important thing to note, though, is that Docker is not the only tool in the market that does this. Other applications exist like rkt, Apache Mesos, LXC among others. Docker is just the most popular one.
Magalix Trial
Containers And Microservices: The Need For An Orchestrator
The ability to run complete services in the form of processes (a.k.a containers) on the same OS was revolutionary. It brought a lot of possibilities of its own:
Because containers are way cheaper and faster than virtual machines, large applications could now be broken down into small, interdependent components, each running in its own container. This architecture became known as microservices.
With the microservices architecture becoming more dominant, applications had more freedom to get larger and richer. Previously, a monolithic application grew till a certain limit where it became cumbersome, harder to debug, and very difficult to be re-deployed. However, with the advent of containers, all what you need to do to add more features to an application is to build more containers/services. With IaC (Infrastructure as Code), deployment is as easy as running a command against a configuration file.
Today, it is no longer acceptable to have a downtime. The user simply does not care if your application is experiencing a network outage or your cluster nodes crashed. If your system is not running, the user will simply switch to your competitor.
Containers are processes, and processes are ephemeral by nature. What happens if a container crashed?
To achieve high availability, you create more than one container for each component. For example, two containers for Apache, each hosting a web server. But, which one of them will respond to client requests?
When you need to update your application, you want to make use of having multiple containers for each service. You will deploy the new code on a portion of the containers, recreate them, then do the same on the rest. But, it’s very hard to do this manually. Not to mention, it’s error-prone.
Container provisioning.
Maintaining the state (and number) of running containers.
Distribute application load evenly on the hardware nodes by moving containers from one node to the other.
Load balancing among containers that host the same service.
Handling container persistent storage.
Ensuring that the application is always available even when rolling out updates.
All the above encourages IT professionals to do one thing: create as many containers as possible. However, this also has its drawbacks:
For example, let’s say you have a microservices application that has multiple services running Apache, Ruby, Python, and NodeJS. You use containers to make the best use of the hardware at hand. However, with so many containers dispersed on your nodes without being managed, your infrastructure may look as shown in below illustration.
multiple applications inside containers
You need a container orchestrator!
Please Welcome Kubernetes
Kubernetes is a container orchestration tool. Orchestration is another word for lifecycle management. A container orchestrator does many tasks, including:
Like Docker not being the only container platform out there, Kubernetes is not the sole orchestration tool in the market. There are other tools like Docker Swarm, Apache Mesos, Marathon, and others. So, what makes Kubernetes the most used one?
Why Is Kubernetes So Popular?
Kubernetes was originally developed by the software and search giant, Google. It was a branch of their Borg project. Since its inception, Kubernetes received a lot of momentum from the open source community. It is the main project of the Cloud Native Computing Foundation. Some of the biggest market players are backing it: Google, AWS, Azure, IBM, and Cisco to name a few.
Kubernetes Architecture And Its Environment?
Kubernetes is a Greek word that stands for helmsman or captain. It is the governor of your cluster, the maestro of the orchestra. To be able to do this critical job, Kubernetes was designed in a highly modular manner. Each part of the technology provides the necessary foundation for the services that depend on it. The illustration below represents a high overview of how the application works. Each module is contained inside a larger one that relies on it to function. Let’s dig deeper into each one of these.
Let’s now have an overview of the landscape of Kubernetes as a system.
kubernetes ecosystem
Kubernetes Core Features
Also referred to as the control plane, it is the most basic part of the whole system. It offers a number of RESTful APIs that enable the cluster to do its most basic operations. The other part of the core is execution. Execution involves a number of controllers like replication controller, replicaset, deployments...etc. It also includes the kubelet, which is the module responsible for communicating with the container runtime.
The core is also responsible for contacting other layers (through kubelet) to fully manage containers. Let’s have a brief look at each of them:
Container runtime
Kubernetes uses Container Runtime Interface (CRI) to transparently manage your containers without necessarily having to know (or deal with) the runtime used. When we discussed containers, we mentioned that Docker, despite its popularity, is not the only container management system available. Kubernetes uses containerd (pronounced container d) by default as a container runtime. This is how you are able to issue standard Docker commands against Kubernetes containers. It also uses rkt as an alternative runtime. Don’t be too confused at this part. This is the very inner workings of Kubernetes that, although you need to understand, you won’t have to deal with almost entirely. Kubernetes abstracts this layer through its rich set of APIs.
The Network Plugin
As we discussed earlier, a container orchestration system is responsible (among other things) for managing the network through which containers and services communicate. Kubernetes uses a library called Container Network Interface (CNI) as an interface between the cluster and various network providers. There are a number of network providers that can be used in Kubernetes. This number is constantly changing. To name a few:
Weave net
Contiv
Flannel
Calico
The list is too long to mention here. You might be asking: why does Kubernetes need more than one networking provider to choose from? Kubernetes was designed mainly to be deployed in diverse environments. A Kubernetes node can be anything from a bare metal physical server, a virtual machine, or a cloud instance. With such diversity, you have a virtually endless number of options for how your containers will communicate with each other. This requires more than one to choose among. That is why Kubernetes designers chose to abstract the network provider layer behind CNI.
The Volume Plugin
A volume broadly refers to the storage that will be availed for the pod. A pod is one or more containers managed by Kubernetes as one unit. Because Kubernetes was designed to be deployed in multiple environments, there is a level of abstraction between the cluster and the underlying storage. Kubernetes also uses the CSI (Container Storage Interface) to interact with various storage plugins that are already available.
Image Registry
Kubernetes must contact an image registry (whether public or private) to be able to pull images and spin out containers.
Cloud Provider
Kubernetes can be deployed on almost any platform you may think of. However, the majority of users resort to cloud providers like AWS, Azure, or GCP to save even more costs. Kubernetes depends on the cloud provider APIs to perform scalability and resources provisioning tasks, such as provisioning load balancers, accessing cloud storage, utilizing the inter-node network and so on.
Identity Provider
If you’re provisioning a Kubernetes cluster in a small company with a small number of users, authentication won’t be a big issue. You can create an account for each user and that’s it. But, if you’re working in a large enterprise, with hundreds or even thousands of developers, operators, testers, security professionals...etc. then having to manually create an account for each person may quickly turn into a nightmare. Kubernetes designers had that in mind when working on the authentication mechanism. You can use your own identity provider system to authenticate your users to the cluster as long as it uses OpenID connect.
Kubernetes Controllers Layer
This is also referred to as the service fabric layer. It is responsible for some higher level functions of the cluster: routing, self-healing, load balancing, service discovery, and basic deployment(for more info, https://kubernetes.io/docs/concepts/services-networking/, and https://kubernetes.io/docs/concepts/workloads/controllers/deployment/ ), among other things.
Management Layer
This is where policy enforcement options are applied. In this layer, functions like metrics collection, and autoscaling are performed. It also controls authorization, and quotas among different resources like the network and storage. You can learn more about resource quotas here.
The Interface Layer
In this layer, we have the client-facing tools that are used to interact with the cluster. kubectl is the most popular client-side program out there. Behind the scenes, it issues RESTful API requests to Kubernetes and displays the response either in JSON or YAML depending on the options provided. kubectl can be easily integrated with other higher level tools to facilitate cluster management.
In the same area, we have helm, which can be thought of as an application package manager running on top of Kubernetes. Using helm-charts, you can build a full application on Kubernetes by just defining its properties in a configuration file.
The DevOps and Infrastructure Environment
Kubernetes is one of the busiest open-source projects out there. It has a large, vibrant community and it’s constantly changing to adapt to new requirements and challenges. Kubernetes provides a tremendous number of features. Although it is only a few years old, it is able to support almost all types of environments. Kubernetes is used in many modern software building/deployment practices including:
DevOps: provisioning ephemeral environments for testing and QA is easier and faster.
CI/CD: building continuous integration/deployment, and even delivery pipelines is more seamless using Kubernetes-managed containers. You can easily integrate tools like Jenkins, TravisCI, Drone CI with the Kubernetes cluster to build/test/deploy your applications and other cloud components.
ChatOps: chat applications like Slack can easily be integrated with the rich API set provided by Kubernetes to monitor and even manage the cluster.
Cloud-managed Kubernetes: Most cloud providers offer products that already has Kubernetes installed. For example AWS EKS, Google GKE, and Azure AKS.
GitOps: Everything in Kubernetes is managed through code (YAML files). Using version control systems like Git, you can easily manage your cluster through pull requests. You don’t even have to use kubectl.[Source]-https://www.magalix.com/blog/kubernetes-101-concepts-and-why-it-matters
Basic & Advanced Kubernetes Course using cloud computing, AWS, Docker etc. in Mumbai. Advanced Containers Domain is used for 25 hours Kubernetes Training.
0 notes
Text
Connect 2017
Visual Studio Live Share - VS + VS code - colaborative programing - propojení IDE - share editace, debug - Cosmos DB - no sql db .net embeding - embed .net kod do objective c apod pro mobile app, volání z androida i ios - visual studio app center - ci/cd sjednocení - deploy, test, distribute, crash, analytics, push
Kubernetes - něco s konteinery/microservice zase - simulace prostředí se všemi microservice, přes containery v azure - normálně je aplikace rozdělená do hodně microservices - více app v různých tech, je problém lokálně rozjet, ve VS je AKC connected enviroment, které to vyřeší přes azure debug se nějak se nějak propojí s azure, kubernetes udělá i proxy pro url cally
VSTS - používá MS pro win i vsts DevOps - v azure je new resource, azure devops projekt - nastaví se jaký projekt, jazyk, platforma - vytvoří vsts projekt, ci build - checkin = build, cd - nasazování, release management, u build�� jsou různá fáze - tasky, jde vytvořit vlastní přes powershell/nodejs release plan - vytvoří se prostředi, podmínky za jakých to postupuje, zase serie tasku https://channel9.msdn.com/Events/Connect/2017/B103 - cool, ale overkill trochu, hodně plánování
VS - git merge tagy - rozpona v editoru - ctrl T - go to all, zkratky f - file apod - ctrl a kliknuti - go to definition - nove code fixy - null check apod - code sugestion - podle pravidel coding styles - .editorconfig - directory level - extension pro code sugestions.. - smart variable names sugestions
VScode - multiroot workspace - více složek otevřených, uložení nastavení - vylepšení práce se source control - zvýraznění v editoru inline diff i v solution - regiony, refaktoring - import v js, extract method js
TS - string enums - enum Color Red = "Red".. - week type checking - nyní blíž csharp objekty musí mít alespoň nějaký stejný property
react, ionic, cordova - mobilní aplikace 100procent code reuse live player - VS propojení s mobilem pro dev, xamarin azure functions - mále fce v azure, není potřeba server, zajímavé prozkoumat VS .net core + docker support více devops optimalizace prý
https://channel9.msdn.com/Events/Connect/2017/T122 Csharp 7.1 - tuples - select (jmeno: hodnot, jmeno2: hodnota) - async Task main - zkrácené default Csharp 7.2 - struct - pass by value, lepší pro paměť ref, povoleno pro extension metody aby první bylo ref - ref jde změnit, místo toho nový parametr IN - fce(in this Trida neco) - neco je readonly v metodě - ref může být i v returnu, ale když nechceme změnit tak public static ref readonly Csharp 8 - nullable reference types - string?, nakonec přiznak kompileru?
Span https://channel9.msdn.com/Events/Connect/2017/T125 na stack, blbě vysvětlený - mnohem lepší http://adamsitnik.com/Span/ - je to jednoduchý hodnotový typ, zajišťuje správnou manipulaci s pamětí a typy, něco podobného jako pole, velký bonus na výkonu - paměť v .net - stack (malé do 1MB, per fce), unmanaged - bez GC specialni api, managed - new, GC
.net 4.7.1 - net standart 2.0 - configuration builder - inject konfigurace do ConfiguraionManager z external zdrojů, např enviroment variables, přidání sekce do web.configu, a configbuilders tag, naše třída, která rozšiřuje konfiguraci, u např appSettings pak povolit dany builder
modernizace aplikace - winforms hdpi, docker/kontejner, azure - windows compatibility pack for .net core - vrátí chybějící api v core pro windows - drawing, registry.. - nuget, je extension pro analýzu co nepujde na linuxu - trik MVC - img source je akce Home/GetImage, vrací File(byte array, content type) - nuget snapshotcollector - poznamená info o vyjímce - jde stáhnout do VS
Microservices https://channel9.msdn.com/Events/Connect/2017/T116 packages - dll/exe nebo odkaz na kontejner config packages - dohromady - service package - nasadi se na nody umí balancování podle kapacity, automaticky, u stateless
docker - mam aplikaci a image (treba win s net) - misto popisu jak nasadit aplikaci, docker stáhne image a rozběhne aplikaci podle napsané konfigurace kubernetes - mam hodne aplikaci v dockeru - microservice, potřebuje je nasadit na vice node, load balancovat, a debugovat jako bych je měl lokalne - orchestrator
Sql Operation Studio - podobné VS code, snaží se pomoci s sql projekty - go to definition, script, statistiky, sledování dotazů
0 notes
Text
Scaling the serverless summit requires environmental sympathy with dev & ops
The only way to gain confidence that a feature branch will work in the cloud is to run it in the cloud — with environmental sympathy
In the wake of Serverlessconf 2017 in Austin, there’s been an increasing number of discussions about today’s cold reality of serverless. While we can see the glory of serverless manifesting in the not-too distant future, the community still finds it difficult to test, deploy, debug, self-discover, and generally develop serverless applications.
The discussion has been amplified in recent days with tweet storms and the great threads on the Serverless Slack channel from Paul Johnston that prompted this post. The common sentiment is that the difficultly with serverless gets more acute when developing applications composed of multiple sets of functions, infrastructure pieces, and identities evolving over time.
On the one hand, the serverless approach to application architecture does implicitly address some of the high-availability aspects of service resiliency. For instance, you cloud assume — without empirical evidence — that AWS transparently migrates Lambda execution across Availability Zones in the face of localized outages. This is unlike a more traditional VM/container model, where you must explicitly distribute compute across isolated failure domains and load balance at a higher logical level (e.g. ELB and ALB).
While this intrinsic reliability is undoubtedly a good thing, overall resiliency isn’t so easily satisfied. Take for instance the canonical “Hello Serverless” application: an event-based thumbnailing workflow. Clients upload an image to an S3 bucket, a Lambda function handles the event, thumbnails the image, and posts it back to S3. Ship it.
Except, how do you actually test for the case when the S3 bucket is unavailable? Or can you? I’m not thinking of testing against a localhost mock API response, but the actual S3 bucket API calls — the bucket you’re accessing in production, via a dynamically injected environment variable.
Another example is when you have two Lambda functions, loosely coupled. The functions are blissfully ignorant of one another, although they share a mutual friend: Kinesis. In this use case, “Function A” publishes a message, perhaps with an embedded field whose value is another service’s event format (like an S3 triggering event) that’s consumed by “Function B”. While there’s no physical coupling, there’s potentially a deep logical coupling between them — one which might only appear at some future time as message contents drift across three agents in the pipeline.
How can we guard against this? How can we be certain about the set of functions which ultimately defines our service’s public contract?
Are they coherent? Are the functions secure? Resilient? Correct? Observable? Scalable? How can we reduce uncertainty around non-functional requirements?
body[data-twttr-rendered="true"] {background-color: transparent;}.twitter-tweet {margin: auto !important;}
Serverless is an implementation detail, not an architectural pattern.
— @mweagle
function notifyResize(height) {height = height ? height : document.documentElement.offsetHeight; var resized = false; if (window.donkey && donkey.resize) {donkey.resize(height); resized = true;}if (parent && parent._resizeIframe) {var obj = {iframe: window.frameElement, height: height}; parent._resizeIframe(obj); resized = true;}if (window.webkit && window.webkit.messageHandlers && window.webkit.messageHandlers.resize) {window.webkit.messageHandlers.resize.postMessage(height); resized = true;}return resized;}twttr.events.bind('rendered', function (event) {notifyResize();}); twttr.events.bind('resize', function (event) {notifyResize();});if (parent && parent._resizeIframe) {var maxWidth = parseInt(window.frameElement.getAttribute("width")); if ( 500 < maxWidth) {window.frameElement.setAttribute("width", "500");}}
The non-functional requirements of serverless
The great thing about non-functional requirements is that they’re … non-functional. They speak to a system’s characteristics — how it should be — not what it should do, or how it should be done. In that sense, non-functional requirements both have nothing and everything to do with serverless.
The slide from Peter Bourgon’s presentation on the microservice toolkit for Go
The slide above is from Peter Bourgon’s excellent presentation on the design decisions behind go-kit, a composable microservice toolkit for Go. The concerns listed apply equally to a JVM monolith, a Go-based set of microservices, or a NodeJS constellation supported by FaaS. If you’re running something in production, those *-ilities lurk in the shadows whether or not they’re explicitly named.
In that sense, serverless is less a discontinuity with existing practice and more the next stage in the computing continuum — a theme emphasized in Tim Wagner’s closing keynote. It’s a technique that embeds more of the *-ilities into the vendor platform itself, rather than requiring secondary tools. Serverless enables us to deliver software faster and with fewer known unknowns — at least those that are externally observable.
Although serverless offloads more of these characteristics to the vendor, we still own the service. At the end of the day, each one of us is responsible to the customer, even when conditions change. We need to own it. And that means getting better at Ops. Or more specifically — cloud-native development.
Charity Majors does an excellent job describing the operational best practices for serverless
The Base Camp — “Works on My Machine”
For many of us, the end result of our furious typing is in many cases a cloud-native application. In more mature organizations, our software constructs go through a structured CI/CD pipeline and produce an artifact ready to ship. This artifact has a well-defined membrane through which only the purest configuration data flows and all dependencies are dynamic and well behaved.
On a day-to-day basis, though, there is often a lot of bash, docker-compose, DNS munging, and API mocks. There is also a lot of “works on my machine” — which may be true, at least at this instant — but probably doesn’t hold for everyone else on the team. And it definitely doesn’t provide a lot of confidence that it will work in the cloud.
The only way to gain confidence that a feature branch will work in the cloud is to run it in the cloud.
Operations is the sum of all of the skills, knowledge and values that your company has built up around the practice of shipping and maintaining quality systems and software. — Charity Majors, WTF is Serverless Operations
If everyone on the team is developing their service feature branch in the cloud, complete with its infrastructure, then we’re all going to get better at ops. Because it’s development and ops rolled together. And we’re all going to share a sense of Environmental Sympathy.
To the Summit — From #NoOps to #WereAllOps
Environmental Sympathy, inspired by Mechanical Sympathy, is about applying awareness of our end goal of running in the cloud to the process of writing software.
While it’s always been possible to provision isolated single-developer clusters complete with VMs, log aggregators, monitoring systems, feature flags, and the like, in practice it’s pretty challenging and expensive. And perhaps most aggravating, it can be very slow. Short development cycles are critical to developer productivity and that’s not really a hallmark of immutable, VM-based deploys.
Serverless, precisely because it’s so heavily reliant on pre-existing vendor services and billed like a utility, makes it possible for every developer to exclusively develop their “service” in the cloud.
The service can have its own persistence engine, cache, queue, monitoring system, and all the other tools and namespaces needed to develop. Feature branches are the same as production branches and both are cloud-native by default. If during development, the *-ilities tools prove too limiting, slow, or opaque, developer incentives and operational incentives are aligned. Together we build systems that make it easier to ship and maintain quality systems and software. Which will also help to minimize MTTR as well.
Serverless, for both financial and infrastructure reasons, makes it possible to move towards cloud-native development and Environmental Sympathy. It represents a great opportunity to bring Dev and Ops — and QA, and SecOps) together. This allows us to mov from “worked on my machine” to “works in the cloud — I’ll slack you the URL.”
From #NoOps to #WereAllOps.
Scaling the serverless summit requires environmental sympathy with dev & ops was originally published in A Cloud Guru on Medium, where people are continuing the conversation by highlighting and responding to this story.
from A Cloud Guru - Medium http://ift.tt/2rFik4J
0 notes
Text
youtube
#youtube#video#codeonedigest#microservices#aws#microservice#docker#awscloud#nodejs module#nodejs#nodejs express#node js#node js training#node js express#node js development company#node js development services#app runner#aws app runner#docker image#docker container#docker tutorial#docker course
0 notes
Text
youtube
#youtube#video#codeonedigest#microservices#microservice#nodejs tutorial#nodejs express#node js development company#node js#nodejs#node#node js training#node js express#node js development services#node js application#redis cache#redis#docker image#dockerhub#docker container#docker tutorial#docker course
0 notes
Text
youtube
#youtube#video#codeonedigest#microservices#docker#microservice#nodejs module#nodejs express#node js#nodejs#nodejs projects#nodejs tutorial#node js development company#node js express#node js training#mongo database#mongo db#mongoose#mongodb#docker image#docker container#docker tutorial#docker course#dockerfile#dockerhub
0 notes
Text
youtube
#nodejs express#node js express tutorial#node js training#nodejs tutorial#nodejs projects#nodejs module#node js express#node js development company#codeonedigest#node js developers#docker container#docker microservices#docker tutorial#docker image#docker course#docker#postgres tutorial#postgresql#postgres database#postgres#install postgres#Youtube
0 notes
Video
youtube
Create Nodejs JavaScript Microservices Project with Postgres Database in... Full Video Link https://youtu.be/pTFUC6eFMLM Hello friends, new #video on #nodejs #microservices with #Postgresdb in #docker #container #dockerfile #dockerimage #sequelize #tutorial for #api #developer #programmers with #examples is published on #codeonedigest #youtube channel. @java #java #aws #awscloud @awscloud @AWSCloudIndia #salesforce #Cloud #CloudComputing @YouTube #youtube #azure #msazure #restapi #nodejs #api #restapitutorial @codeonedigest #codeonedigest #docker #nodejs #dockertutorial #learndocker #dockercompose #postgresqldocker #databaseindocker #databaseindockerproduction #databaseindockercompose #databaseindockercontainer #postgresqlsetup #dockerfile #dockerimagedownload #dockerhubtutorial #databaseimage #downloadpostgresql #downloadpostgresqlandpgadmin #microserviceproject #microserviceprojectusingnodejs #microservicesprojectinnodejs #nodejsmicroservice #nodejsmicroservicestutorial #node
#youtube#nodejs microservice#nodejs#javascript#microservice#javascript microservice#postgres database#postgresql#docker container#docker image#dockerfile#nodejs microservice with postgres db in docker container
1 note
·
View note
Text

code
#codeonedigest#cloud#aws#docker container#java#nodejs#javascript#docker image#dockerfile#docker file#ec2#ecs#elastic container service#elastic cloud computing#amazon ec2#amazon ecs#microservice#solid principle#python#kubernetes#salesforce#shopify#microservice design pattern#solid principles#java design pattern
0 notes
Video
youtube
Nodejs Microservice with MongoDB in Docker Container | Learn Express Mon... Full Video Link https://youtu.be/_3u7H6Hu7n0 Hello friends, new #video on #nodejs #microservices with #mongodb in #docker #container #tutorial for #api #developer #programmers with #examples is published on #codeonedigest #youtube channel. @java #java #aws #awscloud @awscloud @AWSCloudIndia #salesforce #Cloud #CloudComputing @YouTube #youtube #azure #msazure #docker #nodejs #dockertutorial #learndocker #dockercontainer #nodejsmicroservice #nodejsmicroservicestutorial #nodejsmicroservicearchitecture #nodejsmicroserviceproject #nodejsmicroservicearchitectureexample #nodejsmicroservicearchitecturegithub #mongodbdocker #mongodbtutorial #mongodbinstall #mongodbfullcourse #dockertutorialforbeginners #dockercontainertutorialforbeginners #mongoimagedockercompose #mongoimage #mongodbimage #mongodbatlas #nodejsmicroservice #nodejsmicroservicestutorial #nodejsmicroservicearchitecture #nodejsmicroserviceproject #nodejsmicroserviceexample #nodejsmicroservicesinterviewquestions #nodejsmicroserviceframework #mongodb #nodejsmongodbtutorial #nodejsmongoose #nodejsmongooseconnection #nodejsmongooseexpress #nodejsmongooseschema #nodejsmongodb #nodejsmongodb #nodejsexpress #nodejsexpressapitutorial #nodejsexpressproject #nodejsexpressapi #nodejsexpressapiproject #nodejsexpresstutorial #nodejsexpresscourse #nodejsexpressrestapi #nodejsexpresscrashcourse #nodejsexpressapplication
#youtube#node js microservices#nodejs#node js development services#node js training#node js application#node js development company#node js#mongodb#docker#docker container#docker image#dockerfile#dockerimage
1 note
·
View note
Video
youtube
Run Nestjs Microservices & Mongo Database in Docker Containers | #docker...Full Video Link - https://youtu.be/g3pRQZSP1rU Check out new video about Running Nestjs #Microservices in Docker Container with #Mongo DB on the #CodeOneDigest YouTube channel! Learn to setup #nestjs project with dependencies. Learn to create #docker image of nestjs project. Learn to connect nestjs application with mongo database. #mongodb #dockerimage #dockerfile@nestframework @nodejs @typescript @Docker @MongoDB @JavaScript @dotenvx @npmjs @vscodetips @getpostman #nestjs
1 note
·
View note
Video
youtube
Run Nestjs Microservices in Docker Container with Postgresql Database Full Video Link - https://youtu.be/HPvpxzagsNg Check out this new video about Running Nesjs Microservices in Docker Container with Postgresql DB on the CodeOneDigest YouTube channel! Learn to setup nestjs project with dependencies. Learn to create docker image of nestjs project. Learn to connect nestjs application with postgresql database. #postgresql #nestjs #docker #dockerfile #microservices #codeonedigest@nestframework @nodejs @typescript @Docker @PostgreSQL @typeormjs @JavaScript @dotenvx @npmjs @vscodetips @getpostman
#youtube#nestjs microservice#nestjs tutorial#nestjs full tutorial#nestjs complete course#nestjs microservice with postgres#run nestjs microservice project in docker#nestjs docker postgres#nestjs postgresql
1 note
·
View note