#non manifold boolean blender
Explore tagged Tumblr posts
Visit Tumblr Blog
Explore Tumblr blogs with no restrictions, modern design and the best experience.
Last Seen Tumblr Blogs


Fun Fact
China blocked Tumblr because of pornography and censorship problems in 2013.
Text
BLENDERY ADVETURES FROM THE LAST 4 WEEKS #3
I´m so so so sorry... I said in this post that I would uptade 𝐿𝑒 𝓅𝓇𝑜𝒿𝑒𝒸𝓉 "next week". I said that LAST MONTH. Its just that Square took way longer to do than I thought he would, + I had a TON of problems to fix in all my rigs so... TvT
BUT NOW THE BOY IS DONE!!!!! BEHOLD
SQUARE

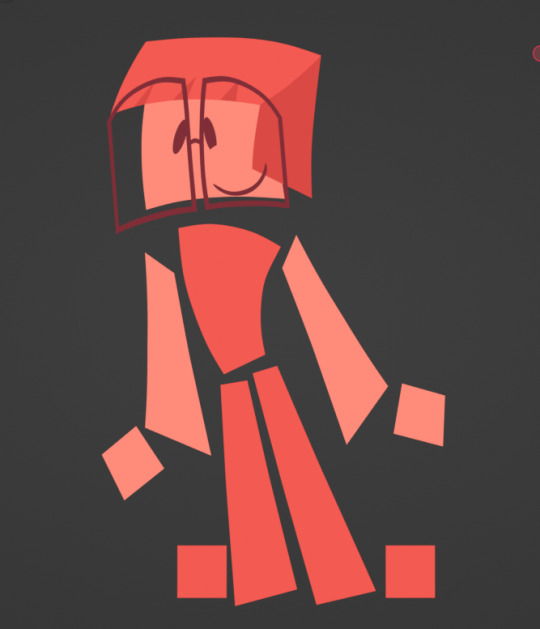

In the story he is basically the nerd (he is SUCH a square...), but he is nice to talk to and really caring about his and his friend´s well being!
What I did this last month:
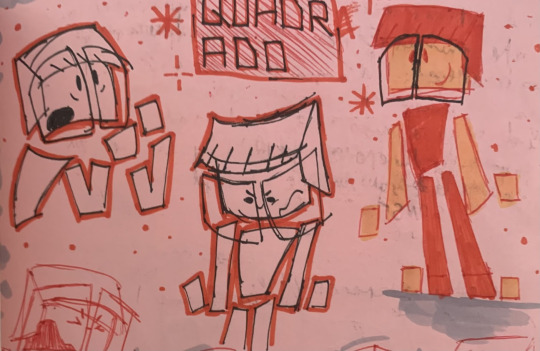
First I modeled him
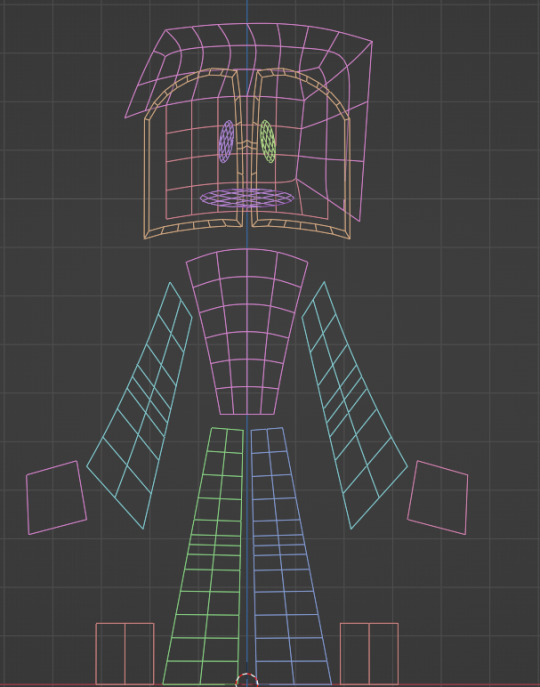
Then I rigged him, as I did with all the characters
But after that, I had to tackle a really big problem:
For all my 2D characters' faces I use booleans, to cut out their facial features to different colors. BUT blender´s boolean algorithm only work in manifold-geometry -- manifold-geometry are meshes that: 1) have a volume bigger than 0, and 2) have a distinct separation from their inside from outside / don't have any holes.-- In other words, booleans HATE 2D geometry... So what I did? I forced the booleans to work! How?
GEOMETRY NODES
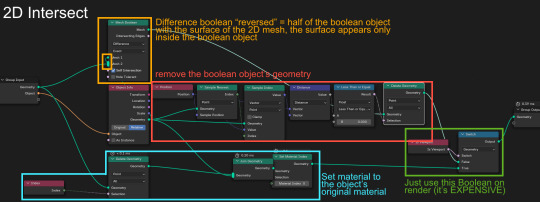
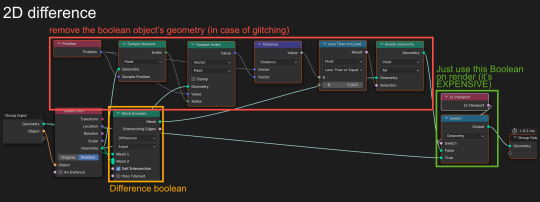
(unobstructed view)
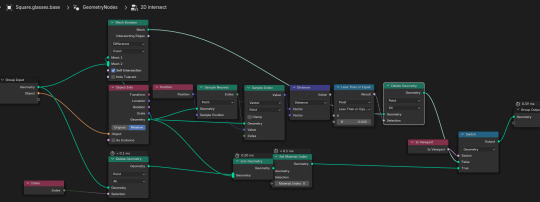
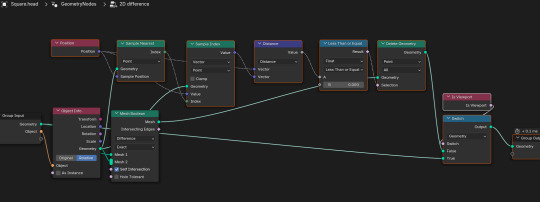
If any of you are going to use this node tree and encounter glitches or errors feel free to message me! THIS WORKED WONDERS!!!!! It only glitches really bad if your boolean object has fliped normals (if I can say so, it isn't even a glitch, it's just incompetence on my part...), so its really easy to fix.
And the last thing I did for this character was his glasses. They needed a bit more care in the rigging process, but now they work and twist like magic!

And that was it for this little guy! I know I really won't update as much here because now I will focus on the story-boards. But maybe I will show the cut models when I come to that! (cutting models is a practice to make animating less glitchy)
#blender#blendery adventures#blender3d#blender rig#geometry nodes#blender geometry nodes#geo nodes#blender geo nodes#boolean#blender boolean#non manifold boolean blender#𝐿𝑒 𝓅𝓇𝑜𝒿𝑒𝒸𝓉#Square#geometry#math#mathblr#from 2D to 3D#3D#2d model
3 notes
·
View notes
Text
one of the digital art professors has his students spend the semester using Blender — which i think is great because it’s free software with lots of online resources so they can keep using it once the class is over — but oh my god the files these kids make are so… monstrous
this kid wanted to make a ~5x5x5 inch 3D print and his file had 44 million triangles???? the stl was 2.7gb
another kid wanted to split their model into three parts, the parts were overlapping in the model, whatever - details not important. i thought i could fix it in 5 minutes. if it were my model, in fusion360, i could have fixed it in 30 seconds. it should have been one simple boolean and a plane cut but her model was so deeply non manifold that it was impervious to boolean functions. trying to subtract a sphere somehow added a sphere. i don’t know how kids do it but very often like 60% of their model is inside out. if it were 100% it would be easy to fix. but instead i just sit there with my head in my hands and say i’m sorry i don’t know how you did this and i don’t know Blender well enough to fix this.
#the second kid… i had told them i would fix the model and i felt bad because there were some language barrier issues#so i felt obligated to get this working… i am so inexperienced in blender it took me 2+ hours and i had to restart 3 times
0 notes
Text
Blender Woes
I was thinking that yesterday morning, I'd do a quick re-boolean of my readjusted Silo credit tokens and be good to go. The 20CR piece was fine. But the 5 CR file ended up being "non-manifold" in Chitubox.
I spent a huge portion of the day trying to track down the non-manifold edges and fix them. Every time I thought I had it figured out, the mesh would still be non-manifold, and boy, there were so many points that it was taking literally hours to reconnect/re-face them. This morning, I realized that somewhere along the line, I had taken a shortcut that was now turning into a longcut. I decided that rather than continuing to be a part of the sunk cost fallacy (struggling with manually fixing faces), it would be more efficient to track down the initial problem and fix that, instead.
I remembered that when I had imported the number (which I'd built in Inkscape), which imported as a curve, and then applied the solidify modifier to make it into a 3D shape, it had some spikes on it, which i had "fixed" by making the modifier not make the object so wide in the vertical dimension: this visually removed the spikes, but what it didn't do was fix the issue with the curve which I'm pretty sure was leading to my non-manifold nightmare later on down the road.
So I reimported the curve, went into edit mode, recalculated all of the points, applied the solidify modifier again, found the point (it was a single point) that was the issue, converted it to a point of type "automatic", and that fixed everything.
As is my wont, I check for manifold using the 3D Print add-on after every boolean operation (because I've found in the past that if something happens that makes a mesh non-manifold, the longer you wait to fix that -- that more boolean operations you add after that -- the more the problem compounds), and had no troubles at all.
It makes sense to me, in hindsight, why Blender would have trouble with Inkscape curves; they're different software, and probably don't handle curves and curve points in the same way. Blender does its best, but doesn't always "guess" correctly.
0 notes
Link
One of the things that will make you fed up with Boolean modifiers in Blender is the non-manifold output. Unfortunately, there is no robust way to cover this issue. However, we can create a tool that can fix most (if not all) of the problematic meshes. This tool helps us fix non-manifold meshes in Blender. Creating A Tool to fix Non-Manifold Meshes in Blender In the photo below, you can see an example of a non-manifold result that appeared as a result of a Boolean difference of another cube from this one. If you apply another Boolean operation on this object, you will see that the object gets fully destroyed.
0 notes
Video
vimeo
Here it is - the stream intro for my darling @mogsk‘s current season, the MogsK Underground Experience! The idea was inspired the kind of ��underground broadcast’ vibe, old Playstation demo discs, and of course the Fallout intro.
I built the TV and all its attachments, and the surrounding 3D environment, in Blender and animated the camera move, which bridges the gap from the ‘prestream’ section that runs while people are filing in and the main stream itself. Mogs made the video that plays on the TV and the sound!
Making-of details below:
Mogs provided me a reference of the type of TV she wanted:

I made a preliminary sketch of the scene which proved very useful for quickly working out concepts:

Most of the TV parts were poly modelled. The wires are all curves, naturally, as are the metal strips connecting the decoder box to the colander. The colander doesn’t actually have holes in the mesh, that’s just an alpha channel I painted. Overall the construction phase of the project took maybe a couple of solid days, most of it all in one huge burst last week.
Here’s a different angle on the TV. You can see it’s really designed around this one camera angle...

Would it actually work to use a colander as an aerial? ...probably not very well, not least because it’s spherical rather than parabolic, but I love the concept. It was fun to try and get the rest of the pieces to look like sheet metal bent and screwed or welded together.
Rendering was done in Cycles. I drastically cut the sample count down to keep render time under control. We decided against denoising since the grainy noise felt appropriate to a desert environment. plus about six hours to render the camera move at 59.96fps.
The static camera part was achieved almost entirely in compositor nodes. I disabled the whole scene apart from the video, rendered the cropped and transformed video to an image sequence, and then rendered a transparent version of the TV with a holdout texture to EXR and composited it over. It worked great and saved days of rendering - if I ever come back to add more elements to the scene, I’ll render on top of shadow catching holdout materials and composite them over.
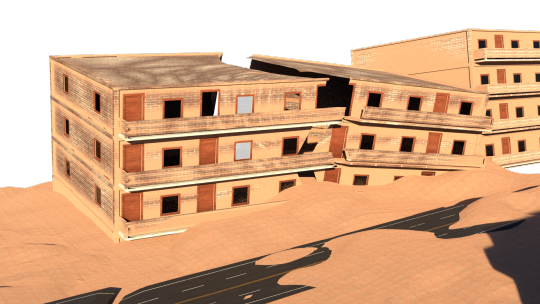
I generated the buildings in the background using the Building Tool addon to blender, assigned materials mostly by hand then created the shattered building using Booleans (which required some cleanup since Building Tool makes non-manifold meshes). I wanted to use voronoi shatter for debris but it didn’t work great, so instead I used that on the foreground bricks. To the shattered building I also used a procedural voronoi material to add displacement for cracks, though I don’t think this effect worked too great and I ended up turning it off almost completely. Here’s a closeup on the broken building - it’s not pretty up close!
The materials are broadly based on free PBR textures from various websites, such as:
https://freepbr.com/
https://www.sharetextures.com/
https://polyhaven.com/ (which provided the HDRI lighting)
https://ambientcg.com/
https://www.texturecan.com/
https://www.cgbookcase.com/
The ground was given a displacement map following this procedural dunes tutorial which I modified to cause the dunes to scale with difference. I added to this a PBR sand texture with a normal map from one of those sites. I used adaptive subdivisions on the displacement maps, which is a very nice rendering feature, although I think it hit the render time a bit to precalculate those on each frame.

As a quick hack to have sand and dirt catch the recesses of the TV and make it feel like it’s been outside in a desert, I used an ambient occlusion node to mix the TV’s material with the sand material. This was far from perfect - there are many places on the TV where you can see the sand appearing where ambient shadows would, making it obvious it’s an ambient occlusion. Unfortunately Blender does not yet have a node to produce something like a cavity map, but in any case the right approach would have been to simply paint a sand map. Learning texture painting will have to be another project.
With GPU acceleration, Blender can get really impressively good renders very fast, but it sure hit my computer hard. It’s obviously nice when you can work in Eevee but in this case I wanted lots of specular surfaces like the TV screen reflecting the environment which could be part of Mogs’s screen overlay.
8 notes
·
View notes
Text
Blender & Inkscape: problems with boolean operators & 3D printing failures using imported SVG paths (curves) converted to meshes
I tried to make this post in r/blenderhelp and it got removed, possibly because it fell afoul of the "no tutorials" rule, but I didn't mean it as a tutorial; rather, a solution to a problem that I had. So, with the original intent in mind (in the hopes that it will help someone), I'm reposting it here. Bottom Line Up Front: Use the "Mesh: 3D Print Toolbox" add-on to ensure that every path that you import from an SVG and convert to a mesh is manifold (and also use the "Distorted" button to clean up overhands) before and after using the Boolean modifier to join pieces together, which you should do one at a time.
The situation: I used Inkscape to create shapes that I wanted to import into Blender to use to make a 3D shape for printing (basically just some extruded shapes to give them some thickness). The intent was to set the various shapes to different thicknesses before joining them together into a final piece. But I could not use the Boolean modifier on them (the modifier would fail, or there would be really marked differences between "Fast" and Exact"), or if I managed to make a shape with it, the print would fail (various pieces of the print would simply not print, even though they showed up just fine in the slicing software). Recalculating normals, a frequent piece of advice, did not fix the issues. The ultimate problem was that trying to join non-manifold objects together compounded the problem -- the finished object was wildly non-manifold. It was so non-manifold that if I tried to use the 3D Print Toolbox to make the finished item manifold, the whole thing would disappear except for a few edges and vertices, and this was defeating the slicer's ability to deal with it, too.
The solution was this process:
Make sure the paths in Inkscape are clean and as simplified as you can before importing the SVG file into Blender. Here is some reference for removing duplicate nodes and closing paths: https://cutlings.datafil.no/remove-duplicate-nodes/ (and for simplifying a path, it's "Simplify" on the Paths pull-down menu".
For my paths, I used the "Solidify" modifier, with the thickness set to the thickness I wanted to it to be, when printing, and an offset of 0. After this, use "Convert to Mesh" on the Object pull-down menu in Object mode. I know there's a bunch of ways to do this, but this is what eventually worked best for me (ymmv).
After you do convert your path (curve) to a mesh, use the 3D Print Toolbox's tools to check the item (with the "Check All" button), then fix overhangs with the "Distorted" button, then follow that with "Make Manifold" (which I did regardless of the results of "Check All" because I am obsessive and want to make sure I don't skip a step if it's needed).
When joining multiple pieces, do so one at a time: add the Boolean modifier and then apply it. Next, repeat step 3 with the mesh you just completed before moving on to adding the next piece. Don't try to stack a bunch of Boolean modifiers: the farther you get from the original mesh, the wonkier Blender is going to get with the geometry, so one at a time (with 3D Print Toolbox corrections each time) is best.
Doing this fixed all of the issues I had with the Boolean modifier (the "Union" operation, in particular). I was able to use "Exact" as the Boolean mode with all of my pieces, and I was able to eventually assemble them into a finished, fully manifold mesh that printed with no issues. Doing it this way, I never had any issues that ended up with the normals flipped or otherwise weird (which you can check by turning on "Face Orientation" in the "Viewport" overlay settings (in Object mode)).
I was unable to find this particular process after many days of searching, so I'm hoping that I've got as many keywords as possible to help someone else who might be running into the same issues as I have been find this solution.
0 notes
Link
This tutorial covers most (if not all) of the problems concerning the Boolean union of multiple objects in Blender. If you have worked with a Boolean modifier in Blender more than just a try, you must have faced the circumstances in which the result of union would have been a non-manifold mesh or you have wanted to Boolean union a great number of objects and you have ended up with a simple modifier that only does the Boolean union only for a couple of objects that you wouldn’t be sure if the result of the union would have non-manifold mesh or not. This article guides you with different ways to solve this issue. Boolean Union of Multiple Objects in Blender Suppose you have a lot of cubes that you want them all to merge into one object, if the number of cubes is n, you will have to apply the Boolean union modifier n-1 times, which takes a lot of time. You may use the Python Blender API and do this job in a loop. This solution is OK until you face with the non-manifold result caused by the Boolean modifier. That is when the issue begins. = 10 and n = 2): for i in range (9): cubes[i+1] = "Cube.00%d"%(i+1) cubes = tuple(cubes) makeUnionOpt(cubes) return 'FINISHED' def invoke(self, context, event): return context.window_manager.invoke_props_dialog(self) #################################################################### ##### Register and Unregister #################################################################### def register(): bpy.utils.register_class(MainPanel) bpy.utils.register_class(WM_Function_myOp) def unregister(): bpy.utils.unregister_class(MainPanel) bpy.utils.unregister_class(WM_Function_myOp) if __name__ == "__main__": register() And as you can see, we have got one object at the end with the help of just a button.
0 notes
Link
0 notes
Photo

I am attempting to teach myself blender. Fortunately, there are tons of really great tutorials I can walk through. Here’s the result of my favorite online teacher so far: Blender Guru (Andrew Price). This image is the result of going through his beginning blender tutorial playlist.
I’m trying to learn how to make .stl files for 3D printing, and the hardest thing is being patient and going through the tutorials before trying to get the 3D piece designed. Case in point: I just spent an entire day on a 3D design and realized: you know, self, there are so many options and features in blender, if you keep going like this, you’re going to end up starting all over from scratch when you learn about a new one you should have used, but it’s too late.
Also, I hate non-manifold vertices and am intensely jealous of the people whose time-lapse construction of, say, jewelry, seems to make use of boolean operations without resulting in a zillion non-manifold edges and vertices that need to be sorted out by hand (I’m looking at you, Vladimir Serdechny). Welp, I guess that just means finding more tutorials. Luckily there are a lot of great ones out there!
0 notes