#blender boolean
Explore tagged Tumblr posts
Visit Tumblr Blog
Explore Tumblr blogs with no restrictions, modern design and the best experience.
Last Seen Tumblr Blogs


Fun Fact
Premium Tumblr themes are available from anywhere between $9 to $49.
Text
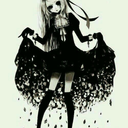
BLENDERY ADVETURES FROM THE LAST 4 WEEKS #3
I´m so so so sorry... I said in this post that I would uptade 𝐿𝑒 𝓅𝓇𝑜𝒿𝑒𝒸𝓉 "next week". I said that LAST MONTH. Its just that Square took way longer to do than I thought he would, + I had a TON of problems to fix in all my rigs so... TvT
BUT NOW THE BOY IS DONE!!!!! BEHOLD
SQUARE
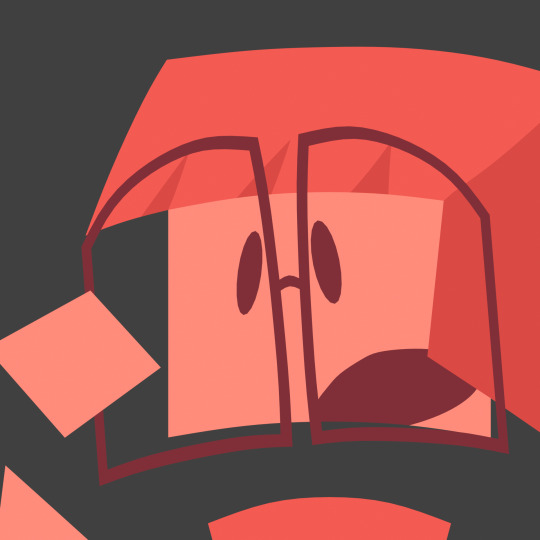

In the story he is basically the nerd (he is SUCH a square...), but he is nice to talk to and really caring about his and his friend´s well being!
What I did this last month:
First I modeled him
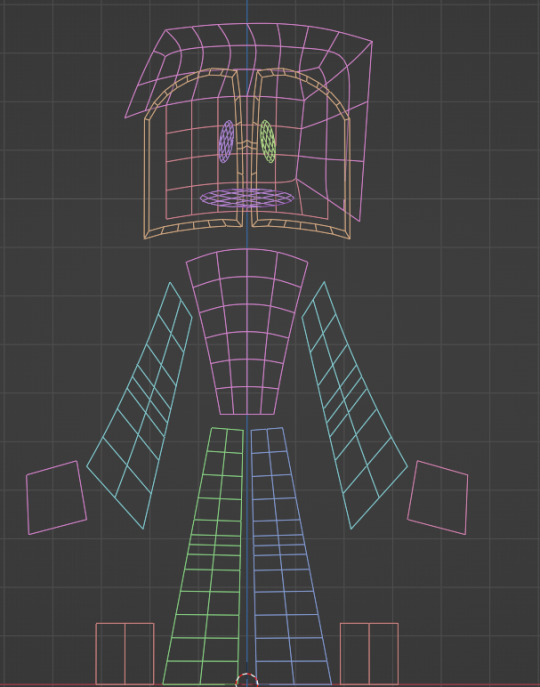
Then I rigged him, as I did with all the characters
But after that, I had to tackle a really big problem:
For all my 2D characters' faces I use booleans, to cut out their facial features to different colors. BUT blender´s boolean algorithm only work in manifold-geometry -- manifold-geometry are meshes that: 1) have a volume bigger than 0, and 2) have a distinct separation from their inside from outside / don't have any holes.-- In other words, booleans HATE 2D geometry... So what I did? I forced the booleans to work! How?
GEOMETRY NODES
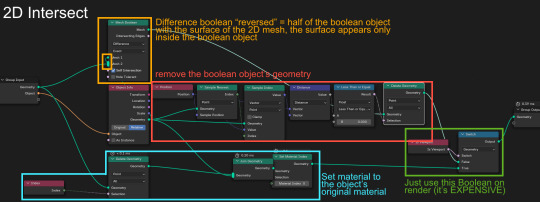
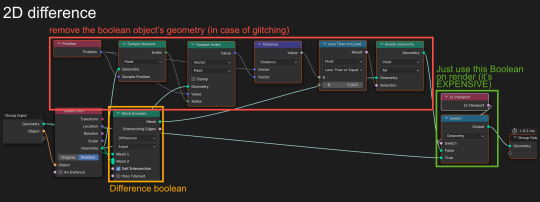
(unobstructed view)
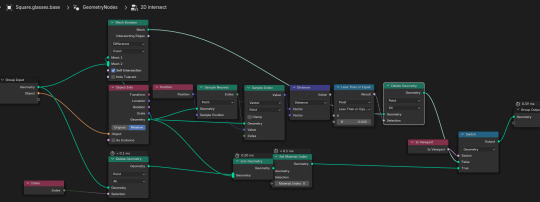
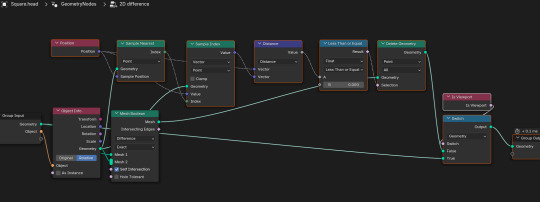
If any of you are going to use this node tree and encounter glitches or errors feel free to message me! THIS WORKED WONDERS!!!!! It only glitches really bad if your boolean object has fliped normals (if I can say so, it isn't even a glitch, it's just incompetence on my part...), so its really easy to fix.
And the last thing I did for this character was his glasses. They needed a bit more care in the rigging process, but now they work and twist like magic!
And that was it for this little guy! I know I really won't update as much here because now I will focus on the story-boards. But maybe I will show the cut models when I come to that! (cutting models is a practice to make animating less glitchy)
#blender#blendery adventures#blender3d#blender rig#geometry nodes#blender geometry nodes#geo nodes#blender geo nodes#boolean#blender boolean#non manifold boolean blender#𝐿𝑒 𝓅𝓇𝑜𝒿𝑒𝒸𝓉#Square#geometry#math#mathblr#from 2D to 3D#3D#2d model
4 notes
·
View notes
Text
How to use Boolean Modifier in Blender
Boolean Modifier is a useful tool for cutting object or joining object together. In this Blender tutorial, we will go through how to use Boolean Modifier in Blender. At the beginning of video, we will add 2 objects, and then we will add Boolean Modifier into one object, then we can use another object for making difference, union or intersect. After adding Boolean modifier and setting with another…
0 notes
Text
Month 4, day 16
Alrighty, getting a lot closer to where I started over last time, and I'm pretty sure I passed the point I fucked up at that stalled my last attempt. This time is going a lot better and I'm much happier with the results!
#the great artscapade of 2025#art#my art#blender#blender render#blender 3d#cycles render#cg fast track#hard surface modeling boot camp 3#finishing early tonight bc I don't trust myself to not get lost in fiddly details and go to bed late#instead I'm gonna go watch some Blender speed builds I'm subscribed to and marvel at all the things I have yet to learn! :D#these people perform magic using booleans and I have no idea how they do it#but I'm gonna learn one day >:D#and I'm gonna abuse that power like woah#definitely something I'll want to learn before I tackle Prav's sword bc I can see it being so useful for the setting I want to make
1 note
·
View note
Text
goodnight. 🌆
youtube
0 notes
Text

Finally downloaded Blender on my new laptop today. Feast your eyes on my first-ever attempt at 3D modelling! If those finials have taught me anything, it's that smooth robot parts are gonna be hellish to model (why did I think a cyborg would make a good first project???)
1 note
·
View note
Text
ONLY HANDS AND FEET LEFT AND THEN SCALING DOWN. I REPEAT. ONLY THE HANDS AND FEET LEFT!!!!!!
#jaytalking#no more fucking around w booleans#and if it fails in the printing stage then i’ll just be like oh. let me mess around with what might have gone wrong but still this is good#research!! really what i was learning was blender and just applying many different tools to it#or some bullshit like that#lmao
0 notes
Text
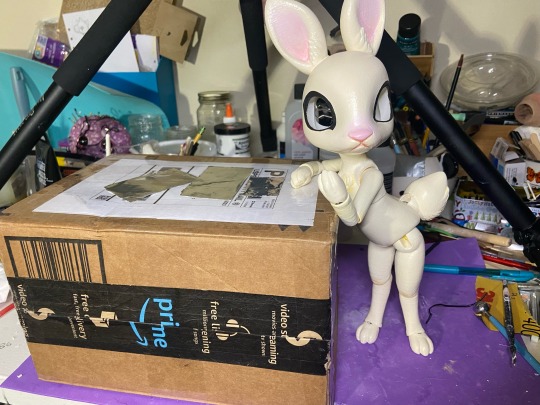
What's in the Box?
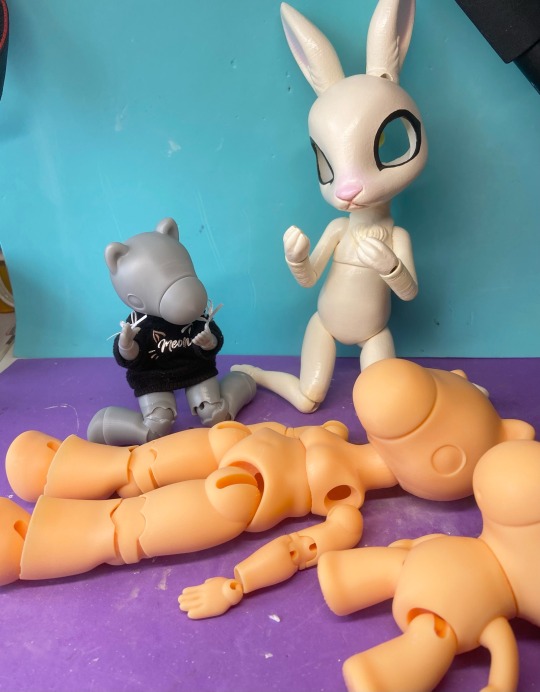
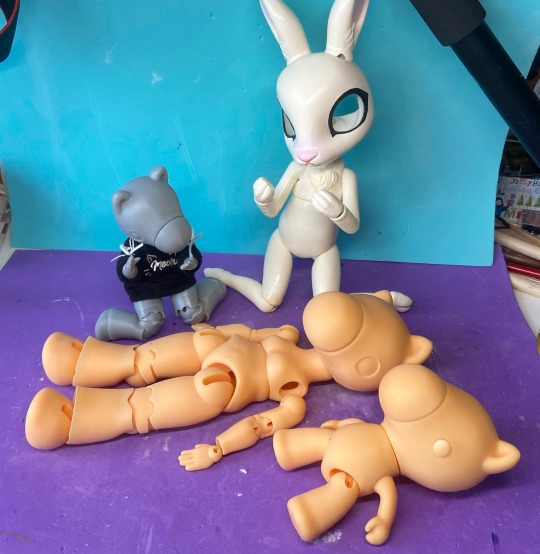
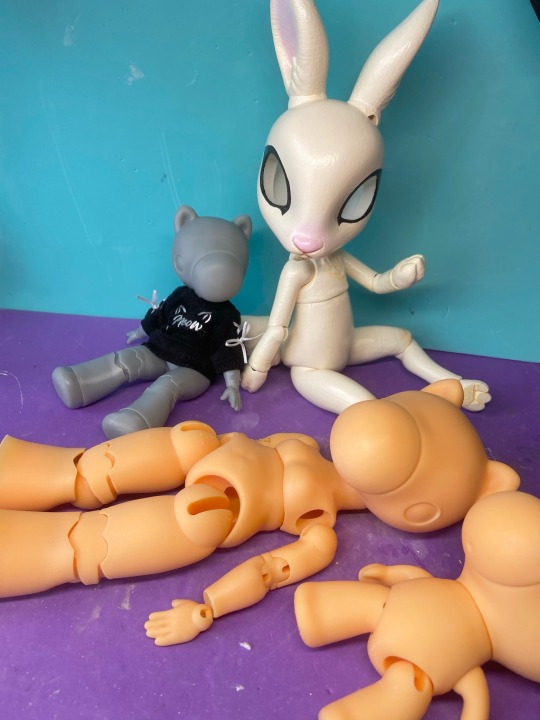
PONY PONIES IN THE BOX
If you've been following along you may have seen that @queenofsquids printed the Takara-inspired BJD last week, both in a "mini" test form and a full-sized one. The full-sized one was supposed to be in yellow, but the pure yellow resin turned out to be a more orangey tone. She incredibly generously offered to send me the orange pony BJD
And then
She incredibly incredibly again generously sent not only the little test takara-bjd in grey BUT ALSO printed my original takara 3D model and sent that?! This is so unbelievably kind and generous. I was so surprised when I opened them all!
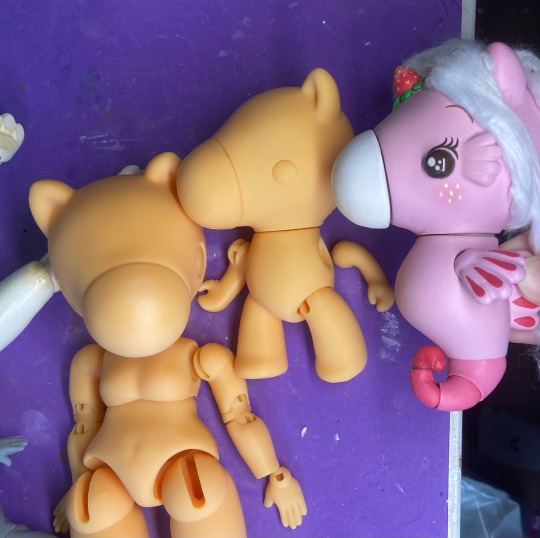
I'm not sure if you were all aware but I actually dont have a print of the original "Takara duplicate" doll. I did get the seapony PLA printed at the library (and it was my first ever 3D print!).
For my second print, I got the Dollightful bunny doll printed because I wanted to have experience with jointed dolls made by other people before I put more complex models out. So I figured it would be a while before I got the chance to see my newer models printed.
So like its actually so kind of @queenofsquids to send these but also it's really meaningful to me because I started the takara project where I became obsessed with them over a year ago. It's so amazing to see this thing that frankly I spent so much time fiddling with (even if there are some imperfections; more about that later) and hold it in my hands 🥹 I just keep looking at them and smiling

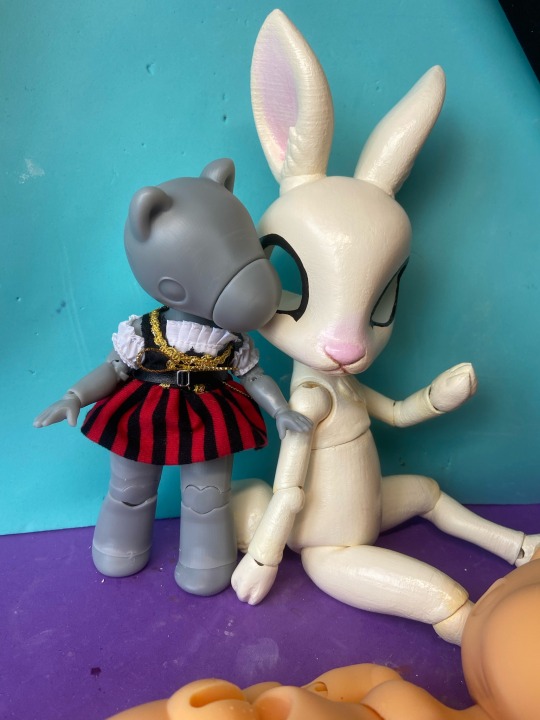
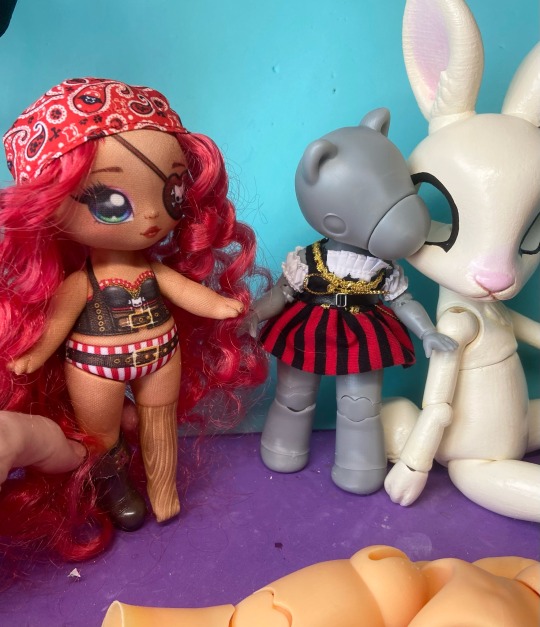
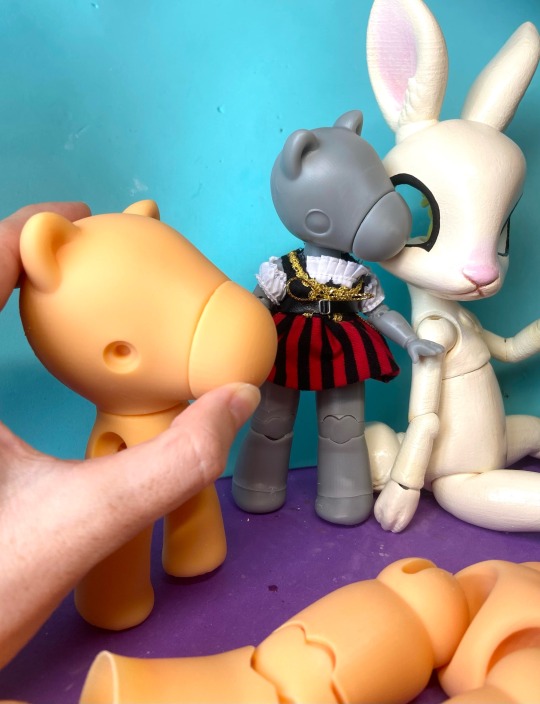
Also I immediately stole the clothes off my NaNaNa dolls and put them on mini-takara-bjd. They're a little short but fit pretty well!
Some design notes/planned adjustments under cut
-The neck and arm balls are definitely too blocky, this doesn't impact the movement but it is very visually obvious
-Queenofsquids mentioned this but the arm bean is too big and gets stuck in the arm sockets.
^^ These two issues are the most obvious upon brief inspection but are also easy to fix so I'm gonna put out a version ASAP adjusting the file. Call it the version Version 1 Hotfix. Both of these should be fixed in the existing models with a bit of sanding.
-The legs are like just a touch too blocky and I think you can also see lines in the head and chest areas ;-; I think this would depend on the printer, like it might be fine in PLA due to the lower resolution. This can also be buffed out but I can adjust it with some effort
-> I think the blockiness issues come down to the fact I was trying to make the models not too high resolution because then the file size is massive, can't import into cura properly, and even slows down *my* beefy computer. that's why it might take a bit for me to adjust all of these pieces, especially the legs because they have a lot of booleans that lag blender. basically i leaned in the other direction and went a bit too far with some pieces.
-legs are very thin at the bottom (ran into this issue with the dollightful bunny doll too and had to redo quite a bit actually to make it neat)
-The bottom of the heart on the knee in particular is an imperfect fit. I was getting errors in Cura because of some issues related to the knee so I had to remesh it, if you'll remember, so I will need to maybe go in and redo that one :/
-The line around the eyes could be a touch more pronounced, its supposed to be somewhat stylized eyelashes
-I need to play with the arms/legs more to figure out potential issues with the existing joints. But they do at least work and hold poses. I'm not sure if people would prefer anything more complicated like locking joints or if this level of poseability is acceptable
Other things I want to experiment with
-hand pose variation
-nose/mouth variations? it is actually kind of funny to imagine you could switch the expression out to a little :o face or a c: or :3 type of thing
-pegasus/unicorn/fluffy hoof variants like i had planned before
so much stuff :0 and I haven't even finished bunny doll, although at least her paint job is basically done. Once I string the big BJD I can also test posing.
94 notes
·
View notes
Text


DL (mediafire)
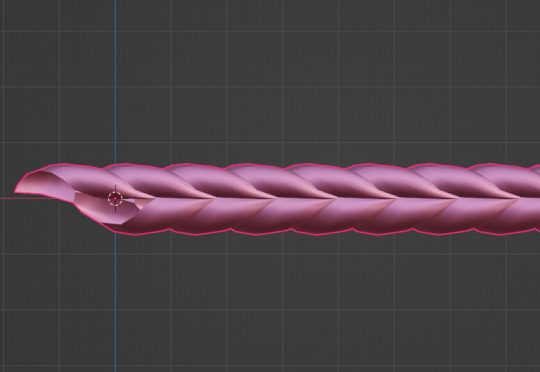
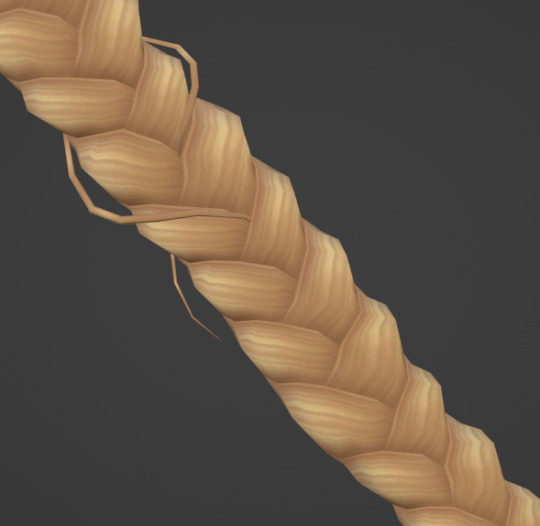
Today I bring you not cc, but a small collection of .blend files for making cc a little easier. If you've ever wanted to quickly put a braid into a custom hair without completely obliterating your poly count*, then these might be able to help.
*braids will still add a LOT of polygons to your hair, but since every single polygon is visible** on these tiling braids, at least you know they're all being put to use, whereas if you were to physically braid 3 strands of geometry, lots of those polygons would wind up inside the braid, just adding to your count without contributing anything to the look
**if some polygons end up inside of other meshes, you may want to delete them to reduce the poly count further. The boolean modifier may be able to help you, but I haven't tried
These are completely hollow, tiling braid "facades". They just look like a braid, without being anything more than a stylized tube. Available in 9 shapes (which are all pretty similar, more or less, but have different 'vibes', and one of them technically doesn't resemble a braid, but if you squint it looks close enough) and 3 polygon counts to hopefully fit in with your project.

TOU: Same as my cc. Read it here. I obviously don't own this concept, so feel free to reverse engineer, make your own braid tiles, etc. Just don't use mine for anything commercial (using them in commissions is fine, just not paywalled final products!)
You will need to be using one of the newer versions of blender, I believe 2.8 and up. These were made in blender 3.6, so the files will not be compatible with old versions like 2.7x.
Quick start guide:
Open your hair wip's .blend
In object mode, 'Append' the 'BraidTile' object of your choice
Select 'BraidPath' and, in Edit mode, position it however you like
Additional info under the cut, because I tend to ramble, and these require a little bit of a primer before use, probably. Unless you for sure know what you're doing, in which case, feel free to just take these and run with them.
THIS IS NOT A TUTORIAL ON MAKING HAIR, OR HOW TO USE BLENDER. Seek that information elsewhere.
Before appending braids, you may want to open up the blender file and look at all the shapes, to decide which one you want to use.
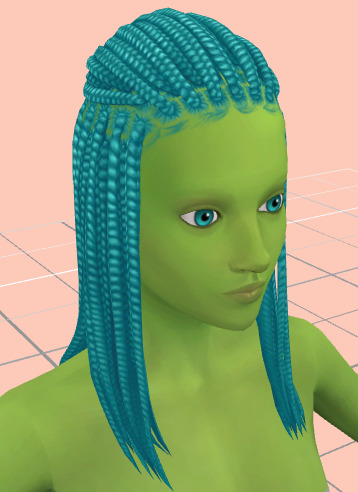
When you first append your braid, or open the blend files, you may notice it does not look like the preview images above, and instead looks like a shiny pink slug. This is intentional! For previews and development work, I use @/simandy's base textures, but your hair will probably be using a different texture, so I have not included a texture at all.
Simply switch the material of the 'BraidTile' to the same material your hair is using, and adjust the uv map accordingly. I'm going to assume if you are making hairs that you know how to do that, so it will not be explained here.
Once you have your braid appended, and have edited the UV Map of the 'BraidTile' piece to your liking, you can also try scaling the tile in the X, Y, and Z axes to change up the look a little. Make sure you select all of the vertices before scaling, to make sure it still tiles. This should be safe to do, and not mess up the tiling at all, but make sure you do it in Edit mode, not Object mode. (If you mistakenly do it in Object mode, you just have to press ctrl+A and select 'scale', and that should fix it)
When you have your braid adjusted, switch over to the 'BraidPath' object, and use edit mode to move the points around however you want. This is just like any other hair strand, if you're used to making hairs with paths and curves then this should already be familiar to you. All the same controls should work.
And, if you already have a curve in your hair that you'd like the braid to snap to instead, you can select the 'BraidTile' object, locate the curve modifier, and switch the curve object to any other curve in your .blend. You'll want to change the curve in the array modifier to the same one, most likely.
If you haven't used curves to make a hair before, here's a couple quick controls you might like to know:
ctrl+T will let you Twist the object around the selected point(s) alt+S will let you Scale the object around the selected point(s) selecting the first or last point of the 'BraidPath' and pressing E will Extrude a new point, making your braid longer
Remember to do all of your positioning on the 'BraidPath' object! You do not need to edit the 'BraidTile' at all once you've set up the UV map and adjusted the scale!
It should tile, twist, etc. with little issue, and should get longer or shorter according to the length of your curve with no issue. If it doesn't, make sure both the array and curve modifiers of your 'BraidTile' object are using the same curve. They should be using the 'BraidPath' object by default, but if you changed this manually, ensure that both modifiers match for best results.
Unless you know what you are doing, I do not recommend messing with any other settings in the modifiers, or adjusting the 'BraidTile' mesh in any way besides scaling the entire object at once. Otherwise you could end up with gaps and holes in your braid.
When you are done posing your braid, you can apply the modifiers to turn the whole thing into a regular mesh. I like to make a copy of my 'BraidTile' and 'BraidPath' first, just in case I want to go back and change the shape later. After converting it to a regular mesh, I'd recommend going in with proportional editing turned on and randomly scale and move a few of the pleats just a little, to make the braid look a little more organic. You can even add a couple strands to make it look messier, if you dont mind adding to your poly count even more. But this comes down to your preference and style. The braid below has had some half-assed editing done to demonstrate the concept. (Note: This is actually the low-poly version of this particular braid shape)
Ultimately, it is up to you to decide how you want to blend the braid in with the rest of your hairstyle. I can't tell you how to do that, as it is ultimately going to come down to your own personal preference, workflow, and the hairstyle you are making.
How do I know if I should use Hi, Mid, or Lo poly?
This is largely due to personal preference, and how you're using the braids in your project. I have included the three different poly versions to try and be mindful of the overall poly count of your poor poor meshes, but even a lo-poly braid is going to add an easy couple thousand polygons to your project. Keep that in mind! If you plan on having a LOT of braids, something like this EA hairstyle, for example:
You will probably want to follow their example and use a very simple mesh and just apply a braid texture instead of using these. EA's braids here appear to be a simple box shape painted to look like braids.
If you only plan on having one, maybe two braids in your entire project, especially if they are very large braids, then you might want to go with the hi-poly option. They're the smoothest, roundest choice.
If your braid has a very small diameter, you can probably get away with just using the lo-poly option, and save some polygons you won't need anyway.
The mid-poly version exists as a sort of happy medium. They aren't quite as pointy as some of the lo-poly shapes, and they won't inflate your poly count as much as the hi-poly models, so you may find you prefer them for your applications.
It's all very subjective.
I think that's pretty much everything I wanted to say. If you have specific questions, my inbox is open.
Keep in mind I am not very skilled in blender! There's probably some optimization that can be done if you know what you're doing, and I welcome you to tweak these meshes to your heart's content, if that's you! I made these for me, but I figure they could make someone else's life a little easier too, so here you go.
If you make anything using them you are welcome to tag me! If you don't end up making anything with these then I hope you at least have some fun playing with them!
#simoleon#THIS IS NOT CC DO NOT DOWNLOAD THINKING ITS CC#im going to the store now if anyone has any questions ill answer them later#dl#(as in 'download' not 'delete later')#i dont wanna put this in my cc tag but i also dont wanna lose track of it yknow
258 notes
·
View notes
Text
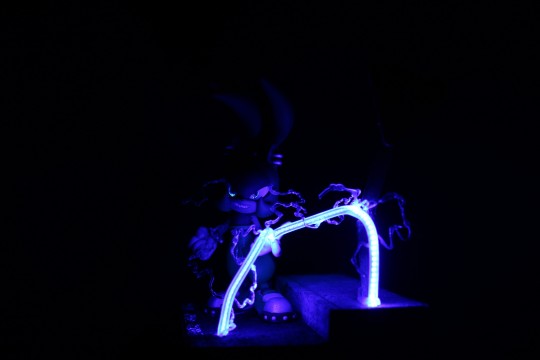
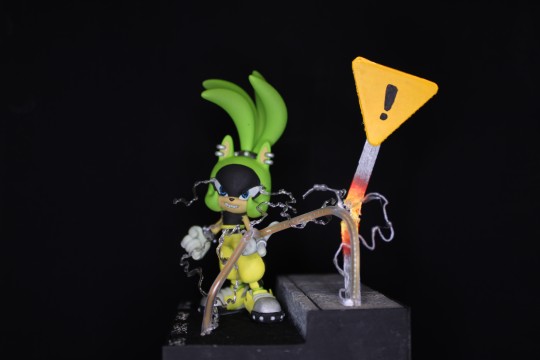
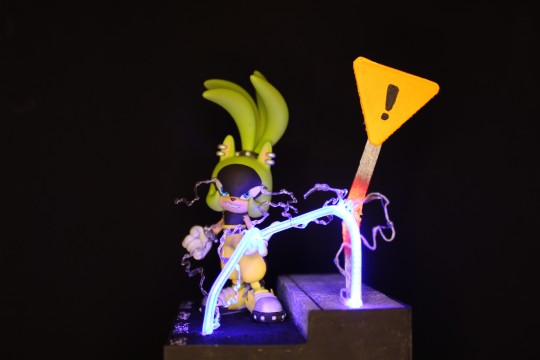
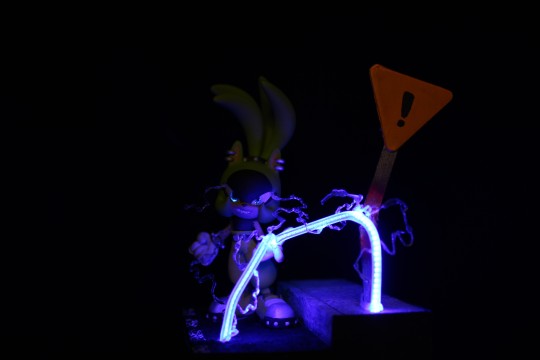
SURGE THE TENREC FIGURE/DIORAMA THING! (from the IDW Sonic comics).
Model for this is Surge the Tenrec by thekingdog over on deviantart.
I got some LED filaments recently, and was looking for something to do with them, when Surge popped up on my dash and I had this idea.
I absolutely love how this turned out, it was a tonne of fun to make. Just finding a scourge STL file was surprisingly hard. I ended up having to use a VRchat model I found.
That actually worked out really well, because I could easily pose it and apply mouth expressions, even with my limited blender knowledge.
Then I went and made that process way harder by deciding I wanted to be able to light up the eyes, meaning I needed to hollow the head, punch eyeholes out and create a tube down from the head out the foot to run wires.
After managing to get that done (had to try several times because I kept introducing slicer artifacts with my 'BOOLEAN MODIFIER IS MY FRIEND' approach), I realised the heads walls were too thin and translucent, so I had to carefully shove milliput in there without blocking up the eyeholes... and in the process didn't realise I'd covered the wire hole, and then had to carve out part of the neck and back to get access again.
Worth it all in the end though, for how dope this looks.
#painted miniature#3d printing#painted miniatures#printed miniature#resin printer#miniature painting#diorama#LED#surge the tenrec#idw sonic
51 notes
·
View notes
Text
Working on something new and almost done.

I wanted to take a break from character modeling and do a simple environment. I was inspired by this Grant Abbitt's beginner low-poly tutorial but wanted to make something more advanced. It's been a good way to learn the Blender 4.X changes though - since I was used to using 3.X over the last few months/years.

This looked pretty simple, and I liked the idea of having a small pocket environment stuffed with props and detail. It also lines up with a lot of the props that I made for school last year, though I made all those in Maya and had a much worse time.

The scene is modular, and it's fun to think about what other room/corners I could make. I enjoy this part of the process the most - filling a room with props/art and telling a story with it. Maybe a warrior room, a rogue room, a mage room, a druid room, that sort of thing.
The tech art behind the scenes is fun as well. I dont know how much I will end up animating in this scene, but I always enjoy making goofy shaders and working with the new post-processing options has been a gamechanger.
This window boolean is pretty neat too.

For now I just stuck my old Kass model in there because the postprocessing painted look reminds me of Breath of the Wild and its a nice set to show him off in. I sat my minotauren in there as well and he's looking comfy.

your character here
38 notes
·
View notes
Text
I've gotten a few people asking about how I did the bubbly slop slime material for the blender slime fox so heres a quick overview. the bubbles are the interesting part so ill go over those first

the bubbles are 100% geometry nodes. i use this big box just to control the bounds of where bubbles show up. i first spawn in a bunch of points randomly inside the box, and i use a 3d noise texture to set their radii.

i also have this simulation zone that just increases a vector by (0,0,0.1) every frame. i modulo (that vector + every point's position) with the bounds of the bubble area and i get a nice scrolling effect. (i also move the NOISE texture DOWNWARDS with the same vector and that causes the radii of the points to fluxuate.

in a separate geometry node for the mesh, i have it first check every point whether that point is inside the mesh or not, and delete it if it's not. you can do that by raycasting in some direction, getting the normal of the face you hit, and dotting that normal with the direction you raycasted in. if the result is positive then the point is inside the mesh!

i do a few extra checks besides that - i use a geometry proximity node to get rid of points too close to the surface of the mesh. finally for each of the remaining points i instance an inverted sphere with a radius given by the point's radius. originally I was using a boolean mesh node but i realized just creating a bunch of inverted spheres was way faster and gave the same result. heres the mesh without any kind of refraction so you can see the bubbles more clearly

okay now for the actual slime material. i just had a texture for the eye, and used an alpha(transparency) texture as well as a regular albedo(color) texture so i could edit the color of the goop in blender. one silly issue that this setup actually allowed me to fix was this.(refraction is off here but you get the idea):

the other eye is visible through the head! whadda hell! well, i had a node to check if the incoming ray was a camera ray (i.e. it's not light bouncing through the mesh) and by changing the alpha of the eye texture based on that i could make the eyes only visible on the outside of the mesh (as they should be. imo at least.
the refracting light effect is due to the IOR being cranked up to 1.3 and also due to the noise texture normal map i applied, which makes the light bounces look WAY more interesting. it also causes the bubbles to appear to wobble as they pass through the mesh even though they're moving straight upward - kinda neat i think.

anyways heres the actual material graph i used if you wanna look at the specifics. i dont know why i connected the camera ray multiply bit to the transmission i think it looks kinda darker and worse that way but it's whatever. hope this was somewhat enlightening

38 notes
·
View notes
Text
a fun pro tip is that if an online storefront has a "3D preview" of an object you can probably grab it as a glb file and throw it into blender with perfect scaling, full textures, and detailed dimensions that you can then pull off for other projects (or, like, I've seen people straight up dump Ikea furniture into blender scenes for animations)
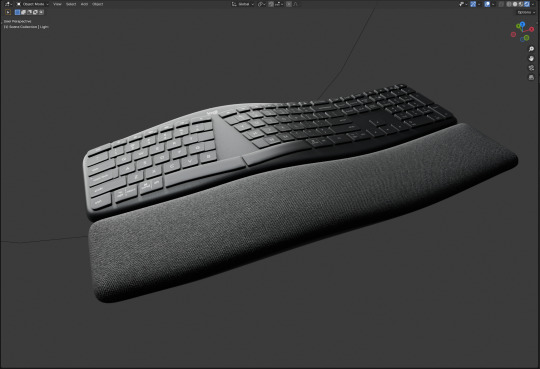
I want to add some printed parts to this keyboard and here's a perfect to-scale model I can reference and use to do boolean operations with to make my parts fit, even on complex curves
53 notes
·
View notes
Note
what software do you use to make the 3d models for your dolls? I've been trying to make dolls and it hasn't been working out very well.
blender. my hottest beginner tip, as somebody who has been doing this for maybe a year so i do fall into the beginner category myself, is to ignore all advice on how to 3d model Properly.
what i mean is that 3d printing is very forgiving. there are no poly count budgets or topology requirements like games or animation have, and a lot of the advice online is geared towards those things. i have no idea how to do low-poly modeling, or anything deeply technical. mostly i just add some balls of clay in object mode, and then go directly to sculpting. the sculpt mode is pretty quick to figure out; if you can do it with clay, you can do it in blender after playing around with the tools for a bit. there's no need to learn everything immediately; you can get pretty far with dolls by just sculpting and figuring out how to use the boolean modifier for joints & other miscellaneous holes.
44 notes
·
View notes
Text

I spent the better part of the morning modeling the 2 & 10 CR "chits", or tokens, from Apple's Silo series.
I feel like working with Blender is basically a huge exercise in sunk-cost fallacy. I am 100% certain that there are far better programs out there for modeling for 3D printing, but at this point I've spent so much time Doing Battle with Blender that I feel like I just can't face the idea of starting over from scratch with something else.
Blender is fiendish: no matter how hard you try to ensure that the meshes going into a boolean operation are manifold, the result is often non-manifold, like Blender is determined to make my whole day non-manifold, and learning how to repair the non-manifold parts can be pretty dang frustrating -- nothing's more irritating than having 1 manifold edge, and you fix it, and you check again, and now you have 14 manifold edges. And there's no consistent way to fix it; sometimes you need to merge edges/vertices, some times delete and rebuild them, argh. I am pretty sure the prop makers for the show were not using Blender and if they were, I am in awe.
Now I have this batch of tokens printing out. I messed up one printed 5 CR token with too much sanding, so I'm printing out another to give it another go. Hopefully these print out all right.
The next step, after sanding these down and figuring out a way to minimize print lines in places where I can't reach with a sanding stick, is to figure out a way to sprue these up so that I can cast them in Mold Max 60 (a high-temp, flexible silicone) and then eventually, maybe, cast these things in pewter.
The super long-term goal is to make a couple of patchwork "rice bag" pouches for these, and send a set to Norm Chan & Adam Savage for them to weather (if they want to).
5 notes
·
View notes
Text

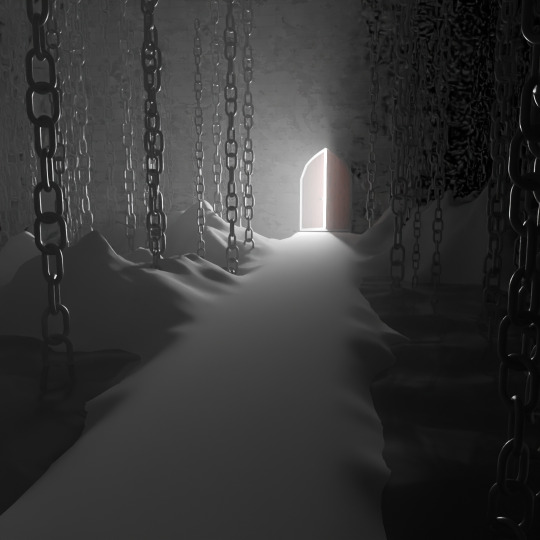
Blender does something different with the final render depending on if you copy it or save it and I don't know what's going on.
Also I wanted to add some footprints leading up to the doorway, but the boolean modifier wasn't cooperating.
7 notes
·
View notes
Text
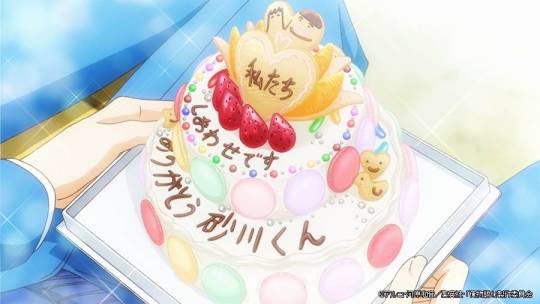
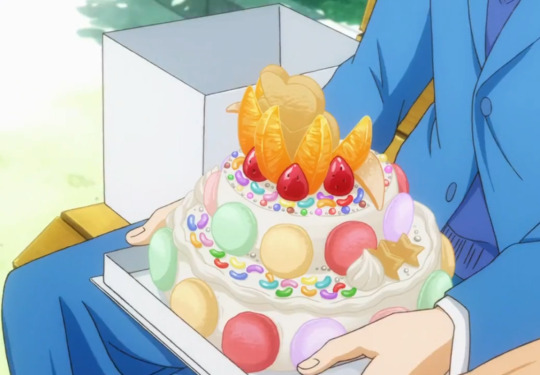
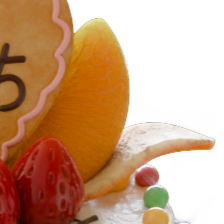
Process - Sunakawa Cake 🎂
A little breakdown of how I made my 3D recreation of the "thank you sunakawa" cake from Ore Monogatari ~

1. Collecting reference
Aside from referencing stills from the anime, I came across the official cake sketch from Madhouse's website! It was really helpful in identifying all the toppings on the cake and other details.
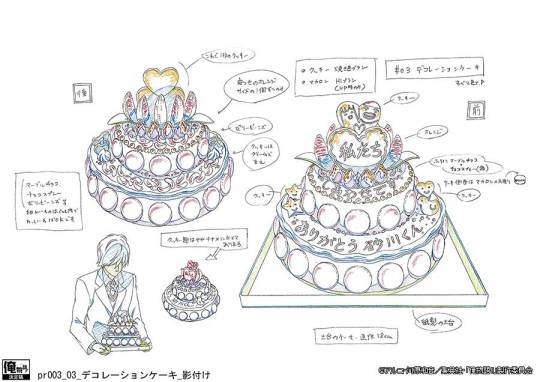
Next was collecting real-life references of all the ingredients I needed to make and taking notes of the shapes, textures and variety.
2. Modelling & Texturing
I go back and forth between modelling and texturing, and jump all over the place so I'll break things down based on the toppings/elements:
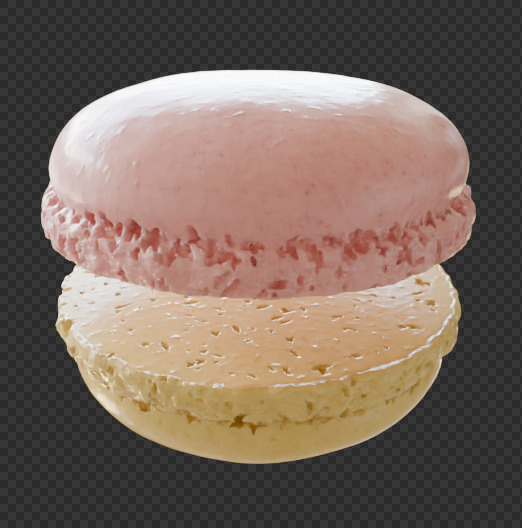
A. Macaron
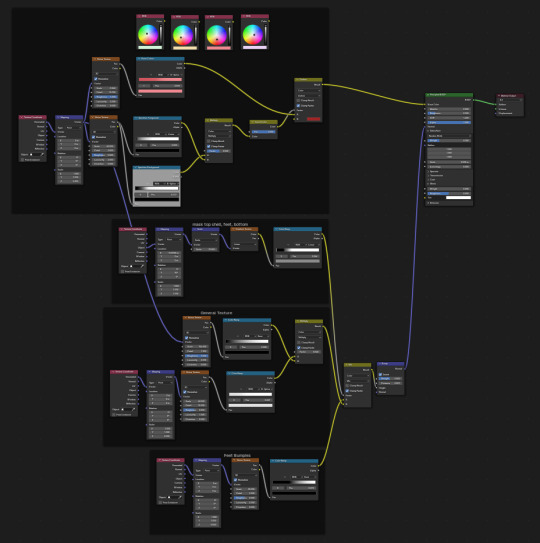
I referenced Canosie Lab's macaron tutorial here, tweaking the process a little bit; using one mesh instead of two and using particles to distribute the boolean meshes. I ended up with LOTS of vertices, so I made a lower poly version of the macaron and used those to avoid bogging down the computer. As for the texture, I used Blender's procedural nodes, utilizing mostly the noise texture node.

Above: The first row are the lower poly versions of the macaron and the second row are the original meshes with around 200,000 vertices each o_o
B. Cookies
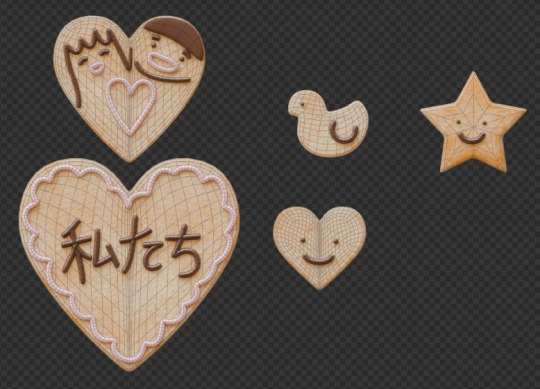
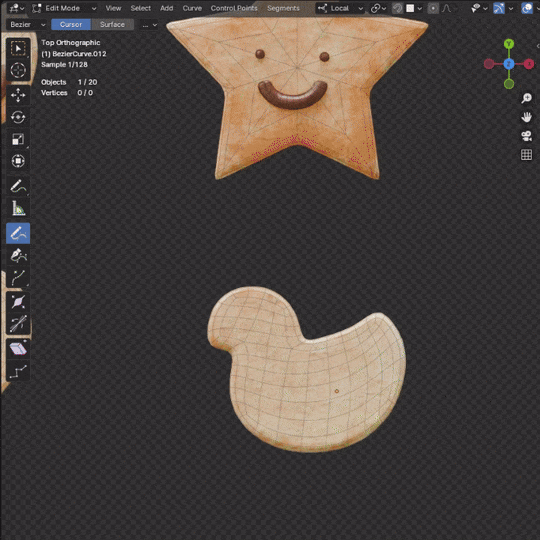
There's not much to it here; I just modeled the cookies and used procedural textures I've made for a previous project (I'll post that project soon!!!)
The icing is made using bezier curves with some bevel depth. I used the draw tool to draw on the cookies. I did the same for the writings on the cake.
C. Strawberries
I've previously made strawberries for another project so I just used those but baked them to a lower poly mesh first. I used Canosie Labs' strawberry tutorial as reference :) I initially used a scaled down version of the regular-sized strawbs, but decided to make a proper mini strawberry 🍓


Left: with scaled down regular strawberries, Right: proper mini strawberries.

I made them super shiny with lots of subsurface scattering to make them look juicy and gummy-like -- not the most realistic but I think they look cuter like this :>
D. Orange slices
The orange slices were the most challenging to make! Did a lot of trial and error to get that pulpy texture oranges have but I managed using a combination of voronoi nodes :") If you look at the pictures below, you can see how the orange looked in the beginning vs. at the end after I refined it some more.
They look fine from a distance but a little janky up close; maybe I'll do a breakdown one day once I figure out a proper node setup.

Above: before & after
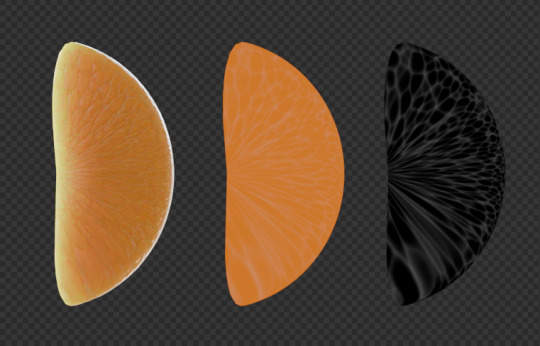
Left to right: rendered, colour only, B/W
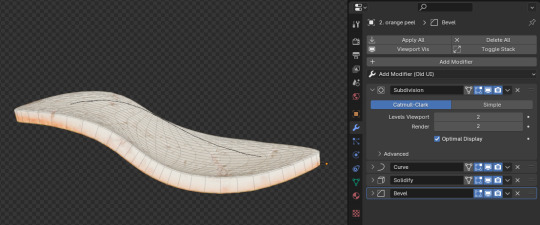
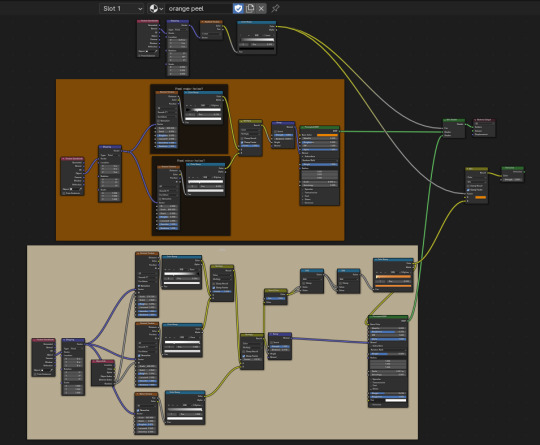
E. Orange peel
A simple plane with a solidify and curve modifier. What's most important here is the texture! I used two different shaders (one for the pith another for the peel) combined using a mask.
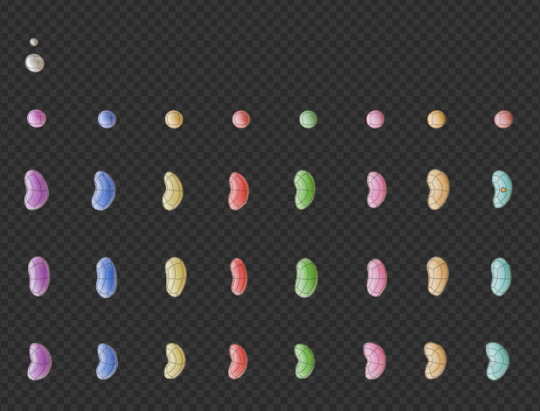
F. Jelly beans & choco marbles
A tweaked subdivided square for the jelly beans and subdivided icosphere for the choco marbles. The two use pretty much the same shaders but the jelly beans have more subsurface scattering.
H. Cake
After placing all the toppings, I sculpted the cake (using the multires modifier) a little bit to model the cream that's displaced.

#ore monogatari#sunakawa makoto#process#3d modeling#artists on tumblr#blender#blender 3d#3d model#cake#b3d#3d art#3d render#3d#digital art
30 notes
·
View notes