#oauth2 example
Explore tagged Tumblr posts
Visit Tumblr Blog
Explore Tumblr blogs with no restrictions, modern design and the best experience.
Last Seen Tumblr Blogs


Fun Fact
Users from the US are the majority of Tumblr visitors.
Text
A Beginner’s Guide to RESTful API Design

RESTful APIs are the backbone of modern web and mobile applications. Whether you're building the backend for a web service, a mobile app, or a microservice architecture, understanding how to design a RESTful API is essential. In this guide, we’ll walk you through what REST is and how to structure APIs that are scalable, maintainable, and easy to use.
What is a RESTful API?
REST stands for Representational State Transfer. It's an architectural style that uses standard HTTP methods (GET, POST, PUT, DELETE) for communication between clients and servers. A RESTful API exposes data and services over the web using URLs, returning responses typically in JSON format.
Core Principles of RESTful API Design
Statelessness: Each request should contain all the information needed to process it. The server does not store client session data.
Resource-Based: Data is represented as resources (e.g., /users, /products).
Use of HTTP Methods: Use standard HTTP verbs for actions: GET (read), POST (create), PUT/PATCH (update), DELETE (remove).
Uniform Interface: Consistent structure and naming conventions help developers understand and use your API easily.
Representation: Resources are typically represented using JSON or XML.
Best Practices for RESTful API Design
1. Use Nouns in URIs
URIs should represent resources, not actions. Example:✅ /users❌ /getUsers
2. Use HTTP Methods Correctly
GET /users → Get list of users
GET /users/1 → Get user with ID 1
POST /users → Create a new user
PUT /users/1 → Update user with ID 1
DELETE /users/1 → Delete user with ID 1
3. Return Proper HTTP Status Codes
200 OK → Successful request
201 Created → Resource created successfully
400 Bad Request → Client error
401 Unauthorized → Authentication failed
404 Not Found → Resource doesn’t exist
500 Internal Server Error → Server-side error
4. Use JSON as the Response Format
JSON is the most widely used and supported format. It’s readable by both humans and machines.
5. Version Your API
Always version your APIs to avoid breaking changes for clients when you update your codebase./api/v1/users
6. Use Pagination for Large Collections
For endpoints that return many items, use query parameters for pagination:/users?page=2&limit=20
7. Include Error Messages
Return helpful error messages to guide developers on how to fix their request: { "error": "Invalid input", "details": "Email address is required" }
8. Secure Your API
Use HTTPS to encrypt data in transit.
Implement authentication (e.g., OAuth2, JWT).
Validate inputs to prevent injection attacks.
Tools for API Development and Testing
Postman: Test and document your APIs.
Swagger/OpenAPI: Generate interactive API documentation.
Insomnia: Alternative to Postman for API testing.
Conclusion
Designing a RESTful API isn't just about making something that works — it's about making it intuitive, reliable, and secure. By following the principles and best practices outlined here, you'll create APIs that developers love to use and that can scale with your application.
0 notes
Text
Weak API Authentication in Laravel: How to Secure It
Introduction
API authentication is a critical aspect of securing web applications. In Laravel, APIs allow developers to connect with the backend while keeping things modular and efficient. However, when API authentication is weak or poorly implemented, it leaves the door open for attackers to exploit sensitive data.

In this post, we’ll explore the risks of weak API authentication in Laravel, how to identify vulnerabilities, and ways to secure your API endpoints. We’ll also guide you through a coding example and introduce a free tool for a website security test to help you identify API vulnerabilities on your site.
Why Weak API Authentication Is Dangerous
APIs are a primary target for cybercriminals due to the sensitive data they expose. When authentication methods are weak, such as using insecure or predictable tokens, attackers can easily bypass security mechanisms and gain unauthorized access to your backend systems.
Here’s why weak API authentication is dangerous:
Data Breaches: Hackers can access user data, financial information, or any sensitive data stored in your database.
Unauthorized API Calls: Without proper authentication, malicious users can make API requests on behalf of authenticated users.
Denial of Service Attacks: Exploiting weak authentication can allow attackers to overload your systems or take them down entirely.
Common Causes of Weak API Authentication
Some common causes of weak API authentication include:
Using Default Tokens: Laravel provides several ways to authenticate APIs, but many developers still use the default tokens or insecure methods.
No Token Expiration: Not setting an expiration time for API tokens can lead to long-term vulnerabilities.
Insecure Password Storage: If you store passwords in plain text or use weak hashing algorithms, hackers can easily retrieve them.
Improper Rate Limiting: Failing to limit the number of API requests from a user can lead to brute-force attacks.
How to Secure API Authentication in Laravel
Here, we’ll walk you through securing your API authentication in Laravel, step by step, using modern techniques.
1. Use Laravel Passport for OAuth Authentication
Laravel Passport provides a complete OAuth2 server implementation for your Laravel application. It is the most secure and robust way to handle API authentication.
To install Laravel Passport, follow these steps:
composer require laravel/passport php artisan migrate php artisan passport:install
After installation, you need to configure the AuthServiceProvider to use Passport:
use Laravel\Passport\Passport; public function boot() { Passport::routes(); }
Then, update your api guard in config/auth.php to use Passport:
'guards' => [ 'api' => [ 'driver' => 'passport', 'provider' => 'users', ], ],
Now, you can authenticate users using OAuth tokens, which provides a much higher level of security.
2. Enable Token Expiration
Another important step is ensuring that API tokens expire after a certain period. By default, tokens generated by Passport are long-lived, but you can customize their expiration time.
To set token expiration, update the config/passport.php file:
'personal_access_tokens_expire_in' => now()->addDays(7),
This will ensure that tokens expire after 7 days, requiring users to re-authenticate.
3. Use Strong Hashing for Passwords
Make sure that you store passwords securely using bcrypt or Argon2 hashing. Laravel automatically hashes passwords using bcrypt, but you can configure it to use Argon2 as well in config/hashing.php:
'driver' => 'argon2i',
4. Implement Rate Limiting
To prevent brute-force attacks, you should implement rate limiting for your API. Laravel has a built-in rate limiting feature that you can enable easily in routes/api.php:
Route::middleware('throttle:60,1')->get('/user', function (Request $request) { return $request->user(); });
This will limit the API requests to 60 per minute, helping to prevent excessive login attempts.
Testing Your API Security
After implementing the above security measures, it's important to test your API for vulnerabilities. Use our Website Vulnerability Scanner to check your website’s API security and identify any weaknesses in your authentication methods.

Screenshot of the free tools webpage where you can access security assessment tools.
Conclusion
Securing API authentication in Laravel is crucial for preventing unauthorized access and protecting sensitive user data. By using OAuth tokens, setting expiration times, applying strong password hashing, and implementing rate limiting, you can significantly enhance your API security.
If you’re unsure about the security of your website or API, try out our Free Website Security Scanner tool to perform a vulnerability assessment.

An Example of a vulnerability assessment report generated with our free tool, providing insights into possible vulnerabilities.
For more security tips and updates, visit our blog at Pentest Testing Corp.
0 notes
Text
Introduction to Azure Data Factory's REST API: Automating Data Pipelines

1. Overview of Azure Data Factory REST API
Azure Data Factory (ADF) provides a RESTful API that allows users to automate and manage data pipelines programmatically. The API supports various operations such as:
Creating, updating, and deleting pipelines
Triggering pipeline runs
Monitoring pipeline execution
Managing linked services and datasets
By leveraging the REST API, organizations can integrate ADF with CI/CD pipelines, automate workflows, and enhance overall data operations.
2. Authenticating with Azure Data Factory REST API
Before making API calls, authentication is required using Azure Active Directory (Azure AD). The process involves obtaining an OAuth 2.0 token.
Steps to Get an Authentication Token
Register an Azure AD App in the Azure Portal.
Assign permissions to allow the app to interact with ADF.
Use a service principal to authenticate and generate an access token.
Here’s a Python script to obtain the OAuth 2.0 token:pythonimport requestsTENANT_ID = "your-tenant-id" CLIENT_ID = "your-client-id" CLIENT_SECRET = "your-client-secret" RESOURCE = "https://management.azure.com/"AUTH_URL = f"https://login.microsoftonline.com/{TENANT_ID}/oauth2/token"data = { "grant_type": "client_credentials", "client_id": CLIENT_ID, "client_secret": CLIENT_SECRET, "resource": RESOURCE, }response = requests.post(AUTH_URL, data=data) token = response.json().get("access_token")print("Access Token:", token)
3. Triggering an Azure Data Factory Pipeline using REST API
Once authenticated, you can trigger a pipeline execution using the API.
API Endpoint
bashPOST https://management.azure.com/subscriptions/{subscriptionId}/resourceGroups/{resourceGroupName}/providers/Microsoft.DataFactory/factories/{factoryName}/pipelines/{pipelineName}/createRun?api-version=2018-06-01
Python Example: Triggering a Pipeline
pythonimport requestsSUBSCRIPTION_ID = "your-subscription-id" RESOURCE_GROUP = "your-resource-group" FACTORY_NAME = "your-adf-factory" PIPELINE_NAME = "your-pipeline-name" API_VERSION = "2018-06-01"URL = f"https://management.azure.com/subscriptions/{SUBSCRIPTION_ID}/resourceGroups/{RESOURCE_GROUP}/providers/Microsoft.DataFactory/factories/{FACTORY_NAME}/pipelines/{PIPELINE_NAME}/createRun?api-version={API_VERSION}"headers = { "Authorization": f"Bearer {token}", "Content-Type": "application/json" }response = requests.post(URL, headers=headers) print("Pipeline Trigger Response:", response.json())
4. Monitoring Pipeline Runs using REST API
After triggering a pipeline, you might want to check its status. The following API call retrieves the status of a pipeline run:
API Endpoint
bashCopyEditGET https://management.azure.com/subscriptions/{subscriptionId}/resourceGroups/{resourceGroupName}/providers/Microsoft.DataFactory/factories/{factoryName}/pipelineruns/{runId}?api-version=2018-06-01
Python Example: Checking Pipeline Run Status
pythonCopyEditRUN_ID = "your-pipeline-run-id"URL = f"https://management.azure.com/subscriptions/{SUBSCRIPTION_ID}/resourceGroups/{RESOURCE_GROUP}/providers/Microsoft.DataFactory/factories/{FACTORY_NAME}/pipelineruns/{RUN_ID}?api-version={API_VERSION}"response = requests.get(URL, headers=headers) print("Pipeline Run Status:", response.json())
5. Automating Pipeline Execution with a Scheduler
To automate pipeline execution at regular intervals, you can use:
Azure Logic Apps
Azure Functions
A simple Python script with a scheduler (e.g., cron jobs or Windows Task Scheduler)
Here’s an example using Python’s schedule module`:pythonimport schedule import timedef run_pipeline(): response = requests.post(URL, headers=headers) print("Pipeline Triggered:", response.json())schedule.every().day.at("08:00").do(run_pipeline)while True: schedule.run_pending() time.sleep(60)
6. Conclusion
The Azure Data Factory REST API provides a powerful way to automate data workflows. By leveraging the API, you can programmatically trigger pipelines, monitor executions, and integrate ADF with other cloud services. Whether you’re managing data ingestion, transformation, or orchestration, using the REST API ensures efficient and scalable automation.
WEBSITE: https://www.ficusoft.in/azure-data-factory-training-in-chennai/
0 notes
Text
Revolutionizing Software Development: The Power of Generative AI in Coding

Generative AI has revolutionized the way developers approach coding. Tools like ChatGPT, GitHub Copilot, and Claude.ai are becoming integral parts of the development process, enhancing productivity, reducing errors, and sparking innovation. This blog delves into how these AI tools are transforming coding practices and what this means for the future of software development.
The Role of Generative AI in Coding
Generative AI models, built on advanced machine learning techniques, can understand and generate human-like text. When applied to coding, these tools assist developers by:
Code Generation:Automatically generating boilerplate code, entire functions, or even complete applications based on natural language prompts.
Code Completion: Suggesting the next lines of code in real-time as developers type.
Debugging Assistance: Identifying and fixing bugs by analyzing code and providing recommendations.
Learning and Onboarding: Helping new developers learn by providing clear explanations of code snippets and best practices.
Enhancing Creativity: Offering alternative solutions or creative ways to approach problems.
Key Generative AI Tools for Coding
1. ChatGPT
ChatGPT by OpenAI excels in natural language processing, making it a versatile assistant for developers. It can:
Generate code snippets from scratch.
Provide detailed explanations for complex algorithms.
Offer guidance on best practices in software design.
For example, if you’re working on a Python project and need a quick function for sorting a list of dictionaries by a key, you can simply ask ChatGPT to generate it for you:
Prompt: “Write a Python function to sort a list of dictionaries by a specific key.”
Response: from operator import item getter
def sort_dicts_by_key(lst, key):
return sorted(lst, key=itemgetter(key))
# Example usage:
data = [
{“name”: “Alice”, “age”: 25},
{“name”: “Bob”, “age”: 30},
{“name”: “Charlie”, “age”: 20}
]
sorted_data = sort_dicts_by_key(data, “age”)
print(sorted_data)
2. GitHub Copilot
GitHub Copilot, powered by OpenAI Codex, is a game-changer for real-time coding. Integrated directly into IDEs like VS Code, Copilot:
Provides instant suggestions for code completion.
Writes boilerplate code based on the context.
Helps developers adhere to coding standards and style guides.
For example, while working on a web development project, Copilot can autocomplete React component structures or generate API calls.
3. Claude.ai
Claude.ai, developed by Anthropic, focuses on safety and reliability, making it an excellent choice for projects where trust and explainability are critical. It can:
Generate and review code with an emphasis on security.
Explain potential vulnerabilities in code and suggest fixes.
Provide ethical guidelines for implementing AI in software.
For instance, Claude.ai might help secure an API by recommending OAuth2 implementation and explaining its advantages.
Practical Benefits of Using Generative AI in Development
Speed and Efficiency: With AI handling repetitive tasks like boilerplate code generation and debugging, developers can focus on solving core problems.
Improved Code Quality: AI tools not only write code but also enforce best practices and optimize for readability and maintainability.
Collaboration: Teams can use AI-generated documentation and explanations to stay aligned, even across diverse skill levels.
Accessibility: Generative AI lowers the barrier for entry, enabling beginners to create functional code with minimal experience.
Challenges and Considerations
While generative AI offers numerous advantages, there are challenges to keep in mind:
Accuracy: AI-generated code may not always be optimal or free of errors. Developers should verify and test the output.
Dependency: Over-reliance on AI can hinder the development of core coding skills.
Security: AI models can inadvertently suggest insecure code practices if not properly configured.
Ethical Concerns: The potential misuse of AI-generated code underscores the importance of ethical guidelines.
Best Practices for Using Generative AI in Coding
Understand the Code: Treat AI as an assistant, not a replacement. Always review and understand the generated code.
Iterate Collaboratively: Use AI tools to brainstorm solutions, but refine them collaboratively with your team.
Stay Updated: Keep up with updates to AI tools and ensure you’re using them in alignment with the latest guidelines.
Focus on Security: Leverage AI to identify vulnerabilities, but always validate its recommendations.
The Future of Generative AI in Software Development
Generative AI is poised to become even more integrated into the software development lifecycle. As these tools evolve, we can anticipate:
Advanced Customization: Tailoring AI models to specific projects or organizational standards.
Enhanced Collaboration: Real-time collaboration between human and AI developers.
Continuous Learning: AI tools that improve with usage, adapting to individual coding styles and preferences.
In conclusion, generative AI tools like ChatGPT, GitHub Copilot, and Claude.ai are transforming coding practices by streamlining processes, enhancing creativity, and fostering innovation. By embracing these technologies responsibly, developers can unlock new levels of productivity and innovation, shaping the future of software development.
Click the link below to learn more about the blog Revolutionizing Software Development: https://tudip.com/blog-post/leveraging-generative-ai-in-coding-practices/.
#tudip technologies#tudip#Custom AI Prompt Engineering#Optimized AI Responses#AI Chatbot Enhancement
0 notes
Text
Flask and OAuth2: Securing Your API with Industry-Standard Authentication
Introduction Flask and OAuth2: Securing Your API with Industry-Standard Authentication is a crucial aspect of building secure and scalable web applications. In this tutorial, we will explore the world of Flask, a lightweight Python web framework, and OAuth2, an industry-standard authentication protocol. We will delve into the technical background, implementation guide, code examples, best…
0 notes
Text
Setting Up Postman to Call Dynamics 365 Data Entities

Overview
A strong API structure offered by Dynamics 365 (D365) enables programmatic interaction between developers and administrators and its data entities. You can set up and run queries to these data entities with ease using Postman, a robust tool for API development and testing. This makes operations like querying, updating, and managing your D365 data easier. In order to ensure that you can efficiently utilize the API for your integration and development needs, this article will lead you through the setup postman to call d365 data entities.
How to Set Up Postman Step-by-Step for D365 Data Entities
Set up Postman:
Install Postman by downloading it from the official website.
Create a new workspace in Postman after opening it to arrange your API testing.
Acquire API Passwords:
Enter your D365 credentials and go to If you haven't already, go to the Azure Active Directory portal to register an application.
Go to "Azure Active Directory" > "App registrations" in the Azure portal to register a new application. Make a client secret and write down the Application (Client) ID and Directory (Tenant) ID.
Your Postman requests will be authenticated using these credentials.
Activation Setup in Postman:
Click the "New" button in Postman and choose "Request" to start a new request.
Navigate to the “Authorization” tab in the request setup.
Select "OAuth 2.0" as the format. After selecting "Get New Access Token," fill out the following information:
Token Name: Any name you want.
Grant Category: Client References.
https://login.microsoftonline.com//oauth2/v2.0/token is the URL for the access token.
Application (Client) ID: This is the Client ID from Azure. Client Secret: The secret you made for the client.
Scope: /.default/.crm.dynamics.com
For your request, click "Request Token" and then "Use Token."
Set Up an API Request:
Configure the D365 data entities API endpoint. For example, the URL would be https://.crm.dynamics.com/api/data/v9.0/accounts to retrieve data from the accounts object.
Based on your action, choose the proper HTTP method (GET, POST, PUT, or DELETE):
GET: To obtain information. For instance, GET /accounts
POST: To generate fresh data. POST /accounts with a JSON payload in the body is an example.
PUT/PATCH: To bring current records up to date. PATCH /accounts() with the modified data in the body, for instance.
DELETE: To delete information. DELETE /accounts(), for instance
Include Query Parameters and Headers:
Add the subsequent headers to the "Headers" tab:
Permission: as bearer
Application/json is the content type for POST and PUT/PATCH queries
Use the query parameters in the request URL to filter or sort the results. To filter accounts by name, for instance, go to this link: https://.crm.dynamics.com/api/data/v9.0/accounts?$filter=name eq 'Contoso'. Requests can be executed and reviewed.
In order to submit your API request, click "Send."
Postman will show the answer, together with any returned data and status codes. Make sure the response satisfies your expectations by reviewing it.
Deal with Errors and Issues:
Summary
A useful and effective technique to work with your D365 data programmatically is to set up Postman to call Dynamics 365 data entities. By setting up Postman You may easily execute a variety of API queries, from adding and removing records to retrieving and updating data, if you have the necessary login information and API endpoints. This configuration offers a simple and manageable interface for working with D365 data, which assists integration efforts in addition to facilitating thorough API testing. Gaining proficiency with this configuration will improve your capacity to create and manage integrations, automate workflows, and take full advantage of Dynamics 365's API features.
0 notes
Text
Oracle Apex Oauth2 Example

OAuth2 in Oracle APEX: A Practical Guide and Example
OAuth2 is a contemporary and secure authorization framework that allows third-party applications to access protected resources on behalf of a user. By implementing OAuth2 in Oracle APEX, you can provide controlled access to your APEX application’s data and functionality, enabling seamless integration with other services.
Why use OAuth2 with APEX?
Enhanced Security: OAuth2 offers a robust security layer compared to traditional username and password-based authentication. It uses tokens rather than directly passing user credentials.
Fine-grained Access Control: OAuth2 allows you to define specific scopes (permissions) determining the access level granted to third-party applications.
Improved User Experience: Users can conveniently authorize applications without repeatedly sharing their primary credentials.
Prerequisites
A basic understanding of Oracle APEX development
An Oracle REST Data Source (ORDS) instance, if you want to integrate with ORDS-defined REST APIs
Steps for Implementing OAuth2 in Oracle APEX
Create an OAuth2 Client:
Within your APEX workspace, navigate to Shared Components -> Web Credentials.
Click Create and select the OAuth2 Client type.
Provide a name, ID, client secret, and any necessary authorization scopes.
Obtain an Access Token:
The method for obtaining an access token will depend on the OAuth2 flow you choose (e.g., Client Credentials flow, Authorization Code flow).
Utilize the Access Token:
Include the access token in the Authorization header of your API requests to protected resources. Use the format: Bearer .
Example: Accessing an ORDS-based REST API
Let’s assume you have an ORDS-based REST API endpoint for fetching employee data that requires OAuth2 authentication. Here’s how you would configure APEX to interact with it:
Create a REST Data Source:
Go to Shared Components -> REST Data Sources.
Set the authentication type to OAuth2 Client Credentials Flow.
Enter your OAuth2 token endpoint URL, client ID, and client secret.
Use the REST Data Source in Your APEX Application:
Create APEX pages or components that utilize the REST Data Source to fetch and display employee data. APEX will automatically handle obtaining and using the access token.
Additional Considerations
Access Token Expiration: OAuth2 access tokens usually have expiration times. Implement logic to refresh access tokens before they expire.
OAuth2 Flows: Choose the most suitable OAuth2 flow for your integration use case. The Client Credentials flow is often used for server-to-server integrations, while the Authorization Code flow is more common for web applications where a user is directly involved.
youtube
You can find more information about Oracle Apex in this Oracle Apex Link
Conclusion:
Unogeeks is the No.1 IT Training Institute for Oracle Apex Training. Anyone Disagree? Please drop in a comment
You can check out our other latest blogs on Oracle Apex here – Oarcle Apex Blogs
You can check out our Best In Class Oracle Apex Details here – Oracle Apex Training
Follow & Connect with us:
———————————-
For Training inquiries:
Call/Whatsapp: +91 73960 33555
Mail us at: [email protected]
Our Website ➜ https://unogeeks.com
Follow us:
Instagram: https://www.instagram.com/unogeeks
Facebook: https://www.facebook.com/UnogeeksSoftwareTrainingInstitute
Twitter: https://twitter.com/unogeeks
0 notes
Text
GraphQL in MuleSoft

Integrating GraphQL with MuleSoft enables you to offer a modern, powerful API interface for your applications, allowing clients to request the data they need and nothing more. GraphQL, a query language for APIs developed by Facebook, provides a more efficient and flexible alternative to the traditional REST API approach. When combined with MuleSoft’s Anypoint Platform, you can leverage GraphQL to design, build, and manage APIs that offer tailored data retrieval options to your API consumers.
Implementing GraphQL in MuleSoft
As of my last update, MuleSoft’s Anypoint Platform does not natively support GraphQL in the same direct manner it supports REST or SOAP services. However, you can implement GraphQL over the APIs managed by MuleSoft through custom development. Here’s how you can approach it:
Define Your GraphQL Schema:
Start by defining a GraphQL schema that specifies the types of data you offer, including objects, fields, queries, and mutations. This schema acts as a contract between the client and the server.
Implement Data Fetchers:
You need to implement a resolver or data fetcher for each field in your schema. In the context of MuleSoft, you can implement these fetchers as Java classes or scripts that execute logic to retrieve or manipulate data from your backend systems, databases, or other APIs managed by MuleSoft.
Expose a GraphQL Endpoint:
Use an HTTP Listener in your Mule application to expose a single GraphQL endpoint. Clients will send POST requests to this endpoint with their query payloads.
You can handle these requests in your Mule flows, parsing the GraphQL queries and passing them to the appropriate data fetchers.
Integrate GraphQL Java Libraries:
Leverage existing GraphQL Java libraries, such as graphql-java, to parse the GraphQL queries, execute them against your schema, and format the response according to the GraphQL specification.
You may need to include these libraries in your Mule project and call them from your custom components or scripts within your flows.
Manage Performance and Security:
Implement caching, batching, and rate limiting to optimize performance and manage the load on your backend systems.
Secure your GraphQL endpoint using MuleSoft’s security policies, OAuth2 providers, or JWT validation to protect against unauthorized access.
Testing and Documentation
Testing: Use Postman, Insomnia, or GraphQL Playground to test your GraphQL API. These tools allow you to craft queries, inspect the schema, and see the results.
Documentation: Although GraphQL APIs are self-documenting through introspection, consider providing additional documentation on everyday use cases, query examples, and best practices for clients.
Challenges and Considerations
Query Complexity: GraphQL allows clients to request deeply nested data, which can lead to performance issues. Consider implementing query complexity analysis and depth limiting to mitigate this.
Error Handling: Design your error handling strategy to provide meaningful error messages to clients while hiding sensitive system details.
N+1 Problem: Be mindful of the N+1 problem, where executing a GraphQL query could result in many more data fetching operations than expected. Use techniques like data loader patterns to batch requests and reduce the number of calls to backend services.
Demo Day 1 Video:
youtube
You can find more information about Mulesoft in this Mulesoft Docs Link
Conclusion:
Unogeeks is the №1 Training Institute for Mulesoft Training. Anyone Disagree? Please drop in a comment
You can check out our other latest blogs on Mulesoft Training here — Mulesoft Blogs
You can check out our Best in Class Mulesoft Training details here — Mulesoft Training
Follow & Connect with us:
— — — — — — — — — — — -
For Training inquiries:
Call/Whatsapp: +91 73960 33555
Mail us at: [email protected]
Our Website ➜ https://unogeeks.com
Follow us:
Instagram: https://www.instagram.com/unogeeks
Facebook: https://www.facebook.com/UnogeeksSoftwareTrainingInstitute
Twitter: https://twitter.com/unogeeks
#MULESOFT #MULESOFTTARINING #UNOGEEKS #UNOGEEKS TRAINING
0 notes
Text
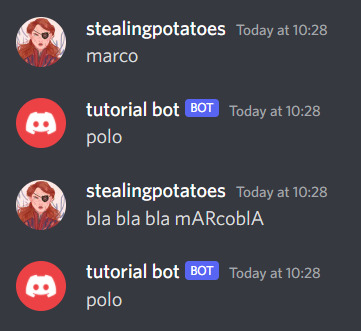
HOW TO MAKE A SIMPLE DISCORD BOT THAT RESPONDS TO MESSAGES!!!
(updated tutorial! trust me, it's super easy!!)
Pretty much every Discord bot tutorial I’ve seen is either outdated, way too complicated, or a video... so I’ve decided to take matters into my own hands and make my own tutorial!!!
So here’s how to make a response bot with Python and Repl.it, step by step, with pictures. NO CODING EXPERIENCE NEEDED

Step 1: HAVE A DISCORD ACCOUNT AND A SERVER!
Seeing as you’re here, I’ll assume you know what discord is and have an account. I won’t explain this bit to you (:
Step 2: MAKE A REPL.IT ACCOUNT
Repl.it is where your bot’s code is gonna live, so you need to make an account for it!!
https://repl.it/signup?goto=%2F~
Step 3: STARTING THE BOT!
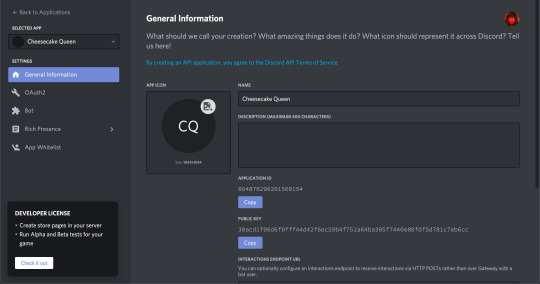
Now you’re gonna go to https://discord.com/developers/applications and make an application!
Once you’re there, click that blue “New Application” button and make a new application!

Once you've done that, you should be here
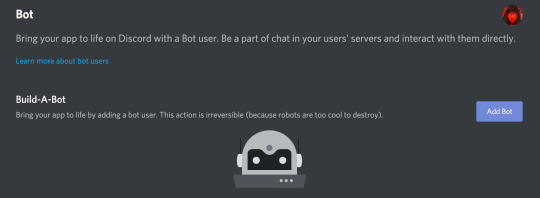
Now go to the bot section and click add bot
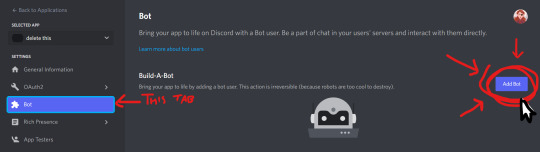
Congrats! You've got the beginnings of a robot! Do not close this tab, we'll need it later!
Step 4: ADDING THE BOT!
Now, you need to add the bot to a server so you can use it!
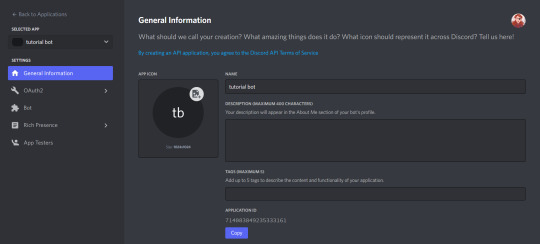
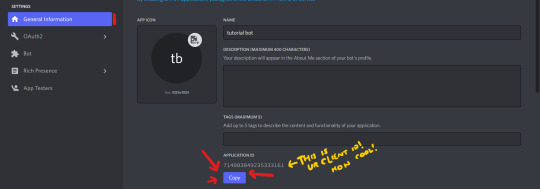
Go to the “General Information” page of your bot/ app, and copy the application ID by clicking the handy little copy button
now, replace where this link says [YOUR CLIENT ID HERE] with your client ID and go to said link:
https://discordapp.com/api/oauth2/authorize?scope=bot&client_id=[YOUR CLIENT ID HERE]
(example: https://discord.com/oauth2/authorize?scope=bot&client_id=714083849235333161)
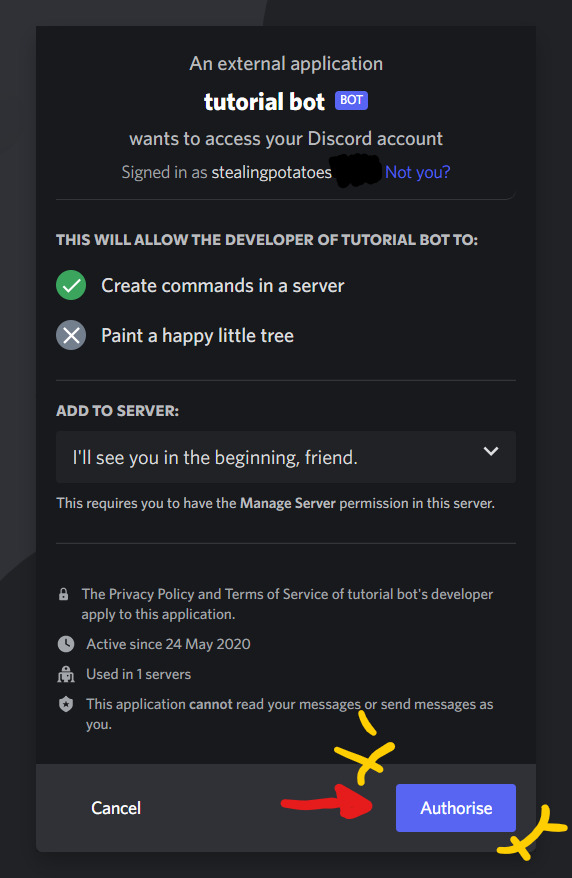
Authorise it and bam! It's in your server!
Step 5: ACTUALLY CODING THE BOT!!
FINALLY!
This bit is REALLY easy, because I’ve made you some base code, so you don’t have to do much!!
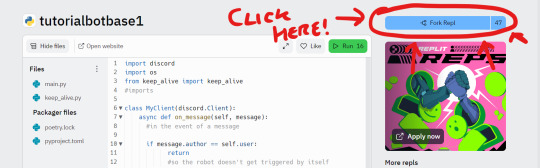
Go to: https://repl.it/@stealingpotatos/tutorialbotbase1
Now click the "Fork" button and you've got your own copy of the code!!! Well done!!
Here comes the actual coding! Replace "trigger word" with whatever you want to trigger the bot, and "response" with the-- well I'm sure you can work it out!
THE TRIGGER NEEDS TO BE IN ALL LOWER CASE

But your bot won't work just yet!
step 6: JOINING YOUR BOT AND CODE
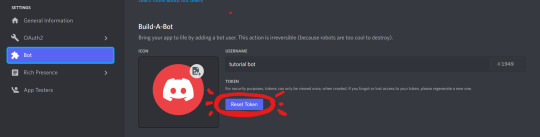
Back in the Discord Dev Portal, go to the Bot tab and click "RESET TOKEN" and then copy it!

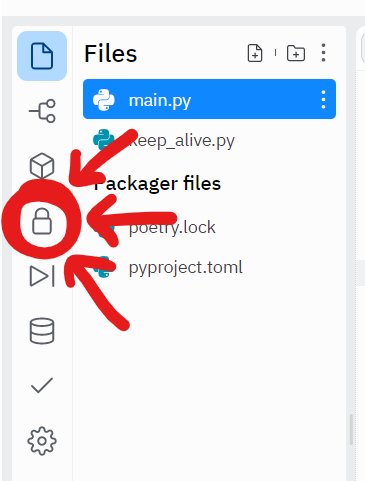
Back on repl.it, click the lock icon to enter the Secrets tab
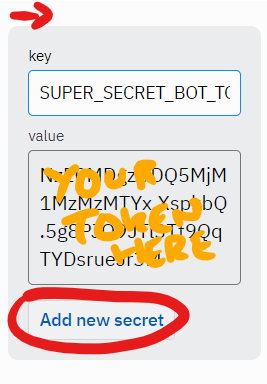
Once you're there, add a new secret called "SUPER_SECRET_BOT_TOKEN" and make the value your copied bot token!
AND THATS IT!!! You have a working bot!!
I'm so proud of you!!!! :D
Have fun botting!!
extras: KEEPING YOUR BOT ONLINE
Because of the “keep_alive” function, your bot will continue to be online for about an hour after you close the tab.
But if you want it online all the time, here's a tutorial I made a while back on keeping your bot online 24/7!
extras: ADDING MORE RESPONSES
Super simple!!
If you want multiple triggers for the same response, copy & paste the “(””) in message.content.lower()” part of the statement, + add an or

Like that!
And for adding another trigger/response entirely, just copy & paste the statement entirely, and change the “if” to an “elif” if you don’t want both things to trigger at once.

Like this!!
If you don’t already know python, I’d very much recommend learning it if you’re going to be doing more bot coding!!
Thank you for reading, and if you have ANY QUESTIONS AT ALL, my askbox is open (and has anon if you think the question is kinda dumb and don’t want your name on it. It’s not a dumb question, ask me!)
Also if you have any questions about adding new functions, I’ll try to help you too! This blog is gonna be all abt that!!
81 notes
·
View notes
Text
Discord Bot Developing [Python & Repl][1/3] Last Updated: 31/05/2022
"Learn, for the sake of learning, not a means of gaining attention." Target:
Understanding The Bot
Bot Creation & Server Invite
Bot Setup & Packages . .. ...
A. The Beginning
Introduction...
Ever wondered, how amazing it would be to finally make your own discord bot. With so many possibilities, and despite the fact that there are limited interactions, delving into the world of discord bot development might be worth getting a shot.
What Is A Discord Bot?
For any of you, who have stumbled into this post out of curiosity, and if you've never even used a social media called, "Discord", then you should probably read this first. A discord bot is a bot from Discord than can do many things depending on how you developed it. It can be used to play songs, send messages, play games, make an economy, and lots lots more. Even AI chatbots could be created, but that is something rather complex. Essentially, there are primarily two languages that are used for bot development. One of them, is in Python, and another, using JS. Here, I'll be using Python.
Lack of Talent? Inexperienced?
So, do you lack the talent of creating your own bot? Or maybe, you don't have enough experience in this department? Well...I hate to break it to you, but, you should just give up...of course not, hell, I even started making my bot without having the basics of Python. Indeed, it started off badly, with me not being able to send one message for 2 days, but now, I've been creating economies and using lots of packages. So, don't discourage yourself when something goes wrong. Be patient, take pride in your work, and always remember everyone has different experiences. Now then, let's skip to the bot creation, shall we?
. .. ...
B. Bot Creation
Bot Creation? How?!
To begin with...how do you even start creating a bot? Do you just, think of it, and "poof"! It exists? No. You have to make your bot from scratch. First, go to Discord and sign in, then, go click this website:
Once you've reached there, you should find something like this. Go click the "new application". Input whatever bot name you want, however you want.

In this part, it is all fully customizable, but here are the top 3 that you should probably customize, especially if you have an aesthetic sense within you. All of these three will be shown when you see the bot in your discord server.

Once you're done with that, focus on the tabs at the side. Click the bot tab, and then click the "add bot". Once you've done that, scroll down and click the permissions and intents that you want to use. In my case, I will click all the intents to check, and give the administrator permission (yes, because I am also lazy).
Fun Fact: Coincidentally, when I made this bot, the tag was 6909!


And then, we go check the tabs again and click the OAuth2. Under that, go click URL Generator. Check the scopes of bot. Scroll down, and click the permissions you have chosen earlier. Scroll down to the furthest part, and click the link for it.


Now that, that's done...go make a new tab in whatever search engine you're using (ex. Google, Edge, Firefox). Add the link to the new tab, and invite it to the server of your choosing. Also remember that whatever permissions you've clicked check, must have the same permissions as the position you have in the discord server. An example of this is if you clicked admin permission. You must be an admin in the server you want to place it in. Anyways, If all goes well, it should have a result like this when you click it in the member's tab.

One last thing before we go to bot coding. Go back to the discord developer applications, go back to the bot tab and copy the token. (If there is no token, click the reset button). This token will be used for coding. You should NEVER share this token with anyone. Even your friends. If you ask why? Let's say that you/your friend's account got hacked, and your bot will also be hacked! That's something that should be avoided! But enough of that... That whole process above was easy peasy, right? If you're done with all that, and everything worked out correctly congrats! You've just finished creating your bot into existence!
. .. ...
C. Bot Setup & Package Installation
Bot Setup, Packages & More
If you're doubting yourself that it was way too easy...yeah it was. Coding the bot is much more tiresome. Now, go on to replit.com (the website below), and make an account, (or use the one you have if you already have one).
Make a new repl, under the language of Python. Once you've done that, you have been redirected to the main.py file of your new repl. Do take in mind to change the title of your new repl if you haven't named it...you'll need it later.

Let's get back to work! Now that we're in the main.py file, write down all this code. And then check the side tabs. Click the tab with the keylock. Under that, add a new secret. Change its key to "BotToken", and its value to the bot token I told you to get earlier.

That should be all the setup necessary! By the way, if you have NOT CLICKED all the intents as yes, you should remove the code for "intents=discord.Intents.all()" Go run your bot, and see if it's online first. If you encounter any errors, read what error you got, and try to change the code that you had based on what the error is. . .. ...
D. Code Explanation
In This Post: import os - Imports os so that the bot token you have will be kept as a secret! bot = commands.Bot(command_prefix=["?","!",".."]) - Gives the prefix/prefixes that you will add to your bot. intents=discord.Intents.all() - Makes all the intents for the bot as true. bot.remove_command('help') - This removes help command in all commands you make so that you won't have to write a help text in all of them. bot.run(os.getenv('BotToken')) - Let's the bot get the value of the BotToken. Because os was imported, this can be used.
NOT In This Post: import random - This allows you to make text random. import asyncio - Delays when the bot sends some stuff. import discord - This is the python package that allows all discord Python code to work. from discord.ext import tasks - This allows the bot to create tasks, without you having to write the command. from discord.ext import commands - This allows the bot to send commands via @bot.command. case_insensitive=True - Allows the bot's command name and aliases to be repeated in any way. (Ex. if the alias of command is "help" when you type the command name in Discord as "HeLp" instead, it will still work).
from discord.ext import tasks from discord.ext import commands
bot = commands.Bot(command_prefix=["yourprefixhere:3"],case_insensitive=True,intents=discord.Intents.all()) bot.remove_command('help')
Copy-Paste Code:
import os import random import asyncio import discord
from discord.ext import tasks from discord.ext import commands
bot = commands.Bot(command_prefix=["changeyourprefixhere:3"],case_insensitive=True,intents=discord.Intents.all()) bot.remove_command('help')
bot.run(os.getenv('BotToken'))

Congrats! You've made it all to the end of creating the most basic bot! As of now, all you've done is only the setup and the creation. Expect some usage of discord tasks, discord commands, embeds, async with typing, and asyncio~ . .. ... If I've made any typos, please do tell me! I will edit it ASAP. Thank you!
7 notes
·
View notes
Text
How To Set Up Your Own Discord Bot: A Guide [v13 update]
Step 1: Go to https://discord.com/developers/applications
Make sure you are signed in to discord. On the top right hand corner, you will see a button that says New Application. Get to clicking!

Step 2: You will be asked for a name. This could be any name, but preferably the one you want your bot to have. Make sure it has a cool name, like Potato Queen, or Jack the Ripped Bot.
Once you have done that, click Create.

Step 3: You will come to a page that shows all the General Information. But you have not created your bot yet! This is just the application page. You can put in your App Icon, Description and the likes, before clicking on Bot at the side bar.
Step 4: You should reach a page with a button that says Add Bot. Well, what are you waiting for? Go ahead and click it!
A whole new page will pop up, with information about your new bot. Remember, you can’t destroy a bot, so make sure you’re definitely wanting a bot when you’re doing this.
From here, you can see your bot’s username as well as its profile picture. You can change it if you want.
IMPORTANT: There is also something called Token. YOU SHOULD NEVER SHOW THIS TO ANYONE ELSE. It is the one thing that will bring your bot to life (it basically controls your bot) and if it’s out in the open, it is best to regenerate a new one.
When you scroll down, you will see Authorization Flow. This is where you can choose to make your bot public or private. Making it public means that others can add it to their own servers, without your help. If it’s private, only YOU can add this bot to servers.

Step 5: Invite your bot into your server.
The link to do this should be: https://discord.com/oauth2/authorize?client_id=[clientidhere]&scope=bot&permissions=[permissionnumber]
An example is: https://discord.com/oauth2/authorize?client_id=707835242475421767&scope=bot&permissions=8 [this has admin permissions]
or you can just use: https://discord.com/oauth2/authorize?client_id=707835242475421767&scope=bot
And you’re done! At least with the application part.
NOW WE MOVE ON TO THE CODING PART. [Note: This is in JS because I love JS. Someday I might do a guide for Python too but we will see.]
The basic things you need: 1. Visual Studio Code 2. Node JS
You can see how to download either one from HERE.
Then, you will need to download discord.js.
Create a folder for your discord bot things, and then open up Visual Studio Code.
Create a new file called index.js and this will be your main page, where you get your bot running. The basic codes inside it would be:

TOKEN: Remember that token that I said you can’t tell anyone? Yeah, put it in there like client.login(”IWEUTWEITU”) where that keysmash is your token.
From here, if you’re using Visual Studio Code, just go to your console.
NOTE: If you do not know where to find the console, follow this:
Click Terminal from the top tab > New Terminal. This will pull up the console for you.
Make sure that the directory of your terminal is the place where your index.js file is at. If not, you can always use ls to list the different folders in that directory and cd to change into that directory as shown below:
My terminal was in the Github folder and I used ls to list all the folders in the Github folder. From there, I can see the cafe-bot folder where my hello.js file is located in. So I used cd cafe-bot to move into that folder.

From there, type npm install discord.js
Once you’re done with that, once again, type node index.js.
[Sometimes you might run into errors that let you know that “The term node is not recognized as the name of a cmdlet”. This either means that you have NOT installed Node JS, in which you can go to this post to see how to do it HERE OR you might have some issues with directories in which you can look at this: https://www.youtube.com/watch?v=pg4t48BPmh8]
You should see “Bot is ready!” and with that, your bot is up!
Go ahead, explore it, enjoy it! You can do it!
#discord bot#discord js#discord.js#js#javascript#discord application#business guides#discord guide#discord beginner#coding#discord
83 notes
·
View notes
Text
Microservices Programming

Microservices architecture is revolutionizing the way modern software is built. Instead of a single monolithic application, microservices break down functionality into small, independent services that communicate over a network. This approach brings flexibility, scalability, and easier maintenance. In this post, we’ll explore the core concepts of microservices and how to start programming with them.
What Are Microservices?
Microservices are a software development technique where an application is composed of loosely coupled, independently deployable services. Each service focuses on a specific business capability and communicates with others through lightweight APIs, usually over HTTP or messaging queues.
Why Use Microservices?
Scalability: Scale services independently based on load.
Flexibility: Use different languages or technologies for different services.
Faster Development: Small teams can build, test, and deploy services independently.
Resilience: Failure in one service doesn't crash the entire system.
Better Maintainability: Easier to manage, update, and test smaller codebases.
Key Components of Microservices Architecture
Services: Individual, self-contained units with specific functionality.
API Gateway: Central access point that routes requests to appropriate services.
Service Discovery: Automatically locates services within the system (e.g., Eureka, Consul).
Load Balancing: Distributes incoming traffic across instances (e.g., Nginx, HAProxy).
Containerization: Deploy services in isolated environments (e.g., Docker, Kubernetes).
Messaging Systems: Allow asynchronous communication (e.g., RabbitMQ, Apache Kafka).
Popular Tools and Frameworks
Spring Boot + Spring Cloud (Java): Full-stack support for microservices.
Express.js (Node.js): Lightweight framework for building RESTful services.
FastAPI (Python): High-performance framework ideal for microservices.
Docker: Container platform for packaging and running services.
Kubernetes: Orchestrates and manages containerized microservices.
Example: A Simple Microservices Architecture
User Service: Manages user registration and authentication.
Product Service: Handles product listings and inventory.
Order Service: Manages order placement and status.
Each service runs on its own server or container, communicates through REST APIs, and has its own database to avoid tight coupling.
Best Practices for Microservices Programming
Keep services small and focused on a single responsibility.
Use versioned APIs to ensure backward compatibility.
Centralize logging and monitoring using tools like ELK Stack or Prometheus + Grafana.
Secure your APIs using tokens (JWT, OAuth2).
Automate deployments and CI/CD pipelines with tools like Jenkins, GitHub Actions, or GitLab CI.
Avoid shared databases between services — use event-driven architecture for coordination.
Challenges in Microservices
Managing communication and data consistency across services.
Increased complexity in deployment and monitoring.
Ensuring security between service endpoints.
Conclusion
Microservices programming is a powerful approach to building modern, scalable applications. While it introduces architectural complexity, the benefits in flexibility, deployment, and team autonomy make it an ideal choice for many large-scale projects. With the right tools and design patterns, you can unlock the full potential of microservices for your applications.
0 notes
Text
HOW TO MAKE A DISCORD BOT THAT RESPONDS TO THINGS!!!
TRUST ME IT’S SUPER EASY!!!
Pretty much every Discord bot tutorial I’ve seen is either outdated, way too complicated, or a video... so I’ve decided to take matters into my own hands and make my own tutorial!!!
So here’s how to make a response bot with Python and Repl.it, step by step, with pictures. (Dw, you don’t even need to know how to code, I’ll run you through everything!!)

Step 1: HAVE A DISCORD ACCOUNT AND A SERVER!
Seeing as you’re here, I’ll assume you know what discord is and have an account. I won’t explain this bit to you.
Step 2: MAKE A REPL.IT ACCOUNT
Repl.it is where your bot’s code is gonna live, so you need to make an account for it!!
https://repl.it/signup?goto=%2F~.
Step 3: STARTING THE BOT!
Now you’re gonna go to https://discord.com/developers/applications and make an application!
Once you’re there, click that blue “New Application” button and make a new application!

Once you’ve done that, you should be here:

Ok, now go to the “Bot” section and add a robot to this thing!!

Keep this tab open, we need it for the rest of the tutorial.
Right, now we’re getting somewhere!!!!!
Step 4: ADDING THE BOT!
Now, you need to add the bot to a server!
Go to the “General Information” page of your bot/ app, and copy the client ID

now, replace where this link says [YOUR CLIENT ID HERE] with your client ID and go to said link:
https://discordapp.com/api/oauth2/authorize?scope=bot&client_id=[YOUR CLIENT ID HERE]
(example: https://discord.com/oauth2/authorize?scope=bot&client_id=714083849235333161)

Authorise it, and bam! It’s in your server!
Step 5: ACTUALLY CODING THE BOT!!
FINALLY!
This bit is REALLY easy, because I’ve made you some base code, so you don’t have to do much!!
Go to: https://repl.it/@stealingpotatos/tutorialbotbase1

Click the “fork” button, and you’ve got your own copy of the code!!!
Now, replace trigger word with whatever sentence/ word you’d like your bot to respond to. IT’S GOTTA BE IN LOWER CASE. IT WON’T WORK IF IT’S NOT.
Then replace response with whatever you’d like your bot’s response to be!

But you’re not done yet!! Your bot still won’t work!!
For your bot to work, you’re gonna need to make a new file called “.env”

This is where your super secret bot token is gonna go! You’re putting it in a seperate file due to how repl.it code is public, and we don’t want people messing with your bot!
In your .env file, write “SUPER_SECRET_BOT_TOKEN=”, like this:

Now, we need to go back to your bot page, and copy the bot token

Now, paste that bot token after “ SUPER_SECRET_BOT_TOKEN=“

(that’s a made up token by the way)
NOW YOU’RE DONE!!!!
Click that big green “run” button at the top, give it a minute, and test your bot!

I’M SUPER PROUD OF YOU, LOOK AT YOU GO!!!!
Your bot will respond to anyone saying the trigger word/ sentence in a message.
If it’s not working, double check you followed the tutorial right. If it’s still not working, send me a message or ask, and I’ll try to help you!!
Extras: KEEPING YOUR BOT ONLINE
Because of the “keep_alive” function, your bot will continue to be online for about an hour after you close the tab.
If you want to keep your bot online all the time, make an https://uptimerobot.com/ alert for the link in the bot alive page!

Extras: ADDING MORE TRIGGERS/RESPONSES
Super simple!!
If you want multiple triggers for the same response, copy & paste the “(””) in message.content.lower()” part of the statement, add an or

Like that!
And for adding another trigger/response entirely, just copy & paste the statement entirely, and change the “if” to an “elif” if you don’t want both things to trigger at once.

Like this!!
If you don’t already know python, I’d very much recommend learning it if you’re going to be doing more bot coding!!
Thank you for reading, and if you have ANY QUESTIONS AT ALL, my askbox is open (and has anon if you think the question is kinda dumb and don’t want your name on it. It’s not a dumb question, ask me!)
Also if you have any questions about adding new functions, I’ll try to help you too!
36 notes
·
View notes
Text
Azure Data Factory for Healthcare Data Workflows

Introduction
Azure Data Factory (ADF) is a cloud-based ETL (Extract, Transform, Load) service that enables healthcare organizations to automate data movement, transformation, and integration across multiple sources. ADF is particularly useful for handling electronic health records (EHRs), HL7/FHIR data, insurance claims, and real-time patient monitoring data while ensuring compliance with HIPAA and other healthcare regulations.
1. Why Use Azure Data Factory in Healthcare?
✅ Secure Data Integration — Connects to EHR systems (e.g., Epic, Cerner), cloud databases, and APIs securely. ✅ Data Transformation — Supports mapping, cleansing, and anonymizing sensitive patient data. ✅ Compliance — Ensures data security standards like HIPAA, HITRUST, and GDPR. ✅ Real-time Processing — Can ingest and process real-time patient data for analytics and AI-driven insights. ✅ Cost Optimization — Pay-as-you-go model, eliminating infrastructure overhead.
2. Healthcare Data Sources Integrated with ADF

3. Healthcare Data Workflow with Azure Data Factory
Step 1: Ingesting Healthcare Data
Batch ingestion (EHR, HL7, FHIR, CSV, JSON)
Streaming ingestion (IoT sensors, real-time patient monitoring)
Example: Ingest HL7/FHIR data from an APIjson{ "source": { "type": "REST", "url": "https://healthcare-api.com/fhir", "authentication": { "type": "OAuth2", "token": "<ACCESS_TOKEN>" } }, "sink": { "type": "AzureBlobStorage", "path": "healthcare-data/raw" } }
Step 2: Data Transformation in ADF
Using Mapping Data Flows, you can:
Convert HL7/FHIR JSON to structured tables
Standardize ICD-10 medical codes
Encrypt or de-identify PHI (Protected Health Information)
Example: SQL Query for Data Transformationsql SELECT patient_id, diagnosis_code, UPPER(first_name) AS first_name, LEFT(ssn, 3) + 'XXX-XXX' AS masked_ssn FROM raw_healthcare_data;
Step 3: Storing Processed Healthcare Data
Processed data can be stored in: ✅ Azure Data Lake (for large-scale analytics) ✅ Azure SQL Database (for structured storage) ✅ Azure Synapse Analytics (for research & BI insights)
Example: Writing transformed data to a SQL Databasejson{ "type": "AzureSqlDatabase", "connectionString": "Server=tcp:healthserver.database.windows.net;Database=healthDB;", "query": "INSERT INTO Patients (patient_id, name, diagnosis_code) VALUES (?, ?, ?)" }
Step 4: Automating & Monitoring Healthcare Pipelines
Trigger ADF Pipelines daily/hourly or based on event-driven logic
Monitor execution logs in Azure Monitor
Set up alerts for failures & anomalies
Example: Create a pipeline trigger to refresh data every 6 hoursjson{ "type": "ScheduleTrigger", "recurrence": { "frequency": "Hour", "interval": 6 }, "pipeline": "healthcare_data_pipeline" }
4. Best Practices for Healthcare Data in ADF
🔹 Use Azure Key Vault to securely store API keys & database credentials. 🔹 Implement Data Encryption (using Azure Managed Identity). 🔹 Optimize ETL Performance by using Partitioning & Incremental Loads. 🔹 Enable Data Lineage in Azure Purview for audit trails. 🔹 Use Databricks or Synapse Analytics for AI-driven predictive healthcare analytics.
5. Conclusion
Azure Data Factory is a powerful tool for automating, securing, and optimizing healthcare data workflows. By integrating with EHRs, APIs, IoT devices, and cloud storage, ADF helps healthcare providers improve patient care, optimize operations, and ensure compliance with industry regulations.
WEBSITE: https://www.ficusoft.in/azure-data-factory-training-in-chennai/
0 notes
Text
Securing Flask APIs with OAuth2 and JWT Authentication Best Practices
Introduction Securing Flask APIs with OAuth2 and JWT Authentication is a crucial aspect of building robust and scalable web applications. In this tutorial, we will cover the technical background, implementation guide, code examples, best practices, and testing/debugging techniques to help you secure your Flask APIs. Importance of Securing Flask APIs API security is critical in today’s web…
0 notes
Text
Mobile Security Testing Guide
Introduction to the OWASP Mobile Security Testing Guide
New technology often poses new safety threats, and mobile computing is no exception. Security issues for mobile apps vary in several important respects from conventional desktop applications. Modern mobile operating systems are probably safer than conventional desktop operating systems, but issues can still occur when security is not carefully considered during the production of mobile apps. Data storage, inter-app communication, proper use of cryptographic APIs, and secure network communication are only some of these considerations.
Authentication and Authorization
In most cases, sending users to a remote service is an important part of the overall mobile app architecture. While much of the authentication and authorization logic takes place at the endpoint, there are also some challenges to implementation on the mobile app side. Unlike web apps, mobile apps also store long-term session tokens that are unlocked with user-to-device authentication features such as fingerprint scanning. While this allows for easier login and improved user experience (no one wants to enter complicated passwords), it also adds additional difficulty and space for error.
Mobile app architectures also increasingly implement authorization mechanisms (such as OAuth2) that delegate authentication to a separate service or outsource authentication to an authentication provider. Using OAuth2 enables the client-side authentication logic to be outsourced to other applications on the same platform (e.g. the system browser). Safety testers must be conscious of the advantages and drawbacks of various potential authorization mechanisms and architectures.
Interaction with the Mobile Platform
Mobile operating system architectures vary in important ways from classic desktop architectures. For example, all mobile operating systems enforce application permission systems that control access to unique APIs. They also offer more (Android) or less (iOS) inter-process communication (IPC) facilities that allow apps to share signals and data. These platform-specific features come with a number of drawbacks of their own. For example, if IPC APIs are misused, sensitive data or functionality could inadvertently be exposed to other apps running on the computer.
Code Quality and Exploit Mitigation
Traditional injection and memory management problems are not often seen in mobile apps due to the smaller attack surface. Mobile apps mainly communicate with the trusted backend service and UI, so even though there are a lot of buffer overflow vulnerabilities in the software, these vulnerabilities typically don't open up any useful attack vectors. The same applies to browser vulnerabilities such as cross-site scripting (XSS enables attackers to insert scripts into web pages) that are very prevalent in web applications. There are still exceptions, however. In certain cases, XSS is technically possible on mobile devices, but it is very rare to see XSS problems that can be exploited by a person. See the section "Cross-Site Scripting Flaws" in the chapter "Checking Code Consistency" for more detail on XSS.
This protection from injection and memory management issues does not mean that software developers can get away with writing sloppy code. Following best-practice protection results in hardened (secure) releases that are resistant to tampering. Free protection features provided by compilers and mobile SDKs help improve security and reduce attacks.
Anti-Tampering and Anti-Reversing
There are three topics you can never bring up in polite conversations: religion, politics, and code obfuscation. Many security experts ignore client-side safeguards outright. However, software protection controls are widely used in the world of mobile apps, so security testers need ways to deal with these protections. We believe that there is a benefit to client-side protections if they are employed with a clear purpose and realistic expectations in mind and are not used to replace security controls.
ASTAQC
ASTAQC is one of the best QA Software testing company. We can minimize risks of software projects by 360° testing. So finding a best software testing company or hire software quality experts is no longer a challenge.
Learn how to perform security testing for mobile applications, test real time mobile applications, mobile application security testing checklist, mobile app security testing tools etc. with ASTAQC.
1 note
·
View note