#obs websocket
Explore tagged Tumblr posts
Visit Tumblr Blog
Explore Tumblr blogs with no restrictions, modern design and the best experience.
Last Seen Tumblr Blogs


Fun Fact
Tumblr has been banned in Indonesia for providing people with access to pornographic content.
Text
Hey, Tumblr, I'm angry and frustrated and I'm making it your problem.
Break the Keep Reading only if you either A. have any experience with OBS-Websocket or other such integrations, or B. sincerely wish to partake in my suffering. Warning for excessive cursing, it gets rough.
Update on the whole KT-1632 overlay situation: After a handful of minor technical difficulties and rookie mistakes (hey cat, it would help if you actually turned on the damn websocket before trying to connect to it), I've established a base framework for connecting to OBS Websocket.
Once I had that in place, I started testing out what kind of messages I can get, and uh... I'm already running into a huge problem, here.
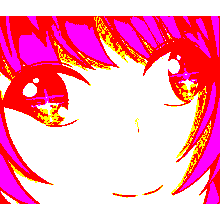
See, OBS Websocket 5.0 has the following messages that seem pertinent to my use case: CurrentProgramSceneChanged, SceneTransitionStarted, SceneTransitionEnded, and SceneTransitionVideoEnded. Keep in mind, the only documentation I can access right now, as far as I can tell, is just the 5.0.1 OBS-Websocket.
Here's a refresher on the use case: I want to be able to move elements of my Unity-based stream overlay depending on which scene is currently active in OBS. A wrinkle in this is that I use a custom stinger transition with a specific cut point, like this:
Now, all three events regarding the scene transition only have one piece of data to them: the name of the transition (which is basically always going to be "SniperScope"). The only event that actually tells me what scene is being switched to is the CurrentProgramSceneChanged event.
There is an immediate problem.

Funnily enough, this order of operations is actually backwards from the current documentation:
On the one hand, there could potentially be some sort of delay or other issue involved with WebsocketSharp / Unity that's responsible for this, however in my testing the exact amount of delay and order of operations is entirely consistent every single time I initiate a transition in OBS. The first message almost always arrives instantaneously; it's the other three messages that seem to come whenever they feel like it, and not at all close to what they need to be at.
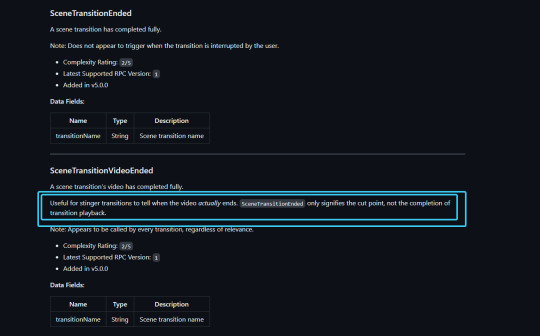
On the other hand-- wait, what? What's this issue on the official obs-websocket github about--
So you're telling me that SceneTransitionStarted used to have the from and to scenes specified in the event data in version 4, and they removed it in version 5 for literally no other reason than an RPC overhaul? And they haven't added it back in OVER A YEAR?!
Now, the github actually does have an install link for obs-websocket version 4.9.1-compat that should (keyword should, you know how that goes) work with OBS 29 (more specifically, it should work with 28+, which means there isn't even a guarantee for it to work with OBS 29... fucking awesome).
However, uhhhhhh... I cannot find ANY FUCKING DOCUMENTATION FOR 4.9'S PROTOCOL WHATSO-FUCKING-EVER. There is LITERALLY ONLY 5.0 in the readmes and protocol.md docs.
This shit has me pulling my hair. I'm goin' the fuck to sleep. Anyone got any bright fuckin ideas, I'm all fuckin' ears for it in the morning.
#pain and suffering#streaming#indie vtuber#software development#obs troubleshooting#obs studio#help appreciated#websocketsharp#obs websocket
3 notes
·
View notes
Text
kantab's proof of concept impl
my main concern was potential latency because this goes through like 3 layers (native > websocket > browser)
this is running pretty sweet at 60fps (mouse position obtained each 10ms)
cpu usage is negligible, latency is negligible
this proof of concept is an astounding success
kantab? yeah, kantab (簡単 [kantan] (easy) + tablet)
many vtubers use a software called spud tablet and arm. the software's purpose is to show a hand that aligns to mouse movement and its images are customizable
it works well, i've used it, it's fun. however it has a few working quirks i am not very happy with
it's basically a game app (made using SDL) so for it to be active the window has to be MAXIMIZED and open at all times, so, in the background behind all active windows or just running like that in your screen while you tell obs to only capture the window for the art program
the background is not transparent, you chroma key it to get it to be transparent in obs
no Windows Ink support (windows ink does not update mouse position, and spud requires mouse movement to work its magic)
not crossplatform
kantab is my response to these issues; basically what spud tablet does but with a degree of customizability i want to add beyond just the images, potential windows ink support (aided by opentabletdriver, which would allow one to use it in modern programs and also browsers) and since it's made in .net core, potentially cross platform too
this is also technically overengineered? idk i like trying things out
5 notes
·
View notes
Text
OBSのアップデート 30.0
OBS Studio 30.0
Note: As previously announced, this release removes support for Ubuntu 20.04, Qt 5, and FFmpeg versions prior to 4.4.
30.0 New Features
Added WHIP/WebRTC output [Sean-Der / kc5nra / DDRBoxman / tt2468]
With the introduction of WHIP, FTL is slated for removal in a release after May 2024
Redesigned the status bar [cg2121 / GeorgesStavracas / Warchamp7]
The redesigned status bar now provides the same information in a more organized and well structured way, with more representative and recognizable icons.
Added option for Full-Height docks to the “Docks” menu [ujifgc]
When enabled, a dock such as chat can take up the entire height of the OBS window
Added support for Intel QSV H264, HEVC, AV1 on Linux [kkartaltepe]
Added a shader cache to improve OBS startup time on Windows [notr1ch]
Added application audio capture on macOS [jcm93]
Added a “Safe Mode” that runs OBS without third-party plugins, scripting, and websockets [derrod]
When OBS detects that it was not shut down properly it will offer the user the option to launch in Safe Mode for troubleshooting purposes. It can also be manually activated via the “Help” menu.
Reworked the virtual camera on macOS to work with all applications (on macOS 13 and newer) [gxalpha/PatTheMav]
Added a YouTube Live Control Room Panel when streaming to YouTube [yuriy-chunak]
Added 10-bit capture support for Decklink devices [jpark37]
Added HDR playback support for Decklink output [jpark37]
Added an option to hide OBS windows from macOS Screen Capture’s “Display Capture” [PatTheMav]
30.0 Changes
Changed audio/video encoder dropdowns to be sorted by name [gxalpha]
Changed the list of applications in the macOS Screen Capture source to be sorted by name [Colerar]
Updated NVIDIA Audio/Video Effects SDK versions [pkviet]
Added more accurate logging for Hardware Accelerated GPU Scheduling status and support [derrod]
Added the ability to arrange filters via drag & drop [cg2121]
Clarified surround sound warning for YouTube 5.1 audio support [pkv]
Added warning if Lenovo Vantage is installed [notr1ch]
Added logging for scene changes in Studio Mode [Penwy]
Changed Video Capture Device sources on Windows to not show an audio device in the Audio Mixer if none is available/selected [Exeldro]
Added support for grayscale MJPEG in V4L / DirectShow sources [Staacks]
Improved settings interface of the “Text (FreeType 2)” source [gxalpha]
Added button to reactivate stopped capture in macOS Screen Capture [gxalpha]
Changed scene collection removal to retain a backup file (.bak) that can be easily reimported if needed [derrod]
Added IPv6 support for RTMP streaming output with IPv4 fallback (“happy eyeballs”) for dual-stack streaming services. The preferred protocol can still be selected in advanced settings. [jgh-twitch]
Fixed virtual camera output when used with additional output channels (e.g., Downstream Keyer plugin) [tytan652]
Added ability to set FFmpeg Options for VAAPI [nowrep]
Added a Help menu item to view the Release Notes [WizardCM]
Added logging for “Ignore streaming service setting recommendations” [derrod]
Added logging for Video Capture Devices on macOS for portrait and studio light effects [gxalpha]
Added more logging for Video Capture Device names on Windows [norihiro]
Added more logging for QSV [RytoEX]
Added logging for WASAPI source names on Windows [prgmitchell]
Increased minimum output resolution to 32x32 to prevent certain encoder failure scenarios [RytoEX]
Reenabled dynamic bitrate for AMF encoders [derrod]
Enabled “Paste Filters” after copying from scenes or mixer [gxalpha]
Removed D3D9 code from QSV encoder plugin [RytoEX]
Changed QSV plugin settings new to Beta 1 to use translatable strings [RytoEX]
Exposed shader creation errors [exeldro]
Changed v4l2 sources to always use linear alpha blending [SludgePhD]
30.0 Bug Fixes
Fixed a crash when using Touch Portal to control OBS [notr1ch]
Fixed a crash when selecting a window in PipeWire capture if one is already selected [GeorgesStavracas]
Fixed a crash on OBS shutdown on macOS [norihiro]
Fixed a crash with the auto-config wizard [norihiro]
Fixed a crash when trying to capture screen via PipeWire [columbarius]
Fixed a crash when rapidly changing scenes [PatTheMav]
Fixed a crash when quickly switching between NVIDIA Audio Filters [pkviet]
Fixed a crash when starting and stopping multiple DeckLink outputs [jpark37]
Fixed a crash caused by plugins deleting properties [ujifgc]
Fixed an issue that could cause hardware encoders not showing up as options on capable GPUs [notr1ch]
Fixed possible security certificate verification failure when trying to stream with RTMPS on macOS [PatTheMav]
Fixed checking for updates not working on Windows if the username contains special characters [derrod]
Affected users will have to manually update to OBS 30.0
Removed legacy AMD encoder plugin [derrod]
Users upgrading from an older OBS version will continue to be able to use the old plugin
Fixed max bitrate not working in NVENC VBR mode [flaeri]
Fixed async sources (e.g. video capture devices) sometimes unnecessarily dropping frames while buffering is enabled [derrod]
Fixed order of IP binding/family setting [tytan652]
Fixed some issues with hotkeys with groups and duplicate sceneitems [derrod]
Fixed warnings being cut off in the UI in Simple Output Mode [gxalpha]
Fixed the installed version number visible in Windows Settings not being updated when using the auto-updater [derrod]
Fixed window capture showing the last frame of a closed window on Windows [Walker-WSH]
Fixed alignment helpers rendering below safe area indicators [cg2121]
Fixed some edge cases where certain undo/redo actions could behave in unexpected ways [derrod]
Fixed media source restarting playback when not necessary [CodeYan01]
Fixed frontend_save_callback in Python scripts [Penwy]
Fixed “flip” not working with “stretch to bounds” [Penwy]
Fixed OBS stealing focus when launching minimized [BenJuan26]
Fixed lossless recording not working if fragmented MP4/MOV was selected [gxalpha]
Fixed rendezvous mode with SRT [pkv]
Fixed browser source events not being sent to all frames [Exeldro]
Improved FFmpeg VAAPI AMD encoder video quality [nowrep]
Fixed virtual camera not deactivating correctly in some cases [Lain-B]
Fixed lag with VLC media source, particularly on macOS [usakhelo]
Fixed “Show more” in service settings selecting the first service in the list [gxalpha]
Fixed incorrectly positioned labels in a scenes-only multiview projector [norihiro]
Fixed detected framerate of videos encoded with Custom Output (FFmpeg) [jack-karamanian]
Fixed a bug where the “Show fullscreen and hidden windows/applications��� option in macOS Screen Capture did not apply immediately [niw]
Fixed a bug where the Auto-Configuration Wizard didn’t save YouTube stream key [Lain-B]
Fixed a bug where the OK button was enabled in the Add Source dialog if “Add Existing” was selected but no existing source was selected [gxalpha]
Fixed a bug where using VoiceOver to toggle the “Use Different Colors” GroupBox in the Accessibility settings, the Apply button would not activate [gxalpha]
Fixed a bug where the Auto-Configuration Wizard would show current frame rate in scientific notation if FPS was 100 or greater [gxalpha]
Fixed an issue where importing a Streamlabs Desktop scene collection would result in OBS performing seemingly random scene changes and scene item visibility changes [prgmitchell]
Fixed not being able to select a stream audio encoder if previous selection was invalidated [derrod]
Fixed source transform shortcuts in context (flip, rotate, etc.) when multiple scene items are selected [gxalpha]
Fixed source type version when dropping files onto the OBS UI [norihiro]
Fixed alignment of vertical audio mixer controls [cg2121]
Fixed a bug where HDR video could incorrectly produce black pixels when tonemapping [jpark37]
Fixed v4l2 source not working correctly with certain non-standard input frame rates [kkartaltepe]
Fixed hotkeys of different scene items for the same source not being saved correctly [derrod]
Fixed hotkeys being lost when moving a source in or out of a group [derrod]
Fixed a possible issue with logging high frame rate video capture devices on Linux [kkartaltepe]
Fixed a bug causing AMF AV1 to have low quality in Simple Output Mode [Penwy]
Fixed a race condition in the Vulkan graphics hook [sawillms]
Fixed an issue with Sparkle delta updates [PatTheMav]
Fixed some unexpected behavior when transforming sources in groups [Zulleyy3]
Fixed Stream Key label not displaying in UI [TianQiBuTian]
Fixed “Use Stream Key” button not hiding from UI when appropriate [TianQiBuTian]
0 notes
Text
i fucked up my OBS settings trying to install some websocket via GitHub and had to reinstall it, i hate tech

7 notes
·
View notes
Text
How to Install OBS Studio 29.0 On Ubuntu / Linux Mint
This tutorial will be helpful for beginners to install OBS Studio 29.0 on Ubuntu and Linux Mint systems.
What is OBS Studio?
OBS Studio is a popular open-source software for video recording and live streaming. It is available for Windows, Mac, and Linux. In this blog post, we will go through the steps to install OBS Studio on a Linux machine. OBS Studio 29.0 Changelog - Added support for the AMD AV1 Encoder for the RX7000 series GPUs on Windows - Added an upward compressor filter - Added a 3-band equalizer filter - Websockets updated to 5.1.0, which has a number of bug fixes, UI improvements, and new stream reconnect events. - Added support for the Intel AV1 Encoder for Arc GPUs on Windows For the Complete changelog refer to the release notes There are two ways to install OBS Studio on Linux: - Method 1: Using the Official PPA (Recommended) - Method 2: Installing from the Flatpak Method 1: Using the Official PPA (Recommended) The official OBS Studio PPA (Personal Package Archive) is the recommended way to install the latest version of OBS Studio on Ubuntu and other Debian-based distributions. To add the PPA and install OBS Studio, follow these steps: Step 1: Add the PPA to your system's package sources: sudo add-apt-repository ppa:obsproject/obs-studio Step 2: Install OBS Studio sudo apt update && sudo apt install obs-studio Method 2: Installing from Flatpak If you don't want to use the PPA, you can also install OBS Studio by downloading and installing using the Flatpak method Make sure Flatpak is installed on your system. If not, you can install it by running the following command and adding the Flathub repository to your system: sudo apt install flatpak && flatpak remote-add --if-not-exists flathub https://flathub.org/repo/flathub.flatpakrepo Step 2: Install OBS Studio from Flathub flatpak install flathub com.obsproject.Studio This will install the latest version of OBS Studio on your system. To launch OBS Studio, run the following command flatpak run com.obsproject.Studio That's it! OBS Studio should now be installed and running on your Linux machine.
Conclusion
In this tutorial, we learned how to install OBS Studio 29.0 on Ubuntu and Linux Mint machine. We covered two methods: using the official PPA and installing from Flatpak. With OBS Studio installed, you are now ready to start recording and streaming your favorite games and videos. If my articles on TipsonUNIX have helped you, kindly consider buying me a coffee as a token of appreciation. Do let us know your comments and feedback in the comments section below.

Thank You for your support!! Read the full article
0 notes
Text
Obs Studio Twitch

Kubernetes airflow. The Airflow local settings file (airflowlocalsettings.py) can define a podmutationhook function that has the ability to mutate pod objects before sending them to the Kubernetes client for scheduling. It receives a single argument as a reference to pod objects, and is expected to alter its attributes.
Obs Studio Twitch Setup
Obs Studio Twitch Alerts
Obs Studio Twitch
MIDIControl is an external software (Windows Only), to remote control OBS, act as Sounboard, send message in Twitch Chat, with any MIDI controller, like APC (from AKAI), Launchpad (from Novation). It support profiles/mapping, so you can switch from one to another, to use your MIDI Controller differently if you want to. Switch scene, show/hide source, mute/unmute any scene/source, show/hide filter, adjust volume .. by pressing a MIDI Key or using MIDI knobs/slider. Also, you can play any local audio file (like a soundboard) and send messages in your Twitch chat ! Install .NET 4.7.2 redistributable. Install & enable obs-websocket. HOW TO CONFIGURE: 0. Open OBS (with obs-websocket enabled) 1. Start MIDIControl after plugging your MIDI device. Open it from SysTray 2. In 'Options', configure the OBS section options. (the MIDI section should be OK by default for a minimal usage). 3. 'Add' a new MIDI Key. 4. Press the MIDI key, it should recognise it, and display it on the 'Add MIDI Keybind' window. 5. Select the action(s) you wanna assign to this midi Key. Validate. 6. Repeat steps 3->5 for every MIDI key. 7. Save your preset. 8. Reduce the window if you want to. HOW TO USE: 0. Open OBS. 1. Start MIDIControl after plugging your MIDI device. 2. Press on your MIDI Keys ! If you have an Android device, you can setup it as a MIDI device, for example with DJ PADS or MIDI Controller (if your device supports MIDI) MIDIControl forwards MIDI events to another virtual MIDI device, in order other apps have access to this events.
Obs Studio Twitch Setup
Installation and Setup Like OBS, Twitch Studio has a one-click download – you can get it if you use Windows or Mac computer. Before you launch the program, log-in to the Twitch profile – once this is done, the program will automatically recognize your account, and you won’t have to manually log-in. To add your stream chat into your OBS Studio window follow the below steps. For the purposes of this guide we've used Twitch. Go to your channel on your streaming platform of choice.
Apps available in macOS Recovery on an Intel-based Mac. The following apps are available in. Sudo nvram 'recovery-boot-mode=unused' sudo reboot This sets a firmware variable in nvram indicating that you want to start in Recovery mode on the next boot, and then reboots the machine. When done in Recovery mode, run the following from the Terminal in Recovery mode. To boot Mac into Recovery Mode using Time Machine, you have to follow the steps below: Step 1 Restart your Mac in a regular way and hold the Option key of your keyboard when you hear a chime during the reboot. Step 2 If you have the backup on an external drive, then insert it into the Mac. If the Time Machine backup is in another partition. Reboot into recovery mode mac.
Obs Studio Twitch Alerts

Obs Studio Twitch
Reactions:SeedVEVO, gatekeeper1122 and tubuname
0 notes
Text
rekordbox+OBSでトラックタイトルの表示を自動切り替えする@Python
★移行先
https://log.flyan.net/archives/20201128_58
★以下旧記事
イントロ
みなさんオウチDJ配信してますか?ぼくは(身内向けに)してます。 某音楽配信のあと某絵師の配信に飛び機材を買う流れに乗ってDDJ-400を買ったクチですけども、好きな曲を流しまくってリスナ��に好きな曲を叩き込むの楽しいねぇ!
ところで、rekordbox+OBSで配信してるとき配信画面にトラックタイトル出したくなるじゃないですか。無い?あるよね。でもrekordboxには(現状)そういう情報を出力する機能が無い。 仕方ないのでレコボの画面そのまま普通にキャプチャするけど次流そうとしてる曲も見えちゃってこう…… みたいな。 状況に応じて隠したりするといいんだろうけど、VJさんが居るわけでもなし手動で切り替えるの大変じゃないですか。
自動化、したくないですか?
アプローチ
KUVOを経由する方法は偉大なる先人様達がやってますので、レコボの画面キャプチャを状況に応じて切り替えるスタイルで考えます。ラグも少ないしね。 あと2デッキで考えます。3デッキ以上は……まあ……
さて、見せたいのは"今流してる曲"、すなわちMASTERになってるデッキのトラックタイトルというわけです。要するにMASTERが点灯しているデッキがどっちなのか分かればなんとかなるはずです。 幸いにもMASTERが点灯するとレコボ上で"MASTER"のテキスト色が変わるので、これを上手い具合に認識できれば処理できそうですよね。昔ちょっと自動運転の研究とかしてた時に多少手慣れたPythonとOpenCVで軽く画像処理してみましょう。 あっバージョン変わってる……
偉大なる先人様
参考にさせて頂いたり部分的にお借りしたりなどしました。
キャプチャボードからの入力映像を画像で保存 - Qiita
Python + OpenCVによる色情報の取得 - Qiita
動画配信ソフト「OBS」をPythonで操るぞ~ - KAYAC engineers' blog
rekordboxとOBS使いがDJ配信で曲名を反映させるには - やりたいことだらけ
ところでQiita(キータ)ってちょっと前[いつ?]まで"チータ"って読むと思ってたんですよね。ワイヤレス充電規格のQi(チー)を先に知ってたのが原因で……。今でもチータって言っちゃう。
物理環境
まずぼくの環境です。実際の接続は��おかしいことになってますが必要な部分だけ大雑��に抜き出すとだいたいこんな感じです。まあレコボの画面が取得できればいいのでPC1台でやってる人もできます。 今回作るものはすべてメインPC上で動かします。
必要なものなど
OBS
たいせつ。
obs-websocket
OBSのプラグインです。導入方法等は割愛しますがココから取ってきて入れましょう。
Python
面倒なことはPythonにやらせよう。 Anacondaで何も考えず環境建てたら3.7.9でした。
OpenCV
今回の核です。画像処理はだいたいOpenCVに任せておけばいい。かしこい。 Anaconda Navigatorからポチっとするとnumpy他必要なもの全部勝手に入ります。
obs-websocket-py
pythonからOBS制御するやつです。デフォルトではAnaconda Navigatorで見つからないのでpipで入れます。 0.5.1が降ってきました。その他必要なモジュールとかも一緒に落ちてくると思います。
pip install obs-websocket-py
映像を切り取って色情報を得るテスト
手始めにそれっぽいのを書きます。 なお切り抜き位置指定はこんな感じです。環境によって変わると思うので気合いで測ってください。
capture = cv2.VideoCapture(1) print(capture.isOpened()) capture.set(cv2.CAP_PROP_FRAME_WIDTH, 1920) capture.set(cv2.CAP_PROP_FRAME_HEIGHT, 1080) ret, frame = capture.read() crop1 = frame[ 353 : 370 , 902 : 958] crop2 = frame[ 353 : 370 , 1862 : 1918] b1 = crop1.T[0].flatten().mean() g1 = crop1.T[1].flatten().mean() r1 = crop1.T[2].flatten().mean() b2 = crop2.T[0].flatten().mean() g2 = crop2.T[1].flatten().mean() r2 = crop2.T[2].flatten().mean() cv2.imwrite("F:/dev-obs/crop1.png", crop1) cv2.imwrite("F:/dev-obs/crop2.png", crop2) print("DECK 1 ##################") print("B: %.2f" % (b1)) print("G: %.2f" % (g1)) print("R: %.2f" % (r1)) print("DECK 2 ##################") print("B: %.2f" % (b2)) print("G: %.2f" % (g2)) print("R: %.2f" % (r2))
そうすると次のような2枚の画像と色情報が取れました。
オレンジに点灯するので赤が大きく増えますね。赤が20超えたら点灯判定とかで良さそうです。
実装
おまたせしました、実装です。 1秒ごとに映像を読み取って処理しています。このソースが全てなのでこれを一部調整して適当な名前.pyで保存して実行すれば動くはずです。 エラー処理とか殆ど考えてないので動けばいい人向けですね。 Ctrl+Cで停止します。
トラックタイトル表示の切り替えですが、デッキ1の表示にデッキ2の表示(以下の場合"deck2_track"という名前で用意してあります)を重ねていて、デッキ2のソース表示/非表示を制御することで切り替えています。
import os import cv2 import time import datetime from obswebsocket import obsws, requests # ====================================== # OBS接続設定 host = "localhost" port = 4444 password = "password" # 色のしきい値 threshold = 20 # キャプチャ解像度 capture_width = 1920 capture_height = 1080 # クロップエリア deck_top = 353 deck_bottom = 370 deck1_left = 902 deck1_right = 958 deck2_left = 1862 deck2_right = 1918 # ====================================== # ソースの表示を切り替える def setVisible(item, visible): ws.call(requests.SetSceneItemProperties(item, visible=visible)) # VideoCapture オブジェクトを取得 capture = cv2.VideoCapture(1) # Webカメラが0に割り当てられているのでキャプボを指定する引数は1 print(capture.isOpened()) capture.set(cv2.CAP_PROP_FRAME_WIDTH, capture_width) capture.set(cv2.CAP_PROP_FRAME_HEIGHT, capture_height) # OBSに接続 ws = obsws(host, port, password) ws.connect() # 処理フラグ switch = 0 try: while True: # 映像を取得 ret, frame = capture.read() # クロップ deck1_crop = frame[ deck_top : deck_bottom , deck1_left : deck1_right] deck2_crop = frame[ deck_top : deck_bottom , deck2_left : deck2_right] # 色情報を取得 red_deck1 = deck1_crop.T[2].flatten().mean() red_deck2 = deck2_crop.T[2].flatten().mean() # DECK1がMASTERのとき if red_deck1 > threshold and (switch == 2 or switch == 0): os.system('cls') print(datetime.datetime.now().strftime('%Y/%m/%d %H:%M:%S')) print("\nNOW PLAYING: DECK1\n") setVisible("deck2_spinner", False) setVisible("deck1_spinner", True) setVisible("deck2_track", False) switch = 1 # DECK2がMASTERのとき elif red_deck2 > threshold and (switch == 1 or switch == 0): os.system('cls') print(datetime.datetime.now().strftime('%Y/%m/%d %H:%M:%S')) print("\nNOW PLAYING: DECK2\n") setVisible("deck1_spinner", False) setVisible("deck2_spinner", True) setVisible("deck2_track", True) switch = 2 # よくわからんとき elif (red_deck1 < threshold and red_deck2 < threshold) or (red_deck1 > threshold and red_deck2 > threshold): os.system('cls') print(datetime.datetime.now().strftime('%Y/%m/%d %H:%M:%S')) print("\nUndefined\n") setVisible("deck1_spinner", False) setVisible("deck2_spinner", False) setVisible("deck2_track", False) switch = 0 # 1秒待つ time.sleep(1) # Ctrl+Cが押されたら終了 except KeyboardInterrupt: capture.release() ws.disconnect()
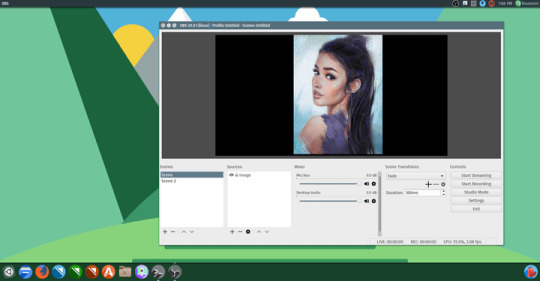
動作デモ
簡単な動作デモです。イラストの娘はオリキャラのつばきちゃん、要するにぼくの分身です。友人が描いてくれました。 MASTERの点灯に応じてトラックタイトル表示と、つばきちゃんの手元にあるDDJのような何かのエフェクトが(1秒間隔で読む設定にしてあるので瞬時ではないですが)切り替わっているのがわかるかと思います。
youtube
問題点など
当然ですが、画面をキャプチャして処理しているのでレコボのレイアウトが変わるような使い方をする人は使えません。 また、キャプチャしている部分にマウスカーソル等が重なるとバグるので注意する必要があります。
おわりに
とりあえず使えるのが出来たのでこれでやっていこうと思います。 画像処理でやってるだけなので色々応用効くと思いますが、機能を増やすとかGUI作るとかのやる気は(今の所)ないので、もしやる気のある人がいればいい感じに改築して頂けると嬉しいです。
特に関係ない宣伝
魔女の旅々をよろしく。めちゃくちゃ好きな作品なので
大絶賛アニメ放送中!
アウトロ
イントロが流れてくる
0 notes
Link
Elgato's Stream Deck is awesome, but also expensive. Touch Portal allows you to transform any android or iOS device you may have like your Phone or a Tablet into a Streamdeck! It really changes the way you stream! This guide is an updated version of my old guide as well as showing you how to make your Touch Portal Page look amazing! A detail I missed to mention is that the number of buttons limited on a page for Free is 8 and for Pro upgrade is 110! Like I mentioned in the video, this video is covering the very basic feature of Touch Portal, it is a tool that has an amazing array of uses and a LOT of depth! Explore and try out and make yourself some amazing pages! Tweet Link for the Iconpack - https://twitter.com/Touch_Portal/status/1265269974828007424 OBS Websocket - https://ift.tt/3gSJYol Want to buy Touch Portal? - https://ift.tt/2IItl1w Music provided by sponsors - Alibi Music Library (https://ift.tt/2vgZNlR) Got suggestions? Criticisms? Liked it? Hate it? Let me know! RDTechy's Discord Server (Ironhide Posse) - https://ift.tt/2zURQ4B Twitch: https://ift.tt/2fBZhTU Twitter - https://twitter.com/RDTechy Portfolio of GFX stuff - https://www.rdtechy.com
0 notes
Link
Here we are going to get a basic understanding of how to establish a connection between client browsers and the application server over a TCP connection using WebSockets in angular.
Websockets
WebSocket is a technology that allows two-way communication over single TCP socket. It is designed to be used between client’s browser and application server.
Role of RxJS in Websockets
RxJS(Reactive extension for Javascript) plays a vital role in angular, RxJS is a library which is mainly used for asynchronous code. Also, it provides an environment for implementing observables, It also helps in adapting language and browser specific environment.
RxJS allow us to listen to the new notifications using the WebSocket connection and perform an action if an event occurs.
Now lets see how we can implement Websockets in angular:
1: First and foremost thing we do here is import * from RxJs library which allows us to create a subject, which acts as an observer and observables both which do both listen to new notifications and also send/broadcast it to any dedicated component which subscribes to it.
import {Injectable} from '@angular/core'; import * as Rx from 'rxjs';
2: After that, we need to create new service that is WebSocket service which we will use to create and share on WebSocket connection between the components.
Injectable() export class WebsocketService { public messages: Subject<any>; private subject: Rx.Subject; public ws: any; constructor() { } public connect(url: string): Rx.Subject { if (!this.subject) { this.subject = this.create(url); } return this.subject; }
Here we create injectable service, after that, we have one private property of type Rx.Subject. This will provide access for the socket to subscribe.
The connect method allows us to connect to Websocket url.
Note: We can connect to only one Websocket per instance.
3: Now we create WebSocket and to create RxJS subject we need to provide observable, It will receive notification and broadcast to the subscriber. As we discuss earlier subject act as an observer and observer as well.
In another part, we create observer, which is a part of the subject which is responsible to send the message back to the WebSocket.
Note: To know more about observer refer this blog click here.
private create(url: string): Rx.Subject { this.ws = new WebSocket(url); const observable = Rx.Observable.create( (obs: Rx.Observer) => { this.ws.onmessage = obs.next.bind(obs); this.ws.onerror = obs.error.bind(obs); this.ws.onclose = obs.complete.bind(obs); return this.ws.close.bind(this.ws); }).share(); const observer = { next: (data: Object) => { if (this.ws.readyState === WebSocket.OPEN) { this.ws.send(JSON.stringify(data)); } } }; return Rx.Subject.create(observer, observable); }
4: In the last part we close the connection using the close method which will disconnect the WebSocket connection.
public close() { if (this.ws) { this.ws.close(); this.subject = null; } }
Conclusion: Here we get a basic understanding of how we can create and establish a connection using WebSockets in angular. I hope u guys found this blog useful. Please feel free to provide your suggestions.
0 notes
Text
Creating a Music Ticker for My Live Stream
I stream a lot on Mixer, Microsoft's Twitch competitor, and I listen to a lot of music when I stream, especially because I usually stream programming stuff.
I'm a YouTube Red subscriber (I want to support channels, even if they're demonetized) and that gives me access to the Google Play Music library, which is really cool.
I've been using this service for upwards of a year at this point, and for that entire time, I've used Google Play Music Desktop Player, an electron-based desktop client for the music service.
For a while now, this application has offered a websocket API to pull information about your current application state, such as how far into a song you are, what song is playing, so on.
A few weeks ago, I wrote a ticker that could share information from this API on my stream in JavaScript. It writes to a text file can then be imported into OBS or XSplit.
However, I'm currently working on moving away from writing EVERYTHING with JavaScript/Node so I decided to recreate the project in Python, a language I've always admired, but never used extensively (check out my only other Python project, MeIRL Bot.)
I used the websockets library for this one, as well as Python 3's asyncio to handle most of the big stuff.
Learning asyncio's form of async/await was kind of a nice experience, and semi-familiar.
I did end up hitting a small bump in the road when I used a different websocket library which had its own asyncio loop, making it impossible to run my own loop as well.
I have two asyncio tasks that I register, one that connects to the local ws server and waits for incoming messages, and another that runs every x seconds to check if any changes have occurred on the socket server (such as song changes, or pausing the music.)
I also had a blast learning about the @property and @x.setter decorators which assisted in the actual checking for changes. When I set a change in the Ticker class, the setter allows me to do more than just change the value of the prop, such as also setting the private __changed property to True so I can track that.
But that's enough talking, here's the code.
If you have any questions, you can ask
0 notes
Link
In this video I look into a FREE Alternative to the Elgato Stream Deck - Touch Portal. This video acts as both an overview of Touch Portal and at the same time it shows you how to go about setting it up to ensure you have a smooth experience while using Touch Portal. Elgato's stream deck is an amazing piece of hardware but for new streamers starting out, the price tag may be too big a commitment to make - Enter Touch Portal, an app that lets you perform many of the essential functions needed to keep your streaming/content creation/productivity running smoothly! Touch Portal Download - http://bit.ly/2MGQ3W5 Websocket Download (required for OBS to function with Touch Portal) - http://bit.ly/2sU2kNV GudShiz Review of Touch Portal - http://bit.ly/2ME6qTz For Custom Icons - http://bit.ly/1d2TRv3 Follow and Watch RDTechy on Twitch - http://bit.ly/2fBZhTU Follow RDTechy on Twitter - https://www.twitter.com/RDTechy Check out GudShiz! - https://www.gudshiz.com
0 notes