#oracle user password table
Explore tagged Tumblr posts
Visit Tumblr Blog
Explore Tumblr blogs with no restrictions, modern design and the best experience.
Last Seen Tumblr Blogs


Fun Fact
Tumblr was attacked by a cross-site scripting worm deployed by the Internet troll group GNAA on Dec 3, 2012.
Text
MySQL insights: Database Management for Beginners and Experts
Databases form the backbone of every online application, from social media platforms to e-commerce stores. MySQL stands out as one of the most widely used relational database management systems (RDBMS) globally. Whether you are a beginner looking to learn MySQL or an expert seeking advanced database management techniques, this blog will provide valuable insights into MySQL's capabilities, features, and best practices.
What is MySQL?
MySQL is an open-source relational database management system (RDBMS) that organizes data into tables. Developed by MySQL AB and now owned by Oracle Corporation, MySQL is widely used for managing structured data efficiently. It is known for its reliability, scalability, and ease of use, making it the preferred choice for small businesses, startups, and large enterprises alike.
Why Choose MySQL?
Open-Source & Free: MySQL is open-source, meaning it is free to use and modify.
High Performance: It is optimized for speed and handles large amounts of data efficiently.
Scalability: MySQL can scale from small applications to large enterprise solutions.
Secure: Features like encryption, authentication, and access control make MySQL a secure choice.
Cross-Platform Support: Runs on multiple operating systems, including Windows, Linux, and macOS.
Integration with Popular Technologies: Works seamlessly with PHP, Python, Java, and more.
MySQL Installation Guide
To install MySQL on your system, follow these steps:
Download MySQL: Visit the official MySQL website and download the latest version for your OS.
Run the Installer: Open the installer and follow the setup wizard instructions.
Configure MySQL: Choose the server type and set a root password.
Start MySQL Server: Use the MySQL Workbench or command line to start the MySQL service.
MySQL Basic Commands for Beginners
If you are new to MySQL, here are some essential SQL commands to get started:

Advanced MySQL Techniques
1. Indexing for Performance Optimization
Indexing is crucial for improving the speed of database queries. Without indexes, MySQL scans the entire table, which slows down performance.
CREATE INDEX idx_users_email ON users(email);
2. Using Joins to Combine Data from Multiple Tables
Joins help retrieve data from multiple related tables efficiently.

3. Stored Procedures for Automation
Stored procedures help automate complex queries and improve efficiency.

4. MySQL Replication for High Availability
Replication allows data to be copied from one server to another, ensuring high availability and load balancing.

START SLAVE;
Common MySQL Errors & Troubleshooting
Error: Access Denied for User 'root'@'localhost' Solution: Reset MySQL root password using the command line.
Error: MySQL Server Has Gone Away Solution: Increase the max_allowed_packet size in the MySQL configuration file.
Error: Table Doesn't Exist Solution: Check the table name and ensure it exists in the database.
MySQL vs Other Database Management Systems

Best Practices for MySQL Optimization
Use Indexing Efficiently to speed up queries.
Normalize Your Database to avoid redundancy.
Avoid Using SELECT* to reduce unnecessary data load.
Regularly Backup Your Database to prevent data loss.
Monitor Performance Metrics using MySQL Workbench.
Future of MySQL in Database Management
With the rise of cloud computing, MySQL continues to evolve. Cloud-based solutions such as Amazon RDS, Google Cloud SQL, and Azure Database for MySQL make it easier to deploy and manage databases at scale. New features like JSON support, improved indexing, and machine learning integration further solidify MySQL’s position as a leading database solution.
Conclusion
MySQL remains a powerful and versatile database management system for both beginners and professionals. With its ease of use, scalability, and extensive community support, it continues to be a preferred choice for web developers, data analysts, and businesses worldwide. By mastering MySQL’s features and best practices, you can build high-performance applications that handle data efficiently.
0 notes
Text
Grant readonly permission to a user in Oracle
Create a user command as follows: create user READONLY_USER identified by password; Script will provide all read permission for all objects: DECLARE v_sql VARCHAR2(500); BEGIN -- Grant SELECT on all tables and views in the schema FOR r IN (SELECT object_name FROM all_objects WHERE owner = 'SCHEMA_NAME' AND object_type IN ('TABLE', 'VIEW')) LOOP v_sql := 'GRANT SELECT ON SCHEMA_NAME.' ||…
0 notes
Text
devlog
i’ve been working on a little web app in golang as a self service front end for the discord server’s reaction image bot (named sasuke bot bc its original purpose was to drop a giant pieced together sasuke in the chat). at the moment i have to manually add any new images + modify the json config file and then push to the github repo, which is honestly kind of gross? the whole thing is deployed on a free oracle cloud ampere instance rn and i’m fetching the static files from the local file system to serve, but i really should move the handler/image metadata into a real data store instead of a json file that i’m changing by hand LOL and the static assets into whatever object store oracle gives me for free
so anyway i’m in the middle of setting up the security/authentication portions of the app rn being like no one should ever be entering real passwords into this app because i do Not know if what i’m doing is actually secure. however i do want accounts because i’ll be slapping a real public internet facing domain name on this baby and i cannot have potential randos trying to upload things like that. i’ll also need new accounts to be approved by me before they can upload images. not sure how i want to do that yet. maybe just add a column to the user table that’s like active/inactive. i’ll have to look into making an admin account for myself or else i’ll have to be manually activating accounts in the db which is sus. idk what i’m doing but i’ve been having fun with making a web app in golang. haven’t built a proper CRUD app with a front end since college
future roadmap is to get this running on k8s i guess. shouldn’t be too bad since it’s mostly containerized already
1 note
·
View note
Text
How to Check Last Password Change History?
How to Check Last Password Change History? #oracledba #oracle #shripaldba #ocptechnology
In this article, we are going to learn how to check past password change history in the oracle database. Using the below commands you can check the password change history step by step. Read: What is control file and datafile in Oracle? When was my Oracle password last changed? The below query will show you the timestamp of last password change. Here i’m checking SCOTT user password change…

View On WordPress
#ctime oracle#get ddl of all users in oracle#how to change expiry date of user in oracle 12c#how to change password in database#how to find who changed oracle user password#how to get user creation script in oracle#how to retrieve user password in oracle 11g#how to retrieve user password in oracle 12c#last password change date in oracle#oracle audit password change#oracle copy users from one database to another#oracle db password change date#oracle export users and passwords#oracle user password table#query to get password of user in oracle#sql query to check password expiry date in oracle
0 notes
Text
How to Generate table DDL
in this practice we are going to learn how to generate table DDL, view DDL, Materialized View DDL and user DDL.
Hi, in this practice we are going to learn how to generate table DDL, view DDL, Materialized View DDL and user DDL. You also read below articles: DB LINK DDL GET TABLESPACE DDLGET ROLE DDL Get more oracle scritps How do you get DDL of a table in Oracle? In real time environment some times we need to DDL of an existing table. We can perfo this activity with the help of dbms_metadata.get_ddl…

View On WordPress
#dbms_metadata.get_ddl materialized view#dbms_metadata.get_ddl table#dbms_metadata.get_ddl view#get ddl for materialized view in oracle#get ddl in oracle#get ddl of all users in oracle#get ddl of materialized view in oracle#get ddl of schema in oracle#how to get create table script in oracle#how to get ddl of all views in oracle#how to get ddl of users and roles#how to get the query of a view in oracle#how to get the query of materialized view in oracle#how to refresh materialized view in oracle automatically#oracle user ddl with password#schema ddl in oracle#user ddl oracle
2 notes
·
View notes
Text
Which Is The Best PostgreSQL GUI? 2021 Comparison
PostgreSQL graphical user interface (GUI) tools help open source database users to manage, manipulate, and visualize their data. In this post, we discuss the top 6 GUI tools for administering your PostgreSQL hosting deployments. PostgreSQL is the fourth most popular database management system in the world, and heavily used in all sizes of applications from small to large. The traditional method to work with databases is using the command-line interface (CLI) tool, however, this interface presents a number of issues:
It requires a big learning curve to get the best out of the DBMS.
Console display may not be something of your liking, and it only gives very little information at a time.
It is difficult to browse databases and tables, check indexes, and monitor databases through the console.
Many still prefer CLIs over GUIs, but this set is ever so shrinking. I believe anyone who comes into programming after 2010 will tell you GUI tools increase their productivity over a CLI solution.
Why Use a GUI Tool?
Now that we understand the issues users face with the CLI, let’s take a look at the advantages of using a PostgreSQL GUI:
Shortcut keys make it easier to use, and much easier to learn for new users.
Offers great visualization to help you interpret your data.
You can remotely access and navigate another database server.
The window-based interface makes it much easier to manage your PostgreSQL data.
Easier access to files, features, and the operating system.
So, bottom line, GUI tools make PostgreSQL developers’ lives easier.
Top PostgreSQL GUI Tools
Today I will tell you about the 6 best PostgreSQL GUI tools. If you want a quick overview of this article, feel free to check out our infographic at the end of this post. Let’s start with the first and most popular one.
1. pgAdmin
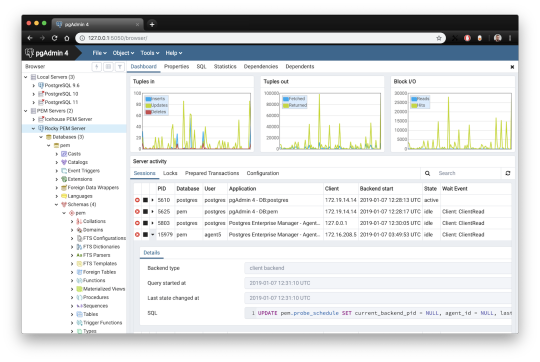
pgAdmin is the de facto GUI tool for PostgreSQL, and the first tool anyone would use for PostgreSQL. It supports all PostgreSQL operations and features while being free and open source. pgAdmin is used by both novice and seasoned DBAs and developers for database administration.
Here are some of the top reasons why PostgreSQL users love pgAdmin:
Create, view and edit on all common PostgreSQL objects.
Offers a graphical query planning tool with color syntax highlighting.
The dashboard lets you monitor server activities such as database locks, connected sessions, and prepared transactions.
Since pgAdmin is a web application, you can deploy it on any server and access it remotely.
pgAdmin UI consists of detachable panels that you can arrange according to your likings.
Provides a procedural language debugger to help you debug your code.
pgAdmin has a portable version which can help you easily move your data between machines.
There are several cons of pgAdmin that users have generally complained about:
The UI is slow and non-intuitive compared to paid GUI tools.
pgAdmin uses too many resources.
pgAdmin can be used on Windows, Linux, and Mac OS. We listed it first as it’s the most used GUI tool for PostgreSQL, and the only native PostgreSQL GUI tool in our list. As it’s dedicated exclusively to PostgreSQL, you can expect it to update with the latest features of each version. pgAdmin can be downloaded from their official website.
pgAdmin Pricing: Free (open source)
2. DBeaver

DBeaver is a major cross-platform GUI tool for PostgreSQL that both developers and database administrators love. DBeaver is not a native GUI tool for PostgreSQL, as it supports all the popular databases like MySQL, MariaDB, Sybase, SQLite, Oracle, SQL Server, DB2, MS Access, Firebird, Teradata, Apache Hive, Phoenix, Presto, and Derby – any database which has a JDBC driver (over 80 databases!).
Here are some of the top DBeaver GUI features for PostgreSQL:
Visual Query builder helps you to construct complex SQL queries without actual knowledge of SQL.
It has one of the best editors – multiple data views are available to support a variety of user needs.
Convenient navigation among data.
In DBeaver, you can generate fake data that looks like real data allowing you to test your systems.
Full-text data search against all chosen tables/views with search results shown as filtered tables/views.
Metadata search among rows in database system tables.
Import and export data with many file formats such as CSV, HTML, XML, JSON, XLS, XLSX.
Provides advanced security for your databases by storing passwords in secured storage protected by a master password.
Automatically generated ER diagrams for a database/schema.
Enterprise Edition provides a special online support system.
One of the cons of DBeaver is it may be slow when dealing with large data sets compared to some expensive GUI tools like Navicat and DataGrip.
You can run DBeaver on Windows, Linux, and macOS, and easily connect DBeaver PostgreSQL with or without SSL. It has a free open-source edition as well an enterprise edition. You can buy the standard license for enterprise edition at $199, or by subscription at $19/month. The free version is good enough for most companies, as many of the DBeaver users will tell you the free edition is better than pgAdmin.
DBeaver Pricing
: Free community, $199 standard license
3. OmniDB
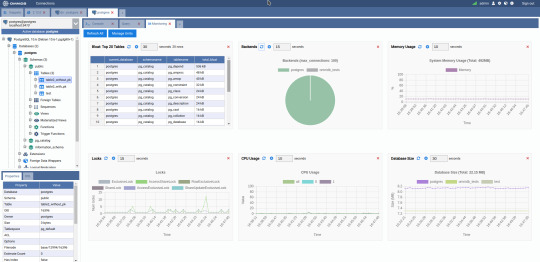
The next PostgreSQL GUI we’re going to review is OmniDB. OmniDB lets you add, edit, and manage data and all other necessary features in a unified workspace. Although OmniDB supports other database systems like MySQL, Oracle, and MariaDB, their primary target is PostgreSQL. This open source tool is mainly sponsored by 2ndQuadrant. OmniDB supports all three major platforms, namely Windows, Linux, and Mac OS X.
There are many reasons why you should use OmniDB for your Postgres developments:
You can easily configure it by adding and removing connections, and leverage encrypted connections when remote connections are necessary.
Smart SQL editor helps you to write SQL codes through autocomplete and syntax highlighting features.
Add-on support available for debugging capabilities to PostgreSQL functions and procedures.
You can monitor the dashboard from customizable charts that show real-time information about your database.
Query plan visualization helps you find bottlenecks in your SQL queries.
It allows access from multiple computers with encrypted personal information.
Developers can add and share new features via plugins.
There are a couple of cons with OmniDB:
OmniDB lacks community support in comparison to pgAdmin and DBeaver. So, you might find it difficult to learn this tool, and could feel a bit alone when you face an issue.
It doesn’t have as many features as paid GUI tools like Navicat and DataGrip.
OmniDB users have favorable opinions about it, and you can download OmniDB for PostgreSQL from here.
OmniDB Pricing: Free (open source)
4. DataGrip

DataGrip is a cross-platform integrated development environment (IDE) that supports multiple database environments. The most important thing to note about DataGrip is that it’s developed by JetBrains, one of the leading brands for developing IDEs. If you have ever used PhpStorm, IntelliJ IDEA, PyCharm, WebStorm, you won’t need an introduction on how good JetBrains IDEs are.
There are many exciting features to like in the DataGrip PostgreSQL GUI:
The context-sensitive and schema-aware auto-complete feature suggests more relevant code completions.
It has a beautiful and customizable UI along with an intelligent query console that keeps track of all your activities so you won’t lose your work. Moreover, you can easily add, remove, edit, and clone data rows with its powerful editor.
There are many ways to navigate schema between tables, views, and procedures.
It can immediately detect bugs in your code and suggest the best options to fix them.
It has an advanced refactoring process – when you rename a variable or an object, it can resolve all references automatically.
DataGrip is not just a GUI tool for PostgreSQL, but a full-featured IDE that has features like version control systems.
There are a few cons in DataGrip:
The obvious issue is that it’s not native to PostgreSQL, so it lacks PostgreSQL-specific features. For example, it is not easy to debug errors as not all are able to be shown.
Not only DataGrip, but most JetBrains IDEs have a big learning curve making it a bit overwhelming for beginner developers.
It consumes a lot of resources, like RAM, from your system.
DataGrip supports a tremendous list of database management systems, including SQL Server, MySQL, Oracle, SQLite, Azure Database, DB2, H2, MariaDB, Cassandra, HyperSQL, Apache Derby, and many more.
DataGrip supports all three major operating systems, Windows, Linux, and Mac OS. One of the downsides is that JetBrains products are comparatively costly. DataGrip has two different prices for organizations and individuals. DataGrip for Organizations will cost you $19.90/month, or $199 for the first year, $159 for the second year, and $119 for the third year onwards. The individual package will cost you $8.90/month, or $89 for the first year. You can test it out during the free 30 day trial period.
DataGrip Pricing
: $8.90/month to $199/year
5. Navicat

Navicat is an easy-to-use graphical tool that targets both beginner and experienced developers. It supports several database systems such as MySQL, PostgreSQL, and MongoDB. One of the special features of Navicat is its collaboration with cloud databases like Amazon Redshift, Amazon RDS, Amazon Aurora, Microsoft Azure, Google Cloud, Tencent Cloud, Alibaba Cloud, and Huawei Cloud.
Important features of Navicat for Postgres include:
It has a very intuitive and fast UI. You can easily create and edit SQL statements with its visual SQL builder, and the powerful code auto-completion saves you a lot of time and helps you avoid mistakes.
Navicat has a powerful data modeling tool for visualizing database structures, making changes, and designing entire schemas from scratch. You can manipulate almost any database object visually through diagrams.
Navicat can run scheduled jobs and notify you via email when the job is done running.
Navicat is capable of synchronizing different data sources and schemas.
Navicat has an add-on feature (Navicat Cloud) that offers project-based team collaboration.
It establishes secure connections through SSH tunneling and SSL ensuring every connection is secure, stable, and reliable.
You can import and export data to diverse formats like Excel, Access, CSV, and more.
Despite all the good features, there are a few cons that you need to consider before buying Navicat:
The license is locked to a single platform. You need to buy different licenses for PostgreSQL and MySQL. Considering its heavy price, this is a bit difficult for a small company or a freelancer.
It has many features that will take some time for a newbie to get going.
You can use Navicat in Windows, Linux, Mac OS, and iOS environments. The quality of Navicat is endorsed by its world-popular clients, including Apple, Oracle, Google, Microsoft, Facebook, Disney, and Adobe. Navicat comes in three editions called enterprise edition, standard edition, and non-commercial edition. Enterprise edition costs you $14.99/month up to $299 for a perpetual license, the standard edition is $9.99/month up to $199 for a perpetual license, and then the non-commercial edition costs $5.99/month up to $119 for its perpetual license. You can get full price details here, and download the Navicat trial version for 14 days from here.
Navicat Pricing
: $5.99/month up to $299/license
6. HeidiSQL
HeidiSQL is a new addition to our best PostgreSQL GUI tools list in 2021. It is a lightweight, free open source GUI that helps you manage tables, logs and users, edit data, views, procedures and scheduled events, and is continuously enhanced by the active group of contributors. HeidiSQL was initially developed for MySQL, and later added support for MS SQL Server, PostgreSQL, SQLite and MariaDB. Invented in 2002 by Ansgar Becker, HeidiSQL aims to be easy to learn and provide the simplest way to connect to a database, fire queries, and see what’s in a database.
Some of the advantages of HeidiSQL for PostgreSQL include:
Connects to multiple servers in one window.
Generates nice SQL-exports, and allows you to export from one server/database directly to another server/database.
Provides a comfortable grid to browse and edit table data, and perform bulk table edits such as move to database, change engine or ollation.
You can write queries with customizable syntax-highlighting and code-completion.
It has an active community helping to support other users and GUI improvements.
Allows you to find specific text in all tables of all databases on a single server, and optimize repair tables in a batch manner.
Provides a dialog for quick grid/data exports to Excel, HTML, JSON, PHP, even LaTeX.
There are a few cons to HeidiSQL:
Does not offer a procedural language debugger to help you debug your code.
Built for Windows, and currently only supports Windows (which is not a con for our Windors readers!)
HeidiSQL does have a lot of bugs, but the author is very attentive and active in addressing issues.
If HeidiSQL is right for you, you can download it here and follow updates on their GitHub page.
HeidiSQL Pricing: Free (open source)
Conclusion
Let’s summarize our top PostgreSQL GUI comparison. Almost everyone starts PostgreSQL with pgAdmin. It has great community support, and there are a lot of resources to help you if you face an issue. Usually, pgAdmin satisfies the needs of many developers to a great extent and thus, most developers do not look for other GUI tools. That’s why pgAdmin remains to be the most popular GUI tool.
If you are looking for an open source solution that has a better UI and visual editor, then DBeaver and OmniDB are great solutions for you. For users looking for a free lightweight GUI that supports multiple database types, HeidiSQL may be right for you. If you are looking for more features than what’s provided by an open source tool, and you’re ready to pay a good price for it, then Navicat and DataGrip are the best GUI products on the market.
Ready for some PostgreSQL automation?
See how you can get your time back with fully managed PostgreSQL hosting. Pricing starts at just $10/month.
While I believe one of these tools should surely support your requirements, there are other popular GUI tools for PostgreSQL that you might like, including Valentina Studio, Adminer, DB visualizer, and SQL workbench. I hope this article will help you decide which GUI tool suits your needs.
Which Is The Best PostgreSQL GUI? 2019 Comparison
Here are the top PostgreSQL GUI tools covered in our previous 2019 post:
pgAdmin
DBeaver
Navicat
DataGrip
OmniDB
Original source: ScaleGrid Blog
3 notes
·
View notes
Text
Installing Nginx, MySQL, PHP (LEMP) Stack on Ubuntu 18.04
Ubuntu Server 18.04 LTS (TunzaDev) is finally here and is being rolled out across VPS hosts such as DigitalOcean and AWS. In this guide, we will install a LEMP Stack (Nginx, MySQL, PHP) and configure a web server.
Prerequisites
You should use a non-root user account with sudo privileges. Please see the Initial server setup for Ubuntu 18.04 guide for more details.
1. Install Nginx
Let’s begin by updating the package lists and installing Nginx on Ubuntu 18.04. Below we have two commands separated by &&. The first command will update the package lists to ensure you get the latest version and dependencies for Nginx. The second command will then download and install Nginx.
sudo apt update && sudo apt install nginx
Once installed, check to see if the Nginx service is running.
sudo service nginx status
If Nginx is running correctly, you should see a green Active state below.
● nginx.service - A high performance web server and a reverse proxy server Loaded: loaded (/lib/systemd/system/nginx.service; enabled; vendor preset: enabled) Active: active (running) since Wed 2018-05-09 20:42:29 UTC; 2min 39s ago Docs: man:nginx(8) Process: 27688 ExecStart=/usr/sbin/nginx -g daemon on; master_process on; (code=exited, status=0/SUCCESS) Process: 27681 ExecStartPre=/usr/sbin/nginx -t -q -g daemon on; master_process on; (code=exited, status=0/SUCCESS) Main PID: 27693 (nginx) Tasks: 2 (limit: 1153) CGroup: /system.slice/nginx.service ├─27693 nginx: master process /usr/sbin/nginx -g daemon on; master_process on; └─27695 nginx: worker process
You may need to press q to exit the service status.
2. Configure Firewall
If you haven’t already done so, it is recommended that you enable the ufw firewall and add a rule for Nginx. Before enabling ufw firewall, make sure you add a rule for SSH, otherwise you may get locked out of your server if you’re connected remotely.
sudo ufw allow OpenSSH
If you get an error “ERROR: could find a profile matching openSSH”, this probably means you are not configuring the server remotely and can ignore it.
Now add a rule for Nginx.
sudo ufw allow 'Nginx HTTP'
Rule added Rule added (v6)
Enable ufw firewall.
sudo ufw enable
Press y when asked to proceed.
Now check the firewall status.
sudo ufw status
Status: active To Action From -- ------ ---- OpenSSH ALLOW Anywhere Nginx HTTP ALLOW Anywhere OpenSSH (v6) ALLOW Anywhere (v6) Nginx HTTP (v6) ALLOW Anywhere (v6)
That’s it! Your Nginx web server on Ubuntu 18.04 should now be ready.
3. Test Nginx
Go to your web browser and visit your domain or IP. If you don’t have a domain name yet and don’t know your IP, you can find out with:
sudo ifconfig | grep -Eo 'inet (addr:)?([0-9]*\.){3}[0-9]*' | grep -Eo '([0-9]*\.){3}[0-9]*' | grep -v '127.0.0.1'
You can find this Nginx default welcome page in the document root directory /var/www/html. To edit this file in nano text editor:
sudo nano /var/www/html/index.nginx-debian.html
To save and close nano, press CTRL + X and then press y and ENTER to save changes.
Your Nginx web server is ready to go! You can now add your own html files and images the the /var/www/html directory as you please.
However, you should acquaint yourself with and set up at least one Server Block for Nginx as most of our Ubuntu 18.04 guides are written with Server Blocks in mind. Please see article Installing Nginx on Ubuntu 18.04 with Multiple Domains. Server Blocks allow you to host multiple web sites/domains on one server. Even if you only ever intend on hosting one website or one domain, it’s still a good idea to configure at least one Server Block.
If you don’t want to set up Server Blocks, continue to the next step to set up MySQL.
4. Install MySQL
Let’s begin by updating the package lists and installing MySQL on Ubuntu 18.04. Below we have two commands separated by &&. The first command will update the package lists to ensure you get the latest version and dependencies for MySQL. The second command will then download and install MySQL.
sudo apt update && sudo apt install mysql-server
Press y and ENTER when prompted to install the MySQL package.
Once the package installer has finished, we can check to see if the MySQL service is running.
sudo service mysql status
If running, you will see a green Active status like below.
● mysql.service - MySQL Community Server Loaded: loaded (/lib/systemd/system/mysql.service; enabled; vendor preset: enabled) Active: active (running) since since Wed 2018-05-09 21:10:24 UTC; 16s ago Main PID: 30545 (mysqld) Tasks: 27 (limit: 1153) CGroup: /system.slice/mysql.service └─30545 /usr/sbin/mysqld --daemonize --pid-file=/run/mysqld/mysqld.pid
You may need to press q to exit the service status.
5. Configure MySQL Security
You should now run mysql_secure_installation to configure security for your MySQL server.
sudo mysql_secure_installation
If you created a root password in Step 1, you may be prompted to enter it here. Otherwise you will be asked to create one. (Generate a password here)
You will be asked if you want to set up the Validate Password Plugin. It’s not really necessary unless you want to enforce strict password policies for some reason.
Securing the MySQL server deployment. Connecting to MySQL using a blank password. VALIDATE PASSWORD PLUGIN can be used to test passwords and improve security. It checks the strength of password and allows the users to set only those passwords which are secure enough. Would you like to setup VALIDATE PASSWORD plugin? Press y|Y for Yes, any other key for No:
Press n and ENTER here if you don’t want to set up the validate password plugin.
Please set the password for root here. New password: Re-enter new password:
If you didn’t create a root password in Step 1, you must now create one here.
Generate a strong password and enter it. Note that when you enter passwords in Linux, nothing will show as you are typing (no stars or dots).
By default, a MySQL installation has an anonymous user, allowing anyone to log into MySQL without having to have a user account created for them. This is intended only for testing, and to make the installation go a bit smoother. You should remove them before moving into a production environment. Remove anonymous users? (Press y|Y for Yes, any other key for No) :
Press y and ENTER to remove anonymous users.
Normally, root should only be allowed to connect from 'localhost'. This ensures that someone cannot guess at the root password from the network. Disallow root login remotely? (Press y|Y for Yes, any other key for No) :
Press y and ENTER to disallow root login remotely. This will prevent bots and hackers from trying to guess the root password.
By default, MySQL comes with a database named 'test' that anyone can access. This is also intended only for testing, and should be removed before moving into a production environment. Remove test database and access to it? (Press y|Y for Yes, any other key for No) :
Press y and ENTER to remove the test database.
Reloading the privilege tables will ensure that all changes made so far will take effect immediately. Reload privilege tables now? (Press y|Y for Yes, any other key for No) :
Press y and ENTER to reload the privilege tables.
All done!
As a test, you can log into the MySQL server and run the version command.
sudo mysqladmin -p -u root version
Enter the MySQL root password you created earlier and you should see the following:
mysqladmin Ver 8.42 Distrib 5.7.22, for Linux on x86_64 Copyright (c) 2000, 2018, Oracle and/or its affiliates. All rights reserved. Oracle is a registered trademark of Oracle Corporation and/or its affiliates. Other names may be trademarks of their respective owners. Server version 5.7.22-0ubuntu18.04.1 Protocol version 10 Connection Localhost via UNIX socket UNIX socket /var/run/mysqld/mysqld.sock Uptime: 4 min 28 sec Threads: 1 Questions: 15 Slow queries: 0 Opens: 113 Flush tables: 1 Open tables: 106 Queries per second avg: 0.055
You have now successfully installed and configured MySQL for Ubuntu 18.04! Continue to the next step to install PHP.
6. Install PHP
Unlike Apache, Nginx does not contain native PHP processing. For that we have to install PHP-FPM (FastCGI Process Manager). FPM is an alternative PHP FastCGI implementation with some additional features useful for heavy-loaded sites.
Let’s begin by updating the package lists and installing PHP-FPM on Ubuntu 18.04. We will also install php-mysql to allow PHP to communicate with the MySQL database. Below we have two commands separated by &&. The first command will update the package lists to ensure you get the latest version and dependencies for PHP-FPM and php-mysql. The second command will then download and install PHP-FPM and php-mysql. Press y and ENTER when asked to continue.
sudo apt update && sudo apt install php-fpm php-mysql
Once installed, check the PHP version.
php --version
If PHP was installed correctly, you should see something similar to below.
PHP 7.2.3-1ubuntu1 (cli) (built: Mar 14 2018 22:03:58) ( NTS ) Copyright (c) 1997-2018 The PHP Group Zend Engine v3.2.0, Copyright (c) 1998-2018 Zend Technologies with Zend OPcache v7.2.3-1ubuntu1, Copyright (c) 1999-2018, by Zend Technologies
Above we are using PHP version 7.2, though this may be a later version for you.
Depending on what version of Nginx and PHP you install, you may need to manually configure the location of the PHP socket that Nginx will connect to.
List the contents for the directory /var/run/php/
ls /var/run/php/
You should see a few entries here.
php7.2-fpm.pid php7.2-fpm.sock
Above we can see the socket is called php7.2-fpm.sock. Remember this as you may need it for the next step.
7. Configure Nginx for PHP
We now need to make some changes to our Nginx server block.
The location of the server block may vary depending on your setup. By default, it is located in /etc/nginx/sites-available/default.
However, if you have previously set up custom server blocks for multiple domains in one of our previous guides, you will need to add the PHP directives to each server block separately. A typical custom server block file location would be /etc/nginx/sites-available/mytest1.com.
For the moment, we will assume you are using the default. Edit the file in nano.
sudo nano /etc/nginx/sites-available/default
Press CTRL + W and search for index.html.
Now add index.php before index.html
/etc/nginx/sites-available/default
index index.php index.html index.htm index.nginx-debian.html;
Press CTRL + W and search for the line server_name.
Enter your server’s IP here or domain name if you have one.
/etc/nginx/sites-available/default
server_name YOUR_DOMAIN_OR_IP_HERE;
Press CTRL + W and search for the line location ~ \.php.
You will need to uncomment some lines here by removing the # signs before the lines marked in red below.
Also ensure value for fastcgi_pass socket path is correct. For example, if you installed PHP version 7.2, the socket should be: /var/run/php/php7.2-fpm.sock
If you are unsure which socket to use here, exit out of nano and run ls /var/run/php/
/etc/nginx/sites-available/default
... location ~ \.php$ { include snippets/fastcgi-php.conf; # # # With php-fpm (or other unix sockets): fastcgi_pass unix:/var/run/php/php7.2-fpm.sock; # # With php-cgi (or other tcp sockets): # fastcgi_pass 127.0.0.1:9000; } ...
Once you’ve made the necessary changes, save and close (Press CTRL + X, then press y and ENTER to confirm save)
Now check the config file to make sure there are no syntax errors. Any errors could crash the web server on restart.
sudo nginx -t
nginx: the configuration file /etc/nginx/nginx.conf syntax is ok nginx: configuration file /etc/nginx/nginx.conf test is successful
If no errors, you can reload the Nginx config.
sudo service nginx reload
8. Test PHP
To see if PHP is working correctly on Ubuntu 18.04, let’s a create a new PHP file called info.php in the document root directory. By default, this is located in /var/www/html/, or if you set up multiple domains in a previous guide, it may be located in somewhere like /var/www/mytest1.com/public_html
Once you have the correct document root directory, use the nano text editor to create a new file info.php
sudo nano /var/www/html/info.php
Type or paste the following code into the new file. (if you’re using PuTTY for Windows, right-click to paste)
/var/www/html/info.php
Save and close (Press CTRL + X, then press y and ENTER to confirm save)
You can now view this page in your web browser by visiting your server’s domain name or public IP address followed by /info.php: http://your_domain_or_IP/info.php
phpinfo() outputs a large amount of information about the current state of PHP. This includes information about PHP compilation options and extensions, the PHP version and server information.
You have now successfully installed PHP-FPM for Nginx on Ubuntu 18.04 LTS (Bionic Beaver).
Make sure to delete info.php as it contains information about the web server that could be useful to attackers.
sudo rm /var/www/html/info.php
What Next?
Now that your Ubuntu 18.04 LEMP web server is up and running, you may want to install phpMyAdmin so you can manage your MySQL server.
Installing phpMyAdmin for Nginx on Ubuntu 18.04
To set up a free SSL cert for your domain:
Configuring Let’s Encrypt SSL Cert for Nginx on Ubuntu 18.04
You may want to install and configure an FTP server
Installing an FTP server with vsftpd (Ubuntu 18.04)
We also have several other articles relating to the day-to-day management of your Ubuntu 18.04 LEMP server
Hey champ! - You’re all done!
Feel free to ask me any questions in the comments below.
Let me know in the comments if this helped. Follow Us on - Twitter - Facebook - YouTube.
1 note
·
View note
Text
Connecting FileMaker Pro with MySQL in Mac OS X

Previous Versions of FileMaker Pro and ODBC
Filemaker Pro has had the ability to connect to and use ODBC as early as version 7. Using the Execute SQL script step, you could specify a ODBC DSN (Database Source Name) and execute any SQL statement that you can build with a FileMaker Pro calculation which could include field data.
Limitations of this functionality included the following:
Communication is only one way. You must be well versed in SQL. It must be done through a script. In databases I had created in FileMaker Pro 7 where data synchronization with a MySQL database was required, I was forced to first delete all data in each MySQL table before repopulating it with live data from the FileMaker database.
FileMaker Pro 9 and ODBC
In FileMaker Pro 9, ODBC connections are treated like a FileMaker Pro external data source, formerly known as file references. The data source acts similar to a reference to another FileMaker Pro database file. Tables can be added to the relationship graph, layouts can be created showing records from a MySQL (or any ODBC capable database) table. Calculations can be made in the context of a data source table. You can even add calculation and summary fields to the tables for use within FileMaker Pro.
Through a layout, you can then add, remove or modify the external records as if they were in a FileMaker Pro table. No SQL required. No scripts required. Theoretically, you could create an entire FileMaker Pro database based solely on MySQL data tables with no tables defined within the FileMaker Pro file.
You can now use FileMaker Pro as a friendly front-end to any MySQL, MS SQL, Oracle, Access or any ODBC capable database. The only thing you can not do from within FileMaker Pro is create tables and fields.
What is ODBC?
ODBC, an acronym for Open Database Connectivity, is a standard protocol for communicating with databases. It allows users to set up a DSN, or Database Source Name, that can be used by any ODBC aware application on a particular computer to send queries and receive data from a specified data source. It is kind of like having a shortcut or alias on your desktop linking to a file on a server, except the shortcut is a DSN and instead of a file on a server, it links to a database.
By setting up a DSN, you are assigning an arbitrary name, or shortcut, that will be recognized by your computer as a pointer to a server and database. The scope of a DSN can be restricted to a particular computer user or to a computer system. A single DSN can not be used on multiple computers. If database connectivity is required on multiple computers, it is necessary to set up a DSN on each computer.
ODBC Setup Overview for FileMaker Pro 9
There are 4 basic steps for getting FileMaker Pro 9 to work with other databases.
Install an ODBC Driver. Set up the DSN. Add the DSN data source to the FileMaker Pro database. Add the table(s) to the relationship graph. Each of these steps is explained in detail below.
Installing the MySQL ODBC Driver for Mac OS X
There are a number of MySQL ODBC drivers available for Mac OS X, many of which have simple package installers. I have only managed to get one to work properly with FileMaker Pro: Actual ODBC Driver for Open Source Databases. It comes with a $30 price tag.
MySQL.com has a free, open-source driver available, but I could not get it to work properly for FileMaker due, apparently due to a bug in Mac OS X's iODBC driver manager. If you are interested in the details, I filed a bug report. Hopefully, they will have a work around soon.
Both drivers come with an easy to use, standard OS X package installer. Download, double click, click Next a few times, and you are done.
Setting Up the DSN
Once the driver is installed, you can create a DSN using the Mac OS X ODBC Administrator program located at Applications/Utilities/ODBC Administrator. FileMaker Pro 9 only supports system data sources and does not support user data sources. So, you must add a User DSN:
Select the User DSN tab. Click the lock and authenticate to allow changes. Click Add. Choose the appropriate driver (probably "Actual Open Source Databases"). Click Continue. Enter a name for the data source. This can be whatever makes sense to you, but if two or more computers are being set up to use the same source, the names must be identical. Click Continue and enter the MySQL database server address. Enter MySQL database server login information and click continue. Click the drop down arrow next to the Database field and select the database to which this DSN should link. If a list of databases on the MySQL server appears in this drop down, you know a successful connection was made. Click Finish or Continue if you wish to review the settings and test the connection. Using the Data Source in FileMaker In the FileMaker Pro database, perform the following steps:
Open the Manage External Data Sources window through the File->Manage->External Data Sources... menu item. Click New..., to add a data source. Enter a name, choose ODBC, then click the Specify... button. Choose the DSN data source you recently created and click OK. If you wish, enter a user name and password for the MySQL server, or you may leave it set to require entry by users. Since you can use calculations to specify user credentials, you can easily customize the authentication process, including passing the user's FileMaker Pro database user name and password to the MySQL server. Keeping users synchronized between databases is a topic worthy of its own article. filemaker pro Add a Table to the Relationship Graph The rest of the process is quite simple. When you go to the relationship graph and click the Add Table button, you will see your new data source in the Data Sources drop down menu. Select it and add the desired table as you would with any FileMaker Database. You can then include it in any relationships, create new layouts with it and add Calculation and Summary fields under the Fields tab.
1 note
·
View note
Text
PostgreSQL vs MySQL – Which Database is Best For Your Project?

PostgreSQL and MySQL are relational databases that manage data in tables. These tables can be connected or linked based on data that is common to each. Relational databases allow your business to better understand the relationships among available data and help achieve new insights for making better decisions or recognizing new chances. PostgreSQL vs MySQL is important when choosing an open-source relational database management system. Both PostgreSQL and MySQL are time-proven solutions that can compete with business solutions such as Oracle and SQL Server. In this article, we will describe the differences between MySQL and PostgreSQL.
What is SQL?
SQL stands for Structured Query Language. It is used to handle relational databases and perform different operations on their data. The purpose of SQL is to store, recover, handle and operate data within a database management system. SQL was developed by IBM in the early 1970s and became publically in 1979. It is globally acknowledged as the standard relational database management system (RDBMS).
What is MySQL Database?
MySQL is a simple, fast, scalable, and easy-to-use open-source relational database system. It is efficient and user-friendly, making it one of the most recognizable technologies. You can quickly learn many MySQL ideas to create robust data storage systems using SQL. MySQL uses an access system that provides authentication through the hosting provider and an encrypted password system for security.
Full Article Source: https://www.temok.com/blog/postgresql-vs-mysql/
0 notes
Text
Postgres app or postgres

#POSTGRES APP OR POSTGRES INSTALL#
Payment will be charged to your iTunes Account at confirmation of purchase. Any unused portion of a free trial period, if offered, will be forfeited when the user purchases a subscription to that publication, where applicable. Your Account will be charged for renewal (based on your selected plan) within 24-hours prior to the end of the current period. Subscriptions auto-renew within 24 hours of the expiration date unless auto-renewal is turned off in the iTunes account settings. Premium is available as either a Lifetime Purchase or through a Subscription with Monthly and Yearly options. SQLPro requires a Premium upgrade in order to interact with database result sets. It is a client tool for working with existing local or remote PostgreSQL servers. PgAdmin is graphical user interface administration tool for PostgreSQL.
#POSTGRES APP OR POSTGRES INSTALL#
It sets up a PostgreSQL database server on your computer when you install it. It will not work with other database servers such as MSSQL, MySQL or Oracle. Postgres.app is a full-featured PostgreSQL installation packaged as a standard Mac app. SQLPro for Postgres works with PostgreSQL database servers. + SSH Tunnelling (password authentication only). + Dark & Light themes which can be switched manually or automatically adjusted by your devices brightness. + Quick access to tables, columns and more. + Support for executing multiple queries at once. + Tabbed based interface for an optimal user experience (iPad). SQLPro for Postgres is a lightweight but powerful PostgreSQL database client, which allows quick and simple access to Postgres Servers including cloud services such as Amazon RDS, Microsoft Azure, Heroku Digital Ocean.
0 notes
Text
How to install mac os on windows machine using virtual box

How to install mac os on windows machine using virtual box how to#
How to install mac os on windows machine using virtual box for mac#
How to install mac os on windows machine using virtual box mac os x#
How to install mac os on windows machine using virtual box upgrade#
How to install mac os on windows machine using virtual box software#
Using snapshots to avoid the 30-day Microsoft limit
How to install mac os on windows machine using virtual box upgrade#
If you want to upgrade to IE 11, open the shortcut, and open the IE 11 upgrade tab located on the left-hand side of the screen. When the Windows virtual machine boots up, you may notice an icon on the desktop labeled “IE Test Drive.” This is a link to the IE 11 download page, which is the newest version of Microsoft’s browser. Tips for using VirtualBox – Downloading Internet Explorer 11 IE should pop up momentarily, ready for you to use. Once the virtual machine boots up, click the IE icon in the taskbar at the bottom of the screen to launch the browser. The catch-all password is used for all IE virtual machines, and also doubles as the password hint, should you ever forget the proper password. To boot the virtual machine, simply click Start , and if prompted for an admin password, enter “Password1”. Step 3: Then, launch VirtualBox and locate the download in the column on the left. Once you’ve put in the command for the version of IE you’d like to snag, press Return. If you’re rocking an older Mac, we recommend that you download IE 7 or 8, and run the Windows XP virtual machine. Note that the last command contains all versions of IE, and requires 20GB of free space on your hard drive. Each command will grant you a different version of IE. Step 2: Next, launch Terminal via the main Applications folder on your Mac, and paste in one of the commands listed in the table below. Navigate to Oracle’s main VirtualBox download page and click the blue, x86/amd64 link to the right of “VirtualBox 4.3.10 for OS X Hosts.” Once downloaded, run the installer and follow the on-screen instructions.
How to install mac os on windows machine using virtual box mac os x#
How to install Internet Explorer on Mac OS X using Oracle VM VirtualBox Moreover, it’s incredibly user-friendly, making it appealing for tech-savvy pros and novice users alike.
How to install mac os on windows machine using virtual box software#
The software is freely available through the developer’s website, and though it’s not as extensive as some premium offerings, users and developers are constantly updating and patching the software to include the latest features and security fixes. The software essentially allows Mac users to run other operating systems while using their Mac as a host, granting them access to OS-exclusive applications not offered on OS X. Say hello to Oracle VM VirtualBox for MacĪlthough its gone through multiple name changes since launching, Oracle VM VirtualBox has always offered a robust level of simplicity and functionality.
How to install mac os on windows machine using virtual box how to#
Also, feel free to check out our guides on how to block pop up ads in Internet Explorer, our side-by-side comparison of the best browsers, and our handpicked selection of the best Web browsers for the iPhone. Here’s our guide on how to run Internet Explorer on a Mac. Despite that, we think some people and developers would still prefer to use IE in OS X.įortunately, VirtualBox, Oracle’s virtualization software, allows you to run more recent builds of IE without requiring you to dual boot Windows and Mac OS X.
How to install mac os on windows machine using virtual box for mac#
Microsoft’s Web browser quickly faded from popularity on Apple rigs starting in 2003, when Microsoft stopped supporting IE for Mac and Cupertino introduced Safari. Internet Explorer may seem like a forgotten relic for most Mac owners, but for some, old flames die hard. So with VirtualBox you get the best of both worlds - it's free, and it allows you to run both Windows and macOS simultaneously so you can switch between them as required without having to reboot. And while Bootcamp is also a free option, it doesn't let you run macOS and Windows simultaneously (you have to reboot the machine every time you want to switch to the other operating system). While there are other options available (such as Parallels and VMware Fusion), VirtualBox is free. To run Windows on a Mac, you need to use virtualization software such as VirtualBox. Here are the main steps involved in installing Windows on a Mac: This enables you to run Windows-only applications on your Mac. By using VirtualBox, you can install Windows on your Mac. VirtualBox is free software that allows you to install different operating systems on your machine. Here I explain how to install Windows on a Mac using the (free) virtualization software, VirtualBox.
0 notes
Text
Peazip drive

#Peazip drive archive
#Peazip drive full
#Peazip drive portable
#Peazip drive software
#Peazip drive password
Just drag the file onto this browser window and drop it. You can also display a PEA file directly in the browser. SOLVED Exit Steam completely, go to whatever drive you have the game installed on>Program files>Steam>SteamApps>Downloading and delete the. Then click "Open with" and choose an application. If you cannot open your PEA file correctly, try to right-click or long-press the file.
#Peazip drive archive
But after trying to reopen the archive with Peazip or Ark, the filenames were now visible without a.
#Peazip drive software
Without proper software you will receive a Windows message " How do you want to open this file?" or " Windows cannot open this file" or a similar Mac/iPhone/Android alert. This is not a huge issue for me, but after encrypting a series of file and folders with 7z and the 'encrypt file names option' active, I noticed that at first the the names were indeed hidden (password needed to display content). PeaZip supporta il suo formato darchiviazione nativo Pea (che implementa compressione, split degli archivi in più volumi, authenticated encryption e integrity check) e altri formati più diffusi, focalizzandosi particolarmente sui formati aperti. You need a suitable software like PeaZip to open a PEA file. There are several versions of the PeaZIP file compression tool which have integrated support for numerous utilized versions of the Windows operating system, while other versions of PeaZIP are also compatible with machines that run the Linux operating system. In addition, it can speed up archiving by creating, editing, and restoring an archive's layout. Additionally, the developer of PEA files, Giorgio Tani, sought to offer a flexible security model through Authenticated Encryption, that is able to provide privacy and authentication of the data while performing redundant integrity checks.The PeaZIP program allows users to automatically run operations such as archiving and extracting using a command-line generated for exporting the job defined in the GUI.
Main Usage: PEA files are primarily a file format focused on a user's data security, where the files aim to provide archiving, compression, and a multi-file split feature in a single conversion.
Often times, the data within the PEA files are compressed for better portability as their sizes are reduced, allowing users to easily transfer these files between machines. PEA files are an acronym for Pack, Encrypt, Authenticate, where PEA files are file archives which may contain multiple files, folders, or entire directories of files which have been compressed through the integrated encoding and data compression specifications within the compression algorithm utilized by the PeaZIP program.
#Peazip drive portable
Added support for CPGZ, GPT (GUID Partition Table), QCOW2 QUEMU image, VMDK VMWare Virtual Machine Disk, VDI Oracle VirtualBox Virtual Drive Imageĭownload: PeaZip 5.8.0 | PeaZip Portable | 8.0 MB (Open Source)ĭownload: PeaZip 64-bit | PeaZip Portable 64-bit | 9.PEA files mostly belong to PeaZip by Giorgio Tani.
Number of files/folders selected for cut/copy is displayed in Clipboard panel and in status bar's hint.
#Peazip drive password
If password is set to not being kept for the entire session, it is cleared after every operation (archiving, extraction, browsing the filesystem) except while browsing archive file, as password may be needed for listing the archive content.Some file management functions now supports UTF-8 filenames.
#Peazip drive full
console tab shows if action can be exported as script ANSI-safe (can run on legacy systems regardless the encoding), codepage-safe (can run on legacy systems with same codepage of original device), or if requires full UTF-8 environment (system, command/script interpreter).
Those who want to skip the installer and run the app directly from a pen drive can resort to PeaZip Portable.
browsing archives with UTF-8 filenames is possible but it is still under development (warning icon is displayed) PeaZip can be integrated into the Explorer context menu to quickly compress files.
7-Zip will unzip them into the Temp directory on the main hard drive, and then take forever to copy the file to the correct location. The whole reason I use PeaZip instead of 7-Zip is that PeaZip unzips files in place, even on drag and drop.
PeaZip can now create and extract archives with UTF-8 filenames, both from application and from system context menu Unfortunately, this doesnt fix the problem, because I still have to use the other drag-and-drop mode.
1 allow only use of Free Software components 2 allow only use of Free Software components and open archive formats (not encumbered by patents for read nor for write).
"Free Software compliance" directive (Options > Advanced, previosly named LIBRE_DIRECTIVE) can be either set in configuration or hardcoded at compile time (HLIBRE_DIR const).
(Windows) Updated to 7z 15.07, adding support to QUEMU, VirtualBox, and VMWare virtual machine's disk image formats.
0 notes
Text
This guide is intended to help you install and host your WordPress website using Caddy Web server. Caddy is an open-source, production-ready that is build to be fast, easy to use, and makes you more productive. Caddy is available for Windows, Mac, Linux, BSD, Solaris, and Android. You can also use some of the popular WordPress hosting platforms for your website hosting needs. If you don’t have Caddy Web server installed, use our guide Install Caddy web server on an Ubuntu 18.04 with Let’s Encrypt SSL to set it up. For Nginx users, see How to Setup WordPress Multisite Network with Nginx and Let’s Encrypt Once you have Caddy web server up and running, proceed to configure it for WordPress hosting: Using Caddy Web Server to host WordPress Website In this section, we will install and configure WordPress to be powered by Caddy web server. To run a WordPress website, you need PHP, Web server, and Database server sudo apt -y update sudo apt -y install php-fpm php-mysql php-curl php-gd php-mbstring php-common php-xml php-xmlrpc For CentOS 7 server run: sudo yum install http://rpms.remirepo.net/enterprise/remi-release-7.rpm sudo yum install epel-release sudo yum install yum-utils sudo yum-config-manager --disable remi-php54 sudo yum-config-manager --enable remi-php72 sudo yum -y install php-cli php-fpm php-mysql php-zip php-devel php-gd php-mcrypt php-mbstring php-curl php-xml php-pear php-bcmath Install and Configure MariaDB Database server Install and configure MariaDB database server using: Install MariaDB 10.x on Ubuntu 18.04 and CentOS 7 Once done, login as root user and create a database for WordPress $ mysql -u root -p Enter password: Welcome to the MariaDB monitor. Commands end with ; or \g. Your MariaDB connection id is 520 Server version: 10.3.9-MariaDB-1:10.3.9+maria~bionic-log mariadb.org binary distribution Copyright (c) 2000, 2018, Oracle, MariaDB Corporation Ab and others. Type 'help;' or '\h' for help. Type '\c' to clear the current input statement. MariaDB [(none)]> CREATE DATABASE wp_site; Query OK, 1 row affected (0.001 sec) MariaDB [(none)]> GRANT ALL PRIVILEGES ON wp_site.* to 'wp_user'@'localhost' IDENTIFIED BY 'StrongPassword'; Query OK, 0 rows affected (0.001 sec) MariaDB [(none)]> FLUSH PRIVILEGES; Query OK, 0 rows affected (0.001 sec) MariaDB [(none)]> quit Bye Download WordPress and Install Now download WordPress and untar the archive wget http://wordpress.org/latest.tar.gz tar xvf latest.tar.gz This will extract all content of the tarball to a folder named wordpress on your working directory. Move the wordpress folder to /var/www directory sudo mv wordpress /var/www Change ownership permissions to userwww-data and group. sudo chown -R www-data:www-data /var/www/wordpress Configure WordPress database connection mv /var/www/wordpress/wp-config-sample.php /var/www/wordpress/wp-config.php Edit the file to configure sudo vim /var/www/wordpress/wp-config.php Set below variables // ** MySQL settings - You can get this info from your web host ** // /** The name of the database for WordPress */ define('DB_NAME', 'wp_site'); /** MySQL database username */ define('DB_USER', 'wp_user'); /** MySQL database password */ define('DB_PASSWORD', 'StrongPassword'); /** MySQL hostname */ define('DB_HOST', 'localhost'); /** Database Charset to use in creating database tables. */ define('DB_CHARSET', 'utf8'); /** The Database Collate type. Don't change this if in doubt. */ define('DB_COLLATE', ''); Configuring Caddy to Serve the WordPress Site We have WordPress installation ready, we now need to configure Caddy Web server to serve our WordPress website. Start by creating a Caddy configuration file on /etc/caddy/Caddyfile sudo vim /etc/caddy/Caddyfile Add the content example.com tls [email protected] root /var/www/wordpress gzip fastcgi / /run/php/php7.2-fpm.sock php rewrite if path not_match ^\/wp-admin
to path path/ /index.php?query Replace example.com with your actual domain for WordPress website and [email protected] with an actual email address used to request Let’s Encrypt certificate. We’re using php-fpm via fastcgi to support php. Start caddy service sudo systemctl start caddy.service If the start was successful, you should get a successful message: # systemctl status caddy ● caddy.service - Caddy HTTP/2 web server Loaded: loaded (/etc/systemd/system/caddy.service; enabled; vendor preset: enabled) Active: active (running) since Sun 2018-09-02 14:34:26 EAT; 7s ago Docs: https://caddyserver.com/docs Main PID: 32443 (caddy) Tasks: 12 (limit: 4704) CGroup: /system.slice/caddy.service └─32443 /usr/local/bin/caddy -log /var/log/caddy.log -agree=true -conf=/etc/caddy/Caddyfile -root=/var/tmp Sep 02 14:34:26 wp.computingpost.com systemd[1]: Started Caddy HTTP/2 web server. Sep 02 14:34:34 wp.computingpost.com caddy[32443]: Activating privacy features... done. Sep 02 14:34:34 wp.computingpost.com caddy[32443]: https://wp.computingpost.com Sep 02 14:34:34 wp.computingpost.com caddy[32443]: //wp.computingpost.com Access the WordPress dashboard by visiting.https://example.com You should get initial wordpress setup page. Provider username and password. Thank you for reading our guide on how to Install Caddy web server on an Ubuntu 18.04 with Let’s Encrypt SSL. I like Caddy simplicity, robustness and the fact that it uses HTTPS by default. No routing and redirects needed to host your website.
0 notes
Text
Are you a WordPress user who want to switch to WordPress Multisite Network setup? – To host more than one domain on the same WordPress instance?. In this guide, I’ll take you through the steps to setup WordPress Multisite Network using Nginx as a web server and secure the setup with Let’s Encrypt SSL certificates on Ubuntu 22.04|20.04 Linux systems. In a nutshell, this is a LEMP Stack with WordPress installed and secured with Let’s Encrypt. So we will start our installation by setting up LEMP stack on Ubuntu 22.04|20.04 Linux. WordPress Multisite is a popular feature of WordPress which enables Web masters to run multiple websites using the same WordPress installation on the same server. Step 1: Install MariaDB Database Server This setup requires a database server. We will install and create a database to be used by WordPress. Run the commands below to install MariaDB database server: sudo apt update sudo apt -y install mariadb-server After installation of the database server you need to secure it by running the command below: $ sudo mysql_secure_installation NOTE: RUNNING ALL PARTS OF THIS SCRIPT IS RECOMMENDED FOR ALL MariaDB SERVERS IN PRODUCTION USE! PLEASE READ EACH STEP CAREFULLY! In order to log into MariaDB to secure it, we'll need the current password for the root user. If you've just installed MariaDB, and you haven't set the root password yet, the password will be blank, so you should just press enter here. Enter current password for root (enter for none): OK, successfully used password, moving on... Setting the root password ensures that nobody can log into the MariaDB root user without the proper authorisation. Set root password? [Y/n] y New password: Re-enter new password: Password updated successfully! Reloading privilege tables.. ... Success! By default, a MariaDB installation has an anonymous user, allowing anyone to log into MariaDB without having to have a user account created for them. This is intended only for testing, and to make the installation go a bit smoother. You should remove them before moving into a production environment. Remove anonymous users? [Y/n] y ... Success! Normally, root should only be allowed to connect from 'localhost'. This ensures that someone cannot guess at the root password from the network. Disallow root login remotely? [Y/n] y ... Success! By default, MariaDB comes with a database named 'test' that anyone can access. This is also intended only for testing, and should be removed before moving into a production environment. Remove test database and access to it? [Y/n] y - Dropping test database... ... Success! - Removing privileges on test database... ... Success! Reloading the privilege tables will ensure that all changes made so far will take effect immediately. Reload privilege tables now? [Y/n] y ... Success! Cleaning up... All done! If you've completed all of the above steps, your MariaDB installation should now be secure. Thanks for using MariaDB! Step 2: Create database and user for WordPress After the MariaDB server has been installed, proceed to create a database and user for your WordPress website. But first update authentication plugin: $ sudo mysql -u root UPDATE mysql.user SET plugin = 'mysql_native_password' WHERE User = 'root'; FLUSH PRIVILEGES; QUIT; Login to your MariaDB database as root user: $ mysql -u root -p Enter password: Welcome to the MariaDB monitor. Commands end with ; or \g. Your MariaDB connection id is 59 Server version: 10.3.31-MariaDB-0ubuntu0.20.04.1 Ubuntu 20.04 Copyright (c) 2000, 2018, Oracle, MariaDB Corporation Ab and others. Type 'help;' or '\h' for help. Type '\c' to clear the current input statement. MariaDB [(none)]> Then create a database for wordpress: CREATE DATABASE wp_db; GRANT ALL PRIVILEGES ON wp_db.* TO wp_user IDENTIFIED BY "StrongDBP@ssw0rd"; FLUSH PRIVILEGES; \q Once the database is ready, proceed to install nginx web server:
Step 3: Install Nginx Web Server Next we install Nginx web server on our Ubuntu server: sudo apt install nginx Starting nginx service on both methods is from systemd service manager. sudo systemctl start nginx Enable service to start on boot using: sudo systemctl enable nginx Step 4: Install PHP and PHP-FPM process handler The next phase is the installation of php and all required modules. Unlike Apache web server, Nginx does not contain native PHP processing. For that, we have to install PHP-FPM (FastCGI Process Manager). On Ubuntu install php and php-fpm using the commands: sudo apt update sudo apt install php php-fpm,pear,cgi,common,mbstring,net-socket,gd,xml-util,mysql,bcmath PHP socket is located on /var/run/php/ directory, i.e PHP 8.0 Sock – /run/php/php8.0-fpm.sock For PHP 7.4 – /var/run/php/php7.4-fpm.sock For PHP 7.3 – /var/run/php/php7.3-fpm.sock For PHP 7.2 – /var/run/php/php7.2-fpm.sock sudo vim /etc/php/*/fpm/pool.d/www.conf Step 5: Download and Install WordPress Download WordPress archive: wget wordpress.org/latest.tar.gz Extract the file: tar xvf latest.tar.gz Move resulting wordpress folder to website root directory: sudo mv wordpress /var/www/mywebsite Configure WordPress Database connection cd /var/www/mywebsite sudo cp wp-config-sample.php wp-config.php Edit wp-config.php: $ sudo vim wp-config.php define('DB_NAME', 'wp_db'); define('DB_USER', 'wp_user'); define('DB_PASSWORD', 'StrongDBP@ssw0rd'); Change ownership of /var/www/mywebsite to web user: sudo chown -R www-data:www-data /var/www/mywebsite Step 6: Configure Nginx for WordPress Multisite Network Create VirtualHost configuration file for your WordPress: sudo vim /etc/nginx/conf.d/mywebsite.conf Copy the following configuration snippet and modify accordingly: ################################## # WORDPRESS NGINX CONFIGURATIONS ################################## server listen 80; root /var/www/mywebsite; server_name mywebsite.com; return 301 https://$server_name$request_uri; server js Remember to replace mywebsite.com with your valid domain name,/var/www/mywebsite with your wordpress installation root. Step 7: Generate Let’s Encryt SSL certificate for the domain Once you have modified nginx with correct settings, proceed to request for Letsencrypt certificate that we’ll use to secure the main site. Download and install certbot client to use: sudo apt update sudo apt install certbot Open http and https ports on the firewall if ufw is active: sudo ufw allow http sudo ufw allow https Stop nginx: sudo systemctl stop nginx Request for certificate export DOMAIN="mywebsite.com" export EMAIL="[email protected]" sudo certbot certonly --standalone -d $DOMAIN --preferred-challenges http --agree-tos -n -m $EMAIL --keep-until-expiring You should get output like this: Saving debug log to /var/log/letsencrypt/letsencrypt.log Plugins selected: Authenticator standalone, Installer None Obtaining a new certificate Performing the following challenges: http-01 challenge for wp.computingforgeeks.com Waiting for verification... Cleaning up challenges IMPORTANT NOTES: - Congratulations! Your certificate and chain have been saved at: /etc/letsencrypt/live/mywebsite.com/fullchain.pem Your key file has been saved at: /etc/letsencrypt/live/mywebsite.com/privkey.pem Your cert will expire on 2018-09-17. To obtain a new or tweaked version of this certificate in the future, simply run certbot-auto again. To non-interactively renew *all* of your certificates, run "certbot-auto renew" - If you like Certbot, please consider supporting our work by: Donating to ISRG / Let's Encrypt: https://letsencrypt.org/donate Donating to EFF: https://eff.org/donate-le Confirm that certs we indeed generated: $ sudo ls -1 /etc/letsencrypt/live/mywebsite.com/ cert.pem chain.pem fullchain.pem privkey.pem README
Make sure you modify nginx configuration ssl section to point to correct path of Let’s Encrypt private key and certificate. Validate configuration settings then restart nginx for the changes to be affected: $ sudo nginx -t nginx: the configuration file /etc/nginx/nginx.conf syntax is ok nginx: configuration file /etc/nginx/nginx.conf test is successful $ sudo systemctl restart nginx Step 8: Configure WordPress Website from browser Open http://mywebsite.com to start wordpress installation. You should get initial installation page which looks similar to one below. Provide required information and click on “Install WordPress” button. If all goes well, you should get login page. Click Log in and provide username and password. On Login, you should get to wordpress Admin dashboard. Step 9: Configure WordPress Multisite For WordPress multisite to work, you need to first enable it on wordpress configuration file: sudo vim /var/www/mywebsite.com/wp-config.php Add the following content before the line /* That's all, stop editing! Happy blogging. */ define( 'WP_ALLOW_MULTISITE', true ); Restart Nginx service: sudo systemctl restart nginx Relogin to WordPress Admin Page and go to: Tools > Network Setup Choose whether to use Sub-domains or sub-directories to host other sites. Enabling WordPress Network Paste the given configuration snippet on /var/www/mywebsite/wp-config.php, just before /* That's all, stop editing! Happy blogging. */ define('MULTISITE', true); define('SUBDOMAIN_INSTALL', true); define('DOMAIN_CURRENT_SITE', 'mywebsite.com'); define('PATH_CURRENT_SITE', '/'); define('SITE_ID_CURRENT_SITE', 1); define('BLOG_ID_CURRENT_SITE', 1); See below screenshot as example: Restart nginx: sudo systemct restart nginx Relogin to start using WordPress Network Multisite feature. You should see new Network Admin Menu. You can start adding websites to your WordPress Network by navigating to Sites > Add New In our next guide, I’ll cover how to Add websites to wordpress Multisite Network Setup. Stay connected to receive our latest article updates.
0 notes