#origami tutorials
Explore tagged Tumblr posts
Visit Tumblr Blog
Explore Tumblr blogs with no restrictions, modern design and the best experience.
Last Seen Tumblr Blogs


Fun Fact
Tumblr was created by web developers David Karp and Marco Arment.
Text
The Art of Origami: A Journey Through History, Use, and Mastery
In this series, we have been looking at various types of art as art forms. We have visited collage, multi-media art, Mexican Folk Art, ATC’s, Japanese Kintsugi, Street Art and Murals, pottery, Chinese Kites, and now Origami. Wow! That’s a lot of art. I hope you have been following and have enjoyed learning about these different types of art around the world. Origami, the traditional Japanese…

View On WordPress
#artistic expression#Creative Origami#Foldable Structures#Japanese art#Learning Origami#Origami#Origami and Mathematics#Origami Designs#Origami for Beginners#Origami History#Origami in Education#Origami in Engineering#Origami Manual#Origami Symbolism#Origami Techniques#Origami Therapy#Origami Tutorials#Paper Folding#Senbazuru Orikata#Traditional Origami
3 notes
·
View notes
Text
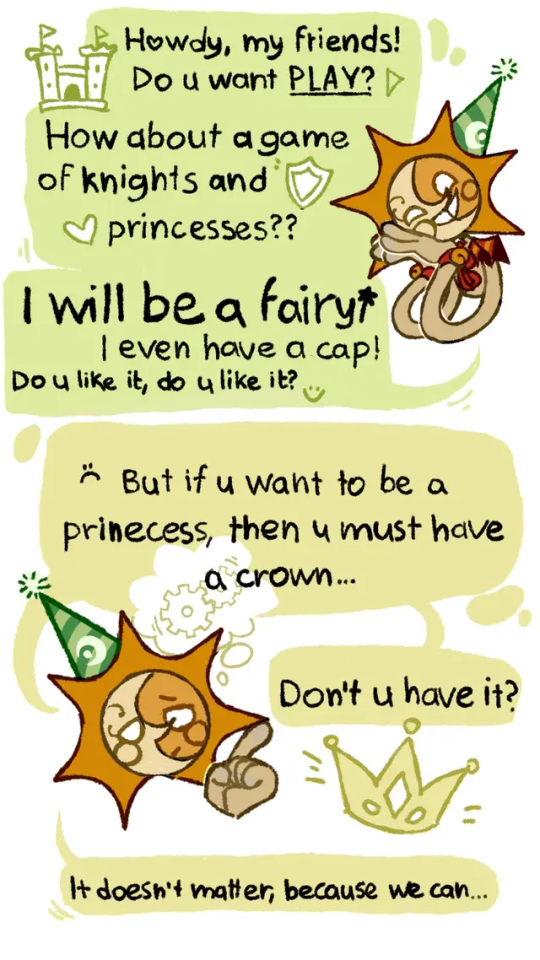
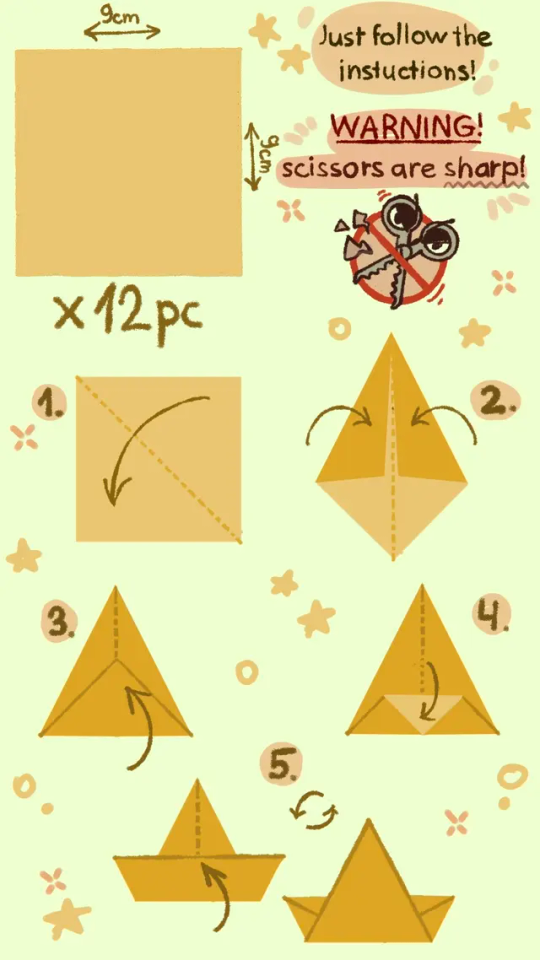
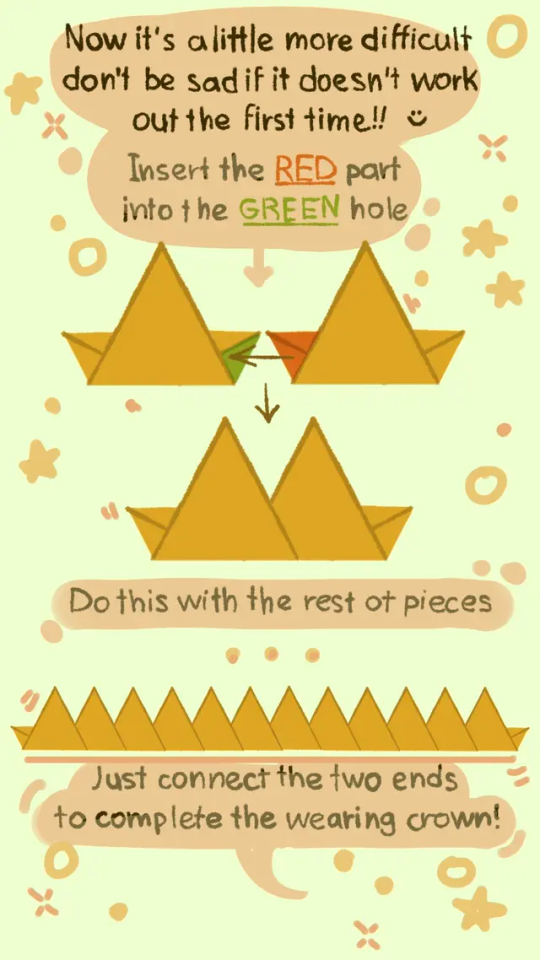
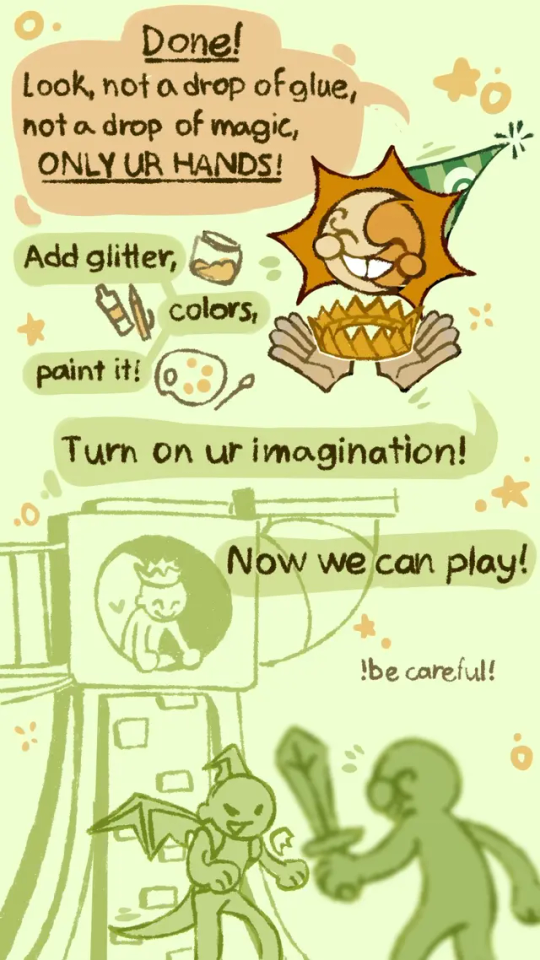
Some old childish shit (I love that and I love Sun so much, someone please treat me like this)
Paper crown tutorial 👑:P
#please treat me like this I'm begging u#hur hur hur hur hur#sundrop#sun#fnaf 9#fnaf 9 security breach#sun fnaf#sun fanart#fanart#tutorial#origami#origami tutorial#crown#paper craft#paper crown#so much tags
2K notes
·
View notes
Text
➩ Tutorial on a Paper Star 🌱
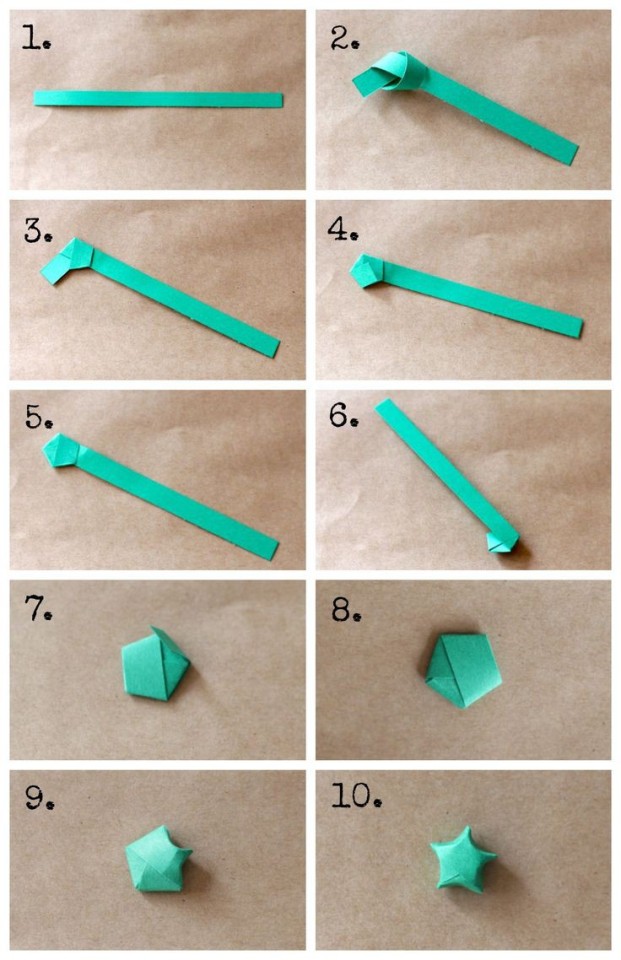
#tutorial#paper stars#paper star#star#papercraft#paper art#origami#aesthetic#greencore#green aesthetic#handmade#diy#crafts#starcore#design#art#goblincore#goblin aesthetic#green#green goblin#fairycore
1K notes
·
View notes
Text
how to make origami ninja stars out of sticky notes
640 notes
·
View notes
Text

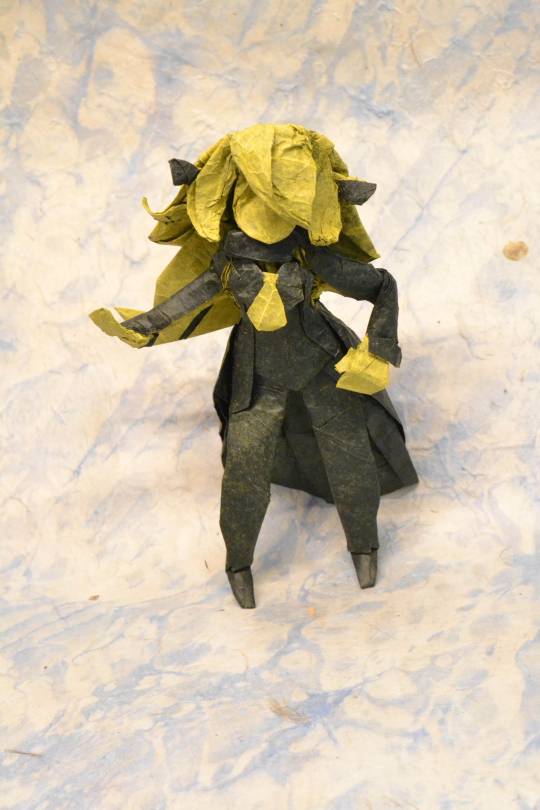
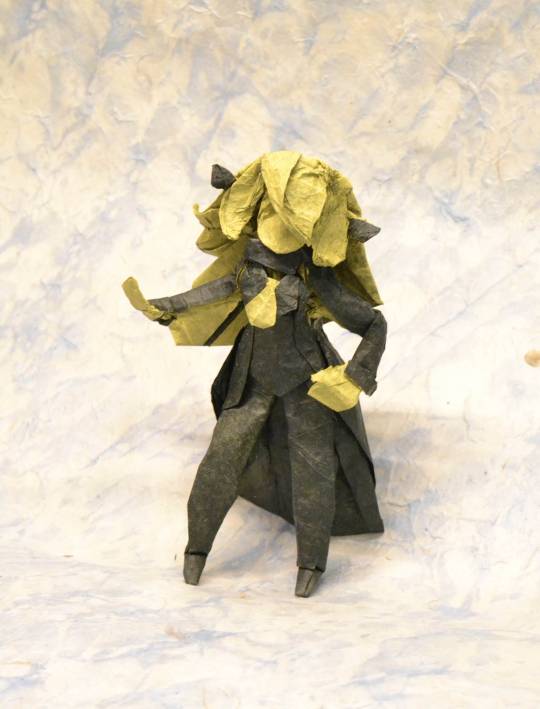

Origami Cynthia designed by ino87 on youtube, folded by me from a square of about 50 cm double tissue (black on one side and yellow on the other).
I like how the designer handled the color changes. Tutorial here:
youtube
#origami#paper folding#paper art#paper#champion cynthia#cynthia pokemon#pokemon#sinnoh#pokemon gen 4#pokemon diamond and pearl#pokemon cynthia#was excited to see this tutorial and knew I had to fold her#still have to fold more of this designer's work#so many good Pokémon designs I haven't folded yet#Youtube
49 notes
·
View notes
Text
i dont know how to edit videos i fear
#ADOBE PREMIERE PRO TUTORIALS PLEASE#IM ON MY KNEES! I CANT EDIT#this program makes me want to DIIIEIDIEIEEIEIEDIEEEIEE#pmtok#paper mario the origami king#paper mario#king olly#super mario#pmtok olly#pmtok olivia
17 notes
·
View notes
Text

Such a beautiful paper lotus. Tutorial at Origami Guide.
#tutorials#paper#crafts#crafting#origami#handmade#DIY#pink#hot pink#fuchsia#lotus#lotus flower#flowers#faux flowers
6 notes
·
View notes
Text
I posted the stellated rhombicosidodecahedron i made a while ago but i love it so im posting again
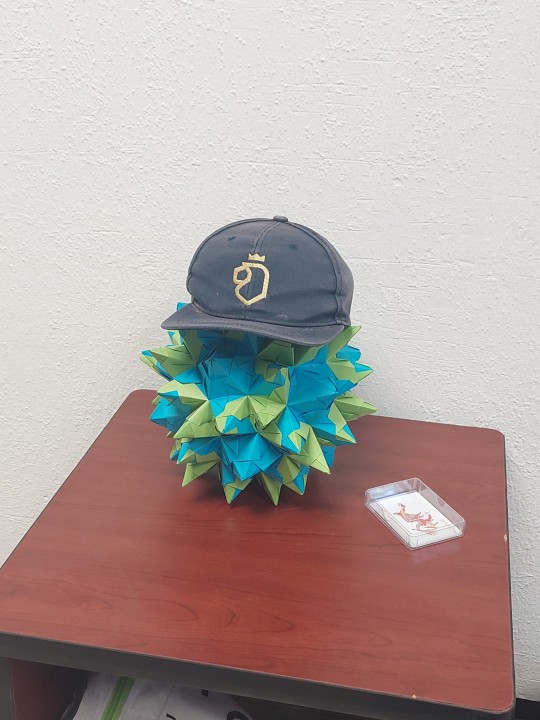
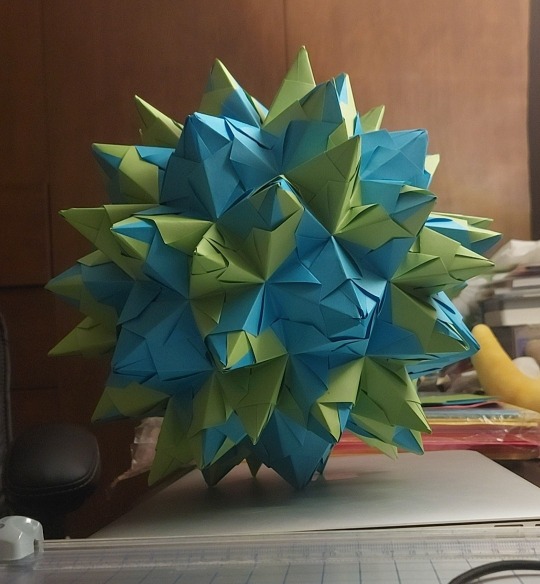
her name is kiki
#its from a youtube tutorial so if interested you can dm me#hat is from the friend that i gifted it to#it turned out so big though i do not recommend using 10cm squares unless its going to be like. a lamp#this was my first venture into origami polyhedra and im really happy about it#doing this instead of the 5 assignments and 3 books i need to read LOL
15 notes
·
View notes
Text
Origami bookmark ლ(╹◡╹ლ)


Lotus flower bookmark tutorial>>
youtube
Bird crane bookmark tutorial>>
youtube
4 notes
·
View notes
Text
The disparity between Nintendo’s promotion of Pikmin vs their promotion of totk is honestly killing me. Sure they probably don’t need to promote totk all that hard since it was so highly anticipated, but seeing the Pikmin plushes, official Pikmin merchandise collabs, Pikmin-themed Nintendo online rewards, Pikmin posts on NoA social media, Pikmin on the official Nintendo magazine cover, and even a Pikmin-themed Christmas commercial compared to… 2 totk posts in the last month even after it’s been nominated for a goty award is funnier than it has any right to be. The totk amiibo figures that everyone was hyped for when the game first came out released on November 2nd and they made like one announcement about it. I only found out they existed because I went into GameStop last week and there was a pile of Ganondorfs beside the register. If someone told January 2023 me which game would get multiple sold out merch lines + a weekly manga and which one would be overshadowed by the release of splatoon 3 amiibo I would not have believed them
#bluebird.txt#salt of the kingdom#<- not really but just to be safe#pikmin#I have to wonder what’s going on at Nintendo re t0tk bc I would have thought they’d be capitalizing harder on their biggest moneymaker#even the zelda lore YouTubers are barely talking about it anymore#but it’s also bc Pikmin solos#anyways I’m gonna go use the official Pikmin origami tutorial to make myself some origami Pikmin to keep me company during my botw replay
42 notes
·
View notes
Text
How I fold my curved origami
Lots of people are asking how can you make curved origami, so here's a little explanatory post! First off, credit where credit is due, most of the curved origami I've posted is either directly following or inspired by the work of Ekaterina Lukasheva (instagram). I would definitely recommend checking out her book on curved origami if you're interested in the subject, as part of the following post is also inspired by it.
1. Useful basic terms to know: Crease pattern (CP): This is what the patterns marking the creases necessary to fold the model are called. A good CP will have the valley folds (paper folded like this -> V) and mountain fold (paper folded like this -> ^) contrasted in some way, either by using different types of line or different colors.
Molecule: When a pattern is repeated, the repeated unit is called a molecule.
2. Materials needed A crease pattern to follow: There are a ton in Lukasheva's book! I've also made one myself, and there are of course plenty you can find online for free, like this one, or this more simple version with only one molecule. If you're just starting, I recommend trying out just one molecule first, and with a model you have a photo of, so that you know what results to expect.
Once you've got your pattern you only really need two more thing: paper, and some kind of sharp tool to mark the creases from your pattern onto that paper. Standard printer paper works fine! Feel free to experiment with other types if you like, I have a mix I like to use here, and here are what it looks like with just scraps of paper. Definitely no need to buy specialty paper if you're starting out.
For the sharp tool, I prefer to use an empty mechanical pencil (i prefer ones with a metal tip for easy cleaning, but a plastic one will work perfectly fine if you use clean paper). These are easy enough to obtain but if you don't have one a simple toothpick will also do the job, although you might have to replace it if it cracks.
These are the only essentials in my opinion, but more tools can be used as you progress, like a spray bottle with water which will make the paper keep its shape on its own, small clothespins to keep the paper in place for more complex models, or curved rulers to invent your own pattern. Again Lukasheva's book is quite useful for suggestion on what materials to get, but no need to rush and buy it all to start!
3. How to actually do it To get the pattern on the paper you actually plan to fold, you can either directly print it (a good reason to use printer paper), or if you don't have a printer place your paper on your computer screen and trace it. If you'd like to fold another paper than the one you have the pattern on, you can place your patterned paper on top of the one you intend to fold, and follow the creases with your sharp tool. They will be transferred onto your end goal paper and you can trace them again with your tool to reinforce them. Check out the first clip in this video for an example of this process. If you mess up while tracing, don't worry too much; you can always go over the line again.
Once you have your pattern on your paper of choice, it's time to reinforce those creases. This is a crucial step to ensure sharp creases and will drastically simplify the folding process. To do this, look at your pattern and verify which creases are valley folds and which are mountain fold. Then, take your sharp tool and mark them in the direction you want the paper to go. Since you are always marking valleys with your tool, switch your paper to the other side when you want to make mountain folds. This is especially important if you have colored your paper and want a specific side to be viewed. If you've marked the wrong side, simply switch your paper to the other side and mark it the right way; creases on printer paper are pretty easy to reverse. Don't hesitate to be quite forceful during this step, again we want those creases to be sharp.
Once that is done the folding can start! For this step, lightly push the sides of the paper together as if you were making it smaller. It should naturally follow the curves you've marked. Your job is now to go over those creases and reinforce them as you would with folding a straight crease: use your nails or the tips of your fingers to progressively sharpen them. I find it easier to work from the sides to the center, in several passes folding the paper sharper and sharper. You can see an example of this process here. As you can see I am reinforcing the curves by pushing the waves towards each other, making the mountain folds go up and the valley folds go down. Like plate tectonics! A useful part of the folding process is understanding paper tension. In this video you can see I am holding the paper in my right hand in a way that holds it together: I am pinching a mountain fold with two fingers on the bottom, and holding another one with my thumb on the top. This makes it easier to go with my left hand and fix the valley fold in the spiral in the bottom by simply pushing down on it; you can see it snapping into place automatically. The more creases you are trying to hold together at the same time, the harder it is; this is why it's useful to start will simple models. A final folding example in this video: here too I am holding the paper with my right hand, and pinching with my left. Pinching with only your fingers makes a softer gesture, and helps at the beginning of the process to avoid sharp creases where you don't want them. Using one nail (or a ruler if you have short nails) alongside a curve will help sharpening your curves without pinching with both your nails and risk making a straight line accidentally. I find that folding the mountain folds (like the blue curve in the last example) is easier for me. For the other half of the curves, simply turn the paper over and the valley folds become mountains! You can also sharpen your creases with the tool you use to mark them down on the paper like in this video. This is especially useful for the center of spirals which are otherwise hard to get precisely with only your fingers. Mostly this process involves a lot of back and forth! Don't be worried about sharpening the same line several times, or having to push it down the right way more than once. It is also useful to look at a photo reference of the model you are folding to know what results to expect; how sharp the creases should be, or which creases are valleys or mountains if you get confused.
Once you're satisfied with your model, you can either leave it as is if you like to stretch it and scrunch it, or you can let it set a bit for it to keep its shape. For this, simply lay your model on a flat surface, and place some books or whatever heavy objects you have on each side, squeezing it as much as you can like in this photo (no need to put a book on top of it in addition to the sides if you're afraid about squashing it). You can then leave it overnight to keep its shape! This will work even better if you lightly spray it with water before leaving it. And that's it! please tell me if you've used this to make some curved origami, or if you'd like more clarifications. Enjoy your folds and see ya!
#going to tag these tutorial type posts#tutorial#they'll be in my pinned post so people wondering can find them more easily than by traipsing around my wip tag#origami#curved origami
45 notes
·
View notes
Text
trying to read sewing patterns reminds me a lot of trying to read origami diagrams
#oh the things we had to do before we had video tutorials#to be clear I was good at origami#I am not good at sewing because I have just started
17 notes
·
View notes
Text


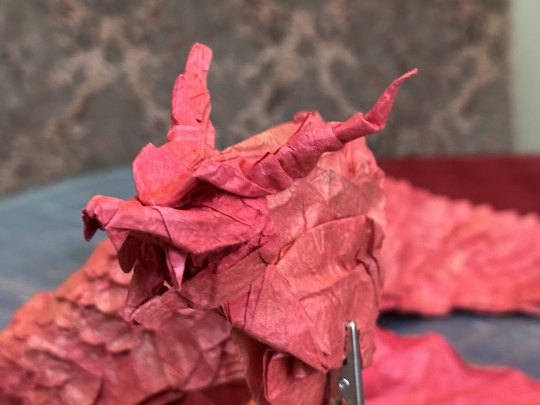
WIP origami dragon from the 1 meter square that has been in progress for the past month. Still need to do detail on the legs and maybe some other parts. But they're getting closer to being finished!!
Thinking of folding a number of items for a treasure hoard to display them with when I finish. Decided to start by making a dagger for today.
EDIT: finished here
#wip#origami#paper folding#paper art#paper#origami art#origami dragon#also origami dagger for ides of march#dragon has a knife...#ides of march#dragon#dragon art#but yeah I think this is one of my best dragons I've folded#and it's not finished yet#even if the scales could be shaped cleaner#I tried#makes me want to fold MORE scaled origami dragons#I'll have to look more into Shuki's zoanoid dragon sometime#dagger had a tutorial#though the dagger is basically a fish base with some open sinks and shaping. It doesn't take long to fold and I modified it a bit
17 notes
·
View notes
Text

Note three.
And just in case anyone wants to learn how to make these, make sure you first write your note on the sticky note that has the sticky side

Then flip your paper over like so

Then fold it in half like so and unfold

Then this and unfold again

Now flip it back over

This is when you fold it like this, unfold, and do it again but the opposite direction. And ofc unfold again

Then you’ll bring everything over like this. I like to have the sticky part on my left side.

Then fold the edges like so and flip it to the other side with the top of your triangle facing down

Then pull that sucked up like so and fold that tiny top part that’s overhanging over it. Now I like to tuck it in, but you don’t have to do that bit.

Then fold it backwards and now you’ve got yourself a butterfly when you flip it around. But I’ve got a 10 picture limit being on mobile so you gotta use your imagination from my previous posts
#sticky note origami#sticky note thoughts#sticky notes#origami notes#origami art#origami butterflies#origami butterfly#origami#notes to a loved one#sweet notes#sweet nothings#i love him#i love my bf#i love my boyfriend#origami tutorial
2 notes
·
View notes
Text
I’ve been trying to figure out how to finish solving this rubiks cube for the last week or so because i haven’t done one in a while and for the life of me i cannot seem to figure out the bottom layer.
The worst part is that my dad taught me how to solve them; which means i learned how to do it HIS way…which happens to be a bit different to how they’re apparently “supposed” to be solved. Thus, I cannot look it up because every tutorial is either a completely different method, uses a lot of shorthand that makes it impossible to follow (which tbf means it may or may not circle back to the first problem but i wouldn’t know as it doesn’t make sense).
But i don’t want to ask my dad yet because i wanna try and solve it myself…but i just keep swapping the colors from one side to the other and getting nowhere.
#i was taught to solve the bottom layer corners first but so far everything wants you to do cross first and im like thanks but no that feels#weird and wrong :/#and tbh i don’t wanna watch a video. idk why but i just don’t like video tutorials for this kinda thing.#its like with origami. sure it may be easier to do along with a video but its more fun to puzzle it out for yourself with written directions
2 notes
·
View notes