#pattern adjustments
Explore tagged Tumblr posts
Visit Tumblr Blog
Explore Tumblr blogs with no restrictions, modern design and the best experience.
Last Seen Tumblr Blogs


Fun Fact
The most popular pages on Tumblr are about Minecraft, GIFs, and David J. Peterson.
Text
Fit adjustments links
1 note
·
View note
Text

Hm

Hmm

Hmmm

Hmmmm
#is he adjusting his tie or trying to rip his suit open in public#in any case the pattern of gay behaviour from Carlos continues#carlos sainz jr#charles leclerc#charlos#f1#c2#c square
522 notes
·
View notes
Text


alright where are the people who asked for ardante come get your food 🗣️
#ardante has become real. next time ardanteleon will become real (maybe) (no promises)#man i sure hope this doesnt turn into anything serious.... if i start doing that it's you guys' fault... smh....#oh god i have to put them in the tags now this is so embarrassing EHJFHKDHSF#red dead redemption 2#rdr2#arthur morgan#devil may cry#dante (dmc)#allyart#i think this is like. my third time ever actually drawing arthur in color. thats so funny to think abt#im still not sure if i got his hair color right i wont lie i had to like adjust it a few times before it looked right#the curse of having the kind of brown hair that gets influenced by lighting a lot..............#oh god i just realized i forgor the stripe pattern on his shirt </3 whatever im not fixing that im going to bed
402 notes
·
View notes
Text


i am still soooo charmed by that one set of eyecatchers
#my art#zosan#one piece fanart#specifically as blue and i have been slowly working thru watching the raid on onigashima i have loved every time they do that thing where-#-they incorporate the motion of the scene into the motion of the first part of the eyecatcher#and then the other fist comes swinging w/ clownery lol#not specifically art for fic but like [anime villain glasses adjustment] i suppose i was thinking about my own Woeurke of Writinge...#ALSO in a very brief scrub-thru of some eps can you believe that you can literally only see part of sanji's shoulder in his yukata fit.#absolutely criminal. you can see the whole pattern when he's about to bitch out zoro re: hiyori but i had to guess at the pattern colors :^#i also know that yukata patterns can be like... modern/traditional or Gendered or in/formal but i have no idea of the specifics.....#one piece tag
2K notes
·
View notes
Text

acheron redesign because her shorts annoy me.
#thoughts:#i felt like just putting her in pants was firstly#the boring way out#and two#pants are the devils clothes. no warrior should have to wear awful cloth like that#so instead shes wearing a sort of long leotard??#or is it a short onesie#i love her top though so absolutely no adjustments there#i couldnt be arsed to draw all her patterns so just PRETEND theyre there#fanart#art#redesign#acheron#honkai star rail#i also think her colour scheme is very boring#bland even#so she got some reds in there
755 notes
·
View notes
Text
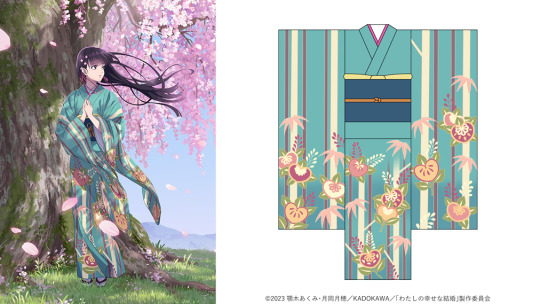


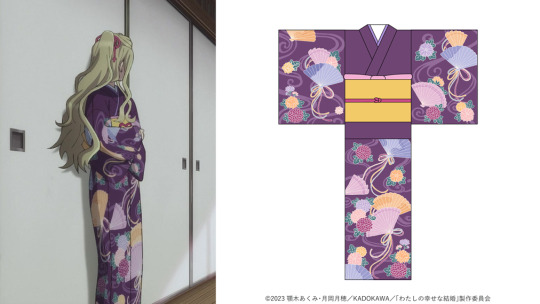

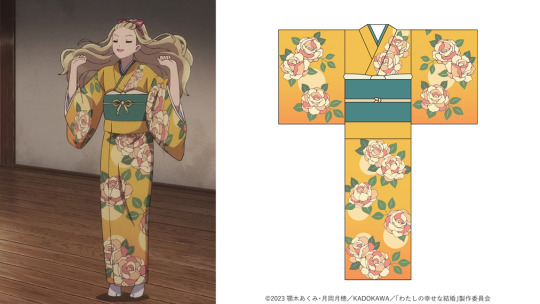


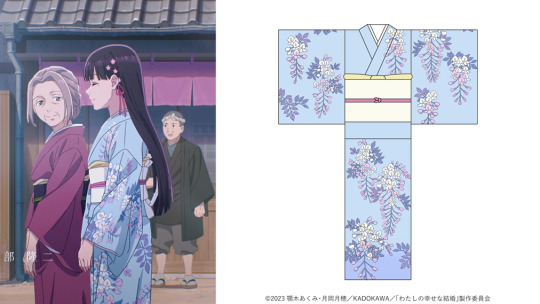


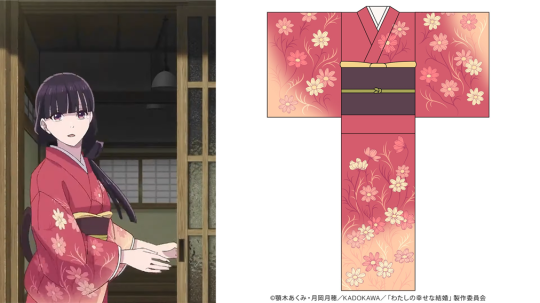
My Happy Marriage Season 1
Kimono designs by Halka (with adjustments by color designer Anna Okamatsu)
#my happy marriage#Watashi no Shiawase na Kekkon#miyo saimori#kaya saimori#Kazushi Tatsuishi#kanoko saimori#sumi saimori#sumi usuba#kimono#my happy marriage designs#watakon#halka comments how after she makes the designs and okamatasu adjusts colors there is a third person who has to fit the patterns in the shot#and like. obsviously someone has to do it but I hadn't thought about it. that's impressive#also to know they hired someone specifically for the kimonos...I'm charmed#I mean she also designs other stuff in the series (title cards / wrappers / THE comb / etc) but
83 notes
·
View notes
Text
Na'vi Stripes Tutorial!
Tagging @eywaschild891, in case you were still interested in this! (note: this tutorial is about the digital process of adding the stripes, not actually designing the patterns)
I'm using MediBang Paint Pro, but this technique should work in any program that supports layers.

So you've drawn your Na'vi and now you want to add some stripes! First we'll have to start with a base color. Underneath your lineart layer, add two new layers: one as the main base color layer (for coloring hair, eyes, clothes, etc), and on top of that, a separate layer for the skin. Putting the skin on a separate layer is important because that way you'll be able to do the stripes as a clipping mask.
Your layer box should look something like this (you can ignore the gray background and extra folder, they're not important for this tutorial):

Now we can start on the base stripe layer. Create a new layer and set it as a clipping mask on your skin layer. This makes it so that you can't "color outside the lines", so to speak, while drawing the stripes. Then take a hard-edged brush and start drawing the patterns you want. I like to use MediBang's "mapping pen", which has a subtly textured edge, but the regular default Pen tool will work perfectly fine as well.


If you'd like, you can stop here and call this done: solid stripes are perfectly acceptable in a cartoonified stylization. However, if you look closely at Na'vi stripes on canon characters, you'll note that they're not completely solid: they have a subtle fading effect, where they're darker along the edges and a bit lighter in the middle, and in some places they fade out into the body. Sometimes it almost looks watercolor-ish.
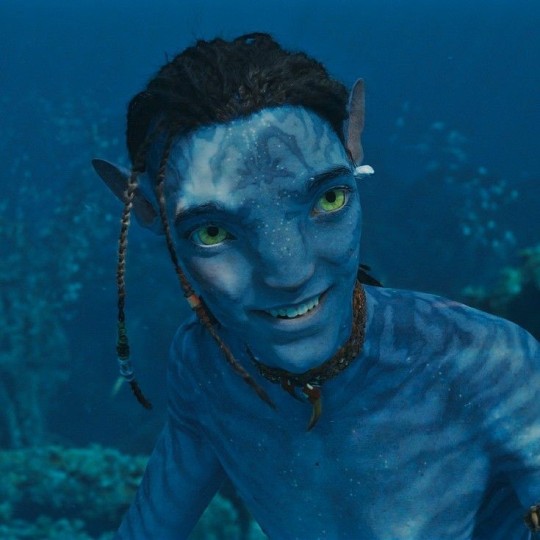
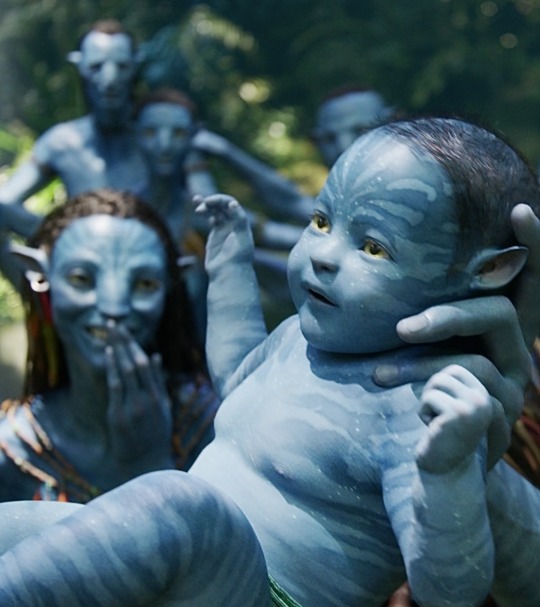
(I'm sure there are better examples out there than these but I'm not up to digging for them rn 😅)
So, let's continue! To fade our stripes, create another clipping mask layer above the main stripe layer. Use a brush with pressure-based opacity such as MediBang's "pencil" to loosely fill the insides of the stripes with the base skin color.


Once you have filled in all the stripes, use the gaussian blur filter to smooth out the fade. The filter doesn't need to be super strong—in fact, if you make it too strong you will loose the detail and the stripes will look solid again. With MediBang's version of the tool, I had it set to 7 (out of a max of 64) for this image, though of course the way it works may be different in other programs; mess around with different settings until you get something you like.
(sadly I do not have a screenshot of the blurred version because apparently the way my cintiq takes screenshots is dumb; it only captured the "gaussian blur" popup window instead of the whole screen. oh well. :P)
Now that we have the fade within the stripes, let's also make them fade into the rest of the body. The areas you'll want to do this with are the torso, inner arms, and inner/back of legs.
Create another clipping mask. Using the same pressure-opacity brush and base skin color as before, loosely block in where you want the stripes to fade into the body.

Once you've finished, gaussian blur the layer just like before. This one can be a little stronger than the inside-stripe one. For this image I had it set to 14.
Sometimes, the areas you block out will overlap with areas that shouldn't be faded—for example, here the fading from the back of the character's thigh is overlapping with her tail. To fix this, just erase it to remove the fade from where it shouldn't be (this is why we do this step on separate layers). Make sure you do this erasing after you've applied the gaussian blur.

Depending on the pose of your character, there may be places where one faded area overlaps with another. For example, in this drawing, the blocking for the arm fading overlaps with the blocking for the torso fading. Here it is with the torso fading turned off so you can see the overlap:

This makes it difficult to do both the arm and the torso on the same layer, because I won't be able to remove where the arm fading overlaps the torso fading without also removing the actual torso fading.
Luckily, there's a simple fix: just do the arm fading on a separate layer. Do this as many times with as many layers as you need to for your particular pose. Sometimes you'll only need one or two, like here; other times you'll need several.
BUT, fading the stripes is the last step! Regardless of how many layers you end up needing, once you're done, you're done! Now you have a Na'vi with nice natural-looking striping 😸

At this point you can go ahead and merge all the clipping masks into the main skin layer and even merge the skin layer with the other-base-colors layer if you're ready!
Hopefully that wasn't too hard to follow; feel free to ask if anything is confusing or unclear. Happy drawing! 😸
#avatar#avatar 2009#way of water#na'vi#na'vi oc#my art#tutorial#yes i draw every stripe individually yes it takes a long time 😭#anyways...#wanted to make this over the holidays but then i was sick the whole time and not up to it ;w; oh well#i suppose this is also technically a preview for a new ref sheet though 👀#i have made some changes to my sona's design since making her current ref so it was in need of an update#they're not *major* changes or anything; just some minor adjustments to outfits and stripe+sanhì patterns#but enough to want a new ref#so 👀
130 notes
·
View notes
Text


I've always made use of dragon iconography, using them to represent resilience and determination. A phoenix rises from the ashes, but a dragon doesn't burn in the first place.
But I can't always be a dragon. Sometimes I do burn. And then I have to get back up again. Right now I need to get back up, so I decided to work on a phoenix pattern. I reckon a lot of y'all need to get back up too, so remember that even a tiny phoenix rises.
113 notes
·
View notes
Text
Hey someone please remind me in like an hour to start getting the mini mushroom pattern ready to share
#I got hung up on wanting to take example photos of the steps before I share it#but like. they are mushrooms! very adjustable and customizable#I can just share the pattern and add example photos later when I next make a mushroom
61 notes
·
View notes
Text


weighing my yarn mid-project like a drug lord 💀
#that's what you get for adjusting patterns#knitting#sophie shawl#also: yes. i hand wound the yarn onto a toilet paper roll
54 notes
·
View notes
Text

Nox ( I haven't drawn him in 4 years...ough... my son)
#I redesigned him a year or two ago but that's trad art so he officially was last drawn 2021...#redesign made him more avian in terms of anatomy. I like it. Also his new pattern. My old designs are rather dull in terms of patterns#his was one of the worst (just purple with random shapes splattered. Fine for a cartoonie style maybe even a bop if adjusted. Not this one)#this drawing was meant to be less anthro for practice purpoises so I lost some of his shapes (shame on me) and his friendly energy (ough)#but I did what I wanted so no real issues#art#my art#furry art#oc#furry#monster#nox#feral furry#original species#orignal character
65 notes
·
View notes
Text
i love the language of knitting and crochet i love being able to examine an item and see every step it took to make it i love items that tell you their pattern without any words
#snark.exe#crochet#knitting#fiber arts#im working on the last sleeve of a sweater i havent worked on for a long time#and its so fun to me to be able to look at the other sleeve and figure out what i did#and what bits of the pattern i had to adjust
119 notes
·
View notes
Text
God I love sewing
#the tactility the creativity the improv the steps the sequencing the patterns and constant small adjustments#the mistakes and status effects and all#I spent hours today sewing on and off and it just soothes my brain and body and hands so much
48 notes
·
View notes
Text

i finally finished my sketch-over of Gelato from the other day, and i'm happy with how it turned out :)

#Gelato#my characters#my art#i wasn't sure how far i'd get with this initially honestly...#but im really happy with how he ended up :)#i feel that i could've probably adjusted some things like the thickness of his legs. or how many fingers he had.#since i was mostly worried about going off-model from his original sketch....#but regardless i think he turned out swell#the sketchovers aren't as indepth as i probably would've wanted in the beginning. but i enjoy how it looks#i was also kinda worried his clothes would mess up his existing colour pallette. but i think i happened upon some fitting colours for him#his boards design is just one of the goopy patterns i do in paintdotnet. ive made a few of them and picked one at random#i probably should've picked a different one though because the colours distract from his swimtrunks#but oh well#his shirts design is somewhat based off the mario sunshine shinesprite shirt. i was initially going to draw the shine sprites but#when i started placing splotches on his shirt. they turned out like pawprints. and so i just pivoted to using those instead#the design on his trunks i kinda had a vague idea of like. palm trees and stuff. but ended up drawing spirals and liking that more#his hair is also a mix between what i had in SFM and how his hair actually looks in Helpers sketch
34 notes
·
View notes
Text
I made this for a friend 💀

[Image description: a cross stitch of the words 'live laugh lobotomy' in a medieval font with a top and bottom border of a skull, blue flowers and green leaves. End ID]
#craftblr#cross stitch#fibre arts#fibre crafts#live laugh love#live laugh lobotomy#designed it myself#which i'm not a fan of doing cause i question everything and need feedback from my cross stitch bestie#but I'm proud of it#used a font pattern and a skull i found in a different pattern and adjusted a flower border pattern i found
47 notes
·
View notes
Text
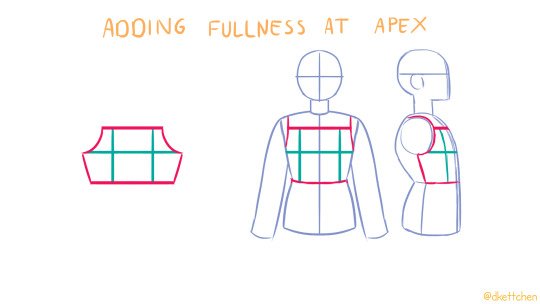
(After several weeks of pants agony that is still not quite over) I think I've finally cracked the code so
have an illustrated darts/fullness/etc pattern drafting master post!
(incl. how to take in women's tops for flat(ter) chests! among many other applications)


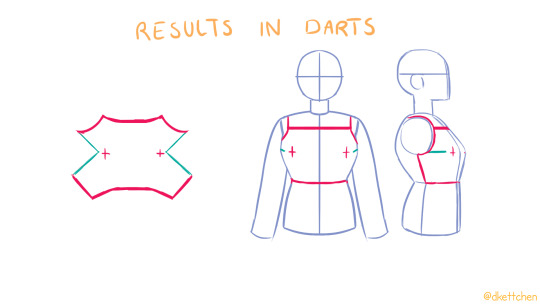

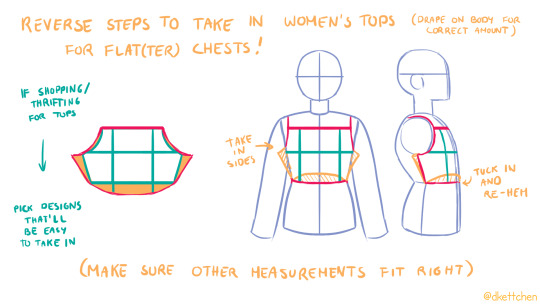
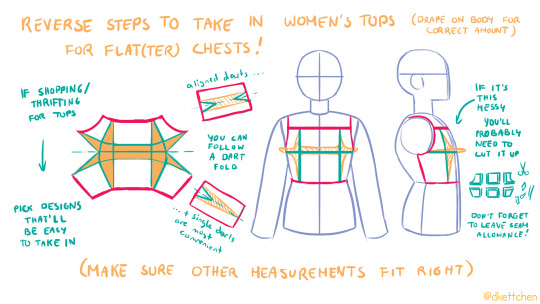


If you're interested in dart manipulation specifically, do also check out TheClosetHistorian's video on it! She shows how the pattern makes the shape using paper, and shows more places darts can go on a bodice.
#sewing#pattern drafting#hope this is helpful for other folks :)#it does require some base level of sewing skills but being able to adjust clothes & make your own patterns is HECKING useful!#if colours aren't working for anyone re colour blindness or something please let me know and I can adjust them and replace the images
207 notes
·
View notes