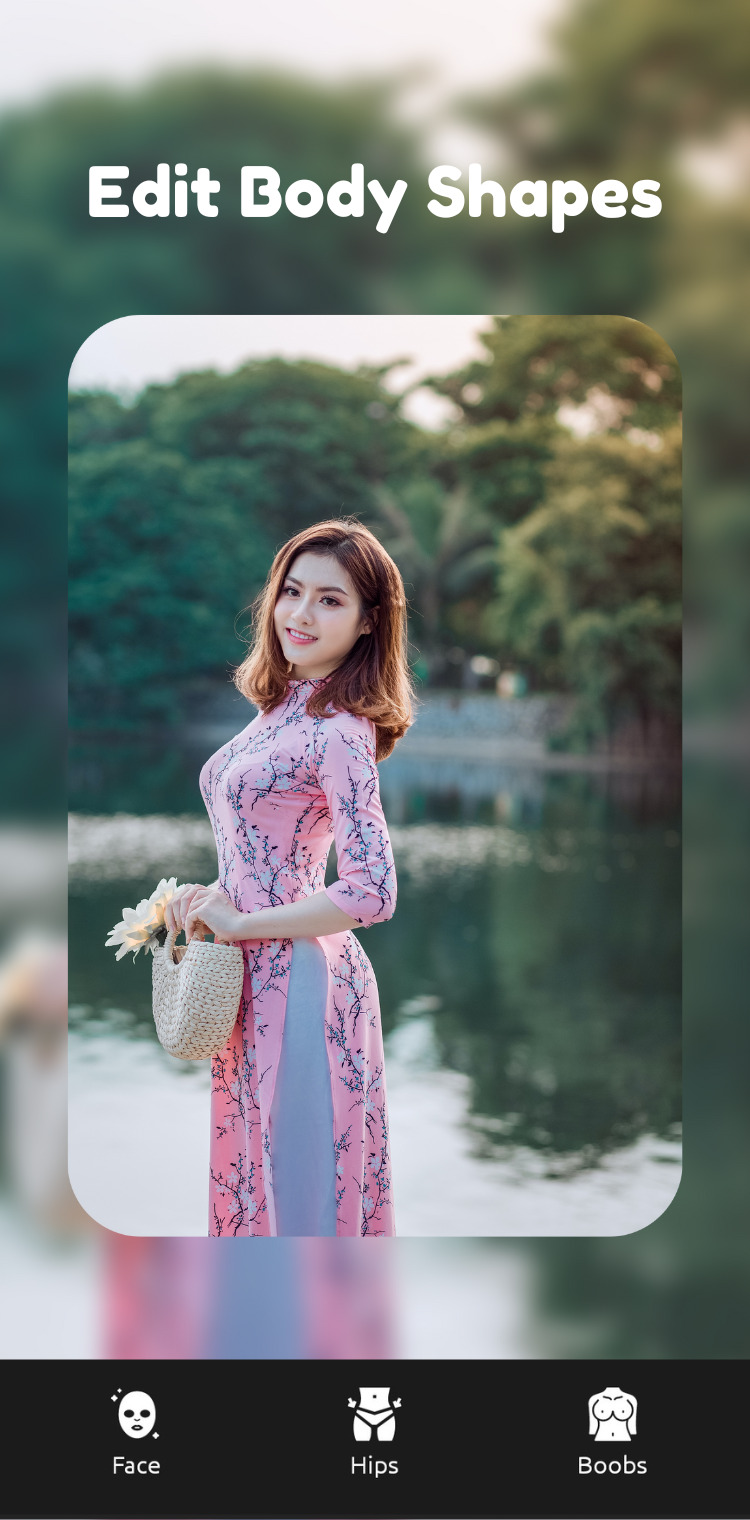
#photo grid maker
Text
#photography#best photo editing app#collage maker#photo collage maker#photo editor collage maker#collage editor#photo grid maker#collagemaker#photo collage editor#photo collage free online#photo grid collage maker#photo grid editor#photo collage maker app#collage wallpaper maker#collage editor online#collage photo editor online#collage editor app#photo collage editor app#love collage maker#photo grid editor online#love collage app#collage photo maker online#birthday photo editor collage#photo lite collage maker edit pics#pic collage photo editor#collage picture editor#collage photo frame online editor#free collage editor#photo editor and collage maker#collage app without watermark
2 notes
·
View notes
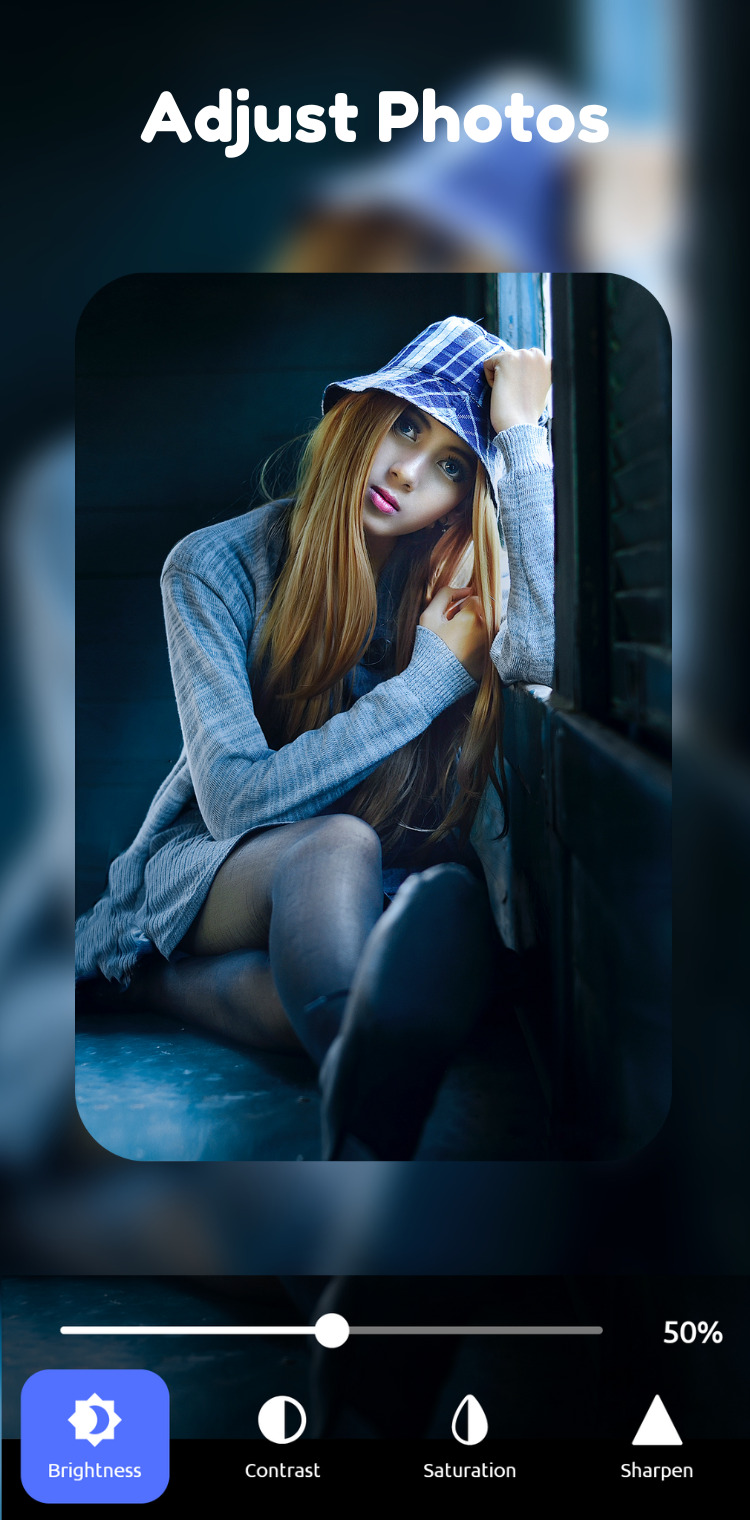
Text
#grids app for instagram free#best grid app for instagram free#apps for instagram grid#examples of instagram grids#how do you create a grid on instagram#grids app for instagram#best grids app for instagram#photo grid app for instagram#grid maker app for instagram#grid layout app for instagram#best grid app for instagram iphone#best photo grid app for instagram
1 note
·
View note
Note
top 5 pieces of bambi inspo 🎤
jfsdjjkfd couldn't look directly at this one yesterday it was like staring directly into the sun
okay deep breaths. (original posts are linked under the gifs but i'm not tagging the makers because i'm sure half of them have no interest in my unhinged bimbo lando thoughts)

1. this whole gifset from grill the grid makes me INSANE - this is my favourite bambi moment of all. absolutely nothing going on behind the eyes, brain is just the spinning beachball of death, tongue moving, mouth open, learned helplessness kicking straight in


2. festive finger sucking - the combination of the blank stare into the middle distance, being COVERED in cream and chocolate sauce (irl this level of stickiness would give me anxiety but i appreciate the bambi metaphor potential) and the way he's practically deep throating his own fingers? god tier

3. from mclaren unboxed - he's soooo pretty but there are no thoughts happening here, slow blink, slightly parted lips, head tilt ✅✅✅


4. when he forgot jesus' name - fun fact, i affectionately tagged this "is it still dumbification if he starts out this thick?" way before i ever saw the hypno fic prompt and bimbo lando ate my brain. it was percolating!!

5. and a photo to finish - this is his bambi sleep trigger phrase where the bambi personality has been triggered and he's docilely waiting for commands TO ME
#for those bewildered by bambi#it's the real-world name for the files in the hypno fic verse#anyway thanks i'm going insane now#ln4#answered
37 notes
·
View notes
Note
hello! i am a longtime huge admirer of your clothing/fashion sense, as well as a longtime backreader of your #victorian and #goth tags. i am really interested in what you've written about Victorian dress, and i am looking to get more into 19th and 20th century clothing for gender + diy craft reasons. i'm so sorry if you've answered similar questions before, but do you have any tips for where a newbie should start researching? either way, thank you thank you, your blog opens my mind wide and brings me much joy and reflection!
General research:
Spend some time searching the 'net, museum websites, and archive sites for fashion plates (such as archive.org—link leads to a date-restricted query for "fashion"—or the Smithsonian—link leads to fashion plates in their image collection). Take note of what you like, as well as which styles correspond to which decade. Karolina Żebrowska has a good rundown of English fashion over the decades.
The undergarments are what does the most work creating the necessary silhouette to make Victorian & Edwardian womenswear fit properly. If you've figured out a decade you want your outfit to draw on, doing a quick search for "[decade] undergarments" should bring up plenty of blog posts, which may or may not cite primary sources (such is the fickle nature of the historical blogosphere). Bustle pads and sleeve supports can be purchased or made; they're both pretty simple, and tutorials abound.
Purchasing clothing:
Reproduction made-to-measure clothing can be readily found on etsy, but can be in the several-hundred USD range. I've had some luck finding vintage reproduction clothing (like, a skirt someone made by hand in the 1980s to a 1900s walking skirt pattern), which tends to be much cheaper.
Men, women, and children wore stays and corsets. As far as I know, Orchard Corset has the cheapest OTR corsets that are good quality and safe to wear. If you get a corset in the style of a specific decade handmade or made to measure, make sure that the seller tells you what the boning material is, what construction the boning is (spiral steel is sturdiest and most flexible), how many bones there are, what the corset material is, &c.—otherwise it's an indication of an unserious maker. Follow general advice for wearing corsets at a waist reduction (lace up slowly, break it in, &c.).
Antique Menswear on youtube gives a lot of good, practical advice for wearing late 19th-century and early 20th-century men's clothing (including where to buy reproductions and how to treat them, how to modify modern shirts to 19th-century standards with basically no sewing skills, &c.).
Actual antique clothing can be found and purchased online or at estate sales—usually in very small sizes, but I've seen Edwardian skirts and petticoats in an XL (also a small size, but...). You can also just simply browse this kind of thing for inspiration and save photos of anything you think you'd like to recreate.
Even clothing that was not "meant" to be worn by re-enactors can be clearly historically influenced (e.g. the huge boom in Victorian- and Edwardian- style blouses in the 1980s), so keep an open mind when shopping for vintage clothing! A lot of 1970s dresses that look "hippy" on their own can look very Victorian with the right undergarments and an updo. A lot of 1980s men's trousers also approach the right silhouette for the 1910s-inspired three-piece suit I'm trying to put together. Witness also the recent trend for big puffed sleeves!
Making or modifying clothing:
Victorian and Edwardian manuals for garment drafting and sewing can be found online—go to archive.org and search for "sewing," "drafting," or "dressmaking," then use the filters on the left to chuse which year(s) you want to see results from. Most of these have patterns that are sort of vibes-based: The work-woman's guide is one manual that claims to have patterns laid out strictly according to a grid.
I don't sew garments, but if Victorian pattern-writing for sewing is anything like it is for knitting, that may not be super useful. People do sell updates and graded 'translations' of antique patterns (which tend to be written in only one size) on etsy and ebay—just make sure from the description that it's 'deciphered' and translated rather than a scan of the original pattern!
One of the easiest things that you can do to add some Victorian or Goth flair to an otherwise plain-looking garment is to add trim. You can knit, crochet, or tat your own trim from Victorian lace-making patterns; purchase antique trim from resale sites; or buy braided or lace trim very cheaply at any craft store. Trim doesn't just have to go around the hems and cuffs of a garment: lace "insertions" between two pieces of fabric, as well as raised geometric patterns over the surface of a garment, are common in 19th-century clothing.

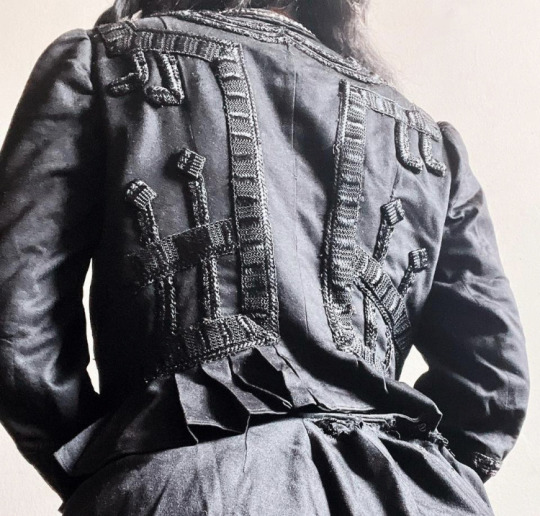
[ID: first image shows a black overdress showing lace insertions between strips of fabric of equal width, creating a striped effect. second image is the back of a black blouse with trim in a geometric design centred around right angles and parallel lines. end ID]
Jewellery (women's and men's):
Actual antique jewellery (including men's jewellery and fastenings) is not as expensive as you might think. Even if you're not willing to spend a lot of time learning what to look for and scouring estate sales for people who don't know or care what they have, late Victorian mass-manufactured costume jewellery often goes for sub-$50 or even $30 prices at auction on ebay (USD, in the US—in my experience it is even more plentiful and cheaper in the UK).
Specifically, I've lucked out with lots ("lot" as in, a bunch of small things being sold together) of "vintage men's accessories" going for $20 or so that contained Victorian cufflinks (in low-karat gold, mother-of-pearl, and jet), collar studs (in low-karat gold and base metals), and shirt studs (in low-karat gold, with garnets and seed pearls, &c.). Searching for lots of accessories is generally a good idea since by and large people do not know what these things are... but if you're willing to spend a little more for something that has been identified and is more likely to still be with its set, use the specific search term for that item (e.g. "antique collar studs").
Answers to Questions About Old Jewelry (though aimed at estate sellers and, if memory serves, full of regrettable pæans to Queen Victoria) is a good reference text to dating antique jewellery. I also recommend Miller's Illustrated Guide to Jewelry Appraising. Both of these texts are available on libgen.
Feel free to ask me follow-up questions if you want more detail on any of these points. As you can see I am perfectly happy to blather away on this topic
83 notes
·
View notes
Note
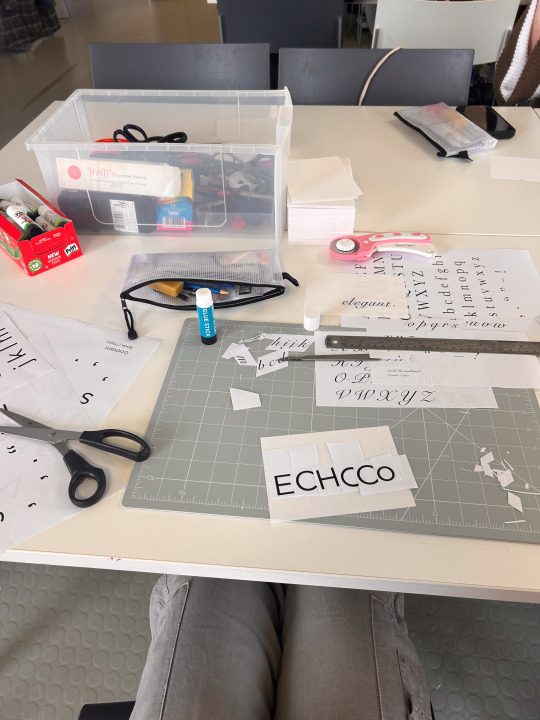
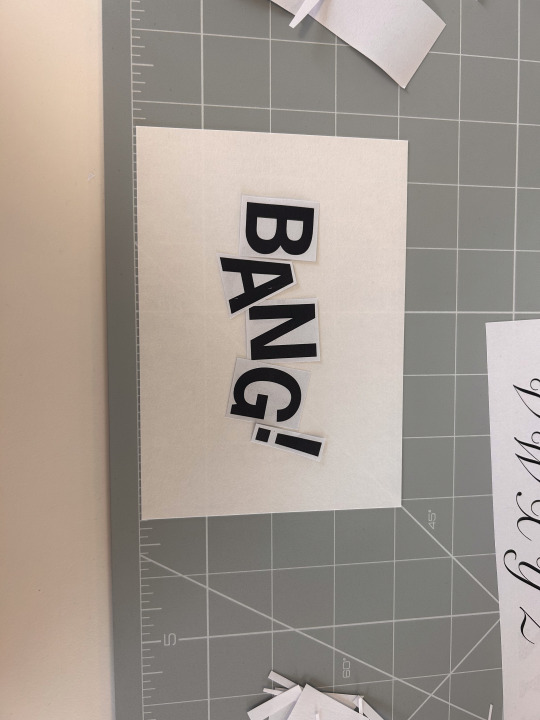
Sorry if you’ve answered this question before, but how do you make your gifs?
With an outdated version of photoshop and a lot of patience 😤
my messy process under the cut
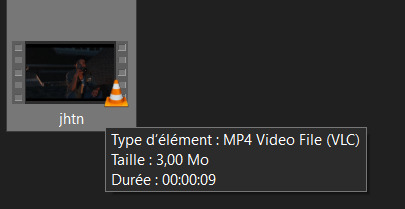
let's say i have this movie downloaded in .mp4
i open it in windows movie maker - or any other software that lets you do quick and easy edits and whatnot but me i use wmm even tho it's obsolete i knoooow leave me alone - cut the scene i want to gif out and save it into this tiny little file
then i open photoshop and go into import > video frames into layers
(i may be a little bit off in how things are called on PS in english, but they should be in the same places anyway)
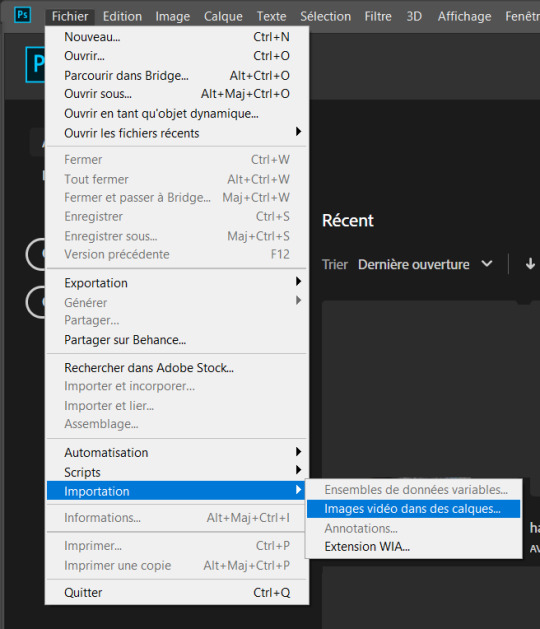
this little popup will open

since my file is exclusively the thing i want to gif i don't need to bother with the little arrow-ish things underneath the video player, they're there if you need to shorten your thing or like cut into it.
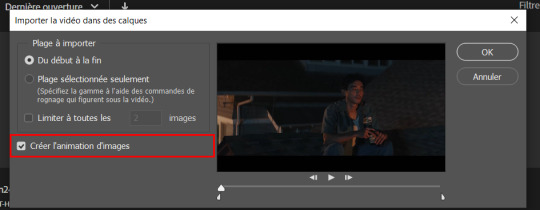
this bit here needs to be checked like this, it'll set up the gif animation or whatever. so yeah then click Ok
bim bam boom photoshop will open like this
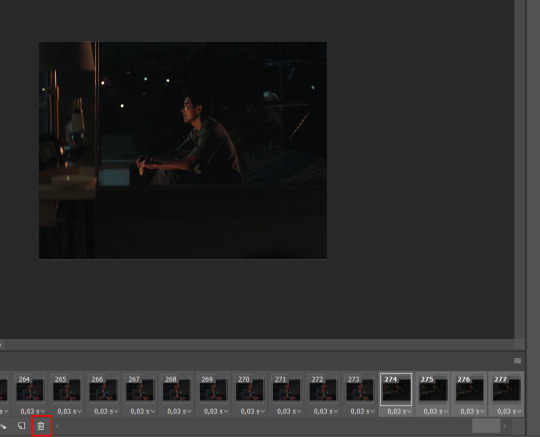
big scary image with many tiny scary images, so first of all what i do is get on the cropping tool

this will show up in the toolbar up top

and in there you set the dimensions of the gif,
1 gif in a gifset that takes up the whole post has to be 540px wide
for 2 gif next to each other it's 268px wide and i can't remember 3 by 3 but i never do that so whatever who cares.
once you've set up the dimensions you want, you got this grid thing to move around and set however you want it to be
and then you wait as it painstakingly takes its time to do it
boom! it's done!

so that's your gif raw and unprepared without any filters or whatever, no length, no speed, nothing!
down there you've got the frames of the gif, depending how long is it'll be either a lot or very very short, in this case it's 277 frames, so already you know it's not gonna be just one gif but probably two or three - which i knew btw that's on purpose!!

first thing i do when all the cropping and setting up is done is scroll all the way through the frames to see if there's a bit that won't make it into the gif, and here, there is

these last four frames show a different bit of the scene because i cut shit very messily and don't check before opening photoshop but you know! trust the process! so make sure to select the unwanted bunch and delete them
so now hurray the gif is 273 frames and it's only the one scene i want

and now the fun not fun starts!
to the right you got these, the layers
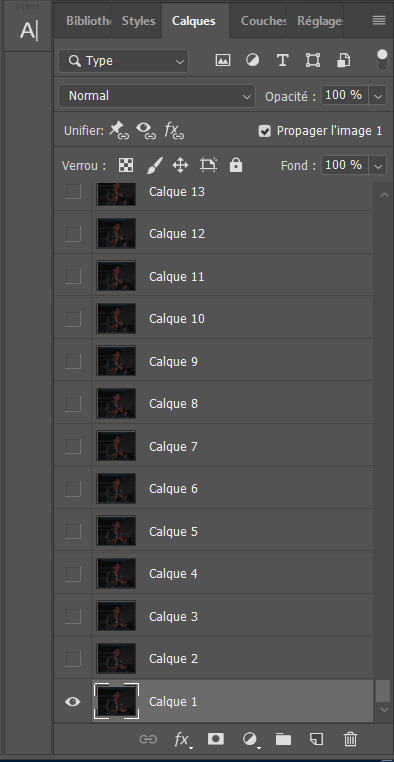
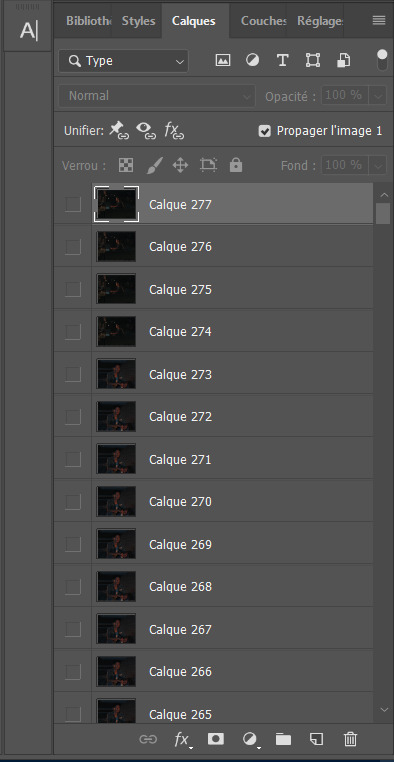
so you gotta scroll all the way up and NOT forget to click on the very last layer before you start playing around with filters and all that

this little guy right here is my bestien he's the only one i use when editing gifs, fuck everybody else on that row. when making gifs i mostly just use a combination of those three things, brightness/contrast, vibrancy and photo filters
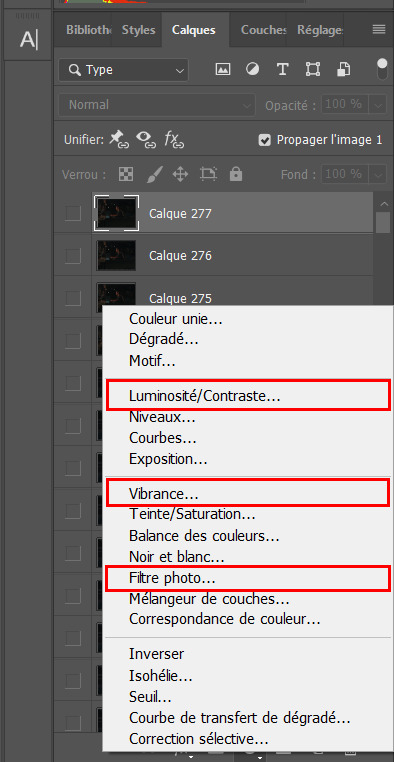
so anyway, let's fool around with those little things and make a gif
(i realize now the scene is very dark and it will look very ugly but never mind! we carry on) so there a bunch of random settings added - you gotta make sure they are all the way on top of everything or else they just won't appear on every single frame

what i do then is probably very stupid and there's probably a better way to do it, but MY PROCESS, so i divide the amount of frames i've got by the number of gifs i want to make in a set, so 273/3 that's 91 (thank you google), so we look back down at the frames
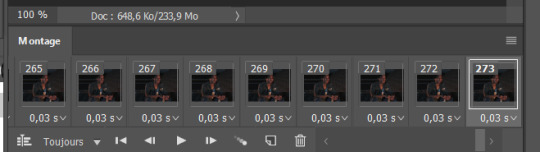
and then scroll aaaaaalllll the way back to frame 91 (if you hold shift and use the wheel it'll be much faster) and while still holding shift pressed down click on frame 92
that will select every frame from the last to that and we delete that shit

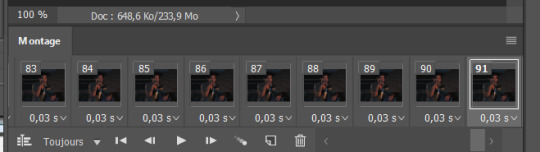
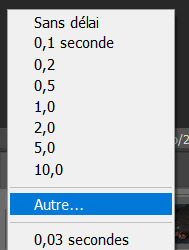
so now we only have 91 frames and that's one gif. so let's save it! but wait, no you forgot to do something!
see the 0.03s? that's the gif speed or whatever, idk how it works but 0.03s is too fast, me i usually use 0.05s so what you do next is select every one of those frames you've got left and click the little pointing down arrow, that'll open that

click Other... and then set it as the speed you want
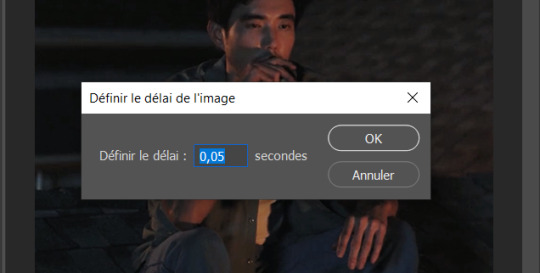
ok so your gif is at the correct speed NOW you can save it
so it's file > export > save for web
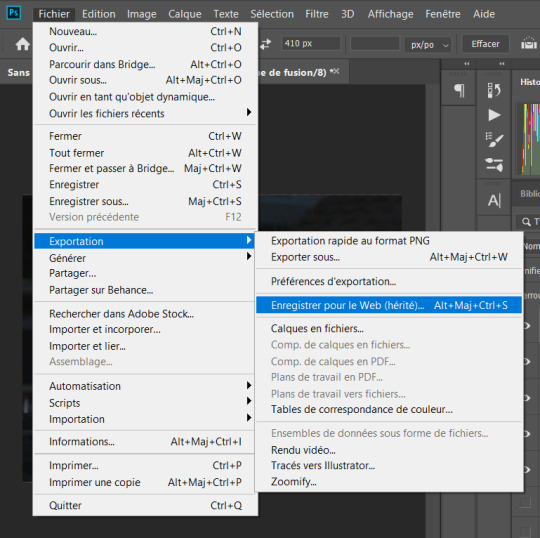
this new popup will appear
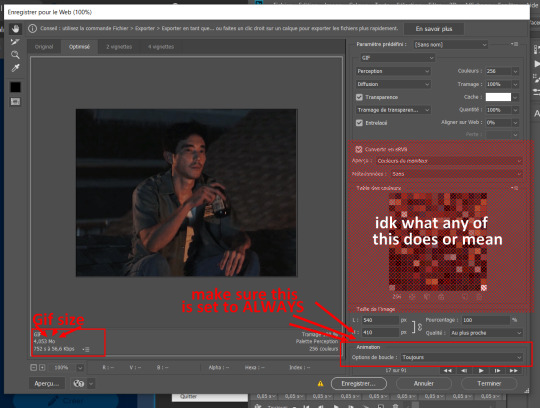
currently as of 2024 gifs can't be bigger than 10Mb/Mo, this one is 4mo

so we're good we're fine. so then you just click save, name the file whatever you want and VOILAAAA, a djeef!

(and then undo the delete and repeat everything for the other two gifs you'd want to make in that set)
7 notes
·
View notes
Note
I couldn't choose just one!
1 + 15 for the WIP ask game if that's ok!
Also, what do you use for a moodboard maker? I have no idea where to get such even square photos lmao.
one is right here, and fifteen is right here :))))
since i've already answered those two, i've outlined how i make moodboards below the cut :)
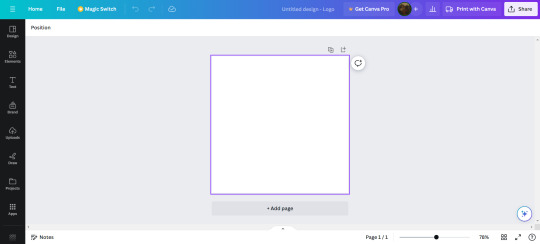
beforehand: find your photos! i use my cousins canva account (i'm a lil leech), but it's free and generally works pretty well :)
1. use a square, blank canvas
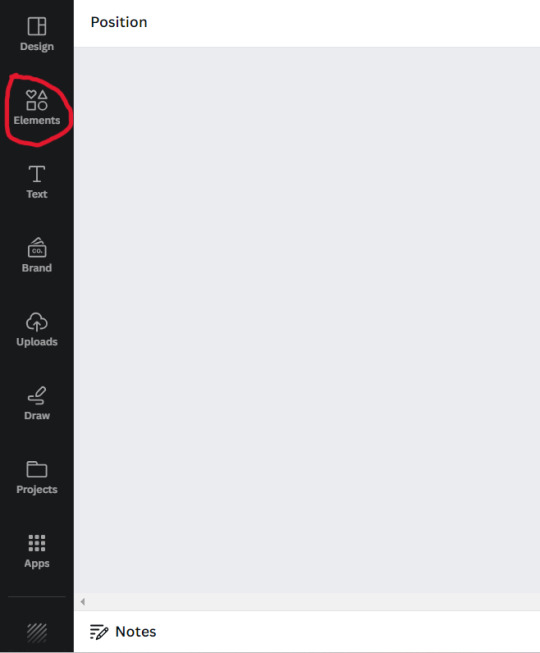
2. go to 'elements'
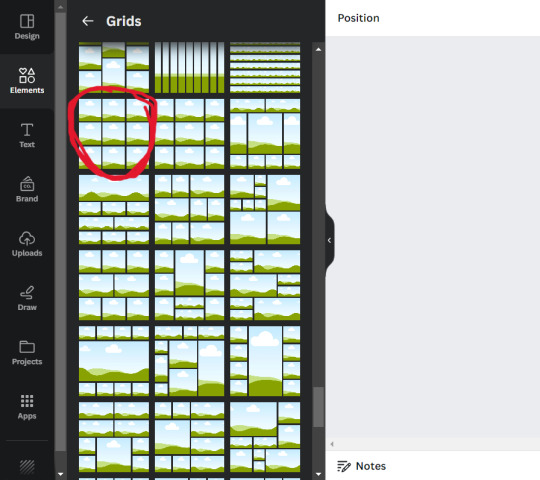
3. scroll down to 'grids'
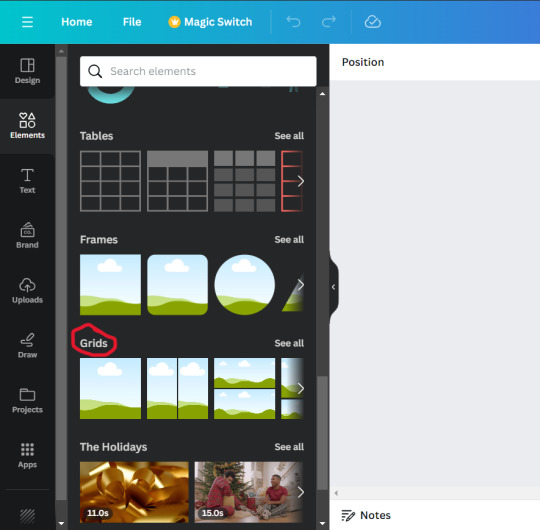
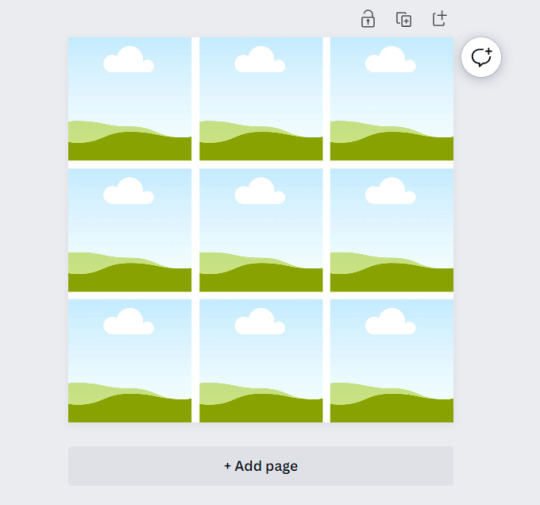
4. scroll through grids until you find one you want and click on it
5. ta-da!
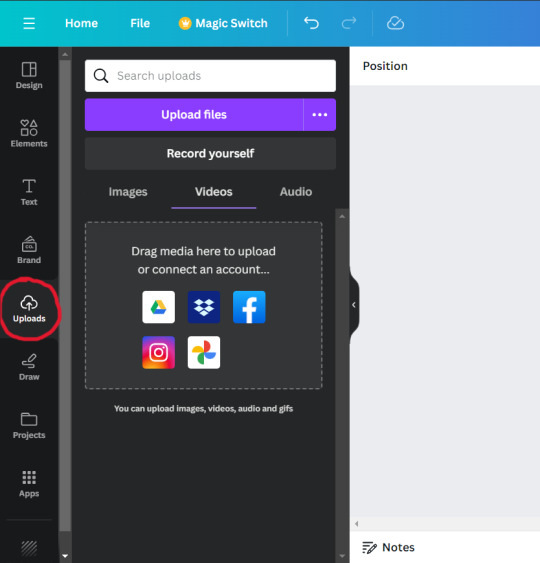
6. go to 'uploads' (mine is on 'videos' because there's pictures of my family in 'photos' lmao) and click 'upload files'
7. choose the photo(s) that you want
8. there she isss!!
9. move the photo into the box you want it to go in (you can right click and choose the 'detach' option if you change your mind, although i don't show that here)
10. do this as many times as you want
and you're done! this is how i do the moodboards (i'm pretty sure) you're talking about, if you have any questions let me know :)
#rie answers#idk this is just how i do it#which i learned from my sixteen year old cousin when i was babysitting her fun fact so thank her ig
4 notes
·
View notes
Text
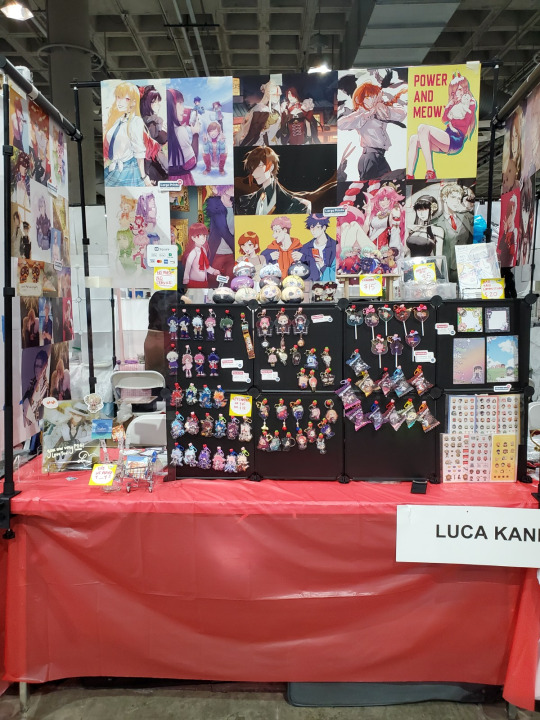
AX ‘22 Con Report
I tabled at AX with my friend (no public social media) last weekend!! I’m sure most people saw tweets about how awful the artist alley conditions were lol... I’m doing this writeup mostly to reflect how sales went + for my own reference but I will also cover con organization, how it felt inside re:safety, masking, AX staff/volunteers. FYI this is very long as it’s a sort of blogging recap with lots of photos.
Here’s our booth! 👇
Day 0:
Setup day! I forget what time Kentia Hall opened for setup but we got to the convention center at like... 4:45-5PM. Getting into the loading dock (a garage directly connected to Kentia) was pretty smooth, luckily since we arrived a little late there was no wait for other cars ahead of us. A con center staff (?) driving a forklift gave us a cart to put our boxes etc. on.

We weren’t allowed to park our cars in the dock, so my table partner had to go repark her car after we wheeled our merch to the Kentia rear entrance.
Here’s what the loading dock looked like (this was from Day 4, so it’s pretty empty).
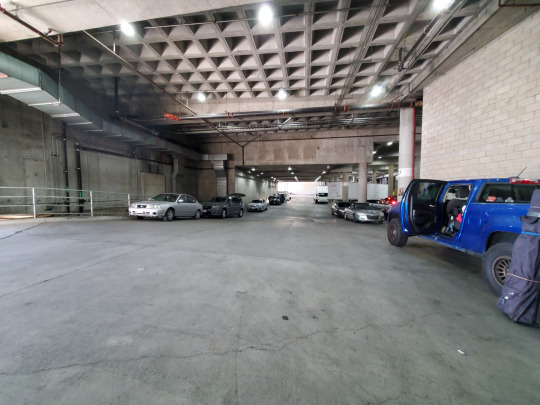
Directly to the right is Kentia Hall.
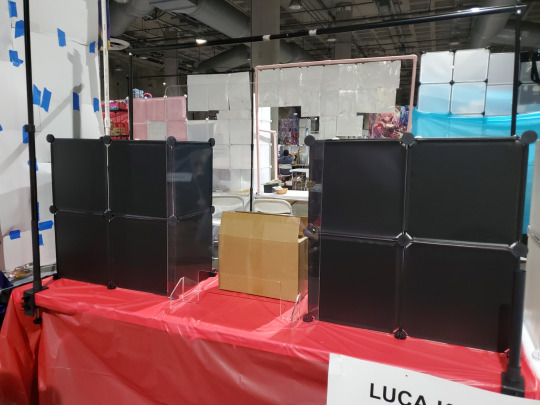
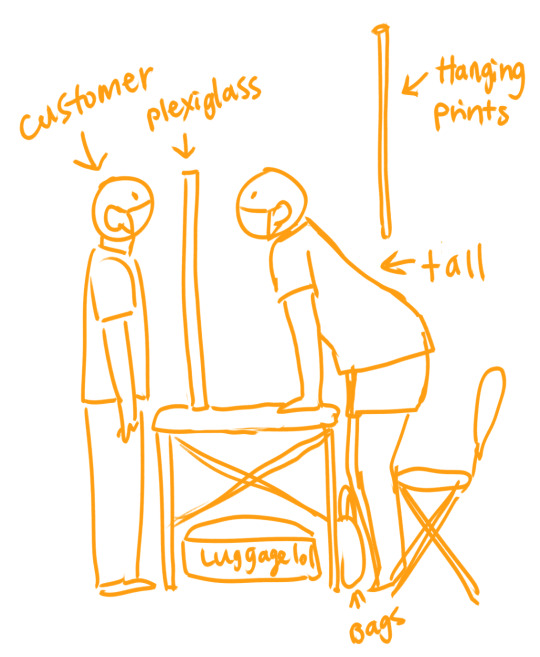
Fortunately the staff at the Kentia entrance (between the loading dock and Kentia, normally closed during convention hours) was also doing COVID checks, so we got our COVID wristbands right off the bat. Setup took the entire 3 hours until 8PM. We didn’t finish either, but we got the basics set up (photo display stand for large prints, grids for charms/small merch). We just needed to add our side hanging prints (medium and mini prints) via a clamp-on side arm.
I don’t think AC was on, so we were kinda sweaty and also tired/hungry from the 6+ hour drive down.
Here’s our original setup; we decided to move the “window” to one side so there’d be no break in our display (easier for customers to see all our merch at once). This is because we didn’t evenly split mine vs. her merch LOL. Other artists often keep their own stuff on one side if they split a table. Also we had a plexiglass screen because we were paranoid about non-maskers breathing on us. Neither of us got COVID from the con so I like to think it worked!
Day 1:
We tried to get to the con by 8:30 AM so we could get convention center parking and finish setting up before 10 AM (AA open) but there was a literal car accident + one that happened 30 feet from our car on the street leading to the parking garage 😑 My table partner had to drop me and our neighboring table (also part of our Airbnb) friend off on the street so we could walk the rest of the way inside lol.
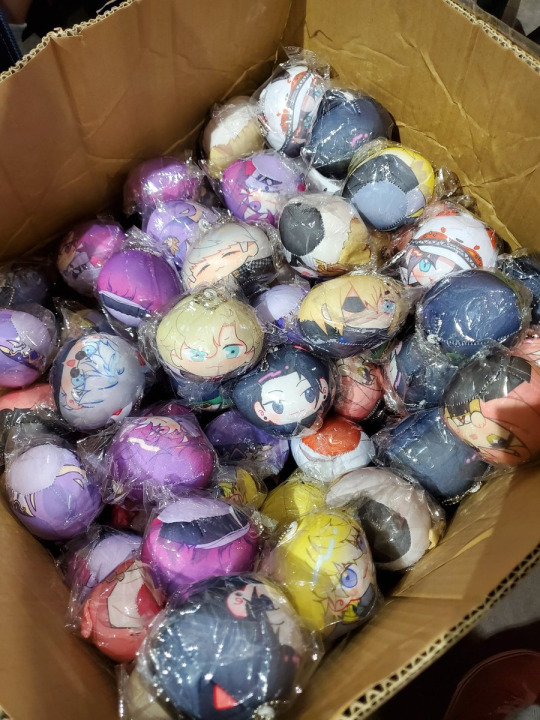
We were both wary of customers stealing our display charms so we pinned our charms through the grids, then secured them on the back. We tugged on each charm to make sure they didn’t come loose.
Here’s Anya, my best-selling charm (or about tied with my Jack Frost charm). My memey-themed merch sold the best lol (not a surprise for me). The pin was stuck in there unless you really yanked it. Also, we used black grids because the contrast really makes the charm colors pop more (vs. white or a corkboard). We got the idea from our friend who uses black canvases.
Some more pics of my merch (and our display in the background). You can see we had a Square payments sign + NO MASK NO SERVICE sign (we forgot to print one but the sticky note was enough). We used the top of the grids to display more 3D items like omanjuu plushies (we used two-tier displays from Daiso, inspired by Hinamatsuri displays), acrylic standees (a mini wooden bench from Daiso again), and my bargain bin (old charms) box. We tabled at Fanime in May and all our stuff was directly on the table, which was low and hard to see. Added height lets people see your merch from farther away.
Personally I wish we displayed our stickers better but we kinda ran out of space. They’re not the main money makers anyways (charms and prints are) but oh well, they’re easy to ship/sell online.
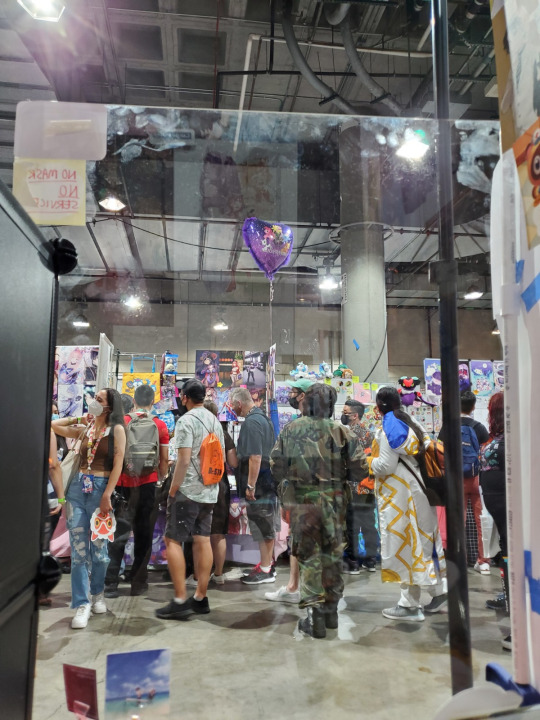
And here’s what it looked like on the artists’ side:

AX volunteer staff is pretty strict about making sure the walkway is clear. Every few tables had personal trash cans, though whether they were emptied or refilled with another plastic bag was kinda dependent on luck...? Most of the time we just had our own personal trash bag we brought and disposed of after closing each day.
Luckily the volunteer assigned to our strip was SUPER friendly and nice. She stopped by our table every day starting Day 2; she reminded us to eat and stay hydrated because another artist had passed out on Day 1. I think actually more than one artist passed out in AA during the entire weekend 🙃 CO2 levels were off the charts especially on Days 2 and 3.
I didn’t get a photo of the actual back of our display, but we had organizers inside our grids so we could store handfuls of charms for quick access. In the past we’ve just hunched over and dug through our giant luggages to find charms when customers asked for them, which REALLY takes a toll on you and your back. We finally learned this year 🤡✨ You can see it jutting out in this picture. You can also see my medium/mini prints hanging (all taped) from the side arm.
We had an open box full of unorganized omanjuu plushies between our table and our neighboring table since we did a group order together. Most of the time I helped dig and grab them when customers wanted to buy them. It was kind of hard in the beginning because my table partner and I had 4 blonde characters LOL but we didn’t bother organizing them because they took up too much space and were too light (like packing peanut light) so they fell out of containers easily...
I would say the only downside of our main display setup is that one person (me) is always hidden by the grids, while the other artist is stuck doing customer service. To talk to customers, I had to stand up on my toes to talk over the grids, and it was uncomfortable because I also had to avoid our large prints that were hanging directly behind my head (when I stood up).

I think I generally had a more enjoyable time at Fanime because I was the one doing the majority of customer service, so I got to chat with customers more. AX I was mostly just... chilling... also there was no service and I couldn’t get onto the AA wifi because it was at capacity (people were sharing the password with their non-AA friends :) ).
This is also when we realized while the plexiglass kept us “safe” from people breathing on us directly, it was also REALLY HARD to hear people. Voices are already muffled with masks on, and cons are LOUD. The plexiglass was thick so we literally could not hear almost every single customer. We either had to ask them to speak up multiple times or we straight up asked them to talk over our grids so we could hear what they wanted to buy. The latter making the plexiglass useless...
It was also tougher on my partner’s back because she’s 6+ inches taller than me (and was wearing heels lol). For me I just had to stand up taller, for her she actually had to scrunch her back to dodge our prints.
Here’s what it looked like from the Customer Service chair:
Anyways Day 1 sales were slow... even compared to Fanime 1 month ago it felt pretty slow. Not a huge surprise since it’s Day 1, most people will browse AA on Friday and then make purchases later during the weekend UNLESS you’re a super popular artist and people want to get your stuff before things sell out. Unfortunately neither of us are at that level lol
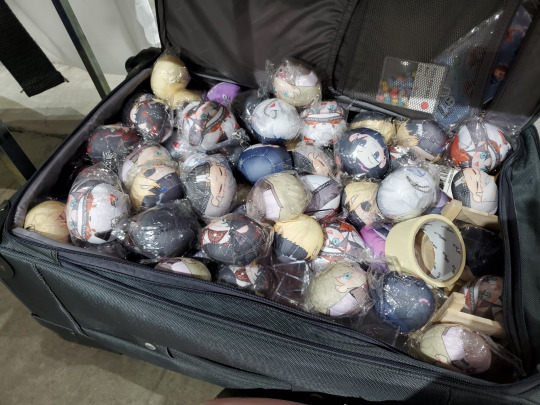
Also here’s a photo of my luggage under the table. This was taken on Day 4 during takedown so it has all the manjuus poured inside LMFAO
AC was either broken or on energy-saving mode (according to some staff?) this day so it felt like A SAUNA. It was humid and stifling. I was fanning my partner and my neighbor with an empty portfolio and shikishi board to help keep them cool. I didn’t feel terrible since my house doesn’t have AC (so I’m used to it) but it was NOT comfortable. This is the day that staff at the South Priority Entrance (for vendors, exhibitors, Artist Alley) apparently had miscommunicated instructions and were confiscating coffee, drinks, snacks, food from everyone. Luckily they hadn’t checked my bag when we got in in the morning, so I had snacks (KitKats, dried apples) and bottles of tea, but we didn’t eat lunch until 4PM (table partner and I split food truck fries).
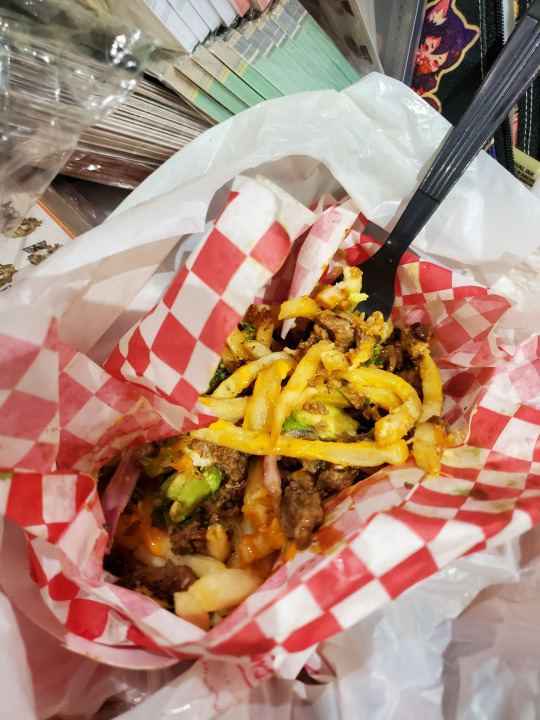
Maybe it was the hunger but these fries were so so so good lol.
Day 2
We expected to get the most sales on this day but sales were also really slow considering it was Saturday... My partner also has tabled at AX multiple times in the past, and she said sales were disappointing for her standards. We wondered if it’s because we were at the back of the hall.
I think my most popular mini print from Fanime (ACNH Timmy and Tommy going “Poggers!”) didn’t sell as well because it wasn’t directly in customers’ faces. At Fanime it was right above the seller’s “window” so while customers waited for me to grab inventory, their eyes would wander and immediately see it, then add it to their purchase. Or they’d see it front and center when they passed by the booth. This time we kept all smaller prints on the sides, so that may have impacted sales. It still sold the best out of all my prints though, but it didn’t sell out like it did at Fanime.
AA conditions-wise were better from Day 2 onwards, but it’s a fact that the AC is not strong in the back of the hall. It’s strongest at the entrance. I did fan myself during Days 2-4, Day 4 was the most pleasant because crowds were much smaller lol. Trying to get through or leave AA on Days 2-3 were a nightmare because of how jampacked the aisles were. Usually I would walk through the artist walkways just so I could avoid the crowds (at least 30% of whom were unmasked 🙃). Honestly it’s a miracle I didn’t get COVID considering how many bare faces I saw!!!!!! After attending Fanime, where it was like 99% mask policy adherence, AX crowds gave me hives... I take Norcal Bay Area masking for granted...
I think...? Because CO2 levels were so potent, I didn’t feel productive or want to draw commissions. At Fanime I took over 30 commissions across 3 days, like I was pumping them out every 20-30 minutes. At AX on Day 2 I took down my commission display and didn’t bother putting it back up until the next day because I just wasn’t in the mood. And it didn’t have anything to do with how much sleep I got (or lack thereof), I was not sleeping well during Fanime either lol. But 🤷♀️ who knows. Luckily I didn’t experience nausea, fatigue, dizziness, or headaches like other artists did. My table partner complained of headaches but she also does require more sleep than I do.
Day 3
Sales were the best on this day! By this point I realized I didn’t really draw enough popular series, but ngl I don’t care much about drawing popular things just for sales. My partner’s Luxiem/VTuber merch was selling like hotcakes.
Okay I’ll just speed through the rest lol
Day 4
I was hoping for a lot of last minute sales on this day but it was kind of slow. Overall AX this year was fairly slow for a lot of artists; I talked about it with other artists and friends who were tabling and we all agreed our sales were lower than we’d anticipated. Like we did well but it wasn’t as high as we wanted; we definitely ordered more stock than we needed to.
AA closed at 3PM, and we were hoping to finish takedown by 5PM. Unfortunately after we’d packed everything up + my partner had helped pack away some of her out of state friend’s boxes into her car... things got really disorganized and confusing.
So my friend had parked in the Venice Parking Garage which is directly across the street from Kentia Hall/the south side of the convention center. The street between the two buildings was filled with cars and PARKED trucks. So normal cars that were exiting the garage were stuck and couldn’t move. No AX staff bothered to explain to these cars that the trucks were Exhibitor’s Hall trucks, and they were parked and waiting for the corporate vendors to bring their stuff down. My friend was stuck on that street for like... 15-20 minutes I want to say. I was stuck in a pretty much empty AA at 6:30PM with way too much stuff for one person to carry. The loading dock that I mentioned earlier in the post was also blocked off.
I briefly went outside to take pics of the street outside the loading dock (the street that my friend was trying to turn onto, so that we could pack our belongings) so I could show her what the holdup was:
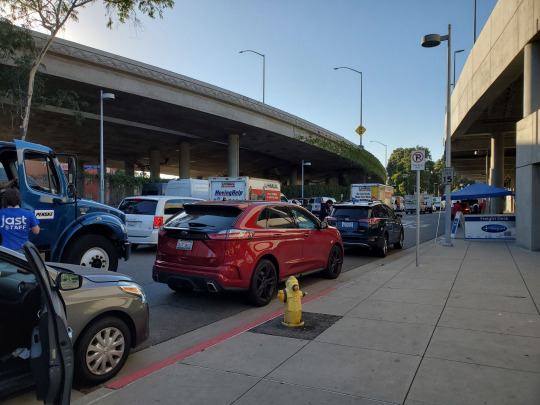
All the trucks and cars in the middle/left lanes were parked. Driver-less. lol.
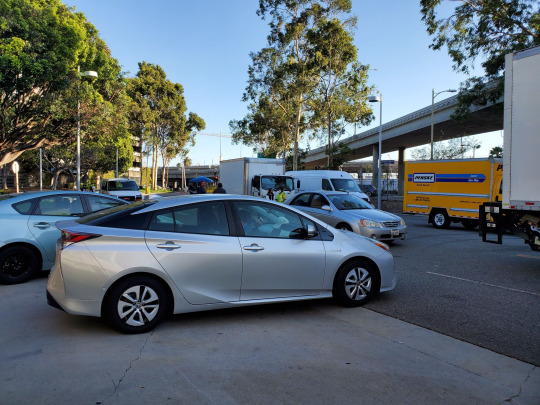
These were cars trying to exit the South Parking Garage (directly inside the con center).
After I sent these pictures to my friend I ran back inside AA, noticed a forklift had kinda haphazardly discarded/dropped two rolling “carts” at the end of the aisle, and realized I was gonna have to grab one and put all our stuff on it if I wanted to move our belongings relatively quickly. These didn’t have handles, just a legit rope tied to it that you had to pull LOL
I felt kinda bad because there was an artist who had been sitting at her table for hours by herself, literally SURROUNDED by luggages. We started talking and it turns out she was confused because her boyfriend was in the same situation as my partner, stuck trying to get out of the parking garage. I told her she should grab one of the rolling carts to start loading her stuff too, since there were two that had been left a couple tables away from us. I didn’t wanna wait for a forklift because we had dinner plans lol.
Once I managed to wheel our stuff outside, I was still pretty lost on what to do, because my friend was around the corner and as versatile as the “cart” was, it could not go over curbs. Under the platform, there were two little mini wheel things on each end. They were not affixed so our stuff actually fell off when I tried to go up one curb (it was smooth but I made too sharp of a turn). Just imagine these things but more industrial looking
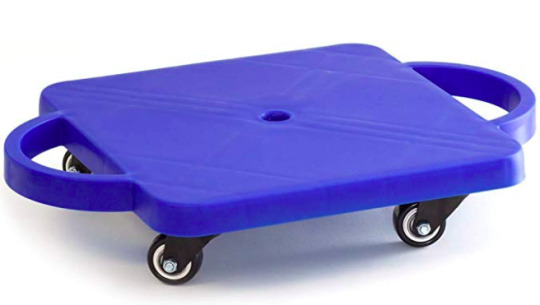
Two of these under the platform here 👇 on both ends
Another artist who was loading their car asked me if I needed help and I said I wasn’t sure since my friend was stuck on another street (literally like.... 200 feet away). They were kind enough to explain the situation, so I relayed it to my friend via Discord (basically, talk to one of the security people, explain that you’re an artist and not exhibitor’s hall vendor, and they’ll wave you through).
So yeah this was a pain in the ass and very disorganized but at least we made it to dinner on time-ish...
Now on to general sales stuff:
Neither of my partner and I sold that many large prints, which was disappointing because 1) large prints are HEAVY and a pain to carry back home, 2) usually she sells a lot of them; large prints are good money-makers because the margins on them are really good. Of my prints I expected my Tokyo Mew Mew and Ib prints to sell the best, but disappointingly I only got 1 buyer for my TMM print 😕 It’s a little disheartening because it’s a nostalgia print, I put the most effort into it, and the reboot anime is now airing... but I guess AX was a few days too early, or I didn’t have it up front and center. I ordered 25 of them, definitely ordered too many.
Meanwhile my Power and Meowy print sold the best (14-15 sales, I ordered 20 which was a good amount). Which is funny because I put the least amount of effort into it; I literally was speed-shading her shirt at 4AM on a workday because the print order deadline was that morning. It was also an “eh this sketch can be a simple large print, let’s bank on Power’s popularity for this to do well” and it did! 🙏 What is a little weird is my partner’s Makima print didn’t do as well as she expected. She said she sold a lot of them at ALA earlier this year... I noticed my mini Makima print also didn’t do that well (I got like 4 sales). I’d wonder if it’s because Makima is controversial but people were buying my Makima charm (more people got my Power charm though).
My second-best selling print was Ib (7-8 sales, ordered 20)! I got more buyers for it on Day 1 and 3 iirc. I was pleasantly surprised because like the Power and Meowy one I was literally rush-coloring parts of it the morning of the deadline. Like actually it made me late to work lol. It’s actually unfinished 🙈 but it’s okay no one knows that...
I didn’t sell any of my P4 large print but that was to be expected because it was a last minute decision to print it; it’s old.
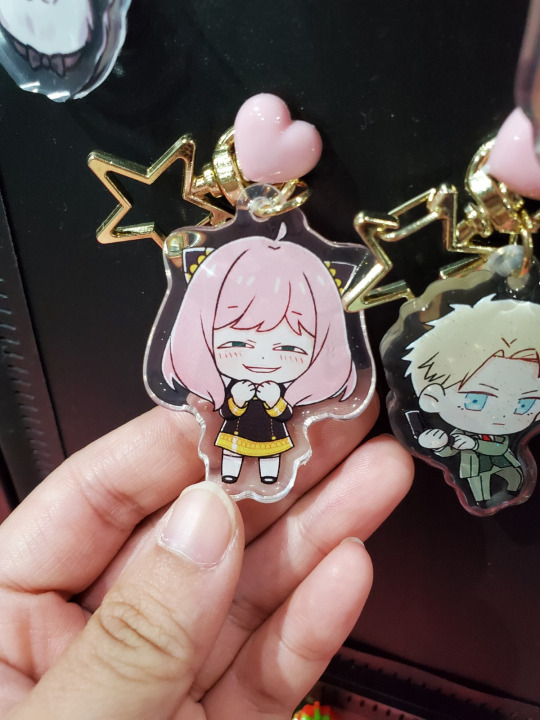
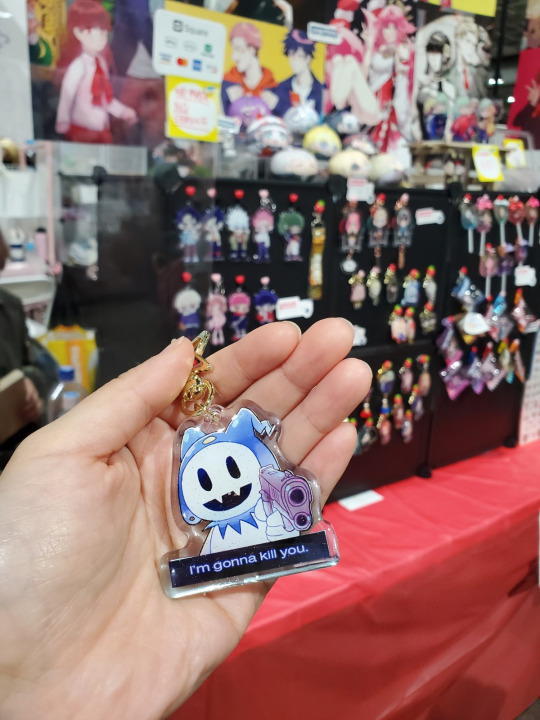
Charm-wise my Anya and Jack Frost “I’m gonna kill you” sold the best by far. I think in general, memey merch sells really well since people think it’s funny and want to show it off to their friends. So if all else fails, make some memey merch to ensure sales ^___^..... Surprisingly, people were not buying my partner’s SpyxFamily charms though, even though we placed our SpyxFam stuff right next to each other. It’s probably because her charms were huge, like 3 inch long/wide Christmas ornament size. It’s a shame because they came out super cute and had a cool transparent effect... But yeah, a lot of people bought my Anyas or the entire family set. I had two customers ask for 3-4 Anyas in one purchase which made me o_o LOL. I think it’s because I drew Anya’s iconic smug face on one side.
A couple Dimileth people came out of the woodworks to buy my Dimitris which made me happy... also what surprised me was that NO ONE bought my Felix charm, whereas he was my most popular charm at Fanime. Really goes to show how demographics differ depending on the con. Most people bought Hilda and Hubert at AX... these are also my slightly messed up charms from a second charm order in early 2020, right at the start of the pandemic (so the manufacturer messed up on clasps and print quality was inconsistent). So I really wasn’t expecting to sell any of them lol.
Another disappointment: I don’t think I sold a single lollipop charm all weekend... and I really expected them to sell well :\ I checked in with our table neighbor and she said only her Anya lollipop was selling, the rest of them weren’t getting bought at all. We found this kind of weird since lollipop charms aren’t super common yet, so we expected they’d do better LOL.
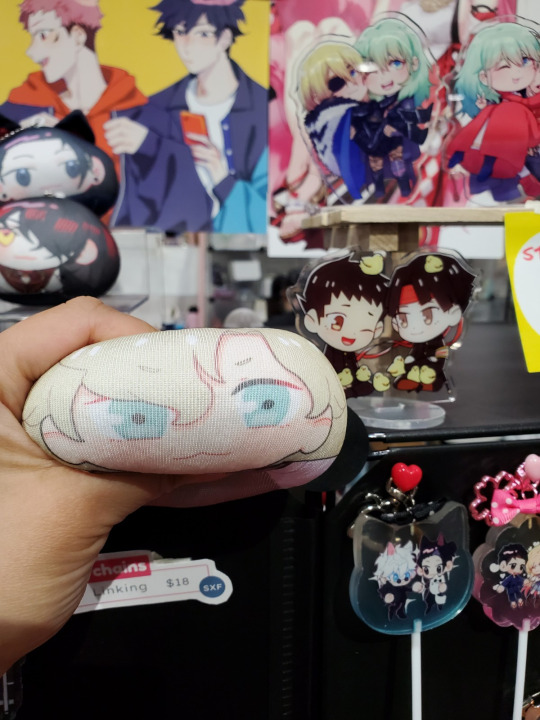
Bad photo of some of the lollipops:

On the flipside my partner’s candy bag charms were selling like crazy, but then again they were all Luxiem streamers so... her Gojo/Geto candy bag didn’t sell well. Probably because the ship hasn’t really come up in the anime yet.
All in all it was a pretty good weekend, I profited a bit over $1k after expenses (Airbnb, gas, parking, merch production costs, badge and table fee). This doesn’t include some tabling gear because my friend and I split (she bought the grids, the pins and their holders, the plexiglass, we borrowed a friend’s side arm thing, the display things I bought were all cheap minus the $50 main display stand).
Honestly that’s pretty low in comparison to all my artist friends who table at 3-5 cons per year, but I table really casually (this is just for fun) and I do more online shop selling, so I’m not too disappointed. I also didn’t draw any Genshin, didn’t have any SpyxFamily-heavy inventory besides a couple charms, didn’t have any VTubers, etc. etc... so I can’t complain about not making a ton of money. We were also tabled super far back, so we didn’t get nearly as much foot traffic as some other friends. HOWEVER we both avoided getting COVID so maybe our table location was a blessing. Based on an unofficial spreadsheet artists have been updating wrt symptoms and test results, there were positive clusters near the entrance (though people tested positive pretty much everywhere in the AA, including a table across from us).
To conclude, I hate LA and traveling to cons is more tiring than it’s worth personally, so I think I’m gonna stick to local conventions from now on. I am a tired introvert lol. I think Airbnb-ing with 8 people (all of us have dodged COVID miraculously) would have been more fun if I was still in college, alas I am now a few years out of school and very sleepy/prefer to keep to myself usually. I had way more fun at Fanime (I drove in every morning) and also didn’t constantly fear I was getting infected with COVID each day there... also didn’t witness a car accident every single day of the con... could relax at home and not worry about forgetting to pack something...
I hope this was useful or interesting to read if you made it this far d( > _・ ) If you have any questions feel free to hit my ask box, though I can’t answer much about merch production because I did group orders via friends and some prefer not to share their manus.
54 notes
·
View notes
Text
The Biden Plan To Construct A Modern, Sustainable Infrastructure And An Equitable Clean Energy Future
CESI has consulting preparations with a substantial variety of skilled specialists in financing, regulation, economic evaluation, and engineering. As a member, you will acquire unprecedented access to choice makers, policymakers and get connected with community and enterprise leadership. CEA supplies an entire quality assurance answer that covers the whole product lifecycle of PV modules, storage systems, and every Balance of System part. Building on Biden’srural plan,which includes proposals to re-invest in land grant universities’ agricultural research so the public, not private firms, owns patents to agricultural advances.
CE4A amplifies the voice of the clear energy workforce in advocating for policies and leaders to advance just, equitable and speedy decarbonization. Internationally, electrical energy sector coverage will determine whether or not the united states will get back on monitor to meet its original commitment beneath the Paris Climate Accord. The Clean Energy Standard requires retail electricity sellers to yearly show the usage of clear energy to generate a specified percentage of their electrical energy sales. We’re making the most of Florida’s sunshine, turning it into clean power and utilizing it to power your house or enterprise. Promoting power efficiency at municipal buildings via the event of a Strategic Energy Management Plan.
Clean Energy Group’s Resilient Power Toolkit might help get your solar+storage project started, with specialized assets for community service suppliers and reasonably priced housing developers. Programs that benefit both refugees and host communities are sometimes extra inclusive, extra productive, and extra resilient to climate change. The Clean Energy Challenge is part of a systemic change to enhance refugees’ self-reliance and cut back their dependency on humanitarian assist, support native economies and boost local infrastructure and produce extra sensible and sustainable support to refugees and the communities that host them. Addressing market barriers to adopting clean power, enabling a low-carbon electricity grid transition. To find out Power Efficiency Guide of going photo voltaic, you need to understand the prices of solar panel and battery set up, and the fee financial savings of decreasing your electric bills.
Achieving the Clean Energy Challenge objective requires creating a new market for clear vitality that has not existed earlier than. We all have a duty to behave, both by lowering our personal emissions and by ensuring that refugees and the communities internet hosting them have clean and renewable power. ” if you improve to 100% renewable and carbon-free electricity with UltraGreen right now. It costs just a little greater than our commonplace service—between $7-10 for the common family per 30 days, relying on how a lot electricity you employ. Community Choice Energy packages just like VCE are springing up throughout the state, offering healthy competitors within the electrical energy marketplace—spurring on innovation, customer choice, and sensible packages and companies.
Advancing Clean Energy PA is an internet neighborhood working to change the conversation surrounding clean vitality, power effectivity, and clear transportation. Fuel What Matters is a public education consciousness marketing campaign designed to connect the citizens of North Carolina with the transportation applied sciences and practices that help improve air high quality, get financial savings and cut back dependence on overseas oil. We offer heat restoration solutions, combined warmth to power and waste to power merchandise in addition to engineering and manufacturing options centered on different vitality efficient and environmental sustainable applied sciences. Explore how CEEM works with policymakers at all ranges and regulatory agencies to enact certainty and allow for growth for our clean vitality companies. In-depth provider, expertise, and market evaluation and insights assist in choices about the price and efficiency of competing PV and vitality storage applied sciences and distributors. Expanding protections for farm employees.Farm employees have all the time been important to working our farms and feeding our country.
#Green Energy#Renewable Energy#Solar Energy#Renewable Energy Projects#Renewable Energy Resources#Sustainable Energy#Wind Energy#Green Energy Companies#Alternative Energy#Clean Energy#Renewable Energy Sources#Green Energy Stocks#Green Energy Future#Denmark Green Energy#Green Energy Problems#Green Energy Building#Green Energy Projects#Green Energy Technology#Energy 101#Nuclear Energy#Kpi Green Enrgy Share#Kpi Green Enrgy Stock
2 notes
·
View notes
Text
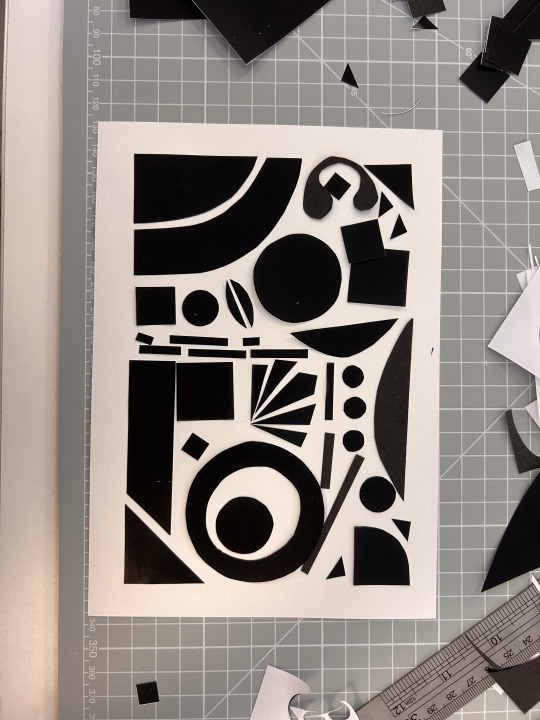
Butterfly swirls
Sometimes I don't plan at all. Sometimes I just see the leftovers on my desk and decide to make something instead of tidying up.
#craftyratuk #collage #butterfly
While waiting for a thick layer of acrylic gel to dry on another piece for the Collage Makers Summit, I took the opportunity to tidy up the scattered papers from making Photo kintsugi and Vintage grid.
Or, at least, that was the plan. But… I had a spare panel that I had prepped for the Summit. And I had quite a few small scraps of paper that were probably destined for the bin. And I’d had an…
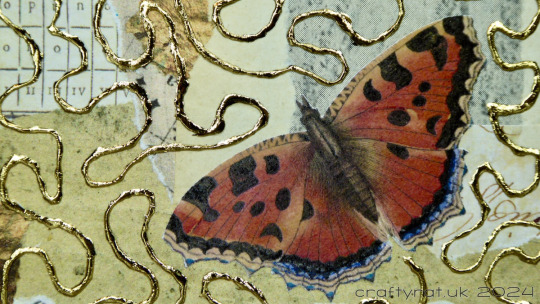
View On WordPress
0 notes
Text

#photo editor collage maker#photo collage maker#collage editor#photo grid maker#collagemaker#photo collage editor#photo collage free online#photo grid collage maker#photo grid editor#photo collage maker app#collage wallpaper maker#collage editor online#collage photo editor online#collage editor app#photo collage editor app#love collage maker#photo grid editor online#love collage app#collage photo maker online#birthday photo editor collage#photo lite collage maker edit pics#pic collage photo editor#collage picture editor#collage photo frame online editor#free collage editor#photo editor and collage maker#collage app without watermark#square collage maker#pic collage editor#photo collage editor app download
0 notes
Text
Free Online AI Vintage Collage Maker: Transform Your Photos with Retro Charm
Craft Vintage-Inspired Collages with Our AI Vintage Collage Maker
Harness the power of nostalgia and create stunning vintage-inspired collages with the help of our innovative AI Vintage Collage Maker. This revolutionary tool takes the guesswork out of crafting captivating collages, injecting a touch of bygone eras into your photos.
Effortless Elegance: Unleash Your Inner Collage Artist
Whether you're a seasoned scrapbooker or a curious newcomer, our AI Vintage Collage Maker empowers you to create evocative collages in minutes. Here's what sets it apart:
AI-Powered Layout Suggestions: Struggling with the perfect layout? No worries! Our AI analyzes your photos and suggests a range of vintage-inspired grid arrangements. From classic squares to playful geometric patterns, the AI ensures a balanced and aesthetically pleasing composition.
Seamless Integration of Vintage Elements: Step beyond simple photo collages. Breathe life into your creation with a curated selection of vintage-themed embellishments. Think faded postcards, travel stamps, aged newspaper clippings, and classic film textures. The AI seamlessly integrates these elements, adding depth and character to your collage.
One-Click Vintage Effects: Transport your photos to another time with a library of vintage filters at your fingertips. Achieve the warm tones of a bygone era or the grainy authenticity of old photographs. Adjust the intensity of the effects to create the perfect level of vintage charm.
Unleash Your Creativity: Customize for a Personal Touch
Our AI Vintage Collage Maker isn't just about automation; it's about empowering your creative vision. Take control and personalize your collage with these features:
Fine-tune the Layout: While the AI suggests starting points, the power is in your hands. Resize, rotate, and reposition photos to match your artistic vision.
Explore a World of Vintage Textures: Delve deeper into the vintage aesthetic with a vast library of background textures. Choose from weathered wood, antique parchment, or distressed fabric to create a one-of-a-kind foundation for your collage.
Add Your Own Vintage Touches: Got a collection of vintage ephemera scanned or photoshopped? Upload your personal vintage elements and seamlessly integrate them into your collage. This personal touch adds a layer of authenticity and sentimentality.
Beyond Nostalgia: The Power of Vintage Collages
Vintage collages aren't just about recreating the past; they offer a unique way to tell a story:
Celebrate Memories: Combine photos from a special occasion, vacation, or family gathering with vintage elements to create a nostalgic keepsake.
Showcase Your Artistic Side: Use vintage collages to express your creative vision. Experiment with different layouts, textures, and effects to create thought-provoking pieces of art.
Elevate Your Brand Identity: Whether you run a vintage clothing store or a travel blog, vintage collages can add a touch of timeless charm to your marketing materials and social media posts.
Ready to Craft Your Vintage Masterpiece?
Our AI Vintage Collage Maker is the perfect tool for anyone who wants to capture the essence of a bygone era. With its intuitive interface and powerful AI features, creating stunning vintage collages is easier than ever. Get started today and embark on a journey of creative expression - all with a touch of nostalgic magic!
0 notes
Text
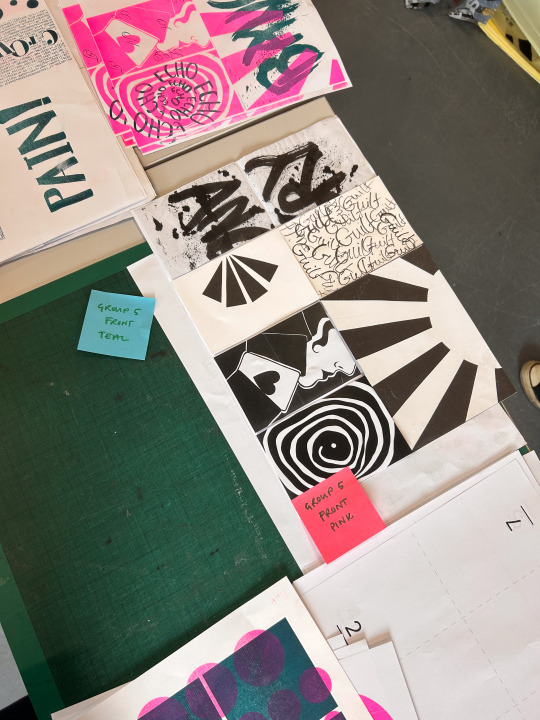
Concept Collider Project
Collage Illustration.
02.10.23
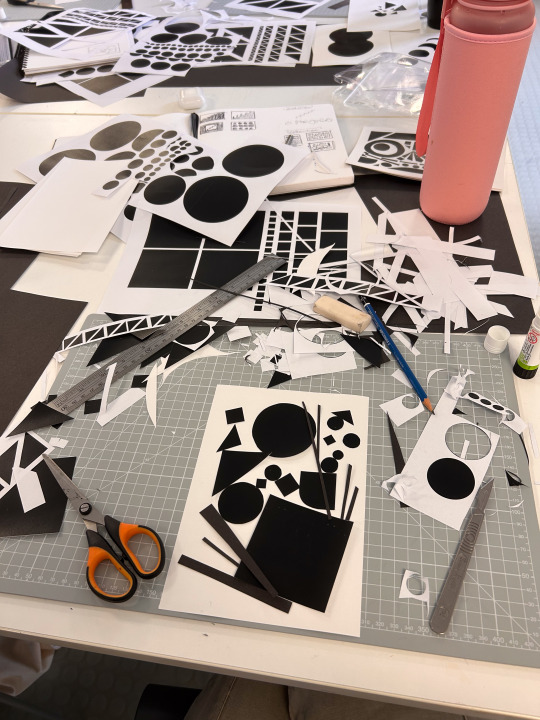
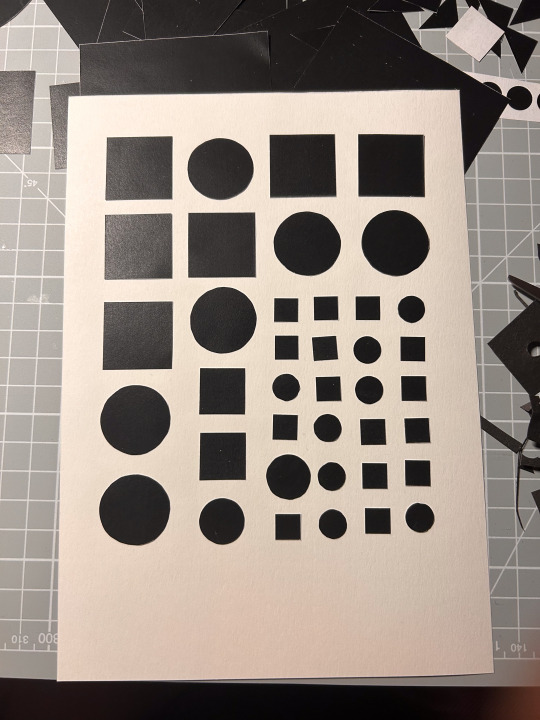
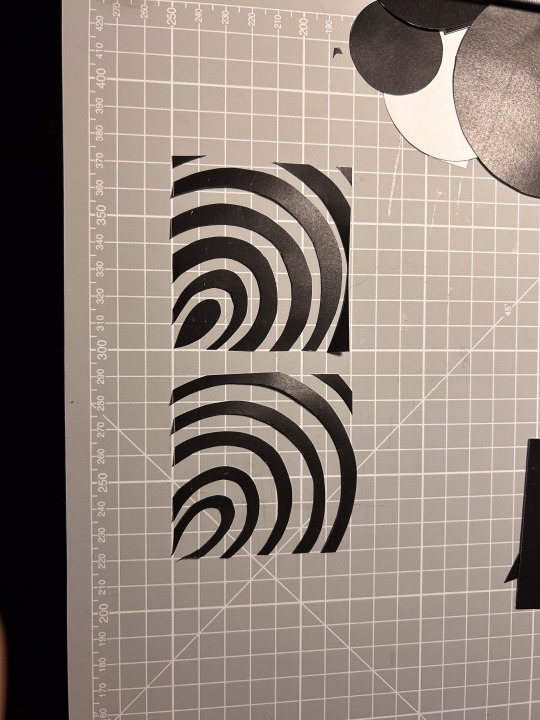
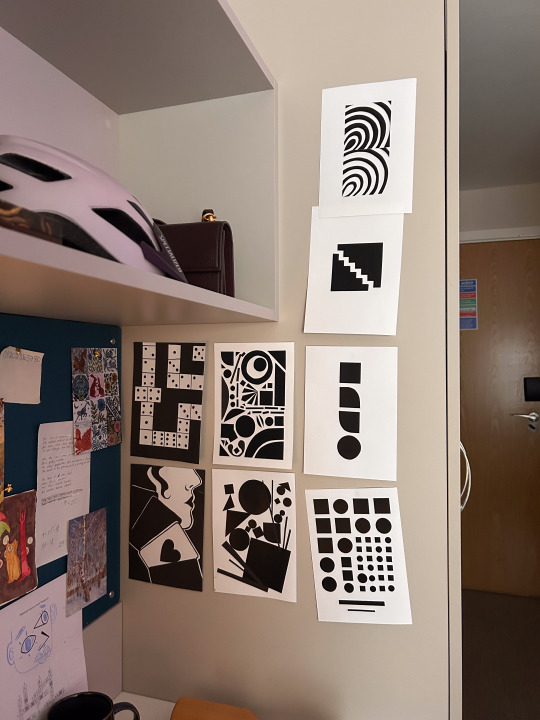
We were handed our Concept Collider project briefing and started by picking out 4 words and creating 5 visual variants for each, totaling 20 collage pieces. The instructions were open, so you could work with simple shapes or take it further with more detailed pieces. I tried to do both. During the session in class, I completed only 4 and was worried since I was unsure if we would have time to complete it out of class. But we did, and I had a bit more time to plan. I started by sketching ideas in my sketchbook, finalizing some ideas, cutting out shapes, laying everything out, and gluing the pieces together.
05.10.23
Then, I tried to knock out as many designs as possible, which went much faster this time. I again started with more sketching and feedback from friends. I usually like to test my ideas before putting them into action, so sometimes I send a photo to a friend and ask for their associations; this way, my illustration is effective. That day, I loved the designs I made for word play, especially my dominos and playing card designs. I was not a fan of how my evolution designs came about.

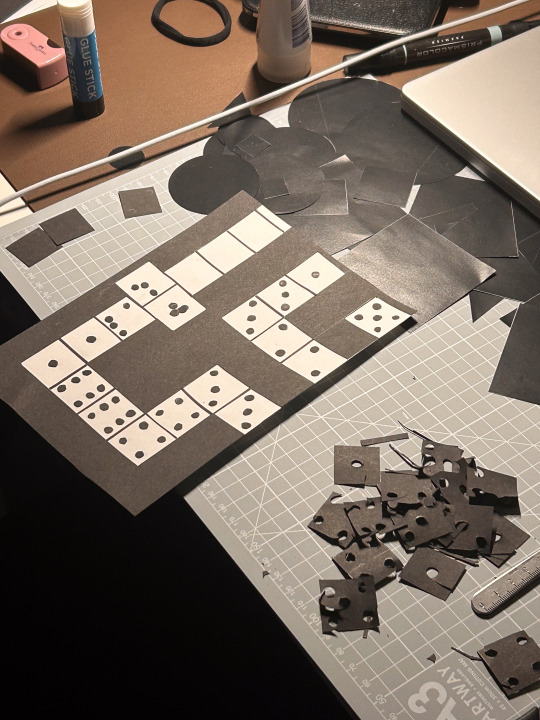
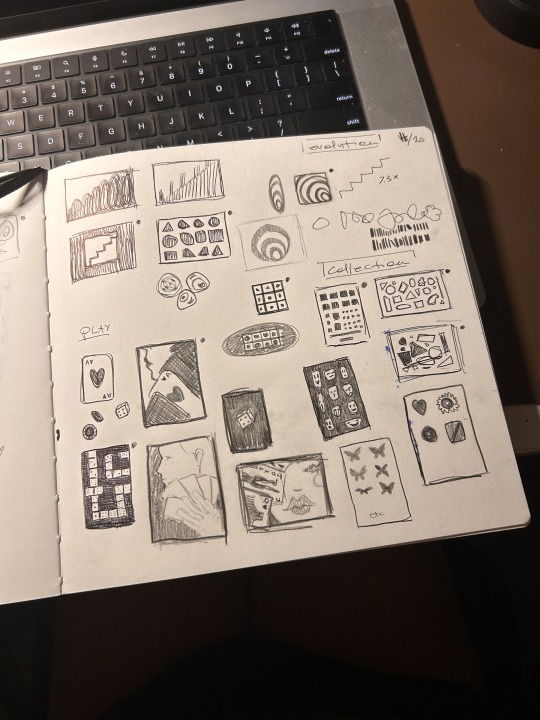
06.10.23
That day, I went to the workroom at home park with Jheel and finished 12/20 designs. I also picked my fourth word; instead of attraction, I picked death because more visual ideas came to my mind. I loved the workroom; it was very peaceful, and I got a lot done.

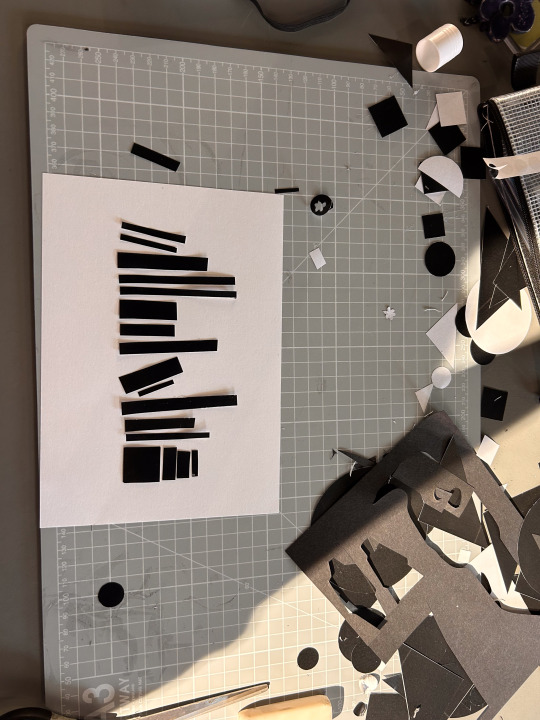
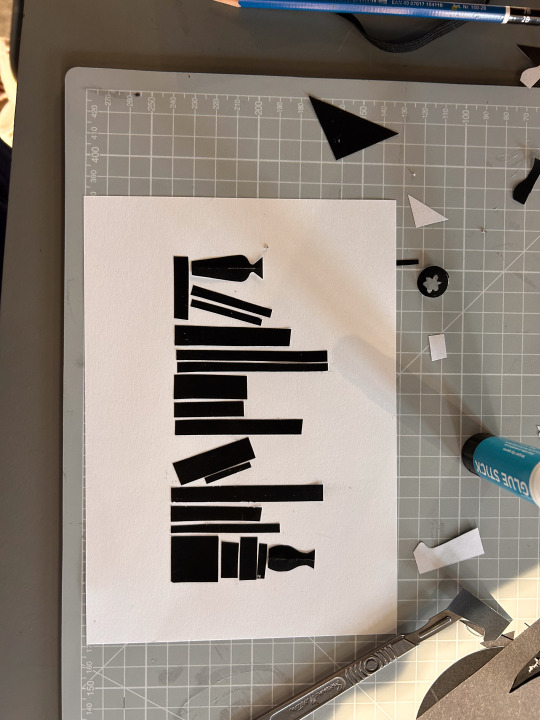
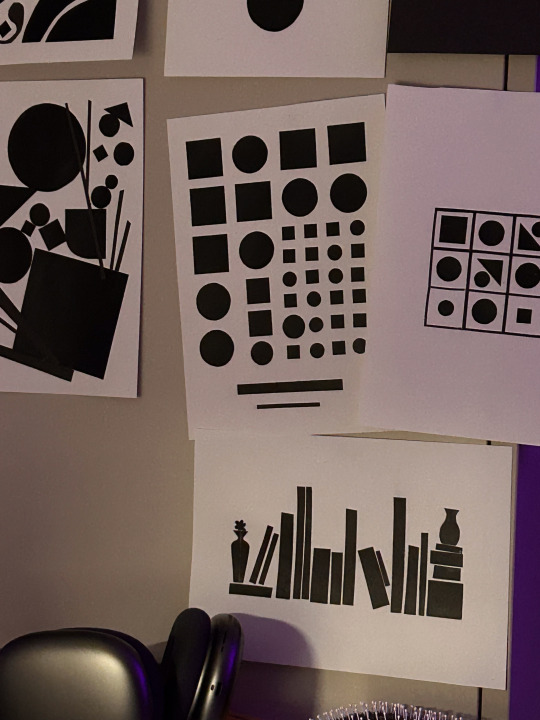

I also thought a lot about the bookshelf illustration I was making. At first, I started with just plain vertical stripes. But it looked like a skyline, so I added some falling books and horizontal books. But it still looked a bit like a city, so I added two vases with a flower, and that really made it look like a bookshelf.
The same night, I finished the rest of the designs. And I liked my play and death illustrations the most.
Typography Workshop.
09.10.23
We worked on 4 stations in this workshop to create another 20 designs for 4 words. Of the 4 stations, collage, ink, tracing, and grid, I particularly enjoyed ink and collage. It gave me a lot of freedom and prevented me from overthinking because I just had to start putting stuff on the blank pages. This time, I finished 12/20 designs during university-provided time, and the same day, I finished the other 8 designs at home.
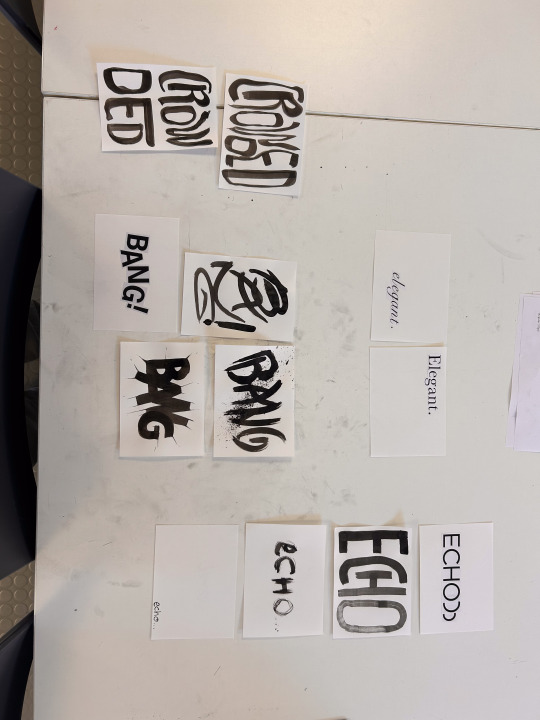
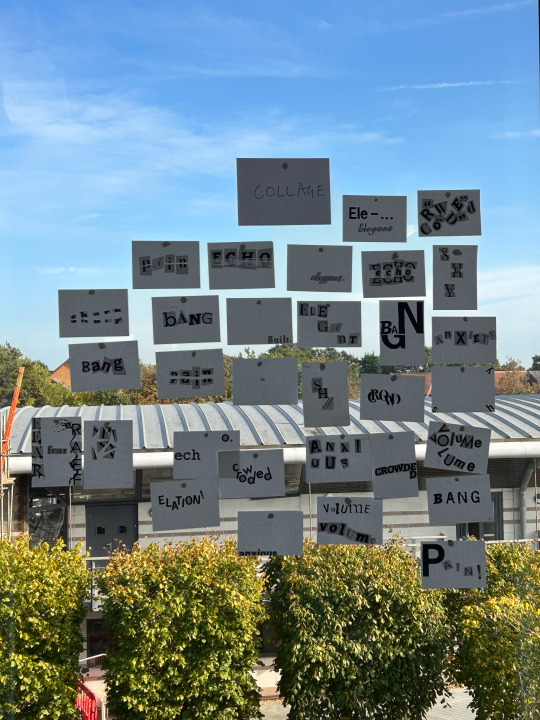

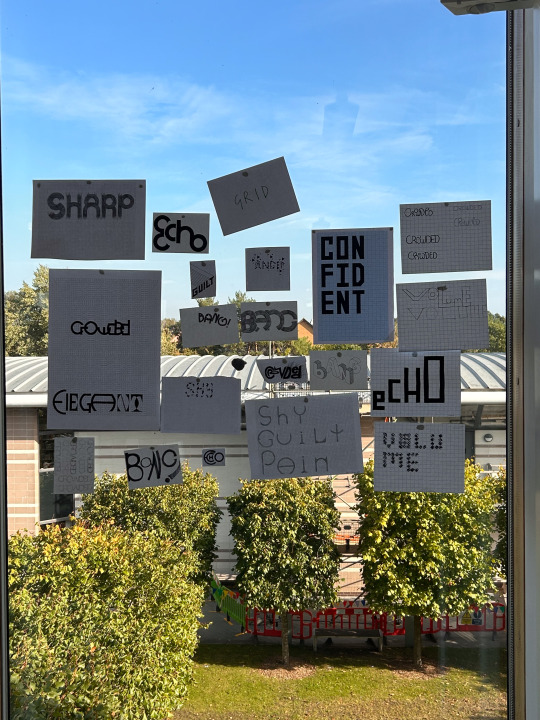
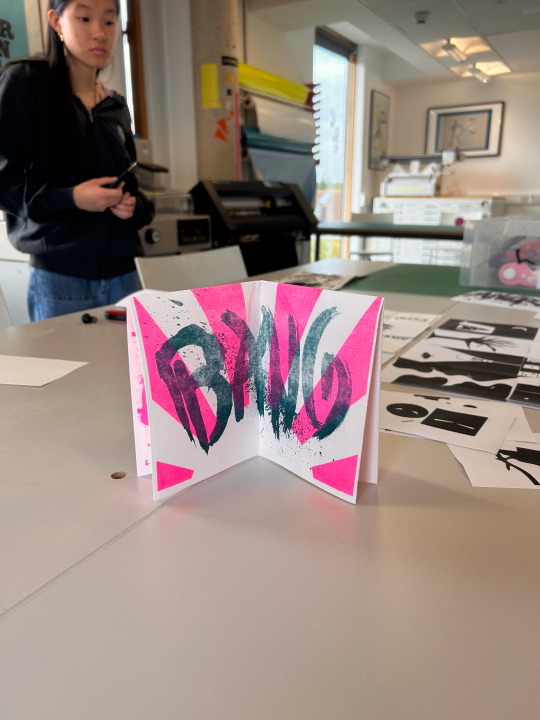
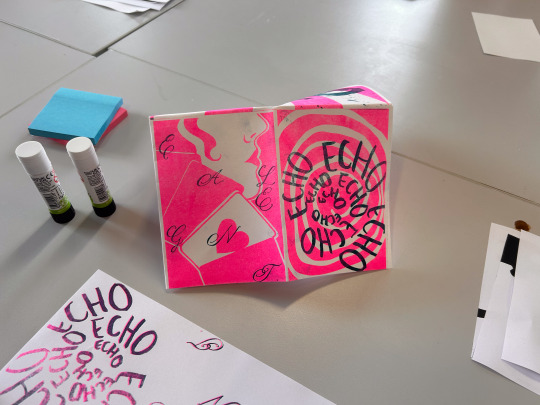
Risograph Workshop.
10.10.23
Today, we went to the maker space to see how risograph printing is done. It was really fun; we worked in a group, and I loved how our designs came together. I was a bit shy to put some of my ideas forward, but I overcame that and put forward some ideas, especially for the elegant + play design. We worked together really well, and I felt amazing because it was lovely to do something hands-on. I even got to take a copy home. :)
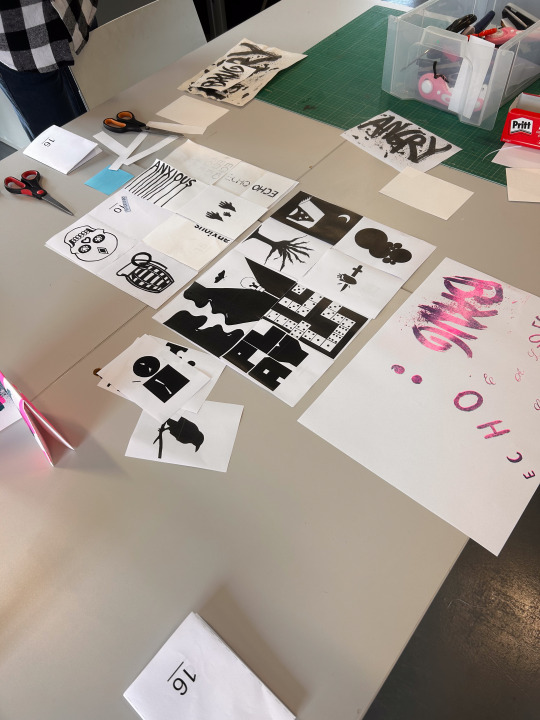

1 note
·
View note
Text
Mastering Collage Creation: A Guide to PixelLab's Free and User-Friendly Collage Maker
In the age of smartphones, photo editing has become an integral part of our daily lives. Whether it's enhancing the colors of a sunset, adding a touch of creativity to a selfie, or creating collages to capture precious memories, we all love to experiment with our photos. If you're an Apple user looking for an impressive photo editing app that provides a wide range of features for free, look no further than PixelLab: Drip & Text on Photo. In this blog post, we'll explore one of the app's standouts: the collage maker. We'll guide you through the steps to use this feature and show you how to create stunning collages effortlessly.
What is PixelLab: Drip & Text on Photo?
PixelLab: Drip & Text on Photo is a powerful and user-friendly photo editing app available for Apple users. It boasts a plethora of features that allow you to take your photos to the next level. From adding text and stickers to applying filters and effects, this app has it all. One standout feature that sets it apart from the competition is its built-in collage maker.
Why Choose PixelLab for Collage Making?
1. Free Access: The best part about PixelLab's collage maker is that it's completely free. You won't need to purchase any premium features to unlock the full potential of this tool.
2. User-Friendly Interface: PixelLab's user interface is intuitive and easy to navigate, making it accessible for both beginners and experienced photo editors.
3. Customization: The collage maker in PixelLab offers a high degree of customization. You can adjust the layout, add borders, adjust spacing, and more to create collages that match your vision.
4. Rich Resource Library: The app provides access to a vast library of fonts, stickers, and backgrounds, allowing you to personalize your collages to your heart's content.
How to Use PixelLab's Collage Maker
Step 1: Download and Install PixelLab
If you haven't already, download and install PixelLab from the App Store. Once the app is installed, open it.
Step 2: Import Your Photos
Tap the "+" icon to create a new project. You can select the photos you want to use in your collage from your camera roll or take new ones within the app.
Step 3: Choose a Collage Layout
PixelLab offers various collage layout options. Pick the one that suits your needs and preferences. You can choose from grids, freeform layouts, or even create a custom layout.
Step 4: Customize Your Collage
Once you've selected your layout, you can start customizing your collage. Add borders, adjust the spacing between photos, and fine-tune the dimensions to your liking.
Step 5: Personalize Your Collage
This is where the fun begins. Add text, and stickers, and apply filters or effects to your photos within the collage. PixelLab provides a wide range of customization options to make your collage unique.
Step 6: Save and Share
Once you're satisfied with your collage, save it to your device and share it with your friends and family on social media or via messaging apps.
Conclusion:
PixelLab: Drip & Text on Photo is a versatile photo editing app for Apple users that offers a host of features, including a powerful collage maker. With its intuitive interface, customization options, and rich resource library, you can create stunning collages to cherish and share. Best of all, it's completely free to use, making it a must-have app for anyone who loves to edit and enhance their photos. Give PixelLab a try and let your creativity run wild!
Grab it for free now from here: https://apps.apple.com/app/id1658958601
#CollageMaker #PhotoEditing #CollageArt #CreativeCollages #PicturePerfect #PhotoCrafting #ArtisticEdits #VisualStorytelling #PhotoMontage #CollageCreations
#beautiful photos#photography#collage maker#editing#apple#marketing#insta filter#picture#pixellab#CollageMaker#PhotoEditing#CollageArt#CreativeCollages#PicturePerfect#PhotoCrafting#ArtisticEdits#VisualStorytelling#PhotoMontage#CollageCreations#FilterFun#InstaFilter#DripEffect#FilterMagic#BeforeAndAfter#FilterQueen
1 note
·
View note
Text
NeonArt Photo Editor & Effects
NeonArt photo editor offers you the best photo editing experience with dozens of neon effects and neon spirals. Your amazing pictures will grab all the attention with neon sketch art. Get ready for the new generation pics art experience with the shiny grime stickers and stylish text. Face tune and retouch selfies just in one tap, then add motion and astonishing picture effects. Picture editing is so easy and fun with NeonArt. When you are done with picture editing, collage your beautiful pics with the pic collage maker using the glowing photo grids. Magic photo editor brings fun to your photos with the gradient neon line art. Combine stunning sketch art with the cool drip effects. Try stylish glowing sketch and grime stickers, then share your artwork on Instagram, Facebook, Snapchat, Twitter, VK and Tik Tok to get many likes :).
🎨 Aesthetic Picture Editor:
NeonArt picture editor has all the picture editing tools to create fabulous artworks. No crop is needed to share your brilliant pic on social media. Combine neon effects with retro filters for pictures :) . Try neon sketch art in many different glowing colors. Explore astonishing drip effect and create a cyberpunk background from a neon background to make your pic stand out :) .
✨ Neon Photo Effects and Spirals:
Let your pictures glow in the dark with neon photo effects :) . Emoji backgrounds and colorful picture frames are here for you to create marvellous pictures. Surprising AI spiral editor has vast amount of neon spirals to bring motion to your pics. There are even some epic spirals available made of emojis and flowers. Use beautiful geometric spirals like circles or triangles to create digital art :) . Finalize magic photo editing with cool neon frame for pictures.
😎 Background Changer:
Remove background in one tap and add a pretty neon background easily :) . You can find yourself in a street full of lights in one tap thanks to the neon backgrounds. Many glowing background designs and cyber punk photo collages available for you.
💖 Neon Stickers and Text:
To personalize your pics use some image stickers and celebrate special days like birthdays. Also there are loads of cute animal stickers, pick one and change it’s size easily. There are dozens of glowing text templates, also you can type whatever you like and change it’s style and color to personalize your photos. Magic cyber punk photo editor pro has all the features you need.
🤳 Selfie Camera Effects:
NeonArt comes up with a magnificent selfie camera. Snap selfie and add camera effects in one tap :). Selfie camera finds the best light for you and smoothens your face automatically. Enjoy the live selfie camera effects and cyber-punk filters for pictures now! Dripping effect is perfect for selfies. Try bewildering drip effects and bring out your inner drip artist. Neon photo editor will bring you a brand-new image.
🎉 Pic Collage Maker and Photo Grids:
Using the photo filters and editing tools like AI spirals and sketch art you‘ll have dozens of pretty selfies :) . NeonArt photo collage maker helps you to montage you pictures to prepare memes. Shiny photo grids, image layouts and cyberpunk frames will make your picture collaging experience super fun and easy. Photo collage maker has photo layouts for all tastes, create breath taking photo collage and funny memes just in seconds. Don’t forget to explore neon stickers and cyber-punk effect for the unforgettable photo collage experience.
NeonArt photo editor pro is best photo editing app with neon blend effects and awesome filters for pictures. Edit like a pro and combine drip effects with the glowing spirals to create cyber punk theme. You’ll love the gradient neon line art with hand drawn sketch designs. Finally use pic collage maker to montage pics in one special post. You don’t need any other photo editing app, once you have Neon photo editor. Share your artwork on Instagram, Facebook, Snapchat, Twitter, VK and TikTok to get many likes :)
Read the full article
0 notes
Text
WEEK 7 - ONLINE SHOPPING FOR A NEW FACE?
Ultimately, social media platforms such as #Instagram, have evolved from what once began as silly intense filters, with the majority of users having a following of just under 20 people.
Also, posting photos of yourself wasn’t as popular due to terrible quality front-facing cameras…oh how times have changed...
Platforms like Instagram exist to represent the self, and one's identity, some accounts do focus on hobbies like food, travel, pets etc. However, the vast majority seem to be personalised accounts suited to fit one ideal version of self in grid form.
With this comes the stereotype of posting the best pictures of one's self, in order to feel gratification from likes and comments - it is this relied self-gratification that has also led to unrealistic depictions and ideas of people's lives, and especially looks (or what some might coin the term #catfish)
With this, comes the troubling issue of self representation with the utilisation of filters or plastic surgery alike, especially “For influencers, the body plays a critical role in the ‘selfies’ that are the end product of their prosumer labour.” (Drenten et al., 2019)
Therefore, with large followings, individuals are faced with daily reminders of these influencer's posts, meaning “For the women who upload these self‐representations to social media, conformance to heteronormative prescriptions of attractiveness and femininity is fundamental in gaining attention” (Drenten et al., 2019)
This is unlikely to slow down any time soon, as described by, Carah & Dobson, 2016, “Social media platforms develop in response to the commercial imperatives of brands and enterprises that invest in them” and brands invest a lot in order to override algorithms and boost ads to platform users.
Filters as I mentioned earlier, have gone to new extremes with the help of technologies crazy ability to seem almost invisible and lifelike, and nowadays even videos can be manipulated with filters which is insane! Especially when comparing it to the filters we used to have when Instagram first began.
On the other hand, which I've noticed is less discussed in the digital community compared to filters, is plastic surgery “The Internet and social media have become ubiquitous in the world of plastic surgery.” (Dorfman, R.G. et al. 2017)
And how unrealistic expectations and beauty standards can be taken from not knowing and even knowing the work done by many influencers, like the #kardashians for example. Some people still choose to ignore as a result of $$$ and still get annoyed when they can’t achieve a similar body type naturally!
Those that do wish to conform to these beauty standards, however, are provided new found research through exploring exactly where these influencers go for their surgery, and as outlined, it is normal for people to be ‘“shopping” around for plastic surgeons” (Dorfman, R.G. et al. 2017) - in order to meet the set beauty standards provided to them, a clear indication of the evolution we see online.
REFERENCES -
Carah, N. and Dobson, A. (2016) Algorithmic hotness: Young womens promotion and reconnaissance work via social media body images, Social Media + Society, 2(4), p. 205630511667288.
Dorfman, R.G. et al. (2017) Plastic surgery-related hashtag utilization on Instagram: Implications for education and marketing, Aesthetic Surgery Journal, 38(3), pp. 332338.
Drenten, J., Gurrieri, L. and Tyler, M. (2019) Sexualized labour in Digital Culture: Instagram influencers, porn chic and the monetization of attention, Gender, Work & Organization, 27(1), pp. 41.
0 notes
Last Seen Blogs