#pmx tutorials
Explore tagged Tumblr posts
Visit Tumblr Blog
Explore Tumblr blogs with no restrictions, modern design and the best experience.
Last Seen Tumblr Blogs


Fun Fact
Total funding amounts to $125.3M.
Text
Making a spinning morph (MMD/PMXe)
So earlier this month I posted a showcase of my newest stage (link) and one of its functions was that you could make the armillary sphere spin with just a morph. I'll try my best to explain here how to make a morph like this yourself! ( ˶ᵔ ᵕ ᵔ˶ )
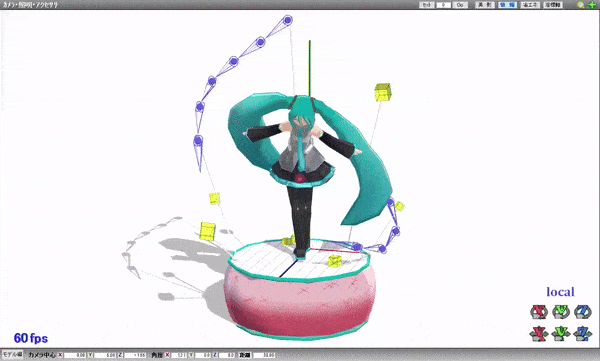
Model by Etheluu
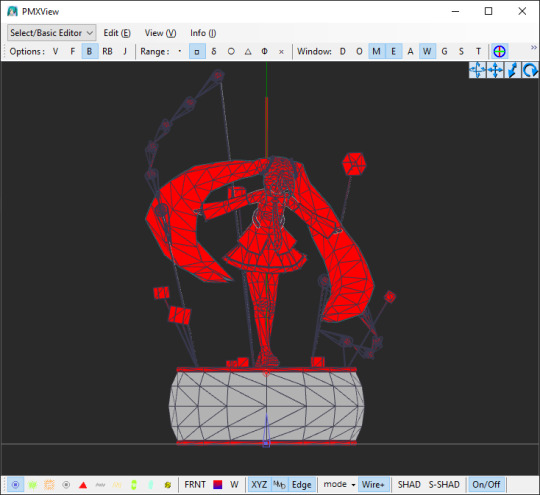
To start of, add one bone and rig the parts that you want to spin to the said bone.
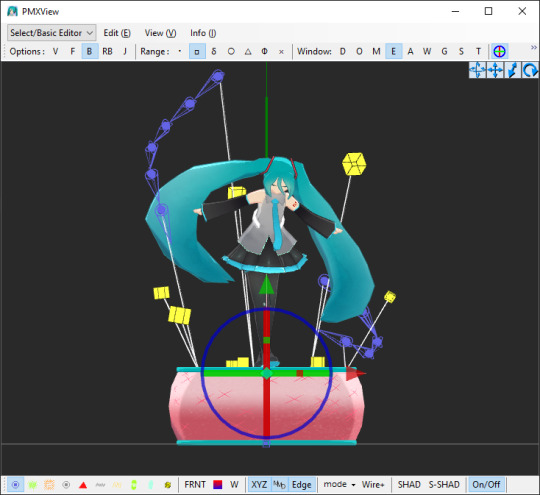
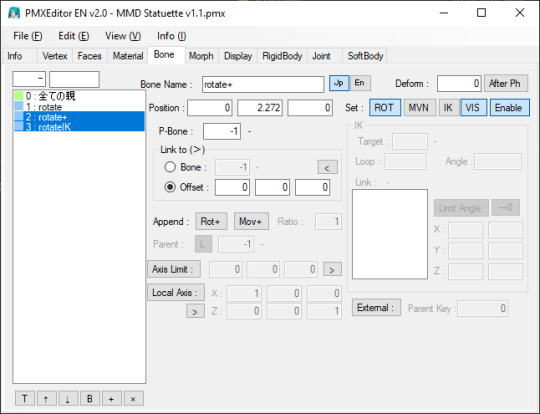
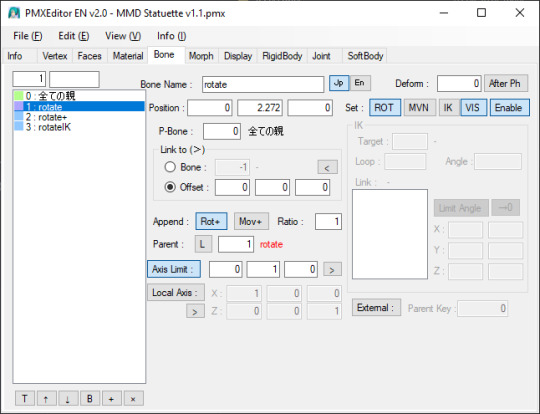
In the 'Bone' section, select the bone that you made (you can name it whatever you want, I named it 'rotate') and click CRTL+D twice to duplicate it twice.
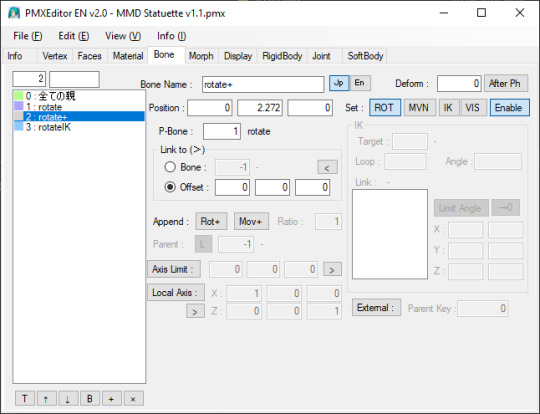
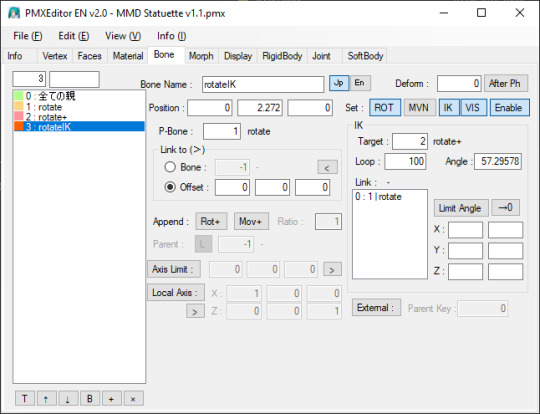
Name those two bones as well, they shouldn't share all the same name! One bone will be the actual IK bone ('rotateIK') and one will be just a target bone for the IK bone ('rotate+').
Now into the each of the bones' settings:
For 'rotate' bone:
assign the parent bone (P-Bone) to the main bone (or a bone that the rotating bone should be attached to)
set 'Append' to 'Rot+', where parent is the 'rotate' bone (yes, the bone must refer to itself! in PMX info it will show up as an error but it will work either way)
turn on 'Axis Limit' and type in '1' in a box that refers to the axis that the bone should be rotating on (X, Y or Z)
For 'rotate+' bone:
assign the parent bone (P-Bone) to the 'rotate' bone
turn off the visibility for this bone (not neccessary for it to work)
For 'rotateIK' bone:
assign the parent bone (P-Bone) to the 'rotate' bone
turn on the 'IK' setting
in IK section, in the 'Target' box, type in the number of the 'rotate+' bone
in IK section, in the 'Loop' box, type in '100'
ik IK section, in the 'Link' box, add the 'rotate' bone (you can do it by right-clicking on the 'rotate' bone on the left side and select 'Copy Index (X)' option from the menu and then right-clicking on the 'Link' box and selecting 'Copy From Index (V)' option)
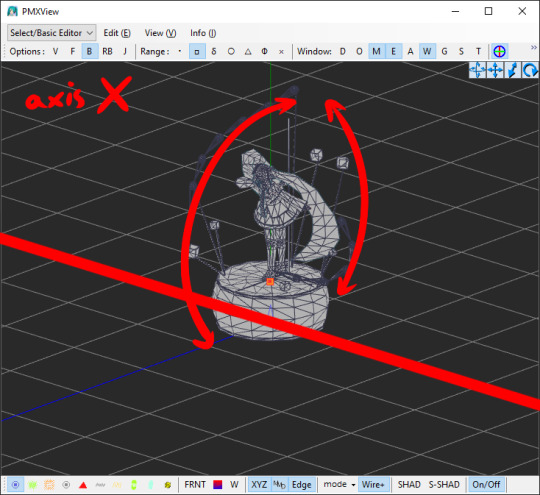
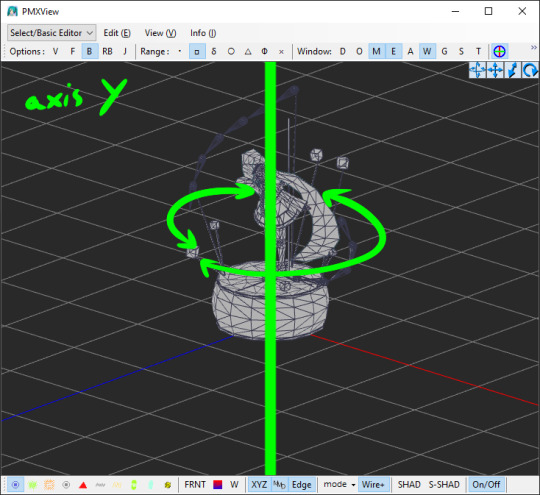
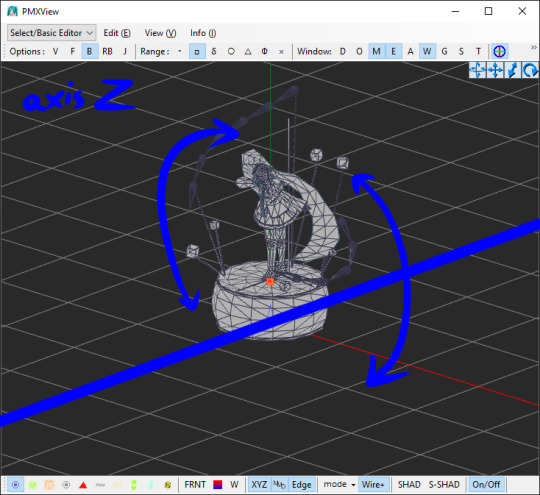
Now, you must move the IK bone ('rotateIK') along the same axis that the whole thing will be rotating along. Example: if you want the materials to rotate by the Y axis, move the IK bone ('rotateIK') by the Y axis.
An infographic(?) if you want to see the direction of the rotation of the axisses in PMXE:
Switching to the 'Morph' tab, add a new morph. Right-click on the area on the left -> New (N) -> Bone (B). Name it however you want.
Don't mind the other morphs on the screenshot, those are just pre-existing morphs I made and are irrevelant.
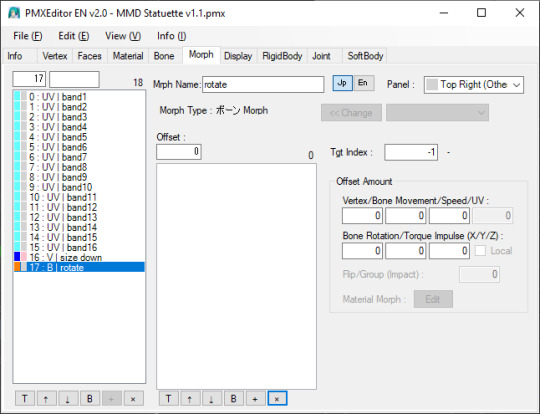
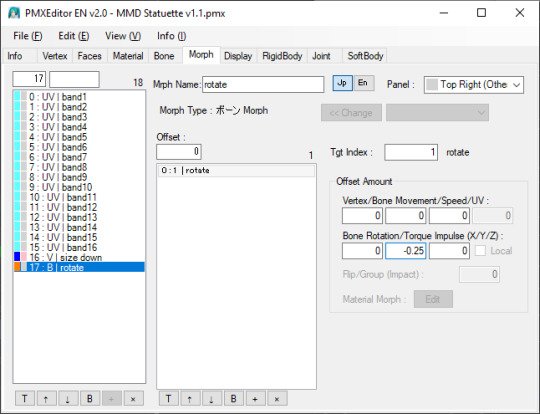
Add the bone that you rigged the materials to ('rotate'). You can do it with the same method as earlier with the IK settings ("Copy Index (X)" and "Paste From Index (X)").
In the 'Offset Amount' section and under 'Bone Rotation/Torque Impulse (X/Y/Z)' text, enter a number from 0 to 1/-1. This determines the speed at which the bone will rotate at:
0 = not moving at all
1 = moving quickly
-1 = moving quickly but in the opposite direction
Theoretically, you can enter higher number but it might result in the bone moving way too fast so I would just simply not recommend doing that.
And here you go! You've made a morph that makes a bone rotate on its own ദ്ദി(˵ •̀ ᴗ - ˵ ) ✧
Remember that this will work only in MMD itself and not in PMX Editor!! If you try to test it in PMXE, don't be alarmed! This does not work in the PMX Editor (for some unknown to me reason) but if you test it in MMD then everything will be alright!
9 notes
·
View notes
Text
MMD model making tip:
If you want your model to have pants or stockings, unless you want your model to have baggy pants or a specific pants shape (bell bottoms, cuffed jeans, etc), it's much easier to simply retexture the existing leg material rather than adding someone else's stocking or tight fitting pants model part to your model. You won't have to worry about the legs clipping through the pants when using motions, and you also don't have to manually fit the pants to the model's leg shape!
You can either edit the texture of the whole body using your preferred image editing software and retexture just the leg part of the texture, or you can separate the legs from the main body material and edit them separately.
I recommend the second method, as it'll make editing the textures simpler. You don't have to worry about the pants part of the texture spilling (for lack of better wording) onto the rest of the body, as the pants have their own texture. It's also better for when you're making renders of the model, you can give the pants a different shader from the main body, useful for when you want to apply a cloth/fabric shader to the pants but not the skin.
I see SO MANY models with stocking and pants related clipping issues which could easily be fixed by simply retexturing the legs rather than fitting pants or stockings to a model. I'm guilty of this, and after learning this life hack making models wearing pants or stockings is much simpler!
This method is also useful for things like gloves and some shirts, assuming you don't plan on having any 3D added details to the gloves.
If you want your model to have baggy pants or cuffs on the legs then this method won't help as much, but for tight fitting pants and socks such as stockings it'll make things much simpler!
Will update with images when I get my computer back from being repaired!
#mmd#mikumikudance#3d modeling#3d modeling tips#mmd tips#mmd tutorial#mikumikudance tutorial#3d modeling tutorial#pmx#pmx editor#pmxe#pmx editor tips#pmx editor tutorial
1 note
·
View note
Text
Yuhh get into it!!!
I made a BEN mmd model! Here's how to use it and or make your own model ヽ(´▽`)ノ
Here's the vroid file! Both of the files are the same, so pick whichever you prefer. I added two in case one file doesn't work. If there's an issue please let me know!
https://www.mediafire.com/file/g188jtmismsnf01/Behavioral+Event+Network.vroid/file
https://www.mediafire.com/file/vifmafoanscfw36/Behavioral+Event+Network+vroid+model.zip/file
You can do whatever you want with the model, have fun! For those interested in making their own models, Vroid is free! It's used for vtubing and stuff, so the uses are endless! You can also use blender (yes, it's free) to make MMD models as well.
I compiled a list of both the written and video tutorials I used for MMD. This also includes motion files and other things for animating.
How to download mmd:
https://learnmmd.com/downloads/
https://www.youtube.com/watch?v=boFDkuqMLDI
How to convert a Vroid file (vrm) to pmx:
https://learnmmd.com/http:/learnmmd.com/convert-vroid-studio-to-mmd-with-one-click/
https://bowlroll.net/file/267190
https://www.youtube.com/watch?v=VnQXq3EAmYI (don't worry about the pmx editor unless you want to do more specific edits to the model. If you're interested here is the link: https://www.deviantart.com/inochi-pm/art/PmxEditor-vr-0254f-English-Version-v2-0-766313588)
The Happy Hands:
https://www.youtube.com/watch?v=Yf-wZ21zmOo
Extra - MMD sample animation:
https://www.youtube.com/watch?v=CKccnq2aD3A
The Disappearance of Hatsune Miku:
https://www.youtube.com/watch?v=93bnn3aZwxc
https://www.youtube.com/watch?v=8b_J0WfX_2U
https://www.youtube.com/watch?v=93bnn3aZwxc
https://www.deviantart.com/merodythann/art/World-Snow-download-488177446
Get down/geddan meme:
https://www.youtube.com/watch?v=r48-cyVII_k
https://www.youtube.com/watch?v=lKHAQPVeIsE
How to export mmd videos:
https://www.youtube.com/watch?v=vBVL2sLWxIE
I used this site to convert the avi files to mp4. You can also use windows movie maker 7 and I'm sure there are apps for this too.
https://cloudconvert.com/avi-to-mp4
When it comes to learning MMD the most important thing is to be patient and read the instructions throughly!
#DO THE RP10 DANCE😝😝#the way all the video files i wanted to attach are too big💀💀ill just post em separately#behavioral event network#ben drowned#ben drowned arg#mmd
38 notes
·
View notes
Note
your Mouthwashing Blender edits are so cool!
I'm learning Blender but it's a bit complicated, do you have any advice for someone getting started?
Hi there, Captain! Thank you for your words! I must say my edits are not done in Blender, they are done in MikuMikuDance

I exported the models created by Aarontaron (.fbx format), to MikuMikuDance using the plug-in "MMD Tools" in Blender, then retouched them a bit in PMX Editor to later use in the mentioned program. (I talk quite a lot about that here (Part 1) and here (Part 2)
Most of my renders are actually pretty raw as I don't have MME (MikuMikuEffects) and my character's model has wonky shadows for being a Daisuke edited model (And also imcomplete, that's why I didn't make any animations yet), so I use them with flat colors.


On your left is the raw version, the second has expressions photoshopped and corrected my character's textures.
But that's just step one. Step two, I add shadows and blurr effects and Step three is copying a merged version of what I got so far, blurr it and set it to "Soft Light" layer mode

Step four, I merge layers then copy it again. And set it to Semi-Tone. Then I reduce frequency to 12. Then rasterize the image

Now, for step 5 we turn the lights into transparency so we only get the dots. We multiply said layer twice then set the three of them a color (Red, Blue, Green). Finally, we Overlay + reduce opacity to 5-10% and separate the dots to give a chromatic abberation
In some cases I apply extra layers of light, shadows and effects. As well Correction layers. End result being this!

I hope this helped! My suggestion for Blender would be to: 1. Get someone that could teach you, or watch a billion tutorials 2. If you aim for animation, then with even more reason! I just learned Blender for two weeks just to get my model and export the crew to MMD.
8 notes
·
View notes
Text

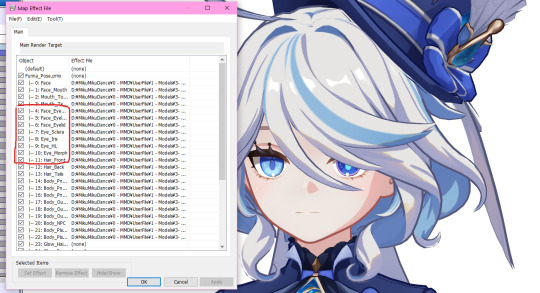
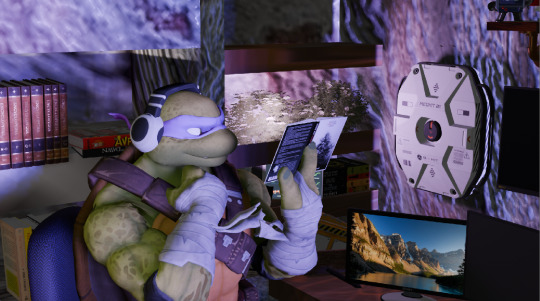
i forgot that i long meant to explain the PROPER way of using the fx PostAlphaEye so i hastily put together this mini tutorial!
click [Keep Reading] for the explanation!
load your model, open the MME tab and identify the material numbers for the eye parts as well as the bangs (or front hair).
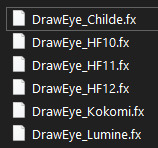
now go to your folder of PostAlphaEye, make a copy of the DrawEye.fx file and rename it to whatever (simplest is name it the same as the character), then open the fx file in any text editing software.
below is example on how i made for my edit of PostAlphaEye mainly used for my Genshin ports. i named a few as HF(*) as some of my ports share the same material organisation for numbering.
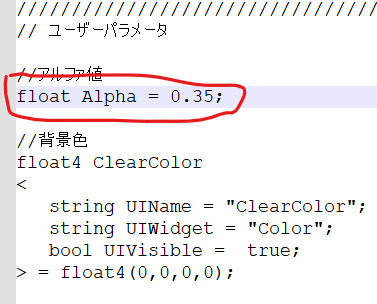
after opening DrawEye.fx, go to these two command lines and input the material numbers according to your model, and save it.
NOTE: DO NOT ADD SPACING AFTER THE COMMAS

now, open up PostAlphaEye.fx and locate this line:
// ここに「"(モデル名).pmd = DrawEye○○.fx;"」のように追加していく ///////////
UNDER the above line, input your command line using this format:
"(Model name).pmx = DrawEye(Name).fx;"
then save your changes.
here's how i did mine:

if done correctly, you'll now only need to load in PostAlphaEye.x for the effect to work WITHOUT having to manually remove/disable through the EyeRT tab!! (this manual method does work but it's too hassling now imo)
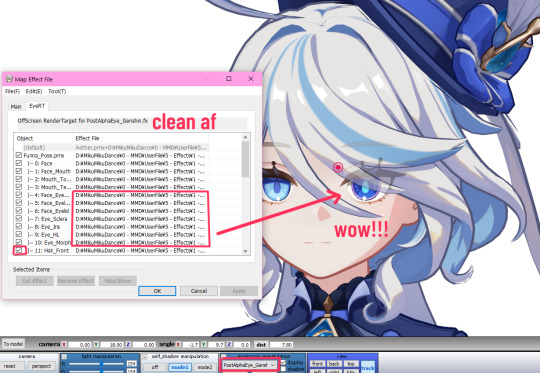
extra tip: in PostAlphaEye.fx, you can change the visibility on this setting if you don't want to bother using the Tr tab in MMD!
19 notes
·
View notes
Text

i may have gone crazy but at least this taught me a few things about blender (i still have no idea why his bone were not exported in the pmx model, it had them in blender but not in mmd.... not even on pmx editor so ig it's my fault lol)
he has some expressions, but because the bones were not exported, I CAN'T TEST THEM T______T. and i'm really a beginner on blender so idk how to visualize them. if i ever suceed to export the model with its bones, it should work tho. I followed a tutorial to retrieve them and uhhhhh well it should work. maybe.
I'm going to restart the WHOOOLe thing since the beginin, maybe it will work better lol
here are screenshots of my failures because idk i find them fnny


YOU + lawrence's true form

idk how to close windows

juke cube


NO EYES T_T
that's all when the model will be ready i'll make a new post BYEEEEEEE
#subway surfers#subway surfer#grand juke#lawrence#winter wonderland#mmd#blender#pmx editor#plz help me lol
2 notes
·
View notes
Note
I'm kinda new making MMD videos, so I was wondering is there an way to change the stages back and forth? 😭 I'm stupid, and I looked at tutorials on YT but the people go to fast!
You can load other stages in, you just have to click the display checkbox to hide the previous stage! If it’s an x file, you go to accessory manipulation. If it’s a pmd or pmx file, you go to model manipulation! Don’t forget to hit the register button to register at what frame the previous stage disappears, and what frame the new one shows up at!
2 notes
·
View notes
Text
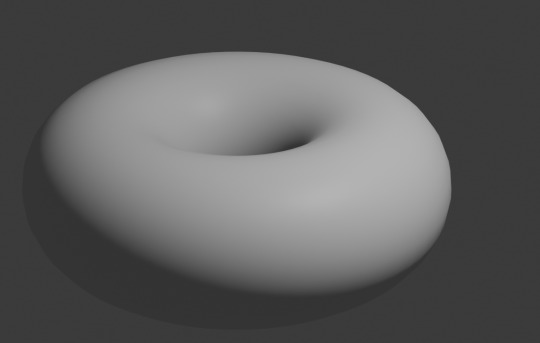
been about an hour since i started trying to put jiggle physics on an ace model for mmd
pmx editor was being difficult (or i was being stupid, one of the two) so i'm updating blender and trying it there
i've only made a singular donut from that donut tutorial, didn't even finish it, but now i have a proper motive
5 notes
·
View notes
Text
[TUTORIAL] Fixing Transparency in PMX & MMD
It's an easy fix for both o7ob Let's start with MMD.

As you can see, my persona here has transparent glasses. That stage is dark, but it's passing through it. To fix this is to move the model order.

Go to your "Background(B)" option, if you use the japanese version it's the 4th option.
Background > Model Drop Order A window should pop up.

You want the model having the transparency to be on the far bottom of the list.

And wa-lah o7ob

[ NOW FOR PMX ] It equally applies to PMX as it does MMD.

As you see on the red box. The Lenses are right under the face mesh/material. So they purposefully hide everything under that list.

Make sure the item that's transparent is on the lower part of the list. (This applies to Blush / Tears / Glasses / other expressions similar). You can also check in "Transform View" and test out the expressions:


(Since the glasses overlap everything, they remain as the bottom of the list. But if you have other expression, do mess with the order until it's reached to your satisfied result)
4 notes
·
View notes
Note
Hi!! I have a P5 OC and seeing your 3d art with your OCs and canon characters is inspiring!! I looked around at stuff on google and I can easily see that models and assets obviously exist for the Persona 3 - 5 games. I'm curious about maybe trying to make my P5 OC as a P5 model. If you don't mind disclosing, how did you makes the custom models of your OCs and what kind of system requirements would I need? Although this may be beyond my talent, seeing as I have no experience in 3d art....
Hello!
Honestly I'll be as blunt as I can, all of my model meshes were done in PMX Editor, which is a program used for MikuMikuDance. I don't think I'll make a clear "tutorial" type on this one as I literally just use pre-existing model's assets to make custom models (which you can find downloads through DeviantArt!)
3 notes
·
View notes
Text
Fun fact: I love blender


HOWEVER...
This program is not easy.
I love blender, it's given me so many new avenues to create and I adore it, I really do, I probably spend at least 20 minutes a day goofing in it and I still don't know everything yet, but...
I am it's biggest hater when it's not going well.
When it's not going well... IT'S NOT GOING WELL
FOR EXAMPLE

These two were posed differently, smooching, upon render they snapped to this position on their own, to this day I don't know how this happened fully, I still don't understand.

I had to change Missy's bathing suit, because the normals got all FUCKED UP.

Leo's mouth INVERTED Dude just broke. This is why I don't use SFM models anymore btw. This is exactly why.

This pic made me ugly cry, from how many times the scene crashed AND I still couldn't turn off the dayglow vroid models get (THIS IS WHY YOU ALWAYS CONVERT TO PMX IN BLENDER OR FIND A GOOD SHADER OR MAKE AN NPR SHADER. ANYTHING BUT LEAVING IT ON LIKE THIS IT RUINS THE LIGHTING)
It's cute but God...
Also this was when I was still using SFM models, Leo's legs under this kotatsu are scrunched together like I put him through a woodchipper to make it fit, because his knees wouldn't fold normally.
Three people in a discord made fun out of me for this, for no reason except they were being dicks. Why? Because they're dicks.
Also blender crashed five times trying to get the shot right.

Aileen had to save me with the lighting in post, because nothing wanted to work right that day.
Thank you Aileen.

This shot was perfect except her arm going through him. The final version of this render, has a blanket over them

and re-positioning the arm.
and of course.
The original
The classic
The unfinished donut that I got bored with because it wasn't cool interior stuff and I wanted to do that instead.
All of these, were probably... 8 hours a PIECE. Some of these renders, were all day labors of love, that still didn't turn out right and I try to be REALLY freaking positive, but when it goes to SHIT, I become Blende'rs NUMBER 1 HATER, screaming from the rooftops about it.
And then I take a deep breath...
And remind myself...
"I am not an idiot. I can do this."
Because I'm learning.
If you're new to blender, or you're not sure where to start...
It's okay to just take your time with it.
Also, it's okay to turn off the donut tutorial and try something else, I PROMISE YOU, you don't have to finish the donut unless you wanna. Just make what you wanna make and figure it out as you go.
Point of all of this is, you can do amazing things...
And even when your experienced at it, you can also SCREAM AT THE TOP OF YOUR LUNGS when shit goes south.
The arm of my chair has been given full out falcon punches, while screaming like I'm Markiplier with animatronics trying to tear my spine out.
Art is fun, art is good for you.
BUT IT'S NOT EASY.
And that's okay
1 note
·
View note
Text
hmmm i wanna get back into mmd, i havent used it once this year, only accidentally opened it. but theres no good ninjagoo models for download and even when im interested in 3d modeling/animating idk how to do that and plus i take like years to learn new programs until im confident in using them my way... ugh, im gonna have to make yhem myself, dont i? damnit. (dont let this trick you, i might not actually start researching for this until 6 months later (i wanted to make my own models for literal years but the pmd/pmx editor parts always suck and theres no tutorials for them that work for me because theres always either texture or rigging issues in the finished thing as well as renaming parts and editing descriptions doesnt want to work))
1 note
·
View note
Text

forgot to give today's update. i barely did anything because MIGRAINEEE (i got an aura and i havent had an aura in MONTHS) but i DID rudimentarily mold a scalp and a few hair strands
the fun part is going to be. uh. doing The Rest of these hair strands but i am hoping i'll get faster by the time i move onto the back / right side of their head 😭
im also reeaaally insane and after watching a few tutorial videos of people modeling clothes for, like, vroid characters, am wondering if i have the chutzpah to actually model the clothes myself? aside from the boots. i dont think i have it in me to model shoes
either way thatll be, like, a Future summer attempt. at the very least im gonna keep this one with cobbled together sims 4 cc -> pmx conversions (thank you deviantart) as my clothing models for now and maybe do a tempo 2.0 later on .... partially bc i have told a friend (hi ironclast if u see this) i would attempt to make a fucked up aura mod for him so he can live his rock dragon dreams in ff14 after i finish this model
#honestly i think the rock dragon would be so much fucking easier than This. so. LMAO#like ironically i think i can apply the same method im using to make these hair strands to the rock dragon???#i might need to reverse engineer. like. the hr3 mod i think. and also a scales mod.#<- hr3 is because ik they have a metadata toggle to hide shoulder fur for hroth depending on what armor you have on#anywyas moral of the story is IM HAVING FUN. i think blender tickles the same part of my brain as like#playing insane simulators like ck2 / ck3 or rimworld yk. like.#it's just all this SHIT and i have to Understand It to make it work and do anything at all#AND IT'S ?? FUN ????#honestly i love thinking of future me#like. working as a rad tech and then coming home to make mods and shit in blender. like thats so rad.#summer's text tag
0 notes
Text
How to make accessories/objects in PMX Editor (MMD Tip)

here’s the button that lets you make stuff in pmx editor, and here’s a tutorial for how to make a table with Pmx editor (I have the Eng 2.0 ver) ( if you just wanna make something to test it out and get familiar with using it) : https://learnmmd.com/http:/learnmmd.com/build-accessories-and-stages-with-pmxe-primitives/
a tutorial on vu mapping in PMX : https://www.youtube.com/watch?v=lor72sggQRA&ab_channel=OtomeZaki
and here’s a tutorial for how to make 3D text (if you wanna make like spinning text to add to your motions and stuff): https://www.deviantart.com/cmsensei/art/3D-Text-in-PMX-Editor-551034993
Hope I was helpful!!!
#MMD#mmd model#mikumikudance#mikumikudance community#mmdc#mmd community#mmd helpful tips#mmd tips#PMX Editor#mmd tutorials#pmx tutorials#3d modeling#3d text
2 notes
·
View notes
Photo
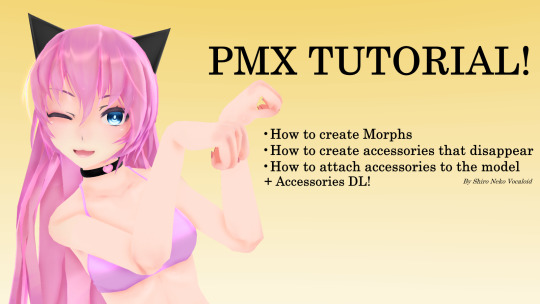
[PMX TUTORIAL] Morphs and others +VIDEO
VIDEO→ https://www.youtube.com/watch?v=oJRM5r_xnkI
#mmd#pmx#3d#mikumikudance#vocaloid#pmd#pmx editor#mmd accessories#accessories#neko#tutorial#guide#shiro-nekovocaloid#video
2 notes
·
View notes
Photo


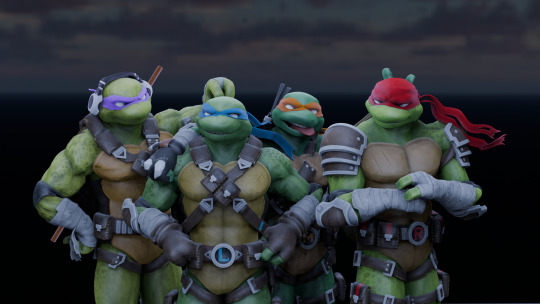
Both models: By me!
Stage by: Touko-p
Jolyne’s first post by: elina002
Teto’s last pose by: Ninjakeks54
All other poses: By me!
Autoluminous effect by: sovoro
SVSSAO effect by: sovoro
SSAO effect by: Otamon
#MMD#MikuMikuDance#Tutorial#helpful#PMX editor#Kasane Teto#Jolyne Cujoh#Utau#UTAULOID#Winter#Seasonal#Autoluminous#MME#MikuMikuEffect#JoJo's Bizarre Adventure#JJBA#JoJo#jojo no kimyō na bōken#Stone Ocean#part 6#Jolyne#Jolyne Kujo#Teto#cute#moe#step by step#help#effects#effect tutorial#MMD tutorial
21 notes
·
View notes