#pmxe tutorial
Explore tagged Tumblr posts
Visit Tumblr Blog
Explore Tumblr blogs with no restrictions, modern design and the best experience.
Last Seen Tumblr Blogs


Fun Fact
The average Tumblr user visits about 67 pages every month.
Text
Making a spinning morph (MMD/PMXe)
So earlier this month I posted a showcase of my newest stage (link) and one of its functions was that you could make the armillary sphere spin with just a morph. I'll try my best to explain here how to make a morph like this yourself! ( ˶ᵔ ᵕ ᵔ˶ )
Model by Etheluu
To start of, add one bone and rig the parts that you want to spin to the said bone.
In the 'Bone' section, select the bone that you made (you can name it whatever you want, I named it 'rotate') and click CRTL+D twice to duplicate it twice.
Name those two bones as well, they shouldn't share all the same name! One bone will be the actual IK bone ('rotateIK') and one will be just a target bone for the IK bone ('rotate+').
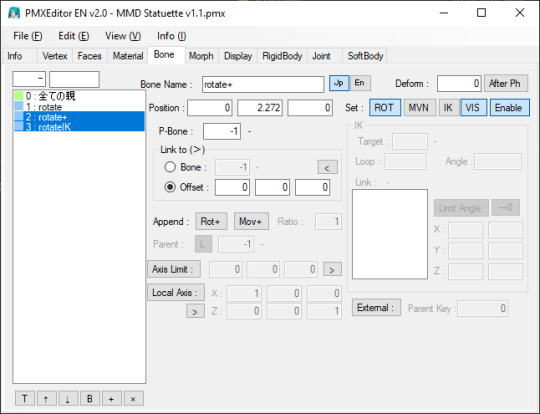
Now into the each of the bones' settings:
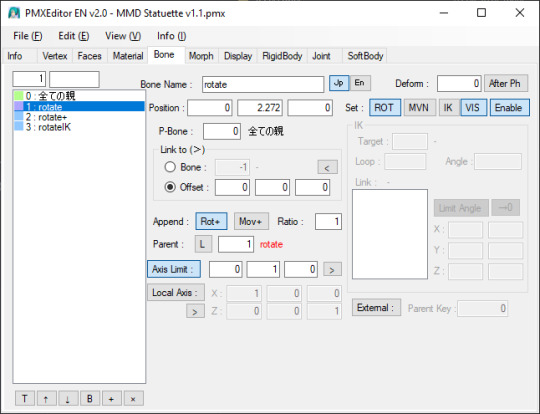
For 'rotate' bone:
assign the parent bone (P-Bone) to the main bone (or a bone that the rotating bone should be attached to)
set 'Append' to 'Rot+', where parent is the 'rotate' bone (yes, the bone must refer to itself! in PMX info it will show up as an error but it will work either way)
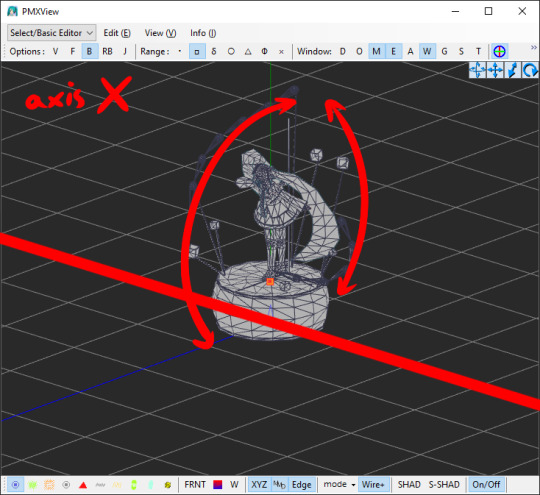
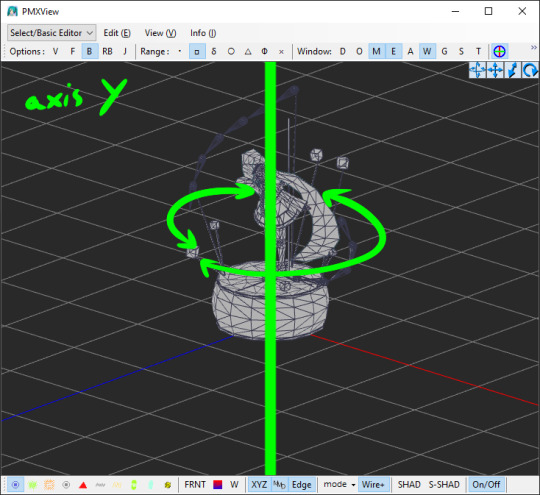
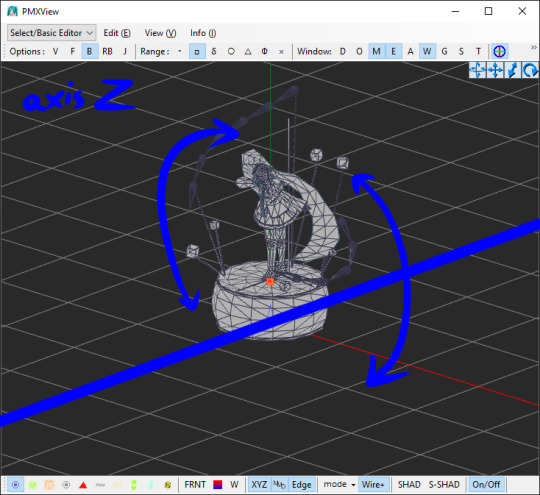
turn on 'Axis Limit' and type in '1' in a box that refers to the axis that the bone should be rotating on (X, Y or Z)
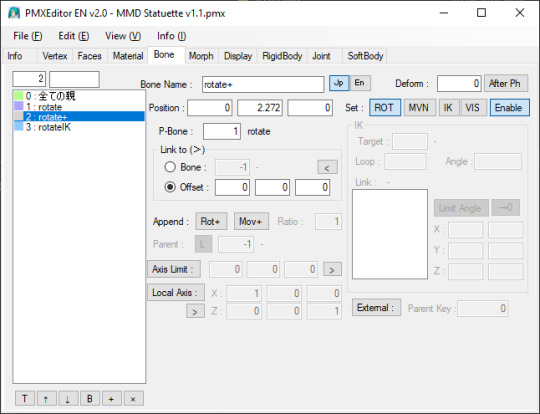
For 'rotate+' bone:
assign the parent bone (P-Bone) to the 'rotate' bone
turn off the visibility for this bone (not neccessary for it to work)
For 'rotateIK' bone:
assign the parent bone (P-Bone) to the 'rotate' bone
turn on the 'IK' setting
in IK section, in the 'Target' box, type in the number of the 'rotate+' bone
in IK section, in the 'Loop' box, type in '100'
ik IK section, in the 'Link' box, add the 'rotate' bone (you can do it by right-clicking on the 'rotate' bone on the left side and select 'Copy Index (X)' option from the menu and then right-clicking on the 'Link' box and selecting 'Copy From Index (V)' option)
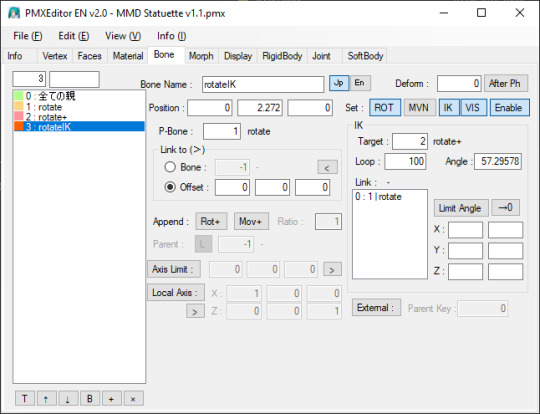
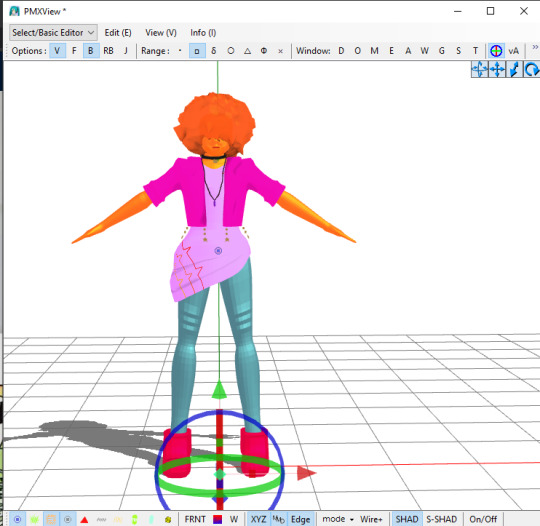
Now, you must move the IK bone ('rotateIK') along the same axis that the whole thing will be rotating along. Example: if you want the materials to rotate by the Y axis, move the IK bone ('rotateIK') by the Y axis.
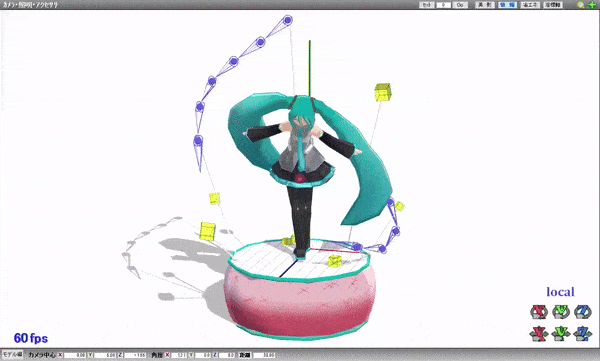
An infographic(?) if you want to see the direction of the rotation of the axisses in PMXE:
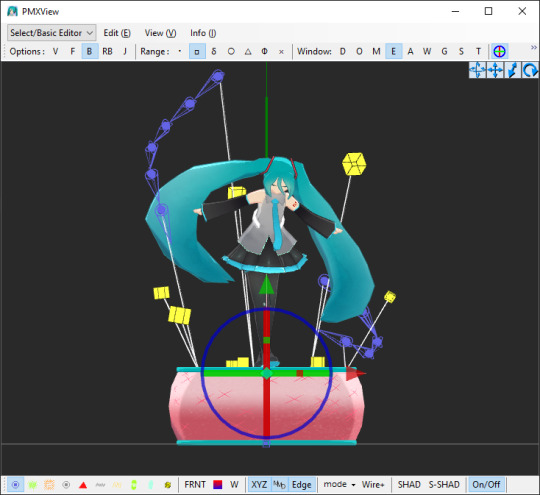
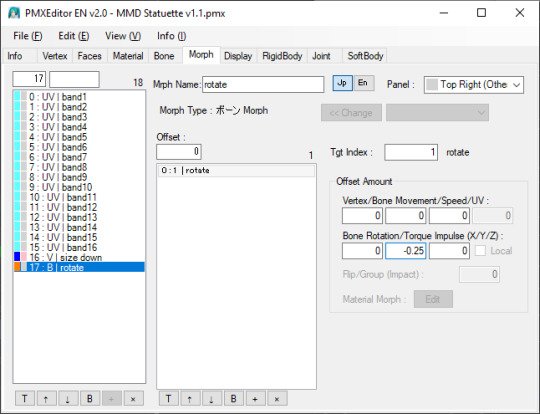
Switching to the 'Morph' tab, add a new morph. Right-click on the area on the left -> New (N) -> Bone (B). Name it however you want.
Don't mind the other morphs on the screenshot, those are just pre-existing morphs I made and are irrevelant.
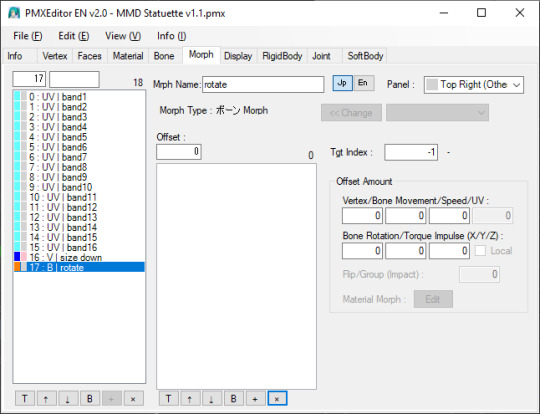
Add the bone that you rigged the materials to ('rotate'). You can do it with the same method as earlier with the IK settings ("Copy Index (X)" and "Paste From Index (X)").
In the 'Offset Amount' section and under 'Bone Rotation/Torque Impulse (X/Y/Z)' text, enter a number from 0 to 1/-1. This determines the speed at which the bone will rotate at:
0 = not moving at all
1 = moving quickly
-1 = moving quickly but in the opposite direction
Theoretically, you can enter higher number but it might result in the bone moving way too fast so I would just simply not recommend doing that.
And here you go! You've made a morph that makes a bone rotate on its own ദ്ദി(˵ •̀ ᴗ - ˵ ) ✧
Remember that this will work only in MMD itself and not in PMX Editor!! If you try to test it in PMXE, don't be alarmed! This does not work in the PMX Editor (for some unknown to me reason) but if you test it in MMD then everything will be alright!
9 notes
·
View notes
Text
MMD model making tip:
If you want your model to have pants or stockings, unless you want your model to have baggy pants or a specific pants shape (bell bottoms, cuffed jeans, etc), it's much easier to simply retexture the existing leg material rather than adding someone else's stocking or tight fitting pants model part to your model. You won't have to worry about the legs clipping through the pants when using motions, and you also don't have to manually fit the pants to the model's leg shape!
You can either edit the texture of the whole body using your preferred image editing software and retexture just the leg part of the texture, or you can separate the legs from the main body material and edit them separately.
I recommend the second method, as it'll make editing the textures simpler. You don't have to worry about the pants part of the texture spilling (for lack of better wording) onto the rest of the body, as the pants have their own texture. It's also better for when you're making renders of the model, you can give the pants a different shader from the main body, useful for when you want to apply a cloth/fabric shader to the pants but not the skin.
I see SO MANY models with stocking and pants related clipping issues which could easily be fixed by simply retexturing the legs rather than fitting pants or stockings to a model. I'm guilty of this, and after learning this life hack making models wearing pants or stockings is much simpler!
This method is also useful for things like gloves and some shirts, assuming you don't plan on having any 3D added details to the gloves.
If you want your model to have baggy pants or cuffs on the legs then this method won't help as much, but for tight fitting pants and socks such as stockings it'll make things much simpler!
Will update with images when I get my computer back from being repaired!
#mmd#mikumikudance#3d modeling#3d modeling tips#mmd tips#mmd tutorial#mikumikudance tutorial#3d modeling tutorial#pmx#pmx editor#pmxe#pmx editor tips#pmx editor tutorial
1 note
·
View note
Photo


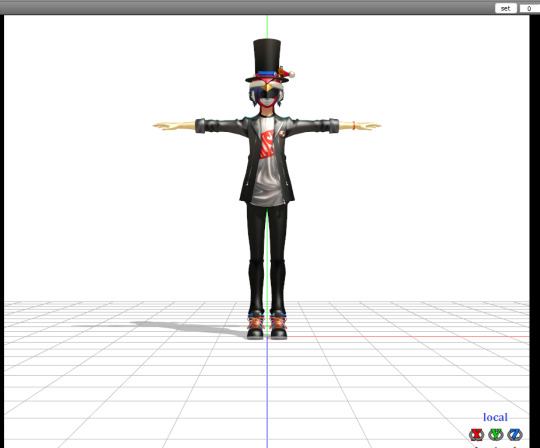
fIRST TUTORIAL ALRIGHT.
I hope this makes sense because I have noooo clue honestly.
I’d like to reiterate, though, that with this set up the objects will not be spinning automatically when loaded into mmd. All you have to do is rotate the bone slightly and they’ll start spinning endlessly. The more you rotate the bone, the faster it will go, and if you reset the bone it’ll stop moving.
#may's boops#tutorial#pmxe tutorial#also please note that the rotation is endless and that the jumping the gif does is literally just the gif not being an endless loop#bc who has time for that
129 notes
·
View notes
Note
hello mmd question (This can be answered privately if it is easier)
how does one get the models to uh.. work. i tested it with the makoto/minato model you use but my issue is that its not a pmx or pmd file. did you convert yours to one of those files or am i just doing something wrong?
ALRIGHT SO i use blender with some plugins to convert my models, blender can be a bit tricky to figure out (it took me a while to figure it out akljhsahd) so i'll try my best to explain it akjshsdh
and also i'll make this public since i figured someone might find this useful :3
i'll put this under a readmore bc its kinda long but i hope it helps!! i'm terrible at explaining things aljksasd (i think learnmmd might have an article on this too)
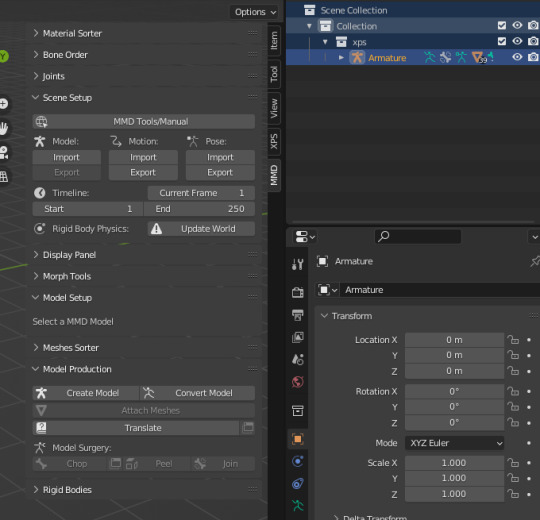
SO. the plug ins i have: mmd tools & xps tools

SO i delete the scene first and then import whichever model i want to convert (xps for this model, but as u can see u can import basically any type)
drag this arrow on the side OUT to reveal the mmd plug in
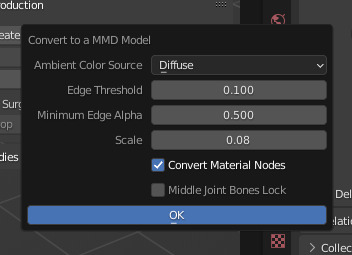
u get this. click on 'convert model' and then click 'ok' to convert it

'export' will now be available! this works for .dae and .fbx as well, but for fbx u can also use metasequoia if u can afford it (it has a month trial iirc)
they will now load in mmd!! i had to zoom out bc i havent fixed him up in pmx (u WILL need to do that aljsld) but he works :>
also, if they have extra things like this model, removing them in pmx is much easier than in blender (at least for me)
i usually nab the face off of elina002's models for my minato, yu, and yosuke conversions since the xps conversions dont include facials
i'm not sure if converting lazyspongies fbx models in blender will keep the facials because i used meta to convert them, but its worth a shot!!
ALSO i mentioned needing pmxe; u definitely need it for conversions since, as u can see, he is SHINY. he is not supposed to be shiny alusakdhasdkhsd
i can also make a little tutorial for how i fix up models if u want but its incredibly basic (apart from like connecting the face i nabbed to the new model.. that can be a bit difficult sometimes)
#squishy asks#mmd#i hope this helps at least a bit aljhhd#also i am not at all an expert i like only just learnt how to properly use the mmd tools plug in alsjhkdjhd#this did give me an excuse to finally convert this specific model tho thank u alsjldhdkh#tutorial#<- so i can find it again
4 notes
·
View notes
Link
I meant to share this earlier. This is some of the best help I can probably offer any of you. If you’ve been needing a way to set up an automatic backup system for PMX, this is the way to do it. This periodically saves backups of your progress in PMX.
14 notes
·
View notes
Text
RAY-MMD: fixing realistic hair like a king
It took me long to remember writing this tutorial, I’m sorry!
As many know, realistic hair in MMD looks horrible because of how it reads the alpha channels. This makes working with game rips a nightmare depending on the model, but fear not! I’ve been rendering realistic models for so long that fixing fucked up alphas became part of my work.
Also, I’m in no way an expert on the matter, I only do things that don’t demand much from my sanity because honestly? I don’t have energy to waste overworking on hair when Raycast does most of the job for me.
Content Index:
Core Work in PMXe
Alphas in Raycast
Final notes
Credits
1. CORE WORK IN PMXE
If you’re new to fixing game rips, I’m going to cover some basics here of fixing alphas in PMXe and then covering up any flaws later in MMD. Notice that this tutorial is aimed toward the realistic models for our quality of life!
First things first. This tutorial’s guest is Hoshino-san! He’s going to help me illustrate the alpha fixing, as I haven’t worked on his model yet.

Good to see you, Hoshino-san!
As you can see, his hair looks like shit, but that’s an easy fix. A common and straight forward cut like that one won’t take long. Messy hair like Yagami’s can be hell on earth, so it’s best to do fix some parts here and there, then leave it to Ray.

I hate you (affectionate).

Raw hair from his untouched topless model. I’m so sorry, Yagami-san...
Now back to Hoshino-san, a good way of dealing with it is by separating the hair meshes with the UV plug-in. If you’re new to this, I’ll show you step by step how to open it.

Now running the plug-in, look for the hair mesh on the material list. The hair must always be at the end of the mesh order for alpha priority. That’s what happens when otherwise.

Back to the plug-in, I found our hair mesh. What we’ll do is to select vertical parts of it and hit Show Selected Vertices to split them. Don’t forget to select the material and make the vertices visible before doing so.


After splitting, hit Re-Import Model Data to refresh the plug-in and update the materials. Now you split the other major meshes until PMXe “refuses” to go further. Sometimes, you’ll be done by then, but that wasn’t Hoshino-san’s case.

He looks better, but still need fixing. We can close the UV plug-in and proceed to manually select and split meshes using face and triangle selections. You can active or not the wireframe for ease of use, it’s personal preference.
We’ll click on desired mesh and hit CTRL + X to select every mesh linked to the one you picked. Be aware that this doesn’t work on every model, some simply can’t do it for whatever reason (I’m not a PMXe expert).

This is a tedious process, you have to keep checking and rearranging the meshes. If you want superb results, good for you! Expect spending a lot of time on this. I did the bare minimum and Hoshino-san looks much better now.
Now you save updated model and go have fun!

2. ALPHAS IN RAYCAST
“But Lírio, what if I want to have fun in MMD and my model’s hair looks like puke when I load Raycast?”, one may think. Ray sucks for any transparent material, simple as that. Of course you can work around it using the transparent material, but the results aren’t that predictable if you ask me. While it looks awesome for tears and glasses, you can’t use this material on hair.
For any alpha fix, we use dendewa’s material. It’s easy to set up and we’ll go step by step. Before anything, I want to show you how hair looks if you load main.fx and leave it be.

Fucked, right?
It doesn’t get any better when we load main_ex_mask.fx...

So our solution is to use the alpha material. To make it work, first load main_alpha.fx on the hair and any other transparent part. It’s located in the Alpha Fix folder.

Now go to the MaterialMap tab and select any material from the Hair Materials folder. I like picking hair with anisotropy 3x for the shiny look or hair with SSS.


Anisotropy 3x.

SSS.
Hoshino-san looks great! However, some hair details are missing. The same happens to eyelashes, they disappear. How we work around this? We add Croquis! Just change the Z value to 1 and it’ll read the textures for you. Setting X and Y values to 1 grant more edges.
While it isn’t the ideal, it works fine. Don’t worry about this effect killing the 3D aspect of your renders. You can always change the Tr and Si to a smaller value.

3. FINAL NOTES
In other scenarios, Croquis is a must to save the model’s hair with Ray. Unfortunately, you’ll have to deal with black edges around the hair. The tons of effects that a render has will probably hide or make them less obvious.

Raw alpha fix.

Tr 1.

Tr 0.5.
Do you remember Yagami-san’s hair from before? That’s him now! It isn’t perfect, but does the job just fine. In his case, X was needed to cover the smallest hair strands. The first image shows X, Y and Z on 1 and Si on 0.5; the second, Si 1.


4. CREDITS
Connor by Quantic Dream
Yagami and Hoshino by SEGA
7 notes
·
View notes
Note
hi! i've been wanting to get into mmd/making mmd models, but both mmd and pmxe look really intimidating, even with the help of tutorials.... any tips for a newbie?
When I first started all I knew how to do was change textures. That’s what a lot of early MMD was about. So you can start easy by customizing an Animasa Miku (The default models that come with the program). You can tweak her look a bit while not messing to much with her functions. Then if you find you want to do something more, do it small, like adding a hat. And then on slowly doing more complicated things such as customizing facial sliders.
PMXe is a pretty intimidating program and there are soooo many things you can do with it that can get complicated. So start out small with the easiest parts first and then you can build up.
I’m also planning on doing an in-depth review of the program, although I’m pretty shy on the microphone, but I really wanna teach others about the program and how easy it is once you get the hang of it! <3
17 notes
·
View notes
Text
How to make accessories/objects in PMX Editor (MMD Tip)

here’s the button that lets you make stuff in pmx editor, and here’s a tutorial for how to make a table with Pmx editor (I have the Eng 2.0 ver) ( if you just wanna make something to test it out and get familiar with using it) : https://learnmmd.com/http:/learnmmd.com/build-accessories-and-stages-with-pmxe-primitives/
a tutorial on vu mapping in PMX : https://www.youtube.com/watch?v=lor72sggQRA&ab_channel=OtomeZaki
and here’s a tutorial for how to make 3D text (if you wanna make like spinning text to add to your motions and stuff): https://www.deviantart.com/cmsensei/art/3D-Text-in-PMX-Editor-551034993
Hope I was helpful!!!
#MMD#mmd model#mikumikudance#mikumikudance community#mmdc#mmd community#mmd helpful tips#mmd tips#PMX Editor#mmd tutorials#pmx tutorials#3d modeling#3d text
2 notes
·
View notes
Text
Off topic
Sorry haven’t been here, been battling depression and cabin fever from this stupid coronavirus quarantine, but I’ve also been trying to learn how to put together models in PMX editor, but I haven’t had luck with the bones. I put together the very first model of Anon from Blush blush by Sad panda studios by using parts from da, but when tested in mmd, nothing moves right. So if anyone either has experience with pmxe or knows someone who does, PLEASE...I am begging you to message me. I will shared the zipped folder of Anon with all his parts, textures, and ‘finished’ model privately to you, just PLEASE, help me out. I have tried countless tutorials, and no matter what I can’t figure out the issues. So please everyone, help me fix the very first model I ever made from scratch!!
8 notes
·
View notes
Photo

this is what i’ve been wrong-focusing on for the past 2 days. 3d jaelynn.
i haven’t manually rigged them because i have no clue how to even start to rig this shit, though there’s also a .pmx with bones i made with the auto-rig thing from rigify? it worked in blender but idk how pmx editor works so i can’t test it in pmxe, but i do know the necklace is weighted to the head bone so if i come back to this thing i need to fix that
that weird black line going up the back of their head is the result of me trying to bake an ao map of a randomized sphere with some of the vertices merged (that’s how i made the hair). it went okay for the most part except i learned how to add seams to things literally yesterday and it Shows right there because parts of the map overlapped. or something that’s what the tutorial i read told me but i’m too lazy to fix it
i want to add textures to the pants but my burst for this is really starting to wear off.
this entire model was made from scratch. the face is from scratch. the body is from scratch. the clothes and accessories are from scratch. the 3 textures itt uses are from scratch. there are no feet because feet are fucking stupid and please don’t take their shoes off i’m begging you.
tl;dr: i made a fucking 3d model of my utau because i’m procrastinating on chorus battle shit
#mmd#van posts#this is the first character model i've ever made#an ode to doing the wrong thing#i used a tutorial from the learnmmd website#no facial rig#not that i really have to worry about eyes/eyebrows here because there literally are none#this is cringe bro
1 note
·
View note
Video
youtube

Here’s a little tutorial on keeping those skirt physics in somewhat the same place as they were before you turned on the physics in MMD. Although I don’t go into slowing down physics in this, I do go into a lot of other small ways to keep your physics a little more stiff- without making move as if they’d just taken a can of hairspray.
I have a bit of a cold so I’m sorry if I sound super stuffy, but I hope you can understand me somewhat ;-; If you have any questions, feel free to ask! I love you all!! <3 -Howl
33 notes
·
View notes
Video
tumblr
Greedy
P-nez, 09/30/2022
Choreography: Babo
Distribution Video
Note: This motion requires the use of P-nez Bones. The download includes a plugin for pmxe to add these bones to your model, as well as a link to a tutorial on how to do it.
1 note
·
View note
Note
i always thinked that ANIMASA type models is actually the most difficult model to edit, i mean the model is low poly but still looks good. it will be difficult to find parts like that.. also, theres no upper bone 2, waist etc. so it will be hard to edit them without semi standard bones plugin... but animasa models is still my favourites, it brings me... nostalgia. also, im still learning how to PMXE, im stuck at the intermediate level.... /sorry for the bad english and this super long ask lol
It can definitely be a pain sometimes, that's true. I made an Animasa Ruko a few months ago and honestly it was just an edit of EE Haku with a few things added on, but it was fun anyway. I think by now a majority of people have the Semi Standard plugin installed in their copy of PMX, but if they don't it's pretty easy to find. There's an old Semi Standard tutorial by Puroistna that I think is great, there's a link to the plugin in the description too.
5 notes
·
View notes
Text
Fixing realistic hair in MMD: the cool guy way
Welcome to an effect tutorial! Here I will cover the basics of mipmapping and teach you how to “fix” realistic hair using MME.
Game ports have been around the MMDC since forever, but MMD struggles to read alpha channels right and the hair looks horrible. Thankfully, I have an alternative solution to that!
Before we start, we need to understand what are mipmaps and how they play a role on realistic hair for MMD.
For starters, the MIP maps, or mipmapping, is a 3D rendering technique that creates many copies of the same texture in different resolution scales, so the image is always clean when you either zoom in or out, distant or not. Check the examples below:


Ok, and how is it related to MMD and realistic hair?
Well, have you ever noticed that MMD’s view tab has an option called “mipmap (anisotropic)”? Nobody talks about it at all, so it is understandable if you haven’t.

As you know, MMD struggles a lot to read realistic hair alphas properly and you must fix it most of the time. However, some models have hair so realistic that you may only think “ok, so what am I supposed to do here? Even with bad alphas, it looks great in PMXe!”

How great king Noctis looks! His hair and beard look fine, oh boy what a great day! Then you open MMD and see this:

Do not worry about him, he is going though adult life crisis.
Wondering what the hell happened there? I tell you: mipmaps. The thing is that PMXe does not have mipmaps (do not quote me on that) while MMD has them, so the texture looks like a mess once you load the model.
If you go to the view tab and disable the mipmapping, you will see that the model is looking good again! However, our job is not done here.

Did you notice the default alpha issues? These white outlines must go away or they will mess with our render! If you turn the default background black, they look much better, go almost unnoticed.

Since MMD’s default background changes from white to black and vice versa depending on the effects you load, I recommend using a solid black skydome behind the model in the draw order with another skydome or stage in front of it, so you keep this “fix”.
Now you decide to continue the project and apply the effects! When it is shading time, the mipmaps simply are on again.

Back to stage 0, I guess...
What happened is that some shaders have mipmaping enabled by default and disabling it on the view tab is no use. Now here is the catch: I did my homework and compiled a list of shaders that do not make up of mipmaps, so you can apply them only to realistic hair.
They are mostly old shaders that people do not bother to use anymore (Ray tutorial coming soon), but if you prefer working with them, here is the list:
Adult Shader;
Dark Adult Shader;
Full Simple Soft SHadow;
Mask Shader;
OverRay Shader;
PmotSkin;
Toon Master.
My favorite one is OverRay because of the highlights, they look great on realistic hair!
For best results, I recommend using o_disalphablend to ease even more the problematic hair alphas and add Object Luminous for the highlights! Example of usage of Adult Shader + Cook Torrance below:


With Adult Shader, Yagami’s hair was “fixed” with the addition of o_disalphablend. The black lines are actually good for separating the hair strands from the background and make good aeshtetics too!
Now a test without Adult Shader on the hair:

Exactly, Yagami-san...
DISCLAIMER: I am not saying you do not need to manually fix the crazy alphas in PMXe because you have this gimmick to back you up. It is a “fix” and may not work in every situation!
11 notes
·
View notes
Note
I’ve always wanted to get into making mmd models but I always got confused when it came to coloring models and it overall just intimidated me lol. Do you have any starter recommendations? (I like ur art btw)
Thanks, and it can be very confusing at first. Coloring is probably the easiest part to me. It’s really just editing the textures in art programs. For me when I first started model making it was all about tutorials. One thing that was the most difficult for me was how bones work and weighting parts but luckily the internet has maaany different tutorials for PMXE.
It just might take a while to understand all the different aspects of the model. Its okay to be intimidated. You can always start small. When I first started I never even changed the textures. Try starting with simple character designs to get a hang on everything. Almost every model I’ve ever made has mistakes.
I remember when I first started making models they barely worked! But by learning what caused them to break helped me figure out how to make my models more polished.
15 notes
·
View notes
Text
“How do I get a smooth rig?”

Often times, people neglect the basics. They see amazing parts that are already rigged wonderfully and they think; “Wow, I have to make a model out of these!”. They put all of the parts together, they follow all the steps they think they’re supposed to make- but the rigging somehow turns out wrong. Why are there all these sharp edges? Why isn’t it smooth? Let me explain why- and I’ll go into a couple of things in blender that will help you improve. You won’t miraculously be able to rig like a god after this, but you will at least get the building blocks required to improve. Lets first test the waters in bone placement and how that has a big impact.

This is a general map of where I’ve rigged. You can see where I placed my bone. That is the correct area to place it. Think of it this way- 50 is where the bone under the joint has the same pull strength as the joint, creating a fold. This fold mimics joints as they extend and retract their arm, wrist, ankle or knee and it helps for a better and more fluid movement. The gradient you see here (25-100) is the standard rigging element of a finger. Normally, fingers are so small that rigging isn’t a huge problem and you could get away with a 50-100 ratio rather than going the full gradient.

Left - Too High | Right - Too Low
As you can see, bone placement is a key factor in the success of your rigging. Not too high, not too low. It’s like the Goldilocks effect with MMD. (Sounds kinda fun.).
Now let’s hop into blender- there’s something I’d like to show you that might help out some modelers if they’re looking for a small tip with elbows. This can also go for MMD editors who are looking for a way to make their models work better but don’t have the skills to model themselves.

What I’ve done is I have taken a knife tool and made a V shape and dissolved the edge lines in the middle of that V. I’ve done this on BOTH SIDES, creating a plane for the vertex to collapse in on itself. An example; Montecore models often do this on their elbows. This is actually an EXTREMELY good tactic to use.

As you can see, the inner fold collapses on itself- which is extremely useful for elbows, the folds of the knees and ect. It’s normally not needed on fingers but can be a very nice detail.
I think that’s all I care to go into for now- I hope this helps you! If you have any questions or would like me to elaborate on anything, feel free to send an ask! -Howl
142 notes
·
View notes