#mikumikudance tutorial
Explore tagged Tumblr posts
Visit Tumblr Blog
Explore Tumblr blogs with no restrictions, modern design and the best experience.
Last Seen Tumblr Blogs


Fun Fact
The total number of visits Tumblr.com received during January 2021 is 327 million.
Text
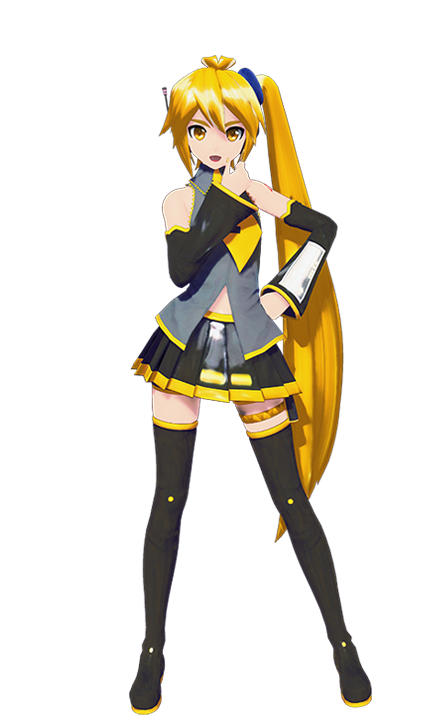
MMD model making tip:
If you want your model to have pants or stockings, unless you want your model to have baggy pants or a specific pants shape (bell bottoms, cuffed jeans, etc), it's much easier to simply retexture the existing leg material rather than adding someone else's stocking or tight fitting pants model part to your model. You won't have to worry about the legs clipping through the pants when using motions, and you also don't have to manually fit the pants to the model's leg shape!
You can either edit the texture of the whole body using your preferred image editing software and retexture just the leg part of the texture, or you can separate the legs from the main body material and edit them separately.
I recommend the second method, as it'll make editing the textures simpler. You don't have to worry about the pants part of the texture spilling (for lack of better wording) onto the rest of the body, as the pants have their own texture. It's also better for when you're making renders of the model, you can give the pants a different shader from the main body, useful for when you want to apply a cloth/fabric shader to the pants but not the skin.
I see SO MANY models with stocking and pants related clipping issues which could easily be fixed by simply retexturing the legs rather than fitting pants or stockings to a model. I'm guilty of this, and after learning this life hack making models wearing pants or stockings is much simpler!
This method is also useful for things like gloves and some shirts, assuming you don't plan on having any 3D added details to the gloves.
If you want your model to have baggy pants or cuffs on the legs then this method won't help as much, but for tight fitting pants and socks such as stockings it'll make things much simpler!
Will update with images when I get my computer back from being repaired!
#mmd#mikumikudance#3d modeling#3d modeling tips#mmd tips#mmd tutorial#mikumikudance tutorial#3d modeling tutorial#pmx#pmx editor#pmxe#pmx editor tips#pmx editor tutorial
1 note
·
View note
Text
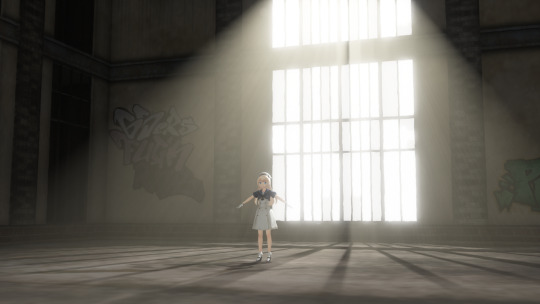
Making a spinning morph (MMD/PMXe)
So earlier this month I posted a showcase of my newest stage (link) and one of its functions was that you could make the armillary sphere spin with just a morph. I'll try my best to explain here how to make a morph like this yourself! ( ˶ᵔ ᵕ ᵔ˶ )
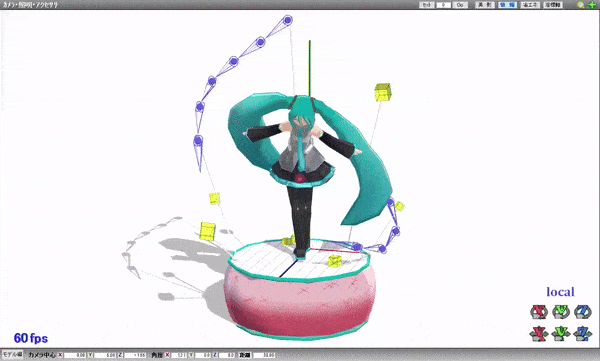
Model by Etheluu
To start of, add one bone and rig the parts that you want to spin to the said bone.
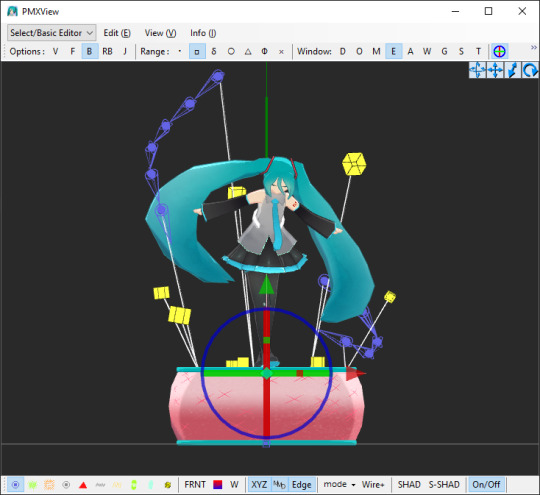
In the 'Bone' section, select the bone that you made (you can name it whatever you want, I named it 'rotate') and click CRTL+D twice to duplicate it twice.
Name those two bones as well, they shouldn't share all the same name! One bone will be the actual IK bone ('rotateIK') and one will be just a target bone for the IK bone ('rotate+').
Now into the each of the bones' settings:
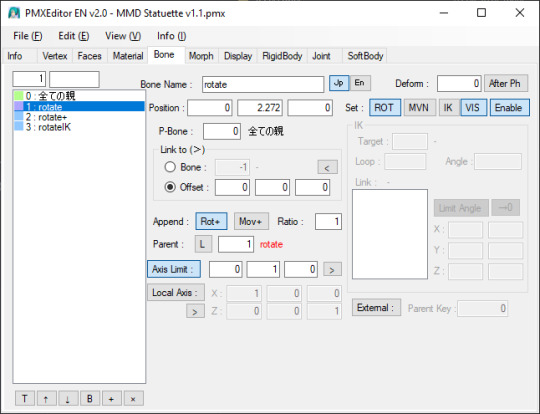
For 'rotate' bone:
assign the parent bone (P-Bone) to the main bone (or a bone that the rotating bone should be attached to)
set 'Append' to 'Rot+', where parent is the 'rotate' bone (yes, the bone must refer to itself! in PMX info it will show up as an error but it will work either way)
turn on 'Axis Limit' and type in '1' in a box that refers to the axis that the bone should be rotating on (X, Y or Z)
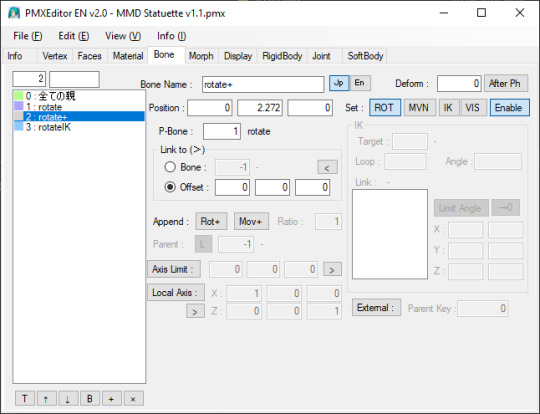
For 'rotate+' bone:
assign the parent bone (P-Bone) to the 'rotate' bone
turn off the visibility for this bone (not neccessary for it to work)
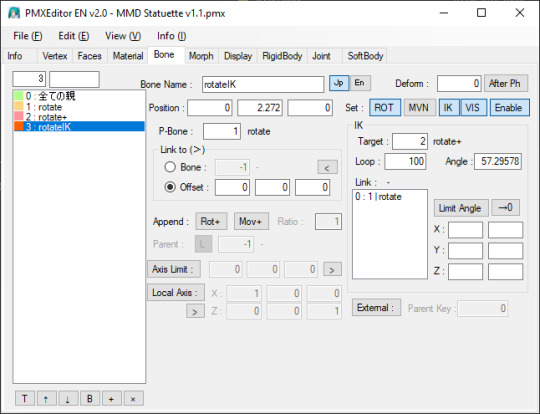
For 'rotateIK' bone:
assign the parent bone (P-Bone) to the 'rotate' bone
turn on the 'IK' setting
in IK section, in the 'Target' box, type in the number of the 'rotate+' bone
in IK section, in the 'Loop' box, type in '100'
ik IK section, in the 'Link' box, add the 'rotate' bone (you can do it by right-clicking on the 'rotate' bone on the left side and select 'Copy Index (X)' option from the menu and then right-clicking on the 'Link' box and selecting 'Copy From Index (V)' option)
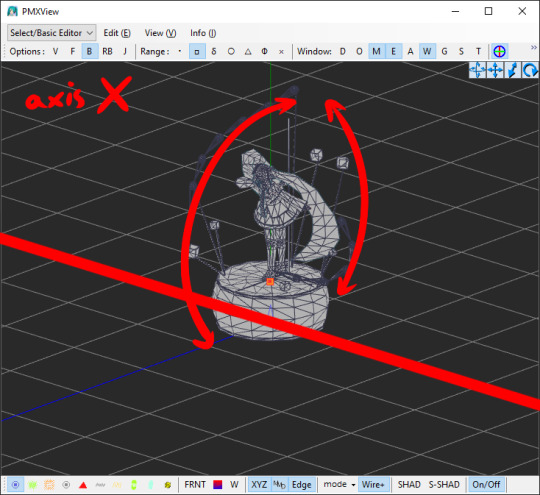
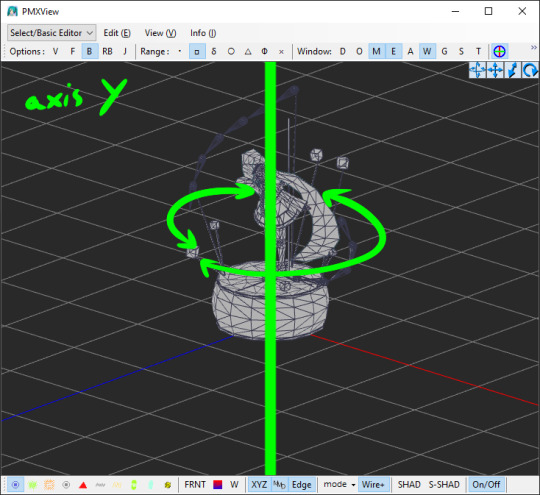
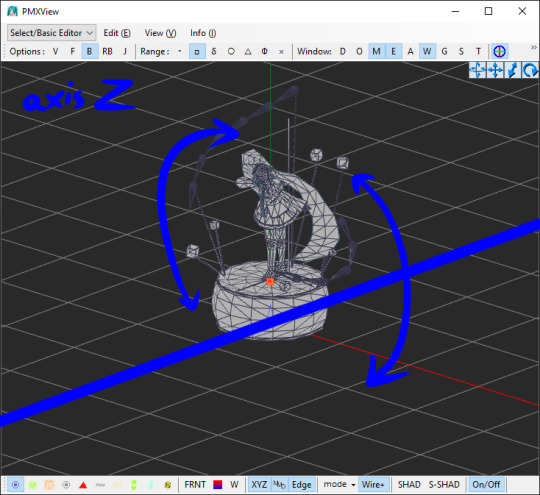
Now, you must move the IK bone ('rotateIK') along the same axis that the whole thing will be rotating along. Example: if you want the materials to rotate by the Y axis, move the IK bone ('rotateIK') by the Y axis.
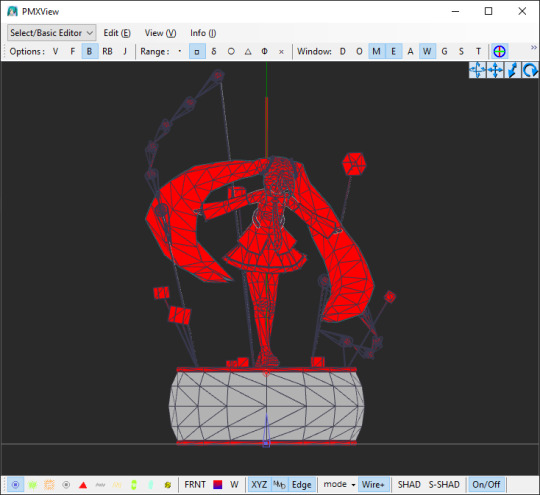
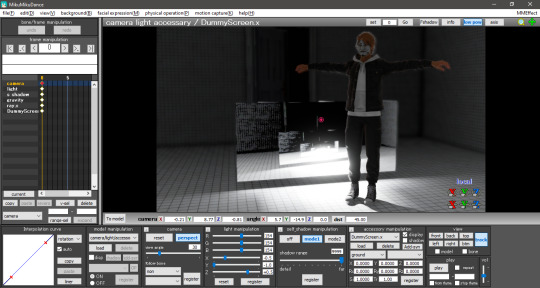
An infographic(?) if you want to see the direction of the rotation of the axisses in PMXE:
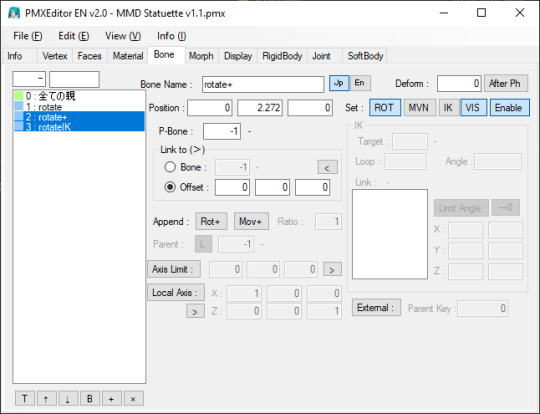
Switching to the 'Morph' tab, add a new morph. Right-click on the area on the left -> New (N) -> Bone (B). Name it however you want.
Don't mind the other morphs on the screenshot, those are just pre-existing morphs I made and are irrevelant.
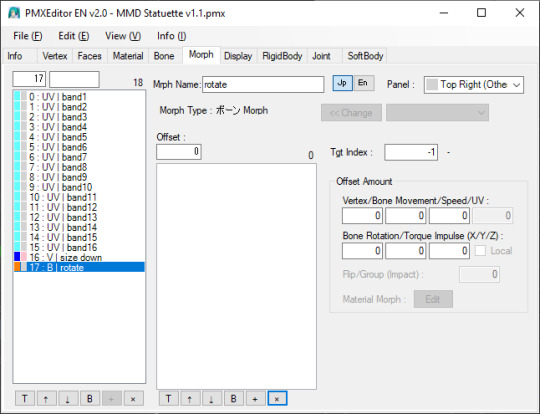
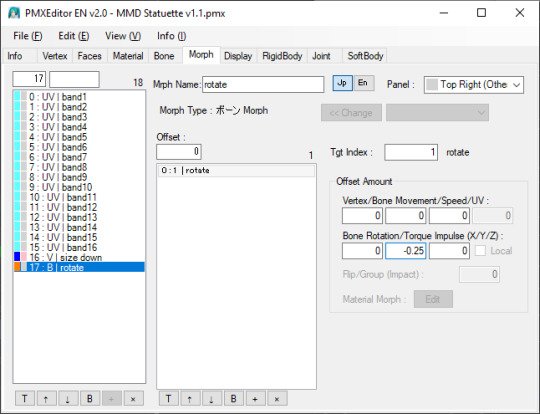
Add the bone that you rigged the materials to ('rotate'). You can do it with the same method as earlier with the IK settings ("Copy Index (X)" and "Paste From Index (X)").
In the 'Offset Amount' section and under 'Bone Rotation/Torque Impulse (X/Y/Z)' text, enter a number from 0 to 1/-1. This determines the speed at which the bone will rotate at:
0 = not moving at all
1 = moving quickly
-1 = moving quickly but in the opposite direction
Theoretically, you can enter higher number but it might result in the bone moving way too fast so I would just simply not recommend doing that.
And here you go! You've made a morph that makes a bone rotate on its own ദ്ദി(˵ •̀ ᴗ - ˵ ) ✧
Remember that this will work only in MMD itself and not in PMX Editor!! If you try to test it in PMXE, don't be alarmed! This does not work in the PMX Editor (for some unknown to me reason) but if you test it in MMD then everything will be alright!
9 notes
·
View notes
Text
I realize I have alot of metaseq/mmd knowledge floating around in my head that may not be common knowledge? and tbh I forget alot so. maybe I will post some randomly now and then.
Todays random MMD information is....
Have you ever wondered why some bones merge and some flip when you hit Mirror in PMD editor? Well, I can tell you why! It's important for any bone you want to flip instead of merge have the kanji for Left/Right in the bone name. Any bone with 左 (hidari/left) 右(migi/right) will automatically flip to the other direction when mirrored. if this kanji is not present, and the bone is not manually renamed before merging the sides, the bones will merge into one.

here's an example of my quadroped model that I made the bones for. Although he isn't compatible with mmd motions/is in english. I slapped on that kanji so I didn't have to manually rename anything while mirroring.
As you can see....I'm the kind of person who doesn't name my layers.
#mmd#mikumikudance#tutorial#i guess???#mmd tutorial#pmd editor#I want to help others also create new things instead of gatekeeping information.
2 notes
·
View notes
Text
Introduction - Vocal Synth Terminology - Part 2
This is a continuation of my previous post. I highly recommend checking that one out first before reading this post.
Append: This term was originally used to describe an additional voice library, originating with Hatsune Miku Append (shown below) and Kagamine Rin and Len Append. Appends provide vocal synths with different tones, such as Miku’s Soft append giving her a more gentle, breathy voice, and her Dark append, which provides her with a more mature, motherly tone. Now, the word “append” can be used for any vocal synth of a character that differs from their usual voice, such as Gumi’s “Adult” voicebank, though the correct word to address these voicebanks is just… voicebank. Proper appends are commonly seen among UTAU voicebanks, like Kasane Teto’s Weak Append, and Yamine Renri’s EDGE Append!

Fanloid: Also known as "derivatives", these are fanmade vocal synth characters. Fanloids do not have their own voicebanks, instead, their voices are made by editing the parameters of a pre-existing vocal synth. For example, Akita Neru (shown below) is a high-pitched Miku or a low-pitched Rin, Yowane Haku is a low-pitched Miku, Hatsune Mikuo is literally a gender-bend of Miku with the voicebank’s gender factor increased, and Honne Dell made with Kagamine Len with his gender and brightness factors lowered.
Realistic Voice Cloning: Also known as RVC, this phenomenon is loathed by every vocal synth user. If you have been on the internet since 2023ish, you have probably seen things like “Mr. Beast AI sings IDOL by YOASOBI” (shown below), or “Dio Brando sings Colleen Ballinger’s Apology”. These AI modules basically involve taking voice samples of a celebrity, fictional character, or literally ANYTHING, and creating a voice module that can sing any audio track provided to it. It should not be a big surprise that AI has made its way to the music industry as well, but as cool as they sound, most RVC modules are illegal and essentially harmful to the vocal synth community, and the music industry in general. People make these modules without the knowledge of the “voice providers” and gain a ton of views for doing LITERALLY NOTHING aside from mixing the vocal track with the instrumental, and often make money off of someone else’s voice. They could also make the module say something obscure, offensive, or lewd, and put the blame on the voice provider. I do not think we need to go into details about what is wrong with these consequences, but long story short, they fucking suck. The icing on the cake is that people would make AI modules of VOCAL SYNTHS as well, which is why most people think Miku is like Squidward AI or whatever. Not only does it harm the voice providers who put their time and effort into creating amazing voicebanks, but it also gives the public a nasty impression of the producer and cover artist community.
youtube
Jinriki UTAUs: Similar to the RVC phenomena, these are UTAU voicebanks that are made without the knowledge of the voice providers. Again, Jinrikis can be anything, from Mario to Baldi from Baldi’s Basics in Education and Learning, to a YouTuber or a LoveLive! character. Yeah… they can be quite cursed. Like RVC, these voicebanks can be considered illegal, however, it's not much of a problem if you keep these voicebanks to yourself, don’t run around advertising them, distribute them, or use them for commercial use. Jinriki voicebanks should not be confused with porting voicebanks (second video below) from other software, like putting MEIKO into Open UTAU. This is completely okay, so as long as you do not distribute them and port the voicebank yourself.
youtube
youtube
AI Voicebanks: These are actual paid voicebanks that use AI technology to enhance the quality of the vocals to make the tuning sound realistic and to make the overall tuning process much easier for producers. The AI technology would analyze the pitch deviation and other factors of a file and smooth out and clean up anything that sounds too flat or janky. In fact, even when a file is untuned are flat, AI voicebanks will try to create a smooth transition and can provide users with a nice start. As useful as they sound, sometimes these voicebanks can be unpredictable and not provide you with the desired output, but with a bit of practice you can create beautiful melodies with them. The popularity of AI voicebanks started with CeVIO and SynthesizerV, but now we have AI voicebanks in VOCALOID as well! However, the V6 voicebanks are… not exactly the best, but I will get into them in another post. The most popular AI voicebanks as of now are Chris-A (CeVIO + VOISONA), Eleanor Forte (SynthesizerV), KAFU (CeVIO + SynthesizerV), ONE (Synthesizer V), Megpoid Gumi AI (VOCALOID + SynthesizerV Studio), and recently, Kasane teto AI (SynthesizerV; shown below)!
youtube
Diffusion Singing Voice Conversion Model: Commonly known as Diff-SVC, this a program used to make AI voicebanks that works similarly to UTAU; you make a voicebank with your own singing, and use AI to make it into a voicebank that sounds human. These voicebanks are slowly “trained” to sound more realistic, and can produce beautiful vocals! These should not be mixed up with RVC modules as these voicebanks are either made by the voice providers or with their consent, and they have to be tuned like in any other synthesizer software.
youtube
Talkloid: These are commonly seen in memeish side of the vocal synth community. Basically, instead of making voicebanks sing, you tune them to make them talk. Talkoids are typically shitposts of vocal synths in bizarre scenarios (with a ton of swearing and Generation Z/Alpha jokes… some talkloids are really unhinged and/or cursed), but there are a few hidden gems such as cute conversations or stories tying to a producer’s lore about their favourite vocal synths.
youtube
youtube
PV: This acronym stands for Promotional Video. PVs accompany vocal synth songs and covers to enhance the listening experience . PVs can range from still artwork with lyrics underneath, to animatics and full-on animations.
youtube
Project Diva: A rhythm game series starring the Cryptonloids alongside Kasane Teto, Yowane Haku, and Akita Neru created by SEGA. Not only are they are known for their nightmarish beatmaps (looking at you, The Intense Singing of Hatsune Miku), but their stunning 3D PVs as well. Producers would often record PVs of the vocal synth of their choice in whatever costume they desire, and if the singer is a character who is not in the game, there are tons of mods on GameBanana (example with Otomachi Una shown below; the Teto AI Ghost Rule cover I posted above is another instance of this)!
youtube
Project Sekai! Colorful Stage!: Hell. Absolute hell. Just kidding, I have a strong feeling that you already know what this is, but in case you do not, Project Sekai! is a mobile rhythm game created by Sega and Piapro starring the Cryptonloids and five music groups of original characters, all with their own stories and songs. Like any other mobile rhythm game, you can pull for characters you want with gacha currency and participate in events that may or may not relate to the main story for prizes. A lot of new VOCALOID fans come from the Project Sekai! fandom, and although much of the fandom is a mess of entitled, bratty teenagers on Twitter, some people genuinely want a better understanding of how vocal synths work, softwares aside from VOCALOID, and songs aside from those in the game. This is one of the reasons why I made this blog, to properly explain how vocal synths work, and I hope this will give you a better understanding of this precious community. Also… I may add my EN ID to my about page. Maybe.
MikuMikuDance: Commonly known as “MMD”, this is a community-driven animation software. In MMD, you can create your own motions, cameras, stages, accessories and models, to create stunning PVs. You can also use other software like Blender to enhance your animations As the name implies, MMD was initially designed for VOCALOID and UTAU fans to create music videos of their favourite characters, but now it has evolved beyond great lengths. You are sure to find models and stages from your favourite video game or TV/anime series, and there are tons of motions and cameras out there. If you were in the vocal synth fandom in the late 2000s’, you may remember the MMD CUP series. These animations are an example of common memes people will make with this software, alongside PVs for Talkloids or a short motion of your favourite character doing whatever dance is currently popular on TikTok.
youtube
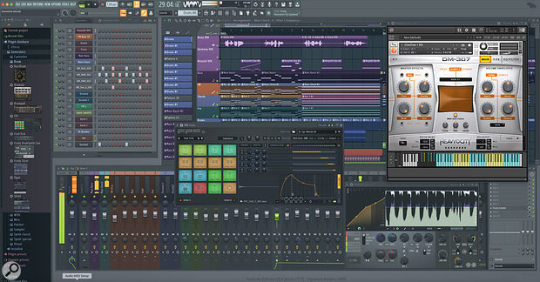
Digital Audio Workstation: Know by the shorthand “DAW”, these are softwares used for making music! DAWs are extremely versatile, allowing you to create a huge variety of projects in them. You can mix an exported wav. file of a tuned VSQx with an off-vocal track, edit audio in general, or use the virtual instruments to create your own arrangements and arrangements! In the vocal synth community, people do all of these things! The most popular DAWs include FL Studio (shown below), Studio One, Logic Pro, Cubase, Ableton Live, Reaper, Cakewalk, and Waveform! Unsurprisingly, DAWs are quite expensive, usually costing more than the actual vocal synthesizer as well. Not to mention, plug-ins can add additional expenses. When picking a DAW, it’s honestly better to pick quality over cost, all while seeing what fits your budget and needs. Oh, I’m going to regret exposing myself here, but in case anyone asks, I have no idea how to mix and probably will not make a tutorial on it. I have never used a proper DAW aside from Audacity and Soundtrap by Spotify, and those mixes turned out HORRENDOUS. Not to mention, I’m practically broke so I can’t invest in a good DAW. I’m trying to figure out how to use FL Studio 20 (the free, limited version of this software), but my smooth brain can not wrap my head around the process, even with two helpful tutorials I found. Plus, I do not have the time to learn. However, I may share some resources in the future relating to using a DAW from people with a brain cell, so keep your eye out for those. But I promise, the day I get decent experience in mixing is when I will make a guide on it.
That is all of the definitions I can think of for now! I know I did not go over all of the parameters like "growl" and "cross synthesis", and that is because I will explain how all of the parameters work in a planned post. I also took some notes from Minnemi's video on basic VOCALOID terminology and the Vocaloid wiki. If I am able to think of any other important jargon later on, I will update this post. Thank you for reading this! I hope your knowledge on vocal synths has expanded, and I apologize for the huge post!
#vocaloid tutorial#vocaloid#vocal synth#vocaloidproducer#ai that are not paid voicebanks must die#mmdmikumikudance#mikumikudance#project diva#fanloid#synthesizer v#utau#long post#vocaloid resource
6 notes
·
View notes
Note
your Mouthwashing Blender edits are so cool!
I'm learning Blender but it's a bit complicated, do you have any advice for someone getting started?
Hi there, Captain! Thank you for your words! I must say my edits are not done in Blender, they are done in MikuMikuDance

I exported the models created by Aarontaron (.fbx format), to MikuMikuDance using the plug-in "MMD Tools" in Blender, then retouched them a bit in PMX Editor to later use in the mentioned program. (I talk quite a lot about that here (Part 1) and here (Part 2)
Most of my renders are actually pretty raw as I don't have MME (MikuMikuEffects) and my character's model has wonky shadows for being a Daisuke edited model (And also imcomplete, that's why I didn't make any animations yet), so I use them with flat colors.


On your left is the raw version, the second has expressions photoshopped and corrected my character's textures.
But that's just step one. Step two, I add shadows and blurr effects and Step three is copying a merged version of what I got so far, blurr it and set it to "Soft Light" layer mode

Step four, I merge layers then copy it again. And set it to Semi-Tone. Then I reduce frequency to 12. Then rasterize the image

Now, for step 5 we turn the lights into transparency so we only get the dots. We multiply said layer twice then set the three of them a color (Red, Blue, Green). Finally, we Overlay + reduce opacity to 5-10% and separate the dots to give a chromatic abberation
In some cases I apply extra layers of light, shadows and effects. As well Correction layers. End result being this!

I hope this helped! My suggestion for Blender would be to: 1. Get someone that could teach you, or watch a billion tutorials 2. If you aim for animation, then with even more reason! I just learned Blender for two weeks just to get my model and export the crew to MMD.
8 notes
·
View notes
Text

:) More to come~!
Model by Rsainbow on Deviantart, stage by 哩希Lix.
But yeah, for those of you interested in learning to animate bits from the QSMP, I highly recommend using MMD (mikumikudance) the software is easy to use, it’s got TONS of tutorials on line, and there’s a huge amount of free resources, models, and stages on Deviantart. And if you can’t find a model of your favorite mcyt, then you can make your own (although that’s a bit harder).
8 notes
·
View notes
Note
Hi!! I have a P5 OC and seeing your 3d art with your OCs and canon characters is inspiring!! I looked around at stuff on google and I can easily see that models and assets obviously exist for the Persona 3 - 5 games. I'm curious about maybe trying to make my P5 OC as a P5 model. If you don't mind disclosing, how did you makes the custom models of your OCs and what kind of system requirements would I need? Although this may be beyond my talent, seeing as I have no experience in 3d art....
Hello!
Honestly I'll be as blunt as I can, all of my model meshes were done in PMX Editor, which is a program used for MikuMikuDance. I don't think I'll make a clear "tutorial" type on this one as I literally just use pre-existing model's assets to make custom models (which you can find downloads through DeviantArt!)
3 notes
·
View notes
Photo


Both models: By me!
Stage by: Touko-p
Jolyne’s first post by: elina002
Teto’s last pose by: Ninjakeks54
All other poses: By me!
Autoluminous effect by: sovoro
SVSSAO effect by: sovoro
SSAO effect by: Otamon
#MMD#MikuMikuDance#Tutorial#helpful#PMX editor#Kasane Teto#Jolyne Cujoh#Utau#UTAULOID#Winter#Seasonal#Autoluminous#MME#MikuMikuEffect#JoJo's Bizarre Adventure#JJBA#JoJo#jojo no kimyō na bōken#Stone Ocean#part 6#Jolyne#Jolyne Kujo#Teto#cute#moe#step by step#help#effects#effect tutorial#MMD tutorial
21 notes
·
View notes
Text
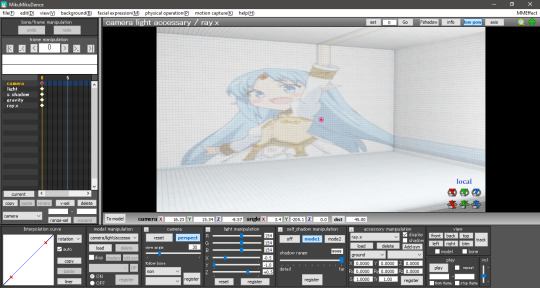
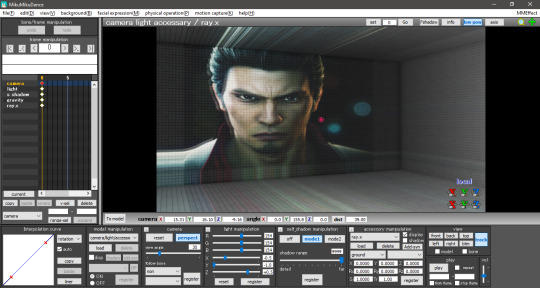
RAY-MMD lighting tips: a translation by ryuu
The following tutorial is an English translation of the original one in Japanese by ngreeed. (WARNING: the website is NSFW)
Let’s get started? If you just landed on this tutorial for advanced MMDers and is wondering what the hell is going on, there are beginner Raycast tutorials in Learn MMD! Also, if you feel like reading more about rendering tips, I suggest taking a look at my other tutorial: advanced MMD rendering tutorial (and why you should care).
Content Index:
Introduction
Lighting: introduction
Lighting: basics
Fog
Other Tips
Final Notes
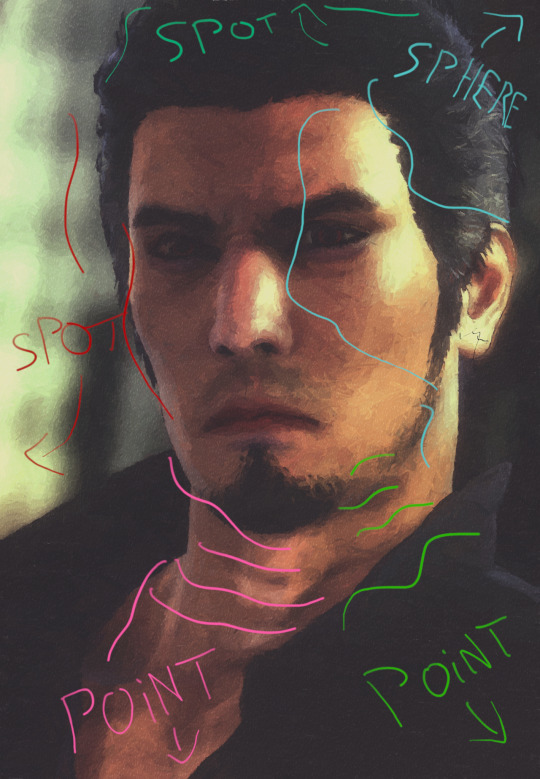
Introduction to Lighting Content Index:
Directional Light
Rectangle Light
Sphere Light
Point Light
Spot Light
Spot Light IES
Disk Light
Tube Light
Basics of Lighting Content Index:
Ambient
Shadow
Fog
IES
LED
IBL
GIF
Fog Content Index:
Atmospheric Fog
Ground Fog
Volumetric Cube And Sphere
1. INTRODUCTION
This compilation was brought together by the MMD community and contemplates ngreeed’s own experiences with fog and lighting usages. Every picture shown in this translation can be found in the original documentations on Iwara and GitHub.
It was translated from Japanese to English by ryuu with written permission from the author to share it on my blog and add information. The translation was done with the aid of the online translator DeepL and my friends’ help. This tutorial has no intention in replacing the original author’s.
2. LIGHTING: INTRODUCTION
By learning lighting, you’ll have more freedom in directing your videos, but it’s only for those who are confident that they understand how to use Ray-mmd, because it’s a pre-requisite and an additional part of understanding how to use skybox and materials. If you’re unsure about the other two items, start by reading this wiki.
Originally, surface lights in a 3DCG software are characterized by their ability to create soft shadows, but the surface lights used in Ray-MMD are very difficult to handle and don’t provide much benefit, so we recommend using point lights or directional lights.
Translator’s note: for those wondering what lights are available in Raycast, there’s a translation below of the wiki’s list.
2.1 Directional Light
Directional light simulates lighting hitting an object from an infinite distance. The angle of each ray reaching the object is negligible and the rays will always be parallel to each other, so it is also called sunlight.
Directional light doesn’t take into account the coordinates of the light source and won’t affect the lighting effect when placed in any position of the scene. Only the rotation will affect the lighting, because of the nature of directional light requires shading calculations for the whole scene.
Therefore its computational overhead is the largest among all multi-source shadows, and its shadow quality is only suitable for lighting characters at very high quality, which you may use when you want to attach a bone to the main light source.
2.2 Rectangle Light
The light source will shine from a plane towards a fixed range. It’s used to simulate monitors, screens, smartphones, etc.
Since the light source of the area light needs to consider the volume of the light source, the real calculation of its shadow in real time is very difficult to do. It’s recommended to use spot light shadow instead.

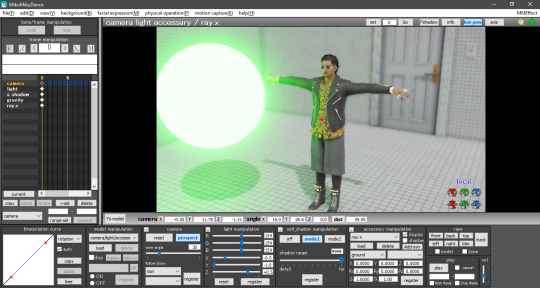
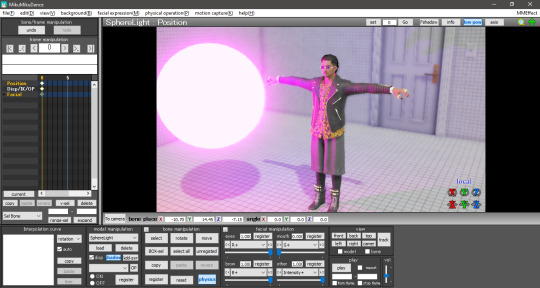
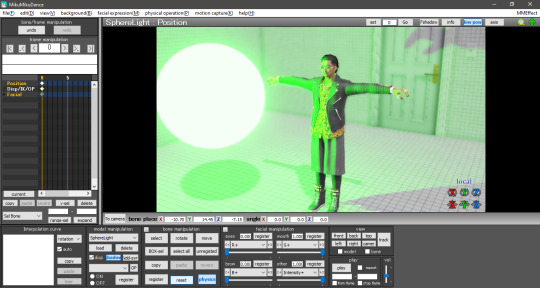
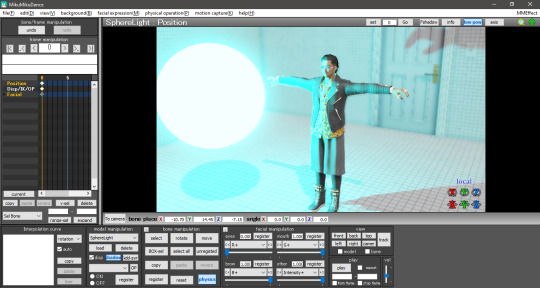
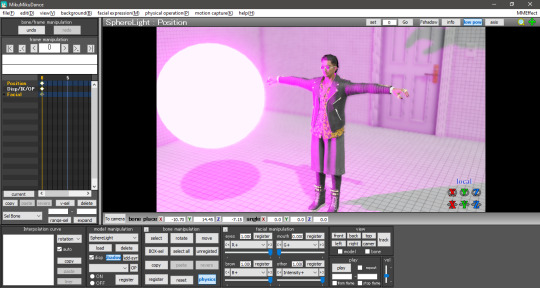
2.3 Sphere Light
The light is emitted from the location of the light source to the surrounding area and the volume of the light source is taken into account to illuminate all the objects within the range.
Since the light source of the area light needs to consider the volume of the light source, the real calculation of its shadow in real time is very difficult to do, so the point light source shadow is used instead.

2.4 Point Light
Light source from a point, uniformly emitting light to the surrounding area, all objects within the range of light.
The point light source needs to calculate the shadows of objects within the range and will lead to a large shadow calculation overhead, while its shadow quality isn’t suitable for character lighting.

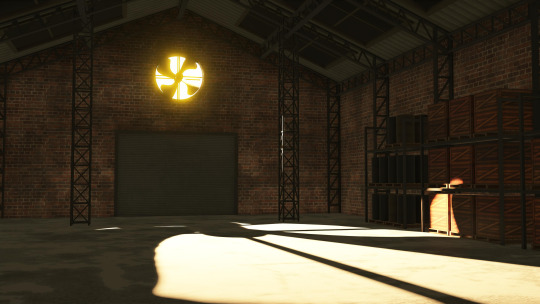
2.5 Spot Light
Spotlight dosn’t take into account the volume of the light source from a point, in a fixed direction to a certain range of cone angle irradiation object. The brightness of the edges of the ball will gradually fade and the angle of the ball can be controlled by the (Angle +/-) morph.
It’s used to simulate lampshade, flashlight and a car high beam. The quality of shadows is the best of all light sources, so it’s very suitable for irradiating the character on the simulation of stage lighting.

2.6 Spot Light IES
Sampling IES textures simultaneously on the behavior of the spotlight.
IES defines the luminous flux of its light at different angles, so that certain areas will be brighter or darker, thus simulating light coming through certain places and shining around the scene.

2.7 Disk Light
The light source will be irradiated from a plane object towards a fixed range. It’s used to simulate light from afar, because the light source of the area light needs to consider the volume of the light source.
The calculation of its shadow in real time is very difficult to do, so use spotlight shadow instead.
2.8 Tube Light
Uniform illumination of the surrounding objects. It’s used to simulate the light source of a lamp, because the light source of the area light needs to consider its volume
The calculation of its shadow in real time is very difficult to do, so use a point light source shadow instead.

3. LIGHTING: BASICS
Before explaining the parameters, let's start with an explanation of how to use the Lighting folder.
In the Lighting folder of ray-mmd, there are 10 different .pmx's to load into the MMD and their respective folders. Basically, the MME of the light will assign the .pmx's in the Default (Ambient/LED/GIF/IBL) folder of the respective light folder to the light’s .fx. .....lightning.... .fx is assigned to the LightMap tab of MME, and ...fog... .fx is assigned to the FogMap tab of MME.
Translator’s note: a fog .fx can be assigned to LightMap, but it’ll produce only fog.
Once you know this, you can play around with the lights and learn what you can do with them.
This spreadsheet shows the parameters and .fx available for each light, along with a brief explanation. The explanation of the terms is pretty much a translation.
3.1 Ambient
Reference: twitter.com
Assign the .fx in the Default Ambient folder to the LightMap to create a light without reflections or highlights when a material with high parameters such as Specular is lit. It is good to use it when loading multiple lights.
DirectionalLight is located in the Default folder, not in the DefaultAmbient folder.
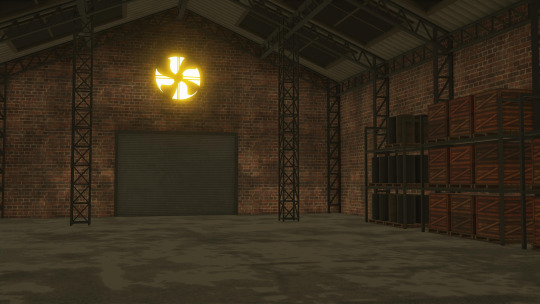
3.2 Shadow
There are four types of shadow: low, medium, high and very high. If you assign it, when light (or fog) hits the model, it won’t shine on the model beyond it. Rather than increasing the shadow, it’ll stop when the light hits the model. In other words, it isn’t attached to the initial light, the light will be brightened nonetheless.

Default spot light.
The same spot light with shadow (very high).
3.3 Fog
When fog is loaded, light streaks are created at the location of the light emitted by the light. There are also special parameters called MiePhase and MieDensity, but be aware that other parameters aren’t isolated. The godray may or may not be displayed depending on the angle and position of the camera. So be careful.
Godray representation using volumetric fog and disk light.
3.4 IES
Reference: unrealengine.com
Simply put, it’s a light which displays the distortion caused by the reflective surface of the lighting fixture, the shape of the bulb, and the lens effect.
It can express a light closer to the one you have at home than a straight spot light like the ones used on stage. You can think of it as basically spot light with just a little distortion in the shape of the light. A point light IES is also spot light.
3.5 LED
Reference: twitter.com
The light source itself is the same as rectangle light, but it can display AVI images or screen images.
In order to display images on the LED light source, load DummyScreen.x in the Extension folder and set the Background (B) in the upper left corner of MMD to ON mode. You can also load the background AVI and change the mode to display any image.
If you just want to display the image, you can set the material of your favorite model to material_screen, but you can use the LED as a light source for the image.
Translator’s note: in practice, it looks like this. In a more straight forward way to explain this, load the LED light and add main.fx to it. Then, load the dummy and select any AVI file or just enable the capture mode. The LED will start capturing the screen and emit light. You can play with the RBG sliders and all. I added a volumetric cube for the dark room effect and Sugiura-san for you to see how the panel behaves. Whenever there’s a change in the captured screen, the light behaves accordingly i.e. a red screen emits red light; a mostly white screen with green details emits white-ish.
3.6 IBL
This and the GIF sections were writen by the translator, ryuu, as the original author requested information about it.
IBL stands for Image Based Lighting, which is what Raycast does! The image is projected into a sphere and it samples the data to light the objects. All of the skyboxes we use have images in the .dds format for easier rendering.
According to the spreadsheet, the only light capable of using IBL is sphere. To activate it, head to the Default IBL folder instead of the default one that opens when loading light properties. You’ll notice the sphere reacts with weaker lighting, you have to increase the intensity.
The following images are color tests with sphere IBL. The most visible differences are in how RG and RBG react: they produce shades of red and yellow, then white and pink respectively.


Now with disabled IBL, this making the sphere another common light. The default is very strong compared to IBL, Zhao-san hand’s shadow is even huge on the door behind him.

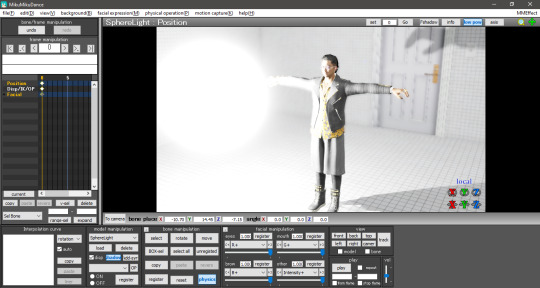
The .dds used was the default one in the Default IBL folder. I haven’t experimented with a different one yet, plus I believe it isn’t any .dds image that’ll work there. If we follow the logic of how custom skydomes are created, a HDR image is needed and you have to “craft” them.
3.7 GIF
A rectangle light can load .gif images and project them on their light, Just load the .fx inside the Default GIF folder to activate it. The default GIF is the following. However, when loaded as light, it doesn’t animate and has some distortions on the edges.

For now, the only advantage I see in using a GIF light is to mimic a projector effect at the cinema. You can use custom images by renaming the default one to rance1 and the new one to rance.
The projection’s size depends on the rectangle’s, so a small rectangle will show a small GIF. Also, keep in mind that the projection is a mirror of the original image.
4. FOG
The fog can be used to create realistic perspective, smoke, and air, and it can also be used in conjunction with fog lights to change the atmosphere. It’s important to note that when the fog is loaded, it’s rarely displayed in Model Edit mode, so be sure to check it in Camera mode. In this case, you may need to tweak the model display order a little to get it to show up.
There are four types of fogs: atmospheric fog, ground fog, volumetric cube and volumetric sphere.
4.1 Atmospheric Fog
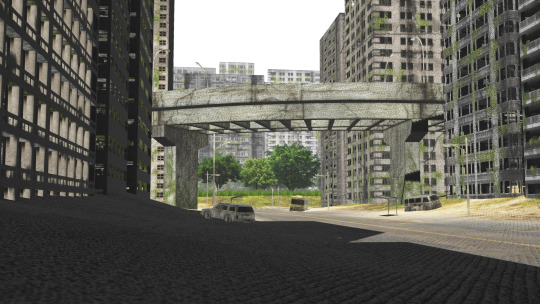
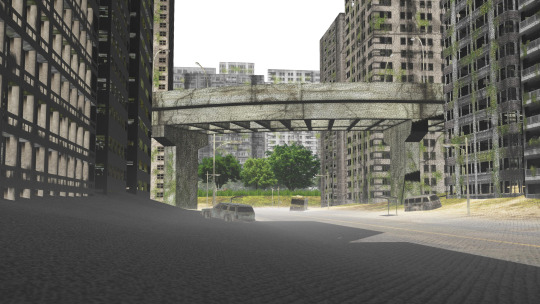
If you don't know what you're doing, but want to use a fog, just load this to get a sense of perspective (or rather, fading in the distance). So if you have a stage that extends far into the distance, you can use this to get a certain atmosphere.
Also, only the atmospheric fog has multiple fog maps, which can be found in the AtmosphericFog folder with a godray .fx file. You can apply godray to the lighting (sunlight) in MMD and, by assigning a fog map with ...without sky... .fx, you can disable the fog effect on the skybox.
You can also disable the fog effect for skyboxes by assigning a fog map with ...without sky.... .fx.
The number of parameters is overwhelming and difficult to adjust, but it may be easier if you think that the parameters with Mie are related to the lighting (sunlight) in MMD.

Without fog.

With atmospheric fog and changed density and range values. The farther away the image is, the lower the saturation and lightness become. The perspective is clearer. It’s rare to see much difference, but the atmosphere changes quite a bit with and without the atmospheric fog.
4.2 Ground Fog
When loaded, the fog is displayed based on the ground, and its color and height can be adjusted using morphs. The number of adjustable parameters is small, but if you adjust them, you can use it in the same way as the ground-based atmospheric fog.
Without ground fog.
With ground fog.
4.3 Volumetric Cube And Sphere
Unlike the other fogs, these two are only loaded and not applied to the entire room. At first, they only appear small at the foot of the screen and need to be resized to fit the room. By the way, they are basically the same, just round or square. The advantage is that it can be assigned to a limited space only.
Without light.
With light.

With light and volumetric fog. It might be good for a dusty atmosphere in a closed room.
5. OTHER TIPS
If you feel that your PC can't handle it, you can lower the shadow to low and get by.
The skybox time of day can be used as a second atmospheric fog which is easy to handle since it is built into the skybox. If you turn off EnvLightMap, Main and MaterialMap, it won't interfere with other skyboxes. It's pretty easy to use, but not for everyone.
Turn on Bokeh (DOF effect of Ray-MMD) and pull the MeasureMode morph of ray-controller to the right to bring the ray.x accessory into focus.
It's a good idea to set the SSAOMap of eyes and face to 0.
6. FINAL NOTES
Stages shown in this tutorial: P.T by G_Wuuuuu, warehouse by hiro K, skyscrapper by 化身バレッタ and abandoned city by NOB.
Models by SEGA.
I tried to keep the translation as faithful as possible to the original documentation. Thank you, ngreeed, for allowing me to share your tutorial with non-Japanese speakers.
Also, I absorbed many knowledge from this tutorial and rendered a new image using the improved technique. Only the sphere light had fog. The colors were applied after adjusting all the lights in their black and white counterpart. Retouched in GIMP.


38 notes
·
View notes
Photo
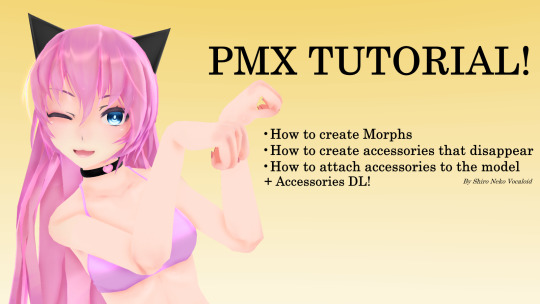
[PMX TUTORIAL] Morphs and others +VIDEO
VIDEO→ https://www.youtube.com/watch?v=oJRM5r_xnkI
#mmd#pmx#3d#mikumikudance#vocaloid#pmd#pmx editor#mmd accessories#accessories#neko#tutorial#guide#shiro-nekovocaloid#video
2 notes
·
View notes
Text

How I’m making my comic / REWRITTEN /
Hello! Today I have something that I'm really proud of - a page that is all about how I'm making my comic in MMD. Some of you might already know about this since it was first published as a DeviantArt post. Although now it has a new version - ✨ the rewritten one ✨and it was published on my notion page (link below).
-> Link to the page here <-
All comments and suggestions regarding this page are greatly appreciated! ( ´ ▿ ` ) We don't talk about how it was published back in September and I'm writing about this in the middle of November, I just forgot.
More info under the cut ↷
What does this page consists of?
Main topic is the process of making an episode I describe each step of this process in details to show to the reader how does all of this looks like and how it works.
My ways of crediting Crediting is a very important thing in MMD community and so I showcase my system of crediting on almost a mass scale.
Tips regarding stuff related to MMD and a comic It's a short section where I share my tips regarding e.g.: making good poses or 2D-ish effect style.
Disclamers
My native language is not English therefore there may be some spelling mistakes I haven’t noticed. I’m using translators too. I’m sorry for that in advance.
I’m not trying to force anyone to do everything exactly like I described in this document. It’s for you to read if you’re curious about how I’m making episodes for Webtoon and it’s for you to decide whether you’ll try to do something from it or not.
This document is based only on my experience. I’m not an expert in making comics or 3D art, it’s just a hobby for me. There won’t be any professional advice, only my personal ones.
Do not repost this anywhere. You’re allowed to share the link to this page with it but not copying the entire content of the page itself. Quoting with sourcing the original post is of course allowed.
I do not take responsibility for any damages caused by any advice included in this document.
If you have any questions or suggestions regarding anything related to me making episodes for a comic or the comic itself, you may send them through one of my social medias. Frequently asked questions might be anonymously added into the page for others.
#ethu stuff#mmd#mikumikudance#mmd tutorial#runaway comic#indie comic#original comic#notion page#watch me ramble about some niche topic in this community
6 notes
·
View notes
Text
How to make accessories/objects in PMX Editor (MMD Tip)

here’s the button that lets you make stuff in pmx editor, and here’s a tutorial for how to make a table with Pmx editor (I have the Eng 2.0 ver) ( if you just wanna make something to test it out and get familiar with using it) : https://learnmmd.com/http:/learnmmd.com/build-accessories-and-stages-with-pmxe-primitives/
a tutorial on vu mapping in PMX : https://www.youtube.com/watch?v=lor72sggQRA&ab_channel=OtomeZaki
and here’s a tutorial for how to make 3D text (if you wanna make like spinning text to add to your motions and stuff): https://www.deviantart.com/cmsensei/art/3D-Text-in-PMX-Editor-551034993
Hope I was helpful!!!
#MMD#mmd model#mikumikudance#mikumikudance community#mmdc#mmd community#mmd helpful tips#mmd tips#PMX Editor#mmd tutorials#pmx tutorials#3d modeling#3d text
2 notes
·
View notes
Video
youtube
MMD to Blender 2.8x motion file VMD (RigidBodies setup)
1 note
·
View note
Video
youtube
How I clean my mmd models/parts -bad speaking-
1 note
·
View note
Text
Paracosm Resources <3
Need help bringing your paracosm to life? Try these free resources!
⚠️ Updates always pending! Suggestions always welcome! Feel free to message me any tips or questions <3 ⚠️
(Cont. below cut, or with real time updates on this google doc!)
Art Programs
FireAlpaca - 2D Art Program, Animation. Where I make most of my digital art, and paint the frames for my animations :) It is free to use, and easy to learn and use! It can make basic animations as well, such as gifs. It requires download.
Krita - 2D Art Program. Professional, free digital paint software :) I have not used it before, though I have heard good things.
GIMP - 2D Art Program, Photo Manipulation. It's free to use, but I do not like it/recommend it highly. But! If FireAlpaca and Krita don't float your stoat, try Gimp! For 2D art, but also able to emulate Photoshop to a degree ^^
Inkscape - 2D Art Program. Free to use digital illustration software. Makes 2D art :)
Of course, who can forget classics like good old MS Paint, and the new and exciting 3D MS Paint, which can both be used to create some really neat things! Classic MS Paint is available here in browser form! If you need that. I just think it's neat!
Art AI
Petalica Paint - Coloring Software. An in browser, watercolor manga style coloring software, which can (almost) effortlessly color in any of your line art pieces! I've played around with it for my Thorn illustration style piece, and enjoyed it! It is free to use, and can take user input to make the colorations more precise.
ArtBreeder - 3D Realism Software. Using Artbreeder, you can create lifelike images of your paras, planets, or potentially even fursona, using the intricate AI they let you work with for free! A premium version exists, but most functions are fully usable without - though I recommend donating ^^ You can randomly generate, or prune and shape what you make until its perfect! Slow to use and get the hang of, but very worth it! Artbreeder is also pioneering an intriguing animation software to go alongside their product! Browser based.
3D Software
Blender - 3D Modeling, Animation. The best (in my opinion) free 3D modelling software.
MagicaVoxel - 3D Pixel Art. Free to use! Could be interesting :)
MikuMikuDance - 3D Rigging. Anime style rigging and animation software, free to use, and certified internet artefact! Has stood the test of time, and is still used and loved today. Can support ports of many kinds of assets, including, I believe, those from Blender, and of course those that are downloaded. DA has a bunch of old MMD communities you can raid for assets!
Animaze - Face Rigger. Use 3D models and a webcam to watch your paras talk! Models can be made in Blender, downloaded online, or even from CHARAT V, CHARAT GENESIS sister app!
Character Creators
CHARAT GENESIS - 2D Character Creator. Browser based anime style character creator, with multiple crops and poses, and infinitely customizable options. It is legitimately insane. Has a 3D function called CHARAT V which can apparently convert characters made in CHARAT GENESIS into 3D models compatible with Face Rig and Animaze!
V-Katsu - 3D Character Creator. Free on steam! Anime style, intensive character creator, by the same people who made Koikatsu, and Koikatsu Party, two amazingly detailed 3D hentai makers. While V-Katsu is a SFW VTuber maker, if you're looking for NSFW anime content, you could always spend roughly $70 on the full NSFW versions. V-Katsu requires a translation mod (free online as well) which you have to install, or the ability to read Kanji <3 Works with VR tech.
V-Roid Studios - 3D Character Creator. Free on steam! Anime style, fairly in depth character creator, that allows for some degree of digital 3D hand sculpting, particularly with their amazing hair engine, to get your paras looks perfect!
And, of course, Picrew has thousands of character creators of various styles and quality uploaded by the artists who made them! Also, honestly I think we as a society should embrace making dinky chibis in Gacha Life. IDK why everyone is mean to the gacha kids, like we weren't all cringe at some point,
World Design
HomeStyler - 3D and 2D Room Designer. Make a model of an interior for a home or building, using real 1:1 furniture of IRL brands! Apparently this is free to use, though there is a premium version, and it offers 3D and 2D models.
Map to World - 3D Planet Maker. Turn your fantasy world into a 3D model of the planet. Put maps directly on, or design the surface and textures of your world. Takes a lot of getting used to, but it is AMAZING. Free to use, and browser based!
PlanetMaker - 3D Planet Maker. Make a customized 3D planet! Free to use browser site! I have never used this, but I would love to mess around with it sometime! Allows you to add orbital rings, change textures, and more at the click of a mouse.
If on sale, I also recommend snagging a copy of the Sims, particularly 3 or 4, for character creation and world design. Maybe not the best gameplay without mods, but it's also a load of fun, and very easy to add custom content to! Minecraft also. But you just need Minecraft, in general. Beyond its ability to fairly faithfully recreate structures from your paracosms, it's just Good.
Game Creators
Maybe you wanna turn your paracosm into a cool game idk, just thought I'd put these here!
Construct 3 - 2D Game Creator. Beginner level game making :) Drag-and-drop if/then style programming.
GameSalad - Codeless 2D Game Creator. Drag and drop style/no coding, beginner friendly. Free version available!
Solpeo - 2D Game Creator. HTML5 based game engine for 2D and isometric game development. Some programming knowledge needed. Platforms supported: Chrome, Firefox, Internet Explorer 9+. Free version available.
Stencyl - Codeless 2D Game Creator. Drag and drop style building/no coding skills needed. Has editable templates!
Scratch - 2D Game Creator. Very easy to use and totally free, though relatively basic!
Unity - 3D, 2D, and VR Game Creator. Make games with 3D software. Import your own assets (Blender compatible) or download free options, or buy the rights to models. Works for 3D and 2D games. Free version available, and now works with VR tech!
Unreal Engine - 3D Game Creator. Extremely advanced 3D game developer. Highly customizable. Free to use!
Twine - Text-based Game Creator. Use a map to make a branching paths text-based story game. Free to use.
Squiffy - Text-based Game Creator. have used Squiffy and it can make some really, truly incredible things. Can take a while to pick up, and learn how to use to its full potential. Free to use! Has an online and offline library of player creations you can get inspiration from!
Quest - Text-based Game Creator. I've never used this, but it seems cool! Use it to make interactive text-based DND game adventures in browser.
Ren'Py - Visual Novel Creator. Visual novel engine, that is well acclaimed, and of course, free to use!
Companion AI
Replika - 3D Companion.
Kajiwoto - Chatbot Companion. Customizable, learning AI you can shape into a personality. Communicates via Discord like chat box.
Organization
Toyhou.se - Character Gallery. A customizable library where you can upload all of your paras and characters for the public to view! Free to use, but requires a premium member to invite you!
Refsheet - Character Gallery. I haven't used it before, but I've heard good things, and that it's a suitable alternative to toyhou.se if you can't get an invite!
Notebook.AI - Character Gallery. I haven't used it before, but I've heard good things, and that it's a suitable alternative to toyhou.se if you can't get an invite!
World Anvil - World Building Toolset. Like character galleries, but for worlds and their lore :)
Scabard - World Building Toolset. Aimed at DnD campaigners, but I reckon it'll be useful for many!
YARPS - World Building Toolset. More focused around story and lore than Scabard or World Anvil, and looks beautiful! Still in its prototype stage, however.
Pinterest - Photo Organizer. Look at, collect, and sort images into boards. Personalizes your feed based on that, and is free to use and join! However, unlike their myriad of wonderful recipes, DIY tutorials, and the likes - a lot of the images are uploaded by second parties and not credited, so be careful reuploading anything you find! Also great for finding outfits and art inspo for your paras!
Generators
Fantasy Name Generator - Name Generators. Does what it says on the tin! Generates fantasy names. Is a lovely website, run by a purportedly lovely woman.
Fantasy Map Generator - Map Generator. Randomly generates a fictional map, which you can view in 2D or 3D.
Donjon RPG Generator - Multiple Generators. Can make maps, weapons, items, etc.
Seventh Sanctum - Multiple Generators. One of my favorites from high school! Does all kinds of things - the standard items, spells, and names - but also prompts, backstories, characters, and even comedy generators!
ShindanMaker - Multiple Generators. User created and uploaded, any kind of generator you can imagine, of varying complexity. And when I say any generator? I mean ANY generator.
Audio
Audacity - Record and Edit Audio. What can't Audacity do? I love Audacity to death. At surface level, it records audio. I've used it to record voices for my paras, and get audio for animations and games I've worked on. I cannot recommend it enough. Comprehensive editing, and with some investigation, it can do so, so much more than just record simple dialogue.
FL Studios - Compose. Compose music with an unlimited free trial. Upgrades available for purchase!
Indie Game Music - Royalty Free Music Library. Free to use Indie Game Music. What it says on the box!
AudioJungle - Royalty Free Music and Audio Library. Thousands of free to use audio clips!
Online Piano - Someone could use this, for recording, or just messing around. I've seen plenty of paras who play piano, this could just be used for fun!
Online Guitar - Same reasons as above, but this site looks kinda sketchy. Use at your own risk or reward! Audio
For real, if you ever need music, sound effects, or really any MP3 clips that can be used without infringing on copyright laws, just search 'royalty free' (music/audio/insert thing here) same applies for photos! Make sure the source is reputable, however.
Tutorials
W3Schools - Coding. Learn the basics of coding, for free, online!
Miscellaneous
Debut Video Capture - Screen Recorder. Record game footage and let's plays for free! Professional and home versions. I see a few of our community members have paras who run YouTube channels, and I thought these might help! It could be a nice way to connect your parames. YouTube quality <3
Pixton - Comic Maker. Comic making website. I have no experience with this at all, but some may find it useful!
Picfont - Image Editor. Puts customizable text on an image. I used these for @paraesthetics paracosm header edits <3 It has a premium version (???) but the free version has all functions, but it crashes regularly (honestly seems timed :/) but once you get it down, it's a very quick process, and you won't have to worry about that at all.
Itch.io - Publishing. You can publish your self made games here :)
Korsakow - ??? Described as, "The Future of Storytelling" and is apparently a way to create interactive films. I *just* found out about this, but thought I should include it for someone who may know how to use and appreciate it! Free? Unknown, at the moment.
Tips and Tricks
Animation Done Easy
Our forefather's of internet animation used MS Paint, Windows Movie Maker, and Audacity. All of these, or their equivalents, are free on standard computers. I, personally, use FireAlpaca - which works just as well, if not better, than MS Paint for animation - but takes longer, and definitely lacks that retro feeling. I also use my trackpad to draw and animate everything, so its doable, but probably not totally comfortable, to animate like this for most people :)
⚠️ Updates always pending! Suggestions always welcome! Feel free to message me any tips or questions <3 ⚠️
#immersive daydreaming#paraportal#paracosm#paracosms#paracosmonaut#madd art#art resources#masterpost#free resources
282 notes
·
View notes
Note
Your 90s photoshoot is amazing! How did you learn to make poses? I’m thinking of trying but wondering if it is a steep learning curve haha. Your content is always so inspiring :)
thank you!! i learnt years ago in mikumikudance🥴 the posing works pretty much the same so it sticked with me. I'm sure there are multiple tutorials on youtube, they're usually pretty good. if anyone has any recommendations on where to start please comment!
17 notes
·
View notes