#polyboard stands
Explore tagged Tumblr posts
Visit Tumblr Blog
Explore Tumblr blogs with no restrictions, modern design and the best experience.
Last Seen Tumblr Blogs


Fun Fact
Tumblr.com is the 103rd most visited website in the world.
Text
POLYSTANDS!

M TOP POLYBOARDS
Feeling Kinky?!
We have a limited supply of M TOP POLYSTANDS
Treat yourself!
Eggsactly what your studio needs
Or maybe you need to replenish existing stock…
…or replace tatty stands
Happy Hols!
For more info
And to purchase direct from the site
Hit Up POLYBOARDSTANDS.CO.UK
You’ll find a selection of STANDS
All Fit Standard POLYS – We Sell These Too!
8x4ft | 2.4 x 1.2m x 2in | 5cm thick
We also sell BACKGROUND SUPPORTS
Hit Up PAPERPAL.LIVE!
other useful bitz + bobz
Stand Specs etc
UK manufactured using top quality steel
Robust — Hard Wearing — Sturdy
Great for the studio + on location
very useful for retail
exhibitions
Length 44cm Width 20cm Height 24cm 50mm | 2in Gap Weight 1.5kg
2” | 50mm | 5cm gap — in stock
1” | 25mm | 2.5cm gap — special order
Shipping = Worldwide
Various delivery speeds available
Any questions?
Hit Us!
AKA Foam Core Stands in the US
Looking for STUDIOHIRE…?
🤜 Swing by STUDIOHIRE.COM!
SO DAMN SOURCEY! . . . . . . . . . .
POLYBOARDSTANDSdotcodotuk #POLYBOARDSTANDS #PolyTrollies #FoamCoreStands #PolyboardHolder #StudioPhotography #PhotoStudio #PhotographicStudios #PhotoStudioEquipment #StudioEquipment #PhotographicStudioSupplies #EssentialStudioKit #PhotographicAccessories #POLYBOARD_STANDS #LocationKit #Studio #Studios #POLYBOARDSTAND #PowderCoatedStands #POLYBOARDS #FoamCore #LocationPhotography #Photographers #DisplayStands #EssentialKitForPhotographers #Photography #PhotographyKit #Foamcore #STUDIOHIRE .COM #THEPAPERPALBACKDROPSUPPORT
#displaystands#essentialkitforphotographers#foamcore#foamcorestands#photography#photographers#studiohire#polyboards#photographicstudiosupplies#polyboardstand#polys#polystyrene boards#polyboard#polytrolley#poly styrene#studio#studios#photo studio#background support#paperpal background support#paperpal#the paperpal#colorama#film studio#foam core stands#retail stands#exhibition stands#exhibitionstand#polyboard stands#stands
3 notes
·
View notes
Text
Lola's Room: Equiptment List
Here is the equiptment list I put together for Lola's Room.
Camera
URSA - Blackmagic URSA Mini Pro 4.6k G2 URSA - SIGMA PL Prime Lens Kit Ronford Baker Heavy Duty Short Tripod Ronford Baker Heavy Duty Tall Tripod URSA - Sachtler 25 Fluid Head URSA - Arri Follow Focus FF5 Tilta Nucleus-M Wireless Follow Focus Kit URSA - ARRI LMB Matte Box Kit SmallHD Cine 7 Monitor SmallHD Cine 7 Monitor BNC SDI Cable - Medium Length BNC SDI Cable - Medium Length BNC SDI Cable - Medium Length 4 x V-Lock Batteries + Charger 4 x V-Lock Batteries + Charger Monitor Stand - Small Small Lighting Stand Small Lighting Stand
Lighting
Kino Flo Celeb 250 DMX LED Celeb Kino Flo Stand 150w Dedolight Kit - HALOGEN LIGHT 650w Arri Fresnel - HALOGEN LIGHT 300w Arri Fresnel - HALOGEN LIGHT 300w Arri Fresnel - HALOGEN LIGHT Avenger Light Stand Avenger Light Stand Avenger Light Stand C Stand with 40" extension Arms C Stand with 40" extension Arms C Stand with 40" extension Arms Polyboard - Large (White) Aluminium Flat Trace Frame 48 x 48" Aluminium Flat Trace Frame 36 x 36" Lastolite Reflector Black Flag ( 24" x 36" ) Black Flag ( 24" x 36" ) 25m Drums Mains extension 25m Drums Mains extension 25m Drums Mains extension Bag of Croc Clips Bag of Croc Clips Bag of Croc Clips
Sound
Sound Devices MixPre3 - Recorder and Mixer MKH50 Shotgun mic Boom Pole - Large Sennheiser Portable Wireless Radio Mic Sennheiser Portable Wireless Radio Mic
Miscellaneous
10 x Sand Bags Tennis balls LT Track Pro-sup Laptop Dolly Bike Pump for Dolly wheels Apple boxes - Large Apple boxes - Large Apple boxes - Large First Aid Kit
0 notes
Text
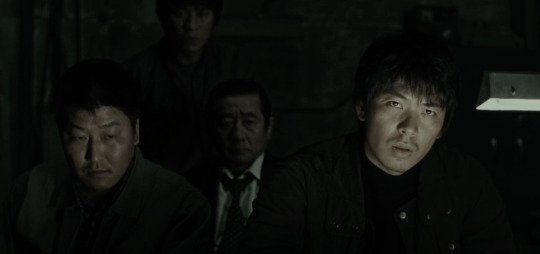
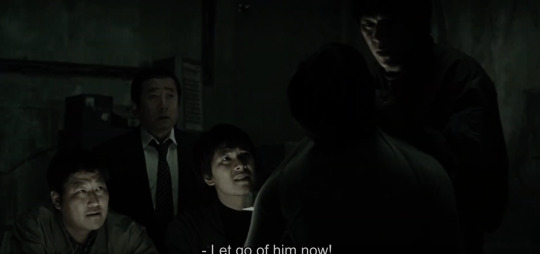
Group 8 Scene Recreation - Memories of Murder Production Breakdown
Brainstorming
For the final week of the production workflow module, my group were tasked with recreating a scene of our choice. Bar some budgetary and time concerns, nothing was off the table.
Eventually we settled on the interrogation scene from Bong Joon-Ho's Memories of Murder. I personally had not seen the film but was excited to tackle it based on seeing the director's other work Parasite.
Pre Production
We had plenty of kit to acquire in order to convey an accurate recreation of the scene:
Camera:
Blackmagic Pocket PRO 6K, Samyang Xeen Cinema Lens Kit, Smallrig Tripod
Sound:
Sennheiser 416, Sound Devices MixPre3-Recorder and Mixer, Large Boom Pole, Microphone Stand.
Lighting:
LEDGO LG-B308K 3x 308 light Daylight Reporter LED Lighting Kit, Gloves
Other:
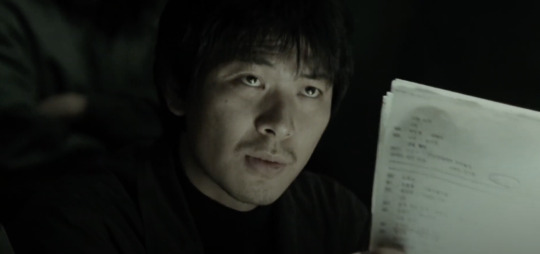
Polyboard (White), Black Flag x3, Floor Cable Cover, Clapper, Sandbag x3
In terms of props we also had to purchase a light from amazon which would replicate the look of the desk light found in the original scene as well as being flexible to being adjusted in order to match different shot compositions. We had also our crew supply shirts and ties for respective actors as well as paper for the process of interrogation.
Aside from kit, scheduling was also CRITICAL and just as important as many groups were filming at the same time. This ended up being a close call as the only time we ended up getting kit that was far enough in advance to leave plenty time for editing conflicted with the premiere of another group project we unfortunately had to miss.
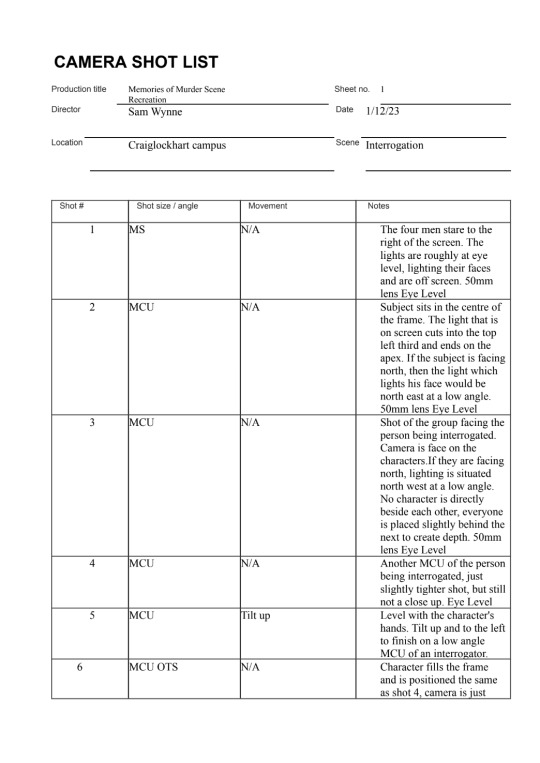
Next we took still frames from each shot in order to plan out lighting:


From there we planned our shotlist:

Along with this we decided on Crew Roles:
Sam Wynne: Director Jack Burns: Producer, Actor, Runner Jake Rae: Director of Photography Jacob Doig: Lighting, Camera Assistant Rushil Deepak: Production Design, Sound
And our actors:
Harry Batkin: Park Hyeon-Gyu Daniel Lee: Seo Tae-Yoon Cameron Mcintyre: Park Doo-Man Jack Burns: Shin Dong-Chul Euan Hunt: Cho Yong-koo
Our chosen filming date the 4th of December 2023.
Filming
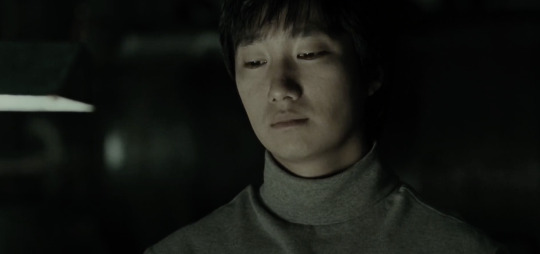
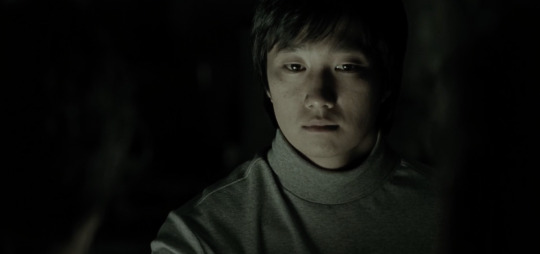
While the location of the scene might not seem complex there was lots of shots and respective lighting to match each.
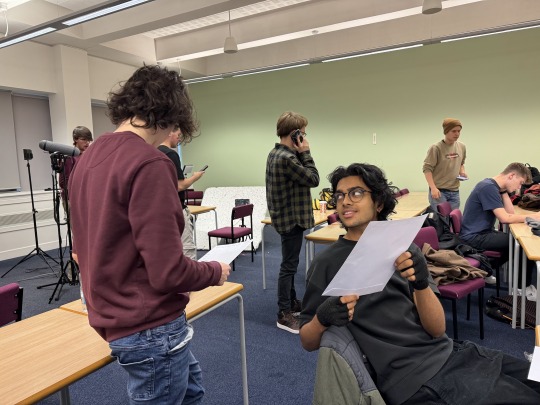
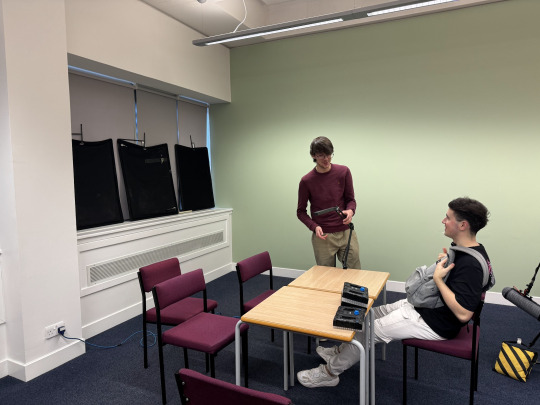
Figuring out framing with the crew/ Practicing lines with actors
We experimented with different angles and setups in the classroom we had booked for the day, and settled on using the corner of the room, which was conveniently near lots of sockets (Useful for our luck of batteries dying).
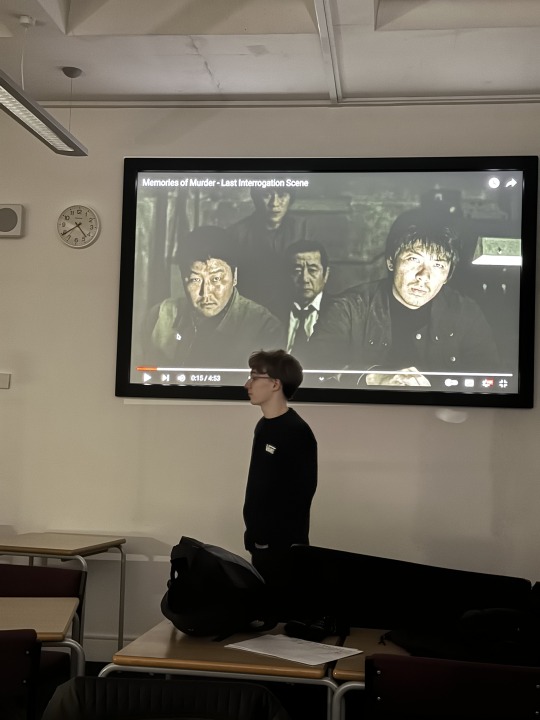
The classroom booking and the orientation of set placement actually worked out in our favour as we had full view of the room's projector, on which we displayed the original scene allowing both actors and the crew to get a feel for each respective shot as it came and went.

This initial shot we filmed first was actually quite simple compared to the others as we only had one character to worry about, along with just having to light his face, as opposed to later shots with characters blocking part of the framing.
Post Production
I helmed the post production of this project, inheriting the audio and video files onto my macbook. I then edited the film in premiere pro.
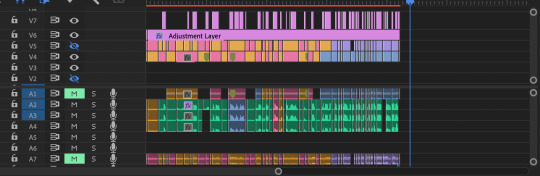
FInished Timeline
I attempted to organise individual cuts by colour coding different takes and angles, as the scene ended up being pretty complex to put together.

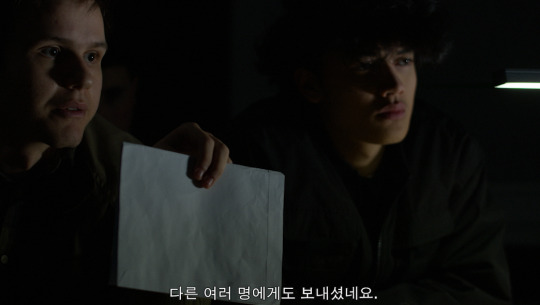
While not integral to recreating the scene, I thought a nice touch in the post production process would be the inclusion of Korean subtitles, paying homage to original language of the film.

Colour Match Feature
I used premiere pro's colour match feature to try and make some small lighting adjustments based on the original scenes. Admittedly, I don't have much experience with colour correction so I didn't go too in depth past this stage. However, this definitely something I want to learn over the winter break..
0 notes
Text
KIT LIST, Shoot Date -04/12/23
Blackmagic Pocket PRO 6K, Samyang Xeen Cinema Lens Kit, Smallrig Tripod
Sennheiser 416, Sound Devices MixPre3 - Recorder and Mixer
Large Boom Pole, Microphone Stand
LEDGO LG-B308K 3x 308 Light Daylight Reporter LED Lighting Kit, Gloves
Polyboard (White), Black Flag x3, Floor Cable Cover, Clapper, Sandbag x3
0 notes
Text
The Actor Headshot
Inspired by kate Winslet Headshots shot by English based photographer Andy Gotts.

I created these 9 images using Adobe Photoshop in Studio class today as part of The Actor Headshot Brief.
I love the character of each image as well as the contrasting skin tone and dark background. The clothing wore is also dark in colour. I love the eyes in each of the shots too reflective by the lighting and subtile lips.

B&W Effect

Equipment Used
Canon 450d
85mm lens
Studio stand
Nice trigger
Reflector
Polyboard
Softbox lighting from above at the front of the subject
I also created 3 Tripdych images using Adobe Lightroom.


Next time I would develop the background to a lighter colour of white or grey to understand the affects this would create.
6 notes
·
View notes
Text
Actor Headshot


Equipment Used
Canon 550D
85mm lens
Studio stand
Reflector
Polyboard
Softbox lighting at the front and above the subject
3 notes
·
View notes
Text
Introduction to Lighting
111019
Three Point Lighting
Key Light - The main light, which is often high and angled at the subject. This will create highlights and shadows.
Fill Light - The light or reflector used to reduce the contrast in an image by ‘filling’ out the shadows.
Back / Hair / Kick / Rim Light - An additional light that separates the subject from the background.
Lighting Design
High Key - A lighting style, which is bright, upbeat and lively. This is often seen in sitcom and comedy films. The highlights dominate over the shadows.
Low Key - A lighting style, which is dark, moody and atmospheric. This is often seen in horror and thriller films. The shadows dominate over the highlights.
Hard Light - Light emitted directly from the source has a hard quality. It is bold and defined. The highlights stand out from the shadows. It exaggerates facial features, which is seen in masculine lighting design. The most common hard light modifiers are the spill kill, snoot, honeycomb grid and gobo. These direct light onto specific areas of a subject.
Soft Light - Light that has been weakened by passing through a physical barrier or bounced off a surface has a soft quality. It is diffuse and scattered. The highlights merge into the shadows. It softens facial features, which is seen in feminine lighting design. The most common soft light modifiers are the umbrella, softbox, bounce card, polyboard and reflector. These spread light across the surface of a subject.
Equipment
Studio Flash Head - In the studio, these are the most common source of lighting. They deliver a flash of high-powered light at a fast speed, which will freeze motion. The power is defined by the wattage output of the head - 400W is acceptable to illuminate one subject, 1000W or more is needed for large groups. Every head has a modelling light, which is working light to give a photographer some indication of the final outcome of the picture. The flash tube delivers the actual flash. This can be turned up and down as needed. It is important to shoot slowly for cheaper and older models. Also the charge must be dumped before switching it off. The full range of modifiers is available for them.
Speedlight - On location, these are the most common source of lighting. They deliver a flash of moderately powered light at a fast speed, which freeze motion. The guide number defines the power - the larger number the more powerful the flash. The most common mode is Through-The-Lens (TTL) Metering, which uses a camera’s internal light meter to calculate the amount of light needed. It is useful most of the time and changes are only needed for creative concepts. In manual mode the flash can be turned up and down as needed. It is important to shoot slowly for cheaper and older models. There is a limited range of modifiers for them.
Summary
During my time experimenting with the equipment at the university, low-key lighting appealed to me the most. An isolated back light on my subject Gyorgy Englert created the mood that I was after. It was interesting to give Gyorgy direction and ask him to think about different things to achieve subtle changes in his expression.

Test Shot, f/2.8, 1/400, ISO 1600

Test Shot, f/2.8, 1/400, ISO 1600

Test Shot, f/11, 1/125, ISO 100

Test Shot, f/11, 1/125, ISO 100
1 note
·
View note
Text
Cheap Photoshoot
Continuation of the research,
When i bought this product i came back and shot it, i used the black side of the poly board as my backdrop and i used a scrap bit of black a3 paper on the table out flat. I had to use this as i didn’t go out and buy anything as additional probs yet. I used a clamp stand to tie the invisible thread onto and that made my bauble appear floating. This is my contact sheets for the first photoshoot.


I started off with trying to light the whole bauble by using the white side of the polyboard, but i felt as though it just wasn’t as visually interesting or of a high standard. when i experimented with the lighting a little more i came to the conclusion i liked the shadowed look with the background completely dark, if i am going to be adding the additional props then i will need to try and make the background slightly lighter so that you can actually see the other objects in the composition. I thinking maybe the fairy lights will slightly adjust the backgrounds brightness without actually having to add lights to the background. Because i like the darkness of the background i’m thinking that i could potentially just have the silhouettes of the garland instead, this will also make sure that the bauble is the main focal point as it should be, and with them being a silhouette it will not be as distracting.
This is one of my images edited. Even though the angle of the object is off i feel like i like it like that. To get rid of the string i used the blemish tool on photoshop.

1 note
·
View note
Text
Lighting Workshop
We was introduced to John who took over the Lighting workshop. We was firstly informed about the safety precautions when in the studio. I really enjoyed the workshop as it gave me me more understanding of how Digital Cameras co operate with head lights etc. He also introduced us to many equipment used in a portraiture photoshoot,such as A power pack ( Bron ), C stand to hold gel and polyboards .Overall it gave me a further insight in a professional Photoshoot environment


1 note
·
View note
Text
Cheap - Contact sheet + Evaluation


For my cheap unit, I chose a ‘plumb line’ as the object I was going to photograph. I decided on this as my product, because I thought the shiny metallic surface along with its varying textures, would allow me to experiment with multiple compositions and techniques in the studio.
As you can see from my contact sheet I started off by photographing to fit the entire subject in the frame. I then decided that focusing on a close up area of the plumb line was the best route forward, as that would show the detail and texture in the metal much better.
Having now decided that a cropped in view was the way forward, I experimented with what areas of my subject would look best. My thinking was that the knurled texture was the most interesting feature to look at close up, but that it would only look good alongside the smooth part of the plumb line. This was so that the viewer could see the contrasting textures found on the product.
After trying out multiple different framings and angles, I then added in some coloured gels to see what effect they would have. The colours ended up looking quite nice on the knurled texture, but after reviewing my images decided to go with a monochrome aesthetic instead.
I photographed my product by dangling it from a piece of fishing wire. I originally tried using the string that came with the plumb line, but once I decided to go for a cropped in look I switched over to fishing wire.
Because the subject was hanging by wire, it was prone to move and sway. I’ve worked with products hanging from fishing wire on multiple occasions already, so I was able to fasten in such a way that minimised movement; but because I was using a macro lens, and photographing such a close up area of the object, any small movements translate to large movements in camera.
To try and counter the movement. I used a ring light rather that the studio flashes. This meant I could use a faster shutter and not worry about the curtain showing in the image.
Using the ring light also allowed me to experiment with rim lighting, a technique that worked well with the metallic material.
Equipment used-
Nikon D5300
NIKKOR 18 -140 mm (test shots)
NIKKOR 105 mm
SIGMA 70 - 300 mm
Tripod (test shots)
Ring Light
Polyboard (x2)
Portable background bar
Fishing wire
Bulldog clamps
Final Image-

My final image is a monochrome conversion of a shot I took using the 105mm macro lens. This photo has been cropped to a square format, and is rotated to have the subject running diagonally through the frame.
I was experimenting with different crop sizes for my final images, and then thought that I could try rotating the whole image to change the way the object sits on the page. Having the subject run from one corner of the frame to the other helps make the photo stand out. The monochrome subject shot against a black backdrop also helps everything tie in together, and ensures that the viewers focus remains on the textures of the object.
Overall, I am happy with how this image came out, and I had fun working on it. Product photography is definitely something that I enjoy, and working with a budget of £1 was a good way of testing my ability to photograph under certain parameters.
1 note
·
View note
Text
Glassware - Shoot 2
Studio Shoot 2
Overview
For the second studio shoot, there were already lighting set ups ready to use that were intended for us to shoot at and explore the lighting and background sets with our chosen glass object. The object I chose to shoot was an old glass clock with a carved-out surface like that of a whisky glass. This glass clock is transparent except form the face of the clock, so I felt this would be an interesting and challenging subject to photograph to capture the qualities of the cut glass as light interacts with it.
Set Up and Lighting
For this set up, the I used two wooden trestles to hold a black box and on this I laid out a black velvet material used as the foreground to add texture (this material also absorbs a lot of light). The camera is positioned in front of the subject using a studio tripod stand, the lens used is a 100mm macro lens on a Canon 1300D body. To the left of the subject’s positioning, there is a background stand set with a white roll of diffusing paper being suspended from it (used to soften the light on the subject). Behind this is a vertical rectangular soft box. There is also a black polyboard positioned in front of the soft box and diffused sheet where light seeps through, flagging this light removes it from impacting the light falling onto the white background behind the subject as well as removing unwanted lighting hitting the back of the subject. A second studio lamp is positioned using a spider stand on the floor behind where the subject is positioned. This light has a snoot modifier attachment to create a narrow beam of light positioned towards the background, reflecting the light onto the subject.

I felt this shoot went well, I began by positioning the subject then working with the softbox, changing the positioning of the light and removing the diffuser paper. By moving the soft box closer and further away as well as forward and backwards I could watch how the light interacts with the subject and decided where I want the highlights to be before working on the background light. I went through the same process with the back light also changing modifiers between a barn door and a snoot to see what created the effect I wanted.
Overall, I felt this was a successful shoot and I am more confident in this set up however I do feel like there is a lot to develop further. Perhaps focusing on one aspect of the glass and its texture, adding
Contact Sheet


0 notes
Text
Cheap Photo Studio Hire, Film Studio Hire, Film Studio Hire London and Photoshoot Studio London
Running a photography studio is a very exciting job but at the same time, it can be difficult if you don’t have essential equipment in the studio. These are the top 5 equipment that enhance the efficiency and simplifies photography shoot in a studio.
C-stand means century stand, they are used primarily to position light and modifiers but is used to setup cameras, lights, flags, diffusion panels, silles, scrims and anything you can think of. Our c-stands are used absolutely everyday in the studio. It is the most important investment for any photographer and filmmaker out there.
These are large sheets of thick foam used in photography as light modifiers to reflect light and create shadows. Most photography studios use black and white polyboard to block light and bounce light. You use a black side to block light and white side to reflect or bounce light back to the subject (can be used as a fill light). photo studio hire
Sand bags is used in studio to help stablise and support lighting and grip equipment. Usually bags are empty when bought new and can be filled with gravel, sang, rocks or any other material to add weight. You can buy cheap sand bags from ebay.
We have great tops to make sand bags last long for years. Firstly, fill sand in a plastic bag and tape it all over using duck tape. Then put it inside the sand bag. This helps prevent sand bags from wear and tear.
Extension cables are one of the most important equipment to have in a photo studio. There are many types of extension cables in the market. We suggest you avoid buying small extension cables and for long cables which are much more powerful and can hold more power as well as easy to move around in the studio. photography studio london
here are so many purposes and use of clamps in a photo studio. You can get various sizes of clamps from small 4″ to 8″. You should buy various sizes of clamps which can then be used for different purposes. In our studio we have over 20+ clamps which we use in daily basis from holding a fabric in a c-stand to holding our backdrops. Clamps can be used to hold flags, diffusers, boards and backdrops.
Buy it you will definitely use it and when it works, you will love clamps. Cineview Studios has various clamps.
0 notes
Text
10 Life Hacks for Your Photo Studio
Having a photography studio is fun, but it is even more fun when you start applying simple and cheap solutions plus common sense to make your shooting experience (and your clients’ experience) smoother.
This is the list of what I think are the smartest and most useful photography studio life hacks.
#1. Transparent Rubber Hairbands
These little guys are a life saver for those who enjoy having a tidy studio (me included). Apart from having hundreds of these in the make up station, they have become a daily resource when tidying up gel rolls and cables.
#2. Wine Boxes
If I had to choose between an apple box and a wine box… I’ll take the wine one!
Apple boxes are enormously useful in a studio. You can use them to sit your subject down, make someone taller, or level-up a C-stand, among other things. But these precious boxes are expensive. The solution? What about asking that friend-who-works-in-a-restaurant (we all have one) to get you one of those spare wooden wine boxes that otherwise his manager is going to throw away, right? (Shoutout to my friend Mattia Laurenti.)
After a bit of painting, it has become a staple on my headshot work, as I use it for the clients to step on them a lean forward in order to engage with the camera.
This solution is not as versatile nor sturdy as an apple box, but hey, it’s free!
#3. IKEA Pegboard
A photo studio wouldn’t be complete without having a space to put all your gear, adapters, connectors, screws, tapes, etc. IKEA has this pegboard solution that works wonders for the studio, a bag to roll the gels in, hooks for the gaffer tape, compartments for screws, etc. Really handy!
The downside is that if you overload it, it will start bending forward and the little drawer compartments will slide off causing a lot of trouble.
#4. Shelf Rails and Wood
This one is a bit of a DIY but fun to make and tremendously useful. Other similar solutions are bike stands. This one, in particular, is perfect for holding a 2-inch polyboard with a tire width of 53mm. Ideal for polyboards and for less than $30.
#5. Metal Clips and Magnets
This is by far the most useful studio life hack of all. As studio photographers, we have all been there trying to stick gaffer tape into a dish or modifier. The results more than often are not what I would call “neat.”
Gel lighting master Jake Hicks comes to the rescue (once again) and gives us this splendid tip. For an in-depth post on this tip please visit his original article.
#6. Shoe Rack
As someone who shoots a considerable amount of in-studio portrait sessions, I have obtained a number of rolls of seamless paper through the years. This rolls take up a lot of space and becomes unorganized quickly. What started as an organized system for 2-3 rolls, suddenly turned into a big pile of rolls of paper leaning up against a wall.
The idea is that you want to keep your seamless paper sitting upright, to prevent warping and color inconsistencies over time. In order to keep the seamless vertical and tidy, SLR Lounge a great solution by using a small shoe rack. Using the metal frame of a shoe rack, seamless rolls seem to fit perfectly into the system, allowing you a space-saving option that can be had for around $20 or less.
#7. Elastic Ropes and Clips
Another great studio life hack to keep your softboxes out of the way is to attach elastic ropes with clips on both ends, this way you can leave the softboxes hanging from the ceiling instead of being around in the studio.
#8. Door Stopper
As a photographer, there is no most annoying thing like a backdrop that doesn’t stay in place. While using these multi background solution that attaches the paper roll to an aluminum cylinder.
I tried so many things, from pieces of cardboard to small pins but door stoppers have become the studio life hack final solution. They look great when they are in place and they are easy to stick in between background roll and cylinder. Problem solved!
#9. Silver Reflector Backdrop
Studio reflectors are a must have in every photography studio for obvious reasons. I have plenty of them on different sizes and shapes depending on whether I’m shooting headshots, commercial or something else. Also, depending on the skin tones of the subject and quality of bounce you’d like to achieve, you might use silver, golden, white or black side. (I’ll tackle that in another article).
But what about using them as backdrops of your scene? As they catch and bounce the light with its slightly irregular textured surface they are perfect for this modern outdoors-hallway-studio effect. Its corrugated surface will give you a nice texture with some reflections of the strobes in it.
Sometimes even your subject will cast some lights and shadows within the reflector if you place him/her close enough.
#10. Neon Tubes and PVC Corrugated Roofing Sheets
This was an idea I had for a long time as a DIY project that I got from strolling down Regent Street and checking the shops (I think it was the Top Man storefront). I decided to build a small replica myself.
Using this corrugated PVC roofing sheet you can get from any DIY shop (I got mine from Wickes) and attaching a series of neon fluorescent tubes to it. It makes the perfect neon sci-fi background for your portraits or headshots.
And this concludes my list of 10 photo studio life hacks. Some of the solutions are very cheap and straight forward and others require a bit of “do it yourself” But I hope you found these tips useful.
About the author: Roberto Vivancos is an internationally published photographer and actor with over fifteen years of experience specializing in the areas of headshot and commercial photography. The opinions expressed in this article are solely those of the author. Whether shooting in his own London studio environment or on location worldwide, Vivancos’s clients range from models, actors, singers, bands, and dancers. His bold cinematic style inherited from 80’s films, Japanese anime and superhero comics uses dramatic lighting techniques to bring his subjects to life. You can find more of his work on his website, Facebook, Twitter, and Instagram. This article was also published here.
source https://petapixel.com/2019/04/08/10-life-hacks-for-your-photo-studio/
0 notes
Text
10 Life Hacks for Your Photo Studio
Having a photography studio is fun, but it is even more fun when you start applying simple and cheap solutions plus common sense to make your shooting experience (and your clients’ experience) smoother.
This is the list of what I think are the smartest and most useful photography studio life hacks.
#1. Transparent Rubber Hairbands
These little guys are a life saver for those who enjoy having a tidy studio (me included). Apart from having hundreds of these in the make up station, they have become a daily resource when tidying up gel rolls and cables.
#2. Wine Boxes
If I had to choose between an apple box and a wine box… I’ll take the wine one!
Apple boxes are enormously useful in a studio. You can use them to sit your subject down, make someone taller, or level-up a C-stand, among other things. But these precious boxes are expensive. The solution? What about asking that friend-who-works-in-a-restaurant (we all have one) to get you one of those spare wooden wine boxes that otherwise his manager is going to throw away, right? (Shoutout to my friend Mattia Laurenti.)
After a bit of painting, it has become a staple on my headshot work, as I use it for the clients to step on them a lean forward in order to engage with the camera.
This solution is not as versatile nor sturdy as an apple box, but hey, it’s free!
#3. IKEA Pegboard
A photo studio wouldn’t be complete without having a space to put all your gear, adapters, connectors, screws, tapes, etc. IKEA has this pegboard solution that works wonders for the studio, a bag to roll the gels in, hooks for the gaffer tape, compartments for screws, etc. Really handy!
The downside is that if you overload it, it will start bending forward and the little drawer compartments will slide off causing a lot of trouble.
#4. Shelf Rails and Wood
This one is a bit of a DIY but fun to make and tremendously useful. Other similar solutions are bike stands. This one, in particular, is perfect for holding a 2-inch polyboard with a tire width of 53mm. Ideal for polyboards and for less than $30.
#5. Metal Clips and Magnets
This is by far the most useful studio life hack of all. As studio photographers, we have all been there trying to stick gaffer tape into a dish or modifier. The results more than often are not what I would call “neat.”
Gel lighting master Jake Hicks comes to the rescue (once again) and gives us this splendid tip. For an in-depth post on this tip please visit his original article.
#6. Shoe Rack
As someone who shoots a considerable amount of in-studio portrait sessions, I have obtained a number of rolls of seamless paper through the years. This rolls take up a lot of space and becomes unorganized quickly. What started as an organized system for 2-3 rolls, suddenly turned into a big pile of rolls of paper leaning up against a wall.
The idea is that you want to keep your seamless paper sitting upright, to prevent warping and color inconsistencies over time. In order to keep the seamless vertical and tidy, SLR Lounge a great solution by using a small shoe rack. Using the metal frame of a shoe rack, seamless rolls seem to fit perfectly into the system, allowing you a space-saving option that can be had for around $20 or less.
#7. Elastic Ropes and Clips
Another great studio life hack to keep your softboxes out of the way is to attach elastic ropes with clips on both ends, this way you can leave the softboxes hanging from the ceiling instead of being around in the studio.
#8. Door Stopper
As a photographer, there is no most annoying thing like a backdrop that doesn’t stay in place. While using these multi background solution that attaches the paper roll to an aluminum cylinder.
I tried so many things, from pieces of cardboard to small pins but door stoppers have become the studio life hack final solution. They look great when they are in place and they are easy to stick in between background roll and cylinder. Problem solved!
#9. Silver Reflector Backdrop
Studio reflectors are a must have in every photography studio for obvious reasons. I have plenty of them on different sizes and shapes depending on whether I’m shooting headshots, commercial or something else. Also, depending on the skin tones of the subject and quality of bounce you’d like to achieve, you might use silver, golden, white or black side. (I’ll tackle that in another article).
But what about using them as backdrops of your scene? As they catch and bounce the light with its slightly irregular textured surface they are perfect for this modern outdoors-hallway-studio effect. Its corrugated surface will give you a nice texture with some reflections of the strobes in it.
Sometimes even your subject will cast some lights and shadows within the reflector if you place him/her close enough.
#10. Neon Tubes and PVC Corrugated Roofing Sheets
This was an idea I had for a long time as a DIY project that I got from strolling down Regent Street and checking the shops (I think it was the Top Man storefront). I decided to build a small replica myself.
Using this corrugated PVC roofing sheet you can get from any DIY shop (I got mine from Wickes) and attaching a series of neon fluorescent tubes to it. It makes the perfect neon sci-fi background for your portraits or headshots.
And this concludes my list of 10 photo studio life hacks. Some of the solutions are very cheap and straight forward and others require a bit of “do it yourself” But I hope you found these tips useful.
About the author: Roberto Vivancos is an internationally published photographer and actor with over fifteen years of experience specializing in the areas of headshot and commercial photography. The opinions expressed in this article are solely those of the author. Whether shooting in his own London studio environment or on location worldwide, Vivancos’s clients range from models, actors, singers, bands, and dancers. His bold cinematic style inherited from 80’s films, Japanese anime and superhero comics uses dramatic lighting techniques to bring his subjects to life. You can find more of his work on his website, Facebook, Twitter, and Instagram. This article was also published here.
from Photography News https://petapixel.com/2019/04/08/10-life-hacks-for-your-photo-studio/
0 notes
Text
Cheap Photo Studio Hire, Film Studio Hire, Film Studio Hire London and Photoshoot Studio London
Running a photography studio is a very exciting job but at the same time, it can be difficult if you don’t have essential equipment in the studio. These are the top 5 equipment that enhance the efficiency and simplifies photography shoot in a studio.
C-stand means century stand, they are used primarily to position light and modifiers but is used to setup cameras, lights, flags, diffusion panels, silles, scrims and anything you can think of. Our c-stands are used absolutely everyday in the studio. It is the most important investment for any photographer and filmmaker out there.
These are large sheets of thick foam used in photography as light modifiers to reflect light and create shadows. Most photography studios use black and white polyboard to block light and bounce light. You use a black side to block light and white side to reflect or bounce light back to the subject (can be used as a fill light). photo studio hire
Sand bags is used in studio to help stablise and support lighting and grip equipment. Usually bags are empty when bought new and can be filled with gravel, sang, rocks or any other material to add weight. You can buy cheap sand bags from ebay.
We have great tops to make sand bags last long for years. Firstly, fill sand in a plastic bag and tape it all over using duck tape. Then put it inside the sand bag. This helps prevent sand bags from wear and tear.
Extension cables are one of the most important equipment to have in a photo studio. There are many types of extension cables in the market. We suggest you avoid buying small extension cables and for long cables which are much more powerful and can hold more power as well as easy to move around in the studio. photography studio london
here are so many purposes and use of clamps in a photo studio. You can get various sizes of clamps from small 4″ to 8″. You should buy various sizes of clamps which can then be used for different purposes. In our studio we have over 20+ clamps which we use in daily basis from holding a fabric in a c-stand to holding our backdrops. Clamps can be used to hold flags, diffusers, boards and backdrops.
Buy it you will definitely use it and when it works, you will love clamps. Wex Photography sells various clamps.
0 notes
Text
Studio Lighting (03.10.17)
First set up was for Creating Daylight effect in a studio environment.
Important to always be analysing and thinking about the light source, where is it coming from? always look at the eyes, then ask yourself is the light reflection circular? square? rectangular? is it coming from above? below? to the left? to the right? is it diffused? reflected? what can you see? always always always be analysing the picture....
In todays studio set up we had two overheads with large silver light heads, with semi - silver textured interior which gives a good light spread.
the lights were both pointed onto white polyboard which was then reflected back onto the model standing opposite the polyboard. this position creates a non dramatic flat light with a slight edge to it. This is a common look often used by American Apparel ( see Bryan McGinlay’s work see “Look up”)
0 notes