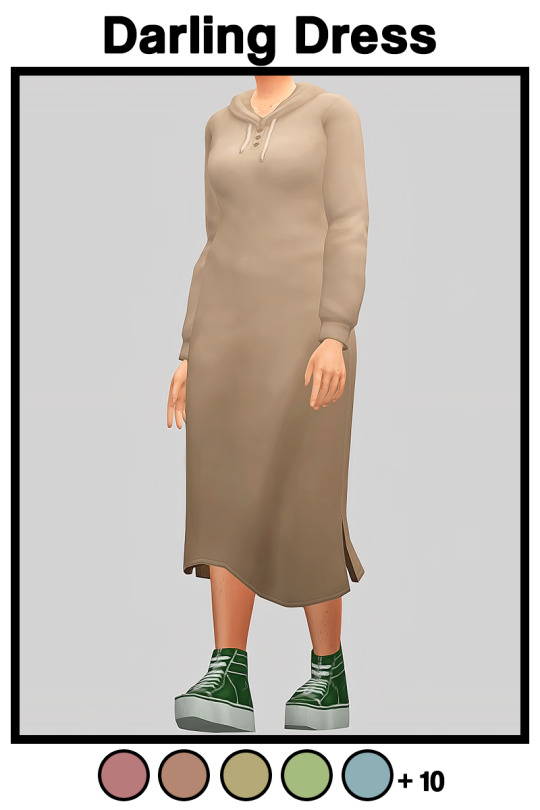
#psd so you can rip and color it
Text
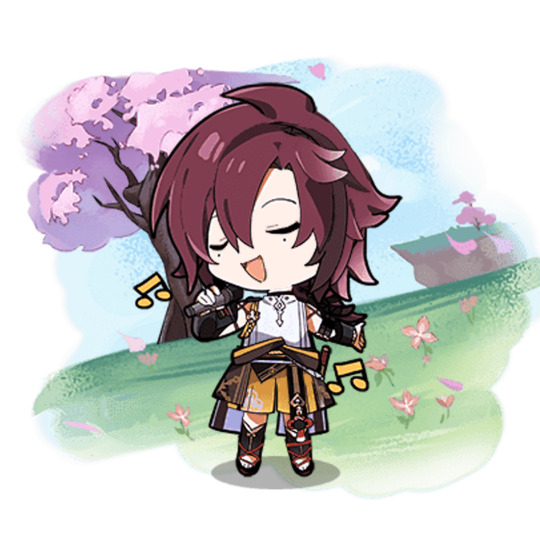
Heizou SD -- Genshin Sprite
I finally finished it!
I finished making his little sprite and now you can have him too!
Be warned that this file is foldered, so I have all the little pieces in folder sets
This did take a little while
Download here
#Heizou Shikanoin#Heizou#Shikanoin#Heizou SD#heizou genshin#Genshin Impact#Genshin Art#hoyo art#psd so you can rip and color it#Genshin PSD#Gensin Impact Art
4 notes
·
View notes
Note
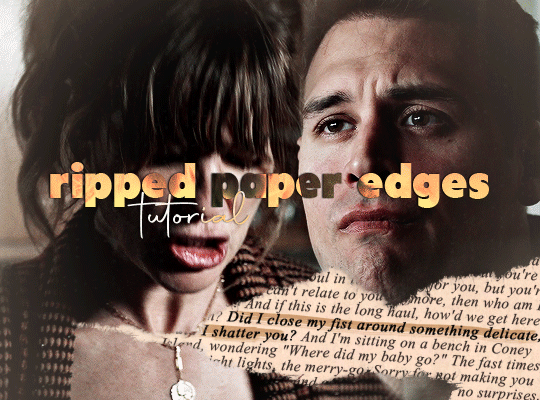
could you please do a tutorial of your game of thrones 'so much for stardust' gifs where it has the ripped paper textures? it's so pretty, and i'd like to learn how to do one with just the texture in the middle and two gifs on either side, like half and half and just having a rip in the middle. it's so cool how you did a gif in the middle though so i wanted to ask as well! all of them are so cool looking. you are extremely talented. if you don't want to though i understand :) thank you
TORN PAPER EFFECT + BLENDING TUTORIAL
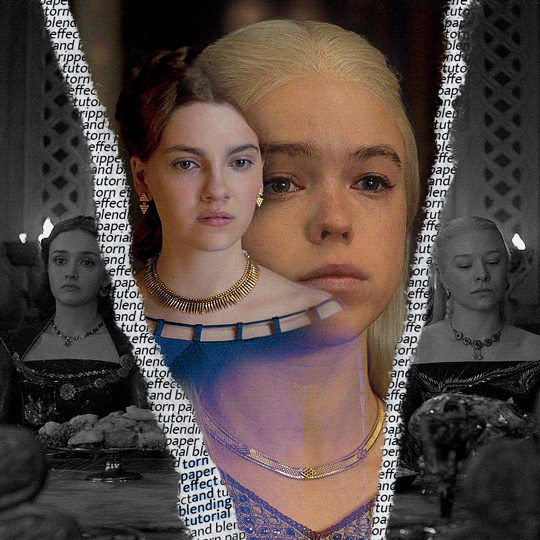
thank you so much for your sweet words, dearest anon and i'm sorry it took so long to answer but it's here now so i'll try my best to explain <3
disclamer: this is the first tutorial i ever made, it's very screenshot heavy and it assumes the basic knowledge of ps and gifmaking. if there's something you don't understand, don't hesitate to ask <3 so, let's get to it!
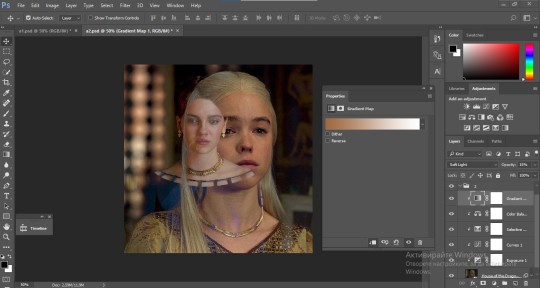
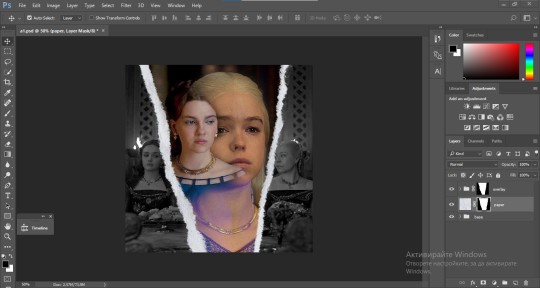
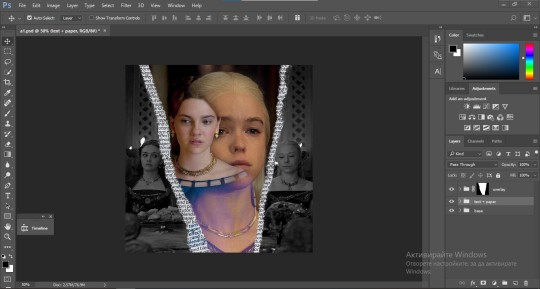
1. PREPARING THE BASE
As you can see in this shot there's a lot of space between Rhaenyra and Alicent and that makes it perfect for the ripped paper overlay without hiding much of the base gif. So the first thing i did was to crop it like this:
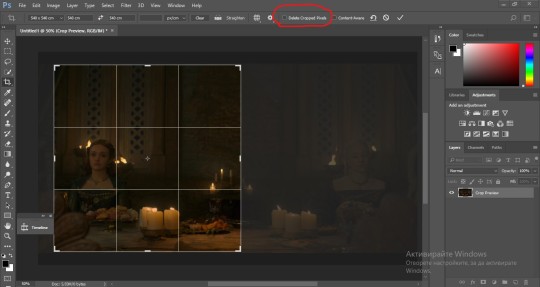
Also you want to make sure that the highlighted box (delete cropped pixels) is unchecked! After taking the usual steps for the animation (creating frames from layers, reversing the frames, setting frame delay) you continue with the video timeline and convert your frames into a smart object.
psa: if you don't have the motivation or the time to play around with coloring here are some psds i recommend: 1, 2; as for the sharpening i think this one is the best.
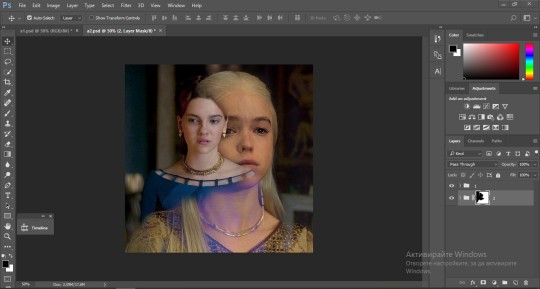
now that you have your smart object sharpened and colored what you want to do next is drag it to the end of the canvas and duplicate it. after that you move the copy on the other end like the original and make sure it's under the coloring layers, like this:
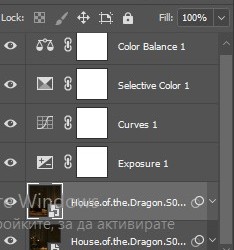
After that you have to create layer masks (the highlighted icon above) for both smart object and the copy and change the blending option of the copy to screen or lighten (whatever looks best!). So this is how it looks now:
pls ignore that there are no layer masks on the smart objects i just added them after changing the blending rip </3
Now, as you see both gifs are like fighting eachother for their rightful place on the canvas. (fgfgfdf) To fix that you have to use a soft round brush to delete the parts you don't want. (feel free to play around with the brush however you want to get the result you want!) Here's my result:
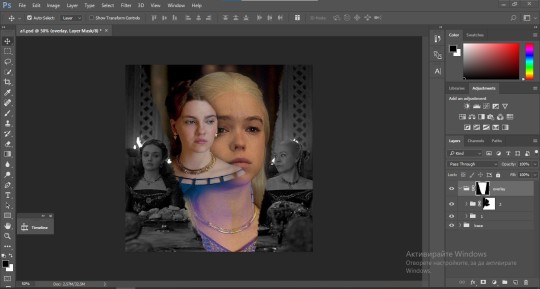
2. THE OVERLAY
Now for the both gifs you want to use for the ripped paper effect you pretty much apply the same steps as the ones you did with the gifs for the base. Here are the two gifs i chose:

Before blending both gifs however you want to create a clipping mask for each of the smart objects coloring layers, like this:
And now you're ready to blend both gifs together! You choose the group with one of the gifs and change the blending again to screen or lighten and place the said group on top of the other. So this is how it looks now:
optional: if you feel like the base gif doesn't pop out enough you can always add a gradient map on one of both gifs and play around with the opacity and the color you think fits best.
Then you add a layer mask on the overlay gif group and again play around with the brush to delete what you don't want. So this is the final result:
ps - don't repeat my mistake by placing the group with the layer mask under the other group. it should be on top and the blending option should be lighten or screen.
After blending both gifs together, you're ready to place them on the base. So first thing you want to do first is place both groups of each gif in one single group together. Then you duplicate the said group in the psd of the base gif and create a layer mask. This is how it should looks:

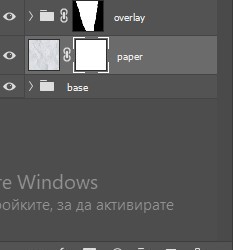
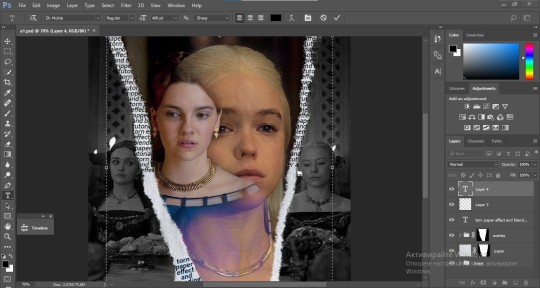
Now, in order to create the ripped paper effect, you'll have to download a ripped paper brush pack. This is the one i use. After loading the brushes in ps (if you don't know how here is explained) you're ready to begin! Change the size and angle however you'd like to make it look how you want. And if you want you can move the overlay gif by choosing both groups in case you aren't happy with the adjustment. This is how it looks like so far:
We're almost done! Now you have to find a paper texture, (i got mine from google) place it between both groups of your gifs and create a layer mask, like so:
What you have to do here is pretty much the same thing you did with the overlay gifs. Still, make sure there's enough space for the text you want to write in. However, if you think that the space isn't enough you can just delete a bit more of the overlay gifs. Here's mine:
3. THE TEXT
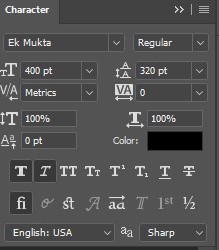
You're finally ready to type out the text you want! If you're having troubles with choosing the right font and size, here are my text settings:
You can always play around with the angle and if your text is too small, zoom in so you can place it just how you like it. And since i'm a bit lazy to deal with it later, i choose to add the highlight color while it's still zoomed. You just have to add an layer above the text and use a soft round brush with opacity from 70-75% and flow from 15-18%.
For the repeated text you want to make sure you create a big space for writing so it can contain the whole space of the torn paper. Also, write where the text will be seen only and use the tab button to skip the space where the gif is. This is how it looks:
Once you're done with writing the repeated text, you want to select all the character layers and the highlight layer and move them under the overlay gif and on top of the paper, like this:
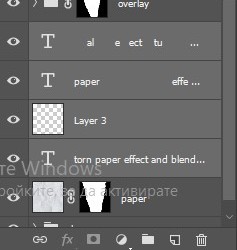
With the layers still selected and in order to contain the text within the paper the last thing you want to do is create a clipping mask. And that's It. You're done! This is the final result:
#allresources#dailyresources#usergif#chaoticresources#gifmakerresource#hisources#onlyresources#alielook#usermaguire#userrobin#usernik#userpat#userbells#gif tutorial#ps help
151 notes
·
View notes
Text
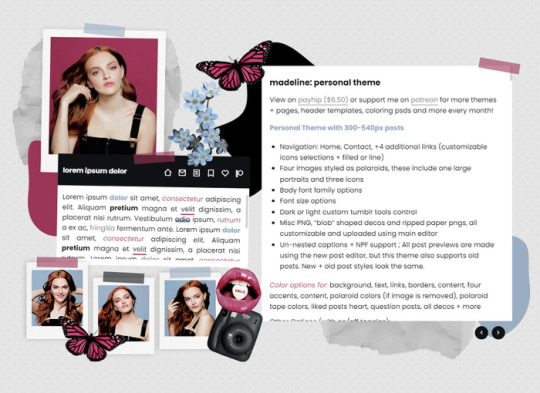
MADELINE: PERSONAL THEME BY ETHEREAL THEMES
View on payhip ($6.50), check out the preview or support me on patreon for more themes + pages, header templates, coloring psds and more every month!
Personal with 300-540px posts
Navigation: Home, Contact, +4 additional links (customizable icons selections + filled or line)
Four images styled as polaroids, these include one large portraits and three icons
Body font family options
Font size options
Dark or light custom tumblr tools control
Misc PNG, "blob" shaped decos and ripped paper pngs, all customizable and uploaded using main editor
Un-nested captions + NPF support ; All post previews are made using the new post editor, but this theme also supports old posts. New + old post styles look the same.
Color options for: background, text, links, borders, content, four accents, content, polaroid colors (if image is removed), polaroid tape colors, liked posts heart, question posts, all decos + more
Other Options (with on/off toggles):
Blog Title
Sharpened images (large polaroids are slightly rotating which can cause blurriness)
Do edit any feature to make it your own.
Don’t use as base code, remove credit or claim as your own.
Everything you see can be edited including colors, texts and much more. This theme was made with personal (and muse / rp) blogs in mind.
Basic HTML to edit, all info is on the main editor, so no html needed! Please reblog or like if using. And let me know if you come across any issues.
#personal theme#muse theme#contained theme#rpt#codingcabin#dearindies#personal#rp#themes#all#madeline#muse*#personal*#contained*#premium theme#ethemes#all*
61 notes
·
View notes
Note
hello. it’s me again who asked for the ripped paper tutorial. i can’t wait to try it out later!! are you able to make a tutorial on how you put the text on the ripped paper? thank you so much ☺️
hello! sure! i'll explain how i made the ripped paper effect from this gifset in more details under the cut 😊 (it’s a different method than what i did on my previous tutorial here)
i apologize in advance for my lack of coherence, i’m not always the best at explaining stuff, especially not in english haha
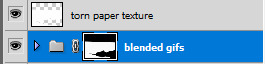
first things first: make your gif, color it, sharpen it etc etc, and put all of it's layers in a group. i called mine “blended gifs”. oh and make sure you are in timeline mode, not frame animation!

then you want to import the ripped paper texture(s) you want to use onto your canvas and position them the way you want them to be on top of your gif, like this:
(i am using these textures for most of this gifset)

what you want to do next is create a mask of this torn up area so the gif layers only show up around the "hole". to do that, select the texture layer and press "ctrl" while clicking on the texture's thumbnail. this will create a selection of your ripped paper texture (you'll see a flashing dotted line showing your selection).

btw: the ctrl + click method works only if the image/texture has transparency like this texture does.
[if you want yo create your own torn/ripped shape with 2 or more textures, you can place them on top of each other and create a mask by doing ctrl + selecting the thumbnail of the first one, then while still holding ctrl, also hold the shift key and click on the second texture’s thumbnail (and the third, fourth, etc). this will add the shapes to the same selection and then you can create one layer mask with all of the shapes selected together.]
with that selection still active, you want to select your gif's folder you created earlier and click on the add layer mask button.
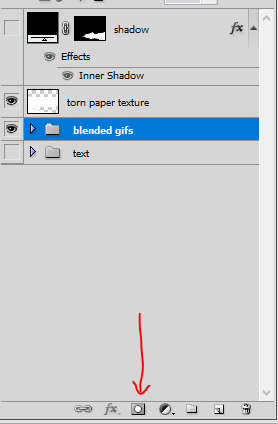
this will create a mask for the ripped paper edges on your gif, the group layer should look like this:
now disable the torn paper texture (by clicking on the eye next to it, you won’t need that torn paper texture layer again), and your gif should look like this so far:
as you can see, there's a transparency issue, and we're losing the top part of the gif. to fix that, you need to brush some white color onto the mask.
to do that, hit ctrl and select the group's mask thumbnail again, you will see the same selection as earlier show up. with the selection ready, select the brush tool in the color white (and 100% opacity), and go brush/paint some white over the whole layer mask. this should fix the transparency issue and the gif should look like this:
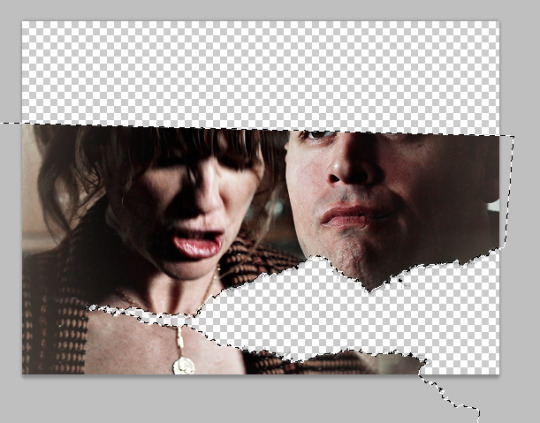
once you're done, hit ctrl + D to make the selection disappear, and still with the layer mask selected on the gif's group, with the brush tool paint some white at the top so we get the top of the image back. it should look like this:


(you can also brush more white or black to add/remove parts to this layer mask if you want to, it’s what i did for the original gif, actually.)
now you should be ready to put whatever you want in that ripped edges “hole” you’ve created.
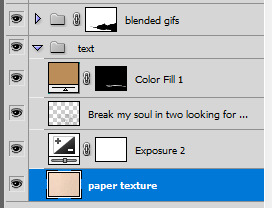
what i did for this gifset is i found a random paper texture on google and used it as a background for my text. make sure you put this background texture under the gif folder, so it will only show up in the “hole”. (i put my texture in a group i renamed “text” because i love my psd compositions to be tidy lol)


then i just typed the text i wanted and positioned it the way i wanted it to look. the text layer should be over the paper texture but still under the gif folder:


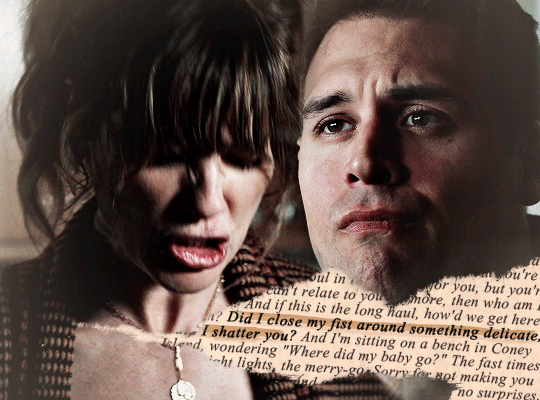
to finalize the look I color corrected the paper to be a bit more bright and added some highlight on the text, here you can do whatever you want to make the text look the way you want it to look.
i also added a bit of dropped shadow on the edges of the ripped paper. to do that I selected the mask (ctrl + click the smart mask thumbnail), created a new color fill layer (the color is not important). this will create a layer with a layer mask of the selection. i then selected the smart mask thumbnail and hit ctrl + i to invert it, so my mask is not only the inside of the “hole”. then i put this layer on top of everything, and the fill at 0%. finally i added an inner shadow in the layer style options (by double clicking on that color fill layer).


and that is the final result!
i hope that wasn’t all too over the place or not too detailed? i wasn’t sure how familiar with photoshop you are 😊
@nightmaarebeforechristmas here u go!
#*ps help#resource#photoshop#agentplant#userdean#tutorial#usermadita#omgari#userrainbow#alie replies#anonymous#completeresources#allresources#resourcemarket#useryoshi
693 notes
·
View notes
Text

Helpful RP TIPS ✨feat. beta editor
subject : how to make custom text colours && formatting.
using beta editor is a learning curve for those of use that are used to legacy ( rip ol' boi ) . you can say goodbye to all that beautiful custom formatting that gave your blog that PIZZAZ. . . . SIKE !! you can still do all that time consuming / wonderful formatting just as easy. there is a small work around but one you should be used to if you are using Roleplay Formatter ( view this tutorial here ) .
⇧ this right here ? garbage. trash. colour choice is not the vibe. do better t/umblr. what even is that red ?? that green ?? CARDINAL SIN.
luckily for you, i'm going to show you an easy way to make your text colours match your blog aesthetic using icons && graphics.
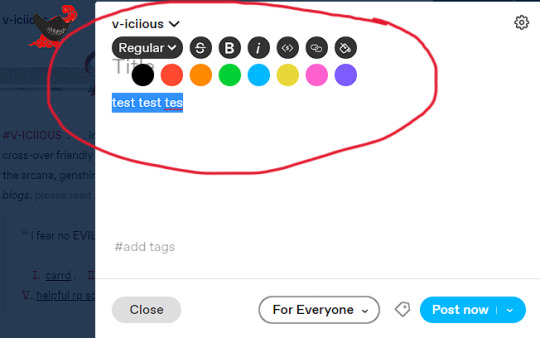
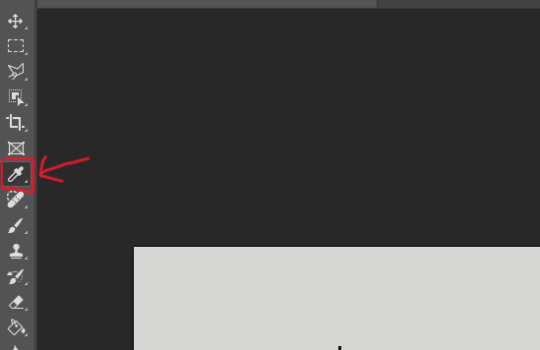
first youre going to want to pull up adobe PhotoShop ( PS for short ) or any other editing service you use for your icons / graphics. the most important part if that it uses the ' EYEDROPPER ' tool function. now assuming your icons / graphics ( i'll be using my icons as an example ), already have the PSD you want attached an active-- use the eyedropper tool on the colours you want to use. i recommend three for variety but you can do as many as you want.
keep in mind by default most people's blog editors have a white background. so using white text is not recommended. i personally like to use 1 vibrant colour && 2 muted colours because of eye strain. vibrant colours can be overwhelming for some viewers but you are welcome to do whichever colours you like. it is subjective after all.
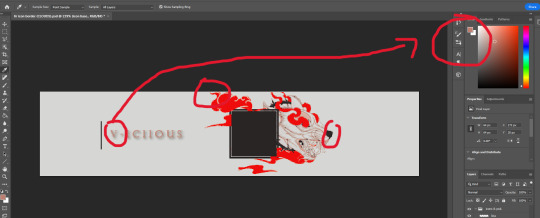
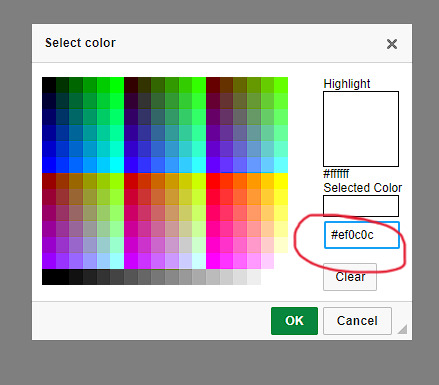
now that youve selected your colour, consider having a notepad ready ( either digital or ol' fashioned pen & paper ) . at the TOP RIGHT side of the program in PS you'll see your colours, click the top overlayed square. this will open a sub-menu that shows you indepth stats. from there you'll see that EXACT colours HEXCODE.
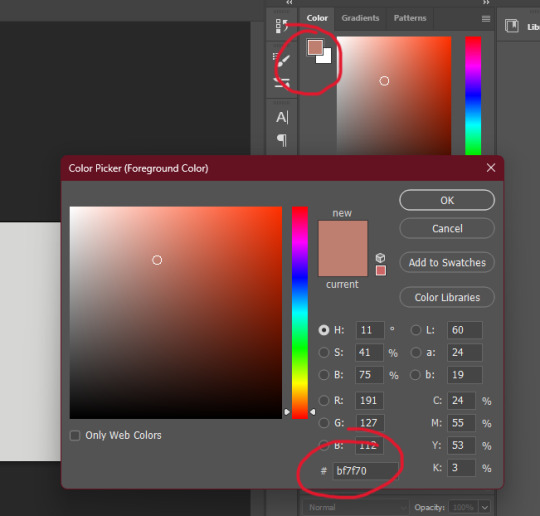
go ahead && write down the HEXCODEs including the ' # ' sign. you'll plug in this code here in the Roleplay Formatter. ( the ' A ' symbol at the TOP RIGHT. ) from there another sub menu will open and you'll click ' More Colors '. that is where you will plug in your hexcode. while the editor is open it will save your colours, however when you close they will disappear which is why i recommend writing them down. but you can always just have PS open and copy & paste them from there. its a matter of personal prefenece at this point.

and thats it. Thats the whole thing. take your now formatted and coloured reply, copy the source code and paste it into t/umblr's HTML editor ! play around with bolding, italics, capitalizing, && enlarging / shrinking specific words or phrases to give your reply that speical little OMPH !! you're on your way to being a pro, good job !

78 notes
·
View notes
Text


GIF REMAKE CHALLENGE! ✨
📩 remake someone's else coloring, sharpening, slowing, and resizing. do your best to get close to the original and share how you did. make a new gif to challenge those you tag to recreate. share the source video if possible! try not to tell those you tagged anything to help them: see what they can figure out and how close they get on their own! if you're tagged in several, you can do one or all, whatever you like! if they have a giffing tutorial, shared actions, etc., you can use that to aid your recreation!
@changbeens bee my beeloved 💗
i had so much fun trying to recreate your pretty gif but i think i coined a plethora of new curse words in the process adhjsda i couldn’t figure out how to add that pink hue to the gif and i had to remake the psd twice
then when i thought i was finally done and i was reasy to export the gif i noticed the speed didn’t match at all, i was ready to rip my hair out one by one lmao
now your bin has a... well maybe not a twin but a close cousin i hope :]
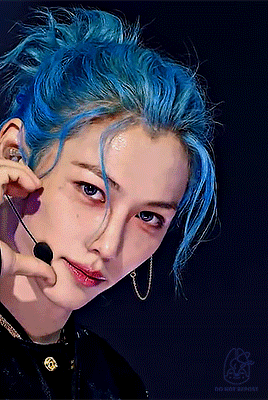
@minzbins mel mel mel... your seungmin made me despair quite a lot, i think it’s the gif that took me the longest? and there’s still something a little off with the reds, this was so hard 🫠 started making it had a breakdown bon appetit this is the final result i hope i did your beautiful gif justice <3
@chalamst ahhh thank you for choosing a shot of squishy lino!! those stage lights were a nightmare to color and your gifs looks so so nice, surprisingly enough it’s the one i finished the quickest, maybe because it’s the closest to my own style of coloring <3
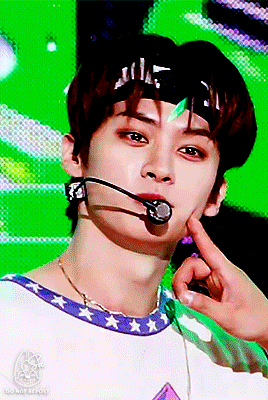
im tagging @yang-innie @woodziecup @yonglixx @bangzchan @leenope @babycatlix and @cheekyquokka no pressure of course! my challenge for you is this stage, 00:03:22
#*tag game#le mie creature#had to use the new editor my detested hopefully it won't ruin the quality
42 notes
·
View notes
Note
hi, i'm that yannqi who asked you about making gifs, it really helped me to make yangyang gifs and upload them into tenor, thank you so much!! can i ask about the sharpness, smart sharpen, curves etc. settings for your gifs, you really helped me so much, I'm so grateful.
aw hi friend !! i'm so glad <3 and i hope you'll post your yangyang gifs here on tumblr too so i can see them !!! tag me !!! hehe
as for my settings - they are different with every gifset. i make all of my coloring from scratch and i adjust sharpening based on the source video depending on the quality, lighting, etc. but i'll try to share my most often used options, so you can play around and see what you like.
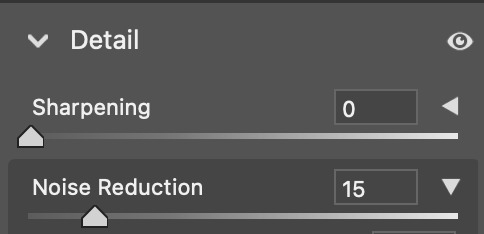
sharpening:
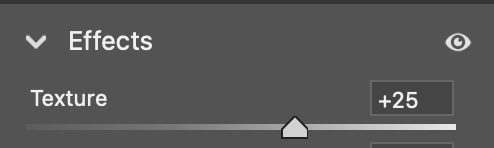
opt 1 (what i'm using most often currently, creates a smoothing and fine detail sharpening effect) - i use camera raw filter with texture to +25 and noise reduction to +15
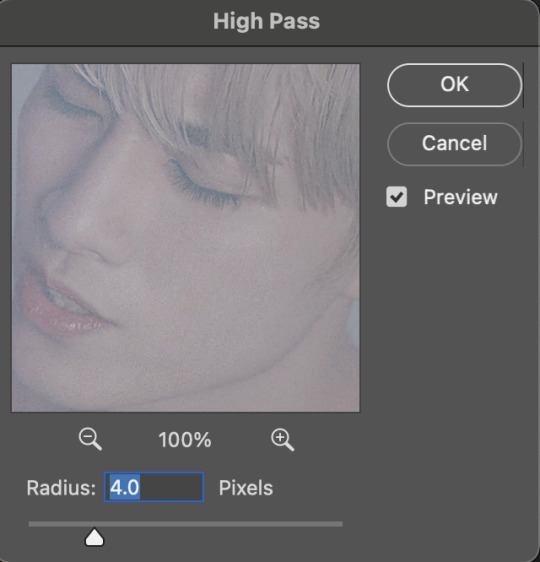
opt 2 (for a quick, easy way to create HD sharpening) - i use high pass at 4.0 px in soft light blending mode

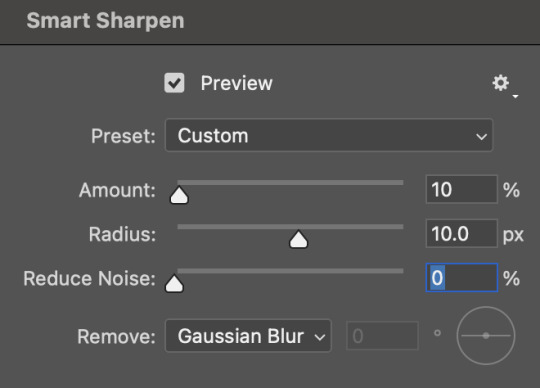
opt 3 (for a classic look with fine detail and definition) - i use smart sharpen in these settings

you can also combine some of these together! and if i am not using the camera raw noise reduction, i often will add a gaussian blur layer. usually just 1 px at ~20% opacity.
coloring:
you can see some examples of my psds here ! they are not the most up to date for me now but they are a place to start. some other coloring things i pretty much almost always do:
set my darkest point with curves (always always my first step!)
increase reds and blacks in selective color
mattify / even out overexposure (esp of stage lights) with a gradient map layer in black&white, reverse box checked, soft light blending, 50% opacity 50% fill
color correct with color lookup, color balance, and/or color fill layers
add a top coat with an exposure layer set to multiply or soft light at 25% opacity
as always ... try things out and see what you like and what makes your own style come together :) if there is a specific set of mine you want the exact settings for, let me know, and i'll pull them if i have it saved ! i don't save a lot rip but i can also try to remember what i did ahbghsb . good luck, happy giffing, and PLEASE TAG ME IN UR YANGYANG GIFS 🫶🏻
#sorry it took a while to respond i was at work today <3#hope this helps u !!!#erimail#mail from: anonymous friend!#gif help#.resource tag
4 notes
·
View notes
Text


By the way, I would love for other people with ARMS OCs of their own to be able to make their own Party Crash badges as well.
So here I've attached some pngs of the versions with the shine/shadow and without (if you want to add your own)
In addition to that heres a PSD file of all the different layers (so you can easily edit the badge color, move the framing text around as you see fit, etc etc)
(btw sorry smarmimo if it comes across as me ripping off your work I started using the base you provided in your post, but I ended up needing to scale it larger for the file size I was drawing on! and that made it super blurry so I ended up tracing the one you made for the most part!! So once again if you use this please go show some love to smarmimo's original post where they made badges for their own ocs here!!) (Also follow them they draw amazing art)
#ARMS Nintendo#ARMS game#Nintendo ARMS#ARMS Party Crash#ARMS Nice#do they use that tag on here or is that just a twitter thing LMFAO
15 notes
·
View notes
Note
14, 16, and 25!
thank you!!
14. A fandom you want to create more content for!
any that i'm into really. i don't have a lot on my computer and i'm so hesitant to go out and get things myself. what i do have were links given to me or shit i ripped off of youtube. but i'd love to create for the witcher, ted lasso, yellowjackets(!!!), almost every movie i've seen. once i get my external dvd drive i can do a couple of films i currently own so that tax return is taking entirely too long to get to me. OH and the flanaverse, i've always wanted to dive into creating for a lot of his shows and then finally watch his films.
16. List some creators that always inspire you with their creations and talent!
i answered some here. but i'd argue that you also inspire me!! especially with how many different things you do, not only within your creations but also the different shows and films you create for. and again i forget people easily so idk who to list out right now 🫣
25. Do you use PSDs or colour everything by scratch?
i color from scratch!! i've been funking around with coloring since 2018/2019 and i love to fuck around and find out sometimes. it's frustrating! don't get me wrong. i have a set right now that no matter how i color it, it hasn't been consistent and i want to cry but i still truck on.
creators asks!
0 notes
Text
I haven’t giffed for a while, so making the previous post was a bit of an adventure.
I started this gifset in February 2021. Back then I ripped every frame and the gifs were too big for tumblr, so I had to delete every other frame by hand. It looked so choppy that I put the post on ice, and it got buried under other drafts. Evidently I found the post again months later but didn’t fix it and left it to rot again.
I found the post again this week and almost published in that state, but thought it’d be too embarrassing to post a gifset with every second frame in 2023. I then tried to remake it in proper quality. I discovered that I had one of the gifs ripped with every second frame, and had to re-rip it again (and remember how to crop them). For some reason, the new screenshots were brighter, so I had to use a different coloring for them. I also had to split that gif into two, but that’s easy.
The gifs were still way past the Tumblr limit, and I was on the brink of losing hope and shelving the post again when I realized that I can just reduce the number of colors. This is b/w! There are 64 and even 32 colors per gif in that post and it all looks perfectly fine. So my big problem from two years ago was finally solved. (Too bad this solution would not work with normal color gifs.)
The original version was also awfully slow. For the new one I started experimenting with frame delays since I’m unfamiliar with giffing every frame. At first I tried to abandon frame animation altogether and set the FPS on the timeline the same as original video, but that didn’t work (in two different ways). Then I realized that gif exporting ruins frame delays anyway, rounding them up/down to either 0.03 or 0.07. 0.03 looked perfect in my desktop image viewer but too fast on Tumblr in the browser. 0.05 looked too slow. Then it finally occurred to me to do the math, and 1 second / 23.976 fps indeed equals 0.04 (rounded). So I adjusted the gifs to have 0.04 as frame delay and it still looks wrong somehow, even though objectively it should be the best option.
By the way, I had to carefully replace gifs one by one in the original post buried like fifty pages deep within my drafts, and not just because I didn’t want to make a new one: that draft is in the legacy photo post format, and I don’t have access to it for new posts anymore.
After finishing and uploading all that, I realized that I never cropped out the black border, and it’s quite visible at the edges of the gifs. But I already wasted way too much time to go through every gif again.
In the end, the only thing I had to redo from scratch was the final gif (now split in two). For all the others, I used the same psd, adjusted the export settings, then redid the frame delay of the exported gifs. The real time-consuming part was not the editing process itself, but figuring out what I needed to do.
All this was for an extremely simple gifset, by the way. The kind that requires no actual creativity or hard work, only a bit of technical know-how. If you know what you’re doing, and not blindly poking at the settings you’re not used to, it should take no time to make. I just want to share how much I’m overthinking everything. (And also to journal for my own sake, because this has been An Experience.)
0 notes
Text
SIMS TAG
Ahhhh thanks for the tag @natolesims ^_^ I’ll tag @ashubii @mosneakers @payte and @ashubii
What’s your favourite sims death?
Hmmm, drowning is classic but I was so shocked when the meteorite killed my sims in ts2, so let’s go with that one.
Alpha CC or Maxis Match?
Gotta go with MM; I tried Alpha back in the day but it just looks off in my game.
Do you cheat when your sims gain weight?
Not usually. I did have a pear shaped sim back in gen 3 of the insectas I fixed, but most of my sims keep their weight.
Do you use move objects?
Always.
Favorite mod?
I like SoL, but I’m looking into the other game enhancing mods...
First expansion/game/stuff pack you got?
Sims 1: Vacation, Sims 2: University, Sims 4: Seasons
Do you pronounce “live mode” like aLIVE or LIVing?
ALIVEEEE, like, “LETS DO IT LIVE”.
Who’s your favorite sim that you’ve made?
I don’t MAKE too many sims (I steal them all from the neighborhoods) but Ant was my favorite for a loooong time. Theo is my favorite currently :) They’re both entertaining to “play” the game with lmao
Have you made a simself?
Yeah but she’s been sitting for years in her sad house in Windenberg. I don’t play simself stuff, but sometimes I’ll dress her up for a simblr challenge.
What sim traits do you give yourself?
Cheerful, Geek, Goofball. I’m very basic.
Which is your favorite EA hair color?
I don’t really have one...uhhhh, black!
Favorite EA hair?
I always use the city living hairs. Love the one ponytail with the braid on the side. I also love the Island Living hairs.
Favorite life stage?
I like my moody teenagers the best. The phases can be irritating but entertaining if I integrate it into the story.
Are you a builder or are you in it for the gameplay?
Gameplay but I actually really like customizing lots. I’ll download a lot or redo an existing one.
Are you a CC creator?
Nah, I honestly don’t have time :(
Do you have any simblr friends/a sim squad?
I have some pretty awesome mutuals. I’m too MIA to be a part of a squad. Work, relationships, and life get in the way of playing sims lol. I’ve tried to join a general discord but I’m awful at using it.
What’s your favorite game?
Currently, Disco Elysium. Usually, Stardew Valley/Harvest Moon or whatever the current Zelda game is. (Actually I’m playing Minish Cap rn!)
Do you have any sims merch?
No T_T I might have in the past. I REMEMBER DISTINCTLY that I had the Sims 1 ONLINE but my mom and I didn’t understand how to set it up so she gave it away.
Do you have a YouTube for sims?
No, that sounds terrifying. I barely post on tumblr LOL
How has your “sim style” changed throughout your years of playing?
Hmmm good question. I think it’s less “basic NPC” (base game??) and a little leaning towards my own lil funky style. When I first replayed sims 4 again in 2020, I downloaded all the basic CC that was trendy (and kinda outdated). In 2022, I moved my save to a new PC and started over, so that helped.
What’s your Origin ID?
I do not know. I do not use Origin or any EA app for socializing/sharing
Who’s your favorite CC creator?
Looking at my CC folder: simandy, clumsyalien, sentate, nolansims, and deetron.
How long have you had a simblr?
2020 I believe. Maybe a bit earlier but I didn’t post anything
How do you edit your pictures?
I used to have photoshop T_T (RIP) and used PSD and actions and EVERYTHING LOOKED SO GOOD. I lost access and I can’t bring myself to pay monthly rn. I miss it though, I hate the way my screenshots look now.
What expansion/game/stuff pack do you want next?
I’d honestly like packs to be refreshed. I’m not one to ask for new stuff...I think there’s enough stuff. We need things to work properly LOL
What expansion/game/stuff pack is your favorite so far?
City Living has gotten the most focus from me. It’s SO much fun to go thrifting, go to festivals, and I love apartments. I’m sure I’ll love Island Living but I haven’t gottten to explore it yet.
1 note
·
View note
Photo
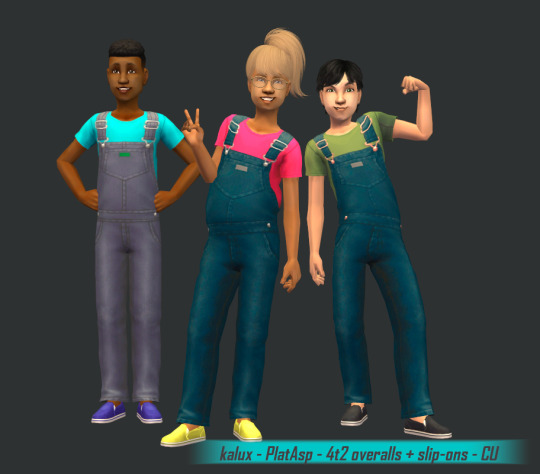
I’ll be honest right up front...these aren’t perfect, but they’re cute and I like them, so here they are. I’ve tweaked and tinkered with the textures as much as I can bear, so slight wavy texture goofs around the shoulders are what they are. I hope you like them anyway.
I liked the idea of these overalls, but the colors EA chose...not s’much. And I wanted them to have the slip-ons I keep adding to everything. (I’m not done yet!) So this is (deep breath) my recolor of my no rip edit of @platinumaspiration’s 4t2 BG overalls, with a shoeswap to my conversion of the TS4 BG slip-ons. Phew. Please swat me with a newspaper next time I decide to try to recolor something where the parts are all mapped together like this. It was a beast.
They’re CU Everyday, with a fat morph. They come in ten color combos, with coordinated shoes, some of which are my recolors.
Swatch:
Download - SFS or MediaFire
Credits - @platinumaspiration for the 4t2 overalls conversion, @mdpthatsme for the conversion database
As much as I want more recolors of these...I’m either gonna make a PSD of the layers separated and fixed up (which...why the hell didn’t I?) or I’m just not gonna. Time will tell. I love that EAxis switched to mapping all the little fiddly bits as their own parts on the texture, but it makes me resent the times they didn’t do that. In other words, the tee, straps, bib, metal findings, tags, etc are all exactly as you see them, so I split them apart, recolored, hated the result, redrew a bunch of it by hand, smoothed, grimaced....it was a whole thing. Grr. But they’re done and I can stop thinking about them now. Grr again for good measure. Grr.
97 notes
·
View notes
Text


Content Creator Tag Game: Before & After!
Show your gifs before and after coloring ♡︎
tagged by the lovelies: @myork & @kimtaegis
tagging: @userhobi ♡︎ @namjaan ♡︎ @bisexualrapline ♡︎ @taejinnies ♡︎ @sevencoloredstar ♡︎ @honeyboysvga ♡︎ @itsallaboutzayn ♡︎ @yoonstudios ♡︎ @rkivedfiles ♡︎ @hobis-suga ♡︎ @userkoo ♡︎ @usertae and everyone who would like to show their before and after!
i delete my psds as soon as i post so i had to dig through my recycle bin folder for these. honestly my coloring is nothing special. i do all of them from scratch and just go with the vibes. as you can see i like to go wild with the saturation and the reds in the selective color. i like bright gifs, but honestly i fail making them brighter like 99% of the time, but overall i am happy with most of them. also i’ll never post that mots7 yoongi even if it’s one of my faves. rip to it </3
just ignore this if you don’t want to do it or tag me in yours if you already did it 💗
i delete my psds as soon as i post so i had to dig through my recycle bin folder for these. honestly my coloring is nothing special. i do all of them from scratch and just go with the vibes. as you can see i like to go wild with the saturation and the reds in the selective color. i like bright gifs, but honestly i fail making them brighter like 99% of the time, but overall i am happy with most of them. also i’ll never post that mots7 yoongi even if it’s one of my faves. rip to it </3
#if you don’t want me to tag you in the future let me know and i won’t do it again :)#also don’t feel pressured to do this if you don’t want to#tag games
25 notes
·
View notes
Photo


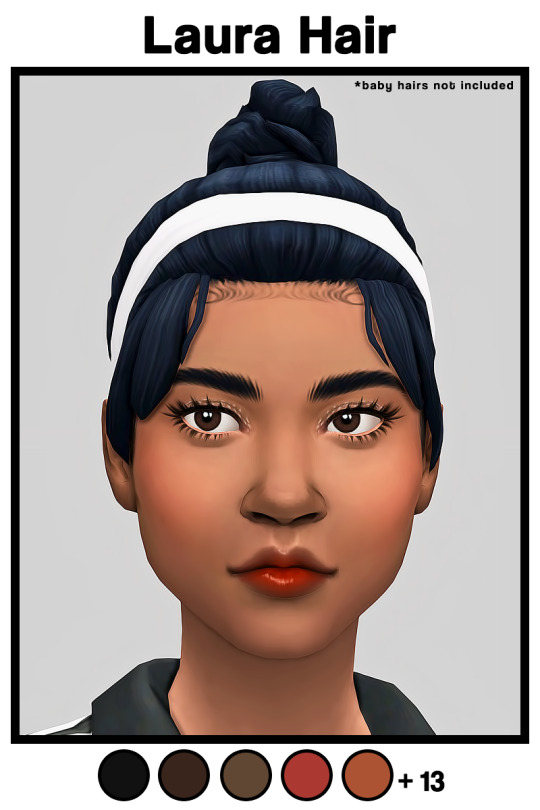
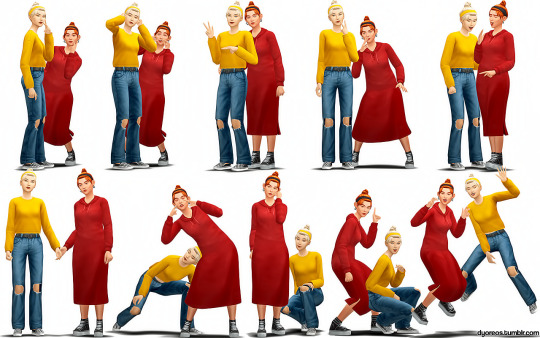
[Dyoreos] Girls Rule CC Pack
Wooo! Finally, the long-awaited female cc pack has arrived. This wouldn’t have happened without my lovely patrons. I want to thank you all so so much! I also would like to thank my followers because every single one of you gives me motivation and energy to keep on creating for this lackluster game, lol. I’m very excited to share this cc pack with you all!
This pack comes with a couple pose pack, a cardigan, a cropped sweater, a long denim skirt, baggy ripped jeans, a hoodie dress with side-slits, and an updo bun. The headbands on the hair are different colors depending on the hair color you choose. I’m really surprised with how the hair came out because it’s the first hair I’ve ever done. I still want to improve so I can release better hairs than the first :P Let me know if you have any issues with any of the items or if you want a PSD for recoloring purposes. Enjoy~
Female (T-E)
Base Game Compatible
All LODs and custom thumbnails
Disallowed for random
Poses need Andrew’s Pose Player & Teleport Any Sim
Please, respect my T.O.U
BECOME A PATRON | DOWNLOADS PAGE
DOWNLOAD + MORE INFO (PATREON) | Public release September 30th, 2020
#ts4#the sims 4#ts4cc#s4cc#ts4 pose#s4 pose#mycc#accidentally used the same models from my makeup setTT#its too late to redo all the screenshots#model:hannah#model:samantha#model:lilian#dyo*
3K notes
·
View notes
Photo


wow Look I actually went inside my game to take a preview! it’s really lazy i still have like zero CC in
Hi, I feel like creating, so I went to @rudhira‘s wonderful blog and started eyeing what I could rip apart and mess around with.
I made plain recolors of her shoe swap of the h&m dress. The shoes are texture referenced to the H&M outfit so you need H&M for this to work properly. Thank you to rudhira for helping me figure out how to do that, it’s very clever !
they are in @withlovefromsimtown‘s cheap mm colors because i am obessesed with them, thank u
edit: oh lol i forgot, they’re for AF and TF. teens are referenced to adults.
I also included a PSD of the dress, so you can recolor or add graphics/patterns. I hope to see some stuff made with it!
download
#wow look i posted something#IM ALIVE#i have more stuff in the works too because yes? yes.#rudhira if youre reading my tags i love you and all ur creations mwah#i am going to recolor everything#oldcc
236 notes
·
View notes
Photo

For the anon who asked if I had a tutorial on how I make gifs! I made one that covers just about everything about my gif-making process 💖
A summary of things included in this tutorial:
How to rip videos from nearly everywhere
How to make a basic gif using videos
How to slow down a gif
How to color gifs

Stuff you need:
Windows 10 (for the built-in screen-recording program*) / Xbox Game Bar
Photoshop CS6 or higher
VLC Media Player
PC/laptop
*I like to use the Xbox game bar because it's straightforward and doesn't require any technical shit to make it work. It's plug and play! But if you don't have this, here are some alternatives:
OBS Studio - used for streaming and screen recording, free and open source! lots of tutorials on Youtube for beginners
VLC Media Player - all purpose media player and Youtube video-ripper, also free and open source
You’re gonna have to look elsewhere for OBS and VLC tutorials but they're not terribly hard to get used to. It's just gonna take a little extra work to make gifs that way.
I. Get a video of the thing you want to gif
High quality vids make high quality gifs so I like to source them directly from HD/Bluray digital copies as much as possible. This is how I do it 90% of the time:
1. Open the source video in my media player (I use VLC)
2. Open the Xbox Game Bar
3. Record a short clip from the source vid
I prefer to do this because it's easier to work on a short clip with a small file size in Photoshop.
If I can't download the videos, I rely on screen-recording from wherever it's available (Youtube, Streamable, Twitter, Instagram, etc.). Any video that can play in a browser is fair game.
How to use the Xbox Game Bar to record your screen
you don't need a microsoft or xbox account to use it
can record videos from media players and almost any video that plays in a web browser (not sure if this works with Netflix on a browser though)
How to use VLC Media Player to rip videos directly from Youtube
doesn't always work but it allows you to find the exact address of a Youtube vid and save it on your PC like you would with pictures
most videos aren't high quality when ripped like this but when I got nothing else to rip from, I can't be choosy ¯\_(ツ)_/¯
II. Make a standard gif file
youtube
1. Open PS. Drag/drop your video in PS. The 'Timeline' window should appear on your workspace. If it doesn’t, go to Window > check 'Timeline' near the bottom of the menu
2. Make a new file with the usual tumblr dimensions (Width: 540px for 1 column posts/ 268-268px for 2/ 177-178-177px for 3, Height: up to you)
3. Drag and drop the vid in the new file then close the video file.
4. On your new file in the Timeline window, click on 'Create Video Timeline'
5. In the Layers window, right-click on the video layer and select 'Convert to Smart Object'
6. Resize the video.
7. You can move the start/end bars on the Timeline so it only includes the part of the clip you want to gif. Skip this step for now if you plan to change the speed of your gif.
8. Save your new file. You don't have to keep the PSD and source video in the same folder but I recommend you do.
III. Adjust the speed
youtube
1. Double click exactly on the thumbnail graphic of the video layer--not the layer name or the gray area around it! It should open a new window with 'Layer 1.psb' as the filename.
2. Right-click on this video's Timeline. It should show a small tab that allows you to change the speed of your gif. 60-70% gives it a noticeable slow-mo effect.
3. Since we slowed the clip down, we have to lengthen it. Drag the arrow at end of it all the way to the right until the you can't extend it further.
4. Press ctrl + s to save the changes in 'Layer 1.psb' and then close that window for now.
5. Go back to your main file (LALO 01.psd in my example) and adjust the length of the clip on this Timeline like you did on 'Layer 1.psb'.
6. Readjust the start/end bars on the Timeline so they line up with the part you want to gif.
III. Make it pretty
youtube
There is one effect that makes a gif instantly prettier and that is Smart Sharpen. Look for 'Filter' on the top menus. Click on the video layer, click on Filter > Sharpen > Smart Sharpen.
If the scene you clipped is well-lit and if you are not doing anything fancy, this might be all you need to do. But if not, you can find every tool for color adjustment in the Layers window:

These are the ones I use often:
For adjusting brightness/contrast: Levels and Selective Color
For color correction: Color Balance, Selective Color, Photo Filter and Vibrance
For cleaning up artifacts and reducing noise in nighttime/dark scenes: I use Selective Color and turn up the black anywhere from +5 to +15
IV. Save the gif
youtube
I usually do a bunch of tweaks here and there before I save the final gif. I go back to adjust the speed, to recolor or change the length of the gif, whatever I feel needs retouching.
1. Press Alt + Shift + Ctrl + S all at the same time or click File > Export > Save For Web.
2. I use these settings:
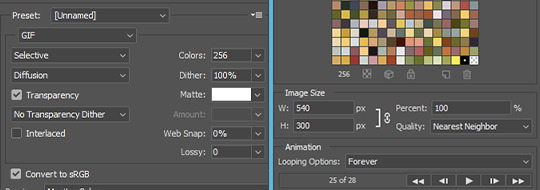
3. Check that the file size doesn't exceed 10mb
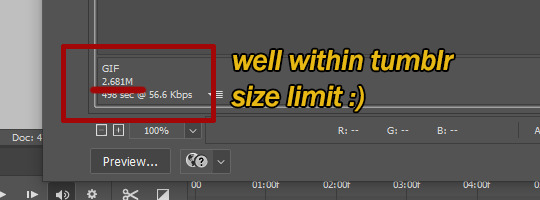
4. Click ‘Save’. And we’re done!

#my gifs#photoshop#photoshop tutorial#gif tutorial#tutorials#might as well tag this#better call saul#breaking bad#brba bcs gifs#my tutorials
213 notes
·
View notes
Last Seen Blogs

style-trumps-fashion
Style Trumps Fashion

dremayhem76
DREMAYHEM76

flyingmanga
Manga Caps

kaamaroja
KAAMAROJA (TAMIL)

whitefang323
Musings of a Devotee