#python constructor overloading
Explore tagged Tumblr posts
Visit Tumblr Blog
Explore Tumblr blogs with no restrictions, modern design and the best experience.
Last Seen Tumblr Blogs


Fun Fact
There were a total of 171.5 billion posts on Tumblr in 2019.
Text
Python Live-1 | Lambda Function & Constructors in Python | Python Tutorial for Beginners | Edureka
Python Live-1 | Lambda Function & Constructors in Python | Python Tutorial for Beginners | #Edureka #Python #Datalytical
🔥Edureka Python Certification Training: https://www.edureka.co/python-programming-certification-training This Edureka session on Lamda Function & Constructors in Python will educate you about the Lambda functions and various constructors available in Python and help you understand how to use them in various scenarios.
———————————————————————————————-
🔴Subscribe to our channel to get video…
View On WordPress
#anonymous function#anonymous function in python#constructors in python#edureka#lambda expresssions#lambda function#lambda function in python#lambda python#python 3 lambda functions#python constructor and destructor#python constructor class#python constructor overloading#python constructor tutorial#python edureka#python functions#python lambda function example#python lambda function explained#python lambda functions#python lambda tutorial#yt:cc=on
0 notes
Text
Oxford Certified Python Professional

Oxford Certified Python Professional
This certification from Oxford Software Institute will impart the basic to advanced Python skills, ranging from running scripts to more advanced features such as File Operations, Database Handling, Exception Handling, Tuples and Array Slices. Python is a widely used dynamic programming language compared to other languages such as Java, Perl, PHP, and Ruby. We provide the best classes with well-researched, latest course content and experienced teachers.
INTRODUCTION TO PYTHON
In this module, we will learn about Python Programming fundamentals, the History and versions of Python, Coding using an IDE, description of first Python Program, the Python keywords, Variables, Operators and Datatypes, Comments and indentation, Input and Output, Type Conversions, the type() function and “is” operator, Handling numeric and textual data, Flow Control Statements like if-else, Loops like while, for, continue and break statements, expressions and much more.
PYTHON FUNCTION, MODULE, STRING AND COLLECTIONS
We will learn about handling Functions, return types, Commonly Used Modules, Scope and Lifetime of Variables, Command Line Arguments, *args and **kwargs, Recursion, Dates and Time, Defining and Using Modules, Basic String Operations like accessing characters in String by Index Number, String Slicing and Joining, String, Built-in collections like Lists, Tuples and Sets, Built-in function used on Dictionaries, Relation between Tuples and Lists, Relation between Tuples and Dictionary, using zip () Function, Sets, Set Methods, Traversing of Sets
FILE, EXCEPTION HANDLING, REGULAR EXPRESSION AND DATABASE CONNECTIVITY
We will discuss topics like File I/O, Types of Files, handling Text Data, File Methods to Read and Write Data, handling Binary and CSV files, the Pickle Module, Reading and Writing CSV Files, Python OS, Catching Exceptions Using try and except statement, handling a single and multiple exceptions, regular Expression Operations, using Special Characters, regular Expression Methods, Named Groups in Python Regular Expressions, Regular Expression with glob Module, RDBMS, SQL, Using SQLite Manager, Python with a database, Event handling with GUI, working with components.
PYTHON OBJECT ORIENTED PROGRAMMING
Students will learn about OOPs, Encapsulation, Abstraction, Inheritance, Polymorphism, Classes and objects, Types of variables, Types of methods – Instance Methods, Class Method, Static Method, Access modifiers �� private, protected, public, ‘self’ reference variable, Constructor, Classes with Multiple Objects, Class Attributes versus Data Attributes, Types of inheritance-single, multi-level, multiple, hierarchical and hybrid and Diamond inheritance, Polymorphism, Method Overriding and Method Overloading, difference between Abstraction & Encapsulation and much more
SOFT SKILLS
Having a technical and discipline-specific expertise can help you get to the interview room but it’s the soft skills that will make the hiring manager hand you the appointment letter. In this course, students will also learn various Soft Skills like how to communicate professionally in English, Speaking in public without hesitation, using effective gestures and postures to appear impressive, managing stress and emotions and taking successful interviews. Oxford Software Institute provides the best classes in Soft-skill training.
CERTIFICATIONS*
During this course, students will be trained for the following certifications
Oxford Certified Python Professional.
0 notes
Text
Java Principles for Beginners to Discover Java Setting

A few more code examples, preferably with new instruments like JShell will really assist. In this article, I truly have chosen a number of the finest Java courses from Udemy and Pluralsight, which are each complete and up-to-date however at the same time suitable for newbies. All the strategies declared inside an interface are implicitly treated as public and abstract even when such strategies are not explicitly declared as public and summary.
And we’ve had college students from each programs get jobs doing JavaScript and Python development.
When we're debugging our code, the overall rule of thumb is to address only the top error on our record; that's the first error that the compiler came throughout in our code.
The correct technique is invoked during compile time depending upon the sequence , datatype and number of arguments.
I found it to be rather merely and missing in sure elements and something that bothered me is that the quizzes where a number of selection most of the time.
We’ve additionally had graduates get jobs at startups constructing small web purposes.
It presents greater than 1000 videosthat are ready by the consultants of different languages. You can research totally different examples and take a look at yourself by executing multiple code examples. After completion of core Java concepts, you possibly can be taught superior Java concepts and other essentials of Java language. It could be very helpful for both novices as nicely as experienced programmers. With the assistance of this website, both can learn in regards to the Java programming language very easily.
In addition to communities, you’ll encounter complete guides and tutorials that can help you grasp the fundamentals and debug errors. We will break down our high tips for how one can begin your Java journey. We may even give you an inventory of actionable suggestions on topics you presumably can explore. By the tip of studying this text, you’ll have a clear roadmap to information you thru studying Java. The video shared below is the last a part of the 10-part playlist referred to as Java For Beginners. There are 5 totally different lessons within the project, namely, account holder, account, bank transaction, bank and particular ATM of the financial institution.
Executing Our Program
And you’ll discover a ton of enlightening interviews with professional Java programmers where they share secrets and techniques of the language to help beginners study the ropes sooner. Once you realize which pitfalls to keep away from you’ll have a a lot easier time working via projects. Java is the unique Sun Microsystems programming language and it’s been across the block for properly over two decades. This can be used for anything from games to cellular apps, desktop software, and enterprise programs for servers.
How can I learn Java for free?
5 Websites to Learn Java for FREE 1. Udemy. This is a popular website for learning Java and other languages online.
2. CodeAbbey. The next site that I am going to share with you guys is CodeAbbey.
3. CodeAcademy. One of the most popular websites, which I used to learn JavaScript, is CodeAcademy.
4. CodingBat.
5. Pluralsight.
After the theoretical classes, you presumably can go ahead with the sensible lessons to apply the data you've gathered all through the courses. If you need to pursue a career as a Java developer or are wanting forward to adding the vast array of concepts of this language to your ability set then you are at the proper place. Comprising of over 12 training, this path has a alternative for everybody irrespective of their skill stage. If you are a newbie then you may begin with the fundamental programs or if you want to follow widespread coding problems in Java then there are courses for that too. By the tip of the trail, you could be prepared to use for a developer profile or work as a freelancer.
What's Class In Java ?
Which means the members of the identical class as nicely as other lessons in the identical package deal and sub lessons in other packages can have access to the protected members . But the members of the classes in other packages don't get access to the protected member. Which means the members of the same class as nicely as different courses in the same package deal can only have entry to the default members . But the members of other packages and in addition the sub classes does not get access to the default member. However , an inside class can be declared as non-public .The class members such as methods and variables can be declared as non-public. If the class member methodology or a variable is asserted as privatethen such member might be accessible onlywithin its personal class .
We noticed that Java was the primary in-demand language within the nation. Right now Java and C# are the two most in-demand languages, so these are the languages that we educate at Tech Elevator. If Ruby turned the most in-demand language tomorrow, then we might look into teaching Ruby. So to keep every little thing simple, let's begin learning Java by writing our Java code in an Integrated Development Environment . This is a software program program of its personal that helps us write, compile, and run Java applications. We're going to make use of the NetBeans IDE, which is awesome because it is free, open source, and it will operate nearly the identical on Windows, Mac, and Linux environments.
However, it's doubtable that you will turn into an professional in such a quick time. Try various exercises for training Java and monitor your progress. These are only a few of the issues that you are in a place to do to make certain that you are writing good code from the beginning. The most important thing at this stage is to get on the market and have a go.
Official Java tutorial - Java documentation is doubtless certainly one of the greatest programming language documentation. Multithreaded − With Java's multithreaded feature it is possible to put in writing programs that may carry out many tasks concurrently. This design function permits the builders to construct interactive purposes that may run smoothly. Nice tutorials, Can you place them as a collection, So that I don’t have to come again to the homepage to view the second tutorial within the listing.
The Child Class Object reference factors to the Child Class object . In this case Child class constructor has been used to instantiate the thing . The Parent Class Object reference factors to the Child Class object . The overloading could be achieved by declaring totally different technique parameters when it comes to parameter numbers , sequence and the info types of the parameters.
youtube
0 notes
Text
What is Constructors in Python?
A constructor is a special kind of method (function) that is used to initialize the instance of the class. Python considers the constructors differently but the C++ and Java declare the same name as the class.
There are two types of constructors:
Parameterized Constructor
Non-parameterized Constructor
Create Multiple Constructors in Python Class
To create multiple constructors in the python class, we declare the __init__() function with argument. That argument will check which function has to execute.
It means the class will execute different functions based on that argument condition checking in the constructor function.
I explain in the article here
#python#constructors#multiple constructors#python constructors#what is python constructors#implement multiple constructors#python class
1 note
·
View note
Text
Kotlin vs. Groovy: Which Language to Choose

Application of Computer Science to a growing range of fields and general advancements in technologies push programming languages to constant improvement and adaptation to the present-day needs. Now we have a bunch of languages serving different purposes: some of them emerged as an independent project, while others bud off from established and well-known languages.
The colossus of Java, for example, has a number of offspring; some of them have proved to be a success. One of them, Kotlin, was backed by Google as the official language for Android development in 2017 and was reported to be the second most loved and wanted programming language in 2018 Stack OverFlow survey and remains in Top 5 in this year’s survey. Another successful member of Java-based languages is Groovy that is gaining popularity among developers. At the same time, the 2018 Stack OverFlow survey listed Groovy among the most dreaded languages. In this setting, it seems unfair to compare the languages, but let’s see whether Groovy is so dreadful compared to Kotlin and, generally, which of them to choose as another addition to your bag of skills.
Overview
Kotlin
Kotlin is developed by Jetbrains — a company well-known in the Java world for its IDE named IntelliJ IDEA — and open sourced in 2012. It is a high-level, statically typed programming language that runs on Java Virtual Machine (JVM) and can be compiled to JavaScript source code or handle the LLVM compiler infrastructure.
Though internally Kotlin is reliant on the present Java Class library, its syntax may not be specifically compatible with Java. Kotlin has aggressive type inference to decide the type of values and expressions for which type has been left unstated. This makes it less verbose comparing to Java.
Kotlin has a practical mix of features from Java, C# and other new languages. It generally shows many improvements over Java such as null safety or operator overloading, though lacking certain convenient Java properties such as ternary operator and checked exceptions. However, both languages are completely interoperable, so they can co-exist in the same application.
Besides, since Android Studio 3.0 (published in October 2017), Kotlin is also part of the Android SDK and is involved in the IDE’s installation package as an option to the standard Java compiler. The Android Kotlin compiler allows user to target Java 6, Java 7, or Java 8-compatible bytecode.
Kotlin is much appreciated by developers for its interoperability, code security, and accuracy.
Groovy
Groovy is an object-oriented programming language for Java platform that is distributed through the Apache License v 2.0.
The key feature of Groovy is that it aspires to combine the best of two worlds: it supports both static typing typical for Java and more relaxed dynamic typing similar to that of Python.
Moreover, it can be used as both a programming language and a scripting language for the Java Platform. Like Kotlin, Groovy is compiled to Java Virtual Machine (JVM) bytecode and interoperates seamlessly by different Java code and libraries.
Generally speaking, Groovy has a Java-like syntax, but it takes on the ease of more moldable languages, such as Python and Ruby. Groovy can be called a modern Java enhancer, since it provides greater flexibility and introduces special features to applications, such as safe navigation operator (?.), the concept of Closures, Traits, runtime dispatching of methods, Groovy String, Array initialization and many others.
Groovy is a testing-oriented development language with syntax that supports running tests in IDEs, and Java build tools like Ant or Maven. Besides, it provides native support for markup languages like XML and HTML and domain specific languages.
What can also make it attractive to developers is its short learning curve: for Java developers, it is just a step away from the usual syntax, for new learners — it is relatively easy and modern.
Applications
Kotlin
Given the fact that Kotlin as an official Android development language at Google I/O, its most obvious application is Android development.
Speaking more generally, Kotlin is great for developing server-side applications, allowing developers to write concise and expressive code while maintaining full compatibility with existing Java-based technology stacks.
The most prominent applications of Kotlin are rather impressive and include the following giants:
Pinterest moved away from Java to Kotlin for their Android Application Development
Gradle built developing android files (APK files) for both IDEA and Eclipse
Evernote integrated Kotlin in their android client
Coursera built an online courses application for a range of courses
Uber made internal tooling processes on Kotlin
Atlassian and Trello did a full code conversion of the old codebase.
Kickstarter helps find resources for people showcasing creativity.
Groovy
Since Groovy is so similar to Java, it is sometimes difficult to find a distinguishing application for it. One thing that is a definite benefit is that Groovy enables to write scripts besides classes, so you can write applications and scripting with the same language. Groovy scripts are a perfect fit for tasks that change often. Since Groovy is a part of JMeter distribution, it is a good idea to use it for scripting and possibly to migrate the scripting logic developed in other scripting languages, to Groovy.
Examples of using Groovy as a scripting language are rather numerous:
1. Netflix uses Groovy for server-side scripting to offer various levels of filtering Besides, Netflix Spinnaker is implemented in Groovy.
2. Oracle’s fusion middleware is using Groovy scripts in its business component suite.
3. LinkedIn use Groovy also in their “Glu” open source deployment & monitoring automation platform.
The other direction of practical applications for Groovy is to use it as an embedded business language (a Domain-Specific Language):
1. National Cancer Institute uses it to do scientific simulations
2. JPMorgan, MasterCard and other financial institutions use Groovy for its nice DSL capabilities.

Syntax
Kotlin
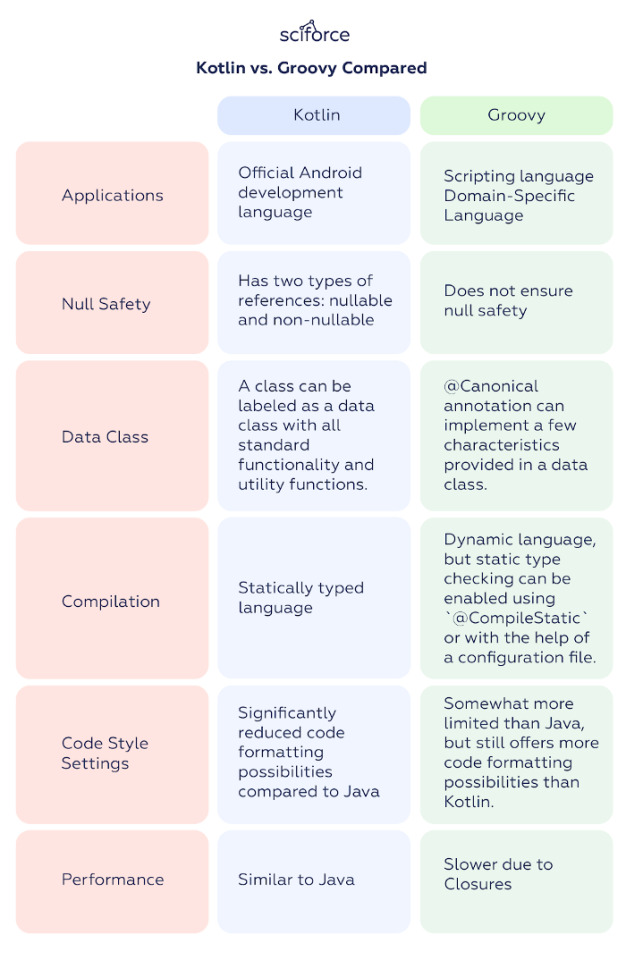
Kotlin is null-safe which is perhaps the most valued feature of Kotlin missing even in Java. Kotlin has two types of references: nullable and non-nullable, so you can compose code by limited NPEs. The null safety feature of Kotlin protects developers from accessing the properties of a null reference.
In Kotlin, every class is a function, and vice versa; besides Kotlin for Android has Optional types, which help with all the safety checkups. A class can be marked as a data class with the standard functionality and utility functions already present.
Kotlin has a lot of other characteristics, like smart casts, ADT (doc), type-safe builders, zero-cost abstractions and, rather importantly, great IDE support.
Groovy
Having no data class, Groovy 1.8 introduced a few alterations which involve,among others, a new class annotation `@Canonical` that is used to create mutable classes. This annotation allows you to write classes in this shortened form and loads all possible combinations of constructors, getters and setters, creating an analogue of the data class.
One of the key features of Groove is Groovy Closures that is an open, anonymous block of code that can take arguGroovyments, return a value and be assigned to a variable. In opposition to the formal definition of a closure, Closure in Groovy can also contain free variables which are defined outside of its surrounding scope that offers a variety of advantages.
Compilation
Kotlin
Kotlin is statically typed language, meaning that the type of a variable should be known at compile-time instead of at run-time.
Groovy
Groovy was created as a dynamic language, so code gets compiled to machine code on the fly while the program is running. Since Groovy 2.0, it is possible to enable static type checking using `@CompileStatic` annotation. It feels nevertheless a little bolted on and does not enforce people to code in a static way. Sometimes even with `@CompileStatic` annotation, Groovy seems to have some dynamic performance remained.
Alternatively, it is possible to designate static typing with the help of a configuration file specifying its name with the — configscript option of the Groovy compiler. It will apply the CompileStatic AST transformation annotation to all source files in the project.

Code Style Settings
Kotlin
One might think that Kotlin as the language developed by a company famous for its intelligens IDEs, will have limitless settings to configure code style. The reality, however, is that the code style settings offered for Kotlin in IntelliJ IDEA are significantly more limited compared to Java. The difference in code style settings is intentional to a degree. The company explains that in their vision they see Kotlin code using consistent coding styles (similar to PEP8 in Python) instead of supporting infinite configuration possibilities.
Groovy
Groovy takes a place somewhere in between Java with its extensive code style settings and Kotlin that has only limited possibilities. As compared to Java, Groovy seems to be 20–25% less flexible in terms of code formatting settings.
Performance
Kotlin
In most cases, Kotlin performance is the same as Java.
Groovy
Groovy even with `@CompileStatic` in most cases is slower than Java or Kotlin due to additional runtime checks and because of Closure which is much more expensive than Kotlin lambda.
Kotlin vs. Groovy Compared
Generally speaking, Kotlin and Groovy are both JVM languages and both are developer friendly. Their major difference lies not in syntax, but in compilation. Besides, notwithstanding their differences, they are total interoperable which indicates they can co-exist in the same application.
Some developers agree that Groovy is easier for quick scripts to do something simple or for testing, while Kotlin is a better choice to create something nontrivial without all the friction/ boilerplate of Java and for Android development.
Speaking about future prospective, Kotlin seems to already grant itself a place among Android languages, so mastering it might be a thoughtful decision.
0 notes
Text
How Can We Do My C++ Assignment for You?

One of the things that C++ offers that Java does not is overloaded operators, these provide a mechanism for writing code that reads much more naturally than code that uses functions instead. The normal types are the int types (short, char, long, etc), and float types (float, double) in addition to pointers to one of these. Say you want to represent values that represent fractions, you can’t use integers and floats (and doubles) are inexact. In decimal 1/3 can not be represented (0.3333…..) and in binary there is a problem representing 0.1, which is common number in everyday use.
If we used a rational class similar to Java, we might have rational a = new Rational(1, 10); rational b = new Rational(2, 5); rational c = a.add(b); instead of rational c = a + b; Although the Java works it is less readable, and we could do a.add(2) instead of a + 2 but that does not work if we want 2 + b since we can’t write 2.add(b). With addition it too much of a problem to switch them around, but 2 – a is not the same as a – 2. With rational we can even avoid writing methods that operate on a rational and an integer value because we can use the fact an implicit constructor is called to convert the integer value into a rational value.
The other advantage of operator overloading, is that we can offer implicit casts to float, so you could write sin(a) without having to provide your own implementation of sin, we just need to offer an implicit conversion to double. You should also override the << and >> for ostream and istream so that you can display a value using cout << a and read it by using cin >> a. You should also provide for comparisons to make them behave as expected. You write methods using operator+, operator- etc rather than using __lt__ as you would do in Python.
Overloaded operators allow you to extend the language, but use responsibly. A string class that uses + to add strings together makes sense, but what would – do? If you made – remove the string if it appeared at the end, that might be OK for your use case but “Hello World” - “ ” to give “HelloWorld” could also be argued to be correct, so it would need documenting. Python allows you to use “-” * 40 to give a string 40 characters long, so you might consider that as a reasonable overload.
If you are looking for help with a C++ project we can help, and can use features such as operator overload, templates, or just stick to the basics if that is the level you have been taught to use. We operate 24/7 but the fastest response time is during the hours 8AM-11PM (PST).
You can rely on Programming Assignment Helper if you need someone to do my C++ homework.
0 notes
Text
ESP32 Tutorial Arduino: 29. Websocket server - Sending binary frame to client
Introduction
In this tutorial we will check how to send binary frames to a client that connects to websocket endpoint from a HTTP server running on the ESP32. We will be using the Arduino core and the HTTP async web server libraries.
For an explanation on how to receive binary frames from the client, please check this previous tutorial. So, in this example, we will do the opposite, which corresponds to the ESP32 server sending the data to the client in binary format.
Our websocket client will be implemented in Python. The script will be very simple and the basics on how to work with binary frames were already covered in this Python tutorial. It also explains how to install the Python module that will be needed to setup the client.
The tests were performed using a DFRobot’s ESP32 module integrated in a ESP32 development board. The Python version used was 2.7.8.
The code
We will start our code by including the libraries needed for this example to work. As usual, we will need the WiFi.h and the ESPAsyncWebServer.h libraries, to connect the ESP32 to a WiFi network and to setup the HTTP server and the websocket endpoint, respectively.
We will also need to store the WiFi credentials (the network name and the password), which we will assign to two global variables, making them easy to change later.
To finalize the global variable declarations, we need an object of class AsyncWebServer, which we will use below to setup the HTTP server, and an object of class AsyncWebSocket, which we use to setup a websocket endpoint and to associate that endpoint to a handling function.
Recall from the previous tutorial that the constructor of the AsyncWebSocket class receives as input the websocket endpoint, as a string. Our endpoint will be “/test” and this value will need to be used later in the Python code.
#include "WiFi.h" #include "ESPAsyncWebServer.h" const char* ssid = "yourNetworkName"; const char* password = "yourNetworkPassword"; AsyncWebServer server(80); AsyncWebSocket ws("/test");
Moving on the setup function, its implementation will be the same we have been covering in other tutorials where we have used websockets and the HTTP async web server framework.
So, we start by opening a serial connection and then we connect the ESP32 to the WiFi network, using the previously declared credentials. After the connection procedure finishes, we print the local IP assigned to the ESP32, which will be needed later in the Python code.
Serial.begin(115200); WiFi.begin(ssid, password); while (WiFi.status() != WL_CONNECTED) { delay(1000); Serial.println("Connecting to WiFi.."); } Serial.println(WiFi.localIP());
After this, we will bind our websocket endpoint to a event handling function, which will be triggered when a websocket related event occurs. We do this by calling the onEvent method on our AsyncWebSocket object, passing as input the handling function.
We will call our handling function onWsEvent and we will define it later.
ws.onEvent(onWsEvent);
Then, we register the AsyncWebSocket object in our HTTP web server. This is done by calling the addHandler function on theAsyncWebServer object, passing as input the address of the AsyncWebSocket object.
server.addHandler(&ws);
To finalize the setup function, we need to call the begin method on our AsyncWebServer object, so the server starts listening to incoming requests. The full setup function, which already includes this method call, can be seen below.
void setup(){ Serial.begin(115200); WiFi.begin(ssid, password); while (WiFi.status() != WL_CONNECTED) { delay(1000); Serial.println("Connecting to WiFi.."); } Serial.println(WiFi.localIP()); ws.onEvent(onWsEvent); server.addHandler(&ws); server.begin(); }
The only thing missing is the definition of the websocket event handling function, which we will now analyze. This function needs to have a signature accordingly to what is defined by the AwsEventHandler type.
void onWsEvent(AsyncWebSocket * server, AsyncWebSocketClient * client, AwsEventType type, void * arg, uint8_t *data, size_t len){ // Handling function body implementation }
Since the same function is invoked to handle the different types of websocket events from that route, then the easiest way to implement it is with simple If Else conditions.
We can check the event type by looking into the third argument of the event handling function, which corresponds to an enumerated value.
So, we will look for the client connection event and, when a new client connects, we will send a binary frame to it. The client connection event corresponds to the enumerated value WS_EVT_CONNECT.
if(type == WS_EVT_CONNECT){ // Send binary frame to the client }
Inside the previous conditional block body, we will declare an array of three bytes with some arbitrary values to send to the client. Naturally, you can test with other values and array lengths.
uint8_t content[3] = {10,22,43};
To send the actual data to the client we will need to use the second argument that is passed to our handling function. This argument is a pointer to an object of class AsyncWebSocketClient, which we have already used in this previous tutorial to send textual data to the client with the text method.
This time, since we want to send binary data, we will use the binary method of the AsyncWebSocketClient object. This method receives as first input an array of bytes to send to the client and as second argument the length of the array.
Nonetheless, keep in mind that this method is overloaded and can be called with other argument types, as can be seen here.
client->binary(content, 3);
The complete handling function can be seen below. It also contains the handling of the client disconnected event, to help in debugging, and some extra prints.
void onWsEvent(AsyncWebSocket * server, AsyncWebSocketClient * client, AwsEventType type, void * arg, uint8_t *data, size_t len){ if(type == WS_EVT_CONNECT){ Serial.println("Websocket client connection received"); uint8_t content[3] = {10,22,43}; client->binary(content, 3); } else if(type == WS_EVT_DISCONNECT){ Serial.println("Client disconnected"); } }
The final code can be seen below.
#include "WiFi.h" #include "ESPAsyncWebServer.h" const char* ssid = "yourNetworkName"; const char* password = "yourNetworkPassword"; AsyncWebServer server(80); AsyncWebSocket ws("/test"); void onWsEvent(AsyncWebSocket * server, AsyncWebSocketClient * client, AwsEventType type, void * arg, uint8_t *data, size_t len){ if(type == WS_EVT_CONNECT){ Serial.println("Websocket client connection received"); uint8_t content[3] = {10,22,43}; client->binary(content, 3); } else if(type == WS_EVT_DISCONNECT){ Serial.println("Client disconnected"); } } void setup(){ Serial.begin(115200); WiFi.begin(ssid, password); while (WiFi.status() != WL_CONNECTED) { delay(1000); Serial.println("Connecting to WiFi.."); } Serial.println(WiFi.localIP()); ws.onEvent(onWsEvent); server.addHandler(&ws); server.begin(); } void loop(){}
The Python code
We will start our code by importing the websocket module, so we have access to all the functionalities needed to create the client, connect to the server and receive the binary frame data.
import websocket
After this, we will create an object of class WebSocket, which becomes available by importing the websocket module.
ws = websocket.WebSocket()
Next, we will establish the connection to the server. We do this by calling the connect method on our WebSocket object. The connect method receives as input the websocket endpoint as a string, in the following format:
ws://#ESP_IP#/test
You should change #ESP_IP# by the IP that will be printed once you run the ESP32 Arduino code and it finishes connecting to the WiFi network. You can check the final format below, where I’ve used the local IP assigned to my ESP32.
ws.connect("ws://192.168.1.78/test")
Finally, we will call the recv_frame method on our WebSocket object, in order to receive a frame from the server. Note that this is a blocking call which will wait indefinitely until a frame is sent by the server.
This method call will return as output an object of class ABNF, which is a lower level class that not only allows us to get the data returned by the server but also to analyze the frame type (binary or textual), as covered in more detail in this Python tutorial.
binAnswer = ws.recv_frame()
After receiving the frame, we will confirm that it is indeed a binary frame by accessing the opcode attribute of the ABNF object. Nonetheless, since this opcode is a numeric value, we can convert it to a user friendly textual format by using a python dictionary structure defined as static variable of the ABNF class. This dictionary variable is called OPCODE_MAP.
print websocket.ABNF.OPCODE_MAP[binAnswer.opcode]
To get the actual data sent by the server, we need to access the data attribute of our ABNF object. Nonetheless, we need to take in consideration that, independently of the format of the frame (binary or textual), this attribute is always a string. So, we need to convert it to a byte array, iterate over it and print all the values, since we are working with binary data and not textual data.
for byte in bytearray(binAnswer.data): print byte,
Note: we usually don’t work with a lower level class such as the ABNF one, specially in a higher level language such as Python. Naturally, this module we are using offers higher level methods that allow to directly obtain the data returned by the server. We are just using this approach so we can confirm that the server is indeed sending the frame as binary, like we expect.
After obtaining the data, we will call the close method on our WebSocket object, in order to close the connection to the server and free the resources. The final code can be seen below and already includes this method call.
import websocket ws = websocket.WebSocket() ws.connect("ws://192.168.1.78/test") binAnswer = ws.recv_frame() print websocket.ABNF.OPCODE_MAP[binAnswer.opcode] for byte in bytearray(binAnswer.data): print byte, ws.close()
Testing the code
To test the whole system, first compile and upload the Arduino code to the ESP32. After the procedure finishes, open the Arduino IDE serial monitor and copy the IP address that will be printed once the connection to the WiFi network is established.
That is the local IP assigned to the ESP32 that you should use on the Python code, when specifying the websocket endpoint.
After putting the correct IP in the Python code, simply run the script in a tool of your choice. I’m using IDLE, a Python IDE. After the code finishes the execution, you should have an output similar to figure 1, which illustrates the binary content sent by the ESP32 server.
As can be seen, the bytes received match the ones we have defined on the Arduino code. Besides that, the frame is of type binary, as expected.

Figure 1 – Output of the Python program.
0 notes
Text
Implementing Domain-Driven Design with Go (Golang)
I recently joined the Domain-Driven Design group on LinkedIn Domain Driven Design and the group owner David asked me:
"How do you like golang? Any features of go that make it work well with DDD or micrososervices?"
So here we go, I'll use that stimulus to start blogging again.
A bit about my background and history with Go
Before I started programming with Golang in my last company I did PHP for almost 2 decades (true story). Last PHP version I worked with was PHP 7.0, which had all relevant features to do SOLID OOP, with the exception of strict typing (that was added later). My team was switched to a new greenfield project working with Go, in a Microservice environment. We did DDD with EventSourcing from the start. Some more tech stack namedropping: Kafka, PostgreSQL, Docker, Kubernetes - backend services talking RPC with "go-micro" as their framework.
Now we had a similar journey getting into Go as many other devs who were also coming from OOP, we started trying to turn Go into OOP, which is generally not a good idea. Actually, if you favour "composition over inheritance" there is not SO much of a difference, at least to PHP (PHP has no generics, no method overloading, no other OOP Voodoo). Most of the differences lie in what's idiomatic in Go, which can savely be ignored given developers make educated decisions, for example by declaring higher level concepts more important than language concepts.
Some details about Go and it's challenges
There is one important difference to OOP languages, which is how interfaces work in Go. You don't declare an object in Go to be implementing an interface, instead it's "duck typed". So anyhing that fulfills all method signatures of some interface just magically implements it. In Go it's common to not define interfaces on the implementation but on the client side, or put other way, every client using the implementation of some service can bring it's own interface and use interface segregation (e.g. if only a portion of the service's methods are needed). I totally like that, but it conflicts a bit with hexagonal architecture aka. ports and adapters. Luckily this is a case of "idiomatic Go", so here's our good reason to ignore that. As an example, in DDD you would define the interface for a Repository or a DomainService in the Domain package, in Go you would define it where it's used, e.g. in the Application package.
Some other common ways of doing things in Go are probably not even described as "idiomatic", e.g. creating objects like structs on the fly without using factory methods, which is only possible if the internals of such a struct are public (Go calls it exposed). As DDD practitioners we want our ValueObjects immutable, so we'll keep our stuff private and have proper factory methods.
I plan to write about how I would implement things (VOs, Entities, etc.) in Go nowadays - after 2.5 years of learning and changing my mind back and forth at least 5 times about every detail.
My friend James has blogged about BYPASSING GOLANG'S LACK OF CONSTRUCTORS which he could also have named "How can I avoid all those nil pointer checks in Go?", it's very interesting!
Spoiler alert -> With quite some effort you ... still can't fully avoid those nil pointer checks (but there are some ideas how to reduce them)
What makes Go a good fit for DDD / Microservices
Speed
There are faster languages around, but Go runs fast and it compiles very fast, mostly because of the simplicity of the language. And it's getting faster, afaik mostly because of improvements in the garbage collector. For people like me - coming from an interpreted language like PHP or Python - it's fast as lightning, which raises the bar for (premature) performance optimisations quite high. I profiled our stuff a while ago and there was no worthwile target for optimisations in our event-sourced application (unmarshalling was the biggest "thing" but only accounted for around 10% of runtime). To give a rough idea about speed - we could easily serve any command that did not have to make synchronous calls to other external services under 10 ms. With full reconstitution of the Aggregate, no snapshotting or other caching involved.
Simplicity
As Microservices tend to be small they also tend to be relatively simple (this is for sure a simplification), so a language with simplicity as a core concept is a natural fit. I'll put another fact into this catogory, which is the lack of sophisticated frameworks, ORMs, etc. For sure frameworks and ORMs exist, but they tend to be more lightweight and none of them is a de-facto standard which you have to use because everybody does it and then suddenly you're spending more time fighting the accidential complexity of such things instead of solving your domain challenges.
Concurrency
I totally love Go's way of concurrency with goroutines and channels to synchronise them if necessary. As an example, we have implemented a very efficient and hight throughput event publisher, which publishes Domain Events after they were commited to the Event Store. Often all you need is to fire and forget a goroutine to do things that must not block your main application flow, e.g. sending notifications (emails) given it's not critical if the sending fails.
Summary
I like Go alot, especially for not too big services. It takes a while to find your own way through Go, SOLID, DDD, hexagonal architecture but I think it's worth it, because it forces you to think about concepts, instead of blindly applying them. I still love PHP for various reasons (community, eco system, ...) but would not switch back without a very good reason (e.g. a new job requires it).
0 notes
Text
11 Free Programming Video Tutorials in Tamil (65+ Hours)

11 Free Programming Video Tutorials in Tamil
In this post, we list out 11 free programming video tutorials in Tamil from YouTube website where each video tutorial is more than 4 hours in length and thoroughly covers the fundamentals of the programming languages #1 – C Programming language video tutorial in Tamil In this tutorial, it covers the basic concepts to advanced concepts. It is a beginner friendly video tutorial to learn C programming language in tamil #1.1 - C Programming in Tamil https://www.youtube.com/watch?v=8LjPNYOxrVQ Tutorial Length: 04 Hours & 21 Minutes #1.2 - Complete C Programming course https://www.youtube.com/watch?v=JAy56OH58Y4 Tutorial Length: 05 Hours & 24 Minutes #1.3 - Mastering C Programming in Tamil https://www.youtube.com/watch?v=08ZBz1q0wnU Tutorial Length: 07 Hours & 28 Minutes #1.4 - C Complete Course For Beginners in Tamil https://www.youtube.com/watch?v=u3RSpNk0N0U Tutorial Length: 04 Hours & 50 Minutes #2 - C++ Programming Video in Tamil In this beginner video tutorial, it covers all the basics of C++ programming. It will help you learn C++ from beginning to Advanced Concepts. #2.1 - C++ Full Course For Beginners https://www.youtube.com/watch?v=Y4s8CdQQaxk Contents of C++ Full Course For Beginners in Tamil Timeline of all the concepts: - 00:00:00 - Introduction - 00:04:43 - Printing Text - 00:17:17 - More Info on Printing Text - 00:25:38 - Variables - 00:35:38 - Inputs, A Simple Calculator - 00:46:35 - Arithmetic Operations - 00:54:41 - If Else Statements - 01:03:34 - Functions - 01:13:03 - Passing Values To Functions - 01:17:43 - Multiple Arguments In Functions - 01:24:32 - Classes & Objects - 01:32:12 - Variables In Classes - 01:40:35 - Constructor - 01:47:30 - While Loop - 01:56:10 - For Loop - 02:03:59 - Assignment and Increment Operator - 02:14:28 - Datatypes - 02:20:30 - Do While Loop - 02:26:03 - Switch Statement - 02:33:48 - Logical Operators - 02:43:53 - Random Number Generator - 02:54:08 - Default Parameters or Arguments in Functions - 02:58:56 - Unary Scope Resolution Operator - 03:04:49 - Function Overloading - 03:09:42 - Recursion - 03:17:08 - Arrays - 03:23:26 - Using Array With For Loop - 03:29:52 - Arrays As Function Parameters - 03:36:16 - 2D Array or Matrix - 03:41:39 - Introduction to Pointers - 03:47:37 - Pass by Reference Using Pointer - 03:58:35 - Sizeof - 04:03:20 - Pointer Arithmetic - 04:12:00 - Arrow Selection Operator With Pointers - 04:18:29 - Deconstructor - 04:26:08 - Using Const In Classes & Objects - 04:36:35 - Member Initializer List - 04:42:45 - Class Composition - 04:53:28 - Friend Function - 04:58:21 - this Keyword - 05:05:27 - Operator Overloading - 05:17:18 - Inheritance - 05:22:27 - Protected Access Specifier - 05:27:50 - Derived Class Constructor & Destructor - 05:36:02 - Introduction to Polymorphism - 05:46:16 - Virtual Functions & Pure Virtual Functions - 05:54:45 - Template Functions - 06:01:33 - Function Templates With Multiple Arguments - 06:05:25 - Class Templates - 06:12:21 - Template Specialization - 06:19:34 - Try Catch Exception Handling - 06:31:16 - Basic File Handling - 06:38:56 - Checking File Open Error - 06:44:20 - EOF - End of File Operator - 06:50:24 - Reading From File - 06:56:44 - Common String Functions Tutorial Length: 07 Hours & 09 Minutes #2.2 - C++ Complete Course For Beginners in Tamil https://www.youtube.com/watch?v=1_jiTafzzNA Tutorial Length: 04 Hours & 58 Minutes #2.3 - C++ Programming in Tamil https://www.youtube.com/watch?v=wemtzkWwIHA Tutorial length: 04 Hours & 14 Minutes #3 - Python Tutorial for Beginners in Tamil In this python tutorial, the instructor teaches python programming language for Tamil speaking learners. This tutorial covers from the basics to advanced concepts where the learner will get a thorough understanding about the core of the python language and will be able to learn advanced concepts by self. #3.1 - Complete Python Video Tutorial in Tamil Content of the tutorial - 0:00 Welcome to Python Complete Tamil Tutorial - 03:45 Introduction of Python - 08:40 Compiler Vs Interpreter - 13:49 Python Software Installation - 20:29 Anaconda Python Software Installation - 28:40 How to Change Spyder Theme - 30:30 What is Variables in Python - 33:29 Basic Program in Python - 35:49 What is id and type in Python - 38:09 Run Python in Online - 40:29 Run Python Using Notepad++ or Vs Code - 50:12 Keywords in Python - 54:08 Getting Inputs in Python - 01:00:18 Multiple Inputs in Single Line Python - 01:03:56 Multiline String in Python - 01:05:12 Getting Multiline Input in Python - 01:13:17 Pycharm installation in Python - 01:18:35 Single and Multiline Comment in Python - 01:20:58 Type Casting in Python - 01:26:30 String and String Functions in Python - 01:40:48 String Manipulation in Python - 01:44:05 Arithmetic operators in Python - 01:46:28 Assignment operators in Python - 01:49:28 Comparison operators in Python - 01:52:37 Logical operators in Python - 01:56:06 Bitwise operators in Python - 02:08:47 IF Statement in Python - 02:12:06 IF ELSE Statement in Python - 02:15:17 ELIF Statement in Python - 02:21:27 Nested IF Statement in Python - 02:27:48 While Loop in Python - 02:31:06 Continue Statement in Python - 02:32:39 Break Statement in Python - 02:33:56 Range in Python - 02:37:58 For Loop in Python - 02:41:18 Nested For Loop in Python - 02:50:59 While Else & For Else in Python - 02:54:25 List and Its Function in Python - 03:14:17 Tuples and Its Function in Python - 03:25:53 Sets and Its Function in Python - 03:42:17 Dictionaries and Its Function in Python - 03:51:33 Identity operators in Python - 03:54:34 Membership operators in Python - 03:56:23 Functions in Python - 03:57:35 No Return Type Without Argument Function in Python - 03:59:50 No Return Type With Argument Function in Python - 04:01:17 Return Type Without Argument Function in Python - 04:02:37 Return Type With Argument Function in Python - 04:03:39 Arbitrary Arguments Function in Python - 04:05:42 Keyword Arguments Function in Python - 04:07:38 Arbitrary Keyword Arguments in Python - 04:09:31 Default Parameter Function in Python - 04:10:47 Passing a List as an Argument in Function Python - 04:12:14 Recursion Function in Python - 04:16:32 Lambda Functions in Python - 04:18:03 Date Time Functions in Python - 04:29:25 Maths Functions in Python - 04:34:00 try block in Python - 04:36:22 try else block in Python - 04:37:42 Finally Block in Python - 04:38:58 Type of Exceptions in Python - 04:46:28 Handling Multiple Exceptions in Python - 04:48:35 Class and Object in Python - 04:55:14 Class Attributes in Python - 05:04:27 Instance Attributes in Python - 05:09:37 Class Method in Python - 05:13:57 Instance Method in Python - 05:17:31 __init__ Method in Python - 05:22:21 Property Decorator in Python - 05:27:46 Property Decorators Getter Setter in Python - 05:35:51 Property Method in Python - 05:37:29 Class Method Decorator in Python - 05:41:41 Static Method in Python - 05:46:00 Abstraction and Encapsulation in Python - 05:56:54 Single Inheritance in Python - 06:00:32 Multiple Inheritance in Python - 06:04:26 Multilevel Inheritance in Python - 06:06:20 Function Overriding in Python - 06:10:29 Handling Diamond Problem in Python - 06:13:53 Operator Overloading in Python - 06:18:19 Abstract Base Class in Python - 06:23:28 Open a File in Python - 06:28:50 Read a File Using readLine in Python - 06:32:08 looping through the lines in Python - 06:33:25 Write to an Existing File in Python - 06:35:19 Append Mode File in Python - 06:36:26 Delete a File in Python - 06:39:26 SQLite Browser installation - 06:41:36 Creating Database and Table in SQLiteDatabase - 06:44:59 Crud Introduction in Python SQLite - 06:50:49 SQLite Database Connection String in Python - 06:52:04 Insert data in SQLiteDatabase in Python - 06:56:22 Update data in SQLiteDatabase in Python - 07:00:01 Delete Data in SQLiteDatabase in Python - 07:01:47 Select All Data in SQLiteDatabase in Python - 07:04:06 Crud Introduction in Python MySQL - 07:11:02 MySQL Database Connection String in Python - 07:20:17 Select All Data in MySQL Database in Python - 07:26:48 Insert data in MySQL Database in Python - 07:29:32 Update data in MySQL Database in Python - 07:32:12 Delete Data in MySQL Database in Python - 07:35:45 Creating Database and Table in MySQL - 07:39:24 Creating New Flask Project - 07:43:03 Install Flask Framework & Flask-mysqldb - 07:48:00 Create index page Route - 07:51:37 Render Template in Flask - 07:55:24 Database Connection to Flask - 07:57:14 Display all data from MySQL db to HTML page - 08:03:57 Insert data in MySQL db with Flask - 08:14:40 Edit data in MySQL db with Flask - 08:23:43 Delete data in MySQL db with Flask - 08:37:10 Create New Tkinter Project in Python - 08:38:13 Create SQLite database Class - 08:56:38 Design Form using Python Tkinter https://www.youtube.com/watch?v=Yp_tqu22zIU Tutorial Length: 09 Hours & 55 Minutes #3.2 - Python Tutorial for Beginners in Tamil https://www.youtube.com/embed/t5Nmi9KDonw Tutorial Length: 04 Hours & 55 Minutes #4 - Java Tutorial in Tamil In this Java beginners’ tutorial, the instructor teaches Java programming language for Tamil native audience. This tutorial covers core concepts of java where the learner will get a thorough understanding of the core of the Java language and will be able to learn advanced concepts by own. Are you ready to learn Java? Start Watching, Start Writing Code #4.1 - Java for Beginners in Tamil https://www.youtube.com/watch?v=5QTPBQGRDkk Tutorial Length: 06 Hours & 42 Minutes #4.2 - Java Basic Course in Tamil https://www.youtube.com/watch?v=X1rdWCUfQMY Tutorial Length: 04 Hours & 12 Minutes In this post, we have shared a carefully crafted 11 Complete Free Programming Video Tutorials in Tamil for the students and anyone who would like to learn programming or start a career in Programming. If you want to know how to learn programming language, read our complete guide 11 Tips on How to learn programming language faster Share with loved ones and show them you care for them. Read the full article
0 notes
Link
Learn C++ Programming -Beginner to Advance- Deep Dive in C++
Learn C++ Programming -Beginner to Advance- Deep Dive in C++
Classroom and Hands-on sessions- Features of C++ 11, Exception Handling and STL - for Both Academics and Industry
What you'll learn Learn C++ Programming -Beginner to Advance- Deep Dive in C++
Learn Basic concepts of Programming C++, OOPs, Exception Handling, STL, Features of C++ 11
Learn Object-Oriented Programming Design Concept in C++ Perfectly with Examples
Learn How to Develop an Application (Student Project in C++ )
Requirements
C++ Compiler and IDE, Like CodeBlocks, Eclipse, Xcode, etc.
No programming knowledge required. Course covers C and C++ programming concepts in detail.
READ ALSO:
The Complete 2020 Web Development Bootcamp
Agile Fundamentals: Including Scrum and Kanban - 2020
Python for Data Science and Machine Learning Bootcamp
Machine Learning A-Z™: Hands-On Python & R In Data Science
Description
This course covers C++ from very basic to more advanced features.
Concepts of C++ programming are made very simple and easy.
Every topic is covered in greater detail.
All lectures are discussed both on the whiteboard like a classroom session and practical demo.
Programs and Bullet points are provided as a resource.
Every Topic is Explained with Real-life Examples
This course also covers features of modern C++ 11.
Student Project at the end of Course
Course Highlights
Every Topic is covered on White Board
Practical Session for each Topic
Section-wise Quiz
Section-wise Workbook Programs
Student Project
You will be learning concepts perfectly and also learn how to perfectly utilize the features of C++. you will be confident to develop any type of Application using C++.
What I will learn?
Basics - Datatypes and Variables
Operators and Expressions
Conditional Statements
Loops
Pointers
Functions
Function Overloading
Oops Concepts
Classes and Objects
Constructors
Destructors
Operator Overloading
Inheritance
Polymorphism
Abstract Classes
Function Overriding
Friend Members
Static Members
Inner Classes
Templates
Exception Handling
I/O Streams
STL
Lambda Expressions
Features on Modern C++ 11
Student Project
Who this course is for:
Beginners - (Concepts are Covered from Basics to Advanced)
Course Covers more than University Syllabus.
If you already know C++ then you will definitely improve your understanding of programming and OOPs concepts.
Learn C++ Programming -Beginner to Advance- Deep Dive in C++
Created by Abdul Bari
Last updated 4/2019
English
English [Auto-generated]
Size: 28.50 GB
Download Now
Content From: https://ift.tt/34hiLpn
0 notes
Text
Java Assignment Help- A Blessing In Disguise
Source : https://www.olaladirectory.com.au/java-assignment-help-a-blessing-in-disguise/
Java is one of the most used programming language for developing software as well as web-applications. It is an object oriented language which provides pre-defined procedures and features that makes it easy to write codes in it. Most of the IOS and Android applications are developed on java platform. However all of us know, programming is not an easy task and every student is fond of programming. But they have to prepare their java assignments in order to score passing grades, but sometimes they fail to do it. It’s not easy for students to write codes if they lack knowledge in programming. To help those students, Online Assignment Expert provides java assignment help so that they can also score higher grades and astound their friends.
Topics that Java Assignment Help Has Already Covered
Java Virtual Machine:
It is an abstract machine that allows the execution of programs written in java. It makes java platform independent because it executes byte codes. No matter which computer system you are using and which operating system is installed in your system, if you have JVM installed in it you can run java byte code written in any other system having any of the operating system.
Constructors:
Constructor is a block of codes just like any other procedure. It is automatically called at the time of object creation. The main purpose of constructor is to allocate memory to the object to hold values. There are two types of java constructors:
Default Constructor
Parameterized Constructor
Method Overloading:
Method overloading is the process of writing same method name with different arguments. It is used to increase the readability of the code. If you have to perform same operation many a time with different data sets and different arguments, you can use method overloading to make your program simple and understandable.
Abstract Class:
Abstract class is the medium to achieve abstraction in java. Abstraction can be explained as hiding the implementation process and showing only the functionality to the users. To make an abstract class, abstract keyword must be placed before the class. It can have abstract as well as non abstract methods. However abstract class can’t be instantiated.
We also provide python assignment help to the students who opted python as their programming language instead of java. So if you are seeking any kind of programming help, you are at right place. Our experts possess extensive knowledge in almost every programming languages taught in Colleges and Universities.
Java Assignment Help-A Choice! Not An Option
Plagiarism free assignments:
We provide zero plagiarism assignments with a turnitin report that authenticates the assignment is 100% original and not copied from any other source.
World Class Experts:
We have hundreds of brilliant assignment expert who are highly qualified and have years of experience in writing assignments. They promise to deliver the assignment prior to the deadline.
24*7 Chat Support:
We have a chat support team that works 24*7 for the convenience of students. Students can drop their query in chat support option and they’ll get the response in the blink of an eye.
0 notes
Text
Computer Software Training Courses for 2019
This is the era of technology. Everywhere you go you find technology in the form of computer, mobile phones, satellite etc. Even in your workspace also. So, you need some kind of familiarity with them. For example, you need to handle a computer in your office, android phone, and scanner and even with a coffee machine as you are surrounded by technologies. But this blog is not about all of them it is about Information Technology.
Today in the market you find a lot of institutes who offer IT training courses. These courses may include the following:-
Web development
Web Designing
Digital Marketing
App Development
Hardware & Networking
System Analyst
DBA (Database administrator)
Cloud Technology
Software Development
AI (Artificial Intelligence) etc…
But if you have made your mind to build your career in Computer Software then ZENITECH is the best institute for you to start with as this offers various computer courses. The list of the courses is as follows:-
Embedded System Training
C/C++ Training
JAVA
C#ASP.NET
Python
Linux
Web Development
IOT
VHDL
Embedded System Training:
1) The basics of embedded systems, the basic computer architecture, voltage and current, pull down & pull up registers etc.
2) Basic intro to ARM Cortex M
3) Intro to Assembly language
4) Basics of C language
5) LCD controllers, pinout, interfacing, data transfer.
6) Intro to Beaglebone Black
7) OS Fundamentals (Linux)
C/C++ Training:
C is a very beginner and basic computer programming language. In this course, we cover the following parts:-
1) Basics of C (Variables, Data Types, Control structure, input, output, header files etc)
2) Data Structure (Lists, Stack, Queue, Tree Heap, sorting algorithms etc)
3) Tree
4) Basics of C++ (Classes, Objects, Methods, Constructors, Operators, Inheritance, Polymorphisms etc).
5) STL (Standard Template Library)
6) Multithreading (Deadlock, Thread Management)
7) Design Patterns
8) C++11, C++14, C++17
JAVA
JAVA is a very popular and demanding programming language. This course contains the following sections:-
1) Core JAVA (First java program with the console and with Eclipse, Data Types, variables, Literals, Arrays, Class, methods, Operators, Statements etc)
2) JAVA Exceptions (Types of Exceptions, Defining and Throwing Exceptions, Assertions etc)
3) Java Strings
C#ASP.NET
.NET is a free platform for building many different types of apps with multiple languages. You can build apps for web, mobile, desktop, gaming, and IoT. C#, F# and VB (Visual Basic) are the languages that are used to write .NET programs. This course contains:-
1) An intro of C# (What is .NET, CLR, Namespaces, Statements, Expressions, Operators, Defining Types, Classes)
2) Encapsulation, Directional Dependencies, Method Overloading, Properties, Events etc.
3) Control and Exceptions (Looping, Re-throwing Exceptions)
4) C# and the CLR
5) C# and Generics (Generic Collections, Generic Parameters, Generic Constraints, Generic Methods)
6) C# and LINQ (Extension Methods)
7) Prime Abstraction, Multithreading, Resource management, ArrayList, Hashtable, SortedList, Stack and Queue
8) ADO.NET
9) WPF (Windows Presentation Foundation) includes Windows Application using WPF, Data Binding, Data Template, Styles, Commands etc.
10) ASP.NET (ASP.NET Architecture, Data Binding, Validation, Config file encryption, Custom Controls, ASP.NET Ajax Server Data)
11) C# 6, C# 7
Python
Python is free and easy to learn a computer programming language. In this course first, we tell you how to install the Python interpreter on your computer as this is the program that reads Python programs and carries out their instructions. There are 2 versions of Python: Python 2 and Python 3. Our course contains the following sections:-
1) Python Basics (What is Python, Anaconda, Spyder, Integrated Development Environment (IDE), Lists, Tuples, Dictionaries, Variables etc)
2) Data Structures in Python (Numpy Arrays, ndarrays, Indexing, Data Processing, File Input and Output, Pandas etc)
Linux
According to Wikipedia,
“Linux is a family of free and open-source software operating systems based on the Linux kernel.”
Linux is the leading OS on servers and other big iron systems such as mainframe computers, and TOP500 supercomputers. It is more secure Os as compared to the other OS(s) like Windows. Our Linux course contains the following sections:-
1) Linux Basics (Utilities. File handling, Process utilities, Disk utilities, Text Processing utilities and backup utilities etc).
2) Sed and Awk (awk- execution, associative arrays, string and mathematical functions, system commands in awk, applications. etc)
3) Shell Programming/ scripting (Shell programming with bash, Running a shell script, The shell as a programming language, Shell commands, control structures, arithmetic in the shell, interrupt processing, functions, debugging shell scripts)
4) Files and Directories (File Concept, File types, File system Structure, File metadata, open, create, read, write, lseek etc)
5) Processes and Signals (Process concepts, the layout of C program image in main memory, process environment, Introduction to signals, Signal generation and handling etc)
6) Inter-Process Communication (IPC), Message Queues, Semaphores(Introduction to IPC, IPC between processes on a single computer, on different systems etc)
7) Shared Memory (Kernel support for Shared memory, APIs for shared memory)
8) Socket TCP IP Programming (Introduction to Berkeley Sockets, IPC over a network, client/server model etc)
9) Linux Kernel (Linux Kernel source, Different kernel subsystems, Kernel Compilation etc)
10) Linux Device Driver (Major and Minor numbers, Hello World Device Driver, Character Device Driver, USB Device Driver etc)
So, these are the computer software training courses offering by ZENITECH. To enroll yourself for any of the following course you can call us @ 9205839032, 9650657070.
Thanks,
0 notes
Text
*Python Creating objects with overloaded operators
*Python Creating objects with overloaded operators
Creating objects with overloaded operators allows you to use the object like a built in data type. In this lab, you will create a fraction class. By overloading its operators, you can easily use your class to solve mathematical problems related to fractions. Part 1: Complete Fraction Class
Complete the implementation of the Fraction class provided below.
class Fraction: #Constructor. Puts…
View On WordPress
0 notes
Text
Advanced Selenium Training in Bangalore
KRN INFORMATIX is a stop shop for software testing training services .This institute provides young job aspirants, the perfect launch-pad to build a gratifying career in the growing IT sector .Besides training, we also provide placement assistance to our students and most of the big corporate in the corporate world will hire our trained talent. Among all the trainees in KRN INFORMATIX,100% of the trainees are working as IT professionals in various MNCs .This indicates clearly that the KRN INFORMATIX teaching methodology is beyond the industry standards. We have helped Fresher’s, Software Engineers, Working Professionals, business leaders, Corporate Companies and individuals incorporate the Knowledge in to their Minds through hands-on Real time training.
Selenium is a portable software testing framework for web applications.
Selenium provides a record/playback tool for authoring tests without learning a test scripting language ().It also provides a test domain-specific language (Selenese) to write tests in a number of popular programming languages, including C#, Groovy, Java, Perl, PHP, Python, Ruby and Scala.
The tests can then be run against most modern web browsers. Selenium deploys on Windows, Linux, and OS X platforms. It is open-source software, released under the Apache 2.0 license, and can be downloaded and used without charge.
JAVA FOR SELENIUM
Selenium Overview
Installing Java
Installing Eclipse
Features of Java
Why Java for Selenium
First Eclipse Project
First Java program
Concept of class file
Platform Independence
Datatypes in Java
String class
If statements
Conditional and concatination operators
Mille Loop
For Loops
Practical Examples with loops
Usage of loops in Selenium
40. Single Dimensional Arrays
Two Dimnsional arrays
Practical usage of arrays in Selenium
Drawbacks of arrays
What are Functions?
Function Input Parameters
Function Return Types
Local Variables
Global Variables
Static and Non-Static Variables
Static and Non-Static Functions
Creating Objects in Java
Meaning of static
Why Is main method static?
Object and Object References
Call by reference and Value
Constructors
Usage of Objects In Selenium
Concept of Inheritance
Interface
Overloadings and Overriding Funtions
Example on inheritance
Object Class
Usage of Inheritance in Selenium
Relevence of Packages
Creating Packages
Accessing Classes Across Packages
Good Features of eclipse
Accessing modifiers - Public, Private, Default, Protected
Exception hading with try catch block
Importance of exception handling
Exception and Error
Throwable Class
Final and Finally
Throw and Throws
Different Types of Exceptions
Need of exception handling in Selenium framework
Introduction to Collections API
ArrayList Class
HashTable Class
String class and functions
Reading/Writing Text Files
Reading Properties File in Java
Concept of jar file
ReadingiWrIfing Microsoft XLS Flies
SELENIUM IDE
Intalling Selenium IDE
Recording Script
Running, Pausing and debugging Script
Running a script line by line
Inserting commands in between script
XPATHS and installing firebug to get XPATHS
Wait Commands
Verification and Assertions
Should I use verify or assertion
JavaScript
User-extension.js in Selenium IDE
SELENIUM WEBDRIVE
Why WebDriver?
Downloading WebDriver Jars and configuring in eclipse
Architecture of selenium webdriver
Drivers for Firefox, 1E, chrome, !phone, Android etc
First Selenium Code
Working with chrome and IE
Selenium RC and WebDriver
Concept of firefox profile
What is Firefox profile
Why we need tirefox Profile
Close and Quit -Difference
Importing webdriver documentation in eclipse
WebDriver i DesiredCapabilities Class
Proxy settings with webdriver/Working with proxy Servers
HTMLUnit driver and desired capabilities
Firepath and firebug Add-ons installation in Mozilla
Inspecting elements in Mozilla, Chrome and IE
HTML language tags and attributes
Various locator strategies
WebDriver Interface
WebElement Interface
Identifying WebElements using id, name, class
Finding Xpaths to Identify
Absolute and complete Xpaths
Creating customized Xpaths without firebug
Css Selectors
Generating own CssSelectors
Performance of CssSelectors as compared to )(paths
Finding xpaths/cssselectors in different browsers - Mozilla,
Chrome and IE
Objects with same idixpathicssSelector
What is class attribute?
Handling Dynamic objects/ids on the page
Working with different browsers without changing code
Managing Input fields, Buttons and creating custom xpaths
Managing/Identifying Links with xpathslcss selectors
Extracting More than one object from a page
Extracting all links of a page/Bulk extraction of objects
xtracting Objects from a specific area of a web page
Various strategies to test Links on a page by clicking on them one by one
Finding whether object Is present on page or not
Handling drop down list
Select Class in Selenium API
Managing radio buttons and Checkboxes
Hidden components
isDisplayed function
Taking Screenshots of the web page
READ MORE
MORE TAGS:
Cucumber Training in Bangalore | Selenium Software Training in Bangalore | Selenium Training in Bangalore | Selenium Training Institutes in Bangalore | Best Selenium Training in Bangalore | Selenium Training in Marathahalli | Automation Testing Training in Bangalore | Best Selenium Training Institute in Bangalore | Software Testing Training in Bangalore
0 notes
Text
ESP32 Arduino Tutorial Socket server: Getting remote client IP
Introduction
In this tutorial, we will check how to get the IP of a socket client that connects to a socket server hosted on the ESP32, using the Arduino core.
You can check a detailed tutorial on how to set a socket server on the ESP32 on this previous tutorial. If you want to learn how to develop a socket client on the ESP32, then please consult this tutorial.
In this tutorial, since the ESP32 will be working as a server, we will need to develop a socket client to contact it. We will do it in Python, since it is very simple to set a socket client on this language.
If you don’t feel comfortable with Python development, then you can skip that section and use a web browser as socket client instead. Details on how to use the browser to reach the ESP32 socket server are explained at the end of the “Testing the Code” section.
The tests were performed using a DFRobot’s ESP32 module integrated in a ESP32 development board.
The Python code
First of all, we need to import Python’s socket module, which we will use to create a socket client and connect to the ESP32 server.
import socket
Next we need to create an object of class socket. This object will expose the methods we need to connect to the server and send data to it.
sock = socket.socket()
Now we will assign the IP address and port of the ESP32 server to two variables, since we are going to need this information to contact the server. If you don’t know the IP of your your ESP32 in your local network, we will print it later on the Arduino code. You should copy it and use it here.
Note that below I’m using the IP of my ESP32 on my local network. Yours will most likely be different.
We will use port 80 for the server and this value is set by us on the Arduino code, so it doesn’t depend on the network.
host = "192.168.1.78" port = 80
To establish the connection to the server, we call the connect method on the socket object, passing as argument a tuple with the host and port we have just declared.
sock.connect((host, port))
To send some data, we need to call the send method on the socket object and pass as input the content to be sent to the server. We will send a simple string.
sock.send("test")
Finally, we call the close method on the socket object to close the connection and free the resources.
sock.close()
The final Python code can be seen below.
import socket sock = socket.socket() host = "192.168.1.78" #ESP32 IP in local network port = 80 #ESP32 Server Port sock.connect((host, port)) sock.send("test") sock.close()
The Arduino code
The Arduino code will be very simple. We are going to focus on getting the remote client IP, so we are not going to establish any exchange of data with it.
As usual, since we need to make our ESP32 reachable by clients, we will need to connect it to a WiFi network. This means we need to include the WiFi.h library and declare two variables to hold the network credentials (password and network name).
We will also need an object of class WiFiServer, which we will use to set the server and receive incoming socket client connections.
The constructor of this class receives as input the port where the server will be listening. As we have seen while writing the Python code, we will use port 80. Nonetheless, you can test with other ports, as long as you update the Python code accordingly.
#include "WiFi.h" const char* ssid = "yourNetworkName"; const char* password = "yourNetworkPassword"; WiFiServer wifiServer(80);
Moving on to the Arduino setup, we start by opening a serial connection to output the results of our program and then we connect the ESP32 to the WiFi network using the previously declared credentials.
After the connection is established, we need to start the socket server, so it receives incoming requests. This is done by calling the begin method. This method receives no arguments and return void.
You can check the full setup function below.
void setup() { Serial.begin(115200); delay(1000); WiFi.begin(ssid, password); while (WiFi.status() != WL_CONNECTED) { delay(1000); Serial.println("Connecting to WiFi.."); } Serial.println("Connected to the WiFi network"); Serial.println(WiFi.localIP()); wifiServer.begin(); }
Moving on to the Arduino loop, we can check if a client has connected to the server by calling the available method on the WiFiServer object. This method receives no parameters and as output it returns an object of class WiFiClient.
WiFiClient client = wifiServer.available();
Note that by default this is a non blocking call, which means that it will return a WiFiClient object even if no client has connected to the server.
We can check if a client is indeed connect by either calling the connected method on the WiFiClient object or by enclosing the object in a IF condition. This last option is possible because in this class the C++ bool operator is overloaded and it calls the connected method and returns its value.
We will use the second approach and inside the IF block we know that the client is indeed connected. Thus, we can get the IP of the client by calling the remoteIPmethod on the WiFiClient object.
This method takes no arguments and returns the IP of the client, which we will print to the serial connection.
Serial.println(client.remoteIP());
As mentioned before, we will not exchange any data with the client, so we can simply close the connection after getting the IP. We do this by calling the stop method on the WiFiClient object.
client.stop();
The final Arduino code can be seen below. It contains some additional prints and a small delay between each iteration of the Arduino main loop.
#include "WiFi.h" const char* ssid = "yourNetworkName"; const char* password = "yourNetworkPassword"; WiFiServer wifiServer(80); void setup() { Serial.begin(115200); delay(1000); WiFi.begin(ssid, password); while (WiFi.status() != WL_CONNECTED) { delay(1000); Serial.println("Connecting to WiFi.."); } Serial.println("Connected to the WiFi network"); Serial.println(WiFi.localIP()); wifiServer.begin(); } void loop() { WiFiClient client = wifiServer.available(); if (client) { Serial.print("Client connected with IP:"); Serial.println(client.remoteIP()); client.stop(); } delay(100); }
Testing the code
To test the whole system, we start by compiling and uploading the ESP32 code. Once the procedure finishes, simply open the Arduino IDE serial monitor.
As soon as the connection to the WiFI network is established, the local IP of the ESP32 on the network should get printed to the serial port, as indicated in figure 1. If you haven’t yet done so, then copy this IP and assign it in the Python code to the host variable.

Figure 1 – Local IP assigned to the ESP32.
Then, run the Python code, so the socket client establishes the connection to the server. Once the program finishes running, go back to the Arduino IDE serial monitor.
You should get an output similar to figure 2, which shows the IP of the remote client. In my case, I’ve tested running the Python code from two different machines, which is why I’m getting two distinct IPs.

Figure 2 – Output of the program, showing the remote clients’ IPs.
Note that the IP that gets printed should match the local IP of the computer where you are running the Python code. You should be able to get your machine’s local IP on this website.
Alternatively, you can open a command line and run the ipconfig command if you are on Windows or the ifconfig command if you are on Linux, and get the local IP of the computer.
Just as a final note, you don’t feel comfortable with developing and running Python code, you can use a web browser as a socket client to reach the ESP32 server. To do it, simply open a web browser of your choice and type the following, changing #yourESPIp# by the IP address of your ESP32, which was printed on the Arduino IDE serial monitor:
http://#yourESPIp#/
On your browser you should get an error message or something similar, but if you go back to the ESP32 serial monitor then an output similar to the one illustrated in figure 2 should be printed, indicated a socket client has indeed connected to the ESP32.
This is because HTTP actually works on top of sockets. So, when a browser contacts a website, it establishes a socket connection with it and the HTTP protocol data is sent over that socket.
Naturally, since our ESP32 socket server doesn’t know how to answer to the HTTP request made by the browser, then the browser presents an error.
0 notes
Text
ESP32 Arduino Tutorial: Setting a socket server
Introduction
The objective of this post is to explain how to create a simple socket server on the ESP32, using the Arduino core. It will act as an echo server which will return back to the client any content it sends.
In order to test our server, we will develop a very simple Python socket client. The Python version used was 2.7 and the code was tested on Windows 8.
The tests of this ESP32 tutorial were performed using a DFRobot’s ESP-WROOM-32 device integrated in a ESP32 FireBeetle board.
The Python code
We will start our code by importing the Python socket module, which will allow us to connect to the ESP32 server.
import socket
Next we will create an object of class socket, which has the methods needed to connect to the server.
sock = socket.socket()
To connect to the server, we will need to know both its IP and the port where it is listening for incoming connections. We will store both values in two variables.
For the port, we will use 80 (we will set it to the same value on the Arduino code).
For the IP, we will need to use the one assigned to our ESP32 upon connecting to the WiFi network. If you don’t know the local IP of your ESP32 when it connects to your network, you can use a dummy value for now, since we will later print its value on the Arduino code.
host = "192.168.1.78" port = 80
To perform the actual connection, we will now call the connect method on our socket object and pass as input a tuple with the host and the port.
sock.connect((host, port))
Since the ESP32 will act as an echo server, we will send it a message and then get the result back. To send a message to the server, we will simply call the send method of the socket object and pass as input the content. In this case, we will send a simple “hello world” message.
message = "Hello World" sock.send(message)
We will now get content from the server until the whole message we have sent is echoed back to us.
To get data, we call the recv method of the socket object. This method receives as input a number with the maximum amount of data that can be received at once and returns a string representing the data received [1] (I’m using Python 2.7, but some Python versions return a byte object rather than a String).
Since we know that the server will echo the message back, we want to receive as much data as we sent. So, we will declare an empty string and keep asking for data and append it to that string until its size is equal to the size of the string we sent.
We will specify 1 for the input argument of the recv method, so we know that each call will return a string with only one character.
data = "" while len(data)< len(message): data += sock.recv(1) print(data)
After receiving and printing the echoed message we call the close method on the socket object to close the connection. The final code can be seen below and already includes this call.
import socket sock = socket.socket() host = "192.168.1.78" #ESP32 IP in local network port = 80 #ESP32 Server Port sock.connect((host, port)) message = "Hello World" sock.send(message) data = "" while len(data) < len(message): data += sock.recv(1) print(data) sock.close()
The Arduino code
We start our code by importing the WiFi.h library, in order for us to be able to connect the ESP32 to a WiFi network.
#include <WiFi.h>
Next we will declare two global variables to store the WiFi network credentials, more precisely, the network name (ssid) and the password. You should place here the credentials for the WiFi network you are going to connect to.
const char* ssid = "YourNetworkName"; const char* password = "YourNetworkPassword";
We will also need a final global variable, which will be an object of class WiFiServer. This class has the methods we will need to set a socket server and accept connections from clients.
The constructor of this class receives as input an integer with the port number where the server will be listening. We will use port 80, which matches the value used on the Python client code.
WiFiServer wifiServer(80);
In our setup function, we will start by opening a serial connection, for later outputting some information messages from our program.
Next, we will connect to the WiFi network. If you need a detailed explanation on how to do it, please consult this previous post.
To finalize the setup function, we will call the begin method on our WiFiServer object, which will initialize our socket server. You can check the full setup function below.
void setup() { Serial.begin(115200); delay(1000); WiFi.begin(ssid, password); while (WiFi.status() != WL_CONNECTED) { delay(1000); Serial.println("Connecting to WiFi.."); } Serial.println("Connected to the WiFi network"); Serial.println(WiFi.localIP()); wifiServer.begin(); }
Now that we have finished the setup function, we will handle the actual client connections and data exchange on the Arduino main loop.
To start, we will check if a client has connected by calling the available method on our WiFiServer global object. This method takes no arguments and returns an object of class WiFiClient.
WiFiClient client = wifiServer.available();
Next, we need to check if a client is indeed connected. We can do this both by calling the connected method of the WiFiClient object or by checking that object with an IF condition. Note that the connected method returns true if a client is connected and false otherwise.
Regarding the second option of enclosing the WiFiClient object inside an IF condition, this is possible because in the implementation of the class, the C++ bool operator is overloaded and it actually calls the connected method and returns its value.
Note that operator overloading is an advanced feature of the C++ language (which is the language on top of which Arduino is built) that we don’t need to worry about and I’m just mentioning this for information.
if (client) { // Data exchange with the client }
If the previous condition is true, we will then start a loop while the client is connected. In this case, we will explicitly call the connected method of the WiFiClient object.
When the previous loop breaks, it means the client is no longer connected. Thus, we call the stop method on our WiFiClient to free all the resources and then print a message indicating the client disconnected.
if (client) { while (client.connected()) { // Data exchange with the client } client.stop(); Serial.println("Client disconnected"); }
Inside the previously mentioned while loop, we can check if the client has sent data with the available method. This method returns the number of bytes available for reading.
So, while the number of bytes is greater than zero, we will keep reading byte by byte with a call to the read method of the WiFiClient object, which will return a byte for each call.
Then, we will simply echo each byte back to the client with the call to the write method, passing as input the byte to send.
The final source code can be seen below and already includes these function calls.
#include <WiFi.h> const char* ssid = "YourNetworkName"; const char* password = "YourNetworkPassword"; WiFiServer wifiServer(80); void setup() { Serial.begin(115200); delay(1000); WiFi.begin(ssid, password); while (WiFi.status() != WL_CONNECTED) { delay(1000); Serial.println("Connecting to WiFi.."); } Serial.println("Connected to the WiFi network"); Serial.println(WiFi.localIP()); wifiServer.begin(); } void loop() { WiFiClient client = wifiServer.available(); if (client) { while (client.connected()) { while (client.available()>0) { char c = client.read(); client.write(c); } delay(10); } client.stop(); Serial.println("Client disconnected"); } }
Testing the code
To test the whole system, simply upload the code to your ESP32 using the Arduino IDE. Then open the IDE serial monitor and copy the IP address that gets printed upon a successful connection of the ESP32 to the WiFi network. That is the IP that should be used on the Arduino code.
Next, with the ESP32 already running the server code, run the Python code. You should get an output similar to figure 1, which shows the data sent to the server being echoed back, as expected.

Figure 1 – Output of the Python client program.
If you go back to the serial monitor, a message indicating that the client disconnected should be printed, as shown in figure 2. This indicates that the server correctly detected that the client is no longer connected, which is the expected behavior after the Python code calls the close method to end the connection.

Figure 2 – Output of the ESP32 program, after the client disconnects.
0 notes