#reduce mp4 file size
Text
Choosing Wisely: Picking the Perfect Mp4 Video Compressor for You
With the increasing popularity of videos in today's digital landscape, the need for efficient file compression solutions has become paramount. Mp4 video compressors offer a way to reduce file sizes without compromising on video quality. However, with numerous options available, it is essential to choose the perfect mp4 video compressor that suits your specific needs. In this article, we will explore the key factors to consider when selecting an mp4 video compressor, helping you make an informed decision.
Compression Quality:
The primary consideration when choosing an mp4 video compressor is the quality of the compressed videos it produces. Look for compressors that utilize advanced algorithms to ensure optimal video quality. The compressor should effectively reduce file size while maintaining acceptable visual and audio clarity. It is advisable to test the compressor using sample videos to assess the quality of the compressed output.
Compression Speed:
Compression speed is another significant factor to consider. Some compressors are faster than others, which can significantly impact your productivity, especially when dealing with a large number of videos. Look for compressors that offer a balance between compression speed and quality to ensure efficient processing of your video files.
Customization Options:
Different videos may require specific compression settings to achieve the desired balance between file size and quality. Look for compressors that provide customization options, such as adjusting bitrate, frame rate, resolution, and audio settings. This flexibility allows you to tailor the compression settings to the specific requirements of your videos.
User-Friendly Interface:
A user-friendly interface is crucial for a smooth compression experience. Look for compressors that have an intuitive and easy-to-use interface. The compression process should be straightforward, with clear instructions and a logical workflow. A user-friendly interface ensures that even those with limited technical expertise can navigate the compressor efficiently.
Format Compatibility:
Consider the compatibility of the mp4 video compressor with various video formats. While mp4 is a widely supported format, it is beneficial to choose a compressor that can handle other popular video formats as well. This ensures that you can compress videos in different formats without the need for multiple compression tools.
File Size Reduction:
The primary purpose of using an mp4 video compressor is to reduce file size. However, different compressors may achieve varying levels of compression. Look for compressors that can effectively reduce file sizes while maintaining video quality. Compare the compression ratios achieved by different compressors to find the one that offers the best file size reduction without compromising on quality.
Batch Processing:
If you frequently work with multiple videos, consider compressors that support batch processing. This feature allows you to compress multiple videos simultaneously, saving time and effort. Batch processing streamlines your workflow, making it more efficient and effective.
AI Detection of Plagiarism:
While selecting an mp4 compressor is essential for efficient file management, it is equally important to address the issue of plagiarism. AI-powered plagiarism detection tools can help ensure the originality and integrity of your video content. These tools compare your content against a vast database of existing texts, identifying any instances of plagiarism or similarity. By utilizing these tools, you can maintain the authenticity of your work and protect against unintentional plagiarism.
Conclusion:
Choosing the perfect mp4 video compressor requires careful consideration of various factors, including compression quality, compression speed, customization options, user-friendly interface, format compatibility, file size reduction, and batch processing capabilities. By selecting the right compressor, you can efficiently compress your videos while maintaining optimal video quality. Additionally, leverage AI-powered plagiarism detection tools to ensure the originality and authenticity of your video content. Take the time to evaluate multiple options, test sample videos, and choose wisely. A well-chosen mp4 video compressor will enhance your file management experience and enable you to effectively handle and share your video files.
1 note
·
View note
Text
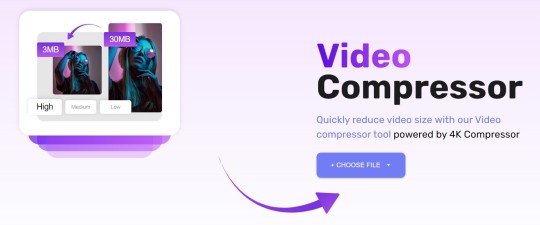
Compress Video: Downsize Video - Online Video Compressor
Are you looking for simple ways to decrease video size so you can upload them faster?🎬
Besides reducing video size, do you also want to share videos?
Meet Compress Video: Downsize Video, which is a versatile video mb size reducer. Have video size reducer for all your video editing and social media needs like video compressor for whatsapp. Whether you want to quickly compress videos and share this video file compressor is all you need.
Also available on Google play: Download Now

⏬Video mb Compressor - Compress SINGLE AND MULTIPLE FILES IN 3 STEPS with Video Size converter
● select the videos
● choose quality
● compress the videos and reduce video mb size
🔄 <b>VIDEO CONVERT TO AUDIO ONLY</b>
Whether it is a music video, a long video interview, a podcast, you can quickly convert videos to audio only (mp3) using the in-built video converter. Then listen to or use the audio as you wish.
🎞️ VIDEO TRIM
Want to quickly edit and trim videos? Remove unwanted parts of the video in seconds using the in-built video trimmer. With intuitive UI you can easily select, replay, and trim each video part to milliseconds.
⏩ VIDEO FAST-FORWARD
Want to add a fast-forward video effect to your video? Well upload the video and use our fast forward video feature to speed up videos and create impressive video effects.
Whether you want to compress videos that you want to upload on the most popular social network, or you want to do quick video compress to reduce video file size before sending it as an email or uploading to the cloud, our video compressor free for android is sure to help. Upload single or multiple files at once and enjoy fast video compressing with our 4k compressor.
▶️WATCH, SAVE & SHARE VIDEOS
Once your videos is compressed or edited you can view it in mini or full screen. Alternatively, compare it with the original one or with the trimmed or cropped version. Easily view your saved videos in separate section. Then share them easily on Instagram, Facebook, Whatsapp or anywhere you desire with 1 tap.
Now It’s time to get one of the most versatile video compressor free for android! Use our mp4 compressor and video mb size reducer to reduce video size.
☑️Download Compress Video: Downsize Video for FREE!
#video size compressor#Crop compress video#Video convertor mp4#reduce file size#video compressor video to mp4#compress whatsapp video#shrink large video files#compressor video cutter#compress video for email#video shrinker#easy to use video compression app#compress mp4 video size#Video compressor free#reduce the size of your videos#best compress video app#how to compress large video files without losing quality#techtool#tools#online tools
0 notes
Note
Hi there! I saw the screen recording you did for the Aemond gifset (superb work, by the way) and I was wondering if you would be open into doing a step-by-step tutorial on how you played with the colors (what was the graph on the right side of the window?) and how you manipulated the color palette when saving the gifs? No pressure! Was just curious :) Thank you!
Hi there, nonny! Step by step below the cut here.
I don't keep the psd files of my gifs, mostly because I don't have the storage space to do that, so I've made a different gifset of the same scene, so it should be much the same, if not better.
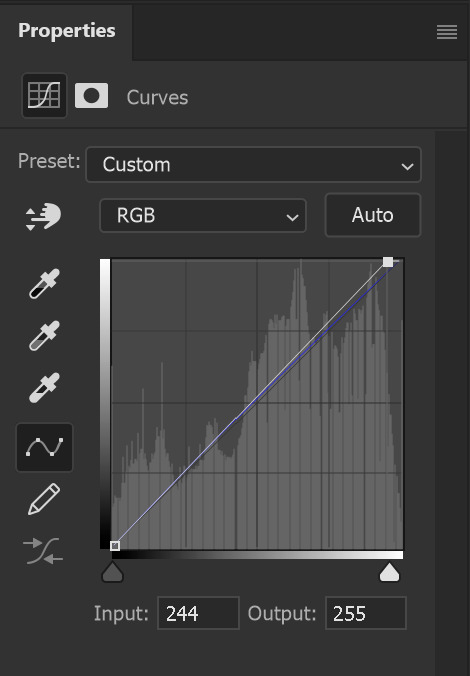
I believe this:

is the graph you were asking about? This is the histogram. I don't believe it has any practical usage in gifmaking. If any other gifmaker here has a different opinion, please share it. (I'm doing a photography degree, photoshop is my next unit so I'll know more about it soon)
Right, step by step. Hold your horses, this is long:
Step 1: get the clip. Some gifmakers use screen caps to make gifs. I do not know how to make them or how to use them and I find my own method works. If another gifmaker could add on how you make your screen caps, and if it is better than my own method, please add it. 😊
Where you get the clip from is a question. YouTube, somewhere else... as long as it's saved as a MP4 file on you computer/laptop, it doesn't matter. What does matter is the quality of your clips. A lot of people use 4K (super high quality) clips. I find those to be slow and arduous and may have been responsible for the fall of my old, decrepit laptop. HD or UHD are likely enough for some decent quality.
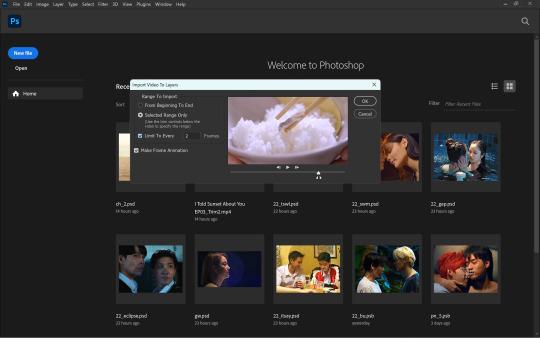
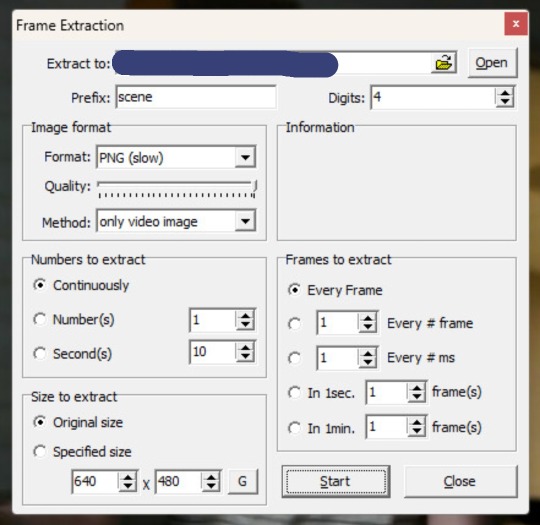
Step 2: Get the clip in the software (I use Adobe Photoshop. For some softwares, you might have to clip the clip i.e. make it shorter before just dumping it in) In Photoshop go to File > Import > Video Frames to Layers and a window will come up. Move the sliders until you have approximately what you want (don't worry about being exact. Just as long as you have what you need.) (Don't forget to click Limit to every 2 frames)
Step 3: Once the clip has opened and your ready to start, crop out any black/white edges. Then cut out the frames you don't want

Step 4: We are now ready to begin editing!! 🥳🥳🥳 Editing tends to just be a huge pile of trial and error. I have an order to things, but I often have to go back and adjust my first layers later.
I like to start with the Brightness/Contrast, for obvious reasons (I like to SEE what I'm doing *cough cough* HBO *cough cough*
The I adjust the Hue/Saturation, where I reduce the saturation of each individual colour. That reduction tends to be useful when I make further adjustments in effort to 'fix' as much of the shit colour grading as I can.
The next step is a combination of a Photo Filter (set to the default warming filter) and a Vibrance adjustment layer.
Next the where most of the magic happens. The Colour Balance allows me to adjust the colours in the shadows, midtones and highlights. The aim of this is to attempt to restore some colour. It can look a little weird when editing.
Finally is the Levels. This is a final brightness edit where I add most of my contrast.
Video featuring both sets here. Pause as needed to see the adjustments
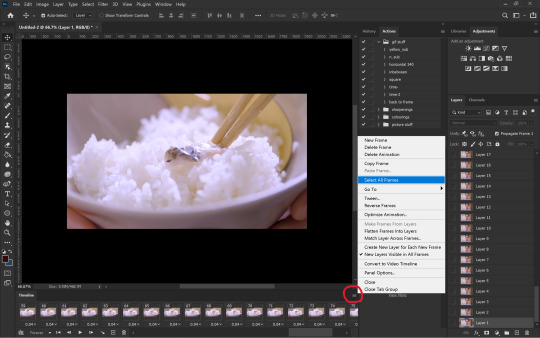
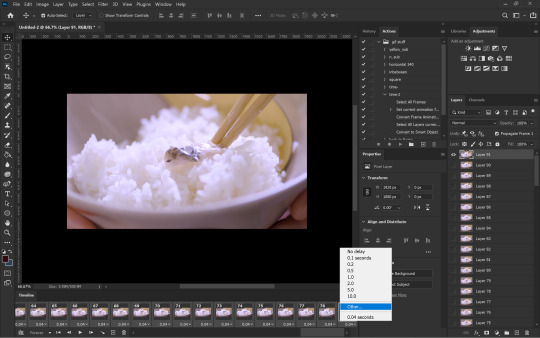
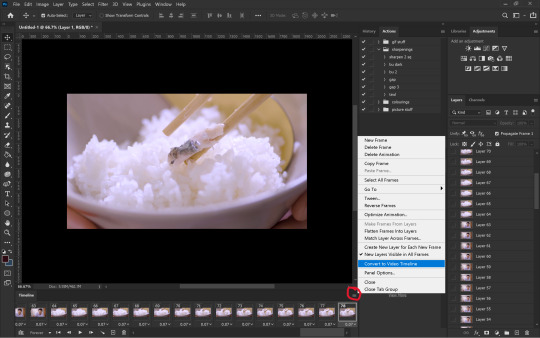
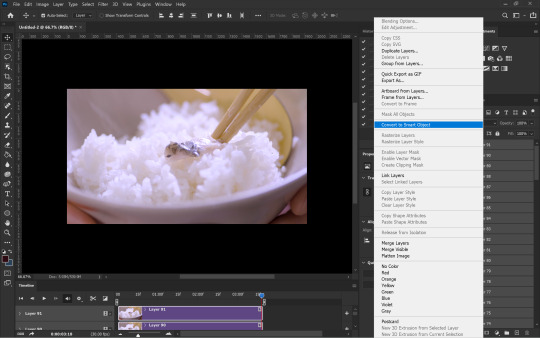
Then, change the frame delay to 0.1, or whatever suits your fancy, but 0.1 is the most natural. Then, Click the button in the bottom left corner of the timeline which Converts to Video Timeline, then select all the layers, right click and Convert for Smart Filters.
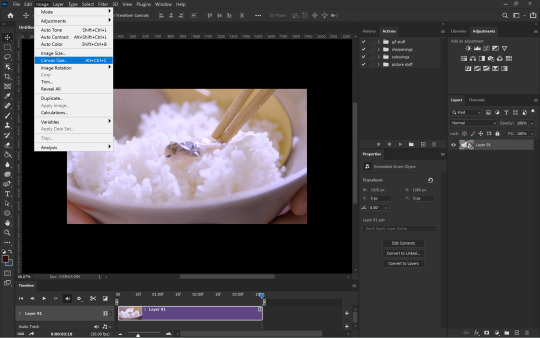
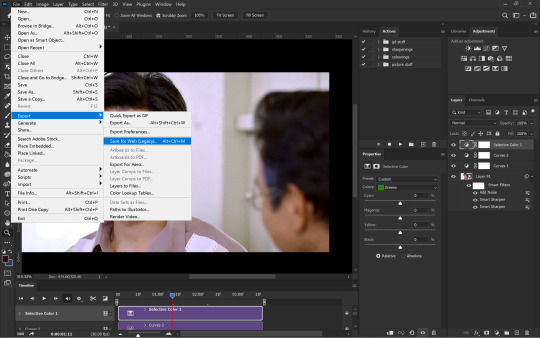
After this is sharpening, cropping and then exporting. Either File > Export > Save for Web (Legacy) or Alt + Shift + Ctrl + S
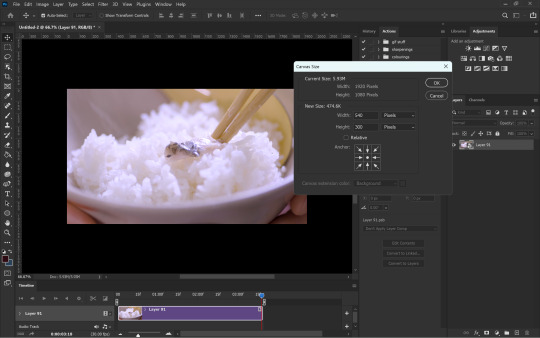
Here I change the size. (Usually adjust the height to 540px. Width depends on how I've cropped it. I my source clip excluding black edges was in the ratio 16:9, 540px is usually half that)
If you are uploading gifs to Tumblr, keep an eye of the file size. Tumblr doesn't allow for file sizes about 10MB, although for me it's always been more like 9.5MB. If that number is too high and you have made the gif as short as possible (no more the 50 frames if possible) and you have reduced the size (my limit tends to be about 480px height dependant on my crop ratio), then you change the number of the colours from 256 to NO LESS THAN 200. (lower than this may considerably reduce your quality)
Then you press Undo or Ctrl + Z a few times until you have all of your frames again and then repeat.
And all that can take half an hour or more. Hope this answers the question as well.
15 notes
·
View notes
Text
GIF MAKING IN PS
i've never done anything like this before so hope it makes some kind of sense.
so before you get into making gifs first thing so will need is some sort of editing software (i use ps 2022) and some raws obviously. most of the shows i gif are on yt so its pretty easy to get them and you can use any kind of yt to mp4 converter.
so once you have all of this i guess we can get started!!! on a daily basis i do not follow all these steps because you can easily turn them into actions on ps, which means that it would take just seconds. so although it may look lengthy its pretty simple
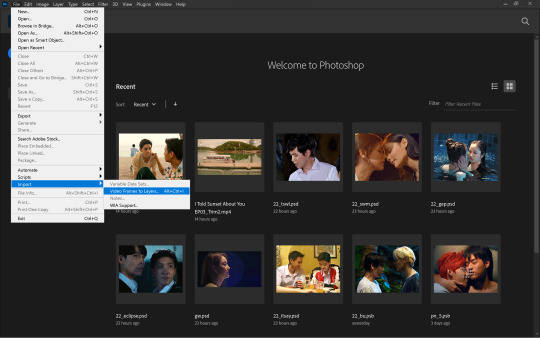
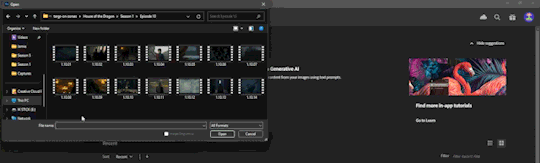
the first step to making gifs is importing the raws. you first want to go to file>import>video frames to layer. this will open up your file explorer from where you can choose your desired file. you may want to make sure your file isn't an mkv one but an mp4 before you do this. also if your raws are large, perhaps a whole episode or longer than 30 minutes, it might help to trim it down beforehand to make it easier to work with.
once you select your file, this window will open up. here, you can move the sliders to select the exact part of the clip you want for your gifs. (when files are larger, it would be more difficult to capture smaller parts of the clip using the sliders) although optional, selecting the limit to every 'x' frames will help reduce the size of your gifs while not making it look too choppy. i do 'every 2 frames' for regular scenes and leave it unchecked for anything in slow-mo. more than 2 usually makes the entire thing look sped up and choppy so i wouldn't recommend it. although it depends on the raws ideally you want something around 80 frames for one gif.
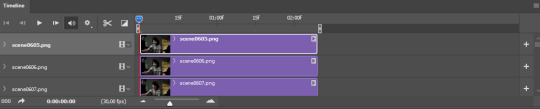
once you press okay on the above step, your workspace will open up and from here we can start making the gif. the first step would be to set the time delay. this is two ensure that the gif doesn't look sped up. for this you want to first select all the frames as shown above.
next, you can click on the downward arrow on any frame to change the time delay. i usually prefer 0.07s which you can set in other...
once you've set the time delay, you have to convert the frames into timeline as shown above.
now that you have your timeline as seen on the left side, all you have to do is convert everything into a smart object. for that you have to first select all the layers using the shortcut Ctrl+Alt+A and then right-click on the layers followed by convert to smart object
now you can see that the many layers have been converted into one layer making it easier to work with. the next step is to resize the gif. the original dimensions would make the gifs too large to fit tumblr's size limit, this can be done by going to image>canvas size
to ensure that tumblr does unnecessarily crop your gifs you want to make sure width is always 540px if there's going to be only one gif in a row. the height can be anything depending how you want your gif to look.
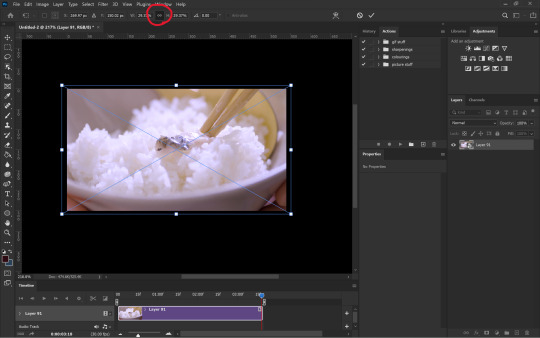
you can adjust the gif onto the new canvas using Ctrl+T to transform the layer. always ensure the height and width are linked to make sure you don't squeeze the image weirdly.
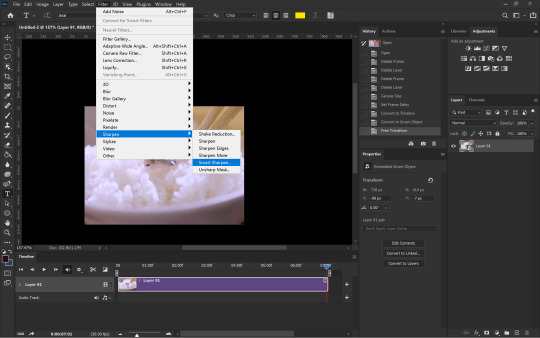
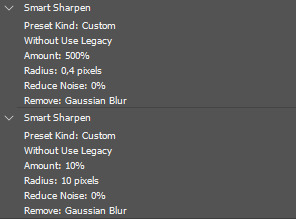
after resizing the gif, i next sharpen the gif (which is my least favourite part). you can sharpen by going to filter>sharpen>smart sharpen while the noise filter is in filter>noise>add noise
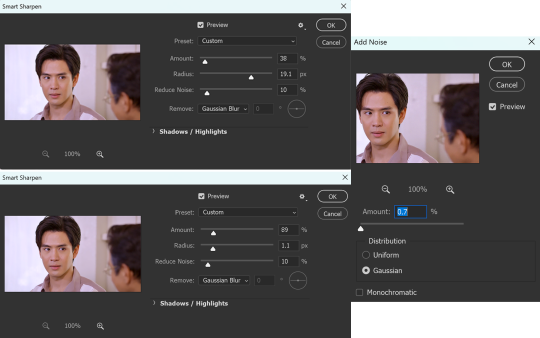
although i don't always stick to the same sharpening, these are the settings i use the most.
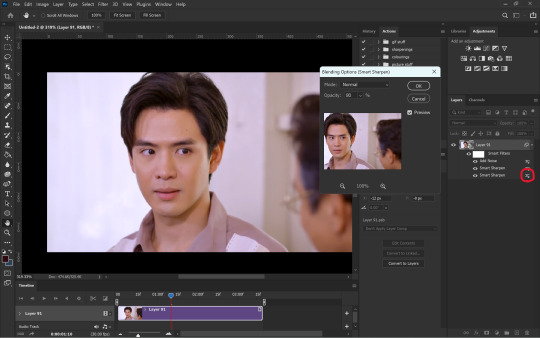
once i'm done with the sharpening i like to soften the first smart sharpen filter. for this i change the blending option of the first filter to 80%. this is entirely optional.
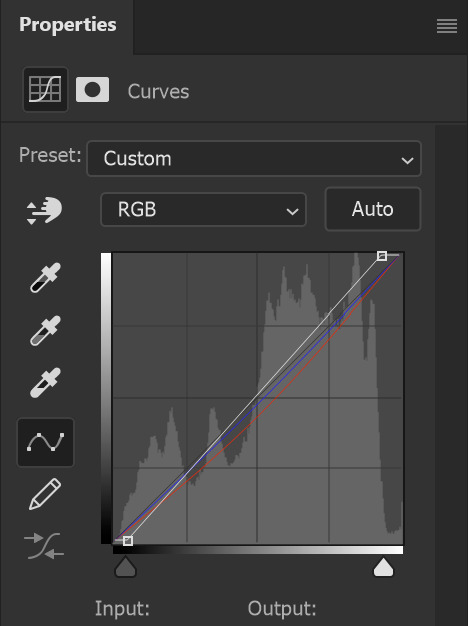
once sharpening is done, you can colour and edit however you like using any of the adjustment layers. i mostly prefer curves and selective colour. these are the curves i used for this particular gif to remove the purple/redness it had going on. in RGB mode the white slider adds brightness and the grey one darkness/contrast. then you can individually use the red, green and blue modes to adjust the colours. i only used selective colour here to adjust the skin tones a bit so i haven't added that.
once done with colouring all you have to do is export the gif from file>export>save for web (legacy)
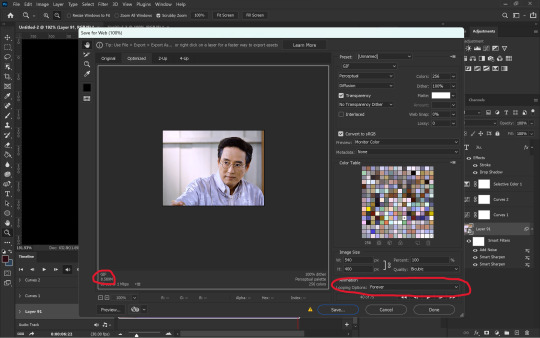
in the last window you have to make sure your looping is forever and that your gif is below 9.5MB. although tumblr says max gif size is 10MB, at least for me nothing over 9.5MB uploads.

and THAT'S IT (i say after a whole one page essay) your gif is ready!!! honestly i don't know if this is the easiest or most convenient method but this is just how i do it. also i use actions for everything other than colouring so it isn't as time consuming as it looks. you can also set shortcuts for importing and exporting to save time. this can be done from edit>keyboard shortcuts
since you made it to the end here is an extra bit on captioning
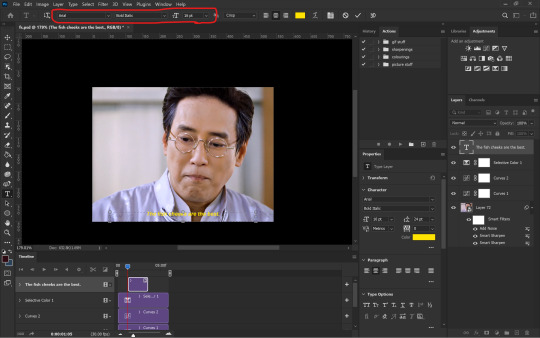
you want to start with a normal text layer and center it at the bottom of the gif. i use arial bold italic in size 16. next to make it look better we can add an outline and shadow to it through the layer style. and you can open up this window either by clicking the fx option at the bottom right or double-clicking the text layer.
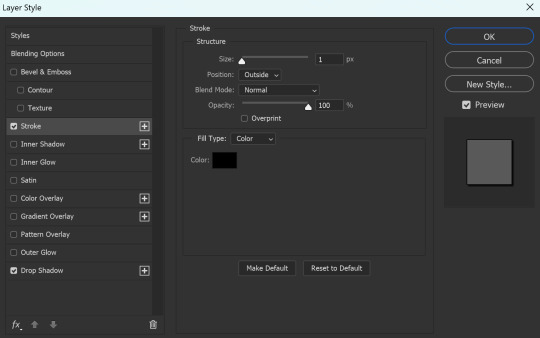
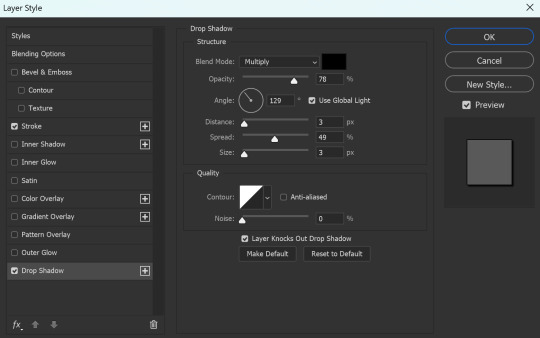
these are the settings i use for the stroke as well as the shadow
now it is ACTUALLY the end!!!
#gif making#ps tutorial#gif making tutorial#photoshop tutorial#hope this makes some sense 😭#i made the important stuff bold so that you don't have to necessarily read through the whole thing#i had to go take a look at my actions cause i had actually forgotten my settings in the first place
89 notes
·
View notes
Video
undefined
tumblr
you get stuck in the void at the end
HORRIBLE GUIDE ON HOW TO MAKE SP WITH IPAD PRO SCREEN RECORDING
notes for myself so i dont have to punish myself going thru this again
YOU NEED: iPad pro, separate mac computer, air drop enabled, adobe premiere pro, adobe media encoder
1 screen record on your ipad. it gonna be like 3 hours of footage that suck up space for a fucking short drawing session.
2 airdrop files to computer after editing all clips together in iMovie (CUT AS MUCH AS POSSIBLE TO REDUCE FILE SIZE! SAVE AS 1280x720)
3 go to after effects and drag the movie in it. change comp size to 1280 if iMovie forces you to save bigger
3.5 MAKE TIME CHANGE! speed up your VID file FIRST! you make like a time stretch i think. change 30fps to 3fps i dont remember what the guy said
4 separate your audio (if you were listening to sm on your iPad, i listen to music) in effects and add in ur speedpaint audio you will need to go to youtube wav converter . org i think it was called? that one has no porn bots n crap and then put the mp3s in the editing composition and move the audio how its supposed to be
5 omfg ummm if the last song is too long look up a vid on how to trim audio i was too fucking tired
6 OPEN adobe media encoder
7 EXPORT to adobe media encoder reader
8go to your best friend media encoder and drag your aep project and drop it in there if exporting doesnt work. it willl hold ur hand and say ok hon what do you want do you want a quicktime or a h.247 click h/246 whatever it means mp4 i need to sleep
9click and wait a reasonable 10 minutes to compress 3 hours of sped up footage
10 drop and drag your same aep to create a QUICKTIME export just incase the mp4/mov is too big
10.5 i held a grunge against after effects so it turns out you can trim the end of your clips in media encoder so i trimmed the long end of the song off there!
11 omh it works i dragged it on tumblr and youtube and it worked df. IT HAS TO BE MP4! THE MOV FILES ARE TOO BIG!
12 wait a day for your videos to be posted and then DELETE and PERMANENT TRASH all the files you used! you dont need it anymore it will free up space
14 notes
·
View notes
Text
Demystifying Digital Images and Video: Formats, Tools, Copyright, and More.
Introduction
In today's digital age, images and videos have become an integral part of our daily lives. From personal photographs shared on social media to professional content uploaded on platforms like YouTube and Twitch, understanding the intricacies of image and video file formats, codecs, and manipulation tools is essential. This blog post aims to provide a comprehensive overview of these digital elements, focusing on the definitions of common file types, export settings for popular broadcasting platforms, image manipulation tools, and the critical aspects of image copyright.
Definitions of Commonly Used Image and Web Video Formats, Wrappers, and Codecs
Image Formats:
JPEG (Joint Photographic Experts Group): JPEG is the most widely used image format for photographs and digital images. It uses lossy compression, which reduces file size while maintaining reasonable image quality.
PNG (Portable Network Graphics): PNG is preferred for images with transparent backgrounds or crisp, high-quality graphics. Unlike JPEG, it uses lossless compression.
GIF (Graphics Interchange Format): GIFs are a popular choice for short, looping animations and simple graphics. They use lossless compression and support transparency.
TIFF (Tagged Image File Format): TIFF is a versatile format commonly used in professional photography and graphic design. It supports lossless compression and maintains high image quality.
BMP (Bitmap): BMP is a Windows-native format known for its lack of compression. It results in large file sizes but retains image quality.
Video Formats and Codecs:
MP4 (MPEG-4): MP4 is a widely supported video format that uses the H.264 codec. It offers a balance between quality and file size, making it ideal for streaming and sharing on the web.
AVI (Audio Video Interleave): AVI is an older format that supports various codecs. It is not as efficient as MP4 in terms of compression and is used less frequently nowadays.
MOV (QuickTime Movie): MOV is a format developed by Apple and is popular among Mac users. It can use various codecs, such as H.264 and ProRes, for high-quality video.
MKV (Matroska): MKV is an open-source container format that can contain videos with a variety of codecs, making it highly customizable.
Export Settings for Popular Broadcast Platforms
When it comes to sharing images and videos on popular broadcasting platforms like YouTube, Twitch, and Facebook, selecting the right export settings is crucial for optimal quality and compatibility.
YouTube: For video content on YouTube, the recommended format is MP4 with H.264 video codec and AAC audio codec. The ideal resolution is 1080p (1920x1080) or 4K (3840x2160) for higher quality. These settings balance quality and compatibility across devices.
Twitch: Twitch also prefers the MP4 format with H.264 video and AAC audio codecs. A resolution of 720p (1280x720) or 1080p is recommended, depending on the viewer's internet speed and quality preferences.
Facebook: Facebook accepts a wide range of video formats, including MP4 and MOV. However, MP4 with H.264 video and AAC audio codecs is a reliable choice. The resolution should be adapted to the target audience and device capabilities.
Commonly Used Image Manipulation Tools and Techniques
Image manipulation tools are essential for enhancing and editing images. Here are some commonly used tools and techniques, along with their purposes:
Adobe Photoshop: Photoshop is a versatile image editing software that can be used for tasks like retouching, color correction, and compositing.
Adobe Lightroom: Lightroom is perfect for photo organization and enhancement, with features like exposure adjustment, color grading, and batch processing.
GIMP (GNU Image Manipulation Program): GIMP is a free alternative to Photoshop, offering similar features for image editing and manipulation.
Canva: Canva is a user-friendly online tool for creating graphics and social media content. It simplifies design tasks for non-designers.
Cropping and Resizing: These techniques are fundamental for adjusting image dimensions and removing unwanted parts of an image.
Image Copyright Essentials
Artists and content creators must be aware of copyright laws to protect their intellectual property. Key copyright essentials include:
Ownership: Creators automatically own the copyright to their work upon creation, but registration provides additional legal protection.
Fair Use: Fair use allows limited use of copyrighted material without permission for purposes like criticism, commentary, news reporting, and education.
Licensing: Creators can license their work under specific terms, such as Creative Commons licenses, allowing others to use their work while respecting their rights.
Public Domain: Works in the public domain are not protected by copyright and can be used freely.
DMCA Takedowns: The Digital Millennium Copyright Act (DMCA) enables copyright owners to request the removal of infringing content from online platforms.
Attribution: When using copyrighted material, proper attribution is often required to credit the creator.
Conclusion
Understanding digital image and video formats, codecs, export settings, image manipulation tools, and copyright essentials is essential for content creators, whether amateur or professional. By adhering to best practices and legal guidelines, creators can ensure their work is of high quality, reaches the right audience, and is protected from unauthorized use. Whether you're a budding photographer, a vlogger, or a graphic designer, the knowledge presented in this blog post can serve as a valuable resource to navigate the digital content landscape successfully.
References
Reference list
Arts Law Centre of Australia 2010, Copyright - Arts Law Centre of Australia, Arts Law Centre of Australia.
Attorney-General's Department 2022, Copyright basics, Attorney-General’s Department.
Image Manipulation: The What, How, and Why 2021, Clipping Path Campus.
Image Processing: Techniques, Types, & Applications [2022] n.d., www.v7labs.com.
Video File Formats, Codecs, and Containers Explained | TechSmith 2018, Welcome to the TechSmith Blog.
By: Juan Gutierrez.
4 notes
·
View notes
Text
The Power of AI and Human Collaboration in Media Content Analysis

In today’s world binge watching has become a way of life not just for Gen-Z but also for many baby boomers. Viewers are watching more content than ever. In particular, Over-The-Top (OTT) and Video-On-Demand (VOD) platforms provide a rich selection of content choices anytime, anywhere, and on any screen. With proliferating content volumes, media companies are facing challenges in preparing and managing their content. This is crucial to provide a high-quality viewing experience and better monetizing content.
Some of the use cases involved are,
Finding opening of credits, Intro start, Intro end, recap start, recap end and other video segments
Choosing the right spots to insert advertisements to ensure logical pause for users
Creating automated personalized trailers by getting interesting themes from videos
Identify audio and video synchronization issues
While these approaches were traditionally handled by large teams of trained human workforces, many AI based approaches have evolved such as Amazon Rekognition’s video segmentation API. AI models are getting better at addressing above mentioned use cases, but they are typically pre-trained on a different type of content and may not be accurate for your content library. So, what if we use AI enabled human in the loop approach to reduce cost and improve accuracy of video segmentation tasks.
In our approach, the AI based APIs can provide weaker labels to detect video segments and send for review to be trained human reviewers for creating picture perfect segments. The approach tremendously improves your media content understanding and helps generate ground truth to fine-tune AI models. Below is workflow of end-2-end solution,
Raw media content is uploaded to Amazon S3 cloud storage. The content may need to be preprocessed or transcoded to make it suitable for streaming platform (e.g convert to .mp4, upsample or downsample)
AWS Elemental MediaConvert transcodes file-based content into live stream assets quickly and reliably. Convert content libraries of any size for broadcast and streaming. Media files are transcoded to .mp4 format
Amazon Rekognition Video provides an API that identifies useful segments of video, such as black frames and end credits.
Objectways has developed a Video segmentation annotator custom workflow with SageMaker Ground Truth labeling service that can ingest labels from Amazon Rekognition. Optionally, you can skip step#3 if you want to create your own labels for training custom ML model or applying directly to your content.
The content may have privacy and digitial rights management requirements and protection. The Objectway’s Video Segmentaton tool also supports Digital Rights Management provider integration to ensure only authorized analyst can look at the content. Moreover, the content analysts operate out of SOC2 TYPE2 compliant facilities where no downloads or screen capture are allowed.
The media analysts at Objectways’ are experts in content understanding and video segmentation labeling for a variety of use cases. Depending on your accuracy requirements, each video can be reviewed or annotated by two independent analysts and segment time codes difference thresholds are used for weeding out human bias (e.g., out of consensus if time code differs by 5 milliseconds). The out of consensus labels can be adjudicated by senior quality analyst to provide higher quality guarantees.
The Objectways Media analyst team provides throughput and quality gurantees and continues to deliver daily throughtput depending on your business needs. The segmented content labels are then saved to Amazon S3 as JSON manifest format and can be directly ingested into your Media streaming platform.
Conclusion
Artificial intelligence (AI) has become ubiquitous in Media and Entertainment to improve content understanding to increase user engagement and also drive ad revenue. The AI enabled Human in the loop approach outlined is best of breed solution to reduce the human cost and provide highest quality. The approach can be also extended to other use cases such as content moderation, ad placement and personalized trailer generation.
Contact [email protected] for more information.
2 notes
·
View notes
Note
you do edits and gifs right? i am trying to find a good screen recorder (preferably free and without a watermark. kind of a tall order. i know)
i just wondered if maybe you knew of one? also curious what programs/process you use to create your gifs and edits if you don't mind sharing
ty
Hey! I've been making gifs for the last ten years and I got some tricks up my sleeve. It's going to be such a long post (as I'll discuss my process in detail and depth, explaining all the little things), so if anyone is interested, just read under the cut! (❁´◡`❁)
Step one: finding the video
To make an HQ gif, your video has to be HQ. The best choice is to go on YouTube and download the highest-quality video:
Example -> if there is as quality option 4K, download the video in 4K.
Remember that .mp4 videos have a lower quality, because it's a compressed file.
A better extension is .mkv, which I find preserves the quality better.
If you can't get the video from YouTube, you may still want to have a good quality video -> you can still record your screen and I suggest this open source program: OBS Studio (Win, Mac and Linux!)
Here you can play with the settings -> on the output menu, remember to select the .mkv output! (NOTE: you need to play around with the settings because depending on how powerful your PC is, some will be better than others!)
Now all you have to do is press start recording and once you recorded your video, press stop recording (it's pretty intuitive!!)
Step two: screencapping
It's the slowest way to make gifs, but it helps preserving the quality.
Once you have your video, you need to make the screencaps!
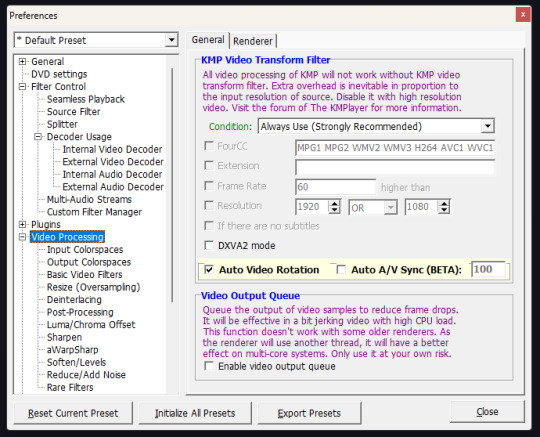
Download KMPlayer
Right click on the middle of the screen > options > preferences

These are my settings:

Open your file (you screen recorded in OBS studio) and put the cursor to the point the scene you want your gif starts
Then right click (on the screen) and select this
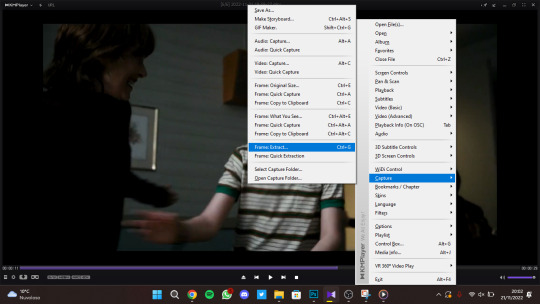
Make sure these are your options:
Press start and press play on the player -> now let it play until you finish your scene -> then press stop.
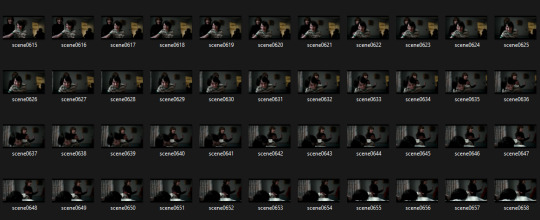
On the folder you chose as destination of the extraction, you should have something like this.
Step three: making the gif
Open Photoshop (I have Photoshop CC - 2018).
Go on File > Scripts > Load files into stack

Click on browse -> select all the screencaps you previously made -> once they're loaded, press on OK
Now, lean back, relax, grab some coffee because it's gonna take a while!
Turn on your timeline (Window > Timeline)

And press on Create frame Animation, there in the middle
Then press on the little burger menu on top right of the timeline and click on Make frames from layers
Click again on that menu and select Reverse frames
Now, select all the frames (the ones you see on the timeline) and right click where you see "0 sec" and choose Other ...

Put 0.04 as delay!
Step four: cropping and sharpening
Select the Crop Tool (shortcut: C) and you should have something like this

Move the handlers like this (don't reduce the image size!)
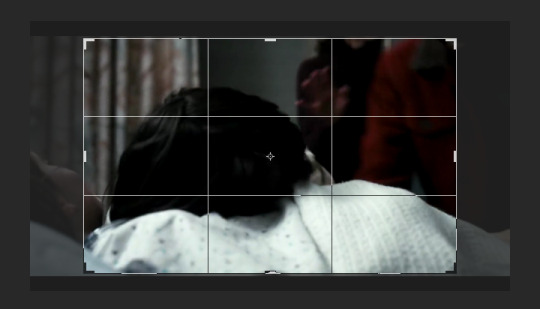
I just eliminated the black stripes on top and bottom and resized the width
Then confirm
Go to Image > Image Size and these are my settings:
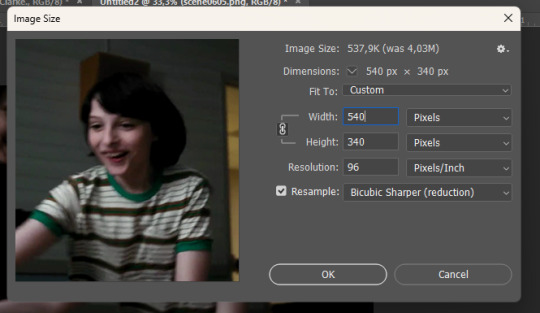
If you want to make a ONE COLUMN gifset -> width has to be 540 px
If you want to make a TWO COLUMN gifset -> width has to be 268 px
Height doesn't matter! Press OK.
Now, back to your Timeline, press that little icon on the bottom left

Now, this is what should happen:
On the layers panel, select all the layers and right click -> Convert to Smart Object

Now, you can use whatever sharpening option you want -> go on Filter > Sharpen > Smart Sharpen.
I usually do that twice:
OPTIONAL -> duplicate the layer and set the opacity to 30% -> add Gaussian Blur (radius 1.5)
Step five: coloring
Now this is the fun part, and it's always different! So, just play around with the adjustments and find what suits the scene the best!
Step six: saving
File > Export > Save for Web

NOTE: .gif files must be under 10MB to be uploaded on Tumblr
REMEMBER TO SET LOOPING TO FOREVER!!!
And that is it!? If you have any questions please DM me, or send in another ask + there is a quicker way to do this, let me know if you are interested in that.

#ask#elz:explains#OMG I WAITED TEN YEARS TO RECEIVE THIS ASK!!!!#😭#sorry for typos#english is not my main language#gif tutorial#*resources
5 notes
·
View notes
Text
Video Transcoding: An Essential Process for Content Distribution Across Multiple Platforms
What is Video Transcoding
It refers to the process of converting a video file from one format or codec to another. This allows video files captured or encoded in one format to be played back on devices that support different formats. Transcoding is necessary because video formats have different technical specifications for things like resolution, frame rate, audio channels and compression standards.
Need for Video Transcoding
The need for transcoding arises because videos today need to be consumed across a wide variety of platforms like smartphones, tablets, desktops and streaming devices. However, not all devices or platforms support the same video formats. While a high-resolution movie may play fine on a high-end desktop, the same file may be too large for a mobile device with limited processing power and storage. Transcoding allows video content distributors to create optimized versions of a video tailored for specific devices or networks.
Some key reasons why transcoding is required include:
- Device and Platform compatibility: As mentioned earlier, different devices have varying support for video formats. Transcoding ensures the video can play on the target device.
- File size optimization: Transcoding to lower resolutions and bitrates helps reduce file sizes, important for streaming over cellular networks or for devices with limited space.
- Encoding optimizations: Transcoding allows re-encoding videos using optimal encoder settings, codecs and profiles best suited for the target environment.
- DRM restrictions: Video Transcoding may need to be converted to formats that support Digital Rights Management (DRM) for distribution through licensing platforms.
- Subtitle/Closed caption embedding: Non-burned subtitle/caption streams can be burned into the video during transcoding.
Transcoding Workflow
A typical video transcoding workflow would involve the following basic steps:
1. Import and Analysis: The source video file is imported into the transcoding system which then analyses key attributes like resolution, frame rate, audio/subtitle streams etc.
2. Profile Mapping: The analyzed data is mapped to pre-defined transcoding profiles configured for various target device classes or bitrate tiers.
3. Transcoding: The source file is transcoded to the appropriate target format(s), resolutions and encoding parameters as per the matched profile using CPU/GPU transcoding.
4. Optimizations: Additional optimizations may be applied like deinterlacing, denoising, ad insertion etc.
5. Quality Check: Random transcoded clips can be checked for quality issues using automated or manual review.
6. Delivery/Distribution: The transcoded files are delivered to various streaming servers, packaged for OTT/VOD platforms or downloaded directly for local playback.
Transcoding Formats and Codecs
Some common formats generated during transcoding include:
- MP4: A popular wrapper format generated at lower resolutions for platforms like iOS, Android, Roku etc. H.264 video with AAC audio is common.
- MPEG-2 Program Stream (M2PS): Used for distribution to set-top boxes and cable/satellite systems.
- Flash Video (FLV/F4V): Used for progressive download and streaming delivery to desktop browsers.
- Microsoft Smooth Streaming (MSS): An adaptive bitrate format optimized for Silverlight/HTML5 delivery.
- HLS: A standard HTTP Live Streaming format for OTT on mobile/desktop with H.264/AAC.
- DASH: An ISO-standard dynamic adaptive format popular for premium OTT with H.264/AAC or HEVC/AAC.
Popular codecs used include H.264, H.265/HEVC for video compression and AAC, MP3 for audio. Selecting the right codecs and container depends on the target audience and delivery network.
Get more insights on Video Encoding
For Deeper Insights, Find the Report in the Language that You want.
French
German
Italian
Russian
Japanese
Chinese
Korean
Portuguese
Priya Pandey is a dynamic and passionate editor with over three years of expertise in content editing and proofreading. Holding a bachelor's degree in biotechnology, Priya has a knack for making the content engaging. Her diverse portfolio includes editing documents across different industries, including food and beverages, information and technology, healthcare, chemical and materials, etc. Priya's meticulous attention to detail and commitment to excellence make her an invaluable asset in the world of content creation and refinement.
(LinkedIn- https://www.linkedin.com/in/priya-pandey-8417a8173/)

#Video Encoding#Video Compression#Media Conversion#Video Format Conversion#File Compression#Codec#Bitrate Adjustment#Video Quality#Video Processing
0 notes
Text

Comprehensive Guide to Video Encoding and Content Delivery
In today's digital age, video content has become an integral part of our daily lives, from streaming movies and TV shows to video conferencing and online tutorials. Behind the seamless delivery of these videos lies the complex world of video encoding. This comprehensive guide aims to demystify video encoding, covering fundamental concepts, adaptive bitrate streaming (ABS), content-aware encoding (CAE), and the role of XML-based Electronic Program Guides (EPGs) in the television industry.
1. Introduction to Video Encoding
Fundamental Concepts
Video encoding involves the conversion of raw video data into a digital format that can be efficiently transmitted, stored, and played back. Key concepts include:
Codecs: These are algorithms used to compress and decompress video data. Popular codecs include H.264, H.265 (HEVC), and VP9.
Bitrates: Bitrates refer to the amount of data processed per unit of time and are crucial for determining video quality and file size.
Container Formats: These formats encapsulate video, audio, and metadata into a single file, with examples including MP4, AVI, and MKV.
Importance of Video Encoding
Video encoding plays a vital role in content delivery and distribution, impacting factors such as streaming quality, bandwidth consumption, and storage requirements. Efficient video encoding ensures optimal viewing experiences across various devices and network conditions.
2. Adaptive Bitrate Streaming (ABS)
Principles of ABS
Adaptive Bitrate Streaming (ABS) dynamically adjusts video quality based on the viewer's network conditions, ensuring smooth playback and minimizing buffering. It achieves this by delivering video in multiple bitrates and resolutions, allowing seamless transitions between them.
Benefits of ABS
ABS offers several benefits, including improved user experience, reduced buffering, and efficient bandwidth utilization. Popular ABS technologies such as HTTP Live Streaming (HLS) and Dynamic Adaptive Streaming over HTTP (DASH) are widely used for online video streaming and live broadcasts.
3. Content-Aware Encoding (CAE)
Concept of CAE
Content-Aware Encoding (CAE) optimizes video encoding based on the characteristics of the content itself. This approach focuses on maximizing visual quality while minimizing file sizes, leading to better quality-to-bitrate ratios and improved streaming efficiency.
Advantages of CAE
CAE techniques, such as scene-aware encoding and object-based encoding, offer advantages such as reduced file sizes, improved visual quality, and enhanced streaming performance. Content providers can leverage CAE to deliver high-quality videos while conserving bandwidth.
4. XML EPG for TV
Role of XML EPGs
XML-based Electronic Program Guides (EPGs) serve as comprehensive databases of TV programming information, including channel listings, show descriptions, and scheduling details. They enable viewers to access detailed program information and make informed viewing choices.
Benefits of XML EPGs
XML EPGs benefit both content providers and viewers by enhancing content discovery, supporting personalized recommendations, and enabling interactive TV experiences. They play a crucial role in modern television services, enriching the viewer's entertainment experience.
Video encoding and content delivery technologies continues to rise, shaping the way we consume and interact with video content.
Understanding the principles of video encoding, adaptive bitrate streaming, content-aware encoding, and xmltv schedule epg guide is essential for content creators, broadcasters, and streaming platforms.
By harnessing these technologies, the industry can deliver immersive, high-quality video experiences while adapting to diverse viewer preferences and network conditions.
Whether you're a video enthusiast, content creator, or industry professional, embracing these concepts can elevate the quality and accessibility of video content in today's digital landscape.
Stay tuned for more insights into the ever-improving world of video technology and content delivery. Get the needed info, to discover where to find the best xmltv schedule epg, and never miss a TV show again! Access reliable sources for up-to-date TV listings and enhance your viewing experience today.
youtube
1 note
·
View note
Text
Common Mistakes in Video Optimization and How to Avoid Them
In today’s digital music landscape, videos are an essential part of an artist’s promotional toolkit. They provide a powerful medium to convey stories, enhance music, and connect with audiences visually. But simply creating a high-quality video is not enough. For your video to reach its full potential, especially across multiple platforms, it needs to be properly optimized. This guide will walk you through the crucial steps to optimize your music video for maximum performance on platforms supported by Deliver My Tune.
Understanding Platform Requirements
Every platform has its own set of video requirements. Whether you’re distributing your video to YouTube, Vevo, or streaming it on social media platforms, understanding the unique demands of each service is essential to ensure your content is delivered in the highest quality.
Platforms like YouTube typically recommend a resolution of 1080p or higher for optimal quality, while others like Instagram may prefer videos formatted for mobile devices. On platforms where mobile-first audiences dominate, such as Instagram and TikTok, videos in vertical formats (9:16 aspect ratio) perform better. Meanwhile, YouTube and other desktop-centric platforms thrive on landscape formats (16:9).
Apart from video format and resolution, understanding bitrate requirements is crucial. High-bitrate videos result in better quality, but may also lead to longer buffering times on slower networks. Finding a balance between quality and speed is key for a smooth viewing experience. Each platform has its guidelines regarding optimal bitrates, and sticking to these recommendations ensures your video is always presented at its best.
Best Practices for Uploading Videos
When uploading your video, there are several technical considerations to keep in mind to guarantee that it meets the platform’s standards and performs well. Let’s break down the main points:
Resolution: As previously mentioned, resolution matters. Aim for a minimum of 1080p (Full HD), which provides a crisp, clear image on most devices. For those who want the best possible quality, 4K (2160p) is now widely accepted, but make sure that the platform you’re uploading to supports 4K playback.
Aspect Ratio: Different platforms call for different aspect ratios. For traditional music videos, a 16:9 aspect ratio is often ideal for platforms like YouTube, Vevo, and Facebook. Meanwhile, social media apps such as Instagram Stories and TikTok work better with a 9:16 aspect ratio.
File Format: MP4 is the most widely accepted format across platforms, thanks to its combination of high-quality video and relatively small file size. Make sure your video is in MP4 format, and use the H.264 codec for compatibility with most streaming platforms.
Compression: When uploading, use a compressed video file to avoid excessively large file sizes that could impact upload speed and buffer times. However, it’s important to compress without sacrificing too much quality. Tools like HandBrake or Adobe Premiere offer options to reduce file size while maintaining high resolution.
Ensuring Consistency in Metadata
Video optimization goes beyond just technical specifications — it extends to how your video is presented through metadata. Metadata includes the title, description, tags, and other relevant information that help platforms categorize and surface your video to the right audience.
Title Optimization: Your video’s title is the first thing a viewer will see. Make it compelling, descriptive, and clear. Avoid clickbait, but do ensure that it’s engaging enough to encourage a click. Including keywords in your title can help with search engine optimization (SEO) and improve your video’s discoverability.
Tags and Keywords: Most platforms allow you to tag your video with relevant keywords. This is especially important for making your video discoverable in search results. Include both general tags, such as your genre or video type, and specific tags, like the names of artists, songs, or themes featured in the video.
Description: The video description offers a chance to provide additional context, promote your social media links, and offer more information about the song, video concept, or the artists involved. The description is also a great place to add keywords to enhance SEO.
Thumbnail: Don’t underestimate the power of a good thumbnail. It’s often the deciding factor for whether someone clicks on your video. Use a high-resolution, captivating image that accurately represents your video content. Text overlays on thumbnails, especially ones highlighting the video’s theme or song title, can also help attract more clicks.
Cross-Platform Considerations
One of the greatest challenges in video optimization is ensuring that the video performs well across multiple platforms. When optimizing your music video for Deliver My Tune’s supported platforms, ensure that you’re not just tailoring the video to one platform’s specifications but considering the broader distribution.
Mobile vs. Desktop Optimization: With more users consuming content on mobile devices, it’s important to ensure that your video is optimized for smaller screens. This includes paying attention to aspect ratios, video file sizes, and thumbnail visibility on mobile.
Playback and Buffering Issues: A large video file size can cause buffering problems for users with slower internet connections. Ensuring that the video is compressed without losing too much quality is critical for offering a seamless viewing experience on all devices.
Platform-Specific Features: Some platforms offer additional features like closed captions, end screens, or cards (on YouTube) that can further engage viewers. These elements should be considered part of your overall video optimization strategy.
Conclusion: Key Takeaways for Seamless Video Distribution
Optimizing your music video across multiple platforms may seem like a daunting task, but by following these best practices, you can ensure your video performs well and reaches the maximum number of viewers. From choosing the right resolution and format to perfecting your metadata and ensuring cross-platform compatibility, every step plays a crucial role in how your video is presented and consumed.
Remember, Deliver My Tune supports a variety of platforms, so staying consistent with your video specifications and metadata can help guarantee your music gets the visibility and engagement it deserves. By taking the time to properly optimize, you’ll improve the chances of your video reaching a wider audience and creating a lasting impact.
0 notes
Text
Maximizing Song Lifespan and Royalties: Why Video Formats Matter
As an independent artist, creating great music is only half the battle. The other half lies in getting your content out there in the most effective way possible. In today's digital world, video content plays a crucial role in showcasing your music. Whether it's a music video, a visualizer, or live performance footage, videos are often the first impression fans have of your music. This is why many artists ask, “Are there any specific formats or guidelines for video submission?” The answer is yes—and following these guidelines can make all the difference. Properly formatted video submissions directly influence how long your music remains live on streaming platforms and can significantly impact the royalties you earn. Platforms like YouTube, Spotify, and others have specific requirements for video submissions, and understanding these can be the key to your song’s longevity and revenue.
1. Understanding Video Formats for Different Platforms
One of the most common reasons artists' videos are rejected or removed from platforms is incorrect formatting. Every platform has its own set of guidelines that define acceptable video file types, aspect ratios, and resolutions. For instance:
YouTube: Prefers videos in MP4 format with H.264 video codec and AAC audio codec, ensuring smooth playback across devices. The preferred aspect ratio is 16:9, with HD resolution being optimal.
Spotify: Accepts MP4 videos for their Canvas feature but requires them to be in portrait format, with specific dimensions like 9:16 ratio and a maximum length of 8 seconds.
Apple Music: Typically requires high-quality ProRes video formats for music videos, which can be much larger in file size but offer greater visual fidelity.
Failing to meet these format requirements can result in your video not being uploaded, significantly reducing your chances of audience engagement and resulting in fewer royalties.
2. Why Correct Video Formatting Is Critical for Song Longevity
Ensuring that your video follows the correct submission guidelines is not just a matter of having your video approved by platforms. It also impacts how long your video stays live. Videos that don’t comply with the format standards are often flagged, resulting in them being taken down. For independent artists, this can be catastrophic since your song’s live time on a platform directly influences its discovery by new fans.
For example, if you release a new single on YouTube, the video needs to meet their technical specifications. If your video has a non-supported resolution or an incorrect aspect ratio, YouTube may reduce its visibility or, in extreme cases, remove it altogether. This significantly shortens the period in which people can view, share, and engage with your song, ultimately affecting its viral potential.
The longer your content stays live, the more exposure it gets, leading to higher audience engagement and, ultimately, increased streaming royalties. Keeping your video live for as long as possible maximizes the chances of your music being picked up by algorithms and recommended to new viewers, boosting your overall reach and streaming numbers.
3. The Direct Impact of Video Submission on Royalties
While many artists focus solely on streams for income, video royalties are a growing source of revenue that should not be ignored. Platforms like YouTube, Vimeo, and Facebook offer royalties based on video views, making it essential to optimize the format for higher visibility. The quality and compliance of your video with the platform’s format guidelines play a huge role in determining your visibility and, consequently, your earnings.
In the case of YouTube, videos with a high-quality format tend to retain viewers longer, which is a key factor in the platform's algorithm. Longer watch times mean more ads can be shown, translating to higher ad revenue and thus more royalties for you. Similarly, Spotify's Canvas feature, while only a few seconds long, enhances the user experience and can encourage listeners to stream your song repeatedly, boosting your royalty count.
By simply ensuring that you submit the video in the right format, you are not only preventing possible removals but also optimizing your video for maximum earnings. Poor formatting or non-compliance with video submission guidelines can result in lower engagement, fewer plays, and decreased royalty payments over time.
4. Technical Aspects of Video Formats: What Artists Need to Know
To make sure your video adheres to platform guidelines, artists need to be aware of several technical factors, including:
Resolution: Standard HD (1280x720) and Full HD (1920x1080) are widely accepted across platforms, but some may also support 4K (3840x2160).
Aspect Ratio: While 16:9 is standard for landscape videos, platforms like Instagram and TikTok require 9:16 for vertical videos.
File Size and Compression: Larger files can offer higher quality, but they may take longer to upload and could be subject to file size limits. Compressing your video while maintaining high visual fidelity is essential for a smooth submission process.
Frame Rate: Most platforms accept 24fps or 30fps, but it's essential to match your frame rate with the video’s intended style and platform preference.
These technical aspects can make or break your video’s submission, and by carefully tailoring each video to meet platform-specific guidelines, you can ensure a smooth upload process.
5. Video Quality and Audience Engagement: A Hidden Link to Royalties
When it comes to artist success, audience engagement is one of the most critical factors in determining revenue. Videos that adhere to submission guidelines are more likely to look professional and visually appealing. In turn, this helps maintain viewer interest, which can lead to higher watch times and better audience retention. The more engaged viewers are with your content, the more they interact, share, and consume it, driving up your streaming numbers and boosting royalties.
Moreover, engaging videos that comply with submission guidelines tend to perform better on search algorithms. For instance, on YouTube, high-quality videos that meet format standards are more likely to appear in search results and recommendations, which increases exposure and, subsequently, potential revenue.
Conclusion:
For any artist wondering, “Are there any specific formats or guidelines for video submission?” the answer is a resounding yes. Submitting videos that adhere to platform-specific guidelines not only ensures that your content stays live for longer but also enhances its visibility, boosting your potential royalties. The technical aspects of video submission, such as format, resolution, and file size, all play critical roles in how well your video is received and how much revenue it generates. Taking the time to understand and comply with these guidelines can make the difference between a successful release and one that falls flat. By paying attention to these details, you not only optimize the song’s live time but also ensure that you maximize your earning potential as an independent artist.
0 notes
Text
Ian Munsick Country & Western Shirt
Ian Munsick Country & Western Shirt
Codec is a short word for ‘coding’ and ‘decoding’. Once you are done editing, you are required to choose a Ian Munsick Country & Western Shirt that encodes the footage with the maximum possible compression. One of the most popular codecs is H.264 that produces MP4 files. H.264 also has its upgraded version called H.265 that offers a better compression ratio, thus reducing the file size even further. Factor 5: Rate Control Modes Rate controlling is a process where you define the bitrates for a video. For instance, if a clip is intended to be distributed via the Internet where the target audience may have specific bandwidth, Constant Bitrate (CBR) mode would be good. On the other hand, if the Internet bandwidth is decent or the video is to be played on a local device, using Variable Bitrate (VBR) (with the highest threshold set) would provide the best picture quality as the bitrate would be automatically controlled according to the motions the clip has.
HOMEPAGE: https://gearbloom.com/

0 notes
Text
Funny Ufc 306 noche sean o’malley vs merab dvalishvili 2024 poster shirt
Funny Ufc 306 noche sean o’malley vs merab dvalishvili 2024 poster shirt
Codec is a short word for ‘coding’ and ‘decoding’. Once you are done editing, you are required to choose a Funny Ufc 306 noche sean o’malley vs merab dvalishvili 2024 poster shirt that encodes the footage with the maximum possible compression. One of the most popular codecs is H.264 that produces MP4 files. H.264 also has its upgraded version called H.265 that offers a better compression ratio, thus reducing the file size even further. Factor 5: Rate Control Modes Rate controlling is a process where you define the bitrates for a video. For instance, if a clip is intended to be distributed via the Internet where the target audience may have specific bandwidth, Constant Bitrate (CBR) mode would be good. On the other hand, if the Internet bandwidth is decent or the video is to be played on a local device, using Variable Bitrate (VBR) (with the highest threshold set) would provide the best picture quality as the bitrate would be automatically controlled according to the motions the clip has.

0 notes
Text
Y2mate : Your Guide to Streamlined Video and Audio Downloads
In an age where digital content reigns supreme, the ability to effortlessly download videos and audio from the internet has become a necessity for many users.
Enter Y2mate apk a versatile and user-friendly tool that has been making waves in the world of multimedia downloads. This article explores what Y2mate is, how it works, and why it stands out among its competitors.
What is Y2mate?
Y2mate is an online platform designed to facilitate the download of video and audio content from a variety of websites. While its primary appeal is its support for YouTube, Y2mate also extends its capabilities to other popular platforms like Facebook, Vimeo, Dailymotion, and more. The service aims to provide a seamless experience for users looking to save content for offline use, be it for personal enjoyment or professional purposes.

How Y2mate Works
Y2mate operates with a straightforward approach that belies its powerful functionality. Here's a step-by-step look at how you can use Y2mate:
Copy the URL: Start by copying the URL of the video or audio you wish to download. This could be from any supported website.
Paste the URL: Navigate to the Y2mate website and paste the URL into the designated field.
Choose Format and Quality: Once the URL is processed, Y2mate will display a range of download options. You can select the desired format (such as MP4, MP3, or WEBM) and quality (like 720p, 1080p, or audio-only options).
Download: Click on the download button, and Y2mate will begin processing your request. Depending on the size and quality of the file, the download time may vary.
Save: After the processing is complete, you’ll be given a download link. Click on it to save the file to your device.
Key Features of Y2mate
Y2mate offers a variety of features that cater to the needs of different users:
Wide Format Support: Y2mate supports multiple formats, including MP4, MP3, AVI, and WEBM. This versatility ensures compatibility with a broad range of devices and media players.
High-Quality Downloads: Users can choose from various quality settings, including HD and Full HD options, ensuring that downloaded content meets their needs.
Speed and Efficiency: The platform is known for its fast processing times, allowing users to quickly download their desired content without long wait times.
No Registration Required: Y2mate does not require users to create an account or log in, making the process simple and hassle-free.
Cross-Platform Accessibility: Being an online service, Y2mate is accessible from any device with a web browser, whether it's a desktop, laptop, or mobile device.
Why Choose Y2mate?
Y2mate stands out for several reasons:
User-Friendly Interface: The platform is designed with simplicity in mind. Its intuitive interface makes it accessible even to those who are not tech-savvy.
Free to Use: Y2mate is free of charge, which is a significant advantage over other services that may require subscriptions or one-time payments.
No Software Installation: Unlike some download tools that require software installation, Y2mate operates entirely within the browser, saving space and reducing the risk of malware.
Versatility: Its ability to download from multiple sites and support for various formats and qualities make it a go-to tool for a wide range of multimedia needs.
Legal and Ethical Considerations
While Y2mate is a powerful tool, it’s crucial to use it responsibly and ethically. Always ensure that you have the right to download and use the content you are accessing. Downloading copyrighted material without permission may violate copyright laws and terms of service agreements.
Conclusion
Y2mate offers a robust solution for anyone looking to download and enjoy multimedia content offline. With its easy-to-use interface, wide range of format and quality options, and no-cost access, it has earned its place as a popular choice among users. By leveraging Y2mate’s capabilities, you can enhance your digital media experience while keeping ethical considerations at the forefront. As always, happy downloading!
0 notes
Text
How to Reduce The Carbon Footprint of Your Website
May 16, 2024
Reducing your website’s carbon footprint is essential for several reasons. Firstly, and most obviously, it is crucial to reduce the environmental impact of your business. Secondly, websites with a low carbon footprint also happen to be low on resource usage and high on performance, so a low carbon footprint is a good indicator of a well-made website. Thirdly, the environmental credentials of brands are essential to consumers — a low carbon footprint is great for your brand. Lastly, governments are increasingly cracking down on wasteful practices, meaning that sooner or later, you’ll be legally required to ensure your website has a small carbon footprint.
Happily, reducing the environmental impact of a website is relatively simple.
Understanding the Website Carbon Footprints
The carbon footprint of a website (or anything else, for that matter) is the amount of greenhouse gases it generates. The most common greenhouse gas is carbon dioxide (CO2), hence the term carbon footprint.
A carbon footprint spans the whole life of a website, beginning with its creation, operation, and maintenance. It includes emissions from data centers that store the site files, the energy used by user devices that access the website (that’s right, you’re responsible for your users’ emissions, too!), and the network that’s used to deliver the content, whether that’s a CDN or just backbone connections. It all comes down to electricity: until all power is clean and renewable, the more we use, the more damage we do.
The real problem with website carbon footprints is scale. Access to a single page is negligible in terms of impact. But when it is multiplied many thousands of times, the cumulated emissions are anything but trivial.
So, now that you know how it’s happening, what can you do to reduce the carbon footprint of a website?
3 Strategies for Reducing the Carbon Footprint of Websites
The key to understanding how to reduce the carbon footprint of websites is to recognize that site performance and user experience go hand in hand with a low carbon footprint. What’s good for the environment is also good for your bank balance!
1. Choose Efficient Web Hosting
Choose web hosting services powered by renewable energy sources. Many hosting companies now offer green hosting plans that use solar, wind, or hydroelectric power.
Select hosts that operate energy-efficient data centers. These facilities use advanced cooling technologies, energy-efficient hardware, and optimized server utilization to reduce energy consumption.
Implement a CDN to distribute your content across multiple servers worldwide. CDNs shorten the distance data has to travel to reach users, reducing latency and energy consumption.
2. Optimize Website Performance
Reduce the size of images, videos, and other media files. Use compression tools to decrease file sizes without compromising quality. Opt for modern formats like WebP for images and MP4 for videos, which offer better compression.
Clean up and optimize your HTML, CSS, and JavaScript. Minify and combine files to reduce the number of HTTP requests. This reduces the amount of data that needs to be transferred, speeding up load times and lowering energy usage.
Write clean, efficient code to minimize processing power requirements. Avoid redundant scripts and functions, and use server-side rendering when appropriate to reduce client-side load.
3. Choose Simple, Clean Design
Adopting a minimalist design not only improves aesthetics but also reduces the amount of data required to load the website. Simplifying navigation and reducing clutter can significantly cut down on resource usage.
Ensure your website is optimized for mobile devices. This involves using responsive design techniques, reducing file sizes, and optimizing loading times for mobile users, who often have slower internet connections.
Conduct regular performance and efficiency audits. These audits can help identify areas where you can improve performance and reduce energy consumption.
Tools for Reducing a Website’s Carbon Footprint
There are lots of tools available to help you reduce your website’s carbon footprint.
Carbon Footprint Calculators
Website Carbon Calculator — Measures your website’s carbon emissions and provides insights on how to reduce them.
EcoPing — Evaluates your website’s environmental impact and offers suggestions for improvements.
Carbonalyser — A browser extension that estimates the carbon footprint of your web browsing activities.
Performance & Optimization Tools
PageSpeed Insights — Analyzes your website’s performance and provides recommendations to improve speed and efficiency.
GTmetrix — Offers detailed reports on website performance and suggests optimization strategies.
Pingdom — Monitors website performance and provides insights on how to enhance speed and reduce energy use.
Image Optimization
ImageOptim — Compresses images without losing quality to reduce file sizes.
TinyPNG — An online tool that reduces the file size of PNG and JPEG images.
Squoosh — A web app that compresses and optimizes images for faster loading times.
ShortPixel — An image optimization plugin for WordPress that compresses images and improves site speed.
Code Optimization
UglifyJS: Minifies JavaScript files to reduce their size and improve loading times.
CSSNano: A CSS optimizer that minifies and cleans up CSS files.
HTMLMinifier: Reduces the size of HTML files by removing unnecessary spaces and comments.
Depending on your tech stack there are many more tools available. The number of tools available only serves to prove that a low carbon footprint website, is exactly the same as a good website.
Conclusion
In the digital age, when every page view contributes to a CO2 record to rival the airline industry, it’s essential that we reduce the carbon footprint of websites.
Fortunately the internet is almost unique in the fact that a low-carbon footprint approach is already best practice: all you have to do is optimize your site inline with best practices.
In essence, a low carbon footprint website is synonymous with a well-made, efficient, and high-performing site. Following these tips has the potential to gain you a competitive edge in a market that increasingly values environmental responsibility.
Simon Sterne
Simon Sterne is a staff writer at WebdesignerDepot. He’s interested in technology, WordPress, and all things UX. In his spare time he enjoys photography.
Read more here https://www.vingle.net/d5media
0 notes
Last Seen Blogs

kekesodan-blog
Untitled

yourlocalpalmtree-blog
شركة تركيب مضخات الكويت

deartaylorface-blog
deartaylorface


nwashy
I don't know how to "reblog".