#remove background color Photoshop
Text
2 notes
·
View notes
Text

I will do quick background removal, clipping path with Photoshop editing
See profile>
Hire Me >
This gig provide UNLIMITED REVISION and 100% SATISFACTION guarantee.
Hello,
I provide every type of professional Photoshop editing services in a short time and low cost. I have 3+ years experience on Photoshop editing. I assure that you are going to get a perfect editor through this gig.
---- I'm providing below Photoshop editing services on this gig ----
Background removal
Clipping path, retouch
Background change
Amazon product background remove
Photo retouch
Product retouching
Color correction
Photo resize
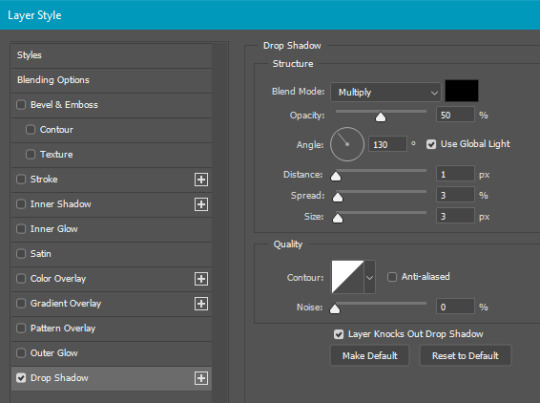
Shadow, Natural shadow, Drop shadow, Reflection shadow
Object remove
File converting JPEG, PNG, and PSD
If you need any other services related to design out of the above list, please contact me. :-)
Note: If you have any questions feel free to message me I will respond asap.
Don't forget to check out extras or package with this gig.
* Unlimited Revision
* Super-Fast Delivery
* 100% customer satisfaction Guaranteed or Refund
* 100% positive rating
#photo background remove#background removal#product background remove#cliping path#photoshop editing#background remove#background change#photo editing#amazon product background remove#photo retouch#product retouching#color correction#object remove#photo resize#shadow#drop shadow#file convert#jpeg#png#psd#podcast cover design#facebook cover design#book cover design#cover photo design#ads banner#social media cover photo#linkedin cover#twitter cover photo#instagram cover photo#youtube cover photo
2 notes
·
View notes
Text
How To Change Hair Color in Photoshop - Easily change your hair color in Photoshop
#clipping path service#professional photoshop services#best clipping path service#clipping path service usa#photo editing services#remove background from image photoshop#image editing service#color correction service#clipping path service company#clipping usa#hair color
0 notes
Text
Image editing and re touching
0 notes
Text
Just a bunch of Useful websites - Updated for 2023
Removed/checked all links to make sure everything is working (03/03/23). Hope they help!
Sejda - Free online PDF editor.
Supercook - Have ingredients but no idea what to make? Put them in here and it'll give you recipe ideas.
Still Tasty - Trying the above but unsure about whether that sauce in the fridge is still edible? Check here first.
Archive.ph - Paywall bypass. Like 12ft below but appears to work far better and across more sites in my testing. I'd recommend trying this one first as I had more success with it.
12ft – Hate paywalls? Try this site out.
Where Is This - Want to know where a picture was taken, this site can help.
TOS/DR - Terms of service, didn't read. Gives you a summary of terms of service plus gives each site a privacy rating.
OneLook - Reverse dictionary for when you know the description of the word but can't for the life of you remember the actual word.
My Abandonware - Brilliant site for free, legal games. Has games from 1978 up to present day across pc and console. You'll be surprised by some of the games on there, some absolute gems.
Project Gutenberg – Always ends up on these type of lists and for very good reason. All works that are copyright free in one place.
Ninite – New PC? Install all of your programs in one go with no bloat or unnecessary crap.
PatchMyPC - Alternative to ninite with over 300 app options to keep upto date. Free for home users.
Unchecky – Tired of software trying to install additional unwanted programs? This will stop it completely by unchecking the necessary boxes when you install.
Sci-Hub – Research papers galore! Check here before shelling out money. And if it’s not here, try the next link in our list.
LibGen – Lots of free PDFs relate primarily to the sciences.
Zotero – A free and easy to use program to collect, organize, cite and share research.
Car Complaints – Buying a used car? Check out what other owners of the same model have to say about it first.
CamelCamelCamel – Check the historical prices of items on Amazon and set alerts for when prices drop.
Have I Been Pawned – Still the king when it comes to checking if your online accounts have been released in a data breach. Also able to sign up for email alerts if you’ve ever a victim of a breach.
I Have No TV - A collection of documentaries for you to while away the time. Completely free.
Radio Garden – Think Google Earth but wherever you zoom, you get the radio station of that place.
Just The Recipe – Paste in the url and get just the recipe as a result. No life story or adverts.
Tineye – An Amazing reverse image search tool.
My 90s TV – Simulates 90’s TV using YouTube videos. Also has My80sTV, My70sTV, My60sTV and for the younger ones out there, My00sTV. Lose yourself in nostalgia.
Foto Forensics – Free image analysis tools.
Old Games Download – A repository of games from the 90’s and early 2000’s. Get your fix of nostalgia here.
Online OCR – Convert pictures of text into actual text and output it in the format you need.
Remove Background – An amazingly quick and accurate way to remove backgrounds from your pictures.
Twoseven – Allows you to sync videos from providers such as Netflix, Youtube, Disney+ etc and watch them with your friends. Ad free and also has the ability to do real time video and text chat.
Terms of Service, Didn’t Read – Get a quick summary of Terms of service plus a privacy rating.
Coolors – Struggling to get a good combination of colors? This site will generate color palettes for you.
This To That – Need to glue two things together? This’ll help.
Photopea – A free online alternative to Adobe Photoshop. Does everything in your browser.
BitWarden – Free open source password manager.
Just Beam It - Peer to peer file transfer. Drop the file in on one end, click create link and send to whoever. Leave your pc on that page while they download. Because of how it works there are no file limits. It's genuinely amazing. Best file transfer system I have ever used.
Atlas Obscura – Travelling to a new place? Find out the hidden treasures you should go to with Atlas Obscura.
ID Ransomware – Ever get ransomware on your computer? Use this to see if the virus infecting your pc has been cracked yet or not. Potentially saving you money. You can also sign up for email notifications if your particular problem hasn’t been cracked yet.
Way Back Machine – The Internet Archive is a non-profit library of millions of free books, movies, software, music, websites and loads more.
Rome2Rio – Directions from anywhere to anywhere by bus, train, plane, car and ferry.
Splitter – Seperate different audio tracks audio. Allowing you to split out music from the words for example.
myNoise – Gives you beautiful noises to match your mood. Increase your productivity, calm down and need help sleeping? All here for you.
DeepL – Best language translation tool on the web.
Forvo – Alternatively, if you need to hear a local speaking a word, this is the site for you.
For even more useful sites, there is an expanded list that can be found here.
77K notes
·
View notes
Text
0 notes
Text
Neck joint and color correction technique
youtube
#color correction#neck joint#neck joint service#photoshop neck joint#neck joint photoshop#neck joint and color correction technique#color correction service#ghost mannequin technique#how to neck joint in photoshop cs6#neck joint photoshop tutorial#color correction image#color correction tutorial#color corrections#photoshop color correction#color correction photoshop#color correction tutorial in photoshop#symmetrical neck joint service#background remove#youtube#beauty#hairstyle#remove background#Youtube
0 notes
Text
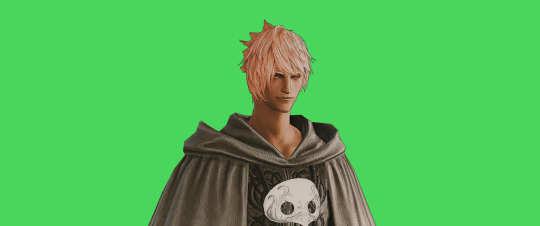
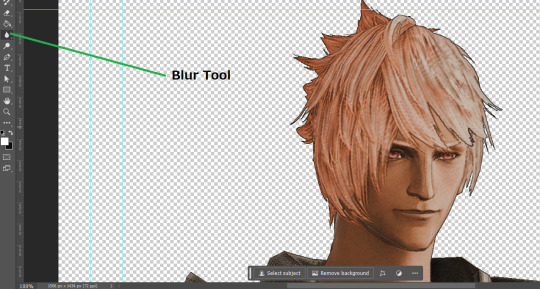
FF14 Battle Portrait Tutorial
For the past few weeks I was trying to find a way to recreate the battle portrait from FF14 as there was a few characters that I want to see in that style but don't officially have one yet. I think I got it down more or less (see image below) so I thought it's a good time to share what I did.

First of all, I made a few files that would help make life a little easier. They can be grabbed here .
Note: I did use Reshade to do a bit of work at the screenshot stage to help speed up the process but the same effect can be recreated in Photoshop with a vanilla screenshot. There are a lot of tutorials on how to do comic/cartoon effect in photoshop and those would make good bases to work off of.
Step 1: Take the screenshot with the PortraitBase Shader on. I usually take two screenshots. One with "Comic" on and one with it turned off. This is so that I have more to work with if needed.

Step 2: Drag all the screenshots into photoshop and remove the background. In photoshop, arrange the layer so that the screenshot with the Comic lines visible is on top of the one with the effect off.
Step 3: Duplicate the the layer with the "comic" effect and apply Blur->Gaussian blur (radius 0.5)
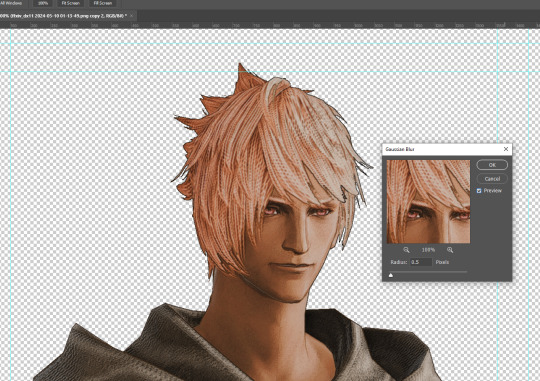
Step 4: Take a look at the hair. In Eric's case, It still doesn't look blur enough to me so I used the blur tool and blurred it a bit more
Step 5: Create a new layer above the layer in the previous step and use the brush tool to start outlining the edges. Where to outline is up to you but the idea is to make edges defined so that it looks more like a drawing.

Step 6: Duplicate the outline layer and then hide that layer.
Step 7: Merge everything under the outline layer.
Step 8: Drag and drop the "Texture.png" into the project and Clip it to your character layer. Set the blending of the texture to "soft light".
Step 9: Drag and drop the "stroke Texture.png" into the project and Clip it to your character layer. Adjust the size till you are happy then set the blending to "overlay".
Step 10: Adjust the opacity settings of both texture layers until it looks good to you.
Step 11: Click on your character layer and go to image->Adjustments->Hue/Saturation (note: you will see I dragged in the official Hades portrait as a point of reference to work off of). Adjust the saturation till you are happy.
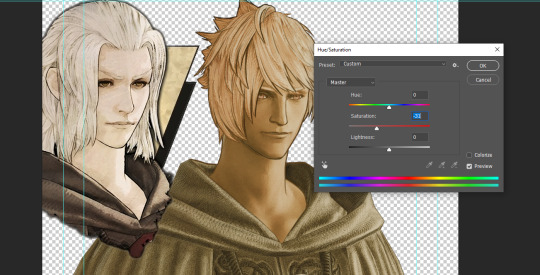
Step 12: Go to image->Adjustments->Color Balance and adjust the color till you are happy. In this example, since Eric is also wearing the Sophist robe, I tried to match that color to Hades' Sophist robe color.
Step 13: Once you are happy, drag the "Template.png" into the project and scale that to the size you want. Make sure it is completely covering the character. If it's not, you can just use paint more of it with the brush tool to extend it till it covers everything.

Step 14: Hide the "template.png" layer and select your character layer. Use the magic wand tool to select the outside of the character.
Step 15: With the selection still selected, click on the "Template.png" layer and press delete on your keyboard. You should now be left with a blank in the shape of your character.

Step 16: Drag the"Template.png" layer to be below your character layer. Then click on your character layer and clip it.
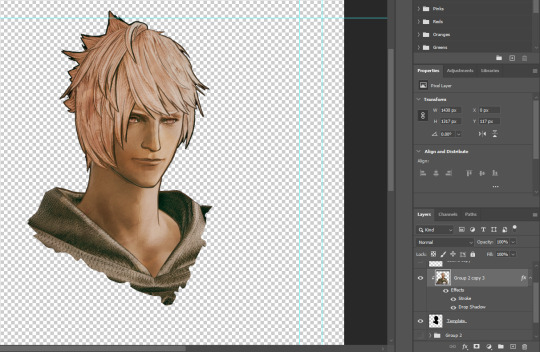
Step 17: Click on the "Template.png" layer and add a 2px stroke and shadow to it.
Step 18: Drag "Back_Deco.png" into the project and place it behind your character. Scale it till you are happy with it.
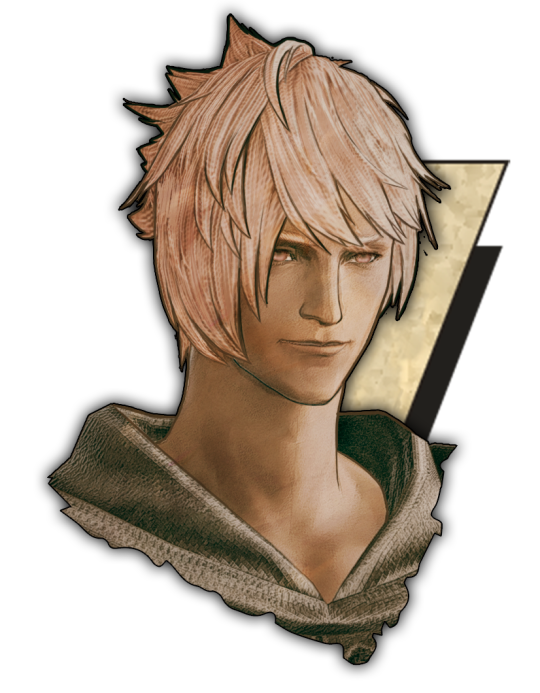
And that's it! Now you can recreate portraits for any NPCs that you want (in theory). A lot of it is also fine tuning to what you want but this should at least give you a decent base to work off of :)
818 notes
·
View notes
Link
#air jordan#shoes#Background removal#remove background#clipping path#photo edit#photography#product photography#Product Image Editing#photoshop#adobe photosop 2020#photo retouching#photo retouch#color correction#ecommerce tips#ecommerce photo editing#white background#ecommerce services#nftmagazine#nftcommunity#entrepreneur#photo enhancement#enhancement#product design#Social Media Design#graphic design#post design#instagram post design#nftcollection#nfts
1 note
·
View note
Photo
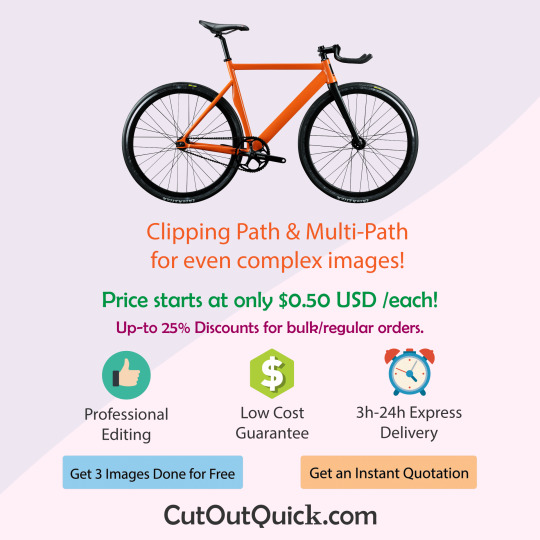
Clipping Path Service for even low price with quick turnaround guarantee. Knock us at https://cutoutquick.com for a free test or quotation or to ask anything.
#clipping path#background removal#image masking#photoshop masking#color correction#photo retouching#ecommerce
0 notes
Text

Why need jewelry retouching Service
Jewelry retouching services are essential for several reasons, particularly in the highly competitive world of e-commerce and marketing. Here are some key reasons why these services are needed:
Enhanced Visual Appeal:
Highlighting Details: Jewelry pieces often have intricate details that may not be captured perfectly by a camera. Retouching enhances these details, making the product look more appealing.
Correcting Lighting Issues: Proper lighting can be challenging in photography. Retouching can correct lighting issues, ensuring the jewelry looks its best.
Removing Imperfections:
Eliminating Flaws: Even the most meticulously crafted pieces can have minor flaws like dust, scratches, or fingerprints. Retouching removes these imperfections.
Symmetry and Shape Correction: Sometimes, pieces might appear slightly distorted in photos. Retouching can correct these distortions to reflect the true shape and symmetry of the jewelry.
Consistency Across Images:
Uniform Backgrounds: Consistent backgrounds in product images help maintain a professional look. Retouching can ensure that all images have a uniform background.
Color Consistency: Ensuring that the color of the jewelry appears consistent across all photos is crucial for brand reliability and customer trust.
Enhanced Marketability:
Professional Presentation: High-quality, professionally retouched images are more likely to attract customers. They convey a sense of luxury and quality.
Better Engagement: Visually appealing images can engage customers more effectively, increasing the likelihood of sales.
Adaptation for Various Platforms:
Different Requirements: Different marketing platforms may have varying image requirements. Retouching can tailor images to meet these specifications.
Social Media Optimization: Social media platforms often favor certain styles of imagery. Retouching can adapt images to perform better on these platforms.
Saving Time and Resources:
Efficiency: Retouching can correct issues that might otherwise require a reshoot, saving time and resources.
Focus on Core Activities: By outsourcing retouching, jewelers can focus on their core activities, such as design and customer service.
Brand Image and Trust:
Professionalism: High-quality images reflect the professionalism of a brand, helping to build trust with potential customers.
Brand Identity: Consistent, high-quality images help in establishing a strong brand identity, crucial for long-term success.
#clipping path service#professional photoshop services#best clipping path service#clipping path service usa#remove background from image photoshop#photo editing services#image editing service#clipping path service company#color correction service#clipping usa
0 notes
Text

HOW TO: Make Animated Neon Text
Hi! No one asked for this tutorial, but this is one of my favorite typography effects as of late — so I thought I'd share how I do it. You can see this effect in the first gif of this *NSYNC Celebrity set and the last gif of this Anthony Bridgerton set. Disclaimer: This tutorial assumes you have a basic understanding of gif-making in Photoshop. It's also exclusively in Timeline and uses keyframes for the fading effect seen on the blue text.

PHASE 1: PREP YOUR BASE GIF
1.1 – Choose a dark scene.
This effect looks best contrasted against a dark background. You can definitely do it with a bright background, but just like a neon sign irl, you only turn it on in the dark/at night — so keep that in mind!
1.2 – Determine the length of your clip.
Depending on how much you want your text to flash or fade in, you'll want to make sure you have a scene long enough to also allow the text not to flash — reducing the strain it takes to actually read the text. For reference, my gif is 48 frames.
1.3 – Crop, color, etc. as you would.
New to gif-making? Check out my basic tutorial here!
PHASE 2: FORMAT YOUR TEXT
Before we animate anything, get your text and any vectors laid out and formatted exactly as you want them!
2.1 – Finding neon sign fonts.
It's easy as going to dafont.com and typing "neon" into the search bar!
2.2 – Fonts I used.
Neon Glow by weknow | Neon by Fenotype | Neon Bines by Eknoji Studio

And to not leave my fellow font hoarders hanging, the font for "tutorial by usergif" is Karla (it's a Google font) 🥰
2.3 – Group your text layers. (Conditional)
If you plan on having multiple text layers like I did and you want them to appear connected (like how the last letters of "NEON" and "sign" intersect with the wand icon), I suggest putting the layers into groups according to color (the shortcut to group layers is Command+G). If you don't group your text and just apply the outer glow settings to each individual layer, you'll end up with something like this:

—where you can see the glow overlap with the line, instead of the smooth connection you see in my final example gif. I'm using 2 colors for my text, so I made a group for red and a group for blue.
2.4 – Apply Outer Glow.
Right-click your text layer (or your group if you have several layers) and select "Blending Options" to open the Layer Style menu. Check "Outer Glow" and feel free to play around with the settings until you like the way your text looks!
Your outer glow color should be darker and more vibrant than the color of the text itself. The text should be within the same color family but much brighter and, sometimes, almost white (see Step 2.2 again for my text colors).
Here are the settings for the Red Glow (the glow color is #FF3966) and Blue Glow (#00F0FF):

These aren't always my exact settings but they're pretty close to my standard. I always set the blend mode to Hard Light and usually have the opacity at 100%.
For every gif I use this effect on, I like to play around with Spread and Size. Spread will make the glow look denser and "expand the boundaries" (source: Adobe) and Size will diffuse the glow and blow it out so it covers a larger area (Adobe says it "Specifies the radius and size of blur").
2.5 – Duplicate your text layer/groups and remove glow.
We're only going to be animating the glow on our text, and since doing this affects its opacity/visibility, we want to preserve the base text by creating a duplicate.
I just hit the Command+J shortcut to duplicate my groups and delete the Outer Glow effects, making sure that the "No Glow" version is above the "Glow" version:

I also put all these groups into one group called "Text" for organization and so I could apply a drop shadow to all the elements for better visibility.
PHASE 3: CREATE THE FLASHING EFFECT
This is for the effect you see on the RED text in my gif!
3.1 – The 0.03-Second Rule
If you've read any of my animation tutorials before, you're probably already familiar with this rule. In my experience (and for reasons I can't explain), Video Timeline pauses every 0.03 seconds (try clicking the forward button a few times, you'll probably find a "duplicate" or paused frame). So, keep all your layers a duration of 0.03-second increments (e.g. 0.06 or 0.09 seconds can also work) and align them on the Timeline at 0.03-second intervals. If you don't follow this rule, you'll get duplicate frames when you export, resulting in a choppy final gif.
3.2 – Trim and arrange your text layers.
Only on the layers/groups WITH the Outer Glow effect, trim them into several segments of varying lengths where the glow will be "on" (visible) and leaving spaces where the glow should be "off."
Typically, I'll have a mixture of 0.06 and 0.03-second text. That's when the glow will be visible. Between each "flash" of visibility, I've got a 0.03-second blank space, baby *pen clicks* and I'll write your name:

The layers shown above are arranged with a few flashes and two long segments of no flashing. This is the order and duration of each segment shown above (purple = visible segments):
0.06 blank, 0.06 visible, 0.03 blank, 0.03 visible, 0.03 blank, 0.03 visible, 0.03 blank, 0.24 visible (the long bit where "FLASHING" doesn't flash at all), 0.03 blank, 0.03 visible, 0.03 blank, 0.12 visible
(I only did this for the text that says "FLASHING" to give it a glitching effect. The other red text keeps the glow visible starting at the first long segment.)
PHASE 4: CREATE THE FADE-IN EFFECT
This is for the effect you see on the BLUE text in my gif!
4.1 – Animate using the Opacity Keyframe.
Again, we're only touching the layers/groups WITH the glow effect. If you only have one layer of text, you'll find the Opacity Keyframe by clicking the film reel icon:

If you're working with groups like me, you'll find it in the Timeline panel under the group when it's expanded:

As you can see, I already added my keyframes (lil diamond babies). And luckily, it's super easy to do!
4.2 – Add the ending Keyframe first.
We're starting at the end because our layers/groups are already at 100% opacity. Drag the playhead (the blue arrow attached to the red vertical line) to a spot where you want the glow to be 100% opaque — this is where the glow will be fully "on" or visible. [Again, follow the 0.03-Second Rule. You will get duplicate frames regardless when using keyframes (this will be explained in the note in Phase 5), but abiding to the rule will mitigate the amount of dupes you get.]
Then, click the clock icon by "Opacity" to place a keyframe:

4.3 – Add the starting Keyframe.
Go backward from the ending Keyframe you just placed (I went back 0.12 seconds — but you can play around with the duration of the fade, just keep it a multiple of 0.03):

And drop another keyframe, this time by clicking the diamond icon by "Opacity":

4.4 – Reduce the opacity on the starting Keyframe.
Keeping that keyframe you just placed selected, go to the layers panel and reduce your layer's/group's opacity to 0%:

Now, this Outer Glow will slowly fade from 0% to 100% opacity.
And just for a visual aid, here's where my fade-in keyframes are in relation to my flashing segments:

To refresh your mind, the 0% Opacity Keyframe starts when "FLASHING" is visible for 0.24 seconds (the first long segment of visibility).
With these keyframes, you'll get a smooth fade-in à la ✨light switch with a dimmer✨
PHASE 5: EXPORT
Yay, we're finished! Convert from Timeline back to Frames and export your gif!
NOTE: If you only did the flashing effect and followed my 0.03-Second Rule, you shouldn't have any duplicate gifs.
BUT if you included the fade-in effect using keyframes, you WILL have duplicate frames. 'Tis the nature of keyframes. 🤷♀️ I had 4 extra frames where the fade-in starts, which I deleted. So, as always, I recommend checking your frames when you convert from Video Timeline back to Frame Animation — and manually delete any duplicate frames.
Sorry this tutorial is so long 🙈 I over-explain so you're not just mechanically copying steps, but understanding the WHY behind each step! Thanks for bearing with me
If you have specific questions about this tutorial, feel free to send a message to usergif and I'll try my best to help! :)
More USERGIF tutorials • More resources by Nik • USERGIF Resource Directory
#typography#gif tutorial#completeresources#usershreyu#useryoshi#userelio#userzaynab#userives#usertreena#usercim#userrobin#userkosmos#usersalty#userhella#alielook#uservalentina#uservivaldi#*usergif#*tutorial#by nik#flashing gif
757 notes
·
View notes
Text
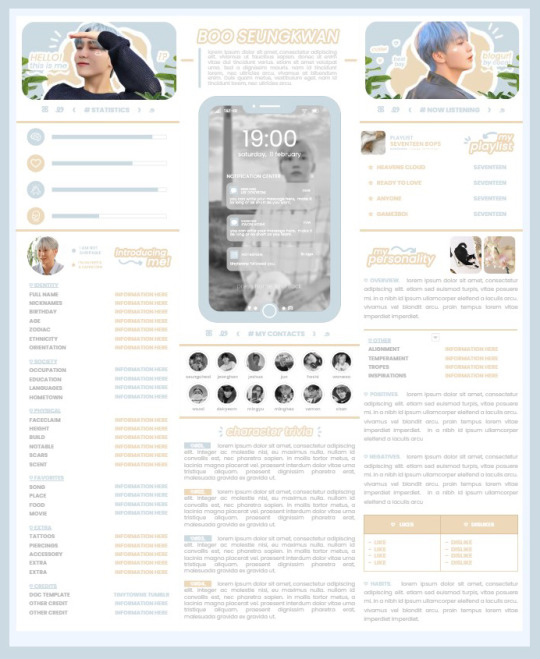
* ( ❀ ˆ꒳ˆ˵ ) ♡ Ꮺ 𝗧𝗜𝗡𝗬𝗧𝗢𝗪𝗡𝗦 — 𝟩𝖯𝖬 ੭

— introducing 7pm , the latest original google doc from tinytowns ! this document is designed to display the basics of a single - muse in one page &. captures a fun & youthful vibe with the inclusion of simplistic yet busy design , bright colours &. doodles ! features statistics , a playlist , basic info section along with character trivia & personality info ❀ the contacts section can be used as an exclusives section if desired ! space is left at the end of the doc so you can adjust easily & not have any of those annoying blank pages but it would be wise to take note of image positions as they are prone to moving. this doc can be considered moderate to difficult to edit due to the amount of edits that you will need to make in photoshop or photopea - but if you don't mind that then the document should be relatively simple to edit ❀ you can find the document link in the source code or under the cut , along with a known position issue + how to fix it , psd temps provided for this document , a video tutorial for adding your gif into a circle &. icon credits ! ( ˘͈ ᵕ ˘͈ ♡) ~
❀ PSD DOWNLOADS ( REQUIRED ! )
GIF CIRCLE - HERE
PHONE TEMPLATE - HERE
TOP IMAGES - HERE
♡ note : you will need to download the title cards to change the color , but if you don't mind the color then you don't need to - also , for full transparency on my end , i did need to touch up a few of the pngs after saving because the top text overlapped with the bottom text. be aware of that ! fonts used are poppins &. sant joan despi !
NAME TITLE - HERE
TRIVIA TITLE - HERE
INTRO TITLE - HERE
PLAYLIST TITLE - HERE
PERSONALITY TITLE - HERE
♡ note : you must change the color via layer style -> stroke for the title cards &. then save as png after deleting the background layer .
❀ KNOWN ISSUES
01. as a gdocs creator i use an external add-on called page resizer which is helpful for customizing the sizing of my canvas , as docs limits us with pre - set sizes. while this is nice to use , i'm aware that it can specifically cause an issue when you change the color of your background page. to fix this you must actually download the page resizer add-on through extensions -> add-ons -> get add-ons &. you should search for page sizer & download the one by nat burns. then you can access the sizer through extensions -> page sizer -> set page size &. what should be set for this document is a width of 9 &. a height of 12 !
this should fix the document , but i also know that sometimes , for what ever reason , the height &. width will flip. if that happens just make the height &. width opposite; so instead of a width of 9 , put 12 & for height , put 9 instead of 12.
02. i cropped the title cards in the document so that you wouldn't be trying to click something &. accidentally click on the titles ! however this means that when you replace image on the title cards they might go off center &. crop halfway through the word. just double click the title card that's bugging out & drag it to about the center of the black box. then it's fixed !
❀ DOCUMENT DOWNLOAD
7PM - HERE !
do not remove the credit , redistribute or profit off of my work.
❀ TUTORIAL
#01. go to file -> make a copy , in order to edit .
#02. to change the top two images double click on them &. a window should appear - in there you're going to click on it once &. hit replace image. the psd for this has been provided so it should be sized correctly !
#03. to change the title cards ( ex. boo seungkwan , my playlist , introducing me etc. ) you just need to click on them once &. hit replace image - please refer to #2 in the known issues section above this if you're going to do this though !! many thanks.
#04. to change the phone you're going to download the psd provided above &. when you've finished editing it you will click on the phone in the doc one time &. hit replace image !
#05. to change the thin color lines around seungkwan's name card you will press them once &. click edit - from there a window should open up &. you will click on it again & find the bucket tool which has a small yellow ( or blue if you clicked the long one ) line under it. that is where you change the color !
#06. the statistics represent intelligence , empathy , friendliness &. fighting skill ; to adjust the levels or colour you're going to double click &. a window will appear. from there you can either change colors with the bucket &. pencil tool ( pencil = outline color ) or you can shift the bars by clicking on the coloured parts of them and literally just dragging them.
#07. to change the playlist cover &. title you'll double click &. adjust inside the window by replacing image &. renaming things. the actual songs on the playlist can be typed normally !
#08. to change the gif circle , personality , &. contact images you again just double click &. replace image inside those windows. for the gif circle you must use the psd.
#09. to change the little bulletpoints beside the gif circle you will double click &. edit the text inside the window.
❀ VIDEO TUTORIAL 4 GIF CIRCLE
watch the tutorial right HERE !
make sure your timeline is checked ( the first thing i showed )
ignore the mistake i made while trying to show you where to end your gif LMFAOOO . . . im clumsy <3
to highlight all of your layers / frames click on the first one , then press shift + click on the last layer.
to bring up the list of options ( when i click convert into smart object ) you just right click.
❀ CREDITS
brain icon - Brain icons created by Vitaly Gorbachev - Flaticon
heart icon - Heart icons created by Chanut - Flaticon
support icon - Sport team icons created by Freepik - Flaticon
boxing icon - Boxing icons created by Freepik - Flaticon
plant png - josh ca.la.brese on unsplash
battery icon - Battery icons created by Stockio - Flaticon
wifi icon - Wifi icons created by Uniconlabs - Flaticon
signal icon - Signal icons created by Freepik - Flaticon
speech icon - Comment icons created by Freepik - Flaticon
close icon - Close icons created by ariefstudio - Flaticon
instagram icon - Instagram icons created by Prosymbols Premium - Flaticon
camera icon - Photo camera icons created by Kiranshastry - Flaticon
torch icon - Ui icons created by yaicon - Flaticon
#google docs#template#supportcontentcreators#gdocs#rph#google docs template#oc template#rpc#free rph#free rpc#docs#roleplay template#oc sheet#rp template#free#muse template#tinytowns#m: gdocs#m: original
1K notes
·
View notes
Text
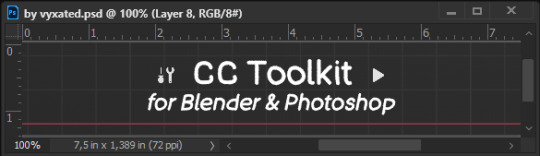
[CC Toolkit] Useful Tools for Blender and Photoshop
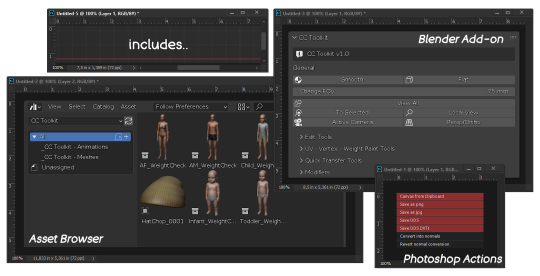
I recently tried making a Blender add-on with all the shortcuts I find useful so I thought, why not share them! As well as a couple other things that'll come in handy when you make CCs 😄
📂 DOWNLOAD // Patreon / Google Drive / Google Doc

Blender add-on
This add-on gathers all shortcuts into one custom UI panel found in the 3D View's sidebar, with the addition of transfer weight/vertex/uv_1 tools that's often used for making CCs.
// To install:
Blender Preferences > Add-on > Install... > select vyxated_cc_toolkit.zip. Made for Blender v3.3 and up.
// Features


General: object shading & various camera view options. FOV slider is included here for quick access.
Mesh Tools: select and merge options.
Edit Split Tools: options to mark edges as sharp and create an edge split modifier (with only the Sharp Edges enabled).
UV Tools: options to mark edges as seam and UV unwrap the mesh.
Vertex Paint Tools: preset colors for vertex painting & a button to apply it to the whole mesh.
Weight Paint Tools: various shortcuts to clean up weight paint and a Delete Unused Vertex Groups shortcut to remove empty vertex groups generated from transferring the weight paint and using the Clean shortcut. Object must be connected to an armature for this to work.
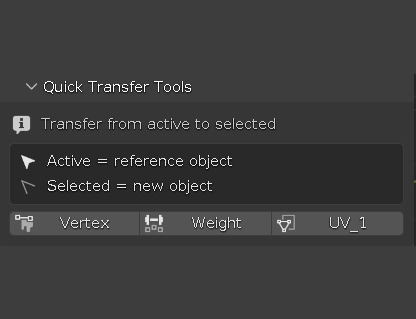
Quick Transfer Tools: buttons that were easily accessible in Blender v2.79 panels are now made into a shortcut for newer Blender versions.
Includes options to transfer vertex color, weight paint, and uv_1 from active to selected objects. Note that the reference object must have the needed data for the shortcut to work.
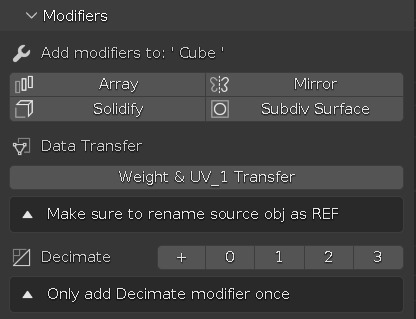
Modifiers: added a few modifier shortcuts useful for making objects.
Data Transfer: modifier approach to the Quick Transfer Tools. Only available for weight & uv_1 transfer. It will automatically create a modifier with the necessary settings for a weight & uv_1 transfer. Note: must have a source object named 'REF", otherwise the operator fails.
Decimate: a quick decimate modifier with LOD presets. Only add the modifier once as you can reset the value with 0. Converts the modifier value to 0.75, 0.4, and 0.25.
Asset Browser for Blender
This is rather barebones right now, but you can suggest things if anything comes in mind. To install, add the CC Toolkit folder as asset library in Preferences > File Paths. Included in the library so far:
Hat models for hat chops.
Weight check animation for infant - adult.
To insert animation asset into your file:
Drag and drop any of the thumbnails found in CC Toolkit - Animations (with the link as import method). This will import a collection with the new rig and animation stored in it. Remove existing rigs so they don't take up space.

Once dropped, it will be placed on an offset which you can revert by pressing undo.
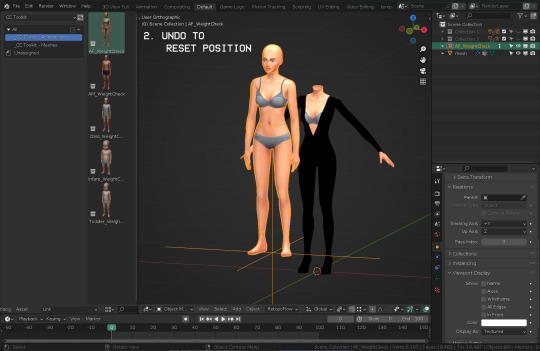
In the Outliners panel, hide any meshes that aren't needed.
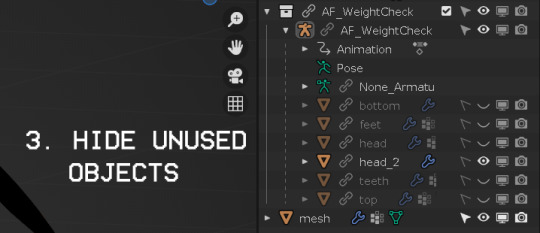
On your mesh's armature modifier, select the new rig so you can test the animation on your mesh :)

Play the animation and see how your mesh moves around. There's about 1700~ of frames in total, so make sure to zoom out on the timeline to see the full anim.
Photoshop actions
// Features
Canvas from Clipboard: this will create a new canvas based on your most recent copied image and paste it in. This is useful if you want to do a quick edit of a snipped image.
Save as png/jpg
Save as DDS DXT5: export preset used for normal maps.
Save as DDS DXT1: export preset used for specular alpha mask.
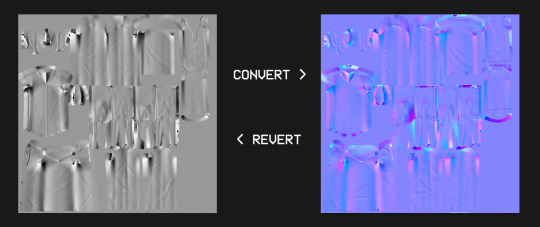
Convert into normals: converts grayscale map to a regular RGB normal map. I use this to help me arrange normal maps for my CAS backgrounds and can be used to edit the normal map without having to worry about the individual RGB channels.
Revert normal map conversion: reverts the previous process and convert back to the grayscale map that's readable by S4S. If you create everything from scratch, this can be used to convert your normal map as well.
291 notes
·
View notes
Note
hey, can i please ask what dimensions you use to make your header gif? (I THINK you used to have that thing where you have a little circle gif inside the header as well. If you don't mind sharing how to do that I would appreciate it! If you didn't, please disregard haha)
hiiii!! sorry this took me so long lmao but yes! this was my header for a while and i basically had the circle gif act as my icon (so i just hid my icon under edit appearance) so i'll walk you through how to make it!
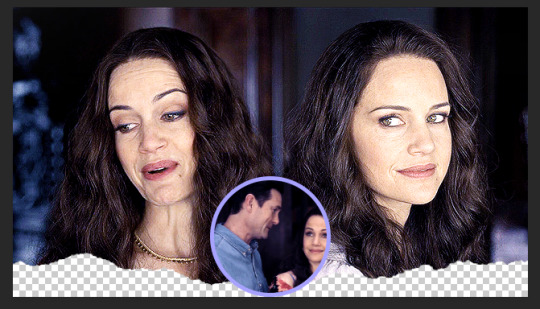
ultimately, the header contains 3 separate gifs: liv on the left, liv on the right, and hugh and liv in the circle. i find it easiest to make the gifs all separately first and then bring them all together on what will become the header's canvas,.
i crop, sharpen, color, and then convert each of the 3 gifs into a smart object and plop them onto the header canvas. the dimensions of this one are 640x360 but i believe the header dimensions have changed and are now 580x326 (that's what my current one is) but idk i never had an issue using the larger dimensions so you can try both out and see what you like best!
the original dimensions for the 3 gifs themselves were: 640x360 for the two large gifs and 368x184 for the circle. the circle gif doesn't matter quite as much, just make sure it's at least a few pixels larger than the circle you create when you get to that step!
so once all 3 gifs are turned into smart objects (if you don't know how to do this, when you're in timeline, highlight all your layers and right-click -> convert to smart object. this just makes the whole gif into one layer and they're easier to work with and adjust as necessary.
when i'm blending gifs together, i like to set the background/first layer of the gif to black. it helps when you're blending and your layer masks get really close together and instead of going to a transparent background, it goes to black and i think it gives it a cleaner look. this really is just personal preference and completely optional though!!
anyway, i brought over the two main liv gifs first and played around with where i wanted each one. this is what i have once i figure out the positioning and set both layers to screen.
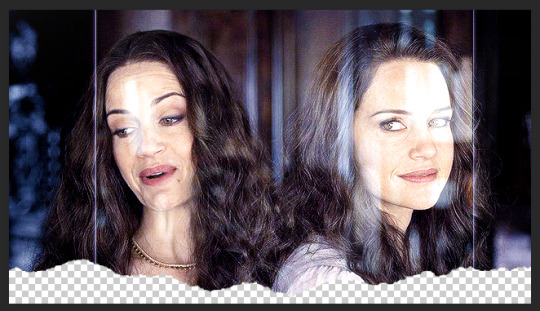
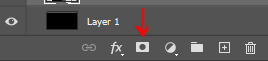
then you want to add a layer mask to each gif. select each layer separately and press this lil guy at the bottom off your layers panel:
when i'm blending, i pretty much exclusively use a soft round brush. size depends on what i'm blending and the dimensions, but hardness is always set to 0%. on a layer mask, you're going to use either black or white. black removes parts of the gif, white will bring them back. it's a very low-stakes way of getting rid of areas you don't want while not having to worry about deleting too much.
once i'm happy with the blending, this is what my layers ended up looking like (with the black layer beneath), but this will vary depending on your gifs and positioning!
the next step is the ripped paper effect at the bottom (if that's the vibe you're going for). you could theoretically do this with any kind of brush. i just like the look of it so it's not such a harsh transition on my mobile theme from the header to the background color.
these are the brushes i use but i'm sure you can google something to the effect of "ripped/torn paper brush photoshop" and find plenty others.
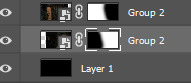
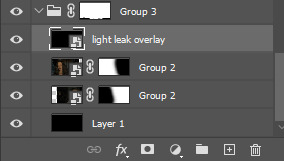
go ahead and group both of your gifs, your base layer, and any other coloring layers if you didn't color them before transferring them to this canvas. to do this, select all applicable layers and press ctrl+g or right-click -> group from layers.
now select the group and add a layer mask the same way we did with the gifs using the little icon at the bottom of your layers panel. your layers should look like this now:

once your brushes are loaded into photoshop, open up the brush tool by pressing 'b' and select the brush you want to use. i usually try a few different ones out just to see the different edges. you may have to adjust the brush size and make sure the hardness is set to 100% if applicable. before using the brush, make sure the layer mask itself is selected like in the above screenshot and your color is set to black.
when you hover over the canvas with your selected brush, you'll be able to see where the top edge will rest. i keep mine pretty close to the bottom -- i think the highest up this particular one goes is about 50px from the bottom. you should end up with this:

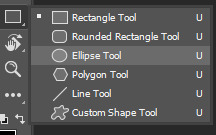
onto the circle/icon!! i truly just ended up eyeballing this size-wise. go ahead and call up the ellipse shape tool. to do this, right click on the shape tool and select ellipse like so:
colors are totally up to you, but i like my shit color-coordinated so i believe i color picked the bottom circle (the outline) from liv's purple dress in the right gif. once you have the ellipse shape tool equipped, click anywhere on your canvas. the dimensions i used were 150x150 but of course feel free to experiment. for a perfect circle, both numbers do need to be the same.
using ctrl+t (the transform tool) drag the circle to the vertical center of your gif and right to the very bottom so it's hanging over into the transparent part. this is what will make it look like your actual icon on your mobile theme.
next, create another circle. i'd recommend using black for this one, but it really doesn't matter. the dimensions for this one are 140x140 (10px less than your outline circle), but again, this will vary depending on the outline dimensions. i liked the thickness of a 10px difference, but you can always increase or decrease that depending on your preference. this circle is going to be the base for your icon gif.
again, use ctrl+t to vertically center your circle and bring it all the way to the bottom just like you did with the outline circle. as long as they're placed/snapped to the exact same location, you'll have a perfectly consistent outline.
go ahead and bring over your icon gif, already sharpened, colored, and converted to a smart object. make sure this layer is directly above your black circle. on your gif layer, right-click -> create clipping mask. ctrl+t to move it to the same location as the circles and adjust it to your liking.
of course, it's completely up to you if you want to add text or overlays or not, but i figured i'd share what i did in case you're curious! (click to enlarge)
and for the overlay, i just grabbed a video off youtube of different light leaks. i only wanted it to be on the two main gifs and not the icon gif, so i plopped it into that group we made and put it at the top, over everything else, and set it to screen like so:
and that's pretty much it! if you have any questions about the tutorial (or anything else) just let me know!! i'm more than happy to help 🥰
#answered#gracegordongreene#my tutorials#gif tutorial#gifmakerresource#chaoticresources#completeresources#dailyresources
57 notes
·
View notes
Note
your icons are soooooo so cute honestly!!! i wanted to ask if there's any way you can make a tutorial on how to make them? of course if you want, if you don't want to, that's okay :)
Hi! I really appreciate that you like my icons, thank you so much! 💖💖💖🥹
It's been a long time since I've done a tutorial so I hope I can explain it well haha
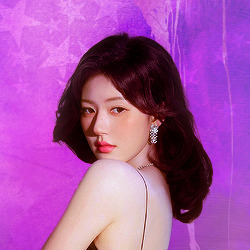
So I will explain how i go from the original picture and the final icon below:
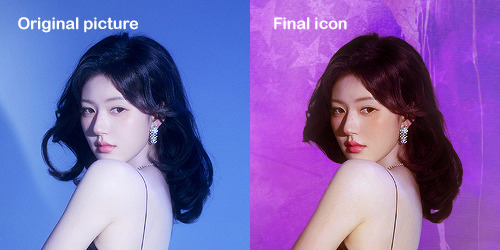
I'm using Adobe Photoshop 2024 but you can use other versions too!
First, I create a 250x250px document and apply a random color fill layer to be the background color of the icon, you can do it by going on Layer > New Layer Fill > Solid color (the color in this moment doesn't matter because I change them later according to the picture I choose to edit).
Then I place the picture I want, adjust the size to make the subject on the center and apply some smart sharpen:
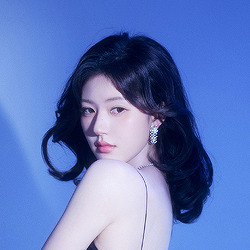
I apply some adjustments to try to color correct if the original picture using Levels, Selective Color and Color Balance to get something like this:
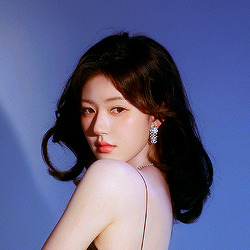
If you want to know the exact adjustments settings I used on this picture you can download the psd here.
To remove the background, I do the hack where I go to the Properties panel (Window > Properties) and click on the "Remove background" option. It's not always that I will get a perfect result but I think it makes easier for me to adjust the little details such as hair and accessories, etc. And I do that using the Lasso tool (shortcut L).
Now, with the background removed I pick a color that I think will match the icon in the Color Fill layer that I created before. To make the background more "fun" I like to add a Gradient Fill layer (Layer > New Layer Fill > Gradient) with a color that might go well with the one I picked earlier to make a smooth and light gradient.
My result until now:
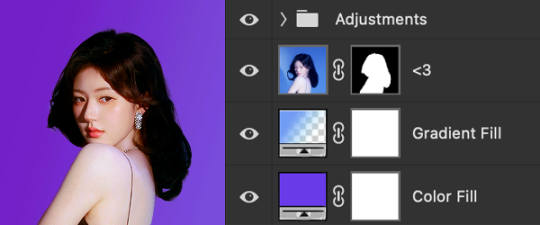
Now it comes the fun: adding textures! I like to add some textures to make the icon more lively and I usually download them on deviantart or on resources websites. You can download some cool textures here, here and here. On this part I really test a lot of textures with different Layer blending. There are a lot of different blending options so you can try as much as you want.
Other thing I like to do is add a clipping mask above the subject layer when I want to color something specific in my picture such as the hair, the clothes or even applying some "fake" blush on the cheeks. I do this adding a new layer, then using the shortcut option (or alt) + command (or ctrl) + g to make it a clipping mask and then using the Brush layer to color what I want. For the blending mode I usually use Soft Light and sometimes Color if I want the color to really stand out.
And in the end I will have something like this:
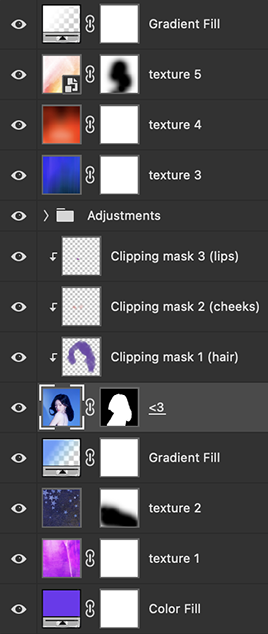
And my layer tab will be like this:
For using on the dashboard I usually resize it to 100x100 to make it look more sharper and defined but it's really a choice, you can already start making your icon using the size you want, I just prefer doing on 250x250px because i'm used to.
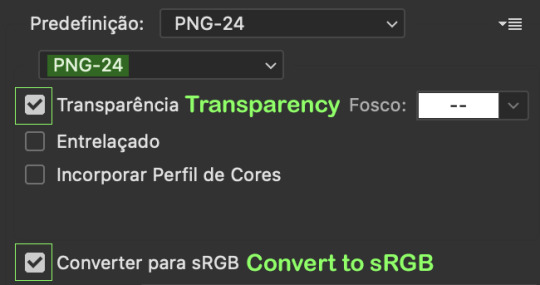
To save it I use the shortcut shift + option (alt) + command (ctrl) + s to save it for web with these settings:
And that's it! Sorry for not going to deep in each step but I guess you can get the feeling when you try making your own icons! Is really about trying different methods and things until you became satisfied with your result.
74 notes
·
View notes
Last Seen Blogs

dulcetdoee
V🦌

studiowebs
Studio Web

ailtoncabral
Ailton Cabral

francescafrr
After all this time?
feksazah
Feksazah