#render PDF to Image
Explore tagged Tumblr posts
Visit Tumblr Blog
Explore Tumblr blogs with no restrictions, modern design and the best experience.
Last Seen Tumblr Blogs


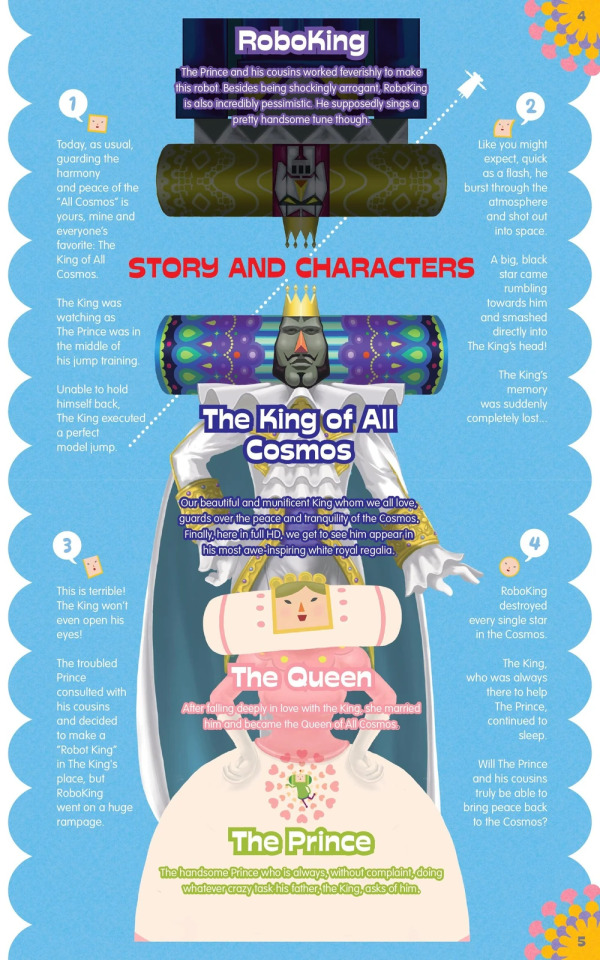
Fun Fact
The KCSC sent more than 20K requests to delete posts related to prostitution and porn to Tumblr from January to June 2017.
Text
we need to line everyone responsible for my university’s printer system up in front of a firing squad
#i’m in hell.#it’s taken like twenty minutes for it to ‘render’ my two page pdf#that is literally just text and an image#i’ve tried it like three times#(circus music starts)
5 notes
·
View notes
Text
Finally working on abandoning my Gumroad store and moving my stuff to itch.io. it's SUCH a long and intensive process but it's gonna be so good to put all my zines and sketchbooks in a place I can control
#itchio requires a cover image so im up fixing old pdfs and making new covers for them#which is kind of nice because ill get to make sure everything has its own unique page n shit#the downside is it takes FOREVERRRRR to render these pdfs#personal
3 notes
·
View notes
Text

KISS KISS FALL IN LOVE! 💍💐‼️
my piece for the @aaweddingzine which is now open for leftovers!
extra stuff/commentary under the cut | like what i do? support me on ko-fi ❤️💜

i also ramble a lot more on the behind-the-scenes pdf for this zine that you can also get with your purchase >;^] i also drew some nifty matching icons for the zine! (hint: it's time for divorce)
you know me, i'm incredibly klapollopilled, of course i'm drawing these two suckers for the wedding zine! <3 something about klapollo marriage makes me incredibly emo so i'm very glad for the opportunity to go all out so i can be EXTRA emo about it 😈

if i remember right, i think this idea came to be when i thought about the image of klavier bursting into tears as he lifts up apollo's veil and it all went from there LOL (also so psyched i get to draw him in a barong tagalog <333)

everything got so much more ambitious, though, from that initial idea! i drew like what (i am counting the number of characters in the spread right now as i type) 40-ISH CHARACTERS ALL IN ALL?! (WHAT THE FUCKDFGDHJ) and i even had to cut out some of the characters i originally had in the sketch 😭 (sorry gumshoe, kay, and seb/eustace ....)

i drew this like a year ago and i'm still so proud of this piece! i don't think i can achieve this level of rendering again, it's been so long i forgot how to do it LMAO

(also i can never reopen the file for this thing again bc it makes clip studio want to dieeeee DFSGHDJ so many layers ...)
another thing, i was working on this in tandem with my piece for the mea culpa zine; do you know how funny it is to draw apollo having such a happy moment and then draw him dying 😭 the contrast, the whiplash
that's all i have to ramble about i think, i'm so so so amazed at this zine bc my zinemates truly made some spectacular pieces of art! :"^D if you have the chance, please do check it out! 💗
#ace attorney#apollo justice#klavier gavin#klapollo#trucy wright#rayfa padma khura'in#nahyuta sahdmadhi#aa judge#phoenix wright#miles edgeworth#thalassa gramarye#datz are'bal#vongole#mikeko#ema skye#simon blackquill#aa taka#vera misham#juniper woods#athena cykes#described#id in alt text#sunnysidedraws#sunnysidezines#ace attorney zine#apollo x klavier#klavier x apollo#kyodoroki#juat realized i can also post this on my phpne since i got the drafts saved wahoooo
3K notes
·
View notes
Text
Curly-Tailed Animal Pendant from Panama, c.350-450 CE: this gold pendant depicts an animal with stubby feet, a rounded head, and a long, thick tail curled up over its back

This design is often referred to as the "curly-tailed animal," and other pendants of the same style have been found in Panama, Colombia, and Costa Rica.

Above: two "curly-tailed animal" pendants from Panama, c.450-950 CE (top) and c.50-450 CE (bottom)
As this publication explains:
Among the intriguing and much-favored Panamanian cast pendants is the curly- tailed animal, a form that is found in both Colombia and lower Central America. Believed to date to as early as the second century A.D., when gold working was introduced into Panama from Colombia, the Panamanian versions are said to belong to the "Initial" style. The curly- tailed animals, so called for the impressively large tails that extend up over their backs, vary considerably in detail and have been identified as everything from dogs to ducks, but the tail, at least, is thought to be simian in derivation. It is clearly the significant element of the composition, and, when the pendant was worn, the tail would have been the most visible part of the ornament.
Produced for centuries in lower Central America, the "curly tails" were rendered in both gold and semiprecious stone; they were one of the few ancient images to be made in both materials.

Above: a "curly-tailed animal" pendant made of agate, c.100-800 CE
This page also expands on the blended characteristics that define the "curly-tailed animal" style:
Artists in the lands that are now part of the modern nations of Colombia, Panama, and Costa Rica created pendants and figures of a hybrid creature known to scholars as the curly-tailed animal.
The diversity of zoological attributes present on this and similar pendants precludes a definitive identification of any specific animal, but the capuchin monkey (Cebus capucinis), coatimundi (Nasua narica), or even domestic dog (Canis lupus familiaris) may have provided inspiration.

Why Indigenous Artifacts Should be Returned to Indigenous Communities
Sources & More Info:
The Metropolitan Museum of Art: Curly-Tailed Animal Pendant
The Metropolitan Museum of Art: Curly-Tailed Pendants 2, 3, 4, and 5
Cleveland Art Museum: Agate Animal Pendant
Museum Publication: Gold of the Americas (PDF)
#archaeology#artifact#anthropology#history#curly-tailed animal#pendant#gold#jewelry#ancient art#mesoamerica#central america#panama#pre columbian#jade#pretty sure that's a charmeleon
271 notes
·
View notes
Text
Shnowy's collection of transformers art references! Idk if anybody has done this before but here's my collection ^^ feel free to add on, I may edit as I discover more.
G1
Tfw2005 g1 model sheets
Probably the one I use the most. Not all but MOST characters from s1 s2 tftm and s3 are there. Sadly no s4/the rebirth. They even have a good collection of sheets for weapons, ships, background characters, ect. I'll usually Ctrl+f and type a character name to get to it quickly though this doesn't work with cybertronian modes since those are named separately from the characters.
Tfraw model sheets refs and concepts from g1 and multiple series there after
Model sheets and reference scans from s1 s2 tftm and I think some g1 patent concepts? Also contains background location stuff. There's also scans of art from The Headmasters model sheets which include characters and some set piece sketches. There aren't any Masterforce model sheets but there's scans of art from a dvd set that I use as reference. Beast wars design sheets that I assume were originally patents or simply very early passes. Plenty of Beast Wars 2 sheets for characters, locations, weapons, accessories, ect. Beast Wars Neo character models and locations. And stuff from Car Robots (Robots in Disguise 2001), Micron Legends (Armada), Superlink (Energon), Galaxy Force (Cybertron), Animated, Combiner Wars, Titans Return, and some official style guides for stuff around 2016 I think? I haven't looked through all of these since I haven't needed to yet. So they may or may not be useful to you but they're here regardless.
Sunbowmarvelarchive g1 resources
Lots of PDFs, I mainly go here for the scripts and the show Bible, though there's plenty of stuff regarding marketing and patents too I believe. There's a second page for transformers content I still have yet to touch on and the site covers multiple other pieces of media such as MLP and GI Joe.
TFRaw Japanese translations
A collection of Japanese translations from magazines audio books and ads, I don't use it much but maybe you will.
Transformers concepts and art
Patents, model sheets, and concept art
Lots of stuff from Japan, I'm not as familiar with this site as I only recently discovered it.
Imgur background art
G1 background art
Allspark concept art toys
There's a lot of cool stuff in this thread, I mainly know it for the beta megatron designs
TRANSFORMERS ONE / TFONE
Tfw2005 most kayou cards
My main references for tfone characters, there's also a link to a thread with the 13 primes kayou cards
Tfw2005 13 primes cards
Said thread with the 13 primes.
Tfw2005 concept art
A tf2005 thread with a lot of the concept art
Tfw2005 character concepts and renders
Character concepts and renders
Ilm concepts
Has background characters as well
Ilm study
I forget what this one is but I found it recently
Tfw2005 masterpost
Basically a masterpost of a few additional resources.
If anyone wants to share that is again appreciated! I'm currently looking for sheets from The Rebirth/s4, masterforce, victory, and idw1 concept art or references in particular.
I've been meaning to hunt through the artist and writers social medias to try and find some stuff but I just haven't gotten around to it yet. If it's on Twitter I'm probably not going to be finding it.
Also tfwiki is amazing for lore and stuff if you don't know about it already, and depending on character I'll go there for quick reference images. It's incredibly funny too.
Edit: I forgot how links work on Tumblr I'll fix it tomorrow oh geez..
Edit: fixed links
#transformers#tf g1#g1 tf#g1 transformers#transformers g1#transformers generation one#tfone#tf one#transformers one#maccadam#maccadams#resources
20 notes
·
View notes
Text
Updating... The Tattooer (ver. 3.4)!

Finally! Took me a while, huh. This is the updated version of the Tattooer project. It skips some steps, making the workflow much, much faster! Huge thanks to @applewatersugar for his suggestion on how to bake textures while preserving the transparency. This is kind of a repost of the original Tattooer post, but it actually has some new stuff and a few changes here and there, so please take a look if you want to learn how to use this new version.
This is a series of Blender template files already set up to quickly bake textures from The Sims 4 to The Sims 2. The different Blender files will allow you to: -Bake body textures from TS4 to TS2 (Female) -Bake body textures from TS4 to TS2 (Male) -Bake body textures from TS4 (Female) to TS2 (Male) -Bake body textures from TS2 (Female) to TS2 (Male) [Bonus!] -New! Bake face textures from TS4 to TS2 (Unisex) [Bonus!] -Bake head textures from TS4 to TS2 (Face + Scalp) (Unisex) [Still experimental] Check the file names to see which one is which, and the resolution of the baked texture it will give. Everything you see in the render above was 100% converted using those Blender files.
Download here! SFS / GD
Update: Version 3.4.1 (27/08/2023) Fixed some issues on the shoulders for the AF-body-4t2-1024 and AF-body-4t2-2048 templates. Now the top straps on most converted underwear/swimwear should look right.
Update: Same version (13/12/2023) As requested, added a new spanish version of the included pdf guide!
These templates were made mainly to bake and convert tattoos, but there’s more you can do with them if you get creative. I have to say, these are NOT perfect. Results may vary depending on what you are trying to convert, so! With that in mind, this is all the stuff you will be able to convert almost seamlessly from TS4 to TS2: -Tattoos. -Other body details such as body hair, scars, freckles, supernatural/occult details… -Body painted underwear and swimwear, as well as some other clothing that’s mostly painted on the body. -Socks, stockings and maybe leggings. -Even skintones! In some areas they will look weird, so I recommend editing and blending them with other existing TS2 skins. -Makeup, eyebrows and beards. In the old version this was just a proof of concept, but now I’ve added a new Face file template which gives some pretty decent results! -Hair scalps. Very useful when converting some hairs! Although keep in mind part of that texture might also need to be baked on the face mesh, you know, that hairline makeup stuff.
Got your attention? Nice! Editing some of the textures from TS4 to match the UV mapping in TS2 using a 2D editing program can be incredibly hard. That’s where texture baking in Blender comes to the rescue!
You will need to download Blender, at least version 3.4, but you could always use a newer version. It is only incompatible with versions older than 3.4. -You can download Blender for free here. -You will also need Sims 4 Studio to extract the original Sims 4 CC textures you want. In the first version of these Blender files, there was a necessary step using Photoshop, but that’s no longer needed. However, there’s still a tiny extra step which requires resizing the newly baked texture on some of the high resolution templates, so you might need a 2D editing program like Photoshop. More on that later.
So, before we begin, let’s clear out some questions you might have. What the heck is this texture baking thing and what does it do? Well, let’s imagine you have a video projector and point an image into a blank wall. Then you pick up some brushes and start painting and copying that projected image in that wall. Texture baking is kinda like that when it comes to 3D models. You align two models and match them as closely as you can in shape and form, and once you adjust some parameters and values, Blender does the rest for you: it will give you a new texture for a new model with a different UV map. These files I’m sharing have everything already set up, so it’s a matter of plopping in that Sims 4 texture and you will get that new texture for TS2 in just a few clicks.
This tutorial assumes you know literally nothing about how to use Blender, so if you feel uncomfortable with it, worry no more! This will guide you with pictures showing where you need to click and explaining what is happening. For Sims 4 Studio and Photoshop the process might be a bit less detailed, but still this should be pretty beginner friendly. For this tutorial, I will use some tattoos as an example (properly credited at the end of the post). Alright, enough with the rambling. Let’s get started!
·EXTRACTING TEXTURES IN SIMS 4 STUDIO: First things first, you will need to extract as pngs all the textures you want to convert from TS4 using Sims 4 Studio. It should be pretty straightforward. Just open the packages and export the Diffuse textures. Keep them organized in a folder for easy access.
·BAKING THE TEXTURES IN BLENDER: PRELIMINARY STEP 1: CONFIGURING BLENDER’S GRAPHICS SETTINGS: Open your preferred Blender file depending on what you’re going to bake and the desired resolution (in this example I’m going to use the AF-body-4t2-1024 file). Before we start messing around in Blender, there’s one thing you should set up. It is a onetime step, and once it’s done, you won’t need to do it again. So, does your computer have a dedicated graphics card? If you don’t know or you’re not sure, just skip to the next step. Configuring Blender so it uses your graphics card instead of your CPU will make the baking render much faster, so it is recommended you set it up correctly. If your computer has a dedicated graphics card, click File (1) > Preferences (2) > and on the window that pops up click System (3) > and select CUDA and make sure your graphics card is there and tick it (4). I have an Nvidia Graphics card but your case may vary. Once you’re done, click on the tiny button on the bottom left corner and Save Preferences (5).

PRELIMINARY STEP 2: CHOOSING THE RENDERING DEVICE: Click on the tiny camera button on the right, called Render Properties (1), and on Device (2) select GPU Compute if it’s not already selected. If you’re not sure if you have a graphics card or not, just select CPU. Then select the Material Properties tab (3) and Save your changes, either by pressing Ctrl + S, or clicking File (4) > Save (5). You might need to do this second step with the other Blender files, but once you have it done and saved, you won’t need to do this again. Okay, time to get into the good stuff!

·STEP 1: LOADING YOUR TS4 BASE TEXTURE: In the Material Properties tab, click the folder icon that says Open (1) and on the window that pops up, navigate through your folders and select your first texture. To navigate easily, the 3 buttons on the top right (2) are for the display mode. They will show your files in list mode, vertical and horizontal, and the one on the right will display the file thumbnails, pretty useful if you want to easily preview your textures here. The icons on the left side (3) will let you go one folder back and forward, go to the parent directory, and refresh the folder in case you just dropped something new in there. Double click on the image you need and that will load the texture into the Sims 4 body model, named “ts4 body”.

·STEP 2: SETTING UP YOUR SELECTION AND BAKING THE TEXTURE: On the top right of the screen, you will see the names of the 2 models in the scene. Hold the Ctrl key in your keyboard and left click on the “ts2 body” model (1). If you did it correctly, you should see “ts2 body” in a yellowish orange color, and right down below, “ts4 body” should look more like a red orange. If not, try again by clicking first on ts4 body, and then while holding Ctrl click again on ts2 body. Then switch to the Render Properties tab by clicking the tiny camera icon (2) and click Bake (3). Depending on your screen resolution, you might need to scroll down a bit with your mouse to see the Bake button. Wait a few seconds for it to finish. You will see the progress percentage down on the bottom of your screen. Don’t panic if you notice your computer fans start ramping up, that’s completely normal! As I said in the beginning, using your GPU will bake the textures much faster than the CPU.

·STEP 3: SAVING YOUR NEW TS2 TEXTURE: Once it’s finished, switch to the UV Editing Mode by clicking “UV Editing” on the top of your screen. And there it is: your new texture! You might have to scroll up your mouse wheel a bit to zoom in and see it in all its glory on the left side of the screen. We’re still not done yet though. You need to save it to yet another new folder (always try to keep your stuff organized!).

You can save it by pressing Shift + Alt + S, or clicking on Image* (1) and then Save As… (2). That will pop a window where you’ll need to navigate again and save it somewhere. Give it a proper name (3) and hit Enter to save it… well, Enter doesn’t always work for me for some reason, so if that happens just click Save As Image (4). And that’s it! You’ve successfully converted your baked texture. Congrats!

·STEP 4: GOING BACK TO STEP 1: Alright! If you’re done with your textures, you can close Blender without saving and call it a day. But let’s say you want to keep baking other swatches. In order to go back to step 1 and start the process once again, click Layout (1), go back to the Material Properties tab (2), select “ts4 body” (3) and click on the folder icon (4) to open and load your next swatch.

Then it’s just a matter of repeating the process from step 2. When you’re ready to move on, close Blender without saving. If you see a small check telling you it will save some images, make sure you uncheck it, so you will be able to use it again in the future from the starting point with no issues. I don’t think it really matters if you accidentally save your progress in these files, but I like to keep it clean and fresh so I can do the process where I left it from the beginning next time I open it. And in case you mess up and save somewhere, you can always just delete the .blend file and download the template files again.
In case you’d like a video tutorial on how to use these files, the amazing @platinumaspiration recorded this fantastic video showcasing the process! You can watch it here.
One final note: some of the baking .blend files save the textures with a resolution of 2048x2048 pixels, as clearly stated at the end of their file name. That’s way too overkill, because TS2 only properly supports up to 1024x1024 for most of its textures and you should always resize your final product to that max resolution (or lower if needed). I just made those 2048 versions because there might be some really tiny and slim details on some tattoos that might look a little too blurry when baked into a 1024 resolution texture, so for those cases use that if you want and then resize them using your 2D editing software of choice. In Photoshop, in the Resample mode of the Image Size menu, there are a few options to choose. For the fine details, I like the Nearest Neighbor (hard edges) option, which, even if it looks a bit pixelated, it still preserves most of the texture and quality.

For anything else, I would just directly bake them using the 1024 versions in Blender (512 for the face and scalp).
And for the folks who feel comfortable playing around in Blender, this is just the beginning! Texture baking opens a LOT of possibilities, so feel free to move stuff around and edit the models to your liking! If you notice the baked textures look warped or stretched somewhere, or don’t like where some textures are placed in the S2 body, poke around that area moving stuff and then give it another try. The main objective of the baking process is keeping both overlapping models as close in shape as possible. You may also edit and save new copies of the templates, or make new ones from scratch using mine as a reference (keep a close look on those Baking settings and values, I think they work pretty well) and share them if you want to. Go ham, do whatever you want with them! I still have plans on making templates to convert body textures from Sims 3 to Sims 2, but for now it’s not on my priorities, so we’ll see when that happens.
Whew! Hope none of this was too confusing. Need help or have any issues with these? Please ask/message me here and I’ll be glad to help when I’m able to!
Credits for the CC used in the render demonstration: -Skin by Sims3Melancholic. -Eyes by Northern Siberia Winds. -Eyebrows by PeachyFaerie. -Tattoos by xtc. -Top by SerenityCC. And the Tattoo I used for the tutorial can be found here, by ValhallanSim.
Last but not least, a huge thanks to all the people who somehow contributed to make this project and update possible, either by doing initial testing, finding issues to fix, or teaching me new Blender tricks to make the workflow way faster and easier. So thanks again to @elvisgrace @moyokeansimblr and @applewatersugar on Tumblr! <3
And thank you for reading! Hope you have fun playing with this (not so) new toy hehe.
#tattooer project#tattooer update#ts2 tutorial#ts2 resources#ts2 blender#ts2 overlays#ts2 texture baking#4t2 conversion tutorial#this took me so LONG to update#im really sorry for the delay :(
408 notes
·
View notes
Text
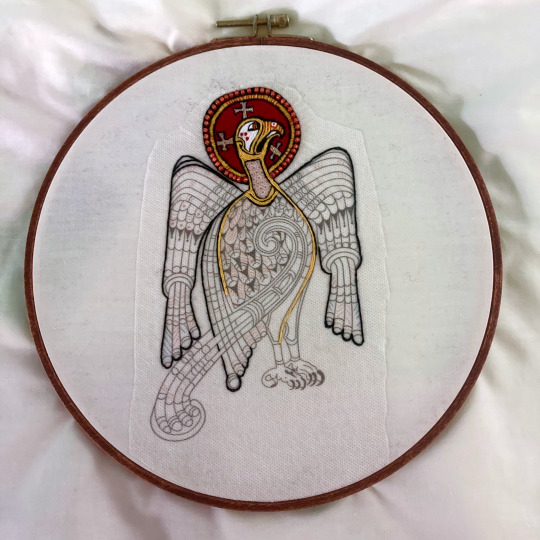
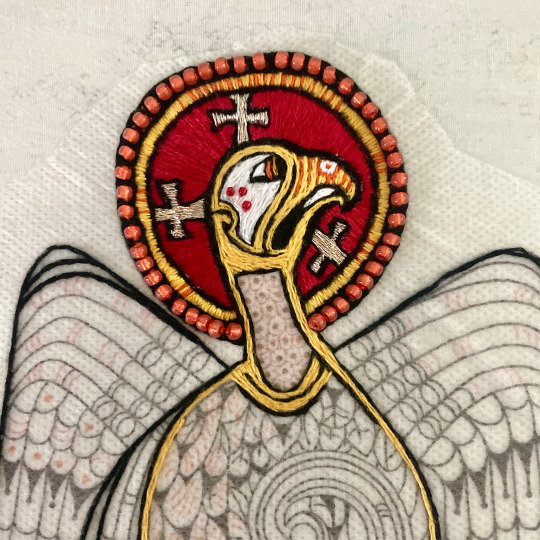
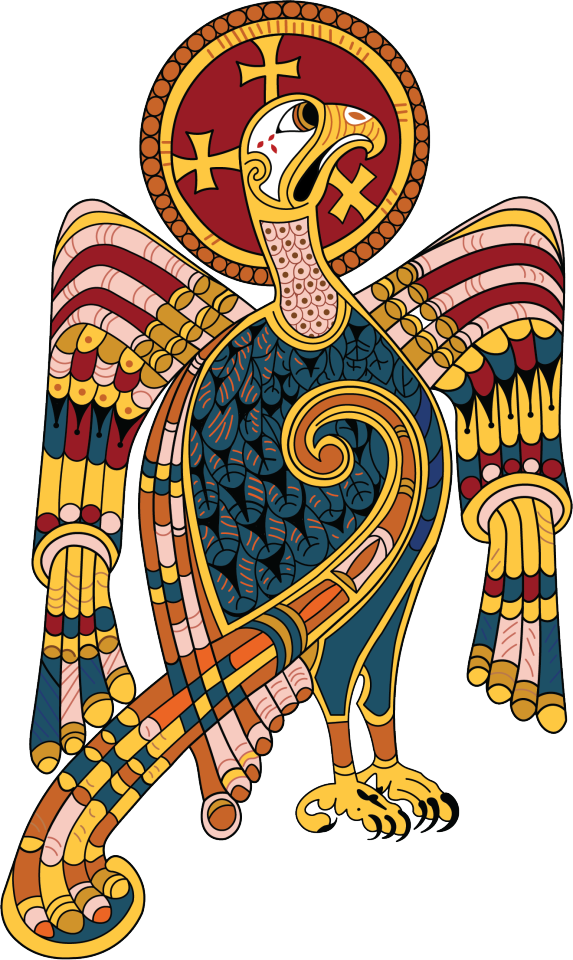
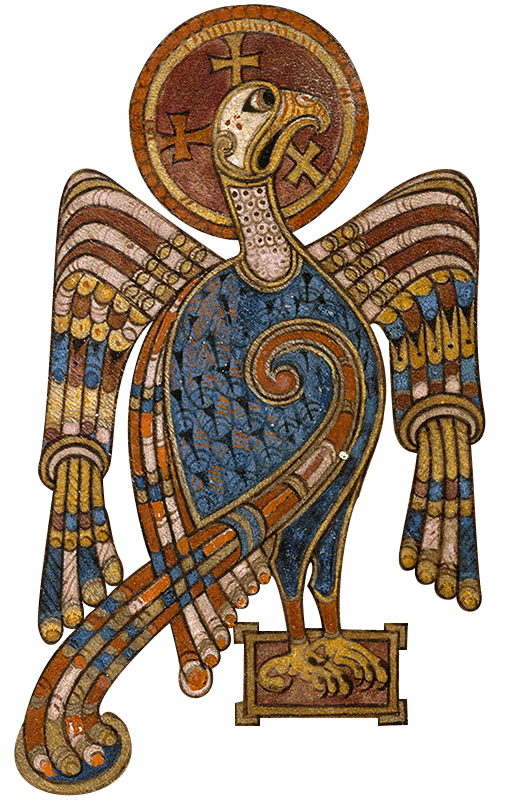
So this project is continuing to be complex and detailed, but I'm having a good time. If you haven't seen my original post, this is an image that I pulled from the book of Kells on folio 27v. The full page contains four figures: the man, the lion, the ox, and the eagle. The four figures represent the four gospels. This figure is the eagle, and it represents the book of John, St. John the Evangelist and the ascension of Christ into heaven. I am not religious (though I was raised Irish Catholic), so I picked this design because I love the art in medieval manuscripts and in the Book of Kells specifically.
So, how'd I get here? (an extremely detailed step-by-step)
Downloaded the full size image of Folio 27v
Cut St. John out of the image using the pen tool in Photoshop and moved it to a new document with a clear background.
Pasted St. John into a blank high res procreate document.
Did a rough digital tracing of the image in procreate with my iPad and Apple Pencil.
Opened tracing in Illustrator and made it into a vector. Took forever because I fucked up my procreate settings RIP.
Turned Vector into live paint object.
Opened original image in PS, and used eyedropper tool to select colors in original document. Compared those colors to the colors that I had in my stash (wanted to use mostly if not all from my stash rather than buying new floss).
Used threadcolors.com to get the hex codes for the selected threads. Made a spreadsheet of the selected colors for my reference. Printed out spreadsheet.
Colored the image using the paint bucket tool (and recolor artwork options) with the colors corresponding to selected threads. Saved Illustrator document.
Opened illustrator document in PS, gave it a solid white background and exported it as PDF.
Printed out initial copy of PDF image on blank printer paper to see if it was the right size. It wasn’t lol, so I made it bigger (super easy with vector images!) Printed test copy #2 and it was the right size.
Iron chosen fabric and stretch in Phillips head screw tightened hoop.
Printed the PDF image on Sulky Fabri-solvy, cut to size, and adhere to the surface of the stretched fabric.
Stitch, all single stranded….
What's new?
Since the last time I posted, I've mostly completed the head. It's comprised of a mixture of satin stitches, long and short stitches, chain stitches, and some other stitch I can't remember the name of. The other new feature is very, very, tiny orange and red glass beads.
When I was considering how I wanted to render the dots in the circle behind the head and the three tears of blood, I initially considered doing french knots for the dots and bullion knots for the blood tears. To make a decision about this, I did some tests on scrap fabric. At the end of the test stitching I found that I was not completely satisfied with what I had come up with. As I stared at it, I was hit with the sudden vision of using seed beads of some kind for these two areas. This idea completely possessed me (lol), and I made a trip to my delightful local beading store the next day, hoop in hand.
The old ladies who run the bead store helpfully showed me to a bunch of interesting beads and got me all set up with them. I also purchased some size 11 beading needles, which are barely large enough to stick a single strand of embroidery floss through. At the time, I didn't know whether or not the embroidery floss would even go through the needle or the beads, so I purchased some tiny beading thread, but ended up not needing it. The eyes of those needles are SO tiny that they were extremely difficult to thread, but I managed it eventually. They were also, interesting very, very bendy. I ended up liking the stitching experience with them so much I continued using them to stitch other, non-beaded sections of the piece.
The other consideration that I had to make while putting this section together was whether or not I wanted to render that yellow ring around the head in golden yellow thread or gold, gold metallic thread, as in the original image that section appears to potentially be illuminated with gold leaf. However, my hatred of metallic thread (Satan's embroidery supply) won in the end so I went with the gold yellow thread, leaving the crosses as the only metallic gold element. I don't know that I'll end up using any other metallic gold, but I obviously can't rule it out.
Anyhow, looking forward to continuing this project and to what new challenges I'll end up having to figure out as it goes along.
#embroidery#mine#my art#fiber art#medieval art#the book of kells#stitching#fiber arts#long post for ts
72 notes
·
View notes
Text
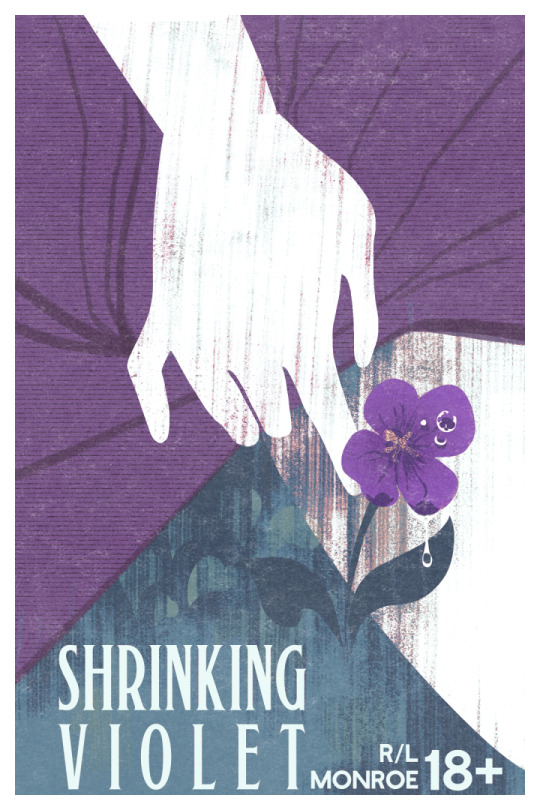
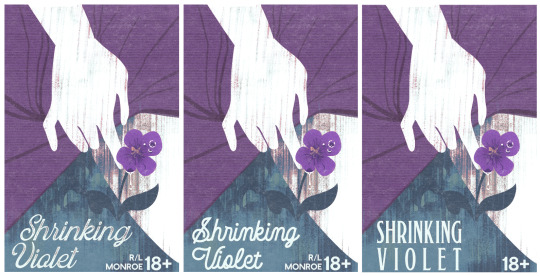
Shrinking Violet is out! another of @petitemortality R/L Monroe's wonderful erotic shorts, with another cover by yours truly >:) i've been saying it on nearly every promo post i make for this but if you're one of the people who has wanted me to write f/f, you're legally obligated to read this one. below is the sales copy, and then below that some discussion of the process for designing the cover!
Nobody at college knows that shy, nervous Maya had a 'bad boy' reputation in high school - and Maya is the only one who knows tough, rebellious Nasrin used to be a sweet-tempered teacher's pet. Mutual attraction is rekindled when their paths cross again, but the two find their old dynamics have been flipped on their head. Maya finally knows what she wants, and Nasrin is bold enough to give it to her...that is, if she can bring herself to ask. Will their first time be perfect the second time around? 7k words, EPUB and PDF format. This is the second in the Fuck Yourself Friday series of shorts. New stand-alone erotic stories are released on the last Friday of every month. FYF 1: Go Fuck Yourself These stories contain explicit sexual content, and are intended for 18+ audiences.
Contains: -F/tF -transfem sub -outdoor sex -praise kink -soft penis stimulation -non-penetrative sex
THUMBNAILS
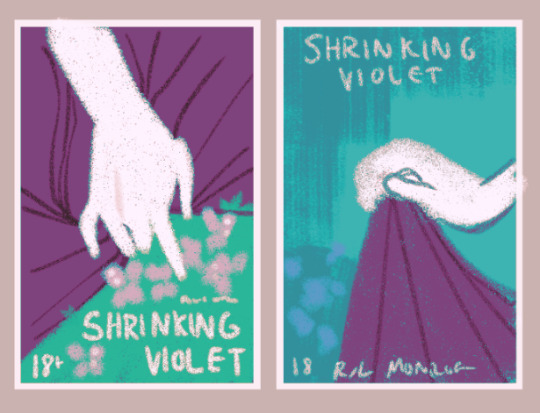
this one was very straightforward with the request: "the image I have in my mind for a cover is someone's fingers knotted in a skirt spread out against wildflowers. but more in the sort of gripping your own skirt gently kind of way, somewhere between anxious and excited if that makes sense. I'm thinking like you know the classic soft grunge tumblr aesthetic photo vibe. type of shit you'd post next to a closeup of a skinned knee in long socks"
very easy instructions to follow! so while i usually prefer to do 3 thumbnails, i only ended up with 2. there's only so many ways you can depict a hand on a skirt, after all. and we decided that we wanted to continue with the style i established with the first one, with silhouettes, lineless art, and bold textures. we liked the first one more, but wanted to get some leg in there.
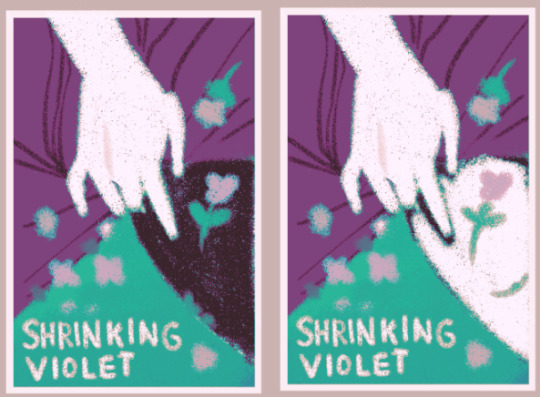
i proposed adding black pantyhose to the narrative to make it work on the cover (i have changed prose to match what i drew for illustrations Many times) but we went with bare leg in the end
FINISHING

so i didn't actually do a sketch for this one, just went straight to rendering. as we all know i use gradient maps a lot in my work, so i gave lee a choice between a bright, springy palette, and a wetter, darker palette. i also offered it with the border, or with the skirt going over it. personally i like the skirt going over it, but the border keeps it consistent and more book-cover-y, so we went with that. lee chose the darker palette, which suits the story much better
but the font didn't fit! too vintage for the story, which takes place in modern day.
fonts time :^)
we went with the third option for the contrast. and also added a raindrop to the flower (which got moved to the right petal in the final draft). gently touching petals, wetness, This Is Yuri.
and the final result is as above!
anyway you should all read this story, it's incredibly sweet childhood-best-friends-to-lovers and in itself a love letter to trans femininity. i highly recommend it, and it's only $3!
go and get it!
69 notes
·
View notes
Text
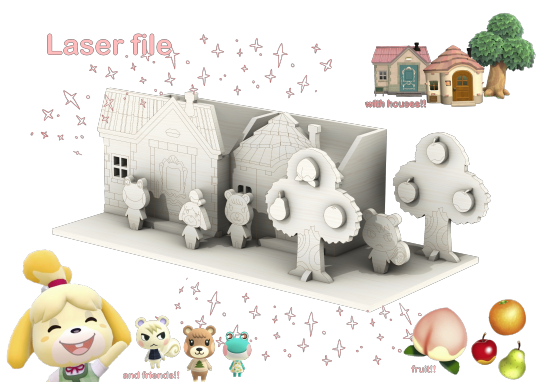
Animal Crossing laser cut pen holder
I made a pen holder for my twin @frogtowns and thought I'd share the files here as well. It's Merry and Maple's houses with characters Isabelle, Lily, Maple, and Marshal. Two trees and some fruit.
The files and full instructions are here, it's free and nothing weird. Feel free to use and modify the files, however please do not make profit off of them. More photos and text under cut <3
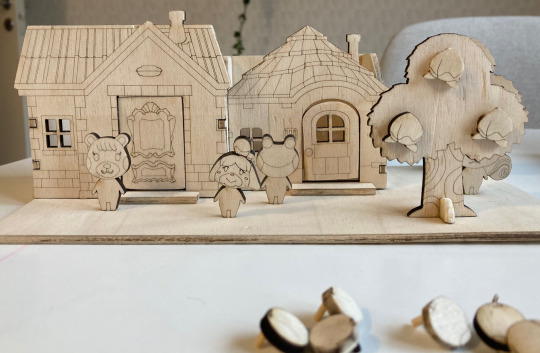
Here's a photo of my print! It's the first version and I've fixed things, such as the tree bases. The fruits that come with are peaches, pears, apples, and oranges. I have glued together the houses and walls, but I haven't glued anything to the baseplate. The fruits aren't glued either, they hang by the little studs on the back.
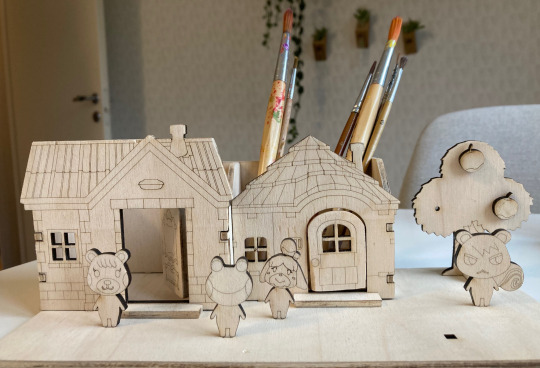
Here I put some brushes in it to show scale, also removed one of the trees so you can see better. I cut the doors and put hinges on them so they open but that is obviously not necessary. :)
Also the door to Maple's houes (on the right) is a bit messed up because I sanded it down way too much to fit my stupid hinge. The file is not crooked, it's me hi I'm the problem :S
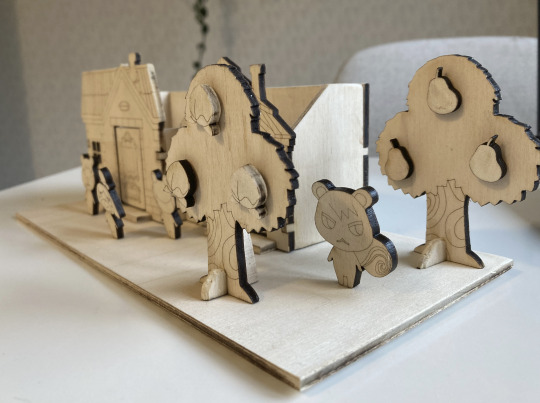
And a little side view. I sanded down many sides and the fronts and backs because the laser I use stains a bit, but I found out that the charred sides are easily sealed with some clear glue!!
Happy printing and as I said, feel free to edit the files however you'd like. Give it edges to make out of cardboard. I don't care. I just hyperfixated on this instead of doing my work and would love it if anyone else found any use of it. Just please don't make profit off of it just like that because that's a bit rude :(
Details:
Printed size: Baseplate: 25x12 cm (X,Y) Merry's house: 10x7x7 cm (X,Y,Z) Maple's house: 8x5x7 xm (X,Y,Z) Trees: 7x8 (X,Z) Figures: 3-4 cm (Z)
Total material use: 60x30 cm (X,Y), however this is not optimised.
Material: 4 mm plywood
Print time: Less than 30 min for me. I used an Epilog Legend EXT 75 Watts 36x24 laser.
Scale for pdf: A2, 1:1
Units for CAD files: mm
Everything is in the Drive folder, download it and read the README instructions and use the files :) If you need it in another file format, just let me know. I won't redraw anything for you but I can resave it to another file format such as sketchup or an earlier Rhino version for you if you want :)
ok bye xoxo
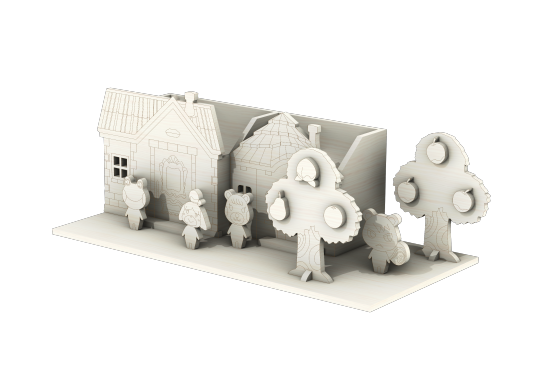
the render image without my graphic design is my passion glitter additions on it
#animal crossing#acnl#animal crossing new horizons#animal crossing villagers#lily#maple#marshal#isabelle#laser file#laser printing#ac#diy#art#hello its me the adhd hyperfocus that made this instead of my master thesis work thihi
19 notes
·
View notes
Text
ficbinding archive: The Office / Beautiful Bastard


the story the office by tby789 (and with ongoing additions by LolaShoes) published as Beautiful Bastard in 2013.
archive notes one of the OG p2p fics from some of the OG twilight BNFs. includes original title image and summary.
Fandom: Twilight
the binding:
churchpaper warm white 24# paper
all interior text rendered in alegreya
typeset from a PDF
rounded and backed casebinding
oxford hollow spine
made endbands sewn over plain piping
dubletta bookcloth
9 notes
·
View notes
Text
Comissions and other stuff
I've heard about Vgen and how it's for artists to post and get commissions so I thought it would be such a good idea to try it since I was already wanting to open them but you need an invite?? I don't really understand how that page works yet but I did make an entry for the monthly contest so let's hope I get to enter lmao
On the meantime! I'll be opening commissions here, easy and simple.
-Portrait sketch: 20eur
-Full body sketch: 30eur
-Portrait rendered: 40eur
-Full body rendered: 50eur
I can draw backgrounds and won't charge for them (on top of the other stuff) cuz I need the practice (please note that).
I WON'T draw any minor characters doing weird stuff or anything that I'm uncomfortable with. (I can draw nsfw, gore (mild), animals...)
Realistic portraits are on the table, but just for humans, sorry.
As for payment, I'm cool with paypal and bizum (if u have it) but I'm open to trying other stuff if needed.
This is important so keep it in mind, the payment will be done after you give the ok to the initial sketch! Refunds will be possible if I'm not too far into the drawing but the sketch up to that point will not be sent to you as a proper file.
Once the commission is over I'll send it to you via email to ensure you get the full quality of the drawing! (just the image or pdf if you prefer it that way). You can print it, post it (with credits) or make a poster for yourself! but not make prints, stickers, posters.... to sell.
Sorry if I seem too careful with this but It's not my first rodeo, some people are ruthless to artists and I won't stand for it.
If you have any questions or are interested, send me a message and I'll reply asap!
#drawing#sketch#fanart#painting#digital art#artists on tumblr#my art#artwork#digital drawing#digital illustration#commission#artist comms#open comision#comms info#art commisions
4 notes
·
View notes
Text
Monster Spotlight: Bogeyman
CR 10
Neutral Evil Medium Fey
Bestiary 3, pg. 42 (pic taken from Adventure Path: Extinction Curse: Legacy of the Lost God, pg. 79)
For years, FOR! YEARS! I’ve wanted to do an article on the Bogeyman. This monster has a very special spot in my heart, because around 10 years ago when I was just getting into tabletop stuff, I found a copy of Bestiary 3 on a game store shelf and flicked it open. After flicking past Behemoths and Asura, the most striking image to hit my eyes was what appeared to be a clown in a jaunty tophat and an absolutely menacing set of chompers. While by no means my favorite creature in Bestiary 3, my earliest memory of Pathfinder content was seeing that garish purple-and-red beast masquerading as a human, and as such the Bogeyman held a special place in my heart.
Which made it absolutely heartbreaking when my every attempt at extracting its picture from the PDF for use on this blog ended up looking HIDEOUS in a way my brain couldn’t reconcile with. As such, my first-ish exposure to Pathfinder languished... up until recently, with the release of 2nd Edition and a whole host of updated art for a WHOLE bunch of critters! While this Bogeyman isn’t my favorite--I’ll always love the bright purple bastard from 3--it certainly still portrays the mood of the Bogeyman in a way I enjoy. There’s plenty of Fey who cause fear for their own amusement, more than a few who eat it in some fashion, but Bogeymen are fear. They’re terror incarnate, they’re living nightmares, they’re the villain of a thousand stories and they know it, they revel in it, they wear it on their sleeves!
Bogeyman delight in finding singular victims and haunting them for days or even weeks, silently lurking under beds, within closets, in attics, or in basements, occasionally using Ghost Sound to create eerie noises, Darkness to cut the lights, or even Invisibility to quietly stalk their victims from their very own shadows until the haunted soul is on the verge of a breakdown. They’re artisans of terror, delicately crafting every moment of their target’s life of fear, plaguing them with Nightmares by night and by day whispering horrid thoughts into the victim’s ears from an invisible vantage point, making them lash out against friends and family to assure they’re entirely isolated when the malevolent Fey finally decides to end their lives.
Like many creeping terrors, Bogeymen prefer to keep out of combat unless they’re sure they can win, remaining in the background otherwise. Unlike many creeping terrors, this should by no means make you think they’ll fold easily. They have high saves for their CR, DR 15/cold iron, and 21 SR, but their most infuriating defense is their ability to go invisible at will. Bogeymen are as maddeningly patient in combat as they are when seasoning their victims, flitting in and out of sight with Invisibility and exploiting their titanic +35 to Stealth checks to slither among combatants and find out where they’re weakest, physically and emotionally. Even an invisible Bogeyman can make use of its +28 to Intimidation checks to shake up anyone who can hear it speak as it waits for an opening, something it’s very keen on doing because as you may expect, Bogeymen are all about fear!
They live for fear, gaining Fast Healing 5 if someone within 30ft of them is suffering from any level of it. 30ft is, coincidentally, the range of their Deepest Fear aura, and illusion that shapes itself into the worst fears of anyone who views it. Failing a DC 25 Will save means you’re shaken as long as you’re in the aura, but succeeding the save renders one immune to it for 24 hours... but that just won’t do, will it? We can’t have someone NOT be afraid, so if someone succeeds and maintains a brave face, the Bogeyman disappears once more to Intimidate them, either through the skill check or with their claws. Their 1d8+1 damage claws aren’t really all that scary, but the burst of +6d6 from their Sneak Attack will probably make both the character AND the player jump. Both claws crit on a 19 or 20, and being critically hit by their claws causes Striking Fear to mount up. Failing another DC 25 Will save while already suffering from a fear effect compounds the fear, moving shaken to frightened, frightened to panicked, and panicked to paralyzed with fear (and thus vulnerable to being torn to shreds by Sneak Attack). While relying on crits is... well, unreliable at best, someone being hit even once while already shaken removes that person from the fight for several rounds, as frightened creatures must flee unless cornered, potentially giving the Fey deadly amounts of breathing room so it can recover and slip away... or savage a different, more vulnerable target.
Or just instantly kill someone who’s proven they’re a threat to it. For whatever demonic reason, Paizo decided to give them 3 castings of Quickened Phantasmal Killer each day! The moment it pops out of invisibility to Sneak Attack someone, it may be able to just take out someone else nearby with a glance! If your party doesn’t have any protection from fear, an encounter with a Bogeyman may go from tough to unwinnable in a single round.
If you can weather their initial Sneak Attack and have a way to counter their invisibility (like a sack of flour), things get much simpler. Adding onto that, anything that’s not afraid of them, either because it passed its save against the aura or was unaffected by it in the first place (in case you needed another reason to put Unbreakable Heart in your spell list), takes an enormous bite out of its offense and its defense and can potentially leave it floundering. Even with that weakness, Bogeymen still have access to Hold Person at 3/day to use against creatures they cannot terrify and Suggestion at will to manipulate them so they’re not ENTIRELY helpless against Paladins; keep that in mind if you’re going fey-hunting!
As a closing note, it’s a little funny to me that Bogeymen don’t actually have Darkvision, so their at-will Darkness--which would otherwise be an excellent tool to get in more Sneak Attacks--is just as much and impediment to them as it is to everyone else. It’s also extremely ironic that they’re not immune to fear effects, so any telepathic creature that succeeds against their Phantasmal Killer can turn it back around against them, potentially killing them with their own ability!
You can read more about them here.
75 notes
·
View notes
Text
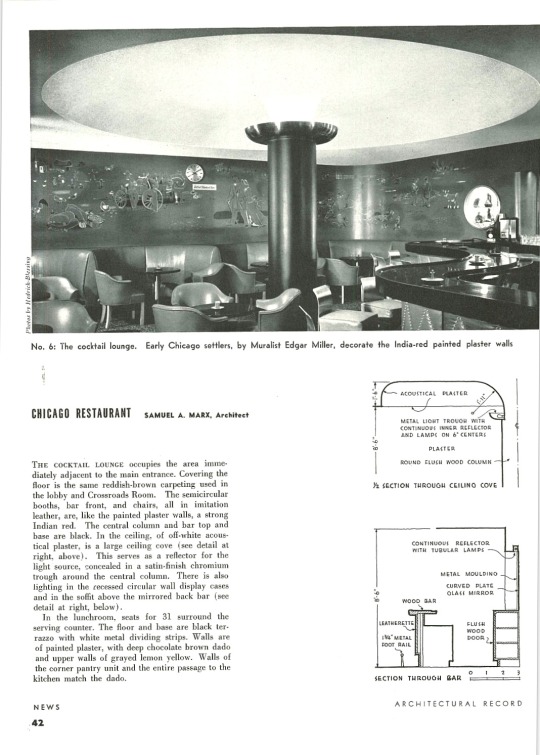
Crossroads Room, Dearborn Station, Chicago
A lost Fred Harvey Restaurant in Chicago, designed by Samuel A. Marx, with murals by Edgar Miller

Fred Harvey Crossroads Room, Dearborn Station, Chicago, c. 1940, architect Samuel A. Marx. Source: Chicago History Museum
I only learned about this long-gone but exceptional moderne restaurant interior a couple of days ago, while perusing a lengthy post on the Forgotten Chicago site.
Another mostly forgotten Art Deco landmark is seen above by noted Chicago architect and art collector Samuel Marx for the Fred Harvey Crossroads Restaurant at Dearborn Station. Perhaps best known locally for the original incarnation of the legendary Pump Room at the Ambassador East Hotel (now PUBLIC Chicago) in 1938, this Marx commission included a restaurant seating 102, a 50-seat cocktail lounge, and a 31-person lunchroom. Edgar Miller, Chicago’s great and recently rediscovered artist, was commissioned for the murals that commemorated both old Chicago and the southwestern routes served by the Santa Fe Railroad. Patrick Steffes, Chicago’s Million Vacant Lots, and Other Recent Research Finds, Forgotten Chicago, May 31, 2014

Dearborn Station. Designed by Cyrus L. W. Eidlitz, the station opened in 1885 at 47 West Polk Street, Chicago. Source: Dearborn Homes website

An earlier Fred Harvey Restaurant in Dearborn Station, 1899

Cover and contents page of Architectural Record, Vol. 88 No. 1, July 1940. PDF of entire issue is available from Architectural Record Archives here.
The scans below are from pp. 40-43 of this issue:


Text of the article:


Description on back of postcard

Another view of the restaurant. Source: Chicago History Museum

A view of the bar. Source: Chicago History Museum
The Crossroads Room featured curving walls in each of its three rooms, chrome fixtures with indirect lighting, and a serpentine bar. Marx specially designed all the furniture. He used a wide-ranging color scheme throughout the project, including "brilliant green, reddish brown, deep chocolate brown, pigskin, Indian red, black, and white," colors that were seen in much of Santa Fe's advertising through the years. Other distinctive decorating touches included Indian and roadrunner motifs and rather bizarre round neo-Baroque wall cases containing what appear from photographs to be cactus sculptures. These unique features would no doubt have reminded patrons of the exotic destinations of the Santa Fe Railroad in the American Southwest. Although Fred Harvey was best known for promoting travel to the West and Southwest, the new spaces were also full of depictions of the history and early life of Chicago. For the 183-seat Crossroads restaurant, Miller created a large wall mural depicting early nineteenth-century pioneer life in Chicago, including a cntral rendering of Indians, fur traders, and Fort Dearborn. For the 50-seat cocktail lounge, adjacent to the main entrance, Miller illustrated early Chicago settlers along with various livestock.... Patrick Steffes, "Crossroads Room," in Robert Brueggman, editor, Art Deco Chicago: Designing Modern America. Chicago Art Deco Society, 2018, pp. 313-315.

Enlarged view of floor plan, from p. 41 illustration above

Crossroads Room menu, Saturday, January 14, 1950 (ebay)

Crossroads Room, matchbook cover (ebay)

Anemo-Light advertisement; this type of anemostat indirect lighting was used in the Crossroads Room.

Portrait of architect Samuel Marx at his desk in his office in Chicago, Illinois, February 15, 1941. Source: Chicago History Museum

Art Institute of Chicago, works by Samuel A. Marx
Sources:
Andrew Raimist, Architectural Ruminations
Robert Brueggman, editor, Art Deco Chicago: Designing Modern America. Chicago Art Deco Society, 2018.
Chicago History Museum, images of buildings designed by Samuel a. Marx
Liz O'Brien, Ultramodern: Samuel Marx, Architect, Designer, Art Collector. Pointed Leaf Press, 2012
Old Chicago Station Gets New Restaurant, Architectural Record, Vol. 88 No. 1, July 1940, pp. 40-43
The Pump Room, Architectural Forum, July 1940, pp. 21-24
Samuel Abraham Marx, Wikipedia
Samuel A. Marx in the Art Institute of Chicago collections
Patrick Steffes, Chicago’s Million Vacant Lots, and Other Recent Research Finds, Forgotten Chicago, May 31, 2014
#Fred Harvey#Crossroads Room#Chicago#architecture#buildings#art deco#moderne#Samuel A. Marx#Dearborn Station#restaurant#demolished#Edgar Miller#mural
16 notes
·
View notes
Text
Indie Games Fanzine: new project!
⭐️Some Guidelines for you:
✅You can submit
-Digital Illustrations, 3D still renders, Traditional Art (any and all artstyles are accepted);
-Gore and Violence are accepted but limited to stylized pieces;
-Artistic nudity;
-Ship art (more on it later);
-Small comics;
-The amount of illustrations you can do will be based on the number of artists participating.
❌You can't submit:
-Animated/Recorded Videos or Music, as they cannot be printed or as easily shared within a PDF.
-Mild NSFW (Including implied sexual acts);
-Ship/Erotic art featuring prepubescent/pubescent looking characters;
-Art with Hate Speech, Symbols, Controversial Political Material and/or "Dog Whistles";
-Ai Generated/Enhanced Images.
If you have any questions, don't hesitate to leave a comment!
4 notes
·
View notes
Text
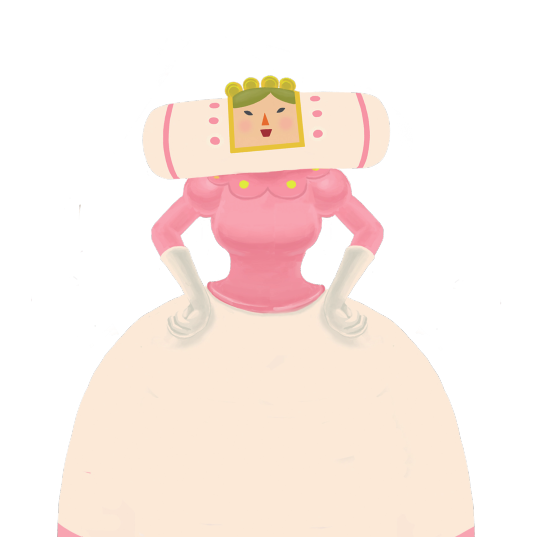
KATAMARI FOREVER QUEEN PNG!!!
Hello, it’s me again!
Fans of the Katamari series may recognize this render of the Queen of All Cosmos from Katamari Forever. The version shown here was originally a .jpg with a black background, edited to be transparent. It is NOT a true .png. (Left: Fanmade .png, Right: official .jpg)

Lately, I’ve been into archiving press material, which has led to me adding tons of official renders to the Katamari wiki. Today, I was looking for Touch My Katamari press material, and I came across a NEOGAF thread. Inside of it was a link to mediafire for a file named “TMK.rar”.
And inside the archive was…!?! The Queen render!? I was so excited! But how did she get there? After all, this artwork was from Katamari Forever, not Touch My Katamari. Honestly, I have no clue, but I don’t mind.
Of course, I uploaded this render to the wiki and look at that size 😱 Now, you may be wondering “these look like the same image!” And yes, it’s the same art. However, the image uploaded in 2019 was an edited version of this jpg.
“How can we confirm its authenticity?”
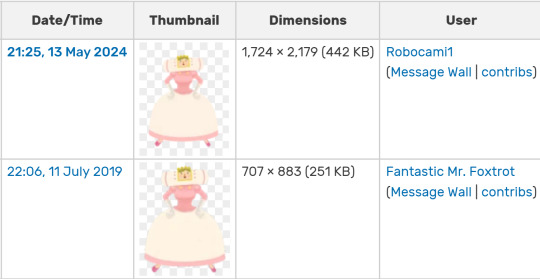
Stray lines! Shown below is a cropped version of the render sourced from the Katamari Forever manual’s .pdf.
(Left: image of .pdf, Middle: .png from KF manual, Right: manual's .png's markings)
To the left of the Queen, you can see small streaks left in the blank space. I took a screenshot of the streaks behind a black background and saturated it for visibility.
(Left: official .png, Right: official .png's markings)
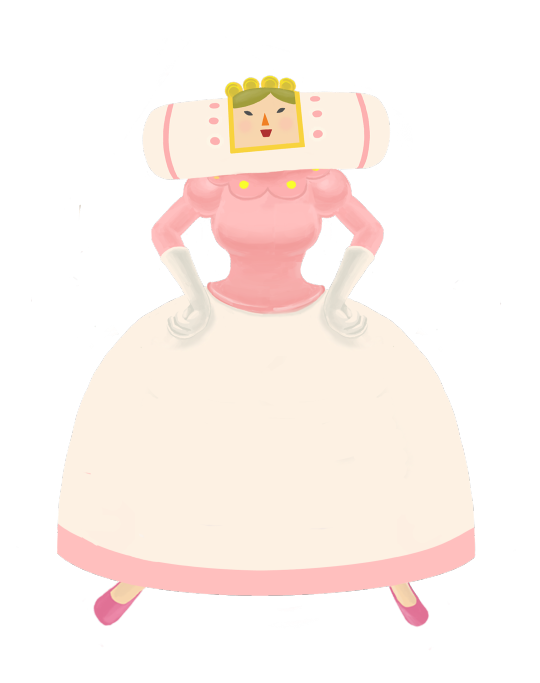

Now, here is the .png from TMK.rar. Looking closely, there are streaks! So, this is the real deal!
13 notes
·
View notes
Text
hey y'all, just a shop update.
shopify is currently blocking my payments because they continually refuse my personal information for some reason. I'm not currently waiting on any funds, but if anyone purchases through this shop again I'll have no way to access the money. I was already planning to cancel my shopify subscription when it's up for renewal in June, so thankfully I had a back up ready to go. from now on I'll be selling through Ko-fi, which I'm excited about because for the first time since I started this shop I'll be getting every cent from my sales.
I have had one issue in moving platforms though. I store my patterns in my google drive and something strange happened that rendered all of the pdf files unusable. I was able to recover almost all of them from my long dead etsy account, but I did lose the pattern for the HP sampler. I don't plan on selling that one again (thanks for ruining everything jk terfling) but it was a lot of work and I'm really bummed to not have it in reserve.
moving forward, I think I'm going to shift the direction of the shop. cross stitch is a really time consuming medium and it's extremely difficult to ever have enough stock to fill a table at shows - which brings me to my next point: shows don't want me. I don't know if it's because they don't know where I fit in, or if they just don't like my work, but even shows I've done repeatedly in the past are denying me now. however in the past couple years I've taught myself to make vector images and made some stickers, and that seems to be a much more cost effective and marketable product. I'll still sew because I can't not do it, but I'm going to try to bring some new kinds of work in as well.
so for now, please buy through ko-fi if you're looking to sew some memes, and keep an eye out for some new stuff in the future.
-strom
5 notes
·
View notes