#router setup guide
Explore tagged Tumblr posts
Visit Tumblr Blog
Explore Tumblr blogs with no restrictions, modern design and the best experience.
Last Seen Tumblr Blogs


Fun Fact
Tumblr is available in 18 languages.
Text
https://cudyrouter.com/cudy-router-setup/
Cudy Router VPN Setup – Quick Configuration Guide!
To initiate the Cudy Router VPN Setup, access the router's web interface via http://cudy.net or http://192.168.10.1. Navigate to General Settings > VPN, enable the VPN feature, and select your preferred protocol (e.g., OpenVPN or WireGuard). Upload the necessary configuration files from your VPN provider, enter your credentials, and apply the settings. For further assistance, connect with our experts in the chat box!
0 notes
Text
Complete Guide to Linksys Velop Setup: Easy Steps for Seamless Wi-Fi
Building a mesh Wi-Fi network is simple with Linksys Velop setup. Connect the main node to your modem, then finish the installation with the Linksys app. The software will walk you through configuring your Wi-Fi name, password, and best location of additional nodes for flawless coverage over your house. For detailed instructions, visit our website.
#Linksys Velop Setup#Linksys Velop Login#Linksys velop setup with existing router#Guide For Linksys Velop Setup With Existing Router#Linksys Velop bridge mode#Factory Reset Linksys Velop#Linksys Velop Red Light
0 notes
Text
I feel like the last year has been a great push for me to slowly detach myself from giant companies and ensure what I do is in my control and ownership
Finally switched over to linux permanently
switched to firefox
enabled adblocker, sponsor blockers, and tracker removers
disabled autoplay and the recommendations sidebar on YouTube (highly highly encourage, though I still keep the homepage open so I can choose when to browse new suggested content rather than it pestering me)
downloaded all my tumblr posts and now host them parallel on my website (stuck here until we find some decentralized way of doing social media right)
cleared out 99% of my online storage to now be on multiple hard-drive backups
downloaded locally all my music
removed myself from basically every data tracking social media platform except this and YouTube
And now currently I'm trying to consolidate all my feeds into just an RSS reader.
It takes a long time and a lot of planning, but its very rewarding to take control over what you want to see, how you see it, how its formatted, ect. I find these are my steps to an easy transition off a certain service:
Download all your data and back it up. Now your account can be deleted at any time with no remorse.
Find browser extensions that enhance and modify the experience to what you might need. Use that to tangibly guide your preferences. Go ahead and remove the app on your phone if its there.
Research every alternative service and try them out. Begin moving certain activity exclusively to the alternative. Take time getting used to it and see if its better to try more alternatives.
Completely jump ship, delete the account, move all feeds or settings over.
Its an ongoing process but there's still probably a few more years of this to go through. Future plans are:
Completely remove all prior emails and self host a new one
Get off Discord entirely except for running the wiki server. It sucks that Discord is so prevalent. Probably move to various forums. Maybe look into some sort of forum management software such as how RSS feeds tame articles and videos into one place.
Setup adblockers directly into my router so ads won't even appear on phones.
Setup my phone to just straight up also run linux. There's a few mobile-designed linux platforms to look into until I decide.
52 notes
·
View notes
Text
how to connect to wi-fi services in pokemon gen 4 (DPPT/HGSS)
it's still possible to access the wi-fi services of the gen 4 games after the official shutdown of nintendo's wii/ds wi-fi in 2013 due to fan efforts by changing your DNS settings in-game - this is called the DNS exploit. this is popularly used in gen 5 which really has no complications, but in gen 4 it's a bit more complicated because the games are So old that they can't connect to the internet through modern routers due to fancy modern internet encryption. the connection either needs to have no password, or have WEP encryption, which most modern routers do not support. i had some people asking me how to do this so here's a post lol
first, it should be noted i use the pkmnclassic service, and i think you should too. this gives you access to old mystery gifts as well as pretty much every other wi-fi feature. their website also allows you to view pokemon currently uploaded to either gen 4 or 5's GTS through your browser. once you get your wi-fi set up properly, connecting to the internet will be easy, but that setup comes first. below i am going to list all the options i am currently aware of and able to explain
option 1 - phone hotspot (easy/convenient, doesn't work for every type of phone)
some phone hotspots are able to use old WEP type encryption, or be password-less. if you have access to a phone hotspot, it's worth taking off the password if it lets you and trying to connect to the gen 4 wi-fi with it before trying any other method, since if it works it's super convenient, just turn on the hotspot any time you want to do something online in gen 4 and turn it back off when you're done. unfortunately this depends on the type of phone and what OS its on and i don't have a list of what phones or OSes are compatible, so good luck lol. mine personally is not, and i have a fully updated iphone
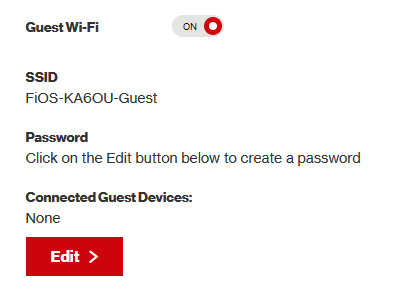
option 2 - guest wi-fi (a little less convenient but still easy if you have access to router settings)
in the same vein as phone hotspots, guest wi-fi hotspots can also work, and this is what i personally use myself. the catch is you have to have access to your router settings, so if you're a young person using a parents' router without access to those or some other situation like that, you may have to ask for assistance every time you want to turn this on/off, which could be a dealbreaker for some unfortunately. but if you're able to do that, simply make your guest wi-fi password-less and turn it on when you want to connect to gen 4 wi-fi and turn it back off when you're done. since these settings pages are so different per internet provider, i can't really give a guide on how to do that here, though mine through verizon fios is pretty straightforward. some guest wi-fi may not work for this but i think most should
option 3 - use an old router that supports WEP encryption (probably inaccessible for most, but only has to be set up once and then you're done)
i've done this in the past but i had my dad's help with the process, i cannot walk you through buying an old router lol. but yes if you purchase an old router and set that up you can have password protected gen 4 wi-fi permanently
option 4 - save backup + emulation through melonds (works pretty much 100% of the time if you have a hacked 3DS and some sort of PC)
MelonDS is a really great DS emulator that you can find here for windows/linux/mac: https://melonds.kuribo64.net/downloads.php
the basic idea is that you can backup your save file/game with a hacked 3DS using Checkpoint or TWLSaveTool (outside the scope of this guide but this is easy to do and you can walk through the steps here) and then run it through melonds, which can bypass all this WEP/encryption hell for you and simply connect to the internet. of course this is not very convenient if you have to constantly back up your saves to do wi-fi stuff but it's better than nothing if you have no other option.
unfortunately setting up the wi-fi can be a pain, and you also need DS BIOS files to run everything properly, which i cannot provide myself for legal reasons but they uh... aren't that hard to find lol, and you can back them up from an actual DS if you have access to the necessary tools for that.
if you use a windows PC, feel free to use my version of melonds which already has all the wifi shit set up, you'll just need to provide your own bios files under emu settings (it's a bit old but it works great for this purpose): https://drive.google.com/file/d/1DQotaqFuBwXz1KYdQWiwxghtn3faLgj-/view?usp=sharing
edit: just found out right after posting this that the most recent version of melonds might work out the box without having to do any particular wi-fi setup? so feel free to try it instead of my version if you like

if you are using linux/mac or don't want to use my version, you'll have to use the melonDS FAQ/google to figure it out, i'm sorry!
by the way yes, this means even if you don't have a gen 4 cart and solely play over emulator, you can trade/battle/etc with people who are playing on DS - they connect to the same servers!
okay and NOW once you have one of those options set up, you can actually connect to wi-fi in game by doing the following:
(these screencaps are from my capture card, i am doing this on an actual DS, but you can also do this with melonds if you're using that option)
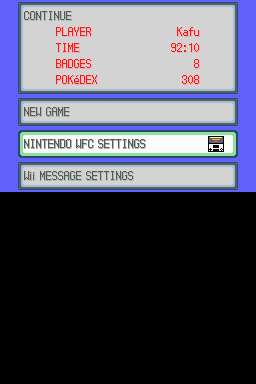
step 1: navigate to "NINTENDO WFC SETTINGS" in the menu where you press continue on your save file, in-game. in gen 4 you need to do it here and not in your DS settings.
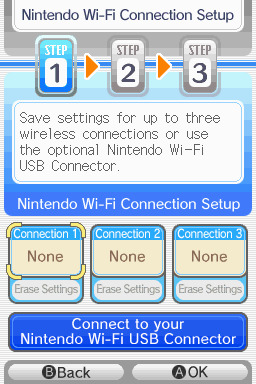
step 2: tap "Nintendo Wi-Fi Connection Settings" and pick any of the three connections here to start the set-up. if you already have some here, i'd click "erase settings" underneath to start from scratch.

step 3: search for an access point and pick your desired access point from the list that comes up, and put in a password if needed (this assumes you have set up your wifi properly at this point)
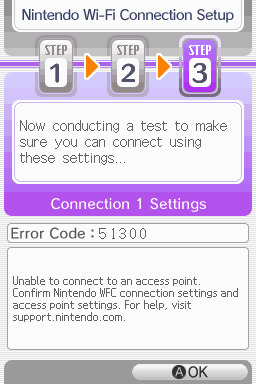
step 4: it will attempt a connection to the internet, and may or may not throw an error. regardless, the error doesn't really matter, you can just hit "OK" whether it's successful or not

step 5: go back into your new connection (the box that previously said "None" should now say "Ready") and scroll down until you see the option "Auto-obtain DNS" - change this to "No"
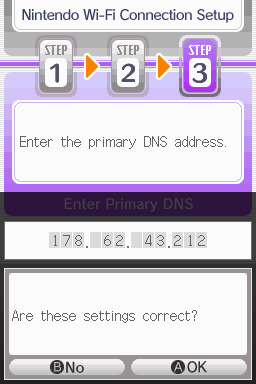
step 6: change the primary DNS to pkmnclassic's DNS, which is 178.62.43.212 - in layman's terms this will essentially let you connect to their servers instead of nintendo's, which are obviously down. as for the secondary DNS, either leave it at 0.0.0.0 or change it to the same DNS as the primary
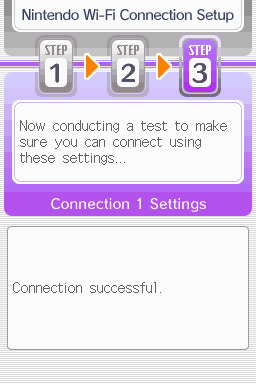
step 7: now would be a good time for a connection test. tap "Test Connection" in the top right. there should be a successful connection. assuming there is a successful connection, congrats! save your settings and enter your game as normal. you'll need to go to the basement of any pokemon center and pick up your pal pad, then try entering the wi-fi club (middle NPC at the counter) to test it in-game and get your friend code.
if there isn't, try a few more times or get closer to your access point - sometimes it's not you, the service can just occasionally be spotty. if you keep getting errors, you can use this site to look up what the error code might mean. if you still can't solve the issue, you may have to try a different method of connection as listed above.
sorry i couldn't be more in depth but frankly i'm not an expert on this stuff either, i'm just doing my best. there are a couple other options for doing this, like taking the password off your modern home wi-fi, or bridging your connection to an old laptop/computer, but the first is particularly dangerous so i didn't want to include it in the list and the second is completely out of my league, i just know people have done it before
good luck feel free to ask questions but no promises i'll have answers. if you need troubleshooting help i'd recommend pkmnclassic's discord over me, they have channels for that stuff (yes i hate troubleshooting stuff moving to discord and not forums as much as the rest of you but it can't be helped lol)
81 notes
·
View notes
Text
What types of issues does technical support handle?
Technical Support Services

Technical Supporting services serve a vital role and prospect, by keeping businesses and organizations running efficiently & active by resolving their IT-related problems and issues. From minor glitches to major disruptions errors, technical support teams and professional experts help to ensure that systems remain up and running while in use, allowing the users to stay productive and alert. But what exactly do they handle? Let's take a closer look at what to look for and they assist with.
Hardware and Device Issues:
Technical supporting teams and professional experts assist with problems related to desktops, laptops, printers, scanners, and other hardware. As this includes and consists of deliverables fixing hardware failures, replacing parts, configuring devices, and troubleshooting connectivity or performance issues. Whether it's a malfunctioning keyboard or a slow-loading workstation, Technical Support is there to help.
Software Installation and Troubleshooting:
From installing and implementing the applications to resolving and assisting the software errors and glitches, technical Support guides various software-related and applications concerns and points at a time. They help and assist with updating programs, fixing bugs, assuring the overall compatibility within the operating systems, and restoring the performance if an app crashes or freezes.
Network and Connectivity Problems:
A strong network and support is the backbone of modern businesses and companies. Technical Supporting officials handle and maintain the internet issues, router configuration, VPN access, slow connection speeds, and network outages. Whether it's a minor or impactful Wi-Fi issue or a more significant server connectivity problem, the support team works to restore communication quickly.
Email and Communication Tools:
Email downtime can affect the business continuity and its proceedings. The technical supporting team manages email configuration, syncing errors, spam filters, and login issues and errors across multiple devices and platforms, including Outlook and Gmail. They also handle collaboration tools like Teams, Slack, or Zoom when they don't function as expected.
Security & Access Management:
Working professionals play an essential role in managing the IT security measures and operating parameters. While they also assist to reset passwords settings, also help to manage the user accounts, set up two-factor authentication, and address down the ongoing suspicious activity.
Personalized Help and Guidance:
From onboarding and completing setup for the new users to answering tech-related questions, technical Support assures that employees use systems efficiently. Their goal is to minimize downtime and boost productivity. Companies like Suma Soft, IBM, Cyntexa, and Cignex offer dependable technical support services tailored to your specific business needs. Their expertise helps resolve issues faster and keeps your systems up and running at all times.
#it services#technology#saas#software#saas development company#saas technology#digital transformation
2 notes
·
View notes
Text
192.168.1.250 Netgear Setup: A Beginner’s Guide
The netgear extenders are widely used by many of the networking users to create a reliable network. Netgear extender devices are known for their performance and stable network. Setting up the extender device is not a daunting task if you are aware of the setup process. In this article we are going to elaborate in detail how you can perform 192.168.1.250 Netgear Setup using the web. Web based setup method is the most reliable way to add the netgear extender into your existing network. Gather the important details and configure any model of netgear wireless range extender device. Scroll up the page and read the information till the last to boost up your network.
Unboxing The Extender
Unboxing the wireless range extender is the first step of the 192.168.1.250 Netgear Setup. In the box you will find an extender along with power adapter, user guide and ethernet cable (optional). You need all such items for the setup process. In addition to these items you also need host router network details, working internet connection, electric power socket, and computer/ laptop device.
Placement
Second step is placement of the device. Proxy placement is needed for the setup. Put the device closer as possible. Also there is no signal interface closer to the router & extender device.
Boot Up
Next step of the process is boot up. For booting up you have to use the power adapter you got with the extender. In case your device is a wall plug compact design device then you have to directly connect it with a wall outlet. Boot process might take around 1 to 2 minutes. Before proceeding further towards 192.168.1.250 Netgear Setup using the web, wait for LED lights to stabilize.
Connect To Extender Network
Step ahead and connect the extender device to the client device using any of the given methods:
Ethernet: Use the ethernet cord you got with the range extender and connect the extender with the client device. Inject the cord’s one end into the ethernet port of the extender and other in the client device ethernet port. Make sure the connection is secured.
Wireless: Using the wireless network of ethernet you can establish a connection. Check out the device label to know the default SSID & password. Use your client device and run a scan for available wireless networks. Enter the details and connect the devices.
Access 192.168.1.250 Netgear Setup Page
Now you have to access 192.160.1.250 netgear setup page by follow the given steps:
Launch google chrome or any other similar browser.
Thereafter, mention 192.168.1.250 IP in the URL bar.
A new page appears where you have to provide default information.
Enter admin and password in the fields.
Further press login and netgear installation assistant will guide you.
Configure Extender
Once you get access to the configuration page, choose the language first and then your router’s network name. Choose next and enter the password on the screen. Further click on connect option and then next.
Secure Network
Now you have to secure the wireless network by creating an SSID & password for your extender network. Also make changes in the admin account user details. This step is important to keep your existing network secure.
Update Firmware
Afterwards, you need to look for the firmware version. In case the firmware is outdated then you should install the latest version. For installation you can opt for an online update option and follow the prompts. You can update the firmware manually also by downloading it from the official portal of netgear.
Finalize Setup
Finalize the setup by choosing the submit button once you made all the important changes in the network. Review the changes you made to verify every step. Note down the extender security details you have created and keep them secure. Submit the changes and then you can step further to reposition the device.
Reposition The Extender
Repositioning the extender is a very important step to optimize the network performance. Unplug the extender from the proxy position. Search for a midway position (from the router and the area where the dead spot was). Then plug it in again to the power at the new position. Wait for the device to boot up and monitor the router LED on your extender device. If it’s green then the position is perfect. On the contrary if it turns amber or red then relocate it.
Test New Network
Lastly, test the new network using a wireless handset. Using the new SSID & password connect the device with the extender network and browse, stream or play online to check speed.
Conclusion
Lastly, I would like to rest my words by saying that the 192.168.1.250 Netgear Setup process is a super easy task. By following the above mentioned step by step breakdown of the extender setup process, anyone can configure the extender easily without a tech expert. Setting up an extender device will boost your existing network signal strength and terminate the dead spots from your home or office area.
2 notes
·
View notes
Text
Streamline Your Office Setup with These Essential Tips and Gadgets

Setting up an office can be a daunting task, whether you're working from home or establishing a new workspace for your business. From choosing the right furniture to integrating the latest technology, each decision plays a crucial role in creating an efficient and productive environment. Here's a quick guide to help you get started.
Office Setup Times: Tips for Efficiency
Plan Ahead:
Space Assessment: Measure your office space to understand what furniture and equipment will fit best.
Design Layout: Sketch a layout of your office, considering the placement of desks, chairs, and other essential items. Tools like SketchUp or RoomSketcher can help visualize the space.
Prioritize Ergonomics:
Chair and Desk: Invest in an ergonomic chair and an adjustable desk. Your comfort is paramount to maintaining productivity.
Monitor Positioning: Ensure your monitor is at eye level to reduce strain on your neck and back. A monitor stand or adjustable arm can help with this.
Declutter and Organize:
Storage Solutions: Use shelves, drawers, and organizers to keep your workspace tidy. A clutter-free environment can significantly improve focus and efficiency.
Cable Management: Implement cable organizers or under-desk cable trays to keep cords and wires out of sight.
Set Up Essential Tech:
Computer Setup: Choose a reliable computer or laptop that meets your work requirements. Ensure all necessary software is installed and updated.
Network Configuration: A stable internet connection is critical. Set up your router in a central location and consider using a mesh network for larger spaces.
Test and Adjust:
Trial Run: Spend a day working in your newly set up office to identify any issues or adjustments needed. Pay attention to your comfort, productivity, and overall workflow.
Feedback Loop: Regularly assess your setup and make changes as necessary to optimize your work environment.
Must-Have Tech and Gadgets for Your Office
Smart Lighting:
Philips Hue: These smart bulbs allow you to adjust the lighting based on your needs, helping to reduce eye strain and improve focus.
LIFX Smart Bulbs: Another great option, offering a range of colors and brightness levels that can be controlled via an app or voice assistant.
Ergonomic Keyboard and Mouse:
Logitech MX Keys: A wireless keyboard designed for comfort and efficiency, perfect for long hours of typing.
Logitech MX Master 3: An ergonomic mouse with customizable buttons and excellent precision.
Noise-Cancelling Headphones:
Bose QuietComfort 35 II: Ideal for blocking out distractions and focusing on work.
Sony WH-1000XM4: Another top choice with superior sound quality and noise-cancelling capabilities.
Smart Assistants:
Amazon Echo: Use Alexa to set reminders, control smart devices, and even manage your calendar.
Google Nest Hub: A smart display that integrates with Google Assistant, providing hands-free control and useful information at a glance.
Standing Desk Converter:
VARIDESK Pro Plus: Easily convert your regular desk into a standing desk, promoting better posture and reducing the risks associated with prolonged sitting.
FlexiSpot M2B: Another versatile option that offers ample space for your monitor, keyboard, and other essentials.
High-Quality Webcam:
Logitech Brio: Provides ultra HD video quality for virtual meetings and video calls.
Razer Kiyo: Comes with a built-in ring light, ensuring you look your best in any lighting condition.
Portable Charger:
Anker PowerCore: Keep your devices charged and ready to go with this reliable portable charger.
RAVPower 20000mAh: Another robust option, offering fast charging and multiple ports.
#workspace#homeoffice#ergonomics#productivity#techtips#officeinspiration#smartoffice#officedesign#officesetup#gaming#gamingsetup#workfromhome#office gadgets#network#network setup#office equipment#it#it support#computers#computer science#tech#technology#office furniture#office makeover#remote work#office organization#organization#office ergonomics
2 notes
·
View notes
Text
Well, it's done!

It took most of the month, but it's done!
Please note: it is not finished. Projects have 1 rule: they're never done, they've merely escaped the first development stage. Same goes for this: it's escaped dev phase 1, but it's not finished, not by a long shot. To be finished requires more work than I can get done right now.
So anyway, how did we get here? After 6 months, several finger injuries and lots of swearing later, how is this the specific result?
Well, let me take you back to December last year, where I got the body and kit as a semi-late Crimble present.

Look at it. No modifications to the body, the kit's barely touched, and I'm taking the photo at almost 9pm.
Anyway, Jan 5th, I took the body, kit and a nut blank (a surprise tool that will help us for another project) up to my aunt's house, and we measured up the body to make it compatible with the neck from the kit.
There, we found a problem: the neck heel was too wide for the neck pocket in the body, by all of 3mm. I know, doesn't sound big, does it? Well, 3mm can mean a hell of a lot when it comes to woodwork and lutherie, because it can be the difference between a snug fit, and too big to fit in.
So how do we fix the problem? We decided to rout out the neck pocket, in order to make the heel fit in. However, doing that freehand is what we in the business call a Bad Idea. So we made a jig to guide the router. That just so happened to be on February 9th of this year, the 60th anniversary of the first Ed Sullivan broadcast which struck Beatlemania in the States.
Yeah, that's a side tangent all to itself. Now, returning readers with remember that I've mentioned February 9th before. Yeah, that incident where I got 3 new cuts on my index finger. To quote me from February: "Ouch."
Following a 3 week break to heal, I made up for lost time well. How, you may ask? By modding the body to fit most of the parts from the kit (I'd placed the pencil there to hide the nut):

I was very busy during the month of March, as these 3 photos can prove:


Yes, all 3 show effectively the same thing, but they mark a good point of progression in the completeness of the thing: not only had we designed, cut out and fitted a scratchplate to the body (well, test fitted. We didn't have the neck on yet, and we hadn't actually drilled any of the holes in either).
Apparently I just... didn't take any photos during April, so I have no record of when the headstock was carved out to make the cresting wave. It was either the 12th or the 26th, because I had a 2 week system for this thing, but when it got carved, I can't recall.
Anyway, I have a photo for May:

This is literally the only photo I took of it during May. As you can quite visibly see, we stained the top of the guitar. I did owe peoples another photo, though, so I got a couple more photos of it the time after:


Photos not only of it having been stained front and back (it was either that or try and get any dyes that got past the binding out - with sandpaper.), but also it in the final stages of assembly and setup.
However, I got it from my aunt today. So, you may be wondering, why did it take another week to finish?
The short version? Miscalculations.
So what about the long version?
Back when I got the body, it had a neck pocket size and depth meant for a standard Telecaster guitar neck, meaning that it had to be routed out to 59mm to fit the stupid thing in.
Notice how I mentioned both size and depth. That meant that not only was the neck heel too wide to fit it in, but it also sat too proud of the surface of the guitar. What that meant was that it created a neck angle that should not have existed whatsoever - the back of the fretboard was too far up in comparison to the headstock.
I took a photo of it on Monday, when I learned about all this:

Notice how it's missing a string. That's because the saddle for the A octave was sharp, meaning when the string was put under a little tension (seriously), it snapped off at the saddle, and pinged off.
So for this entire week, I've been wondering if it's going to be ready soon or not. Obviously, though, the answer turned out to be yes. On Wednesday, I received this photo:

If you're confused at what it's showing, it's the neck pocket's old depth (marked by it still being that depth), in comparison to the depth which it should be (marked by a chinagraph pencil). That got carved away, and now the strings sit much lower and actually ring out.
I got another photo yesterday too.

This one is the nut slots being cleaned up so the strings don't go sharp when fretted near the nut. You'd be surprised how common a problem that is.
And, of course, I got the guitar today. To end off this post, have a couple photos taken with natural light:


#fender telecaster#telecaster thinline#takosader's ramblings... six? really?#guitar building#guitar#note: i didn't get to select what the grain was in the body#i lucked out this one because holy shit that ripple tho#next project's probs gonna be a thing using the body that came with the kit#need to source multiple woods#also fret wire and pickups#and a bridge for it#maybe something that can be top-loaded#just so i don't have to source a bridge plate that can fit on the pre-drilled body
4 notes
·
View notes
Text
I got my siblings the Starter Max kit for the Raspberry Pi Zero W here:
There's also a good deal, for the somewhat faster Raspberry Pi Zero 2 W, but short a micro SD card, here:
Both are officially approved Raspberry Pi sellers, and I've ordered from both and can confirm their reliability.
Depending on how you do the setup, you may need more or less than are in these kits.
Here are some links on how to set it up:
https://privacyinternational.org/guide-step/4341/raspberry-pi-setup-and-run-pi-hole
Do note, you will need to be able to access your internet router settings. You basically have to tell your router to run all internet traffic by the raspberry pi, which then uses the pi-hole program to figure out what to let through.
You may also figure out that you could technically run pi-hole on any computer running linux! The benefit to using a raspberry pi rather than, say, an old laptop, is it takes up very little space and uses far less energy. You have to have the pi-hole running at all times, after all! And trust me when I say the initial investment is 1000% worth it.

>First, we’ve discovered that about a quarter of all the internet connection in or out of the house were ad related. In a few hours, that’s about 10,000 out of 40,000 processed.
>We also discovered that every link on Twitter was blocked. This was solved by whitelisting the https://t.co domain.
>Once out browsing the Web, everything is loading pretty much instantly. It turns out most of that Page Loading malarkey we’ve been accustomed to is related to sites running auctions to sell Ad space to show you before the page loads. All gone now.
>We then found that the Samsung TV (which I really like) is very fond of yapping all about itself to Samsung HQ. All stopped now. No sign of any breakages in its function, so I’m happy enough with that.
>The primary source of distress came from the habitual Lemmings player in the house, who found they could no longer watch ads to build up their in-app gold. A workaround is being considered for this.
>The next ambition is to advance the Ad blocking so that it seamlessly removed YouTube Ads. This is the subject of ongoing research, and tinkering continues. All in all, a very successful experiment.
>Certainly this exceeds my equivalent childhood project of disassembling and assembling our rotary dial telephone. A project whose only utility was finding out how to make the phone ring when nobody was calling.

>Update: All4 on the telly appears not to have any ads any more. Goodbye Arnold Clarke!

>Lemmings problem now solved.
>Can confirm, after small tests, that RTÉ Player ads are now gone and the player on the phone is now just delivering swift, ad free streams at first click.
>Some queries along the lines of “Are you not stealing the internet?” Firstly, this is my network, so I may set it up as I please (or, you know, my son can do it and I can give him a stupid thumbs up in response). But there is a wider question, based on the ads=internet model.
>I’m afraid I passed the You Wouldn’t Download A Car point back when I first installed ad-blocking plug-ins on a browser. But consider my chatty TV. Individual consumer choice is not the method of addressing pervasive commercial surveillance.
>Should I feel morally obliged not to mute the TV when the ads come on? No, this is a standing tension- a clash of interests. But I think my interest in my family not being under intrusive or covert surveillance at home is superior to the ad company’s wish to profile them.


>Aside: 24 hours of Pi Hole stats suggests that Samsung TVs are very chatty. 14,170 chats a day.
>YouTube blocking seems difficult, as the ads usually come from the same domain as the videos. Haven’t tried it, but all of the content can also be delivered from a no-cookies version of the YouTube domain, which doesn’t have the ads. I have asked my son to poke at that idea.

196K notes
·
View notes
Text
To proceed with the Cudy router setup, there are 2 methods you can use. You can either set it up via the WPS button or from the user interface. For the first method, check if your router supports the “WPS” button. Then, set up the router easily. You need to log into your Cudy router’s user interface for the other method. Chat with our team if you are unable to set up the Asus router.
0 notes
Text
Troubleshooting Common Issues Through PLDTHomeWiFiSettings

Dealing with internet slowdowns or connectivity issues can be frustrating, especially when you rely heavily on WiFi for work, streaming, and daily communication. Fortunately, many common problems can be resolved using pldthomewifisettings. This guide will walk you through practical troubleshooting tips and tricks using your PLDT router's admin panel.
Understanding PLDTHomeWiFiSettings
The pldthomewifisettings portal is your gateway to diagnosing and solving most network issues at home. From checking signal strength to rebooting your system remotely, it offers a variety of tools to enhance your internet experience.
How to Access PLDTHomeWiFiSettings
Before troubleshooting, you’ll need to access the settings:
Connect your phone or computer to the PLDT Home WiFi.
Open a web browser and type 192.168.1.1 or 192.168.0.1.
Enter login credentials—usually "admin" and "1234" (or "adminpldt" with a specific password).
You’ll now see the pldthomewifisettings dashboard.
Once inside, you’re ready to start troubleshooting.
Problem 1: Slow Internet Speed
If your internet seems slower than expected:
Go to Status > WAN to check the real-time speed.
Run a speed test from your browser and compare it with your subscribed plan.
Use QoS Settings to prioritize work-related devices or apps.
Reduce the number of connected devices by checking the Client List.
Through pldthomewifisettings, you can quickly allocate bandwidth to where it matters most.
Problem 2: Frequent Disconnections
A common issue with wireless connections is frequent drops. Try the following:
Change the WiFi Channel under Wireless Settings. Avoid crowded channels like 1 or 6.
Switch from 2.4GHz to 5GHz if supported. It’s faster and less prone to interference.
Ensure firmware is updated via System > Firmware Upgrade.
If none of these fixes work, a factory reset through pldthomewifisettings might be necessary.
Problem 3: Unauthorized Users on the Network
Are you noticing unfamiliar devices?
Navigate to the Client List in your dashboard.
Block unknown devices using MAC Filtering.
Change your WiFi password under Wireless > Security and re-authenticate trusted devices.
Regularly monitoring your pldthomewifisettings can help you catch freeloaders before they eat up your bandwidth.
Problem 4: Can’t Connect to WiFi
Sometimes your device might not connect at all:
Restart your router using System > Reboot.
Check if the WiFi signal is hidden. Go to Wireless Settings and make sure SSID broadcast is enabled.
Ensure the device isn’t blocked under MAC Filtering.
This is a common situation easily resolved by checking settings via pldthomewifisettings.
Problem 5: WiFi Signal Weak in Certain Areas
Dead zones in your house?
Try changing the transmission power from “Low” to “High” under Wireless > Advanced Settings.
Reposition your router centrally in your home.
Add a WiFi extender or Mesh system and link it via LAN cable.
While pldthomewifisettings can help optimize range, hardware limitations may also need to be addressed.
Problem 6: Can’t Log In to PLDTHomeWiFiSettings
If you can’t even access the admin panel:
Check the IP address. It should be 192.168.1.1 or 192.168.0.1.
Make sure you're connected to the PLDT WiFi, not mobile data.
Reset the router to factory settings using the small reset button at the back.
Access to pldthomewifisettings is crucial for all troubleshooting, so this step is foundational.
Problem 7: Port Forwarding Not Working
Need to open ports for gaming or remote access?
Navigate to NAT > Port Forwarding.
Input the local IP, start/end port, and protocol.
Save and reboot the router.
If port forwarding doesn’t work even after setup, check with PLDT support—some accounts are on CGNAT which restricts this function.
Preventive Maintenance Tips
Log into your pldthomewifisettings weekly to monitor devices.
Change your password monthly.
Keep firmware updated.
Avoid overloading your network with too many devices.
Preventive maintenance reduces the frequency of technical problems and improves long-term performance.
Conclusion
When problems arise with your internet, don’t panic. Many issues—from speed concerns to unknown users—can be resolved by exploring your pldthomewifisettings. By taking the time to understand the control panel, you empower yourself to maintain a fast, secure, and stable network connection without always needing technical support.
FAQs on PLDTHomeWiFiSettings Troubleshooting
Q1. What should I do if my PLDT WiFi keeps disconnecting? Ans. Check for channel interference, update firmware, and limit the number of connected devices using pldthomewifisettings.
Q2. Can I remove a device from my WiFi using PLDTHomeWiFiSettings? Ans. Yes, go to the device list, find the suspicious device, and block it via MAC filtering.
Q3. What if I forget my PLDTHomeWiFi admin password? Ans. You can reset the router to factory settings and log in using default credentials, then reset the password again.
0 notes
Text
How to Choose the Right Affordable VPN Canada 2025 for Your Needs

But with so many VPN services flooding the market, how can you be sure you’re choosing the right one? The key is to identify a VPN that balances performance, security, ease of use, and price. This is especially important for users in Canada, where local servers, data privacy, and access to global content are important considerations. A reliable provider like Browse Freely Canada has positioned itself as a top contender, offering affordable, fast, and secure VPN services tailored to the needs of Canadian users.
1. Security First: What to Look For A strong VPN should offer military-grade encryption, a strict no-logs policy, DNS leak protection, and a kill switch. These features ensure that your internet activity remains private even if the connection drops unexpectedly. In 2025, with growing concerns over government surveillance, third-party tracking, and cybercrime, these security features are more vital than ever.
2. Speed and Performance Matter Affordability should not come at the cost of performance. Whether you’re streaming 4K content, playing online games, or working remotely, speed is essential. Choose a VPN with high-speed servers, especially in and around Canada, to ensure smooth, uninterrupted service. Browse Freely Canada provides optimized Canadian servers that allow fast, buffer-free connections while maintaining robust security.
3. Accessibility for Streaming and Browsing Many users turn to VPNs for accessing region-locked content on platforms like Netflix, Hulu, and BBC iPlayer. An effective Affordable VPN Canada 2025 should be capable of bypassing geo-restrictions without detection. Look for providers that offer dedicated streaming servers or regularly update their IPs to stay ahead of VPN blocks.
4. Compatibility Across Devices In 2025, the average internet user accesses the web via smartphones, laptops, smart TVs, and even gaming consoles. A good VPN should support multiple device types with user-friendly apps and allow simultaneous connections. Providers like Browse Freely Canada offer intuitive apps for all major platforms including Windows, macOS, Android, iOS, and routers — ensuring your entire network is covered.
5. Customer Support and Ease of Use Especially if you’re new to VPNs, responsive customer support and an easy-to-navigate interface can make all the difference. An ideal VPN service will provide 24/7 live chat or email support, along with setup guides and tutorials. Browse Freely Canada stands out with its user-first approach, offering quick support and clear, jargon-free guidance for all users.
6. Transparent Pricing and Free Trials While affordability is a major selling point, beware of VPNs that promise too much for free. Opt for services that are transparent about pricing, offer flexible plans, and provide a money-back guarantee or free trial. This lets you test the service without commitment and ensures you’re only paying for features that work for you.
Conclusion Choosing the right Affordable VPN Canada 2025 involves more than just picking the cheapest option — it’s about finding a service that aligns with your security needs, browsing habits, and digital lifestyle. With cyber risks on the rise and privacy becoming a premium concern, now is the time to invest in a trustworthy VPN solution.
Browse Freely Canada stands as a leading choice for Canadian users in 2025, offering robust security features, fast local servers, easy usability, and competitive pricing. Whether you’re streaming content, working remotely, or simply browsing the web securely, their service is designed to deliver top-tier protection without breaking the bank. Stay private, stay secure, and browse freely.
1 note
·
View note
Text
Unitree Go2 Pro Meets Meta Quest 2
The Unitree Go2 Pro and Meta Quest 2 are cutting-edge devices that push the boundaries of robotics and virtual reality (VR). The Unitree Go2 Pro is a quadruped robot dog known for its AI intelligence, agility, and responsive sensors. Meanwhile, the Meta Quest 2 is a standalone VR headset that delivers immersive experiences. When integrated, these devices create a powerful synergy—where physical robotics and virtual interaction meet, opening the door to futuristic applications in entertainment, education, industrial simulation, and beyond.
Getting Started: Preparation and Requirements
Before diving into the setup, it’s essential to prepare your hardware and software environment. Both devices need to be fully charged and updated to the latest firmware versions. Ensure they’re connected to the same stable Wi-Fi network, as consistent connectivity is vital for real-time interaction.
In terms of hardware and software, here’s what you’ll need:
• Unitree Go2 Pro: Ensure it’s powered on and connected to the same Wi-Fi network as your PC.• Meta Quest 2: A standalone VR headset to get stunning experience.• VR-Capable PC: A computer with sufficient performance to run VR applications and handle robot control.
Software Tools:• Unitree Go2 WebRTC Driver – Enables real-time communication between the robot and your device.• AVP Teleoperate Package – Lets you control the Go 2 Pro remotely with precision.• Cerebro-Control – Seamlessly integrates VR features for Meta Quest 2.
Step-by-Step Setup Guide to connect Unitree Go2 Pro to Meta Quest 2
1. Enable Developer Mode on Meta Quest 2
Install the Meta Quest mobile app on your smartphone.• Connect your Meta Quest 2 headset to the app.• Enable Developer Mode in the headset settings via the app.
2. Install Android Debug Bridge (ADB) on Your PC
Download and install the Android SDK Platform Tools.• Connect your Meta Quest 2 to the PC using a USB cable.• Allow USB debugging when prompted on the headset.
3. Set Up the Unitree Go2 WebRTC Driver
• Clone the Unitree Go2 WebRTC Driver repository to your PC.• Follow the instructions in the repository to install dependencies.• Ensure the driver can communicate with your Go2 Pro.
4. Configure AVP Teleoperate Package
• Clone the AVP Teleoperate repository to your PC.• Set up the image_server.py script to stream video from the Go2 Pro’s camera to your PC.• Adjust settings as needed to match your network configuration and hardware.
5. Integrate with Cerebro-Control for VR Teleoperation
• Clone the Cerebro-Control repository to your PC.• Follow the setup instructions to link the Meta Quest 2 with the robot control interface.• Launch the VR application to begin controlling the Go2 Pro using your headset.
Connecting the Devices
With everything configured, power on the Unitree Go2 Pro and ensure it’s on the same Wi-Fi as your VR setup. On the Meta Quest 2, launch the Cerebro-Control VR app or interface. Use the controllers or hand gestures to initiate a control session.If prompted, confirm the pairing or input the provided code using the Unitree app. Connection issues may be resolved by restarting devices or checking firewall/router port settings.
Optimizing Performance
● Entertainment: Build interactive games or simulations featuring real-time pet control or robot combat.● Education: Use VR + robotics to teach AI concepts, robotics programming, or physics simulations.● Research and Industry: Simulate warehouse operations, disaster response, or robotic telepresence.● Virtual Training: Combine physical robot feedback with VR immersion to learn skills in a safe environment.
Conclusion
Check out META QUEST 3 now - https://www.xboom.in/shop/brands/meta/meta-quest-3/
The integration of Unitree Go 2 Pro and Meta Quest 2 marks a leap forward in immersive technology. With precise setup, careful calibration, and regular updates, you can unlock a highly interactive and futuristic experience that blends the physical and virtual worlds. Whether you’re a developer, researcher, gamer, or educator—this combination offers incredible potential. Explore, experiment, and elevate your interactive experiences with robotics and VR. The future isn’t coming—it’s already here.

0 notes
Text
TP-Link TL-WA701ND Repeater Setup – Step-by-Step Guide
For your TP-Link TL-WA701ND repeater setup, power on the device and connect it to your computer. Access the web interface by entering tplinkrepeater.net in your browser. Log in with default credentials (admin/admin). Navigate to the setup wizard, select 'Repeater Mode', and follow the prompts to connect to your main router's SSID.Need assistance? Reach out through the chat box below for expert help!
0 notes
Text
Getting Started with Network Design 🧠🌐
#coding#programming#orhanergun#webdev
Are you building a scalable and secure network for the first time? Here's a beginner-friendly guide to get you started with network design fundamentals.
🧩 What Is Network Design? Network design is the process of planning the structure of a computer network—whether it's for a small office, a campus, or a global enterprise. It involves identifying business needs, selecting hardware/software, and defining how devices will communicate.
Think of it as an architect’s blueprint—only for data, not buildings.
🧱 Core Components of a Network Before diving into design, it’s important to know what makes up a network:
Routers: Connect different networks together.
Switches: Connect devices within the same network.
Firewalls: Protect your network from unauthorized access.
Access Points: Allow wireless devices to connect to the network.
Cabling or Wireless Links: Physical or radio-based communication paths.
🗺️ Step-by-Step: Designing a Basic Network Here’s a simplified roadmap to start designing a small to medium-sized network:
Define Requirements Ask:
How many users or devices will connect?
What are the performance needs? (e.g., speed, uptime)
Are there remote or mobile users?
What applications will run on this network?
Create a Network Topology Choose a logical layout:
Star topology: Common and simple (e.g., one central switch).
Mesh topology: High redundancy (used in critical systems).
Hybrid: A mix of both, which is common in larger setups.
Tip: Use tools like draw.io or Cisco Packet Tracer to visualize your design.
Select Hardware and IP Schema Choose devices based on your budget and needs:
Cisco, Juniper, MikroTik (enterprise)
TP-Link, Ubiquiti (SMBs)
Plan IP addressing:
Use private IP ranges (e.g., 192.168.1.0/24)
Avoid IP conflicts using DHCP or static planning.
Add Security Layers Firewalls, VLANs, and ACLs (Access Control Lists)
Enable port security on switches
Use VPNs for remote access
Plan for Scalability and Redundancy Design with future growth in mind
Consider redundant links and failover strategies (e.g., dual routers)
🧪 Test Your Design Use simulation tools:
Cisco Packet Tracer
GNS3
EVE-NG
Before deploying a real network, simulate traffic, check for bottlenecks, and validate security.
🛠️ Tools to Help You Design Tool Purpose Cisco Packet Tracer Network simulation SolarWinds IPAM IP address management Wireshark Network traffic analysis draw.io Network diagrams
📌 Final Thoughts Network design is more than just connecting wires—it's about planning for performance, security, and growth. Whether you’re building a home lab or laying out an enterprise infrastructure, starting with a solid design can save you from major headaches later.
If you're just getting started, experiment, document everything, and stay curious. 💡
0 notes
Text
Netgear AC3000 Setup: Steps To Follow By Beginners
Netgear AC3000 is a networking device that offers a reliable network connection. Get buffer free internet with the netgear AC3000 setup. Add the device into your existing network to uplift the coverage and eliminate wireless dead zones. Even all persons who are new to networking can perform the setup easily. Step by step guide to configure netgear AC3000 device is sanctioned in this article, check the content further and uplift the home network.
Netgear AC3000 Setup Requirements
Netgear AC3000 devices can easily be set up if you have all the significant items.
Netgear AC3000 Wifi Extender
Ethernet Cable
Power Adapter
Electricity Outlet
Computer/ Laptop/ Smartphone
Netgear AC3000 Installation
Netgear AC3000 installation of the hardware device is super easy. You just have to perform the installation by follow the given steps:
Unbox your netgear AC3000 range extender device first. While unboxing, be sure the box contains ethernet cable, power adapter and user manual also along with the range extender.
Step forward towards the netgear AC3000 setup and start looking for a location.
Choose a position closer to the host router but not too far from the area where you were facing network problems.
A location where the device is able to receive the signals from the router and amplify it to eliminate network trouble is ideal.
Once an ideal location is found, keep the device and look for a nearby power socket to power up the device.
Use the power adapter to turn on the device and wait until it get booted completely.
LED lights get stable when bootup completes.
Step ahead and connect the device with the client device using ethernet cable or wireless network.
Wireless connection requires a wireless network name and password, on the contrary, wired methods need a working ethernet cord.
As the connection is done you may proceed to perform netgear AC3000 setup.
Netgear AC3000 Setup
Netgear AC3000 setup includes easy to follow process as specified:
Embark the netgear AC3000 setup process with the launch of a web browser of your choice.
Rush to the browser’s address bar, mention the default IP or web address “www.mywifiext.net”
On the keyboard connected to the laptop or computer, tap on the enter button to initiate the search.
As the setup page appears on the screen, get its access by entering the username and password in the shown field.
After mentioning the information hit on the login tab and web admin panel appears on the screen.
Netgear installation assistant will help you to complete the setup.
Prior to all choose the language, then change the admin account login details. Default login details may risk your network security.
Once you change the admin security, go to the link device option.
Now you need to search for the SSID of the host router device. Choose your network among all the available networks which you desire to extend.
After selection the screen will ask for the password of the main network with which you wish to connect the extender.
Now, enter the password and step ahead to create a new network name for your netgear ac3000 setup.
After deciding the network name, form a security key as well. Keeping the network secure is very important. While creating a security key you should create at least 8 character passwords.
Once you make changes in the wireless network security, remember to check for the firmware update.
Tap on the submit option at last to end the setup and then test it.
Netgear AC3000 Network Boost
To boost the network you have to perform a network test. This will help you know what exactly you should do to boost the network:
Check the network by using a smartphone, link it with the netgear extender network and browse the internet.
In case the coverage of the device network is weak as before in the area previously you were facing trouble then you need to relocate it.
Again search for the location and then test it again.
In case the device is not receiving proper signals from the router device then relocate it and put it closer to the router device.
Also you should check the firmware version of the extender. If required then update it.
Stepping ahead you need to boost the network by eliminating the nearby radio frequency device or heavy metal objects.
Conclusion
I would like to end my words by saying that the netgear AC3000 range extender device is perfect for the users to create a strong network. This device will eliminate wifi dead zones and offer signals to the location where the router's signals are hard to reach. Above available step by step breakdown of the setup process will help you in adding the device into the network very conveniently. Netgear AC3000 setup will change your online experience and enhance your working.
0 notes