#routing in laravel 5.8
Explore tagged Tumblr posts
Visit Tumblr Blog
Explore Tumblr blogs with no restrictions, modern design and the best experience.
Last Seen Tumblr Blogs


Fun Fact
Premium Tumblr themes are available from anywhere between $9 to $49.
Text
Laravel 5.8 tutorial #3 - simple routing - Laravel
Laravel 5.8 tutorial #3 – simple routing – Laravel
Laravel 5.8 tutorial #3 – simple routing – Laravel
[ad_1]
in this laravel 5.8 tutorial we learn how to use routing with a simple example. topic cover in this video is
what is routing and location change routing change file pass parameter optional perameter and redirect
find us on fb https://www.facebook.com/reactNativeCode/ https://www.facebook.com/stepbysteplearn/
[ad_2] laravel routing in…
View On WordPress
#laravel 5.8#laravel 5.8 routing#laravel 5.8 tutorial#laravel for beginner#laravel latest version#routing example laravel 5.8#routing in laravel 5.8
1 note
·
View note
Text
Laravel 6.0: What You Should Know

Since the inception of Laravel 5.0 around 4.5 years ago, the Laravel ecosystem has blossomed into something that leaves users nothing to complain about, to say the least. Laravel Nova, Laravel Horizon, Laravel Echo, Laravel Scout, and Laravel Passport are just some of the tools that have been introduced since then. At the time of this writing, we’re on Laravel 5.8 and Taylor Otwell has decided to skip past 5.9 on to 6.0 on the 3rd of September. Previously, Taylor has stressed that this won’t be a major paradigm shift for Laravel and the most significant change will be the transition to semantic versioning. However, this doesn’t mean that there aren’t plenty of new features worth talking about.
Let’s dive into some of the smaller changes first.
The Smaller Things
Authorization

Authorization messages can now be made easier for users to understand. Before Laravel 6.0, the infrastructure wasn’t in place to easily give a specific response to a user when they were given an authorization-related error. The status code could be given fairly easily, but giving a custom error message was more complicated back then. Giving a custom messaged required the developer to create a new file and write their own exceptions.
Now, to get a customizable authorization response, you can simply use the Gate::inspect method when linking to the function that enables you to receive the response. Delivery of the message to the front-end is also easy to organize. Simply add $this->authorize or Gate::authorize to a suitable route or controller.
No More Default Front-End
The typical front-end setup you are given when you first start a Laravel project is now gone. This means the Vue and Bootstrap code you would usually see, would have now been removed. What it’s been replaced with is unknown. Perhaps, it hasn’t been replaced. Strangely, the make:auth command, used to provide the login system scaffolding is now not a part of the original Laravel install either. To be honest, the rationale behind this change is unclear to me. However, given Laravel’s versioning adjustment, it makes sense that third-party technologies like Vue and Bootstrap that haven’t recently undergone the same changes could cause conflict. Though, this is merely speculation.
If you want access to the old UI, you can extract a composer package that contains it with the CLI: composer require laravel/ui and php artisan ui vue --auth.
Lazy Collections

This is one of the more interesting additions. If you’re new to Laravel, Collections are tools that make it easier for you to manipulate arrays. Eloquent, one of the two main tools in Laravel used to communicate with databases, returns its queries as Collection instances. Check out the docs for Collections if you think you’re gonna lack context in a moment. https://laravel.com/docs/5.8/collections
So, what are Lazy Collections? Traditional Collections are often used for working with large amounts of data. When they run into data-heavy files, they’ll try and store all of that data at once. This may sound quick and convenient but the downside is that this is very memory-taxing. Lazy Collections solve this problem by only storing the part of the file they need, and thus, save memory usage and boost performance.
If you understand how lazy loading works then you’ll be familiar with my previous explanation. Lazy loading works the same way. When you make a request to the server with lazy loading implemented, the browser will only return the part of the web page it knows you’re going to use immediately. Then, when the user scrolls down the page or clicks on an internal link, the server will provide you the necessary content it knows you need. This way, only memory that is needed at that particular moment is being used. This method increases speed. Lazy Collections is kind of like lazy loading but with arrays from a database and not content on a webpage.
The Bigger Things
Laravel Ignition
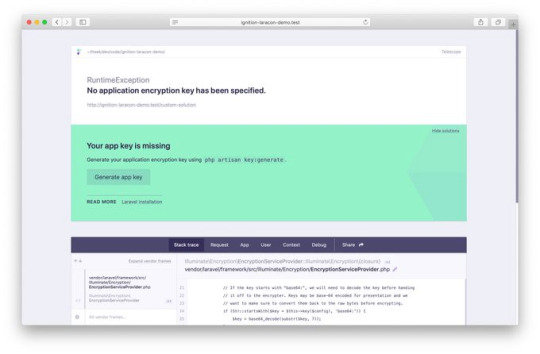
So yeah, the new error page for Laravel is called Ignition and it looks awesome. It’ll be the default error page for Laravel when 6.0 releases. However, if you don’t feel like making the switch to 6.0 just yet, that’s fine, you can still install Ignition on previous versions. Let’s talk about what Ignition brings to the table.
With Whoops (the current default Laravel error page), stack traces and relevant code snippets are shown in an error page, but this doesn’t always lead the developer to the solution. Worse, sometimes the stack traces just reference compiled paths. This can it make it difficult to find the necessary non-compiled files to fix because they aren’t listed anywhere on the error page. Thankfully, this isn’t a problem with Ignition, it can display to you the non-compiled file where the problem actually exists. By clicking on a pencil icon, you can go directly to the file in your chosen editor.
The second coolest feature of Ignition is that it can display potential solutions when displaying an error message. Most error pages just leave you with the error. For example, if the error is that you misspelled a property name, Ignition will tell you that the property has been misspelled and offer you the correct spelling. Solution suggestions can be way more sophisticated than this, I’ll link you to the source down below. Your suggestions are even customizable!
You wanna know the coolest feature? These solution suggestions are actually runnable!

Yes, really. Take a look at this short demo by one of the creators, Freek Van der Herten.
https://youtu.be/EZu0-CwTU9Q
Also, you can add your own runnable solutions too! This is great as Ignition is open source so people in the Laravel community will undoubtedly contribute their own solutions for everyone to use.
There’s a bunch of other cool features too such as creating your own tabs (yes Ignition has tabs) and sharing your error messages with other people. This is done using Flare, a tool that comes with Ignition.
For everything about Laravel Ignition and Flare, visit https://freek.dev/1441-ignition-a-new-error-page-for-laravel.
Laravel Vapor

Another big one. Laravel Vapor is a serverless deployment platform for Laravel. But wait, why do we need a deployment platform? We already have Laravel Forge, right? As beloved as Forge is amongst the Laravel community, it does have its limitations. It doesn’t have autoscaling to deal with large sudden increases in traffic that prevent your site from crashing. Also, configuration is required when OS or PHP updates occur. Vapor has autoscaling, so, you don’t have to worry about sudden spikes in your traffic causing website downtime. In addition, because of the serverless structure of Vapor, it also handles all the updates you may stress about when using Forge.
Vapor’s website is very clean looking and everything seems easy to find. When you deploy a project, you can see the different stages of the deployment process loading on the UI. I find this to be very reassuring and comforting. You can also rollback your application with a click of a button. Just click on “rollback” and it’ll do just that. Pretty neat. Same deal if you want your app to undergo maintenance. Just click on the “maintenance mode” button.
Another cool feature of Laravel Vapor is that you’re able to set alarms. What do I mean by that? For example, to know when your website traffic suddenly blows up, you can set a certain amount of HTTP requests per minute, and if your website hits that limit, the alarm will go off, informing you of the surge in traffic. Taylor Otwell showcases this and other conditionals in his Laravel Vapor demo which I’ll link to below.
There’s so much to cover with Laravel Vapor and the Laravel update itself. Because of this, I didn’t really want to dive into the complexities too much in this post. To learn more about the technical aspects of Laravel 6.0, you can take a look at the release notes here https://laravel.com/docs/6.0/releases. For more info on Laravel Vapor, visit this video by Taylor Otwell https://www.youtube.com/watch?v=XsPeWjKAUt0&t=362s.
1 note
·
View note
Text
12 Best Reasons Why Use Laravel to Build Web App Development
Developers find difficulty in choosing the proper framework for their application in the initial stages of project development. So, here we have come up with some stages that a developer should keep in mind while choosing the proper Laravel PHP framework for their web app development. It includes Development cost, Experience, Third-party integration, Popularity, Deployment, Testing, etc.
Before choosing a framework, you need to contemplate on programming language and software development community to perform the task for you. PHP Development Services is an open-source, widely-used programming language. It is a powerful tool for making web pages . It comes with a variety of frameworks that have robust technical capabilities. Those frameworks are- Zend, Slim, CakePHP, Symfony, Yii 2, Phalcon, Laravel, etc.
Among all of the above frameworks, Laravel is the most acclaimed framework of PHP. Why is Laravel’s most popular framework? Why should developers choose Laravel amongst a variety of frameworks? You will find the answer to the above questions in this article. Before it, you have to understand what Laravel is? So, let’s get started!
What is Laravel?
“Taylor Orwell” created Laravel. It is the most popular and power-packed open-source framework of PHP. It is an advanced alternative to the Codelgniter framework and follows a modal-view-controller design pattern based on the Symfony framework.
The popularity of the Laravel PHP framework increased more after releasing version 3. With this version, Laravel comes with the following features-
Command Line Interface ( known as Artisan)
Support for the Database system
Migrations
Packaging system (known as bundles)
Laravel has many tools and frameworks to help you build modern web applications. It offers a library of guides, documentation, and tutorial videos that help developers learn and gain expertise. Simultaneously, it has simplified the efforts of the laravel web app development company in gaining the correct user traction.
From time to time, Laravel has come up with a new version and gets more popular with each one. In June 2011, the first stable version was released, Version 5.6 ( February 2018), Version 5.7 (September 2018), Version 5.8 (February 2019), Version 7 (March 2020), and Version 9 (February 2022).
We have seen what Laravel is. Let’s see the reasons why use it to build web app development?
Reasons to Use Laravel PHP Framework to Build Web Apps
There are many outstanding reasons to choose Laravel. The top reasons are well explained by laravel web app development companies. Thus, here are the best 12 reasons to choose laravel for web app development.
1. Simple Coding Languages
No one in this world looks for a complex way to finish their work. Everyone wants an easier way to complete the process. In the same way, web developer utilizes laravel web development services to render the most scalable apps easily. Laravel is the one that helps developers to develop an application with the simplest coding languages. In comparison to other frameworks, it is one of the simplest coding languages. It is ideal for all types of projects.
This framework has an impressive syntax that helps developers to make their work easier. The developers can create diverse applications with the features of Laravel and satisfy the needs of various clients.
2. URL Routing
URL Routing is necessary for web applications. Without URL Routing, it is difficult for web applications to understand what the users want. It will display a blank or error page. Users use web development by clicking links or typing to see contents like a product description, an article, a contact form, etc. Laravel services allow the simple method of defining routes and make work easy for developers.
3. Effective Queue Service
The situations happen like server failure or applications becoming expensive when constant communication occurs between two parts of an application or between two or more applications. Laravel PHP framework happens to be the savior.
Developers try to avoid these situations by adopting a message queue system at the initial stages of project development and ignoring other techniques. It helps the developers speed up the applications, maintain integrity, and load balancing.
View Original Source:
https://www.dreamsoft4u.com/blog/12-reasons-use-laravel-build-web-app-development/
0 notes
Text
Be taught Laravel From Zero & Type Kindly Mission in Arabic.
Be taught Laravel From Zero & Type Kindly Mission in Arabic.
Web The Route Note: $24.99 Laravel 5.8 باذن الله بعد انتهاءك من الكورس ستكون قادر ان تكون مطور لارافيل فعلى . سيقسم هذا الكورس بأذن الله الى اقسام كثيره وكل قسم سيتكلم فى موضوع وسيكون لكل قسم مشروع بسيط لتتعلم وتتقن كل شئ بشكل اكيد. ستتعلم فى هذا الكورس جميع الاساسيات والمواضيع المتقدمه اللتى ستؤهلك لتكون مطور لارافيل وستقوم بعمل مشروع كورسات تعليمى كامل من الصفر بعد الانتهاء من تعلم جميع…

View On WordPress
0 notes
Text
How to Add and Remove Laravel Events | Yudiz Solutions

Prefix:
Laravel Version 5.8 or above
PHP Version 7.1.3 or above
Overview:
Hello friends, today we will discuss the Event and Event Listener and how we can add on laravel and manage Events. There are so many blogs for Event and Event Listener but in this blog, we will discuss what is an Event and Event Listener is and how we can add and remove Events in our project.
What is an Event?
In Computer terminology, an Event is an action detected by a program. Events can be user actions such as moving a cursor, clicking a mouse button, or pressing a key.
What is an Event Listener?
An Event Listener is a function in a program that waits for an event to occur. The listener is a program that reacts to an input or signal by calling the event’s handler.
E.g: When a user is registered successfully at that time sending an email.
When to use Event?
An Event is mainly used to perform repeated tasks in your project. Suppose you are working on any project and you have some tasks that you have to perform more than once, at that time you can use an Event.
Let’s take an example, In our project, we want to send emails to a particular user when the user signs up or purchases a product from our website. Here if we don’t use an Event, we have to perform separate codes to send mail for sign up and purchase of product.
In Laravel, best practice is that we have to create one event for sending emails and create a different Listener and set “listen” property to identify which event is executed.
Create Event and Event Listener
In Laravel we can easily create an Event and Event Listener. This mainly is covered in three parts.
Registering Events & Listeners
Generating Events & Listeners
Dispatching Event
Let’s discuss all the parts of an Event and Event Listener in detail.
1. Registering Events & Listeners
In Laravel, we have an App/Providers/EventServiceProvider class to register our events and listeners. In this class “listen” property contains an array of all events (keys) and their listeners(values). You can add one or more events
In this array as per your requirement.
Example:-

2. Generating Events & Listeners:
In laravel Generating Events & Listeners there are two method that is as follow:
a. Generate an Event and Listeners using EventServiceProvider
b. Create Listener and Event using command:
a. Generate an Event and Listeners using EventServiceProvider:
Step (1) : In the first step you have to define Event and Listener in Providers/EventServiceProvider class.You can define multiple Events and Listener in this array as explained above.
Step(2) : After that we need to generate an Event and Listener using the following command.This command will generate ‘CheckPayment’ event in App/event path and create ‘CheckPaymentListener’ listener at App\Listeners location.=> php artisan event:generate
b. Create Listener and Event using command:
Step(1): In this way we have to execute the following command to create an event and listener.The following command will generate “ChkPayment” event at App/Events.=> php artisan make:event ChkPaymentAbove command will create a “ChkPayment” file something like this :ChkPayment:

The following command will generate Listener that is “ChkPaymentEventListener” for event “ChkPayment”.”CheckPaymentListener” provide one method that is “handle”.In this method you can define your action(logic) to perform when this event is called. => php artisan make:listener ChkPaymentEventListener –event=”ChkPayment”
ChkPaymentEventListener:

3. Dispatching Event
In the last step we have to dispatch (execute) our event. To dispatch an event, you may pass an instance of the event helper. The helper will dispatch the event to all of its registered listeners. Since the event helper is globally available, you may call it from anywhere in your application. We can pass arguments to the event and access in our defined Event and Listener class.
Please find below file examples:
Controllers/frontend/PaymentController:

web.php(Route):

Note (To Stop Event):-
In laravel if you want to stop the execution of an event you need to return false in the handle method of Listener class. In our example, we have defined a ‘fireornot’ variable in “CheckPayment” event and we will pass value in PaymentController here we have passed second argument as boolean value that is true or false.
Here, the passing argument is true so it will execute an event and display the following output.
Output:
Payment amount is: 10 This is check payment event.
Conclusion:
I hope this blog is useful to all those who want to add Events in Laravel. In this blog, we have tried to cover all possibilities regarding Events. It is the best practice to add Event and Event Listener so that the code stays optimized and can take advantage of code reusability. Once you have created any Event it can be accessed by the entire application.
Follow us on https://blog.yudiz.com/ for more such interesting blogs.
0 notes
Text
Dicas Rápidas: Rotas em Laravel

Olá! No post de hoje pretendo abordar de forma rápida e branda o roteamento dentro do maior Framework de PHP da atualidade, o código foi criado na versão 5.8, mas continua inalterado até a versão atual da data desta postagem!
A postagem será organizado em código e explicação do mesmo. Bom Divertimento!

Lembre-se que para chamar uma das rotas que você nomeou pelo nome dela efetivamente,
Usa-se a função {{route('nome-que-você-deu-para-a-rota')}}, assim mesmo, com duas chaves isso pode ser usado em <a nos href's por exemplo, mas sempre utilizando essa função que é do próprio Laravel.
O método abaixo irá fazer com que, não importando o método utilizado pela rota, quando entrar na do primeiro parâmetro, seja automaticamente redirecionado para a segunda rota

ou

Dessa forma eu fiz com que toda vez que for acessada a rota "sobrenos", ela redirecione o usuário para a rota "ihul"

Criar uma rota para associar cada método de um controlador criado por meio do comando make:controller --resource, para associar cada método pré-gerado a uma rota pré definida por um group de domínio a especificar, nesse caso, cliente.

E por hoje é isso! Espero que tenham gostado e/ou aprendido com essa postagem, vejo você na próxima, e agora BORA PRO CÓDIGO!
0 notes
Photo

Multi guard authentication in laravel 5.8
Table of Contents
What is a guard in laravel authentication?
Create middlewares for normal users and admin users routes
Register middlewares in Kernel.php
Apply middlewares on their respective routes in web.php
Conclusion
How to create a guard in laravel ?
What is middleware in laravel ?
#laravel#laravel framework#authentication#guards#multi guards#php#programming#php programming#medium#Social media#social media marketing#social#social marketing
0 notes
Text
Why Should You Choose A Laravel Development Company?

Created by Taylor Otwell, Laravel is an open-source PHP web framework. The previous framework did not provide certain features like built-in support, for the authentication and authorization of the user previously. Thus Laravel was created in the intention for the development of web applications following the MVC architectural pattern. A Laravel Development Company has modular packaging systems with dedicated dependency manager, showing different ways to access relational databases. The version 1 of Laravel has a built-in support included for routing, localization, authentication, models, sessions, views, and other mechanisms. It’s just that this version lacked support for controllers that prevented it from being a true MVC framework. But major new features were included which made Laravel version 2 a fully MVC acquiescent framework. This version includes a built-in support for the inversion of control principle, and a Blade which is a template system, with a plus point as it was a downside, i.e., support for third-party packages was removed in Laravel version 2. As the years passed, a set of new features had been included from Laravel version 1 till Laravel version 5.8 that was just released this February in 2019 with many new features, like Laravel Mix, Route Improvements, Laravel Dusk, Blade Components and Slots, Automatic Facades, Markdown Emails, Higher Order Messaging for Collections, and others.
Laravel is specially built for server side programming. It produces reliable website solutions when it is mixed with its innate quality of the inbuilt tools for security purposes. Organizations who are looking for a Laravel solution as part of their product or service side can expect to garner the maximum benefit with companies like, Moon Technolabs which use Laravel, to provide a rich and elegant coding platform providing it with quicker development and tapered process time, making it the most favorable Laravel Development Company. It offers a protean horizon for deft software application development, due to its sturdy platform to build quality-rich websites and database access. Laravel development Companies derive its utter power from its technology platform, and with features like Routing System, Database Migration, Decoupled Components, Code Validation, Micro Framework Support, Secure & Swift Development, Unit Testing, Latest PHP Support and Multiple File System, are the main reasons why you need to go for it.
0 notes
Text
Membuat Ajax Crud Laravel 5.8

Mari kita main-main dengan Laravel 5.8. Disini kita akan membuat AJAX CRUD di Laravel 5.8. Kita anggap anda sudah bisa menginstall apache server, dll di PC anda, bisa menggunakan Xampp atau lebih mudah lagi menggunakan Laragon. Pertama-tama kita Install Laravel 5.8, masukkan ini di console anda : composer create-project --prefer-dist laravel/laravel laravelunik Kedua, seting konfigurasi .env : DB_CONNECTION=mysql DB_HOST=localhost DB_PORT=3306 DB_DATABASE=nama_data_base DB_USERNAME=root DB_PASSWORD= Ketiga, migrasi database ke tabel : php artisan migrate Keempat, silahkan anda install Paket Yajra Datatables di Laravel anda, lakukan perintah berikut di console anda : composer require yajra/laravel-datatables-oracle Kelima, selanjutnya, silahkan anda buka file config/app.php, dan sesuaikan dengan kode berikut di service provider dan alias : config/app.php 'providers' => , 'aliases' => Selanjutnya, jalankan perintah berikut di console anda : php artisan vendor:publish Ke-enam, menambahkan Route di web.php, silahkan anda buka routes/web.php dan sesuaikan kode seperti berikut : Route::resource('ajax-crud-list', 'UsersController'); Route::post('ajax-crud-list/store', 'UsersController@store'); Route::get('ajax-crud-list/delete/{id}', 'UsersController@destroy'); Silahkan anda buat controller dengan memasukkan kode berikut di console : php artisan make:controller UsersController Sekarang, silahkan anda buka file app/Http/Controllers/UsersController.php dan edit seperti berikut : ajax()) {return datatables()->of(User::select('*'))->addColumn('action', 'DataTables.action')->rawColumns()->addIndexColumn()->make(true);}return view('list');}/*** Store a newly created resource in storage.** @param \Illuminate\Http\Request $request* @return \Illuminate\Http\Response*/public function store(Request $request){ $userId = $request->user_id;$user = User::updateOrCreate(,); return Response::json($user);}/*** Show the form for editing the specified resource.** @param \App\Product $product* @return \Illuminate\Http\Response*/public function edit($id){ $where = array('id' => $id);$user = User::where($where)->first();return Response::json($user);}/*** Remove the specified resource from storage.** @param \App\Product $product* @return \Illuminate\Http\Response*/public function destroy($id){$user = User::where('id',$id)->delete();return Response::json($user);}} Read the full article
0 notes
Link
Learn to master Laravel to make advanced applications like the real CMS app we build on this course
What you’ll learn
Learn to build applications using laravel
To install Laravel using Windows and MAC
You will learn how use Laravel
You will learn how to use routes
You will learn how to create and use Controllers and what they are
You will learn how to create Views an what they are
You will learn to use the templating engine Blade
How to connect and use Databases
How to create migrations and what they are
You will learn about Laravel ORM (Object Relational Mapper) and Raw SQL queries. Database stuff 🙂
How to use Laravel Tinker – Command line program to play around with Laravel without persisting data
Database: Eloquent One to One – CRUD
Database: Eloquent One to Many – CRUD
Database: Eloquent Many to Many – CRUD
Database: Eloquent Polymorphic – CRUD
Form Validation
You will learn to download third party libraries to add to Laravel
You will learn to upload files
You will learn about Middleware and security
You will learn about sesssions
You will learn about sending emails
You will learn Github or version control
You will learn how to install a WYSIWYG editor
To install a commenting system / Disqus
You will learn to create a BULK functionality that you can use the CRUD on it
You will learn to deploy Laravel on share hosting accounts, like godaddy
And lots of more cool things
Requirements
Basic OOP PHP
Description
VERSION 5.2 but we keep updating as new version come out. This is an evergreen course because we keep adding new fresh content all the time!
UPDATES …….
5.3 – section 33
5.4 – section 38
5.5 – section 40
5.6 – section 41
5.7 – section 43
5.8 – section 43
We will keep updating the project as new versions come out!
Over 23,000 students in this course and over 380,000 students here at Udemy.
Best Rated, Best Selling, Biggest and just baddest course on Laravel around 🙂
Oh it’s also the best course for complete beginners and of course regular beginners 🙂
Laravel has become on of the most popular if not the most popular PHP framework. Employers are asking for this skill for all web programming jobs and in this course we have put together all of them, to give you the best chance of landing that job; or taking it to the next level.
Why is Laravel so popular? Because once you learn it, creating complex applications are easy to do, because thousands of other people have created code we can plug (packages) in to our Laravel application to make it even better.
There are many reasons why Laravel is on the top when it comes to php frameworks but we are not here to talk about that, right?
You are here because you want to learn Laravel, and find out what course to take, right? Alright lets lists what this course has to offer, so that you can make your decision?
Benefits of taking this course (I promise to be brief)
1. Top PHP instructor (with other successful PHP courses with great reviews)
2. Top support groups
3. An amazing project that we will be building and taking to Github
4. Lots of cybernetic coffee to keep you awake…..
5. Did I mention I was not boring and you will not fall asleep?
Ok, Let’s break each of these down, shall we?
Top Instructor…..
I don’t like boasting but my other PHP courses can speak for me 🙂
Top support groups
I make sure everybody helps in the class and we also have Facebook support groups if needed.
The Amazing project / real life application….
On this project you will learn everything you need for creating awesome applications the easy way with Laravel, and new features will be implemented all the time, just the the curriculum and look at the updates section.
Full Source Code is Available at Github
Oh yeah, we take this to Github (A app repository online) and even show you how, so you will learn that too.
—————————————-
Practicality…………………..
Lots practical skill with some theory so you get more experience that its essential for becoming a Professional Laravel Developer.
This course will take your game a new level. Imagine being able to create the next Facebook or twitter, or even getting the developer job you dream of? What about just a programming job? You can achieve all that if you study with us and really focus. We will help you along the way.
Here are some my lovely students (Not to show off of course) 🙂
REVIEWS ——————————->
Rating: 5.0 out of 5
*****
Understood MVC in one sentence after so many years! Great job Edwin. A great deal of effort has been put by Edwin to create the content in two parts , first for understanding the basic components (eloquent relationships, views, controller etc) and then actually using it in a project. And he loves teaching. We love learning from him!
———————————————————
Rating: 5.0 out of 5
Great Course! Everything was explained well and if you will have any questions they will give you good answers, or you will find the answers in Q&A.
———————————————————
Rating: 5.0 out of 5
I would recommend this course to Laravel beginners like me, it covers a lot and the idea of learning on short-manageable videos + learning from errors that follow is a home run best approach! I am satisfied with course and especially with teacher Edwin who is extreme motivator…….
Rating: 5.0 out of 5
I loved the course!! Learned a lot and actually applied it, I’m very happy. 10-stars!!!
———————————————————
Get it? Not every course its perfect we do get the best reviews for a good reason, of course you can’t please everybody but we try.
Are you ready to to create the next Facebook or Twitter? …………….
Lets start with the fundamentals
Downloading Laravel
Installing it with composer
Lets also use Laravel Homestead
We learn about Routes, Controllers, views, models, migrations, template engines, middleware and more
Lets learn the CRUD, create, read, update and deleting data 🙂
Wait, lets also learn the CRUD with all the ELOQUENT relationships,
Lets learn so database stuff 🙂
One To One
One To Many
One To Many (Inverse)
Many To Many
Has Many Through
Polymorphic Relations
Many To Many Polymorphic Relations
Querying Relations
Relationship Methods Vs. Dynamic Properties
Querying Relationship Existence
Querying Relationship Absence
Counting Related Models
Inserting & Updating Related Models
The save Method
The create Method
Belongs To Relationships
Many To Many Relationships
Let me break down some things from the projects but not all, cause my hands are a little tired 🙂
Authentication system
Multi users with roles, Admins, subscribers and whatever you want 🙂
User profiles
Uploading photos, multi pictures
Multiple input selections
User, CRUD
Pos CRUD
Category CRUD
Photo CRUD
Pretty URL’s
Commenting system, reply system with tree
Disqus commenting system
Sessions, and flash messages
Email Sending
EMAIL testing
Restrictions
Deployment
Lots more, too many to list
Oh did I mention we keep updating the course with new versions?
Did I also mention this LARAVEL course is the best rated course, the best selling and the biggest of its kind here in Udemy?
Lets start this and let’s create big things 🙂
Who this course is for:
People looking for web programming jobs should take this course
People looking to learn everything about laravel should take this course
Students who want to take their PHP skills to another level should take this course
Created by Edwin Diaz, Coding Faculty Solutions Last updated 3/2019 English English
Size: 9.60 GB
Download Now
https://ift.tt/1sLScUT.
The post PHP with Laravel for beginners – Become a Master in Laravel appeared first on Free Course Lab.
0 notes
Link
はじめに 皆様こんにちは。OPTiM新卒1年目エンジニアの青木です。 前回は早押しボタンなんかを作っていました。 tech-blog.optim.co.jp 今回は、PHP フレームワークの Laravel を、PostgreSQL と Vue.js と組み合わせて作成する TODO アプリを通して紹介します。 このフレームワークらはこちらの記事でも密かに利用しています。 tech-blog.optim.co.jp OPTiMではあまり利用されていませんが、一部のアプリケーションで実利用されている箇所もございます。 PHPは昔のイメージからかなり避けられていていますが...今のPHPとそのフレームワークはすごく発展していてとても使いやすいので是非使っていただきたい!という気持ちがあります。 ですが、現状はあまり利用していただけなくて個人的には悲しい気持ちでいっぱいです。 そんなPHPですが、フレームワーク(LaravelやFuelPHPなど)を利用することにより未利用時よりも高速かつ安全に開発することができます。 そんなフレームワークの紹介を「TODOリストアプリケーション」を作りながら見ていきましょう。 PHPフレームワーク「Laravel」 今回ご紹介するのはPHPフレームワークの「Laravel」です。 Laravel - The PHP Framework For Web Artisans laravel.jp フレームワークの仕様に乗っかって開発することによりかなり安全で可用性のあるアプリケーションの開発が容易になります。 個人的にLaravelのいいところはズバリ 爆速安全開発 です。 本当に手早くWebアプリケーションが作れます。 今まで数人で作業していたものをたった一人で1週間もあればかなり強い物が作れます! 2019年8月5日現在のLaravel最新バージョンは「5.8」で「5.7」の��イナーアップデートとなっています。 Laravelは奇数バージョンがメインとなっており、中でもLTSとなっているのは「5.1」「5.5」となっています。セキュリティフィックス期限はLTSで3年間、一般的なリリースについては1年間のサポートとメンテナンスがされています。 このように、言語仕様だけではカバーできないセキュリティの担保もフレームワークが担ってくれることにより、PHP5以前の時代よりも遥かに強くなっています。 ここで、Googleトレンドより注目度を比較してみましょう。 実は代表的なWebフレームワークの「Ruby on Rails」や「Django」などよりもLaravelの注目度が上がってきています。 日本ではダントツで「Ruby on Rails」が多く見られます。 海外での「Laravel」の注目度が上がってきているようですね。 Laravelは機能がとても豊富です。ですからファイルサイズ的にも大きくなりますし、環境にも負担がかかってしまいます。 そんな時は「Lumen」を利用しましょう。ここではあまり解説しませんが、「Lumen」は「Laravel」の軽量版として開発されています。 とっても雑に説明するとNode.jsのExpressのような感じですね。 さて、前置きが長くなりましたが、本題に移りたいと思います。 今回の目標 PHPフレームワークLaravelで、DBを使用したSPA(Single Page Application)のTODOアプリを作ります。 またログイン認証によるユーザ管理も同時に行っていきます。 完成形 この記事の最後にはこのようなアプリケーションが出来上がります。 ユーザの新規登録・ログイン・ログアウト ログインユーザごとのTODOの表示・追加・更新・削除 最低限のView 使用する技術 PHP Laravel Vue.js PostgreSQL Docker 導入・環境構築 PHPの導入 LaravelでバージョンごとにPHPに対する要件が決められています。 現時点でのPHPの最新バージョンは「7.3.8」 現時点でのLaravelの最新バージョンは「5.8.17」 Laravel「5.8.*」で求められるPHPの要件は以下のとおりです。 = 7.1.3 BCMath PHP拡張 Ctype PHP拡張 JSON PHP拡張 Mbstring PHP拡張 OpenSSL PHP拡張 PDO PHP拡張 Tokenizer PHP拡張 XML PHP拡張 これに応じてPHPの導入を行いましょう。 ちなみにHomebrewでインストールした場合は「7.3.7」がインストールされました。こちらのバージョンでも要件を満たしておりますので大きな問題はありません。 ※ただしセキュリティ等の関係上最新バージョンを使うに越したことはありません。下調べは慎重にかつ念入りに行いましょう。 Composerの導入 Laravelを構築するためのパッケージマネージャが必要となります。 PHPの代表的なパッケージマネージャである「Composer」を導入しましょう。 curl -sS https://getcomposer.org/installer | php sudo mv composer.phar /usr/local/bin/composer composer config -g repositories.packagist composer https://packagist.jp HelloWorld(プロジェクトの作成) さて、いよいよプロジェクトを作成していきます。 「Laravel」では以下の1コマンドのみでプロジェクトの新規作成が行えます。 $ composer create-project laravel/laravel Techblog_sample ビルトインサーバの起動 Laravelに標準搭載されているartisanコマンドでビルトインサーバを起動してみましょう。 簡単ですね。環境構築後からはたった3コマンドしか叩いていませんが、HelloWorld同等の画面まで出せました。 データベースの導入とAuth実装 データベースの導入を行います。 今回はPostgreSQLを利用していますが、MySQLやSQLiteなども対応しています。 PostgreSQL導入 (Docker使用) LaravelとDBの接続 Auth(認証)導入 PostgreSQL導入 (Docker使用) PostgreSQLを構築します。 こちらは皆様のお好きな方法で構築していただいて構いません。 あくまで一例として記載いたします。 データベースを開発機にそのまま構築しても良いですが、比較的構築の簡単なdocker-composeを利用して構築をしたいと思います。 docker-compose.yml version: '2' services: db: image: postgres:11-alpine ports: - "15432:5432" environment: POSTGRES_USER: "postgres" POSTGRES_PASSWORD: "password" POSTGRES_DB: "techblog" 5432/tcp データベースの構築が終わりました。 LaravelとDBの接続 LaravelとDBサーバを接続します。 こちらはデフォルトで環境変数から接続情報を取得するようになっており、環境変数を変更することにより接続情報を更新できます。 また、環境変数に存在しなかった場合はディレクトリに存在する.envファイルを参照するようになっています。 .envファイルを以下のように変更してください。各自で構築された場合は構築した際の情報に都度変更してください。 .env ... DB_CONNECTION=pgsql DB_HOST=127.0.0.1 DB_PORT=15432 DB_DATABASE=techblog DB_USERNAME=postgres DB_PASSWORD=password ... 接続確認は次のAuth作成時に確認します。 Auth(認証)導入 LaravelにAuth(認証)を追加します。 至って簡単です。 $ php artisan make:auth Authentication scaffolding generated successfully. 以上です。 試しにビルトインサーバを立ち上げ、確認をしてみましょう。 お気づきの方が既にいらっしゃるかもしれませんが、右上にログインボタンなどが現れています。 試しにログインボタンを押してみましょう。 ログイン画面が構築されています。 たった1コマンドで ログイン画面 新規登録画面 パスワードリセット画面 が実装されます。 素晴らしいですね。 ただ、いまのままですとDBにアクセス出来ていません。 以下のコマンドを入力してマイグレーションを行いましょう。 $ php artisan migrate Migration table created successfully. Migrating: 2014_10_12_000000_create_users_table Migrated: 2014_10_12_000000_create_users_table Migrating: 2014_10_12_100000_create_password_resets_table Migrated: 2014_10_12_100000_create_password_resets_table これで新規登録などが出来るようになりました。 デフォルトではセッションでログイン情報を管理します。 コマンドライン(Tinker)でDBデータ確認 artisanコマンドによるデータ確認を行ってみたいと思います。 Laravelにはデフォルトでtinkerと呼ばれる対話型ツールが存在します。 こちらを利用することにより、ソースコードにする前に動作確認が出来ます。 また、Laravelに読み��まれるモジュール等が手動で読み込める状態になっているので、Laravelで開発する際はおすすめの動作確認方法です。 LaravelからDBにアクセスするために、クエリビルダを利用します。 作業をするそのまえに データベースにデータを入れるため、一旦画面上から新規登録を行ってみましょう。 しっかりと新規登録されていますね。 また、こういった事もデバッグとして利用できます。 false コマンドライン上でセッションも利用できるということですね。 独自で作成したサービスモジュールなんかも利用出来るので、是非デバッグなどにご利用ください。 テーブル設計 TODOアプリケーションを制作するに当たってテーブルを構築しなければいけません。 今回は1ユーザが複数のTODOを持てるように設計します。 テーブル設計は前項でも利用した Migration を利用します。 $ php artisan make:migration create_todos_table Created Migration: 2019_08_05_065824_create_todos_table database/migrations/2019_08_05_065824_create_todos_table.php <?php public function up() { Schema::create('todos', function (Blueprint $table) { $tablebigIncrements('id'); $tablestring('todo'); // この行を追加 $tableinteger('user_id'); $tabletimestamps(); }); } public function down() { Schema::dropIfExists('todos'); } 作成できたら、マイグレーションを実行してデータベースに反映させましょう。 $ php artisan migrate Migrating: 2019_08_05_065824_create_todos_table Migrated: 2019_08_05_065824_create_todos_table これで新たにテーブルが作成されました。 ここまで ここまではLaravelの導入、環境構築、Authの導入を行いました。 PHPでのコーディングをほぼ無しとしてここまで作れました。 次は、実際にルーティングやMVCなど、Laravelのメイン機能についてご紹介していきます LaravelのMVCとその他の機能 ルーティング コントローラ(C) ビュー(V) モデル(M) ミドルウェア ログイン後のリダイレクト先 実装するページ Authは自動で実装されるので割愛しています。 TODOアプリケーションはSPAで作成し、APIを叩いて操作を行います。 ルーティング いよいよ基盤が完成したので、ルーティングの説明に入ります。 Laravelのルーティングは routes ディレクトリ内に存在し、それぞれのファイルは用途によってプレフィックスが初期でつけられていたりします。 今回は web.php を編集していきましょう。 routes/web.php <?php Route::get('/todo', function () { return "このページはアプリケーションのページです"; }); このルーティングを追加すると、画像のように表示されます。 今回はSPAなのであまり使いませんが、SPAではないアプリケーションを作る場合は基本的にここに記述していきます。 また、 api.php に作成することで自動的に/api/のプレフィックスが付きます。任意のプレフィックスに変更したい場合は app/Provider/RouteServiceProvider.php を変更しましょう。 さて、このままではクロージャがどんどん膨れ上がって行ってしまいますので、次の工程でしっかりと分業してあげます。 コントローラ web.php がロジックでどんどん汚染されていくので、コントローラと呼ばれるもので分業していきましょう。 下記のコマンドでコントローラが自動生成されます。 $ php artisan make:controller TodoController Controller created successfully. TodoController.phpの中にメソッドを生やし、web.phpから読み込んでみましょう。 app/Http/Controllers/TodoController.php <?php namespace App\Http\Controllers; use Illuminate\Http\Request; class TodoController extends Controller { public function index() { return "コントローラからこんにちは"; } } routes/web.php <?php Route::get('/todo',TodoController::class . "@index"); 実装が出来たら、php artisan serveで見てみましょう。 いかがでしょうか。 コントローラに分割することによってルーティングによる画面や機能別にロジックを記述することが可能になりました。 ビュー では、ビューを表示してみましょう。 Laravelのビューは強力なbladeテンプレートエンジンを含んでいます。 コントローラから変数を渡し、bladeテンプレートエンジンにより表示してみます。 $ touch resources/views/todo.blade.php resources/views/todo.blade.php <?php @extends('layouts.app') @section('content') <div class="container" <div class="row justify-content-center" <h2TODO アプリケーション</h2 </div </div @endsection @から始まるものはbladeテンプレートエンジン特有のメソッドです。 今回は既に用意されているレイアウトデザインを利用します。 上記のファイル作成が終われば、TodoController.phpを変更していきます。 view()メソッドにbladeテンプレートのファイル名を記入すればviewが帰ります。 app/Http/Controllers/TodoController.php <?php namespace App\Http\Controllers; use Illuminate\Http\Request; class TodoController extends Controller { public function index() { return view('todo'); } } モデル Eloquent ORM と呼ばれる非常にシンプルかつ高機能なORMがLaravelでは提供されています。 ここでいうモデルとはEloquentモデルのことであり、Eloquent ORMの利点を最大限生かされたものです。 まずはじめに、モデルを作成しましょう。 $ php artisan make:model Todo 基本的にはこれで終わりです。 テーブル名が todos であれば、モデル名は Todo モデル名が Sample であれば、テーブル名は samples この方式で決定しています。 仮にテーブル名とモデル名を変更したい場合はモデルファイル(app/モデル名.php)のクラス変数に <?php protected $table = 'テーブル名'; と指定することが出来ます。 では、確認してみましょう。 Illuminate\Database\Eloquent\Collection {#2981 all: [ App\Todo {#2980 id: 2, todo: "TestTest", user_id: 1, created_at: null, updated_at: null, }, ], } insert文で追加してみました。 しっかりと反映されていますね。 モデル(リレーションの定義) モデルにリレーションを定義することが出来ます。 かなり便利なので是非使っていきたいところです。 今回のリレーション内容を再確認してみましょう。 users.id と todos.user_id が紐付いていますね。 これをユーザ側のモデルからtodosを参照出来るようにモデルに定義していきます。 app/User.php <?php class User extends Authenticatable { ... 省略 public function todos(){ return $thishasMany('App\Todo'); } } これで実装が終わりです。 Tinkerで確認してみましょう。 を利用することでユーザに紐付いたTodosテーブルのレコードを受け取ることが出来ます。 ミドルウェア ルーティングする際に、特定のページらに一定の操作を与えたい。 などのニーズに応えるのがミドルウェアです。 現状問題となっているのは、ログインしていなくても/todoにアクセス出来てしまうということです。 ログインしていないのにTodo画面へ遷移されてはとても困ります。ユーザ毎に情報を表示するのにそのユーザが誰かわからないのでエラーが出てしまいます。 かといって、毎ページ同じ動作を記述するのはとてもスマートとは言えません。 そこで、ミドルウェアの登場です。 説明よりやってみたほうが��いので、コードを記述します。 routes/web.php <?php Route::group(["middleware""auth"],function(){ Route::get('/todo',TodoController::class . "@index"); }); Route::groupの第2引数のクロージャに先程の /todo を入れてみましょう。 すると、/todoにアクセスしようとするとログイン画面へリダイレクトします。これでログイン判定が出来るのでいちいちコントローラ内部にロジックを書くことはありません。 また、ミドルウェアは自作することが出来ます。後ほどAPI作成の際にひつようになりますのでそちらで詳しく解説いたします。 ログイン後のリダイレクト先 現状、新規登録・ログイン後に /home へリダイレクトしていると思います。 これはLoginController.php などが自動的にリダイレクト処理を行っているからです。 今回は/homeを利用しませんので、削除する方法を記載します。 app/Http/Controllers/Auth/LoginController.php app/Http/Controllers/Auth/RegisterController.php app/Http/Controllers/Auth/ResetPasswordController.php app/Http/Controllers/Auth/VerificationController.php - protected $redirectTo = '/home'; + protected $redirectTo = '/todo'; resources/views/home.blade.php 削除 routes/web.php name('home'); これでログイン後は /todo へリダイレクトします。 TODOアプリケーションのメイン機能実装(サーバーサイド実装) APIの実装 まずはじめにAPIの実装を行います。 今回のAPIでの認証は、セッションで行いたいと思います。 機能一覧 TODOアプリケーションを作成するに当たって、APIの機能を洗い出します。 こちらの機能を作成していこうと思います。 機能実装 まず、コントローラに定義します。 app/Http/Controllers/TodoController.php <?php use App\Todo; use Illuminate\Support\Facades\Auth; class TodoController extends Controller { ... 省略 public function get(){ // 全件表示 } public function post(){ // 1件追加 } public function delete(){ // 1件削除 } public function update(){ // 1件更新 } } 次に、ルーターに追加していきます。api.phpになっているので注意してください。 route/api.php <?php Route::get('/todo','TodoController@get'); Route::post('/todo','TodoController@post'); Route::delete('/todo/{id}','TodoController@delete'); Route::put('/todo/{id}','TodoController@update'); 次は確認をはさみつつ、それぞれの機能を実装していきます。 全件表示 <?php public function get(){ return response()json(Auth::user()todos()get()); } モデルの説明の時に行ったものと同じです。 1件追加 <?php public function post(Request $request){ $todo = new Todo(); $todotodo = $requesttodo; $todouser_id = Auth::id(); $todosave(); return response("OK", 200); } モデルでインスタンスを生成し、それぞれに値を当てはめてから最後にセーブをすればSQLを発行して追加処理を行ってくれます。 Todo::insert()でも同じことが行なえます。 1件削除 <?php public function delete($id){ Todo::find($id)delete(); return response("OK", 200);; } Todoのインスタンスにdeleteメソッドがありますので、それを実行すれば削除できます。 1件更新 <?php public function update(Request $request,$id){ $todo = Todo::find($id); $todotodo = $requesttodo; $todosave(); return response("OK", 200); } 追加の時とほぼ同じで、findでtodoのインスタンスを持ってくるだけで出来上がります。 APIのAuth実装 このままでは誰でもAPIにアクセスできてしまいます。 しかもコード内部で Auth::を利用しているので、ログインしていないユーザがアクセスするとエラーが発生します。 ここではそのAuth(認証)をAPIからでも行えるように変更、追記していきます。 セッションを有効化 APIではデフォルトでAuthorizedTokenを利用するような設計になっています。 今回はセッションを利用するので以下のように変更します。 app/Http/Kernel.php <?php // 省略 protected $middlewareGroups = [ 'web' [ \App\Http\Middleware\EncryptCookies::class, \Illuminate\Cookie\Middleware\AddQueuedCookiesToResponse::class, \Illuminate\Session\Middleware\StartSession::class, // \Illuminate\Session\Middleware\AuthenticateSession::class, \Illuminate\View\Middleware\ShareErrorsFromSession::class, \App\Http\Middleware\VerifyCsrfToken::class, \Illuminate\Routing\Middleware\SubstituteBindings::class, ], 'api' [ // ここを追加 \App\Http\Middleware\EncryptCookies::class, \Illuminate\Cookie\Middleware\AddQueuedCookiesToResponse::class, \Illuminate\Session\Middleware\StartSession::class, \Illuminate\View\Middleware\ShareErrorsFromSession::class, \App\Http\Middleware\VerifyCsrfToken::class, \Illuminate\Routing\Middleware\SubstituteBindings::class, // ここまで追加 'throttle:60,1', 'bindings', ], ]; // 省略 これでセッションが有効になります。 ミドルウェアの作成 デフォルトで備わっているAuthのミドルウェアはビューに最適化されており、ログインせずにミドルウェアに到達すると /login にリダイレクトされてしまいます。 APIではリダイレクトではなく エラーメッセージ が帰ってくることを期待します。 ですのでミドルウェアを自作します。 $ php artisan make:middleware AuthApi app/Http/Middleware/AuthApi.php <?php use Illuminate\Support\Facades\Auth; // 省略 public function handle($request, Closure $next) { if (!Auth::check()) return response("",401,["Content-type: application/json"]); return $next($request); } use ...Auth の行が必要ですので注意してください。 app/Http/Kernel.php <?php // 省略 protected $routeMiddleware = [ // 省略 'auth.api' \App\Http\Middleware\AuthApi::class, ]; これでミドルウェアの実装完了です。 実装 先程作成したtodoのルーターに変更を加えていきます。 route/api.php <?php Route::group(["middleware" "auth.api"],function(){ Route::get('/todo','TodoController@get'); Route::post('/todo','TodoController@post'); Route::delete('/todo/{id}','TodoController@delete'); Route::put('/todo/{id}','TodoController@update'); }); これでログインしていないと401エラーを返すことになります。 フロントの実装 いよいよフロントの実装に入ります。 ここではVue.jsを利用したSPAで制作していきたいと思います。 VueJSの構築 LaravelはデフォルトでVueJSが導入されていて、 既にExampleファイルも構築されています。 Webpackも何も書かなくても初期導入されています。 したがって、npmインストールを行い、Viewを少し変更するだけでVueJSを導入できます。 $ npm i $ npm run dev $ npm run watch # ファイルの変更時、自動的にコンパイルが走る resources/views/todo.blade.php @extends('layouts.app') @section('content') <div class="container" <div class="row justify-content-center" <h2TODO アプリケーション</h2 <example-component</example-component </div </div @endsection を追加することでVue.jsの導入は完了です。 APIを叩くリクエストモジュールを作成 APIを叩く際、数が多くなってくるとごちゃごちゃになってくるので、APIを叩く機能は別に作成します。 resources/js/api.js "use strict" const send = (method,uri,data={} { const url = 'http://127.0.0.1:8000' + uri return new{ var xhr = new XMLHttpRequest(); xhr.open(method, url); xhr.setRequestHeader("Content-Type", "application/json; charset=utf-8" { try{ const res_json = JSON.parse(xhr.responseText) resolve(res_json) }catch (e) { resolve(xhr.responseText) } } { console.log(xhr.status); console.log("error!"); }; xhr.send(data); }) } const api = { getTodoList(){ return send("GET","/api/todo"); }, postTodo(todo){ return send("POST","/api/todo",todo); }, updateTodo(id,todo){ return send("PUT","/api/todo/" + id,todo); }, deleteTodo(id,data){ return send("DELETE","/api/todo/" + id,data); } } export default api APIを叩くためのメソッド send を用意して、下段にAPIをリストのように記述することで新たにAPIが増えても追加しやすいようにします。 コンポーネントの実装 では、駆け足でコンポーネントを作成していきましょう。 今回はLaravelの紹介なのでフロント実装の部分は大幅にカットします。 以下のソースコードをまるごとコピーすれば動作すると思います。 resources/js/components/ExampleComponent.vue <template <div class="container" <div class="row justify-content-center" <div class="col-md-8" <div class="card" <div class="form-group" <input type="text" class="form-control" id="inputtodo" v-model="todo_form" <button type="button" class="btn btn-primary" @click="addTodo"Add</button </div </div <div class="card" v-for="todo in todos" <div class="card-header" <button type="button" class="btn btn-danger" @click="deleteTodo(todo.id)"Delete</button <button type="button" class="btn btn-info" @click="updateTodo(todo.id)"Update</button <input type="text" class="form-control" id="todo" v-model="todo.todo" </div </div </div </div </div </template <script import api from "../api.js" export default { data(){ return { active_todo: null, todo_form:"", todos:[] } }, methods:{ addTodo(){ let data = {todo:this.todo_form} data._token = document.getElementsByName('csrf-token')[0].content; api.postTodo(JSON.stringify(data)).then((){ this.getTodoList() }) }, deleteTodo(id){ let data = {} data._token = document.getElementsByName('csrf-token')[0].content; api.deleteTodo(id,JSON.stringify(data)).then((){ this.getTodoList() }) }, updateTodo(id){ let data = {todo:this.todos.filter((v){return v.id === id})[0].todo} data._token = document.getElementsByName('csrf-token')[0].content; api.updateTodo(id,JSON.stringify(data)).then((){ this.getTodoList() }) }, getTodoList(){ api.getTodoList().then((result){ this.todos = result }) } }, mounted() { this.getTodoList() console.log('Component mounted.') } } </script それぞれの機能ごとに method を用意して、dataやv-modelなどを駆使してAPIを叩きます。 APIを叩いた後はすかさずthis.getTodoListを行っていますが、これは変更を適応するためです。 完成 TODOリストが完成しました。 最後に いかがでしたでしょうか。 記事が長くなってしまいましたが、実際に記述したソースコードはほんの一部分だけです。 こちらにアプリケーションのソースコードを載せております。 GitHub - optim-corp/techblog-laravel-todo-sample Auth(認証)やAPIの作成、SPAの実装までこの量で出来てしまいます。 この記事の通りに実装を行えば上記のTodoアプリケーションが出来上がりますが、バリデーションチェック等の エラーハンドリングを全く行っておりません(特にAPI部分) ので、ご注意ください。 最後になりましたが、「Laravelを使って爆速Webアプリケーション開発を行っていこう!」という言葉を残して締めくくりたいと思います。 ありがとうございました。 OPTiMでは様々な分野で活躍できるエンジニアを募集しております。 今回のようなWebアプリケーションも然り、機械学習やクラウド系インフラ周りまであらゆる分野で活躍出来る場があります! 興味がある方は是非弊社採用ページにてご覧ください! www.optim.co.jp また、夏季インターンシップも募集しておりますので、合わせてご覧ください。 www.optim.co.jp
0 notes
Photo


Multi guard authentication in laravel 5.8
Table of Contents
What is a guard in laravel authentication?
Create middlewares for normal users and admin users routes
Register middlewares in Kernel.php
Apply middlewares on their respective routes in web.php
Conclusion
How to create a guard a in laravel ?
What is middleware in laravel ?
#laravel#laravel framework#php laravel codeigniter html mysql#laravel market share#php#php frameworks#php programming#php projects#phpunit#unittest#endpoint security#security#authentication#guards#guard#routes#author#blog#wattpad#issuu#edocr#slideshare
0 notes
Text
Laravel 5.8 Tutorial From Scratch - e23 - Adding a Custom Middleware
Laravel 5.8 Tutorial From Scratch – e23 – Adding a Custom Middleware
[ad_1]
Now that we know how to apply one of the default middlewares, let’s take the time to create our own custom middleware for our app. Follow along as we talk about all of the ways you can add a middleware, from global, to web groups to individual routes.
For the best experience, follow along in our interactive school at https://www.coderstape.com
Resources
Course Source Code
https://github.com…
View On WordPress
#Laravel#laravel 5 auth#laravel 5.8#laravel 5.8 authentication#laravel 5.8 custom middleware#laravel 5.8 feature#laravel 5.8 features#laravel 5.8 global middleware#laravel 5.8 middleware#laravel 5.8 multi auth#laravel 5.8 user auth#laravel 5.8 user authentication#laravel auth#laravel authentication#laravel custom middleware#laravel from the ground up#laravel global middleware#laravel middleware#laravel registration#laravel route group middleware
0 notes
Text
Laravel 5.8 Tutorial From Scratch - e24 - URL Helpers - Laravel
Laravel 5.8 Tutorial From Scratch – e24 – URL Helpers – Laravel
Laravel 5.8 Tutorial From Scratch – e24 – URL Helpers – Laravel
[ad_1]
In this episode, we explore the 3 URL Helpers offered by Laravel out of the box and refactor our project to use them.
For the best experience, follow along in our interactive school at https://www.coderstape.com
Resources
Course Source Code
https://github.com/coderstape/laravel-58-from-scratch
Hit us up on Twitter with any…
View On WordPress
#laravel 5 auth#laravel 5.8#laravel 5.8 authentication#laravel 5.8 feature#laravel 5.8 features#laravel 5.8 multi auth#laravel 5.8 named resource routes#laravel 5.8 named routes#laravel 5.8 user auth#laravel 5.8 user authentication#laravel auth#laravel authentication#laravel from the ground up#laravel middleware#laravel named resource routes#laravel named routes#laravel registration#laravel route group middleware#laravel routing with parameters
0 notes
Text
Laravel 5.8 Post Form Data From View to Controller Using Ajax
[ad_1]
In this laravel tutorial I have explained how can we post form data from view to controller Using ajax in Laravel 5.8. I also explained how can we validate the form.
#Laravel5.8 #Laravel
1 – Create Controller (0:25)
2 – Create Route (1:05)
3 – Include jQuery for Ajax Function (7:40)
3 – Add Server Side Validation (17:02)
This laravel tutorial video is very good for beginners where they…
View On WordPress
#get data in controller laravel#how to pass form value to controller in laravel#how to send data from form to database in laravel#how to send form data to controller in laravel#Laravel#laravel pass data from view to controller#laravel pass request to controller#laravel post request from controller#laravel post route#laravel tutorial#laravel tutorial for beginners step by step#pass form data to controller laravel#send post data to controller laravel#view to controller laravel
0 notes
Text
𝐋𝐀𝐑𝐀𝐕𝐄𝐋 6 ROLES and PERMISSIONS + ADMIN AREA - EASY LARAVEL TUTORIAL - Part 1 - Laravel
𝐋𝐀𝐑𝐀𝐕𝐄𝐋 6 ROLES and PERMISSIONS + ADMIN AREA – EASY LARAVEL TUTORIAL – Part 1 – Laravel
𝐋𝐀𝐑𝐀𝐕𝐄𝐋 6 ROLES and PERMISSIONS + ADMIN AREA – EASY LARAVEL TUTORIAL – Part 1 – Laravel
[ad_1]
Laravel 5.8 / Laravel 6 Roles & Permissions tutorial.
Create roles, permissions and an admin area in Laravel with this easy tutorial.
– Create Role models which define what name the role has
– Create middleware to protect certain routes from being accessed
– Add checks to controller methods to prevent…
View On WordPress
0 notes