#rpi rpi-setup
Explore tagged Tumblr posts
Visit Tumblr Blog
Explore Tumblr blogs with no restrictions, modern design and the best experience.
Last Seen Tumblr Blogs


Fun Fact
Tumblr is available in 18 languages.
Text
Got the RPi 4 and an external SSD mounted to the wall, soon I'll have my own internal server machine.
There's a lot of things I wanna try doing, but first and foremost is a fie server that doubles as a music streaming device so I don't have to duplicate a few dozen gigs across all my other devices.
#nicoisms#I saw a game streaming setup for RPi too which would be neat as hell but I'd need a second Pi for that
0 notes
Text
A friend of mine asked me recently to detail my Linux setup, and after thinking about it for a bit, I realized that this is essentially a personality quiz for the Linux users I thought I would detail it here as well.
I no longer have a desktop computer at all. I have two older generation "gaming" laptops and three Raspberry Pis. I'm going to go through in the order I got them:
Laptop #1:
[Purchased New in 2016] Acer ROG 7th Gen i7, 16GB Ram, nVidia 1050Ti Mobile, Internal 1TB HDD, external 2TB HDD
This was originally a windows laptop when I got it back in 2016, but in 2021 I was tired of the long windows boot times on the the HDD and was much more familiar with Linux due to several years experience doing webserver admin work.
I use Ubuntu LTS as my base. It's easy, it's well supported, it's well documented, and the official repos have just about everything I could need. The only thing I've really had to add myself is the repo for i3, but we'll get to that in a bit. I also chose Ubuntu because I already had my first two Raspberry pis, and both were running Raspbian, so using a debian based kernal meant that it wouldn't be much of a change when ssh'ing into them.
That said, I've never really liked the default Ubuntu desktop. Gnome3 is slow and full of too many effects that don't look especially nice but are still heavy to execute. Instead I loaded up KDE plasma. You can download Kubuntu and have them to the setup for you, but I did it the hard way because I found out about Plasma after installing Ubuntu and didn't want to start from scratch.
My plasma desktop looks like this:
Of my two laptops, this one is in the best shape. It's the one that I usually take with me on trips. With the dedicated GPU it can do some light gaming (it did heavier gaming on windows, but due to emulation layers the performance is just a little worse these days, Linux gaming isn't perfect), the screen hinge has never been an issue, and it's on the lighter side of gaming laptops (which is not to say that it's light). For that reason, I often find myself actually using it on my lap, in airports, at people's houses, on my own couch typing this up.
For this reason, I started looking into ways to better keep my hands on the keyboard, rather than having to drift down to the track pad, which is my least favorite part of this laptop. During that research I discovered i3. If you're not familiar i3 is a Linux Desktop Environment that is entirely keyboard driven. https://i3wm.org/
To be fair, it's less of a desktop environment and more of a keyboard driven window manager, as it doesn't have a "desktop" per se. Instead when you log into it, you simply get a black status bar at the bottom of the screen. It doesn't even black out the login screen, so if you don't know what to look for, you might think the whole thing has hung. But, the big benefit of this is that the whole thing is lighting fast for a DE. It doesn't waste any resources on effects or really anything that you don't need. But it's really nice for window tiling and task switching without having to get the mouse involved. This is great for productivity (if you're into that), but it's also just convenient for working on a gaming laptop, which might be balanced such that if you take your hands off of it, it might topple off your lap.
This laptop is my primary project computer. It has all my git repos and scripts for doing things like renewing my website's ssl certs. I also run game servers on it for Minecraft. I'm probably going to spin up a Valheim server on it in the near future too. Especially now that the process has improved somewhat.
Raspberry Pi #1:
[Gifted New in 2016] Raspberry Pi 3b, 4GB RAM, 32GB SD card
This one is my oldest RPi. It's had a lot of roles through the years, including an early version of the vogon media server during initial development in 2020. It's run headless Raspbian for a good three or four years now. Currently it's configured as a web server/php scripted web crawler and a pi-hole DNS server. My router currently refuses to use it as a DNS server without bringing the whole network down, but I will on occasion manually switch devices to it when I'm running especially ad-ridden applications.
There's not too much to say about this one. It's stable, I almost never have problems with it. I frequently use it for things that I want running in the background because they'll take too long and I don't want them blocking up one of my other computers.
Laptop #2
[Gifted Used in 2020] Asus Predator 7th Gen i7, 16GB Ram, nVidia 1080 Mobile, 2 internal 256GB SSDs, External 2TB HDD
This one runs windows 10 still. I use this primarily for gaming. The screen hinge is an absolute joke, and replacing it involves replacing the entire screen bezel assembly, which I can absolutely do, but is such a pain that I haven't gotten around to it in the 3 years I've owned this laptop.
There's nothing really special about this one, other than that when both laptops are at my desk, I use a KVM switch to swap my external monitor, keyboard, and trackball between the two computers.
Raspberry Pi #2:
[Gifted New in 2020/21] Raspberry Pi 4b, 4GB Ram, 16GB SD card, 2 120GB USB Sticks, External 2TB HDD
This is my media server. I got it for Christmas 2020 (or 2021, I don't actually remember which because 2020 was a hard hard year). It runs Rasbian, the full OS, with the desktop environment disabled from booting via the command line. It runs PHP 8.2, MariaDB, Apache2, and MiniDLNA to serve the content via my Vogon Media Server.
If you can't tell from the above storage, I'm running the USB ports well past the power delivery they are rated for. The webserver and OS are on the internal storage, so functionally this just means that sometimes the media disappears. I need to build a migration script to put the contents of the two USB sticks on the external storage, as there is more than enough room, and if I can put the HDD in an enclosure with dedicated power, that will solve the issue. But that's at least a hundred dollars of expense, and since the server only has 1, maybe two users at a time, we've been limping along like this for a few years now.
Raspberry Pi #3:
[Purchased New in 2023] Raspberry Pi 4b, 8GB Ram, 16GB SD card
This is the newest Pi. Work gave me a gift card as a bonus for a project recently, so after weighing the pros and cons of getting a VR headset, I settled on setting up a retro gaming tv box. Currently it's running Batocero Linux and loaded up with classic game roms up through the PSX. Though, I would really like to use it as a tv client for the media server. I've upgraded the devices in the living room recently, and there's no longer a dedicated web browser we can use without hooking up one of our laptops. I've got a spare 128GB SD card in the office, so I'm strongly considering getting a wireless mouse and keyboard and setting it up to dual boot between Batocero (which is convenient because it can be navigated with just a controller), and Raspbian. I think I'd set Batocero as the default in Grub, and then if I want to use Raspbian I'd need to have the keyboard handy anyway.
Maybe I'll get one of those half-sized keyboards with the trackpad built in.
Speaking of controllers. I use an 8BitDo Pro 2 controller, and I've been super happy with it since purchase: https://www.8bitdo.com/pro2/
So that's the setup. I have entirely too many computers for any one person, but I included the dates when I got them to show that a number of these have been around for a long time, and that part of the reason I have so many now is that I've put a lot of time into ongoing maintenance and repurposing.
If you've read this far, I'd love to hear about your setups. You don't have to reblog this, but please tag me if you detail yours.
5 notes
·
View notes
Text
ECE 5725 Lab 2
In Lab2, we will go through the following steps: • Add external buttons to the RPi setup to expand the control functions of video_control.py from Lab1 • Compare performance of video_test.py in lab 1 and modified versions of this program. • Develop general methods for checking performance of applications on the Pi with an eye towards performance tuning. • Develop some test programs using the…
0 notes
Text
Argon One with NVME base
I've been having some fun lately with my Raspberry Pi 4s. They're back in stock more frequently at adafruit.com. Give my filter at rpilocator.com a look to catch one in stock. I just picked up 2 8GB rpi4b's. They can be found.
Anyway, I was looking for an RPI4 to add to my desktop setup and wanted a nicer, more functional case for it. I also have a few nvme drives floating about, and wanted to put one to work in this desktop pi.
Don't get me wrong, I've got a gaming rig, slightly aged, but sporting a RTX4070ti, next to my Macbook Pro... the one I bought right before the Apple Silicon MBPs were released. That's just the way of the road with these things.
Lots of digressing... so... the rpi case I settled on was the Argon One with the add-on Argon M.2 NVME Expansion Board. Note: There is also a sata version.
The Argon One is an aluminum case with a fan, a daughter board that converts the mini-hdmi ports to regular HDMI ports, and an IR receiver, that I'll never use. What I did do, obviously was add the nvme base. I put a drive on it, got it all installed with 64 bit RaspberrypiOS (formerly Raspbian?) and fired it up.
Well there was no sign of the nvme drive. I was heartbroken. I through the drive in an external ssd case I had and realized I just needed to format the drive. I put it all back together, and now have a desktop pi to play with.
Fun stuff.
0 notes
Text
Apropos of nothing
If you are the techiest person in the house (and for many of you, this is not techy at all), today is a good day to build a pihole thanks to Google's new TLDs.
For the record, this straight up stopped Dad from getting computer viruses when coupled with the Ublock browser extension, so I will volunteer my time to get you set up. We will find an evening and do a Zoom call. I am serious.
Prerequisities:
Before you start, this will be way way easier if your router has a magic way to:
Set static IP addresses
Set a custom DNS server
If you can't do this, I'm not saying you're stuck, but there's some non-obvious failure modes and maybe it's time to buy a better router.

Parts:
Raspberry Pi 4B. 2GB if you just want to set and forget, 8GB if you want to do more things on this than just your pihole (Coughs in a MarioKart box) -> https://www.raspberrypi.com/products/raspberry-pi-4-model-b/
Spare USB-C charger if you don't have one already. I'm a fan of https://www.amazon.com/Argon-USB-C-Power-Supply-Switch/dp/B0919CQKQ8/ myself
A microSD card at least UHS class 3 or better. 32 is fine for just a pihole, I have a 512 in some of mine that I use for more stuff. https://www.tomshardware.com/best-picks/raspberry-pi-microsd-cards
Some method of flashing the card if you don't have one (Some come with SD to micro-SD adapters, if not a USB to SD/micro-SD adapter is about $10 off Amazon)
If you really feel like going nuts, go buy yourself an Argon case and then very very carefully never ever install the software for the fan that does nothing. The value is entirely in having a big giant brick that is self-cooling. If you want to play MarioKart, I would consider this a requirement. https://www.amazon.com/Argon-Raspberry-Aluminum-Heatsink-Supports/dp/B07WP8WC3V
Setup:
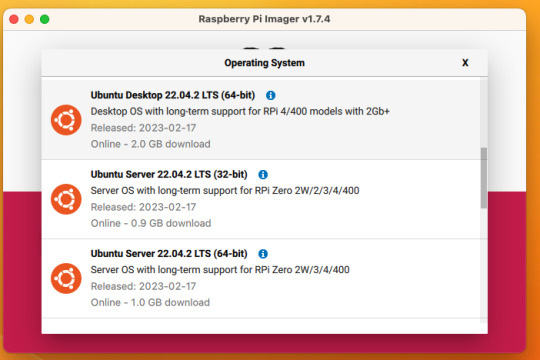
Do yourself a favor and ignore all the signs telling you to go get Raspbian and instead go grab an ISO of Ubuntu 64-bit using RPi Imager. Because Raspbian cannot be upgraded across version WHY U DO THIS
Download Rpi Imager, plug the microSD card into your computer,
Other General Purpose OS -> Ubuntu -> Ubuntu 22.04 LTS
So now you have an operating system on an SD card.
Assemble the case if you bought one, plug in the SD card, power supply, ethernet cable if you have one or mouse and (mini) HDMI cable if you don't. If you bought that Argon case, you can just plug a keyboard (server OS means no mouse gang; In this house, we use the Command Line) and HDMI cable into the Pi. Turn it on.
Gaining access
The end state of this is that your pi is:
Connected to the internet by cable or wifi
You can SSH to it (Also not scary)
If you plugged in an ethernet cable, once it's done booting (1-2 minutes?), you should be able to ssh to "ubuntu@<the IP of the system>". Look it up in your router. It may make sense to give the static IP NOW to keep it stable.
If you've never used SSH before, I think the standard is Putty on Window or you can just open a terminal in Mac. (And if you know enough Linux to have a Linux computer, why are you reading this?)
If you didn't plug it in, and need to setup the wifi, there's magic incantations to attach it to the wifi and to be quite blunt, I forget what they are.
Your username is ubuntu, your password is ubuntu and then it will ask you to make a new password. If you know the meaning of the phrase "keypair-based access", it may make sense to run `ssh-copy-id` at this point in time.
Router settings (part 1)
Give your new Pi a static IP address, and reboot your pi (as simple as typing in `sudo reboot`).
Open a new SSH session to the pihole on the new address.
Installing pihole
Open up an SSH session and
curl -sSL https://install.pi-hole.net | bash
This is interactive. Answer the questions
When it's done, on your other computer, navigate to <the ip>/admin
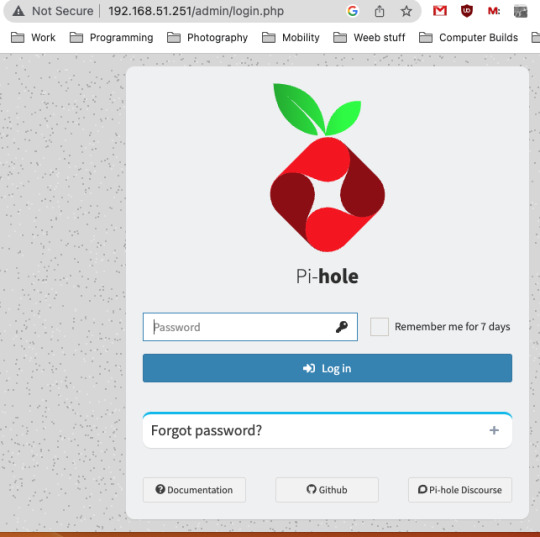
Login with the password you just set. Router settings part 2
Give your new Pi a static IP address then point your router at that address
Set the DNS servers to the static IP
Then ensure you're blocking something. Anything.
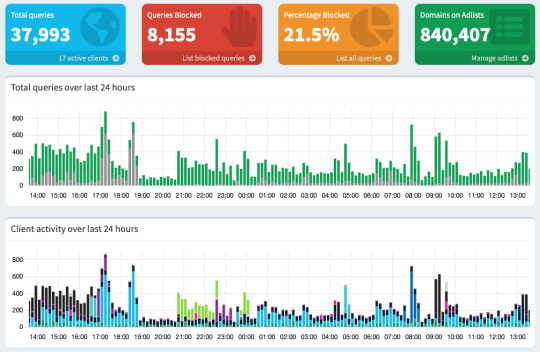
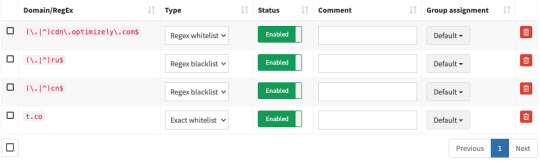
Then do what you want to do. You'll probably need to whitelist some sites, blacklist some more, but the main thing is going to be "Adding more list of bad sites". Reddit has some lists.
And... enjoy.
/But seriously, there's some stuff to do for maintenance and things. I wasn't joking about the pair setup.
2K notes
·
View notes
Note
I've got a RPi 3b+ that was intended as a gift, but the recipient left the state before I was able to give it to them, so I guess it's mine now. Are there any fun and educational projects you know of I could use it for? For some reason I imagine this is a relatively common thing in makerspaces
1) could resell it bc there’s a shortage and ppl are lightly desperate
2) ive wanted to make a magic mirror since 2016 but very glad i haven’t yet bc that thing would not survive a cross country move
most of the ones i saw in makerspace applications were for incredibly specific robotics or rocketry stuff. also one girl who used one to control her hydroponics fertilizer/ lights/water quality sensor setup
4 notes
·
View notes
Text
It does make me wonder for how long the "do not connect TV to the internet" solution is gonna work. After all, the next logical step is making a deal with telcos to embed a SIM and send data through cellular network.
(my assumption is for as long as significant number of people is willing to connect their TVs to the Internet)
Also while I'm at it: my current setup is a TV so old it doesn't even have Full HD, a Raspberry Pi 4 that runs OSMC, and an external SSD drive connected over USB to rPi. I also enabled Transmission bittorrent client there which I connect to remotely from another device with a web browser, and add torrents to download there.
had to replace my 11 year old TV that pre-dates the concept of smart TVs and brother, I fucking hate the modern TV experience
I have never in my life wanted to interact with an OS that's built into a TV, you exist to have other devices plugged into and display what they are showing on your screen
2K notes
·
View notes
Text
RPi + Kano OS + PICO-8 workstation
Last year, game dev Dylan Bennet tweeted about this project he was working on: the setup of several workstations to teach kids to develop games with PICO-8.
He’s using Raspberry Pi’s with Kano OS installed (from Kano PCs). The monitor is a 10.1″ LCD screen with the RPi attached on the back.
The setup looks smart and cool, specially for kids learning the ropes!
be sure to check Dylan Bennet’s twitter feed and other endeavors, like his PICO-8 Game Development Zine and itch.io page.
5 notes
·
View notes
Text

ESP32 with Dual Isolated CAN Port Controls Thomson Electrac Linear Actuator
The espBerry DevBoard combines the ESP32-DevKitC development board with any Raspberry Pi HAT by connecting to the onboard RPi-compatible 40-pin GPIO header. For the two isolated CAN ports, I chose the Dual Isolated CAN Bus HAT for Raspberry Pi. I extended the original espBerry baseboard, adding some digital and analog IO plus a serial connection for an external display.
0 notes
Text
further update: i got a sata to usb converter and now my rpi has 150 gbs of additional memory. i might setup a custom git thing


a story in 2 pictures
21 notes
·
View notes
Text
Control your IoT devices from your freeboard™ dashboard.
Part 3 of 3:
In Part 1 we showed you How to Connect your RaspberryPi to the dweetPro™ messaging system. In Part 2 we discuss how to Control your RPi with dweetPro.
In this tutorial, we show you how to connect your device and control it from a freeboard™ dashboard. We are using the same RaspberryPi device from before.

To get started, follow the previous tutorials to connect the RPi device to dweetPro, and write the python software to listen to dweetPro for a trigger. With that complete, we can set up our trigger anywhere, like on our freeboard dashboard.
First, we add a new button widget to the dashboard we previously built. Creating a button is easy with the HTML widget:

We use JavaScript to create the look of the button, made simple with a hosted .PNG file. Depending on the size of the picture, we may need to adjust margins and sizes.
We shifted our picture to the right with margin-left, and reduced the picture size to fit our window, as seen below (which should all be one line in the .JS editor).

Next, we connect the new button to our dweetPro trigger with a custom freeboard plugin. Learn more about freeboard plugins here.
Plugins are the best way to customize your freeboard dashboard. You can create any type of widget or datasource you like, and with some skill and JavaScript knowledge, the possibilities are unlimited!
This tutorial covers only the most basic integration. For more complex integrations, see our other examples in our Twitter feed.
For this plugin, we first support CORS. This is good practice for any new datasource that does not have CORS supported by default. Next, we setup our button, so when it is clicked, we kick off the sendSpin function:

Next, we set up the dweetPro call as a variable, so we can more easily refer to it later:

Remember to use your own Thing ID and Key, but feel free to re-use the same content, or add your own key:value pairs as desired.
Now we create our sendSpin function:

For this example we used the AJAX call to transport our JSON data. We designate the Type of call (POST), the URL to call, add our Headers (required for dweetPro), content and data types, and the data to send (the variable we setup earlier).
We also added a neat freeboard feature, the Loading Indicator. This is a feature of freeboard that allows you to show an indicator that something is happening behind the scenes. This helps users understand that the dashboard is working for them, and keeps users from smashing the button over and over again. Read more about the features of freeboard and it’s hidden secrets here.
After creating our plugin, we load the plugin into the Developer Console of our dashboard:

Finally, we refresh the dashboard, and click our button! Watch the video below to see the Plant Spinner in Action!
youtube
Next up? We will show you ways to trigger the Plant Spinner from any UI you want, including SMS, email, calendar events, Alexa, Google Home, Slack, and more. Let us know which UIs you would like to control your device from, and we will show you how.
-Bug Labs, Inc.
7 notes
·
View notes
Text
NixOS on the RPi: Adventures in Aarch64
I've spent most of today working on my new home network setup, and part of that is setup on my Raspberry Pi
Now, naturally, as a Nix fanatic I had to put NixOS on it!
Now, NixOS actually has fantastic support for the Raspberry Pi! In fact, most setup was identical to creating a desktop using my flake
The only thing I needed to do additionally was to import nixos-hardware in my Flake and add nixos-hardware.nixosModules.raspberry-pi-4 as a module on the RPi
After some troubles (mostly from me not understanding Nginx as well as I thought I did) I've also now got modules in my flake for deploying Nextcloud, Lychee (for one of my side projects) and Vaultwarden through Nix
As always, my Flake is available at https://gitlab.com/mchal_/flake !
0 notes
Note
How hard is it to set up a pi-hole? I want one for my house but my IT Skill is 05/100 My 'following instructions' is 98/100 though.
it's not super difficult imo, there are lots of good tutorials out there to do it.
Raspberry Pis themselves are simple to use, but there are some things that aren't included that you need to get it running, mostly adapters of different kinds since the ports are all mini and micro variants. vendors sell all these in kits together with the RPi a lot of the time which is way more convenient. this is the one I bought, but there are kits on that site for other models as well so you can make a note of what's included in those to determine what you'd need for a specific model
the Pi-hole installation itself isn't complicated at all, just answering yes or no questions basically. the hardest part tends to be setting your router up properly, since some don't let you change the settings you need, specifically the option of using static DNS. you can get around this by telling each device to use the Pi-hole, but it's more tedious
after you install it you can configure everything graphically in a web browser so you only have to use the command line a few times during the setup
this tutorial is pretty straightforward I think. it tells you pretty much exactly what you need to do for each step. and if you happen to run into some sort of issue feel free to ask me, i'm not exactly a tech expert yet but it is my job lol
edit: just realized that the tutorial I linked does the device-by-device method, which is fine but like i said, tedious. the more effective thing is going into your router settings (via the router's local IP address in a web browser) and changing the static DNS option there to be the same IP as your Pi-hole. that may or may not be an option depending on your setup but it would force everything on the network to use it
1 note
·
View note
Text
Current dev status: APPEASED
After some dirty VM work and trimming, the web build now works ...satisfactorily. The trick was... well....
In Matte's virtual machine written in JS, I wanted to keep it near one-to-one with the C version aside from garbage collection behavior, as I can naturally leverage JS' garbage collection. In C, each value is represented by a struct with the type ID and the associated data. Soooo in JS i figured that I would follow suit and make each value an object, each with a type tag and some data. So this means simple VM computations like 2 + 2 would involve the creation and destruction of multiple objects (in this case at least 3). When running a whole game like this where numeric computations happen 10000s of times per second, the browser was unhappy and the GC was put under load. So, I changed the VM to, instead, store numbers, booleans, and strings as plain data, no object involved, and use typeof for type detection of those types. After doing this and some bug fixing, garbage collection on the game (and memory usage) was drastically reduced.
At first, I was concerned. While my test machine setup (rpi 5 on firefox) showed drastic improvement on garbage collection invocation, it still showed a bit of stutter still. But trying the same machine in Chromium (bleh) showed absolutely perfect performance. Worried it was a firefox JS engine issue, I tried firefox on my Windows machine. ...and...It was perfect! Then the final test: android phone (also chromium(bleh)). And... it was.... also perfect! So if youre running my game on a raspberry pi 5 in firefox, youll have some issues, but everything else seems fine so far.
I'd say its in a good enough state to continue to the Beautification and Quality of Life stage of the web build to make it work perfectly on desktop web and mobile web alike. Still need some safari testing, but that can come after everything looks and feels reasonable. Still a half a week away from that at least..
Really though, was worried I would have to mark the web build of the game as just "forever experimental" but FINALLY its starting to work right ❤️
Current dev status: FRUSTRATED
So for the web version of my game, wanted to make it much more easy on the CPU usage. Like I mentioned before, i was using a DOM solution for text rendering which was slow... So i made and basically finished up a webgl solution thats pretty snappy.
I was still not super impressed with game performance; my game's VM is just so beefy. I got a suggestion from a friend to try web workers, and that got me excited. I took it and ran with it and just finished putting the VM on its own thread and passing finished frame data asynchronously to the main thread.
But now.... playing the game... its great! For 10 seconds! every 10 seconds i get jitter, about 200ms or more of stoppage which is. obscene for a game.
I look at performance statistics and what do I see? Real smooth performance EXCEPT: GARBAGE COLLECTION
Every now and then garbage collection is ruining EVERYTHING because its not distributed in my case for some reason. I dont remember it being this bad before ... So maybe the web worker message passing is causing some major garbage somehow?
The big thing is definitely the Matte VM which... i dont know. I guess I'll have to see if i can trim it down somehow....
Just equates to more work when I thought I was done... yeesh
6 notes
·
View notes