#sculpting tutorial
Explore tagged Tumblr posts
Visit Tumblr Blog
Explore Tumblr blogs with no restrictions, modern design and the best experience.
Last Seen Tumblr Blogs


Fun Fact
In February 2021, Tumblr had 518.6 million blog accounts.
Text


Got the ear area done on the head, so I don’t have to worry as much about screwing up the mechanism now. I can finally finish the face and be done with it and get the tutorial pieced together and posted
#art#animal art#wip#sculpting#cardboard#cardboard art#cardboard mask#cardboard craft#mask#werewolf#coywolf#wolf#kinetics#test#tutorial wip#snarling#snarl#snarl mask#snarling werewolf#werewolf snarl#snarling wolf#wolf snarl
262 notes
·
View notes
Text
Don't quite understand the obsession with bringing back characters' old interests/hobbies. Like yeah it could be fun but also, people pick up and abandon hobbies all the time? People do them a little every once in a while and then forget about them for like 3 years? It's not some horrible character-assassinating thing to not mention someone's interest in poetry or whatever they quite literally might have just stopped doing it.
#and dare I say this can even go for Jay's inventing#like. the guy was never “the inventor” he was just the dreamer. he liked MAKING things sure but of his own admittance he liked making#ALL SORTS of things#nya was always the mechanic#jay could get into baking or sculpting or needlework or woodcarving or programming or fuckin makeup tutorials and it would feel in-character#okay fine so maybe the post is just about jay#ninjago#ninjago jay
53 notes
·
View notes
Text


i made this skunk plush because i was frustrated at the lack of patterns on the internet :')
#skunk#plush#mine#photo#i might release the pattern but i dont wanna make a tutorial so i might make it a pay what you want kinda thing#i had to do a lot of thread sculpting to get the shapes i wanted im gonna post before and after pic latwr#i shouldve stitched the arms to the belly but i forgot
32 notes
·
View notes
Note
Do you use wire in all of them , or just the tall ones? If it's not too much to ask, could i get some more progress pictures to see how you did it?
Hi again ^^ yes all of the figures have a wire and or metal rod spines. So I don’t have a lot of step by step photos that would explain what I did soooo let’s make a little sun just for you! Hopefully these photos will help show how I made my figures. Bare with me this might be long.

Photo collage, my way of getting around tumblrs photo limit. So let’s start, 1 and 2: Materials, like I said before everyone is made of polymer clay and metal rod/wires all of the figures have some form of metal support in their bodies. In these two pictures you can see two small metal jump-loop rods and a spool of metal bendable craft wire. A good majority of the figures use these loop rods as spine pins, they are one of the many leftover art supplies I have from my days making Christmas ornaments. They are as thick as a sewing needle and are what usually holds the figures head, body and legs together. However they are limited in size so for the tall figures (earth, Killcode and solar flare) I switched to the wire. With the wire I unspool a large amount of it then bent it in half, once bent I twist the wire around itself so it becomes as thick as the pins and just as sturdy. ( this worked for earth and flare but unfortunately like I’ve said before kc was too big for just one wire to support even twisted. If you’re gonna make big figures I recommend making the support thicker.) due to the nature of polymer clay and it holding its shape as well as the figures being relatively small (even the big three) I didn’t need to use wire or pins anywhere else but in their spine. Image 3 enter the sun head! Simple sculpt just like any solar themed figure. Image 4. we pick a pin, as stated this will be what holds everything together, we set it aside for now. Image 5 we start to sculpt this suns body and arms. Simple shapes two equal sized noodles and a mini marshmallow.

Now we are gonna get a new color for his pants. This spring green will do nicely, give some contrast to the white clay.

1. Alright first things first we grab a bit of clay and roll it into a noodle, trying to keep it all an even size. 2. We take our rolled noodle and bend it into a small n shape flattening the upper bend a little, I’ve been told by my discord pals that this shape looks like a little among us character. It can be hard to keep the two sides from sticking to each other while you shape, I usually keep one of my sculpting tools in between them just to keep them separate. 3 &4. A majority of these characters wear ruffles, the easiest way I’ve found to make them is to take a small sphere of clay (one big one small for the neck and waist ) and smoosh them into little pancakes. Then get a noodle of whatever line color is on the ruffle ( in this case yellow) make a small thin noodle, loop it on top the pancake then gently press them together. After that take a thin tool and make shallow indents along the edges, it give the illusion of ruffles. ( I like making the characters with ruffles because they kinda disguise the areas where the clay connects making the figure look alittle more whole rather than the segmented pieces they are.)

At this point we have all we need to assemble this little sun. I start by connecting his arms to his body, then taking the neck and waist ruffle and sticking them in their respective places. At this point in time they are only stuck together by the clays natural adhesive, there is no connecting pin yet and that’s okay because polymer clay loves to stick together with just a little pressure, it will not fall apart like this so long as your gentle with it. I’ve also set aside two small white ovals that will become his feet.

Add top to bottom, stick on his feet and we are almost done.

Now’s the time we go back to his head and gently insert the pin where his neck would be. Try to get it so it won’t Pierce his face, I recommend having pushed in more tward the back of his head then the front cause then if it accidentally opens the clay the damage will be hidden in the back of the figure which is an easier place to fix than the face.( kinda looks like a wand or a lollipop)

Now that you have his head on a pin, slowly press it into his body. It should slide in with little resistance. Using the right size pin is very important, if it’s the right length the pin will go through the body completely and stick into the pants without being seen.

And with that step completed ( plus any last minute details you want to add like buttons or toe beans) you now have yourself a tiny figure, ready to be baked and afterwards painted. I hope that these photos helped explain how I made these little guys and in turn helps you make your own. ( I wasn’t gonna keep this little guy but now that he’s done I’m definitely baking and painting him tomorrow, think I’ll call him sunflower) 🌻
#polymer clay#sculpting#tutorial#fnaf sun#fnaf daycare attendant#sundrop#hope this helps anyone who wants to make their own mini sundrop
17 notes
·
View notes
Text

This is the very first thing I tried making in blender and I’m not sure you can even tell who I was trying to make
#it’s obvious that I put all my faith into the grab tool#I watched a total of two minutes of a tutorial and decided that I absorbed enough info to get started#YOU CAN SEE THAT I tried to sculpt the mouth but didn’t know how to#I just. can’t figure it out lmao.#maybe I should’ve sculpted the face around an imported image rather than free handing it
36 notes
·
View notes
Text

Tony Tony Chopper: cup edition
#digital art#artists on tumblr#ipad art#art#my art#pinksepia#tony tony chopper#one piece chopper#op chopper#chopper#nomad sculpt#nomad 3D#3d art#3d modeling#3d artwork#3d artist#one piece#I did it#I finally did it#😭😭😭 dude#I was trying to follow a tutorial and that didn’t work out well#like fucking always LMAO#THE SHIT WAS NOT CENTERED SO I COULDNT MIRROR ANYTHING#IT WAS ANNOYING#and then it crashed bc my iPad so old#and I wanted to add the antlers but maybe in another version#I had fun and I actually like how it turned out#like this is better than any if the stuff I have done in blender and it makes me sad ):#lol but imagine that the straw hat pirate go to an island and they turn into inanimate objects and stuff 😭😭
28 notes
·
View notes
Text


This is V O I D! Her eyes glow in the dark :))

And here's a comparison with Verdigris :))
#in which rosemauled falls even further down the homemade furby shelby rabbithole#custom furby#furby shelby#homemade furby shelby#theyre too much fun to make to stop#honestly i would make some to open an Etsy shop if their sculpted fluff wasnt so fragile#i could make a tutorial tho#since the originals are so expensive this is definitely a cheaper option#s V O I D#s verdigris
43 notes
·
View notes
Text


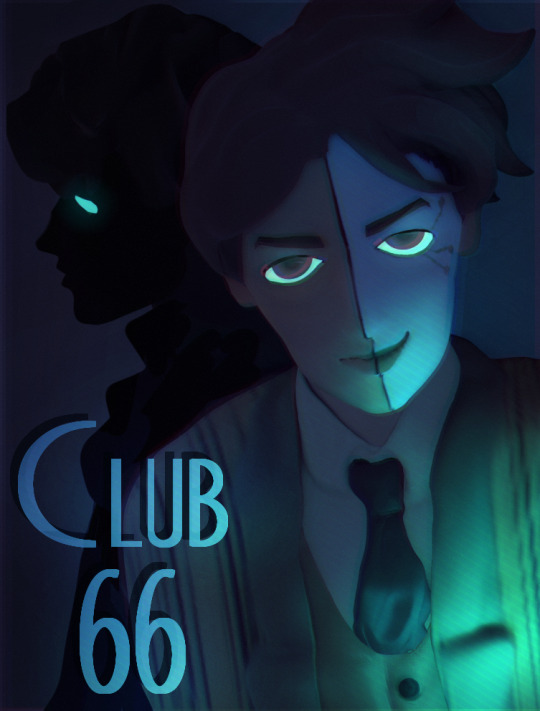
Heres some 3D busts from 2021 for my Club 66s
#i followed a tutorial from a guy who only posted that and nothing else. ITS SO GOOD#its very fun its a sculpting method#my ocs#3D art
6 notes
·
View notes
Text
A quick sculpting tutorial of my Luna keycap
#art#etsyshop#handmade#fypツ#resin art#keycaps#sculpture#keycap#sculpting#art wip#art tutorial#sailor moon#cat
54 notes
·
View notes
Text

Introducing "Jojo" my newest face sculpt. After MONTHS of failed attempts (and procrastination), I finally figured out how to split a mesh to create a mouth and put teeth inside. So many google searches and forum posts told me the only answer was retopologizing the mesh, which means creating an entirely new, but simplified mesh in the shape of the one I've already made in order for me to create an opening in the face. I just couldn't accept this and so I started experimenting with masking in Sculpt Mode.
Here's a short pictorial for my future self and anyone interested in trying this out:
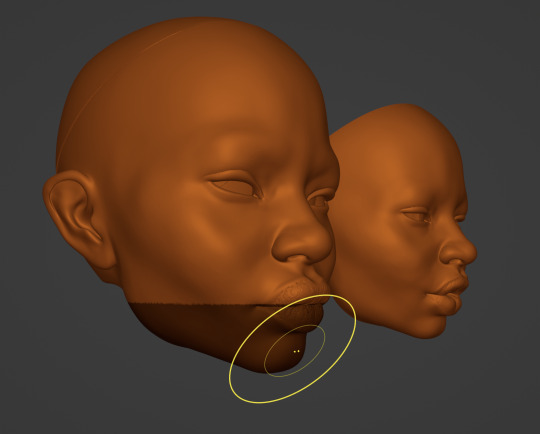
First you enter SCULPT MODE and press "B" to start a box selection. Create a box selection in between the top and bottom lip. The selection should include the bottom 3rd of the face.

Now that the area is masked, invert the Masked selection using CTRL + I or Command + I. This keeps the rest of the head safe from any changes as we shape the jawline and chin area. When the mouth opens, it curves backwards rather than moving straight down. If you place your hands on your jaw as you open and close your mouth you'll see what I mean. For this reason, we use reference images and press "G" to grab medium to large sections of the unmasked jaw and chin to push it into place. A subtle, incremental approach is very important during this step.
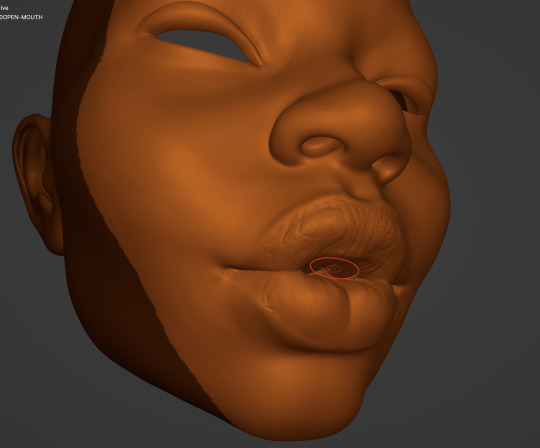
Now the mouth is open but crowded with meshy nonsense. Clear the inverted mask by pressing ALT + M or OPTION + M. Delicately Smooth the artifacts that may have appeared around the edges of your dissolved mask. Then you can apply a new box selection to protect the rest of the face as you work on the mouth.
Clear out the mouth by using "Crease" to sink the cavity inwards and give shape to the mouth. "Draw Sharp" may also be useful here. Take care to "Smooth" out this area without reintroducing that meshy nonsense.
Then there's the final step!

Add in the teeth! Here I am using a model I downloaded from generous creator on Sketchfab. (View credit below.) I positioned and scaled the mesh as much as I needed to for the look I wanted. As you can see in the first image, I altered the teeth mesh quite a lot for a more dramatic look.
I used "G" or grab to shape the lips around the mouth to match my reference photos. I also used "I" to inflate parts of the lips and "C" to crease the middle of the bottom lip.
Then Voila! I finally found a solution and immediately used it on a separate mesh to create Jojo! You can find the secondary mesh here: "Human teeth" (https://skfb.ly/6xVZO) by Alexander Antipov is licensed under Creative Commons Attribution (http://creativecommons.org/licenses/by/4.0/).
16 notes
·
View notes
Text
blender sketch tricks tutor
16 notes
·
View notes
Note
hi! i love reading your fics but i specifically love the social media shenanigans in dearly beloathed. i was wondering how you would feel if i took some inspiration from that for a fic of mine because i would love to write something that's very similarly formatted but i wanted to make sure you were fine with that (cause i'm assuming it took some time and effort to come up with) before i did. anyways your writing is awesome and i love reading it
Yes sure of course! I took inspiration from ao3 fics (F1 fandom in particular is stunning at formatting, I have so much respect for their dedication), such as this one (I basically took the formatting from this) and this Twitch streamer AU. If you're posting on ao3, there's the option of playing with HTML/CSS for a more "realistic" socmed interface, for example this one for Twitter which is magic to me. This one is an extremely impressive Discord mockup. An Unauthorised Fandom Treatise is a nice look into mid 2010s Superwholock era fandom whereas F1 rpf and indeed mcyt / streamer stuff is more "modern". Anyways yeah there's a lot of potential in this genre of fics and loads of stuff to check out on ao3 if you wish :) I love scrolling through the Unconventional Format tag because people are just so creative. Good luck with your writing!
#im serious about the f1 thing. go into the f1 tag and search for social media or unconventional format and boom#theres also more simple css with different coloured text which can mimic socmed better than black and white#still the basic italics bold underlines is usually enough to sculpt the look of socmed#text symbols and emojis are also fun. the document is your sandbox yipppee#ao3 has a faq section about their built in html which is very helpful. lots of css tutorials on ao3 too#sorry if this is a lot i get excited about formatting <3#ask box#answered#writing#dearly beloathed#hrm posting on stuff like neocities gives even more customisation... but yeah it takes effort and time#theres also sth i like about simple mockups with no css and minimal html (it's easy to copy and paste / edit)
12 notes
·
View notes
Text
youtube
Here's this week's video (I know it's late, sorry!)! This week I'll be working on sculpting parts of the face and I'm starting with lips! Let me know what you think, and share and subscribe to support this little artist (me!)! Thanks so much for all the love and support!
#ArtAtTiffanys#Blender Tutorial#Cute Blender Art#Blender 3D#Blender Community#blender practice#blender modeling#blender speed modeling#blender workflow#blender timelapse#digital art#3d digital art#3d modeling#blender 3d workflow#blender sculpting timelapse#blender speed art#blender 3d art#blendertips#blendertricks#masteringblender3d#cute 3d art#blender2025#blender 4.3#sculpting#3D sculpting#Blender 3D Sculpting#Character Design#3D Character Design#insideguppysworld#art
4 notes
·
View notes
Text


I'M EVOLVING!
I followed this tutorial:
youtube
4 notes
·
View notes
Text
I did a tutorial on how I sculpt ork heads on tiktok!!!

Please help me make the algorithms not drop this it took a lot to do n I wanna do more vids like these 😭
#artist for hire#art#small artist#orktober#space orks#warhammer orks#40k orks#orks#orks40k#waaagh#warhammer community#warhammer oc#warhammer art#warhammer sculpt#epoxy sculpt#clay sculpting#handmade#action figures#tutorial#small art account#artist support#artists on tumblr
3 notes
·
View notes
