#set Vertical Resolution of Output Image
Explore tagged Tumblr posts
Visit Tumblr Blog
Explore Tumblr blogs with no restrictions, modern design and the best experience.
Last Seen Tumblr Blogs


Fun Fact
28.6 is the average number of monthly visits per US mobile user.
Photo

Hisense 80cm (32″) LED Matrix TV Image display Active display area, horizontal dimension: 697,685 mm Active display area, vertical dimension: 392,256 mm Screen size (rounded to nearest integer): 80 cm Screen size (rounded to nearest integer): 32 inch Display technology: LCD / LED lit Backlight source: LED Matrix Resolution (Horiz x Vert): 1366 x 768 pixel Colour depth: 8bit Image refresh frequency: 60 Hz Smooth motion rate: 120 Maximum brightness of white: 300 cd/m2 Native contrast ratio: 3000 : 1 Viewing Angle (Horiz / Vert): 178 / 178 Degrees Response Time: 6,5 ms Connectivity RF – Radio frequency input: 1 AV input: 1 USB interface type 2.0 (Qty / List ….): 2 / USB 1, USB 2 Optical digital audio output (SPDIF): 1 Earphone jack: 1 HDMI ports HDMI inputs: 2 HDMI type 1.4 with HDCP version 1.4: HDMI 1, HDMI 2 ARC – Audio Return Channel: HDMI 1 CEC – Consumer Electronics Control via HDMI: Yes Digital TV reception Television system (DVB-T / DVB-T2+S2): Yes / Yes Video decoder (MPEG2 / MPEG 4): Yes / Yes AC3 Surround sound decoder: Yes Subtitles: Yes Analogue TV reception Colour-Sound systems in VHF band: PAL B Colour-Sound systems in UHF band: PAL B Stereo sound decoder A2, Nicam, ….: NICAM Subtitles: Yes Image processing Zoom function settings (4:3 / 16:9 / Auto / Zoom 1 / Zoom 2): Yes / Yes / Yes / No / No Sound Audio power output per channel: 6 Watt Number of speakers (Tweeter / Midrange / Woofer): 0 / 1 / 0 Automatic volume level (AVL): Yes Audio equalizer: Yes Dolby Digital: Yes Features: On / off timer: Yes Power off if no signal: Yes Sleep timer: Yes Program lock: Yes User interface: Linux Software version OSD indication: Yes Legal requirements: Disclaimer / Acceptance of Terms: Yes / Yes Favourite channels list: Yes USB media player Personal Video Recorder: Yes Time Shift: Yes DTV Recording (EPG scheduling / start from Standby): Yes / Yes DMP – Digital media player content (Music / Video / Photos / Text): Yes / Yes / Yes / No DMP File allocation table (FAT / FAT32 / exFAT / NTFS): Yes / Yes / No / Yes PVR File allocation table (FAT / FAT32 / exFAT / NTFS): Yes / Yes / No / Yes Hotel lock Protected Hotel lock submenu (Password / fixed code): No / Yes Sub-menu lock, including tuning lock: Yes Power on RF channel selection: Yes Power on mode (On / Standby / Last): Yes / Yes / Yes Inputs access (Enable / Disable): Yes Maximum volume lock: Yes Power on volume: Yes Power on, apply default sound / image settings: Yes Power on source selection: Yes Hardware Processor / Cores: MSD3666 Colour (Front bezel, rear, stand): Black / Black / Black Standby consumption: < 0.5W Compact packaging: Yes Supply range [Voltage / Frequency ]: 100 ~ 240V / 50, 60Hz Installation Power cord length: 155 cm Stand area (Width / Depth): 671 x 160 mm Wall mount dimensions (Horiz x Vert): 100 x 200 mm Wall mount, screw thread: M6 VESA compliance: Yes Accessories Remote controller (Technology / Part number ): IR / EN2T30H Battery (size / quantity): AAA / 2 User manual (Available online) / Quick setup guide (Print): 1 / 1 Warranty [In User manual | In separate sheet]: In separate sheet Dimensions Dimensions with stand (W x H x D): 717 x 469 x 160 mm Dimensions without stand (W x H x D): 717 x 427 x 86 mm Carton box dimensions (W x H x D): 811 x 129 x 515 mm Net weight (with stand / without stand): 3.6 / 3.7 kg Gross weight: 5,5 kg EMC – Electromagnetic Compatibility: Yes CB – Electrical safety: Yes HDMI: Yes Dolby Digital: Yes
1 note
·
View note
Text
Price: [price_with_discount] (as of [price_update_date] - Details) [ad_1] Description: Full support for HDMI 1.4, support for 3D. Quick installation and easy operation. Easily connect to multi-channel audio receiving devices. With signal buffering, amplification, and automatic recognition. Long-distance transmission over 15 meters (expansion) can be achieved by serial connection. By stacking, you can significantly increase the number of HDMI output ports. Support HD video, Elite Standard, clear, HDTV, support 480p, 576p, 720p, 1080i, 1080p resolution. The output image has a vertical pixel of up to 1080P, conforms to the HDMI1.3 standard, and is compatible with the HDCP protocol. Specification: Video Amplifier Bandwidth: 4.95 Gbps Input video signal level: 1.2 volts p-p Input DDC signal level: 5 volts p-p (TTL) Single connection signal range: 1080p/1920x1200 HDMI connector: Class A 19-pin female Video output: DVI-I 25-pin female (pure digital) Power consumption: 5 watts (maximum) Package Includes: 1 piece of HDMI splitter Note: Please contact us firstly if there are any problems with the product. The items color may be slightly different from the pictures due to the light and screen setting difference. Please allow slight dimension error due to manual measurement.Thanks for your kindly understanding. [ad_2]
0 notes
Text
TWINMOTION AMBIENCE
In this blog, we take a look at the Ambience setting in Twinmotion. Discover the ability to enhance your Revit projects, transcending mere visual aesthetics to infuse depth and mood into your designs.
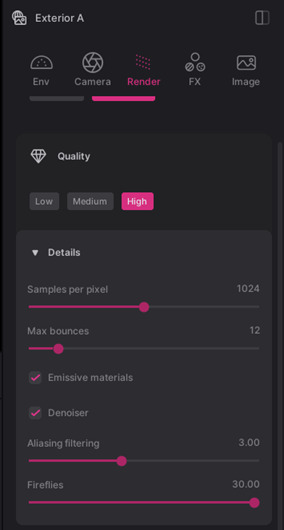
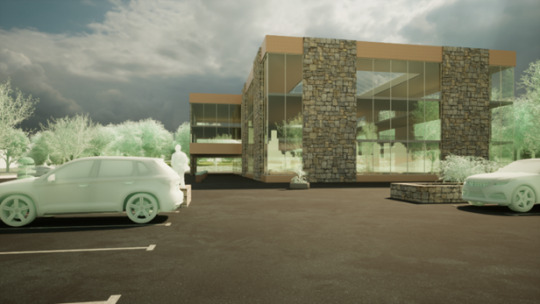
Utilising the same Revit import process and incorporating the Day Night Template highlighted in my previous blog, it has provided an excellent foundation for additional views. The image below showcases an exterior view from the project, enhanced with additional content and textures from the Twinmotion library.
In this section, we will look at the Ambience settings. This is relevant to the view so either the working view or one of the Media views.
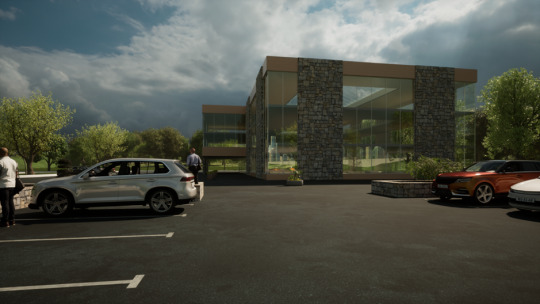
Here, the image shows the Exterior A media view, where I have the Ambience selected in graph view. At the bottom of the image both Scene and Properties are selected, these are the properties of the Ambience.
There are five options on the Ambience properties tab consisting of; Env, Camera, Render, FX, and Image.
Env or Environment tab have the most options which includes; Global Lighting, Weather, Location, HDRI Environment, Horizon, and Ocean.

Looking at my settings, you can see that the Time of Day is greyed down and is not available. This is due to the HDRI being enabled as a skydome; therefore, the lighting is derived from the HDRI.
Moving down the HDRI Environment tab you will see a dropdown for the details, and you are able to uncheck the Lock Sun to HDRI. This now allows you to go back to the top of the Global Lighting section and change the time of day independent of the HDRI. I believe this to be quite useful in setting the mood.
Under Global Lighting, you can see Exposure and a details dropdown, where you can fine tune the environment with Ambient Light and white balance.
The environment tab, location, Horizon and Ocean has other features. As a Revit exterior I see that we have a vast amount of scope with the HDRI lighting.
Showing in the next Tab is the camera settings; the edit I would do here is the Focal Lenth, looking at around 23mm for Revit exteriors. Under the Camera effects, I would activate Parallelism to maintain parallel vertical lines as seen in many Architectural visualisations
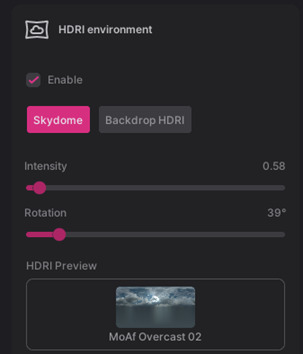
Moving over to the Render tab, we see Realtime and Path tracer. The Realtime is the view you see as you navigate around the scene. The path tracer is the GPU render. There are three settings for the quality of the Path tracer: low, medium, and high. Expanding the Details dropdown allows edits such as Samples per pixel and Max bounces. You will also see that the denoiser is active and I have set antialiasing to three pixels. The images can sometimes show single pixels of white in the render particularly on reflective surfaces, this is called Fireflies, which is worth adjusting.
In addition, adjusting Global Illumination and Shadow in the Realtime render options can make for a high-quality image without the need to Render through the Path tracer. Activating Reflections – Scene Space Reflections (SSR) under Misc is also a great option on real time render.
In this image you can view the FX tab, this allows a few post render effects including, Contrast and Saturation. I particularly like the Clay render.
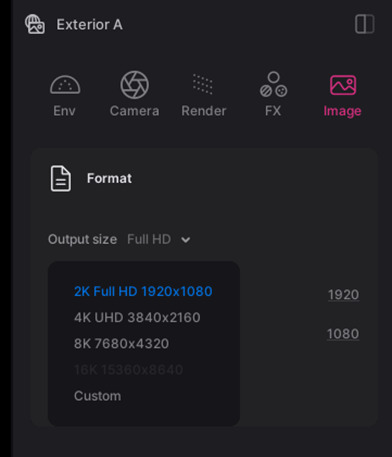
The last tab on the Ambience panel is for the output of the image. Here we can adjust the resolution of the final render.
2K Full HD 1920 x 1080. 4K 38040 x 2160, and 8K 7680 x 4320. Or as a custom resolution.
Please note that in the trial mode on Twinmotion, you have only HD format at 1920 x 1024.
The Ambience features are very comprehensive and contained within simple sliders, making it very easy to adjust and see immediately revisions as well as changes.
HDRI lighting an exterior is very quick and the Environment tab features are exceptional for a Revit exterior or Interior, adding height fog as well as adjusting Vegetation growth.
To find out more about Twinmotion, visit our product page. Alternatively, please contact SYMETRI to book an appointment by calling us on 0345 370 1444 or email us at [email protected].
0 notes
Text
VeryUtils HTMLPrint Command Line is a Windows printing utility intended for printing HTML, ASCII text documents, and image files
VeryUtils HTMLPrint Command Line is a Windows printing utility intended for printing HTML, ASCII text documents, and image files, including those with the following file extensions: .htm, .html, .txt, .png, .gif, .bmp, .jpg, .jpeg, .wmf, and .emf. HTMLPrint operates as a command-line tool designed to send HTML content to a printer, all without displaying prompts to the user. By default, it utilizes the system's default printer unless an alternative is specified in the command line.
The VeryUtils HTMLPrint Command Line product serves the purpose of batch printing HTML, MHTML files, or web URLs on Windows Printers. It enables the printing of complete web page content to a Windows Printer seamlessly, eliminating the need for user interaction. Furthermore, it provides full control over the printer's capabilities through the DEVMODE structure. VeryUtils HTMLPrint Command Line relies on Microsoft Internet Explorer to render HTML pages, ensuring support for all features present in the MS Internet Explorer application.
VeryUtils HTMLPrint Command Line stands out as a handy and potent tool that excels in batch mode, enabling the printing of large volumes of HTML, MHTML files, or Web URLs in real-time. Additionally, VeryUtils HTMLPrint Command Line is developer-friendly, allowing developers to access the product via various programming or scripting languages, including but not limited to Visual Basic, C/C++, Delphi, ASP, PHP, C#, .NET, and more.
✅ VeryUtils HTMLPrint Command Line Key Features: •Print HTML to a specific printer. •Enable user prompts with a print dialog, allowing for printer setting adjustments and manual page selection. •Load/Save DEVMODE data from/to a disk file. •Set copy number, orientation (portrait/landscape), duplex (simplex/horizontal/vertical), color (monochrome/color), x-resolution, y-resolution, collate, and scale options for the printer. •Support for over 100 standard paper types (refer to Paper Definition). •Accommodate any custom paper size. •List installed printers on the system. •Display bins/trays available on a printer. •Configure the paper bin (paper tray) for a specific printer. •Restore original settings to the printer after printing. •Monitor print job status and automatically delete failed jobs if necessary. •Print background color and images in HTML pages. •Exercise control over header, footer, and margins. •Achieve printing without user interaction. •Support "postdata" when printing HTML pages. •Show or hide the print preview dialog as needed. •Output debug messages during the printing process. •Print HTML pages containing CSS, JavaScript, Java Applet, SVG, Flash, or iframe elements. •Ensure compatibility with all features supported by Microsoft Internet Explorer. •Implement a feature to force the printing of large HTML pages or exit the process if a timeout occurs. •Send HTML directly to a specified printer. •Control header, footer, and margins effectively. •Maintain a user-independent printing experience. •Retrieve HTML content from files or via command line switches.
✅ Printing Options with HTMLPrint Command Line:
VeryUtils HTMLPrint Command Line offers multiple flexible methods for printing, making it a versatile tool for various printing needs:
Batch Printing with Retainable Lists: •HTMLPrint allows you to create and manage lists of documents that can be retained for future use. •These lists can be automatically printed in a document sequence of your choosing. •This feature streamlines the printing of multiple documents, ensuring they are processed in the desired order.
Printing HTML Files via Command Line: •You can initiate HTML printing directly from the command line. •By passing the file or directory name to HTMLPrint as a command line parameter, you can print HTML files effortlessly. •HTMLPrint processes these files invisibly, without any user interaction. •For detailed instructions on using the command line, please continue reading below.
Directory Monitoring: •HTMLPrint offers a convenient feature known as Directory Monitoring. •When activated, HTMLPrint continuously watches a specified folder within the Windows Task Bar for incoming HTML or image documents. •As soon as documents are detected, HTMLPrint automatically sends them to the designated printer for hassle-free printing.
It's important to note that HTMLPrint operates as a visible application when started without any command-line arguments. It cannot function as a service.
✅ Command Line Parameters Usage:
When utilizing the command line for HTML printing, follow these guidelines: •To print an HTML file from the command line, provide the filename as a parameter. •You can enhance your printing experience by adding additional parameters to configure various printing settings to meet your specific requirements.
HTMLPrint is designed to seamlessly integrate with other software or batch files. It can be called upon by passing the HTML or TXT file names or image filenames (GIF, JPEG, BMP, PNG, WMF, or EMF) as parameters in the command line. Additionally, you have the option to pass a text file containing a list of files to be printed or a directory path, expanding the tool's flexibility.
✅ Printing Lists or Files from a Predefined Directory (Directory Monitoring):
HTMLPrint offers a valuable Directory Monitoring feature: •HTMLPrint can actively monitor one or more folders, continuously scanning for incoming HTML documents or images. •When new documents are detected, HTMLPrint swiftly sends them to the specified printer. •Alternatively, you can predefine file lists, save them, and schedule printing tasks. •This feature provides the flexibility to print files without saving them, streamlining your printing workflow.
VeryUtils HTMLPrint Command Line is a powerful and versatile tool for handling various printing tasks. Whether you need to print batches of documents, initiate HTML printing from the command line, or employ directory monitoring for automated printing, HTMLPrint has you covered. It offers user-friendly options for enhancing your printing processes and can be seamlessly integrated with other software or batch files for increased efficiency. Say goodbye to printing hassles and optimize your workflow with HTMLPrint Command Line.
0 notes
Video
youtube
YABER V9 Outdoor Projector Review – PROS & CONS Native 1080P Auto Focus Projector
Projector 4K with WiFi-6 and Bluetooth 5.2, 500 ASIN 1080P Native Portable Projector, YABER V9 Outdoor Projector Auto 6D Keystone 50% Zoom, Movie Home Projecteur for Android/iOS/TV Stick/PC/PS5
SMART AUTO FOCUS PROJECTOR+AUTO 6D KEYSTONE - Effortlessly get a clear and well-aligned image within 5S of turning on the projector! 4K projector adopts advanced SLR focusing technology, displacement gyroscope and sensor to accurately detect real-time motion, adjusting the picture accordingly to ensure it stays crystal clear. Save hassle of manually adjusting. Portable projector comes with auto-focus and 6D auto-keystone technology (±30°horizontal, vertical), easily set up for movies or games.
PROJECTOR 4K, 500ANSI & 20000:1 CONTRAST RATIO - Outdoor projector has a native 1080P resolution and supports 4K movie playback, provides a contrast ratio of 20000:1 for perfect details, boasting an impressive 500 ANSI lumens of brightness. Projector utilizes AI optical algorithm and RGB color model, which can provide up to 99% NTSC, presenting 1.8 million colors, with German optical coated glass lens, +90% brightness, +95% contrast, ensuring the most precise color reproduction possible.
Ultra-fast WiFi 6 & BLUETOOTH 5.2 & Hi-Fi SPEAKERS - Wi-Fi 6 is compatible with 2.4GHz and 5GHz networks, with the maximum rate up to 9.6G bps. Compared with the 5G network, it has three times faster speed, larger capacity for data transfer, and lower latency. Bluetooth projector built-in 12W Hi-Fi Speakers offers crisp highs and lows output to truly gives a home theatre experience. Bluetooth 5.2 chip allows the WiFi projector to stably connect to Bluetooth headsets/speakers/Airpods, etc.
FULLY-SEALED ENGINE & WIDE COMATIBILITY - V9 movie projector is designed base on fully-sealed optical concept, which means it will not easy to enter dust, effectively reducing black spots and image loss, and extending the lifespan of the projector. Equipped with AV/USB*2/HDMI*2/audio ports, it can easily connect to TV box, Fire Stick, Chromecast, Phone, PC, PS4, PS5, Switch etc. Excel / Word / PPT can be easily displayed on the projector via your USB stick. Small meetings are easily realized.
150000 HOURS LAMP LIFE & 50% ZOOM & FREE PORTABLE BAG - Portable projector uses the latest SmarEco technology to minimize lamp power consumption and extend lamp life up to 150000 hours. ±50% zoom adapts to different screen sizes without compromising image quality. Take the outdoor projector anywhere with the free bag. YABER's friendly customer support and 3-year warranty make your completely worry-free.
Yaber auto focus 4k projector utilizes latest AI optical algorithms, paired with German optical coated glass lens, boasting an impressive 500 ANSI Lumens of brightness.
WiFi 6 is not only compatible with 2.4GHz and 5GHz networks, but the maximum rate can also reach 9.6G bps.
Bluetooth 5.2 provides stable external connections without compromising audio quality.
Brand YABER Manufacturer YABER Place of Business YABER Model YABER Auto Focus Projector Model Name PRO V9 Model year 2023 Hardware interface Bluetooth Special features ⭐Auto Focus & Keystone⭐4K supported (Native 1080P)⭐WiFi 6, 5G+2.4G Dual Band Wifi⭐Bluetooth 5.2⭐ 6D Auto Keystone⭐100%-50% Zoom⭐with Hi-Fi Speakers⭐Extra Portable Bag Include⭐Customer Service: WhatsApp +8618664592344, [email protected] Mounting Hardware Remote Display Technology LCD Image brightness 500 ANSI lm Image Contrast Ratio 20000:1 Aspect Ratio 16:9 Display Resolution 1920 x 1080 Resolution 4K Supported, Native 1920x1080 Wattage 110 watts Batteries Required No Refresh rate 50 Connector Type Bluetooth, Wi-Fi, USB, HDMI Form Factor Portable Mounting type Ceiling/ Wall/ Table/ Tripod Mount Does it contain liquid? No Manufacturer YABER Item model number YABER Auto Focus Projector Product Dimensions 25.7 x 20 x 10.3 cm; 2.9 Kilograms
0 notes
Text
Learn to create realistic models, texture, animate and render in Autodesk Maya!

Autodesk Maya course is a powerful software used in the animation, visual effects, and gaming industries. It offers a wide range of tools and features for modeling, texturing, animating, and rendering. Here's a general overview of the process:
Modeling:
Start by creating a new project in Maya and setting up the necessary preferences.
Use polygonal modeling or NURBS (Non-Uniform Rational B-Splines) modeling techniques to create the basic shapes of your objects.
Refine the models by adding details, manipulating vertices, edges, and faces, and using tools like extrude, bevel, or sculpting.
You can also import or create reference images to help guide your modeling process.
Texturing:
UV mapping: Unwrap the models' surfaces to create a 2D representation of their geometry. This allows you to apply textures accurately.
Create or import textures, such as color maps, bump maps, specular maps, etc.
Assign the textures to the corresponding UVs or use procedural texturing techniques within Maya.
Adjust material properties like reflectivity, transparency, and specularity to achieve the desired appearance.
Animation:
Set up your scene by creating a rig for your characters or objects. A rig defines the movement and deformation of the model.
Use keyframes to establish the initial and final positions of your characters or objects.
Manipulate the objects' transformation properties (position, rotation, scale) over time to create smooth and realistic animations.
Maya offers various animation tools, such as the Graph Editor for fine-tuning animation curves.
Rendering:
Set up the scene's lighting, including ambient lights, directional lights, spotlights, or area lights, to achieve the desired mood and atmosphere.
Configure the rendering settings, such as resolution, frame rate, file format, and quality.
Choose a rendering engine, such as Maya Software, Arnold, or other third-party renderers.
Render your scene and save the output as image sequences or video files.
To learn these skills, you can follow online tutorials, take courses, or refer to official Autodesk documentation. Maya's official website provides learning resources, including tutorials, documentation, and community forums. Additionally, there are many online platforms and educational websites that offer Maya courses and tutorials, both free and paid, which can help you dive deeper into the software's capabilities. Remember to practice regularly and experiment with different techniques to improve your skills.
#online training#fundamentals of digital marketing#maya animation course online#maya software classes#maya graphic design courses
0 notes
Text
Custom Backdrop-digital File
This will give you a real illustration of the banner's actual measurement and the final print. Take a close look at all the pictures, pictures, and logos in your design on your pc screen to ensure you're satisfied with their decision. How long does it take to print your custom backdrops? The commonplace turnaround time for each customize backdrops our Custom Banner + Stand and Banner Only is three (3) enterprise days. However, if you need to expedite the production of your Banner Only order, you'll have the ability to shorten the printing time to 1 (1) or two (2) business days for a small charge. We are able to put your branding and identity on your custom backdrop in a selection of other ways.
PSD, PDF, and AI recordsdata ought to be in CMYK color mode to ensure correct color output. The resolution of your files must be set to 300 dpi, until acknowledged otherwise. If you require a print proof, select “I want a PDF proof” underneath Proofing Options when importing your artwork.
Custom photograph backdrops are transportable and may go anywhere you want to promote your brand. They are designed with sturdy matte vinyl so you possibly can simply fold them and take them alongside to your subsequent group event, commerce show, or evening gala. The matte finish ensures that you won’t have a glare from camera flashes when someone needs to take an image. The commonest design for a photo backdrop is a emblem repeated at regular custom printed backdrops intervals throughout the whole banner. This is often known as a “step and repeat.” You can embrace different logos as nicely, such as a sponsor for an event, a partner emblem, or an event-specific brand (like a tradeshow or awards show). Backdrops are a straightforward yet enriching method to give an expert look to your conference stands, picture cubicles, retailer window shows, and public events.
Material is thicker by laptop printed, which might be washable, If there are messes just take a humid fabric with water and/or a gentle cleaner(like soap) to wipe clear. Here are just a few of the questions people have about our banners. Lucy will contact you to rearrange customized backdrops the file switch after your purchase. That is why we already have more than 500,000 glad prospects. That means we want to divide it into two or extra items.
Only logged in customers who've purchased this product might leave a review. FINAL DIGITAL FILES After you've approved the final design you may be sent 1 PDF file inside customize backdrop 24hrs, for printing purposes. Your custom backdrop could be installed in just a few minutes. Individually printed for you, on the identical prime quality lay flat materials and hand checked by eye.
At Backdropsource our objective is to provide the best possible quality in the trade. Step 4 - Connect the horizontal poles to the vertical poles and carry the backdrop to its position. Send me exclusive presents, distinctive gift ideas custom backdrops, and personalised suggestions for buying and promoting on Etsy. Public collections may be seen by the general public, together with different buyers, and will present up in recommendations and other locations.
Since our custom backdrop size is as much as 8 ft. x 10 ft., which may match as a lot as four folks, photograph studios can organize them with out the stand to make use of as backgrounds for portrait pictures. While it's easy to get Free Digital Backdrops, get the upper hand by having your individual Personalized Digital Backdrop that suit your model or company. These digital backgrounds can be utilized for more than just conference calls because the design is up to you. So if you're a student, teacher, or digital creator with an thought, our designers will work with you on getting the best design custom tailored to you.
Unlimited design choices are available, however the most well-liked are step-and-repeat patterns and outsized logos. Team Fitz Media Backdrops are great for media classes, faculty signings, and photo backgrounds. These cloth background banners are simple to arrange, journey nicely, and retailer easily when not in use. Glowtronics, Inc., ("Glowtronics"), offers customers with a wide variety of internet and e mail printing companies, as nicely as transport of finished merchandise (collectively, the "Services").
0 notes
Photo
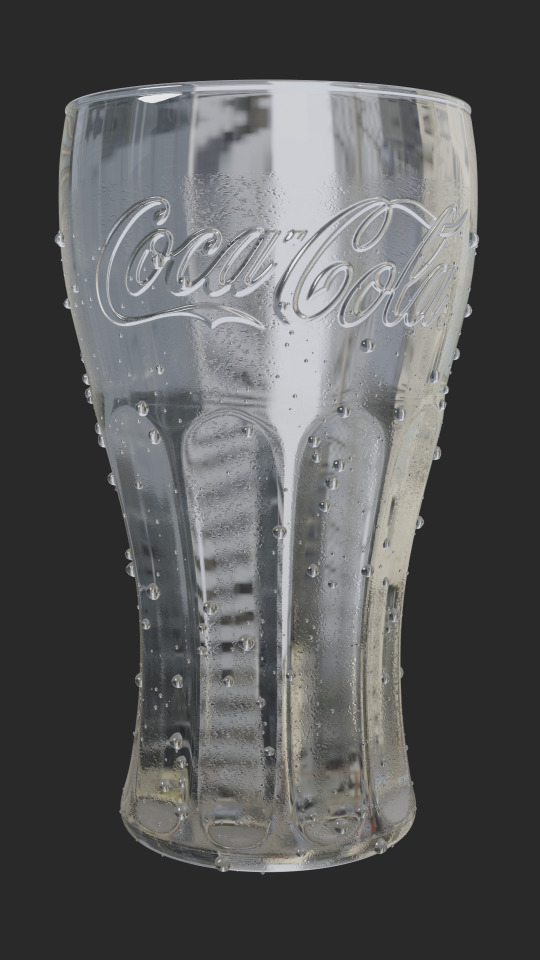


Burger On The Grill
Part 16: Pouring a Drink--Condensation
After completing the donut tutorial by BlenderGuru, I was challenged to create something similar by myself, so I made a burger. I will make that burger into a meal with a soda and fries.
In the last parts, I showed how to make carbonation foam and fizzy bubbles. Now, I'll reveal how to add condensation to the outside of the glass.
Adding Droplets
In a previous part, I showed how to add dewdrops to tomato slices by creating metaball instances with geometry nodes, a method that is shown in this tutorial by Weil Labed. This method was problematic from the start, requiring multiple workarounds.
In Blender 3.3, metaball instances may show up in the render preview window but disappear in the actual render. Using Eevee, you can go to View and select Viewport Render Image; however, the resolution may be less than what you'd get from an actual render. Since we are using Cycles as the render engine, I had to move on from metaballs.
Joey Carlino offers an alternative method of generating water droplets with geometry nodes by converting Points to Volume and Volume to Mesh.
Water Droplets with Geometry Nodes by Joey Carlino
Start by creating a duplicate of the soda glass. Add a geometry nodes modifier with these nodes and values.
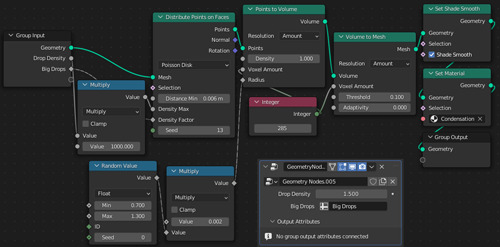
In weight paint mode, paint the entire glass blue and then paint warm colors where you want your droplets. Under Object Properties > Vertex Groups, name this weight paint “Big Drops.”
Repeat the process a second time, adding smaller droplets. Increasing the voxel amount will yield better resolution on a smaller scale. Create another weight paint vertex group named “Small Drops.”
I used the same node setup but with these values:
• Drop Density Multiplier: 6000
• Distribute Points of Faces > Distance Min: 0.002m; Seed: 9
• Random Value > Min: 0.13; Max: 0.35
• Volume to Mesh > Voxel Amount: 1000
There are now water droplets on the glass, but at a glance, they can be easily mistaken for carbonation bubbles. How can we get a more integrated effect?
Painting Drip Trails
Blender Guru combines image textures with a particle system that instances a collection of droplets.
How to Make a Rainy Window by Blender Guru
I liked how some of these droplets had trails behind them. This is a good method if you have the water rolling down a flat surface; however, with a complex curving surface, like we have on our glass, the trails would stick out unnaturally as instances.
Jonathan Kron demonstrates a method that solves this problem, using instanced particles in combination with dynamic paint to create trails in the roughness of the texture of the container.
Realistic Condensation by Jonathan Kron
It turns out that dynamic paint works just as well with geometry nodes as it does with the particle system.
Let's make some drip trails for the big droplets!
With the Big Droplets selected, go to Physics Properties and add Dynamic Paint with these settings:
• Type: Brush
• Paint: Mesh Volume + Proximity
• Distance: 0.001
With the Glass selected, add Dynamic Paint with these settings:
• Type: Canvas
• Format: Vertex
• Frame End: 19
• Drip: Checked
• Weights > Gravity: -1
• Output > Wetmap Layer: Click + sign
If you run the animation now, you’ll notice the trails being painted up are a bit messy and out of sync with the droplets. To fix this, add a Subdivision Surface Modifier to the glass set at 2 and drag it above the Dynamic Paint in the modifier stack.
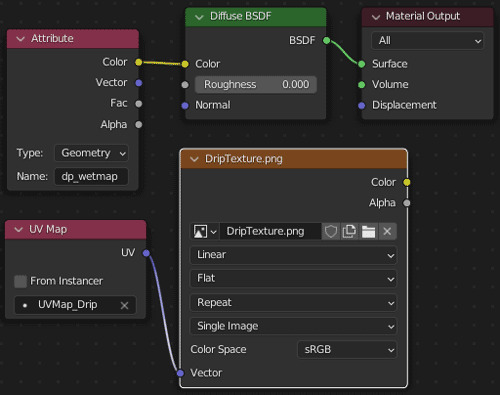
On the Dynamic Paint canvas, under Cache, click Bake. This will produce an attribute called “dp_wetmap” which can be dragged into the Shader Editor of the Glass to drive the texture.

Adding subdivisions to the glass helps to get a cleaner wetmap, but at the cost of nearly maxing out my graphics card. To prevent failed renders, it is necessary to reduce the load.
Our wetmap is operating as vertex color, which is intrinsically tied to the vertices of the highly-subdivided mesh. In this form, the wetmap cannot be transferred to a lower poly mesh. How can we get around this problem?
The answer is baking. We can bake this wetmap to an image texture which can be used on a simpler mesh.
Converting vertex painting to texture maps by Taylor Hokanson
Connect the color sockets between the wetmap attribute and a diffuse shader. Add an image texture node and create a new 4K image with a black background and no alpha channel. Add a UV map node and connect it to the vector input of the image texture node.
Create a new UV map named "Drip" to be referenced by this UV map node. Since we already have a UV map for the Coca Cola logo, we will be working with multiple UV maps.
Texturing with Multiple UV Maps by The Observatory
Go to Object Data Properties > UV Maps and click the + sign to create a new UV map. Open the new black image in the UV Editor, mark seams in discreet areas, unwrap the UVs and position and size the islands to maximize the area taken up by the drip trails.
Go back to the Shader Editor and select the name of the new UV map in the UV map node. Make sure the image texture node is selected. Then, go to Render Properties > Bake. Set the Bake Type of Diffuse and make sure only the Color Contribution is checked under Influence. Bake and save your image to the hard drive as "DripTexture."
Now, we need to transfer the "Drip" UV map from the high-poly subdivided glass ("source" object) to the low-poly unsubdivided glass ("target" object).
Go to Object Data Properties > UV Maps on the source object and make sure the UV Map for the drip texture is active. For the target object, click the + sign to add a new UV map and make sure it is active. Select the target object and then the source object. Go to Object > Link/Transfer Data > Copy UV Maps. The new UV map of the unsubdivided glass object will be replaced by a copy of the drip texture UV map from subdivided glass object.
Set up the following nodes for the low-poly unsubdivided glass.
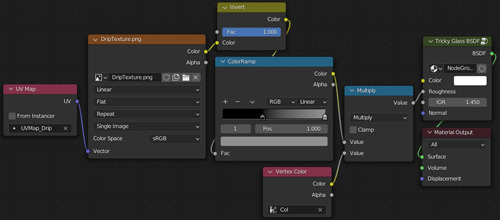
Feed a UV Map node referencing "Drip" into the Vector socket of an Image Texture node referencing "DripTexture." Invert the color and add a Color Ramp to decrease the maximum brightness.
Using vertex paint, paint the entire glass black. Paint white on the outside of the glass below the level of the liquid, creating a soft transition at the level line. Add a Color Attribute node and reference the vertex paint which needs to be named "Col" to avoid render problems.
Feed the Color sockets of the ColorRamp and Color Attribute nodes into a Math node set to Multiply. Feed the result into the Roughness socket of the Tricky Glass Shader.
This effect looks good on a metal can, but increasing the roughness on a glass material makes it difficult to see the details on inside the glass, the ice cubes and carbonation bubbles we worked so hard on.
Adding an Image Texture
To add more spaces where the roughness is lower and further integrate the droplets to the glass, I decided to add another image texture.
Blender Guru uses multiple materials and adds a condensation texture to his coffee glass.
Condensation by Blender Guru
Create a new UV map for the Glass and name it “Condensation.” In the UV Editor, bring up the Condensation Image Texture in the background.
Mark seams around the base and the fill level of the glass. Choose a discreet place to mark a seam down the side of the glass. Select the glass and UV > Unwrap. You might notice that the result is somewhat curved, causing the texture to stretch along the glass.
To fix this, we need to use a different unwrapping method.
Add a camera and change the lens type to Orthographic. Name the camera “UV Cylinder Projection.” With the camera selected, go to View > Cameras > Set Active Object as Camera. Position the camera to face the vertical seam through the glass as shown in the image below.
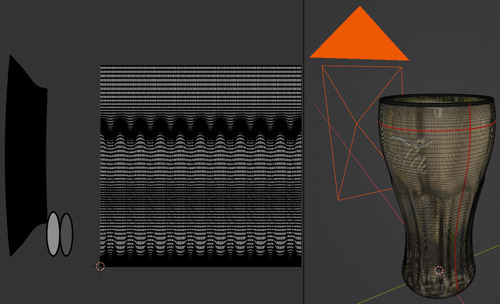
Drag the UV islands outside of the Condensation Image Texture. Then, select only the island where you want the texture to appear on the outside of the glass.
Go to UV > Cylinder Projection. Set the Direction to View of Equator. That island should now fill the whole square of the image texture, maximizing resolution without stretching the texture.
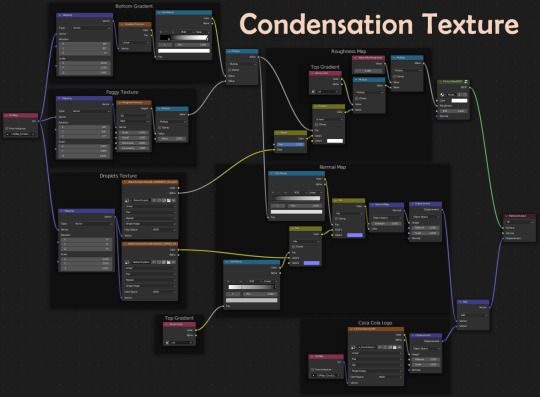
In the Shader Editor, drag in the Alpha Masked and Normal textures for the Condensation. Feed a UV Map node into the Vector input and use a Mapping node to scale them. The Normal texture will drive the Displacement while the Alpha Masked texture will contribute to the Roughness of the Glass Shader. Use a Vertex Color to control where the condensation appears on the glass.
Reference Condensation Texture Shader Nodes at the top of this post.
The Foggy Texture creates some randomness in the application of the condensation and the Bottom Gradient decreases the amount of condensation as you move down the glass and away from the ice.
Combining Effects
Pulling it all together requires an even more complicated node tree, but essentially all that is left is to add the Wetmap Drip Texture frames and feed it into what we already have.
Reference Condensation + Drip Trails Shader Nodes at the top of this post.
Organizing node trees into frames is a good way to communicate your process to your future self and to others. Whole segments can easily be copied from one material to another.
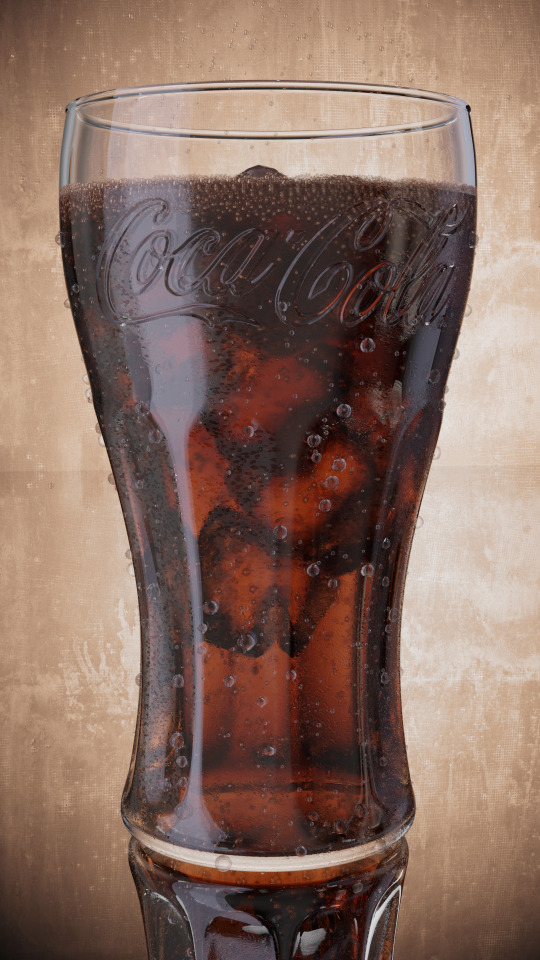
Finally, we have completed our soda!
Follow me to keep watch for the next part! Now that we have our burger and our soda, we can start to set up our burger meal scene.
Review the previous part.
See overview for links to all parts of this tutorial series!
See more of my work: Check out my archive.
Join me on my journey: Follow me on tumblr.
Support my creative profession: Buy me a coffee on KoFi.
#blender#tutorial#soda#glass#condensation#texturing#water drops#droplets#geometry nodes#coca cola#3d art#art process#food art#3d artist#art#digital art#3d render#blender3d#blendercommunity#blendertutorial
8 notes
·
View notes
Text
What Intel’s image-enhancing AI means for the gaming industry?
Intel recently unveiled a deep learning system that turns 3D rendered graphics into photorealistic images. Tested on Grand Theft Auto 5, the neural network showed impressive results. The game’s developers have already done a great job of recreating Los Angeles and southern California in detail. But with Intel’s new machine learning system, the graphics turn from high-quality synthetic 3D to real-life depictions (with very minor glitches).
And what’s even more impressive is that the Intel’s AI is doing it at a relatively high framerate as opposed to photorealistic render engines that can take minutes or hours for a single frame. And this is just the preliminary results. The researchers say they can optimize the deep learning models to work much faster.
Does it mean that real-time photorealistic game engines are on the horizon, as some analysts have suggested? I would not bet on it yet, because several fundamental problems remain unsolved.
Deep learning for image enhancement
Before we can evaluate the feasibility of running real-time image enhancement, let’s have a high-level look at the deep learning system Intel has used.
The researchers at Intel have not provided full implementation details about the deep learning system they have developed. But they have published a paper on arXiv and posted a video on YouTube that provide useful hints on the kind of computation power you would need to run this model.
The full system, displayed below, is composed of several interconnected neural networks.
The G-buffer encoder transforms different render maps (G-buffers) into a set of numerical features. G-buffers are maps for surface normal information, depth, albedo, glossiness, atmosphere, and object segmentation. The neural network uses convolution layers to process this information and output a vector of 128 features that improve the performance of the image enhancement network and avoid artifacts that other similar techniques produce. The G-buffers are obtained directly from the game engine.
The image enhancement network takes as input the game’s rendered frame and the features from the G-buffer encoder and generates the photorealistic version of the image.
The remaining components, the discriminator and the LPIPS loss function, are used during training. They grade the output of the enhancement network by evaluating its consistency with the original game-rendered frame and by comparing its photorealistic quality with real images.
Inference costs for image enhancement
First, let’s see that, if the technology becomes available, whether gamers will be able to run it on their computers. For this, we need to calculate inference costs, or how much memory and computing power you need to run the trained model. For inference, you’ll only need the G-buffer encoder and image enhancement network, and we can cut the discriminator network.
The enhancement network accounts for the bulk of the work. According to Intel’s paper, this neural network is based on HRNetV2, a deep learning architecture meant for processing high-resolution images. High-resolution neural networks produce fewer visual artifacts than models that down-sample images.
According to Intel’s paper, “The HRNet processes an image via multiple branches that operate at different resolutions. Importantly, one feature stream is kept at relatively high resolution (1/4 of the input resolution) to preserve fine image structure.”
This means that, if you’re running the game at full HD (1920×1080), then the top row layers will be processing inputs at 480×270 pixels. The resolution halves on each of the lower rows. The researchers have changed the structure of each block in the neural network to also compute inputs from the G-buffer encoder (the RAD layers).
According to Intel’s paper, the G-buffer’s inputs include “one-hot encodings for material information, dense continuous values for normals, depth, and color, and sparse continuous information for bloom and sky buffers.”
The researchers note elsewhere in their paper that the deep learning model can still perform well with a subset of the G-buffers.
So, how much memory does the model need? Intel’s paper doesn’t state the memory size, but according to the HRNetV2 paper, the full network requires 1.79 gigabytes of memory for a 1024×2048 input. The image enhancement network used by Intel has a smaller input size, but we also need to account for the extra parameters introduced by the RAD layers and the G-buffer encoder. Therefore, it would be fair to assume that you’ll need at least one gigabyte of video memory to run deep learning–based image enhancement for full HD games and probably more than two gigabytes if you want 4K resolution.
One gigabyte of memory is not much given that gaming computers commonly have graphics cards with 4-8 GB of VRAM. And high-end graphics cards such as the GeForce RTX series can have up to 24 GB of VRAM.
But it is also worth noting that 3D games consume much of the graphics card’s resources. Games store as much data as possible on video memory to speed up render times and avoid swapping between RAM and VRAM, an operation that incurs a huge speed penalty. According to one estimate, GTA 5 consumes up to 3.5 GB of VRAM at full HD resolution. And GTA was released in 2013. Newer games such as Cyberpunk 2077, which have much larger 3D worlds and more detailed objects, can easily gobble up to 7-8 GB of VRAM. And if you want to play at high resolutions, then you’ll need even more memory.
So basically, with the current mid- and high-end graphics cards, you’ll have to choose between low-resolution photorealistic quality and high-resolution synthetic graphics.
But memory usage is not the only problem deep learning–based image enhancement faces.
Delays caused by non-linear processing
A much bigger problem, in my opinion, is the sequential and non-linear nature of deep learning operations. To understand this problem, we must first compare 3D graphics processing with deep learning inference.
Three-dimensional graphics rely on very large numbers of matrix multiplications. A rendered frame of 3D graphics starts from a collection of vertices, which are basically a set of numbers that represent the properties (e.g., coordinates, color, material, normal direction, etc.) of points on a 3D object. Before every frame is rendered, the vertices must go through a series of matrix multiplications that map their local coordinates to world coordinates to camera space coordinates to image frame coordinates. An index buffer bundles vertices into groups of threes to form triangles. These triangles are rasterized—or transformed into pixels— and every pixel then goes through its own set of matrix operations to determine its color based on material color, textures, reflection and refraction maps, transparency levels, etc.
This sounds like a lot of operations, especially when you consider that today’s 3D games are composed of millions of polygons. But there are two reasons you get very high framerates when playing games on your computer. First, graphics cards have been designed specifically for parallel matrix multiplications. As opposed to the CPU, which has at most a few dozen computing cores, graphics processors have thousands of cores, each of which can independently perform matrix multiplications.
Second, graphics transformations are mostly linear. And linear transformations can be bundled together. For instance, if you have separate matrices for world, view, and projection transformations, you can multiply them together to create one matrix that performs all three operations. This cuts down your operations by two-thirds. Graphics engines also use plenty of tricks to further cut down operations. For instance, if an object’s bounding box falls out of the view frustum (the pyramid that represents the camera’s perspective), it will be excluded from the render pipeline altogether. And triangles that are occluded by others are automatically removed from the pixel rendering process.
Deep learning also relies on matrix multiplications. Every neural network is composed of layers upon layers of matrix computations. This is why graphics cards have become very popular among the deep learning community in the past decade.
But unlike 3D graphics, the operations of deep learning can’t be combined. Layers in neural networks rely on non-linear activation functions to perform complicated tasks. Basically, this means that you can’t compress the transformations of several layers into a single operation.
For instance, say you have a deep neural network that takes a 100×100 pixel input image (10,000 features) and runs it through seven layers. A graphics card with several thousand cores might be able to process all pixels in parallel. But it will still have to perform the seven layers of neural network operations sequentially, which can make it difficult to provide real-time image processing, especially on lower-end graphics cards.
Therefore, another bottleneck we must consider is the number of sequential operations that must take place. If we consider the top layer of the image enhancement network there are 16 residual blocks that are sequentially linked. In each residual block, there are two convolution layers, RAD blocks, and ReLU operations that are sequentially linked. That amounts to 96 layers of sequential operations. And the image enhancement network can’t start its operations before the G-buffer encoder outputs its feature encodings. Therefore, we must add at least the two residual blocks that process the first set of high-resolution features. That’s eight more layers added to the sequence, which brings us to at least 108 layers of operations for image enhancement.
This means that, in addition to memory, you need high clock speeds to run all these operations in time. Here’s an interesting quote from Intel’s paper: “Inference with our approach in its current unoptimized implementation takes half a second on a GeForce RTX 3090 GPU.”
The RTX 3090 has 24 GB of VRAM, which means the slow, 2 FPS render rate is not due to memory limitations but rather due to the time it takes to sequentially process all the layers of the image enhancer network. And this isn’t a problem that will be solved by adding more memory or CUDA cores, but by having faster processors.
Again, from the paper: “Since G-buffers that are used as input are produced natively on the GPU, our method could be integrated more deeply into game engines, increasing efficiency and possibly further advancing the level of realism.”
Integrating the image enhancer network into the game engine would probably give a good boost to the speed, but it won’t result in playable framerates.
For reference, we can go back to the HRNet paper. The researchers used a dedicated Nvidia V100, a massive and extremely expensive GPU specially designed for deep learning inference. With no memory limitation and no hindrance by other in-game computations, the inference time for the V100 was 150 milliseconds per input, which is ~7 fps, not nearly enough to play a smooth game.
Development and training neural networks
Another vexing problem is the development and training costs of the image-enhancing neural network. Any company that would want to replicate Intel’s deep learning models will need three things: data, computing resources, and machine learning talent.
Gathering training data can be very problematic. Luckily for Intel, someone had solved it for them. They used the Cityscapes dataset, a rich collection of annotated images captured from 50 cities in Germany. The dataset contains 5,000 finely annotated images. According to the dataset’s paper, each of the annotated images required an average of 1.5 hours of manual effort to precisely specify the boundaries and types of objects contained in the image. These fine-grained annotations enable the image enhancer to map the right photorealistic textures onto the game graphics. Cityscapes was the result of a huge effort supported by government grants, commercial companies, and academic institutions. It might prove to be useful for other games that, like Grand Theft Auto, take place in urban settings.
But what if you want to use the same technique in a game that doesn’t have a corresponding dataset? In that case, it will be up to the game developers to gather the data and add the required annotations (a photorealistic version of Rise of the Tomb Raider, maybe?).
Compute resources will also pose a challenge. Training a network of the size of the image enhancer for tasks such as image segmentation would be feasible with a few thousand dollars—not a problem for large gaming companies. But when you want to do a generative task such as photorealistic enhancement, then training becomes much more challenging. It requires a lot of testing and tweaking of hyperparameters, and many more epochs of training, which can blow up the costs. Intel tuned and trained their model exclusively for GTA 5. Games that are similar to GTA 5 might be able to slash training costs by finetuning Intel’s trained model on the new game. Others might need to test with totally new architectures. Intel’s deep learning model works well for urban settings, where objects and people are easily separable. But it’s not clear how it would perform in natural settings, such as jungles and caves.
Gaming companies don’t have machine learning engineers, so they’ll also have to outsource the task or hire engineers, which adds more costs. The company will have to decide whether the huge costs of adding photorealistic render are worth the added gaming experience.
Intel’s photorealistic image enhancer shows how far you can push machine learning algorithms to perform interesting feats. But it will take a few more years before the hardware, the companies, and the market will be ready for real-time AI-based photorealistic rendering.
2 notes
·
View notes
Text
Reverse enginnering the unreleased GameBoy Printer COLOR
For a long time, when I checked out the graphics for the 64DD title Mario Artist Paint Studio, the successor to Mario Paint, I found a bunch of graphics and text that seemed to be for printing images. I was not entirely sure how that worked, how to even access it. I didn’t know enough reverse enginnering “techniques” to even bother while I was translating all the Mario Artist titles.
Fast forward to this month, and with new tools that I wrote, I started to think again about this feature, because it seemed like a full fledged working overlay code. So I went on, and tried to find the other overlays, such as Game Boy Camera menu, and see how the game loaded the overlay and access it.
After finding the LBAs for those overlays, I tried to backtrack the process of loading until I find what is seemingly a bunch of functions to load, init and access the overlay. Bingo! One of them accesses the unused printer overlay. So all I need is to force a way to access it, such as repointing a button’s purpose.
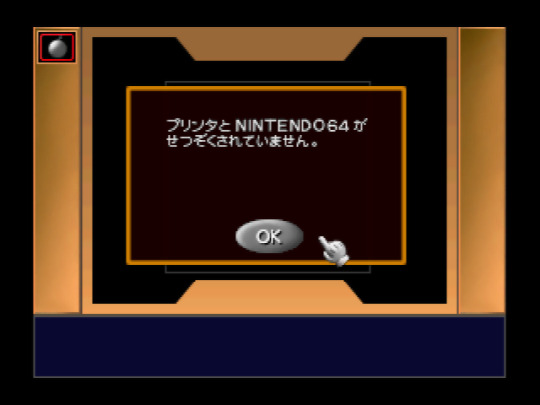
Okay, so I’m greeted with an error that the Printer is not connected. Now it was time to know what it is actually doing to detect the printer. Turns out it expects the Transfer Pak, as there are errors involving the “64GB Cable” (japanese name)? With JoyBus commands that I’ve never seen?
I eventually respond with something that it wants with a custom script, and then I see commands that are pretty much as the same as commands used for the GameBoy Printer.
Thank you Shonumi for having this great article about the technical aspects of the GameBoy Printer, else I would have never known: https://shonumi.github.io/articles/art2.html
So, okay, we need to “emulate” an unreleased Transfer Pak Link cable feature, alongside some response from the printer.
For people who wants some technical information, here’s how the Transfer Pak Link Cable feature works, this uses the JoyBus commands 0x14 to write data (0x23 bytes to send, 0x01 byte to receive), and 0x13 to read data (0x03 bytes to send, 0x21 bytes to receive). (Oddly close to the commands used for GameCube to access the GBA...)
Those commands basically constantly uses 0x20 bytes for data, and 1 byte for some kind of CRC which, sorry, I haven’t taken the time to figure out the calculation, my script just fetches the CRC output.
I plan to write more about the Transfer Pak communication aspects later, as I want to focus on the GameBoy Printer Color.
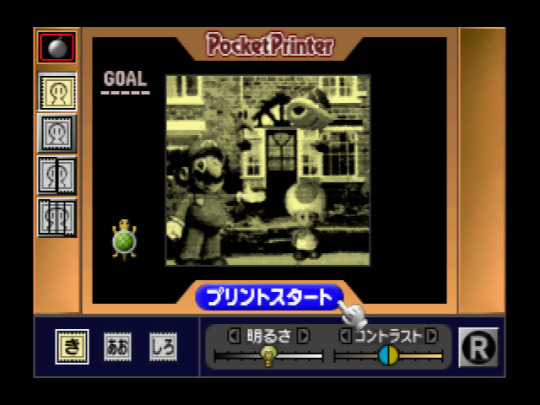
Eventually it sends GameBoy Printer commands if you “emulate” the Transfer Pak link cable, then receives the so called “keepalive” byte, usually 0x81. And sure enough, I get a Pocket Printer screen.
You get a screen like this, where you can print vertically, horizontally, or vertical strips, with a bigger resolution. You can zoom the picture a bit when you hover the pointer to the picture. You can set the paper color to get a preview of the output, set the brightness and contrast, not unlike the GameBoy Camera, and then a button to print. It is slow, but I found one undocumented command for the GameBoy Printer: Command 0x08. It seems when there’s an error, this command is sent and may interrupt what the GameBoy Printer is doing? Either way, I’m sure Shonumi would be interested to verify this command.
However, this article is about the GameBoy Printer COLOR. Turns out the game expects more than one keepalive byte, it expects 0x81... but it also expects 0x82. What happens if we use that one?
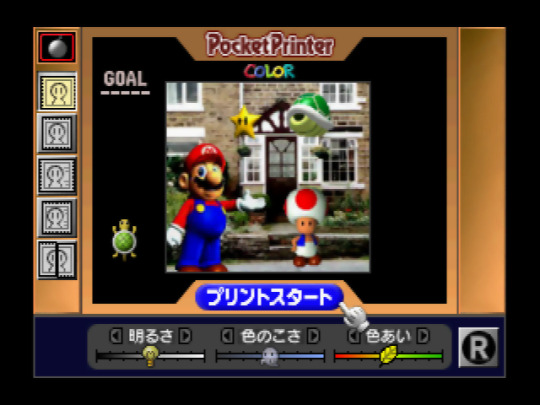
Pocket Printer Color detected, with a full color picture at the center, and more settings. This time there are 5 print settings: slow horizontal/vertical, fast horizontal/vertical (difference explained later), and vertical strips. We are also allowed to change the brightness, contrast, and hue. And of course, the print button.
This is pretty huge, because not only we get to emulate an unreleased Transfer Pak Link Cable support, but also emulating an unreleased, heck, even unannounced GameBoy Printer Color, and Paint Studio provides a fully functional menu for it.
So here’s the commands for that hardware:
0x01 - Init 0x02 - Print Settings (used before copying) 0x04 - Copy Pixel Line 0x06 - Print? (used after copying) 0x08 - Stop? 0x0F - Nop (Status)
It is pretty similar to the original Printer, but some things are performed differently. First, it uses Command 0x02, which uses 5 bytes now, which I’m not sure of the definition (magic bytes, after all), aside that it may set the horizontal resolution, which is either 320 (slow print) or 160 (fast print).
Then it uses command 0x04, which copies a full pixel line, in either resolution, and sends a linear RGBA5551 line just like the N64 format, which means the printer supports a pretty good amount of colors.
After copying all the lines, command 0x06 is used... twice. I’m not sure what it does, but the menu does ask if you want to print the image again, and if I say yes, it only sends that command again, so that means the printer has a large buffer to contain a linear 320x240 RGBA5551 image, and that this command is related to print the image.
As far as I know, the printer status byte definition is very similar, if not the same as the regular printer.
I have made a script for Project64 that “emulates” the necessary stuff so you can mess around with this feature: https://github.com/LuigiBlood/EmuScripts/blob/master/N64/Project64/DMPJ_PocketPrinter.js
You can select the Printer Type between Normal and Color, and you have to click the Save & Load button to access this feature. Disable the script to recover the use of that button. There’s also a bit of documentation inside.
It also creates a RAW file output of what’s copied, so you can take a look at the image with a proper viewer.
This is kind of an experimental blog post, as I’m not very good at writing this stuff, but I hope this gives a good view of the GameBoy Printer Color.
#N64#64DD#Mario Artist#Paint Studio#Game Boy#Printer#Color#GB#GBC#reverse engineering#emulation#Nintendo#Nintendo 64
273 notes
·
View notes
Photo
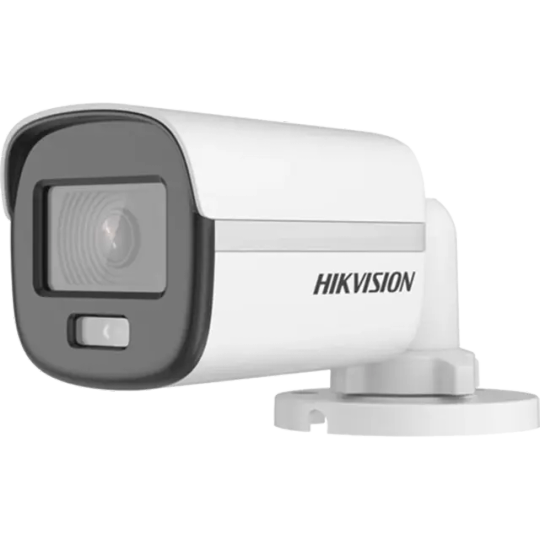
Hikvision 2MP 2.8mm ColorVu Fixed Mini Bullet Camera Camera Image Sensor: 2 MP CMOS Max. Resolution: 1920 (H) × 1080 (V) Min. Illumination: Color: 0.001 Lux @ (F1.0, AGC ON), B/W: 0 Lux with white light Shutter Time: PAL: 1/25 s to 1/50,000 s;NTSC: 1/30 s to 1/50,000 s Angle Adjustment: Pan: 0° to 360°, Tilt: 0° to 90°, Rotation: 0° to 360° Signal System: PAL/NTSC Lens Lens Type: 2.8 mm fixed focal lens Focal Length & FOV: 2.8 mm, horizontal FOV: 98°, vertical FOV: 51°, diagonal FOV: 115° Lens Mount: M12 Illuminator Supplement Light Type: White Light Supplement Light Range: White Light Distance: Up to 20 m Smart Supplement Light: Yes Image Image Parameters Switch: STD/HIGH-SAT/HIGHLIGHT Image Settings: Brightness;Mirror;Sharpness;Anti-Banding;AGC Frame Rate: TVI: 1080p@25fps/30fps CVI: 1080p@25fps/30fps AHD: 1080p@25fps/30fps CVBS: PAL/NTSC Day/Night Mode: Color Wide Dynamic Range (WDR): Digital WDR Image Enhancement: BLC;HLC;Global Noise Reduction: 3D DNR/2D DNR White Balance: Auto/Manual Interface Video Output: Switchable TVI/AHD/CVI/CVBS Alarm: Solid Light Alarm (White Light) General Power: 12 VDC ± 25% *You are recommended to use one power adapter to supply the power for one camera. Max. 2.4 W Material: Plastic Dimension: 161.1 mm × 70 mm × 70 mm (6.34" × 2.76" × 2.76") Approx. 229 g (0.50 lb) Operating Condition: -40°C to 60°C (-40°F to140°F), Humidity: 90% or less (non-condensing) Communication: HIKVISION-C Language: English Approval Protection: IP67
0 notes
Text
RESOLUTION
Digital Camera Resolution

The amount of detail that the camera can capture is called the resolution, and it is measured in pixels. The more pixels a camera has, the more detail it can capture and the larger pictures can be without becoming blurry or "grainy."
Some typical resolutions include:
256x256 - Found on very cheap cameras, this resolution is so low that the picture quality is almost always unacceptable. This is 65,000 total pixels.
640x480 - This is the low end on most "real" cameras. This resolution is ideal for e-mailing pictures or posting pictures on a Web site.
1216x912 - This is a "megapixel" image size -- 1,109,000 total pixels -- good for printing pictures.
1600x1200 - With almost 2 million total pixels, this is "high resolution." You can print a 4x5 inch print taken at this resolution with the same quality that you would get from a photo lab.
2240x1680 - Found on 4 megapixel cameras -- the current standard -- this allows even larger printed photos, with good quality for prints up to 16x20 inches.
4064x2704 - A top-of-the-line digital camera with 11.1 megapixels takes pictures at this resolution. At this setting, you can create 13.5x9 inch prints with no loss of picture quality.
High-end consumer cameras can capture over 12 million pixels. Some professional cameras support over 16 million pixels, or 20 million pixels for large-format cameras. For comparison, Hewlett Packard estimates that the quality of 35mm film is about 20 million pixels.
Image Resolution
Image resolution is the detail an image holds. The term applies to raster digital images, film images, and other types of images. Higher resolution means more image detail.
Image resolution can be measured in various ways. Resolution quantifies how close lines can be to each other and still be visibly resolved. Resolution units can be tied to physical sizes (e.g. lines per mm, lines per inch), to the overall size of a picture (lines per picture height, also known simply as lines, TV lines, or TVL), or to angular subtense. Line pairs are often used instead of lines; a line pair comprises a dark line and an adjacent light line. A line is either a dark line or a light line. A resolution of 10 lines per millimeter means 5 dark lines alternating with 5 light lines, or 5 line pairs per millimeter (5 LP/mm). Photographic lens and film resolution are most often quoted in line pairs per millimeter.
Pixel density
Pixels per inch (ppi) and pixels per centimetre (ppcm or pixels/cm) are measurements of the pixel density of an electronic image device, such as a computer monitor or television display, or image digitizing device such as a camera or image scanner. Horizontal and vertical density are usually the same, as most devices have square pixels, but differ on devices that have non-square pixels. Note that pixel density is not the same as resolution, where the former describes the amount of detail on a physical surface or device, while the latter resolution describes the amount of pixel information regardless of its scale. Considered in another way, a pixel has no inherent size or unit (a pixel is actually a sample), but when it is printed, displayed, or scanned, then the pixel has both a physical size (dimension) and a pixel density (ppi).
Adobe Ilustration Photoshop
Basic PrinciplesEdit
Since most digital hardware devices use dots or pixels, the size of the media (in inches) and the number of pixels (or dots) are directly related by the 'pixels per inch'. The following formula gives the number of pixels, horizontally or vertically, given the physical size of a format and the pixels per inch of the output:
Number of Pixels=Size in Inches*PPI
Pixels per inch (or pixels per centimetre) describes the detail of an image file when the print size is known. For example, a 100×100 pixel image printed in a 2 inch square has a resolution of 50 pixels per inch. Used this way, the measurement is meaningful when printing an image. In many applications, such as Adobe Photoshop, the program is designed so that one creates new images by specifying the output device and PPI (pixels per inch). Thus the output target is often defined upon creating the image.
Printing on PaperEdit
Printing on paper is accomplished with different technologies. Newspapers and magazines were traditionally printed using a screen called a halftone screen , which would print dots at a given frequency called the screen frequency in lines per inch (LPI) by using a purely analog process in which a photographic print is converted into variable sized dots through interference patterns passing through a screen. Modern inkjet printers can print microscopic dots at any location, and don't require a screen grid, so they use a metric called dots per inch (DPI). These are both different from pixel density or pixels per inch (PPI) because a pixel is a single sample of any color, whereas an inkjet print can only print a dot of a specific color either on or off. Thus a printer translates the pixels into a series of dots using a process called dithering. The dot pitch, smallest size of each dot, is also determined by the type of paper the image is printed on. An absorbent paper surface, uncoated recycled paper for instance, lets ink droplets spread — so has a larger dot pitch.
Often one wishes to know the image quality in pixels per inch (PPI) that would be suitable for a given output device. If the choice is too low, then the quality will be below what the device is capable of -- loss of quality -- and if the choice is too high then pixels will be stored unnecessarily -- wasted disk space. The ideal pixel density (PPI) depends on the output format, output device, the intended use and artistic choice. For inkjet printers measured in dots per inch it is generally good practice to use half or less than the DPI to determine the PPI. For example, an image intended for a printer capable of 600 dpi could be created at 300 ppi. When using other technologies such as AM or FM screen printing, there are often published screening charts that indicate the ideal PPI for a printing method.
Using the DPI or LPI of a printer remains useful to determine PPI until one reaches larger formats, such as 36" or higher, as the factor of visual acuity then becomes more important to consider. If a print can be viewed close up, then one may choose the printer device limits. However, if a poster, banner or billboard will be viewed from far away then it is possible to use a much lower PPI.

2 notes
·
View notes
Text
Make Cool Graphic Design using Removal.AI - Free Background Remover and Photo Editor
Trying to remove background from image seems to be a tedious job. Well, not anymore with a free background remover like Removal.AI. Whether you are a designer, photographer, advertising firm, or simply loves to enhance photos, you know that a background removal tool is such a huge help in making different creative projects that involve the use of photos.

If you are going to remove background from an image, you are opening up plenty of possibilities to improve the whole picture. With the Removal.AI tool, you can produce both professional and personal outputs in seconds.
Unlike using Photoshop and other complicated photo editors, Removal.Ai is both fast and simple to use. The process requires a few clicks of a button and would take literally just seconds to complete.
What makes Removal.AI the best tool to remove background from photos is that it is also a simple image editor. You can use different tools to manually erase unwanted parts, set the image into whatever position, flip the image vertically or horizontally, add shadow effects, enhance the photos further, and more! There is even a text editor for you to add text on the picture. Want to change the photo’s background? There are plenty of background photos that you can add on your photos to make them suited for any use. It is basically all that you need to create incredible designs!
Excited about making creative and engaging designs using this amazing tool? Here is how you can make the best designs using Removal.AI in few simple steps:
Step 1 - Upload your image
Simply drag and drop any photo from your computer or click on the Choose a Photo button to upload an image.
Step 2 - Edit using free online photo editor
Aside from magically removing the background, you have the option to use Removal.AI in transforming the photo into an attractive work of art. Just click on the Edit button and the free online photo editor will open with your image.
Use the different enhancement tools to change the size of the photo, customize the background, add text, etc.
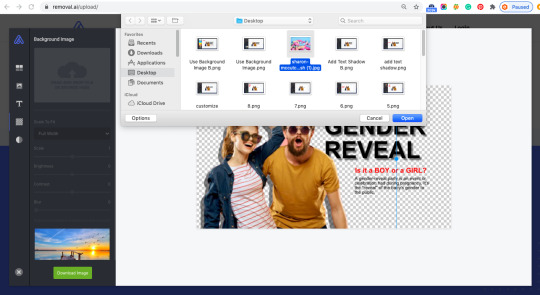
The tool works in real time so you can instantly see the changes as you work on the image. Design the photo as much as you like and unleash your creativity until you are satisfied with how the photo looks.
Step 3 - Download and Share
Happy with your project? Click on the Download Image button and it will be saved on your computer. You may choose to download the photo right away and for free or get full resolution images for as low as $0.03 per image, depending on the reasonably priced package that you will subscribe to.
The tool works in real time so you can instantly see the changes as you work on the image. Design the photo as much as you like and unleash your creativity until you are satisfied with how the photo looks.
Conclusion
Although you can really do wonderful projects on your own, you may also want to contact the team if you need help with bigger projects. Just click on the Contact Us button and fill out the form so the team can reach you and discuss how they can help you out.
Removal.AI is a must-have for anyone who works with photos. It is very quick to use and the results are always professional-grade. This is great for those who want to increase productivity without sacrificing quality because Removal.AI uses algorithms that have been created and tested by professional photo editors themselves.
The best thing about it is that it is free to use so you can try the tool and see how superb it really is!
1 note
·
View note
Text
Set Horizontal/Vertical Resolution for Output Image & Advanced Documents Comparison Options
What's New in this Release?
Aspose development team is happy to announce the monthly release of Aspose.Words for Java & .NET 17.4.0. This month’s release contains over 80 useful new features, enhancements and bug fixes. Here is a look at just a few of the biggest features and API changes in this month’s release; CompareOptions class introduced to allow customer specify comparison settings, Custom Xml Data Properties is now supported for RTF format, Implemented support for baseline alignment in Asian text, Improved table split for vertically merged cells in combination with at-least height, Improved table grid calculation for horizontally merged cells, Improved BalanceSingleByteDoubleByteWidth handling, The horizontal and vertical resolution of output images can now be specified separately (through ImageSaveOptions.VerticalResolution and ImageSaveOptions.HorizontalResolution), Underline, strikethrough, text borders and effects are now taken into account wile rendering OfficeMath equation text, A substitution of fonts with the same name but with different suffixes now generates a proper warning, Textboxes with automatic fit is now rendered correctly inside the group shapes, Corrupted texture images do not stop the rendering procedure with an exception, a warning is sent instead now and DrawingML Charts rendering improved (rotated and scaled horizontal axis labels). It has implemented a more generic and flexible solution to format field result. It has added an interface IFieldResultFormatter in Aspose.Words 17.4 allowing to implement custom formatting of field’s result. Now, users can apply formatting to numeric and date/time field result. Previously it was one property ImageSaveOptions.Resolution that set both vertical and horizontal resolution to the same values. It has added new public properties HorizontalResolution and VerticalResolution in ImageSaveOptions class to set horizontal and vertical resolution of output image. It has introduced new class CompareOptions in Aspose.Words 17.4 to compare two documents with advanced options. Now, users can ignore document formatting and header footer content during document comparison. The list of new and improved features added in this release are given below
Compare documents with comparison setting
Convert Vml shapes to Dml upon saving to Strict Open XML Document format.
Add feature to remove spaces between sign and digits during mail merge
Add feature to set Horizontal and Vertical Resolution of output image
Consider support of conditional and browser-dependent comments
Document.Save removes {*\datastore ...} tag from Rtf
Make sure CssIdentifierValue.ToCss escapes identifier.
Import custom list markers from ::before pseudo-elements when converting from HTML to Words
x-none language is not supported for DOCX
Cell's border become visible after modifying style of Div tag in HtmlFixed
Table width is not calculated correctly during rendering to PDF
ROOT Inline Shape position is changed after conversion from Docx to Pdf
Docx to Pdf conversion issue with AltChunk (HTML file)
Restricted and Hidden styles appearing in styles pane and Quick style gallary
The font size of altChunk contents is changed after re-saving Docx
The font name of altChunk contents is changed after re-saving Docx
TextAlignment property does not take effect and leads to different output from MS Word when converting to xps
PDF Conversion Issue with Docx containing customxml
Unknown ListTrailingCharacter enum member.
Image is rendered on next page after conversion from Docx to Pdf
Document.Compare generates incorrect format revisions
Incorrect export of equation in MathML
Incorrect order of tags if they are inside of MS Word's table during Replace operation
Shape's text does not render correctly in output Pdf
Docx to Pdf conversion issue with shape's rendering
Docx to Pdf conversion issue with shape's rendering/position
Strikethrough in Equation not preserved during rendering
Textbox positions are not preserved during open/save a DOCX
Roundtrip of the DOCX document has wrong output
Word to HTML then back to Word, table has extra space between rows
PageRef is converted to hyperlink in output Pdf
Showing bullets and font substitution problems
Document's contents are lost after re-saving Docx
Saving Embedded Spreadsheet produces a different file every time
MHTML to PDF, Hebrew content in Subject is changed.
When DOCX is saved as PDF, some content overlaps the footer.
Document.UpdateFields does not update Ref field in output Docx/Pdf
Extra div elements are exported in HtmlFixed
While transforming a specific Word document to PDF, the table appears mixed up.
Word drawing diagrams are overlapped after conversion from Docx to Doc/Pdf
When DOCX is saved as PDF, the line of graph is different.
The embedded xlsm is changed to xlsx after re-saving Docx
DOCX save inserts invalid tblPrEx element to style
Different number of lines in AW pdf output because of SBCS/DBCS balancing
Stylesheet problem when saving DOC to DOC
When DOCX is saved as PDF, gradient fill is lost
Horizontal Axis of chart does not render correctly
ShapeRenderer.Save renders extra number on chart's image
Corrupted word file after save
DocumentBuilder.MoveToHeaderFooter does not move the cursor to the header of document
Trendline of chart is changed in output Pdf
Part of header image is truncated in output HtmlFixed
Docx to Pdf conversion issue with OfficeMath equations
Range.Replace finds and replaces text in the incorrect order
The Image is lost When Convert docx to docx (pdf)
Old incorrect value is rendered inside a SDT in PDF
When DOCX is saved as PDF, the comma in chart has been replaced by semi-colon in all labels.
The chart's legend entries are reversed in HtmlFixed
SEQ Ordinal not translated in Dutch
Pictures not shown or rendered incorrectly in HtmlFixed
Custom document properties are lost after conversion from Doc to Docx
Spanish labels become english
Style of text in header is changed during rendering.
Composite nodes inside paragraph not handled during TOC update.
Font name is corrupted when converting RTF to DOC
Other most recent bug fixes are also included in this release
Newly added documentation pages and articles
Some new tips and articles have now been added into Aspose.Words for .NET documentation that may guide users briefly how to use Aspose.Words for performing different tasks like the followings.
Inserting Images Dynamically
Setting Text Background Color Dynamically
Overview: Aspose.Words
Aspose.Words is a word processing component that enables .NET, Java & Android applications to read, write and modify Word documents without using Microsoft Word. Other useful features include document creation, content and formatting manipulation, mail merge abilities, reporting features, TOC updated/rebuilt, Embedded OOXML, Footnotes rendering and support of DOCX, DOC, WordprocessingML, HTML, XHTML, TXT and PDF formats (requires Aspose.Pdf). It supports both 32-bit and 64-bit operating systems. You can even use Aspose.Words for .NET to build applications with Mono.
More about Aspose.Words
Homepage Aspose.Words for .NET
Homepage of Aspose.Words for Java
Online documentation of Aspose.Words
#Custom Formatting of Field Result#Set Horizontal Resolution of Output Image#set Vertical Resolution of Output Image#Advanced Documents Comparison#.NET Word processing API#ignore Document formatting
0 notes
Text
Microsoft Xbox One S review
The Good The Xbox One S is a slick looking game console that's 40 percent smaller than the original and ditches the infamously gigantic power brick. It can display 4K video from streaming services and Ultra HD Blu-rays, and supports HDR contrast on video and games. The updated controller works with other Bluetooth devices, too.
The Bad 4K, Ultra HD Blu-ray and HDR settings only work with newer TVs, and may require some trial and error. The updated controller feels cheaper than its predecessor. Project Scorpio, the more powerful Xbox One successor, arrives in late 2017.
The Bottom Line The Xbox One S is the console Microsoft should have delivered three years ago, but there's little reason to upgrade if you already own the original box.
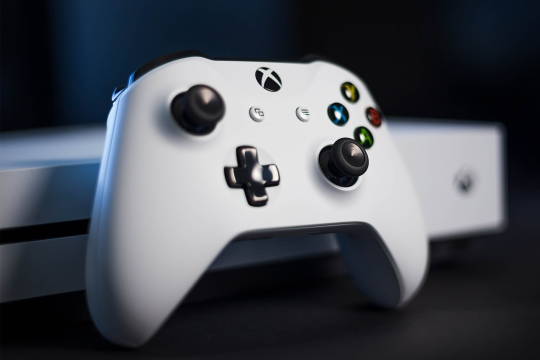
The Xbox One S is the version of the console that Microsoft should've first released back in 2013 instead of the lumbering beast that we got. It's better in a number of ways, making it even more of a worthy alternative to Sony's PlayStation 4.
Xbox One S offers a far more attractive enclosure, options for a bigger hard drive, a slightly redesigned controller and some video perks for owners of 4K TVs. It starts at $300, £250 or AU$400 for the 500GB version; $350, £300 or AU$500 for a 1TB model; and $400, £350 or AU$549 for 2TB.
That last model is available to buy as of today in the US (and includes the vertical stand that otherwise costs $20 when purchased separately in the US), while those with the smaller hard drives will be available later in August, bundled with games such as Madden 17 and Halo. (Additional bundles will follow later in the year -- including a pricier 2TB Gears of War 4 version in October -- and may vary by region.)
Sounds like a slam dunk, right? Unfortunately, it's never that simple. The One S doesn't get an across-the-board "buy it now" recommendation for two reasons. First off, it doesn't deliver huge improvements for anyone who already owns an Xbox One. But more importantly, Microsoft has already promised that the next Xbox -- dubbed Project Scorpio -- will be arriving in late 2017 with with the seriously amped-up graphics and VR-ready hardware that audiences are clamoring for.
When it's all said and done, the Xbox One S should be primarily viewed as a slimmed-down version of the Xbox One that introduces a mildly updated controller and provisions for 4K display. It's not going to warp you into a state-of-the-art gaming experience. Pragmatically, you're probably better off nabbing an older Xbox One, which are now being sold at fire-sale prices. But if you are getting an Xbox One for the first time, have an interest in the bundled games and aren't saving your pennies for 2017's Project Scorpio, the One S is certainly a good all-round gaming and entertainment deal.
Note: I found a site where you can complete task and get free Xbox gift card Codes
What's new in the Xbox One S
There's a short but significant list of improvements and changes to the Xbox One S.
Smaller, cleaner design: To start, it's 40 percent smaller, which considering its power supply is now internal, is impressive. It's also stark white, with some slick plastic moldings flanking the entirety of the box. I think it's the best-looking Xbox Microsoft has ever designed.

The One S can also stand vertically, too. The 2TB model we received for review packs in a stand. If you buy one of the other models, you can get the stand separately for $20.
4K and HDR video: Xbox One S gets a fairly beefy upgrade on its video capabilities, with 4K resolution (3,840x2,160, or four times as sharp as standard 1080p HDTVs) and HDR (high dynamic range, which is basically enhanced contrast and color). Keep in mind: those features only work on compatible TVs and 4K functionality only works with a small but growing list of compatible video content. 4K can currently be accessed through streaming video services such as Amazon and Netflix (as long as you have the bandwidth to support it and pay for their premium tier) and those new 4K Ultra HD Blu-ray discs. Certain games, meanwhile, will eventually be able to take advantage of HDR visual improvements, but don't look for PC-like 4K graphics -- the games are merely upscaled to 4K.
So no, you're not getting native 4K gaming out of an Xbox One S. In fact, only a limited number of games will feature HDR and none of them are out yet. They are Gears of War 4, Forza Horizon 3 and 2017's Scalebound.
New controller design: The Xbox One controller has been updated for the S, too. It has a more streamlined top section, better range and textured grips. It can also use Bluetooth to connect, which opens the door for compatibility with other devices -- no more annoying dongles, at least on Bluetooth-compatible PCs.
Unfortunately, I'm not a fan of the new controller's design. It's not a drastic departure from the original, but there's just enough of a change to make it feel cheaper. The plastic textured grips don't feel good the way rubberized ones do, but thankfully the triggers seem unchanged. The D-pad also feels slightly less tactile -- I even noticed differences between two of the new controllers side by side.
IR blaster and receiver: Still present is the IR port for controlling the console with a remote, but the Xbox One S also features an integrated IR blaster to control or power on other devices in the room.
And it still does everything the old Xbox One does: The good news is that you're not losing anything with the Xbox One S compared with its predecessor. Around back the console offers a lot of the same ports as the original Xbox One, though noticeably absent is a dedicated Kinect port. You can still attach Kinect to the Xbox One S, you'll just need a special $40 (!) adapter. Either way, the omission of a Kinect port should give you an idea of how that peripheral is regarded at Microsoft HQ.
HDMI-in and -out ports are still there, so you can still make use of the Xbox One's live TV integration if that's something that appeals to you, but I never found it overly useful.
Suffice it to say, the One S plays all existing Xbox One games, and a growing list of Xbox 360 games. It also includes all of the encouraging software improvements Microsoft has made over the past few years, including the redesigned interface, support for the Cortana digital assistant (using a microphone headset), compatibility with the Windows Store and, soon, additional cross-play options with Windows PC gamers on certain titles.
4K and HDR scorecard
I want to personally thank the Xbox One S for introducing me to the hot mess that is the world of 4K and HDR formats. I considered myself fairly fluent in the language of home theater, but I was bewildered at the insane of amount of granularity and confusion that the format is currently plagued with.
Odds are you won't be able set up in 4K right out of the box. I needed to download two separate updates for the Xbox One S to finally realize it was attached to a 4K TV, at which point it offered to bump up the resolution output to 4K.
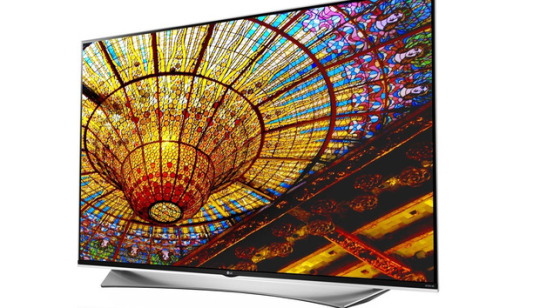
I hooked the console up to four different TVs and had mixed results with each, so I tapped CNET's David Katzmaier to help me test out the rest of the Xbox One S' 4K and HDR capabilities.
What we learned is that getting all of these finicky display technologies to work together in sync will require some trial and error -- and patience.
Our major issue was getting our TVs to recognize HDR. The problem (which isn't solely the Xbox One S' fault) is that some TVs with HDR require a specific "UHD" or "deep color" setting to be turned on in order for HDR to work. These modes usually turn a TV's brightness all the way up and activate automatically when HDR content is detected. But none of our TVs detected the Ultra HD Blu-ray HDR signal that was being output by our "Star Trek" Blu-ray.
It wasn't until we forced the Xbox One S to output a higher bit depth (10-bit up from the console's default setting of 8-bit) did we get a clean HDR signal. Furthermore, we had issues maintaining a video signal altogether when our TV was in that special "UHD/deep color" setting for HDR but the Xbox One S was outputting a signal lower than 10-bit.
Sound confusing? That's because it was. And this was with the help of one of the best TV reviewers on the planet. It's possible your setup goes smoother, but there are definitely a lot of variables and boxes to check when entering the world of 4K, Ultra HD and HDR to make sure it all works correctly.
There's a really helpful 4K detail screen in the system display settings that gives you a heads up of which requirements for 4K, HDR and so on are currently being met. Definitely check that out.
Tragically, all of this time-consuming troubleshooting to get HDR to switch on isn't always worth it. In fact, it's sometimes nearly impossible to tell just by looking at the image onscreen. We tried. The takeaway? 4K and HDR are nice novelties, but I'm not sure even the most discerning eyes can always tell the difference. And because only a fraction of games will even support HDR (the aforementioned trio of Gears of War 4, Forza Horizon 3 and Scalebound), it makes upgrading a tough sell. Not to mention the fact that all the games you'll ever play on Xbox One S won't be in true native 4K resolution -- they'll just be upscaled to fit.
That said, there are plenty of 4K Blu-rays out there, and Netflix can stream some content in 4K (as long as you pay for its Premium tier). If you are in the specific position of owning a 4K TV and are looking for an Xbox One, the S is what you should be buying.
It's worth noting that the Xbox One S doesn't handle the higher-end audio options out there such as Dolby Atmos. The most you'll get out of the console is a seven-channel surround signal.
Looking forward to Project Scorpio
Microsoft's messaging about its console offerings can get confusing. It's best to think of the Xbox One and One S as their own tier. In terms of graphical horsepower, they're equal. The next jump in visuals and performance will come along with Project Scorpio, which is being targeted for the 2017 holiday season.
Details on that machine are scant at best, but it's safe to say it will significantly outperform the Xbox One and One S, the PlayStation 4 and -- if we're going on rumored specs -- the PlayStation 4 step-up console, the PS4 Neo.
This will usher in a sizable upgrade in all aspects of gaming with native 4K resolution output and HDR support. And Microsoft has already pledged that Scorpio will be "VR ready," presumably for a forthcoming virtual-reality headset.
The current messaging as to how games will work across Xbox One platforms seems simple enough. Any Xbox One (be it a standard, S or Project Scorpio) will be able to play any Xbox One game, though the Scorpio will be able to take advantage of better graphics, performance, frame rate and resolution. This seems to mostly fall in line with the PS4 Neo plan as well.
If we're just comparing raw specs, Project Scorpio's rumored details still fall short of what an Nvidia GTX 1080 graphics card is capable of.
Decisions, decisions
Under most circumstances, no, you don't need to buy an Xbox One S. If you already own an Xbox One or even plan to wait for whatever Project Scorpio winds up being, it's tough to rationalize a purchase.
If you're looking to enter the Xbox One space and you don't feel like waiting a year or more for Project Scorpio, an Xbox One S might be the right purchase for you as long as you have or plan to get a 4K TV.
If a 4K TV isn't in your future, you may want to look at the original Xbox One. It's already as low as $250, £250 or AU$500 and it's entirely possible Microsoft will drive the price even lower if it's looking to sunset the model and clear out remaining inventory.
1 note
·
View note
Text
Hello! I was recently asked on how I made this edit with gifs behind it, and I thought the best way would be a tutorial, since there are a lot of steps to do. Now I use Photoshop CS6 and I probably do things the hard way, but it’s the most comfortable way for me. Anyways, here it goes! (warning! A lot of text..sorry I’m just thorough I guess..)
This part is for the still image first;
Open the photo you would like to use. I’m using this one.
Select the brush tool.
Press Q
Draw over the part that you want in your edit (it should look red)
Press Q again
Select any selection tool (I usually use the Marquee Tool)
Right click on the image and hit ‘Select Inverse’
Right click again on the image, and select ‘Refine Edge.’ I use this to clean up my edges a bit, since it’s really hard for me to make it perfect with a mouse. So play around with the settings, make sure it’s on preview so you can see what it is doing with your image.
When you are happy with the settings you have, go to where it says ‘Output To:’ use the drop down menu and select ‘New Layer’ and hit ok. You should now have something that looks like this;

So that’s one part done. Onto the next one.
Create a new document, and select your size. For my edit I used 560 x 560.
Go to the crop tool, and right click and select the slicing tool.

Right click your document, and select ‘Divide Slice’
Select how many slices you want horizontally and vertically. I did 3 slices horizontally and 2 vertically, so it looks like this;

Now to get the correct size of each square is a bit of a process (well the only way I know how to do it)
Use your paint bucket tool and select any color and use it on the main image.
Select your Marquee Tool and go over one of the squares
Hit CTRL + C to copy that selected area
Go to File on the upper left hand corner of Photoshop and select ‘New’ and it should tell you the width and height of each square. You can write it down if you wish, or if you can remember lol. Mine is 280 x 187
If you want to remove the colored background you just did, just hit CTRL + Z, it removes the last step you did.
Now this is where it kind of gets tricky if you aren’t too familiar with Photoshop, but be patient! Patience is KEY!
So for the gifs part, I do gifs the hard way (OBS + KMPlayer) and i’m sure there are simpler ways to do it, but I like to make things complicated for me I guess lol. If you have an easier way to make gifs, like ezgif or something, anything that saves the gif to your computer..please do it that way lol, anyways.
On your main image, on the bottom select ‘Create Frame Animation’ (if its not there you made just have to toggle it on. Go to ‘Windows’ in Photoshop and select ‘Timeline’ and it should pop up.)
Duplicate as many frames as you like. I believe my edit had 20 frames. Be cautious, if your file is OVER 3MB, it will not move on Tumblr. So you have to make sure, when you are saving that it is NOT over the 3MB (I will show you how you can see if it is or not) So try not to do a lot of frames, 12-20 should be good for this.
Open the gif you want to use.
Select the crop tool and use the drop down menu to select W x H x Resolution and type in your square size in your main image (mine was 280 x 187) and hit enter. Your frames should now all be the exact size of your square now.

Select all your frames on your gif. You can select them all by SHIFT clicking the first and last one.
Now select the little menu at the end of the timeline (looks like three lines) and select ‘Copy Frames’

Now go back to your main image, select all frames by shift clicking the first and last one and then select the same menu button with the three lines, and select ‘Paste Frames.’
A pop up menu will come up and select ‘paste over selection.’
On the left hand side, where your layers are, shift click the first and last one so they all move at once, and move it to whatever square you want it to be.
Now keep doing this till all your gifs are where you want them on the main image.
Make sure you change the speed of each frame in your Timeline to whatever you want, mine is set to .2 secs. Also make sure to change ‘Once’ to ‘Forever’ or it will only loop once.
Now to add your ‘Still Image’. This part is pretty simple.
Select the layer with the ‘Still Image’ on it (the one with no background) and drag it to the main image. (to drag it just make the window smaller and hold left click and drag it over to the main image.)
Now make sure the ‘Still Image’ is at the very top of all your gifs, so the gifs aren’t overlapping the image.
Now here you can play around with coloring, and brightness etc. Just remember that it will affect not only your main image, but also the gifs as well. (I haven’t learned how if it affects one it won’t affect the others lol)
If you want the out line like I did with Jack, just select the ‘Still Image’ layer, right click it, go the ‘blending options’ , select ‘stroke’, make sure the color is white, select your size (usually 1-4 but see what you like), and if you want, change the opacity.
Ok now onto saving. This is where my frustration usually sets in as, more often than not, my gifs are way over the 3MB limit. If you have more that 3MB size of a file, you may need to remove some frames, or fiddle with the coloring, brightness etc (if you did that)
When you are satisfied with your finished product, go to file, and select ‘Save For Web’. Now this is where you will see how big your file size is and how your image will look on the web.

As you can see mine is way below the file limit, which is fantastic!
Also I will show you my settings I use when I’m saving a gif;

Again, make sure your looping options is set for ‘Forever’ or will it only loop once.
Uhh..ok..I think that’s it. I hope this was a little bit helpful and not at all confusing...if you have any questions, ask away and I’ll try and answer them. :)
@jacksinsanity
4 notes
·
View notes