#sharedmailbox
Explore tagged Tumblr posts
Visit Tumblr Blog
Explore Tumblr blogs with no restrictions, modern design and the best experience.
Last Seen Tumblr Blogs


Fun Fact
The KCSC sent more than 20K requests to delete posts related to prostitution and porn to Tumblr from January to June 2017.
Text
Exchange Shell - Get all Shared Mailboxes Information

Exchange Shell - Get all Shared Mailboxes Information | https://tinyurl.com/26u3657b | #Exchange #Guide #Microsoft #Powershell Following on from our previous post about how IT professionals can use the tools available to them to make their lives easier, we have another Exchange Management Shell (EMS) script which will get all the information available from all Shared Mailboxes including the sizes of each mailbox. Guide Open up the Exchange Management Script tool and enter this command: Get-mailbox -RecipientTypeDetails sharedmailbox -Resultsize unlimited | ft Name, Identity, ItemsInFolder, FolderSize This will return all the information on your businesses shared mailboxes. However, this is only on screen using the EMS and the formatting is not the best. Export to CSV […] Read more... https://tinyurl.com/26u3657b
0 notes
Text
Sharing the calendar of a shared mailbox
Let everyone see the calendar: Set-MailboxFolderPermission -Identity [email protected]:\Calendar -User Default -AccessRights ViewDetails Let the owner make changes: Add-MailboxFolderPermission -Identity [email protected]:\Calendar -User [email protected] -AccessRights Editor
View On WordPress
0 notes
Text
Leveraging Microsoft’s Graph API with Power Automate
Recently, Microsoft broke many of their customers’ production workflows they had built in Power Automate (formerly Flow) using mail arriving into Shared Mailboxes as the trigger.
After mail had arrived, subsequent actions from a mail action would fail with the error of “Item Id doesn't belong to the current mailbox.” Microsoft’s official workaround was to use the Graph API but a savvy user on the Power Automate message board on Microsoft.com suggested to change the password of the user of the shared mailbox (not the delegate, the actual user created alongside the mailbox); i.e. mailbox name: “Shared Mailbox” username: [email protected].
If Microsoft did not suggest that workaround, and they didn’t, it leads you to believe if this method breaks they won’t care either.
Enter: Graph API via the HTTP action.
Before we get in weeds, the HTTP action is a Premium action. So, if you do not have the Premium license for Power Automate you cannot use it.
The first step is to get a custom connector created into Azure AD to leverage the API. This allows you to build your actions once and apply them to multiple Flows.
The guide I used to get the Custom Connector created was this one from Microsoft. https://docs.microsoft.com/en-us/graph/tutorials/flow
Once that is created, you can create different actions inside the connector then access them from your Flows under Custom when adding an action. I’ll go into detail about the actions I use later in this post.
In order for the Custom Connector to have the correct token, you need to get a token from the API. Below is a screenshot of what the action looks like using the HTTP connector. The action under the HTTP connector will be the “Parse JSON” action.
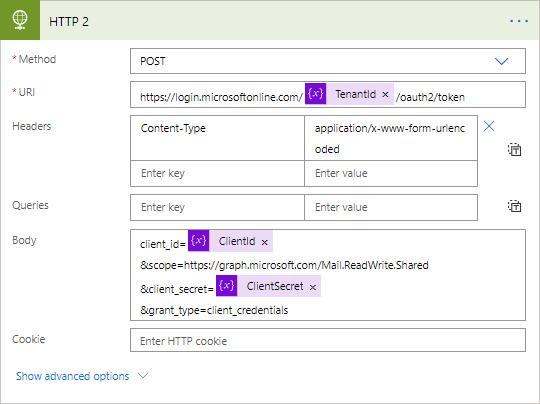
In the above screenshot, you’ll notice I stored the Tenant ID, Client ID and Client Secret from the Azure AD App Registration as variables.
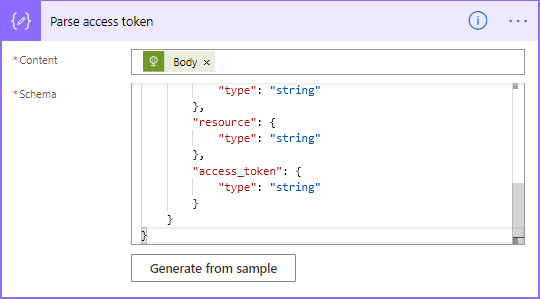
In this action, you can generate the JSON Schema using the below sample. Click “Generate from sample” and paste the below text. NOTE: after every HTTP action (including those with the Custom Connector) use the Parse JSON action in order to know the schema of the JSON.
{ "type": "object", "properties": { "token_type": { "type": "string" }, "expires_in": { "type": "string" }, "ext_expires_in": { "type": "string" }, "expires_on": { "type": "string" }, "not_before": { "type": "string" }, "resource": { "type": "string" }, "access_token": { "type": "string" } }}
Now to the Graph API Custom Connector actions.
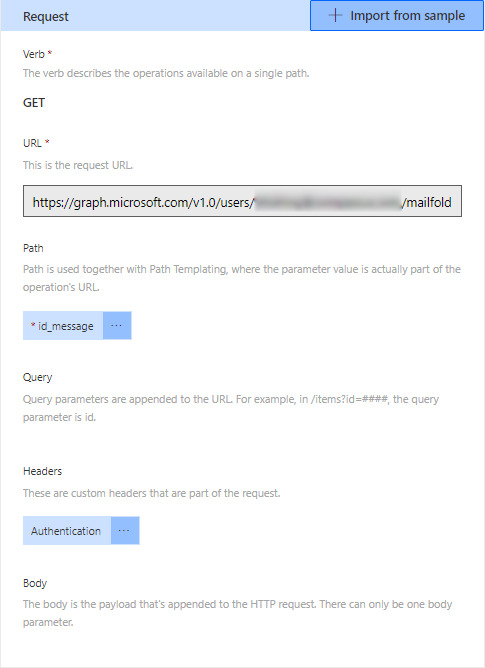
The below action gets all the attachments on a given email. Later, we’ll select the attachment we want to work with. The URL is truncated but is “https://graph.microsoft.com/v1.0/users/[email protected]/mailfolders('Inbox')/messages/{id_message}/attachments”. The text inside the brackets in the URL becomes a parameter. NOTE: actions cannot share parameters so if you have multiple actions with the same parameter they’ll need to be named uniquely. When you create the request, you will see a section for header enter the below be sure to put a space after “Bearer”, you’ll use the token from the above JSON behind Bearer after a space.
Authentication Bearer
Much like the above action, I have an action that selects an attachment. To do this, change the URL to “https://graph.microsoft.com/v1.0/users/[email protected]/mailfolders('Inbox')/messages/{id_message}/attachments/{id_attach}”; you’ll use the attachment ID found in the JSON of the above action.
I also mark the message as read. This is done with the “PATCH” verb in the Request section. I’ll discuss that in a later guide.
#powerautomate#mspowerautomate#flow#msflow#graphapi#msgraphapi#microsoft#api#microsoftapi#office365#exchangeonline#sharedmailbox
0 notes
Video
youtube
Understanding Shared & Resource Mailbox | Exchange 2019
1 note
·
View note
Text
Shared Mailbox permissions Export/Import
Check access rights first. look for fullAccess/SendAs etc. In this example all rights were Full Access.
Get-exoMailbox -RecipientTypeDetails SharedMailbox -ResultSize:Unlimited | sort Identity | Get-exoMailboxPermission |Select-Object Identity,User | Where-Object {($_.user -like '*@*')}
Edit to return the correct access rights if required and export to CSV:
Get-exoMailbox -RecipientTypeDetails SharedMailbox -ResultSize:Unlimited | sort Identity | Get-exoMailboxPermission |Select-Object Identity,User | Where-Object {($_.user -like '*@*')}|Export-Csv C:\Temp\sharedmailboxpermissions.csv -NoTypeInformation
Open CSV and edit username if required.
Create PowerShell cmdlet
=CONCATENATE("Add-MailboxPermission -Identity """,A2,"""","-User """,B2,""""," -AccessRights FullAccess")
Copy and paste result into PowerShell and run
0 notes
Text
New Post has been published on o365info.com
New Post has been published on http://o365info.com/using-the-search-mailbox-powershell-command-introduction-part-1-5/
Using the Search-Mailbox PowerShell command - Introduction | Part 1#5
The current article series deal with a very useful and powerful PowerShell command named – Search-Mailbox . I relate to the Search-Mailbox PowerShell command as a “Swiss Knife” because we can use the Search-Mailbox PowerShell command for many types of scenarios.
Article Series table of content | Click to expand
Using the Search-Mailbox PowerShell command | Article Series
Using the Search-Mailbox PowerShell command – Introduction | Part 1#5
Using the Search-Mailbox PowerShell command | Perform a search + save a copy of search results | Part 2#5
Using the Search-Mailbox PowerShell command | Recover mail items from Recovery mail folder (the Dumpster) | Part 3#5
Search and Delete mail items from Multiple Exchange mailboxes (Bulk) using the Search-Mailbox PowerShell cmdlets | Part 4#5
Search and Delete mail items from the Exchange mailbox using the Search-Mailbox PowerShell cmdlets | Single mailbox | Part 5#5
What does the Search-Mailbox PowerShell command do?
The Search-Mailbox PowerShell command as the name suggests, serve as a tool for the Exchange administrator to perform a search in Exchange mailboxes (or multiple mailboxes) for specific mail items.
The term “mail items” relate to any type of mailbox items such as – E-mail message, calendar meeting, contact, task and so on.
The Search-Mailbox PowerShell command has four distinct and special characters. 1. The search result
Associatively, we can assume that the term “Search Results” translates into some kind of index, which list all the search findings (Log file etc.). The interesting thing about the Search-Mailbox “Search Results” is that the “Search Results” realized as a copy of the original mail items that answer our search query.
For example, if we use the Search-Mailbox PowerShell command to look for E-mail message with a specific text string in Bob’s mailbox, the Search-Mailbox PowerShell command enables us to copy the mail items that answer our query (the “Search Results”) to another store (the Target mailbox which will be discussed later).
2. The “action” that can be implemented when using Search-Mailbox
As mentioned in the former section the Search-Mailbox PowerShell command can help us to look (search) for specific mail items stored in Exchange mailbox and copy this mail item to another store (another Exchange mailbox).
An addition “action” that can be implemented by the Search-Mailbox PowerShell command is a very interesting and powerful action – Deletion of mail items (Deletion of the “Search Results”).
Besides of a new Office 365 PowerShell command named – New-ComplianceSearchAction, the Search-Mailbox PowerShell command is the only command that enables Exchange administrator to “remove” (Delete) specific mail items from Exchange mailbox or Multiple Exchange mailboxes.
Note – you can read more information about how to deleted mail items using the PowerShell command New-ComplianceSearchAction in the article – Search for and delete email messages in your Office 365 organization – Admin Help
3. he Exchange mailbox “space”
The Search-Mailbox PowerShell command enabled us to define specific “location” of the Exchange mailbox in which the search action will be implemented.
For example, we can instruct the Search-Mailbox PowerShell cmdlet to perform a search only in the special hidden mailbox folder named – the Recovery mail folder (the Dumpster) that serves as a dedicated store for Soft Deleted and Hard Deleted mail items.
4. The search query
The Search-Mailbox cmdlet enable us to define almost every possible parameter for defining our search query such as – sender, recipient, date, the type of the mail item, specific Text string and much more.
In addition, we can use a very sophisticated search query that combines many different types of filters such as – show only calendar items from a specific date that have a specific subject.
Search-Mailbox command structure
The Search-Mailbox cmdlet consists of three parts
Part A – In this part, we define the “objects” that we want to address. The object is Exchange mailbox
Part B – In this part, we define the specific characters of the search query that we need to perform. For example, search for mail items that include a specific text string.
Part C – In this part, we define the specific “action” that we want to apply to the Search Results we get from the former parts.
Search scope
The term “Search Scope” relates to the Exchange mailboxes that we “address” when we perform the search. The specific mailbox or the mailboxes defined as “Source Mailbox.”
Scenario 1 – Searching mail items | Single Exchange mailbox
In this scenario, the PowerShell command syntax is implemented as follows:
Search-Mailbox <Source Mailbox> -SearchQuery
Scenario 2 – Searching mail items | Multiple Exchange mailboxes
In this scenario, the PowerShell command syntax is implemented by “declaring” the search scope, meaning the Exchange mailboxes for which the search task will be carried out.
Then we “pipe” the Exchange mailbox group to the Search-Mailbox PowerShell command.
There many options that we can use for defining a specific “group” of Exchange mailboxes.
Example 1 – Perform Multiple mailbox search | All types of Exchange mailboxes
For example, to perform a search for mail items in all existing Exchange mailboxes, we can use the following command syntax:
Get-Mailbox -ResultSize Unlimited | Search-Mailbox -SearchQuery
Example 2 – Perform Multiple mailbox search | All Exchange USER mailboxes
Get-Mailbox -Filter '(RecipientTypeDetails -eq "UserMailbox") | Search-Mailbox -SearchQuery
Example 3 – Perform Multiple mailbox search | All Exchange Shared mailboxes
Get-Mailbox -Filter '(RecipientTypeDetails -eq "SharedMailbox") | Search-Mailbox -SearchQuery
Example 4 – Perform Multiple mailbox search | All Exchange Room mailboxes
Get-Mailbox -Filter '(RecipientTypeDetails -eq "RoomMailBox") | Search-Mailbox -SearchQuery
Example 5 – Perform Multiple mailbox’s search | Exchange Mailboxes – members in Distribution Group
In this scenario, we want to perform a search by defining a “group of Exchange mailboxes” which “belong” (members) to a specific Distribution Group.
Get-DistributionGroupMember <"Distribution Group name"> | Search-Mailbox -SearchQuery
Search Query (Search filter)
The Search-Mailbox PowerShell cmdlet supports very powerful syntax that defines the Search Query (the Search filter or the Search criteria).
The search Query is implemented by using the parameter – SearchQuery + the specific filter that we want to use.
The search filter can be implemented as a simple search query or, as an advanced search query that is written by KQL language.
Note – in case that you want more information about the KQL language in the following articles:
Keyword Query Language (KQL) syntax reference
Search-Mailbox (Exchange 2013, 2016, Online): Attributes
Example 1 – Search for a specific type of mail items
We can define a search filter that looks only for specific types of mail items.
For example,
To search only calendar items, we can define a search query using the following syntax:
Search-Mailbox <Source Mailbox> -SearchQuery “Kind: meetings"
To search only Contacts items, we can define a search query using the following syntax
Search-Mailbox <Source Mailbox> -SearchQuery “Kind: contacts"
Example 2 – Search for a mail item that sent from a specific sender or sent to a specific recipient
In case that we want to filter the search result by defining a specific sender or specific recipient, we can use the following syntax
Search for mail items sent by a specific sender:
Search-Mailbox <Source Mailbox> -SearchQuery from:"<E-mail address>"
Search for mail items, sent to a specific recipient:
Search-Mailbox <Source Mailbox> -SearchQuery to:"<E-mail address>"
Example 3 – looking for mail items that sent in a specific date
We can perform a search query that relates to the “date” of mail items.
For example
Search for mail items sent on a specific date:
Search-Mailbox <Source Mailbox> -SearchQuery sent:mm/dd/yyyy
Search for mail items sent on a specific date range:
Search-Mailbox <Source Mailbox> -SearchQuery sent:mm/dd/yyyy..mm/dd/yyyy
Example 4 – looking for mail items with attachments
In case that the information that we look for is mail items with attachments, we can use the following search query:
Search for mail items that, include a specific attachment (attachment file name):
Search-Mailbox <Source Mailbox> -SearchQuery attachment:"<Attachment file name>"
Search for ANY mail items that, include an attachment:
Search-Mailbox <Source Mailbox> -SearchQuery HasAttachment -eq $true
Example 5 – looking for mail items with a specific text string
To search Emails with Text String in mail SUBJECT, we can define a search query using the following syntax
Search-Mailbox <Source Mailbox> -SearchQuery ‘Subject:"<Text String>"'
To search Emails with Text String in mail BODY, we can define a search query using the following syntax
Search-Mailbox <Source Mailbox> -SearchQuery Body:"<Text String>"'
Search-Mailbox cmdlet and the required “action”
We can define three types of “actions” that the Search-Mailbox PowerShell command will perform:
Create a Log File – this option can be used in case that we don’t want to get a copy of the mail items (the search result) but instead, only a “report” (Log) that include information on the mail items that were found.
Copy the mail items (the search results) to “another” mailbox – this option can be used in a scenario in which we want to recover or save mail items that appear in the search result.
Delete the mail items that were founded – this option can be used in a scenario in which we want to “destroy” (delete) the specific mail items. For example, a scenario in which our organization was attacked by a virus, and we want to locate all the infected mail items and delete them.
In addition, we can choose to “combine’” couple of “actions.” For example, we can define an action in which the mail items will be deleted from the source mailbox, but in addition, a copy of the mail items will be saved in a “target mailbox” + create a Log file that includes information about each mail items that appear in the search results.
The concept of “SOURCE mailbox” and “TARGET mailbox”
An important concept of the Search-Mailbox PowerShell cmdlet is the concept of:
Source Mailbox
Target Mailbox
Target Folder
As mentioned, most of the time the action of “Search Results” is translated to a Log file or, to a copy of the mail items that was found in the search process.
To be able to “store” the “Search Results” (the Log file or the mail items that were found), we need to define a “target store” meaning – Target Mailbox. In addition, we need to define a Target Folder that will be created, and that will contain the search results.
The Search-Mailbox cmdlet will need to “know” – what is the Source Mailbox, what is the Target Mailbox (that will store the search results) and what is the name of the Target Folder.
Target Folder
Given that we provide the name of the Target Folder name, the Search-Mailbox cmdlet will create this NEW folder in the Target Mailbox.
An example of the PowerShell syntax that we use for defining these “entities” could be:
Search-Mailbox <Source Mailbox> -TargetMailbox <Target mailbox> -TargetFolder <Target Folder>
The target Folder naming convention and structure
As mentioned, the Search-Mailbox cmdlet creates the Target folder (based upon the Target Folder name whom we provide as part of the PowerShell command) in the Target Mailbox. The Target Folder serves as a “store” for the search results, and have a specific hierarchy.
In the following diagram, we can see the structure of the Target Folder.
Target Folder provided name
This is the name whom we provide as part of the Search-Mailbox command mandatory parameters.
Mailbox Display name + current search date
“Under” the name of the Target Folder, Search-Mailbox cmdlet creates the following hierarchy:
The source mailbox “Display name” + the current search time
The “folder name” that stores the search result is built from a combination of the Source mailbox display name + the current search time.
Notice that the “Time” that appears as part of the folder name considers as “GMT +0”. The meaning is that in most of the scenarios, the search results “time” that appears as part of the folder name is a different time than your current \local time.
In case that you want to adjust the time to your local time zone, you will need to add or subtract the hours based on your local GMT.
For example, my time zone is GMT+3
In the following screenshot, we can see that the time that is mentioned is 10:13
In my scenario, the “real time” is 13:13 (10:13 + 3 hours).
The folder name – Primary mailbox
Search-Mailbox cmdlet creates a folder named – Primary mailbox.
This term relates to the “standard user mailbox” which defines as – Primary mailbox.
The reason that the Search-Mailbox cmdlet refers uniquely to the standard mailbox is because that theoretically, an Exchange user can have additional mailbox or a secondary mailbox which describes as the Archive mailbox.
Under the Primary mailbox, we can find the search result (a copy of the original mail items from the Source Mailbox). The Search-Mailbox cmdlet will keep the same folder hierarchy as it appears in the “source mailbox.”
Recoverable items
As mentioned, one of the most powerful abilities of the Search-Mailbox cmdlet is, the ability to search and “export” (copy) mail items stored in the Recovery mail folder (Dumpster).
In case that the search results include mail items that were stored in the Recovery mail folder (Dumpster), a new folder named – Recoverable items will be created.
Note – the mailbox owner cannot see the Recovery mail folder (Dumpster) because this is a hidden folder. Only the Exchange administrator who performs the search has the “privilege” to view this folder and the folder content as part of the search results that stored in the Target Mailbox (in the Target folder).
The folder name – Archive mailbox
This folder name “appears” only in a scenario in which the Source Mailbox has Archive (additional mailbox).
In this case, the Search-Mailbox cmdlet will store the search results that were found in the Source Mailbox archive
Source mailbox “space” or “scope”
In this section, I would like to briefly review that way that the Search-Mailbox cmdlet relate to the source mailbox “space.”
Search-Mailbox cmdlet define the of Exchange mailbox “space.”
The Primary mailbox space.
The Recovery mail folder (Dumpster) space.
The Archive mailbox space.
By default, the Search-Mailbox cmdlet will look (search) for mail items in all three parts above.
In some scenarios, we will need to instruct the Search-Mailbox cmdlet to “ignore” one of those “spaces” or to “concentrate” only in a specific “space.”
Example 1 – Perform a search only in the Recovery mail folder (SearchDumpsterOnly)
For example, a scenario in which we need to recover mail items that were Soft Deleted or Hard Deleted by the user. In this case, we want to define a very specific mailbox scope – the Recovery mail folder (Dumpster).
To restrict the search scope only for mail items stored in the recovery mail folder (defined also as the Dumpster), we can use the following syntax:
Search-Mailbox <Source Mailbox> -SearchDumpsterOnly
Example 2 – Perform a search only in the Recovery mail folder (SearchDumpsterOnly)
In this case, we want to perform a mailbox search, but we don’t want that the search will run on the Recovery mail folder (Dumpster) of the Source Mailbox.
To exclude the Recovery mail folder (Dumpster) from the search results, we can use the parameter SearchDumpster:$False
For example:
Search-Mailbox <Source Mailbox> -SearchDumpster:$false
Note – in case that you want more information about the “Recovery mail folder” you can read the article – Recover deleted mail items in the Exchange Online environment | Single item recovery | 2#7
Example 3 – Perform a search only in the primary mailbox
In case that the user has an archive mailbox, and we want to exclude the Archive Mailbox from the search process, we can use that parameter DoNotIncludeArchive
For example:
Search-Mailbox <Source Mailbox> -DoNotIncludeArchive
Search-Mailbox cmdlet and required permissions
Using the Search-Mailbox cmdlet for “snooping” Exchange mailboxes require a special permission because from the “data privacy point of view,” we are looking at a private user data. In case that we use the Search-Mailbox cmdlet for deleting mail items, we are deleting private user data.
Attached a quotation from Microsoft’s article, about the required permissions that need to be assigned to the Exchange administrator who perform the search (or the deletion) by using the Search-Mailbox cmdlet:
You need to be assigned both of the following management roles to search for and delete messages in users’ mailboxes:
Mailbox SearchThis role allows you to search for messages across multiple mailboxes in your organization. Administrators aren’t assigned this role by default. To assign yourself this role so that you can search mailboxes, add yourself as a member of the Discovery Management role group. See Assign eDiscovery permissions in Exchange.
Mailbox Import ExportThis role allows you to delete messages from a user’s mailbox. By default, this role isn’t assigned to any role group. To delete messages from users’ mailboxes, you can add the Mailbox Import Export role to the Organization Management role group. For more information, see the “Add a role to a role group” section in Manage role groups .
[Source of information – search for and delete messages – Admin help]
To assign the roles directly to a user via PowerShell, run the following PowerShell commands:
New-ManagementRoleAssignment -Role "Mailbox Import Export" -User "<user name or alias>"
New-ManagementRoleAssignment -Role "Mailbox Search" -User "<user name or alias>"
Search-Mailbox cmdlet and limitation
The Search-Mailbox cmdlet have two limitations that we should know about. 1. Maximum “source mailboxes. The Search-Mailbox cmdlet can perform a multiple mailbox searches for a maximum of 10,000 mailboxes.
You can search a maximum of 10,000 mailboxes using the Search-Mailbox cmdlet. If you’re an Exchange Online organization and have more than 10,000 mailboxes, you can use the Compliance Search feature (or the corresponding New-ComplianceSearch cmdlet) to search an unlimited number of mailboxes. Then you can use the New-ComplianceSearchAction cmdlet to delete the messages returned by a compliance search. For more information, see Search for and delete email messages from your Office 365 organization.
[Source of information – search for and delete messages – Admin help]
2. The maximum search results when using search queries When we use the Search-Mailbox cmdlet + a search query, meaning using the –SearchQuery parameter, the results are limited to a maximum of 10,000 results.
When we run the Search-Mailbox cmdlet, the following warning appears:
WARNING: The Search-Mailbox cmdlet returns up to 10000 results per mailbox if a search query is specified. To return more than 10000 results, use the New-MailboxSearch cmdlet or the In-Place eDiscovery & Hold console in the Exchange Administration Center.
Additional reading
General information
Search-Mailbox
Search for and delete messages – Admin help
Search-Mailbox in Exchange 2013
Mailbox Search and permissions
Assign eDiscovery permissions in Exchange
Mailbox Search and Search query syntax
Keyword Query Language (KQL) syntax reference
Search-Mailbox (Exchange 2013, 2016, Online): Attributes
Exchange – Search For Keyword
Search-Mailbox and Date format
Search-Mailbox SearchQuery not working
Mailbox search and mail items deletion
Exchange Search-Mailbox Delete More Than 10,000 Items
Search for and delete messages – Admin help
Mailbox search and mail items deletion
Exchange Search-Mailbox Delete More Than 10,000 Items
Search for and delete messages – Admin help
Restore Exchange Online mailbox | Article series index
Now it’s Your Turn! It is important for us to know your opinion on this article
Related Post
Repair Outlook mail profile
Detect spoof E-mail and mark the E-mail as spam us...
How to Manually Configure Outlook (Office 365)
Configure your WordPress site to send E-mail via E...
Testing cross site permissions in Exchange Hybrid ...
.yuzo_related_post imgwidth:120px !important; height:110px !important; .yuzo_related_post .relatedthumbline-height:15px;background: !important;color:!important; .yuzo_related_post .relatedthumb:hoverbackground:#fcfcf4 !important; -webkit-transition: background 0.2s linear; -moz-transition: background 0.2s linear; -o-transition: background 0.2s linear; transition: background 0.2s linear;;color:!important; .yuzo_related_post .relatedthumb acolor:!important; .yuzo_related_post .relatedthumb a:hover color:!important;} .yuzo_related_post .relatedthumb:hover a color:!important; .yuzo_related_post .yuzo_text color:!important; .yuzo_related_post .relatedthumb:hover .yuzo_text color:!important; .yuzo_related_post .relatedthumb margin: 0px 0px 0px 0px; padding: 5px 5px 5px 5px; jQuery(document).ready(function( $ ) //jQuery('.yuzo_related_post').equalizer( overflow : 'relatedthumb' ); jQuery('.yuzo_related_post .yuzo_wraps').equalizer( columns : '> div' ); )
0 notes