#sieve kelp
Text
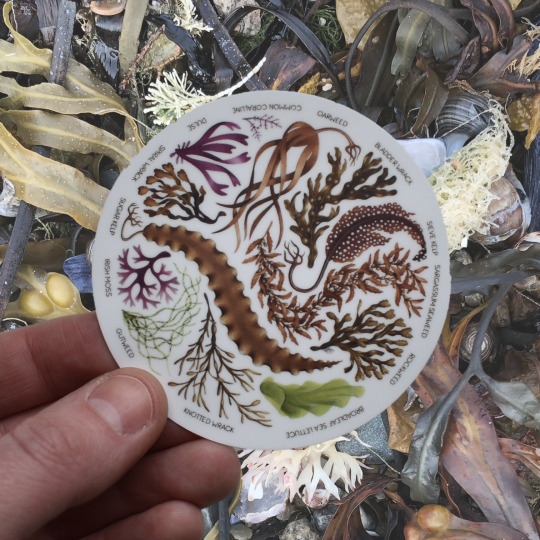
Seaweed Stickers!
#illustration#jada fitch#art#maine#watercolor#nature#design#circle#sticker#vinyl sticker#waterproof sticker#seawee#seaweed#bladder wrack#sieve kelp#sargassum seaweed#rockweed#broadleaf sea lettuce#knotted wrack#gutweed#Irish moss#sugar kelp#spiral wrack#dulse#common coralline#oarweed#wrack#kelp#painting
100 notes
·
View notes
Text
the-magical-crawdad:
siriusblaque:
yo but mermaid monster hybrids though
• vampire mermaids who prey on their own kind - when they get bitten, their scales fall off, their tails turn a slick and fleshy grey, a dorsal fin begins to sprout from their spine, and suddenly there’s six rows of teeth where once there was only one
• mermaid medusas who’ve got eels for hair and it’s not their gaze that can turn you to stone but their song
• fairy mermaids who’re born of spite and mischief - they’re small, the size of sehorses, and they speed through the currents causing mayhem and sometimes destruction
• were-mermaids who turn into huge, hulking great whites when the full moon filters through the deep waters, who cannot be restrained because what shackles can find you that deep?, who leave blood and guts in their wake
Let’s go deeper
• Mermaid dryads tied to a whole kept forest, fins and hair perfectly camouflaged with their natural habitat. they drift serenely through their gardens until it is threatened, the whole kelp forest turns on the attacker and drags it down to its death.
• Elementally aligned mermaids - air-aligned mermaids leap joyously from the water and glide on tough fins, punching through the surface of water like tiny spears of blue. fire-aligned mermaids drawn to deep volcanic vents, blind and sickly-white with teeth that fit together like a sieve.
• Kraken mermaids.
#not my post#i just needed it back in my reality where i could revisit it#it's not exactly right but anyway#mermaids#mermay#just aquatic things#or maybe...#aquatic beings
4 notes
·
View notes
Text
Udon and tempura

I love pasta and noodles. Ramen, udon, soba, spaghetti, penne, łazanki, no matter the shape or flour used, I absolutely love boiled dough with tasty soups and sauces. But what do you do when you want soba but have no buckwheat flour? What do you do if you want pasta al pomodoro but you have no tomatoes? Well, you’re usually screwed. But there are cases where you can figure out the bare minimum of ingredients and replacements to still be able to call a dish that dish.
It might be hard to agree on what the bare minimum is though. Does pizza need to be round? No, there are square pizzas. Does it have to have cheese on it? No, the pizza marinara from Napoli has no cheese on it. Does the bread need to be from wheat flour? I’ve had pizzas made with cauliflower crusts. You get my point, it’s tricky to define a dish unless you’re extremely traditional both when it comes to ingredients and presentation. That being said, I’m making udon noodles now without using any special ingredients. You’ll find it all in any western grocery store.
Udon noodles for 1 hungry person
100 grams of all purpose wheat flour
5 grams of salt
45 grams of water
Dissolve the salt in water
Mix flour with the salted water
When you have a ball of dough, put it in a thick plastic baggie, wrap the baggie in a cloth and stomp on it. Yup, your whole body weight should kneed that dough for at least 20 minutes. The gluten will develop, the whole thing will be elastic like plastic, just perfect!
Leave the dough to rest for 1 hour
Roll out the dough, then fold it into a square and roll out that square until it’s a large thick sheet of dough. Flour it and fold it and cut into long thick udon noodles.
When it’s time to boil the noodles, bring a lot of water to a boil (don’t salt it!) and boil noodles for about 10 minutes. But careful, don’t boil it for too long. Try it after 3 minutes. It should be just cooked, no “dry core”.
Wash them in cold water.
For the soup
1 garlic clove
1 vegetable cube stock
A fish or beef cube stock (fish is better if you want the feeling of udon broth), or just another vegetarian stock if you want it all vegetarian.
1/2 onion
1/2 teaspoon of sugar (instead of sweet Japanese wine)
3 mushroom (instead of shiitake, just button mushrooms)
1 shitty carrot
2 litres of water
1 tbsp vegetable oil
5 tbsp of light soy sauce
(Bonus: Kombu. You’ll find it in asian stores, it’s dried kelp and it really gives a deep umami sea flavour, and gives it a really genuine Japanese flavour. But if you have none of this, just ignore it)
Basically, chop everything up that can be chopped, and fry it in a little oil in a large saucepan, and then add water and stock cubes
Boil until half the liquid has evaporated
(If you have kombu, add one piece now and let it simmer 15 minutes and then remove it)
Sieve it all back into the large saucepan
Add sugar and soy sauce.
For the tempura
2 dl flour plus some more in a bowl on the side
4 dl water
10 ice cubes
A lot of frying oil
Any vegetables (e.g. carrot, bell pepper, aubergine)
Heat up a lot of oil in a saucepan until 170 degrees celsius
Mix the 2 dl of flour with the water into a light, watery battery.
Add the ice cubes to keep it cold.
Cut the vegetables into nice bite sized pieces
First cover the vegetables in flour…
… Then dip them into the batter. Fry in the hot oil until light golden coloured. Very light.
Serve
Pour hot soup over the cooled noodles
Make a dipping sauce of equal parts light soy sauce+sugar+vinegar
Serve with freshly fried tempura
0 notes
Photo
SASHIMI
(From BtN)
https://thehappyfoodie.co.uk/recipes/salmon-sashimi-with-ponzu-sauce
Ingredients:
50-200g fresh, sashimi-quality salmon fillet, skinned and boned (ask your fishmonger to do this for you)
10cm-long piece of daikon (Japanese radish), or mooli
a handful of cress, to garnish
For the ponzu sauce (makes approximately 175ml):
l00ml tamari soy sauce
100ml lime juice
2 tbsp of mirin
3cm x 3cm piece of dried kombu (kelp)
a handful of katsuobushi (bonito flakes)
Directions:
Ponzu sauce (make the ponzu sauce a day before you need it)
Mix all the ingredients together in a small bowl and keep in the fridge for 24 hours to rest.
Strain the sauce through a fine sieve into a container or bottle. You can keep the ponzu sauce in the fridge for a few weeks. When it gets cloudy and loses its shine, it’s time to throw it out.
Sashimi
Slice the fish from one end into 0.5cm-thick bite-size pieces.
Peel daikon into 2mm thick slices.
Slice your sheet-like pieces of daikon as thinly as you can, so that it is like string. Then soak it in cold water for 10 minutes and drain very well.
Mix a handful of the shredded daikon with the cress and place in the centre of the plate, then arrange the sashimi pieces around it. Serve the ponzu on the side, and drizzle it over the fish before eating.
Tips:
Ponzu sauce can be useful for many things and keeps well, so make a generous amount.
Use a very sharp knife to cut the fish - I recommend using a Japanese sashimi knife.
Try different types of fish or shellfish.
#harvest moon#hm#food#recipe#sashimi#harvest moon cookbook#hm cookbook#story of seasons#bokujou monogatari#main dish#appetizer#side#fish#turnip#soy sauce#mirin
18 notes
·
View notes
Photo

Full for minutes Vs. Full for hours. I love bone broth it’s a great way to utilise a nose to tail approach by buying a joint or whole bird. Cooking bone broths extracts the maximum amount of nutrients as possible. These would be predominantly the amino acids proline, glycine and glutamine. The last 2 specifically required for glutathione synthesis. Additionally there are a whole range of other vitamins and minerals included.There is no rules to bone broth, you can add what you like + flavourings and veggies, simmer for a few hours and sieve out. — Whilst bone broth is “trending” paying £6+ for a pouch doing it yourself saves a load of money with a leftover carcass. For me, Bone broths are not a substantial meal, it will not hold off hunger and energy needs. To make my “upgraded” version more filling, tasty and energy dense I have added the following to make a more Thai inspired broth. - • 100 grams skinless boneless chicken thighs • 1/2 tbsp ghee • small handful of sugar snap peas • small handful of green beans • a few chestnut mushrooms • 1/4 red chilli • squeeze of lime • dried kelp • Celtic sea salt • dash of coconut aminos — The same goes for fish + shellfish bones or beef bones. Get creative in the kitchen. Have a warm Friday 🙌🏼💚 . By @livevitae . . #bonebroth #homemadefood #cleaneating #healthyeating #healthyfood #glutenfree #paleo #healthychoices #fitfood #biohacking #healthyliving #weightloss #nutrition #plantbased #foodforthought #paleodiet #whole30 #primal #weightlossjourney #lowcarb #lchf #jerf #keto #eatrealfood #bbg #functionalmedicine #dairyfree #guthealth
4 notes
·
View notes
Text
Lophonetta specularioides

By Tony Castro, CC BY-SA 4.0
PLEASE SUPPORT US ON PATREON. EACH and EVERY DONATION helps to keep this blog running! Any amount, even ONE DOLLAR is APPRECIATED! IF YOU ENJOY THIS CONTENT, please CONSIDER DONATING!
Name: Lophonetta specularioides
Status: Extant
First Described: 1914
Described By: Riley
Classification: Dinosauria, Saurischia, Eusaurischia, Theropoda, Neotheropoda, Averostra, Tetanurae, Orionides, Avetheropoda, Coelurosauria, Tyrannoraptora, Maniraptoriformes, Maniraptora, Pennaraptora, Paraves, Eumaniraptora, Averaptora, Avialae, Euavialae, Avebrevicauda, Pygostylia, Ornithothoraces, Euornithes, Ornithuromorpha, Ornithurae, Neornithes, Neognathae, Galloanserae, Anseriformes, Anseres, Anatoidea, Anatidae, Anatinae
Lophonetta, the Crested Duck, is a non-threatened duck native to South America, sometimes lumped into Anas, but it seems to have diverged significantly earlier than the other dabbling ducks, warranting its own genus. It’s a medium sized duck, with males only reaching about a kilogram. The males and the females look fairly similar, with mottled brown feathers and brown tops of their heads. They live primarily in Peru to central Chile, around the Andes mountains, even in high altitudes. They don’t live in large flocks, but rather only when there’s high food amounts, otherwise they live mostly in pairs. They nest throughout the year, though primarily in the summer. They incubate the eggs for about a month, while the males help raise the ducks after hatching. They are also monogamous ducks that work together extensively during raising the chicks. They dabble in water to sieve through mud to find invertebrates such as zooplankton, clams, and even plants such as kelp. It is one of the most common ducks found in the Tierra del Fuego.
Buy the author a coffee: http://ko-fi.com/kulindadromeus
Source:
https://en.wikipedia.org/wiki/Crested_duck
#lophonetta#lophonetta speculariodies#crested duck#duck#dinosaur#bird#birblr#factfile#dinosaurs#biology#a dinosaur a day#a-dinosaur-a-day#dinosaur of the day#dinosaur-of-the-day#science#nature#Dìneasar#דינוזאור#डायनासोर#ديناصور#ডাইনোসর#risaeðla#ڈایناسور#deinosor#恐龍#恐龙#динозавр#dinosaurio#공룡
26 notes
·
View notes
Photo
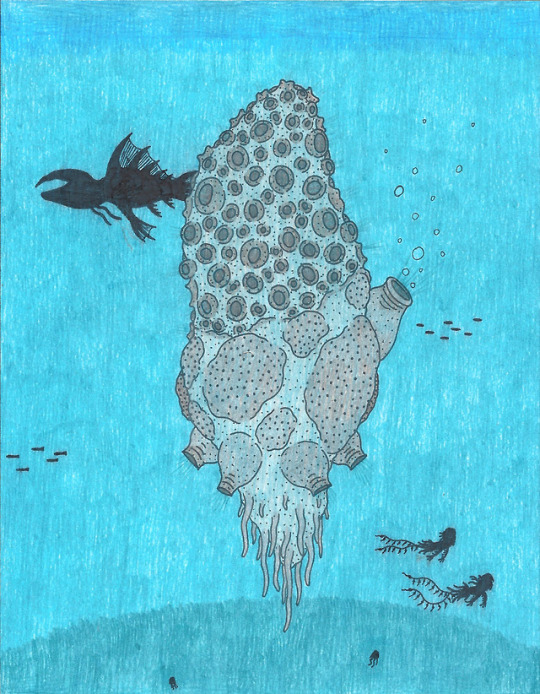
Just to clarify right here right now, this is an entry on the Hydrolith, not the Hydralith. The Hydralith is a type of large, nut-producing trees, while the Hydrolith is a giant oceanic filter-feeder. If you are looking to learn more about the Hydralith, go to that entry, or at least take a look at my entry on Thunderbirds. This here is all about those oceanic Hydroliths!
Where to even begin with these aquatic oddities? I guess the best is to go over the basics. Hydroliths are a purely oceanic species, whose young forms are found in reefs, atolls and other ocean bottom ecosystems. When they become adults, though, they drift out into the open sea, following the currents and tides through that blue abyss. No matter what stage of life they are at, Hydroliths are purely filter feeders, sieving the waters for food particles and tiny critters. This is done with their muscular pumps, which suck in and expel water. This pulls in water through their hole-filled tops, where it is run through a fine network of filters and sieves. The water is then pushed out through their various fleshy orifices, and then the process begins anew. When small, this feeding behavior is practically invisible to the eye, as you cannot notice the flow of water in and out, save for the occasional bubble. When they grow to their massive adult stage, though, one part about that changes. Yes, you may note the rare stream of bubbles that may be blown out of one of their pumps, but what really changes is the fact that they start "breathing." Now this isn't referring to actual breathing, instead it is talking about the sound they make when they are pumping water in and out. At their full grown size, the flexing of their pumps and the flow of water creates a deep noise that sounds a lot like heavy breathing. This sound is not particularly loud, but it is capable of being heard for quite some distance underwater. In some cases, you may barely be able to spot the Hydrolith in the distance, but you will hear that slow, heavy "breathing." Though I am incapable of diving down and hearing it for myself, many describe the sound as "haunting" and "creepy." Something about swimming in that blue void and hearing that sound sends shivers through many, and it must be even more unsettling when you are near that giant, still monolith.
Hydroliths start off their life as tiny creatures that are birthed by their adult stage. They are released in the thousands, and they will simply drift on the tides and currents. A lucky few will make it to a reef or a rocky bed where they can anchor and begin to grow. By glimpsing at the Hydrolith, you can probably tell that it is related to the sponges, and that is correct. In their young stage, they will grow into what appears to be any normal, colorful-looking sponge. They will form a large slab-like body, with the filters on top, and the pumping organs on the side and bottom. Plates will form on their side and begin to slowly expand to create air pockets in its body. An interesting feature is its anchoring appendage, which is fleshy, unlike the stone-like shell of the rest of the Hydrolith. Over the course of years, the Hydrolith will grow from a height of two to three feet, to an incredible fifteen, dwarfing the other sponges and corals of the reef. When it reaches this size, it will begin its transition into adulthood. The color will slowly drain from their bodies, turning into a dull gray, while their organic anchor slowly deteriorates. As this happens, their air pockets will swell and make them more buoyant. At last the anchor will finally give away, and the Hydrolith will begin to rise. After ascending from the sea bottom, it will position itself high above the bed, but close to the surface. At this point its pockets and chambers will tune themselves to make the Hydrolith neutrally buoyant, causing it to hang in the empty waters. From then one, the Hydrolith will just drift along, feeding on the water and using the expelled fluid to lazily push them along. Despite this being their adult form, they will continue to grow. Adults have been found at a startling height of twenty-five to thirty feet! Imagine what that must look like! A giant, seemingly lifeless monolith just hanging in the empty sea, its deep breath the only sign of activity! Though I may find it awe-inspiring, I cannot deny that it would sure be a creepy visual. Sometimes it is no wonder why people fear the sea.
Due to their rocky exterior and very few fleshy parts, Hydroliths do not really have any predators or enemies. There is not much to really feed on, so what is the point? Instead, they face a countless amount of parasites and hitchhikers, those who find refuge from the empty sea on these floating islands. Barnacles will often attach to them, and small shrimp and crustaceans may cling to their vents to nab some sucked in goodies. Certain species of small fish will hang close to them, feeding on the critters that crawl along their surface and hiding in the vents when predators come by. In warmer, tropical waters, Hydroliths may turn into traveling reefs, forming their own ecosystems on their bodies. These little paradises, though, are not permanent. Over the years, the weight of all the hitchhikers and growths may be too much for their bodies to hold up and they shall sink down below. Down in the darkness, they will perish, as will the rest of the attached colony. Supposedly these remains last for decades, turning bone white and providing shelter for the denizens down below. That would be another neat thing to see! Imagine a graveyard of ecosystems and personal islands, frozen remains of a lost paradise! One possible way they may perish is if they happen to float above a Charybdis, one of old age and large size. If the Hydrolith trips off the creature's senses, than it may begin to create a whirlpool with the intent of feeding. The Hydrolith will be sucked it, and will slam into the feeding beast. In these cases, both will receive some nasty injuries, and both them may perish if the damage is too much. Another cause of death for Hydroliths can be beaching, which is usually caused by violent storms and hurricanes. The raging waters will push them to shore and throw them upon the sand and rocks. Some may break upon impact, while others simply lay upon the ground and asphyxiate. These beached carcasses are partially responsible for the belief of some underwater civilization, as coastal folk interpret them as alien architecture or bizarre carriers of aquatic horrors. Even when alive, these creatures have influenced many terrible tales. Their heavy breathing sound may have aided the belief in giant oceanic monsters, and there are plenty stories of men lost at sea who have lost their minds hearing that infernal noise.
To the aquatic community, the Hydrolith is not so unsettling. Kelp Dryads and Sea Goblins see them as simple creatures and necessary components to their homes. Supposedly there are instances where several Hydroliths may drift together, and this is referred to as a "giant's garden." These communities have also been called a "Kelpie's playground," as young Kelp Dryads often like to swim and play around these large creatures (Note that Kelpie is referring to the Kelp Dryads and not an actual Kelpie. I don't think ocean dwellers are even aware that a creature called a Kelpie exists). When these behemoths eventually sink and pass, their carcasses provide plenty of homes and shelter to those below, and may even turn into another reef. In those cases, the cycle may begin anew, as larval Hydroliths attach to the carcass and begin to grow. In time, a new generation of monoliths will take to the seas, carrying along life and spreading it through that empty expanse.
Chlora Myron
Dryad Natural Historian
-------------------------------------------------------------------
Sometimes these fantasy things tend to get a bit alien looking, but I like it! While these creatures are indeed based on sponges, their entire existence is owed to sperm whales and their creepy way of sleeping. Just looking at photos of them is unsettling, and it made me wonder what it would be like to swim amongst them at such a time. To be in that blue void, swimming through a garden of gray, breathing monoliths. Slumbering giants in an empty sea, uncaring and unmoving.
18 notes
·
View notes
Text
THE DANCE AWARDS FOOTAGE
ALL BEST DANCER DANCE-OFFS
these are all of the dance-offs i could find, it seems there aren’t any from 2012, 2011 or 2013 (other than mini female). likewise, any others that i couldn’t find i’ve indicated with an asterisk - if you can find these let me know and i’ll add them to the list.
MINI FEMALE
2013 / NEW YORK
tate mcrae, sophia lucia, kayla mak, brynn rumfallo, rosie elliott, madison foley, paige litle, carlee schield, madi toney, jaycee wilkins
2014 / NEW YORK
kayla mak, charlee fagan, ruby castro, emily roman, destiny kluck, sarah moore, isabella baldino, kelsey cook, makenna miller, camila schwarz
2014 / LAS VEGAS
brynn rumfallo, bostyn brown, dabria aguilar, keara nichols, courtney mccolley, jezzaeyah slack, jenna valenzuela, amber skaggs, ysabella reyes, emma york, carlee schield
2015 / NEW YORK
jezzaeyah slack, bella klassen, ashley vallejo, ava brooks, ying lei pham,
eliana hayward, halle lum, courtney lam, sarah moore, malli grace lackey
2015 / LAS VEGAS
avery gay, kaylee quinn, peyton macdonald, brooklin cooley, kiarra waidelich, jessamina piazza, haley beck, ava dipretoro, cami ritzler, christian burse
2016 / ORLANDO
diana pombo, destanye diaz, casey tran, alexis adair, brooke shaw,
dyllan blackburn, ella saunders, hailey bills, madison brown, rachel leon
2016 / LAS VEGAS
kiarra waidelich, brooklin cooley, hailey meyers, brightyn brems, alexis de lucas, bryten belka, carly allyn, samantha eve, summer montenegro, vanessa francis
2017 / ORLANDO
hailey bills, dyllan blackburn, mariella saunders, cameron voorhees,
brightyn rines, kaitlyn winnell, casey tran, lucy charlton, alexis adair,
elliana walmsley
2017 / LAS VEGAS
brightyn brems, sabine nehls, brooklin cooley, summer montenegro,
crystal huang, aimee cho, ali ogle, alexis de lucas, savannah kristich,
charlotte cogan
MINI MALE
2014 / NEW YORK
brady farrar, zachary doran, charlie macdonald, jonah benyamin, devin mar,
liam ramdeen
2014 / LAS VEGAS
joziah german, tristan ianiero, summit geiselman, sam kurtz, artyon celestine, morgan stowell
2015 / NEW YORK*
tristan ianiero, jonathan paula, nicholas jacobsen, justin stillwagon,
zachary doran, ryan scalero, garris munoz, ethan thai
2015 / LAS VEGAS
gavin morales, artyon celestine, devin mar, lawson sharrer, mason kolontay, ramsey morrell, andrew imm, morgan stowell, collin benning, diego garcia, anthony curley, cristian ponder, andrew nash
2016 / ORLANDO
jonathan paula, stefano bonomo, jackson foley, david consuegra,
hayden mucha, sam fleshler, saverio tedesco, shawn taylor, tj beal,
william huguet
2016 / LAS VEGAS
artyon celestine, nathaniel chua, anthony curley, amadeus tiesling,
arthur celestine, devin mar, diego garcia, jonah smith, timmy zvifel, wyatt moss
2017 / ORLANDO
stephano bonomo, nicholas bustos, luke barrett, david consuegra,
jason patryluk, william huguet, timothy zvifel, brady amaya, tristan gerzon,
talen tsigaris, nathaniel chua
2017 / LAS VEGAS
jt church, marcus taylor, roman pesino, degie setnes, jonah benyamin,
patricio lopez, landon incorvaia, shane wexelman, nathan coish, asher morgado, oscar moreno, merce meynardie, ethan huang
JUNIOR FEMALE
2014 / NEW YORK
sophia lucia, talia seitel, olivia alboher, rachael anderson, grace lethbridge, vivian ruiz, amy benedetto, mims mckee, anessa zivic, gabreille woodall
2014 / LAS VEGAS
emma sutherland, jaycee wilkins, lauren yakima, brynklie brown, keely meyers,
megan goldstein, michelle siemienowski, lucy vallely, lauren shaw,
alexis watson
2015 / NEW YORK
tate mcrae, lily gentile, emma york, maddie ziegler, madison foley, madi toney, gabrielle woodall, faith huguet, jenna waller, skye ayala
2015 / LAS VEGAS
jaycee wilkins, quinn starner, bostyn brown, emmy cheung, eva igo,
sophia frilot, courtney mccolley, jenna valenzuela, mia maxwell, dabria aguilar, julia depretoro, keely meyers, paige litle
2016 / ORLANDO
bostyn brown, bella klassen, kayla mak, burkelle, reighard, camila schwarz, charlee fagan, courtney mccolley, destiny kluck, hallie green, isabella baldino, lizzy zaritsky, malli grace lackey
2016 / LAS VEGAS
emma york, haley beck, abbey mcwhirter, alexandra andrada, alexis weldner, ava brooks, carlee schield, ella horan, emmy cheung, jade bucci,
samantha mcgowan
2017 / ORLANDO
bella klassen, jezzaeyah slack, brooke judge, lindsey wade, elliana mannella, bella mills, ava arbuckle, josabella morton, olivia deangelo, emma johnson
2017 / LAS VEGAS
avery gay, ella horan, ava brooks, christian burse, ava wagner, brooke shaw, hailey meyers, haley beck, peyton macdonald, brooke cheeke, bennet espinda
JUNIOR MALE
2014 / NEW YORK
findlay mcconnell, tristan simpson, julian sanchez, giovanni castellon,
jacob lipke, anthony kelly, jeffrey lapira, adam iantorno, spencer seebach, brian hooper
2014 / LAS VEGAS
carter williams, ryan maw, nate milledge, alec mittenthal, beni gottesman,
yadiel figueroa, zach cordova
2015 / NEW YORK
murphy lee, parker garrison, holden maples, nate milledge, aydin eyikan,
justin luca, hayden luedde, kyler durrence, landen glass, daniel paula,
marcel cavaliere
2015 / LAS VEGAS
ryan maw, sage rosen, summit geiselman, alex cohoon, tj williams, mikey tua, zach cordova, michael filgas, justin renaud, joshua ukura, carter musselman
2016 / ORLANDO
parker garrison, joziah german, daniel paula, daniel vargas, david keingatti, ethan thai, jackson rolof, jared grospe, russell schuller, ryan fiore, zachary doran
2016 / LAS VEGAS
holden maples, easton magliarditi, ryan williams, alexander shulman,
ashton eatchel, ethan taylor, holden kunowski, jemoni powe, moses rankine, sky bleeker
2017 / ORLANDO
brady farrar, jackson rolof, hans anderson, jalen scriven, shawn taylor,
john mays, anthony dessables, tyreke holt, russell shuller, eliazar jimenez, anthony mattson, hayden mucha
2017 / LAS VEGAS
tristan ianiero, easton magliarditi, jackson foley, holden kunowski, jonah smith, morgan stowell, colin benning, tai pampo, garris munoz, amadeus tiesling,
rylen besler, isaiah wilson
TEEN FEMALE
2014 / NEW YORK
jayci kalb, payton johnson, briar nolet, taylor sieve, madelyn link, makayla ryan, katrina khachi, kierstyn typa, madison macgregor, kerrynton jones, jessy lipke
2014 / LAS VEGAS
simrin player, ashley green, addison moffett, kenedy kallas, alexis warr,
lexi tonniges, mackenzie meldrum, sam grayson, ambry mehr, olivia gieringer
2015 / NEW YORK
payton johnson, kennedy kallas, ariana mcclure, jamie bacon, makayla ryan, anessa zivic, alexis warr, morgan higgins, paylina macias, ali deucher
2015 / LAS VEGAS
lucy vallely, lauren yakima, kalani hilliker, mackenzie meldrum, mykayla hicks, sidney ramsey, aaliyah zolina, lauren shaw, emma janus, megan goldstein,
talia seitel, kennedy huff
2016 / ORLANDO
morgan higgins, quinn starner, samantha soto, lauren yakima, anessa zivic, bridget lee, camille cabrera, lauren shaw, lily gentile, rosie elliott, skye ayala, sydney burtis, vivan ruiz
2016 / LAS VEGAS
emma sutherland, bella allen, kalani hilliker, denise goping, elise monson,
ellie wagner, maria rosenberg, megan goldstein, olivia aboher, shelby patterson, talia seitel, taylor nunez
2017 / ORLANDO
quinn starner, kelis robinson, vivian ruiz, anessa zivic, emily valencia, lily gentile, jenna meilman, ruby castro, trinity bonilla, skye ayala
2017 / LAS VEGAS
megan goldstein, lauren yakima, chau, eva igo, briana del mundo,
emmy cheung, mia maxwell, taylor nunez, ellie wagner, lauren shaw,
madison foley
TEEN MALE
2014 / NEW YORK
julian elia, jonathan wade, jhaleil swaby, ty forhan, liam melady, niko martinez, dean husted, d’angelo castro, mariano zamora, myles erlick
2014 / LAS VEGAS
lex ishimoto, justin pham, nathan hirschaut, braxton hew-len, dylan slamka, spencer mccarrey, christian smith, michael artiga, quintin hugate, vince castillo
2015 / NEW YORK
logan hernandez, eli alford, stefano gallelli, ezra soso, joey socci, wyeth walker, alex swader, scott autry, joseph harrington, shamus moriarty, scott dudas
2015 / LAS VEGAS
graham feeny, d’angelo castro, christian smith, nathan hirschaut, anthony tette, julian lombardi, tristan simpson, evan iguanez, yadiel figueroa, emanuel dostine
2016 / ORLANDO
d’angelo castro, gino cosculluela, findlay mcconnell, jamaii melvin,
anthony kelly, harrison knostman, kyle anders, stefano gallelli, stephen myers, tim blankenship, troy martin
2016 / LAS VEGAS
sage rosen, christian smith, carter williams, andres penate, brian hooper,
ezra sosa, ferris schley, jaxon willard, nate milledge, tyler smith, zach cordova
2017 / ORLANDO*
findlay mcconnell, joziah german, julian lombardi, sam mcwilliams,
stefano gallelli, julian sanchez, anthony kelly, kyle anders, tj williams,
daniel paula, murphy lee, tyler smith
2017 / LAS VEGAS*
ryan maw, jaxon willard, carter williams, yadiel figueroa, jemoni powe,
alexander shulman, brian hooper, spencer seebach, zack sommer, joshua ukura
SENIOR FEMALE
2014 / NEW YORK
brianne sellars, briana morrison, chantelle good, jessica ferretti,
candace vincent, vanessa kiriakou, alexa barzuna, selena lucchese,
zoe hollinshead, audrianna martin del campo
2014 / LAS VEGAS
alyssa allen, aika doone, hayden hopkins, cassidy fulmer, taylor labruzzo,
lily leyva, nadia antonangeli, bostyn asjian, savannah latimer, paulina meneses, ale perciago, mccall olsen
2015 / NEW YORK
jazzmin james, briar nolet, zoe hollinshead, christine mirando, sami eismont, kae kae lee, takia hopson, kalyn langford, ellen giffings, selena lucchese
2015 / LAS VEGAS
ashley green, aika doone, taylor sieve, amanda sun, addison moffett,
natasha wells, bostyn ashjian, ambry mehr, jennie palomo, alex brooks
2016 / ORLANDO
jayci kalb, mackenzie meldrum, paulina macias, sidney ramsey, amanda baez, andrea ward, ashley coulson, kae kae lee, kaylin maggard, makayla ryan
2016 / LAS VEGAS
taylor sieve, kailyn rogers, simrin player, justice moore, kennedy huff,
kierra kelp, michaela horger, mykayla hicks, nichole bennis, nicole ishimaru, olivia gleringer
2017 / ORLANDO
payton johnson, jessy lipke, sidney ramsey, megan caines, allie best,
ashley coulson, ali stevens, mykayla hicks, paulina macias, samantha soto, makayla ryan
2017 / LAS VEGAS
simrin player, elise monson, jamie bacon, ariana mcclure, jaida underwood, mindy platt, taylor payne, aubrey mccleary, aria terango, lexus johnson
SENIOR MALE
2014 / NEW YORK
keanu uchida, kyle patrick clarke, issac lupien, shannon womble, jack moore, tristan ghostkeeper, wesley tang, matthew taylor, ethan colangelo,
devon brown, derek piquette
2014 / LAS VEGAS
eric schloesser, moises parra, jeremy platt, mathew rogers, ben green,
lucas santhon, zane green, omar rivera, peter elakis, daniel bordonali
2015 / NEW YORK
kyle patrick clarke, myles erlick, jay jay dixonbey, devon brown, liam melady, barry gans, shannon womble, niko martinez, dean husted, mariano zamora, jeremy platt
2015 / LAS VEGAS
michael hall, chase bowden, nico lonetree, justin pham, andres cruz,
eliott trahan, keegan hill, aaron williams, riley kurilko, evan morash,
andrew mulet, damian terriquez, zane green
2016 / ORLANDO
jonathan wade, nick daniels, nathan hirschaut, alex swader, david wright,
dean husted, eli alford, howard johnson, niko martinez, shannon womble,
asten stewart
2016 / LAS VEGAS
lex ishimoto, jay jay dixonbey, riley kuriko, andres cruz, justin pham,
luke kamppila, maclean frey, michael garcia, michael novitski, michael thurin, nico lonetree, samuel hall, scott autry, todd baker
2017 / ORLANDO
wyeth walker, michael novitski, benjamin peralta, alex swader, tyrese parker, shamus moriarty, ian sanford, brendan moran, eli alford, tyler hutchings,
conner chastain
2017 / LAS VEGAS
timmy blankenship, sam hall, christian smith, emiliano jimenez, tucker ferguson, riley kirlko, scott autry, david wright, ezra sosa, joshua bergner
166 notes
·
View notes
Text
Detection Method of Iodine and Polysaccharide Content in Kelp
[Content Determination] Take about 10g from this product, cut it into small pieces, weigh it accurately, place it in a porcelain dish and slowly heat it up. Keep it for 10 minutes every time the temperature rises by 100°C, and keep it for 40 minutes when the temperature rises to 400 ~ 500°C, then take it out and let it cool. Put the residue on ignition in a beaker, add 100ml of water, boil for about 5 minutes, filter, and treat the residue with water for 2 times, 100ml each time. filter, combine the filtrate, then wash the residue with hot water for 3 times. Combine the washing solution and the filtrate, heat and concentrate to about 80ml, let cool, transfer the concentrated solution to a 100ml measuring flask, add water to the mark, shake well, accurately measure 5ml, place in a stoppered Erlenmeyer flask, add 50ml of water and 2 drops of methyl orange indicator solution, drop Add dilute sulfuric acid until red, add 5ml of newly prepared bromine test solution, and heat it to boiling. Add 5ml of 20% sodium formate solution along the bottle wall, and then heat for 10-15 minutes. Wash the wall of the bottle with hot water, let it cool, add 5mL of dilute sulfuric acid and 5ml of 15% potassium iodide solution. Immediately titrate with sodium thiosulfate titration solution (0.01mol/L) to light yellow, add 1ml starch indicator solution , and continue to titrate until the blue color disappeared. Each 1ML of sodium thiosulfate titration solution (0.01mol /L) is equivalent to 0.2115mg of iodine (I).

This product is calculated as a dry product. The iodine (I) in kelp shall be not less than 0. 35%; the iodine (I) in Kombu shall not be less than 0.20%.
Polysaccharose
Preparation of Reference Substance Solution: Take an appropriate amount of fucose reference substance, accurately weigh it, and add water to make a solution containing 0.12 mg per 1 ml.
Preparation of The Standard Curve: Precisely absorb the reference solution 0.2ml, 0.4ml, 0.6ml, 0.8ml, 1.0ml, 1.2ml, put them into 15ml graduated test tube with stopper, and add water to each to 2.0ml , quickly add 6ml of 0.1% anthrone sulfuric acid solution in precision, shake it immediately, and leave it for 15 minutes, immediately place it in an ice bath to cool for 15 minutes, take it out. With the corresponding reagent as a blank, according to the UV-Visible spectrophotometry. Measure the absorbance at a wavelength of 580nm, and draw a standard curve with absorbance as the ordinate and concentration as the abscissa.
Detection Method: Take about 1g of this product powder (through No. 3 sieve), accurately weigh it, put it in a round bottom flask, add 200ml of water, let it for 1 hour, heat and reflux for 4 hours, cool and transfer it to a 250ml centrifuge cup for centrifugation ( at a speed of 9000 revolutions per minute) for 30 minutes. Aspirate the supernatant, transfer it to a 250ml measuring flask, wash the precipitate with a small amount of water, transfer it to a 50ml centrifuge tube, and centrifuge (at speed of 9000 revolutions per minute) for 30 minutes. Aspirate the supernatant, put it in the same measuring flask, add water to the mark, and shake well. Accurately measure 5ml of the supernatant, place it in a 100ml centrifuge tube, slowly add 75ml of ethanol while stirring, shake well, and left it at 4°C for 12 hours, take it out, centrifuge (rotating at speed of 9000 rpm) for 30 minutes. Discard the supernatant, dissolve the precipitate with boiling water, let it cool, transfer it to a 20ml measuring flask, add water to the mark, shake well and centrifuge. 2ml of supernatant was accurately measured and put into a 15ml graduated test tube with stopper. According to the method under the preparation of the standard curve, from the "rapid and precise addition of 6ml of 0.1% anthrone sulfuric acid solution", the absorbance was measured in accordance with the law, and the weight of fucose contained in the test solution was read from the standard curve ( mg ), calculated and obtained.
This product is calculated as a dry product, and the polysaccharide contained in the form of fucose (C6H12O5) shall not be less than 2.0%.
article from:https://www.kingherbs.com/info/detection-method-of-lodine-and-polysaccharide-62187224.html
0 notes
Link
Introduction
In this article, we will explain the best methods to growing your own microgreens.
In a previous article, we reviewed in detail the reasons to start your own microgreens business.
FINDING YOUR NICHE
One of the most critical decisions in starting a business is to understand what you want to sell. As mentioned earlier, not all markets are the same. First, you need to understand what product consumers in your area need most. Next, you need to try to find your niche.
Generally, those who sell microgreens follow one of the following three strategies:
1-Mainly sell commodity microgreens such as radishes, peas, sunflowers, brassicas.
2-Mainly sell specialty microgreens such as beets, corn shoots, cilantro, basil, mustard, amaranth, etc.
3-Sell all varieties.
You almost certainly won’t be able to sell all varieties initially, but you’ll need to choose one of the other two solutions.
If there are no other microgreens sellers in your local market, you can quickly start with commodity microgreens, which are easier to sell because they are better known. Conversely, if there are already other sellers in your market, try selling microgreens varieties they don’t have and focus more on specialty products.
The good news is that the growth rate of these products allows you to change your offering quickly. So, if at any point you find that one product is more in demand than another, you can start producing it immediately.
THE BEST MICROGREENS TO GROW
Microgreens come in a wide variety of shapes, colors (green, yellow, red, purple), textures (ten-der, crunchy, juicy), and flavors (sweet, neutral, sour, spicy) offered by the different varieties.
Radishes, broccoli, arugula, and cabbage are among the easiest species to grow. Sunflower microgreens are also very popular and are among the most commercially viable.
However, the latter pose a few more problems for beginners. For more information, I recommend that you read the last section of this book, which contains detailed in-formation about the main types of microgreens you might want to grow and sell.
The advice I can give you to get started is to focus on a few varieties of microgreens. You can begin by growing just three or four types. Over time, you can decide to expand your production to other varieties as well.
GROWING MICROGREENS
As mentioned earlier, microgreens can be grown in two ways: in soil or hydroponically. Growing in soil is more straightforward and suitable for beginners. In the following sections, I will show you both ways.
You will definitely need to buy seeds that have been explicitly produced and packaged for micro-greens. These seeds have low levels of foreign matter, are not treated with fungicides or other chemicals, and are well cleaned.
This is especially important when buying seeds for pea, corn, or spinach microgreens, as these species’ seeds are usually treated with a fungicide. Seed companies have also introduced several special microgreens varieties that are a marked improvement over the standard types.
Many of these have brightly colored or modified first leaves, such as green-leaved radish varieties and those bred for pea shoots. Some microgreen varieties have mucilaginous seeds, which means the seeds form a thick, gelatinous layer that retains the moisture once moistened.
Watercress and basil are examples of mucilaginous seeds,
and you should not soak these types of seeds before sowing. Larger grains such as wheatgrass, corn, and peas can be soaked in warm water 24 hours before sowing, although this step is not essential.
The microgreen seed should then be weighed and sown as evenly as possible on the wet surface – the use of seed shakers will help. The correct seeding density depends somewhat on the species being cultivated.
Once the seeds have germinated, microgreens need light and nutrients to produce a high-quality product. Artificial lighting does not need to be intense, and these young seedlings do well under grow lights as long as the lights do not produce too much heat that can burn the tender young foliage.
When the cotyledons (seedling leaves) are visible and begin to develop chlorophyll, the seedlings have used up the reserves contained in the seed. At this stage, the young plant begins to photosynthesize and produce its own assimilates, and the root system takes up nutrient ions.
Generally, after about ten days after sowing (it may be more or less, depending on the variety you grow), you can start harvesting.
However, before choosing a method (with or without soil), you need to understand which is ideal for the seeds you want to grow.
SOIL METHOD: STEP BY STEP INSTRUCTIONS
To grow your microgreens using this method, first make sure you have all the material you need:
Seeds
Water jar
Growing trays with drainage holes
Growing trays without drainage holes
Soil mix
Spray bottle
You can buy all of these materials individually at specialty stores or, even better, in special kits that include everything you need. If you want to save money, you can buy the seeds and use the materials you already have in the house.
Below are general instructions that you can use for most seeds that can be grown in soil. However, certain microgreens may require special care.
It is therefore always advisable to read the instructions that the seed supplier usually includes with the products. The best suppliers can also give advice and explain everything you need to do to grow these specific seeds that you have purchased.
Step 1: soaking
Wash the seeds with a filter, germination bag, or in a germination container.
Soak the seeds for about 4-8 hours (depending on the size of the grain). You can soak them in the same bag or jar.
Place the seeds in the germination bag or jar and wait for them to germinate. You will need to wash them two or three times a day. Once they reach the same size as the grain, they are ready for sowing.
You can skip the previous two steps and sow the seeds directly on the moist substrate, especially if they are very small or slimy seeds.
Step 2: preparing the grow tray
Insert the planting tray (with holes) into the watering tray (without holes). Prepare the growing tray by spreading the substrate on the tray with drainage holes, forming a 2-3 cm thick layer. You can use containers that you have at home or special trays made for this purpose.
Ensure that there are no pieces of wood or other materials in the soil that would hinder the growth of plants.
Then press lightly on the soil with your hand to smooth it out. You can use a spatula to help you do this.
Do not overdo the pressure: the soil should not be too compact. Soak the soil with water without puddling it to keep it moist and spongy.
Step 3: planting
Spread the germinated or ungerminated seeds evenly over the ground and compact them a little with your hands. You should leave enough space between each seed. This space can vary depending on the size of the seed. As a rule of thumb, the space should be the same size as the seed you are planting.
Step 4: covering
Cover the seeds with a light layer of soil and water them lightly with your spray bottle (this will encourage germination).
Now take the tray without holes, spray some water into it (this will create a humid indoor environment), and then cover the first tray. You can now put the tray in a place that is not too hot or too cold.
Step 5: maintenance
Every 12 hours, lift the lid and spray some water to keep the soil moist. It is essential to keep the soil moist without letting it puddle, do not let it dry out.
At this stage, the plants can be enriched with a solution based on compounds rich in trace elements, increasing the nutritional value of the plant, but this is entirely optional.
Two options for fertilizing our micro garden are kelp-type algae powder or macerated compost.
Step 6: uncovering
During the first 3-4 days, you must keep the plant in the dark (the “blackout period”). After this time, the tiny leaves of your plant will appear.
Now you can lift the upper tray (the one with holes) and pour some water into the lower tray (the one without holes). This way, your seedlings can absorb the water not only through the upper mist but also through the roots.
Step 7: growing
Microgreens need a lot of light. Therefore, it is necessary to expose them to direct sunlight after 3-5 days or, even better, use LED lamps.
At this stage, it is crucial to keep the plants well hydrated. The soil needs to be moist but not soggy. Check regularly, including weighing the tray (if the soil is too dry, the tray will be very light).
Step 8: harvesting
After 2 -4 weeks after sowing, your microgreens will reach the desired size. Now you can gather them by hand with scissors or a sharp knife in small bunches, from the outside inwards, and at ground level.
Cutting height is critical because high-quality microgreens require a good, clean portion of the stem below the leaves, but they should not be cut so low as to risk contamination with the growing medium or material in which the seeds were sown.
This is especially important if light, the granular medium was used for production, as particles can be easily trapped during the harvesting process and contaminate the product. Clean, sharp shears are suitable for cutting microgreens on a small scale, while larger growers use mechanical harvesters.
During warm growing climates, microgreens, like herbs and lettuce, are best harvested earlier in the day when the foliage is still cooler and plumper. This extends the life of the packaged product.
Please note: Do not throw away the soil after harvesting. You can still use it to make compost!
Step 9: Storing
After harvesting, you need to dry the microgreens. You can use a sieve to do this and then use some paper towels. When the microgreens are completely dry, you can store them in the refrigerator for a few days.
Some microgreens are shipped to customers while still growing in trays or cells to extend shelf life and be harvested on-site when needed.
Method 2: Hydroponic method
Hydroponics consists of the cultivation of various species without the use of soil. Contrary to what many people think, it is not expensive to do hydroponics at home.
There are hydroponic systems on the market that are designed for small spaces and at an affordable price.
Hydroponic microgreens have a distinct advantage over those grown in substrate trays or soil mixes because there is no granular growing medium to use.
The high seeding rate and density of microgreens mean that tiny particles of the substrate can get into the foliage. Since microgreens are not usually washed off after harvest, there is a risk of the crunchy grains getting into the final dish.
For this reason, hydroponic microgreens are best grown in a thin or capillary mat that holds the seed in place and retains some moisture for germination. Paper towels, linen cloths, rock wool cubes or sheets, fine kitchen towels, and hydroponic microgreens pads can all be used to grow a clean, high-quality crop at a low cost.
Hydroponic systems for microgreens can be as simple as a small, flat, hand irrigated kitchen tray or as complex as a nutrient or aeroponic film technology system.
Ideally, the growing system needs to have a balanced, slightly sloped surface to layout and moisten the ever-growing mat/pillow paper or fabric.
Doing hydroponics at home is very easy; you can buy your hydroponic system or build it at home. Hydroponics is an excellent form of growing with this technique, you can grow lettuce, arugula, herbs, kohlrabi, cabbage, strawberries, tomatoes, among others, in a small and compact space.
You can do this growing at home, in your apartment, in the kitchen, or even on the terrace. These hydroponic kits allow you to cultivate about 40 to 90 plants per month and can be used for lettuce, arugula, herbs, beets, cabbage, strawberries, tomatoes, among others. The time from cultivation to harvest varies depending on the species grown.
From a practical point of view, the steps for growing microgreens hydroponically are no different from those already described for the soil method. The seeds used are the same as those used in traditional cultivation. You still need a planting tray and a watering tray.
In this case, the only difference is that you do not plant the seeds in soil but another growing medium such as phenolic foam, coconut fiber, rock wool, or vermiculite.
I recommend phenolic foam as it is more practical, hygienic, and biodegradable. It provides good support for the tiny seedlings and is porous so that the roots are optimally supplied with moisture.
0 notes
Text
New year, new me, new you, perhaps. Veganuary is a good time to explore plant milks. And what a coincidence, there’s a splendid new book out which will help you do just that. Read on for a review of Plant Milk Power by Dr Aparna Prinja & Shital Shah. Plus there’s a chance to win a copy for yourself. You’ll also find a recipe for a delicious raspberry cashew nut milk smoothie.
AD – this is a review post. It contains affiliate links. See my cookie and privacy statement for further details.
Veganuary
For the second year running I’m taking the Veganuary challenge. I’m over a week in now and I’m loving it. This book along with the raspberry cashew smoothie has helped, but I just find it really exciting to come up with three meals a day that are entirely vegan. So far this year I’ve posted a recipe for roasted hazelnut bliss balls, but do watch out for some more substantial recipes further down the line.
You can find all of my Veganuary posts by clicking on the link. Most of them are recipes, but you might find these ideas for 31 healthy vegan breakfast recipes useful as well.
Plant Milk Power
Authors Dr Aparna Prinja and Shital Shah debunk the myth that plant milks are difficult to make. Their book, Plant Milk Power: delicious, nutritious and easy recipes to nourish your soul is stuffed with gorgeous recipes for easy and quick to make vegan milks and smoothies. There’s no need to strain or sieve anything. How fabulous is that?
From the title, I was expecting worthy recipes for conventional nut milks such as my hemp seed milk. But Plant Milk Power is actually a lot more interesting than that. The premise is that they are delicious drinks in their own right. Yes, you could add them to hot drinks or your cereal, but that’s not the real point of them. I haven’t tried to use them this way as they are sweetened with dates and I prefer my conventional milks to be unsweetened.
#gallery-0-7 { margin: auto; } #gallery-0-7 .gallery-item { float: left; margin-top: 10px; text-align: center; width: 50%; } #gallery-0-7 img { border: 2px solid #cfcfcf; } #gallery-0-7 .gallery-caption { margin-left: 0; } /* see gallery_shortcode() in wp-includes/media.php */
Photo captured from Plant Milk Power.
Photo captured from Plant Milk Power.
As the subtitle suggests, the milks and smoothies are meant to be nourishing to both body and mind. So they taste good, look good and are healthy too. Dr Aparna Prinja is a professional nutritionist and Shital Shah runs a nutrition-based catering business. So I reckon their credentials for coming up with nutritious and tasty recipes are sound.
In Love with Plant-Based Milks
As well as recipes for various nut and seed milks, there are lots of what I’d call light smoothies. As you can see from the front cover, these are beautifully coloured and range from green to yellow to pink to purple. If you like green tea, I can highly recommend the matcha, chia and almond milk. My matcha is a bit past its best, so the photo below is not as vibrantly green as it should be. But it was still a great way to start my day. I’d definitely call it a smoothie rather than a milk though. The chia seeds made it quite thick.
Almond Matcha Smoothies.
The base recipes for the plant-based milks are interesting too. They not only include the usual suspects, but you’ll find pistachio milk, oat milk and sesame seed milk amongst other less obvious ones. As for the smoothies, you can go safe, as in this raspberry cashew smoothie. Or you can go wild. The baobab, cacao, almond, chia and sesame seed calcium punch has just got to be tried.
Walnut milk is my new favourite thing. I was expecting it to be a bit bitter, but not at all. It’s absolutely delectable. You can see a photo of one I made further down the post.
Ingredients
At the back of the book, you’ll find an ingredient section. This not only tells you about linseeds, for example and their health benefits, but also shows a photo so that you can easily identify them. Possible allergies and intolerances are not forgotten either.
Standard nuts and seeds are covered in the first section. Although oats are a grain, they have a place too. The second section covers ingredients that are used both for flavour and health. These include baobab, cardamom, maple syrup, moringa and saffron. The final section is all about fruit. These have also been chosen for their health benefits as well as their flavour.
Although some of the ingredients take a bit of effort to find, many of them are everyday ones that you can buy anywhere. Many of the recipes require nuts or seeds, dates and water only. Oh! Don’t forget that pinch of kelp, if you so desire. If you don’t know what I’m talking about, read on.
Publisher Details
Plant Milk Power: delicious, nutritious and easy recipes to nourish your soul */ Dr Aparna Prinja & Shital Shah. Published by Meze Publishing in paperback with an RRP of £15. ISBN – 9781910863411.
If you like the sound of Plant Milk Power, head down to the bottom of the post where you’ll find the chance to win a copy.
What I Really Liked
I have to say I’m completely in love with this book. It’s just perfect for jumpstarting that healthy new year, whether or not you’re vegan or participating in Veganuary. Even if I get tempted by less healthy foods later in the day, I like a nutritious start. I also like my breakfasts to be interesting. There are so many good ideas in Plant Milk Power that I feel completely inspired. I can’t wait to get going with almond, cacao, chicory and walnut milk. Sadly, I threw out my chicory powder when I was having a clear out a few months ago. I wasn’t using it so thought the compost heap needed it more than I did. Oops!
#gallery-0-8 { margin: auto; } #gallery-0-8 .gallery-item { float: left; margin-top: 10px; text-align: center; width: 50%; } #gallery-0-8 img { border: 2px solid #cfcfcf; } #gallery-0-8 .gallery-caption { margin-left: 0; } /* see gallery_shortcode() in wp-includes/media.php */
Photo captured from Plant Milk Power
Photo captured from Plant Milk Power
There are lots of good tips too. I’m already incorporating some of them into my morning smoothie. Iodine is one of the nutrients often lacking in plant based milks. It just so happens that kelp is full of it. So if you add a pinch to your morning milk or smoothie, it’s going to help. When I remember, which isn’t very often, I take a kelp supplement. But I’d far rather add it to a smoothie than take it on its own. It doesn’t affect the taste, so that’s an added bonus as far as I’m concerned. I’m not a fan of the flavour.
Walnut Milk.
Plus there are simple drink ideas to kickstart the day that are a lot healthier than coffee. As I may have mentioned, walnut milk is my new favourite drink. Every recipe sounds delicious and the photos are appealing. There are lots of pictures, so the book gets extra brownie points for that.
What Could Be Better
Really, there’s very little I can think of to improve Plant Milk Power. The main issue I have with the book is that it’s a paperback. I much prefer my cookery books to be hardbacks as I find paperbacks get tatty really quickly. Especially if they’re used as often as this one is likely to be.
The other niggle is that with my librarian’s hat on, I want and expect a recipe book to have an index. It makes it so much more useful. Whilst the book only has 43 recipes in it, it’s still quicker to go to an index to look for recipes with raspberries in, for example, than it is to trawl through the page of contents.
Top Tips
Overnight Soaking
You need to be organised. Every recipe requires overnight soaking of the nuts or seeds. I haven’t tried nearly as many of the recipes as I otherwise would have done as I keep forgetting to do this. Activating the nuts and seeds is key to these nourishing milks and smoothies.
Power Blender
You will need a power blender to make the plant milks in these recipes. An ordinary blender just won’t cut it. You need a machine that’s able to grind the nuts and seeds up finely enough to make a smooth milk.
As a Froothie ambassador, I have tried a number of power blenders. By far and away the best so far is the new glass-jugged Froothie Evolve*. I much prefer to blend in a glass jar as I’ve always been a bit wary of plastic. The Evolve is powerful and has a vacuum function so that the nutrients don’t oxidise. See my power blender review for more info on this. This makes your plant milks even more nutritious. Having said that the Nutri Force* is a powerful little blender which is the perfect size for the milks and smoothies in Plant Milk Power.
Raspberry Cashew Smoothie
It’s a rare occurrence for me to buy fruit and veg out of season. But when I spotted some reduced raspberries recently, I couldn’t resist. Raspberry cashew nut milk smoothie was one of the recipes in the book after all. Gosh, I can’t wait until the raspberry season so I can guzzle this again. Plus there’s a couple of other raspberry recipes I’d like to try. The raspberry and tiger nut smoothie has my name written all over it.
As you can imagine the combination of raspberries and cashew nuts is a really good one. The cashew nuts make for a particularly creamy milk and the raspberries provide colour and punch. But the ingredient that got me particularly excited was the addition of rosewater. As anyone who’s been following me for a while will know, I adore the combination of rose and raspberries. Initially I was tempted to use my rose syrup instead of rosewater. But I wanted to stay true to the recipe and not use refined sugar, so in the end I went with the ingredients as stated in the recipe.
These include lemon zest. What a lovely addition this is. And why haven’t I thought of using it before? It brings a bit of extra vibrancy as well as flavour. And lemon and raspberries are another good combination.
So, once you’ve soaked your cashews overnight, it’s just a case of whizzing everything up in a power blender. So simple and so quick.
Photo captured from Plant Milk Power.
Alternatively, you can add chia seeds and transform your raspberry cashew smoothie into a ‘Turkish Delight’ chia bowl.
Stay in Touch
Thanks for visiting Tin and Thyme. If you get hold of Plant Milk Power or try this recipe for raspberry and cashew nut smoothie, I’d love to hear about it in the comments below. Do share photos on your preferred social media site and use the hashtag #tinandthyme, so I can spot them.
For further book reviews and giveaways follow me on Twitter, Facebook, Instagram or Pinterest.
Plant Milk Power. PIN IT.
Raspberry Cashew Smoothie – The Recipe
Raspberry Cashew Smoothie

A zingy sweet and floral smoothie to wake you up in the morning. Packed full of nutrients, it's almost guaranteed to put a spring in your step.
6 cashew nuts ((about 9g))
150 g fresh raspberries
2 dates
1 tsp rosewater
½ organic lemon – zested
pinch of kelp powder
110 ml fresh water
Soak the cashews in 60ml water overnight.
In the morning, remove the cashews from the soaking water and place them in a power blender. Discard the water.
Add the remaining ingredients and whizz until you get a smooth smoothie. I used the smoothie function on my Froothie Evolve, then gave it an extra minute at speed 7.
To transform this into a ‘Turkish Delight’ chia bowl, just add 15g of chia seeds that have been soaked overnight in 60ml of water.
Please note: calories and other nutritional information are per serving. They’re approximate and will depend on exact ingredients used.
Sharing
I’m sharing this healthy and delicious raspberry cashew smoothie with The Peachicks Bakery for #CookBlogShare.
Plant Milk Power Giveaway
Meze Publishing is offering one Tin and Thyme reader a copy of Plant Milk Power. To be in with a chance of winning, please fill in the Gleam widget below. You will need to leave a comment on this post, answering the question, which then gives you additional chances to enter if you so wish. Gleam will pick a winner at random from the entries received. If you are commenting anonymously, please give me some way of identifying you as I will be verifying the validity of entries. Any automated entries will be disqualified.
This giveaway is only open to those with a UK postal address. Winners will need to respond within 5 days of being contacted. Failure to do this may result in another winner being picked. Leaving your details gives permission for them to be passed on to Meze Publishing should you be a winner in this giveaway.
Prizes are offered and provided by Meze Publishing and Tin and Thyme accepts no responsibility for the acts or defaults of said third party. Tin and Thyme reserves the right to cancel or amend the giveaway and these terms and conditions without notice.
Closing date is Saturday 8 February 2020
Plant Milk Power
Thanks to Meze Publishing for the copy of Plant Milk Power. They did not expect me to write a positive review and all opinions are, as always, my own. This post contains affiliate links to Amazon and Froothie Optimum products*. Links are marked with an *. If you buy through a link it won’t cost you any more, but I’ll get a small commission. Thanks to my readers for supporting the brands and organisations that help to keep Tin and Thyme blithe and blogging.
Raspberry Cashew Smoothie – Plant Milk Power New year, new me, new you, perhaps. Veganuary is a good time to explore plant milks. And what a coincidence, there's a splendid new book out which will help you do just that.
0 notes
Text
Adorreal 100% Arabica Green Coffee Bean Powder for Weight Loss- 250gm
Adorreal 100% Arabica Green Coffee Bean Powder for Weight Loss- 250gm


Price: [price_with_discount]
(as of [price_update_date] – Details)

[ad_1]
Step-1 Take 5g-10g ( 1 scoop) of green coffee powder. Step-2 Pour 150-200 ml water over it and let it brew for 5-10 mins. Step-3 Then filter the brew through a fine sieve. Step-4 The healthy Green Coffee beverage ready to drink.
✔ PROMOTES WEIGHT LOSS AND BURN EXTRA FAT: This Powder also contain large amount of kelp. It is…
View On WordPress
0 notes
Photo
As a dryad, many other natural historians have turned to me when it comes to the study of my species. After all, what better person to ask questions or gain insight on these plant based beings than an actual dryad? To make me even more qualified, I have spent a good chunk of my own research studying them as well! I have made it a mission to visit a settlement or group of each variation (or subspecies) so that I can learn more about them and their daily habits. As a fellow sister, I am much more welcomed into these communities and have an easier time getting certain groups to open up about their culture. While this is good, I have definitely been accused of having a bias. "Of course the dryad has only good things to say about other dryads," I have heard, which is clearly not true. I have mentioned troubled parts of our history before, and have talked about some problems certain dryad variations have. I am not blind to the issues or bad things my kind has done, as ignoring such things would be detrimental to my own studies. Nonetheless, I still get the accusation that I have nothing but great things to say about dryad kind, and that I refuse to show any kind of criticism towards them (still not true). I do have problems with certain dryad cultures, like the Florals who take part in kidnapping and inbreeding, or the dryads who still demonize the Bloody Dryads and Amanitas. It doesn't even have to involve atrocities or lawbreaking! This entry here is a good example of that, because the Lily Dryads are a kind, harmless variation that I cannot stand to be around!
Before I go any further, allow me to give more background on Lily Dryads. This variation of dryad is mainly aquatic, like the Kelp Dryads of the sea. They spend most of their lives in freshwater environments that have little to no water movement. These habitats include lakes, ponds and wetlands. The only time a Lily Dryad will leave the water is on the rare chance that their watery home is drying up and they need to slither to a new pond. This variation is also the smallest, with their main bodies only reaching three feet, while their long anchor root may grow over twice that size! The most notable thing about them is their large flat head flower that resembles a lily pad. This wide structure in tandem with their small body size allows them to float on the water's surface. While their head flower remains out of the water, the rest of their bodies are submerged below. When it comes to breathing, Lily Dryads are amphibious. They can easily breath on land or underwater, though they much prefer to remain in their ponds and lakes.
When it comes to eating, Lily Dryads have it quite easy. With their head flowers above the water, they can absorb the sunlight for energy without having to put in any kind of work. For food beneath the surface, it is just as simple. Lily Dryads possess filters in the back of their throats that allow them to sieve the water they breath for nutrients. All one has to do is simply gulp up some water and their bellies will be full! To think if we could all get food that easy!
Since Lily Dryads live an aquatic lifestyle, they don't exactly build villages or towns. Instead, these dryads float together in "swarms." When you spot one of these communities, they will just look like a mass of floating lily pads that keep close to one another despite the waves and wind. Often these "swarms" will hang out in the shallows, finding the waters warmer and the food growth more plentiful. In these areas, they will use their long anchor roots to grab the bottom so that the waves can't dislodge or scatter them. During harsh weather, they will travel out to the deeper areas of the water body, holding onto one another with their anchor roots and thin limbs. They retreat to the middle part of the pond or lake so that the waves can't smash them against the shore. They will also do this to avoid predation, in case a herbivore is stalking through the shallows. When cold weather comes in and winter rears its ugly head, Lily Dryads will collapse their head flowers and sink to the bottom. They will bury themselves in the mud and hibernate until warmer days return.
Reproduction is also quite easy for Lily Dryads as well. Since they are restricted to one body of water, all their potential mates will often be floating in the same "swarm" they are. As a more laid back and carefree variation, Lily Dryads aren't all that picky when selecting mates. They don't do things like marriage or that sort, though they do have "best friends" but that title is given to anyone who talks to them. Rather, when breeding season comes around, Lily Dryads who wish to bear seed will simply pick which individual they want to pollinate with and that is that. I have literally seen a Lily Dryad float over to another and say "want to pollinate with me?" The other happily agreed, they did the deed and then they moved on with things. I think I have some exs who wished relationships were that simple (ZING)! Afterwords, the seed will be developed, regurgitated and buried within the mud. The breeding season of Lily Dryads is around the last few weeks of summer, so that the seed is created and planted just before winter. The sapling will grow as their parents hibernate, and will pop out when spring comes around. From there they will have a whole spring and summer to grow big and strong!
By reading about their lifestyle, you can probably see that Lily Dryads have things quite easy. They feed themselves by breathing, their mates are practically their neighbors and they don't have to worry about things like shelter or hunting. With all these adaptations, they don't have to worry about a thing, at all. This allows them to live a care-free life, which leads to the reason why I cannot stand being around them. Lily Dryads are very joyful, happy-go-lucky creatures, which sounds pleasant, but it isn't. With no need to ever do anything, they don't really ever grow up. Though this doesn't apply to all Lily Dryads, most of them are quite childish and easily amused. The mere sight of a butterfly can get them chattering and giggling for hours. Oh goodness, the giggling! I had one Lily Dryad do that for hours on end! HOURS! They are impossible to talk to! They are always distracted by the simplest of things, they come up with the silliest ideas out of nowhere and they have an endless supply of whimsy! One time I was trying to ask them about migration to different ponds and one of them pointed out a necklace I was wearing that day. From that moment onward, conversation became impossible, as they kept commenting on my "pretty necklace" no matter how many times I tried to change the subject. Every time I tried to talk or come up with something new to discuss, they would just point out the piece of jewelry and start the whole ordeal over again! I wound up storming off and quitting for that day. The next day I waded into the pond, I smartly left my necklace at camp. I went in wearing the blandest stuff I had so that my apparel wouldn't distract them. That day wound up being a bust as well, as all the Lily Dryads kept asking where the "pretty necklace" went! It's insane! You can't get them to focus on a single thing! And that is not even including the utterly bizarre ideas or activities they come up with out of nowhere! I was interrupted one time because they got it into their heads that they wanted to learn how to whistle! It was stuff like this that made me quit even trying to research them, especially after that close call I had. It's crazy to think that I have been through so many dangerous and deadly scenarios, and yet have come out alive each time. I've been the prisoner/propaganda writer for a warlord, dealt with a severe case of salt poisoning, been chased by an angry Rock Dragon and so many other things! And to think that the one thing that would finally do me in is drowning in some pond because a swarm of Lily Dryads decided to drag me into a tickle fight. If I ever get the crazy idea to research them again, it is going to be done on dry land!
Chlora Myron
Dryad Natural Historian
11 notes
·
View notes
Last Seen Blogs

tirupenopoq
Untitled

skcc-note
ここに絵があるかも

vaporisk-blog
Imaginary Oeuvres

mozflowers-blog
Moz Flowers

chadmmc
Untitled