#simple jQuery popup
Explore tagged Tumblr posts
Visit Tumblr Blog
Explore Tumblr blogs with no restrictions, modern design and the best experience.
Last Seen Tumblr Blogs


Fun Fact
Tumblr.com is the 103rd most visited website in the world.
Text
Top 25 Tools, Libraries, and Resources for Web Development

Today, the visual appeal and usability of a website take precedence over its development intricacies. Prioritizing a user-friendly and resilient front end is crucial. Thankfully, an array of plugins and frameworks exist in the market, simplifying development processes. These tools offer easy integration and negate the need for in-depth knowledge of specific technologies, ultimately saving valuable time.

ullpage.js: Enables creation of fullscreen scrolling websites and landscape sliders, ideal for One-Pagers.
Owl Carousel: A favorite slider plugin for creating simple sliders with easy integration.
jQuery custom content scroller: Allows customization of scrollbars with vertical and horizontal options, along with different themes.
matchHeight.js: Useful for equalizing heights of columns or floating boxes, especially when using flexboxes.
fancyBox: Popular for image popups with mobile-friendly features and quick setup.
Highcharts: Offers interactive chart creation for various purposes like stocks, timelines, and maps.
Animsition: Provides CSS animated page transitions for smoother reloading experiences.
TwentyTwenty: Allows comparison of two images with a draggable slider, responsive across devices.
Wow.js: Adds cool animations for page scrolling effects.
Dragdealer.js: Enables 2D dragging and tapping functionalities for mouse and touch interactions.
Select2: Replaces select boxes with a customizable jQuery plugin offering features like searching, tagging, and more.
CSS libraries / Design stuff
Animate.css: A CSS animation library.
Flat UI Colors: Offers a selection of trendy colors.
Material Design Lite: Google’s material design framework.
Materialui.co: Provides resources for material design.
Colorrrs: Generates random colors.
CSSpin: Offers a variety of CSS spinners.
Font Awesome: Provides a wide range of icons.
Bootstrap: A popular open-source toolkit for web development.
Foundation: Responsive front-end frameworks for designing websites, apps, and emails.
Interested in delving deeper into these valuable tools and resources for web development? Explore further details and insights by visiting our blog post at: Read more at — https://nitsantech.com/blog/25-useful-tools-libraries-and-resources-for-web-developer
0 notes
Text
jQuery popup plugin - simple jQuery popup
To create a popup, add the data-role="popup" attribute to a div with the popup contents. Then create a link with the href set to the id of the popup div, and add the attribute data-rel="popup" to tell the framework to open the popup when the link is tapped. A popup div has to be nested inside the same page as the link.
A modal box is a jQuery popup plugin window that forces the user to interact with it before returning to the site. Modal boxes are useful for warnings, informational boxes, and more. You can create a modal box with jQuery.
A modal is a dialog box/popup window that is displayed on top of the current page: Open Modal.
The jQuery UI dialog method is used to create a basic dialog window which is positioned into the viewport and protected from page content. It has a title bar and a content area, and can be moved, resized and closed with the 'x' icon by default.
There are two steps to using a DIV as a simple jQuery popup box. First, you must create the DIV on your page (it can be invisible to start). Second, you need a script function to make the DIV appear & disappear and change it's contents and location. Click on the button to answer the questions. To open a modal, we'll need any element with the data-open attribute (normally a button ). The value of this attribute should be the ID of the desired modal. By default, a modal will close if we click outside its boundaries or when the Esc key is pressed.
0 notes
Text
Tiny Any Content Modal Window - lightWeightPopup.js
A lightweight and simple-to-implement jQuery modal popup plugin that supports almost all web content such as inline, AJAX, and iframe.
Demo
Download

1 note
·
View note
Text
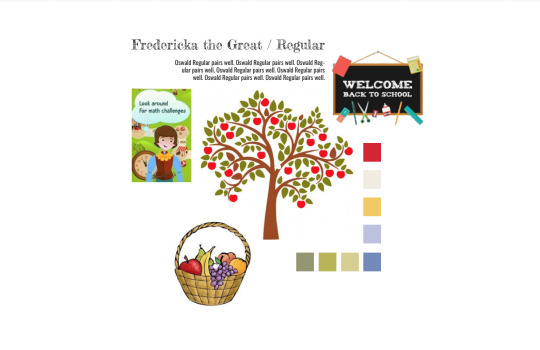
Project 2: Game/Learning Tool
We began this project by brainstorming a variety of simple things. First, we brainstormed around things we learned in elementary school. Next, we thought of daily processes, followed by different professions, and lastly, our hobbies and interests. Below are the lists I had formed.
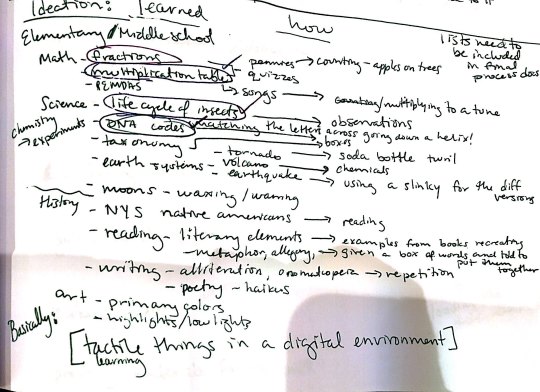
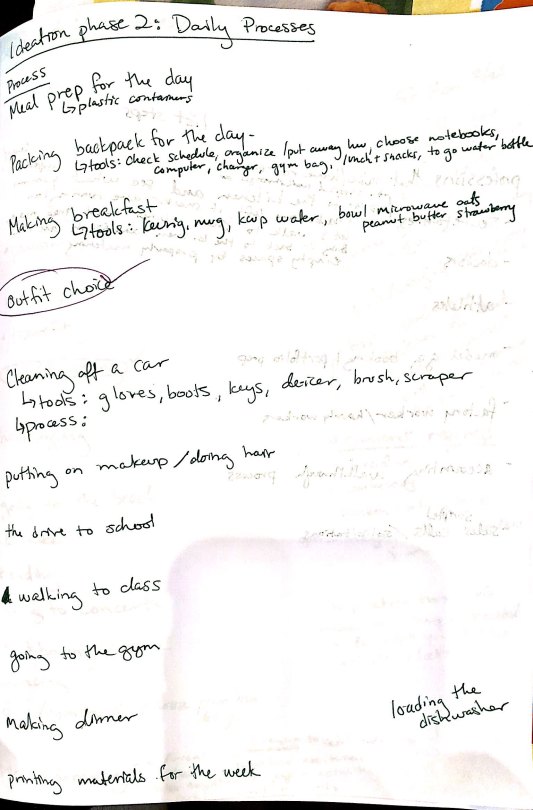
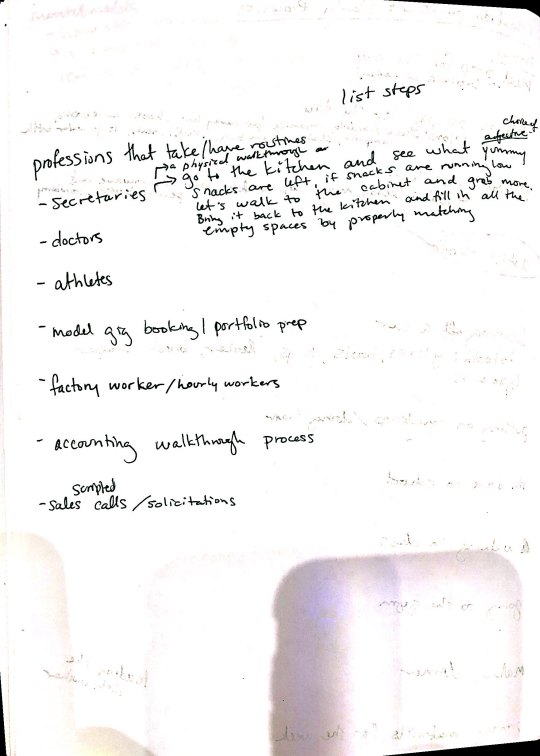
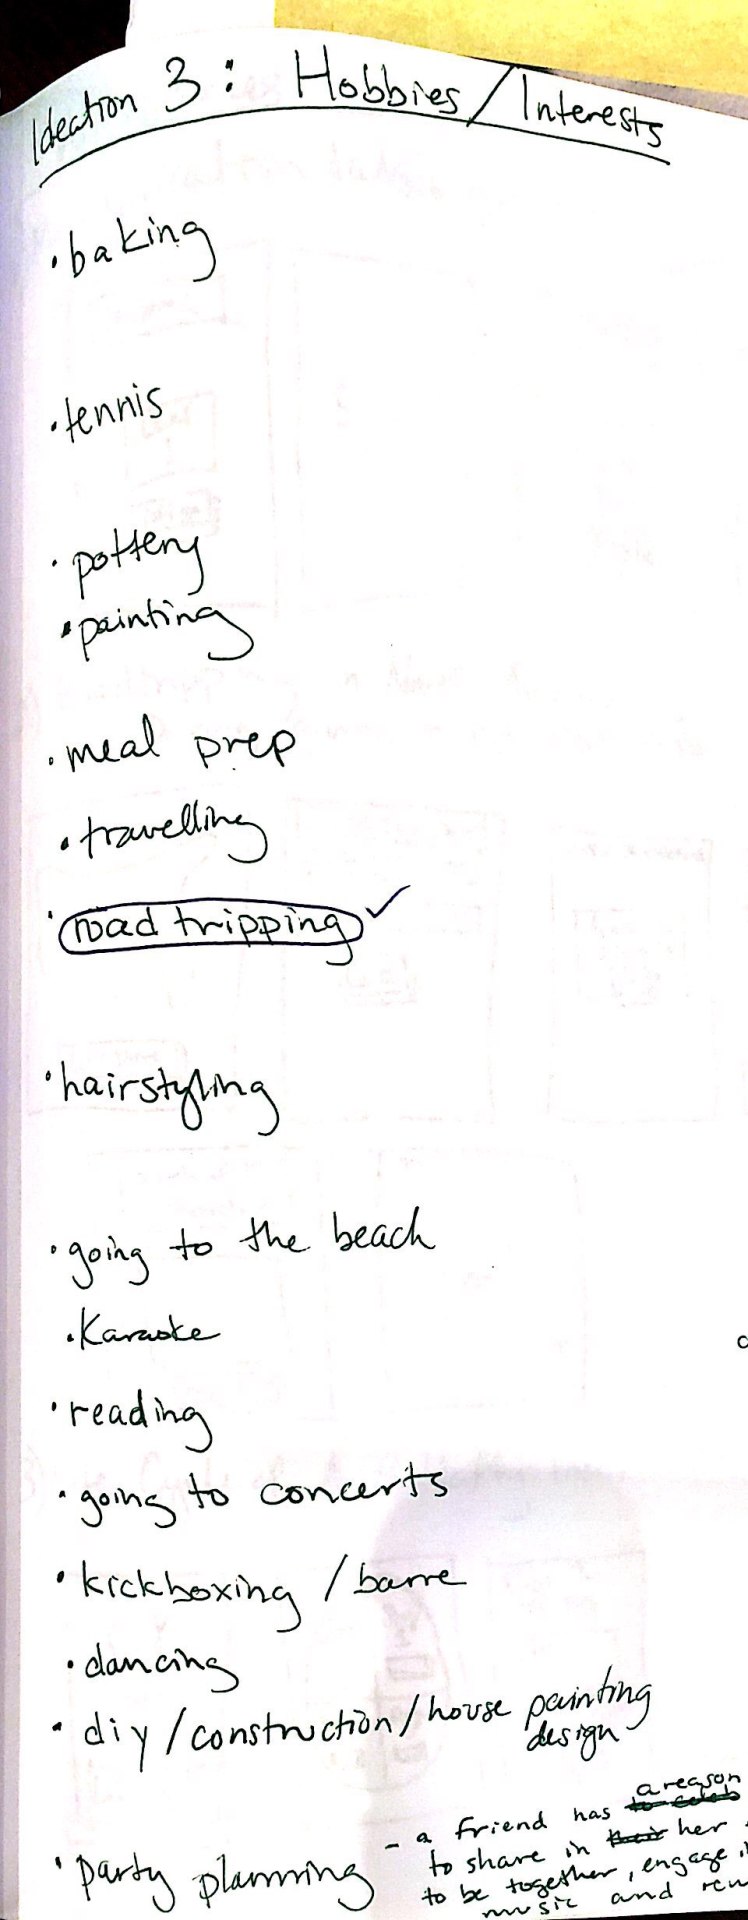
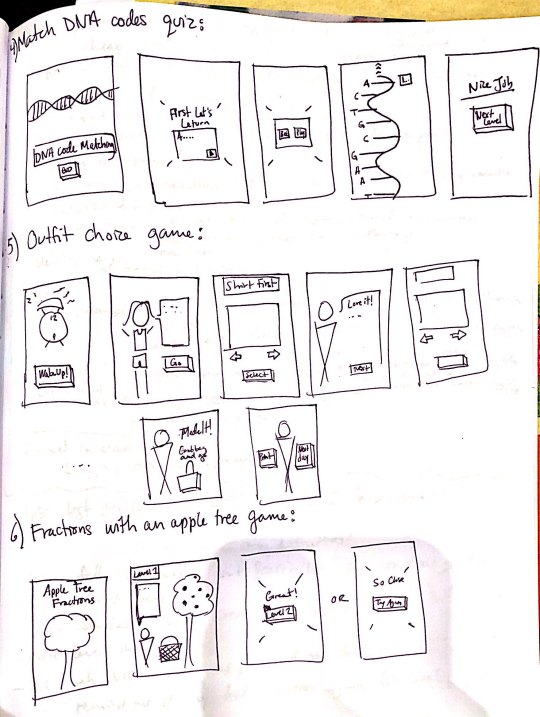
I selected my top 6 concepts to use to develop simple wireframe sketches. The concepts were a multiplication table game (inspired by the speed quizzes we would do in elementary school), a roadtripping/map of America game (inspired by my interest/roadtripping hobby - I love the idea of getting in a car and going anywhere - it was a large part of my life even if it was just traveling with my family or friends to the beach or my lacrosse tournaments), the life cycle of a butterfly informative site (inspired by my second grade project of documenting the life cycle of the butterflies we kept in our classroom), a DNA code matching game, an outfit choice game (inspired by my passion for biology and my memory of how cool it was learning about how code matching can completely change your physical appearance and other aspects of your body/personality/health etc.), and a fraction game using fruit (inspired by how we learned fractions drawing fruits or coins on paper). These sketches helped to convey the goal of the game, the interactions with the game, and the visual placements. We split into small groups to discuss our ideas and narrow down the three most enjoyable and feasible ideas.
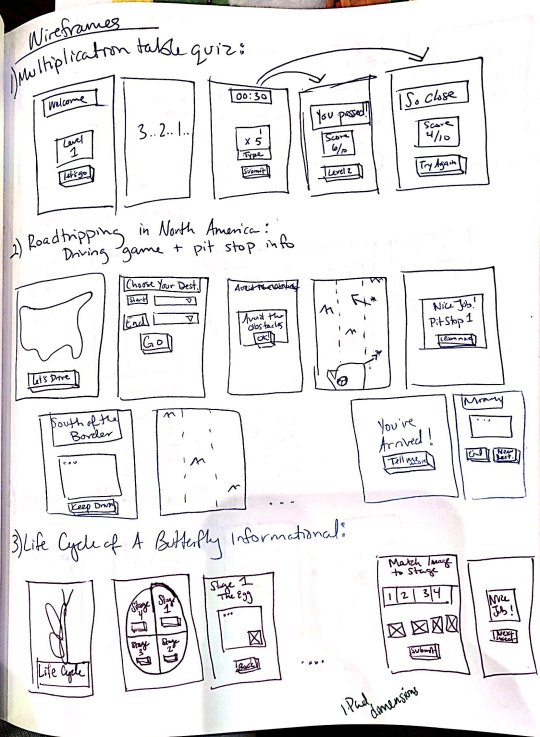
I decided the one concept I wanted to use was the Fraction game. I felt I had the most developed concept for it and it would be most feasible to create for my first interactive multi page website. Using this idea, I created a lo-fi paper prototype of the website (see below).

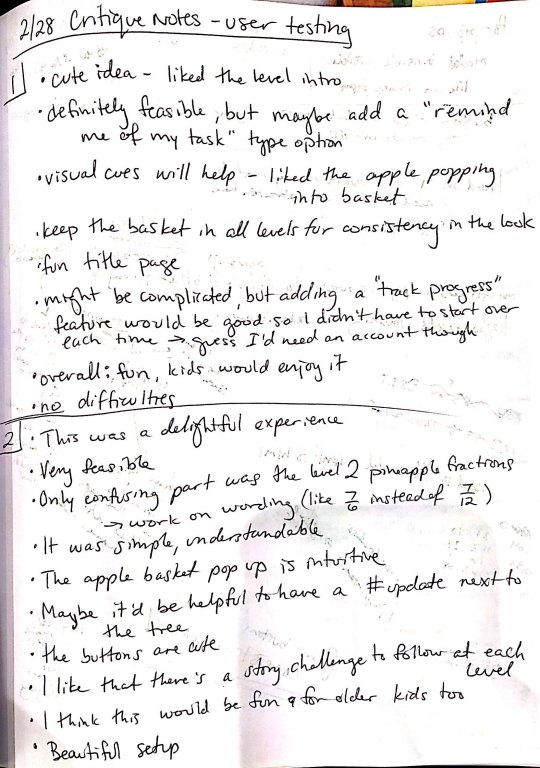
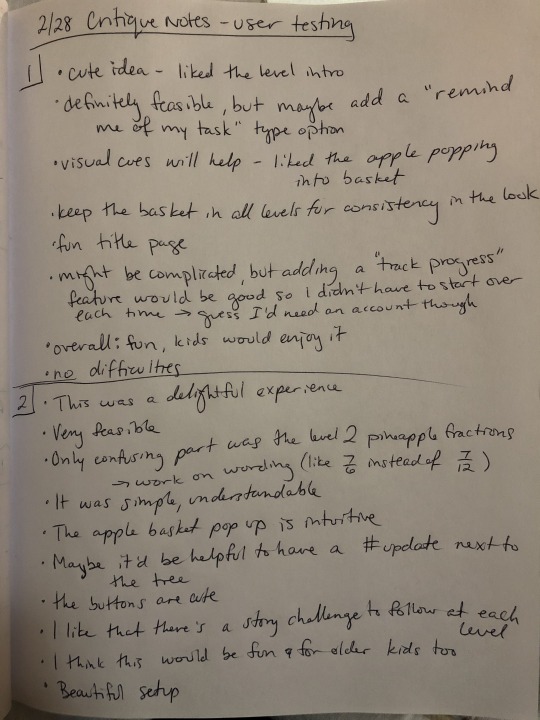
I used this prototype and a task list I created to conduct user testing with two of my classmates. My goal was to observe and document their process to see if they were able to accomplish my task list. The main questions to consider while they were interacting with the prototype were what was the overall experience like, is it a good idea, is it feasible, did you have any difficulties? The following are my two critique notes.
Next, I used Adobe XD to create a static digital wireframe of my site. Then I went on Pinterest and explored Google fonts to create two mood boards that would help me decide which visual experience I wanted my users to have.

After my critique, I used the feedback and static wireframes as a guide to help me code an interactive wireframe using HTML, CSS and jQuery that my content could later be added into. This part was extremely helpful in the final coding of my site because it helped me visually see where the divs would be and how my content should be included and positioned. Also, any interactions I had not thought of or missed in my static wireframe became evident here and I was able to include them now rather than realizing this later.

(The interactive wireframe can be found under Project 2: Interactive Wireframe at http://swalker97.github.io).
I used the mood boards from earlier to create two style tiles/static digital mockups on Adobe XD. These mockups included most of the content that was used in the final site, so it gave a better idea of what the game would look like and how it would function. For both versions, I tried to find header fonts that were playful and childish and pairing that with a simple body copy typeface that would be easier for a child to read. The first version included Fredericka the Great for the header and Raleway for the body copy. The second version included Luckiest Guy for the header and Oswald for the body copy. The first version was more clean cut lines and pastel colors with 2D images. The second version was inspired by a felt board because I remember learning with felt pieces in my childhood, we would be able to move the pieces to accomplish the task. I felt this memory of my interaction with fractions would work well with the movement of the game pieces. However, after critiques, I decided the 2D cleaner version was more visually appealing for the user, so I chose this design when I began coding. I also decided against both pairs of typefaces. My final version uses Short Stack for the header and Open Sans for the body copy.


Using my digital mockup, I catalogued all of the illustrations I would need to create for my site. I used Adobe Illustrator and Photoshop to create these illustrations and learned to save the files as svg’s so that they appeared most clear when on my site. One difficulty I ran into when coding was that my image files had too much transparent background padding and it was interfering with the jquery clicks. Once I discovered this issue, I re-saved all my illustrations with less background and once the images were updated in the code, my issue was resolved!
I made a copy of my interactive wireframes folder, and began to recode it using my actual content and assets (my illustrations). It was really exciting to see my static concept come to life with jQuery. My favorite parts of the site is the fruit appearing into the basket and the popup modals. The modals were a new challenge for me, so when they worked with the opaque black overlay hiding the main page I felt extremely accomplished. This project allowed me to add to my coding skillset and feel more confident in creating future usable sites. My least favorite part of the coding was the frustrations of the illustrations as I explained above. I could not understand at first why my jQuery was not working because the code appeared right to me, but the behaviors were not occurring on the hide/reveal clicks and manipulating the visibility. However, using inspect on Chrome and changing the z-index helped me find the issue, which was the unnecessary background in the images that began to overlap other images inhibiting their click-ability. Now my game is fully functional and is a good representation of what I had intended when designing the concept in the early stages of this project!

My entire site can be found under Project 2: Fully Functional Site at http://swalker97.github.io.
1 note
·
View note
Text
How to Create Flip Cards with Any Module in Divi Without a Plugin
Flip Cards are a fun way for users to interact with your website. Not only does it provide a cool flip animation, it also allows you to offer additional information in one concise location. In this tutorial, I’m going to show you how to turn Divi Modules into flip cards without using a plugin! With this method, you will be able to use one Divi module as the front of a card and another Divi module as the back of a card. You can even design each module (front and back) however you like using the divi builder. The functionality is accomplished through just a few snippets of CSS (no jquery).
I think you will be surprised at just how simple and fun building these cards can be.
Let’s dive in!
Sneak Peak
Here is a sneak peak of the design we will be building today.
What You Need for This Tutorial
All you will need for this Tutorial is Divi! No plugin needed. We will also be using the App Developer Layout Pack which is FREE and available within the Divi Builder.
The Basic Idea Explained
The inspiration for this concept actually came from this basic example of how to design flip cards. All it took was a little re-engineering to assign the div classes to Divi rows, columns and modules and then clean up the CSS a bit.
The Divi layout consists of a regular section with four one-column rows. In each row, I added two blurb modules stacked on top of each other (although any Divi module would work as well). The top blurb serves as the front of the flip card and the bottom blurb serves as the back of the flip card. By applying “display:flex” to the section, the rows are structured horizontally like columns. This allows to the cards to be aligned side by side into four columns.
Here is what the setup looks like before we add the custom CSS.
Then I added the custom CSS to page settings and added the corresponding CSS classes to each row, column, and module.
That’s it!
Creating Divi Flip Cards Using a Premade Layout
Adding the Premade Layout to Your Page
To get things rolling, go ahead and create a new page, give you page a title, and then click to use the Divi Builder. Select the option “Choose a Premade Layout”. From the Load from Library popup, select the App Developer Layout Pack and then click to use the App Developer Landing Page layout.
Once the layout loads to the page, publish your page and then click the button “Build on the Front End”. Now you are ready to start creating the Flip Cards.
Setting up the Section, Rows, and Modules
Under the first section of the layout, add a new regular section with a one-column row. Don’t add any modules yet. Open the row settings and update the following:
Custom Margin: 20px bottom Custom Padding: 0px top, 0px bottom
Save settings.
Then duplicate the row three times so that you have a total of four rows in the section.
Now open the section settings and add the following custom CSS to the Main Element:
display:flex;
This changes the rows to display horizontally which basically converts our rows into four columns even though technically they are still Divi rows each with one column.
Adding the Modules to the Rows
This is where our premade layout comes in handy for this tutorial. We will use the four blurb modules in the top section of the layout to jumpstart the design of our flip cards. Using the right click options or the shortkeys ctrl+c and ctrl+v (windows) and cmd+c cmd+v (mac), copy and paste the premade modules into each of the rows we just created. Make sure that each row has duplicate versions of the same module.
Now your section should look like this.
Designing the Front and Back Flip Card Modules
The two modules stacked in each row will be used as the front and back of the flip cards. The top module in each row will serve as the front and the bottom module will serve as the back. Since the design of the front card (top module) is already done thanks to our premade layout, all we need to do is adjust the design and content of the back card (bottom module).
Using Divi multiselect feature, select all bottom modules in each row and then open the element settings to customize all four modules at the same time.
Now we can update the element settings options to style the back version of our flip cards. Update the element settings as follows:
Content: “This is a description.” Background Color: #00a2fa Text Color: Light
Adding Custom CSS and CSS Classes
Now it’s time for the custom CSS that will give us the flip card functionality. Open the page settings and add the following Custom CSS:
@media (min-width:980px){ .flip-box-row { background-color: transparent; width: 250px; height: 250px; perspective: 1000px; } .flip-box-column { position: relative; width:100%; height: 100%; transition: transform 0.8s; transform-style: preserve-3d; } .flip-box-row:hover .flip-box-column { transform: rotateY(180deg); } .flip-box-front, .flip-box-back { position: absolute; width:100%; height: 100%; backface-visibility: hidden; } .flip-box-back { transform: rotateY(180deg); } }
Notice that the above CSS classes are named in a way that should help you understand what each is doing. It is also a helpful indicator as to where we need to add those CSS classes to our Divi elements. For example, the class “flip-box-row” is meant to style each of the four rows; therefore, each row needs to have that CSS class.
Adding CSS Classes to the Divi Elements
Using Multiselect, select all four of the top modules (front cards) in each of the rows. Then add the following CSS class:
CSS Class: flip-box-front
Then, use multiselect to select all four of the bottom modules (back cards) in each of the rows and add the following CSS Class to those modules:
CSS Class: flip-box-back
Lastly, use multiselect to select all four rows and give them the following CSS Classes:
CSS Class: flip-box-row Column CSS Class: flip-box-column
Final Design on Desktop
With all our CSS classes added, our flip cards are fully functional. Check out the final design on desktop.
Customizing the Design for Mobile
In the custom CSS code that we already added to the page settings, there is a media query that limits the flip card functionality to desktop only. However, we still need to hide the front versions of our flip cards on tablet and smartphone as well as make sure our rows stack nicely when adjusting browser widths.
To hide our front card blurb modules, use multiselect to select all of the top modules (front cards) in each row (this will be easier in wireframe view mode since things will be moving around in the front end builder) and update the following:
Disable on: Phone and Smartphone
Then open the section settings and add one more line of CSS to the main element in addition to the one added previously:
flex-wrap:wrap;
This will make sure the rows will stack on mobile.
Now let’s check out the final design on tablet and smartphone.
Bonus Option: Vertical Flip Cards!
If you want your flip cards to flip vertically instead of horizontally, you only need to change a two letters (literally) in the custom CSS. Open the page settings and locate the two places where “transform: rotateY(180deg)” is being used. Then replace the “Y” with “X”. If you haven’t guessed already, this changes the rotation to rotate on the X axis instead of the Y axis.
Pretty cool stuff! Check out the result.
Final Thoughts
You don’t have to resort to a plugin to create great looking Flip Cards in Divi. With this tutorial, you have a framework to create countless designs and combinations of flip card content. Don’t forget that you can choose any two modules to serve as the front and back of your cards. So feel free get creative!
I hope this was helpful and I look forward to hearing from you in the comments below.
Cheers!
The post How to Create Flip Cards with Any Module in Divi Without a Plugin appeared first on Elegant Themes Blog.
😉SiliconWebX | 🌐ElegantThemes
2 notes
·
View notes
Text
Rock4Life- Responsive Template for Bands/Musicians
Rock4Life- Responsive Template for Bands/Musicians
LIVE PREVIEWBUY FOR $9 Every band and musician needs to have an effective website. Rock4life is a responsive HTML template that perfectly suits your Bands / Musicians website. Features Valid HTML5 / CSS3 Responsive Modern and Unique Design Highly Customizable Page Structure Custom Jquery Animations Lots of CSS3 Animations Super Simple Toast CSS Framework Html5 audio list Popup sidebar &…

View On WordPress
0 notes
Text
Jquery mobile html5 video player

#JQUERY MOBILE HTML5 VIDEO PLAYER HOW TO#
#JQUERY MOBILE HTML5 VIDEO PLAYER SOFTWARE#
#JQUERY MOBILE HTML5 VIDEO PLAYER CODE#
This whole process has been an extremely valuable learning experience for me.Īlso, a shout out to the creator(s) of Media Element for creating an awesome media player plugin. I'd like to thank Team Treehouse for providing another great project idea through their "Front End Web Development" techdegree. I corrected both mistakes, and BOOM it finally worked. I also hadn't formatted the milliseconds appropriately in the data-start and data-end attributes. I discovered that there were twice as many span tags as I had thought because I had completely forgotten about what might be inside the media player plugin.
I spent awhile trying to make the highlighting event handler work before I decided to debug it through the JavaScript console in Chrome's Dev Tools.
I'm not sure if it's a bug or something I missed when coding. However, once you hit the "play" button, the video's dimensions return to what they were programmed to be, and the video plays normally.
For some reason at times, before playing the video, the dimensions of the black video screen are not what the actual dimensions are they will be bigger or stretch thin.
I added a header and a footer as bookends to kind of package it all together.
You'll notice that the end product does not EXACTLY match the provided mockups because I thought the mockups looked too.plain.
#JQUERY MOBILE HTML5 VIDEO PLAYER HOW TO#
zip file containing the Media Element plugin from their documentation on how to install it is found at, and their documentation on how to use it (and style it) is found at. The version of jQuery that I am using is v3.3.1 from.All of the JavaScript has been successfully run through JSHint it only mentions some ES6 standards.
#JQUERY MOBILE HTML5 VIDEO PLAYER CODE#
All of the CSS code has been successfully run through the W3C CSS validator there are no errors.
Add your own HTML5 videos to the modal popup. load the core style sheet videopopup.css in the header section to style the video popup. I'm leaving them as percentages because that is what the creators of the media player plugin have recommended in their documentation so that the video's dimensions can scale appropriately to the screen. Load the latest version of jQuery JavaScript library (Slim build is recommended) and the jQuery videopopup.js script in the html page. It works everywhere Elite video player is a HTML5 ready player that enables it to work on all platforms desktop & mobile. Once detected, player will skip to next available video file, until the video can be played regularly. There are 2 errors that say the width and height attributes on the video should not be percentages. Elite video player can detect files and sources that are not playable (for example broken link, or misspelled file).
All of the HTML has been run through the W3C HTML validator.
anyone can click on any part of the transcript, and the video will fast forward to that point in time.
the transcript is synced with the video so that as the video progresses, the transcript text will turn a different color.
a jQuery plugin that redesigns the look of the video's controls.
This web page has three features of note: I built a simple web page (with a mobile-first design) that showcases an interactive video in HTML5.
#JQUERY MOBILE HTML5 VIDEO PLAYER SOFTWARE#
You'll still need to do the "second" math to interpret the time, both inward and outward, but the second unit is as fair as you could expect, so this API is one to be appreciated.Interactive Video Player Software Summary Just specify thumbnail and audio or video file and turn it into your hover. Media Hovers is a responsive HTML5 plugin which plays audio and video on hover. The API is easy enough and the property is self-explanatory. jQuery Plugin to plays Audio & Video on Hover : Media Hovers Novem HTML5, Plugins, Premium, Video & Audio Get Motion to your images. You can retrieve the video's current time with the following:Ĭonsole.log(video.currentTime) // 25.431747ĬurrentTime acts as both a getter and a setter, so you can move about the video by setting a value to currentTime: The first and probably most important part of managing video time state is knowing that video currentTime is the important attribute. Both setting and getting the video's time is important when creating a chrome around the video, so let's review how to accomplish this feat. It's an important technique, obviously, but one that may be a bit more important is managing the video's time setting. Last week I explored how you could get the duration of a HTML5 video.
0 notes
Text
Build Website For Coffee Shop
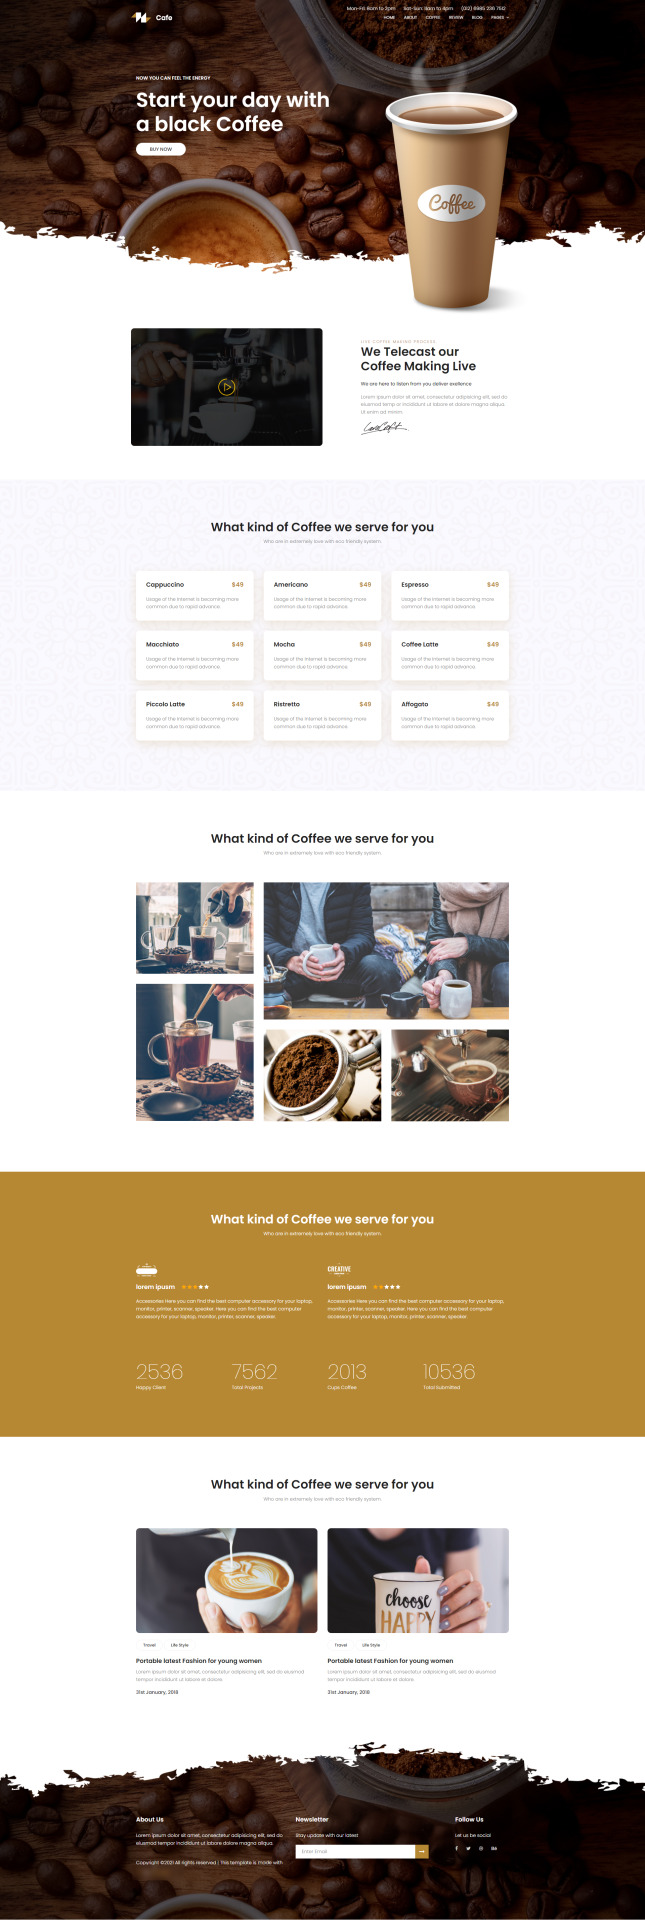
This is a versatile, simple, and polished coffee shop website. Harness your promotion and let the business bloom with this carefully packed theme and enjoy the up-to-current features.
The design is so captivating that people must fall for it, so striking that they will love to spend some time on your site. To illustrate more, the beginning of this stylish website creates an appeal that users can’t ignore. On the other hand, the navigation becomes sticky on scroll with dropdown option. Similarly, the full-screen header background ensures visually engaging interface. Then, you can make the visitors enthralled with a promotional video alongside some attractive copy text. Not only this website is clean and minimal but it has some creative backgrounds as well. Additionally, the lightbox gallery is across the way to scroll down as you want to show the selective moments of your coffee shop. Correspondingly, animated counters allow you adding some fun facts. Before this free Bootstrap template ends, the email subscription box will let the users connect with your services. Furthermore, social media icons, off-screen responsive navigation, and on-hover effect are some awesome facilities to mention.
Awesome Features
One Page Template
Bootsrap 4 Framework
Full-width Header
Sticky Navigation
Dropdown Option
Font Awesome Icons
On-hover Effect
Lightbox Gallery
Slide-out Navigation
Video Section
Fun Facts Counter
Email Subscription
Social Media Icons
Blog Section UI
Credits
Bootstrap 4
jQuery v2.2.4
Animate.css
FontAwesome
Magnific Popup
Owl Carousel
Easing
Hover Intent
Nice Select
Linear Icons
Our Services
Website Development
Domain, Hosting and Services
Web Application Integration
eCommerce Development
Web Theme Development
Customization
Digital Marketing
0 notes
Text
Feature-rich Modal/Dialog/Notification Library - jQuery madWindow
A simple and lightweight jQuery plugin to create animated, customizable, multifunctional modals, lightboxes, dialogs, notifications popups with minimal effort.
Demo
Download

2 notes
·
View notes
Text
Prestashop Security
With this easy, touch-enabled jQuery picture zoom plugin, visitors will have the flexibility to enlarge merchandise and suppose about them to minor particulars. With this extension your customers won’t have to go to the product web page every time they wish to see a larger merchandise picture. All they want to do is to click on the product photo and it will appear at the popup window. Placing the Google map into your site’s web page provides a clue to your guests about your business’ location. Such approach helps consumer to know about your corporation location and your working hours.
Сonduct a bodily stock rely using a barcode scanner or a product search with Product Picker software. Take orders via cellphone and send invoices to be paid through e mail to make it simple in your clients. For brick and mortar stores use POS with a barcode scanner to add merchandise to order, calculate the change or apply a discount.
It is written in the PHP programming language with help for the MySQL database administration system. It has a software program dependency on the Symfony PHP framework. Go to your BTCPay server, select a retailer, open its settings and choose "Access Tokens".
Use developer instruments in Google Chrome to detect the element you are looking for and find the file that needs edits. To change colors and primary layouts, go together with a custom.css file, whereas grid/list switcher will let you swap between grid or record layouts manually. Also, use an editor, such as Notepad+ , for fast adjustments. PrestaShop is a freemium, open-source software used to construct an internet retailer. It has gained recognition as an eCommerce answer utilized by each small and huge companies all round the world. It currently powers 300,000 shops worldwide and is available in 60 completely different languages.
They solely have to sort the brand of a product or a keyword within the search field and the system will present the results. As a business owner, you want your customers to acquire associated merchandise or accessories of the gadgets they’ve chosen. By providing comparable or complementary merchandise you will not solely enhance the searching expertise, but in addition increase overall gross sales. Share YouTube videos on the homepage of your on-line retailer to provide richer multimedia expertise for its visitors. Custom block is an area the place you'll be able to insert info of different sorts, from contacts to sale phrases and cost details. Each time a model new product is added, this data automatically stays in place.
Also, it permits creating filters with the limitless number of search standards, available in the store by default or are created, when including the products. Ready To Go Store Quick Start – our eStore Team will install and customize your on-line store, organising cost modules, currencies, transport, taxes options and so on. PrestaShop supplies a fundamental responsive theme by default.
However, usually occasions the IP adjustments dynamically, which must also be saved in thoughts. While getting a new module always make certain that it has a good community score. Moreover, if the set up is outdated, it is highly vulnerable to assaults as exploits are publicly obtainable. Steal delicate info corresponding to customer data, orders, bank card information and so forth. This characteristic lets your users to sort out the merchandise they need, much faster.
Secondly, make it recognizable and associated with your e-store. Remember that the choice of a site name may serve search engine optimization and branding functions. Documentation offered for you is extraordinarily express. The manuals will information you through the PrestaShop set up process, template installation, and additional web site customization.
WooCommerce is a completely customizable e-commerce platform constructed for Wordpress. Displays a block with links relative to a consumer's account. Adds an data block geared toward providing helpful information to reassure prospects that your retailer is trustworthy. This is why we have set up a Bug Bounty Program the place anyone can privately contact us with all the details about points that have an effect on the security of PrestaShop retailers or clients. Our safety team will answer you, and focus on of a timeframe on your publication of the details. If you want to use other port, open and modify the file docker-compose.yml.
Find and fix lacking or broken pictures, unused photos and clear them in your database to optimize site speed. Check information integrity issues and rapidly right them. Retrieve SEO issues and amend them to optimize your retailer. PrestaShop is considered one of the world’s most popular ecommerce platforms, and most profitable open source tasks. This site covers the technical elements of PrestaShop and it’s tailor-made for theme, module and core developers.
Hence the site admins should safe it following security practices. TemplateMonster is a marketplace the place you ought to buy everything you need to create a web site. Hundreds of impartial developers sell their merchandise here in order that you would create your own distinctive project. Installing the theme should not be a problem, particularly if you’ve chosen the theme of the most recent 1.7 version that is simpler to make use of in comparability with its predecessor. You can set up the theme both manually or utilizing PrestaShop Cloud or Themeinstallator.
If you wish to contribute code to PrestaShop, learn the CONTRIBUTING.md file on this repository or learn the tutorials about contribution on the documentation web site. Add-on modules extend the software's built-in functionalities. Users could install modules instantly throughout the software program administration panel or develop their very own. Connect and share data within a single location that is structured and simple to go looking. If you need to learn the way Regiondo Booking Software can improve the sales of your tour and activity business, merely strive our resolution now. Your web site visitors may have the choice to choose both the date and time in your presents.
To view the completely different pricing plans, please use the ‘Pricing’ button. If the payment is profitable, the shopper is redirected to the success web page and the status is defined as “CAPTURE REQUESTED“. You can install this module in a classic means, then instantly modify the file “hipay_enterprise_data.php” and the strategy “hookActionHipayApiRequest” to add your info. Update your secret and public API keys within the plugin's settings with the keys from your live Hub account.
It is a normal protocol for guaranteeing that the communications between Prestashop store and the users are secure. SSL works utilizing the elliptical curve cryptography where two distinctive key pairs are generated. This might help prevent man-in-the-middle attacks on Prestashop store. To increase the Prestashop safety, admins can purchase an SSL certificates and enable SSL on the Prestashop installation. While installing and configuring the server, some ports could have been left open.
Ensure that the admin dashboard password is a secure one. Also, some frequent passwords like admin, password, qwerty and so on should by no means be used. Moreover, keep separate passwords for FTP, cPanel, Dashboard and so forth. It is of the utmost importance for Prestashop safety that a password should be very strong. Enabling SSL offers a significant boost to the Prestashop safety.
Levilon Prestashop Theme has a quantity of functioning options of a modern template for multi objective in constructing a website. Levilon Theme supporting the latest model of Prestashop. Megatree Prestashop Responsive Theme is totally customizable options and appropriate for e-commerce websites of multipurpose store.
When search engines like Google crawl the web site for indexing, these pages get listed. PrestaShop platform has plenty of modules meant to increase its initial functionality. These extremely versatile extensions are used to customise the net pages of an online retailer. Basically, PrestaShop modules are packages using PrestaShop’s functionality meaning to make the eCommerce engine simpler in use or more customizable.
Necessary cookies are absolutely important for the website to perform properly. This class solely includes cookies that ensures basic functionalities and security features of the website. At the identical time, remember that PrestaShop is taken into account to be much less scalable than different platforms .
This characteristic makes the site more informative as the visitors get all essential details about the product at once. Mega footers could be so much greater than an afterthought containing fine print of an web site. With the right design they reinforce model consciousness and drive person actions by providing site-wide entry to helpful secondary info. The company blog roll can be displayed on the primary page of the positioning. This would not only assist hold the audience engaged however would additionally present larger web optimization rankings and seamless visitor expertise. TM Related Products module will display similar or associated merchandise to these your purchasers were on the lookout for on the web page.
Unavailable slots are updated on-the-spot so you avoid overbookings. There are scores of free as nicely as paid PrestaShop GDPR and cookie bar modules that you need to use right here. Brute pressure attacks are fairly widespread within the Prestashop shops. The prime goal of such assaults is to disclose default or weak credentials.
PrestaShop makes use of an online template system that allows customers to customise store themes and add new options via add-on modules. The PrestaShop Addons market offers a platform for third-party developers to sell themes and modules to retailers. As seen in the article, there are multiple ways to assaults your Prestashop store. More and more Prestashop security issues are discovered yearly. So, won’t it be nice should you may discover Prestashop security loopholes before the attacker does? The answer to this may be a comprehensive Prestashop safety audit and pentesting.
As of September 14, 2019, the issuer will resolve if a cost is processed depending on the evaluation of greater than 150 data collected in the course of the purchasing course of. Thanks to our Prestashop 1.6.x / 1.7.x module we deal with many of the knowledge with out you having to develop anything. You can see all the brand new parameters onour explorer API. Go to your storefront and add a product to your cart. This information assumes that you've PrestaShop (our plugin is appropriate with model 1.7.6 and later) put in.
These skilled designs allow your clients to shop simply regardless of where they're from. PrestaShop offers greater than modules, themes and providers to assist you construct and develop your on-line retailer, whether you’re an skilled vendor or just getting started in e-commerce. The preferences settings on the dashboard can add extra to the PrestaShop security. Using a cookie makes it easy to trace customers and establish unique customers from faux ones. If the cookie mismatches with the IP it was issued to, it is prone to be an attacker.
Making a alternative might be straightforward owing to a vast amount of theme classes that can swimsuit a project of any sort – from private to enterprise. Korean skincare merchandise turn into extremely popular nowadays. From hyaluronic mask sheets and eye patches to numerous makeup gadgets. This is Montsera, a theme that understands your fashion sense. You don't need to be a coding skilled to create an internet store. Simply obtain the theme you love and set up it to get started selling instantly.
0 notes
Text
Bloquear pantalla si otro usuario está activo con JavaScript y PHP
Bloquear pantalla si otro usuario está activo con JavaScript y PHP aparece primero en nuestro https://jonathanmelgoza.com/blog/bloquear-pantalla-si-otro-usuario-esta-activo-con-javascript-y-php/
Muchas veces en un sistema web nos encontramos con la situación de que necesitamos bloquear pantalla si otro usuario está activo en esa misma, esto como una solución para la concurrencia de usuarios y posibles modificaciones no deseadas en base de datos, hoy implementaremos esta funcionalidad con JavaScript y PHP.
Actualmente existen varias formas de tratar la concurrencia de usuarios.
Hoy vamos a hablar e implementar posiblemente la solución más sencilla pero eficaz.
En un proyecto que estoy desarrollando me tope con esta problemática que me ocasionaba actualizaciones en base de datos no deseadas.
Trabajo en un sistema donde un usuario ingresa a una pantalla y se encuentra con cientos de datos que se actualizan en base de datos automáticamente al cambiar sus valores.
Esto hace que el sistema sea más fácil de trabajar pues no existe un botón de guardar, pero también causa algunos problemas de compatibilidad al estar dos usuarios sobre la misma pantalla de proyecto.
Por esta razón implementamos una solución de concurrencia de usuarios bastante simple, bloquear pantalla si otro usuario está activo, veamos que hicimos.
Estructura de base de datos
Cabe mencionar que en nuestra base de datos tenemos una tabla de proyectos que es sobre lo que va la pantalla que queremos bloquear el acceso a solo un usuario.
En esta tabla de proyectos agregamos dos columnas o campos más: ultimaactualizacion y idusuarioactivo.
El primer campo es un datetime donde almacenaremos una fecha que cada usuario dentro de la pantalla de proyecto estará reportando cada cierto tiempo.
El segundo campo es el id del usuario que está reportando para conocer a detalle quien está trabajando en la pantalla de proyecto.
Revisar concurrencia al ingresar a pantalla
A continuación veamos lo que se hace al ingresar a la pantalla de proyecto, nuestra pantalla en la que queremos implementar esta funcionalidad.
function revisarConcurrencia() jQuery.post("database/revisarUltimaActualizacion.php", idproyecto : <?php echo $IDPROYECTO; ?>, idusuario : <?php echo $_SESSION['IDINDEX']; ?> ).done(function(data) data = JSON.parse(data); if( data['status'] == "ERR" ) jQuery("#usuarioactivo").html(data["usuario"]); jQuery("#popup-proyecto-en-uso").modal( backdrop: 'static', keyboard: false ); else // Iniciamos worker concurrencia iniciarWorker(); );
Esta función debe de llamarse al inicio del proyecto, recomendable en el metodo jQuery(document).ready(function(){).
Lo que hacemos aquí es revisar si existe un usuario activo mediante un archivo llamado revisarUltimaActualizacion.php.
Si el estatus es ERR entonces sabemos que existe otro usuario en este proyecto entonces hacemos cualquier cosa que querramos nosotros lanzamos un modal con información del usuario activo gracias al idusuarioactivo.
Si no existe usuario activo únicamente iniciamos la función iniciarWorker() que se encarga de reportar que estamos trabajando en esta pantalla cada cierto tiempo.
Revisar ultima actualización
<?php include "db.php"; if( isset($_POST['idproyecto']) && isset($_POST['idusuario']) ) $idproyecto = $_POST['idproyecto']; $idusuario = $_POST['idusuario']; $fecha = date("Y-m-d H:i:s"); $fechaUltima = ""; $idusuarioactivo = 0; $usuario = ""; $data = array(); $data["status"] = ""; $data["ultimaactualizacion"] = ""; $data["idusuarioactivo"] = 0; $data["usuario"] = ""; // Revisar si han pasado más de 10 min sin actividad en ese proyecto $sql = " SELECT ultimaactualizacion, idusuarioactivo, usuarios.correo as usuario FROM proyectos INNER JOIN usuarios ON proyectos.idusuarioactivo = usuarios.idusuario WHERE idproyecto = $idproyecto"; $sql .= " AND idusuarioactivo != $idusuario; "; $result = mysqli_query($conn, $sql); if($result->num_rows>0) while($fila=$result->fetch_assoc()) $fechaUltima = $fila["ultimaactualizacion"]; $idusuarioactivo = $fila["idusuarioactivo"]; $usuario = $fila["usuario"]; // Comparamos $fechaPrimera = new DateTime($fecha); $fechaUltima = new DateTime($fechaUltima); $diferencia = $fechaUltima->diff( $fechaPrimera )->i; if( $diferencia > 5 ) // Si han pasado mas de 10 minutos $sql_u = "UPDATE proyectos SET ultimaactualizacion = '$fecha', idusuarioactivo = $idusuario WHERE idproyecto = $idproyecto; "; if ($conn->query($sql_u) === TRUE) $data["status"] = "OK"; $data["ultimaactualizacion"] = $fecha; $data["idusuarioactivo"] = $idusuario; $data["usuario"] = $usuario; else echo "ERR"; else // Existe un usuario activo $data["status"] = "ERR"; $data["ultimaactualizacion"] = $fechaUltima; $data["idusuarioactivo"] = $idusuarioactivo; $data["usuario"] = $usuario; echo json_encode($data); $conn->close(); ?>
He tratado de comentar el código anterior para que sea más fácil de comprender.
Lo que hace es prácticamente revisar la última fecha de actualización y el id usuario activo mediante un idproyecto.
Si no hay actividad hace más de 10 minutos se registra la fecha actual y el id usuario que entro a revisar, ahora el tiene el control de la pantalla o proyecto.
Regresamos el arreglo mediante JSON, en este arreglo pasamos estatus, ultimaactualizacion, idusuarioactivo y usuario.
Worker en JavaScript
En nuestra pantalla de proyecto también implementamos la función iniciarWorker() que se encarga de reportar cada 3 minutos a base de datos.
function iniciarWorker() if(typeof(Worker) !== "undefined") if(typeof(worker) == "undefined") worker = new Worker("assets/js/worker.js"); // Enviamos idproyecto e idusuario worker.postMessage("<?php echo $IDPROYECTO;?>-<?php echo $_SESSION['SIJSAUSERIDINDEX']; ?>"); // Recibimos confirmacion worker.onmessage = function(event) console.log(event.data); ; else console.log("Tu navegador no soporta Workers."); function detenerWorker() worker.terminate(); worker = undefined;
Esto lo hacemos mediante un archivo JavaScript llamado worker.js que veremos a continuación.
function ultimaActualizacion(idproyecto, idusuario) const Http = new XMLHttpRequest(); const url = '../../database/registrarUltimaActualizacion.php?idproyecto='+idproyecto+"&idusuario="+idusuario; Http.open("POST", url); Http.send(); Http.onreadystatechange = (e) => if( Http.responseText == "OK" ) postMessage("Ultima actualizacion registrada."); setTimeout("ultimaActualizacion("+idproyecto+","+idusuario+")", (60000)*3 ); onmessage = function(e) var tmp = e.data.split("-"); if( tmp.length == 2) ultimaActualizacion(tmp[0], tmp[1]); ;
En la función onmessage recibimos el idproyecto y el idusuario que enviamos en nuestra pantalla de proyecto y los enviamos a la función ultimaActualización.
En esta función lo único que hacemos es registrar nuestra actividad en base de datos mediante el archivo registrarUltimaActualizacion.php
Ejemplo de la funcionalidad Picture in Picture en JavaScript.
Registrar ultima actualización
En este archivo recibimos idproyecto e idusuario que usaremos para registrar en la base de datos que seguimos trabajando en ese proyecto.
<?php include "db.php"; if( isset($_GET['idproyecto']) && isset($_GET['idusuario']) ) $idproyecto = $_GET['idproyecto']; $idusuario = $_GET['idusuario']; $fecha = date("Y-m-d H:i:s"); $sql = "UPDATE proyectos SET ultimaactualizacion = '$fecha', idusuarioactivo = $idusuario WHERE idproyecto = $idproyecto; "; if ($conn->query($sql) === TRUE) echo "OK"; else echo "ERR"; $conn->close(); ?>
Ahora cuando un usuario este activo en un proyecto y quiera ingresar otro usuario al mismo proyecto verá este mensaje, tu puedes realizar cualquier otra acción.
Ceder el control rápidamente
Aunque esta funcionalidad funciona perfectamente existe el inconveniente de tener que esperar algunos minutos para que otro usuario tome el control de un proyecto.
A pesar de que una persona solicitará a la otra que le deje ingresar a un proyecto aún asi tiene que esperar menos de 10 minutos a que deje de reportar una vez abandono la pantalla de proyecto.
Para solucionar este problema se implementó un botón en la pantalla de proyectos que permite ceder el control, es decir, eliminar los campos ultimaactualización e idusuarioactivo.
En nuestra pantalla de proyecto:
jQuery("#btn_cederControl").on("click",function() jQuery.post( "database/eliminarUltimaActualizacion.php", idproyecto : <?php echo $IDPROYECTO; ?>, idusuario : <?php echo $_SESSION['SIJSAUSERIDINDEX']; ?> ).done(function( data ) if( data == "OK" ) location.href = "tablero-de-proyectos"; ); );
En nuestro archivo eliminarUltimaActualizacion.php:
<?php include "db.php"; if( isset($_POST['idproyecto']) && isset($_POST['idusuario']) ) $idproyecto = $_POST['idproyecto']; $idusuario = $_POST['idusuario']; $sql = "UPDATE proyectos SET ultimaactualizacion = '', idusuarioactivo = 0 WHERE idproyecto = $idproyecto AND idusuarioactivo = $idusuario; "; if ($conn->query($sql) === TRUE) echo "OK"; else echo "ERR"; $conn->close(); ?>
Como dijimos anteriormente, limpiamos los campos de ultimaactualizacion e idusuarioactivo, de esta forma cualquier usuario podrá ingresar rápidamente sin tener que esperar.
Si esta información sobre cómo bloquear pantalla si otro usuario está activo con JavaScript y PHP te ha sido de utilidad no olvides compartirla en tus redes sociales favoritas o dejarnos un comentario en la sección de abajo si tienes cualquier duda respecto de este tema, será un placer ayudarte.
¡Hasta luego!
0 notes
Text
Wilcity 1.3.11 - Thème WordPress pour la liste des répertoires

Télécharger gratuitement Wilcity 1.3.11 - Thème WordPress pour la liste des répertoires - Produit original - Téléchargé de l’auteur d’origine - 100% des fichiers propres du virus - Fichiers intacts et non modifiés (Vous n’aurez pas besoin d’une clé de licence) - Utilisation illimitée des sites Web - Mis à jour régulièrement (dernière version) - Version du produit: dernière version - Dernière mise à jour du produit: dernière mis à jour - Licence: GPL Wilcity annulé est un thème wordpress de liste et d'annuaire hautement personnalisable qui vous aide à créer tout type de répertoire facilement et rapidement. Thème Wilcity annulé Créez tout type de répertoire avec le plus rapide et le plus simple pour wordpress Créez des types de répertoires illimités, notre outil vous évite également de concevoir des fonctionnalités et des fonctionnalités pour chacun d'eux.Démo Thème WordPress de la liste de l'annuaire WilcityFonctionnalités du thème WordPress Wilcity- WordPress - jQuery - Amorcer - Vue - Vuex - Isotope - images téléchargées - Magnifique Popup - Police Awsome - Polices Google - swiper - Sélectionnez2 - Barre latérale Theia Sticky - Barre de défilement parfaite - YTPlayer - PredisTélécharger le thème WordPress WilcityNoter: Si vous rencontrez des problèmes avec Thème WordPress Wilcity Nulled Téléchargement gratuit, essayez de désactiver AD blocWilcity pour le site ou essayez un autre navigateur Web. Read the full article
0 notes
Text
PHP CRUD Application – Portfolio Piece
I am super pleased to share that I have completed and uploaded my first (that I can share at least) personal portfolio piece written in PHP to a subdomain on my personal hosting server located at walk.openlamp.tech. Over the better part of the last year, I have developed a custom reporting dashboard written in PHP for my (current) employer, but do not share any of that work as it is proprietary and not owned by me. However, for a personal project, I can share far and wide. In this post, I provide a brief overview of my simple (in theory at least) application/site, built on the LAMP stack using the MVC (Model-View-Controller) design pattern in core PHP along with Bootstrap 4, jQuery, and MySQL. Image by Tomislav Kaučić from Pixabay Self-Promotion: If you enjoy the content written here, by all means, share this blog and your favorite post(s) with others who may benefit from or like it as well. Since coffee is my favorite drink, you can even buy me one if you would like! Although I will provide some context in this post, its main purpose is to bring awareness to my skill set in Back-end web development as I learn and grow in this area, with the goal to move into more of this type of role. Expect several follow-up posts containing more details on the application code, design, and implementation itself for this particular portfolio project located at walk.openlamp.tech. I initially set out to create a CRUD site/application to store all the data from the many walks I take as I work towards a healthier weight and lifestyle. Site and Project Navigation The ‘Walking Stats Dashboard’ is accessible from the main navigation menu through the ‘Projects’ drop-down: Using Bootstrap 4 navbar dropdown Clicking ‘Walking Stats Dashboard’ from the drop-down, navigates to the ‘All Walks’ page, which displays a jQuery Datatable of information. Four important distinctions in this image are: The ‘Log In’ choice in the navigation menu Disabled ‘Add A Walk’ button Disabled ‘Edit’ button for each row in the table Disabled ‘Delete’ button for each row in the table (Note: The ‘Add A Walk’, ‘Edit’, and ‘Delete’ buttons are functional only if a user is authenticated and logged in.) User Log In and Authentication By clicking the Log In choice from the navigation menu, this simple log in screen is displayed, allowing a user to log in: Login screen Submitting invalid credentials prompts the user with a validation error: Displaying validation error for failed login attempt. Reading and Displaying Data Once logged in and redirected back to the ‘All Walks’ page, we can see that the ‘Add A Walk’, ‘Edit’, and ‘Delete’ buttons are now enabled. Additionally, the ‘Log In’ choice in the navigation menu has been changed to ‘Log Out’: Add A Walk, Edit, and Delete buttons are enabled since an authenticated user is logged in. Create a row of data In order to create a new row of data, we click the ‘Add A Walk’ button, and use this displayed form: Using HTML forms to create a new Walk row of data in the table. There is custom data validation checking on the back-end in PHP prior to any record being submitted to the MySQL database for processing. When values are unacceptable, the user is prompted with all applicable errors. In the example below, all of the input form fields were left blank, resulting in errors returned – and displayed – for each field upon submitting the form: Using PHP validation handling to provide meaningful error messages in Bootstrap 4 modal… Once any validation errors are corrected, the data is added to the MySQL database and the user is redirected back to the ‘All Walks’ page. Update a row of data We can easily edit a particular row’s information by simply clicking that rows’ ‘Edit’ button, which displays the relevant data in a Bootstrap 4 Modal as shown in the following screen-shot: Using Bootstrap 4 Modals for editing a row’s data… Again, there is data validation checking on the Back-end in PHP. However, any errors are propagated through jQuery using AJAX to the form on the front-end without the need for a page refresh: Using jQuery ajax validation with Bootstrap 4 Modals for editing and validation errors. Just as is with creating a new row of data, when any validation errors are corrected, the edited row of data is then updated in the MySQL database via clicking the ‘Update’ button. Upon success, the user is informed by a message in the Bootstrap 4 modal: Display message for a successful update. Delete a row of data Initially, I set out to not include any Delete functionality into this portfolio piece. However, the more I thought about it, I came to conclude that I could not call this project a legit CRUD application without the ability to delete a row. Clicking on any rows’ ‘Delete’ button displays this Bootstrap 4 modal popup, with the date of the row to be removed along with ‘Cancel’ and ‘Confirm Delete’ buttons: Bootstrap 4 modal popup for delete information. Clicking the ‘Confirm Delete’ button executes an AJAX script, deleting the row of data from the MySQL Database. A follow-up confirmation message is displayed as well once the Delete is completed: Delete confirmation message for successful delete. Filtering and pagination Search filtering and pagination are provided out of the box by the jQuery Datatable plugin by means of the ‘Search’ text box located on the top right of the Datatable and the pagination choices on the bottom right. Both of these features are extremely useful and require very little jQuery code to activate: Search filtering and pagination provided out of the box by jQuery Datatable plugin Future Features I’m planning to add more features to this project in the near future, including analytics on the actual data itself so be on the lookout for posts about those features as they are added. I couldn’t be more pleased with the progress I have made in my continued learning of PHP Back-end Web Development. Being self-taught, I suffer a great deal from Impostor Syndrome. But, there is nothing like real-world experience and seeing the code actually come to life in application to remove those thoughts of self-doubt. Like what you have read? See anything incorrect? Please comment below and thank you for reading!!! A Call To Action! Thank you for taking the time to read this post. I truly hope you discovered something interesting and enlightening. Please share your findings here, with someone else you know who would get the same value out of it as well. Visit the Portfolio-Projects page to see blog post/technical writing I have completed for clients. To receive email notifications (Never Spam) from this blog (“Digital Owl’s Prose”) for the latest blog posts as they are published, please subscribe (of your own volition) by clicking the ‘Click To Subscribe!’ button in the sidebar on the homepage! (Feel free at any time to review the Digital Owl’s Prose Privacy Policy Page for any questions you may have about: email updates, opt-in, opt-out, contact forms, etc…) Be sure and visit the “Best Of” page for a collection of my best blog posts. Josh Otwell has a passion to study and grow as a SQL Developer and blogger. Other favorite activities find him with his nose buried in a good book, article, or the Linux command line. Among those, he shares a love of tabletop RPG games, reading fantasy novels, and spending time with his wife and two daughters. Disclaimer: The examples presented in this post are hypothetical ideas of how to achieve similar types of results. They are not the utmost best solution(s). The majority, if not all, of the examples provided, are performed on a personal development/learning workstation-environment and should not be considered production quality or ready. Your particular goals and needs may vary. Use those practices that best benefit your needs and goals. Opinions are my own. The post PHP CRUD Application – Portfolio Piece appeared first on Digital Owl's Prose. https://joshuaotwell.com/php-crud-application-portfolio-piece/
0 notes
Text
Top 12 jQuery notification and popup message plugins for developers 2020
Top 12 jQuery notification and popup message plugins for developers 2020
You are building your perfect website – professional, personal, blog, interactive; it’s all starting to come together, but you’re still missing a feature set. Maybe a way to be more attentive to your visitors, to let them know the latest updates, the latest offers or simple announcements that you think are important. Informing your visitors of essential information is always crucial. Nowadays –…
View On WordPress
0 notes
Photo

15 Best HTML5 and JavaScript Video Players (+5 Best Free Players)
Are you in need of a high-quality HTML5 video player plugin for your website? Are you having trouble finding a video player that delivers an exceptional user experience?
CodeCanyon offers a wide range of HTML5 and JavaScript video players that can easily be installed on your website.
Modern Video Player is one of the many high-quality HTML5 & JavaScript plugins available on CodeCanyon.
Much of today's online content is consumed through video and images. This makes it incredibly important for you to offer your particular business website content in video format through a high-quality video player. By purchasing one of the many affordable plugins available on CodeCanyon, you will get a modern-looking web player that works with many video formats and can even display your images in a slideshow.
The Best HTML5 and JavaScript Video Players on CodeCanyon
Discover the best HTML5 and JavaScript video plugins ever created on CodeCanyon. With a cheap one-time payment, you can purchase any of these high-quality video players.
Here are a few of the best HTML5 and JavaScript video players available on CodeCanyon for 2020:
Don't miss out on some of the best selling HTML5 and Javascript video players on CodeCanyon.
These feature-rich HTML5 and JavaScript video players will give your website visitors the best viewing experience possible. With the premium video players offered on CodeCanyon, you will be able to:
advanced video player controls
fully responsive players
song and video statistics
social sharing
Head on over to CodeCanyon and find the right video player plugin for your website!
Top 15 HTML5 and JavaScript Video Players (From CodeCanyon for 2020)
1. Elite Video Player
Elite Video Player is a stellar HTML5 video player that can handle just about anything you throw its way:
self-hosted MP4
YouTube
Vimeo
Dropbox
Amazon S3
and Google Drive
Show your videos with style—across all browsers and devices—with this fully customizable HTML5 video player.
Features also include:
lightbox, responsive, and fullscreen modes
YouTube channel and playlist support
select player and scrollbar effects
resizable height and width
and many more options
One of the more unique and appealing features the Elite Video Player brings to the screen is the ability to add pre-roll, mid-roll, and post-roll video and popup ads. A WordPress version is also available.
2. Modern Video Gallery Player
This video player supports a wide variety of embeddable media: from HTML5 video, to YouTube playlists, to Vimeo videos, and much more. This highly customizable video player has many features that make this a must-have if you are in need of displaying videos on your site.
Here are a few of the plugins notable features:
desktop, mobile, and tablet support
responsive layouts
highly customizable with HTML and CSS
SVG icons
3. HTML5 Video & Youtube Background
Need a clean and simple JavaScript video background player that is customizable for your website? You can play a single video in a loop, loop multiple videos, or have a mixed playlist of videos and images.
Here are a few features of this plugin:
responsive or fixed size layouts
basic video player controls
optional built-in skip intro feature
optional keyboard navigation
4. Revolution Multimedia Gallery
Revolution Multimedia Gallery is a responsive gallery that runs on all major browsers and mobile devices. It uses object-oriented code and the latest CSS3 techniques making this a very well built JavaScript video player and gallery.
Here is what you can expect from Revolution Multimedia Gallery
responsive layout
responsive, fixed, fluid width, and fullscreen modes
includes two skins
optional deeplinking
5. Ultimate Video Player
This HTML5 video player includes all the basics you'll need for a cutting edge player—without losing those users that are using outdated browsers.
The Ultimate Video Player can play videos on the latest mobile browser or an old desktop computer using IE8 with its Flash fallback feature.
It's also:
“Packed with a huge amount of features like responsive layout, multiple playlists, external API, optional deeplinking, flexible skin, embed & share, Facebook share etc...”—Ultimate Video Player
Set up playlists, provide a video download button, and much, much more with the Ultimate Video Player (also comes as a WordPress plugin).
6. HTML5 Video Gallery with Live Playlist
Build a robust video showcase with the HTML5 Video Gallery with Live Playlist. Set up your Live Playlist with HTML markup, an XML playlist, or a folder of self-hosted videos.
You can also mix YouTube and self-hosted MP4 videos.
Additional features include:
deeplinking with jQuery addresses
YouTube API v3 support
video aspect ratio control
live preview
A public API is available with play, pause, next, previous, seek and more!
Bring many of your favorite YouTube player features to your own website with HTML5 Video Gallery with Live Playlist.
7. ProgressionPlayer
This high-quality HTML5 video player comes with five custom skins. You can also play audio on this player with audio playlists making this quite a diverse player. The GUI is simple and easy to navigate making it an ideal choice for your website.
Here is what you will find when you purchase this audio/video player:
a responsive player for mobile and desktop
five skins
unlimited players per page
Retina support
8. Responsive Video Gallery HTML5 Player
Easily mix your Vimeo, YouTube, and self-hosted MP4 videos into one playlist with the Responsive Video Gallery HTML5 Player.
You'll find all sorts of useful features:
optional deep linking with jQuery address
HTML, XML, and folder-based playlists
supports YouTube and Vimeo API v3
optional ads before or after playback
robust playback options
and much more
Responsive Video Gallery HTML5 YouTube Vimeo includes a solid API and just about everything you'll ever need in an HTML5 video player.
9. Universal Video Player
Universal Video Player is another HTML5 video player that's worth your attention.
Not only does it come with many features included in other video players, but it also includes a few extras that set it apart.
Stand out features include:
Google Analytics tracking
playlist search
categories
shuffle mode
Like some other HTML5 video players, it includes YouTube, Vimeo, and self-hosted video support, a customizable color scheme, and an option to download videos.
The Universal Video Player is a nice solution, and can even automatically retrieve video thumbnails, titles, and descriptions from YouTube servers. A WordPress plugin version is available.
10. HTML5 Video Player With Playlist & Multiple Skins
The HTML5 Video Player With Playlist & Multiple Skins (also available as a WordPress plugin) offers side and bottom playlists and six different skins to match your website.
Unlike many other HTML5 video players, this gem also supports .webm video files in addition to the standard .mp4 video format.
You'll also find:
optional video descriptions with HTML and CSS support
support for both single and multiple instances
auto hide for playback controls
click listener
and more
HTML5 Video Player with Playlist & Multiple Skins is a good HTML5 video player for playlists, complete with definable preview images for both videos and playlists.
11. Modern HTML5 Responsive Youtube Playlist Player
This video player allows you to play YouTube playlists. You can enter a YouTube playlist ID or channel ID. This video player is fully responsive and will work on all screen sizes. The custom-designed interface makes this video player a must-have.
Here is what users are saying about this HTML5 video player:
"Really easy to work with and customize. All the features you would ever want in a player. Thanks."—YogiFish
12. HTML5 Video Player & FullScreen Video Background
The HTML5 Video Player & FullScreen Video Background not only makes a great HTML5 video player, but it also includes the ability to set full-screen video backgrounds.
Do you need a video player in your web dev toolbelt?
This is what you're looking for.
This has many helpful features, including:
fallback image for mobile devices that do not support fullscreen video backgrounds
30+ JavaScript-controllable options: player controls, playback, design, etc.
supports YouTube, Vimeo, and self-hosted videos
navigation positioning
texture over video
and more!
HTML5 Video Player & FullScreen Video Background is a welcome addition to any web developer's toolbox—it also comes in a WordPress plugin version!
13. HTML5 Blue Video Player
This HTML5 video player has a simple and sleek design. You can place the playlist menu anywhere around the video player, giving you the flexibility to choose how it will look on your website.
Here are a few notable features for this video player:
embed and social share buttons
logo overlay on videos
touch-enabled
Flash fallback for older browsers
Download the HTML5 Blue Video Player now!
14. Stellar Video Player
Stellar Video Player is a premium, multi-purpose video player that supports YouTube videos, Vimeo videos, self-hosted MP4 videos, Google drive videos, and much more!
Here is what you can expect from this video player:
fully customizable and responsive
lightbox mode
sticky mode
social sharing
Here is what users are saying about the Stellar Video Player
"Great product! Easy to setup and use!"—Tomcat253
15. Ultra Video Gallery
Ultra Video Gallery is a powerful and very customizable JavaScript video player. You can easily build your own gallery with thumbnails, titles, and descriptions. The player also comes in with 8 pre-built skins which can be used to customize YouTube and Vimeo videos.
The video player comes with many features including:
Amazon S3 support
Google Drive videos support
2 gallery types
font awesome icons
self-hosted videos
5 Free HTML5 & JavaScript Video Player Plugins for Download in 2020)
The premium HTML5 & JavaScript video players available on CodeCanyon will certainly give you the most up to date and advanced features available, which will greatly improve the user experience.
However, you may be on a budget and still be needing to add a high-quality video player to your website. To help you with your video player needs, I have collected five of the best HTML5 & JavaScript video players you can download for free.
1. Video.js
Video.js supports HTML5 video and modern streaming formats such as YouTube and Vimeo. The player comes can be styled with CSS to fit your website's theme.
2. Plyr
This JavaScript video player is a simple, accessible, and customizable player for video and audio. The player comes with a minimal and responsive design and can work for all types of websites.
3. jPlayer
jPlayer is an open-source media library written in JavaScript. The plugin is completely customizable and skinnable using HTML and CSS and is very lightweight.
4. MediaElement.js
MediaElement.js is a simple and easy to install plugin that can display today's standard video formats. All the basic video player controls come with this JavaScript video player.
5. Kaltura HTML5
This HTML5 video player both HTML5 and Flash with the same configuration. The player is fully responsive and can be viewed on tablets and mobile devices.
Discover More Great HTML5 & JavaScript Video Players for 2020
The HTML5 & Javascript video players mentioned above are some of the best possible that you can implement on your website in 2020.
However, these video players may not have the exact functions or design that you are looking for. If none of the premium HTML5 & JavaScript video players mentioned in this article seem to work for your website, then be sure to check out our other articles, which contain many more high-quality HTML5 & JavaScript video players for you to download:
JavaScript
10 Best JavaScript Media Scripts and Plugins of 2019
Franc Lucas
WordPress
How to Add the Stellar Video Player to Your WordPress Site
Ashraff Hathibelagal
WordPress
14 Best Video Background Plugins for WordPress
Nona Blackman
Add a Premium HTML5 and JavaScript Video Player to Your Website Now!
If you are in need of a video player that has a sleek design and is fully functional, then head on over to CodeCanyon.
The video players available will give you complete control over the design and features offered in your web players on your website. Ultimately, this will lead to a better user experience for your particular audience.
In addition to all the high-quality HTML5 and JavaScript video players on CodeCanyon, you can browse through thousands of other high-quality plugins and scripts for your website. You'll find everything from social media to marketing plugins and scripts in CodeCanyon's massive premium library.
Find the right HTML5 and JavaScript plugin or script for your website today!
by Eric Dye via Envato Tuts+ Code https://ift.tt/3iDA9ui
0 notes
Text
9 Best JavaScript Lightbox Libraries of 2020
Lightbox is a library provided by JavaScript that displays videos and images by filling the screen, and it dims the rest of the web page. Lightbox is one of the best ways to overlay images on the web. It brings all the focus on the image only. But sometimes browsers are unable to download the images properly, which can disrupt your viewing experience. That’s why you might need to have either of the responsive lightbox libraries from the list mentioned below.

PhotoSwipe
It is an independent JavaScript gallery that supports all the basic touch gestures, such as spread to zoom the image, pinch to close gallery, horizontal swipe to switch items, etc. You can customize your actions for tap and double-tap gestures. It manipulates the browsing history so that the users can link every gallery item and close the gallery using the ‘Back’ button. It also creates illusions for faster downloading. This app includes many advanced features, like smart loading indicator, zoom animation, responsive image support, smart lazy-loading, and more.
iLightBox
It is a powerful and smooth lightbox plugin that provides six retina-ready skin and supports swipe events, YouTube and video integration for HTML5 videos, and a powerful JavaScript API. It has jQuery capabilities and smart content recognizers. This responsive plugin can power your HTML and WordPress websites. It offers lifetime free support and updates as well. iLightBox supports multiple browsers like Firefox, Chrome, Safari, Opera, iOS 4+, IE7+, IE10, and Android smartphones. It also supports various social media sites along with Delicious, Digg, Reddit, etc.
Magnetic Popup
This is another responsive lightbox and dialogue script app that does not require you to define the size of the content. Its progressive loading displays the images before they are completely loaded. It is supported by a High-DPI Retina display, and the controls are made with pure CSS without the help of external graphics. You get full control of the display in the popup. It has an extendable micro templating engine that reuses the existing DOM elements. It supports Chrome, Safari, Opera, Firefox, IE8+ desktop along with Android 2.3+ and iOS 5+ smartphones.
Swipebox
This lightbox plugin is available on desktop, mobile, and tablet. It offers swipe gestures for mobile users and keyboard navigation for desktop users. It also provides CSS transitions with jQuery fallback. This app uses Retina support for UI icons and enables you to customize CSS. Apart from images, you can use it for YouTube and Vimeo videos as well. It is compatible with Chrome, Safari, Opera, Firefox, IE9+, iOS 4+, Android, and Windows mobile phones.
FeatherLight
It is a lightweight jQuery lightbox that supports images, iframes, and ajax out-of-the-box and can adapt quickly to meet your requirements. It supports browsers like Chrome, Firefox, Opera, IE8+, and Safari. You can also develop your extension for this plugin without any trouble. The custom styles allow you to reset all CSS and override the styling of FeatherLight.
StripJS
StripJS is an unobtrusive, yet responsive lightbox that covers the page partially, so that it could leave room to interact with the pages on more substantial screens while giving the classic lightbox experience to its mobile users. It supports all the major browsers, and its strip uses jQuery. Along with images, it also supports YouTube and Vimeo videos.
Nivo Lightbox
It is a robust jQuery lightbox plugin that automatically detects your content type and displays them in a responsive modal window along with animations. It supports HTML elements, iframe, ajax, gallery, YouTube, and Vimeo videos. Nivo Lightbox offers CSS3 transition animations. You can customize it according to your needs through CSS and JavaScript. It also allows you to insert resources with a link on your page, and you can also display your images in the lightbox gallery. It also supports various browsers, including IE9+ and Opera.
Fluidbox
This image lightbox plugin was inspired by a medium that opens your images seamlessly without any interruption, regardless of the circumstances like image with absolute position, images that have border and padding, floating images, and more. It again supports Chrome, Opera, Firefox, Safari, and IE9+ browsers and is dependent on jQuery.
Bootstrap Lightbox
It is a module designed for Bootstrap’s Modal plugin, and it supports images, galleries, and YouTube videos. You can make your workflow faster and simple using the GitHub packages and built-in CI/CD. Its software is well secured. It automatically updates the vulnerabilities and monitors your project dependency. It supports Chrome, Opera, Firefox, Safari, and IE8+ browsers only.
Source: https://internet-blogs.uk.com/9-best-javascript-lightbox-libraries-of-2020/
0 notes