#jQuery popup plugin
Explore tagged Tumblr posts
Visit Tumblr Blog
Explore Tumblr blogs with no restrictions, modern design and the best experience.
Last Seen Tumblr Blogs


Fun Fact
Tumblr was acquired by Yahoo for $1.1B in 2013.
Text
Top 25 Tools, Libraries, and Resources for Web Development

Today, the visual appeal and usability of a website take precedence over its development intricacies. Prioritizing a user-friendly and resilient front end is crucial. Thankfully, an array of plugins and frameworks exist in the market, simplifying development processes. These tools offer easy integration and negate the need for in-depth knowledge of specific technologies, ultimately saving valuable time.

ullpage.js: Enables creation of fullscreen scrolling websites and landscape sliders, ideal for One-Pagers.
Owl Carousel: A favorite slider plugin for creating simple sliders with easy integration.
jQuery custom content scroller: Allows customization of scrollbars with vertical and horizontal options, along with different themes.
matchHeight.js: Useful for equalizing heights of columns or floating boxes, especially when using flexboxes.
fancyBox: Popular for image popups with mobile-friendly features and quick setup.
Highcharts: Offers interactive chart creation for various purposes like stocks, timelines, and maps.
Animsition: Provides CSS animated page transitions for smoother reloading experiences.
TwentyTwenty: Allows comparison of two images with a draggable slider, responsive across devices.
Wow.js: Adds cool animations for page scrolling effects.
Dragdealer.js: Enables 2D dragging and tapping functionalities for mouse and touch interactions.
Select2: Replaces select boxes with a customizable jQuery plugin offering features like searching, tagging, and more.
CSS libraries / Design stuff
Animate.css: A CSS animation library.
Flat UI Colors: Offers a selection of trendy colors.
Material Design Lite: Google’s material design framework.
Materialui.co: Provides resources for material design.
Colorrrs: Generates random colors.
CSSpin: Offers a variety of CSS spinners.
Font Awesome: Provides a wide range of icons.
Bootstrap: A popular open-source toolkit for web development.
Foundation: Responsive front-end frameworks for designing websites, apps, and emails.
Interested in delving deeper into these valuable tools and resources for web development? Explore further details and insights by visiting our blog post at: Read more at — https://nitsantech.com/blog/25-useful-tools-libraries-and-resources-for-web-developer
0 notes
Text
jQuery popup plugin - simple jQuery popup
To create a popup, add the data-role="popup" attribute to a div with the popup contents. Then create a link with the href set to the id of the popup div, and add the attribute data-rel="popup" to tell the framework to open the popup when the link is tapped. A popup div has to be nested inside the same page as the link.
A modal box is a jQuery popup plugin window that forces the user to interact with it before returning to the site. Modal boxes are useful for warnings, informational boxes, and more. You can create a modal box with jQuery.
A modal is a dialog box/popup window that is displayed on top of the current page: Open Modal.
The jQuery UI dialog method is used to create a basic dialog window which is positioned into the viewport and protected from page content. It has a title bar and a content area, and can be moved, resized and closed with the 'x' icon by default.
There are two steps to using a DIV as a simple jQuery popup box. First, you must create the DIV on your page (it can be invisible to start). Second, you need a script function to make the DIV appear & disappear and change it's contents and location. Click on the button to answer the questions. To open a modal, we'll need any element with the data-open attribute (normally a button ). The value of this attribute should be the ID of the desired modal. By default, a modal will close if we click outside its boundaries or when the Esc key is pressed.
0 notes
Text
Responsive And Innovative Dialog Box Plugin - jQuery nCom.js
A lightweight jQuery plugin for creating responsive and customizable dialog boxes.
Demo
Download

1 note
·
View note
Photo
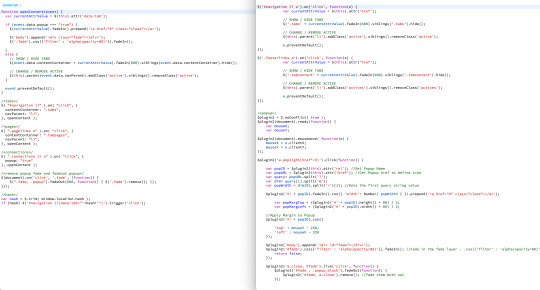
Character development.
Left is the new code (2019), right old (~2017)
#the popup plugin was one i found somewhere but could only get it to work with an old jquery version lmao#and i didnt know why or how to fix it#changed how the popup looks too hence why there's nothing with mouse location#nnspc misc#blog
7 notes
·
View notes
Text
Build CRUD DataGrid with jQuery EasyUI using PHP and MySQL
Build CRUD DataGrid with jQuery EasyUI using PHP and MySQL
DataGrid with CRUD operations is the most used functionality for the data management section. Generally, the web page is reloaded when the CRUD operation occurs. To make the web application user-friendly, you can integrate the CRUD functionality without page refresh. The EasyUI framework provides an easy way to integrate DataGrid with CRUD feature in the web application.
EasyUIis a jQuery…
View On WordPress
1 note
·
View note
Text
What is Bootstrap: A Beginner’s Guide for Web Design Service

Are you a marketer who wants to get inspirational ideas for a responsive website? Not sure where to start with web design and development? Get a detailed guide on why responsive design matters in this blog. Then, keep scrolling to get insights on why the WordPress site is responsive and the building blocks.
This blog also covers media queries, Bootstrap responsive breakpoints and why front-end developers prefer Bootstrap for web design service. Let’s get started.
For a few years now, this has become an essential tool for front-end developers. But, unfortunately, for the rest of us, it’s just another coding buzzword we don’t understand.
Wondering what Bootstrap is?
So we know it’s useful, but what is it used for, and why it is the better option for designers that build websites in a web design agency.
And how does it help web developers?
1. Why is Bootstrap the go-to for Web Developers?
Let’s break the features into the responsive grid, responsive images, progress bar, and thumbnail.
1. Its Responsive Grid

No more spending hours coding your grid—Bootstrap successfully caters to the designing needs as per the current trends as defined guidelines of Google to offer the best user experience. It comes with its grid system predefined. Now, you can get straight to filling your containers with content, automatically resizing images based on the current screen size.
Let Bootstrap resize your images for you.
It can even change the shape of your images with the addition of classes like IMG-circle and IMG-rounded.
Not only is it a breeze to add incredibly excellent and responsive elements to your webpage, looks fabulous no matter the screen size or device used to view them. That’s a lot of ready-made functionality that eases the life of a designer and front-end developer right at your fingertips to get the best user experience using Bootstrap.
4. Its JavaScript
Still, not enough functions, and you think that you need more features? Bootstrap also allows developers to take advantage of over a dozen custom JQuery plugins. To incorporate interactivity, there is a complete library to take help.
offering up easy solutions for modal popups,
transitions,
image carousels
Updates your navigation bar as you scroll through a page.
5. Its Documentation

Simply put, Bootstrap’s documentation is the best thing that has ever happened for front-end designers. Not sure why it’s fantastic and super amazing? Because you will see every piece of code is described and explained.
Here is what you need to do.
● choose a component,
● copy and paste the code into your page,
● and tweak from there.
6. Its Customizability
One of the initial evaluations of frameworks such as Bootstrap is their size—the weight they throw around can slow down your application upon the first load. However, what it allows you to do to combat this is customize which functionality you want to include in your download. By simply going to their Customize and Download page, you can check off the features you won’t need for your application, trimming the weight of your file and saving your users the additional load time.
Customization is a critical feature that you get while using Bootstrap when an agency offers web design service.
Conclusion:
Given the importance of websites to most businesses, many marketers and developers aim to learn Bootstrap for building sites.
The truth is, half of the consumers think website design is essential in customer acquisitions. So it’s worth the effort to make responsive websites by a digital agency that implants bootstrap.
However, this doesn’t mean you need to scrap your site’s vision to engage visitors by incorporating other vectors and branded images. There are still many ways and multiple options to implement stylistic choices across the spectrum. Many Product Designers go either monochromatic in their SaaS offering.
To help you prepare for wherever the web design tide is, this blog offers insights on trends to keep a close eye on for responsive websites to tackle your web design projects this year with style.
Hop on a consultation call to book our web design service to have a delightful experience with Bootstrap.
4 notes
·
View notes
Text
Noteworthy PHP Development Tools that a PHP Developer should know in 2021!

Hypertext Preprocessor, commonly known as PHP, happens to be one of the most widely used server-side scripting languages for developing web applications and websites. Renowned names like Facebook and WordPress are powered by PHP. The reasons for its popularity can be attributed to the following goodies PHP offers:
Open-source and easy-to-use
Comprehensive documentation
Multiple ready-to-use scripts
Strong community support
Well-supported frameworks
However, to leverage this technology to the fullest and simplify tasks, PHP developers utilize certain tools that enhance programming efficiency and minimize development errors. PHP development tools provide a conducive IDE (Integrated Development Environment) that enhances the productivity of PHP Website Development.
The market currently is overflooded with PHP tools. Therefore, it becomes immensely difficult for a PHP App Development Company to pick the perfect set of tools that will fulfill their project needs. This blog enlists the best PHP development tools along with their offerings. A quick read will help you to choose the most befitting tool for your PHP development project.
Top PHP Development tools
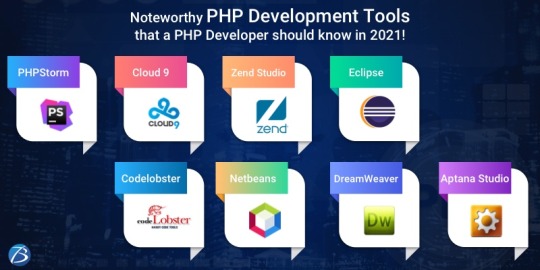
PHPStorm
PHPStorm, created and promoted by JetBrains, is one of the most standard IDEs for PHP developers. It is lightweight, smooth, and speedy. This tool works easily with popular PHP frameworks like Laravel, Symfony, Zend Framework, CakePHP, Yii, etc. as well as with contemporary Content Management Systems like WordPress, Drupal, and Magento. Besides PHP, this tool supports JavaScript, C, C#, Visual Basic and C++ languages; and platforms such as Linux, Windows, and Mac OS X. This enterprise-grade IDE charges a license price for specialized developers, but is offered for free to students and teachers so that they can start open-source projects. Tech giants like Wikipedia, Yahoo, Cisco, Salesforce, and Expedia possess PHPStorm IDE licenses.
Features:
Code-rearranging, code completion, zero-configuration, and debugging
Support for Native ZenCoding and extension with numerous other handy plugins such as the VimEditor.
Functions:
Provides live editing support for the leading front-end technologies like JavaScript, HTML5, CSS, TypeScript, Sass, CoffeeScript, Stylus, Less, etc.
It supports code refactoring, debugging, and unit testing
Enables PHP developers to integrate with version control systems, databases, remote deployment, composer, vagrant, rest clients, command-line tools, etc.
Coming to debugging, PHPStorm works with Xdebug and Zend Debugger locally as well as remotely.
Cloud 9
This open-source cloud IDE offers a development eco-system for PHP and numerous other programming languages like HTML5, JavaScript, C++, C, Python, etc. It supports platforms like Mac OS, Solaris, Linux, etc.
Features:
Code reformatting, real-time language analysis, and tabbed file management.
Availability of a wide range of themes
In-built image editor for cropping, rotating, and resizing images
An in-built terminal that allows one to view the command output from the server.
Integrated debugger for setting a breakpoint
Adjustable panels via drag and drop function
Support for keyboard shortcuts resulting in easy access
Functions:
With Cloud 9, one can write, run and debug the code using any browser. Developers can work from any location using a machine connected to the internet.
It facilitates the creation of serverless apps, allowing the tasks of defining resources, executing serverless applications, and remote debugging.
Its ability to pair programs and track all real-time inputs; enables one to share their development eco-system with peers.
Zend Studio
This commercial PHP IDE supports most of the latest PHP versions, specifically PHP 7, and platforms like Linux, Windows, and OS X. This tool boasts of an instinctive UI and provides most of the latest functionalities that are needed to quicken PHP web development. Zend Studio is being used by high-profile firms like BNP Paribas Credit Suisse, DHL, and Agilent Technologies.
Features:
Support for PHP 7 express migration and effortless integration with the Zend server
A sharp code editor supporting JavaScript, PHP, CSS, and HTML
Speedier performance while indexing, validating, and searching for the PHP code
Support for Git Flow, Docker, and the Eclipse plugin environment
Integration with Z-Ray
Debugging with Zend Debugger and Xdebug
Deployment sustenance including cloud support for Microsoft Azure and Amazon AWS.
Functions:
Enables developers to effortlessly organize the PHP app on more than one server.
Provides developers the flexibility to write and debug the code without having to spare additional effort or time for these tasks.
Provides support for mobile app development at the peak of live PHP applications and server system backend, for simplifying the task of harmonizing the current websites and web apps with mobile-based applications.
Eclipse
Eclipse is a cross-platform PHP editor and one of the top PHP development tools. It is a perfect pick for large-scale PHP projects. It supports multiple languages – C, C++, Ada, ABAP, COBOL, Haskell, Fortran, JavaScript, D, Julia, Java, NATURAL, Ruby, Python, Scheme, Groovy, Erlang, Clojure, Prolong, Lasso, Scala, etc. - and platforms like Linux, Windows, Solaris, and Mac OS.
Features:
It provides one with a ready-made code template and automatically validates the syntax.
It supports code refactoring – enhancing the code’s internal structure.
It enables remote project management
Functions:
Allows one to choose from a wide range of plugins, easing out the tasks of developing and simplifying the complex PHP code.
Helps in customizing and extending the IDE for fulfilling project requirements.
Supports GUI as well as non-GUI applications.
Codelobster
Codelobster is an Integrated Development Environment that eases out and modernizes the PHP development processes. Its users do not need to worry about remembering the names of functions, attributes, tags, and arguments; as these are enabled through auto-complete functions. It supports languages like PHP, JavaScript, HTML, and CSS and platforms such as Windows, Linux, Ubuntu, Fedora, Mac OS, Linux, and Mint. Additionally, it offers exceptional plugins that enable it to function smoothly with myriad technologies like Drupal, Joomla, Twig, JQuery, CodeIgniter, Symfony, Node.js, VueJS, AngularJS, Laravel, Magento, BackboneJS, CakePHP, EmberJS, Phalcon, and Yii.
Offerings:
It is an internal, free PHP debugger that enables validating the code locally.
It auto-detects the existing server settings followed by configuring the related files and allowing one to utilize the debugger.
It has the ability to highlight pairs of square brackets and helps in organizing files into the project.
This tool displays a popup list comprising variables and constants.
It allows one to hide code blocks that are presently not being used and to collapse the code for viewing it in detail.
Netbeans
Netbeans, packed with a rich set of features is quite popular in the realm of PHP Development Services. It supports several languages like English, Russian, Japanese, Portuguese, Brazilian, and simplified Chinese. Its recent version is lightweight and speedier, and specifically facilitates building PHP-based Web Applications with the most recent PHP versions. This tool is apt for large-scale web app development projects and works with most trending PHP frameworks such as Symfony2, Zend, FuelPHP, CakePHP, Smarty, and WordPress CMS. It supports PHP, HTML5, C, C++, and JavaScript languages and Windows, Linux, MacOS and Solaris platforms.
Features:
Getter and setter generation, quick fixes, code templates, hints, and refactoring.
Code folding and formatting; rectangular selection
Smart code completion and try/catch code completion
Syntax highlighter
DreamWeaver
This popular tool assists one in creating, publishing, and managing websites. A website developed using DreamWeaver can be deployed to any web server.
Offerings:
Ability to create dynamic websites that fits the screen sizes of different devices
Availability of ready-to-use layouts for website development and a built-in HTML validator for code validation.
Workspace customization capabilities
Aptana Studio
Aptana Studio is an open-source PHP development tool used to integrate with multiple client-side and server-side web technologies like PHP, CSS3, Python, RoR, HTML5, Ruby, etc. It is a high-performing and productive PHP IDE.
Features:
Supports the most recent HTML5 specifications
Collaborates with peers using actions like pull, push and merge
IDE customization and Git integration capabilities
The ability to set breakpoints, inspecting variables, and controlling the execution
Functions:
Eases out PHP app development by supporting the debuggers and CLI
Enables programmers to develop and test PHP apps within a single environment
Leverages the flexibilities of Eclipse and also possesses detailed information on the range of support for each element of the popular browsers.
Final Verdict:
I hope this blog has given you clear visibility of the popular PHP tools used for web development and will guide you through selecting the right set of tools for your upcoming project.
To know more about our other core technologies, refer to links below:
React Native App Development Company
Angular App Development Company
ROR App Development
#Php developers#PHP web Development Company#PHP Development Service#PHP based Web Application#PHP Website Development Services#PHP frameworks
1 note
·
View note
Text
How to Create Flip Cards with Any Module in Divi Without a Plugin
Flip Cards are a fun way for users to interact with your website. Not only does it provide a cool flip animation, it also allows you to offer additional information in one concise location. In this tutorial, I’m going to show you how to turn Divi Modules into flip cards without using a plugin! With this method, you will be able to use one Divi module as the front of a card and another Divi module as the back of a card. You can even design each module (front and back) however you like using the divi builder. The functionality is accomplished through just a few snippets of CSS (no jquery).
I think you will be surprised at just how simple and fun building these cards can be.
Let’s dive in!
Sneak Peak
Here is a sneak peak of the design we will be building today.
What You Need for This Tutorial
All you will need for this Tutorial is Divi! No plugin needed. We will also be using the App Developer Layout Pack which is FREE and available within the Divi Builder.
The Basic Idea Explained
The inspiration for this concept actually came from this basic example of how to design flip cards. All it took was a little re-engineering to assign the div classes to Divi rows, columns and modules and then clean up the CSS a bit.
The Divi layout consists of a regular section with four one-column rows. In each row, I added two blurb modules stacked on top of each other (although any Divi module would work as well). The top blurb serves as the front of the flip card and the bottom blurb serves as the back of the flip card. By applying “display:flex” to the section, the rows are structured horizontally like columns. This allows to the cards to be aligned side by side into four columns.
Here is what the setup looks like before we add the custom CSS.
Then I added the custom CSS to page settings and added the corresponding CSS classes to each row, column, and module.
That’s it!
Creating Divi Flip Cards Using a Premade Layout
Adding the Premade Layout to Your Page
To get things rolling, go ahead and create a new page, give you page a title, and then click to use the Divi Builder. Select the option “Choose a Premade Layout”. From the Load from Library popup, select the App Developer Layout Pack and then click to use the App Developer Landing Page layout.
Once the layout loads to the page, publish your page and then click the button “Build on the Front End”. Now you are ready to start creating the Flip Cards.
Setting up the Section, Rows, and Modules
Under the first section of the layout, add a new regular section with a one-column row. Don’t add any modules yet. Open the row settings and update the following:
Custom Margin: 20px bottom Custom Padding: 0px top, 0px bottom
Save settings.
Then duplicate the row three times so that you have a total of four rows in the section.
Now open the section settings and add the following custom CSS to the Main Element:
display:flex;
This changes the rows to display horizontally which basically converts our rows into four columns even though technically they are still Divi rows each with one column.
Adding the Modules to the Rows
This is where our premade layout comes in handy for this tutorial. We will use the four blurb modules in the top section of the layout to jumpstart the design of our flip cards. Using the right click options or the shortkeys ctrl+c and ctrl+v (windows) and cmd+c cmd+v (mac), copy and paste the premade modules into each of the rows we just created. Make sure that each row has duplicate versions of the same module.
Now your section should look like this.
Designing the Front and Back Flip Card Modules
The two modules stacked in each row will be used as the front and back of the flip cards. The top module in each row will serve as the front and the bottom module will serve as the back. Since the design of the front card (top module) is already done thanks to our premade layout, all we need to do is adjust the design and content of the back card (bottom module).
Using Divi multiselect feature, select all bottom modules in each row and then open the element settings to customize all four modules at the same time.
Now we can update the element settings options to style the back version of our flip cards. Update the element settings as follows:
Content: “This is a description.” Background Color: #00a2fa Text Color: Light
Adding Custom CSS and CSS Classes
Now it’s time for the custom CSS that will give us the flip card functionality. Open the page settings and add the following Custom CSS:
@media (min-width:980px){ .flip-box-row { background-color: transparent; width: 250px; height: 250px; perspective: 1000px; } .flip-box-column { position: relative; width:100%; height: 100%; transition: transform 0.8s; transform-style: preserve-3d; } .flip-box-row:hover .flip-box-column { transform: rotateY(180deg); } .flip-box-front, .flip-box-back { position: absolute; width:100%; height: 100%; backface-visibility: hidden; } .flip-box-back { transform: rotateY(180deg); } }
Notice that the above CSS classes are named in a way that should help you understand what each is doing. It is also a helpful indicator as to where we need to add those CSS classes to our Divi elements. For example, the class “flip-box-row” is meant to style each of the four rows; therefore, each row needs to have that CSS class.
Adding CSS Classes to the Divi Elements
Using Multiselect, select all four of the top modules (front cards) in each of the rows. Then add the following CSS class:
CSS Class: flip-box-front
Then, use multiselect to select all four of the bottom modules (back cards) in each of the rows and add the following CSS Class to those modules:
CSS Class: flip-box-back
Lastly, use multiselect to select all four rows and give them the following CSS Classes:
CSS Class: flip-box-row Column CSS Class: flip-box-column
Final Design on Desktop
With all our CSS classes added, our flip cards are fully functional. Check out the final design on desktop.
Customizing the Design for Mobile
In the custom CSS code that we already added to the page settings, there is a media query that limits the flip card functionality to desktop only. However, we still need to hide the front versions of our flip cards on tablet and smartphone as well as make sure our rows stack nicely when adjusting browser widths.
To hide our front card blurb modules, use multiselect to select all of the top modules (front cards) in each row (this will be easier in wireframe view mode since things will be moving around in the front end builder) and update the following:
Disable on: Phone and Smartphone
Then open the section settings and add one more line of CSS to the main element in addition to the one added previously:
flex-wrap:wrap;
This will make sure the rows will stack on mobile.
Now let’s check out the final design on tablet and smartphone.
Bonus Option: Vertical Flip Cards!
If you want your flip cards to flip vertically instead of horizontally, you only need to change a two letters (literally) in the custom CSS. Open the page settings and locate the two places where “transform: rotateY(180deg)” is being used. Then replace the “Y” with “X”. If you haven’t guessed already, this changes the rotation to rotate on the X axis instead of the Y axis.
Pretty cool stuff! Check out the result.
Final Thoughts
You don’t have to resort to a plugin to create great looking Flip Cards in Divi. With this tutorial, you have a framework to create countless designs and combinations of flip card content. Don’t forget that you can choose any two modules to serve as the front and back of your cards. So feel free get creative!
I hope this was helpful and I look forward to hearing from you in the comments below.
Cheers!
The post How to Create Flip Cards with Any Module in Divi Without a Plugin appeared first on Elegant Themes Blog.
😉SiliconWebX | 🌐ElegantThemes
2 notes
·
View notes
Text
Jquery mobile html5 video player

#JQUERY MOBILE HTML5 VIDEO PLAYER HOW TO#
#JQUERY MOBILE HTML5 VIDEO PLAYER SOFTWARE#
#JQUERY MOBILE HTML5 VIDEO PLAYER CODE#
This whole process has been an extremely valuable learning experience for me.Īlso, a shout out to the creator(s) of Media Element for creating an awesome media player plugin. I'd like to thank Team Treehouse for providing another great project idea through their "Front End Web Development" techdegree. I corrected both mistakes, and BOOM it finally worked. I also hadn't formatted the milliseconds appropriately in the data-start and data-end attributes. I discovered that there were twice as many span tags as I had thought because I had completely forgotten about what might be inside the media player plugin.
I spent awhile trying to make the highlighting event handler work before I decided to debug it through the JavaScript console in Chrome's Dev Tools.
I'm not sure if it's a bug or something I missed when coding. However, once you hit the "play" button, the video's dimensions return to what they were programmed to be, and the video plays normally.
For some reason at times, before playing the video, the dimensions of the black video screen are not what the actual dimensions are they will be bigger or stretch thin.
I added a header and a footer as bookends to kind of package it all together.
You'll notice that the end product does not EXACTLY match the provided mockups because I thought the mockups looked too.plain.
#JQUERY MOBILE HTML5 VIDEO PLAYER HOW TO#
zip file containing the Media Element plugin from their documentation on how to install it is found at, and their documentation on how to use it (and style it) is found at. The version of jQuery that I am using is v3.3.1 from.All of the JavaScript has been successfully run through JSHint it only mentions some ES6 standards.
#JQUERY MOBILE HTML5 VIDEO PLAYER CODE#
All of the CSS code has been successfully run through the W3C CSS validator there are no errors.
Add your own HTML5 videos to the modal popup. load the core style sheet videopopup.css in the header section to style the video popup. I'm leaving them as percentages because that is what the creators of the media player plugin have recommended in their documentation so that the video's dimensions can scale appropriately to the screen. Load the latest version of jQuery JavaScript library (Slim build is recommended) and the jQuery videopopup.js script in the html page. It works everywhere Elite video player is a HTML5 ready player that enables it to work on all platforms desktop & mobile. Once detected, player will skip to next available video file, until the video can be played regularly. There are 2 errors that say the width and height attributes on the video should not be percentages. Elite video player can detect files and sources that are not playable (for example broken link, or misspelled file).
All of the HTML has been run through the W3C HTML validator.
anyone can click on any part of the transcript, and the video will fast forward to that point in time.
the transcript is synced with the video so that as the video progresses, the transcript text will turn a different color.
a jQuery plugin that redesigns the look of the video's controls.
This web page has three features of note: I built a simple web page (with a mobile-first design) that showcases an interactive video in HTML5.
#JQUERY MOBILE HTML5 VIDEO PLAYER SOFTWARE#
You'll still need to do the "second" math to interpret the time, both inward and outward, but the second unit is as fair as you could expect, so this API is one to be appreciated.Interactive Video Player Software Summary Just specify thumbnail and audio or video file and turn it into your hover. Media Hovers is a responsive HTML5 plugin which plays audio and video on hover. The API is easy enough and the property is self-explanatory. jQuery Plugin to plays Audio & Video on Hover : Media Hovers Novem HTML5, Plugins, Premium, Video & Audio Get Motion to your images. You can retrieve the video's current time with the following:Ĭonsole.log(video.currentTime) // 25.431747ĬurrentTime acts as both a getter and a setter, so you can move about the video by setting a value to currentTime: The first and probably most important part of managing video time state is knowing that video currentTime is the important attribute. Both setting and getting the video's time is important when creating a chrome around the video, so let's review how to accomplish this feat. It's an important technique, obviously, but one that may be a bit more important is managing the video's time setting. Last week I explored how you could get the duration of a HTML5 video.
0 notes
Text
How to Integrate SmartyStreet in OneShield
All of who work in or for insurance domain is quite familiar with the benefits of address verification for the sector. Benefits like -improvement in risk assessment, preventing premium leakage, streamlining operations and most importantly improvement in data quality Newscalibre, makes the selection of good Address Verifying software truly important.
In this article, I would like to discuss the integration of one such software- SmartyStreet with OneShield, which I believe is the best address validating software I have come across so far and hence recommended to my client. SmartyStreet brings many advantages to their clients, few of them are:
Improved Quality of Address Data due to USPS and international address verification feature. Option of both online lookups and web services calls. Elimination of time and effort spent on updating data Unlimited calls in REALLY affordable price. No maintenance required. Accessible by Multiple Users Secure Processing You can validate multiple address on one page like Risk, Mailing, and Billing etc. Apart from the reason mentioned above, its benefits like reduced downtime and ultimate response time (yes, I am talking fraction of seconds here!) which helps us not only in our production environment but delivering the best to our clients as well.
So, sensing that you're already sold on the goodness of the application, let's quickly understand how we can integrate it with OneShield.
Step 1: Go to the SmartyStreet website, click on Resources- Documentation and choose Cloud API reference and Website plugin.
How Website plugin works: It sends the request to SmartyStreet as soon as user start typing the address on address field, a predefined popup appear suggesting closet matching addresses on the UI.
Website plugin provide us with a standard JavaScript file, which anyone can use. It has some installation requirement though; please find the image below for your reference.
As you can see it requires JQuery 1.5.1 or newer and if you are an OneShield developer, you must be aware that OneShield also uses JQuery version 1.4.2 for core version 4.19.XX, and there is challenge to integrate SmartyStreet Plugin!
To overcome this issue, we downloaded and modified SmartyStreet JS file (refer the highlighted part of the image shared below) to make it compatible with the 1.4.2 JQuery framework of OneShield and included the file on website.
It is very important to note that you have toreplace "YOUR_WEBSITE_KEY_HERE" (refer to the image above) with a website key (provided by SmartyStreet) for the website on which you're installing the plugin; else, they will invalidate the request!
Now as per the environment (Dev/QA/Production), we created different keys - the functionality available with SmartyStreet. These keys per environment can be maintain in system attribute and read at run time whenever your plugin loads.
Let's now move to Cloud API reference, where we call the web services using HTTPS or HTTP and get the information back.
If You check the generated HTML page of OneShield it include necessary javascript files at start and that is the custom functionality and cannot be modified. To include SmartyStreet plugin file, we use Page_Layout_Cell configuration to include modified js file.
Then we pass the data required to identify the address fields on UI and invoke the entry point from SmartyStreet js plugin file. This plugin then identify the address component on UI. Now when user start typing in address line 1, internally plugin file grab data entered on UI and ajax request send to SmartyStreet web interface. In return first 10(this can be configured as how many returns records are expected) matching records in JSON format. These records are then shown in drop down list that is attached to address line 1 field on UI. All this is done from plugin provided by SmartyStreet.
This would help us to determine:
Whether entered address is valid /invalid. User also had ability to accept entered invalid address
In above screen User can select Go Back and system mark address is invalid or User can select Use as it is and System make address accepted
3. SmartyStreet also identify if entered address need apartment info and that popup to enter that info
4. Smarty Street also identify entered address as ambigious and provide selection for correct address
5. Once address is verify the verify button mark below zip code is turn to green
User can change from verify to Unverify by selecting Undo from same image.
This clears the zip field and entered address mark as un verified
On Verified address once user change any of address field like Address line 1/State/City/Zip that address is marked as unverified
Now when user change City
* One thing you need to keep in mind that your machine will be directly sending request to SmartyStreet without your application server in between (till you hit the submit button), so you need to make sure to remove any filters or blocking, else your client site HTTPS calls with fail.
Apart from easing and upgrading the process for our client, we were able to use the huge chunk of money, leaving them delighted. So try it, and contact us if you need any help from us for integrating it with your application.
Hope this helps and happy reading!
0 notes
Text
Display A Popup And Play A Sound When A Checkbox Is Checked
A tiny jQuery script that enables a checkbox to toggle a notification popup and play a sound when checked.
Demo
Download

2 notes
·
View notes
Text
jQuery Flying Popup
LIVE PREVIEWBUY FOR $7 Flying Popup plugin for jQuery – now also responsive * Check also WordPress Flying Popups for managing popups in your WordPress site. * The recent version gives the possibility to make popups responsive. Just set the width in % (and/or height if needed), like width: '80%' and popup dimensions will be automatically adjusted to current screen size LAST UPDATE: 16 March…

View On WordPress
0 notes
Text
8+ Cool jQuery Plugins for WordPress That Are Easy & Powerful
8+ Cool jQuery Plugins for WordPress That Are Easy & Powerful
Are you looking for the best jQuery plugins for WordPress to improve your website? WordPress plugins that use jQuery are a great way to add interactive and engaging features to your site like popups, sliders, accordions, and more. In this article, we’ll show you some of the best WordPress jQuery plugins you can use with your WordPress site. jQuery is a popular and widely used JavaScript…
View On WordPress
0 notes
Link
Are you looking for the best jQuery plugins for WordPress to improve your website?WordPress plugins that use jQuery are a great way to add interactive and engaging features to your site like popups, sliders, accordions, and more. In this article, we’ll show you some of the best WordPress jQuery plugins you can use with your WordPress site. What Is a jQuery Plugin, and When Do You Need it?jQuery is a popular and widely used JavaScript library. It’s used by WordPress to add cool features like popups, sliders, and other interactive website elements to your website without affecting its speed and performance.A lot of the top WordPress plugins and most popular WordPress themes will use jQuery for essential functionality. When your site is more interactive and engaging, people will spend more time on it. The more engaged they are with your website, the more chances you’ll have to convert them into subscribers or customers.With that said, let’s show you some of the best plugins using jQuery to add powerful features to your WordPress blog. 1. WPFormsWPForms is the most beginner friendly and best contact form plugin in the market today, used by over 4 million websites. You can use the drag and drop form builder to quickly create any form you need, like contact forms, email subscription forms, order forms, and more. The plugin uses jQuery for all sorts of functions like revealing conditional form fields, validating form payments, letting users pick a time on your form, and more.It also supports dynamic field population, conditional logic, and advanced form fields. These features make it easy to create smart and interactive forms for your WordPress website.Plus, it comes with a library of over 300 pre-built form templates you can use to speed up the form building process. The free version of WPForms lets you create simple contact forms, but for the more advanced features, you’ll need to upgrade to WPForms pro.2. SeedProdSeedProd is the best WordPress page builder in the market used by over 1 million websites. It lets you simply create custom pages with the easy to use drag and drop builder.This plugin comes with a variety of blocks that let you add interactive elements to your site. A lot of these blocks, like animated headlines, use jQuery and jQuery libraries for the effects.You can easily add these engaging effects and animations to your website with the drag and drop builder.You’ll also find accordion dropdowns, countdown timers to improve conversions, and other blocks with unique animations. The lite version of SeedProd lets you create professional-looking coming soon pages, but for advanced animation features, smart blocks, and the template library, you’ll need the pro version.3. Q2W3 Fixed WidgetQ2W3 Fixed Widget is a unique jQuery plugin that lets you add a sticky widget to your WordPress sidebar. When your users scroll down your site, the widget will stay visible.This can be a great way to attract visitor attention to important areas of your site, like a email newsletter subscription form. Many site owners also use this feature to help increase ad impressions and make money with their sites. 4. OptinMonsterOptinMonster is the best WordPress popup plugin in the market used by over 1.2 million smart website owners. It comes with a powerful WordPress popup builder and other targeting and personalization features to turn visitors into subscribers and customers. Note: Our found Syed started OptinMonster to use on WPBeginner, and we increased our email subscribers by 600%.The OptinMonster library is full of high converting templates you can use to build campaigns quickly. For example, you can create an on click popup form that opens when a user clicks on a link or image. Since it’s triggered by user interaction, it’s very engaging and can be a great way to grow your email list.This unique click, or hover, to popup feature uses jQuery to quickly load the popup without refreshing the page.You can also add engaging A/B quiz popups, gamified spin wheels, announcement bars, and much more to encourage visitor interaction.You can use the free version of OptinMonster to get started today. 5. Advanced Custom FieldsAdvanced Custom Fields is a free WordPress plugin that lets you add additional custom fields to your website. By customizing these, you have full control over your post and page metadata. This means you can add and show more than the standard date and time, author name, and title. The plugin uses jQuery to let you add custom fields on demand. Plus, it lets you add custom fields to any area of your site like posts, users, comments, media, and more. For more details, see our guide on how to add custom meta boxes in WordPress posts and post types.6. AccordionAccordion is the best WordPress accordion plugin that lets you add accordions to your posts, pages, template files, and more. Accordions are commonly used to add frequently asked questions sections to your website, but they can be used for any kind of content. This unique drop down feature uses jQuery to display your hidden content quickly. The plugin uses responsive design, so your content will look good on any device. Plus, it supports Font Awesome icon fonts to add beautiful icon fonts to your accordion tabs easily. 7. Slide AnythingSlide Anything is a top WordPress slider plugin that lets you add a sliding feature to any element of your WordPress site. The plugin uses the jQuery Owl Carousel 2 plugin to offer over 60 different customization options. To create a unique responsive slider, you can add text, images, HTML, video, or anything else you want. It has touch and drag support for mobile screens, can lazy load images, supports infinite loop sliders, and much more. The plugin isn’t as beginner friendly as other slider plugins, but it’s very flexible and can be used to create any slider you want.Alternative: If you’re looking for a fast and easy to use slider with similar features, then check out Soliloquy.8. Collapse-O-MaticCollapse-O-Matic is a unique plugin that lets you puts any content you want inside a jQuery powered accordion.This plugin works great if you need to put other shortcodes and media inside a drop down.It’s beginner friendly and uses simple shortcodes that you wrap around each content section. 9. Easy FancyBoxEasy FancyBox is a lightweight plugin that uses the jQuery library to add custom lightboxes to any media on your website.Once you activate the plugin, all of your images, videos, PDFs, image galleries, and more will be opened in a lightbox window. We hope this article helped you find the best WordPress plugins using jQuery for your website. You may also want to see our guide on how to start your own podcast and our expert picks on the best free website hosting compared. If you liked this article, then please subscribe to our YouTube Channel for WordPress video tutorials. You can also find us on Twitter and Facebook. Source:WPBeginner
0 notes
Text
Bootstrap 4 Modal Responsive jQuery Plugin
New item has been added on CodeHolder.net https://codeholder.net/item/javascript/bootstrap-4-modal-responsive-jquery-plugin

Bootstrap 4 Modal Responsive jQuery Plugin Bootstrap 4 Modal Responsive jQuery Plugin is a set of different modals and popups those contains carousel, sliders, forms, adds banners, videos etc with advanced options. 33+ pre-built examples and layouts are the part of this product. The modal
1 note
·
View note
Text
Videography Website

It is specially crafted for someone who is much interested in building a video portfolio. With the bold, dark, and impactful design, this site canvas promises a memorable first impression. This impressive website is 100% responsive and well-adaptive to all the recent browsers and devices.Along with the top-notch design, it sums up many efficient features like a hero header with slider, drop-down menu, sorted portfolio grid, blog post carousel, gradient style, and many more. This web canvas comes with a set of well-defined code and other components. So you can use it directly out of the box. The beautiful dark appearance creates an attractive atmosphere when browsing through the video content. In short, using this website, you can take your online portfolio project straight to the moon.
Key Features
Bootstrap 4
HTML5 & CSS3
Dark & bold design
Multi-page template
Cross-browser compatibility
Fully responsive
CSS3 preloader
Hero header with Slider
Hover effects
Sorted portfolio grid
Drop-down menu
Fun fact counters
Blog post carousel
Newsletter subscription form
Modal video player
Breadcrumbs
Call-to-action button
Testimonial carousel
Service cards
Blog section
Google Maps
Gradient style
Pagination UI
Comment form UI
Contact form
Fontawesome font icons
Footer navigation
Our Services
Website Development
Domain, Hosting and Services
Web Application Integration
eCommerce Development
Web Theme Development
Customization
Digital Marketing
Libraries and Plugins
Bootstrap 4
jQuery
Fontawesome
Owl carousel
Magnific-popup
SlickNav
0 notes