#so i had to add a duplicate folder of everything flipped
Explore tagged Tumblr posts
Visit Tumblr Blog
Explore Tumblr blogs with no restrictions, modern design and the best experience.
Last Seen Tumblr Blogs


Fun Fact
If you dial 1-866-584-6757, you can leave an audio post for your followers.
Text
"Let's Dance"
(Loop the video for the intended experience.)
Even though I actually forgot that the 1st was Mayday's birthday, I got the sudden urge to draw something like this. It's a little belated, but let's call this birthday art anyway~
As frustrating as it is, I booted up AnimeEffects for this one to get a little bounce on 'em. It's a little scuffed, but I'm kinda tired of banging my head against a wall trying to make it better~
#gbunny draws#nsr#no straight roads#mayday#tatiana#kliff#flame trio#so yeah. this is why i wanted to update their group name.#i didn't get anything better than 'two and a half lesbians'#but i can't seriously tag them like that#ya know...#i was pretty proud of myself that for the most part#i went through the trouble of making sure the sprite flips would be edited for asymmetric details#but i just noticed i forgot to flip mayday's bangs#but for me to fix it and reanimate it i would need to animate it from scratch again#and i'm not doing that.#i already started over once during this#because i forgot that anime effects can't actually flip images#so i had to add a duplicate folder of everything flipped#just to get this work the way i wanted
99 notes
·
View notes
Text
Changes and Deleted Content Part 2 - Far Cry 5: Features and Missions
This is a small passion project series of posts where I share some insight of what’s hidden in the game(s) files, but also some general observations. The main focus will be on character changes or deletions with a few words about functions and deprecated missions.
What will not be touched upon are a lot of the things the Resistance Mod on PC restores, namely deleted store weapons and clothes, weather systems and general gameplay related things like skinning animations. I also won’t go into audio files and their content, as @lulu2992 is already working on an amazing series for FC5 that summarizes them per character.
This part will be significantly shorter Edit from post finishing-Angy: This post turned out really damn long despite only discussing some scrapped or changed features and a couple of deprecated mission strings. I still hope you find this as interesting to read as I found writing and investigating it :)
1. Changed and Scrapped Features
1.1 Guns/Fangs for Hire
Just for reference, the release version of the game has 9 unique GFH/FFH available + 3 slots for random specialists you can hire throughout the world.
Among the game’s UI textures for tutorials is this image, showing an earlier version of the GFH screen.

What this indicates is that the planned amount for active GFHs you can have was originally 4; or the top row could function as some sort of favorites tab. We will probably never know for certain.
Interestingly though, this version has slots for 20 GFHs in total, 18 either filled a character icon or a locked symbol, suggesting the originally planned unique GFH count was 18.
Considering almost every NPC in-game has spawn-able archetypes with battle audio fully in place it is possible that we were supposed to be able to recruit more of them. I will return to the matter of recruitment shortly.
Another thing I’d like to open up for consideration is that there may have been plans for (ex-)cultist GFHs or at least areas where they act friendly towards the deputy. Reason for this assumption is the fact that cultists have recorded lines for when you meet them (spawn them), aim weapons at them (the taunts GFH and friendlies do too), along with idle lines when you use mods to spawn them as friendly followers. The game has no purpose for most of these lines, as you never walk into peaceful cultists outside of the intro. In the intro you have no weapons to aim at anyone, making it impossible to trigger these lines.
You may argue they were recorded for the arcade, but the Seeds are also featured in it and have none of those. However, they may also be a leftover from scrapped missions that would feature cultists that don’t shoot you on sight.
Additionally to that early menu screenshot, I have also found an old reddit thread discussing the game’s Uplay page near release because of the following image:

Unfortunately I was not able to find this particular page myself anymore, and knowing how short lived everything is nowadays, it might be lost in time forever. The commenters discuss that the three additional slots here refer to potential DLC characters, but we don’t get to use any of the DLC companions in the main game (nor do the DLCs share the main game’s art direction). So, this might be another indicator for additionally planned GFH/FFH we never got to see.
One of these was likely the Eagle FFH called ‘’Freedom’’ (Character/Unique/FFH_Eagle_Freedom), which was partially restored through mods on PC as its loaders and everything are still present. It is unknown why this was scrapped.
It also appears that there once were inventory (purchaseable?) items for almost each GFH (Boomer and Jess have none), as these placeholder icons exist inside the game’s ui\icons\inventory folder:

Possible functions: Quest items you needed to obtain to recruit them (implying changed missions); Gift items (for potential level up?)
Now to return to the matter of recruitment: Deprecated mission strings suggest that originally you had to hire unique GFHs similarly to random ones; and that was part of quest lines. These lines appear in ‘oasisstrings’, the game’s main language file(s):
HIRE Jess RECRUIT Adelaide Drubman ADD Adelaide to your squad
In light of the old GFH screen I actually looked up the definition of ‘Squad’, and on wikipedia it is listed that a Squad is a team of 5+ members, further strengthening the theory that originally you could have 4 active GFH (plus the Deputy they’d be 5, therefore a squad).
1.2 In-game Wiki menu
Some of the previous Far Cry titles have a sort of wiki menu that features short bios of characters, explanations of locations, resources and weaponry. New Dawn sort of brought part of this back with the ‘Survival Guide’ (accessible from the pause menu), but 5 does not have this at all. However, in the ui files there are still texture leftovers, implying this feature was planned and it had sections for Animals, Base Jumps, Characters, Destructible Structures, Fish, Locations, Parking Spots (Garages), Plants and Treasure Hunts. The following image shows the ‘undiscovered’ symbols arranged in that order.
Again, no text entries along with a lot of duplicate and unfinished images imply this was scrapped early.
You can view the additional images (minus characters, because they will be handled in the next posts) here.
2. Abandoned Missions
This section will focus on mission strings that still exist in ‘oasisstrings’. For the sake of readability I removed the style code the game uses and the line numbers. You can easily find them by searching part of the text in the files or website listed in References. Please keep in mind that only the mission titles themselves are 100% like that in the files, any assumption as to what they might have been used for is purely speculative, but I attempt to always provide a reasonable explanation with evidence for the theories presented. Also I am not perfect, so it is possible I missed something in-game. In that case please do correct me!
2.1. Investigation Type objectives
There is a set of objectives listed that imply a different setup for Willis Huntley’s mission. It introduces the objectives PHOTOGRAPH, TAG, LISTEN and INTERROGATE:
PHOTOGRAPH potential property PHOTOGRAPH an animal slaughter TAG the target PHOTOGRAPH the target LISTEN to the conversation INTERROGATE the target PHOTOGRAPH cult signs and rituals: BRING the photos back to Willis
The release build mission has you tail someone and steal a VHS tape. None of the above objectives appear. It’s interesting to see that at one point there were mechanics in consideration that included intel gathering.
2.2. Quest centered around Melvin
The only Melvin I could find in relation to Far Cry 5 is Nadine Abercrombie’s grandfather. Melvin Abercrombie joined the cult. It isn’t assured that these objectives refer to him, but if they do it’d mean a potential mission where you speak to a lower ranked cultist.
Please Note that mission strings are not always in correct order.
TALK to Melvin LOOT Melvin's corpse REACH Melvin's house WAIT for Melvin to arrive GO MEET Melvin
2.3. The ‘Redeemer’ Objectives
At some point there was a quest-line revolving around something called the ‘Redeemer’ in Holland Valley. I could not find out what this thing really was supposed to be, but it sounds like it was either a boat or a submarine (???). In this line it appears that the garage in Fall’s End had actual relevance.
FIND a similar engine BRING engine to Mary's garage TALK to Mary's assistant TOW Redeemer Back the Garage (this typo is also in the file) SUBMERGE the Redeemer FLIP the Redeemer upside down GET IN the Tow Truck PUT the Redeemer on the Flat Bed
What this also implies is the inclusion of tow trucks and that there was a ‘Mary’s assistant’ character.
2.4. A few seperate Entries before we focus on plot relevant ones
In light of the afore mentioned wiki menues there is also an objective type that goes very well with its character section:
DISCOVER this character.
This could be attached to unknown entries in the character list.
There also is an unused objective called:
FIND the cow in the field
Which at first glance made me believe it was related to the mission at Cattle co., but it is not used there or anywhere else. I suppose we will never find out what was so special about this mysterious cow.
TAKE Joseph's writings
is also an interesting entry, as it is not related to the mission where you burn his book. This is again an unused string with unknown original purpose.
2.5. Mary May and John Seed
There are two particularly interesting unused mission objectives in relation to these two characters.
For one, it looks like originally we were supposed to rescue Mary May from John’s ranch:
RESCUE Mary May From John Seed's Ranch
This could either be a replacement for saving her in Fall’s End or it is a mission that appeared later on in which John possibly captured her. It gets more possible applications with the next one, though.
FIND John and Mary May's secrets
Now, this one caught my attention immediately, because there are two big things that come to mind in terms of possible application. It could refer back to the novel Absolution in which Mary May gets captured and tattooed by John, heavily implying that part of the plot that made it to the novel was originally intended to be shown in the game (we will get back to this in the character episode when talking about Holly).
Additionally, keeping the previous objective in mind, it could also imply that Mary has been converted during her capture (or her capture was planned) and played a different role in the story overall. Of course, all of this is only speculation as we will probably never know, but the objective specifically says ‘John AND Mary May’s secrets’, refering to shared secrets, not just one of Mary herself (which would fit more into the tattoo theory).
If you have ever even considered the possibility that Ubisoft might have cut a lot of stuff from the Whitetail region of the game, the rest of this Mission section should finally prove this to you. I’d like to make clear here that this is unbiased. I have tried to dig up deleted content equally in all regions but it just turns out that this is the one they really went wild with. There is nothing that stands out in terms of deleted or changed missions in the Henbane area and the Holland Valley content is mostly not that plot relevant minus the last examples just mentioned.
2.6. Eli and the Wolf’s Den
In the final version of the game we are told that Eli is an important character, but he is not very active in any way. Where Mary May assists you on the way to John’s Ranch and Tracey and the others at the prison fight by your side in defense missions, Eli will stay at the Wolf’s Den and have you run his errands for him. Just like the other mentioned characters he has full fight capabilities though. His AI is capable of using that bow, despite him never leaving the bunker.
As it turns out, he used to be a far more active character and there were multiple ways you could encounter him for the first time. For reference: In the game as it is now you will only meet him when he and his people rescue the deputy after Jacob’s first trial. You cannot enter the Wolf’s Den prior to this point.
Inside the game’s animations folders are these three subfolders including the respective files (JJ and Key03 is how Eli is often referred to in the files, I will get back to this in the character post):

This means there were three ways that you would encounter Eli: Inside a cabin, through being captured in a net or by being released by Perkins. This was most likely Doc Perkins, giving her a bit more significance in the game.
The main cutscene files for these are not present anymore, only the animations remain so I could not find out where the exact locations for these were supposed to be at. I however, loaded these animations into a game cutscene so we get to look at them anyway. I have chosen Jacob’s death cutscene for the simple reason that there’s only the player + 1 NPC, it is daytime and there’s no intrusive DOF blurring everything. The video below shows all of them.
Keep in mind that only the player animation matters in the first two! Ignore the rest. The third one features Doc Perkins and has her animation applied to her. As you can see it is very very unfinished, but it shows that she possibly unties the deputy or opens an animal cage, then drives away in a car.
youtube
This unused mission string supports the theory of these different ways further, as it implies that you met him somewhere and he would guide you to the den:
FOLLOW Eli into the Wolf's Den
There are several other objectives that suggest a more active Eli, who might have accompanied you on some missions:
WAIT for Eli to arrive GO with Eli GO inside the Wolf's Den
2.7. Jacob and the Veteran Center
Before swan diving down a very deep rabbit hole, let’s address this unused mission string first:
TALK to Deputy Pratt
Sounds very unspectacular and like something you would do at some point, but this is never an objective in the game. The intended function will forever remain unknown most likely, but possibilities are vast, especially with the upcoming abandoned objectives.
There are hints at an alternate useage of Jacob’s bunker (specifically called bunker here and not armory). Mission strings are:
FIND a way out of Jacob's Bunker LEAVE Jacob's Bunker
Again, on first sight you’d think these are just what’s there in-game. But they aren’t. During the final mission it goes from RESCUE Deputy Pratt straight to ESCAPE Jacob’s Armory. There is no indicator that you’d need to find a way out. The objectives above hint that it was similar to John’s and Faith’s bunker initially, where you had to do a few more things before escaping.
An observation derived from the game’s subtitle file is that at one point there might have been a differentiation between ‘Armory’ and ‘Bunker’ as, most likely, a random NPC says "I don't know where Jacob's bunker is. I'm not sure anybody does, but it's out there somewhere." The armory is (other than John’s and Faith’s bunkers) directly next to a main road, next to McKinley Dam. It is quite impossible to miss. Therefore this statement, along with the inconsistent switch between calling it ‘armory’, ‘bunker’ or ‘gate’, could mean there was originally a different bunker and the armory really functioned as such.
Before moving on to more mission strings, there is one more subtitle entry worth mentioning: "When you tried to arrest Joseph, Jacob got wind of it and things got real crazy here in the Whitetail Mountains." It heavily implies that at some point, Joseph’s family might not have been intended to be present during the opening, and they instead found out about the arrest afterwards. As far fetched as it sounds at first, it does check out with the inactivity and absence of the three heralds after you cuff Joseph (and in case you ever wondered what the three of them are doing while you guide Joseph outside, they de-spawn and are gone as soon as you turn around).
But enough about that and let’s get back to more missions we never got to see.
For instance there is:
GO TO the Veteran's Center
Which, as most of you know, is impossible during the game because you get repositioned everytime you attempt to go close. This string implies a different kind of mission at some point.
HUNT Jacob
No, this also does not appear in the game. The final mission goes from DESTROY Wolf Beacons to KILL Jacob Seed. Possibility in combination with the previous entry is that you were supposed to follow him back to the Veteran Center and that’s where the final fight would be. It could also imply a different kind of trial.
Small observation because we are talking about the final fight: The Prima Games’ guide (based on a pre-release build of the game, it will be featured more prominently in the next post) depicts Jacob at the bottom of the mountain during this encounter. WIth a lot of perseverance I’m sure you can somehow manage to replicate this in-game. But it is interesting regardless that they chose this image. It might imply that at some point he was not positioned on top of the hill, and instead closer to the area he finally dies in.

Before we move on, here are a few other interesting unused strings:
TRAIN TRAIN yourself INTERACT with Jacob for finishing takedown TALK to Jacob
They imply a different way to end the fight along with the possibility to talk to Jacob at some point (unrelated to each other mind you). I have no clue in what kind of scenario you were supposed to talk to him. The only explanation I have is that trials were possibly supposed to be different at some point and maybe they had more intentions to explore the whole brainwashed aspect of it to the point you casually took strolls around St Francis. Now before you say I just made that up, I implore you to wait till after the next part to call me out on it, because there are reasons I offer that possibility up for discussion here.
TRAIN and TRAIN yourself might not be linked to this region at all. But it is interesting to have these sort of objectives as they form the ‘Train, Hunt, Kill, Sacrifice’ part of the region’s theme, when you refer back to other mission strings: TRAIN (yourself), HUNT Jacob, KILL Jacob Seed.
Now to get to the main part. If you ever used mods on PC that let you access the Veteran Center, you will have noticed that the AI acts very strange. Your assigned GFH might wander around, aim at nothing or even attack civillians. Cultists inside the area will not always attack you, while civillians will do. This is most likely why the developers were so quick to patch out the tricks to access the region without mods.
I have seen multiple speculations circling around, but the one that always struck me as the most plausible one is that there was some kind of mission after Pratt rescues you from the cage. It is a very discontinuous cutscene, in which you transition from the cage directly to the top floor of the Veteran Center, implying there were no problems for Pratt and the Deputy to get there, despite having to cross the entire guarded frontyard and going through multiple building floors to get to the office. So, naturally I wasted some time of my life trying to dig up stuff that proves this theory right and I...well I did find something.
Important note so you understand what’s going on here: It is very common in games to load objects underneath the map (outside of sight of the player) to assure they are properly loaded in when they are needed. I have seen posts circulating around which depicted Pratt underneath the building, suggesting they eventually had an area planned there. The more likely case is that Pratt was loaded there for later use in a cutscene.
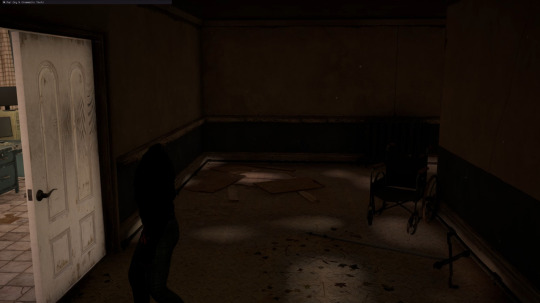
Why am I saying that? Well, this following screenshot was taken underneath the map during the cutscene where Pratt rescues the deputy and it transitions to the top of the building. I have changed the time to daytime for a bit better visibility.

What you see here is an entirely unused set of either cutscene or gameplay elements. A truck, Jacob (who’s absent in the cutscene we see), Pratt, a random NPC, a bag, a small table (unseen in cutscene), a single door (unseen in cutscene), a double door and 3 small pieces of paper (only two are in cutscene). I have kept watch on these assets for the entirety of the cutscene and none of them were moved into place. Meaning that all of these were here to be used in either a different cutscene or even a gameplay segment.
It brings me back to the mission theory, where there was a potential stealth segment between leaving the cage and entering the office. Maybe there was an alternate cutscene for the case where you’d be caught and the one we see in the game is the one after successfully sneaking up there? We will never know for certain again but it is one possible explanation as to why these assets even still exist. It would also check out with the TALK to Deputy Pratt mission string, as you maybe had to speak to him after reaching a certain area.
Here are also some additional screenshots of the room in front of the office:

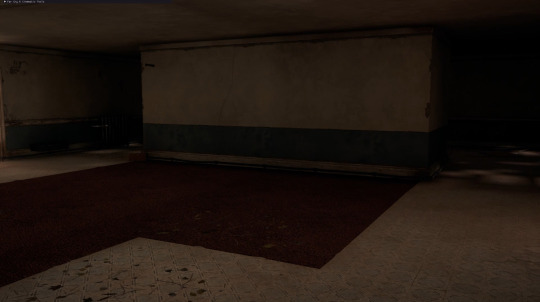
It was modelled and filled with a few detail props we never get to see much of.
Another potential mission, which would explain the broken AI behavior better, is the already mentioned theory that they might have planned to do more with the whole brainwashing aspect. Cultists inside the Vet Center area do not shoot and are allied, while civillians act hostile, implying while the player is there they are considered to be allied to cultists. TALK to Deputy Pratt, TALK to Jacob or TRAIN (yourself) could have taken place during this also. Something that could support this theory is also this unused timelapse marking days passing:
youtube
3. The Game’s Title and Closing Words
Internally the game is often called ‘fc zeta’, ‘zeta’ or ‘fcz’. So *sigh* of course I tried to find a deeper meaning behind it all and came to the sixth letter of the Greek alphabet ‘Zeta’. If you count Far Cry: Primal as a real standalone title, Far Cry 5 is the sixth Far Cry release. But because the Greek were special snowflakes or something, the sixth letter actually has the value of 7. So Zeta is actually 7 despite being the sixth. If you count Blood Dragon as a Far Cry release it’d mean FC5 is the 7th release. However, these theories exclude all the expansions and stuff for earlier Far Cry games.
Another indicator that Zeta might have been more than just a number, is this texture used as a decal on some clothing materials:

I have not found someone in-game who has this anywhere, and they might just disable the transparency and use it only for the American flag. But still, why would they make such a decal texture in the first place? Maybe very early name of the cult or resistance group?
Before closing this incredibly long essay, here is an old, unused version of the logo found in the files :)

Phew, we finally reached the end. If you made it all the way down here: CONGRATULATIONS you just read a long af essay! Again, i’d like to remind you that a lot of what you’ve read is pure speculation. I tried to prove my arguments as best as I could with evidence that I provided but only Ubisoft knows what really happened. And they are unlikely to tell us.
The next post will focus on the expansive character list and I may split it into parts because there is a lot to say and show about some characters.
I hope you have a nice day and thank you for reading ♥
_______________________________________________________
References:
text.farcry.info (website where you can look through Oasisstrings yourself!) languages\english\oasisstrings.oasis.bin languages\english\oasisstrings_subtitles.oasis.bin animations\narrative\cin_key03_q01_b00_meet_jj_cabin animations\narrative\cin_key03_q01_b00_meet_jj_net animations\narrative\cin_key03_q01_b00_meet_jj_release domino\user\fcz_proto_ld domino\user\zeta_dlcm ui\resources\textures\04_menu\tooltips ui\resources\textures\06_icons\inventory ui\resources\textures\05_hud\tutorials\_images __Unknown\XBT\AE800D066AB2E84A.xbt __Unknown\XBT\FD080AA2BBABE691.xbt Zeta on Wikipedia (english) Squad on Wikipedia (english) Prima Games guide (2018, collector’s edition, print and digital) reddit.com/r/farcry/comments/89nsf1/so_theres_3_missing_guns_for_hire_here_maybe_3/ __Unknown\BIK\C6AB10EDBC81E933.bik
#far cry 5#gameinfo#obligatory longessay tag#if you ever wondered how much of a nerd i am#look at these essays#and know that i enjoyed writing and capturing footage of every second of this
188 notes
·
View notes
Text
M4A To M4R
Ever wished to create an iPhone or Android ringtone from an current audio file, however wanted to complete the method totally from the command line? Are the ringtones multi functional folder? I preserve my ringtones on my laptop in a specific folder. Everything's in my "My Music" directory. In there, I've music, audio books, and ringtones. Since I manage my music manually, I haven't got to fret about anything once I back up, as a result of I've all the things organized in the same means on my external arduous-drive. This additionally saves space on my laptop computer's inside hard-drive, since iTunes's default bahavior is to repeat tracks to it's "iTunes Media" folder, thus making duplicates of all the pieces, which is not something I want. It can, of course, do that if something you're making an attempt so as to add is in the wma format or one thing, but I haven't got too many tracks in that format, so it is not an enormous deal. This video will show you how you can convert and MP3 file to make use of as an iPhone ringtone. M4A to M4R Converter supports prevalent operation methods. 3 Click on Convert to transform your M4A TO M4R file(s). Try this wonderful Faasoft AIFF to MP3 Converter to amplify or decrease the sound tremendously. Step four. Choose the AAC model of the file, proper click and m4a to m4r converter software select Present in Finder possibility that may take you to its location on Mac. This system title was changed from Pazera MP4 to MP3 to Pazera Free MP4 to MP3 Converter. M4R is a lossy compression file format identical to MP3 and M4A. This implies the audio in this file format is compressed with compromise in audio high quality and its dimension is quite smaller as compared to lossless compression format equivalent to wma. Click on Select button so as to add and import the video or audio file which you wish to convert and make to iPhone Ringtone. Right here we choose music with MP3 format to transform MP3 to M4R, MP3 to iPhone Ringtone. Free download M4R Converter from Emicsoft Studio to get pleasure from extra. double click file and it ought to pop up within the ringtones section. sync your iphone and it ought to work. I discovered that originally my iTune9 would not have the Ringtones Tab beneath the Library, sherrylcervantes9.uiwap.com at the prime left of the iTunes interface. Step four. Click the convert button to convert M4A to M4R at the finish. If you want to play a M4A file in a device that cannot support it, perhaps you'll be able to convert M4A to OGG firstly. M4B is a file extension for an MPEG-4 part 14 audio layer audio e book container file format used by iTunes. An M4B file is similar to an M4A file but specified for audio books. M4A is a file extension for an audio file encoded with superior audio coding (AAC) which is a lossy compression. M4A was usually meant as the successor to MP3, which had not been originally designed for audio solely but was layer III in an MPEG 1 or 2 video information. M4A stands for MPEG four Audio.
You can easily convert the whole mp3 file to m4r ringtone audio. This tutorial will present you the right way to convert mp3 to m4r. You can easily add m4r ringtones to iPhone with iRingg. It is a MacOS & Windows app that helps you flip any YouTube & SoundCloud song right into a ringtone & push it in your iPhone with iTunes. MP3 to M4R Converter could be very straightforward-to-use with out information of M4R, MP3, and different video and audio codecs. There's also a torrent website that may tell you abt the identical thing besides placing the m4a file on ur desktop after which convert it to m4r, b4 placing it back in itunes. Dont do this cuz you will wanna delete it once more from ur desktop and with the following sync of ur iphone you will loose the ringtone. go to ur itunes folder, normal on ur c drive music folder. M4A je formát pouze audio souborů, který má lepší kvalitu než populární formát MP3, a jehož velikost je také menší než MP3. M4R je druh soubor speciálního formátů používaný pro iPhone vyzvánění, které lze zakoupit na iTunes. Audio v M4A není cenné pouze pro zábavu, ale také vhodné pro použití jako vyzvánění, ačkoli formát je třeba převést. Když dostanete zvukový soubor M4A, musíte jej změnit na M4R, což je typický formát autorizovaný společností Apple. V tomto příspěvku Vám ukážu dvě řešení, jak převést M4A do M4R. If you wish to customize your new song ringtones to particular person contacts, simply open up each individual's contact page, select "Edit" in the prime-right corner, then choose "Ringtone" and select the one you want. You can also choose "Text Tone" for every contact to use for brand new texts or iMessages instead, www.audio-transcoder.com granted it is 30 seconds or shorter. Purpose Two: M4A is the only format acknowledged by iPhone ringtone. So in order to make ringtone to your iPhone, we have to transform M4A to M4R. Now that you've transformed your music to AAC format and renamed it with am4r file extension, it's able to load into iTunes the place it may be. Moreover, M4A to OGG Converter can work as audio editor that can assist you edit the M4A file before converting M4A to OGG. Crop video, improve video quality, rotate video, clip video, alter video impact, convert the video from 2D to 3D, add watermark to video, etc. in response to your needs.

1 note
·
View note
Text
‘til Midnight
chapter 6/7
ao3 | ch 1 | ch 2 | ch 3 | ch 4 | ch 5
twelve x rose, Into the Dalek coda
*
“Only half an hour? How can there only be half an hour left?”
Thirty-four minutes, thirty-three seconds, thirty two, thirty one...
The Doctor looks pointedly at Rose, his eyes flicking to her well-kissed lips and unkempt hair. “We did spend rather a lot of time in the music room.”
Her cheeks flush; he can nearly see the memories play across her face. She touches her hair and makes a face. “I don’t suppose you’ve got anything handy to fix my hair.” She glances around the console room and shakes her head, absentmindedly using her fingers to attempt to tame the worst of the flyaway bits. “Just what I need, to jump back to Torchwood looking like I’ve been thoroughly snogged.”
“You have been thoroughly snogged,” says the Doctor, bounding up the steps to look at the books on one of his many bookshelves. “And you weren’t complaining before.”
“Of course I wasn’t! But no one else needs to know that!” Rose crosses her arms and shoots an exasperated look at the Doctor.
“Ah, here it is,” he says, grabbing a book and taking the steps two at a time to stand in front of her again. “This’ll help,” he says, thrusting the book into her hands.
“The Hobbit?” She looks at the book, then at him, then at the book again.
“Just open it,” he says, the corners of his mouth quirking up in an almost smile.
Rose opens the book, looks inside, and laughs. “I don’t know why I’m surprised. This is...it’s exactly like you.”
The book isn’t a real book, or if it once was it isn’t anymore; it’s hollow, and inside Rose finds a hairbrush, a few hair ties, a headband, a dozen or so bobby pins, and a barrette in the shape of a butterfly. They shouldn’t fit inside the book, of course, but like everything else the Doctor makes it’s bigger on the inside. Pulling out the brush to tidy up her hair she gasps.
“But this is--”
“Yours. Yes.” The Doctor’s voice is soft. “It’s all yours. I…” His eyes dart about, searching for words, or answers, or possibly a place to hide. “I kept everything of yours, Rose. It’s all here.” A smile flits across his face.
There are things he can’t explain, like how there are times he hurts so much he takes everything of hers and asks the TARDIS to hide it away, and it stays hidden for years. Or how he took a silk scarf she wore once when they were traveling and had it made into a bowtie. How all her books are on his shelves, but he rarely reads them because he’s too afraid to damage them; instead he found duplicate copies of each and reads those over and over, reveling in the notion that she once read those words too.
He can’t quite place the look she’s giving him--awe? love? exasperation?--but there are too many questions behind her eyes. To change the subject, or possibly as an excuse to touch her again, he takes the brush from her hand. She barely notices. “May I?” he asks, eyes flicking toward her hair. She only stares.
“I’m just going to brush your hair then.” And he does, all gentle, like he’s trying to keep a frightened bird from stumbling out of its nest. When all the tangles are gone and her hair is smooth again he stands in front of her, takes the trick book from her grip. Holding her hands in his and catching her eyes the same way he says, “Please don’t ask me, Rose. I’m not going to tell you about your future.” He almost slips, almost says our.
Another bit of him breaks.
For a moment she looks like she’s going to argue, but she surprises him yet again. She presses a soft kiss to his lips then says, “I know. An’...an’ I really don’t want to know. I think.” She laughs, a short, bright little laugh. “I don’t want to mess anything up. If I change anything, maybe you wouldn’t be here today...right?”
He hopes his voice is reassuring when he says, “Just live, Rose. It will all work out.” For you, he adds in his head.
Stop it. This is not helping. You have to say goodbye in twenty-seven minutes. Stop being morose.
“I have something for you.” Changing the subject has become his go-to today. He pushes a series of buttons on the console, flips a switch, and a cd, already in a case, pops out of a slot just in front of Rose. “Take it,” he says. “I had the TARDIS make it for you.”
She holds it in her hands, a smile crossing her face. When she doesn’t say anything, the Doctor says awkwardly, “I just thought...well, you seemed to like it, so I thought you might like to listen to it again…”
There are tears in her eyes when she looks up at him. “It’s perfect. Rose and The Doctor, There and Back Again. That’s so...that’s just us. I can’t believe I’ll be able to listen to it again. You were recording the whole time? Doctor, I don’t even know how to thank you for--”
“You’ve got cd players over in that universe, don’t you?” he interrupts, brushing aside her thanks. They both know he’d do anything for her. I’m burning up a sun just to say goodbye. “I could put it on your phone, or...” He shrugs.
“We’ve got cd players, Doctor. Although vinyl is making a comeback, whoever would have expected that? Speaking of my phone, though…” She digs through the inner pocket of her blue leather jacket and pulls out something that looks almost, but not quite, like an iphone. Where the apple would normally be there’s a silhouette of a leaf. In response to his quizzical look she says, “Yeah, no Apple in the other universe. We have Maple instead. Weird, isn’t it.”
“A bit.”
She grins. “It’s a pretty good phone, though. Takes great pictures. Which is exactly what I want right now.” She tucks herself under his arm and gazes up at him, holding the phone at arm’s length to take a selfie. “Don’t look at the phone, look at me. I love the way you look at me.”
He has no problem with that. He doesn’t want to stop looking at her.
Ever.
She snaps a few pictures, then flips through them to see how they look. “Oh, this is the one.” Leaning up against him, her back to his chest, she shows him the picture. They’re looking at each other like nothing else exists.
“Yes,” he says. His voice is hoarse, almost cracking. Before handing the phone back he makes a few swipes on the screen. When his own phone chirps from his pocket he winks.
“How did you do that?” Rose asks, genuinely surprised. “Our phones are from separate realities. They shouldn’t even connect!”
“Time Lord. Big brain. Very clever.”
She rolls her eyes. “Right. May I have my phone back please, Doctor Clever? I want to save that photo in my ‘special people’ folder. There’s an auto-backup to my computer. As soon as I get back to the other universe, anyway.”
A look of pain passes over her face, but she pulls it in so quickly he doesn’t mention it. Instead he hands her phone back and says, “May I see your pictures, then? Any others of me?”
She turns her face up to him and kisses him on the tip of his nose. “You think pretty highly of yourself.”
“Quite right, too.”
“Doctor!” She tries to glare, but she’s overcome by giggles. “New body, new voice, new accent. Very much the same Doctor.”
“That’s the way it works,” he says. She’s looking at her phone and doesn’t notice his sad smile.
“Alright,” she says, handing the phone back. “Go ahead. You may recognize a few faces.”
It starts with a family picture: Jackie, Pete, Rose, and a tiny baby with a head of spiky blond hair. “Oh, look at Tony!” he says. Rose gives him an odd look. Oh. Right. “I mean, Oh look, Jackie had her baby,” he deadpans. She rolls her eyes.
There are familiar faces: Mickey, Jack, Sarah Jane. That surprises him a bit--not that Rose counts her as a friend, but that she actually has a picture--until he notices the background and the angle. “I never knew you got the TARDIS to take pictures for you.” Rose shrugs. “She usually tells me she’s not a photographer, and makes me argue for awhile. She always did like you best.” She ducks her head and turns away but not before he sees her smile, obviously pleased with the compliment.
He sees some people he doesn’t know, but recognizes in context: they are clearly from Torchwood in the other universe. He sees other faces from this universe, some of Rose’s childhood friends, maybe an aunt. And then…
The Doctor and Rose Tyler. As it should be.
The memories replay in his mind all the time, and he has many of these pictures in his own collection. But knowing she has them too, that they gaze upon the same…
Keep it together, Doctor.
Nineteen minutes, fifty-eight seconds, fifty-seven seconds, fifty-six seconds…
The two of them in the TARDIS, just after they’d left Cardiff and Charles Dickens behind. He’d made some excuse about needing to document the first time she’d dipped into the TARDIS’s wardrobe...but really he’d just wanted a picture of her in that dress.
The two of them dancing after they saved all the children--and everyone else--in 1940s London. Jack took that one. Even way back then they’d smiled at each other like no one else existed.
Him with a new suit--and a new face--in Jackie’s flat on Christmas.
The two of them arm in arm after the queen’s coronation, Rose all dressed in pink.
There are a whole series of snaps he doesn’t even remember her taking, all of him. Mostly of him grinning madly. Or making ridiculous faces. Or wearing those ridiculously unnecessary glasses.
She sidles up to him. “Ah,” she says. “I guess you can see how much I like the sexy specs.”
He makes a derisive noise. “You mean the ‘I am pretentious and will wear these glasses even though I don’t need them so I look even more so’ specs?”
“Very, very sexy,” she says, eyes fixed on the picture.
“I think they might be around here somewhere,” he says, taking a step toward the nearest corridor. The one step is all he’s allowed to take. Rose pulls him back and throws her arms around his neck, and in a breath both of them are lost in a long, drawn out kiss.
She looks up at him through her eyelashes. “You don’t need glasses to be sexy, Doctor,” she says, a bit breathless.
“Rose.”
It is an exhalation, a sob, a prayer. She is here, but he still wants what he cannot have.
A tear trickles down her cheek.
He pulls her close again, kissing the crown of her head. “I’m sorry. I don’t mean to make you cry.”
She allows herself a minute to sob into his chest. Just a minute, no more, then she wipes away her tears and pulls herself together. “Sorry,” she says, her voice quavering just the slightest bit. “I was just thinkin’ about--”
“I know,” he says, the words catching in his throat. “Me too.”
They look at each other, unblinking, unable to look at anything else. Finally the Doctor says, “Can I look at the rest of the pictures, then?”
There are a few more of him, mostly the long and stripey him, and then one that stops him short.
Rose and a blond woman.
Rose and a woman with chin-length blond hair facing each other, hands clasped between them, completely in their own little world.
“Oh. Um, that’s just,” Rose says, trying to get the phone back from him, sounding very nervous. “That’s just, uh--”
“That’s me,” says the Doctor, with complete confidence. “Or, it will be. Someday.”
Rose gapes at him. “How could you possibly know that?” she says, disbelief thick in her voice.
“See the way she’s looking at you? That’s how I look at you. It’s in every single one of these pictures. And look how you’re looking at her. If that’s not me, I’m very, very jealous right now. But I’m not, because I know I’m right.”
Rose smiles at him, but it’s the saddest smile he’s ever seen on her face. “And now you know, Doctor.”
His eyebrows draw down. “Know what?”
“In a few minutes we have to say goodbye, but you know now you’ll get to see me again someday. One more time.”
**
@doctorroseprompts
#lirael writes#doctorroseprompts#twelve x rose#'til midnight#dw fic#into the dalek coda#the twelfth doctor#rose tyler#i'm almost done!!!!#one (little) chapter to go
8 notes
·
View notes
Text
Rimworld
Eeesh.
Disabled Fluffy's mod manager and downloaded RimPy (and the database).
Switched a whole bunch of stuff around, because sure, why not, let's try Vanilla Expanded Psycasts, and VE UI. Which, naturally, meant a number of mods were pushed to inactive status.
Haven't launched the game yet (and yes, it'll mean a new game), because I'm otherwise occupied, but we'll see how this goes.
I mean, in some ways RimPy reminds me of MO2 sorta, vaguely.
I do like the option to redownload a mod if something updated...
ETA: So, yeah?
Like, Vanilla UI Expanded (I was using Tab Sorting to handle all my shuffling needs, because fuck if need multiple furniture tabs, and I prefer to split things up by tabs like Bedroom, Infirmary, Kitchen, and so on), and I'm...
Well, shit? I mean, okay, it works (mostly). Except some things I literally cannot see (like the ideogram) while editing the Architect menu (to shove it/them into the Ideology tab).
[Tab Sorting shows everything, just in a rather barebones and shitty display, which to be fair, isn't unusable, because I used it just fine since I got it. And again, it shows everything!]
Also, shit seems to be flipped in reverse order? Like, my vanilla door is now at the end of the list? Why? Why are you confusing me like this!?
[Thank goodness I have my quick menu for a number of often-used things.]
I really need to ditch Architect Icons (why did I subscribe and enable that!?) because they are bugging the hell out of me.
But still, like Tab Sorting, V-UI-E has the ability to add tabs on the fly, which is awesome.
Now I just need to see if all the shit I tossed into a "Ignore" tab (for all the stuff I just never want to see again) can be deleted and all that crap just floats off in the aether never to be seen, or if that fucks shit up.
[Tab Sorting had a "Hidden" option.]
Probably best if I make a copy of the config file for UI (because last time I fucked something up I had to exit the game, delete said config file, then launch again and start over)—
[I've made a backup, you betcha.]
—so that I can easily fix this if it goes very, very wrong.
As it was, the issue that caused me to exit, delete, and start over was (as far as I can tell) removing a very certain something (which already had a duplicate in another tab, so what the fuck?) which caused Map Reroll to die in a fire (and refuse to actually reroll the map), and for me to be completely unable to even go back into V-UI-E to try to fix the problem.
So.
Kudos to RimPy for allowing me to quickly check the mod ID# so I can open the config folder and quickly locate said config (for any of them), rather than fumbling around like an idiot.
ETA2: Oh, yeah. V-UI-E? What the hell? I suddenly have a ton of toggles down in the lower right. I don't need all those. Is there an option somewhere to turn a bunch of those off? Please?
1 note
·
View note
Photo

♡MAKING CC IN PHOTOSHOP♡
I finally decided to make a CC tutorial. However, after finishing the screenshots I realized why I have been avoiding this. It’s a VERY LONG tutorial and it’s definitely not the easiest! If you are trying to make CC, please do not get discouraged. Keep trying and practicing, none of my cc works out the first or even fifth time! (This tutorial does not talk about meshing!) Keep reading for the tutorial.

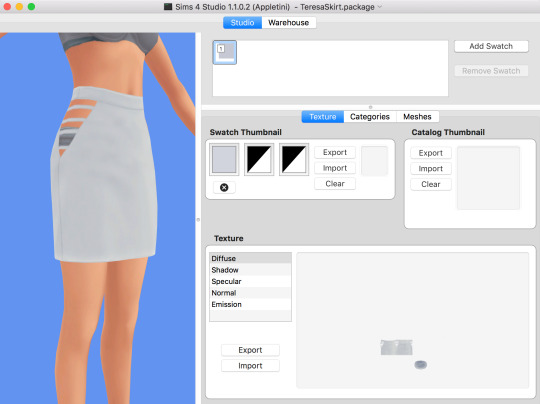
Step 1. Open up Sims4Studio and choose Create CAS standalone. Yours may look different if you are on PC (I use MAC).

Step 2. Choose a piece of clothing you would like to work with. I am choosing this skirt because I like the mesh and it’s white so it can be recolored easier. If the clothing is not white, try this photoshop tutorial to make it white.

Step 3. I named this TeresaSkirt inside a folder I created called Teresa and clicked save.
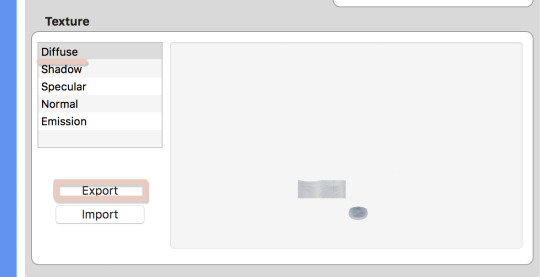
Step 4. Once the display opens, click on diffuse and choose export.

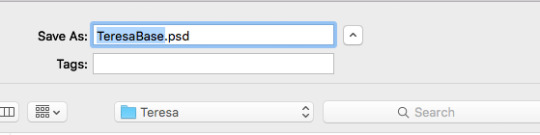
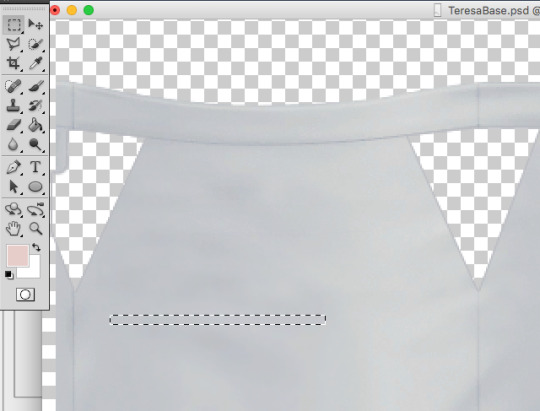
Step 5. I saved this as TeresaBase and clicked save. This is what will open in photoshop.

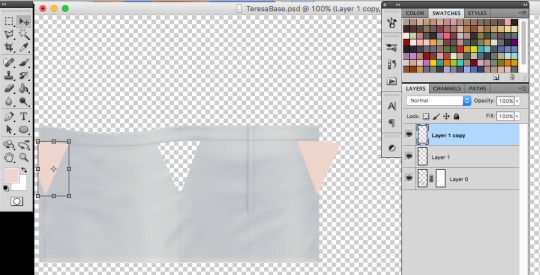
Step 6. Once I open this in photoshop, I am going to duplicate the layer so I can make the skirt high waisted.

Step 7. On the duplicated layer I am going to select the top half of the skirt with the rectangle selection tool.

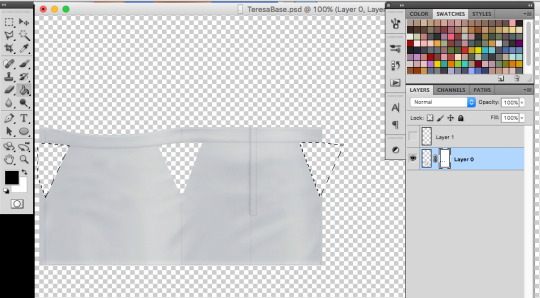
Step 8. Next I am going to take the move tool and move this selection up.
Step 9. Before I go any further, I am going to save this photoshop file, do this often while making your file to make sure you don’t lose any progress. I saved it as TeresaBase.psd.

Step 10. Now let’s save it so we can see how it looks in sims4studio. Normally I would save as a .dds file but I will save as a .png just to see how it looks. I always save as test.png, I use this same file to test throughout my cc making.

Step 11. Go back to S4Studio and click on Diffuse and then import. Choose the test.png file. This looks like the height I want. If it wasn’t I could go back and adjust as needed.

Step 12. Back in photoshop I would like to clean up the line between the bottom and top layer. So I click on the erase tool and choose a brush at the size 91px with a hardness of 0. I click on the top layer and erase just at the bottom of the layer so now they look blended together.

Step 13. Next I will go to Layer>>Merge Layers to merge both layers into one.

Step 14. Now to clean up some of the repeated shadows. Since I duplicated the skirt to make it higher, some of the shadows can look weird since they are exactly the same. So I am going to take the Clone Tool, with a brush size of 37 px and a hardness of 0. I also set the Opacity to 85%.
Basically the clone tool will duplicate anything you choose. On a Mac I hold down Option (ALT) and a little Target comes up. I click on the area I want to clone. That is now my source, I now click anywhere, not holding any buttons and I will start to paint over other areas. You may have to play with this tool a little bit to get the hang of it.

Step 15. You can see above the before and after. In the second screenshot the shadows are more varied.

Step 16. Next I am going to create a layer mask to cutout some of the skirt by clicking the “Add Layer Mask” icon.

Step 17. Then take the Polygon Lasso tool to select an area to cutout. I am cutting out part of the hip.

Step 18. Next take the Paint Bucket Tool and make sure the MASK is selected in the layers window. Anything black will be removed and anything white will remain, so I will fill in the selection with black. (Tip: If the mask is selected it will only let you use black or white) Now that selection is gone.

Step 19. Now we need to make sure we still have the selection so that we can duplicate for the other hip. Hold Command and click on the little mask thumbnail. This will select the mask. (It might still be selected from before)

Step 20. Now make a new layer by clicking the new layer icon from the bottom of the layers window. Choose any color and fill in the selection on this new layer using the paint bucket.
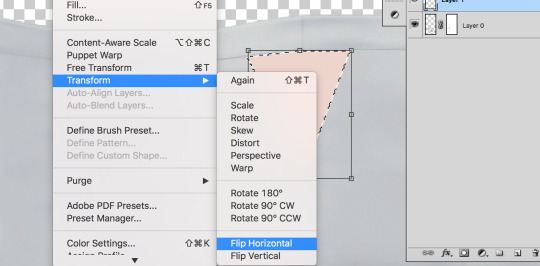
Step 21. Then go to Edit>Transform>Flip Horizontal. This will flip the shape we just made.
Step 22. Now I am going to duplicate the layer by right clicking the layer and choosing duplicate. I need to because half of the hip is on the far left and the other is on the far right. Now I am going to move each shape to where I want the skirt to be cutout using the Move Tool.

Step 23. I save really quick as test.png again to make sure the shapes met up where I wanted to, looks good! If I needed to adjust I could.
Step 24. This next part a little tricky. I want to add these new shapes to my mask. So first merge the two shape layers into one by clicking merge down on the top shape. Then I will select the shapes by holding Command and clicking the top layer thumbnail in the layers window. The shapes should be selected. I clicked on the little eyeball so I couldn’t see the pink anymore, just the selection. Then I will click on the MASK and fill in the selections I made just with black to cutout the skirt. Delete the top layer with the shapes.

Step 25. Now let’s add some darker edges to those cutouts. Command+click on the MASK thumbnail to select the mask. Then create a new layer, and go to Select>>Inverse. Fill in the selections with any color. I just chose grey.

Step 26. Set the fill to 0%, this will hide the layer but we are going to add a stroke. Go to “fx” at the bottom of the layers window and choose stroke.

Step 27. I chose a stroke of 1px, position is outside and I chose a medium grey. This will just create a little darker edge on those cutouts.
Step 28. Now I am going to add some stripes across the cutouts. Go back to the skirt layer and grab a long thin selection with the Rectangle Selection Tool.

Step 29. Copy and paste this selection onto a new layer and drag it to the bottom, under the skirt layer. Then I am going to go to Edit>>Transform>>Warp. I just chose Arch from the presets on the top bar. I set the bend to 12% so it wasn’t just straight across.

Step 30. I duplicated this layer 3 more times to make more stripes. I moved each one to where I thought it looked best using the move tool. I then held down SHIFT and selected all of the stripe layers and right clicked and chose Merge layers to merge all of the stripes together.
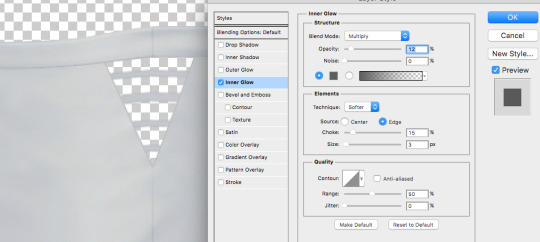
Step 31. I don’t want these to just be solid gray so I added a smaller inner glow. Double click the layer or click “fx” and choose Inner Glow. I set the Blend mode to Multiply, Opacity is at 12%, Choke is 15% and size is 3px. Adjust these until it looks good!
I then duplicated this layer twice (one for the left and one for the right) and added them to the other cutout sections as well. I had to save as test.png a couple of times to check and make sure the stripes lined up. I then went to layer>>merge visible.

Step 32. Once everything was merged, I deleted and sections I didn’t really need. Save this as teresabase.psd for recoloring later.

Step 33. To create a shadow we are going to add a white background by making a new layer, filling it with white and then moving it to the bottom.

Step 34. Now click on the skirt layer and click on “fx” and then choose color overlay. Change the color to white (#ffffff) so the whole skirt is white. Then also choose outer glow. I set the glow to Blend mode: normal, Opacity: 24%, Noise: 0%, the color is #333333, Spread: 5%, Size 4px. Click OK.

Step 35. Save this as a shadow.dds file, I downloaded a MAC .dds plugin from here. MAKE SURE YOU CHECK MIPMAP.
Step 36. Save all of your recolors as .dds files as well (make sure mipmap is checked)
Go back into S4Studio
-- I saved a white.dds file so I imported that into diffuse (this will be my white swatch) -- I uploaded my shadow.dds into Shadow. -- For specular, I just click on make blank. -- For normal use this .dds file to import into normal. -- Leave the Emission alone
Also if you want to import a thumbnail you can use this template: THUMBNAIL TEMPLATE. Make sure the thumbnail is on the first swatch.
You obviously might not have a screenshot yet for the thumbnail, but you can always go back into S4studio and add it later once you have tested the cc.

Step 37. Before you save, go into categories and uncheck Allow for Random.
Once you add all of your swatches you can save and test in game!
A lot of CC making is testing, redoing, trying something else, and failing and trying again so just keep at it!!
#my tutorials#photoshop tutorial#sims 4 tutorial#ts4 tutorial#longest tutorial ever#im sorry#cc tutorial#sims cc tutorial
815 notes
·
View notes
Text
Title Sequence
Now that I had my plan to make the title sequence, I started compiling the necessary assets to do so for After Effects before using the software.

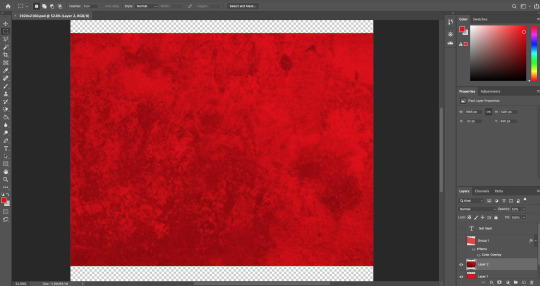
To achieve the screen wipe effect I wanted (at least with the manual method I was planning to do) I would need a shape that’s larger than the 1080p resolution of the screen. So I set up a Photoshop file at the resolution of 1920x2060 (double 1080, the height). I designed a suitable shape for this effect, colouring it red to go with the title sequence’s colour theme. I made sure that at the centre of a document, a 1920x1080 oblong would be completely covered in red. Said oblong is portrayed with white in the centre of the above screenshot.

Thus, I had a screen wipe asset, I tinkered with the exact shade of red for a bit, and I made an alternative version of the asset with a horizontal flip.
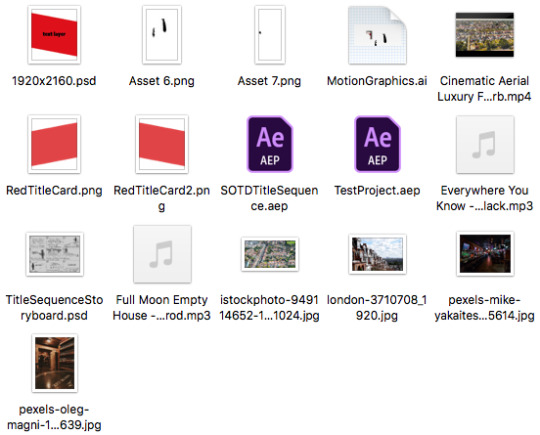
Once I had done so, I decided to move these and also the other collected music files, stock images, AEP files and storyboard into an assets folder for this specific part of the project.

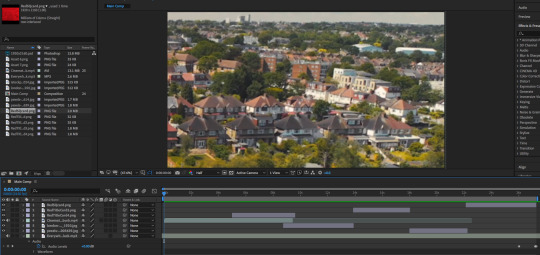
I imported the song file for the music that I had decided to use and I got ready to sync everything to it. I used the stock video I found to set up the new project.
After this I realised that the red screen wipes were far too pale and bland to represent the theme and target audience of this film, as it needed to be gore-y and bloody rather than smart and corporate. So, I found, made and added the above texture to the screen wipe assets and became much more happy with them.
I then got to work with placing all of the necessary background assets into the project file, noting when the key changes in music were so that I could time every background transition on-beat. The layers are visible, and as this was the first step, I just left them as crude hard-cuts.
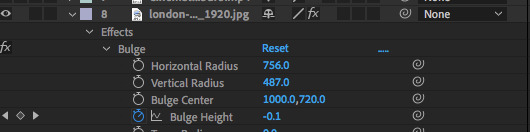
To make the London shot fit in with the moving imagery more, I had it slightly zoom and move right. This felt rather fake though, truly like a 2D image just being moved. So, to give slight illusion to this movement, I used a touch of the bulge tool automated to shrink the centre of the image slightly, making it appear further away. Additionally, I tinted the shot ever so slightly red, to make it blend in a bit better with the rest of the video, instead of appearing garishly contrasting.

After the shots were lined up, I later used automated transform tools on the sequence to make them move around and wipe in between each other with the assets made in Photoshop.
Following this, I felt it was time for me to add the text. I typed in the first film studio’s name and chose to use one of the altered impact fonts from an earlier part of this project and deemed it fitting. I trialled both black and white typefaces, but both seemed to be somewhat conflicting with the background, with white less so.


I decided to solve this by duplicating the text to give the white text a black backdrop, I shrunk the bottom text layer and positioned it slightly underneath to give it this illusion

Afterwards, I decided that making the backdrop a very dark red instead of black made it feel much livelier and in-theme with the rest of the video, as well as representing the type of film to its audience.

I did the same for the three film studios and had them switch between each other to introduce the film text.

After this, I copied over the text to do the same with the two lead actors of the film. I also dragged in the assets I’d made for this, and decided to use the same effect that I’d done for the text with them to make them pop out of the background. I also applied transform effects to keyframe the movement of them, making the silhouettes appear and then move out across the screen. I did this for both slides.


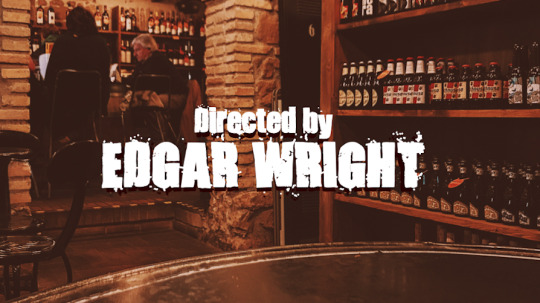
I duplicated the text effects for the director’s name, adding a small subtitle to say “directed by”. I was very happy with my decision to do this, with the contrast of the text on the background.
And finally, I played with alternating text size to make the final title card at the end of the film’s name. I even made it gradually become larger to emphasise it, and I allowed it to play out until the end.
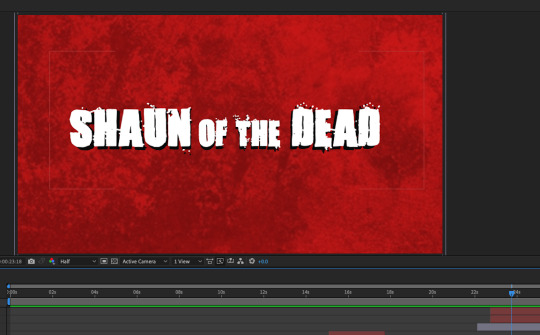
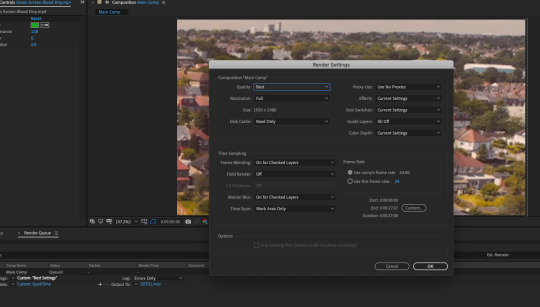
I was pleased with the result of this, only making small tweaks to it after the initial draft, so after this I exported it.
0 notes
Text
Destiny 2: Curse of the Butthurt Man-Children Review
Destiny 2 has been in trouble for awhile now and despite what the crying man-children on Reddit, Twitter, Facebook, the Bungie forums and the hack of journalists from Kotaku, Forbes (lol did I really include them?), IGN, and Polygon, I strongly believe Destiny 2 is getting better in some aspects and worse in others. I still believe this game have great potential in the future, but for Destiny 2 to be great, Bungie needs to be less reactive and beat the community to the punch, sort of speak. More on that a little later. Let’s get on to my blasphemous opinions.
The Story

The Curse of Osiris story reminds me of Call of Duty: Black Ops III’s story. Let me explain before you get triggered: The Call of Duty, in my opinion, always had a great story despite how you felt about the multiplayer and it’s community. When I played Black Ops III’s campaign, I couldn’t help but to be lost in the plot and be almost put to sleep. The plot was convoluted and had too much filler content that further added to my confusion. This is exactly how I felt playing Curse of Osiris’s story. Although people think the story was pretty fast, I beg to differ. It took me about 4 hours to complete, excluding getting distracted by Public Events and in real life stuff. Then again, I wasn’t speed-running. Maybe that’s why, but it was definitely longer than the Dark Below which a lot of people forget about. Bungie squandered a perfect opportunity to effectively use the Osiris lore.
At the same token, Bungie opened the door to expanding the Osiris lore (besides a webcomic) and revealing some Saint-14 lore. I would also love some Dredgen Yor lore at some point too. Time well tell how much more lore we’ll get and of whom.
Eververse
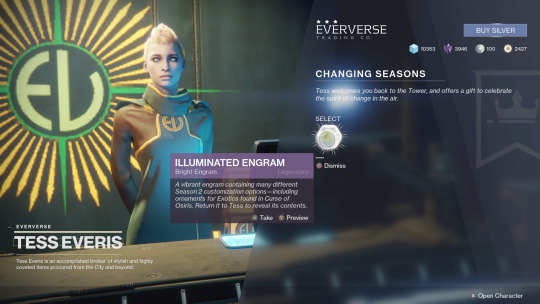
Dear Lord... I hate the fact that the loot pool is so large and RNG is still what you expect from a Destiny game. If I had to pick which is worse between Treasures of Ages and Illuminated Engrams, I wouldn’t answer because there is no lesser of the two evils. Although, at least I get the armor in Destiny 2 while I still haven’t get a single piece of AoT armor for any character on Destiny 1... on Xbox and PS4.
At the end of the day, her wares are still optional, cosmetic to a certain extent, and not game breaking. That’s all I truly ask for in microtransacions. You can make the argument that the Ghost Shells increase xp gains, points out nearby chests and all that jazz. Then, I’ll rebuttal by calling you a retard and ask a simple question: “How does differ from other Ghost Shells and how does it give you an unfair advantage in the Crucible?” Basically, the only people who still hates Eververse are unlucky like me, poor/cheap people and conspiracy theorists that think Bungie is intentionally making her stuff look better than the non-microtransaction gear. Stop being poor. Taste is subjective.
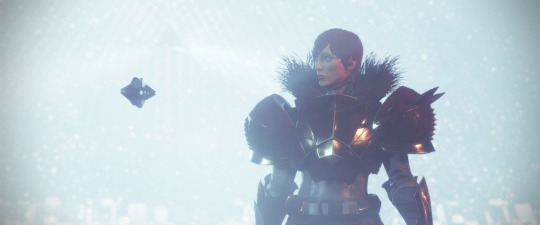
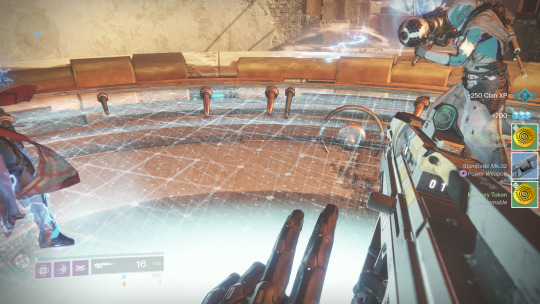
Mercury
It’s a very small area that I would’ve forgiven if you could freely explore the Infinite Forest, Past Mercury, and Dark Future Mercury. However, you can’t. You can only replay the story missions and adventures to go to those places. Not to mention there’s only one Lost Sector. There’s enough space for at least three. Mercury was over-hyped. The Infinite Forest was filler. More could’ve been done.
Despite that, the visuals are beautiful as always. Past Mercury gives you a sense of peace and serenity while Dark Future Mercury makes the atmosphere more grim and dire. Also, doing Flashpoints on Mercury doesn’t require to actually do a single Public Event. You just have to kill majors that are running around the map.
The Leviathan Raid Lair
I have not played it yet, but I heard great things about it. It’s a shame that Bungie advertised it as just a shorter version of the current raid with different bosses and mechanics because I had low expectations and now I think I might be in for a great time.
I’ll update more when I can finally play it.
#TwoTokensAndABlue: Public Events were Nerfed
So much with being rewarding. Less xp gains, lower probability getting exotics, and quite frankly more of a reason not drop everything to go do one.
The Current State of Crucible
Crucible is still like listening to music on Spotify without premium: You gotta play until you get the gametype you want or keep backing out until you get the match you want. There are also no signs of old Destiny 1 game modes returning and the current ones being separated.
At least, we get to tell future Kinderguardians that for a weekend, the Destiny Community was able to play a large game of laser tag and then there’s the return of Mayhem Clash. MC is the only thing making PvP worth play to me.
Armor Ornaments

I’mma just say it: Most of the ornaments makes the armor look ugly and/or are uninspired. Above all, I’m extremely disappointed with Future War Cult’s. All it does is change the color scheme to white and blue. That’s it.
I do like the fact that you can unlock ornaments account wide. For example, unlocking the Crucible Titan Mark ornament unlocks the Crucible Hunter Cloak and Warlock Bond even if you never played on the other characters.
“Heroic” Strikes
Oh boy... Where do I begin? I was very excited about this. A good percentage of my Destiny 1 playtime was shutting my brain off after a long day and running Heroic Strikes if I liked the modifiers. Destiny 2 said, “Why don’t I just take Vanguard Strikes, raise the power level and call it Heroic Strikes? That’s it!” Bungie did say that they will add modifiers, but two things: 1) Why didn’t you just wait? If it’s incomplete why release it now when you could do so later complete? 2) I hope the modifiers aren’t the Destiny 2 Nightfall modifiers. Please God no.
The Vault System is Still a Mess
Imagine every single file on your computer was on your desktop. No folders. Just right there in front of your face. On top of all that, you can only have 200 of those files on your computer before you have to start deleting stuff. That’s where we’re still at. Not to mention you can hold up to 50 different shaders on your person, yet Bungie decides to make more than 50 unique shaders. It gets better: Duplicate Dawning shaders will sort into separate stacks depending on where they were received from. Dawning shaders received through Eververse will fall into one stack, and shaders earned through activity rewards will be sorted into another. This is not a bug and was intentional. On top of all this: no increased vault space, shader kiosk, or mass deletion option.
Prestige Mode Locked by CoO-Paywall
It seems like the less you invest in Destiny 2 (monetary-wise and in playtime), the more your opinion matters somehow in comparison to actual dedicated fans of the game. The whole issue was that people who didn’t owe the DLC, can’t play the 330 version of the Nightfall & Leviathan Raid due to vanilla players not being able to reach the new level cap. Trials of the Nine was also blocked. Note: Normal Mode was bumped up for both the Nightfall and Raid so you can still reach 305 playing those. Trials ALWAYS required people to have the latest DLC and patches. Hell, Nightfalls got the same treatment in Destiny 1, and mind you, there was only one difficulty. The only people that were angry were the disgruntled Destiny 2 players who stopped playing a long time ago and/or already owns the DLC. Trust me, if you’re a hardcore fan of Destiny or remotely likes it, you would’ve made arrangements to get the DLC. Don’t come at me with that “I love the game, but have no money” bullshit. This was all a case of “What if my friend buys Destiny 2 and I can’t play with him/her?!” Um... tell them to buy the game used/on sale and the DLC? Maybe you could buy it for them so you can play with them? Gee, this is a difficult situation I’ve never been in.
Trust me, no one who hasn’t bought Destiny 2 at this point won’t buy it because of all of the ruckus this community is making. Due to Bungie getting cuck’d by a bunch of poor people who don’t even play their game anymore that complained about a theoretical situation, the first Faction Rally of Season 2 was postponed to I assume (I hope) at the beginning of 2018.
Quality of Life Updates Frequency
I remember a time Bungie was constantly adjusting things like the economy and user interface on top of tuning weapons and subclasses, squashing bugs and things of that nature. Destiny 2 received its first Quality of Life update in December on the day of this DLC’s release. Yeah, Bungie fixed stuff here and there between vanilla Destiny 2 and Curse of Osiris releases, but there was the over abundance of legendary shards some people had to deal with, shitty RNG not giving people what they want, etc. that was just improved. The difference between patches and QoL updates to me is one fix problems and the other improves on what was working fine but can be frustrating. There is less of the latter.
The State of the Destiny Community
Everything that I’ve stated thus far is forgivable. However, Destiny 2′s state of being the target of hit pieces of gaming media and butthurt “fan” backlash is 10% Bungie being reactive, 10% Bungie making dumbass decisions, 80% self-proclaimed fans having buyer’s remorse. Destiny 1 was considered an abomination of game around this time last year for whatever dumb reason people came up with. Destiny 1 was shitted on repeatedly. Now all of a sudden, people love and miss Destiny 1 so much. It was the community’s constant bitching that made Destiny 2 the way it is. Bungie had to find a way to not repeat Destiny 1, but guess what... people flipped flopped. Ask any Destiny fan how they felt about Destiny 1, I guarantee all will praise it, but half of them were singing a different tune last year. Destiny 2 and Curse of Osiris is the community’s fault. Bungie had some part in the blame, but: 1) Me and every other non-Bungie employee don’t know what’s going on behind closed doors at the studio in Redmond, WA. 2) If anything, blame the leadership at Bungie. Why are you getting mad some artist or sound engineer. They don’t program the game or have authority to do whatever they want to the final product if it’s outside of their department.
We are the point where people constantly complaining about bullshit like optional microtransactions and plays other games are considered “concerned fans.” Meanwhile, people like me who are objective, still actively plays the game despite it’s current state, and can compliment game when something is done right gets accused of being on Bungie’s payroll. The toxicity of this community reached heights I never thought possible and it makes me cringe to be an actual fan sometimes. Not to say I’m an angel, which I’m not, but at least I provide constructive criticism to Bungie and lash out at little Jimmy who claims to hate the game so much. I’m against people who insist upon passing on their misery onto other people who are actually enjoying the game. I’ve looked on GameStop’s app and Destiny 2 is worth between $12-18. I can recommend better games for that price. If you have Destiny 2 on disc and are that dissatisfied with it, I challenge you to sell it. If you have it digitally, I’m sure you can get a full refund somehow. I challenge you to get that refund. A reasonable adult, tries to get their money back and move on. If you don’t at least try, you’re full shit.
Bungie’s only unforgivable sin is giving birth to a community of entitled ingrates.
Final Verdict: 7.75/10
This could’ve been better and it could get better in 2018. However, out of the gate... it does not live up to the hype.
#destiny#destiny 2#destiny the game#destiny 2: curse of osiris#curse of osiris#review#bungie#activision#fanboy alert#mercury#eververse#leviathan#raid
6 notes
·
View notes
Text
Version 287
youtube
windows
zip
exe
os x
app
tar.gz
linux
tar.gz
source
tar.gz
I had a busy but great week.
Please note that I will be spending the next two weeks working on an important library update (I'll be trying to move from wxPython 3 to 4 for all platforms). There will be no release next week.
thumbnail DnD
The surprise Christmas present is the first prototype of thumbnail drag-and-drop! If you drag and drop some thumbnails to a page tab, the files will be moved to that page! If you drop them on a 'page of pages' tab, they'll go to the current media page beneath it, and if you drop on some empty tab area space, the thumbs will go into a new window. If you hold down control when you drop, the thumbs will copy instead of move.
I have been thinking about this for a long time. A lot of different little things went into its preparation, so bringing it together this week was a nice cap on it all. The thing in itself is a cool new tool that I expect to do more with in future.
This is a prototype. It has worked well in all my testing, but there may be unusual situations where some thumbnails get lost or do not render correctly or something. If this happens to you, please let me know the details. Something that did trip me up a couple of times is that if you drop thumbs onto a page that already has them, it may seem like they never landed, as the file count will not increase and they won't appear appended at the end--but really, they were merged into the ones already there.
I will add some options in a release soon to flip the control-to-copy behaviour and any other custom preferences we can think of for this.
new import presentation
All 'file import options' (and hence all import contexts) now have 'presentation' options. This first version has three choices:
show new files
show files already in inbox
show files already in archive
By unchecking one, the files that fit into that category will still be imported and everything, but they will not 'present' in the import context. For import pages, this means appending the thumbnail, and for subscriptions and import folders, this means appearing in the popup file button. So, if you uncheck all presentation options on a gallery download page, the queue will process but no thumbnails at all will appear!
Regular import and download pages default to presenting everything, just like before. Subscriptions and import folders only include 'new' files (i.e. ignoring all 'already in db' files in their popup button), which I think was the old behaviour, at least most of the time. In any case, if you would like to see all of the files of a sub or only see inbox files from a hard drive import, you can now do it simply.
This will also be useful for users running big (10k+ files) import pages. Adding new thumbs to already weighty pages is computationally expensive, and these big pages tend to make the gui pretty laggy. Now if you have a big import, you can scale back its thumbnail presentation however you like to keep things running smooth!
Please note that all existing import queues will be updated to the new system. Unfortunately, I could only choose one way for them to go, so I went safe and gave them all the 'quiet' subscription's 'only show new files' option. This means that any import pages or thread watchers you have in your gui sessions will only show thumbnails for new files unless you edit their file import options. This will only apply to queues you have open now--all new ones will go back to the old behaviour of showing everything by default. In any case, I apologise for the inconvenience. You will get a popup on update to remind you of this.
Like with the thumb drag and drop, I will add some preferences to set the defaults for these in a future release. Let me know what you think!
misc
Adding to the presentation options above, subscriptions will now fold all their queries' downloaded files into a single popup file button for the subscription. So if your subscription has five queries that each download 20 files, you will end up with one button with 100 files waiting for you. This should reduce some of the "Show 2 files" spam some people are seeing.
Also, popup file buttons now preserve file order! Your new sub buttons will present the combined query results in a neat order, least recently imported first.
For advanced users: The file import status button now lets you import and export all the 'sources' for that import cache to clipboard or png file from its right-click menu. If you want to share all of the urls in a subscription, for instance, this makes it easy. Give it a go, let me know how it works for you! Don't put urls in hard drive importers, or gelbooru urls in deviant art downloaders or anything!
full list
thumbnails can now be drag-and-dropped to other pages!
dragging and dropping thumbs to another page tab will remove them from the source and append them to the destination, maintaining file order!
DnDing thumbs to a 'page of pages' tab will put the files in the next lowest selected media page
DnDing thumbs to a blank notebook area (or a page of pages without a selected media page) will create a new page for the thumbs
holding down ctrl when you drop thumbnails will not remove them from the source
please forgive the thumbnail DnD cursor, which for now will be in the 'copy' state, despite the internal DnD being move by default
improved page tab drag and drop drop logic--dropping onto the page area itself will no longer send the page to the right-end of the current notebook
the 'file import options' object now supports three 'presentation' booleans--for new/already_in_inbox/already_in_archive files--so you can customise whether new thumbnails appear based on each state. page imports will by default show everything, while 'quieter' import queues like import folders and subscriptions will continue to just show only 'new' files in their files popup buttons. if you have a gui page with 10k+ items in its queue, try reducing the presentation to speed it up!
all existing import queues will be updated when they are next loaded--but please note that for simplicity and safety they will all initialise to the 'quiet' presentation method, so if you have ongoing download pages in any of your gui sessions (including thread watchers!), they will only add 'new' thumbnails unless you edit them. I apologise for the inconvenience
the regular hdd import now has a file import options button!
subscription query 'finished' file popups are now merged up to the subscription level--so, a sub with five queries that each get 20 new files in a run will now ultimately leave one popup with 100 files
file popups (as produced by subscriptions and a couple other places) now preserve their import order!
if a subscription with many queries runs out of bandwidth, it should now only give you one 'no more bandwidth to download files' message, rather than one for every outstanding query to sync
added a checkbox to turn on/off the new random subscription syncing to the options->downloading panel
the file import status button's menu now supports import/export of sources to clipboard/png! it _should_ also support unicode. be careful not to paste paths into a url cache, or urls from one gallery site to another, or you'll just get errors--this is prototype, so please keep like with like for now
the png import/export system now supports raw string payloads
the new listctrlpanel can now hang its buttons in multiple rows
the manage subscriptions panel now has an 'overwrite checker options' button to mass-set checker options
the manage subscriptions panel now has a 'select subs' button that selects subs based on a basic query text search
separating merged subscriptions now sets better new subscription names of 'old_sub_name: query_text'
saving a session from a page of pages with a custom name will no longer suggest a session name prepended by [USER]
doubled the subscription and downloader instance default bandwidth rules to 400 and 200 rqs/day
the 'load_images_with_pil' and 'disable_cv_for_gifs' options are now officially BUGFIX in the options--unless you know you need them on, turn them off!
added some safeguards to the new dialog-panel system's OK stuff, which sometimes catches a duplicate OK event
shuffled some db update status texts around
next week
Again, there will be no release next week while I work on the wx update. I will drop by the discord for a bit on Saturday, and if there is some big explosion in the next couple of days I'll push out a hotfix, but otherwise I will be a bit out of touch as I focus on the rewrite. I will post an update on Tuesday 26th on how it is going.
I will be back to the downloader stuff in the new year.
𝕸𝖊𝖗𝖗𝖞 𝕮𝖍𝖗𝖎𝖘𝖙𝖒𝖆𝖘!
3 notes
·
View notes
Text
I first encountered Drobo products eight or nine years ago, and was impressed enough to write a bit about them on this site, but some concerns cropped up, and after a couple years, they disappeared from my radar, and I mostly forgot about them.
But recently, Drobo has popped up again, under new ownership. I met with their reps at PhotoPlus last fall and spent some time checking out their impressive new product line. In addition to network attached storage, they have USB-attached drive arrays and blazing fast Thunderbolt-attached drive arrays… ostensibly fast enough to be used while editing video.
Are they any good? Are they going to leave you high and dry? Are there better options? Let’s see.[mfn]Drobo sent me this model for free to provide an honest review. I never accept goods in exchange for a positive review. Always take everything that you read on the internet with a grain of salt, though.[/mfn]
Ease of Use
There’s no shortage of Network Attached Storage (NAS) devices on the market, but for many people, they can be excessively complicated to set up, configure and use. The Drobo B810n is more expensive than some of the other options, but offers what few others can: simplicity along with a full list of features.
Device Setup
The hardware setup of the Drobo B810n is childishly easy. You slide a couple of hard-drives into the slots in the front (no screwdriver required!). You plug the power cord into the wall. You connect an ethernet cable from the Drobo to your network. That’s it.
To add more hard drives, you don’t even have to turn it off (ie, it’s hot-swap). You can just slide them right in to empty bays. The front panel is just held on with a ring of magnets.


Upon opening the Drobo Box, you’ll see “Drobo Quick Start Card” in large, friendly letters. Upon flipping the card over, you may be disappointed to discover that it doesn’t contain quick and simple instructions, it contains a web address to get more info. But fine: that gives them the opportunity to keep the instructions perfect and up to date for each individual model, right?

This was one of the first instruction slides that I encountered for the Drobo B810n. Note that the B810n does not connect to a computer directly, and does not connect to the network with Thunderbolt or USB.
So it did not inspire confidence when I followed the link to the guide and quickly encountered the instruction to connect the Drobo to my computer with a Thunderbolt or USB cable (next to a GIF of someone doing neither one of those things). Of course, I knew that this was a simple mistake copied over from a different product and attached the device with an ethernet cable, but I could easily understand a less technically minded person getting tripped up here; this is not a great start for a company for which customer service and ease-of-use are their raison d’être.
However, the rest of the instructions were quick and simple, and in a matter of moments the Drobo was all hooked up and turned-on and churning away at some invisible task.
I had started off by installing two 8TB hard drives, but quickly added two more to meet the capacity of the photo archive I wanted to backup, This was seamless; as I slid in each drive they were automatically recognized by the Drobo and put to to work.
Computer Setup
Once the Drobo is connected to your network, you’ll download the Drobo app (called the Drobo Dashboard) and install it on your computer. The software will automatically detect the Drobo on your network, and you click on a dashboard icon to initialize the device.
The only thing left to do is set up “shares” on the Drobo, which are essentially folders that can have separate permissions. I clicked on the “Mount” checkbox and mounted my default “Public” share to be the “P:” drive on my computer (but used E: on my Surface), and from there, the Drobo was available to me just as if it were a hard drive on my computer.
This process couldn’t have been much easier.
For Multiple Computers
I decided to get the Drobo B810n rather than the Thunderbolt version (which attaches directly to a single computer) because we work with multiple computers, and I wanted to be able to access the files on the Drobo from all of them.

Drobo Dashboard installed on my workstation and Surface Pro
To use it from multiple computers, all you have to do is install the Drobo app on each computer that’s on the network. Again, the Drobo will automatically be detected, and you’ll be able to mount the Drobo from the app as a drive on each machine.
This makes it easy to come home from a photo shoot or trip with my laptop or Surface, transfer my images directly to the Drobo, and then access them from my Workstation at my desk. Very handy and efficient.
Data Safety
Drobos are designed for data redundancy using BeyondRAID so that if any one of your drives fail, the data is still safe: you can add a replacement drive back into the Drobo and recover all of your data.
When two drives are in the Drobo, this simply means that one of the drives is a direct backup of the other (similar to RAID 1). When three or more drives are used, though, the Drobo distributes data across all of the drives, with redundancy (similar to RAID 5).
To keep things simple, this means that if you install two 8TB drives in the Drobo, you’ll get only 8TB of storage space, total, losing one of the whole drives for backup space. If you add three 8TB drives, though, you’ll get 16TB, and if you add four 8TB drives, you’ll get 24TB, etc. If your drives are different sizes, It will always be the largest drive that will be lost to data redundancy (so if you have 8, 6, 4, and 2TB drives, you’ll effectively get 12TB of storage space).
Furthermore, you can initialize “Dual Disc Redundancy” (similar to RAID 6), which will protect your computer against the unlikely event of two hard-drives failing at the same time, though at the loss of more storage space. With this option, you’ll lose your two largest drives to redundancy, but this is still a net gain over plain duplication if you’re using 5 or more hard drives in the Drobo.
More Data Details
Drive failure isn’t the only potential problem that can cause data loss. If the Drobo or its RAID controller fails, then things get tricky. Since the data is broken up into blocks and spread across multiple drives, if the Drobo crashes you can’t simply put one of those disks in another computer and read the data from it.
Recovery is possible now, though[mfn]It seems that this was not always the case. Since Drobo uses “BeyondRAID” rather than open RAID protocols, it used to be very difficult to recover data from a Drobo that had failed, and this was one of the reasons that I stopped recommending the Drobo several years ago.[/mfn]. With current firmware, you can simply pull your hard drives from your existing Drobo and put them in a second Drobo of the same model (or a newer one), and the data will all automatically be readable. If this contingency crops up, and you have DroboCare (free for two years, subscription after that), they’ll send you a “Migration Kit” that includes a second Drobo to help with this process.
Even if you don’t have DroboCare, there’s now recover software out there that will get the job done. USF Explorer, for example, will allow you to image each drive from your Drobo, mount them virtually in your computer (assuming you have the space), and then recover the data.
None of that is quick and easy, but that’s life when it comes to catastrophic hardware failure (though there’s no reason to think that it would be any more likely in a Drobo than any other NAS).
Still, I don’t expect the Drobo to be foolproof. It’s still ideal to have backups of your data in additional locations (preferably in another building or on the “cloud”, in case of fire). That said, the Drobo should protect your data from the most common data storage threats.
Failure Testing
One of the problems with testing a piece of equipment like the Drobo B810n is that it’s supposed to protect you from hard drive failure, but that only happens (unpredictably) after several years for most hard drives.
I was lucky. While I was searching through my computer graveyard for old drives to throw into this thing, I ran across a couple that had been labeled as “functional but failing”, and one of them, according to Crystal Disk, had over 50,000 hours of use on it. I slid it into an open slot on the Drobo and, after a few moments, got a green light. I transferred some extra data to the Drobo for good measure.
Everything seemed fine for about a day, but the next afternoon, I got a “drive failure” warning from the Drobo Dashboard, and the drive’s light on the Drobo turned red.


Excellent! This gave me the chance to see if any data had been lost, and how easy it would be to get back on track.
I pulled the bad drive from the Drobo, replaced it with one of a similar size, and waited. The B810n recognized it, and started the data recovery process. For about an hour, the whole Device was unavailable while the machine churned and chattered and lights blinked, and redundant data was copied over to the new drive. When it finished up and the Drobo came back online, and I checked out my files as thoroughly as I could. Everything was back to normal.
The entire process of data recovery when a drive failed was almost entirely automatic, quick, and painless, and in the end I didn’t lose anything. As a photographer, this is what I want: a device that lets me concentrate on my photography, not on computer hardware.
Photo Backup

Once your Drobo is up and running, it is essentially an always-on backup system in itself[mfn]This is not technically a backup; it’s just data redundancy, but it fulfills pretty much the same purpose. I still recommend saving your images to another location, if you can.[/mfn], so to have your photos backed up, all you have to do is store them on the Drobo.
I find that the easiest thing to do is to import my images to my workstation’s fast SSDs for initial editing, but I use Lightroom/ACR’s “Second Copy” feature on import to ALSO copy the images to the Drobo, and that’s all you really need to do.
If you don’t copy your files to the Drobo on import, you can also use backup software to copy them over to the Drobo. I’ve been using Retrospect 17 for this job, but there are other good options, too.
Extra Features
In addition to connecting to your home or office network, Drobo offers a few different apps so that you can access files from your phone or backup your phone images to the Drobo.
Additionally, there are dozens of apps that can run on the Drobo to do the sort of work that is normally done by a web-server: it can host a WordPress Website or Apache Webserver. You can run entertainment apps like Plex or Twonky to serve your music and movies to your network or the internet, or you can run “own Cloud” to use your Drobo as a giant cloud storage drive.

Two screenshots of the Plex interface, with the Plex server running on the Drobo B810n.
I installed Plex on my Drobo, and added a collection of photography-related movies from our definitive list, just to see how it would work. With the movies moved to the Drobo, the Plex server worked like a charm (no problems with transcoding), allowing me to access my movie collection from anywhere on the network, or anywhere in the world with an internet connection. Handy!
Data Transfer Speed
The Drobo B810n has dual Gigabit ethernet ports and can connect to your network with both of them at once, making its data throughput impressive. Of course, most computers only have a single wired Gigabit connection to a network, but wireless (in ideal conditions) can be faster (801.11 ac can be just shy of 7Gbps).
One Gigabit is equivalent to about 125MB/s, so that is the theoretical limit for a file transfer between a Drobo and my computer (with a 1Gbit network adapter). In practice, I get something closer to 65 – 90MB/s, depending on the size of the files.


This is plenty fast for archiving work or even for media lookup and playback, but it’s not ideal for a drive to work from directly, especially if you’re using large video files. For that, one of Drobo’s Direct Attached Storage (DAS) devices would be better; they can connect via Thunderbolt 3 (40Gbit = 5000MB) or USB-C (10Gbit), which will dramatically increase data transfer speeds[mfn]The hard drives will have read/write speeds that are much slower than that, with a theoretical maximum of 6Gbit, generally, but actual performance is slower. Drobos do support SSDs, though. PCIe 4 NVME drives can transfer at just under 5000MB/s (about 40Gbit).[/mfn].
Personally, I keep a couple of fast (PCIe 4) 1TB NVME drives in my workstation for workspace while I’m editing video and to store my images from the past few months. When I know I’m ready to archive them, I transfer them to the Drobo and other backup drives.
The Downside
I haven’t run into many “cons” to go along with all of the Drobo “pros”, but it hasn’t been entirely perfect, either. While the Drobo software is quite good, the overall experience sometimes can lack polish. I’ve already mentioned the mistakes I encountered in the setup instructions, and I’ve found similar little glitches when looking at the documentation on the Drobo site (though Drobo has quickly fixed some of them after my feedback). Furthermore, I’ve found that the Drobo does not report its drive space correctly to Windows:
#gallery-0-5 { margin: auto; } #gallery-0-5 .gallery-item { float: left; margin-top: 10px; text-align: center; width: 33%; } #gallery-0-5 img { border: 2px solid #cfcfcf; } #gallery-0-5 .gallery-caption { margin-left: 0; } /* see gallery_shortcode() in wp-includes/media.php */
After inquiring about this to Drobo’s tech support, I understand that this is normal behavior and allows the Drobo’s actual storage space to expand or contract within that working space without requiring Windows to make adjustments. I’ll trust Drobo that this is the best option, though I’m not sure what the drawback would be of having Windows adjust the volume size on the rare occasions that drives are added or subtracted.
None of these issues are consequential, but they’re the kind of thing that I’d like to see cleaned up; they do erode confidence.
I use an older Android phone (Android 7… yes, it’s time to upgrade) and found that while the Drobo Access and DroboPix apps installed on it just fine, they were unable to connect to the Drobo. I was able to get them to work with one of my newer Android devices, but compatibility seems to be a slight concern, here. It’s also worth mentioning that the Drobo Access app has a fairly poor rating on the Google Play store for what seems to be similar reasons.
Customer Service
Drobo’s devices are intended to be used by everyone, regardless of skill level, and consequently require solid customer service. I wanted to check it out, but didn’t really have any problems with the Drobo to get help with, and didn’t think I’d have much luck just making something up.
Eventually, I picked a selection of little issues that I had encountered and submitted three support tickets one Friday morning to see how they’d be handled: one was a Windows issue, one was a Drobo App update issue (app running on the Drobo), and one was an Android Drobo App issue.
Overall, I’d say that my customer service experience was fair to middling. I got one response on Saturday, and two more on Monday. One ticket was answered with a link to a tutorial that pretty much answered my question, and the others said either that nothing was wrong or that there was nothing that could be done. I didn’t expect a whole lot out of the issues that I raised, and I didn’t get a whole lot in return. We are all currently in the middle of a Coronavirus outbreak, though, and I’m going to cut them a little slack. I don’t know what their staffing situation is like right now.
Versus Alternatives
The Drobo B810n costs around $1300 at the moment. How does that compare to the alternatives?
The Synology DS1819+ 8 Bay NAS is probably the most well-known competitor, and currently costs [asa price]B07KMKDW42[/asa]. Where the Drobo has two ethernet ports, the Synology NAS has four (upgradable to a 10Gbit ethernet card, though 10Gbit networks are still uncommon).

The Drobo has 2GB of RAM, and the Synology has 4GB (upgradable to 32GB). Both devices have a quad-core processor, but the Drobo’s is a Marvell Armada XP MV78460 1.2 GHz CPU, and the Synology’s is a 2.1GHz CPU (about twice as fast).
Like the Drobo, the Synology is capable of a variety of different data redundancy configurations, including offsite backup to a second unit.
However, Synology is not known for their friendly and responsive customer service (to put it mildly). Setup and usage will require solid knowledge of home/office networking. Not a big deal for power-users, but perhaps a bit more daunting for the technically-challenged.
Standard RAID devices like this will require an extra hard drive (a hot-spare), that sits idle in case of drive failure to get similar functionality, which will bring the cost up. The Drobo does not require an extra drive for this purpose.
Conclusion
After using the Drobo B810n for a couple of months, I’ve been very happy with the unit’s performance; it’s very practical for use on a network in a small office (of photographers) or at home. The unit is well built and feature rich, and its simplicity of use doesn’t bog you down with technical concerns. If you run into problems with it, tech support seems to be adequate or better, and it will keep your data much safer than storage on any single hard drive.
Drobos are somewhat expensive, and if you’re technically minded, you’ll probably get equally good performance (or better) from other popular NAS brands, such as the Synology mentioned above, at lower cost. Whether the Drobo’s simplicity of use is worth the extra cost will have to be up to your own personal preference.
[letsreview]
The Return of the Drobo: Easy Photo Backup with the B810n I first encountered Drobo products eight or nine years ago, and was impressed enough to write a bit about them on this site, but some concerns cropped up, and after a couple years, they disappeared from my radar, and I mostly forgot about them.
0 notes
Text
Version 390
youtube
windows
zip
exe
macOS
app
linux
tar.gz
source
tar.gz
I had a good week. I spent most of my time cleaning code, but there are a couple of important bug fixes as well.
highlights
Several users have reported that potential duplicate pairs could sometimes come up again for files that had previous been set not related/false positive. This particularly hit users who had reset their potential dupes and re-searched. I had trouble reproducing this, but thanks to the latest user report I was and I traced down the problem. It should now be fixed. If you have been hit by this, please reset your potential duplicates (hit the 'cog' icon on the duplicates page), and then re-search--the bad pairs should not be re-added again.
Several tag autocomplete bugs are fixed today, all for unusual search types. Searching 'hyphenated-namespace:' now gives the correct 'anything' search. 'anything' namespace searches now work for namespaces that have asterisk wildcards. Autocompletes in manage tag dialogs ('write' a/cs) now match results with UPPERCASE inputs. Several more cpu-killer searches (usually some variant of 'get everything' through a clever wildcard) are now impossible to add.
Also, I have fixed the recently borked layout of the 'cancel search' button, which pops up when a page search takes more than three seconds, and fixed a couple of instances where a search page could get stuck in the 'Loading...' state until it was poked.
full list
fixed a bug that was causing potential duplicates to be sometimes re-added between media groups that were previously set as false positive/not related. I apologise for the inconvenience this bug has caused. if you were hit by this, please reset your potential duplicate pairs (hit the cog button on the dupes page) and re-search, and the bad pairs should not be re-added again
fixed an issue where tag autocomplete entry in the form 'namespace-blah:' was replacing the hyphen or other 'collapsable' character to space, which then was not searching correctly for the _anything_ namespace search
'namespace:anything' searches now work when the namespace itself has a wildcard
fixed 'write' autocompletes not matching inputs with UPPERCASE letters
fixed adding tags that start with a colon (e.g. ":D") in 'write' autocompletes
it should now impossible to enter some 'kill my cpu' queries into tag autocomplete, such as '[asterisk]:anything', even if accidentally entered through the fast-add system
the 'cancel search' stop button that appears after a search takes three seconds is back to being neatly embedded beside the tag autocomplete input box
hitting the cancel search button now clears the non-interactable 'Loading' thumbnail media page (with its misleading 'Loading...' statusbar) and returns you to an empty thumbnail page
loading a favourite search with non-immediate search no longer loads the 'loading...' page. it also saves that new non-immediate status to the page session more reliably
reworked my linux build environment (pyinstaller=3.5, virtualenv=16.1) so that you can launch the built exe using a symlink
rolling out a first version of a requirements.txt, any feedback would be appreciated
rolling out another version of the derpibooru file page parser that no longer duplicates namespaced tags as unnamespaced, thank you to the user who submitted this
.
boring stuff:
.
moving old pubsub system to Qt signals:
all the 'refresh query' calls that do changes to the current file search across the program
the current file and tag domain update calls for search pages
the clear/set file focus calls when launching and exiting the media viewer browser or archive/delete filter
the way thumbnails send the current focused media to the preview media window
the way widgets with shortcuts-based tooltips are notified to update those tooltips when shortcuts change
the way a thumbgrid sends the current tags to be displayed in the 'selection tags' list
the way a thumbgrid adds newly imported files' tags to the 'selection tags' list as they fade in
the way the 'searching/waiting' search button is flipped on and off by shortcut. btw what should be the correct name + label for this button? should it really be an icon?
.
cleanup:
NOTE: the 'include' folder is renamed this week to 'hydrus'. if you have source patches, please update. as I further disentagle code in future, hydrus will ultimately move to typical nested folder/module structure
decoupled the shortcuts edit ui code from the controller and db, unified how shortcuts are edited, and eliminated db wait when booting shortcuts editing
decoupled the shortcuts manager from the controller, cleaned all the code, and moved to a nicer reference with proper typing hints
refactored the frame and media controls of clientguicanvas into separate files
renamed the hoverframes file to canvashoverframes and updated its classnames to 'canvas' rather than the old 'fullscreen'
fixed two wx->Qt typo artifacts in the login script edit ui
reduced some occasional idle memory bloat of clients that have large subscriptions
cleaned up how media-based taglists are appended with new media
removed some old booru object update code
some misc setmedia/clearmedia cleanup
misc search code cleanup
misc typing hints to clear up pylint confusion
misc tag autocomplete code cleanup
misc 'global' variable cleanup
misc gui code refactoring, cleanup and typing
next week
Next week is a 'small jobs' week. I will catch up with little jobs, perhaps 'search by framerate' or adding select/remove for filetypes. I definitely want to add close/minimise to system tray, which keeps being put off.
0 notes
Text
Version 252
youtube
windows
zip
exe
os x
app
tar.gz
linux
tar.gz
source
tar.gz
I had a busy but great week. I fixed some things, moved some long-term jobs forward, and made an important improvement to the shortcut engine.
duplicate filter
Skip this if you aren't interested in testing the dupe filter in an unfinished and currently frustrating state!
I did not have time to add the content merge options, but I have added the batch processing workflow, which I am generally pretty pleased with. I have simplified last week's complicated shortcuts and set middle-click now to 'go back one', just like the archive/delete filter. If you are enthusiastic about testing this, please try the duplicate filter out again and let me know if it makes sense.
Unfortunately, while I was testing this more this afternoon, I discovered the neat new algorithm I have for presenting more useful pairs in order is running super slow on real world clients with tens of thousands of potential dupe pairs. It takes my client 1-20s to launch the dupe filter now, which is obviously something I need to fix for next week.
But if you are prepared to sit at 100% CPU for a little bit, please try the dupe filter for a little bit. If you like, you can report how many 'potential matches' you have and how long it took to launch.
I am confident I can get the merge and delete content options ready for next week, at which point this should be a functional prototype!
shortcuts overhaul ongoing
In doing some duplicate filter stuff, I first needed to do a bit more on the new shortcut engine I have been cooking up. This job started being simple and then spiralled out into a significant rewrite/update of the core shortcut processing systems across the program.
The upshot here is that I have converted the old shortcuts in the file->options dialog to a new and better engine and I have completely replaced 'custom filters' with a single button that just turns a media viewer's shortcut sets on and off dynamically.
The 'shortcuts' page of file->options is gone, and now there is a dedicated and centralised file->shortcuts. The old 'options' shortcuts have been split into multiple smaller 'reserved' sets that are only active in certain contexts. For instance, the 'media_viewer' shortcuts are active on any media viewer canvas, including the preview window. Sometimes multiple shortcut sets can be active at the same time.
The change was so significant that I have reset all these main shortcuts back to default. There are some new defaults, as well--ctrl+r now does 'remove_file_from_view'.
In the same manage shortcuts dialog you can create new 'custom shortcuts' sets that you can turn on and off using the new keyboard button icon on any media viewer's top hover window. These custom shortcuts support content 'commands', so you can make 'ctrl+t' mean 'give the file "tag later" on "local tags"' or '1' mean 'give the file "1/5" on rating service "my rating"'.
If you used the old 'custom filter' system, you should be familiar with this stuff. Your old custom filter sets are now 'custom shortcuts'. Since custom shortcuts sit on top of the existing shortcuts, you should go into your custom sets and clear out old and invalid 'regular' actions (like 'archive' and 'frame_back') that custom filters inherited from the old 'default' set.
There is more I want to do with this system. Not everything is working yet, but I expect to finish off this update step over the next few weeks. I would appreciate feedback. If you want to recreate your preferred 'reserved' shortcuts, you can, but I will likely be resetting the whole system again in the near future, so you may wish to wait.
arch linux gif crash
Users on the Arch Linux package (or who otherwise run from source) may have encountered a crash when viewing any gif. This was due to an imperfect opencv/ffmpeg release. The problem is now apparently fixed and a new version of opencv is out, so if you have had this, please update your libraries again!
full list
the duplicate filter now processes pairs in batches and hence supports 'back' actions to revisit decisions. you will be prompted every fifty or so pairs to commit and checkpoint your progress
the duplicate filter now presents related pairs together, rather than picking at random
fixed a bug in duplicate filter shortcuts initialisation
simplified duplicate filter default shortcuts (these will be overwritten on update) to only use simple left- and right-click for 'this is better' and 'alternates', since those are by far the most common actions. middle-click now goes back, like the archive/delete filter
converted old 'main shortcuts' system to the new shortcuts system, also splitting it up into 'media', 'main_gui', 'media_viewer', and 'media_viewer_browser' constituent parts that will be applied in different contexts
because the change is so significant, all clients will have their old 'options' shortcuts reset to the new default--I expect to expand shortcuts further in the next few weeks, so this default-overwriting will likely happen again, so you will likely wish to wait before recustomising your basic shortcuts
completely eliminated the old main shortcuts system--all references now bodge with the new system to varying neatness
as the old main shortcuts system no longer exists, the 'shortcuts' page on file->options is gone--all shortcuts are now managed through file->shortcuts, which is a completely revamped version of the custom filter shortcuts editing dialog
selecting shortcut commands is significantly simpler for the reserved shortcut sets
all media viewers with hover windows now have a 'keyboard' shortcuts icon button on their top hover window--it links to the manage shortcuts dialog as well as the current active custom shortcut sets and default custom shortcut sets
as the above system supercedes the old custom filter system, custom filters are completely removed from the program! your existing custom shortcut sets will survive, but you probably want to purge them of all the redundant junk they still have
all the media canvases use the new shortcuts system
the canvas frame uses the new shortcuts system
the thumbnails canvas uses the new shortcuts system
the main gui uses the new shortcuts system
some other misc places use the new shortcuts system
most simple shortcut command actions have been renamed to be more readable
some shortcut actions, like zoom stuff, is no longer hardcoded!
mouse shortcuts are still not widely supported!
the shortcut command edit dialog now throws a veto-driven error message if you try to ok on an invalid command (a blank services choice or action string, that sort of thing)
ctrl+r is now 'remove_files_from_view' by default. the old 'show_hide_splitters' is now ctrl+shift+r by default
the preview canvas, if focused, now responds to many normal media viewer shortcuts (content stuff like archive/manage tags, and canvas-specific like frame back/forth, zooming and panning)
the new shortcut system now interprets double-clicks of any mouse button to be a second single click
the new shortcut system correctly 'flips' ratings on and off, rather than always 'setting' to the chosen value. optional 'set only' support will come in the near future
more shortcuts will correctly and reliably propagate to canvases when any part of a hover frame has focus
fixed a conflict between the new shortcut system and taglists, which were no longer accepting otherwise interesting keys, like enter
created a shortcuts manager cache that deals with a bunch of the shortcut workflow centrally
completely eliminated the old accelerator table/menu command system for the main gui window
lots of misc shortcut-related work
fixed wildcard file search predicates that are on a specific file service and have no namespace (like 'mar*')
certain routines that can cause mass refreshing of the menubar (like import folders) will now not spam (and often queue this spam up and hang the gui) the menu so much. the menubar will now always collapse multple overlapping refresh calls to reduce cpu load
fixed a focus-None issue in the new hover window focus detection code
improved some more focus detection and comparison logic--quick rating-scrolling in the media viewer should be less janked
improved 'touch' drag event detection and improved media canvas cursor hide/show logic in general
fixed '&' display in notebook page names
fixed '&' display in some common dialogs' text
wrote a new statictext class that deals with '&' better and in future will autowrap and maybe some other stuff and then switched most of the simple instances of wx.statictext over
updated some out-of-date server help r.e. admin service initialisation
converted a little of the help on custom filter->custom shortcuts. I'll do more in future
wrote a simple checkboxlist dialog
misc cleanup
next week
I want to get the duplicate filter ready for proper use and wider testing.
0 notes