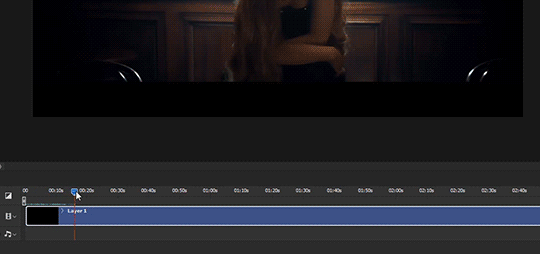
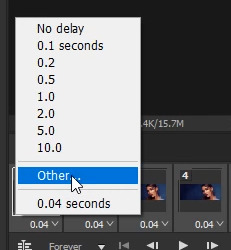
#so i try one more time with my preset!! instead of dragging the file
Text


my sims be getting a tan with the new preset but hey i fixed my preset problem 👍
#i wasnt a fan of it outdoors or in bright lights like in direct sunlight#and my sims looked orange lol#you can see it with robbie 😆#it just gave a yellowy tone which i REALLY COULDNT get use to#so i try one more time with my preset!! instead of dragging the file#i input all shader values for my preset from new preset base#and doing this i found the shaders causing it to keep crashing 😁#and thats it! i have it back!#ill stop rambling#rambles#gameplay update#catch up with everyone soon#postcard extra
40 notes
·
View notes
Text
Mellow
(Shapeshifter!au, but Ramon this time. He doesn't have trauma yet, he's just a sweetheart.)
He held his hand out for the notepad he was supposed to use to communicate with the islanders, and for a moment it looked like Cucurucho was going to give it to him and move on like they had with everyone else, but then they did a quick double-take.
They looked at him for a long moment in silence, and he could only shift awkwardly under their stare.
Despite how many federation workers he had met over his, admittedly rather short, life, he had never managed to get fully used to the way they looked. They were entirely featureless by design, it was one of the first things people give up when they come to work for the federation – their individuality. They weren’t people, they were workers, and their appearances reflected that. Their faces were blank white slates, their outfits were a painfully generic uniform, only a small ‘nametag’ (could it truly be called a nametag when they had no names?) to distinguish them from each other… it was unnatural.
Perhaps that was a little hypocritical to say, though, seeing as Ramon was… what he was.
At least he could shift and make himself look more normal, though. Which is what he had done. Now, he looked like any other kid. Slightly tan skin; a shock of slightly messy, dark brown hair; wide brown eyes; a handlebar mustache; a little bit of baby fat still sticking to his features to make sure he looked young.
You know, average kid things.
Cucurucho disagreed, apparently.
They slid a hand into their pocket and pulled out their communicator. Like everyone else who was either part of or created by the federation, Cucurucho couldn’t ‘speak’, not really. However, as a high-ranking worker, they had a slight exception in the form of a tiny speaker nestled in the bow tied around their neck. Now, they clicked on one of their preset voice lines:
“WHY?” said Cucurucho.
He reached for the notepad and marker and, after a few seconds, Cucurucho handed them over.
“what did i do”
Cucurucho looked at them blankly. Admittedly, they had no other options, but regardless. There was something particularly judgmental about this particular stare. Their shoulders heaved in a silent sigh and they shook their head to themself.
“I HOPE YOU ENJOY THE ISLAND.”
They moved as if to continue on. After all, the islanders would be finishing their orientation video soon and god knows they would need guidance…
He caught them by the hand.
Cucurucho stopped, their head turning to look at him once again.
“CURIOUS,” they said.
Hastily, before they could get impatient, he wrote down his question:
“do you think my parents will like me”
Cucurucho hesitated.
“YES,” they said, patting his head.
He smiled, his shoulders sagging in relief. If Cucurucho was confident enough to say ‘yes’ instead of ‘maybe’, his parents must be good people. He had been briefed on who they were, yes, given a couple of files that listed things such as their general personalities and histories, had been given pictures of them so he could mimic their appearances, but that was all theoretical. Cucurucho, though, had actually met and ‘talked to’ the islanders, and if they thought that his parents would like him, then surely they would know best, right?
He looked at Cucurucho for a few moments more, and then tugged on their hand, trying to drag them down. They glanced at their communicator, ensuring that the islanders were distracted – apparently, they were all messing with their new app, which allowed them to speak in their native languages and still be understood – so they had some free time. Regardless of this knowledge, they were still hesitant when they knelt in front of him.
After a few seconds’ thought, he picked up his marker again and lifted it towards their face.
They flinched back in surprise, almost falling over.
He huffed lightly. He waited for them to get over their surprise and come back, but they never did.
They didn’t have eyes to track, but from the slight, barely there movements of their head, he guessed that they were probably looking between the marker and himself, wary. He pouted.
“WHY.”
He pouted harder, making his eyes slightly wider just to make sure the puppy eyes could have their maximum effect. Maybe he should actually make them into literal puppy dog eyes?
No, Cucurucho didn’t seem the type to like dogs.
They probably liked cats. Or maybe something weirder, like birds.
They sighed again, snapping him out of his thoughts. Hesitantly, they leaned forward, toward the marker. They must have realized they could wash it off, anyway, so they might as well let him have his fun. He beamed and quickly scrawled a smiley face onto Cucurucho’s head to match his own bright expression.
“now youre less scary”
Cucurucho lifted a hand to touch their face, and maybe it was just the poorly-drawn smile that had been added there, but he thought they looked kind of happy. Touched, even.
They ruffled his hair.
“YES.”
“I HOPE YOU ENJOY THE ISLAND.”
Ramon hoped so, too.
#qsmp#qsmp fanfiction#qsmp ramon#qsmp ramón#qsmp cucurucho#done crossposting now#soz about being dramatic kings
11 notes
·
View notes
Photo
Welcome to soonhoonsol’s gif tutorial!
As a nice anon asked me how I make my gifs, I thought it’d be cool to create an in-depth tutorial :) Perhaps this can help some others enter the gif-ing world too!
What we’ll be using for this tutorial:
Software: Bandicam, Avisynth, Photoshop CC 2018, Topaz Labs
File Format: .mp4
Operating System: Windows
Disclaimer: This is just my method. Every gif maker works differently and has different preferences. What works for me may not work for you, and that’s completely okay!
Let’s get into it!
1. Find the best quality video you can find
This really depends on the content you want to gif. For variety shows, music videos or photoshoots, any video of [1080p] should be sufficient. Try not to use anything below 720p.
For stage performances, fancams tend to have higher resolutions [1440p, 4k]. Use these if your computer can handle it. If not, usually 1080p works fine. The best option would be to download .ts files, which provide clearer and less grainy videos.
For Seventeen, you can get .ts files from The Rosebay on Twitter :)
2. Screen recording
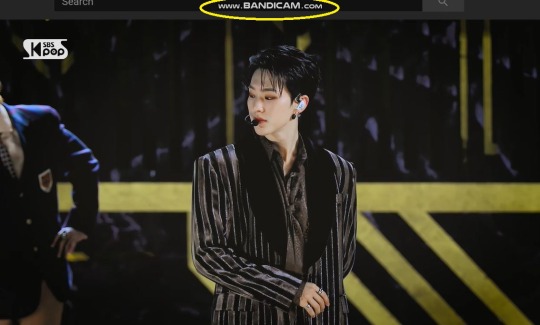
As a Windows user, I don’t have a built-in screen recorder on my laptop. So, I use Bandicam, which is a free screen recording software. The only con to it is that it has a watermark.
To combat the watermark, I always have the boundary box a little bigger than the video itself so that I can crop it out of the gif.
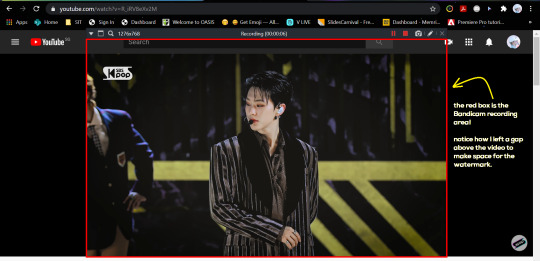
This is what the recording would look like:
Just record the scene(s) that you want to gif so your video file doesn’t end up too large! Your recording should be in .mp4 format.
(You may use pure .ts files in Avisynth but it never worked well for me so I usually screen record the .ts video and move on)
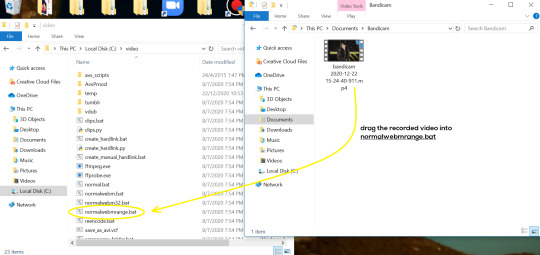
You can find your recorded videos in Documents > Bandicam.
3. Avisynth
I followed THIS tutorial to download Avisynth. This software is really helpful if you want sharp and clear gifs! I recommend to follow the steps in the tutorial as the below method stems from it.
- Once you have downloaded it, open up your recorded video from Step 2 and watch it. Take note of the duration you want to gif. (e.g. from 00:01 to 00:05)
- Drag your video file into normalwebrange.bat. On Windows, you can find this in File Explorer > Local Disk (C:) > video. For other .bat files, you may check out THIS tutorial.
- In the pop-up box, key in the start time for your gif (e.g. 00:00:01). It has to be in hh:mm:ss format. Press “enter”.
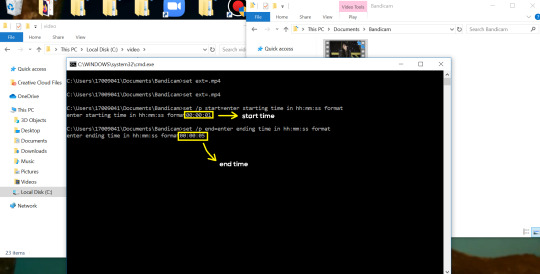
- Key in the end timing and press “enter” again. A resizer should pop up in an Internet Browser. I found that Firefox works best for me.
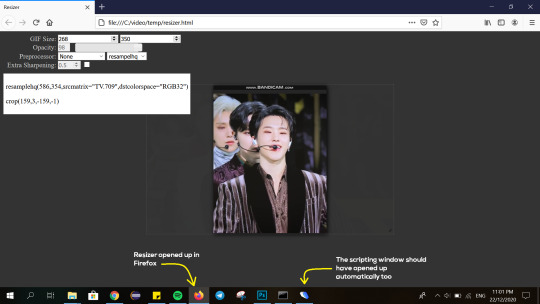
- In the resizer, you may indicate the size of the gif you’d like to make. You can also click and drag the video to resize and frame it to your liking. You may refer to THIS post for Tumblr dashboard sizing.
(These are some common gif sizes for stage performances):
1 gif - 540px by 540px (square)
2 gifs - 268px by 350px
3 gifs - 177/178px by 250px
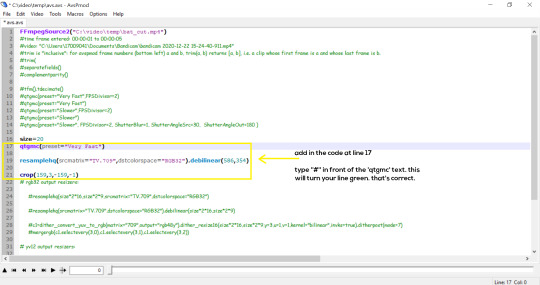
- Under “Preprocessor”, select “debilinear” for the second box. For the first box, you may pick between qtgmc 30 (same frame rate as video) or qtgmc 60 (doubles the frame rate; smoother).
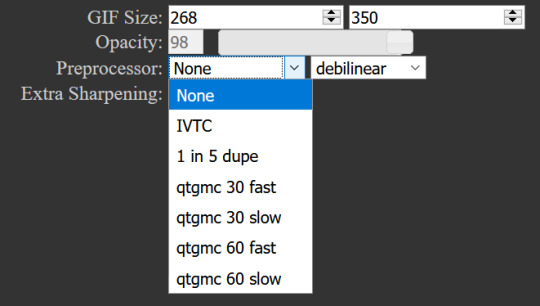
- You will also see “fast” or “slow” options. These are just how long the video will take to render. “Fast” will give you slightly lower quality as compared to “slow”, but usually is good enough.
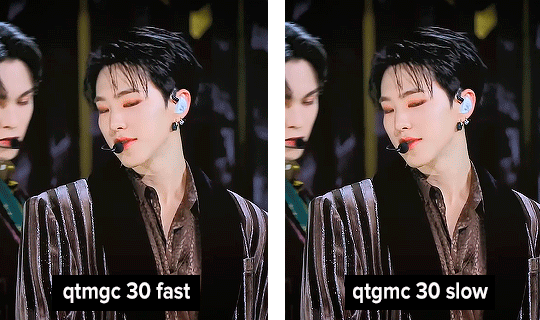
(You can see that his features are sharper and more defined in the “slow” gif as compared to the “fast” one.)
- Copy the code in the white box. Navigate to the scripting window (it should have popped up with the resizer) and paste the code at line 17. Type a “#” before qtgmc on the same line. This will prevent the software from lagging.
- Click on the inverted triangle at the bottom of the screen. Your video will now appear in the scripting window. Drag the slider to the intended starting point of your gif and press the “home” key on your keyboard.
- Drag the slider again to the intended ending point of your gif and press the “end” key on your keyboard. This blue area you see is the duration of your gif.
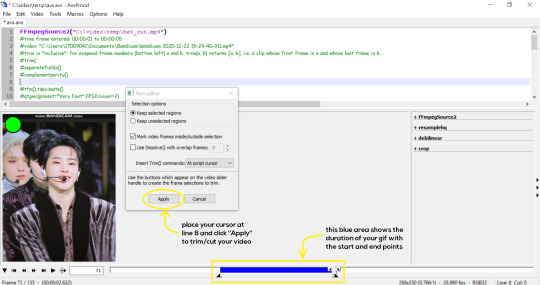
- On an empty line (I usually go to line 8), place your cursor there and click “Apply” in the mini pop-up window. Afterwards, remove the “#” from line 17.
- Go to File > Save or press Ctrl + S to save the code. Close the scripting window. The video renderer will pop up. When it’s done, it will automatically close by itself.
4. Using Photoshop and Topaz
I’m using my school license for Photoshop 2018, but if you don’t have that, there are plenty of cracked versions for free. I don’t have any to recommend though so I’m sorry about that :(
I followed THIS video tutorial to download Topaz plug-ins for free. I use Topaz DeNoise (the most helpful) and Clean, but you may use others if you’d like :)
Alright, let’s dive in to the steps!
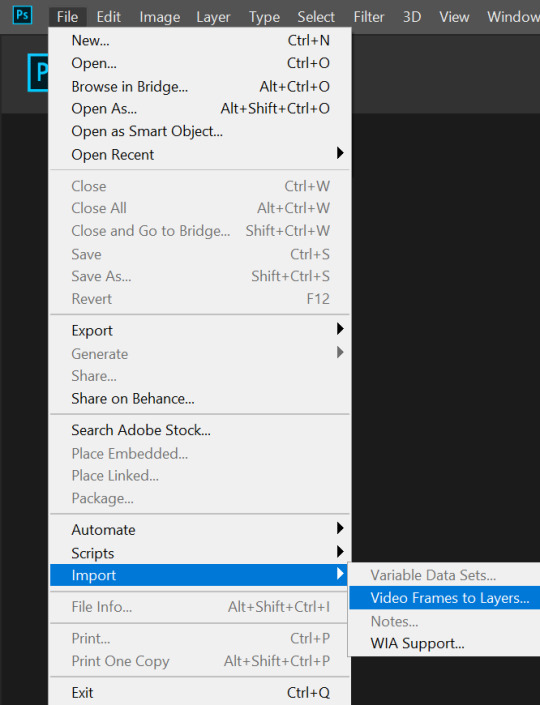
- Open up Photoshop and go to File > Import > Video Frames to Layers.
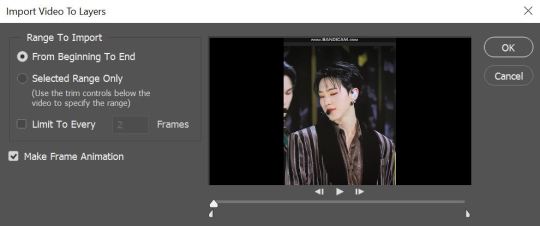
- A pop-up will appear. You can find your deinterlaced Avisynth video in File Explorer > Local Disk (C:) > video > temp > video.avi. Follow the settings in the picture and click “OK”.
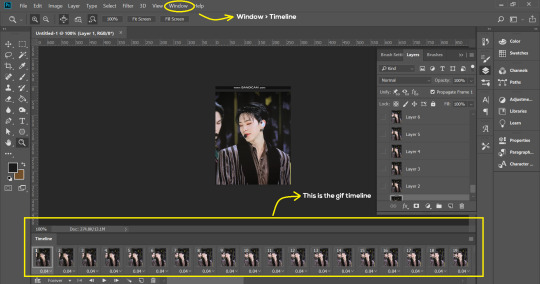
- Go to Window > Timeline to open up the timeline. You should be able to see your gif spread out in frames. If you press the play button, it should play like a video.
- (Quick optional step I learned from THIS tutorial) Go to Image > Canvas and set the Resample option to “Bicubic (smooth gradients)”.)
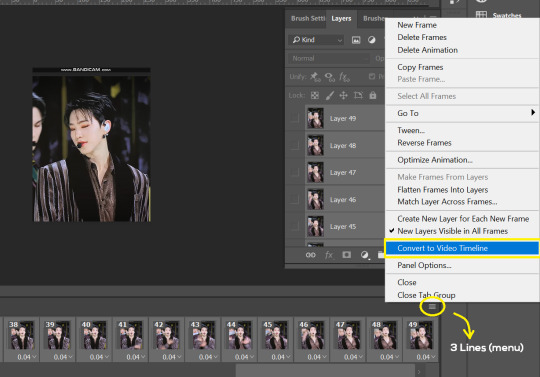
- Select the first frame of your gif in the timeline. Shift select the last frame. Go to Window > Layers. Shift select these layers as well.
- With everything selected, click the 3 lines at the top right corner of the timeline. Select “Convert to Video Timeline”.
- At the top of the screen, select Filter > Convert for Smart Filters. Your layers will condense into one layer. Don’t worry, your gif is fine.
- Now it’s time to sharpen the gifs. Go to Filter > Sharpen > Smart Sharpen. Play around with the settings to your liking!
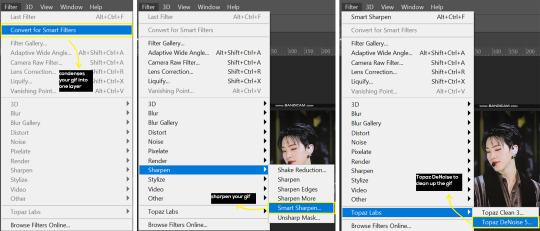
- If you’ve downloaded Topaz correctly, it should appear under Filter > Topaz Labs. If a pop-up asks you for an activation key, you may use THESE to activate it for free.
- Go to Filter > Topaz Labs > DeNoise and/or Clean and play with the settings until you’re satisfied.
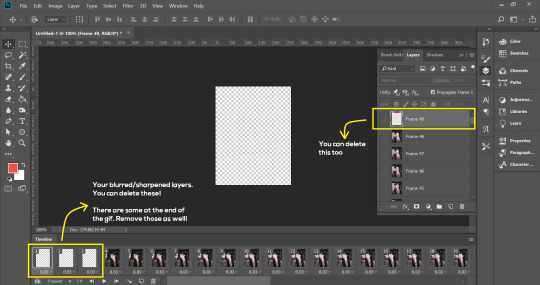
5. Blurring
If your gifs have captions/logos that are distracting, you’d want to blur them out. Don’t be like 2018 me that blurred out the logo frame by frame; it’s very tiring. Instead, using this method from @scoupsy‘s tutorial, you’ll save lots of time.
- In the Layers tab (Windows > Layers), select the “New Layer” icon. It should be blank.
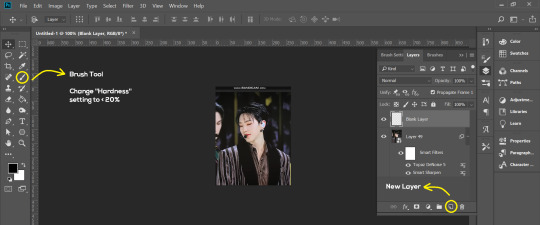
- Select the Brush tool. Make sure the “Hardness” setting is below 20%. This will blend the blurring nicely into the gif.
(For the sake of this tutorial, I will be blurring out the Bandicam logo to show you.)
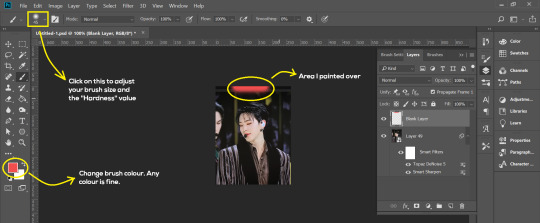
- Paint over the captions/logos. Make sure this is on the blank layer!
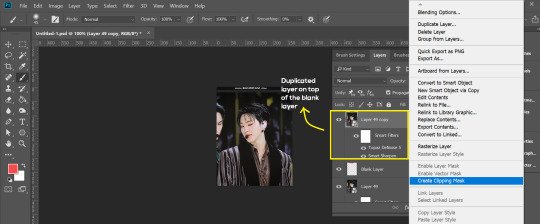
- Duplicate (Right Click > Duplicate) the gif layer and drag it so that it’s on top of the blank layer.
- Right click on the duplicate layer and select “Create Clipping Mask”.
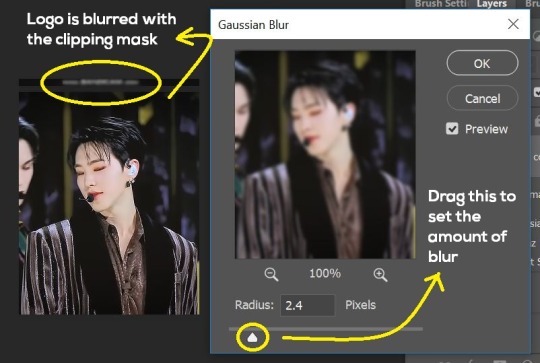
- Go to Filter > Blur > Gaussian Blur and play around with the settings until you’re satisfied with the level of blurring. Click “OK”.
6. Flattening & Colouring
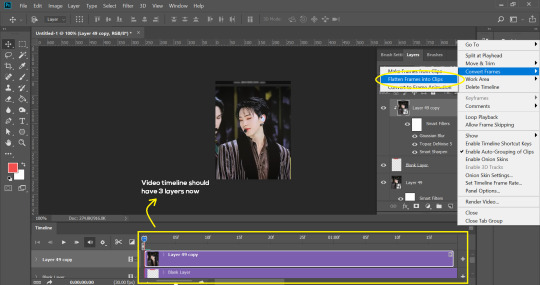
- Once you’re done with sharpening and/or blurring, click on the 3 lines on at the right corner of the video timeline and go to Convert Frames > Flatten Frames Into Clips.
- Topaz layers and blurring will take some time to render so you can just chill for now~
- When it’s done rendering, click again on the 3 lines and go to Convert Frames > Make Frames From Clips.
- Convert it back to the gif timeline by clicking on the 3-box icon at the bottom left of the timeline.
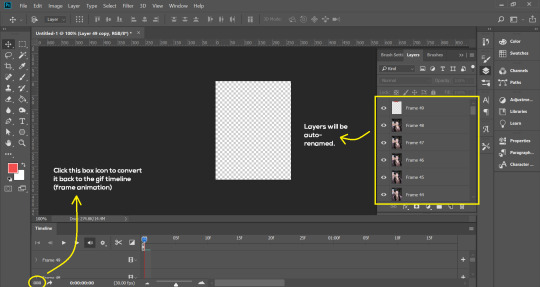
- Select the first frame of your gif. It must be the FIRST.
- Scroll to the top of the layers and select the layer at the top. Any other layers you add should be on top of this layer. VERY IMPORTANT!!
- In the Adjustments Tab (Window > Adjustments), there are many different things to play with. There’s a high chance you won’t use everything, but here’s a few of my favourites.
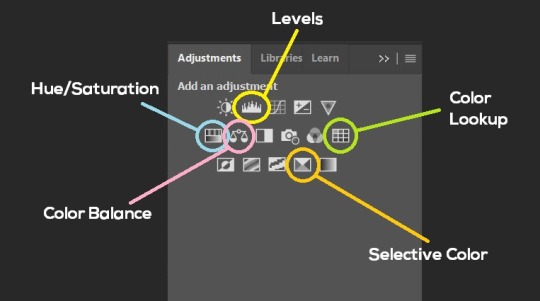
Levels - Adjust the brightness and contrast of your gif in depth.
Hue/Saturation - Useful for changing colours, or switching it to black and white.
Color Balance - Tweak the colours to your liking.
Colour Lookup - Comes with built-in LUTs that you can use as a preset. Great starting point for colouring. Saves time too. You can even download plug-ins for this. 11/10 tool.
Selective Colour - Adjust the vibrancy of specific colours.
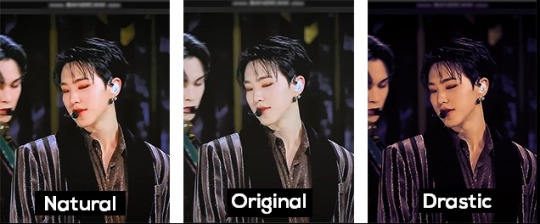
- Colouring is completely up to the gifmaker. Go crazy go stupid :D
7. Exporting
We’re almost to the end!
- Set the timing for your gif.
If you used qtgmc30, the best timing would be 0.04s / 0.05s / 0.06s.
If you used qtgmc60, the best timing would be 0.02s / 0.03s / 0.04s.
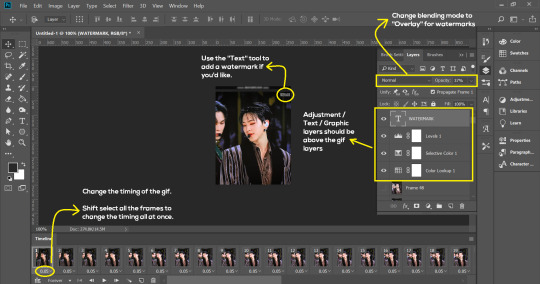
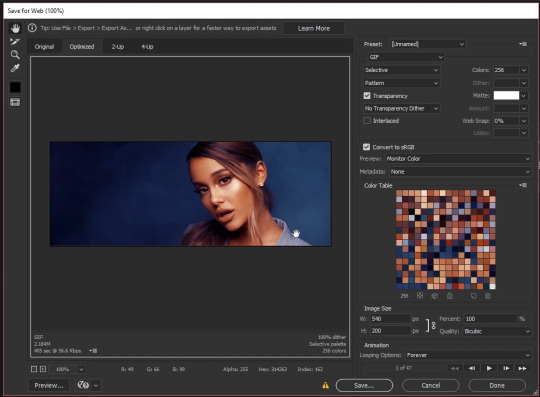
- Once you’re satisfied with everything, go to File > Export > Save for Web (Legacy).
- Follow the settings in the picture below:
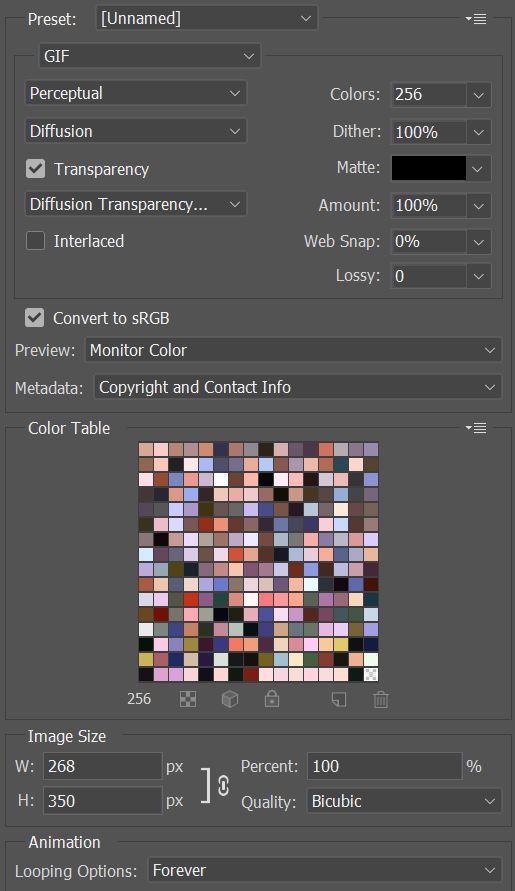
- Tumblr’s gif limit is 10mb per gif. Check the gif size at the bottom left of the pop-up window. Make sure it’s below 10mb; the smaller the better.
- Click “Save”. Choose where you’d like to save the gif.
- Done!
~~~~~~~~~~~~~~~~
And that’s it! You’ve successfully made a gif! Good job you :D
I hope this tutorial was helpful! Please leave some feedback if it helped, or if you have other methods you’d like to share :)
Lastly, if you have any questions, feel free to send in an ask or DM me!! :)
Good luck and happy gif-ing :’D
#gif tutorial#kpop gifs#avisynth tutorial#topaz tutorial#gifs#chey.resource#kpop#idk what else to tag so...#i finally posted the tutorial yay!!#please spare a reblog if you find this even remotely helpful thank you <3#also to spread it hehe i spent a lot of time on this#if anyone has any questions please feel free to DM me!!#i apologize if there are any spelling errors
227 notes
·
View notes
Text
A Case In Need: Am I Understood?

As always here is a link to my Masterlist with all my works. I just started a new Solo Triplets fic!
Slight TW/CW: lots of swearing, some implied consent at the end. Violent overtones throughout.
You haven't slept this soundly in a long time, usually you have to take some sleeping pills before lulling off to sleep but not tonight. Sunlight filtered in through your bedroom windows and you blinked your eyes open to rid the call back to your pillow. Behind you, there was a deep growling noise, followed by a hot breath on the back of your neck. Ren must’ve been sleeping with his mouth shut, you mused, wiggling your arm out you reached out for the clock on your bedside table.
9 AM it read.
“Mother fucker,” you yelled and threw Ren off with all your might. Successfully elbowing him in the face while untangling your limbs.
“Jesus,” Ren cried out and applied pressure to his nose, “Why’d you fucking do that?”
“We slept in,” you called from the closet.
Ren whined in response, you heard the mattress creak while he threw his legs over the side followed by footsteps into the bathroom. He appeared while you were buttoning up a maroon blouse, keeping one hand on his nose. He stared at you with wide blinking eyes that were still fighting sleep.
“Come on, we’re an hour late-”
“What are you talking about (Y/N),” he grumbled before turning to his sink and inspecting his bruised skin.
“My alarm didn’t go off this morning, we’re both late for work,” you pushed by him so you could reach for your toothbrush. Trying to get ready as fast as possible, throwing your hair up in an updo and smudging on your lipstick. Ren just glared at you while wiggling his nose, probably trying to get blood flow back after the hit he took. Hip bumping him to the side so you could spit out your toothpaste, he finally moved and went to the closet. Re-emerging seconds later with black slacks, buttoning up a dress shirt that was the same maroon as yours.
“Oh you wanna be matching today?” you giggled while hopping out of the bathroom, searching for your phone.
“Would it be wrong if I did?” he yelled back from the sink.
Snorting back in response you made it down the hallway. Taking the stairs two at a time, pretty risky to do in heels, and finally making it to the kitchen.
The Keurig was heating up with your coffee when Ren made it downstairs. Fixing the sleeves of his blazer jacket, seeming to look for his shoes he threw off yesterday night. You took a moment to appreciate the scene in front of you, silent domestic bliss between the two of you. This is how it would be if you and Ren were a… you shook your head at the thought. He was still very married, you couldn’t allow yourself to get used to the closeness. Clearing your throat you reached for a mug, “I forgot to tell you I’ve been working on the case file you gave me last week, found something interesting but we can talk about it when I get to the office.”
“When you get to the office,” he mumbled while grabbing some cereal from your pantry, “Aren’t you riding with me?”
“Why would I do that?”
“Because you work for me,” a spoonful of cereal, “you sleep with me,” another chew, “you fuck me, you’re mine Angel I don’t know why you keep forgetting.” He ended with slurping milk from the bowl before standing up and placing it in the sink. “Let’s go.”
He walked past you, grabbing his coat along with your purse which had your car keys inside them. Stopping at the front doorway he yelled for you, “Are you going to make me wait or should I have Ushar drag you to the car?”
-----
The drive to work was short and silent, except for the radio which was playing on some random talk radio bullshit. The man was droning on and on about stock prices and the unemployment rates, you felt yourself falling asleep because of how bored you were. Even the guy talking sounded like he was one sentence away from falling into a coma.
You groaned, “Can we listen to some music, please?”
“Hmm,” Ren smirked at you. You reached for the buttons to change it yourself but he was quicker than you, smacking your hand away. “Now now Angel, it’s my car. We are to listen to what I want.”
“Oh my god…” you whined, trying to get him to release your hand from his death grip.
“Someone’s being a brat today,” he slammed on his brakes, almost mowing over a pedestrian he was clearly not watching for. You would’ve slammed into the dashboard if it hadn't been for your seatbelt and Rens giant arm that was now outstretched in front of you.
You pushed his arm away while he sped off again, “Maybe I wouldn’t be a brat if you didn’t try to kill me with your reckless driving.”
“Hmm.”
He slammed again, this time he didn’t shoot out his arm to protect you, leaving your head to whip forward and smack the dashboard. “Oh come on!” you cried, applying pressure to your forehead. You were so sure he had split it open, you fumbled with the mirror above you, examining the bump that was now forming. Luckily there was no open wound but it still didn’t make up for the fact that you had a screaming headache. “You fucking did that on purpose,” you smacked him in the chest.
“I don’t know what you’re talking about,” he smirked again, “I would never do anything to hurt you, my dear.”
“Just shut up,” you snapped, “And can we change the radio station this guy's voice is giving me a bigger headache.”
“As you wish.” He reached forward and pressed another preset, making sure to give you a glare as he sat back.
“Thank you,” you huffed, closing your eyes and waiting for the music to start playing, or at least another boring old man to start talking.
Slowly the music started, you furrowed your eyebrows trying to concentrate on it instead of the pounding in your ears. As it was getting louder you could pick out some noises, a saxophone, for one thing, was present. Followed by some other deep instruments, you blinked a couple of times trying to understand what was going on.
“Ah, I love this song,” Ren said before turning the volume up another few notches.
“What the fuck is this-”
“You don’t like jazz, Angel?” he smiled at you, it wasn’t a warm smile. More like a taunt for you to complain again, setting a trap for you to fall into. He waited, staring at you while you slowly began rubbing your temples, the music was far worse than the NPR radio, each sound was so disorganized and trying to desperately outdo the other instrument he might as well have slammed you in the dashboard again.
Fuck this was going to be a long day.
-----
“We have a meeting today with a client,” Ren said as he seated himself behind his desk, “It’ll be at the prison, however, so maybe sure you stay by me.”
“Sounds good boss.”
You were rifling through your bags trying to find the case file on the client, Armitage Hux was the name, you had read somewhere that he was a known criminal with a record to show for it. Thrown in and out of jails so many times he probably had his own personalized cell. Most of his charges were small: theft, forgery, robbery, lots of organized crime work. Nothing you weren’t used to seeing, but this time he was charged with something much worse.
During your research you noticed that Hux was always found ‘innocent’ of these crimes, usually, the bail was paid off quickly and whoever was representing him had him out of court within a few hours. It was strange for this type of crime, what was also strange was the lack of information on those cases. It was almost like someone was erasing any information about his past the moment he was set free.
Ren cleared his throat, “I must go see Palpatine before we set off.”
“Oh, okay, let me grab my things and we can go,” you started repacking your bag.
“That won’t be necessary,” he stated, getting up from his chair and walking towards you, “It’s a private matter. Meet me down at the car in 15 minutes Angel.” And with that he kissed you on the forehead and walked out, shutting the door behind him.
“Whatever weirdo,” you muttered, this would be the first meeting you weren’t brought in with him. He usually had you take notes or something while he spoke with colleagues. But he seemed to be on edge when he rushed out. You shrugged and got up, now would be a good time to look around his office. Since you started working here you hadn’t gotten much downtime between reading, writing, and fucking.
Walking around his desk you scanned the stacks of papers. Lots were in order, alphabetical, and by date. He seemed to run a tight ship with his workload. Along with stacks of papers, there were two frames on the left side of his desk, behind his desktop. You grabbed them to get a closer look.
One was an old black and white photo, containing a young man who was very tall and skinny, flanked on both sides with an older man and woman. It looked like it was the young man’s graduation picture, he had tassels and stoles around his neck, achievements of hard academic work, the woman was beaming next to him, holding a bouquet of some sort. The older man was handsome, a little rougher than the woman, but he had the same smirk on his face that you’ve seen Ren have.
“Must be his parents…” you whispered, setting the picture back down. You had never heard about his family, but it wasn’t like the two of you had ever spoken about personal things.
The second picture was in color. It showed the same man, slightly longer black hair and less of a smile, standing outside the First Order office building. He was shaking hands with a man you didn’t recognize, he certainly wasn’t the man from the first photograph. No, this man was very different, his face although smiling had no happiness. Rigid and stiff even as the photo was being taken, and behind him was Palpatine.
Humming, you set the picture back down and glanced around the room some more. To the left of the desk were bookshelves. Filled with texts about the ever-changing laws throughout the nation, and even some about national security. Most of them were covered with dust, but you noticed a very boring pattern of non-fiction work throughout. It figures, you thought, Ren probably reads these for fun when he’s not out dictating my life.
Looking down at your watch you saw you had about five minutes left before having to hoof it downstairs so you took that time to scan the walls for any other information. Your eyes settled on two diplomas framed by a very large fake plant.
University of Oxford
Faculty of Law
Kylo Ren
“Of course he went to Oxford… pretentious ass,” you looked down to the second one.
Harvard University
J.D. Law School
Ben Solo
You stared at it for a few seconds. Rereading it over and over, looking back and forth between the two papers. Ben Solo? Who the fuck was that? Did they print his name wrong? There’s no way, it’s a Harvard degree. Also if they had he would’ve definitely raised hell over it. Maybe it was just a leftover decoration from a previous lawyer… the frame was a little dustier than the top one. Seemed like maybe that could be it-
Your phone started buzzing in your pocket. Shaking your head you fished it out and answered, “Hello this is (Y/N)-”
“Where the fuck are you? I told you to meet me in the car in 15 minutes?”
Ren. Of course, it was, “Sorry I was uh… going to the bathroom. Coming down now.”
He hung up after that, clearly, he was in a bad mood. Maybe something in his meeting didn’t go well. Maybe Rey’s dad confronted him about the two of you… not like there was any way for him to know about it. Unless there were cameras in the office that the two of you didn’t know about.
You shook that thought out of your mind and stepped out of the elevator into the parking garage. Ren was parked directly in front waiting for you. You swung the door open and climbed in while he slammed his foot on the gas, peeling out onto the road.
“When I tell you to be somewhere I expect you to listen to me,” Ren spat at you. Not taking the time to look at you while he weaved through traffic.
“Sorry, I just lost track of time, don’t know what the big deal is,” you huffed.
Ren snorted, “The big deal is you have to listen to me. You’re mine. I expected that lesson I taught you yesterday to stick inside your head for longer than 24 hours.”
“Oh, you mean when you almost drown me?”
“Precisely Angel,” He purred at you, placing a hand on your knee, “You belong to me. I control where you go,” a squeeze, “What you do,” his hand slid upwards and squeezed again, “Even when you breathe.” gripping the inside of your thigh, digging his nails into you, “Am I understood?”
You swallowed, “Yes Mr. Ren.”
“Excellent, now we are meeting with a client. I expect you to stay quiet throughout and take notes diligently. We’ve worked with him before so it should be brief.”
“We have?” you questioned, “Nothing in my research showed that he’s worked with the First Order before…”
“Whatever the case, you will not speak while we meet with him. You are not there to counsel him, only to take notes about the conversation I have with him or any mannerisms he portrays during.” Ren looked over at you, he clearly needed you to listen to him. His usual auburn eyes were dark and cold, commanding you to stay in your place. You nodded and Ren patted your leg and the two of you drove in silence the rest of the way.
——
You and Ren had walked in after parking. Every officer and guard seemed to know Ren personally, never checking his ID or anything, just waving him through. You were awestruck, the facility you were at was no laughing matter. It was a maximum security prison. Only for the worst of the worst criminals, crime bosses, murderers, rapists, serial killers, you name it and they were there. You scooted a little closer to Ren, hopefully to shield yourself from the fear rippling through you.
“Scared Angel?” he chuckled, looking over his shoulder. “There’s nothing to fear. No one will touch you while I’m here.”
“Okay,” you squeaked out.
The guards led the two of you down a series of hallways before opening a steel door. Behind was a man, chained to a desk in the middle of the room. He was pale, not a shiner pale like Ren but more sickly. He had bright red hair atop his head, that was at one point styled but it seemed like he had been through the ringer. He had cold eyes, staring directly at you, not once looking at Ren. “Glad to see you’re finally here,” he spoke from behind a cigarette.
“Apologies about our tardiness,” Ren spat, “Some pieces haven’t found their place yet.”
He moved in front of the ginger, pulling out a chair and ushering you to sit before he did. “Thank you,” you whispered, trying to keep the gingers eye contact away from yours.
“Whose this little fox you’ve brought Ren,” he cooed at you, leaning forward on the table, “She’s different than the last one.”
“That’s enough Hux,” he spat, “Let’s get down to business.”
You reached into your bag and handed Ren the case file. Grabbing out your pad and pen, you were ready for their conversation.
“What’s your name little pet?” Hux blew smoke towards you.
You coughed and shot a look at Ren, he was staring at Hux. His jaw clenched tight, his hands threatening to rip the file in half.
“Cat got your tongue?” he taunted, “ Or are you not allowed to speak?”
“Hux,” Ren boomed.
“(Y/N). It’s (Y/N),” you spit out, staring down at your pad and pen.
“(Y/N)... what a lovely name,” Hux cooed. The way he said your name felt like a threat. You knew immediately that you weren’t supposed to do that, Ren had told you not to speak.
“If you’re not going to talk about your charges then my assistant and I will be leaving.”
“Assistant, is that what you’re calling it now?” Hux laughed, taking another drag off the cigarette. “That’s a fancy way to say whore.”
Ren lunges at Hux, knocking you to the floor in the process. Pinning him to the wall and repeatedly slamming him by his shoulders. You sat there with wide eyes, usually guards would burst in at the sign of commotion but the room was quiet. The only sounds were Hux and Ren's heavy breathing, both daring the other to make a move.
“Kylo… we should go,” you squeaked out again.
“Kyloooo you’re scaring your whore,” Hux smiled at him. Ren growled and shoved him one last time before turning to you.
“Get up.” he barked.
You scrambled to your feet, grabbing the papers that were thrown around. Ren's hand found purchase in your hair, gripping on and ushering you out of the room.
Behind you Hux yelled, “I’m sure Snoke will be happy to hear about this!” and the door slammed shut.
——
Ren said nothing.
Not even when he shoved you into the car, buckled you into the seat and sped off. He was obviously not heading back to the office. His grip on the wheel was so tight it looked like he was going to snap it.
“Where are we-“
“I told you not to speak.”
“I’m sorry I just-“
He pulled in front of a hotel, “No I don’t think you understand Angel. I told you not to speak, and you disobeyed me.”
The valet knocked on his window, tearing Rens stare from you. He stepped out and handed the keys to the young man. Rounding the car he ripped open your door and pulled you out by your wrist.
You didn’t struggle, you were so confused as to where you were going. Why did he bring you to a hotel? Was he going to forgive you for earlier? What had Hux meant about you being a whore?
Once inside the elevator, he let go of you and sighed. His shoulders finally relaxed, and he cracked his neck left and right. “I think it’s time you understood who you belong to.”
You stared at him, eyebrows furrowed with concern, “What do you mean?”
“What I mean is,” the doors opened and he walked out, “You’ll either listen to me tonight, or you’ll be severely hurt.”
You gulped, was he going to beat you? Was this it? You had always felt safe with him but something about the meeting earlier had left him… unhinged. He opened the door and shoved you in.
The suite was huge, full kitchen and living room. Large king bed, and a huge bathroom.
“Strip for me.”
“What?”
“Strip for me or I’ll do it for you,” he threatened.
Swallowing again you slowly took off your clothes, all the way down to your heels. Attempting to cover yourself from his predatory gaze. He walked over to you and held your face. “Do you trust me Angel?” he whispered.
“Yes.”
He gave you a soft kiss, delicately tracing your lips with his own. “Sit down on the couch.”
You followed his instructions, eager to see where this was going. Ren disappeared into the bathroom, re-emerging with items in his hands. “Now, I’m going to put these on you, and you’re not going to struggle, do you understand?” You nodded. “If you struggle this is going to hurt you more, tell me you understand.”
“Yes Mr. Ren.”
“Good,” he cooed. He pushed you back against the sofa, and tied a blindfold over your eyes. You giggled, excited about where this was headed.
Suddenly Ren was behind the sofa, grabbing your left wrist and attaching something around it. He repeated it with the other one. “Try to move Angel.”
You tried to pull your arms back over the couch, but found that they were chained to something. “What’s going on Ren-“
He then attached chains to both your ankles. Leaving you spread eagle across the couch. Unable to move, unable to see his intentions. A knock at the door, Ren sighed, “Their here early.”
“Who's here? What’s going on?”
“One more thing before I forget,” he hummed. He pinched your jaw, forcing it open and shoved a gag in your mouth. Strapping it around your skull. You trashed and cried out, but they came out as moans because you were unable to speak.
“It’ll all be over soon.” Ren whispered and then opened the door.
TAGLIST: @finn-ray-nal-beads @morby @onlykyloscenes @direnightshade @clumsycopy @candycanes19 @kirah36 @desiraypark @princss-bucky
#adam driver#kylo ren#kylo trash#kylo x reader#modern kylo ren#Clyde logan#flip zimmerman#charlie barber#phillip altman
58 notes
·
View notes
Text
After Effects Text Effect Tutorial
A while back, an anon had sent me a request on how to do the fancy little text effects for a previous gifset I made, so that’s what I’m here to show you all today. Here, we’re going to be going from this:
to something like this:

What you will need:
Photoshop (I have CS5)
After Effects (I have CS6, though this tutorial should work with other versions; I will provide links on where to get AE somewhere down below)
Basic knowledge on how to make gifs in Photoshop
A folder or two for your gifs (I’ll explain why as you read on)
Your scene/shot already giffed in Photoshop
The font(s) you will be using for your gifs
Some time and patience (because this is most likely your first time doing this, and it may take a minute to get the hang of it)
As this tutorial is very lengthy, detailed, and image-heavy, I want to divide it into separate little parts:
Part 1 - Opening Your PSD in After Effects
Part 2 - Adjusting Your Timeline Panel in Preparation for Your Text
Part 3 - Typing and Animating Your Text
Part 4 - Rendering Your Composition for Photoshop
Part 5 - Saving Your Final Product
PART 1 - OPENING YOUR PSD IN AFTER EFFECTS
The first thing you’re going to want to do is make your gif however you want it. Since this is solely a tutorial that teaches you all the fancy text effects, I won’t be delving into a basic gif tutorial, though if you would like me to do one of those, or if you want me to direct you to some tutorials that helped me with my giffing, then I can definitely do that for you as well.
Here is what my gif looks like with my coloring and without any text on it:
However, we’re not going to do the whole “save for web and devices” thing just yet. Before we go into the tricky part, you wanna make sure you’re fine with the coloring that you want to use, and after that, we’re going to open After Effects. When you open up the application for the first time, it may end up looking something like this:
What you’re gonna want to do next is create a new composition. Go to Composition > New Composition to create a new canvas for your gif. A little menu will come up, asking you what size you would like the composition to be. You want your composition to be the same size as the gif itself. So make sure the box where it says Lock Aspect Ratio is unchecked, and type in the dimensions for your gif (the gif I’m using for this example is 268 x 200). For the frame rate, I keep it at 29.97 frames per second for the best results. Once you’re done with that, click OK.

Once you have your composition ready, you’re going to want to open the PSD in which your gif is made into After Effects. To do that, you will go to File > Import > File..., and it will ask you to select your PSD. You should see something like this once you’ve made your selection:

You want all your layers to be there when you make your edits in After Effects, so just click OK. Your PSD will then be located on the left side of the screen. Underneath that, you will see this big, blank space labeled Comp 1.

Your next step is to drag the PSD down to this blank area, and that is when you will see your PSD cover your composition that you previously made.
PART 2 - ADJUSTING YOUR TIMELINE PANEL IN PREPARATION FOR YOUR TEXT
One important thing before we actually get to the text part itself. When you load the PSD into After Effects, you’re going to see this little timeline panel towards the bottom of your screen. It’s similar to what you would see when you would do the whole “frames to layers” thing when you make a new gif in Photoshop. Here, you’re going to notice two things: 1) the gray time ruler (that long, gray bar with the yellow end points) is used to determine what is visible when you’re working on your gif, and 2) the short, light blue bar shows you your gif itself. However, usually when you load a new PSD into After Effects, you’re going to end up with a lot of unnecessary time that you won’t be needing.

Towards the very bottom is this little slider that allows you to get a better glimpse of the duration of the PSD you chose. Drag it far enough so you can see where your gif starts and ends. Once you’ve done that, you’re going to drag the gray ruler exactly where your gif ends.
Note: You don’t have to drag the smaller ruler on top of the bigger one; it’s gonna move on its own when you drag the bigger ruler to your end point.

Now you know exactly when the text for your gif is going to stop moving. Your primary goal is to showcase the entirety of the effect you would like to choose, and I will show you why that is in a minute.
PART 3 - TYPING AND ANIMATING YOUR TEXT
Here’s the fun part that you all have been waiting to see. Go to the panel towards the top and select your Horizonal Type Tool. You can choose any particular font you would like for your gif. For the purposes of this tutorial, I am going to use the font Questa Grande. Once you’ve selected your font, type your text over your PSD. You want your PSD to be centered over your PSD, so go to Window > Align, and you should see a little alignment box towards the right side of the screen. I placed mine in the same area with the Character and Paragraph tabs.
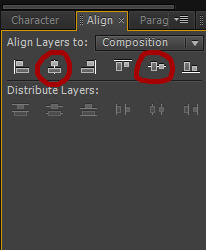
When your align tab is ready, click on these two center alignment options, and your text should be exactly in the center of your gif.
Note: You have to turn your Caps Lock off in order for this to work, as it will not only not center your text, but it will also cover your composition in one solid color.
As you will see in the timeline panel, the red bar represents your text layer. However, it is stretched out way past the point where your gif actually ends.

Align this red bar with the light blue bar as shown above. This will definitely come in handy when you are working on applying the effect itself and making it fit in your gif, which we will go into next.
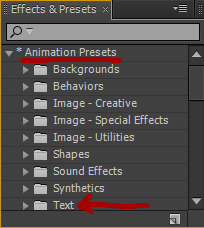
The next step — and the for-real fun part — is where you choose the text effect you would like to apply to your gif. Over to the left side of the screen, you will see a tab that says Effects & Presets, and here contains a bunch of folders and whatnot filled with effects that come with After Effects itself. You’re going to want to click on the one that says *Animation Presets, and from there, you will click on the one that says Text.
At this point, you can experiment with different text effects and see which ones you like. I’m going to show you a couple of examples of how certain effects look, because depending on the one you would like to choose and how long your text might be, you may need to make a couple of adjustments. For instance, when I go under Animate In > Fade Up Characters, this is what my gif now looks like:

Notice how the animation was able to complete itself before it reaches the end of the gif. That’s what you want for your particular gif. If you’re able to get all of your text to fit like this, then you can skip to the rendering section, if you like. Now, in some cases, you may run into animations that may not be complete when you play the whole thing through. Let’s say I decide to go to Animate In > Twirl On Each Character instead. This is what it would look like when you leave the animation as is:

What’s happening here is that some of your text gets cut off towards the end, which more than likely means that you would have to change the time stretch for the effect you’re using. What do I mean by this? Well, try right-clicking either over the text on your gif or over the text layer in your composition panel (that big space where we dragged the PSD earlier) and go to Time > Time Stretch..., and you will get this little window that comes up.
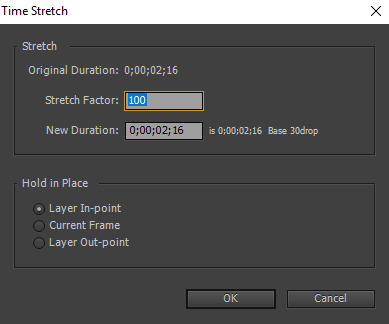
You will have to change the percentage showing in the box where it says Stretch Factor in order to squeeze all of your text in at once. You can experiment as much as you want with this until you get your desired look. I’m gonna type in a stretch factor of 70 just to test it.

However, when you change the stretch factor of your text, then that red bar in the timeline panel is no longer aligned with the light blue bar that represents your PSD. If you leave it like this, then there is a chance that your text might cut off and disappear, leaving the remainder of your gif blank. So you’re going to drag that red bar back across and line it up with the light blue one so they’re together again. Now I’m ready to test the text out once again.

This time, the whole animation is able to play itself out so you can see all of your text appear in the gif. For some people, this particular stretch factor may be cutting it a little close, so if you want to lower it to, like, 60-65 or something like that, you can definitely feel free to do that, if you want.
Here’s that same gif, but instead, I use the Raining Characters In animation and set the stretch factor to 90:

Like I said, feel free to experiment with different effects, because there are a lot of text effects already in the application that you could use. If you somehow don’t find something that you want that’s already in After Effects, feel free to look around for more text effects online, apply them to your application, and then try and follow the steps I provided for you previously.
This is another optional step, but if you’re editing your text over a very bright background, you can change the text color from white to something else. In this gifset I made not too long ago, for example, I had changed the text in one of the gifs to a particular shade of blue. To do that, you would go to the Character tab (located in the same area where I put my Align tab) and change the Fill Color (that little white square next to the available fonts).
PART 4 - RENDERING YOUR COMPOSITION FOR PHOTOSHOP
Now you have your text, the animation you would like for your gif, and all that other good stuff, so now we’re going to save it so we can open it back up in Photoshop. Go to Composition > Add to Render Queue, and you will see this appear towards the bottom of the screen.
My screenshot shows multiple different compositions here for the purposes of this tutorial, though yours will only have just one since you’re starting out. There are two main areas we want to focus on changing here: the one that says Output Module, and the other one that says Output To. When you first add a composition to the render queue, the output module will be set to Lossless. Click on where it says Lossless, and this little window will come up.

The format is automatically set to AVI when you open it, but you want to change it to PNG Sequence. And for the channels section, just change that to RGB + Alpha, and then click OK.
Earlier in this tutorial, I said you would need a folder or two for your screencaps. I said this because when we changed the format to PNG Sequence, that means the gif we added the text effect to in After Effects will be saved as multiple PNG frames after it’s being rendered. In order to keep these frames organized, I personally like to make a folder for the PNG sequence to be saved in.
After making a new folder to save your frames, you’ll want to go to the Output To section and click where it says Comp 1_[#####].png. It will ask you to find the folder that you want to save the sequence in. Once you select that folder, click OK. Once everything looks okay, all you have to do is click Render, and your gif will be saved to that folder.
PART 5 - SAVING YOUR FINAL PRODUCT
You will now need to open up your PNG sequence in Photoshop in order to make it into a gif. To do this, go to File > Open, and find the folder where you placed all of your screencaps from After Effects.

Click on the first screencap within that folder, and then check the box where it says Image Sequence. That will ensure that all of the screencaps within that folder load in your Photoshop document. Once you do that, click Open.
Another dialogue box is going to come up, asking you what frame rate you would like to use. It should be set to 29.97 frames per second. If it is, click OK. If not, change it to 29.97 fps and then click OK. Now all of your frames are all together. Next, go to File > Save for Web and Devices..., make sure your file is under the file limit (3 MB) before changing the Looping Options (towards the bottom right of your dialogue box) to Forever, and click Save. I prefer to save this gif in a separate location from where you placed all of your PNG screencaps previously.
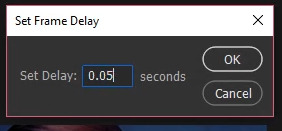
Then open the gif you just saved. You should see that all of the screencaps are set to a screen delay of 0.03 seconds in the frame animation panel. This delay makes the gif move too fast. For the best quality gifs, you want your screen delay to be set at a normal speed but also not too slow (e.g. 0.07). I set my screen delay at 0.05 seconds for all my gifs.
To do that, click this gray button on the top right of the frame animation panel and go to Select All, which will select all of your caps in the panel at once. Then click on the 0.03 on any of the caps you see, and then go to Other..., which will pull up another dialogue box asking you what set delay you want to choose. Then type 0.05 in the box and click OK. Lastly, go to File > Save for Web and Devices... once again, and click Save. To distinguish your final product from the faster gif you saved previously, just change the name (or, if you want, you can keep the same name, and then a dialogue box will come up asking you if you want to replace the gif or not; at this point, just click Replace, because you won’t be needing the faster gif anymore).
And that’s basically it for this tutorial. I know a lot of people aren’t too familiar with After Effects or much less even know how to use it, but since we’ve reached this point in the tutorial, I want to leave you with a couple of extra tips:
You may want to practice using text effects with smaller gifs. I say this because the file limit for gifs (3 MB) may be restricting for big gifs, especially those that are 540 px.
Going off the previous point, make sure that your gif doesn’t have too many frames in it to the point where it goes over the file limit.
The process for this tutorial is basically the same with edits or graphics, except you don’t have to really worry about the file size as much as you do with gifs, because the majority of your image will be still. However, it’s always important to check anyway in case something happens. If you end up with more frames in your edit/graphic than necessary with the text effect(s) applied to it, feel free to delete whatever you’re not going to be using once you get ready to save the final product.
I encourage you to experiment with different text effects and see what works. Not every text effect you look at will work out, depending on your personal preferences. I’m still kinda new to After Effects as well, so we’re all learning here lmfao.
When testing new effects, make sure you press the First Frame button in the Preview tab (it’s gonna be that one arrow pointing to the left towards a vertical line) so you’ll know that the animation will start at the very beginning of your gif. This is very important, because if you don’t do this, then the animation will start wherever your current time indicator (that yellow thing that goes back and forth in your composition panel) had stopped previously, and then you won’t be able to see the whole animation.
If you make a mistake at any point in testing out new effects, just go to Edit > Undo so you’ll know where you’re at.
Just practice using After Effects in general. You may end up finding something that I haven’t even come across yet. That’s totally fine. Not everyone is gonna understand it right away, so study it as much as you can.
For those wondering where specifically I got AE, I don’t remember the exact link (when I got it, I was looking for it on my old laptop, which malfunctioned before spring break this year, unfortunately), though it did take a lot of Google searching for the link to AE CS6, so if you do that and find a good link, feel free to share it so more people are aware. But for the sake of this post, here are a couple of links to posts where you can access a download link:
maxiresources downloads by @maxiresources
How to Get After Effects by @alternatetutorials
Adobe CC 2019 Suite by @yeahps
Activating CC 2018 Programs on MAC (Photoshop, Illustrator, After Effects, etc.) by @kaeveeoh (this should work for PC as well)
Make sure all of the links work when you're looking for one to download After Effects. If the ones I provided don't help, I'm sure you can ask at least one person from @yeahps or any other popular Photoshop blog for some advice.
If you have any questions on any part of this tutorial, feel free to message me anytime you want. Other than that, if this tutorial has been helpful for you, please give it a like/reblog. It would be greatly appreciated.
#completeresources#yeahps#chaoticresources#itsphotoshop#usernums#arianagrandre#gif tutorial#*#resource*#not really sure who else to tag but yeah here it is#@ anon sorry it took me so long to make this btw#between summer school and cleaning my room and dieting i've been up to a lot lately#but i didn't want to leave you hanging either so here you go!!!
279 notes
·
View notes
Text
.gif tutorial - editing video directly in PSCC
Here's a tutorial for my method of making .gifs by dropping a .mp4 video clip directly into photoshop.
This technique doesn't require previous screen capping or importing. All you need is an .mp4 video clip and photoshop. Here's the .gif I'll be making:


Now with a Video version of this tutorial!
While you can drop whole movies into PS, I find it easier to work with shorter clips. VLC player is capable of recording smaller clips of larger videos, so try recording the scene(s) you want into clips a few minutes long. Videos just have to be a compatible codec, of which .mp4 is one. Since that's the only filetype I've used, I'm not sure of the others. I know .mkv and .webm won't work. Try a conversion program to turn an incompatible filetype into mp4.
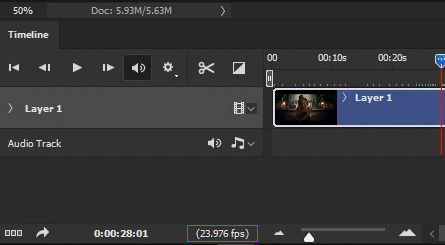
As with any .gif you're making, you'll need your Timeline window open. You can find it under Window >> Timeline. Here's a quick rundown of the relevant parts:

Once you've dragged your video clip into photoshop (see above gif), a blue box will appear in your timeline, along with an arrow pointing to a redline called the playhead. You navigate through a video's frames by clicking the arrow portion of the playhead and holding as you drag it back and forth across the blue box representing your video.
This process is called scrubbing (don't ask me why).
The first thing you'll want to do is turn the video in your timeline into a Smart Object. You can either click on it in the timeline or in the layers palette to select it. Once it's highlighted, use the standard method to turn it to a smart object (Layer >> Smart Objects >> Convert to Smart Object). I like to do a Save As... (File >> Save As...) at this point to create a new .psd file. DON'T SAVE OVER YOUR ORIGINAL VIDEO FILE. Make sure to do Save As....
It's important to note that the .psd you save won't contain the video itself. Instead, a symlink is created, which is basically an embedded link to the original video file. What this means is that if the video you dropped into photoshop is ever moved or deleted, it'll break your .psd file. Make sure not to muck about with the video file as long as you want to be able to work on your .psd
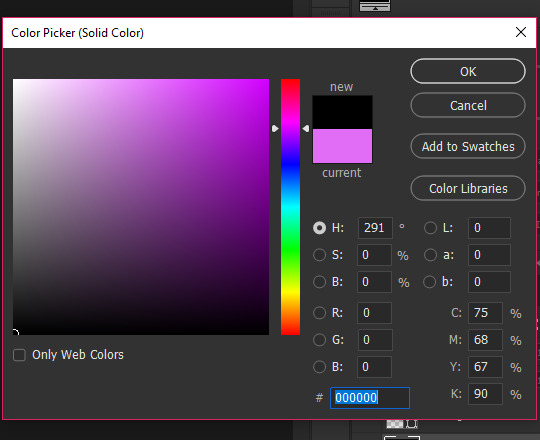
Because resizing/cropping/transforming can make some odd transparency issues on the borders of gifs, I like to place a Solid Color layer of pure black (#000000) at the bottom of the layer palette. So, in the Layers palette, select Create new fill or adjustment layer and select Solid Color at the top of the pop up menu:
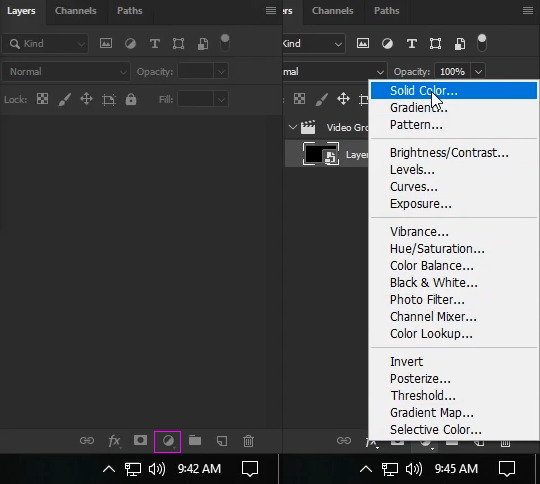
Choose solid black either by entering 000000 in the # field or by using the color picker to pick black from the bottom.
Drag this new fill layer to the bottom of your layers.
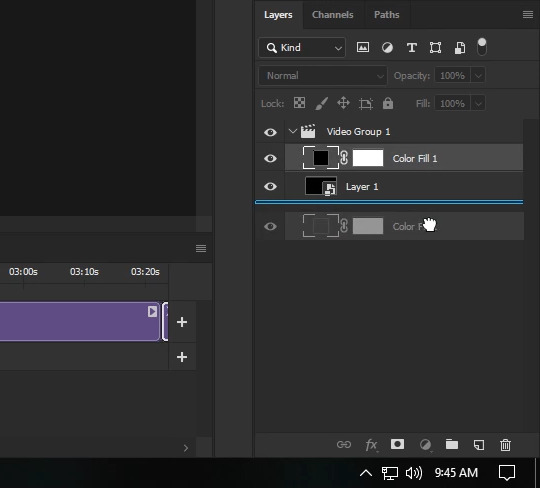
Now the Color Fill object has to be moved in the Timeline so that it stretches across the entire area taken up by the video clip. Your playhead should be at the beginning of the timeline:

If it's not, click on the arrow and drag it there. Make sure your Color Fill layer is selected in the Layers Palette. Then, click on the Timeline's menu and choose Move & Trim >> Move Start to Playhead:
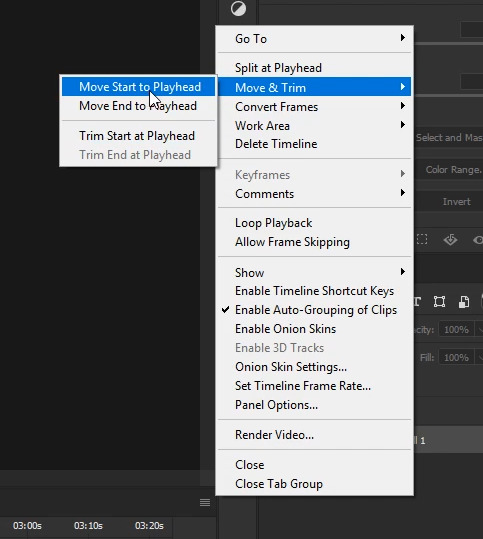
Your Color Fill object should now be at the start of your timeline. Hover over the object's right edge until the mouse turns into a double arrow icon:

Holding down the mouse, drag the Color Fill object to the end of the work area (the whole of the video object's length). It should snap to the end when you reach it automatically.

Next, scrub to a still image that represents your gif for you to look at as you work on cropping/coloring.
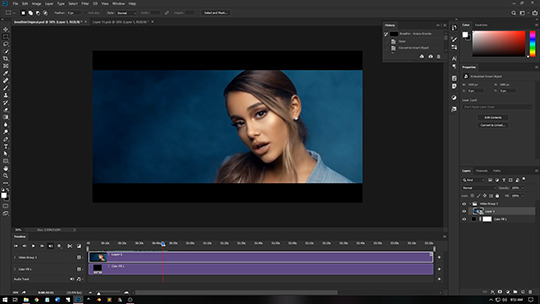
Next you'll want to resize your smart object to gif size. For this .gif, it'll be 540 x 200, so I've set the crop tool's settings to W x H x Resolution: 540px and 200px.

I liked to keep Delete Cropped Pixels unselected so I can move the image around after the cropping. Go ahead and adjust the crop to where you're happy and press enter to crop the image.

You can now start applying filters, masks, color adjustments, text as you normally would. For me, I like to begin by sharpening my resized image. I find Smart Sharpen works best for videos/gifs, because it applies as a filter to the smart object, meaning you can access and adjust the controls at anytime. To use Smart Sharpen, go to Filter >> Sharpen >> Smart Sharpen... In the control panel, apply the following settings:
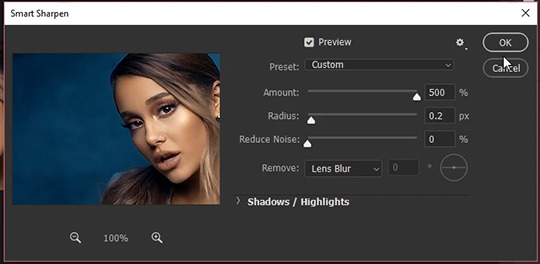
Amount: 500
Radius: 0.2
Reduce Noise: 0
Remove: Lens Blur
Don't worry about the extreme sharpening that takes place from the high amount, because we'll adjust that in the next step. For now, just click Okay.
In the Layers Palette, you'll see the Smart Sharpen filter has been applied to the Smart Object. Right click on the new filter listing and click on Edit Smart Filter Blending Options...
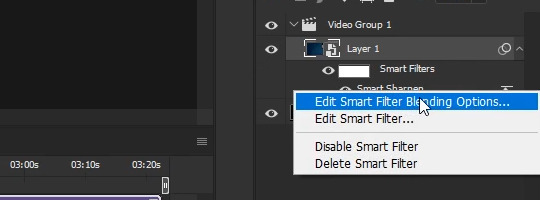
In the new control panel that pops up, turn down the opacity to something that suits your taste. Something between 15% to 30% usually works fairly well. For this video, I've chosen 25%.
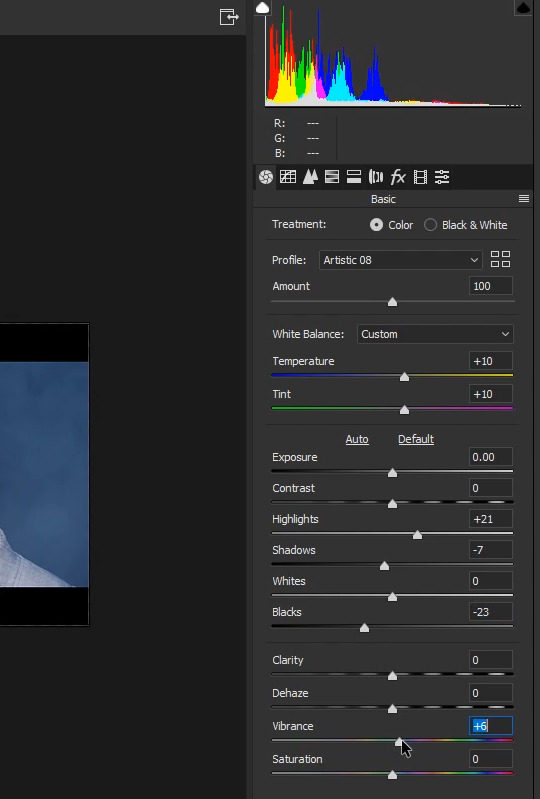
Now to move on to color adjustments and my favorite filter, the Camera Raw filter (Filter >> Camera Raw Filter... or Shift + Ctrl + A). In the Camera Raw control window, I start out by going through Adobe's preset profiles to see if I like the look of any of them. For this video, Artistic 8 deepened the blues and brought out a lovely bronze, so I've selected it and closed the profile section.
Still in the Camera Raw window, you can further adjust the color temperature and tint.
Temperature: +10
Tint: +10
Change the image's constrast by adjusting the highlights, shadows, whites, blacks sliders directly:
Highlights: +21
Shadows: -7
Blacks: -23
Finally, kick up the Vibrance.
Vibrance: +6
I also went to the Calibration tab (looks like a film strip) and added more magenta to the Shadows' Tint.
Tint: +95
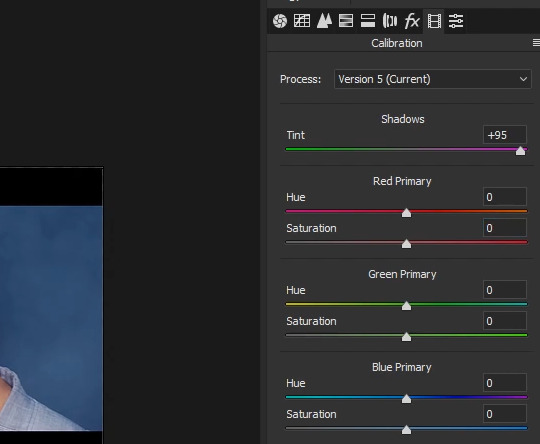
I'm happy with these setting so I won't be using any more camera raw settings, but play around and see what you come up with!
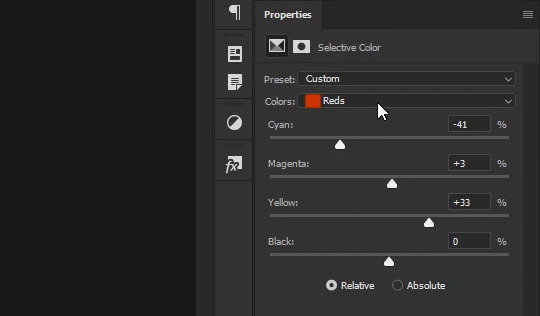
Now, if you want to apply more color adjustments outside Camera Raw, you certainly can. I've chosen to apply a Selective Color Layer to the video to make the bronze pop a bit more. Go to your Adjustments window and apply a new Selective Color Layer.
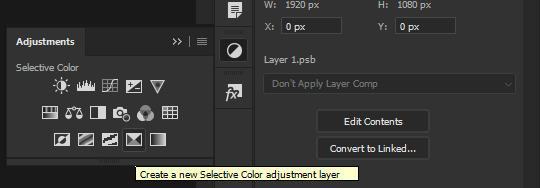
.
With Reds selected in the Colors dropdown menu, I've applied the following settings:
Cyan: -41
Magenta: +3
Yellow: +33
Black: 0
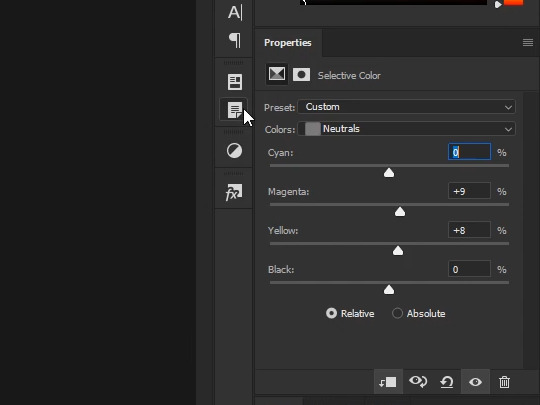
Switching to Neutrals in the Colors dropdown menu, I've made the following slight adjustments:
Cyan: 0
Magenta: +9
Yellow: +8
Black: 0
Next I opened up the Adjustments palette again and applied a Color Lookup layer:

Previewing several layers from the 3DLUT File dropdown menu, I selected Fuji REALA 500D Kodak 2393 (by Adobe).cube color table for the kick in contrast.
I found it much too strong an effect, however, so in the Layers pallette I turned down the Opacity to 23%.
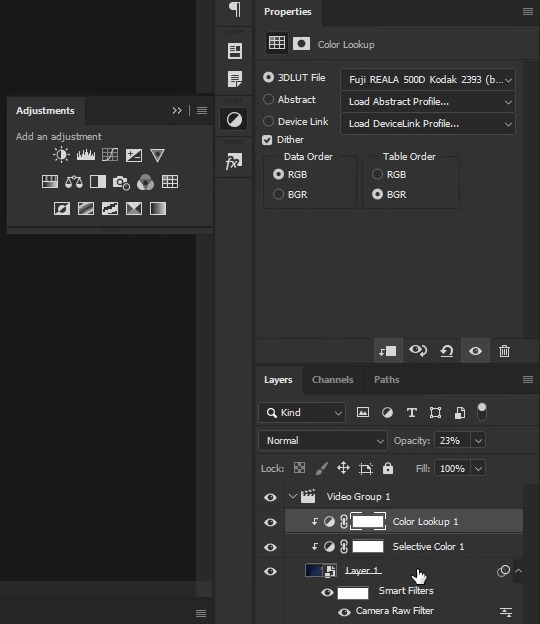
The next steps are easiest to do with a single Smart Object for your video. Since I was done with my color adjustments, from the Layers Window I selected the original Smart Object, held down the Shift key and selected the Color Lookup Layer (which layed above the Selective Color adjustment layer). This selected all three layers. Next, I turned them into a new Smart Object (Layer >> Smart Objects >> Convert to Smart Object...). Now everything is contained in a single object both in the Timeline and the Layers window.
Now, if you've tried scrubbing through the video, you've probably discovered that the once smooth and quick back and forth you were able to achieve with your original video file is now choppy and slow. The reason for this is that photoshop has to recalculate every frame of the video and apply your color filters. This is a pain, and really slows down the gif making process. What you need to do is get back to the original video that doesn't have any adjustment layers or filters applied to it. To do that, return to your layers window and double click on your Smart Object's thumbnail. This will open up your original Smart Object and the two color Adjustment Layers you just applied in a new window. However, if you try scrubbing, you'll have the same choppy loading effect as before, because the color adjustments are still being calculate for each frame. What you have to do is go to your original Smart Object in the Layers Window and double click on it one more time. In the new window that pops up, you'll see your original video file, at it's original size. When you scrub through this timeline, you'll be able to do so at the smooth, quick pace you were before all your color adjustments. This and the tabbed window containing your single Smart Object resized video will be the two windows you click between, so go ahead and close the middle tab window with the color adjustment layers. You won't be needing that one open any longer.
As an aside note, make sure the FPS (framerate) listed in the small info section in your timeline is the same for each smart object window as it is on your original video.
If the framerates don't match, you won't be scrubbing through the same frames. Meaning that when you stop at a certain time on both timelines, they won't be stopping at the same place. This usually happens when you create a new window and drop your video file wrapped in a Smart Object into it, instead of just cropping your Smart Object. (Why do this? Sometimes it's easier to resize it via the transform controls with the image size already set, i've done this moving from full size to a 268px width before.) Anyhow, the good news is that the fix is very simple! Just make a note of the fps in your original video file (the one with the blue box, not the purple!) and in every mismatched Smart Object window, go to your Timeline's menu, select Set Timeline Frame Rate..., and enter in the original video's fps in the custom field (or select it from the dropdown menu if it's available). Voila! Problem fixed. But, like I said, this is only a problem if you drag and drop the Smart Object into a new window. If you want to avoid the hassel all together, just crop or do an Image Resize in your original window, as I've done in this tutorial.
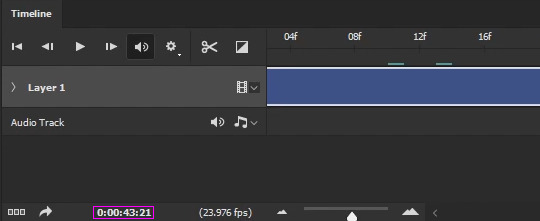
Now for turning your Smart Object into a gif! In your Original Video window, scrub through the Timeline and find the point you want your gif to start at. For this gif, I've chosen to start my gif at timestamp 0:00:43:21.
Go ahead and double click on the timestamp highlighted in the image above (careful not to "slide" the time ahead or behind with the mouse) and in the Set Current Time control window that pops up, highlight and copy (Ctrl + C) the time.

Exit the window by pressing Cancel or Esc. Return to your Smart Object's window (with the color adjustments) and double click on the timestamp here and in the control window, highlight the time and paste (Ctrl + V) the time into it and click OK. Your playhead should then jump to the same frame (after a moment to load) you stopped at in your original video.
Now you want to mark this spot for yourself to easily return to. In the timeline, you'll see there are gray "brackets" that encompass the whole of your Smart Object/Video. These "brackets" are the work area.

These brackets can be moved and repositioned to shorten your work area. This is an excellent way to mark the area of your gif. There are two ways to move the brackets. First, you can grab the left bracket, hold down the mouse, and slide it over to the playhead (it'll snap to it once you're close enough). However, the easier way is to right-click on the blue arrow part of the playhead and choose Set Start of Work Area.
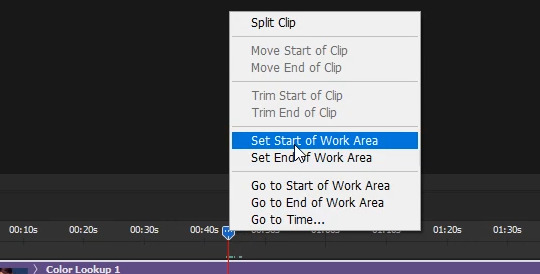
The left bracket will then automatically move to your playhead.

Repeat this process to find your ending point, but picking Set End of Work Area instead of Start. NOTE: If you look very closely at the red line beneath the playhead when you're zoomed in to your timeline, you'll notice a light grey box to it's right:
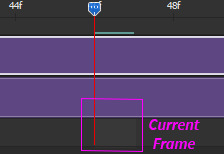
This is highlighting the current frame. You'll want to make sure the highlighted image is the frame AFTER your final frame!. The end of the work area and the playhead snap just to the left of the highlighted frame. The actual frame will be left out out of the work area/split. So if you want your gif to end on the image before, you need to highlight the next image. I know it sounds wonky, but once you've made a few gifs using this method, you'll see what I'm talking about.
Next step is to split the object so you can select Just the section you want to turn into the gif. Having already set your work area makes this easy. Right click on you playhead's blue arrow and select Go to Start of Work Area
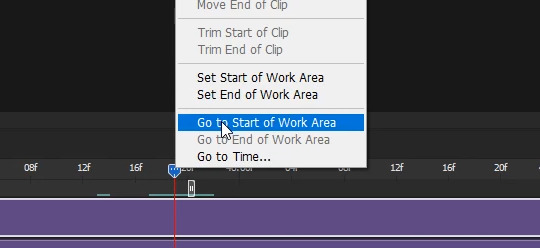
And your playhead will jump to the start of your work area, and where you want your gif to start:
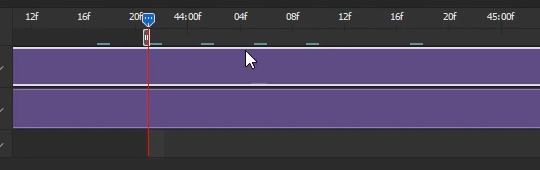
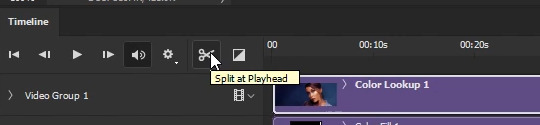
Once you have the playhead positioned where you want your gif to start, select the Split at Playhead button (the scissors) to split the object at the playhead (red line):
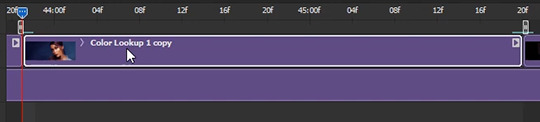
You'll notice your object has split into two objects:
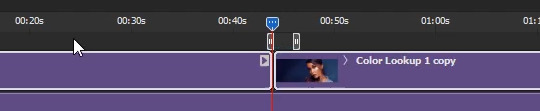
Note: This is why you want all your color adjustments made before you start splitting your gif(s), because your color adjustment layers are still applied to both objects. You don't have to copy/paste any filters/adjustment layers.
Repeat the previous steps, except this time, for the End. (Go to End of Work Area) Note: Sometimes the playhead stops a frame before the End of your Work Area. I don't know why (bug?), so zoom in on your timeline and make sure that read line is bunched up to the End of Work Area "bracket" before you slice. When you're done, you should have the section you want to turn into a gif seperated out from the rest of the object:
Your prepwork is done! Now to make the actual gif!
It's always a good idea to make a Snapshot at this point! That way you'll have a prepped state ready to revert to if you mess up going forward.
You can find the snapshot button in the History window (Window >> History):
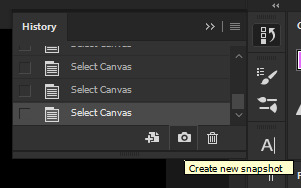
If you ever mess up, just scroll up to the thumbnail at the top section of the list and click it.
Either from your Timeline or your Layer Palette, select the Object you just sliced out (the one you want to turn into a gif), then press and hold Ctrl and select the black color fill layer beneath it, so that both objects are selected.
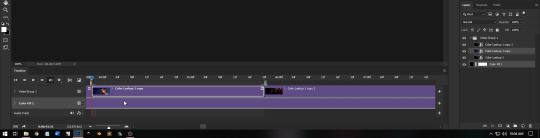
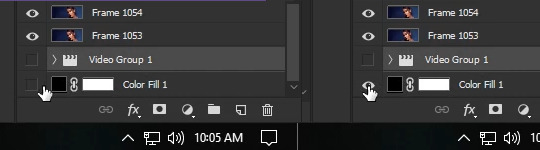
With both objects selected, go to the Timeline's menu and select Convert Frames >> Flatten Frames into Clips:
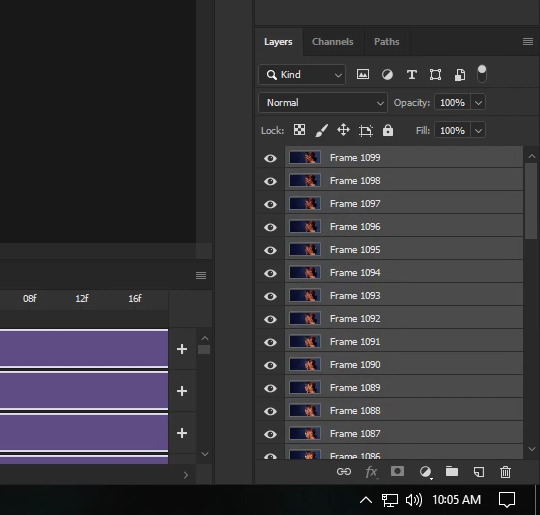
Depending on your graphic card and how big your selection and image sizes are, this will take some time. The faster your card/narrower your selection/smaller your image, the faster it will render. Photoshop is taking every flame and placing it onto it's own layer. When it's finished, your Layer Palette will be filled with new layers... and you might notice it looks similar to how it looks when you're working in a frame timeline. This is no accident.
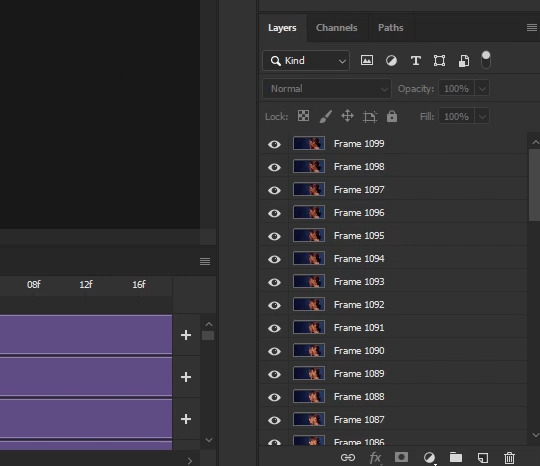
Scroll all the way to the bottom of your Layer Palette and make sure your black Colorfill layer is visible (click on the visibility area until the eye shows up).
Then, click on the first new layer and select it. Holding down Shift, scroll allll the way to the top, and select the topmost layer. All the new layers should now be highlighted in both your Layers Palette and your Timeline.
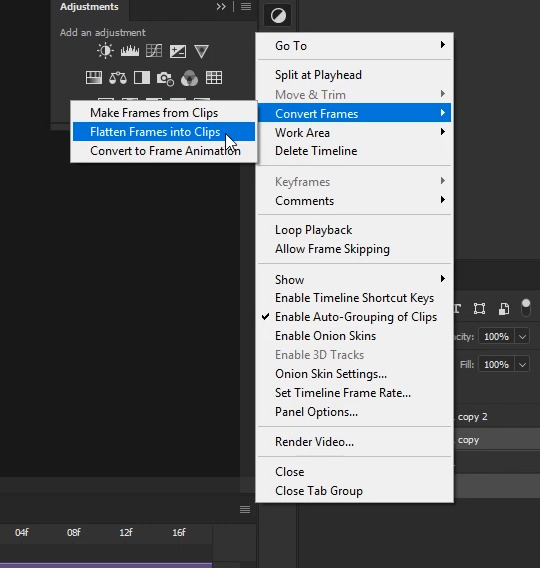
With all the new layers selected and the Colorfill layer visible, go back to the Timeline's menu and select Convert Frames >> Make Frames from Clips:
This shortens the layers into milisecond clips.
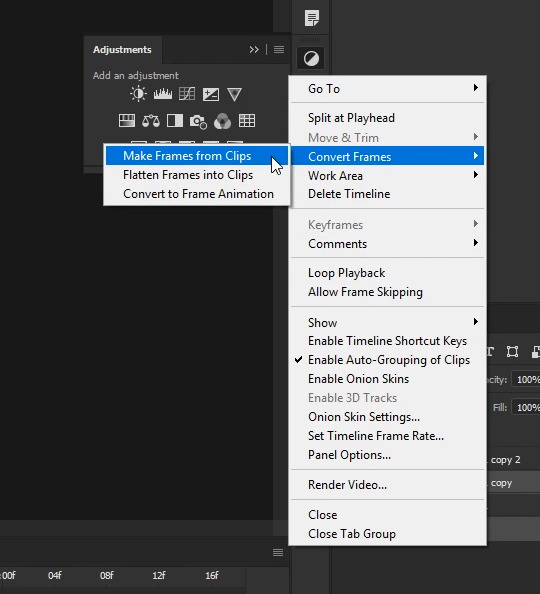
Now, with the layers still selected, go back to the Timeline menu one more time and select Convert Frames >> Convert to Frame Animation:

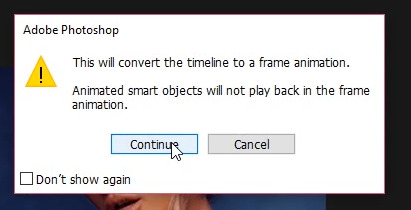
A new warning window will pop up saying "This will convert the timeline to a frame animation". Go ahead and click continue:
At this point, things should look very familiar.
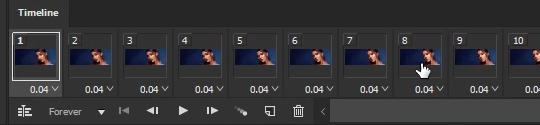
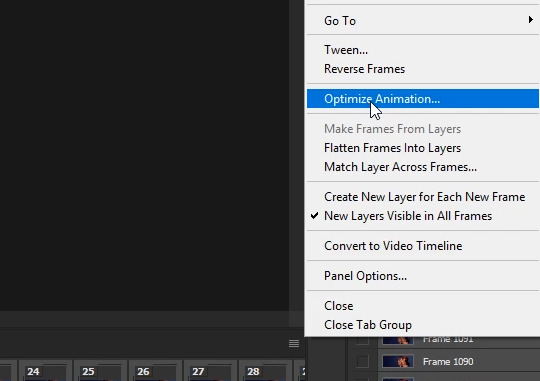
You'll do all the usual steps for saving a gif at this point, EXCEPT you don't have to worry about duplicate/skipped frames. Photoshop hasn't skipped or doubled any frames that weren't recorded that way in the video. Your gif may still be too long to fall under 3mb, but how you trim it down is up to you. In my case, this gif is at the right length, so I go ahead and optimize all the frames by going to the Timeline's menu and selecting Select All Frames. Then from the Timeline Menu again selecting Optimize Animation...:
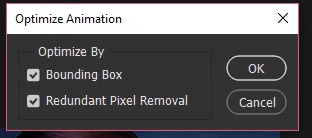
In the control window that pops up, I've left everything selected and just clicked on OK.
Next, with all the frames still selected, click on the pop up menu of one of the frames (the little down arrow in the lower right corner) and choose Other...:
In the pop up window I changed the Delay of 0.04 to 0.05
Now it's just a matter of saving the gif. Pressing Ctrl + Shift + Alt + S or you can go File >> Export >> Save for Web (Legacy) to bring up the Save for Web dialogue box. From there, I make sure the memory comes under 3mb. I like to save with the Selective and Pattern profiles with as high a Colors setting as I can manage, which is the full 256 for this gif. From there, it's just a matter previewing the animation to make sure it looks alright and then saving.
And that's it! That's how I make all my gifs. You'll notice I can go to my history window, undo all the frame conversions or click on my snapshot, and still go to any point in the video to make another gif. Which is usually how I make my gif sets in one go.
I hope this long tutorial was helpful! Please reblog or give a like if it was. If you're interested in how I add text, or use keyframes to manipulate positions/sizes/"camera"/styles/etc, let me know you'd like tutorials on all that too! If there's enough interest I'll be sure to do more.
Happy giffing!
126 notes
·
View notes
Note
Heyyyy. I feel kinda bad asking for your help for free. But how did you make King’s fur colourful and textured? I have the millennium cat in Daz and it doesn’t actually have any colour/fur options and I can’t find any in the store.
Hello there! I am SO SORRY for responding so late. This is actually a really good fucking question, that took me FOREVER to find an answer to when I was trying to figure King out.
So, you actually cant do it with millennium cat :/ I don’t think? I’m sure there are ways, but honestly, millennium cat is not the best cat you can get.
I 10/10 recommend investing in Hivewire House Cat. It’s 30 USD, which is fucking expensive for just a model. I got mine on sale, which they do every so often. If you put it in your wishlist on Renderosity, sometimes they do wishlist sales. Where everything in your wishlist they put on sale. So you can wait around for that, or you can just buy it. I recommend the hell out of it.
***Very important. Downloading files from Renderosity and other websites that do not use the Download Manager from Daz’s own shop, can be v confusing. I have a MAC. There are a shit ton of tutorials on youtube on how to download these files on a Windows computer. But from a MAC, it took me for fucking ever. So if you would like a tutorial on how to download assets from other 3D rendering websites like Renderosity, please let me know! I’ve figured out a really simple way of doing it and I would be more than happy to help and the same goes for finding those files once you have them correctly situated in DAZ!***
Here’s why I recommend Hivewire.
Millennium isn’t as detailed as Hivewire is. Millennium is a v old cat model, with only a few bones and no really helpful sliders in ‘Shaping’ and ‘Parameters’.

Just as a visual, here are these two side by side. On the right is Millennium and on the right is Hivewire. Millennium, for some reason, comes ridiculously oversized. Whereas Hivewire is automatically at the proper size for a common housecat.
Here are the Millennium ‘Parameters’ options:
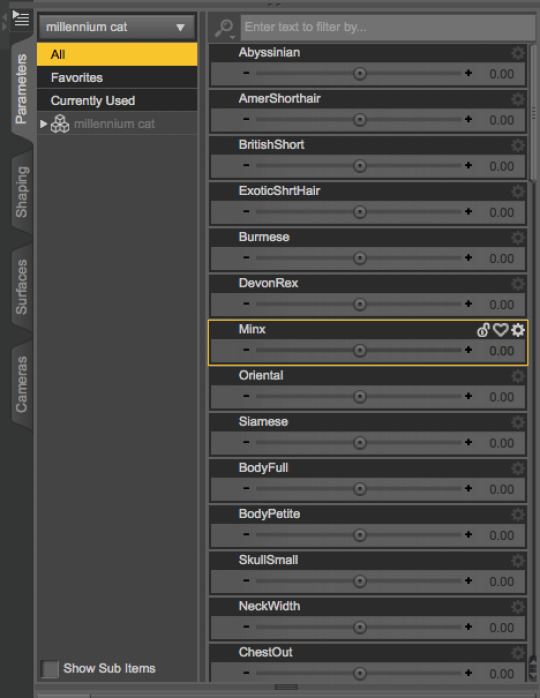
And the Hivewire ‘Parameter’ options:

Even just looking at the size of the sidebar, there’s a big fucking difference. Hivewire is 10x more customizable. And everything that it comes with is already IRAY compatible.
With all that being said, lets get into Hivewire House Cat. Because really, although Millennium is cheaper, I really don’t think it’s worth it.
HHC (hivewire house cat) comes as a Tabby. The Tabby option comes with several different color options. You can also buy Black/White (which I used for King), Calico, and Orange Tabby as well.
Here’s my black/white and gray tabby options:

However, the colors are not the long hair. In the promotional photos for some of these color options, the cats have long hair and it took me FOR FUCKING EVER to figure out how to do it. LUCKILY IT’S FREE THANK FUCKING GOD.
So, lets get into that!
HHC comes with a LAMH (Look At My Hair) option! What does that mean? It means that you can easily add fur to these creatures.
You can buy LAMH or you can get the free version. I recommend the free version. It’s what I have and if you’re only using it for this, then you gucci. Pretty much, to use LAMH, you have to download it from the website. Once that is done, in Daz you go to
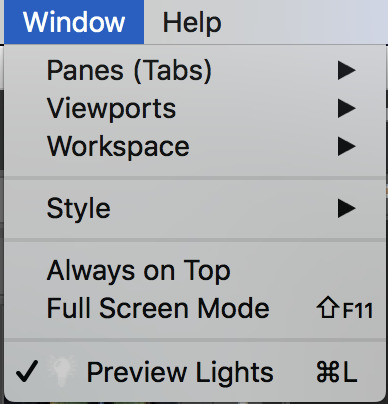

It should pull up this window. You can drag it anywhere on your workspace.
Change the color of your kitty BEFORE you go onto the next steps. Unless you want to mix and match, which we’ll get into later!
So what do you do next - good question.
Now you have to download the LAMH Presets from the Hivewire website.
This. was so. fucking. annoying to figure out. with a lot of trial and error.
Once you have LAMH presents for HHC downloaded (which comes with Short, Short 2, and Long) you can start attaching them to your cat.
Make sure you have your cat selected. I HIGHLY recommend putting this in a new ‘document’ (?) so nothing else can interfere. I swear to god, this makes my program crash unless I don’t have it in a new field. Your program may crash. It’s annoying but the harsh reality of this thing. It’s about as finiky as dforce. So just keep that in mind and don’t give up.
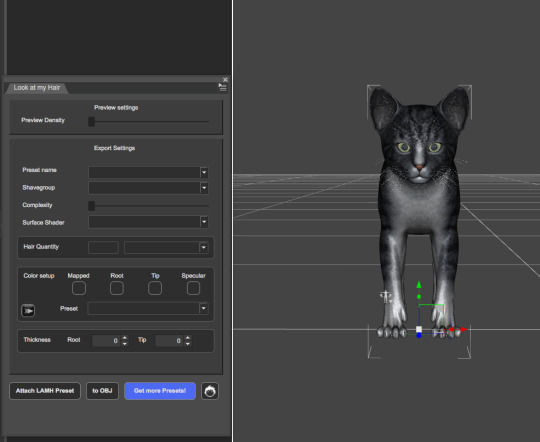
After your cat is selected, hit ‘Attach LAMH Preset’. It’s going to pull up your files. Find the LAMH presets you downloaded from the hivewire website (they can remain in a folder all on their own without being integrated into the program) and select how long you want the hair to be - Short, Short 2, or Long.
I chose Long

It’s going to load and then all this green stuff is going to cover the HHC and in ‘Scene’ it’s going to have a new selection called HHC LAMH Group.

The next steps are really simple, but also really fucking important.
Now, you are going to choose the hair quantity. Online you can find in different forums, the hair quantity that people have chosen. I’ve seen the standard 250,000, 600,000, all the way to 2,000,000. YOU DO NOT NEED 2,000,000. Not even 1,000,000! I nearly always go with 600,000. The cat looks nice and full that way. I say, stay between 250,000 and 600,000. Don’t go any higher or your program will surely crash.
***also, you can pose your figure with this. It will move with it. But, some poses will not work v nicely with LAMH - especially if it’s long haired. Anything too tightly curled, probably wont work.***

I’m going to go with 500,000 and hit ‘to OBJ’. I recommend saving this as you go. Like with every step, just hit save. Like I said, this crashes all the time and it’s extremely annoying to have to redo the steps over and over. So just save it and in turn, save yourself the headache.

Once you hit ‘to OBJ’, this dialogue is going to pop up. Click ‘Yes’ then ‘OK’
Cool cool cool. everythings loaded, now wtf do you do? Use the eyes under HHC LAMH Group to make the green stuff disappear. DO NOT. I REPEAT. DO NOT DELETE.
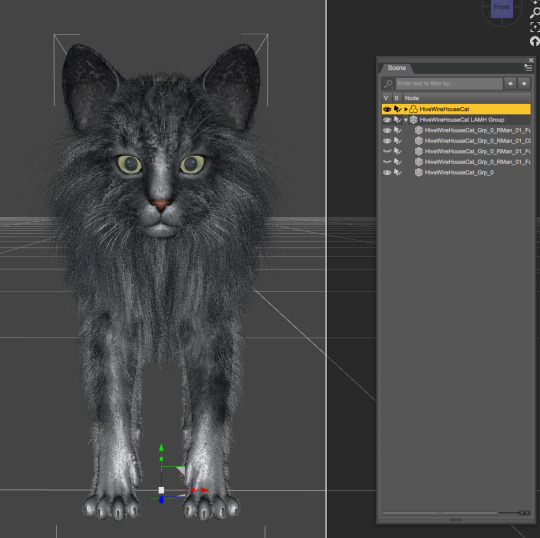
This is just so you can see your kitty with their little fur!!
Okay, you did all these steps. now fucking what? I think this is important to be said, but pose your cat BEFORE you attach the hair. It makes the hair fall more organically that way. Otherwise, it can not only make your program crash but just look weird. So, pose and position your kitty beforehand. So when you merge it into your original file, it’s already in place and you can go straight to rendering. (Leave LAMH for last. Always.)
Cool cool cool you did all of this. You can now pull up the AUX Viewport tab and see what your kitty be lookin like.
Now. I said earlier that you can mix and match. I didn’t know this was a thing, until i made a mistake and REALIZED it was a thing. For King, I wanted her to be black and white. However, homegirl forgot to do that. so after I had all of her fur already on and finished, I clicked one of the black and white options, and all of a sudden it mixed?!?! So I think what happened here, was that I had King as a tabby, or maybe mainly white. I don’t know. And when I attached the fur, the color from her original ‘skin’ also attaches to the fur, in order to give it color. Well, when I changed it afterwards, it ended up mixing her up. So instead of her turning out like this (which is what I originally had her as):
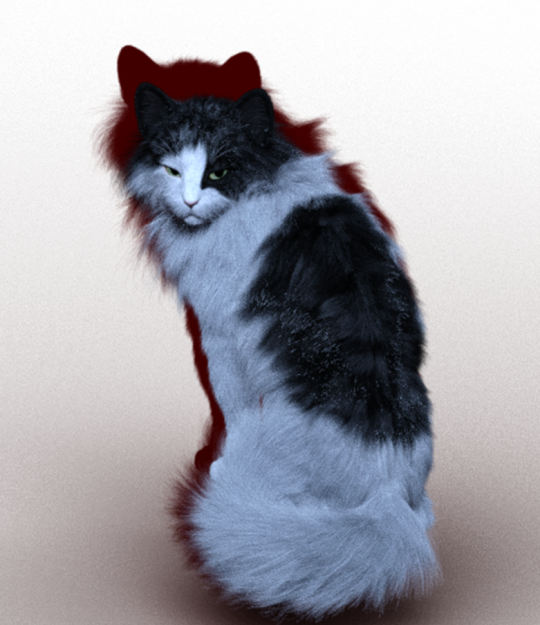
She came out like this:
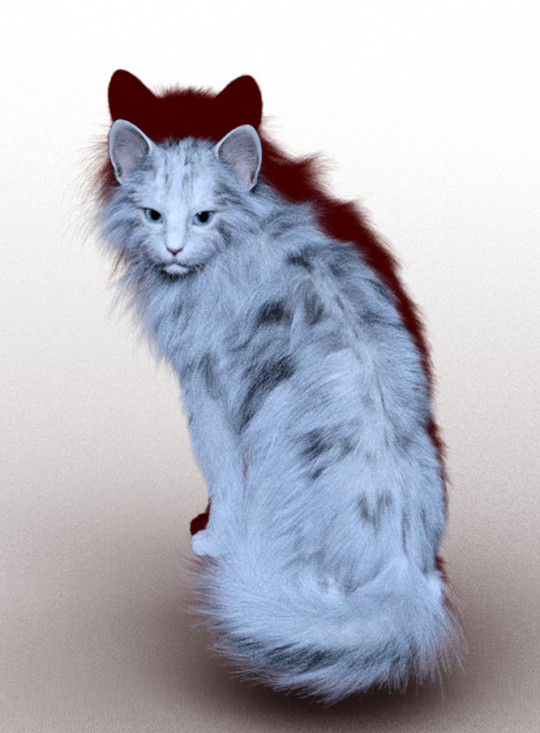
Unfortunately, I have NO IDEA HOW I GOT TO THIS. So although King is looking fucking FIRE here, I couldn’t use it. :(
Ugh, anyway. Another really important thing to keep in mind, is that you don’t want the hair to be too thin. I’m almost positive for both of these models, I used 600,000 hairs. I went lower than that for a picture of king in the office, and her hair came out extremely thin and you could see her body through it. It wasn’t a good look for her (Sorry bb girl). So if your number is too low, it will look off. Like a mangey cat lol.
Example:
250,000

500,000
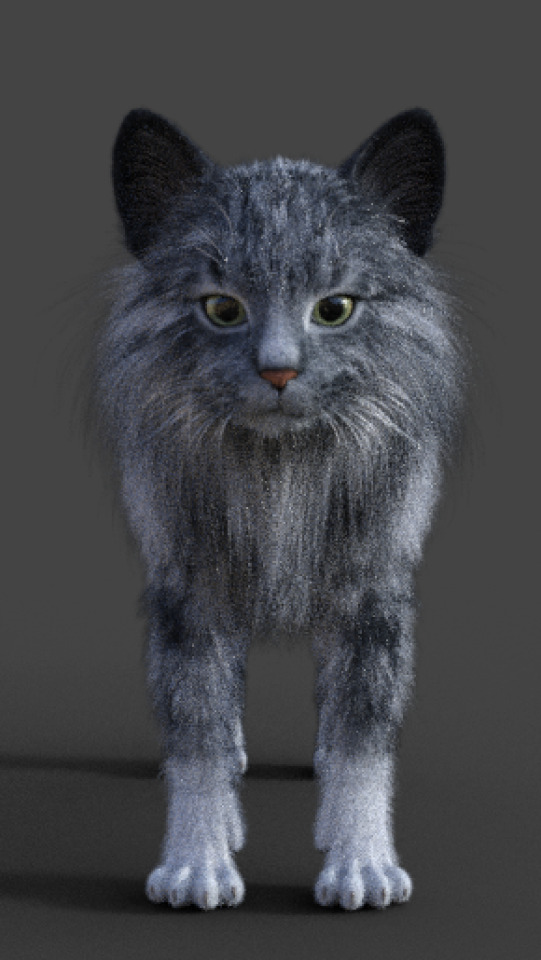
This is a small difference, but they look far more filled out. And you can really tell when you have a stronger light source!
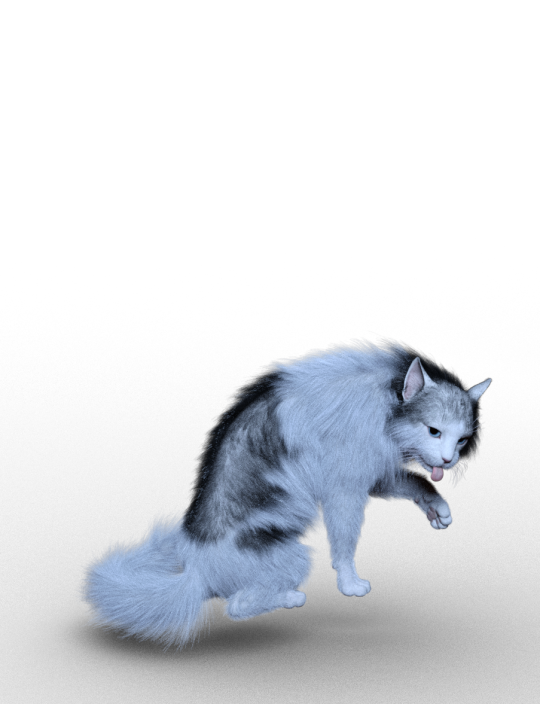
Heres one with King when her fur was literally just too thin. I think this was 250,000 as well.
ANYWAY.
I hope this helps!!! And I’m sorry this came so late. I know it’s really long so anyone reading this going what the fuck, ignore it lmfaoo.
If anyone would like an indepth tutorial on how to download external files and where to find them, please let me know! I’d love to help!
71 notes
·
View notes
Note
Same anon. This question is related to ReShade versions. From what I can understand, the changes that can render old presets useless are those in the shaders, right? So, there isn't really a way to "port" those presets made in older versions to the newest one, no? Apparently 3.0.8 is the most popular for some reason, but most presets that work on it should be fine in 3.1.x, right? Could them still be good on 3.3.x or 3.4.x? Do newer presets work fine on older versions of RS? Thanks and sorry. ;;
This is going to be long. I’m thorough.
I answered an ask about version compatibility not too long ago, you should find it useful to read through. It goes into the basics about the difference between ReShade the tool and shaders as individual things that work with ReShade the tool. It might answer all your questions, but in case it doesn’t…
The reason a lot of people favour 3.0.8 is because shortly after that version Marty McFly, the author of the MXAO shader, rewrote it a little and changed a few things about it, meaning any preset that used the old version would need its MXAO settings updating if using the new shader instead. Some people prefer the older version of MXAO, and some people don’t want to faff around editing the MXAO settings (I am neither of those people!).
As I explain in the link above, however, there is absolutely no reason why the version of MXAO that came with 3.0.8 can’t be used with 3.4.1 (which is another popular version, and the last version of 3.x before they brought out 4.x). Any shader that was made for any 3.x version of ReShade can be used with any other 3.x version of ReShade. There were several improvements to the interface in between 3.0.8 and 3.4.1 which make it worth the upgrade in my opinion, but you can do so while keeping the shaders that came with 3.0.8 if you prefer.
You’re right to say presets rely more on specific shaders than they do on a particular ReShade version (barring major rewrites of ReShade the tool between major releases like from 2.x to 3.x, although 3.x presets should work with 4.x taking into consideration the things I’m going to say next).
I wrote Hazy Days and Blueberryade with 3.0.8 but use it quite happily with 3.4.1, having edited the MXAO settings after Marty rewrote that shader (which could have happened at any time, it just happened to be after the release of 3.0.8), and I know @harrie-cc is using Hazy Days and my more recent Clear Bloom with 4.3, and only encountered a couple of issues relating to the DoF shader (which is no big problem anyway since that’s one of the shaders you change up to suit a scene yourself).
So, any 3.x preset should work with any other 3.x version, as long as you’re mindful that you may need to tweak the MXAO settings (or just use the shaders appropriate to the version that was used when creating that preset). And you’ll probably find a lot of 3.x presets work fine with 4.x versions too, but I’d recommend a fairly decent working knowledge of ReShade before trying it in case you encounter any issues. Because if there’s one thing about ReShade it’s that it requires some heavy duty troubleshooting sometimes, and while solutions are usually quite simple and straightforward, being armed with the knowledge of how ReShade and shaders work first is going to cut down that troubleshooting time considerably.
As for 4.x presets being used on 3.x versions, that gets slightly more tricky.
When 4.x came out they rewrote how ReShade deals with sliders (when you put your mouse inside a box that has numerical values in it you can pull your mouse from side to side to change the value up or down). In 3.x that functionality was called ‘drag’, and in 4.x it’s changed to a different system called ‘slider’.
Now, 4.x has the potential to use either ‘slider’ or ‘drag’, depending on which you specify in the shader code. But 3.x doesn’t have the ‘slider’ functionality at all. This means if you’re using a 3.x shader in 4.x it will recognise where it says ‘drag’ and work appropriately. But it means if you use a 4.x shader in 3.x it won’t recognise where it says ‘slider’, and some settings will be missing from the shaders. This can be remedied by editing the shader code so wherever it says ‘slider’ you change it to ‘drag’, but that’s time consuming and a pain. By all means go ahead and do it (I’m using three shaders that were written for 4.x in 3.4.1 at the moment and they work more or less fine now I’ve edited the shader code), but it’ll probably be tedious. If you do do it, make sure you back up those shaders afterwards so you never have to do it again.
So, your two options for using a 4.x preset in a 3.x version of ReShade would be to either use it with 3.x shaders or use it with 4.x shaders.
The former would be easier on the face of it because you wouldn’t have to edit the shaders to say ‘drag’ instead of ‘slider’, but you might find that some of the shaders were rewritten when 4.x came out (which is the most usual time for shader authors to make changes to their shaders – although some (as we see with Marty) will do so whenever they feel like it) and so using 3.x shaders might mean some settings just aren’t there and the preset doesn’t look as it should anymore. And there might be some entirely new shaders that were introduced in 4.x that aren’t there at all in the 3.x shader packs.
The latter is, therefore, preferable, but comes with its own issues, namely having to edit all the ‘slider’ instances to say ‘drag’ instead.
So really, when it comes down to it, if you desperately want to use a preset that was made in 4.x, I’d recommend just installing 4.x because it will be a lot easier.
And if you want to use a 3.x preset and have 4.x installed, you can probably do so, but be aware you may have to tweak a few settings here and there to accommodate any shader rewrites that have happened in the meantime (which shouldn’t be too big a task if you’re comfortable tweaking settings in the ReShade menu).
The great thing is, however, it’s ridiculously easy to switch between different versions of ReShade, although not as simple as when just switching between presets, because you need to close down the game to do it.
Let’s say you have 3.4.1 installed, and you want to use 4.3 but not have to go through all the set-up for 3.4.1 again if you want to switch back. What you’d do is take the d3d9.dll, d3d9.log, and reshade.ini files that are inside your Bin folder and just put them instead in your reshade-shaders folder and rename that folder to something like reshade-shaders-341 so you know it has everything you need for that version. Then you can go ahead and install 4.3 from scratch, and it will install a new d3d9.dll, reshade.ini and reshade-shaders folder.
Then, if you want to switch back to 3.4.1, take the d3d9.dll, d3d9.log and reshade.ini that you installed with 4.3 and put them in your new reshade-shaders folder and rename that to reshade-shaders-43, take the d3d9.dll, d3d9.log and reshade.ini files out of the reshade-shaders-341 folder and place them back in your Bin folder and rename reshade-shaders-341 to reshade-shaders and it’ll work as it used to.
The steps above are good to do anyway so you have backups of your ReShade installation should anything happen. I have copies of ReShade and shaders going back to version 0.12… because you never know!

Backup, backup, backup everything!
So, that was an incredibly long response, but I get a bit obsessed with making sure people know why and how, because that’s what I want to know when I’m trying to figure something out, so I assume everyone else does too. Knowledge is power. And even if it’s overkill for what you wanted to know, anon, hopefully there’s someone out there who will find the information useful!
#reshade faq#reshade help#reshade troubleshooting#reshade tips#reshade#reshade versions#reshade installation#reshade compatibility
19 notes
·
View notes
Photo
One of the most frequent asks I get is “how do you make your gifs?” Previously I had just linked my FAQ where I have some resources on how to gif listed, but I figured to (hopefully) stop receiving the same ask over and over, I’d just make a tutorial on how I personally gif!
* Please note that everyone has different giffing styles and settings preferences, so the following is just how I make my gifs. Other people are likely to do things differently!
This post will be a comprehensive guide that includes details about DOWNLOADING VIDEOS, USING VAPOURSYNTH TO MAKE GIFS, USING PHOTOSHOP TO MAKE GIFS (+ a blurb on TOPAZ), and COLORING.
This post was last updated on July 30, 2020. Keep reading to get started!
DOWNLOADING VIDEOS
I use a number of sources to download videos/get video clips, depending on the origin of the video. In general, I try to gif from videos that are at least 1080p - the higher, the better. It’s almost impossible to make gifs look high quality if they don’t originate from a high quality video! Below are the sources I use:
TS files: kpop24hrs (you need an account), kpopexciting, occasionally torrent links from Google or download links from Twitter (search the group name + date in YYMMDD format + .ts)
Youtube videos: 4K Video Downloader
Vlive videos: Soshistagram
Twitter videos: Twitter Video Downloader
Instagram videos: Dredown
Long videos: If I don’t have the space (or patience) to download a certain video, or if it’s not a downloadable video (e.g. Fanship, paid online concert, etc.) then I screen record with Quicktime Player
(Side question: what’s a TS file? A TS file is essentially a very high quality video that you can find for live show performances and aired music show interviews! TS files are generally 60fps, so they’re how gifmakers can make those super clear and smooth live performance gifs. If a TS file is available for what you want to gif, use it.)
USING VAPOURSYNTH TO MAKE GIFS - OLD AND NEW VERSION
05/2020 update: I have re-installed Vapoursynth to its latest version, so I am including updated instructions/screenshots for both the old version (that I downloaded ~mid-2018) and the latest version.
After I’ve downloaded my video, I use Vapoursynth to crop, resize, sharpen, and denoise gifs. Vapoursynth is like Avisynth in that both programs can be used to crop and resize gifs without losing video quality, but VS has the added capabilities of sharpening and denoise. VS is the reason I don’t need to use Topaz on any of my gifs! You can install Vapoursynth here.
First you drag your video file to the Vapoursynth app installed on your computer. You’ll be prompted to enter a start timestamp in HH:MM:SS format (so if you want the video to start 5 seconds in, you would enter 00:00:05). Then you put the encoding duration also in HH:MM:SS format (if you want the video to be 8 seconds long, you would enter 00:00:08). Generally I’ll look for the exact moment I want to gif and enter the start timestamp 1 second earlier and have the encoding duration be between 3-5 seconds.
After you’ve entered this, a resizer.html window will automatically pop up. Below are screenshots of examples of my normal settings for my performance gif 4sets (ex. here or here) for both the old and new versions of Vapoursynth.
Old version:
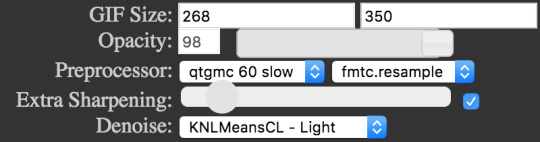
New version:
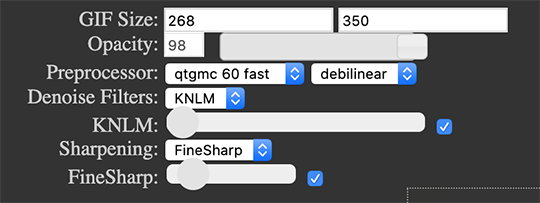
Below is an explanation of the parts:
GIF Size | The gif widths (the first number) recommended for Tumblr:
1 gif per row: 540px
2 gifs per row: 268px
3 gifs per row: 177px
You can use any height, but these are the ones that I tend to use:
1 gif per row: 243px or 300px most frequently, but sometimes I’ll do 220px/201px/400px/450px/540px depending on how large or small I want them
2 gifs per row: 350px
3 gifs per row: 300px, occasionally I’ll do 375px or 400px if it’s a very long video (e.g. some fancams)
Opacity | Don’t worry about this; it just changes how you view the video in the window.
Preprocessor | This refers to how the video will render! Super important because you’ll be given the option of 60 vs. 30 - these numbers refer to frames per second. For live performance gifs, I always use qtgmc 60 fast (slow in theory gives you better quality gifs but I’m far too impatient for that). For all other gifs, I do not use any preprocessing method. A basic rule is that if you’re using a TS file, you should preprocess it because it’ll de-interlace the file. If you’re using an mp4 or mkv or any other file, you don’t need to preprocess.
Extra Sharpening/Sharpening | Pretty self-explanatory. You can move the slider up or down depending on personal preference! I try to keep the sharpening low unless the video quality is especially bad. In the new version, I use FineSharp over VCFreq because I find the latter a little harsh for my tastes.
Denoise/Denoise Filters | Will help remove noise from gifs. In the old version, I almost always used the Light setting unless the video is super grainy, and then I might have chosen Medium instead. In the new version, I use KNLM at its lowest setting. I’ll only bump it up if the original video is quite grainy.
Once you’ve configured all your desired settings, you can copy & paste the output in the resizer.html window to your Vapoursynth editor file and enter the beginning and end frames.
The editor file for the old version:

The editor file for the new version:
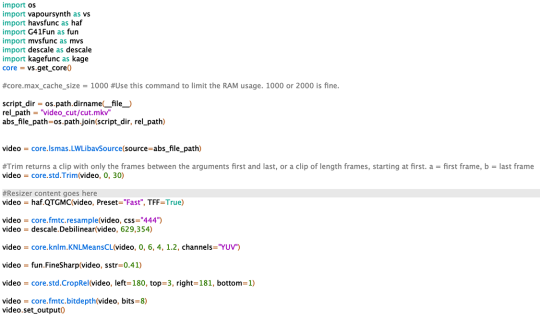
To make the gifs in the old version, just save the file and then wait until everything finishes processing! In the new version, you have to go to Script > Encode video, and then under the gif preset click ‘start.’ Wait until it finishes encoding. On my laptop, this takes anywhere from 20 seconds to 3-4 minutes, so sometimes you have to be patient. This is the end of the Vapoursynth portion of gifmaking.
USING PHOTOSHOP TO MAKE GIFS
To create gifs in Photoshop, go to File > Import > Video Frames to Layers and then select your video file/output file from Vapoursynth (output.mov). These are my settings to create the frame animation:
Once your frames have been imported, you can delete frames and add a coloring psd on top of all your layers.
Photoshop is also where you adjust the timing of your gif. In general, these are my settings:
30fps: 0.04/0.05
60fps: 0.02/0.03/occasionally 0.04 if I want it to be super slo-mo
Honestly, just use whatever timing setting that looks good to you! Some prefer faster gifs, others prefer slower, so just do what you like and things will be okay.
Save through File > Export > Save for Web (Legacy) with these settings (you can play around with selective vs. adaptive or diffusion vs. pattern; they all have slightly different looks, but 256 colors is a must):
Make sure your gif is under 8mb - to decrease a gif’s size, I usually delete frames and/or use selective color to increase the black percentage for whites, neutrals, and blacks.
After you save, you’ll have your gif! Below is the same moment giffed in different ways to illustrate how much a difference that file type + giffing style can make. You can tell that the TS file is higher quality and less grainy than the mp4 file, but it really isn’t unless you use Vapoursynth that the gif becomes super sharp and smooth. This is because if you import a TS file straight into Photoshop, it will only import at 30fps because the video itself is interlaced. You have to run it through a de-interlacer (like VS) to actually get a 60fps clip.
With regard to TOPAZ*, I mentioned above that because Vapoursynth has sharpening and denoise functionalities built into the program, I no longer use Topaz. However, if you do not have access to Vapoursynth, then I highly recommend downloading Topaz (download links can be found through quick searches on Tumblr) and using Denoise and Clean to adjust your gifs. A warning: Topaz can take a long time to process and many gifmakers have a love/hate relationship with it, so be prepared for that. The way you apply Topaz is to select all your frames and layers, then do Filter > Convert to Smart Filters. Add the Topaz/smart sharpen adjustments, then Flatten Frames Into Layers. Once that has happened, hit Convert Frames > Flatten Frames to Clips and then Convert Frames > Make Frames from Clips.
COLORING
I get questions a lot on coloring and the truth is that coloring is an art - I by no means consider myself an expert, but I do experiment a fair amount with different settings and layers so I at least have a decent understand of what’s possible when it comes to coloring.
A few tips I’ll give:
Everyone has different coloring preferences! Whatever coloring you like may not be what others like, and that’s okay. Don’t be afraid to experiment!
PSDs are good for learning how to color - download premade ones and look at how other people made them: what layers did they use? in what order did they put them? what blending mode? at what opacity? These are all questions you’ll need to ask yourself when you create your own PSDs. (Remember not to edit others’ PSDs if they do not allow it, and given them due credit when necessary. Also don’t claim as your own!)
Tips to bring out idols’ natural tan/unwhitewash: increase vibrance, decrease brightness + increase contrast, use selective color and decrease cyan and increase black on the reds channel, use a gradient map that goes from a black/dark red to light pink/coral and change the blending mode to soft light or decrease opacity of the layer to 20-40%.
Below are some examples to show how much a difference coloring can make. I’d consider a basic PSD one that has less than 10 coloring layers/doesn’t make much change to the actual coloring of the gif besides lighting adjustments. More complex PSDs generally have 15 or more layers (the ones I used below in have 16-25+) and drastically change the colors in the original gif. You can also mix PSDs too - for a lot of my performance gifs, I’ll first add a basic PSD that increases the contrast of a gif to make the skin glow, and then I’ll add an additional PSD that adjusts colors and other various lighting aspects.

You can see just how much of a difference coloring makes:
Don’t be afraid to experiment with different layers/styles! Everyone has individual preferences for how they like their gifs to look, and in a sense, coloring is the main way you can make gifs “yours.”
FINAL NOTES
Giffing is hard and requires a lot of patience - you definitely won’t be able to make amazing gifs right when you start! Even though I’ve been giffing for close to a year now, I still dislike many of the gifs I make and think that I can definitely improve. Don’t be afraid to reach out to other gifmakers for advice and help - 99% of the time, they’ll be happy to answer your questions!
I have posted a sped-up version of my gifmaking process here that you can also use as a resource!
Please let me know if I’ve missed something, and feel free to reach out if you still have questions. Good luck!
900 notes
·
View notes
Text
ZSUITE REVIEW – BECOME A PRO FROM SCRATCH
Generally, zSuite OTO is a 4-in-1design app containing Youzign, Gifzign, Mockzign and Logozign that allows anyone to create stunning and engaging Pictures, InfoGraphics, Logo, Gif, Mockup, many more... from scratch. Since zSuite is niche-independent which means it will supply you with unlimited choices for marketing campaigns, introducing a new product or promoting brand.

Another good part is, the industrial License included enables one to be a true freelancer by provide professional design service and charge hundreds bucks. Such a potential land, is not it?
So, what's inside these 4 design apps that make zSuite stick out? Go on reading and you'll know.
Martin Crumlish is the name behind this product. His name is truly well-known for showing up on leaderboard so often.
ZSuite was born after 4 years researching and producing by Martin together with his partners Magnus and Bertand. It passed through several tests over the years and perfected.
Besides including 4 powerful design apps, zSuite is filled with other amazing benefits. Let's dig into these 4 applications first then I will show you the rest.
Program 1: YOUZIGN
Use Youzign in form of:
Youzign online platform
Youzign Desktop app
Youzign WordPress Plugin
Youzign Android and iOS mobile programs
Features inside Youzign:
Unmatched drag n drop interface
Borders and shadows
60 design formats and preset sizes
Huge pool of templates, never struggle for inspiration again
Supports any languages on Earth
Share layouts with any other user
Smart guides that will assist you keep straight lines and design properly
100s of built-in high resolution graphics and icons sorted in categories, including arrows, backgrounds, patterns, buttons, play buttons for videos, mascot characters, and much more we are adding graphics every day.
One-click backgrounds, tee-shirt designer
Background removal
Instant preview technology
Create from scratch or start with a picture
Free access to Youzign marketplace, easily sell your designs
All design formats constantly monitored and upgraded
Integrated into 50+ top marketing programs
Organise your layouts in folders, create unlimited folders
Save layouts as templates and re-use unlimited times
Countless incorporated copy-right free pictures
Retrieve your layouts on your favorite apps with Youzign API
Program 2: GIFZIGN
Gifzign is a Desktop app for PC and Mac that helps you to:
Turn any video on Youtube, Vimeo or your personal computer to a GIF in just a few seconds
Record a video from your camera or screen and turn it into a GIF
Customize your GIFs with text and images
Add other special effects like looping, instagram-like filters, and much more
Create cinemagraph with any uploaded, cloud video or recorded video
Select distinct GIF Player styles with dynamic behaviours
Select different frame mockups
Program 3: MOCKZIGN
Mockzign is a Desktop app for PC and Mac that helps you to:
Simultaneously create 100+ mockups with a single image add
100+ different mockup templates
Create laptop mockups, attire mockups, tablet mockups, desktop mockups, phone mockups and much more
Easily edit and customise your mockup pictures; resize, crop or rotate to match your screen
Upload an image from your computer or beam from any place on the internet with one click
Create mockup that are ready for printing and also optimized for the internet
Program 4: LOGOZIGN
Logozign is a Desktop app for PC and Mac that helps you to:
Create infinite logos for yourself and customers the easy way
Design with No specific skills needed
Immediate real-time downloadable logo mockups
Monogram features included
Mascot features included
Modern icon library with millions of icons
Use different logo styles and containers
Choose Modern design standards
Upload and use your own fonts
Save your logo project and continue editing later
Upload SVG files and continue editing them with Logozign to add to your logos
Last but not the least, in order to offer you a decent with expertise, the team will bring you some other amenities
Commercial license is included so that you can sell your layouts and keep 100% profits
YOUSTART Video Training Course: Everything you will need to know about getting started with Youzign, visual advertising and launching your brand online even if you have zero design skills.
24/6 Support: there should be some time you struggle hard to handle a few tasks, then feel free to contact for assistance
30-day money back guarantee
Weekly training webinars: Join the zSuite for one hour of free training every Friday. Plus instant access to almost two years (100+ webinars) value of recorded training.
Now, let's take a look at some people's opinion about these 4 apps:
I WOULD LIKE TO EMPHASIZE YOU SHOULD GET ZSUITE NOW FOR SOME REASONS:
Before coming to zSuite, perhaps you have to use these 4 applications instead. All take you monthly recurring fee, at $73 per month! Oops! This price is not certainly profitable for business owners who has low-budget, a newbie or a start-up. That's why you need to seriously think about getting zSuite, meaning using a access to 4 design apps with the same outstanding features and the price tag is truly affordable. $67 one time payment for eternally using.
The next reason is, you know Upwork -- the most significant labor market for freelancer?
Companies, Organizations, Entrepreneurs are hungry for these kinds of designing service. The demand keeps growing all of the time. For those who don't need to do dead-end job anymore, you can try getting a professional designer working at home. Since zSuite has all kinds of necessary, niche-independent templates and design together with complete customization, it lets you develop your imagination from zero and make money from it.
You must be curious how it performs in action. So, please listen to my following illustration on a few fundamental design
Building a LOGO WITH LOGOZIGN
There are 4 sections You Need to notice when creating a Logo: Name, Slogan, Symbol and Container
Step 1: Name your own Logo, and make a Slogan
Step 2: Upload SVC in Symbol segment and make some adjustments
A few alterations on text: Size; Font, Spacing, Color
You have a gorgeous Logo like below:
Step 3: Download and Save
You may also save Transparent variant when clicking on it in Container segment .
MAKING FACEBOOK COVER WITH YOUZIGN
Here's the main DASHBOARD
Step 1: Once you log in, hit the"NEW DESIGN" button to start create a new one
As you can see, apart from Facebook, you are able to create impressive cover for virtually all of the social platforms such as Twitter, Youtube, Instagram, Pinterest,...
Step 2: Designing process
There are 4 sections: Background, Graphics, Text, Filter, Upload
Search Graphics on Pixabay based on key word
After adding text and correct it, you can also insert your designed logo on the cover
Step 4: Download and Save
Building a GIF AD USING GIFZIGN
Step 1: Choose from the GIF library or decide to upload your own/ record a new one
Step 2: Make a few adjustments
Upload your designed logo
Adjust the length of the GIF
Go to Filters If You Would like to test what kind of color is suitable
Making Mockups (for MUG) with Mockzign
Step 1: Choose a kind of mug you want to design
Step 2: Click on"PLUS" button that I highlight on the step 1 picture to upload your designed logo
Step 3: Hit download on the right corner
Above all, zSuite also instructs carefully on how to upload each of these logos, covers or GIF in your Facebook or other social networking network. A summary video for you to recap everything you can do with
To be clearer, please watch the DEMO VIDEO under:
youtube
https://uprafficoto.com/
1 note
·
View note
Text
ZSUITE REVIEW – BECOME A PRO FROM SCRATCH
Generally, zSuite OTO is a 4-in-1design app containing Youzign, Gifzign, Mockzign and Logozign that enables anybody to create engaging and stunning Graphics, InfoGraphics, Logo, Gif, Mockup, many more... from scratch. Since zSuite is niche-independent so it's going to provide you with unlimited choices for marketing campaigns, introducing a new product or promoting new.

Another fantastic part is, the industrial License included enables you to be a real freelancer by supply professional design service and charge hundreds dollars. Such a possible land, is not it?
So, what's inside these 4 design apps that make zSuite stick out? Go on reading and you'll know.
Martin Crumlish is the name behind this product. His name is really famous for showing up on leaderboard so frequently. Apart from being a gifted digital marketer, Martin also specializes in creating software helping people deal with traffic generation, designing website,... Some of his previous products that made thousands of sales: Social Mobi Surveys, Social Mobi App, WP Dollar, SocialNeos,...
ZSuite was born after 4 years exploring and generating by Martin with his partners Magnus and Bertand. It passed through several tests through the years and perfected.
Besides including 4 strong design apps, zSuite is filled with other awesome benefits. Let's dig into these 4 software first then I will show you the rest.
App 1: YOUZIGN
Use Youzign in form of:
Youzign online platform
Youzign Desktop app
Youzign WordPress Plugin
Youzign Android and iOS mobile programs
Features inside Youzign:
Unmatched drag n drop interface
Borders and shadows
60 design formats and preset sizes
Huge pool of templates, never battle for inspiration again
Supports any languages on Earth
Share designs with any other user
Smart guides that will assist you maintain straight lines and design properly
100s of built-in high resolution images and icons sorted in categories, such as arrows, backgrounds, patterns, buttons, play buttons for videos, mascot characters, and much more we are adding graphics every day.
One-click wallpapers, tee-shirt designer
Background removal
Instant preview technology
Create from scratch or start with a picture
Free access to Youzign market, easily sell your designs
All design formats constantly monitored and updated
Integrated into 50+ top marketing programs
Organise your designs in folders, create unlimited folders
Save designs as templates and re-use unlimited times
Millions of integrated copy-right free pictures
Retrieve your designs on your favourite apps with Youzign API
App 2: GIFZIGN
Gifzign is a Desktop app for PC and Mac that helps you to:
Turn any video on Youtube, Vimeo or your personal computer to a GIF in just a few seconds
Record a video from your camera or screen and turn it into a GIF
Customize your GIFs with text and graphics
Add other special effects like looping, instagram-like filters, and more
Produce cinemagraph with any uploaded, cloud video or recorded video
Select different GIF Player styles with dynamic behaviors
Select different frame mockups
App 3: MOCKZIGN
Mockzign is a Desktop app for PC and Mac that helps you to:
Simultaneously create 100+ mockups using a single picture add
100+ different mockup templates
Create notebook mockups, apparel mockups, tablet mockups, desktop mockups, telephone mockups and more
Easily edit and edit your mockup pictures; resize, crop or rotate to fit your display
Upload an image from your computer or beam from any place on the internet with one click
Produce mockup that are prepared for printing and also optimised for the internet
App 4: LOGOZIGN
Logozign is a Desktop app for PC and Mac that helps you to:
Create unlimited logos on your own and clients the easy way
Layout with No specific skills needed
Immediate real-time downloadable logo mockups
Monogram features included
Mascot features included
Modern icon library with millions of icons
Use different logo styles and containers
Choose Modern design criteria
Upload and use your own fonts
Save your logo project and continue editing later
Upload SVG files and continue editing them with Logozign to Improve your logos
Last but not the least, in order to offer you a decent with experience, the team will bring you some other amenities
Commercial license is included so that you can sell your designs and keep 100% profits
YOUSTART Video Training Course: Everything you need to know about getting started with Youzign, visual advertising and launch your brand online even if you have zero design skills.
24/6 Support: there should be some time you battle hard to manage a couple of tasks, then don't hesitate to contact for support
30-day money back guarantee
Weekly training webinars: Join the zSuite for one hour of free training each Friday. Plus instant access to nearly 2 years (100+ webinars) value of recorded training.
Now, let's take a look at some people's opinion about these 4 apps:
Prior to coming to zSuite, perhaps you must use these 4 software instead. All take you monthly recurring fee, at $73 a month! Oops! This price is not certainly profitable for business owners who has low-budget, a newbie or a startup. That's why you should seriously think about getting zSuite, meaning using a access to 4 design apps with the same outstanding features and the cost is really affordable. $67 one time payment for forever using.
The second reason is, you know Upwork -- the most significant labor market for freelancer?
Companies, Organizations, Entrepreneurs are hungry for these kinds of designing service. The demand keeps growing all of the time. For people who don't need to do dead-end job , you can try getting a professional designer working at home. Since zSuite has all types of necessary, niche-independent templates and design together with complete customization, it enables you to develop your imagination from zero and make money from it.
HOW TO GET IT TO WORK?
You need to be curious how it performs in action. So, please listen to my next illustration on a few basic design
Building a LOGO WITH LOGOZIGN
There are 4 sections You Need to notice when creating a Logo: Name, Slogan, Symbol and Container
Step 1: Name your own Logo, and make a Slogan
Step 2: Upload SVC in Symbol segment and make some adjustments
A few alterations on text: Size; Font, Spacing, Color
You have a stunning Logo like below:
Step 3: Save and Download
You may also save Transparent version when clicking on it in Container section.
Here is the main DASHBOARD
Step 1: After you log in, hit the"NEW DESIGN" button to begin create a new one
As you can see, apart from Facebook, you have the ability to create impressive cover for virtually all of the social platforms such as Twitter, Youtube, Instagram, Pinterest,...
Step 2: Designing procedure
There are 4 sections: Background, Graphics, Text, Filter, Upload
Search Graphics on Pixabay based on key word
After adding text and correct it, you can also insert your designed logo on the cover
Step 4: Save and Download
Building a GIF AD USING GIFZIGN
Step 1: Choose from the GIF library or decide to upload your own/ record a new one
Step 2: Make a few adjustments
Upload your intended logo
Adjust the length of the GIF
Go to Filters if you want to test what kind of color is suitable
Step 3: Save the GIF and it will appear on the dashboard so that we can preview it
Step 1: Choose a kind of mug you would like to design
Step 2: Click on"PLUS" button that I highlight on the step 1 picture to upload your intended logo
Step 3: Hit download on the right corner
Above all, zSuite also instructs carefully on how to upload all these logos, covers or GIF in your Facebook or other social media network. A summary video for you to recap everything you can do with
To be clearer, please watch the DEMO VIDEO under:
youtube
https://uprafficoto.com/
1 note
·
View note
Text
Blender shortcuts

CAMERA INSTRUCTIONS:
Holding the scroll of your mouse thingy: Will rotate the view
Scrolling the scroll of your mouse thingy: Will zoom in and out
Shift+Holding scroll thingy of your mouse: Change view position
CTRL+Holding scroll thingy of your mouse: Move your mouse and see what it does!
If you have this lil thingy:
Here are some awesome view switchers:
1: Will switch the view to the Front view
CTRL+1: Will switch the view to the back view
3: Will switch the view to the left view:
CTRL+3: Will switch the view to the right view
7: top view
9: Bottom view
5: Change perspective. Great when you’re meshing furniture or creating poses!
Blender Navigation Settings:

Object mode: Is basically the ‘outside coat’ of your mesh, or well... your mesh! if you Right+click on it, the mesh will be selected.
Note: Don’t scale, rotate, move your mesh in object mode though. It will screw up with your UV map and will throw errors!
Edit mode: Edit mode is basically... what it says, you get to drag around those amazing dots or edges or faces or... even the mesh! :)

Occult geometry: This little button will make your mesh transparent in a very helpful way! This way you’ll be able to select the back vertices that you’d otherwise not see.

Note: This option is only available in Edit Mode.
Add: It has various options, but for meshing the add>mesh>pickamesh it could be really helpful!

Transformation orientation:
Translate: Stands for moving around the scene/blender


Rotate: Makes you rotate your mesh in the scene/blender.


Scale: Gives you the ability to make your mesh bigger

Viewport shadings:
Note: Not all shadings are compatible with edit mode!
Solid: Is basically your gray-scaled mesh with no textures or anything added! Just let’s you focus on the mesh (edit mode compatible)


Wireframe: Let’s you see the edges of your mesh but the faces will be invisible. This could be nice to see whether something is symmetric on spots that you wouldn’t be able to see in solid mode. You can also select vertices that you can’t select in solid mode! (Edit mode compatible)


Texture: Makes you see the texture you applied on your UV map. To see how this will be helpful for TS3 meshing, click here: X
(Edit mode compatible)


Render: Sometimes useful to see how strong your specular map is. However for this, I’d recommend switching it to Cycle render. To read more about what the hell i’m talking about, here you go! x
And any tutorial on how to get it game-readyish: X


SHORTCUT INSTRUCTIONS:
Note: All these shortcuts will work in the UV map layout we’ll encounter later on. I’d also suggest copy pasting this list on a text editor so you don’t forget about them.
A: Will select everything Object mode (The view we’re in right now) And will select all the dots (vertices) In Edit mode.
B: Will let you select whatever you want with just dragging the mouse
C: Hey we made the alphabet here Is basically this brush selecting tool. Works great in Edit mode, but I rarely use it in object mode.
CTRL+Rightclick: (Does not work with the UV map layout) Will let you create this circle to select stuff!
TAB: Will let you switch back to edit mode or object mode!
L: (Will only work with Blender 2.70 or later) Stands for ‘Linked’. Will let you select parts of the mesh that are, well linked in a way. Works great with meshes with hard edges or hair meshes!
Shift+Right click: Is selecting one object (In object mode. In edit mode, you’ll be able to select one vertex at a time).
S: Stands for scaling.
S+X: Stands for scaling horizontally
S+Y: Stands for scaling vertically
R: Stands for rotating
G: Stands for grab n move!
G+Y: Stands for grab and moving it up and down
G+X: Stands for grabbing and moving it left and right
CTRL+J: Will join 2 separated ‘groups’ or ‘meshes’ together! Edit mode only!
Spacebar: If you can’t find a specific option, just search it! :)
Recommended settings for TS3:
Setting things up for the sims 3 could be a pain when you have no idea what the game works with and what-not. If you’re not really familiar with creating stuff for games in general, especially the sims 3, I’d definitely check this part out! :)
Right navigation side bar settings:
Note: Make sure that the following settings are being checked in Object mode NOT edit mode!
Location: This should always be on 0.00000. Reason why is because else your CC will be say, somewhere under your world when placing it in-game! Or super high in the sky! We don’t want that to happen, eh? ;)
Scale: This one should always be set to 1.000. This is very important! If you scale them up, it will screw up your UV map and Blender will throw tons of errors. If you do want to scale something up, please do this in edit mode NOT Object mode!
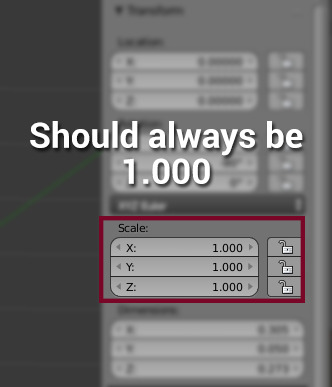
TIP: Scared of accidentally exporting it with these values being not correct or just wanna be lazy/safe? Try ticking these slot thingies before meshing! :) You’ll love them!

3D Cursor: In object mode you always want the cursor to be on 0.0000. This will be helpful when adding an existing Blender mesh! :) If it’s not on the 0.0000, then this could cause issues too with uv mapping.
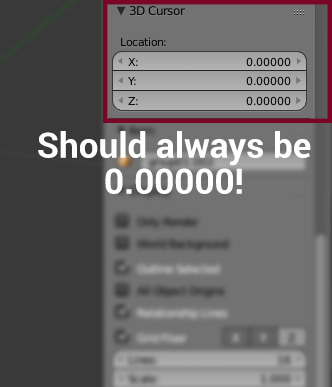
Shadings: There’s not that much that we need to take care of here, but there’s one VERY important box we have to tick, which is the ‘backface culling’. Reason why is, is that the way it will look like turned on is the way it will look like in-game. Turning it off will NOT fix it!
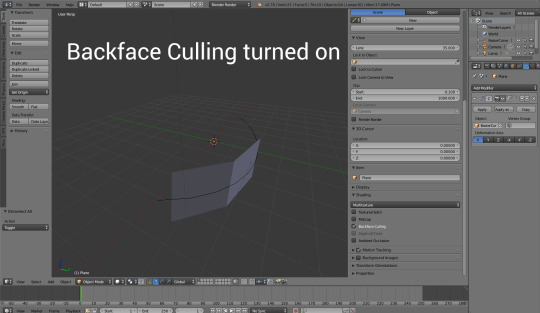
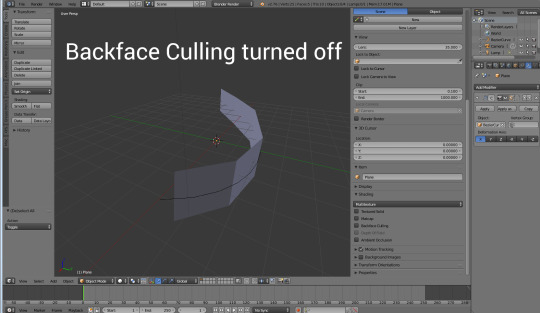
See how when turned on the back is invisible? This is how the plane will look in game if you don’t fix this. But... how *do* we fix it? Let’s go into edit mode!
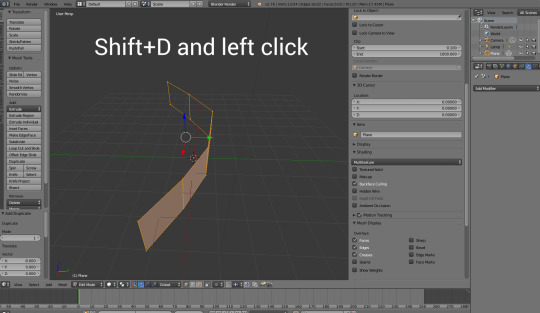
1. We want to duplicate the mesh with Shift+D and then left click to confirm the duplication.
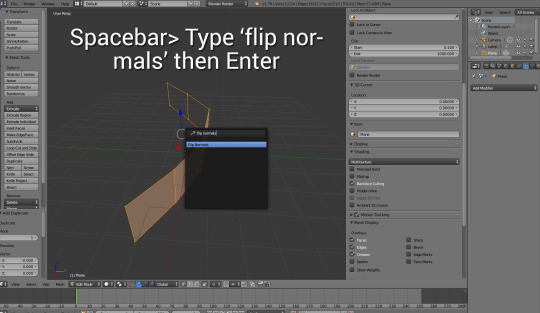
2. Then, we want to use the spacebar which stands for searching certain functionalities, type in ‘Flip normals’ and then press enter,
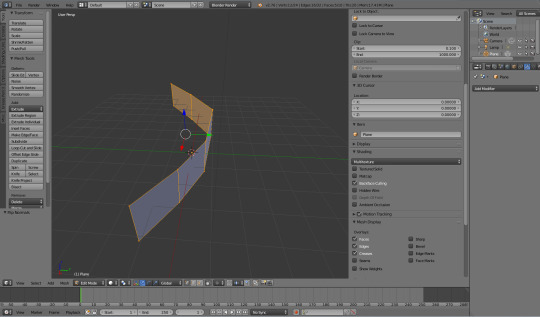
3. And there you go! Now the game won’t make them invisible from the back!
Left side bar navigation:
Shading: This option is only available in object mode. And is very helpful when you just imported a mesh but it doesn’t quite look right. Have a few examples!

Note: This option won’t just affect blender, it will also affect in-game.
Flat:
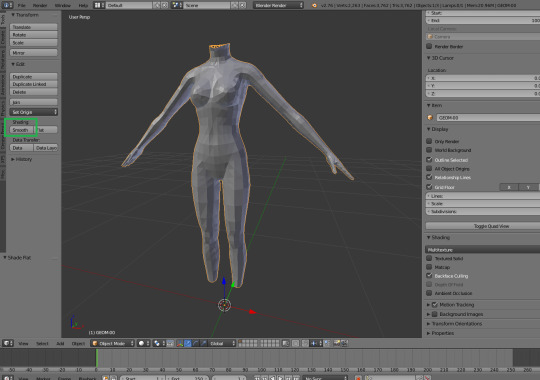
Smooth:

Now you think ‘why can’t it just smooth always?!’ well...
Smooth: Oh yuck! it’s 2005 all over again D:

Flat: Yay! it’s table-y! :D
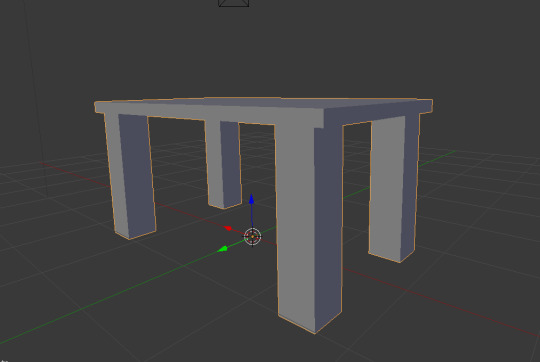
Don’t fancy them all being fully flat or smooth? Let’s get to the next tab...
Shadings/UV>Shadings: This is really helpful for when you’re working on complex meshes! Shoes for example, would probably need this or a specific furniture, or even hair! The most recommended way of doing this is by selecting a few faces and use either the ‘faces: smooth’ or ‘flat’ function
Note: Only shows up in edit mode!
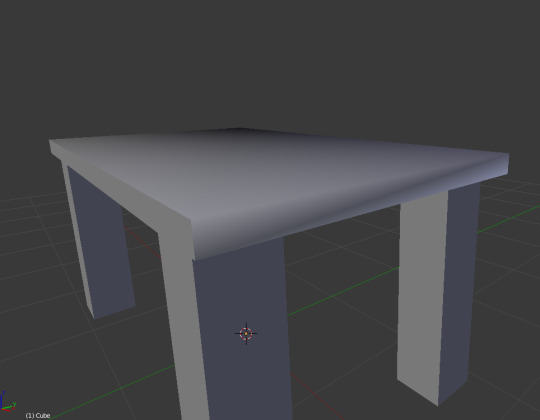
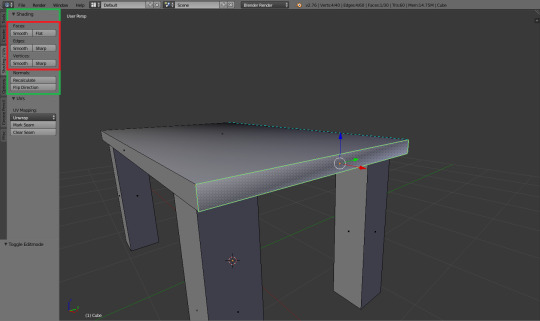
Exporting recommendations
When you’re sure you UV mapped it properly, and your mesh is ready to see the good ol’ milkshape to get it game-ready, the most recommended way of exporting it would be as a waterfront OBJ. OBJ is a really raw export function considered how it doesn’t support bones, which in this case is amazing! Since we don’t do anything with them in Blender when meshing stuff for ts3 :) BUT! There are some settings you want to have in order to export things successfully.
Let’s take a look at this thingy:

For exporting OBJ files:
Apply modifier
Include edges
Write normals
Include UVs
Objects as OBJ groups
Optional: Write materials (Basically your textures)
Scale: should be set to 1.00
Forward: -z Forward
Up: Y up
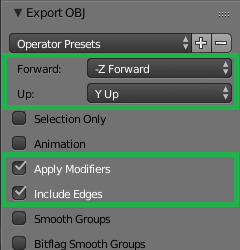
You can even save the setting by clicking on the + next to the ‘operator Presets’ and call it something like ‘ts3 export’ so you don’t have to keep selecting them :)
Helpful guides when you’re a noob!
Now this thing might be super duper long, but does not cover all the things you can do with it! I do recommend watching all or most of these links/videos in order to understand what the tutorials are about and what I’m doing.
NOTE: I occasionally will write down the shortcuts for specific functions but I WILL NOT explain it in my tutorials. They’re written for people with a basic knowledge for at least blender or their chosen 3D program.
Blender starters tutorials:
Interface explanation
Blender fundamentals
Beginner’s course
Awesome UV mapping tutorial
Model with curves
Customized bump maps
Simlicious:
Covering the basics in text
Info about normals
UV mapping to make things ts3 pattern-y good!
Me!:
Render only
Bake less pixelated textures
Fun stuff to look at and follow but optional:
Note: When following specific tutorials about cycle renders (Like making something translucent) These will NOT work in-game. Everything shown in render apart from the specular map, normal map and the diffuse map will NOT work in-game
Blender cloud: Is a really cool platform where you can basically watch whatever you want to gain knowledge on from the professionals! Which, is not your regular youtube videos ;) You won’t be disappointed!
https://cloud.blender.org/welcome
Blender free textures: Is a free online database where there are over 1500 free textures you can choose from, for non-commercial to commercial use, all for free! So no copyrighting involved!
https://cloud.blender.org/p/textures/
Blender today: Is kind of this awesome newspaper website. everyday you’ll get a new article, some artwork, others awesome tips to improve your work with Blender!
http://blender.today/p/
Jayanam: Has some great blender tutorials to maybe give you some ideas for your next meshing mission! :)
https://www.youtube.com/watch?v=icABMWGkOn4&list=PLboXykqtm8dydLQFk962346_TrAgzfMCF
Yan’s UV mapping tutorials: I learned a lot by just watcihng these videos! It sure is a recommended video to watch, but watch this one after you know how to UV map!
https://www.youtube.com/playlist?list=PLvPwLecDlWRD3F9lVD0ks_sdpxCgxgYm-
Hand-painted Sword by XRG81: Why this one? Well it did teach me the advanced ways of drawing on a texture map instead of just guessing in Photoshop if I did them write! :) And besides! It’s a really awesome way to avoid seams!
https://www.youtube.com/playlist?list=PLNHJ5gduZOiWXtbeiZZi3q082bclOHQY4
Tutor4u: Has tons of awesome tutorials on how to work with stuff in Blender!
742 notes
·
View notes
Text
Extensive Guide for Making Gifs
(On Mac and with Photoshop, but the process is basically the same on other platforms.)
Let’s make this gif together (I know it’s not the pretties, but it serves the purpose):

Prerequisites for this tutorial:
gif capture software, e.g. Giphy Capture
Photoshop
Let’s start with the basic. Capturing that gif from your screen.
(If you already know how to do that scroll down until you see a screenshot of photoshop.)
Open Giphy Capture and your video. (I’m grabbing from Netflix, so I’m using chrome to avoid the Netflix Blackscreen)
No need for fullscreen, a fullscreen gif will be too big anyway! Be aware that GC only records 30 seconds at a time. So move a few seconds before your scene - to allow leeway for moving your cursor and for any unwanted details to disappear from the screen (e.g. timeline bars etc.) Adjust the record frame to the size of the video. Start to record one or two seconds before your desired scene.

Stop video and recording when you’re done. Might take two or three tries to get there. don’t worry if it isn’t exact, record too much if you’re unsure. We’re gonna cut this down later.
Now, open your recorded gif by clicking on its icon. Adjust the section you want to export as a gif.

Don’t worry about being exact here either. Better be on the safe side and have a frame or two too many. We can delete frames later in Photoshop. You can also change here if you want it to be a normal loop, ping-pong (back and forth) or reverse, and adjust framerate and size. Don’t worry about the size, we can change that in PS later.
Export your gif. Ignore the file size warning if necessary and save as gif anyway.
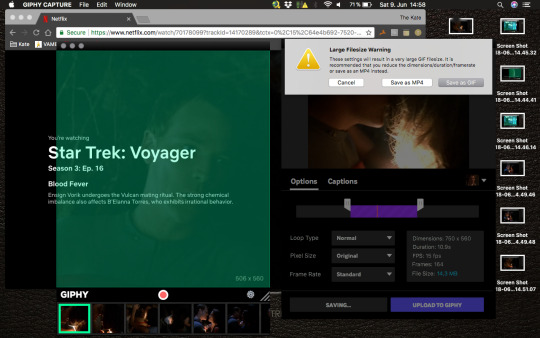
Now, open your saved gif in Photoshop.

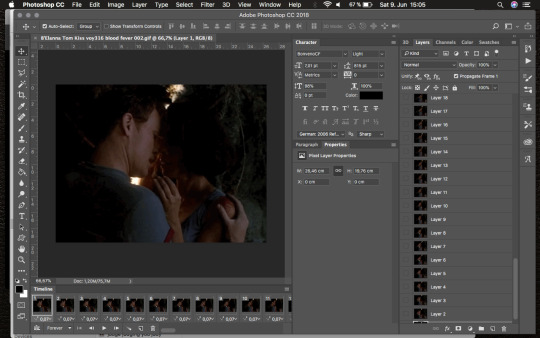
Look through the gif and delete frames in the beginning or end if you want. Do that in the frame section (timeline), NOT in the layer section. You’ll see why in a bit.

Play the gif every time you change something to make sure it’s what you want, and change things back if needed. (cmd + Z/alt+cmd+Z if more than one step back/shift+cmd+Z if step forward again)
Let’s say I want to remove the first 5 frames. Click on frame 1 and then hold shift and click frame 5. Voila, you selected the first 5 frames. Now delete.
Play gif. Not good? Cmd + Z and try again.
Let’s say we’re happy with your frames, but it’s playing too fast/slow. Select the frames you want slowed down. Let’s say all of them. Click the first frame, then hold shift and click the last frame. Now click on the little number under the frames, on any frame - it doesn’t matter as long as it’s one of those you selected (in case you didn’t select all of them)
Don’t slow down too much or it will look like a slideshow rather than a gif. You want it to still be smooth.
Check and revert if necessary, just as before. Let’s slow ours down to 0.1 seconds instead of 0.07s.

Now that looks fine. Let’s move on and improve the images.
For the sake of this tutorial I’m gonna delete some frames.
Now we convert the frames to a timeline.

We move over to the layers section now.
You’ll see that not all of them are visible. The invisible ones are those we deleted, so we can go ahead and delete those layers as well.

Now we selected all the layers and convert them into a smart object (Right click --> Convert into Smart Object)
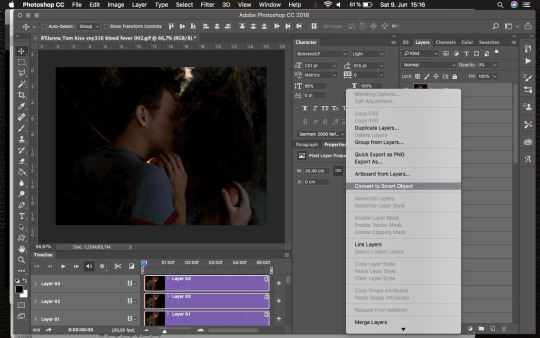
Let’s sharpen our gif and see if that makes it look better. (Undo if you hate it, obviously.)
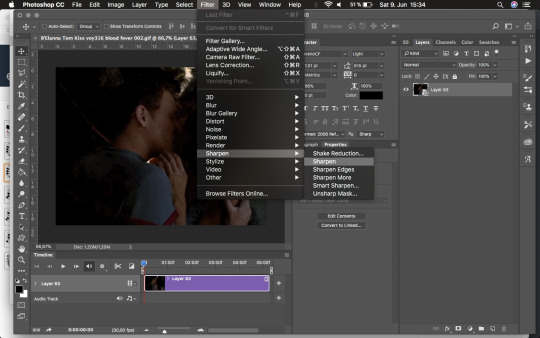
Since our gif is really dark I want to brighten it up.
Right click on layer and Duplicate Layer... (Or use cmd + J)
Set that layer to screen. You can repeat this step as often as you want, but beware, it’ll make your gif look awful at some point.


We can go one forever adding more screened layers, but it’s gonna look bad at some point.

Instead of adding another screen layer, let’s add an adjustment layer instead.
Go to Layer —> New Adjustment Layer —> Curves…
Adjust darkness and light until you’re satisfied. If you’re not happy later on, you can always go back into the layer and adjust it if needed. This goes for every adjustment layer.
From this point on you can basically add as many layers for as many effects as you need/want.
Let’s play a little with saturation.
Layer —> New Adjustment Layer —> Hue/Saturation
I’m lowering the saturation a bit because I want to add an orange glow…you know, create some sunlight streaming in…

I’m adding an empty layer now where I can add the orange glow effect.
Now, if you’ve moved in your timeline, the new layer will appear at your marker. You may have to move it back and adjust the length to the rest of your timeline.

Now let’s get some glow.
Got to the gradient tool in your toolbar (or just press G on your keyboard). This may be set to bucket fill tool, so you’ll have to right click to switch from bucket to gradient.
Then go to the gradient picker and click on that field at the top to choose your colour and variation.
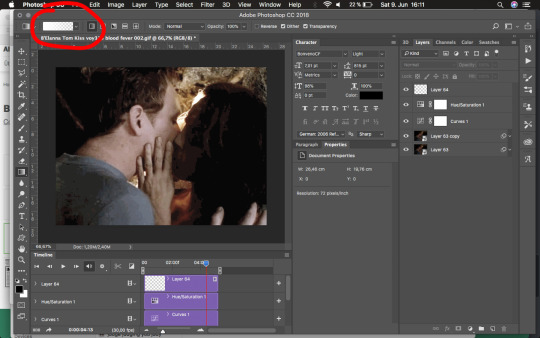
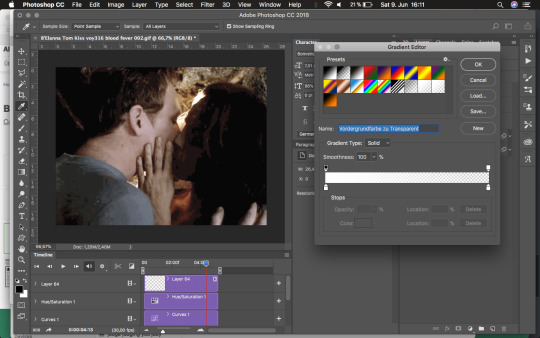
Pick the Foreground colour to transparent and change the foreground colour to what you want (orange here).
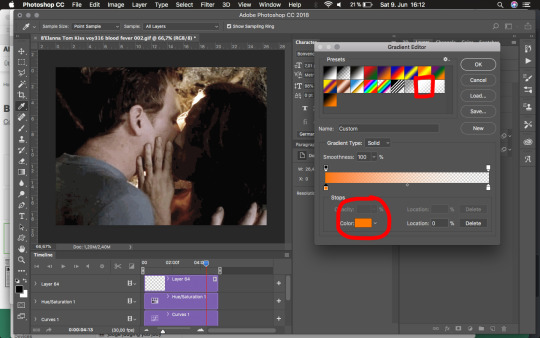
Now back to your image and drag that gradient.
Make sure you’re in your empty layer!
Start dragging from where you want the light to shine to the lower part of the image/gif. Don’t worry about being exact. We’ll adjust this anyway.


Now this looks horrible, so let’s adjust it.
Press cmd + T, that allows you to change the size and angle.

Let’s make it a lot bigger to diffuse the transition, and let’s also change the angle to where we want it. (move your cursor along the sides to any of the middle points until you get a curved cursor - that lets you rotate the layer.)

Then move it up a bit so the orange isn’t fully visible, but only a transparent glow over the image.
Play a little with the position, angle and size until you’re satisfied. Press enter or the accept button on top.

Now, I actually do not want such a blatant orange, so I’m setting my layer to “soft light”…it’s still too much for my taste so I’m going to lower the layer’s opacity a little.
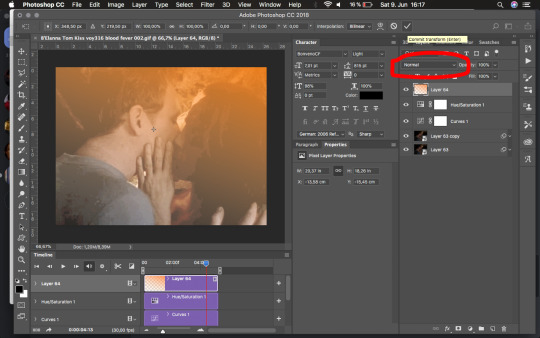

Now that looks fine, let’s check if we like the gif so far.
The quality of mine is terrible, obviously, it’s gonna look much better if the source video has better quality (and maybe other gif capture software can do this better. I think Giphy Capture lowers the image quality drastically.)
Anyway, let’s check the size of this gif. Go to File —> Export —> Save for Web (Legacy)

Now, mine is over 5M…that’s not gonna let you play it on tumblr, so we need to scale it down. We have an image of 750x650 pixels. A nice size, but tumblr won’t display that anyway. Close that tab.
Let’s scale the image down to what tumblr can display. Tumblr display pics with only 540 pixels in width anyway, so let’s scale it down to that (make sure the aspect ratio is locked or it’ll distort.) Set it to pixels and change the width to 540.


Checking size again —> Still 3.8M, so we need scale down or cut something. We don’t want to give up image quality just yet. (Make sure transparency is clicked, or the file will be bigger.)
We could crop the image to where we want the focus (obviously, that’ll make the image smaller again) Select part of your image and crop down to that.

Check file size again —> mine is still over 3M —> I’m going in for the presets.
File —> Export —> Save for Web (Legacy)
Then find the field for presets and choose “Gif 128 no Dither”, that drops our colours from 256 to 128…it’s barely noticeable in our case, but it may be in other cases, see if you like it.
What it does do here is drop the file size from over 3.8M down to 2.6M —> file size restriction for moving gifs on tumblr is 3MB, so it should be fine.
Now make sure that the Looping option is set on forever instead of the default “Once” —> go to Save… and save wherever you want.
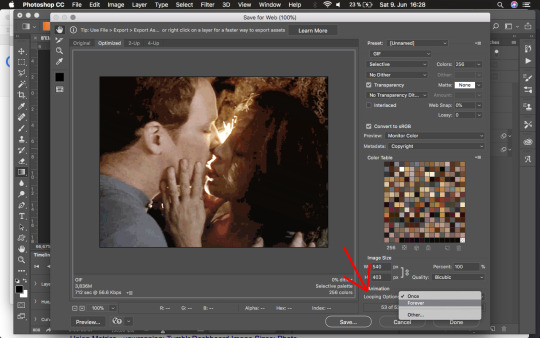
Voilà, have fun with your gif.
PS: If you want to watermark your gif do that in a new layer. I watermark mine as follows:
Dependent on whether it’s a dark or bright gif I choose text in black or white. Choose a spot where it doesn’t ruin the gif but is still visible if necessary. I usually go for a corner and type with a small font.
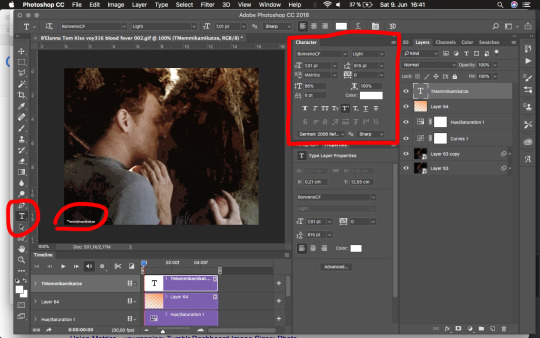
Lower transparency of the layer until it’s barely visible, but still readable. Remember to adjust the length of the clip in your timeline.
If you still have questions about the process don’t hesitate to reply to this post. I can always edit it to add certain info/screenshots of specific steps if necessary.
97 notes
·
View notes
Text
Editing the Video - VFX
I planned to incorporate SFX into my trailer as I wanted a chance to try out Adobe After Effects, and thought it would make it a lot more visually appealing. There were several scenes that had to have effects added to them, which were usually just simple glowing runes or light.
This was my first time using Adobe After Effects.
Arm Rune
To create this effect, I went to the storyboard to see the design I had for the arm rune then traced over it in Photoshop to get the correct shape. The design was then saved as a PSD in 2 colours: black and blue. The PSD was transparent and had no background.
I opened After Effects and imported the clip of the arm, then turned it into a composition. Then, I imported the PSD file and added both of the rune layers to the original clip. I then decided on a time to make the rune appear in the video based on how long it was.

I opened the ‘transform’ bar on the layer (for the blue rune layer) and started making keyframes for the Opacity. To do this, you click on the timer next to Opacity so that it turns blue, like this:

From this point, whenever you move the position in the video and change the opacity there, it will create a keyframe. I set the opacity to 0% at the point just before I wanted it to start appearing, then moved to roughly a second later and set the opacity to 100%. Now it faded in between the points I had selected. I also lowered the opacity when the rune turns black so it would look more like it was on the skin.
Next, I searched for the following effects in the ‘Effects and Presets’ bar on the right hand side of the screen. With each effect, I dragged it onto the blue rune layer, which then allowed me to adjust it in the top left hand corner.

The Hue/saturation effect allowed me to change the colour of the rune from blue to white to black as I needed. I realised at this point that there was no real need to also have a black rune layer as I could just change the colour of the blue one. The rune stayed blue at first, then flashed to white and finally faded to black.
The Gaussian blur was used to make the rune blurry while it was appearing, then appear much sharper at the end once it turns black. However, I made sure to keep a small amount of blue the whole way through, as it looks more realistic.
The Glow effect added a blue glow around the rune as it was appearing, which the colour and opacity of could be changed.
To track the rune to the arm, I had to choose a point on the arm which stood out from the rest of it. Since I wasn’t aware you had to do this, I didn’t add a marker to her arm when filming so had to use a freckle instead.
I used the Tracker on the right hand side of the screen, and positioned the marker on the freckle.

I selected ‘Track motion’ and made sure the motion target was the actual video clip layer. After this, you can change the size of both of the boxes.

I learned that the smaller box is the size of the actual object you’re tracking. The larger box is the radius in which the tracker will search for the object - the smaller this is, the quicker it will be done. If the object barely moves from one frame to the next, the box can be small, but if it moves a large distance between each frame then the box should be big enough to compensate for that.
Finally, I selected the play button next to ‘Analyse’ and it went through each frame and marked where the tracked point is located. If any tracked point was very far out of place I stopped the analysis and moved it back to the correct location before letting it analyse the next frame. Once this was done, it looked like this:

Before clicking Apply, I made a new Null Object layer. I clicked on this layer and then clicked Apply. This way, the tracked point is now attached to the blank layer rather than the video layer.
I then parented the blue rune layer to the null object layer so it will now move along the same path as the tracked point does.
The rest of the effects in the video were made in a similar way except the hardest scene - the one in which the magic circle appears.
Magic Circle Scene
This was the most complicated scene in the entire trailer to create, and i’m still not completely happy with the finished result but I don’t know an easier way to get a better result currently. I got the Magic Circle, Lightning Bolt and Smoke from Production Crate, and referenced this tutorial a lot in order to help me achieve the effect I wanted.
I downloaded the magic circle animation and converted it into a 3D layer:
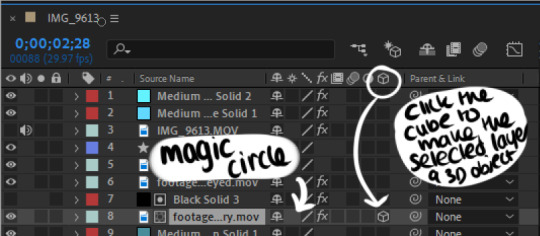
This way, I could move and adjust the layer based on perspective as if it was laying on the ground. In Hindsight, I think that the magic circle was not quite at the right angle to look convincing against the ground.
Changing the size and opacity of the magic circle was achieved the same way as with the arm rune and was easy enough. I also used the same method to make the circle and the lightning bolt glow (and to change the colour of the circle from pink to blue - I used the hue/saturation effect.)
Using the CC Light Rays Effect

(With^^)

(Without^)
I added this both to the magic circle and the bolt, which I think makes it look a little more impressive.
To add even more light, I added solid layers of blue, then hid them while I drew a mask in the area I wanted the light. Once I showed the layer again, the colour was inside the mask. I feathered the mask a lot using the mask options inside the new layer so it actually looked like a glow. Next, I changed the shape of the mask at different points in the video so that the light appeared and dissipated as I wanted it. This worked really well I think. The light layers were on the blending mode ‘Add’
Layering the Magic Circle behind Chloe
This was the most difficult part of the entire process. I tried 3 separate methods for this and even the best looking one didn’t work as well as i’d hoped.
Method 1: Rotobrush
I used this tutorial to help me with using the Rotobrush. This method would have worked a lot better if my video was higher resolution and if she’d have been wearing a more contrasting colour to the ground.
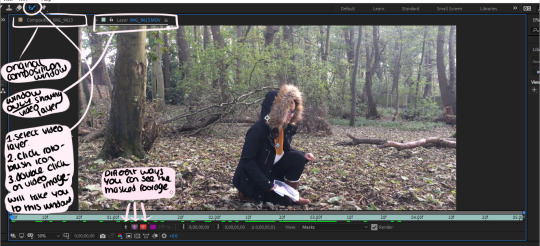
I begun to try and rotoscope Chloe out of the original footage using the Rotobrush tool. I selected the video layer and the Rotobrush, then double clicked the video. This took me to a separate tab with just this layer in it. The brush works a similar way to the select pen on Photoshop - by drawing, it will select the entirety of the area that has the same colour as the one you picked.
To erase using the Rotobrush, I held down the alt key. By playing the footage once all of the subject is selected in the first frame, After Effects will try and keep the same object selected and change the shape accordingly based on it’s position or shape. However this did not work properly, so eventually I had to individually erase and select the area I wanted to rotoscope for each individual frame.
Once the main area was rotoscoped, I tried using the refine edge option which is meant to make the selection more accurate - this didn’t work either. I was left with a mask that I didn’t know how to use and wasn’t the right shape, so I decided to abandon this process and try something else instead.
I tried various other methods - and eventually decided not to mask her out at all. Instead, I created a new solid, hid the layer and then masked around the lower half of her body. Then went into the layer settings and clicked on the stopwatch for the ‘Mask Path’ option. This meant that I could edit the shape of the mask for each individual frame. I also feathered the mask so that it looked a lot softer and less noticeable.

The next part was really difficult to figure out. I was trying to figure out how to make the mask transparent but also not show any of the magic circle inside it. To do this, I made sure that the mask layer was directly above the Magic Circle. I then selected the magic circle layer and did Layer>Track Matte>Alpha Inverted Matte. This created these two icons on both layers:

After this, I hid the mask layer (black solid 3) so it appeared to be transparent while not showing any of the magic circle inside it. The mask was still a little uneven and shaky in some parts of the clip but it seemed to be the easiest way to accomplish what I wanted, despite this method taking several hours.
Chloe’s Eye
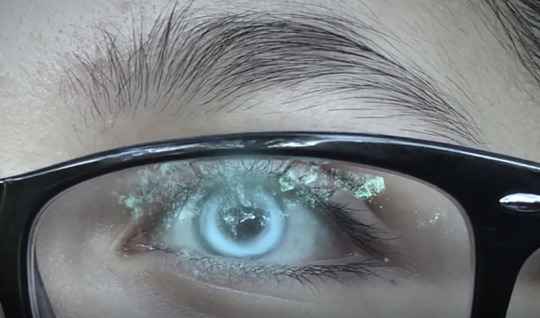
I made this sequence before I had ever used After Effects. At this point, I didn’t want to use After Effects and so attempted to do it in Photoshop, which took a really long time and wasn’t really worth it. I drew in each frame of the eye beginning to glow, and had to manually move the eye colour in each frame so it moved with the face. It ended up looking a little shaky and if I could do it again i’d definitely use After Effects’ motion tracking tool.
Colour Correcting
This was achieved mostly in premiere. The scenes that had SFX were individually colour corrected in After Effects by adding coloured solids set to multiply to get the level of light I wanted. When adding the colour correction to the rest of the clips, I wanted the footage to look cold and somewhat desaturated - since the original is really bright and sunny - which I thought looked really out of place and didn’t fit the genre, song or tone.
To colour correct, I used the ‘Lumetri Colour’ option on the right hand side of the Premiere work-space. I did this while having my chosen clip selected. I then lowered the saturation and changed the hue to something darker and more blue, as I was trying to make it look a lot darker. I then copy pasted the FX to each clip so that they were all the same.
1 note
·
View note
Note
Hi! I'm sorry to bother you but I was wondering if you've ever done an icon tutorial? Your icons are really the most beautiful I've seen, and I'd love to know your secrets 😊. But if you aren't interested in posting them I totally understand. I hope you're having a great day!!
EXTENDED ICON TUTORIAL
Hey sorry this took so long to get around to but I finally felt inspired to make this. A couple things first. I want to give a special shout out to argetnallison cuz I learned how to make icons from her tutorials here. I picked up a few tips and tricks that aren’t included in other tutorials so we’re gonna call this an extended icon tutorial. I’ve also been told I explain things well but if there’s anything from this that needs clearing up later just send me a message and i will be happy to help guide you through it. This Is my first time making a tutorial so bare with me if I ramble.
we will be going from this:

to this

to this

Ok so things you willneed..
photoshop (i personally use the 2014 CC version or something like that but that’s just my preference for layout and stuff)
kmplayer (kmplayer is how i get most of my screencaps. Sometimes I go to google or screencapped.net or other sites that have precapped content when i feel lazy)
Alright so we start off with figuring out which screencap to use.
so basically here i open whatever movie/tv show episode file i want to use and skim in kmplayer till i find a scene that works. Then I hit start and play it until i have the scene i want and then stop,

these are my capture settings for kmplayer.
Alright so I picked this scene of Hermione in HBP (aka the hardest movie to color.
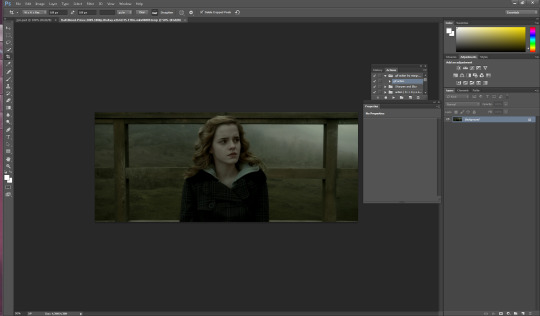
Okay disclaimer here, I don’t actually use anything on the left and rely totally on shortcuts on the keyboard so that’ll be how I explain things here.
People do this step differently but what i tend to do is crop my image before i mask it. I hit “c” on my keyboard. I set my w x h at the top to 100 x 100. Then what i do is I take my mouse and click on the top bar of the crop box and extend it till Jyn is a more icon like size.
after she is at a size I think is ok for this icon i hit enter and it looks like this

alright now for the fun part. this is honestly the hardest part of icon making, the rest is simple if you’ve used photoshop before. Its time to mask the image and get rid of the background around Hermione. So we start by pressing “p” on our keyboard, p for pen is how i remember, and then we start at one end of her shoulder and work our way around. Basically how this works is u click around the image of her and keep clicking until u have an outline around her like I have below. this does not need to be perfect because we’re gonna have to use the eraser tool anyways.
you should have something that looks like this. Also tip here is that you can use ctrl + and ctrl - to make the image bigger or smaller when doing this part.
ok so now we have a rough outline of hermione and we wanna create this mask so we right click within the image somewhere and we hit “create vector mask” which should be the first option (i donno what its like in other versions of ps sorry)

ur image should now look like this
be sure your starting dot and your connecting dot come together at the end or it won’t let you do this part.
Alright so here is where i add my psd and my fancy textures and things. I use argetnallison’s psd (no claiming as ur own, give her credit if you use this) and adjust it as needed because i am really bad at making my own (seriously props to everyone who makes their own psds its hard and i salute you).
so how I do this next part is i take my psd file (this also contains my textures and stuff to make it easier and quicker to do stuff) I take the jyn file with the psd and i ctrl/alt/a toselect everything quickly like this and then drag it onto the hermione image.
i move some of my layers under the hermione image like the solid color layer and the texture pack so she’s visible again and keep going.
alright so another thing to note is if u click on the mask next to hermione you will get a box that has the vector mask and density and feather
you’re going to want to go to feather and where it says 0.0 make it 0.3 (some people do 2 or 1 just mess with it till it suits you).
so i have set mine to 0.3 and now its time to erase the stuff around hermione that’s still visible. i press e on my keyboard and zoom in on it a little Here it is also really helpful to create another layer mask so that it doesn’t mess with the mask of her you already have (ps weird and it’ll get messy trust me) so i go down to the bottom right and hit add layer mask its the third one from the left

the white square between the hermione picture and the mask is where you’re gonna wanna click and then start erasing.
if you mess up along the way and erase too much you can press b on your keyboard for brush and it’ll bring it back.
ok now its time to sharpen the image. i have an action i really like but its from a blogger who’s changed user since then and i donno her new one or i’d 100% credit. I will try and find it and add the link here. anyway I convert the hermione picture to a smart object (right click on the hermione picture and its on the left towards the middle) hit play and add the action to the image Mine looks like this now

so for this next part i usually have green as my default layer but i wanna change the color so i’m gonna double click on the dark green box

i’ve settled for this pink. Now if you follow my icon making at all you know I like to match my background and clothes together so that’s what i’ll show you next.
so next its time to use the eyedropper tool (which was very confusing for me initially so if you have questions don’t hesitate to ask). We start by hitting “i” on our keyboard and finding a spot in our picture that we want her to match so I’m going to click some of the lighter pink in the top left corner.

as you can see in mine in the top right it now has that pink we just selected so now we get to add it to hermione’s jacket.I usually do it right above the psd so i make sure i have that clicked and then i make a new layer for the jacket by hitting ctrl/shift/n on my keyboard. with that layer selected, I hit ‘b’ for brush on my keyboard and set this new layer to “color” then i hit enter and begin to brush over the jacket (in my ps its the second to last one down). The default name is “normal” and its right next to opacity”)
now my picture looks like this: (you can use the “e” to erase if you brush over her skin by accident as well)

now its time to do the same with her hair so i do ctrl/shift/n again to create another layer but this time we’re going to set it to “soft light” instead of color.
just like with the jacket we are going to use the eyedropper tool again but we’re gonna click on a lighter part of her hair.
you can change the opacity here if you would like but for this image i am going to keep it at 100%.
You could honestly leave this image here and have a perfectly good icon but a lot of people have asked me how i do the circle ones like my current one so I will take this one step further. (i learned from this tutorial here in case that helps you better).
First i’m gonna add a texture by checking one of the boxes in my texture stash (feel free to hunt on yeahps and deviantart for some seriously amazing textures that’s where i get all of mine from).
now i’m going to do a duplicate image (so that i can use the original to edit it in different colors). to do this i go to “image” at the top (third option after “file” and “edit” and then i go down to where it says “duplicate”.

i hit ok and then i begin to make my circle icon
What i do here is i convert everything to a smart object so i hit ctrl/alt/a and right click and convert to smart object.

then i hit ctrl/shift/n and create a new layer where we create our circle.i make sure that the circle is white by going to the top right and setting it to white. Then i hit “b” and right click on the hermione picture
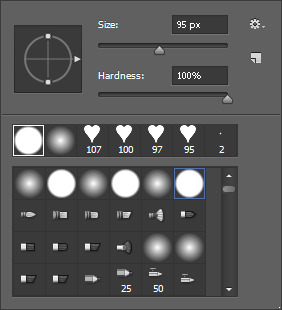
i use the selected brush and have the size at 95 px. Then I click in the middle of the image and it looks like this
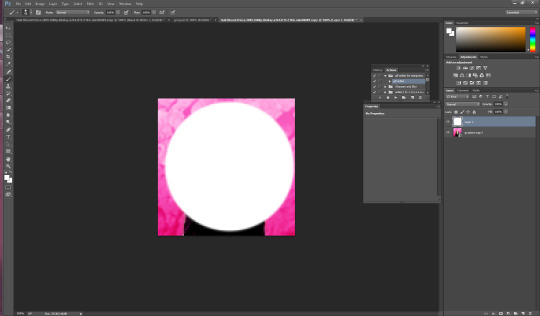
now what I want to do is make sure that the white circle is centered so i’m going to hit “m” on my keyboard Then i wanna right click and hit “free transform” in the middle. you’ll know its in the middle because there’ll be these two purple ish lines that create a plus.

now you hit enter and you have your circle. Now what I do is hit “w” on my keyboard and click your mouse in the circle somewhere (very important to stay clicked on the circle layer here). now that you’ve selected the circle, select the pink hermione image. go to the bottom and click “create layer mask” which again is the third from the left, and you should have a circle next to the hermione picture. You should have something that looks like this

now i just click on the circle layer and delete it and it’ll look like so:
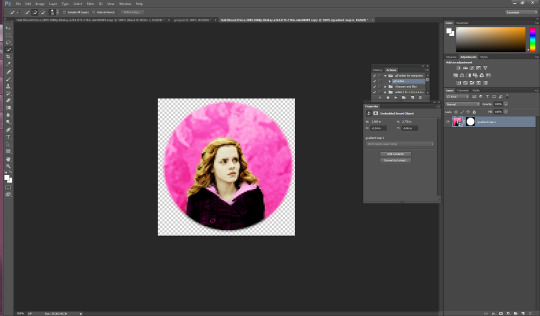
again. you could ctrl/s and save it here and leave as is but i’m a bit on the extra side so we’re gonna take it a step further and add little designs cuz it makes it look more fun.
So what I did in the beginning is I googled a ton of different types of brushes and used search things like “heart brushes for photoshop, deviantart” or “star brushes” or whatever i wanted and i just dug around until ifound what I was looking for. its a fun scavenger hunt but you can deff check out yeahps too or itsphotoshop for resources. Then you go to “edit” and all the way down to “presets” and a drop down will show up and you click “preset manager”. you will see something like this pop up
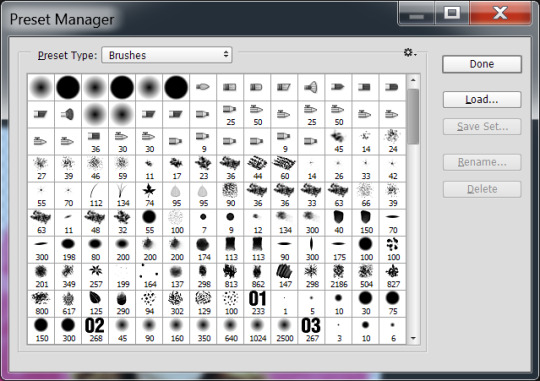
go to the right and hit load and then click on the file you’ve extracted from winrar (if you need help with this part just message me). Ok, once you’ve loaded some brush presets into your ps you can start the next part. once again you have to create a new layer ctrl/shift/n, i then click my star brush and set it to 14 px.

alrighty so before we start clicking and creating stars I want to make them the same color as the background so its time to bring out our “i” for eyedropper again and click somewhere on the pink, then hit “b” again and you should now have pink stars when you click. So Here i go to a transparent corner and i just create my star on the new layer. Sometimes i click it twice so that its more visible ut now i have something like this:

now I’m thinking i want it situated a different way so I use the “m” tool and use “free transform again” to adjust (using the corners like with cropping) to where i want the star to be.
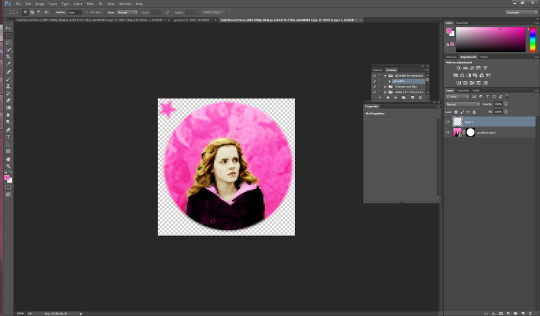
now i have it here and i use the arrows on the keyboard as well sometimes to adjust it. Now what I usually do is create another layer for the smaller stars so i hit ctrl/shift/n again and then i set this new star to 9 px by right clicking on the picture. Then I repeat the steps above and have something like this

Now i just hit ctrl/j and duplicate the little star. then i hit “m” on my keyboard once again and move it to the opposite side of the big star.
now you have this picture:
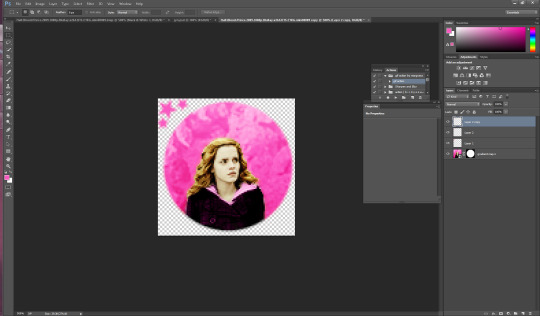
Now what i do is i select all 3 star layers and right click and convert them to smart object so theyre easier to deal with. Then i hit ctrl/j and duplicate the stars.

now i hit “m” on the duplicate layer and click “free transform once again” now right click and hit “rotate 180″ and the result is like this

move the rotated stars to the opposite side of the picture with the mouse. Now it should look like this
and that’s it! just hit ctrl/s and save as a .png and you have yourself an icon. I hope this helps. If i need to clarify anything please don’t hesitate to ask me. This is my first tutorial so I hope I explained things ok. Feel free to tag me in ur new icons I’d love to see them!
1K notes
·
View notes
Text
Free Video Editing Software For Mac Without Watermark

Struggling to find a free video cropper? There are no native ways to crop a video on Windows, and for Mac and mobile users, the built-in croppers have limited functions. It might sounds counter-intuitive, as we thought cropping a video would be as easy as cropping an image.
The minute you start to fumbling around on your device, you will realize (and moan) why a seemingly simple cropping requirement is so hard to fulfill. To make things worse, many tutorials on cropping a video are in fact showing ways to trim a video.
Hitfilm Express free video editor interface and workflow is very similar to Adobe Premiere Po CC, a well-known video editor you may heard about. Like above mentioned software, Hitfilm Express is free to use without watermark on the output. Free software may not add a watermark on output videos, but it usually lacks advanced video-editing tools. If you’re interested in creating fascinating videos with various special effects, we recommend you Movavi Video Editor Plus. Even inexperienced users can use all of the program’s features, thanks to its simple interface. However, Wondershare Free Video Converter ( Free Video Converter for Mac) is an exception. No watermark, no time limitation and completely free. No watermark, no time limitation and completely free. It supports all popular audio (up to 14) and video formats (up to 16), say, MP4, M4V, AVI, MOV, MKV, VOB, DivX, DV, MPEG-1, MPEG-2, 3GP, 3G2. This is a default video editor for all Mac OS X users, and it comes with a mobile version that works well as a video editor app without a watermark. As for its appearance, it somewhat resembles the Mac version that is shrunk into a smaller device. In this article, I am going to share with you 5 best free video editing software without watermark for Windows, Mac and Linux users. These are my best picks after reviewed more than 30 different free video editors I found on the internet. These free video editors are great alternatives to expensive video editing suites out there.
There is another headache:
While cropping a picture simply deals with the still image, cropping a video has more to do with motion objects.
Let's say you shoot a landscape video of skiing in Breckenridge, where the skier keeps moving from the right side to the left side. When you crop it to a square video, the skier might go out of the scene from time to time.
That's where Motion Crop comes to help.
What is Motion Crop?
Motion crop is a handy feature to enhance the editing and cropping of a video by keeping the key action (sporting, pets running) in the frame. To illustrate, it allows you to set keyframes and move the cropping frame to track the key action as you wish.
If you want to create multiple versions of a video in different aspect ratios, say, landscape, portrait and square video, you can use cropping frame in different sizes, and use keyframes so that the 'camera' always follow the subject within the original clip.
So, are there any video editor that supports Motion Crop?
Our R&D team is working on a beginner friendly video editor, NLE in nature. When it's done, the powerful Motion Crop feature will be included, and that's just the start of what this free video editing software can do. Stay tuned (and get excited).
Based on the above demands for cropping, we present you all our picks of best video cropping software for Windows, macOS, iOS, Android as well as those online video croppers. On whatever platforms, we try to make sure you get the tools that fit you the best.
Best Free Video Cropping Software for Windows
#1. VideoProc – Drag and Crop Easily without Limits
VideoProc is a one-stop video editing tool, with recorder, converter and downloader built-in too. Powerful yet lightweight, it runs smoothly even on old computers. The cropper is easy to find on the editing panel. All you need is to drag videos into the software, click crop, adjust area and done. You can crop the video into any size, or use handy presets to crop 16:9 to 1:1. The high quality engine ensures the output file to maintain highest quality.
There is no limit of video size, and thanks to its support of hardware acceleration, you can crop even an hour-long movie and export at high speed without freezing. Besides, VideoProc allows you to cut, trim, zoom videos, adjust speed, and apply effects.
Key features:
No video size or duration limits.
Advanced algorithm to retain high video image quality after processing.
Presets to crop while maintaining same aspect ratio, or crop to another aspect ratio.
Also allows free cropping by simply drags the cropping frame to any size.
More than just a video cropping tool.
How to Crop a Video Easily on Windows and Mac with VideoProc?
It's nonsense to make do with a video cropping software that requires 10 steps or more to simply crop a video. If you only want to crop unwanted area, you should be able to do it as simple as cropping an image; if you prefer to crop it and fill the image to full screen, an automatic process are more preferable to save time. Let's see VideoProc in action.
Step 1 (0:19) Go to Video panel from home screen and drag your videos.
Step 2 (0:31) Select output format, and click Crop on the editing bar.
Step 3 (0:40) Drag the cropping frame (dotted lines), adjust pointers to indicate the area you want to keep.
You can have a real-time preview of the cropped video from the monitor on the right side. This preview window is handy to check how the cropping goes, so that you can play around and adjust it to the desired result. After cropping unwanted area, you can hit done and click Run to export the video.
Our website provides a free download of Bamboo 3.0.1 for Mac. The unique identifier for this app's bundle is com.wacom.BambooSetup. The actual developer of this Mac application is Torus Knot Software Ltd. The following version: 3.0 is the most frequently downloaded one by the program users. Bamboo Scribe For Mac Software Express Scribe for Mac OS v.4.31 A free audio transcription player for typists using Mac OS X. Features variable speed playback, foot pedal control and can automatically load audio files from email, FTP or network. Bamboo scribe download mac.
Can I Use Windows Movie Maker to Crop a video?
Windows doesn't come with a native cropper for videos. The deprecated movie maker has never been programmed with a cropping tool, and the closest function would be the animation zoom in. Plus, it is true that you can crop a picture easily with the built-in photos app on Windows 10, but for cropping a video, there is no luck, either.
With the tools listed in this article, you shall find one that suits your needs. For detailed tutorial with pictures and steps, go on reading: how to crop a video on Windows 10 >>
#2. VSDC – Use Cropping Guideline or Set Border Numbers
VSDC has a free version of video editor. It allows you to crop, trim, and cut videos with advanced options. If you are struggling with other basic tools, which only allows you to set numbers to crop from four edges, VSDC is a life-saver. You can actually drag the frame to decide the area to be kept, and borders to be chopped off. Plus, this cropping tool also automatically enlarges the cropped scene to fit the full screen. That means, if you have a 1920x1080 video, after cropping the unwanted borders, you can still maintain the same resolution.
Besides selecting desired area by manually changing the size of the cropping frame, you can also set number of pixels to crop. However, as it is a feature-rich NLE aiming for advanced video editing, you might take some time to set up the project to get started.
Pros:
Crop borders with an adjustable frame.
Free yet powerful enough for hobbyists.
'Set the original size' button is handy to crop video without changing resolution or aspect ratio.
Cons:
It's not a lightweight tool if you simply want a cropper.
Less friendly for beginners or people who never uses an NLE.
Limited support of input and output format.
#3. Olive Video Editor – Alpha but Promising Tool
Olive is an open-source video editor designed to be a free alternative to professional NLEs. Like most timeline-based editors, the cropping tool can be found in the Effects panel. It offers you parameters such as Left, Top, Right, and Bottom so that you can decide how many pixels you prefer to crop from each side. You can also tick Feather to create a blurring edge of the cropped clips. The best thing is, you can keyframe the cropping to animate the process, so that you can create filmic effect such as crop opening transition.
If you want to simply drag and resize the crop frame to decide the area, this cropper might be complex for you. It is not designed as a basic tool to 1-click select aspect ratio or to drag-n-crop. If you are comfortable with cropping videos in Premiere, then this is a promising free alternative.
Pros:
Lightweight, open-source and free.
Support proxy workflow to deal with high-res large video files.
Support keyframe animations to create a cropping transition.
Cons:
In alpha stage, meaning it could be less stable and lacks features.
Less desired to render drone videos as the output file might have dropped frames.
No preset for the output, making it harder for beginners to manage export settings.
#4. Animotica – Crop and Fit with Blurred Background
Animotica is a popular video maker available on Microsoft Store. The cropping tool it offers is slightly different from other programs. It won't change the original resolution and aspect ratio of the output video, but it works like this: cropping as you required, and at the same time fill in the missing area with blurred background. This mechanism works nice if you plan to share the video to YouTube or Instagram. You don't need to worry about image distortion, or unsightly black bars.
There is no cropping frame for you to crop out an area, instead, it presents you dial buttons to crop top, bottom, left and right. In addition, you can change the cropping area into heart-shape, stars, and many more. Basic editing such as change speed, add filters and music are available too.
Pros:
Modern design with easy to understand interface.
Stock background styles to choose from after cropping the video.
Frame by frame editing with a smart wheel to wind backward and forth.
Cons:
Might not be the kind of cropping function you are looking for.
Free version only allows you to export video from 360p to 720p.
Watermark on output files in free version.
#5. Cyberlink PowerDirector – Crop, Pan and Zoom
PowerDirector is a prosumer video editing tool. Don't worry, Beginner would find it straightforward to use too. It integrates the cropping tool together with Pan and Zoom, and that makes sense. For simple cropping task, you can quickly adjust the cropping box to indicate the area to keep or crop. To spice up the video, you can also zoom in and create panning effects. For instance, you can crop a 4:3 video to a widescreen, and then add keyframes and grab the crosshair to move the frame. It's nice to have pointers and frames to simply drag, or make it smaller to crop.
Pros:
Visualized way to crop a video with built-in crop designer.
Robust features for other editing tasks such as cut, adjust speed, or rotate video.
Crop frame can be set at a fixed aspect ratio (4:3, 16:9, 9:16, 1:1) or freeform.
Cons:
Require some learning curve for the novices.
Free version only allows you to export video from 360p to 720p.
For quick cropping without learning curve, free download VideoProc:
Free Video Cropper on Mac
#1 Hidden Video Editor in macOS Big Sur
Though macOS Big Sur is still in its beta version, there are some existing features on the way. The largest change in the Photos app is the adding of editing tools to deal with videos. Besides utilizing the same tools you use to edit photo, now you can also add filters and crop video right within the Photos app.
The cropping feature on macOS Big Sur works the same as you crop a video on iPhone. You can select standard aspect ratio to crop or use the Freeform. Meanwhile, you can flip the clip or convert landscape to portrait mode. The editing is non-destructive and you can save your copy safely.
The 10.16 update makes it super quick and easy to crop videos with the default Photos app. Yet it is designed to handle a single footage. If you need to assemble multiple clips, add transitions or layovers, you still need dedicated video editors.
Pros:
It is quick to crop a small video clip for instant share.
Free and default app.
Cons:
No batch processing.
Cannot merge video clips together.
#2. iMovie – Mac Built-in Tool
iMovie on Mac is either pre-installed or free downloaded in the App Store. For almost every Mac user, iMovie is the first choice to do easy edits like cropping. In iMovie, there are 2 crop options, Crop to Fill and Ken Burns. By default, they always crop your video at 16:9 automatically. You can adjust its position by moving the frame box, or you can drag a corner handle to change the scale of the crop. Ken Burns is to make the camera appear to zoom in/out by setting the crop at the beginning and end of the clip.
iMovie also satisfies other simple editing needs, e.g. trim, merge, overlay, add subtitles, filters, green-screen effects, etc. Debuted on Apple devices, any edits you did on Mac can be synchronized to your iPhone, and iPad via iCloud. And you can share cropped videos directly in this software.
Pros:
No download.
Easy and free.
Shares the cropped video on social media directly.
Features other basic video editing functions.
Cons:
Can't crop video at specific aspect ratios freely like 4:3, 1:1, 4:5, etc.
Crashes sometimes.
#3. Final Cut Pro X – Professional Video Cropper on Mac
As for cropping videos, Final Cut Pro is pretty similar to iMove, featuring 2 options, basic cropping and Ken Burns style. But Final Cut Pro X does cropping more precisely. Besides the crop windows and four corner handles, you can also adjust each edge of the clip individually by setting parameters in the video inspector.
As a professional video editor on Mac, Final Cut Pro X is applied to edit large and high-quality films like The Social Network, The Girl with the Dragon Tattoo, etc. So as long as you are skilled with great editing ideas, it absolutely helps you make them come true.
Auto Reframe for Final Cut Pro? Here is the Smart Conform Tool.
Update – Aug. 25, 2020 – Apple just released Final Cut Pro 10.4.9, with social media cropping tools that can intelligently analyze your video clips, and crop to square, vertical and other aspect ratio for Instagram and popular social media. This Smart Conform tool is FCP's catch-up of Premiere's Auto Reframe, though it still requires manual adjustments and are less intelligent comparing to Auto Reframe.
Pros:
Easy and precise to reframe a shot.
Crops multiple clips at once.
Retains the high quality of the cropped clips.
Cons:
It automatically adds black background to fit the original aspect ratio in Trim mode.
It takes some time to pick up basic editing skills in FCP X.
Expensive. You don't need to invest too much if you just want easy cropping.
What is the Ken Burns effect?
You might notice that iMovie and FCP X both feature a crop mode called Ken Burns. What is it? It is a crop style named after an American documentarian who applies this style to all of his works.
In Ken Burns mode, you can crop out any two parts of the frame, and it auto transits from one to another gradually. This is how vloggers zoom in the footage to show their facial expressions in post-editing. Wanna have a try? Read this tutorial of video cropping in macOS >>.
#4. QuickTime Pro – Crop Associating with Photoshop on Mac
Crysis 1 game download. In fact, the built-in QuickTime Player can't crop videos, but the paid QuickTime Pro can do it. Although cropping is a simple function in most video croppers on Mac and requires nothing but simple dragging, it is a little complicated in QuickTime Pro. To remove annoying borders or unwanted parts in the frame, you need to create a mask in Photoshop first. And then apply this mask to the video to crop out redundant parts.
As the advanced version of QuickTime Player which can only play, rotate, and trim videos, QuickTime Pro empowers users to crop and resize, compress and apply FX to videos, and create slideshows with music.
Pros:
More versatile than QuickTime Player.
Cons:
Complicated to crop videos with a Photoshop mask.
Apple no longer sells QuickTime Pro. So this is only workable for users who have already installed it.
#5. macXvideo – First Free Video Cropper for 4K UHD on Mac
macXvideo is designed exclusively for macOS and serves Mac users crop features with both entry-level operations and advanced options like parameter customizing. You can utilize the crop feature to remove unwanted parts in the frame and adjust its position by dragging the cropping window, or by setting different aspect ratios including 16:9, 4:3, and 1:1. During the process of video cropping, it allows you to preview the cropped video in real-time so that you can modify the clip accordingly.
Besides cropping and basic video editing, this all-in-one video editor also comes with a robust video converter to transcode incompatible videos and compress large files to meet various playback and sharing needs perfectly.
Pros:
Free and user-friendly.
Crops UHD 4K videos with the least quality loss.
Fully compatible with new Apple standard HEVC and other 300+ video formats and codecs.
Cons:
None-leaner video editor.
Cannot crop a video frame by frame.
Free Download VideoProc for Mac:
Free Video Cropper on iPhone
#1. Photos App – iPhone Built-in Cropper
iPhone models running on iOS 13/14 and higher versions now can take advantage of the default Photos app to crop a video. For instance, you can choose to keep original, crop to 1: 1, 16:9, 10:8, 7:5 and 4:3. A particularly nice feature is that it allows you to zoom in/out videos to emphasize the key element in your shot. The whole process is no different than cropping a picture, simple and learning-curve free.
Like other apps on this roundup list, Photos app also allows you to trim, rotate, flip, and add filters to your picture and video recordings.
Pros:
Pre-installed and free.
Change video to any desired aspect ratio.
Basic video and photos editing toolkits.
Immediately sharing.
Cons:
Available for iPhone iOS 13 only.
The original HEVC clip will turn to H.264.
Can't save the cropped videos as new clips before iOS 13.3.1.
#2. iMovie for iOS – Fast Crop and Edit Video
The crop feature of iMovie on iPhone is not as extensive as on Mac as it cuts off the redundant objects by zooming in/out the frames. And, it will automatically convert any of your recordings to 16:9 aspect ratio. However, if all you want is fast cropping, trimming videos and then sharing with family and friends on Facebook or YouTube, iMovie is your thing.
iMovie comes with the basic tool to edit videos such as subtitle, filter, templates, speed control. It will require a bit of exploration first, but once you get to adapt to its workflow, making casual videos can be easy like walking in the park. In addition, you have the option to save the cropped clips as 540P, 720P, 1080P, and others higher resolution files.
Pros:
Pre-installed and free.
No watermark.
A large variety of useful tools to make basic edits.
Instantly share the outcome in a secure way.
Cons:
Not intuitive for beginners.
Only allows you to create horizontal (16:9) video.
#3. Video Crop – Crop and Resize Videos
Video Crop is a handy video cropper that enables you to easily crop out the unneeded parts of the recordings without distorting the frames and pixels. All you have to do is selecting a favored output aspect ratio, moving your finger on the screen to set the area that you want to keep. Plus, it allows you to select to export files in MPEG-4 (MP4) and QuickTime (MOV) format. As for the export quality, you are free to choose among the Highest, Medium, and Low.
Video Crop only goes as far as free video cropping software. Want to get more editing utilities? You might move to another 3 tools made by the same developers: Video Effect, Video Compress, and Video Cut.
Pros:
Free.
Give buttons to select output file properties.
Cons:
The source video will be resized
No additional editing tools.
Pop-up ads.
#4. Crop Video – Cut Video Editor
Crop Video is a full-featured video cropping and editing application on the iPhone. Just as what its name implies, Crop Video is capable of cropping the interesting area of videos to many preset and customized aspect ratios.
Free accounts have access to the ready-stock music resources, fantastic filters, and adjustment options on the lightness/contrast/saturation/temperature value by clicking the relevant icons. Paid accounts can get several editing utilities like trim, cut, and pro filters.
Pros:
Many preset aspect ratios.
Useful add-on features: color correction, music background, etc.
Cons:
Might cause visible quality loss.
Have to upgrade to a paid account to remove ads.
Not allowed to zoom in/out videos.
Is That Necessary to Apply a Third-party iOS App to Crop Video?
iOS iMovie falls short of expectations for most people due to the absence of the crop tool. But, no hurry to find external applications for help as cropping videos by using the built-in Photos app on a recent iPhone is extremely flexible and easy. This tails with Apple's attempt to turn iOS ecosystem into closed and perfect. See the how to guide on: cropping a video on an iPhone>>
Free Video Croppers for Android
#1. Smart Video Crop – Android Video Cropper, Trimmer, Cutter & Converter
Although Smart Video Crop does not offer as many preset aspect ratios as Video Crop, users wouldn't severely bother with it. The regular modes of Square, Landscape, Portrait, 3:2, and 4:3 can somehow meet the requirements of average users. And after all, we can customize the aspect ratio using its 'Free' feature.
Smart Video Crop can access your phone camera and detect all videos from your video gallery, and videos saved in other file folders including Downloads and SD cards. It integrates Cut and Crop to let you crop either the whole video or just a selected specific part of the vid.
Pros:
Video to MP4 and WebM conversion.
Output quality settings.
Frame rate adjustments.
Speed control.
Video rotation.
Audio removal.
No watermark.
Cons:
The missing 16:9 and 9:16 aspect ratios could be annoying.

#2. Video Crop – A Single-minded Video Cropper for Android Free
Video Crop is all and only about cropping video sizes on Android. Simple, straightforward, and self-illustrative.
There are 20 video cropping presets: Crop for Instagram, Square, Portrait, Landscape, 1:2, 2:1, 2:3, 3:2, 3:4, 3:5, 4:3, 4:5, 4:7, 5:3, 5:4, 5:6, 5:7, 7:5, 9:16, 16:9, and you can also customize the video size by tapping the 'Custom' button. Source videos can be selected from your video gallery and your created history. It also has access to your Android camera, so that you can directly record a live event hot and fresh and crop it right away for sharing online.
Pros:
Fast & easy to use; accurate preset aspect ratio choices.
No water mark.
Cons:
Contains ads, no advanced output settings.
#3. Wonder Video – Crop Video for Instant Share on Instagram, Tiktok, YouTube
Wonder Video gives you ample muscle to change video aspect ratio with or without actual cropping. It offers 1:1 Instagram ratio, 4:5 Instagram ratio, 16:9 YouTube ratio and 9:16 Tiktok ratio. And below the ratio setting, there are two choices – canvas and the full screen video. By tapping canvas, you can change your video ratio without cropping, while tapping the full screen your vid will be cropped and some part of the vid won't display.
Wonder Video is more of a complete video editor on Android. Besides video cropping, you can one-click add styles, songs, texts, cartoon and magic effects, and change brightness, contrast ratio, warmth, saturation etc. But you will have to pay for those features.
Pros:
a no-brainer, very easy to use.
You can choose to crop video either to fill full screen or without crop.
Cons:
Watermark cannot be removed unless you upgrade to pro version.
#4. Video Crop – Android Video Cropping for Resize and Length
Video Crop is a big searching query and this little tool also choose to share the same name, but with different logo. In comparison with the previous 'Video Crop' app, it offers you features of cutting both the length and ratio of a video. 7 aspect ratio presets are sufficient to daily use: landscape, portrait, 3:2, 5:4, 7:5, 16:9 and you can also customize the ratio totally on your own.
The app also allows for simple video trimming and cutting pinpointing to seconds. Many people who misunderstand cropping and trimming/cutting could find this a great combination to cater for both needs.
Pros:
You can close the ads upon popping up right away.
No watermark.
Cons:
You will at least see 2 times of whole screen ads for each video crop when you select a video and crop a video. Just be careful not to tap the banner ads since buttons are close together on the lower sidebar.
Can I Use The Built-in Gallery Apps to Crop a Video?
Yes and no. By far, not a single Android phone of any brand - Samsung, Huawei, Oneplus, Pixel - comes with a native Gallery app that supports cropping video screens on their own. They can only trim videos rather than crop the video frame. But some Android devices do bring along self-made video editing tools or third-party tools.
For detailed pictorials, go on reading: How to Crop A Video on Android Free – Samsung, Huawei, Pixel, Xiaomi
Best Free Video Cropper Online
#1. Ezgif Video Cropper – Crop Small Videos without Watermark
The fast processing speed of this handy video cropping tool is enough to make it one of the best online video croppers but there are many other departments where it outranks many other web-based applications – customizable aspect ratio, watermark-free, and well-supported by all prevalent browsers including Firefox, Safari, Opera and Chrome.
Ezgif is, by design, a GIF file maker. However, it is also capable of editing and converting videos thanks to the available of a number of editing tools including, reverse, resize, audio mute, add subtitles, etc.
Pros:
Free to use.
Widely compatible.
Fast response.
No watermark.
Cons:
Max file size is 100MB.
No access to change the outcome quality or format on your own.
Not supported by IE/Edge browsers.
#2. Kapwing – Crop Video to Share on Social Media Feed
Best Video Editors Without Watermark
Kapwing is a trusted and easy-to-use online video editing software. You can drag the bounding box with the mouse to fast adjust the area that you would like to keep. In addition, it's super handy for newbies to resize video for immediately sharing on social media feed as it offers 7 ready-made aspect ratio options for Facebook/Twitter portrait/landscape/cover, YouTube/Widescreen, and other popular sites.
How Kapwing stacks up to other online cropping software? Aside from the basic editing tools, it covers several advanced editing features usually found on desktop programs, as like shapes, subtitles, images, and layers. All of those features are available for free.
Pros:
No ads or watermark.
Powerful editing capabilities.
Instantly share online.
Cons:
Max file size: 500MB.
Won't publish videos beyond 7 minutes.
Have to login to remove watermarks.
#3. Veed – For Instant Social Media Sharing
Designed for social media sharing, Veed presets loads of cropping canvas size for YouTube, Twitter, Facebook, TikTok, Pinterest, LinkedIn, etc. After importing videos from local PC, Dropbox, YouTube, or even recording a video via the camera of the PC, you can start to crop the video by dragging the cropping window to remove any unwanted segment of the footage. In the end, you can download the cropped video to your computer, save as a GIF, copy the link to clipboard, share it on Facebook, Twitter, or send it via Gmail.
Just like offline video editors, Veed assists you to polish your cropped video by adding texts, filters, images, and BGM, or elements like emojis, shapes, and sound waves. If you are cropping to highlight a frame, you can also add slow-mo effects to it by adjusting the video speed.
Pros:
Free to use.
No account required.
Multiple output options.
Versatile as offline video croppers.
Cons:
File limited to 50MB in its free version.
Big brand watermark on the exported video.
Automatically add black borders if the cropped video doesn't fit the preset aspect ratio.
#4. Video Crop – The Easiest Online Cropper without Login
Among hundreds of online video croppers, Video Crop is a damn simple and juicy tool for video cropping. It supports videos uploaded from the local PC, and online drives like Dropbox, Google Drive, and OneDrive. It has two cropping modes, one is to crop while keeping the original aspect ratio, and the other is to freely crop at any aspect ratio. Since it's developed exclusively for video cropping, you cannot do any other edits in this tool. But is you just want a simple crop, this one is perfect.
Pros:
Totally free.
Directly start cropping without registering.
No watermark.
Cons:
Extremely slow to upload and export a video.
No extra functions.
How to crop videos freely: no watermark, no sign-up, no quality loss
For those who have higher demands on efficiency of video cropping - with quality settings, no watermark, no registration, no pop-up ads, besides online site, you can use lightweight desktop version.
Free download VideoProc:
Why These Free Video Cropping Software are Not on the List
Windows Movie Maker
Windows Movie Maker used to be great to quickly edit a video. It is the native solution, easy and free to use. However, it cannot actually crop a video. You can zoom in on a video with this tool, so that to some extent, the borders are cropped. Plus, this tool is discontinued in 2012. Even if you can download the installation pack from site that still hosts legacy installer, a lack of official support means incompatibilities issues and security risks. We loved Windows Movie Maker, but we decide to remove it from the top list for above reasons.
VLC
VLC is not intuitive to crop a video, but it is indeed one of the free solutions on Windows 10. The cropper tool is buried deep in menus, and you will need dozens of steps to set things up. Worse even, there is no realtime monitor for you to view the cropped video. Instead, you can only enter numbers to define how much you would love to crop.
Openshot
Though Openshot is free and comes with many features to edit a video, it doesn't have a true cropping tool. The workaround is rather a compromise that uses the scale tool. You have to go all the way deep into the menu: right click on a video > properties > scroll down to find Scale > set scale X and scale Y to some number. It actually zooms in your video, so that the edges are 'cropped' while the aspect ratio and resolution stay the same.
Video Crop vs Trim/Cut, Jargons Explained
Trim & Cut a video – While trimming in most cases refer to cutting off the beginning and end part of a clip, cutting can be more diversified. You can cut a clip to add transitions, cut and remove unwanted sections from the footage, or applying J cut and I cut to spice up your story-telling.
Resize a video – Resizing changes the dimension of the video, for instance, from 1920x1080 to 960x540 proportionally.
Resizing doesn't involve the cutting away of parts of the original image, and there is only one thing to notice: always make sure the aspect ratio of the video stays the same when resizing a video. If you change resolution disproportionately, it will result in image distortion.
Crop a video – Cropping allows you to remove the unwanted areas or unnecessary portions of a video clip, just like what you usually do with photos by adjusting the edges. For instance, you can crop 30% from both the top and bottom of a video. Some of us also refer it as 'cropping the frame of a video' or 'cropping a video screen'. Cropping will unavoidably result in a changing of the aspect ratio.
Generally, this is a great solution to change portrait view to landscape and get rid of black bars, watermarks, fingers, and errant objects in the video. Many social media users also favor using this function to make square videos or videos in specific aspect ratios for sharing on Instagram, TikTok, Musical.ly, Twitter, and Facebook.
Conclusion
Cropping video is not a complicated task, but things are a little different when you crop videos on desktop, mobile, or online. Hope our picks of best video cropper for Windows, Mac, iPhone, Android and online have saved your energy and time in researching for free video croppers.
From the pros and cons of each tool, you might conclude that simple and flexible operation is the crucial feature of a video cropper. VideoProc is a piece of lightweight and easy software that enables you to crop videos by dragging the frame box freely and intuitively. Download VideoProc for more features.
There are many screen recorders that can help us to record gameplay, video calls and other screen activities, but you may find that after recording screen with some free screen recorders, there is a watermark in your recorded videos. To record screen without watermark, this guide will introduce to you 6 free screen recorders with no watermark and even no time limit. The no water screen recorders are available for Windows PC and Mac. I am sure that you can find the one you like.
Free Screen Recorder for Windows with No Watermark
I'll first show you 3 screen recorders without watermark for Windows 10, 8, 7 PC.
FonePaw Screen Recorder
FonePaw Screen Recorder is a screen recorder with no watermark. It can not only record full screen of your computer, but also a certain area or an application interface. During the recording, you can record audio and webcam as well. And the screen recorder is equipped with annotation tools, which let you add circle, texts, arrows to your screen videos. Moreover, you can schedule a recording task for the FonePaw Screen Recorder to start and stop screen recording automatically.
It is easy to record screen with this no watermark screen recorder.
Run the screen recorder on PC.
Click Video Recorder. Select the area that you want to capture screen video.
Enable Microphone, System Sound, Webcam if needed.Click Rec button.
When you finish recording, click the blue square to stop.You can preview and even clip the recorded video. No watermark is added.
Not only that it can record screen with no watermark, the recorder can also be used to capture screenshots and record audio(system & microphone sound) on Windows PC.
As a well-rounded application, FonePaw Screen Recorder is surprisingly small in size so that it can run smoothly in recording gameplay even on low-end PCs. The recorder is now free to download.
Download
Pros
Full-featured: It can be used to record screen, capture audio, take screenshots;Easy-to-use: It has a clear interface.
No lag: It runs smoothly without lagging even while there is a game running.
Cons
It is a standalone program that needs to be downloaded on your computer.
Windows 10 Game DVR
Do you know that Windows 10 has a free screen recorder without watermark? Game DVR, a feature of Windows Game Bar, can record not only games, but also other screen activities on your computer. As a built-in recorder, Game DVR, of course, won't give watermark to your screen videos.
Simply press Win + G on an active application window. This will activate Game DVR recording, which assumes that there is a game that needs to be recorded. You can then begin to record screen without watermark and time limit with Game DVR.
It is easy-to-use and totally free. However, you can't record desktop or select a specific region to record as Game DVR can only record the screen activity of an active program.
Pros
Free: You don't have to pay for the recorder.
Pre-installed: The application is pre-installed with Windows 10 system so you don't need to download it separately.
Cons
Not for computers running on Windows 8, 7.
Too primitive: It lacks features that are available on third-party screen recorders, such as selecting recording area, record webcam, add annotations.
OBS
Open Broadcaster Software(OBS) is a open source screen recording software that is free to use and can record screen without watermark and time limit. It is compatible with Windows 10, 8, 7, Mac and Linux.
OBS is more than just a screen recorder. It can be used for live streaming, creating live videos with window captures, images, text, webcams. It offers different modes - Display Capture, Window Capture, Game Capture, etc. - for you to record full screen, applications, games on the computer. And it can record screen in high quality at up to 60 FPS. Audio from different sources can be recorded, too.
However, OBS is complicated. Before you are able to use the recorder, you have to figure out elements such as Scene, Source on OBS. And it is large in size and many users complain that OBS slows down their computers when it is running.
Pros
Powerful: Record screen in high quality at 1080p and 60 FPS.
Cons
Free Video Editing Software For Mac Without Watermark Free
Difficult: You have to spend some time to figure out how OBS works. It is far more difficult to use than other screen recording programs.
Laggy: OBS tends to be laggy when running on low-end PCs.
Free Screen Recorder for Mac with No Watermark
There are also some free screen recorder without watermark for Mac computer.
FonePaw Mac Screen Recorder
This screen recorder for Mac has everything you need for recording screen videos: select recording area, record screen with audio, add annotation to your videos, capture screenshots, record screen with webcam, start screen recording with hotkeys, etc. And there will be no watermark in the screen videos you make. The screencasts can be shared to Facebook, Twitter, YouTube directly through the recorder.
FonePaw Mac Screen Recorder is available for Macs on Mac OS X 10.9 and above (the latest macOS Mojave is supported).
Download
Pros
A powerful screen recorder to record screencasts in high quality.
Compatible with Macs with different macOS versions.
Cons
The recorded screen videos can only be saved as MP4 files.
Free Video Editing Software No Download
QuickTime Screen Recording
QuickTime is not only a video player on Mac, but also a free unlimited screen recorder. You can start screen recording with QuickTime by clicking New Screen Recording on the application. If you need to record yourself in the video, you have to enable New Movie Recording first to activate your webcam. Your sound can be recorded, too, but QuickTime won't record the system sound from the computer.
Moreover, after the recording, QuickTime can trim, split, flip or rotate to screen videos.
Pros
It is a built-in application on the macOS. So it is totally free and has no watermark or time limit.
Cons
Can't record system sound.
Can't annotate your videos.
Apple's Screen Capture Tool for Mojave
Since Mojave, Apple introduce a new screen capture tool that can not only take screenshots, but also record videos of Mac screen. The new tool is simpler than QuickTime. Pressing Command + Shift + 5 button combination will launch the screen capture interface, where you can choose to record the entire screen or a selected area. When you have done recording, the tool also allow you to edit the video, for example, trim the video, add text to the video.
Though there is no watermark, the tool is too simple that it doesn't allow you to record screen with audio or webcam.
Pros
It is the simplest way to record Mac screen. You can access it by a simple keyboard shortcut.
Cons
It is only available on macOS Mojave.
That's the 6 screen recorders to record screen videos without watermark on Windows and Mac. Which one do you like? Leave your comment below.
0 notes
Last Seen Blogs

onlyslightlyinsane
_A$M$O$D$E$U$_

tovilalufegi
Untitled

healthbestproduct
Untitled

lucky88comvn-blog
lucky88comvn

tenerife-sea232
Sinceriously