#sonic tutorial
Text

#sonic the hedgehog#sonic fan characters#sonic comic#archie sonic#sonic prime#sonic tutorial#sonic#sonic boom#sonic fanart#idw sonic comics#sonic idw#idw comics#idw sonic#creamtheraabbit#cream the rabbit#cream the bunny
82 notes
·
View notes
Text
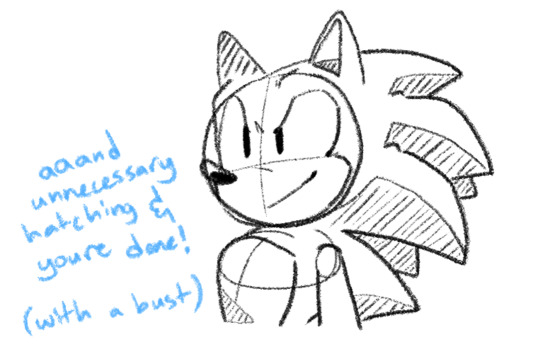
SONIC EXPRESSION NOTES!!
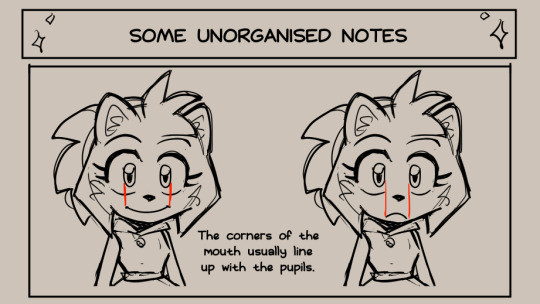
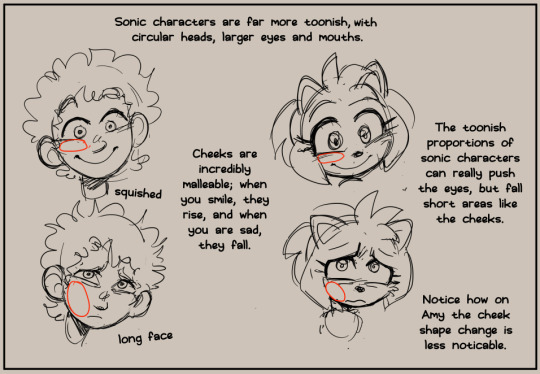
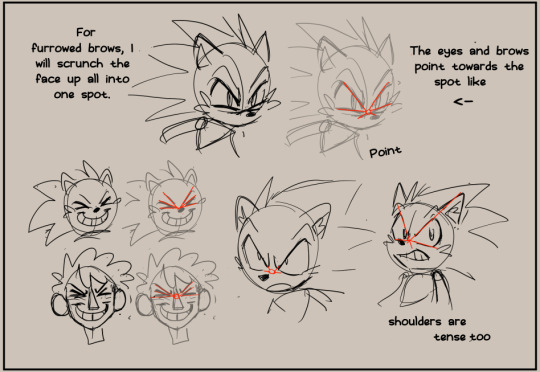
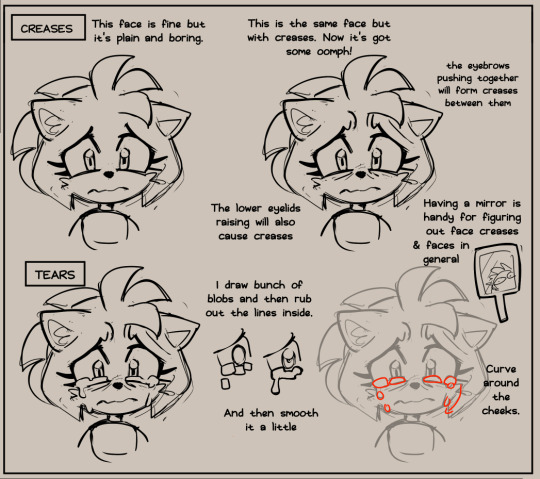
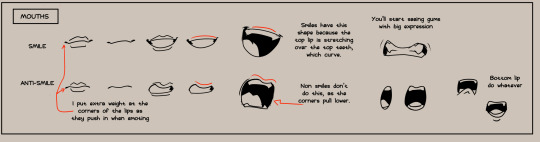
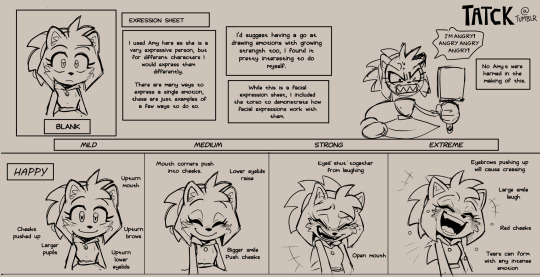

Expressions.... hard to explain... but I hope this is helpful :D
#my doodles#amy rose#tutorial#expressions#sonic the hedgehog#expression sheet#I racked my brain for this#might be typos
10K notes
·
View notes
Text


extremely happy to have enough blender skill now to make this shit
#shadow the hedgehog#blender#3d model#sonic the hedgehog#3d#3d art#his extremely fucked up anatomy i love him#btw this isnt the thing i was doing retopology on this is so poorly made i wouldnt know where to fucking begin#i just got sick of that other thing and decided to make something for myself for once#i am very sick of tutorials
3K notes
·
View notes
Note
I was wondering can u do a tutorial on Sonic eyes and face?
Okay so, my process for drawing Sonic characters usually amounts to 'severely winging it', like so:
I draw a circle, I ignore the circle, you know how it is. I'm not sure I'd be super helpful trying to explain how I do it dfbfh
However!! I can redirect you to this really good tutorial by @tatck! A lot of the techniques in it are stuff I do as well!
#ask#my art#sonic#sth#sonic the hedgehog#amy rose#timelapse#speedpaint#gifs#gif#animated gifs#maybe I'll attempt to do a proper tutorial one day but rn? too tried fbff
750 notes
·
View notes
Text
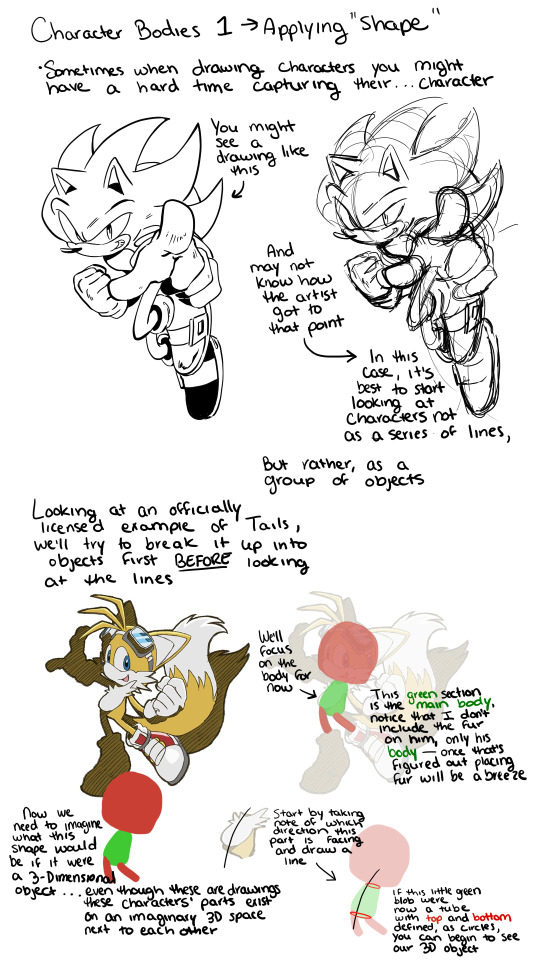
Character Bodies 1 - Applying "Shape"
Sometimes when drawing a character you might have a hard time capturing their... character.
You might see a drawing like this [clean lined image of Super Sonic]
and may not know how the artist got to that point.
In this case, it's best to start looking at characters not as a series of lines, but rather as a group of objects.
Looking at an officially licensed example of Tails, we'll try to break it up into objects first BEFORE looking at the lines.
We'll focus on the body for now [Sonic Riders Tails broken up into sections, red as the head and legs, green as the body]
This green section is the main body, notice that I don't include the fur on him, only his body- once that's figured out placing fur will be a breeze.
Now we need to imagine what this shape would be if it were a 3-Dimensional object... even though these are drawings, these characters' parts exist on an imaginary 3D space next to each other.
Start by taking note of which direction this part [the green body] is facing and draw a line- if this little green blob were now a tube with top and bottom defined, as circles, you can begin to see our 3D object.
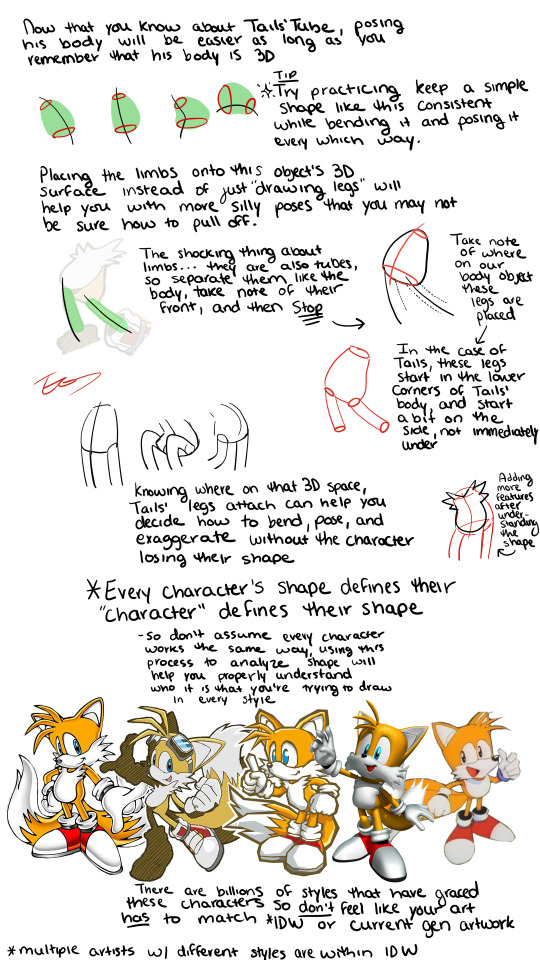
Now that you know about Tails'Tube, posing his body will be easier as long as you remember that his body is 3D.
Tip: Try practicing keeping a simple shape like this consistent while bending it and posing it every which way.
Placing the limbs onto this object's 3D surface instead of just "drawing legs" will help you with more silly poses that you may not be sure how to pull off. The shocking thing about limbs... they are also tubes, so separate them like the body, take note of their front, and then STOP.
Take note of where on our body object these legs are placed. In the case of Tails, these legs start in the lower corners of Tails' body, and start a bit on the side, not immediately under. Knowing where on that 3D space Tails' legs attach can help you decide how to bend, pose, and exaggerate without the character losing their shape.
*Every character's shape defines their "character" defines their shape- so don't assume every character works the same way, using this process to analyze shape will help you properly understand who it is that you're trying to draw in every style.
There are billions of styles that have graced these characters so don't feel like your art has to match IDW* or current gen artwork
*note: multiple artists with different styles are within IDW
#my art#tutorial#how to draw#sonic the hedgehog#sonic charactes#tails#he's just an example#i need to go to sleep its 7 am
406 notes
·
View notes
Text
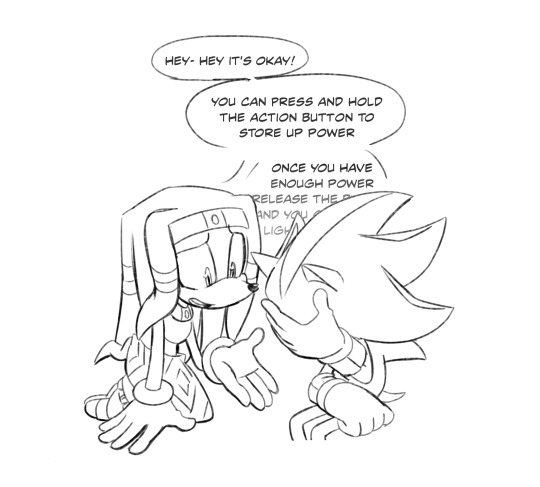

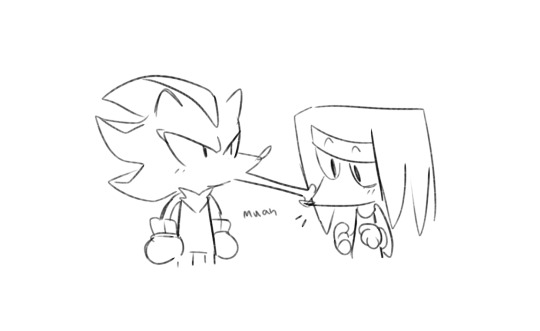
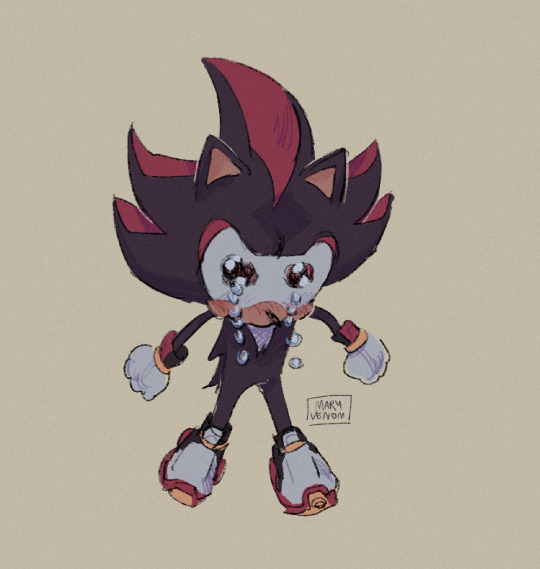
Days 37-39 of drawing Shadow everyday
#I was on a Shadikal kick#shadow#tikal#shadow the hedgehog#tikal the echidna#shadow art#shadow fanart#tikal fanart#sonic art#sonic artist#sth#sonicart#sonic fanart#sonicfanart#drawing shadow everyday#shadikal#shadow x tikal#heheh tutorial gf
559 notes
·
View notes
Text
posted this on twitter, so might as well do it here.
i always thought it was funny how everyone agreed on shadow's shoes being difficult to draw, i used to struggle w them too, but it's actually more easier than it seems! the key is to visualize the correct shape first and draw the rest of the shoe around it.

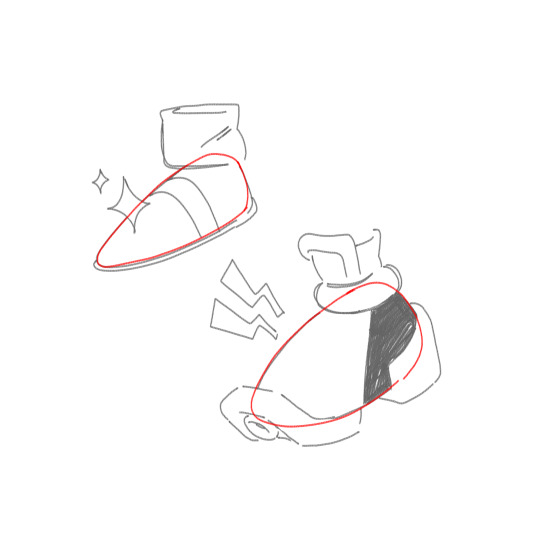
the shape of sonic's shoes it's more closer to a triangle type of shape while shadow's is more like an oval.
here's also a video of how i drew the shoes in case anyone needs a more visual reference :]
hope it helps!!!!
1K notes
·
View notes
Text

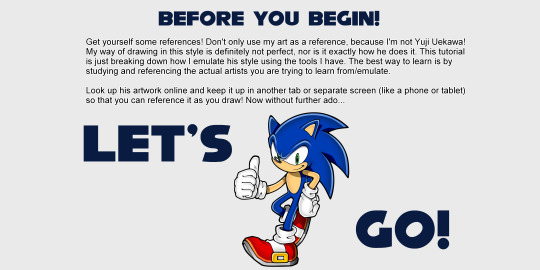
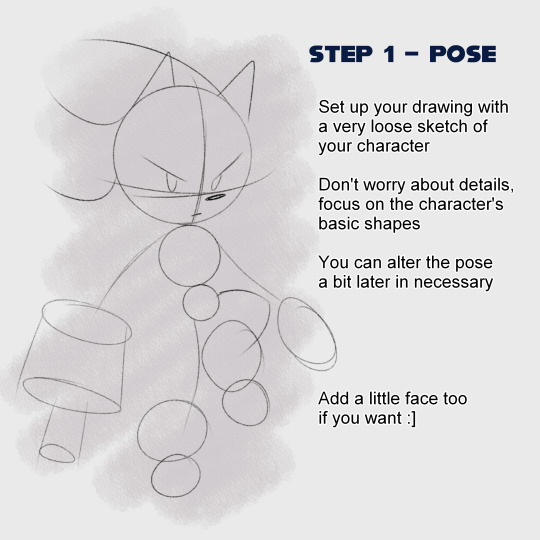
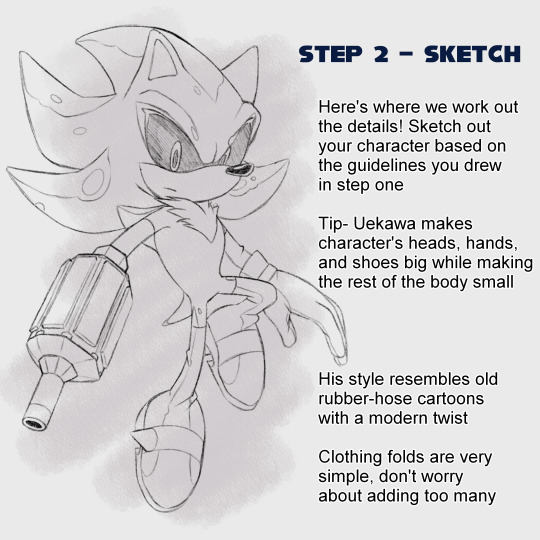
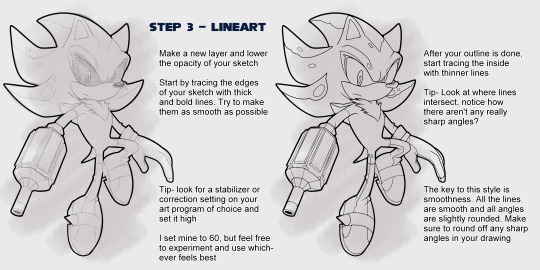
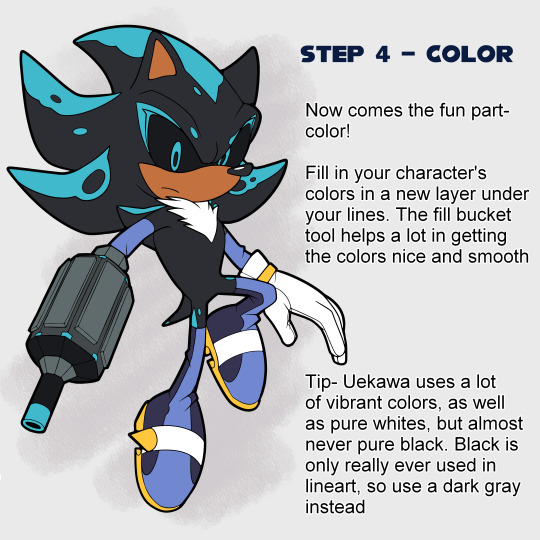
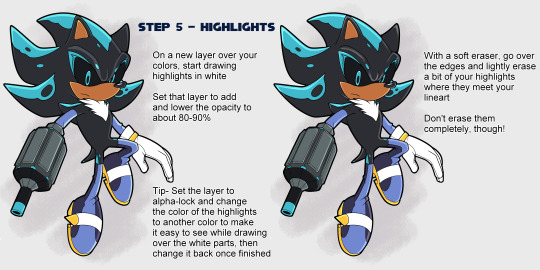
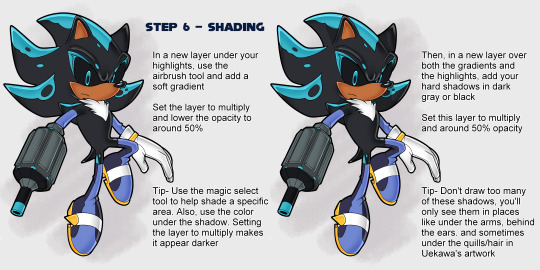
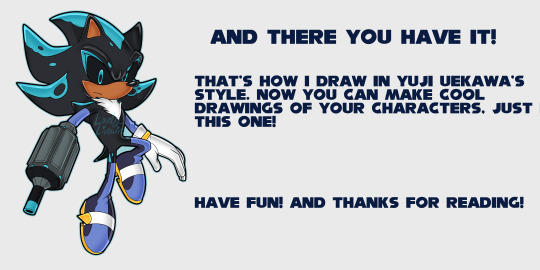
A tutorial on how to draw in Uekawa's style :]
#sonic the hedgehog#sonic oc#sonic fc#sonic fan character#tutorial#yuji uekawa#sonic adventure#sonic adventure 2#elysium the shadow android#shadow android#☆my art☆
751 notes
·
View notes
Note
Love how you draw legs n paws, think you could show us a tutorial ?👉👈
akwhdawdg Thank you and OFCOURSE, I'd love to share my "secrets"
Now, I'm not like the best or even average at teaching so- bare with me lol
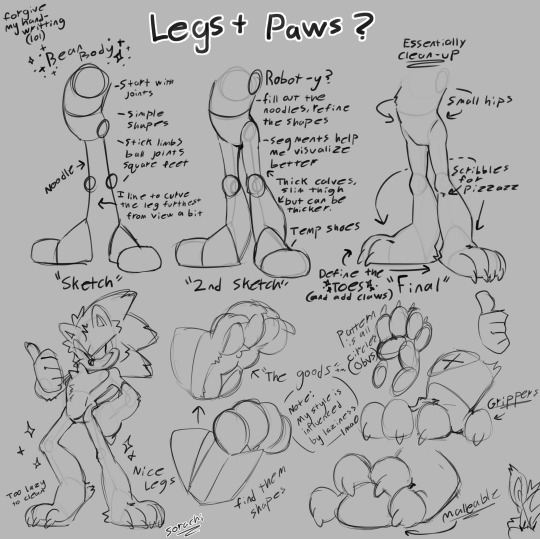
Hope this helps
#sugarhog au#sth#sonic the hedgehog#sonic au#art#shadow the hedgehog#art tutorial?#ig more of tips to replicate my style#idk lol
203 notes
·
View notes
Note
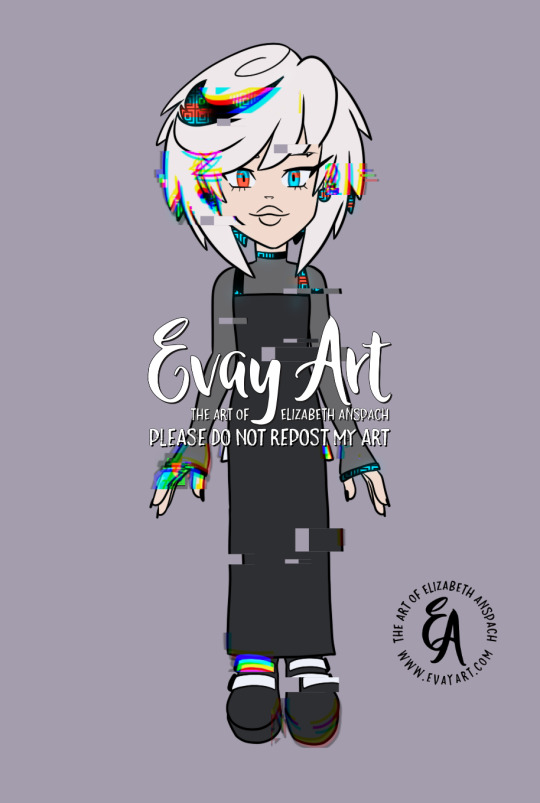
Looking back at your aurora and sage besties comic (its one of my favorites, only being beaten by were amy and sonic being a Simp) and I've got to ask, HOW DID YOU DO SAGES GLITCHING SO FRANKEN WELL??? IT LOOKS AMAZING AND I PERSONALLY LOVE HOW THOSE GLITCHS TURN RED WHENEVER SHES ON NEFARIOUS TIMING ARVDGDBABA
YOU ARE MY FAVORITE SONIC ARTIST.
...just wanted to say and ask.
You are so kind, thank you! I'm so happy you like them!
I do a lot of experimenting in Procreate until I find a technique I like. To achieve Sage's glitch, especially if she's doing something a little more wicked so her "red" side is showing, I'll start by drawing her in her blue version and her red version:

I'll select random rectangles from the red version and mask them/cut them out, so she's mostly blue but some red is showing:
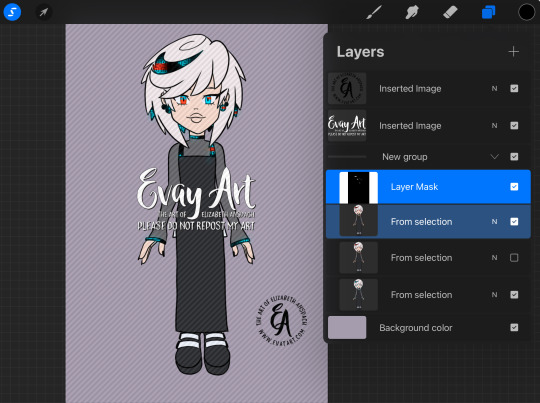
I'll duplicate this layer and keep a copy of the "clean version" and apply effects to the duplicate. In Procreate, I'll use the "Glitch" effect and use the “Artifact” setting and mess with it until it achieves a result I like:
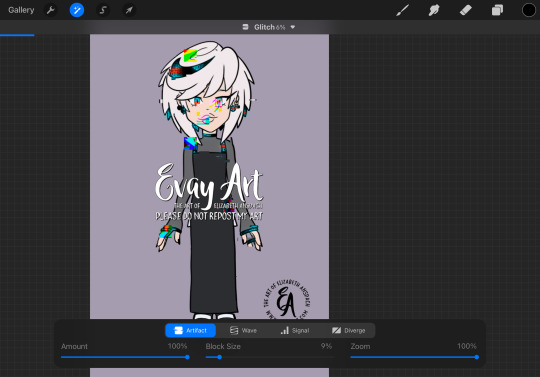
This may take several passes.
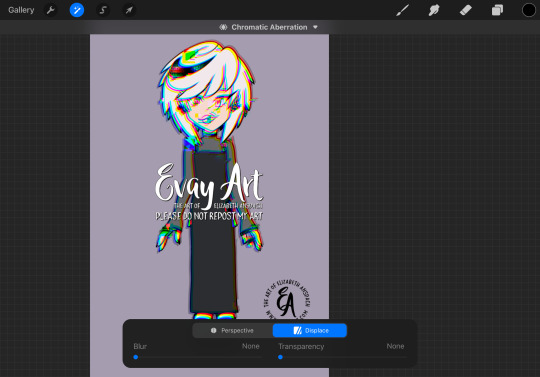
I duplicate the layers again, because again I always want to be able to go back if I don't like it. Then I'll play around with "chromatic aberration" under the “displacement” setting. She only needs a little for a subtle glitch effect, but if she's meant to look more menacing then I can go hardcore with it:
Then, I'll turn that original "clean" layer back on and I mask out the effect layer so only parts of it are coming through. When computers glitch, normally most of the image stays in tact and only some parts are scattered/messy so that's why I only have the effect in some areas.
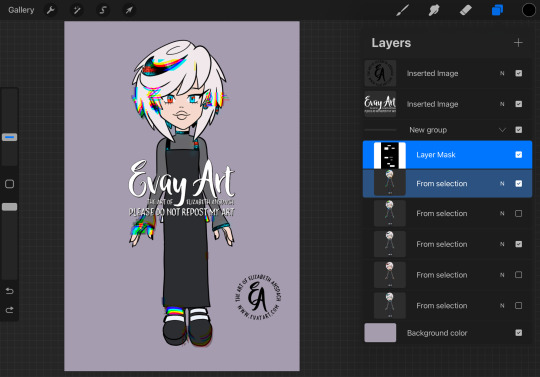
I might even slide bits of those rectangles to the left or right. It's just a matter of playing with it until I like how it looks.
I hope that explanation was easy enough to follow along!
Again, thank you so much! I'm really really happy you enjoy my art and stories 🥰 (and I'm delighted to hear you're a fan of Were!AmyXSimp!Sonic hehehe)
#ask me#evayQA#tutorial#procreate#procreate tips#sage the ai#sage robotnik#sonic trash#art tips#glitch effect
138 notes
·
View notes
Note
girl help i can't draw sonic :(
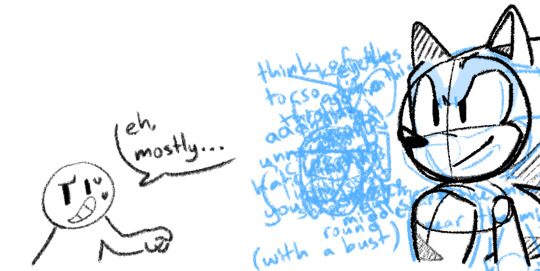
ill try my best to help !

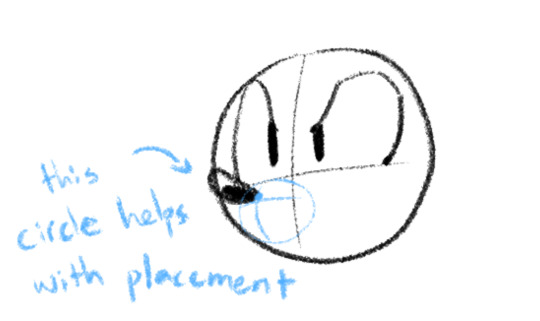

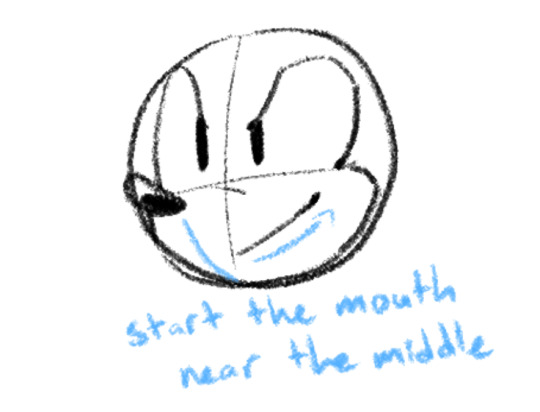
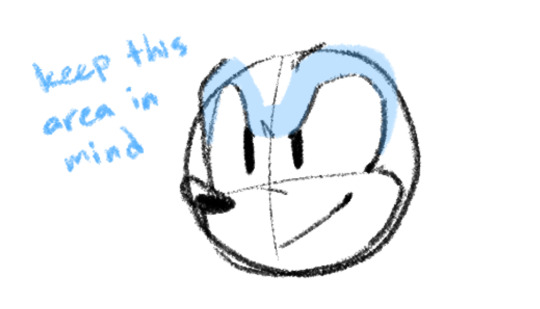
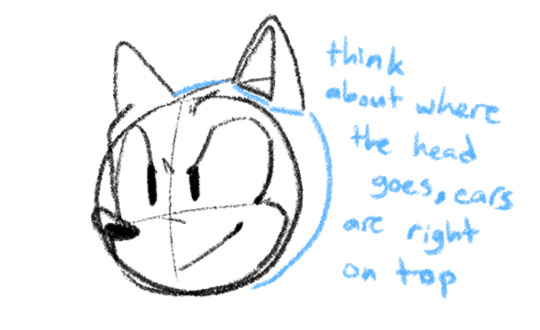
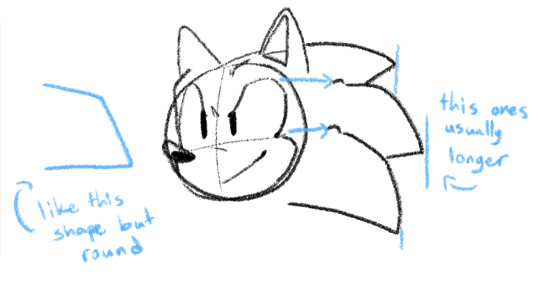
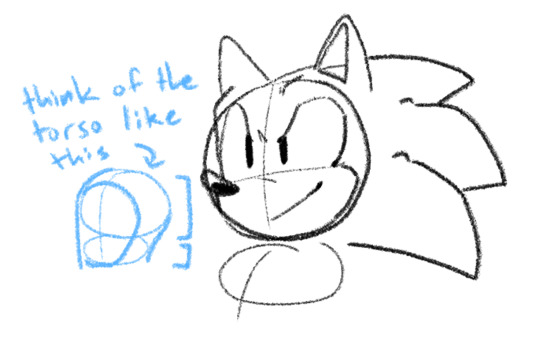


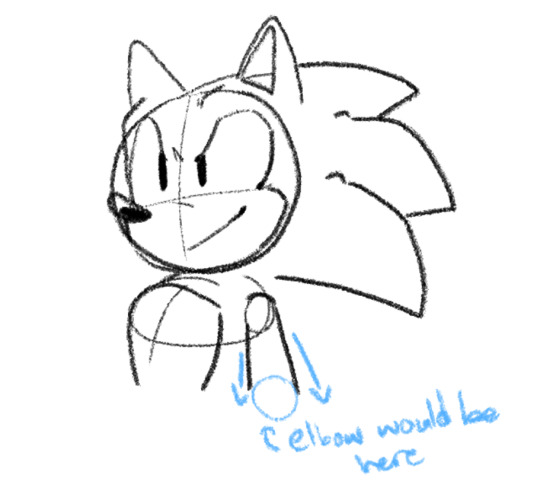
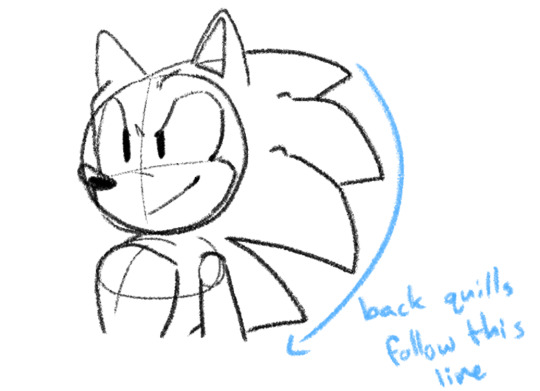

not a full-body because that would take ages but! these are my thoughts. hope you can get something out of it ?
#this is just one angle but i apply the notes to pretty much anything#the design is flexible!! everyone draws him differently!! and thats the best part honestly#sth#doodles#sonic the hedgehog#tutorial#?#anyway. back to uhhhh. more of this guy skjdsb
244 notes
·
View notes
Text

#sonic boom#sonic#sonic prime#sonic fan characters#sonic the hedgehog#sonic tutorial#archie sonic#sonic comic#sonic fanart#sonic oc#sth#sth fanart#idw sonic comics#sonic idw#idw publishing#idw comics#idw sonic#lanolin the sheep
104 notes
·
View notes
Text
SONIC POSING NOTES!!!!! !!
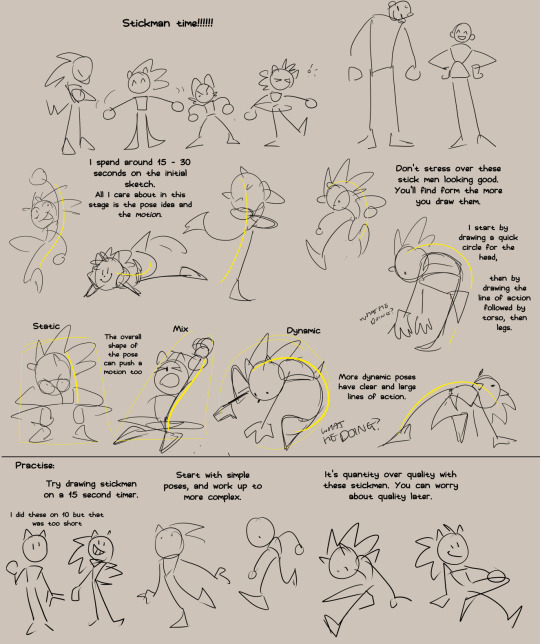
Just gonna repost this image because it is relevent. Once you got your stick man pose you can add those shapes on top.
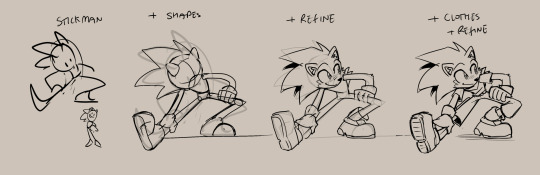
Anyways, more notes, this time on the base shapes.

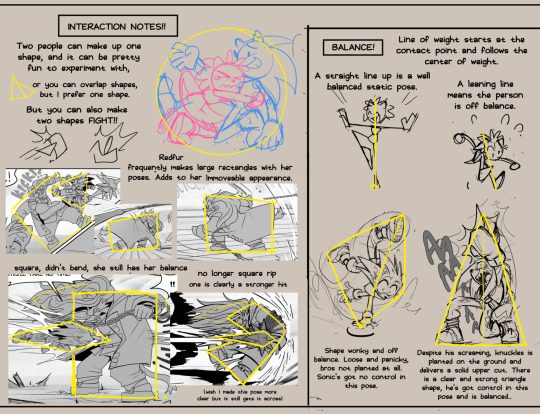

And that's all that came to mind. I'm working on an expession one too, they've been pretty fun to make.
#tutorial#pose tutorial#sonic the hedgehog#my doodles#don't believe for a second i implent all of this into every pose#my brain would explode
4K notes
·
View notes
Text


We've got turnarounds everybody!!!
A completed and updated set of Jolt's references and turnarounds! Strike's Crew is also in progress but I only had the time and energy to finish Jolt's for now.
Please enjoy and thanks for your patience everyone!! Gonna go pass out now. Much love <33
(edit: forgot a note to call out metal texture for her copper accents. fixed for prosperity!)
#Shadow and Jolt#Jolt the Hedgehog#Sonic oc#Sonic fc#fancharacter#fancomic#art help#reference#turnaround#tutorial#how to draw a skittish shy baby#onlyart#fanart
122 notes
·
View notes
Note
I want to eat your artstyle but idk how to draw the silly gay hedgehogs please i need a tutorial so i know how to draw hedgehog proportions
Welcome to the most ass sonic tutorial EVER LMAO.


I essentially just use simple shapes, rough outlines of his stance, arm/leg placement ect. This is a really simple one lmao. (IT DOES NOT HAVE TO BE PERFECT AT ALL SHJSHSJ)
----
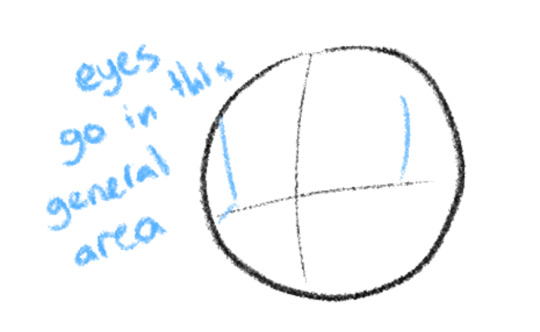
Next is everyone's LEAST fav part, his EYE, or eyes lol. My trick is to draw a placeholder like oval that symbolizes where his eyes separate and curve like so. <3


Next I create da muzzle, I usually start up where his nose is gonna be and the sides of his face-- then its all about shaping until he doesn't look like a potato. (Mephiles looking ass--)

Then you draw his cute widdle nose, give him a smile and some big ol eyes xD. DONT FORGET DA FANGGGGG.


now for my fav part, HIS 100 YARD STARE-- or his irises.💖add a lil shine to make him look alive, the size or lack of shine can express so many different emotions! :D its fun!
His eyebrows and ears are always a bit tricky, but don't forget, HE HAS EYEBROWS THAT CAN EXPRESSION EMOTION TOO SEGA--*dies* and ears as well! (Sonic prime did this so well I can die happy now.)


Now for everyone's least fav part, PART TWO. HIS QUILLS. They are one of the mystery's of life tbh. I start from where his left ear is and kinda brush my way down until I feel like they're correct. His second big quill is always under his right ear, and his last one under that. (you can shade where his back quills are too, depending on the stance is! I'll show this in a sec.)
For his gloves I kinda just draw a lil line so I know where they are. His fingers/hands are drawn in simple shapes as well, I always look at my own hand for reference lmao.

The rest is kinda self explanatory, but it just takes practice! Hell I mean my art style has already grown and changed so much already, theres just so many fun ways to draw. Don't get too stuck in it not looking right the first time. (I cringe at my art sometimes too xD)
HOPE THIS HELPS I HAVE PIZZA ROLLS IN THE OVEN *runs away*
#sonic#sonic the hedgehog#my art#LMAO NEVER THOUGHT ID BE DOING A TUTORIAL HELP#I'm kinda a messy artist Xd oh wells <3#fav#HOPING TO HELP MY FELLOW ARTISTS OUT WITH HIS DAMN EYEBALL WITH THE PLACEHOLDER THING#helps me a ton!#HELP DONT EAT MY ART YOULL GET CAVITIES HSJSHS
174 notes
·
View notes
Text
I drew a thing!!! You know this one!!!
#isat#in stars and time#isat siffrin#isat isabeau#this took like the whole week#it probably wouldn't have if i didn't decide to redraw the template entirely from scartch#but you dont get it#i REALLY wanted the stars to have four points#anyway#im gonna probably do more sketches now#like get back to the sonic ones#or more AA au#if anyone is more familiar with aa case writing hmu because i have no idea what the hell im doing#but i really want to make this fangame#wait i haven't mentioned it before i am kinda working on an aa fangame for isat#but i wanna hold off on doing too much spritework until i have AT LEAST the tutorial case figured out#and i have literally no idea how to write a case that's like not very difficult and makes sense#anyway yeah i should probably stop this rant#OH WAIT ONE LAST THING#i know nothing about the series this art trend is from i just know people draw ships like this and i wanted to do it too#harune draws#I forgot i have to tag my art if i want it to be findable later
194 notes
·
View notes
Last Seen Blogs

yield26snre
VOY👀EUR

gembet88vipclub-blog
Sans titre

derkmeister
Mr. Mcnoname

generalqueenfox
Untitled
