#speedtree
Explore tagged Tumblr posts
Visit Tumblr Blog
Explore Tumblr blogs with no restrictions, modern design and the best experience.
Last Seen Tumblr Blogs


Fun Fact
When “GIF” was named word of the year in 2012, Oxford Dictionaries U.S.A. credited Tumblr for pushing the word.
Text

Leon is surprised that he's in an all new game and not a port for the umpteenth time.
#video games#googly eyes#sony#ps5#resident evil 4#resident evil 4 remake#leon s kennedy#capcom#speedtree#survival horror
21 notes
·
View notes
Photo


James Naughton
Environment Artist at FuturLab
artstation youtube instagram
More from «Artstation» here
#Zbrush#Science Fiction#artstation#halo ce#speedtree#noai#fanart#Games and Real-Time 3D Environment Art#artist#gameart#art#Combat Evolved#James Naughton#blender#masterchief#lighting#game#halo#drawing#substance#Game Art#jnaughton98#scifi
11 notes
·
View notes
Text
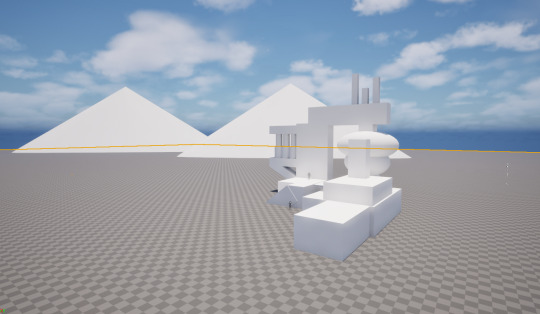
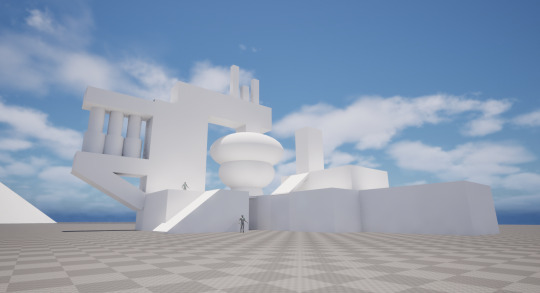
Blog Post 46: Blocking Stage
Date: April 9, 2025
I'm excited to share a significant step forward in the development of my Major Study Project, Sector M17. The blocking phase of the environment is now complete. This stage involved constructing the basic forms and layout of the sci-fi facility and its surrounding terrain using simple geometry to define scale, composition and spatial relationships.
The primary goal during this phase was not to focus on detailing, but to ensure the overall structure, flow, and proportions of the environment were well-planned before moving into high-poly modelling and texturing. I've laid out major architectural elements of the facility – such as the entry platform, towers, outer walls, and central access routes.

#gameart#environmentdesign#gamedev#unrealengine#scifienvironment#3dart#leveldesign#maya#sectorM17#artstation#fasttracktutorials#apexlegends#speedtree#gaeaterrain#digitalart#environmentartist#gameartist#scifiart
0 notes
Text
44-MAIN Development project- Final style
Although the making of the stylized art of magic above by Raashid Ifill is made normally with the normal tree branch, and early like it styles as it is stylized, but in a combination of the previous two styles that I want to do from Ghibli and glossiness of It takes two.
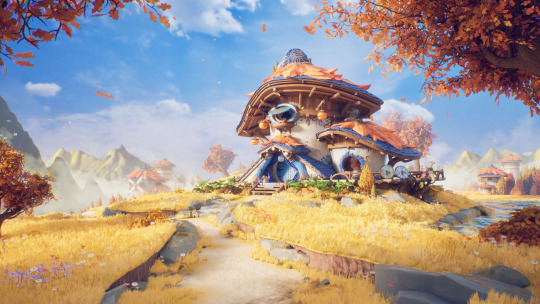
ArtStation - Magician's Abode [Real-Time]

(KeyFrame, 2024) Overall I think that this is the combination of the look I want to achieve for my final project.
References:
KeyFrame (2024). The Foliage of Magician’s Abode. [online] YouTube. Available at: https://www.youtube.com/watch?v=FYaeabnG0p4.
0 notes
Text


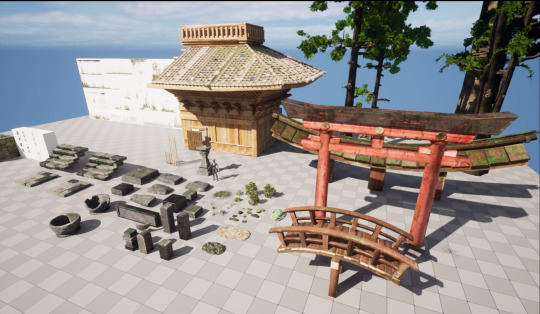

I got Rank B from #TheRookies#gamedevelopment from my project Japanese Forest Shrine made in a Workshop by Steven Downer Organized by Draw Break and thanks to Tim Simpson for the inspiration
The Rookies
ArtStation
#unreal#unrealengine5#gameart#gamedev#lowpoly#realistic#japan#japanese#shrine#forest#videogames#games#props#textures#SpeedTree#maya#3dsmax#substancepainter#enviormentart#enviormentartist#3d#3dart#3dartist#artstationhq#zbrush
#3d#3dart#gameart#freelancer#prop#3dartist#fantasy#lowpoly#unreal5#unreal engine#japan#japanese#japanese culture#shrine#assasins creed#enviorment#enviormentartist#props#realistic#speedtree#maya#zbrush#3dsmax
1 note
·
View note
Text
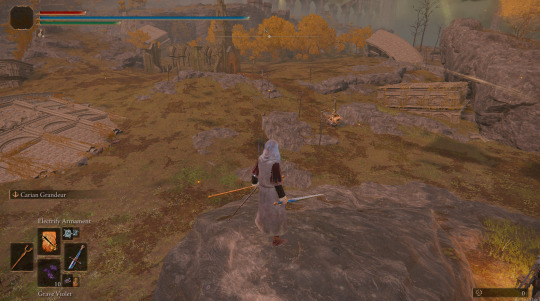
figured out how to peel limgrave
#elden ring#mod stuff#elden ring uses speedtree which isnt normally visible in dsmapstudio but the objects are still There so i can still get rid of them
33 notes
·
View notes
Text
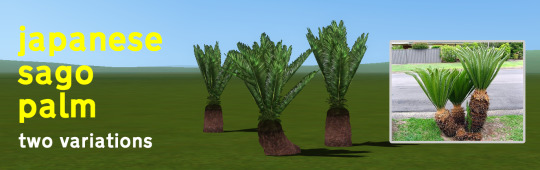
Japanese Sago Palm for TS3 and CAW
Download here
Sago palms! They're native to Japan but are also grown in the US, Taiwan and probably tons of other places that I haven't visited and that aren't listed on Wikipedia. They're so cute. Sadly they would die in a London winter so I have to live vicariously through my Sims.
Two trees are included. One is straight and the other shwoops along the ground as sagos often do. Both are young/short trees:
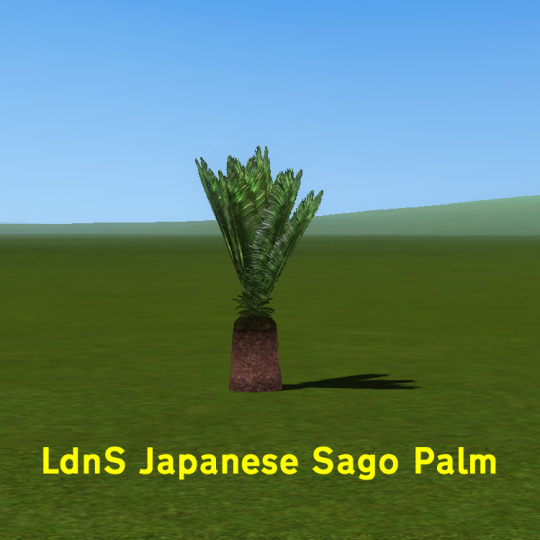

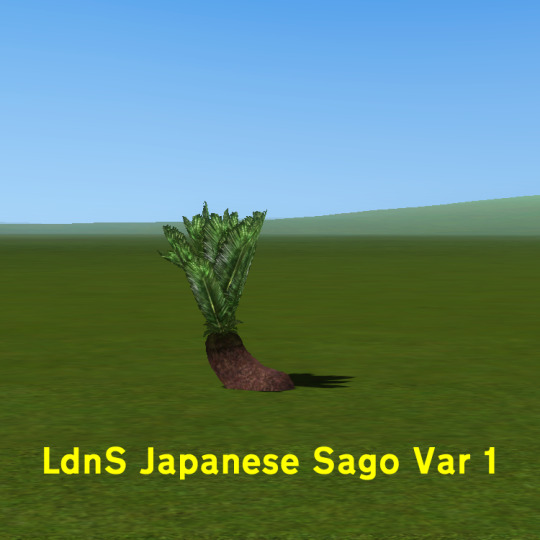
Price: §206 Category: Trees & Plants; CAW; Edit Neighbourhood Name: LdnS Japanese Sago Palm; LdnS Japanese Sago Var 1
Base game compatible / .package file
TOU:
Do whatever you like, include with your world/lot, adapt it to your tastes, steal my textures, etc.
If you create a plant cloned from this, make sure it is unique and not a default replacement - this can't be done to speedtree plants in the usual way with s3oc alone (so message me if you need help!). And please link back to my blog when you share :)
80 notes
·
View notes
Text
Download Stats - Popular items
Y'all were dirty minded when it came to plants and rocks... *lmao*

I swear one day I'll figure out why the hell I'm locked out of speedtree. I haven't been able to run the program since I had to reinstall.
Glad y'all liked them though!
6 notes
·
View notes
Text
it actually has been pretty interesting to see the interaction between procgen stuff and the new ai-generated craze. like procgen as a technique is generally about... using a bunch of different techniques together, with some human-authored stuff to hook things together, to make something interesting. caves of qud, for example, has a static, fixed overworld but procedural terrain, and between the different cave-generation algorithms, generators for different biomes, WFC for ruins, handmade setpieces, probably some other generation stuff for villages etc it's a total melange of procgen techniques applied in different ways for different purposes.
what i find interesting about the hype surrounding ai-generated stuff is the degree to which it's being presented as a one-size-fits-all technique? forget making a tectonic plate sim mixed with perlin noise curved based on biome templates to make some random terrain. ai will just Make A Landscape* (* note generative-ai is not currently capable of producing the data structures needed to actually usefully construct a landscape). speedtree has been around for decades but it doesn't Solve Generation; it's a specific tool for a specific purpose, rather than a big-picture Solution for everything.
like the maxim of procgen taking longer to produce worse output than making things by hand is so well-known as to be a cliche in procgen spaces. people are just enchanted by the thought of generation. somebody in the procjam discord i'm in said like, the thing about people interested in procedural generation is that they're generally interested in the specific algorithms used, not just the output. it's an artist's community, in the sense that they're interested in the process. and the process for generative-ai stuff is currently just like "this is unknowable". it's a particularly weirdly-tuned markov chainer, or something, who knows.
so it's not so much as there's friction there, so much as... sure sure if you want to use generative-ai for a project in practice it is going to be one tool in a toolkit of many different algorithms and techniques. and that is so divorced from the hype around generative ai that it's just a completely different conversation? like the actual use-cases for ai generation for hobbyists are like "i need a splash screen" "i need a bunch of generic and not particularly unique elf faceshots". these ai models are not out here automatically uv-mapping 3d models to generate randomized creatures or w/e. maybe one day they will be, but that would be a fundamentally different kind of thing
9 notes
·
View notes
Photo


Jonathon Gregory Bick
Senior Environment Artist @ Rockstar Games
artstation linkedin youtube instagram
More from «Artstation» here
#dark souls#Unreal Engine 5#Props#hinterlands#cinematic#art#Elden Ring#fantasy#speedtree#Rockstar Games#dark#noai#Maya#bloodborne#artist#demons souls#Jonathon Gregory Bick#lighting#game art#game#jonbick1#Games and Real-Time 3D Environment Art#sekiro#artstation#Game Art#drawing#real time#Fantasy#dark fantasy#realistic
6 notes
·
View notes
Text
What you need to have work as a pro generalist in Disney
5+ years of relevant professional VFX experience and at least a college level diploma or higher in computer graphics, fine arts, design, or photography, or related field; OR 7+ years of relevant professional VFX experience in lieu of education
Shown ability in CG techniques, including modeling, texturing, shading, lighting, look development and compositing
Shown artistic ability in a non‐CG field (portfolio of figure or landscape drawing, painting, photography, composition, perspective, lighting etc.)
Demo reel and shot breakdown (required)
Being able to deliver with minimal direction
High level of problem solving and creative thinking skills
Extensive knowledge of Matte Painting techniques as well as 3D environment techniques
Proficient in the following software:
Photoshop
3ds Max, Maya, Houdini or similar
Vray, RenderMan or similar renderer
Nuke or similar compositing software
Good knowledge of additional environment tools like Gaea, Terragen, Speedtree, Zbrush, Substance Painter
Demonstrated ability to learn new software quickly
Strong communication skills
Being curious of new tools and technologies to improve efficiency
Eagerness for improvement, of attention to details and photo realism of your work
Desire to grow with the company
0 notes
Text
Blog Post 45: Ben Wilkins’ Mountain Launch Facility: Mastering Nature and Technology Blends
Date: April 8, 2025
Ben Wilkins' Sci-Fi Mountain Launch Facility continues to impress with its recent updates and breakdowns. His method of seamlessly blending natural landscapes with hard-surface sci-fi structures directly inspired my Sector M17 approach.
From Ben’s work, I understood:
Structures can contrast dramatically with nature without clashing — through careful color, form, and placement.
Mist, elevation, and distant silhouettes add massive atmospheric depth.
You can celebrate both organic chaos and technological order simultaneously.
This led me to consciously plan Sector M17’s facility to be boldly visible but visually in harmony with the surrounding forest.

#gameart#environmentdesign#gamedev#unrealengine#scifienvironment#3dart#leveldesign#maya#sectorM17#artstation#fasttracktutorials#apexlegends#speedtree#gaeaterrain#digitalart#environmentartist#gameartist#scifiart
0 notes
Text
43-MAIN Development project- Learning Speedtree! Using the birch tree as test subject part 2
Finally, there is the process of making the final tree, here in the trunk of the tree first I centered in having some variations on the branches wideness, normally they are all skinny, but there are some more chunky by the rest.

To put more variation, I decided to put two set of branches in Speedtree, here I was motivated to do my own thing and experiment as I was already more acustom to Speedtree, the only problem is that if I had to do more plants on the future, I will not do two branches for variations and instead I will just modify their thickness by hand, this is because it make me generate a bunch more sets of nodes that otherwise I wouldn't had to.

I follow the same structure, making sure that the branches are always in airs and at least dividing themselves in the point.
Here the final look of the birch with the branches that we did previously, like one can see, there was needed a bunch of branches nodes, the number of which would have been lower if I haven't divided the branches at the start.
The form of the canopy I made it by doing like an oval kind of shape

I was following this shape like tear drop
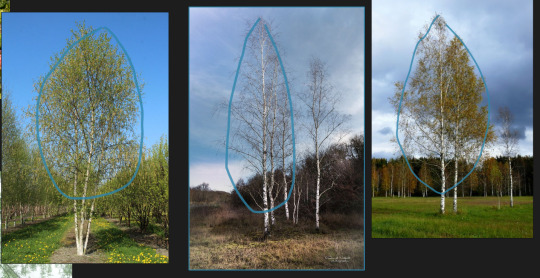

I am overall happy with my tree, the only problem that I think of it is that it is not as stylized as it could be, I haven't made the materials, but I think for this tree as a background foliage that I will not do normal maps for the leaves.
I am happy to say that I learned a lot of how to use speedtree and its node, forces, and modifiers and I am more prepared to do the main flowers now.
Also, there is some trees that has the shape of the leaves different when stylized, like this tutorial

(Kris - LucenDev. 2020)
Here the shape of the leaves are like just an alpha brushstroke, here a more recent example
Viktoriia Zavhorodnia from this popular work:

She had a tutorial of how to do this trees and also the leaves are make as a basic shape

(Zavhorodnia, 2022)
References:
Kris - LucenDev (2020). Unreal Engine 4 stylised tree walkthrough (Free project file). [online] YouTube. Available at: https://www.youtube.com/watch?v=I9oTupdnSgk
Zavhorodnia, V. (2022). Stylized Fluffy Pines Tutorial. [online] YouTube. Available at: https://www.youtube.com/watch?v=LbEv4CGz7LE
0 notes
Text
Blog Post #27- 19/04/2025
So since last few days, I was working in Houdini to create some procedural ivy growth for my Bio-Genesis project. Initially, I had been looking into SpeedTree for foliage creation, but after some more research, I decided to shift gears and dive deeper into Houdini for this task. The reason I moved to Houdini is its power and flexibility when it comes to procedural generation, which is exactly what I need for my ivy. Plus, Houdini allows for more control over the growth behavior, which was key for me since I want the ivy to feel natural, creeping over walls and surfaces in my scene.
The main challenge I ran into was figuring out how to get the ivy to grow across different surfaces, especially ones that aren't just flat things like on the incubator, curved surfaces, or any organic shape. Initially, I was just testing on simple flat surfaces like a box or a wall, which worked fine. But when I tried to apply it to more complex, organic surfaces, like the surfaces that weren't aligned to the grid, Houdini's procedural tools didn't quite behave the way I wanted them to. The main issue was how the ivy was being generated: when using start and end points, the tool would create growth paths that weren't following the curves in the way I expected. The growth would often just stick to flat surfaces or not wrap around the geometry properly, making it difficult to achieve the natural, creeping look I was aiming for.
To solve this, I tried a few different approaches. The first method was using curves to guide the growth. This allowed me to generate more organic, wavy patterns, similar to how ivy would actually grow in real life. But it still wasn’t perfect. The second approach involved using the start and end points, but this also wasn’t ideal for the organic surfaces. That’s when my friend, who’s a Houdini expert, stepped in to help. He suggested I use a third approach—generating user-created curves that are projected onto the surface using the Ray SOP in Houdini. This allowed me to make the ivy growth follow the contours of the surface, regardless of its shape.
By projecting the curves onto the surface, I could ensure that the ivy followed the organic curves of the walls and surfaces in my scene. This technique made a huge difference, as it allowed for more realistic growth patterns that responded to the geometry beneath them. The ivy now feels more natural, like it's slowly reclaiming the lab space.
This solution wasn’t just about solving a technical issue—it was about enhancing the storytelling of the scene. The ivy is meant to serve as a visual metaphor for hope and rebirth in a post-apocalyptic world. By making the ivy feel like it’s growing organically, I’m able to convey that sense of life slowly returning to a lifeless environment. This was crucial for the atmosphere I want to create in the Bio-Genesis project.
Overall, the process taught me a lot about Houdini’s procedural tools and how to adapt them to more complex surfaces.
0 notes
Text
Blog 30: Isengard
For my major project, I have chosen to create a 3D environment based on Isengard from The Lord of the Rings. As a fan of the series, the setting of Isengard inspires me both aesthetically and creatively. The dark towering buildings of Isengard also make me think of the atmospheric world of Dark Souls as another strong inspiration for my artwork. By completing this project, I hope to develop my skills by mastering the use of Substance 3D Designer for procedural texture and SpeedTree for realistic foliage as a means of creating a more professional-looking and immersive environment. Thank you!!
0 notes
Text
F.M.P Pre-production: (Forefront [Giovanna Barcelos] )
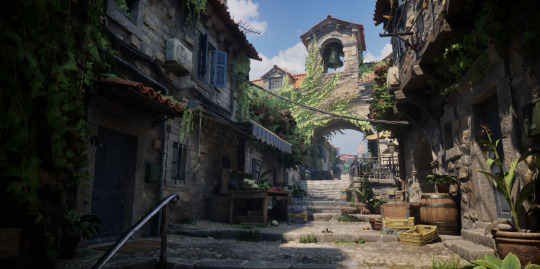
Figure 1: Giovanna Barcelos's Corners of Croatia - Demo Reel 2024. (Giovanna Barcelos, 2024)
For today's forefront research, I went with Giovanna Barcelos’s breakdown of her Corners of Croatia environment and was impressed by how deliberate her process felt at every stage. She began by immersing herself in the streets of Dubrovnik and Split through maps and photos, using PureRef to keep her references organised.
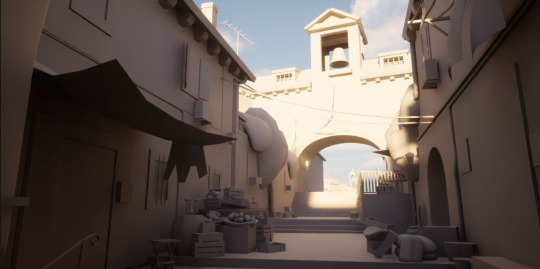
Figure 2: Giovanna Barcelos's grey box. (Barcelos and McKenzie, 2024)
That solid base let her grey box the scene in Unreal Engine with simple blocks, ensuring scale and layout were sound before any detailed work began. As evident by her grey boxing, Investing time in gathering diverse images and testing proportions can save countless hours later on.
Once her blockout was locked in, Giovanna turned to modular design. She made a concise list of every window, door and street element she would need, then built a small kit of reusable pieces. By varying scale and rotation she filled out a large townscape without remodeling each asset from scratch. In my final masters project I intend to break shophouse details into a similar kit of modules so I can populate streets quickly while still keeping each corner feeling fresh. Two to four of the buildings next to the main highlight building will be of the similar style while the other buildings will be and older and smaller style. By creating two unique sets of modular kits like Giovanna did, I should be able to populate the area quickly.

Figure 3: Giovanna Barcelos's brief explanation on how she employed Flood Fills in her materials. (Barcelos and McKenzie, 2024)
Her next key step was creating tile-able materials in Substance Designer. She leaned heavily on flood fills and branching nodes to generate rich height and normal data, which she then used for cobblestone floors, stucco walls and carved trim. Seeing how a handful of masks can give a flat plane the look of layered brick and wear taught me the power of procedural texturing. For my environment, specifically the outside 5-foot walk way and public road, I plan to implement the flood fills method and her node network to introduce organic variation without painting or texturing every tile by hand.
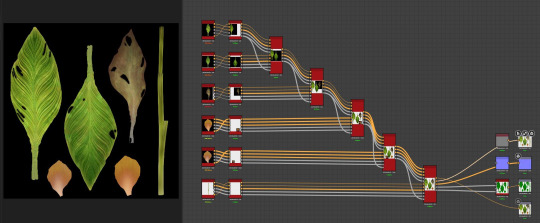
Figure 4: Giovanna Barcelos's foliage atlas in substance designer. (Barcelos and McKenzie, 2024)
Giovanna’s process for creating foliage atlas and models began with blocking out plant placement using simple Quixel Megascans placeholders to plan variation and density. For plants like hostas, ivy and hydrangeas she sculpted high poly leaves and baked their normals, occlusion and curvature onto low poly planes in Substance Painter. For more complex patterns such as canna lily veins she turned to Substance Designer, using procedural nodes and sliders to generate multiple leaf variations in a single atlas. Smaller plants were hand‐assembled in Maya with simple plane kits, while fuller vegetations like ivy were shaped in SpeedTree and then baked back into atlas textures. By combining these atlas maps with lightweight geometry she achieved a rich sense of organic depth without overloading the scene. I planned to create small foliage growing on some of the older nearby buildings. Hence, this section of the article is the most useful part for me as other places on the internet are not straightforward or not in the art style I plan to recreate.
Reference
Barcelos, G. and McKenzie, T. (2024). Learn How to Make A Realistic Modular Environment in Unreal Engine 5. [online] ArtStation. Available at: https://80.lv/articles/learn-how-to-make-a-realistic-modular-environment-in-unreal-engine-5/. [Accessed: 24 March 2024].
0 notes