#super sculpy
Explore tagged Tumblr posts
Visit Tumblr Blog
Explore Tumblr blogs with no restrictions, modern design and the best experience.
Last Seen Tumblr Blogs


Fun Fact
US Tumblr user growth rate is estimated to slow down to 4.1%.
Text
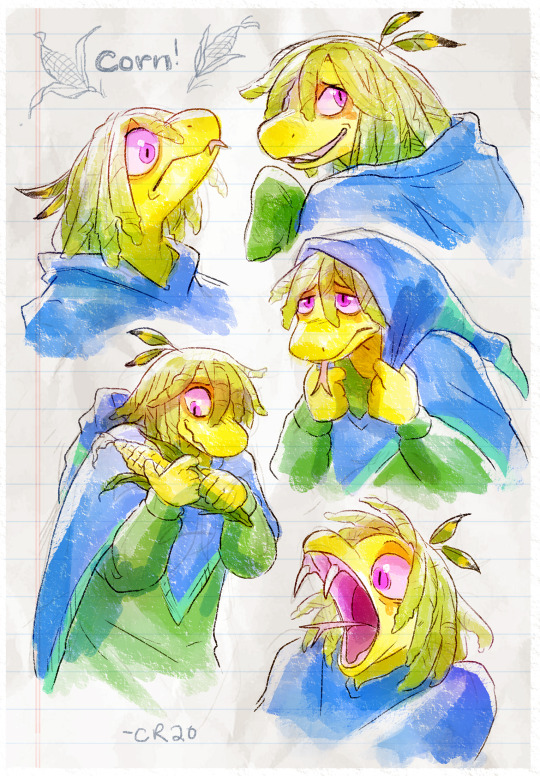
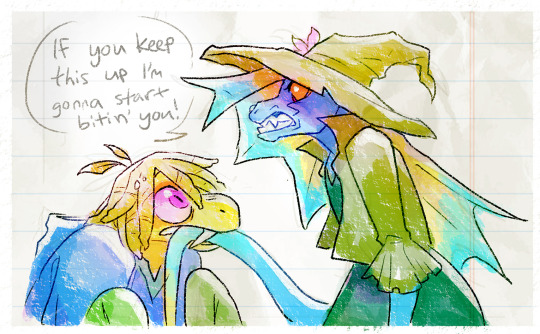
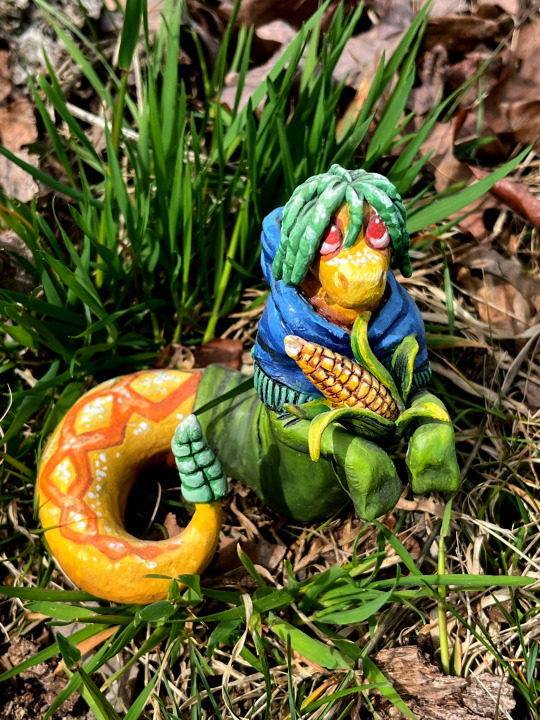
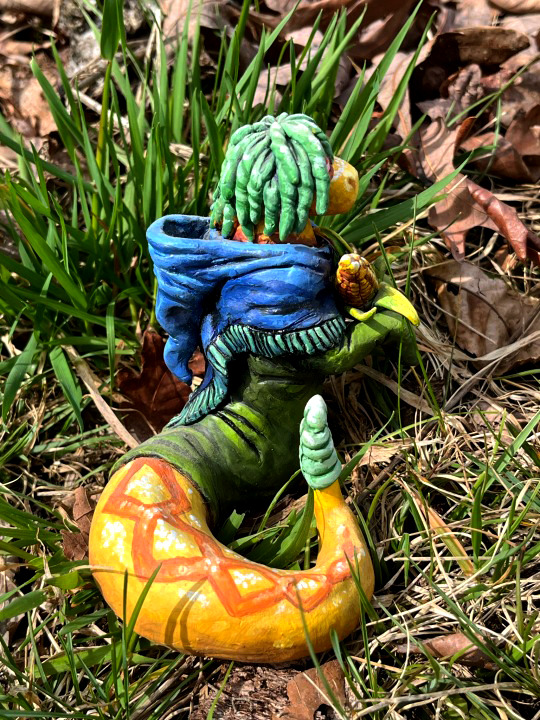
I recently caught back up on Betsy Lee's No Evil and remembered I had a buncha Corns I never posted from 2020! I went through a whole-ass sculpting phase that never made it to tumblr, lol
#no evil#its an animated youtube series and i love it! been keeping up with it for years#no evil betsy lee#no evil corn#quetzalcoatyl#these Corns are from before he was Going Through It so maybe i need to make updated Corn art...#sculpy#super sculpy#sculpting#anthro#fanart
2K notes
·
View notes
Text


ghost bride is finally done!
she's about 6 inches tall and made of super sculpy, wire, string, and an ungodly amount of clear gloss medium
#dont look at the fingers too close i had to replace some them after they broke off and got lost. also i remade the hands 4 times and im stil#l not happy with them 100% but whatever. im limited by the scale im working at#a.txt#my art#sculpture#ghosts#halloween#ghost bride#super sculpy
8 notes
·
View notes
Text


necklace i made for my gf :3
47 notes
·
View notes
Text
Here's my custom 1/12 scale custom Gorge Gridle action figure based off the Dragons Dogma character created by @wayneradiotv

For this project I used a super sculpy to sculpt the body from scratch. The limbs are an amalgam from a number of different base figures.

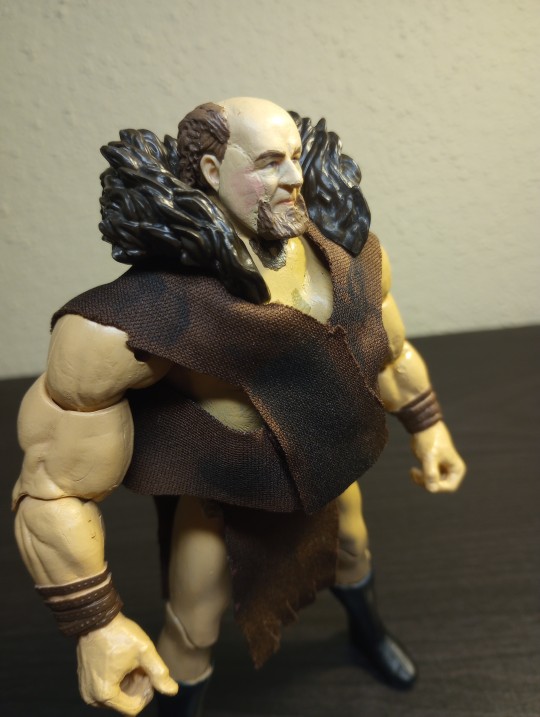
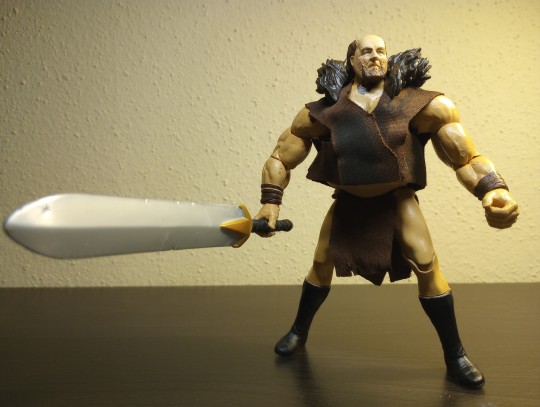
As I was making this I had to scramble last minute to redesign the clothes because Wayne made a big announcement about how he has a loincloth now. It worked out well in the end.
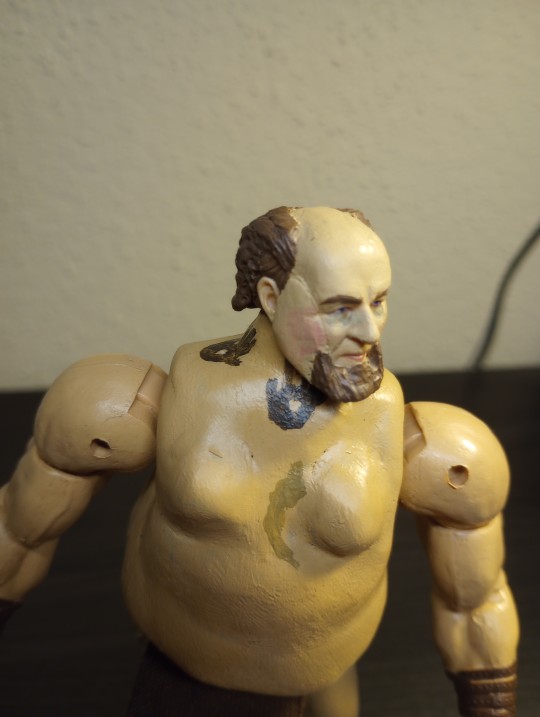
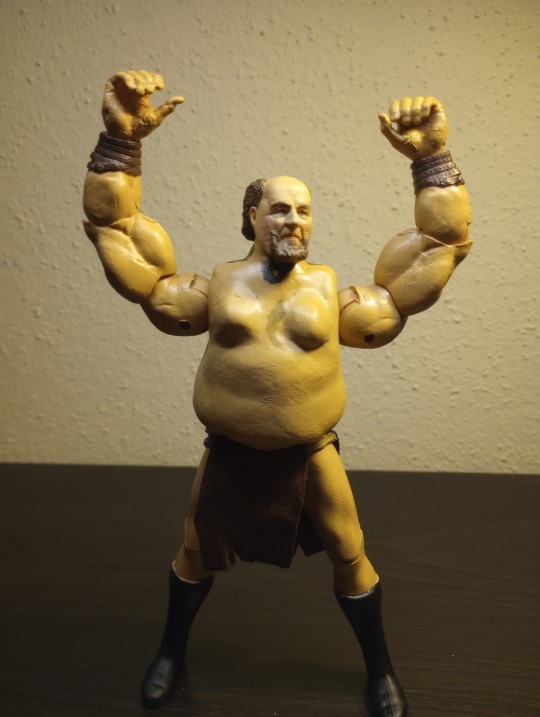
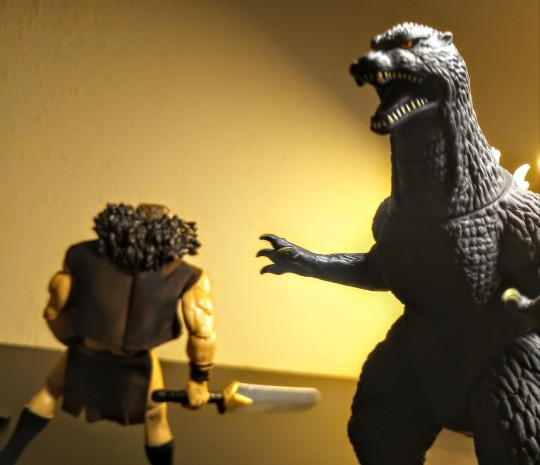
A goal I had was trying to get it as close to the Source material as possible. While I took some creative liberties, I'm happy with the results.
#my art#crafts#custom action figures#rtvs fanart#rtvs#radio tv solutions#wayneradiotv#GorgeGridle#fanart
179 notes
·
View notes
Text


Been experimenting with mixed-media lately. This is a faux-3d flower (super light sculpy) adhered to a tiny mini art panel 3x3inch !
➰💐
8 notes
·
View notes
Text
so @feyshine and i went to the mall the other day and they had a 3D printed espeon figurine. and they look at it and went u gotta make a quin and i went i gotta make a quin so now we're collaborating to make a quin! it's a janky model, harp suspects the printer was jostled during the printing and that's why the layers are misaligned, but i feel like i could smooth things over with sculpy and sanding. so that's my half of the project, the other half is harp painting it and making the fabric shawl!
im SUPER excited about this project and feel compelled to tell everyone i know lol. here's some shitty photos and the end goal design


#stupid text posts#if u have any suggestions or tips for working with 3D printed shit lay it on me pls pls pls
8 notes
·
View notes
Text
How to Build Your Own 'Augmented Super Wife Supersoldier From The Future' Funko Pop.
A Semi-Coherent Guide By RC.
This is a long one. A loooooooong one.
I meant to do this like two and a half years ago, but in the spirit of keeping this fandom's head above water, and the fact I'm at the hospital (nothing serious!) with nothing to do for the next couple of hours, I'm doing it now.
So if, like me, you are still bitter that Grace and Dani didn't get official Funkos, or official *anything* due to manufacturer short-sightedness, why not say 'fuck it' and build yer own?
This rambling tutorial will attempt to demonstrate how to build Grace from the 'when they start to kill me, run' scene.
Like, literally that bit 😋.
Anywho. Let's do this!
You will need:
- Funko Pop DIY (female)
- Polymer clay (eg. Sculpy, Fimo, CosClay). I'd advise against cheapo no-name alternatives purely because in my experience the baking times/temperatures stated are absolute garbo. Also, polymer clay will give off quite gnarly fumes while curing, so better to use a trusted source. But if cheapo's all ya got, it's all ya got.
Other modeling materials you might consider instead of polymer clay include...
Epoxy clay (eg. Milliput, Apoxie Sculpt, The Army Painter 'Green Stuff', even something like J-B Weld or similar 2 part plumber's/repair putty).
Plain ol' air drying clay (eg. DAS, FimoAir, Gedeo).
You could even whip up a batch of 'cold porcelain', or an oven cure salt dough from ingredients you probably already have at home. Make sure you clear coat any salt dough creations properly after curing as over time ambient moisture may mess with it.
Each option above has its own pros and cons. Do your research if you aren't sure. Me? I used Fimo.
*ahem* Carrying on...
- Masking tape
- Hobby knife
- Pin vice
- Kebab skewer (wooden), or styrene rod
- Paint brushes
- Primer (plus dust mask if you're using a rattle can indoors)
- Sandpaper (around 400 grit oughta do it but you could probably go 200 either side of that and get a good result)
- Acrylic paints (optional: Posca PC-1MR pens in black and white for fine detail).
- Crafter's heat gun, or a hairdryer
- Varnish/clear coat.
Optional extras: Airbrush, spray booth/cardboard box, rotary tool, oven thermometer, artist's/cake decorating turntable, UV resin, silver leafing pen, jeweller's files, jeweller's wire, acetone, superglue or 5 minute epoxy, a lil piece of sponge, pearl mica powder, scavenged Funko Pop head 😈.
Step One: Grab your Funko DIY and separate the head from body using heat to soften the vinyl enough to wangle it off the neck post. Shoving it in a mug of hot water for a few minutes should do the trick. Make sure to dry out the head as much as possible. Last thing you want is mould growing inside it. This is Terminator, not The Last Of Us 😉. Alternatively you could use your heat gun/hairdryer, but I explain in Step Six why the water bath approach is a better option (imho) at this early stage.
(You are giving this entire thing a quick read through before you start, right? I dunno about the rest of you but I like to have at least a basic idea of the work ahead before I get stuck in. Saves finding out you're missing a necessary tool/material at an inopportune moment and all).
Stop rambling, RC. Sorry. It's easier to be succinct when you haven't lost half your photos 🤦♀️. Moving on...
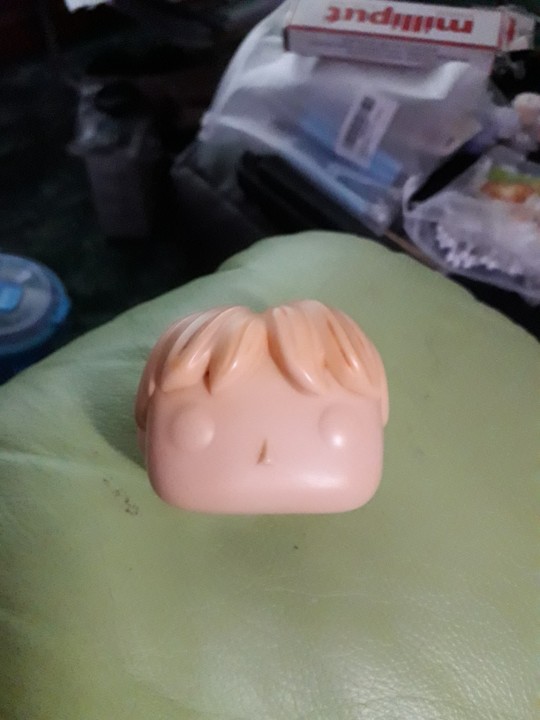
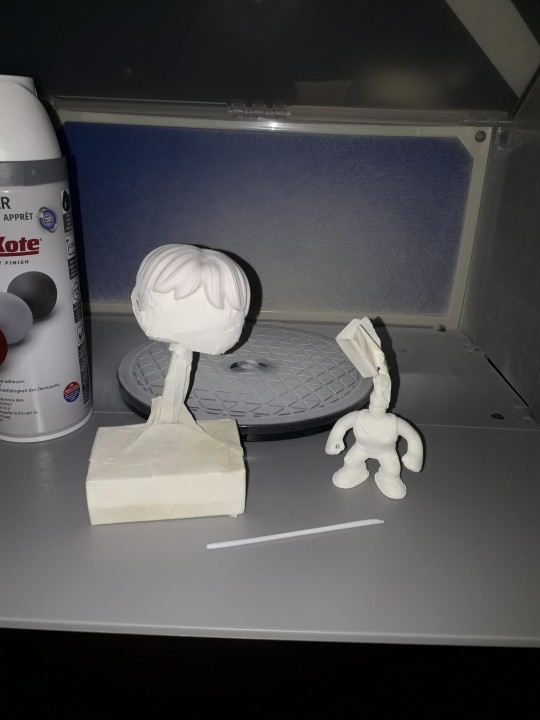
If you don't wanna attempt to sculpt the hair yourself you can, as I did, take a kitbashing approach instead of using the supplied DIY head. Grab one of the many commercially available Funkos with a decent approximation of the hairstyle you want and then go Step One on em. Buy 'pre-loved', buy BNIB, dig one out of a dumpster, steal one from your lil cousin, it doesn't matter. Procure as your time/budget/situation dictates. Improvise where necessary.
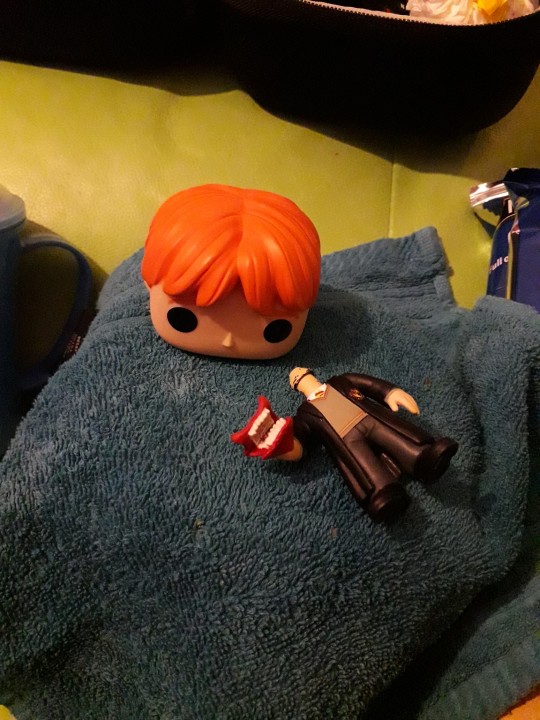
Sorry, Ron. I need your floppy hair. I do not need your clothes.
Or your boots. Or your motorcycle.
...😋
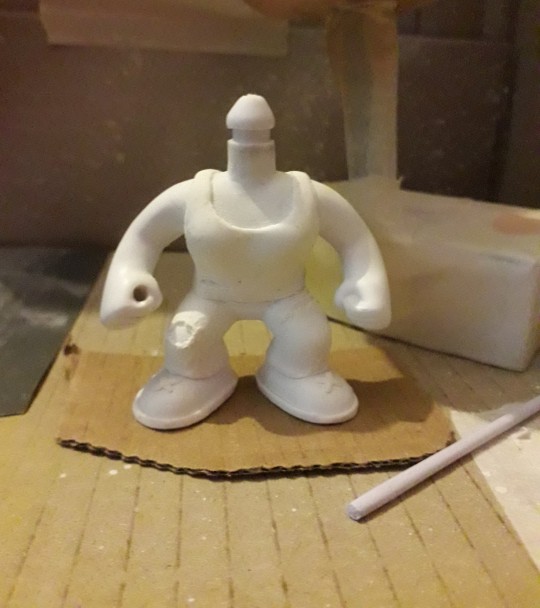
Step Two: Take the body of the Funko DIY and mark out the position of the tank top and the cuffs of the jeans. These will be used as guides for when you add the clay.
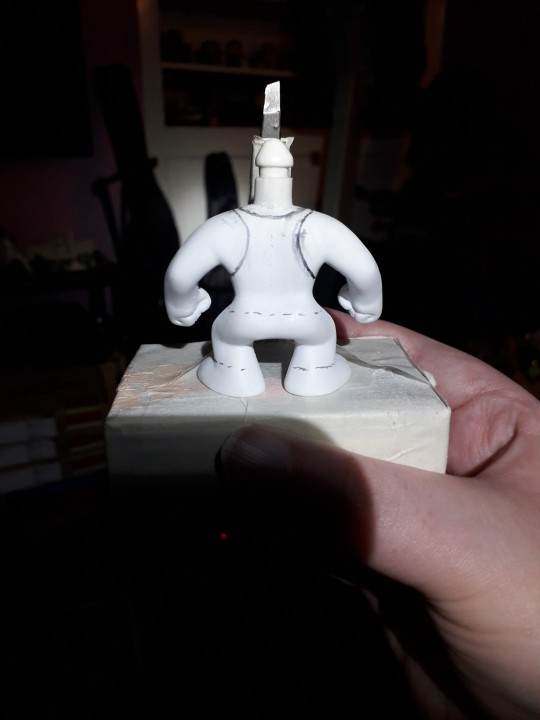
At this point I used a pin vice to drill the hole thru the fist for the rebar. If you're a crazy person you could use a rotary tool with an appropriately sized bit attached.
To make the rebar I fashioned a mould from a drinking straw and filled it with UV resin. Because I'm awkward. A wooden kebab skewer, or some hobbyist's styrene rod (eg. Evergreen Scale Models) would work just as well. Just cut it to size, paint it silver and you're golden. I used a metallic leafing pen. You use whatever you've got handy. Doesn't have to be shiny. A flat grey acrylic would work just fine.
Use jeweller's files and sandpaper to make small adjustments to the hand hole and rebar respectively in order to get a good press fit. There's always glue if you overdo it 😉. But don't add the rebar to the model just yet, as you're gonna need room to manoeuvre for the next bit.
Step Three: How do you make it look like your figure is wearing clothes when you don't have much real estate to work with?
You fake it, that's how.
You do not need to model an entire set of clothes! It's an arse ache, and we're all about working smarter not harder on the RC channel.
So, take your modeling compound of choice, roll a chunk of it out to the desired thickness, and then cut into strips, say 2-3mm wide. Use your best judgement here.
Now, using the jeans as our example, wrap a strip around the bottom of the leg where the cuff would sit. Cut off any excess and blend out the join. Just give it a lil rub and it's like it was never there. Like magic! You should have a nice defined edge at the bottom, just above the foot. Now see the top edge of your lil clay strip? Well, you wanna start pushing and flattening the clay to blend the edge right out so it fades back into the body.
Repeat for the other leg, and the bottom of the tank top. The straps are relatively simple, tho the bits that pass under the arms can be fiddly due to lack of space. Use a hobby knife to shape and crisp up those edges and then blend out the extraneous edge. Same thing with the neckline.
Run a strip around each foot to form the soles of the boots, and a lil 'x' on the top of the feet to give the impression of laces.
For the rips in the clothing you can simply gouge out a little of the clay. If there isn't any on that part of the model (the knee for example) roll out a little wormy dealie (for you North of the Border fans 😉), position it as needed, blend out the edges, then gouge as required.
If you're playing on hardcore mode, this might be the time to start piling clay on the Funko DIY head and sculpting the hair. You may prefer to leave it til the head's re-attached tho. It depends on the material you're using. If you don't think it'll stand up to a bit of manhandling while pushing the head back onto the body, save this step til that bit's done.
Cure according to the clay manufacturer's instructions. The vinyl will not melt at the temperatures required to cure polymer clay, but if you don't wanna risk it or you don't wanna use your food oven to cook plastic, with all the gnarly fumes and stuff, I've given you plenty of air dry and/or non toxic alternatives. Consistent temperature is key with polymer clay. Undercooked, it's quite brittle. An oven thermometer comes in handy here if you've got one.
Step Four: Primetime!!! Some like to brush on primer, which is fine if you're painting a fence or throwing gesso on a canvas. Not so fine if you're painting a figurine imho. I mean, unless it's Cassandra from Doctor Who. A good rattle can of spray paint is what you want ideally, but again, it's about what you can afford/wangle/manage with your crafting space, so feel free to ignore me and brush away!
First rule of Primer Club: several light coats are better than one heavy coat. Second rule of Primer Club: knock each coat back a lil with sandpaper before applying the next one. Third rule of Primer Club: sit your rattle can in a warm water bath for five minutes before shaking it up to improve flow.
You can get primer specifically for plastics but while I would recommend it, it's not absolutely necessary.
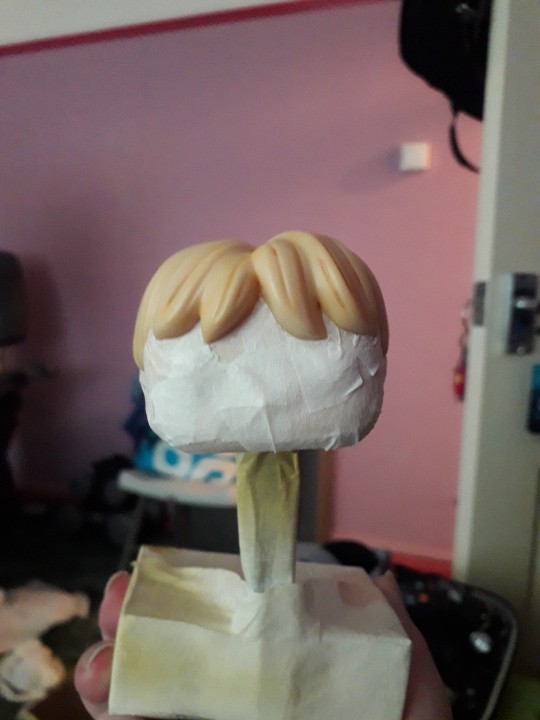
A scavenged head may need masking off if the base colour already matches the skin colour of your character. Save yourself a bit of painting innit. You can get really tight, clean edges against the hairline with a hobby knife. If the hairstyle, hair colour, and skin colour match straight outta the box? Congrats! Why are you even reading this? 😜.
That thing in the background is a portable spray booth (that other thing is a turntable). A cardboard box is also a portable spray booth if you want it to be. Only thing it doesn't have is an extractor fan. So put on a dust mask, and open a window or work outside.
The DIY figure comes primed outta the box, so if you're using the DIY head and are planning on sculpting the hair after re-attachment you don't need to prime it. Unless you want to.
Step Five: Time to paint that shizz. You don't need me to walk you thru this bit, right?
Right?...
Masking is your friend if you don't trust your ability to freehand with a brush. If you're masking over a part you've already painted and are afraid of pulling the paint off, you can knock the level of tack on the tape down by sticking it to yourself (or your clothes) a couple of times before applying it. Some prefer to add a light layer of clear coat to 'lock in' the underlying paint. It's like a real life 'save point'. Some people do both. Some use masking fluid. Some use silly putty/blu-tac/plasticine. Play around, see what works. You do you.
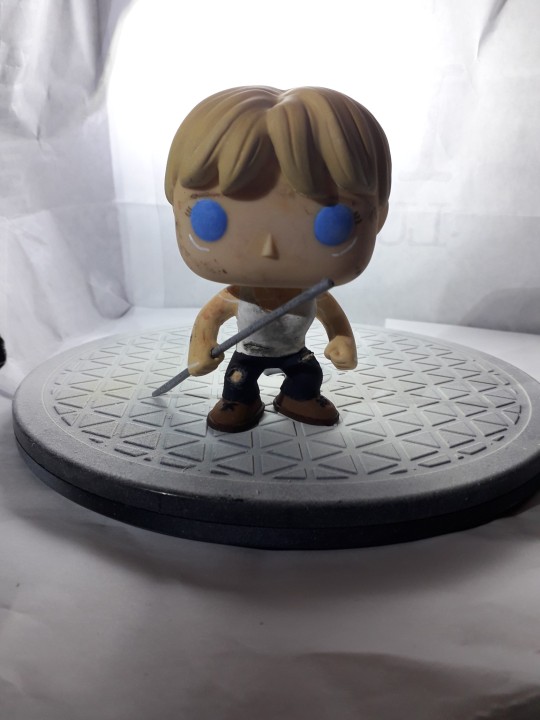
I painted Grace's eyes blue coz Grace is extra and so am I. I threw a lil bit of pearl powder in there to add a subtle shimmer, as I thought going full metallic blue might be a bit too extra.
Lady Funkos have eyelashes. Don't forget the eyelashes.
(I nearly forgot the eyelashes).
A fine tipped Posca pen comes in handy here if you've got one.
Ditto the eyebrows, tho those aren't just for the ladies obvs.
For Grace's augmentation scars, again I recommend a Posca pen but a brush will do.
DO NOT PAINT THE NECK POST. Don't even varnish the neck post. Keep that bitch masked up until you're ready to reattach the head. Like, you can get away with painting the very bottom if you're worried the bare plastic will show even with the head attached, but that's it. Any more will be making a rod for your own back.
You have a choice now. Whether to weather your figure. I chose to add that extra level of detail as it made sense to me. Use a combination of dark washes, dry brushing, and/or sponge stipling to add dirt, blood etc. If ya want.
When you're happy with your paint job, give everything (except the neck post!!!!) a couple of layers of clear coat.
Step Six: When it comes to reattaching the head you probably don't wanna be dunking anything in water by this point, just in case. So we're gonna soften the neck post (and around the base of the head if necessary) with hot air instead. Use a hairdryer if you don't have a heat gun. DO NOT use an industrial or decorator's heat gun for the love o' god. That shit's meant for stripping paint, not gently warming vinyl figurines. It'd be like using a nuke to shake a cherry tree, and you'd likely burn yourself. A hairdryer is more than capable of doing the job.
Why did we not use the hairdryer for Step One? To be honest there's nothing stopping you if that's what you wanna do, but as you don't have direct access to the bits that need softening at that point you will have to wait for the heat to penetrate. You could be doing other things in that time by letting a water bath do the work for you.
Now, however, you do have direct access, so you'll probably find you only need to blast the hot air for 10 seconds or so.
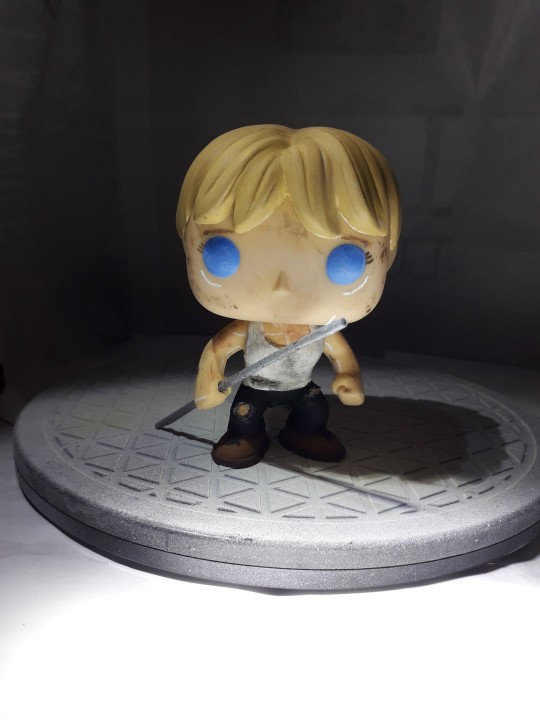
Step Seven: So, you've got the head re-attached, and your paint job is finished and clear coated. That means it's time to add the rebar. If you went a bit too far with the drilling or sanding now's the time to get your glue on. As an final extra touch you can spiral some thin jeweller's wire around the length of the rebar to make it look more rebar-y. I didn't do this bit as the wire I had in my possession at the time was too thick for my tastes.
But whether you opt for that or not, congratulations on making your very own Grace Funko Pop!
I'm still planning on making security guard and future war versions of Grace, and at least one version of Dani. Yeah, I've been saying that for the last two years, but it's still absolutely happening, trust me.
Anyway. That'll do it. If you have any questions, or you need further explanations or recommendations etc. y'all know where to find me.
8 notes
·
View notes
Text
Apparently I have a thing for dystopian crapsack hellscape worlds in fiction.
I love imagining somehow getting Vin out of the Mistborn world and just having her hang out with me in my everyday life. I find my bathroom boring (my husband bought us a gray shower curtain, whyyy) but I can imagine her sense of wonder at the white walls without a trace of soot, and being amazed to find out this isn't some super-rich thing that it takes a household of servants to maintain, but something nearly anyone can have.
I picture her seeing the colors on the shampoo bottles and the little pink heart-shaped soap in the soap dish and her face lighting up.
And then I come out into the kitchen, and Vin sees the vase spilling over with flowers in yellow and pink and red.
I imagine Gideon getting isekai'd the fuck out of The Locked Tomb Trilogy and getting a job in construction or as a mover or as an EMT, and making friends and getting laid and staying up way too late watching internet porn or baiting trolls, and just living her best life in a place where she can live a life. I picture her taking a hot bath every day, sometimes two or three times a day, just because she can, because she never has to spend all night shivering in a cold cell ever again. I picture her buying so many pillows you can't see the bed.
It's not as compelling with El Scholomance, because she does get out, but I can think about her having to sort through curses and magical pests to get any food, and it still doesn't actually taste good and there's usually not quite enough of it, and then biting into a slice of pizza with the cheese going all stringy. I can, in my head, have her sit next to me in the drawing class I took freshman year, on the third floor, shading spheres and cones, knowing it's the last class of the day and after that we get to go home. I can have her go to fencing practice with me, meditate with me at lunch like I did senior year, watch the school musical. We can ride our bikes home. I can take her with me to the year I spent in Melbourne and we can play the flute with my neighbor, making up our own music, and we can do research about animal rights together (this was a good thing, I had more free time, so I could spend some time figuring out my values rather than only being focused on what my teachers wanted me to focus on), and we can make things with sculpy, and go on walks in the park at sunset when the sky is full of clouds and color.
And I can go back further, and Talia Heralds of Valdemar wasn't in a crapsack world but she was getting bullied and I could take her hand and get her away from there a bit so she could have some free time for a change. Go swimming in a lake. Use a bicycle press to make apple cider. Go to a poetry slam or go to a library, oh, I so want to show Talia a good-sized library. And further than that, to Lessa Dragonriders of Pern (warmth, color, comfort, safety) and Menolly (friends, conversation, companionship, freedom)
2 notes
·
View notes
Text
Independant Work [Ear Study]
Another point of weakness in my style is my ears. I'm not good at the different shapes and they often don't look realistic. So before half term, Kyrstie tasked me with doing an ear study. I focused mostly on college work up until now but I found some spare time to do the study so I finally finished it.
First I looked online at some artists I liked to see how they drew ears and I saved a few references.

I chose to save this one because the top right pose had her ear showing and it was a very simple representation of the ear so I saved it to see the basic bare minimum, really.

This one is quite the opposite, this has a lot more detail. It's good to get a good range of references so your visual library gets a spectrum of references.

Lastly I saved this one because it was a sketchy style which shows less detail in htings but I liked that the ears had a slight triangle shape to them and weren't as simple as the first reference I chose.

The next thing I did was put them on PureRef and line them up so I could easily see them all.

Using one of my art books as a real life ear reference, I drew each version. The real ear, the triangle-ish ear, the simple ear and then the realistic ear. The last one on the page is how I do ears normally.
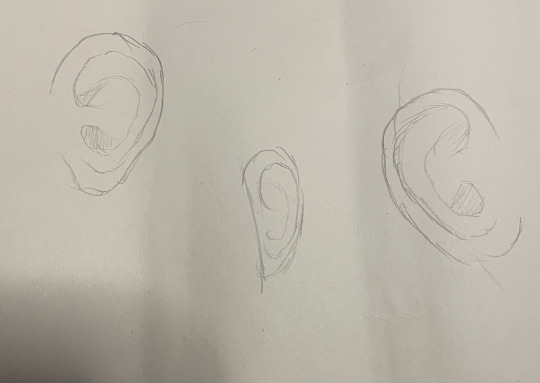
Looking mainly at the real life reference, I sketched a few renditions of the detail I'd like to save. I tested different angles and perspectives and tried to keep the level of detail the same.
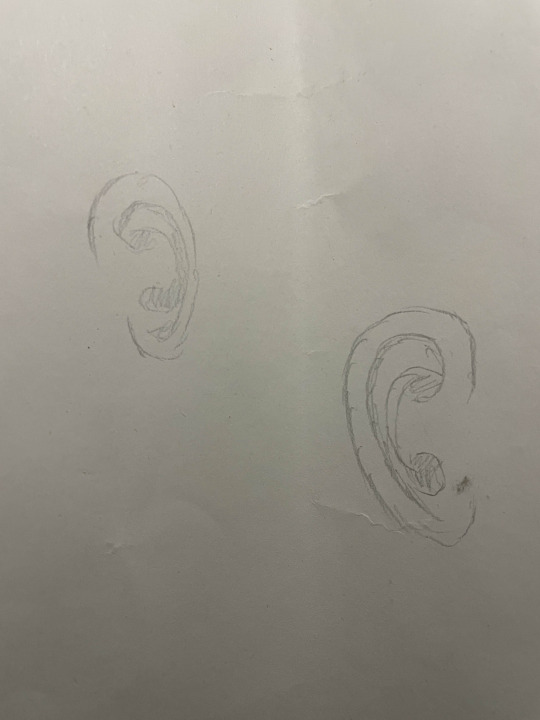
Then these last two were attempts at speeding up/seeing what other details I could forfeit. They were also smaller to see what I could keep/not draw.
Only time will tell if this helped since I have no plans for close up artwork of humans at the moment, but I think it helped. It reminded me the basics of the ear and it reminded me of the ear we made with the Super Sculpy. Ears are very unique, but they do have a basic shape. So I'll make sure to remember it the next time I do art.
0 notes
Text


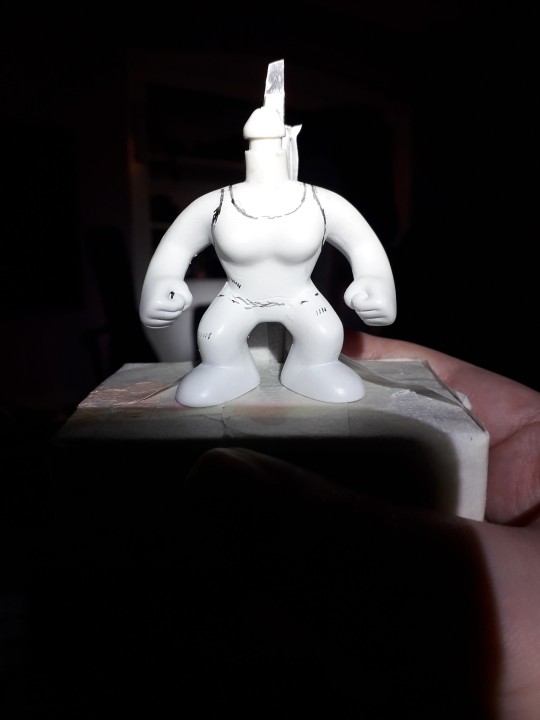
The model had been spray painted with glossy white spray paint but for some reason the paint didn’t dry on the skirt or on the sash. We spray painted another super sculpy piece with the same spray, let that dry and they spray painted it with a matte paint, to see if spraying over it would help it dry out. The paint dried perfectly on the other model, and so we spray painted the model with the matte paint. The paint dried a bit more, but was still a little bit tacky in places, but I decided to just go ahead and paint on it anyway, as I didn’t much like the idea of my model being plain. I think that the reason it didn’t dry well could’ve been down to me not having fully dried the sculpy beforehand, as I added a flag to the antlers that I didn’t bake, and the paint was very tacky there too. Next time I will definitely make sure everything is baked properly.
0 notes
Text

Here are the silicone models I have made with my super sculpy potions. I am got to fill these up with different colour resin.
0 notes
Text
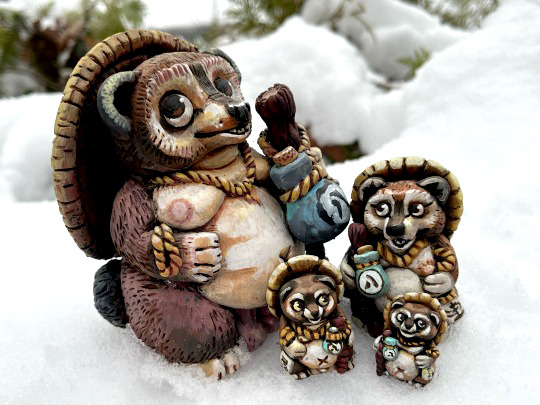
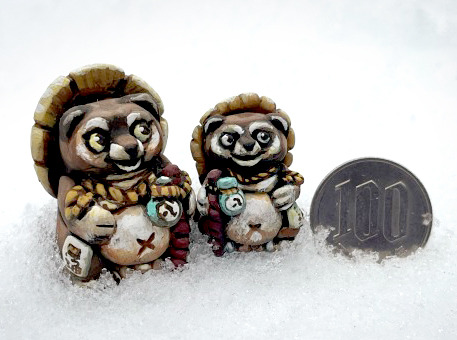
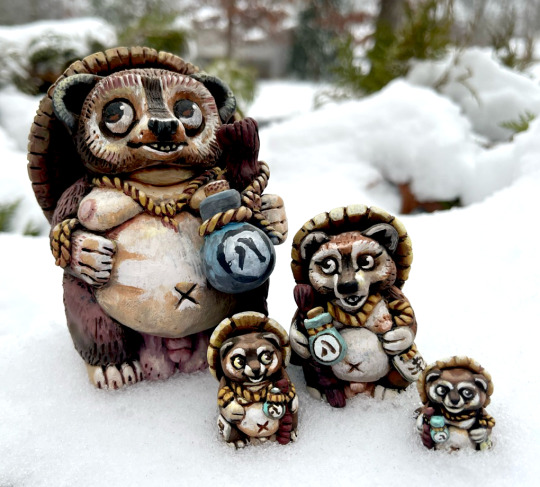

Tanuki statues I sculpted and painted a few years ago! My friend at the time kept challenging me to make them smaller and smaller haha. Believe it or not, there used to be an even smaller one but he is long lost...probably on some adventure in a couch or vacuum bag somewhere.
#the big one's bank note fell off and i dunno where it is#tanuki#sculpture#super sculpy#clay art#anthro#artists on tumblr
144 notes
·
View notes
Text

Some tea pots i drew before I made the super sculpy one. I really enjoyed doing these, all the different styles and designs, it was very interesting to see how the different countries associated with tea, manufactured their teapots.
0 notes
Text
Making a better cup Part 3 (24/3/25):


I tried making one myself with the Super sculpy but I still had the same problem of it sticking, though I was proud when I got one to come off the pole easily but I later ruined it by putting it back on to remove some details I didn't want on it.
0 notes
Text


This then takes us to where we are now. After Birdy got taller I had spare parts and order the rest needed to make a new armature. Which then takes us to the making of Wallie which you can see on my other blog. And the making of Birdys new face useing Super sculpy.


0 notes
Text

MINI BOOKS
Made some mini books out of super sculpy that will be placed around the room once completed.
0 notes