#then i downloaded every frame and put them into an animation file. manually
Text
Me the last few months
#sorry i tried to make it a gif but that did not work at all#my art#digital#dndads#normal oak#i downloaded the original gif.#then to put it into ibis paint to add teeny i had to go to some random website that spliced the gif into all its frames#then i downloaded every frame and put them into an animation file. manually#then i had to draw teeny over 30 times#then i downloaded the video but tumblr wouldn't let me post it on mobile or desktop no matter the file type#so i screen recorded the video and the app i used (xrecorder) let me crop it so it wasn't the length of my phone screen#and then tumblr finally let me post it <3#i hope idk this is my first try and if it doesn't work im going to kill a human person#jk but i will be sad and annoyed
29 notes
·
View notes
Text
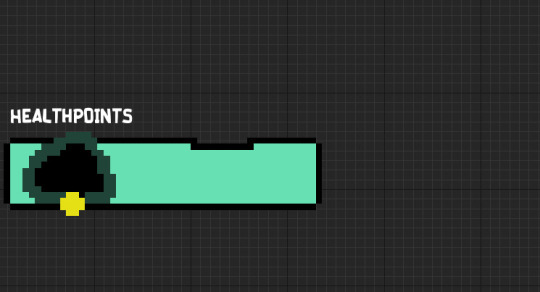
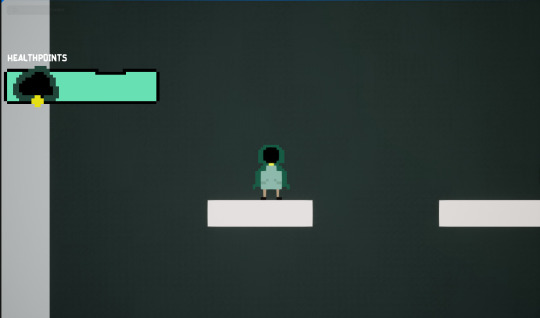
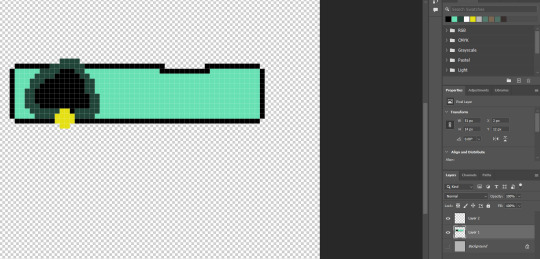
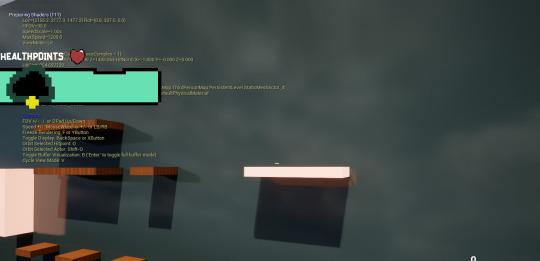
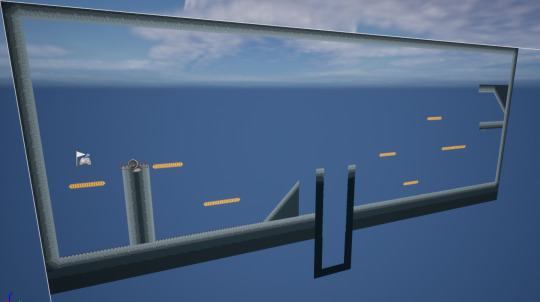
Today I began the design of a HUD. At first I was unsure whether or not I would include a HUD in my platformer but now I have decided that if I were to introduce enemies the health would prove quite useful. At this moment in time I still need to add damaging objects as there are currently none in my game plus coding the health bar to move corresponding to the damage received. I designed the bar using photoshop which I then exported as a png and inserted it into my canvas in unreal. I also downloaded a font off a website called dafont and I found the one I wanted to use which was also put into unreal to rest above the health bar.

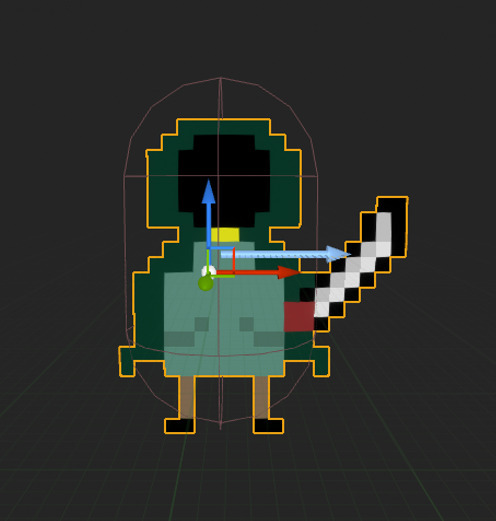
I wanted to add the weapon to my character as an inspiration when I come to complete my sprite sheet. The design of the sword was more of a reminder to design the sword and it's animations later on.
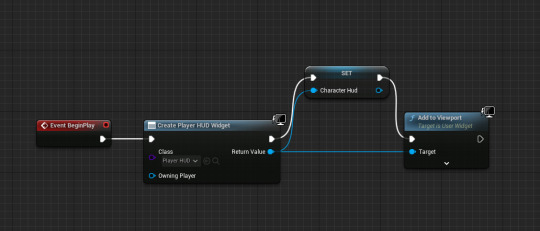
Code to make the HUD function. This inserts whatever I have designed in the widget menu and puts it on the screen. This code allows the widget to be displayed by connecting the integer to the character meaning the widget cannot be deleted by an error if it is hooked to the character

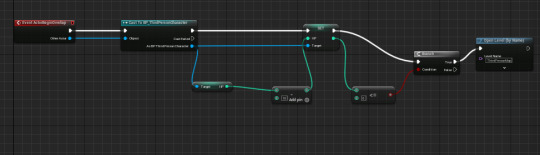
Functioning collectible. The code allows the collectible blueprint that is inserted into the game to be "collected" by the character. Collected is in quotations as what the code actually does is destroy the collectible actors but only in game. The HUD can communicate with the player as it counts the actors destroyed which is the number of coins gimmick.

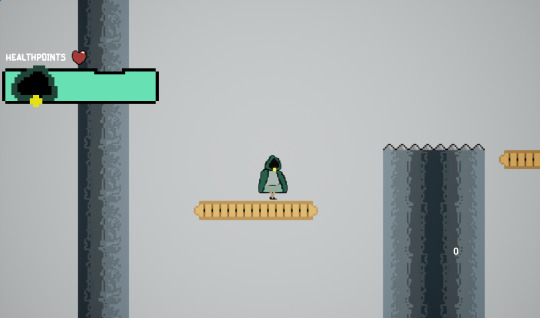
Today I began the designing of the sprites used on a sprite sheet. With some help I conquered my struggle of walking animations. The sprite used here very well may be the final design of my character for the platformer.


I fixed my error with the damage player object. Before I had put all of the code in the wrong blueprint but now I have resolved this by creating spikes that kill the player once it touches them a total of 10 times as they deal 10 damage and the player has 100 health.
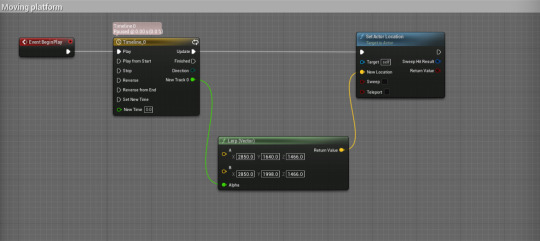
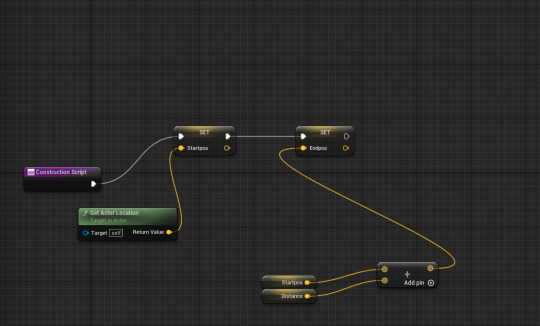
To make moving platforms I used this set of code to allow the coordinates to be set for the new location of a platform. If this was looped, it would make the platform move to the new coordinates set and its original location.
Here is a screenshot of the platform I coded to move .
More code for the platforms. This basically creates a vector in which the platform is able to move to and from a location set. But with more advanced coding each platform will not have manual input of the desired location.
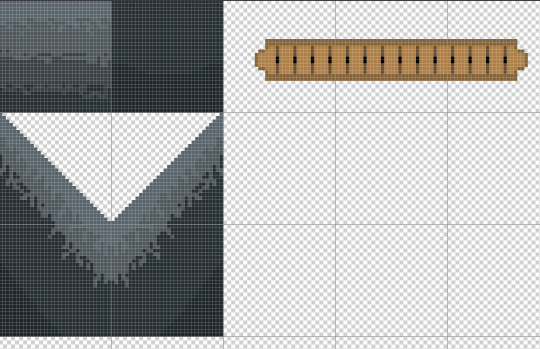
The beginning of my tilemap development. The tile map is set to 320x320 pixels which provides many grids (once turned on in photoshop) to design my tiles that will be used in the design of my 2D platformer.
Progress of the tilemap.
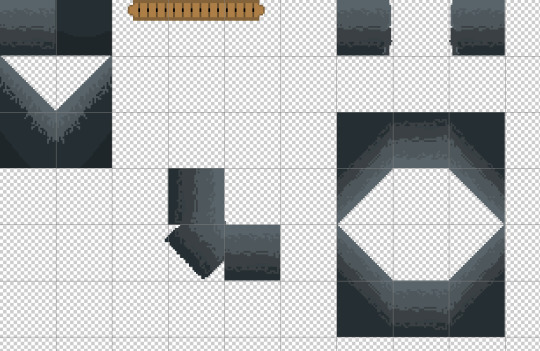
Further progression of tilemap.
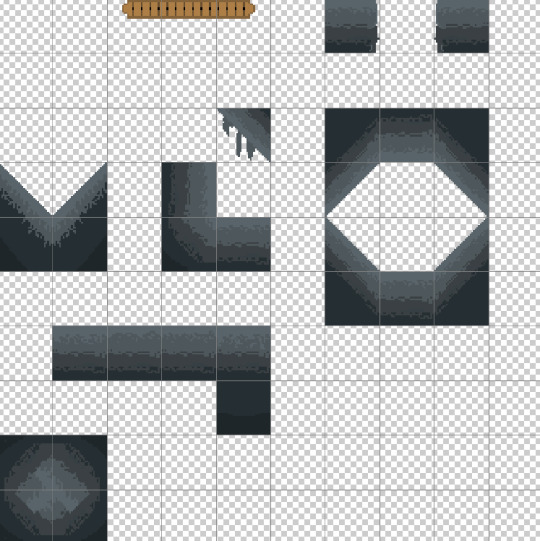
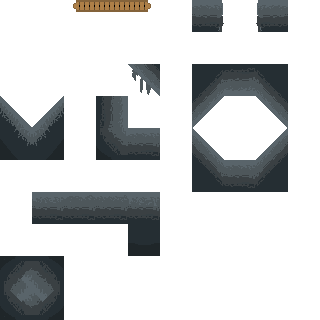
Png version.
I also continued the development of my sword that the character in the platformer will be able to use.

At the moment it is only two frames which makes the sword move up and down, the swish is not yet animated. In the future I would also like to add little clouds beneath my character's feet whenever it moves and jumps. I later on lost the file of the sword but I found a way to rotate the sword without having to redraw it making the current version better than the screenshot above.
Finished tilemap

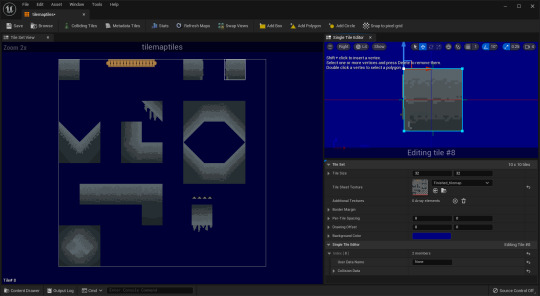
Beginning of the insertion of my tiles into unreal. I created a tile set by right clicking on a blank space, going to paper2D and selecting tile set. Here I gave each tile a collision box so the character is able to interact with every tile.
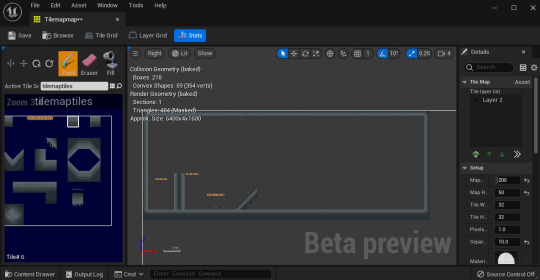
The plotting of tiles onto the tilemap in game. To do this I right clicked on a blank space in my content browser, went on paper2D and selected tile map. To plot the tiles all you needed to do was select the tile and click
Animated sprite in game (walking animation screenshot)


Code that makes sprite walk when holding movement button and stand still when stationary. The boolean allowed the flipbook to pause when movement input=flase so there was no animation palying when idle. (until idle animation is done)

Early development of tilemap in game.
0 notes
Note
hi julie!! have you ever done a tutorial on how you gif before? the quality of your gifs and the coloring are *chef's kiss* and i would love to know the secrets of ur craft lolol ty for hearing me out and hope you're having a good day <3
hi! no i haven’t, now that i think about it. tysm for your sweet words. i think my gif making process is a little bit all over the place and different almost every time, lol. but i’ll try to explain the fundamentals under the cut.
first of all, i always try to use 1080p and download as big of a file as i can find (at least around 5gb, preferably bigger). i know a lot of gif makers use 2160p and while i appreciate their crispy, pretty gifs on my dash, that’s too much hassle for me as i’ve heard nightmare stories about how long they take to cap/load, or how they can be washed out.
then i make screencaps - i know some people like to just load the movie/episode straight into the timeline, then cut the parts they want, but this is how i learned gif making and what i’m most comfortable with - then load them into photoshop using file > scripts > load multiple dicom files > whatever folder i saved them in.
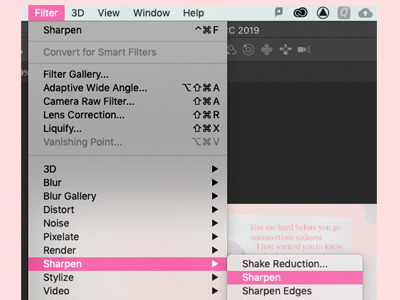
then create frame animation + make frame from layers, crop and resize. to sharpen, you then select all frames and layers and first convert to video timeline and then choose filter > convert for smart filters.

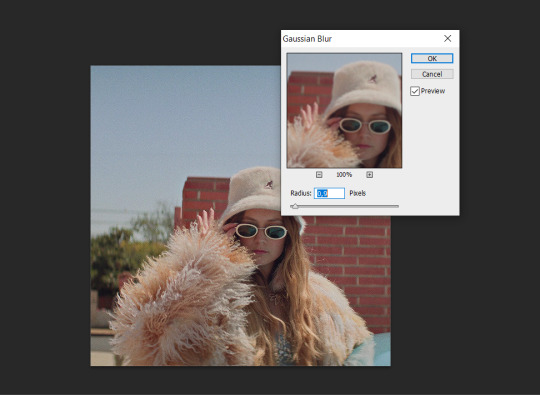
my sharpening varies depending on what quality the file is, but i always start with a gaussian blur to smooth things out and work from there. so duplicate layer, then on the top layer go filter > blur > gaussian blur and put it around 0,9 (again, depending on the quality and graininess etc)
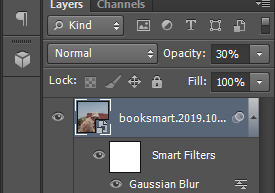
then slide the opacity of that duplicated layer down to about 30%, this might seem counter productive atm but it’s for later, lol.
on the original, bottom, layer, you add sharpening. so filter > sharpen > smart sharpen. these are my settings on the first sharpening:

then you add another smart sharpen to the same layer, but this time the settings are, amount: 10% and radius: 10px. now you can use the opacity on the gaussian blur layer to either slide up or down in percent, depending on how the gif looks after sharpening and what it needs.
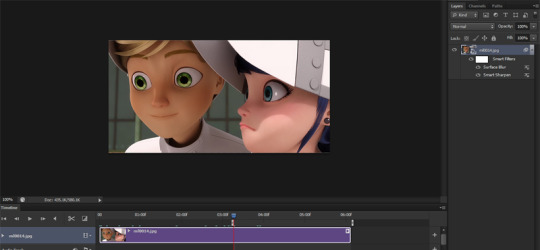
okay, onto the coloring! i always use curves layers first. and the first thing i do is select the white dropper and look for the brightest part of the gif, which on this gif is on the side of her hat, then click there with the dropper:
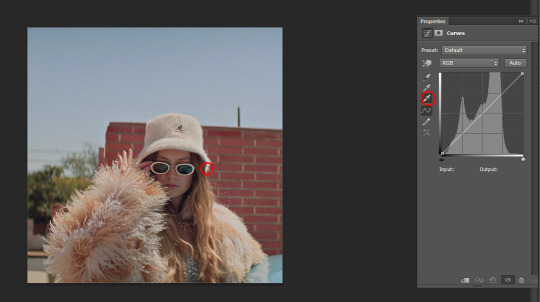
that brightens things up automatically like this:

to add some depth and color correction to the gif, i add another curves layer, except this time i select the black dropper (the one at the top) and find the darkest part on the gif, which is here around her neck, and click on that:
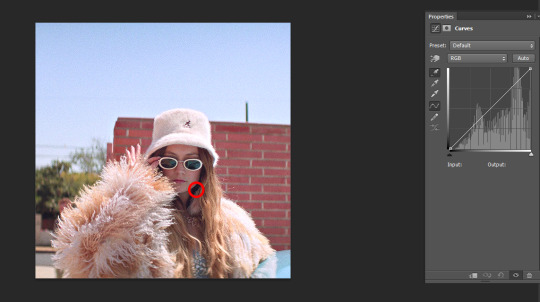
and we end up with this:
note: this method doesn’t work with every gif and it can look terrible when you try it on certain scenes, so please don’t be discouraged if you can’t get it right. if it doesn’t work on something, i just experiment with the curves layers manually until i get a base i’m satisfied with.
two more things i always add to my gifs, no matter what, are a brightness/contrast layer and add fiddle around with it until i think it looks good, and then a selective color layer > blacks > black and add about 1-3 points, depending on how the gif looks, to add darkness to the shadows.
now you can start to play around with the colors in the scene. on plain gifs, i like a more natural look, with some pops of color and a little bit of contrast. so i’ll add another selective color layer and look at what colors already stand out in the gif. so in this case it’s red, green and blue. i go to those colors in the drop down menu on the selective layer and play around with the sliders until i’ve enhanced the colors to my liking.

if you have a person in the gif and the color enhancements affect their skin, use a soft black brush, click the layer mask on the selective color layer and erase the part of the layer only where their skin/and or clothes are visible.
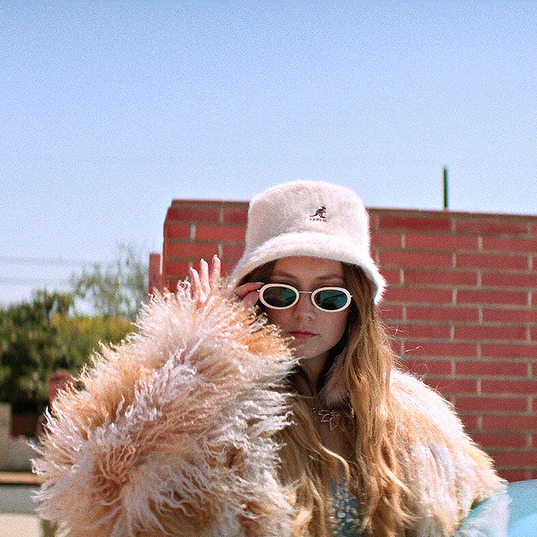
now, she could use a little color in her face, so i just take a color balance layer and a little bit of red and yellow to the gif, but not to much, and viola:

if you don’t want to do the usual work of saving the gif and then reopening it to change the delay, this is a simple tutorial on how to do it without closing the gif.
hope that helped and feel free to message me again if you have any questions or anything confused you!
#ask#anonymous#ps help#gif tutorial#sorry this took a couple of days i am not a natural at explaining things kajndnak
4 notes
·
View notes
Note
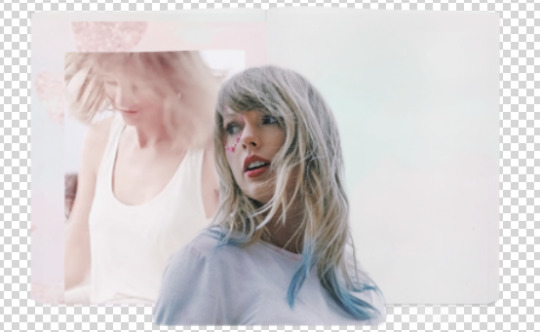
hiii abby!! can you post a tutorial for how you make edits like your latest one? the url edit fro taylorswifh? it’s so prettyyy
♡ edit tutorial for this edit, requested by anon ♡
hiii so! this is quite long, but that’s because I wanted to capture my whole entire process to hopefully help you! I used photoshop (2018) for this tutorial, and all the resources I used are listed here (everything except for photoshop is free)! I’ve sort of split this tutorial up into sections, by the different steps. thank you and have a lovely day!! ♡
so before I begin, I always think about the edit, like what I want the final outcome to look like (or if I don’t know what that’ll look like yet, what direction I want it to go in, the main themes/ideas/colour schemes that I have). I personally love using a minimalist range of colours, all of them being light and pastel (that’s just my personal liking though). I also consider the main themes or ideas that I want to translate through my edit. you also need to have the passion and desire to edit, I’ve learned that there’s nothing more draining than editing when you really don’t want to. so I think that you should think about all these things before starting!!
tip; put on some music, it gets your creativity and thinking flowing if you’re in a good mood ldkjkl
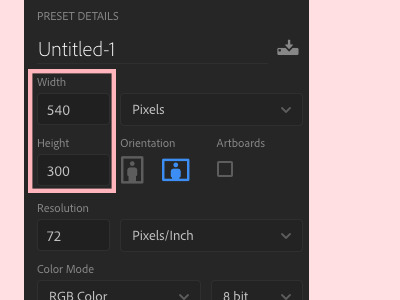
so! when creating the edit; first of all, I created a new document in photoshop - 540 x 300 pixels for this specific edit (just because that shows up as high quality on tumblr, but it doesn’t really matter!) when you click ‘create’, a white canvas should open up.
— creating the book
next! I used a book psd for my edit, which you can find and download here!! so I just opened that psd up (a psd is just a photoshop file that has like all the layers in place so it’s not just one photo);
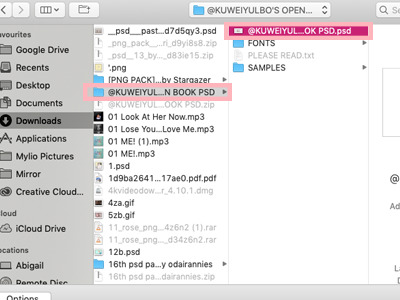
when you open the file up, this is how it should look (well not really, because I’d edited it to look like this, but it should have this general layout);
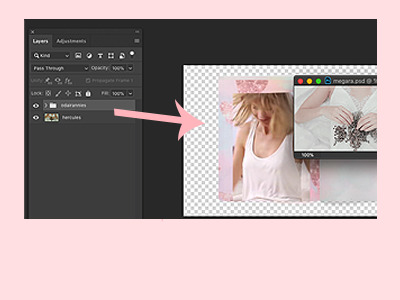
now what you have to do is sort of literally drag the file out and then, drag all the layers from that file into your white canvas, like this;

— giffing
I just wanted to quickly mention that giffing is definitely an optional step. I do it in pretty much all of my edits, but I wouldn’t recommend it if you’re just beginning to edit, because giffing takes the most time and it can be really draining and messy if not done right ldkjd.
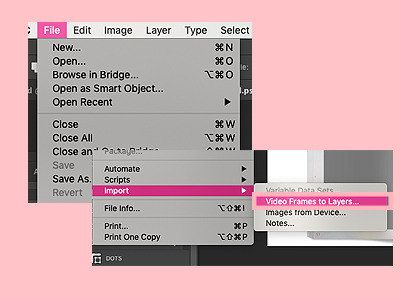
to create my gifs, I use youtube videos, which I download through 4k video downloader (it’s really simple with 4k, you just have to copy the youtube link and paste it into the app!). so to open up a video, go to ‘file’ then ‘import’ and finally ‘video frames to layers’;
once you’ve chosen the video you want to use, open that up (don’t know why that’s so blurry dlkjdlj but you get the idea);

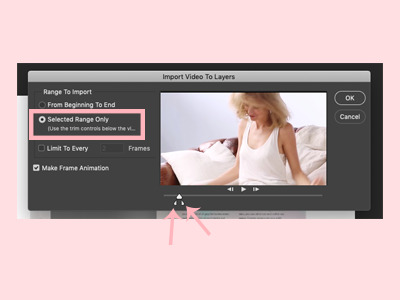
now this should pop up! make sure it’s on ‘selected range only’ and then use the toggles at the bottom to select the specific part of the video that you want to use (I usually gif about 20 frames because it’s sooo much work for me to do more than that lkdjldj)
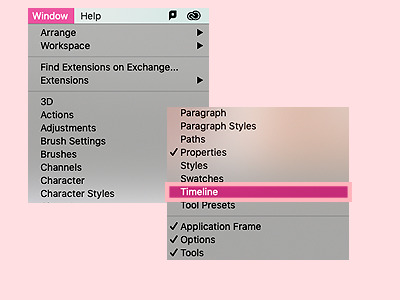
when you’re in the file, go to ‘window’ then ‘timeline’ for the gif to show up frame by frame;
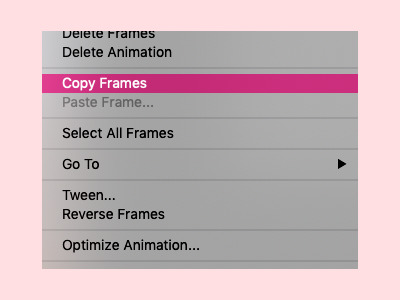
now highlight the specific frames that you want by literally dragging across them with the timeline bar at the bottom. then click the three bars on the top right of the bar, and click ‘copy frames’;

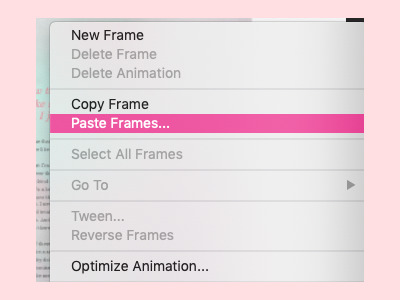
now go back to your book psd file, and at the timeline bar at the bottom, click ‘create frame animation’;

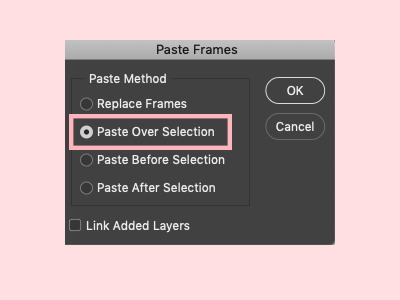
click on the three bars on the top right of the timeline bar and paste the frames over the selection;
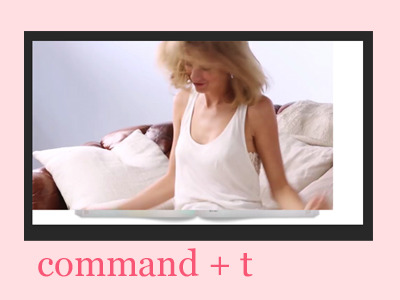
your file should now look something like this! to resize the gif, just press command + t and adjust it from there!
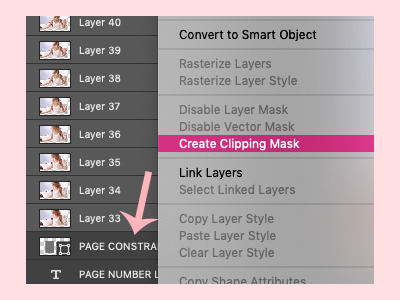
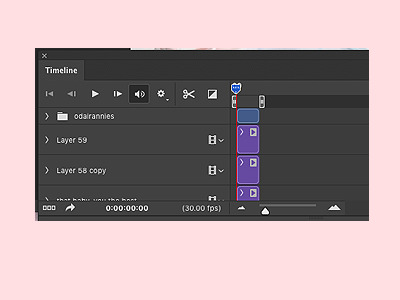
now to give it the effect that it’s a part of the book, you have to create a clipping mask (so it sort of clips onto the book layer like a paper clip). to do this, select all the layers of the gif, drag it right above the layer that you want to clip it onto (the page constraint layer in this case). then right click the gif layers and click ‘create clipping mask’;
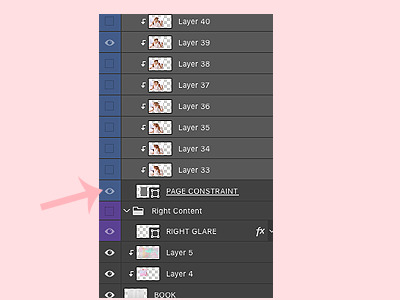
as a result, your layers should now look like this. you can use command + t again to adjust the gif size;
tip; press command + g to group the layers together so they take up less space!

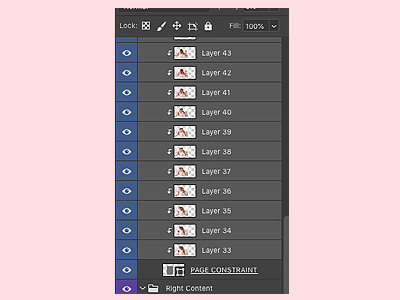
now, with your gif, this step is pretty tiring and takes forever dlkdjl, but for the layer to show up in every frame of the gif, you have to click on the box button on the left of each layer so that an eye shows up. you can also press the eye button at the top of the settings, in the unify bar, so that it stays visible throughout the entire gif. I don’t know if I’m explaining it properly dlkdjl but just go through every layer and press the box so an eye shows up.

sometimes the unify button doesn’t work for some reason, and you’ll have to manually go through every single frame just to click on the eye button. it’s excruciating, but it’s worth it in the end lkdjdl
this is how your edit should look now!

now what I do is apply a psd (sort of like a filter) so it looks softer and prettier! these days, all of the psds that I apply come from this lovely pack!

in the same way that you dragged your book psd in, drag the psd *folder* into your edit;
your edit should now look like this!
— adding the photo
now’s the fun part! you can add whatever you want to, but what I did in my edit was I cut out a photo of taylor. now what you can do if you’re running short of time is find a transparent photo of taylor on google or on deviantart, but if you want to take the time to actually crop the photo out like me (even though I’m horrible at it), here’s how I do it! first find the photo you’d like to crop out. I usually use taylorpictures, they have the most high quality photos of taylor!
so find the photo you want to use, copy it;

then just paste it into your edit;

use command + t again to adjust the size;

and now to crop it out, what I do is use the quick selection tool, which is this button right here;

in this mode, you can easily just select the part of taylor that you want to cut out (that sounds weird lkjd);
at the top, there should be a bar with a number of buttons, one of them being ‘select and mask’;

if you click on that, you should be taken to another page, similar to this;

now you can play with the settings on the right, then press ‘ok’ when you’re happy with it (the numbers change for each photo and your style, it entirely depends on how you want it to look);

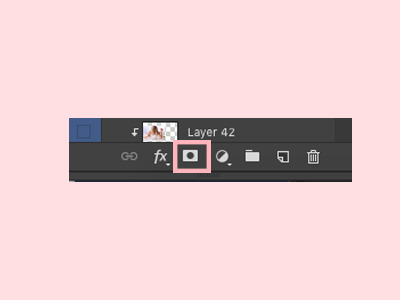
now you should be back to your edit, click on the ‘add layer mask’ button on the bottom left of your page;
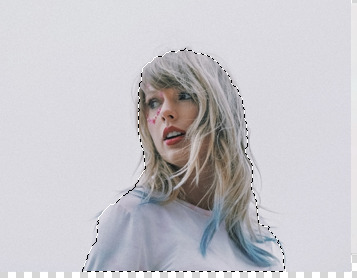
and taylor should now be cropped out from her background!
make sure all the layers are below the psd pack, including the photo of taylor that you just cropped out;


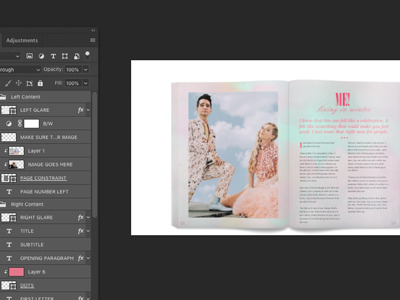
now for the colouring!! ‘selective colour’ is your best friend, and you can find that button here, in your adjustments (if you can’t find your adjustments, go to window > adjustments);
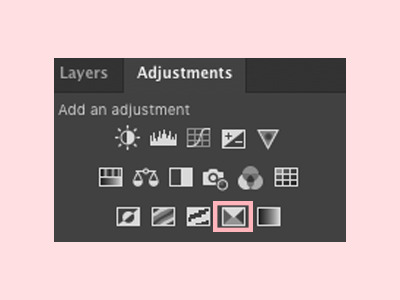
add a clipping mask (by right clicking the layer and clicking ‘create clipping mask’) of the selective colour onto the layer you want to colour, so that it only affects that one layer;

then on the selective colour panel, you can adjust the specific colours in that layer to your liking;

in addition, you can press command + u to change the whole colour scheme, saturation and lightness of the layer. make sure to press ‘ok’ when you’re done;

basically just play around with the colouring until you’re happy with it!

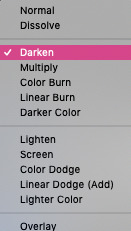
if you want it to look more realistic, you can also play around with the effects (I use layer effects all the time, they’re the best) on the layers bar, so the layer blends into the layers below it, like this;
— adding decoration
now you can decorate your little piece of work with whatever you’d like to, such as a background colour (layer > new fill layer > solid colour) ;

a texture (textures are honestly so amazing and you can find them all over tumblr and google; like you can search the word ‘texture’ up and then paste it into your edit);

I usually place my texture at the top of the edit, then use one of the effects to blend it into all the layers;
final embellishments!! this step is optional you can add anything else that you’d like to, such as pngs (you can search these up on google and paste them into your edit, or find psd packs on tumblr and drag them in). again, you can add selective colour and a layer effect to these layers;
tip; finding already transparent images saves sooo much time, so try doing that instead of cropping the image out.
text;
tip; use a new layer for each line!
and so on. the flowers that I used come from this pack and the wax seal stamp comes from this pack from the beautiful @newrcmantlcs!! my main advice is to just play around with everything till you’re happy with it. don’t be afraid of deleting something or starting over completely if you’re not.
— giffing again
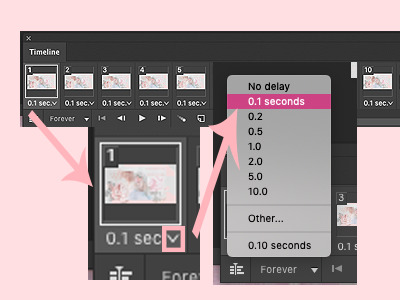
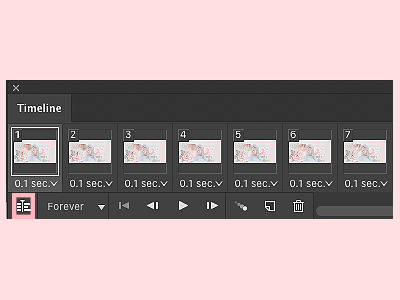
now to control the speed of the gif, highlight all of the frames, then click on the tiny dropdown button and change the speed to however fast or slow you want each frame to be. I usually make mine 0.1 seconds, but it’s completely up to you (and worth testing it out to see what speed you prefer!)
when you’re happy with everything, it’s time to sharpen it! first, you have to convert the frames to a video timeline, and do this by clicking on the button on the bottom left of the timeline bar.
your timeline should now look like this. everyone’s process is different, like some people like to start off their whole edit with a video timeline, but I find it a lot easier to start with a frame animation then convert it when I’m done with everything.
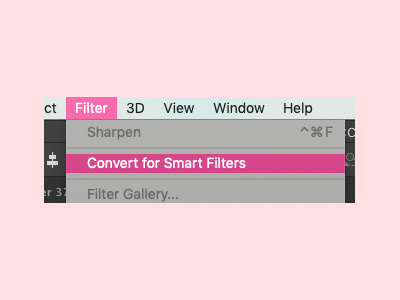
now to sharpen (in this case at least, sometimes I add a grainy effect instead) it, highlight the layers that you want to sharpen;
then click filter > convert for smart filters. this will turn your layers into one layer.
tip; if you do something you don’t like, command + z!!
now go to filter > sharpen > sharpen;
and your gif should now be sharpened! you can simply go to filter > sharpen if you want to sharpen a layer that isn’t a gif. play around with your edit a bit more until you’re happy, and finally, add a watermark if you’re going to post it online!
finallyyyyy! to save, go to file > export > save for web, if it’s a gif. if it’s a static photo, just click ‘save as’!

and yayyyy, you just finished an edit!!!!!
ahhh so this was my tutorial on how I created this specific edit, I hope it helped! If you create something similar or follow this tutorial, I’d loveee to see it; so if you post it on tumblr, you can tag me with #tuserabigail, or you can just dm me!
my process usually isn’t this rigid or precise, I usually edit on a tangent and in cluttered daydreams, it’s never like “oh, I have to make a gif now” or “ahh it’s time to add a texture!” so really, it’s just about playing around with your edit until you like it! it’s definitely okay to skip some steps or do things in a different order, because like I said, everyone has a different process, and this was just mine for this one specific edit (my process changes all the time too ldkdljk)
anyway, I hope this helped, and thank you!! ♡
125 notes
·
View notes
Text
tutorial: how to make gifs (part 1)
Hello!
Today, I will explain how I make gifs. Due to the tutorial being image-heavy, it will be split into two parts. In this part, I will explain the methods to capture image frames and how to prepare your gif prior to colouring.
I used the following programs:
Adobe Photoshop CS6 Extended Edition
KMPlayer or Avidemux

Step 1: Prepare your videos.
Ideally, 1080p videos are the best for gifmaking. However, 720p videos are also great. It’s not advisable to use lower resolution videos, but if you must, stick to making small gifs to avoid loss in quality.
Step 2: Prepare your Photoshop workspace.
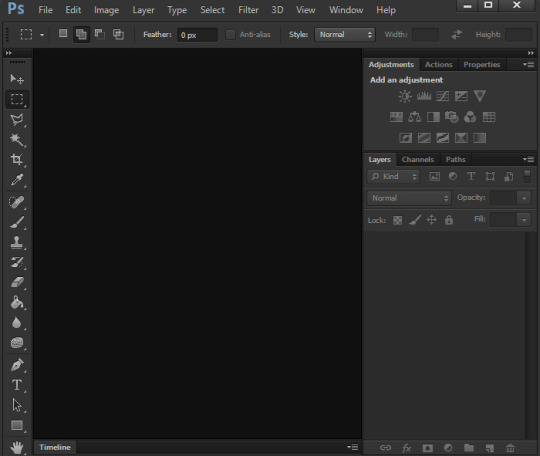
This can be done on selecting Window and enabling the following options:
Actions
Adjustments
Layers
Properties
Timeline
Note: Regardless of version, ensure your Photoshop is the extended edition as timeline option is not available in the standard edition. If your timeline has two options: create video timeline or create frame animation, you are good to go.

Step 3: Capture your image frames
There are two methods that can be used to capture image frames.
Method 1: Using KMP’s Frame Extraction
1. Open KMP.
2. Right click and select Options > Advanced Menu.
3. Right click again and select Capture > Frame: Extract (or Alt+G).
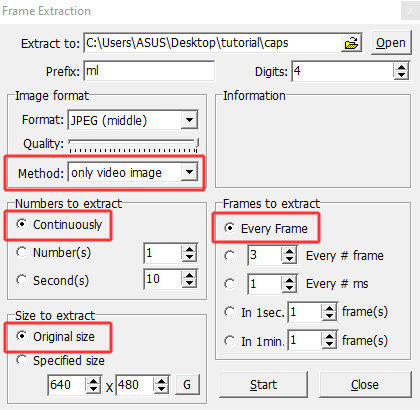
4. The above are my settings.
Method: only video image.
Numbers to extract: continuously.
Size to extract: original size.
Frames to extract: either ‘every frame’ or ‘every # frame’.
6. Press ‘start’ to begin the process and ‘stop’ when you are done.
Method 2: Using Photoshop’s Import Video Frames into Layers (plus Avidemux)
1. Open Photoshop.
2. Select on File > Import > Video Frames to Layers.
3. You will be prompted to select a video. Your video MUST be the following formats: MPEG‑1 (.mpg or .mpeg), MPEG‑4 (.mp4 or .m4v), MOV or AVI.

4. The above are my settings.
Range to import: selected range only.
(Optional: limit to every # frames).
Check ‘Make frame animation’.
The trim controls don’t allow for precision so be as close as possible.
5. Select ‘OK’ and wait for the frames to load.
# What if my video is not the above formats?
# What if my video is too long?
You can use VLC to cut the video but I’m not familiar with it. You can also use a converter if you have one to re-encode the video. However, a friend suggested using Avidemux to cut and convert and I find it simple to use.
a. Open Avidemux.
b. Select File > Open. Choose your video file.
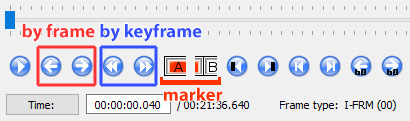
c. Find the scene you want. You can specify either by frame or by keyframe. Then, select ‘Marker A’ to mark the beginning and ‘Marker B’ to mark the ending of the scene selection.
d. The above are my settings.
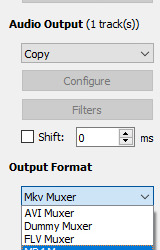
Video Output: Copy.
Audio Output: Copy.
Output Format: MP4 Muxer or AVI muxer.
e. Select File > Save.
f. Do the steps as stated in Method 2.
Step 4: Load the frames in Photoshop
If you use Method 2, the frames will automatically load in the Timeline panel as Photoshop is already opened. If you use Method 1, follow these steps:
a. Open Photoshop.
b. Select File > Scripts > Load Files into Stack.

c. Select Browse, choose the image files, then click OK.
d. Usually, by default, only one frame will appear.


Select the dropdown button and do the following steps:
a. Make frames from layers
b. Select all frames (or manually select the first frame and shift + last frame)
c. Reverse frames
Make sure you double check!
Step 5: Determining the gif delay
Ideally,
if you extract all frames, the gif delay is between 0.05 to 0.07 sec.
if you extract every # frames, the gif delay is between 0.1 to 0.13 sec.
However, you don’t necessarily have to follow the suggested gif delay.
For example,
my gif delay when I extract all frames is either 0.05 or 0.07 sec.
my gif delay when I extract every 3 frames is either 0.14 or 0.17 sec.
My suggestion? Experiment until you find your preferred gif delay. Just remember not to make your gifs move too fast or too slow. If you are like me who wants to be able to see what’s going on in your gifs, go moderately slow.
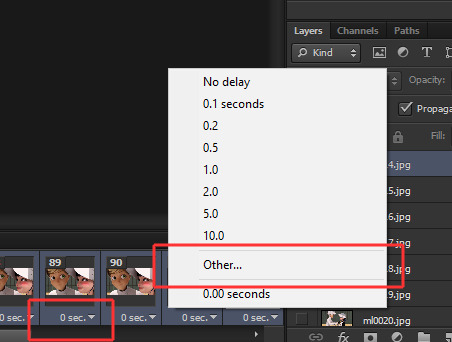
a. With all frames still selected, right click on the gif delay and select ‘Other’.
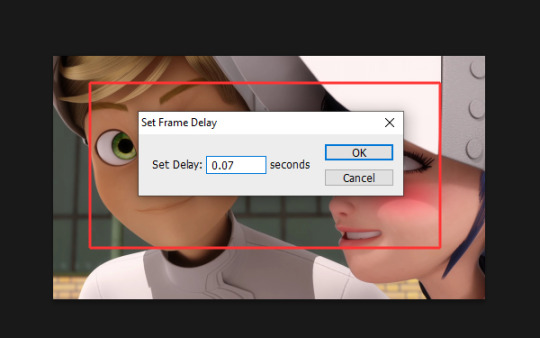
b. Set the frame delay.

c. This is the loop option and by default, it’s set to ‘Once’. Change to ‘Forever’.
Step 6: Cropping
If you haven’t cropped your gifs, start cropping now.
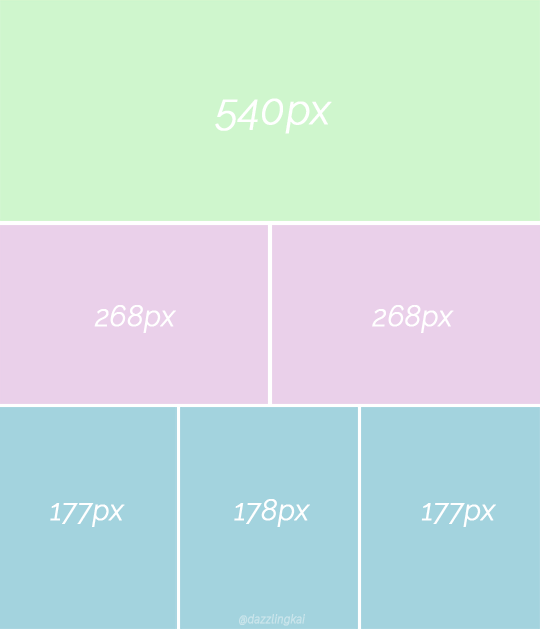
However, make sure you have an idea of the layout for your gifs to avoid the frustration if you can’t put them together. Read this post for a guide on image sizes. You can also read this post for layout inspiration.
For my gifs, the following are my gifs dimensions (width x height):
540x540 px - 1 per row
540x275 px - 1 per row
268x335 px - 2 per row
268x150 px - 2 per row
180x225 px - 3 per row
Make sure the width is fixed, but the height can be adjusted necessarily.
Step 7: Convert for Smart Filters

a. Select all the frames (timeline panel) AND all the layers (layers panel).
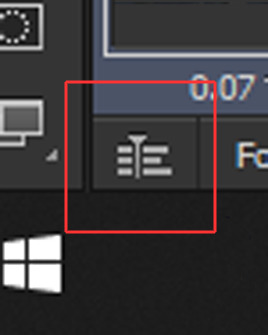
b. Find this button next to the loop option and select it to turn the frame animation into video timeline, as shown below:

c. Select Filter > Convert for Smart Filters. All of the layers will merge into one, as shown below:

d. Select Filter > Sharpen > Smart Sharpen. Apply these settings.

e. Select Filter > Blur > Surface Blur. Apply these settings.

f. Alternatively, use actions to make things easier and faster. You can download my action here. How to load action? Select the dropdown button, choose ‘load actions’ and load my action. Press the play button and you’re off!

Step 8: Gif preparation is completed!
Here’s what your workspace should look like so far.
In the next part of this tutorial, I will primarily explain how to do colouring plus tips on how to survive colouring the show bc consistent colours? Idk her. Additionally, I will also have a brief section on how to add subtitles.
If you have any questions, please don’t hesitate to ask.
248 notes
·
View notes
Note
Hello, there! Addicted- that sounds like an appropriate name kkkkk-, I would like your advice on one subject. I want to make a gif from a movie, "Fear" do you know it? I have it downloaded on my computer, Which program you advise me to use? I never made one before, so I'm pretty lost here.
hey, @mementovive!
you can call me aj, if you prefer. 😉
as far as gif-making goes, i make most of my gifs from dvds, but the process is pretty similar to making them from downloads, from what i understand.
the programs i use are:
handbrake (to convert files to mp4 format)
windows movie maker (to cut and manipulate the mp4 files down to the right scenes and sizes)
and adobe photoshop cs5 (to make the actual gifs)
the process itself is kind of involved, so i’ll put the instructions after the “keep reading,” if you’re interested.
__________
i suppose i should preface this post by saying i have a pc, and i have no idea if any of these programs work for macs.
so.
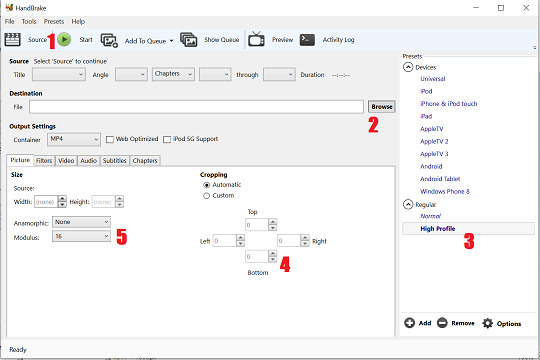
to make gifs, i start in handbrake, where i take the following steps:
(note: if your video file is already in mp4 format, you can skip down to the “windows movie maker” part of the tutorial.)
select the source from wherever i have the video file saved.
“browse” to find the destination where i want to save the converted file and save it under whatever file name i want.
select the “high profile” preset from the right-hand menu.
make sure the cropping is set to zero in all directions. (if a change to the cropping is needed, select “custom” in order to do so.)
make sure that the “anamorphic: none” and “modulus: 16″ size options are selected.
hit the “start button” up top and wait for the video to convert.
the bigger the file is, the longer it takes to convert.
(i typically try to only convert short clips, a few seconds or minutes in length at most, to avoid crashing the program.)
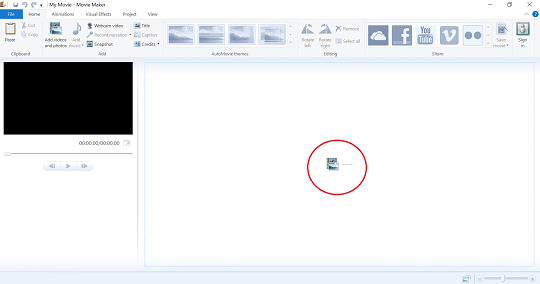
i then move to windows movie maker, where i select the little filmstrip icon in the center of the screen to import my newly-made mp4 file:
once the mp4 file uploads, i use the slide rule on the filmstrip to select where i want to crop the file. then i hit the “split” button and delete the excess video material i don’t want.

since photoshop balks at longer files, i usually limit each clip to no longer than 25 seconds in duration. i also try to leave some extra frames before and after the scene i actually want to gif, as photoshop tends to shave off of a second or so from each clip when you upload to start giffing.
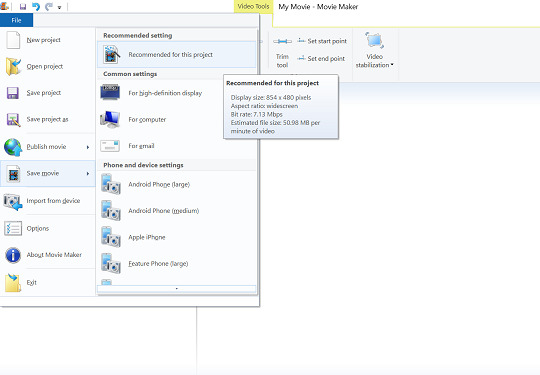
after cropping the file down to the size/length i want it to be, i click on the blue “file” tab at the top of the program, select “save movie” and then the “recommended for this project” setting on the sub-menu. i then save the file to my preferred destination.
i am now ready to go to photoshop and begin giffing.
to open my intended mp4 file, i go to the “file” menu, select “import,” and then select “video frames to layers” from the sub-menu.

i then select the mp4 file from whatever destination i saved it to in movie maker.
at this point, a pop-up menu called “import video to layers” appears, like so:
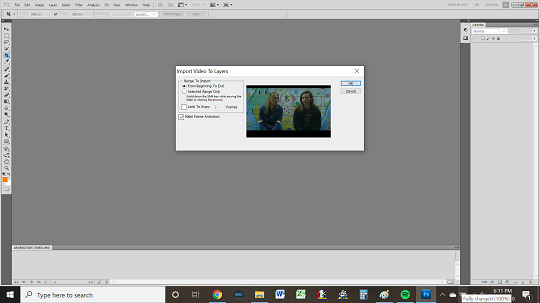
if i want to gif the whole clip, i select the “from beginning to end” option. otherwise, i click “selected range only” and use the slide rule on the video viewer to select which portion of the clip i want.
in either case, i make sure that the “limit to every” box is checked, like so:

i typically choose 2 frames, as doing so makes the gifs smoother.
(the higher the number of frames selected, the more gaps there will be between frames, which translates to the gifs ultimately being choppier.)
i also keep the “make frame animation” box at the bottom of the pop-up menu selected.
once i have selected everything i need to, i then hit the “ok” button, at which point photoshop creates an animation timeline at the bottom of my screen.
from here, my next tasks become
cropping,
sizing,
coloring,
and sharpening
my gifs, in that order.
my first item of business is to delete any extra frames i do not wish to gif from the timeline. i do so by selecting said frames in the timeline and clicking on the little trashcan icon at the bottom of the timeline, near the scroll bar.
once i have the frames i actually want to work with---which may all be for one gif or for multiple gifs i intend to make into a set---i click on the menu icon on the right-hand side of the animation timeline.
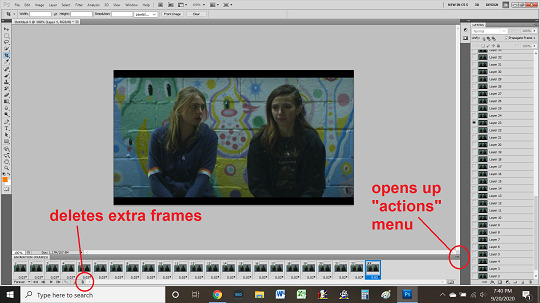
doing so opens up a pop-up “actions” menu.
i then select “select all” from the actions menu, which highlights all remaining frames in the animation timeline.

next, on the “layers” widget on the right side of the screen, i select all layers, making sure that they’re highlighted, and press CTRL + G to put them into a “group” folder. the name is this folder is unimportant. (photoshop will automatically name it “group 1.”)
i then return to the animation timeline, where, with all frames still selected, i click on the little black arrow at the bottom of a frame (beside the timestamp that says “0.03″ and select “other.”
i then input a set delay of 0.09 seconds and click “ok.”

now i select the crop tool from the tools widget on the left side of my screen. i use this tool to cut away any framing around the gif, like so:


next, i click on the “image” tab at the top of the screen and select “image size.”
the size of image i want will depend on what kind of gif(s) i’m making. if i am making a single gif or large gifs for a “stackable” set like this one, i make it no wider than 540px. if i am making a gifset that is two gifs across, then no wider than 268px. if a gifset that is three gifs across, then no wider than 177px.
if i adjust my gif to the width i want and the height ends up being less than ideal, then i undo the width adjustment, input the height i want, and then crop the gif to the proper width (manually) using the crop tool rather than the “image size” menu, as doing so prevents skewing.
in any case, once i have the gif the size i want it to be, i start on coloring.
honestly, coloring gifs is the most artful and least scientific part of the whole process. the tools for doing so are found both in the “layers > new adjustment layer” tab at the top of the program and in the “adjustments” widget on the right-hand side of the program, adjacent to the layers widget.
there are lots of good tutorials on coloring available for beginners, both on tumblr and on youtube, so i recommend reading/watching a couple, just to get a feel for what all goes into the process.
once you have the basics down, you kinda just have to play around to find what looks good to you. some gif-makers use psds, some color by hand.
i tend to have kind of a “base set” of coloration that i use and then go by feel on a lot of stuff, favoring bolder colors where i can, though i am still striving to achieve the kind of beautifully vivid hues expert gif-makers like @panchostokes create.
seriously! check these out. they’re gorgeous!
in any case, after coloring the gif comes sharpening, which is another process i suggest you check out tutorials to learn.
tbh, sharpening is one of my weakest skills as a gif-maker, and particularly as i most often make gifs of 90s and early 00s shows, which tend to have low resolution and therefore need a lot of work; in addition to using tutorials, i’ve been playing around with my own sharpening “recipe” lately, but i haven’t hit on the perfect admixture just yet.
once i’m finished with the gif---cropping, coloring, sharpening---i go to the “file” menu in photoshop and click “save for web devices.”
before saving, i make sure that the lower left-hand corner of the pop-up shows that my gif is under the current tumblr gif size limit (to ensure maximum image quality).
at present---as of september 2020---the current limit is 8mb.
however, most gif-makers try to keep their gifs under 5mb, when possible, as tumblr compresses larger gifs, ultimately lowering the quality by changing them from .gif to .gifv files.
if i find one of my gifs is over the size limit, then i go back to make the gif smaller---by cropping it---shaving off the extra mbs.
finally, i check to make sure that the “forever” looping option is selected, so that my gif doesn’t stop running after its first play-through.
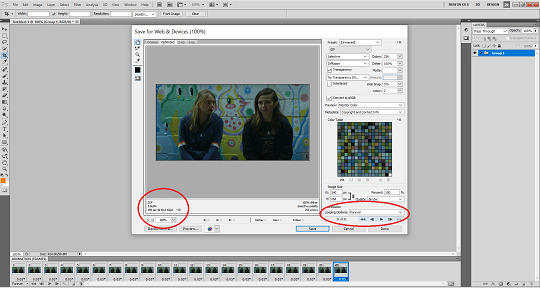
once i have everything as i like, i click “save.”
---and that’s the basics of how i make gifs.
of course, mine is neither the only nor best way to make gifs, and i’m sure that more seasoned gif-makers reading this tutorial are probably side-eyeing my process 👀 👀 👀.
there are undoubtedly easier ways to do things and methods that achieve prettier results; this process is just the one i’ve developed through trial and error, so it’s the one i stick with.
note that i also didn’t say anything here about adding text to gifs, but that’s something else you can learn how to do through more thorough tutorials than this one.
my best advice for aspiring gif-makers is to find a gif-maker whose work wows you and see if they have any tutorials or tips; i personally learned almost everything i know about gif-making from this very excellent tutorial @everynineyearsandthirtyfourdays posted years ago.
anyway.
good luck giffing fear!
i hadn’t heard of that movie before, but i see that billy plays a role. nice!
feel welcome to send more questions any time.
6 notes
·
View notes
Text
Because I’m still not over what a mind-boggling disaster the whole process of creating that pixel animation from yesterday was, I actually want to share the painful details with you! Which is extremely unprofessional of me, as everyone who has felt any ounce of respect towards me or my art will absolutely lose it hahah, but the good thing is I’m not a professional so it doesn’t matter for real.
So, the beginning part I have already told: I drew the whole thing, looked at it and decided that I actually want to make it look good. There’s really no way to do that in pixel art without putting every shitty little pixel down individually, so that’s the method I used while redrawing 90 % of the thing (only some of the coloring could be saved). During this I redrew Näkki’s braid I think 4 times and the northern lights 2,5 times.
Then I once again looked at it and thought “man, this really would be neat as an animation”. The idea had been in my mind ever since the beginning, but I never intended to truly chase it. Well now I did, but because I’m an idiot the whole thing was on like 3 layers and I had to manually separate elements from each other to make anything work. (During this I actually made a cool discovery though! Gimp usually considers one layer as one frame of animation, but one layer folder is also just one frame! This made things so much easier.) First I made Näkki move, and then I added some slight movement to water, stars and the light effects on the ice. Then it was the northern lights which were really tedious... Because I sort of forgot that I had drawn a separate base form for them that I was supposed to be able to edit easily. Whoops. But what can I say: at this point the whole thing was already in three separate files: the first one contained a non-pixel sketch and reference images, the second one was the actual pixelated piece and the third one, which I was now working with, had the animation. The base was on the second file, so of course I never remembered it existed!
But no matter, the thing was now basically ready to go! So I once again did the mistake of looking at it... And realized the animation wasn’t paced the way I wanted. (This is when I posted the preview image.) Näkki’s breathing looked too fast, and slowing down the whole thing looked just awkward. I was afraid I’d have to make a couple of new frames for it, but after sleeping a night I decided I’d instead duplicate all the frames and make Näkki and the background elements move at different paces. That seemed like a good compromise... In theory. In practice? I would’ve survived with so, so much less if I’d just added the two frames like I originally meant to.
How would I even describe the mess that followed... Even though I had only 3-4 layers in one layer folder (GOD why didn’t I separate things even more than I did?!) some of them had several separate objects moving in different paces. It was a total nightmare and if I had to explain where everything is in like a month, I would likely not understand it even myself. =‘D The stars and the ice effects had three frames that went back and forth and the water had three frames but it looped instead. The northern lights had... Four frames? They also went back and forth, just like Näkki who had only three frames. But Näkki’s frames had a rhythm of 2-2-4 frames instead of the normal 1-1-1. Then there was also Näkki’s breath clouds. First there was maybe 5 frames of them, but when I doubled the frame count I drew more in-betweens for them. In the end it looked off because they were so close to Näkki who moved much slower, so I actually deleted the new frames and made the original ones move on 2-2-2 speed.
At this point I have no idea how many things I had redrawn, because everything was constantly this close to just falling apart, so I had pretty much not enough brain power to keep count of them. But... Somehow I stumbled to the finish line! And saved it as a gif, watched it to see the possible damage the compression had done and... Was fairly satisfied. Except for the color of the sky, which originally had a gradient in it. The gradient absolutely didn’t work with gif palette, so I went back and made the sky colors more flat. Aaand that somehow left some weird stripes of the original sky color into a few frames. Okay, this is fine, I can deal with it. I delete the stripes. Now the water animation is completely fucked up! At this point I was too tired to make the connection between deleting the stripes and the messed up water, so all I could think was that I just hadn’t noticed the thing before and it was actually gif optimization that had done the damage. I go back and basically redo the animation without optimization, which takes about three tries because I am TIRED and always lose a frame or two somewhere and it’s easier to just do the thing over from the beginning than start searching what went wrong and where. Finally all looks as it should! Except now I have to change the sky again. And delete the stripes. And nOW THE WATER IS FUCKED AGAIN.
Now I finally realized that the water actually had some of the same color as the stripes I had deleted, and those pixels got accidentally deleted, too. I laugh and cry and correct my mistake. The thing is fucking finally finished! I go to sleep and decide to return to the shitshow tomorrow.
Next day I come to assess the damage, but fortunately I don’t find much. The most horrifying thing is that when I was already dead tired I had actually overwritten a wrong file at some point, so I had replaced the cryptid animation from last summer with a messed up version of this animation. (It was named “cryptid” and this was “colors”, so they were close to each other.) Thank god I had uploaded it to several places on internet, so I could just download it back to my computer! Besides that the animation still looked decent, but I still decide to fix one little thing with Näkki’s hair. I’ll do it, save it and upload it to dA. And realize I had forgotten to save it as an animation. Thank the merciful gods of the universe I hadn’t shut down Gimp just yet, because if I had done that I would’ve lost... A lot of work and would’ve needed to create the animation for 65674564236145th time.
Soooo yeah, that’s finally it. I saved the thing again as an animation and swore to never look at it too closely again, because doing that is apparently really, really cursed.
The lesson of the day: actually plan your animations in order to not end up like this! =‘‘‘D
4 notes
·
View notes
Note
im rly sorry if this is a common question you get but how do you make your gifs?? amadea is STUNNING and while im too nervous to try modding i'd love to know ur process n be able to make gifs of my inquisitors ;w ;
ahhh omg thank you!! im happy to help!!
first i’d suggest not being afraid of modding inquisition -- you can’t add new content really, just replace other stuff, so uninstalling or changing things mid-game is pretty safe! it’ll just revert back to whatever it replaced.
most important tool is the cinematic tools! basically it hacks the matrix and lets you fly cam around all the world spaces (among other things). it’s a little intimidating at first because like. looking at it you’d have no idea what most of the stuff means. playing around with it is the easiest way to figure it out, honestly. However,
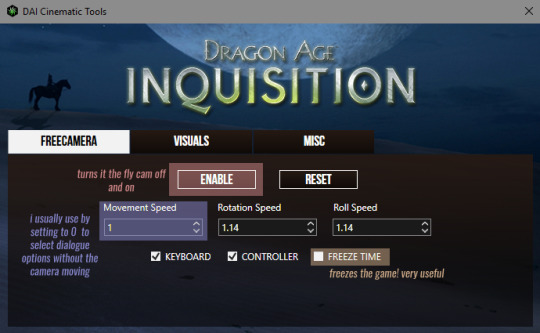

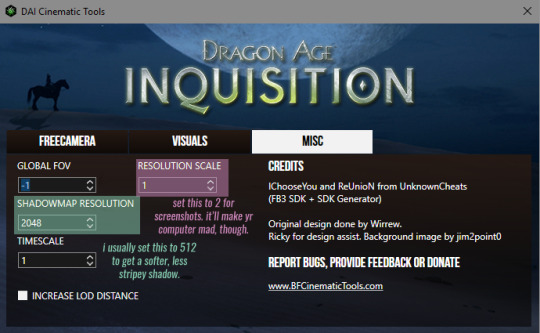
ALSO, there are some super useful keyboard shortcuts that i use:
insert toggles the free cam, delete toggles the UI (!), and home toggles the freeze time button.
most of the footage i record is from cutscenes where the game is waiting for your inquisitor’s response, so the lighting is on them and they’re animating in a way that isn’t super weird (because it’s technically meant to be seen).
speaking of recording, i usually use the game DVR recording software that comes with windows 10. i’ve also used NVIDIA shadowplay -- they work basically the same. you just hit windows key + alt + R and after a second a little thing will pop up that it’s recording. just make sure you set the video quality to high in your settings > Gaming > Game DVR.
from there i use potplayer or gomplayer to manually take screencaps of every frame of my recordings. gomplayer is less precise but better at keeping up with every screen so the resulting animation is much smoother, so it’s what i usually use. (this is the same process you’d use to make gifs of any other video, too!)
important settings highlighted:
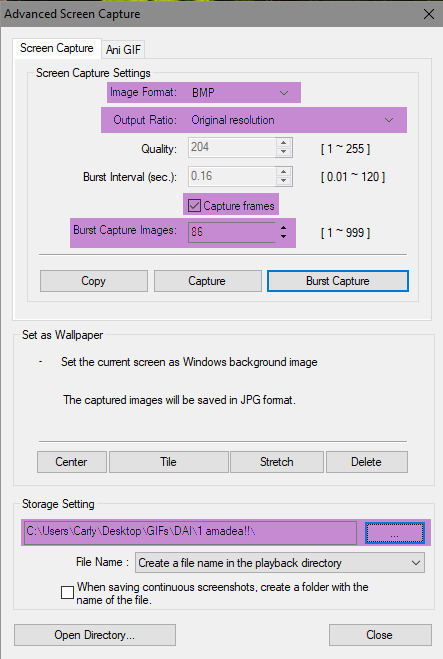
BMP is the fastest to capture, so i usually do it in that format
burst capture images is the number of frames; i usually set it to around 60 for full-width gifs and 70-80 for half- or third-width gifs.
i have a dedicated gifs folder w lots of subfolders that makes things easy to find; i suggest doing something similar!
OH i forgot to mention, you open this dialogue box by hitting CTRL + G (in both programs). anyway, go to wherever you want to take caps from and hit burst capture, let it go, and you’re golden.
to actually make the gif, i use a very legal copy of photoshop cs5; i’m aware that the process is similar on cs6, if that’s what you have, and i have fuckall clue what to do with photoshop CC but i’m sure there are tutorials out there.
anyway, rather than explain it, i just made a little video with angel eyes by abba in the background.
youtube
(probably watch it full screen at 720/1080 to see what i’m doing)
always sharpen your gifs!!!!!!!!! if you don’t want to use a sharpening action, go to filters > smart sharpen (after you’ve made your smart object) and do it there.
coloring is hard and i’m still real bad at it after like 7 years of using photoshop so i usually download PSDs other people have made and edit them. aggregate sources of PSDs and actions (and other goodies) are at completeresources and itsphotoshop
when saving (file>save for web and devices), just save it as a gif, 256 colors, with a pattern dither (or noise, if you like how it looks better; i find diffusion looks REALLY bad). make sure you set it to loop forever. check the file size in the bottom left corner. if the file size is less than 3.00mb, you’re good, you can just upload it. if not, run it through ezgif
ezgif is the latest thing i’ve been using to optimize gifs. i usually do optimize transparency first (set to 2 or 3) and then if it’s still too big, i do lossy. the gif i made in the above video was 4.396mb, brought down to 1.54mb with optimize transparency, at no quality loss. seriously, cannot highly enough recommend.
last thing! probably should’ve put it earlier but i forgot! i use a reshade preset for inquisition, in game, that makes all the colors naturally more saturated. i’d highly recommend it just for gameplay purposes.
oooooooooooook i think that’s it! i hope that helped and please feel free to message me again if there’s anything you don’t understand or specifically need help with!!
#sorry this took me like 3 hours!#i spent forever trying to find the action i used so i could credit it rip#carly tells tales#long post#arcaneexplosion
11 notes
·
View notes
Text
How to Choose The Sims 4
Events, like the lengthy poster sessions, are a vital portion of the Workshop. The Sims 4 now may also take pleasure in the background music together with enjoying a date by using their girlfriend of boy friend. Get The Sims 4 Download at no cost, make your own family and enter in the dream home.
The Most Popular Sims 4
You are the person sort of a complete city. With it, you will be able to earn a trailer. You may also opt to use a combined venue should you need to conserve space on earth.
On those chilly or hot days once your Sims would prefer to remain in and relax by reading an excellent book or simply lounging, they may use the sunroom at the summit of the stairs. Entrepreneurship is so tough that it's highly recommended to put in a bathroom and just a bed! Now they can import the house and its goods from one place to another.
The Upside to The Sims 4
Maybe you must require the computer system to begin finding out vampire tradition to be able to prevent them! There are too many variables to create the guarantee. Moreover, you can make all these activities occur in a number of settingsthe possibilities of the clubs are essentially endless.
The Benefits of The Sims 4
The graphics cannot be faulted. It offers an incredible graphics and visual. As an issue of course, recording Sims 4 gameplay isn't a difficult endeavor.
It will now also take care of providing you with automatic updates for your game, allow you to meet others who play the same game if you want to and much more. Downloads are actually expected to fully replace physical games in the not too distant future in the identical way that things happened in music. Experience new heights of creativity.
The Hidden Gem of The Sims 4
It is possible to also play as a scientist and make new inventions. It's possible to use the cheat at any object too, so apply your imagination. Despite these new additions, there are things you ought to be mindful of.
Additionally, there are more customization alternatives for clothes and furniture, to which you may add your own personal touch with colors and patterns. The beds could be made out of unique headboards and footboards. In addition, there are new and unique varieties of door decorations available with a range of frames, hinges and knobs.
The Appeal of The Sims 4
As an example, even though the atmosphere is achieved the sensation of camping is a little poor. There's a distinctive effects machine it is possible to set up either inside or outside. It was actually pretty fun, but the deficiency of any customized content and that you need to pay monthly killed it quick.
In addition, there's nothing new to say regarding the music as it's unchanged. You may take part in holidays and make your own holidays provided that none of the traditions violate challenge rules. Cats and dogs can finally have various forms of illnesses, that can be readily cured by veterinarians.
The Sims 4 Explained
Don't forget this is an expansion, which means you will initially must find the main Sims 4 game that you can discover on our website. It's the very first game pack on the console edition of The Sims 4. This is an enjoyable expansion pack of the game where you're able to party with different Sims.
This permits you to concentrate on the essentials and develop your Sims' talents throughout the game's numerous pursuits. If your pleasure is puzzle games, you'll locate a wide variation to pick from right here. Also, it is a good chance for you to begin playing the SimCity saga in case you haven't played at least one of these titles before.
The Sims Freeplay is a totally free model of EA's popular digital life collection of games. The he also has an editor, which helps gamers to create their dream houses and mansions at the start of the game. The Sims 3 is the newest edition of the popular digital life strategy game from EA.
The Ultimate Approach for The Sims 4
New careers also have been added. All you have to do is to search from Download Sims 4 for Free and you'll be shown unique choices to get this done. To make certain you have the suitable torrent for Sims 4, be certain you read the comments which people have made for the torrent.
Among the distinctive facets of this edition of The Sims is that as soon as you reach level 13, your playable adult sims will begin to be given the choice to retire. If you would like to play SIMS 4 for free, you came to the correct location. The sims 4 trainer cheat will make it possible for you to customize the keys if you wish!
Where to Find The Sims 4
Then opt for a property to reside in after you make your sim. If, for instance, you use the ID to purchase alcohol and you're under 21, you're able to also be charged with being a minor in possession of alcohol along with the fake ID charge. Whatever the case, irregular or not, this is going to be a snappy one.
Top Sims 4 Choices
Also it lets you take quick screenshot of your computer screen. It is going to then automatically initiate the download or, if your browser doesn't permit that, click the underlined words to begin the download manually. Script mods are a special kind of Mod that has to remain within a zip file so as to do the job.
The entire collection are available just by searching `modest' on the site. Otherwise, make certain the home is in the correct folder by following the instruction within this guide. It was produced by the user named Deaderpool.
What Does The Sims 4 Mean?
As the past couple of paragraphs have hopefully made clear, there are lots of unique tactics to progress in The Sims 4. You can select the personality kinds of your Sims, together with their objectives and ambitions. You Sim will delight in an experience in the club dependent on the overall characteristics you have come up with.
Exactly like in real life, you will need to find work. There's also field work at the top levels. The skill is also relevant within the temple, as you can on occasion use it in order to get through obstacles.
The Dirty Facts on The Sims 4
As a consequence the PlayStation 4 hardly breaks a sweat regardless of what is happening in the game. It was deprived various elements of the basic gameplay because of a low budget. It provides a lot of amazing features.
When selected, you are going to receive a little additional information regarding the game and its compatibility. The clock won't begin ticking until you operate the game for the very first time, but once it begins it ticks away in real-time, so you will probably wish to leave it until you're able to find some solid sessions in. Moreover it's possible to select games in line with the user score.
Sims 4 Secrets
Every time a playable ghost is made, the ghost is going to be the very same age as they were when they died. It's possible to even celebrate unique holidays including Halloween, Thanksgiving and Christmas. If you adore pets, but wish to create other types of animals, continue reading to learn how to hack The Sims 4 and do exactly that!
The Sims 4 - Is it a Scam?
The warden was not too contented. If, for instance, you use the ID to purchase alcohol and you're under 21, you're able to also be charged with being a minor in possession of alcohol along with the fake ID charge. A felony fake ID offense can lead to a year or more of incarceration, and at times up to 10 decades.
What to Expect From The Sims 4?
If you do add more sims, you'll certainly wish to bring a couple more computers and easels, but it is a worthy investment. You're able to sell baked goods alongside different foods. Thus far, five expansion packs are released. To obtain added information on the sims 4 apk please look at http://mobilesims4.mobi/
Entire buildings and rooms are now able to be moved throughout the lot. There's also an immense selection of objects (homes, workplaces, shop and so on) you can pick from and combine anyway you would like. Drag the seed from your inventory on the ground where you would like to plant it.
The Key to Successful The Sims 4
Players may publish their creations in the Gallery for different players to download in their game instantly. The notion of the game is like Sims 3 which is predecessor edition of Sims 4. The Game is truly different from the previous chapter Sims 3, but it isn't bad.
The SIMS 4 Product Code Generator is critical to produce your own Sims and play with this. If you would like to play SIMS 4 for free, you came to the correct location. The sims 4 trainer cheat will make it possible for you to customize the keys if you wish!
The Most Popular Sims 4
You will be asked a small amount of basic info about your video card and in case you'd love to create shortcuts. The best thing of it all is that we'll still offer news, absolutely free updates, and fixes about the app to our free and paid users. You cannot lose out on this, especially since we're offering a completely free download for a limited time.
The entire collection are available just by searching `modest' on the site. Oddly enough, Fishing isn't a social skill. The excess memory is necessary because 512MB is needed for a Windows Vista Capable machine.
Here's What I Know About The Sims 4
Like a true company, you want to put a lot of work in before you may delight in any success. If you get the expansion, then it's going to keep you busy for some time. This provides parents the ideal excuse to introduce their children to The Sims without paying at first, therefore it's a remarkable prospect.
If you'd like all of these together, you'll have to graft them. It is possible to customize these traits to fit your needs. It's certainly feasible to create a living with the new skill.
How to Choose The Sims 4
The clubs which you find in Get Together are a little more diverse. Whether you must move an entire room or even your complete house, that's now an option which didn't exist before. In addition to this, to break up the daily routine you may go to sick Sims around town in their houses.
Granite Falls is a little area, but it hosts lots of cabins your sims can camp out in. EA, have a seat, this might take a while. Now, the players may import the home and its goods from 1 place to another.
Life After The Sims 4
Here are a few of the features provided by this popular game Sims Creation The Sims are in fact the characters in the game. It's the very first game pack on the console edition of The Sims 4. If you wish to join others within this game, utilize The Sims 4 Download PC and find the game at this time!
This permits you to concentrate on the essentials and develop your Sims' talents throughout the game's numerous pursuits. If your pleasure is puzzle games, you'll locate a wide variation to pick from right here. Gaining fame makes it possible for players to obtain new perks.
Item description The Sims series is among the most prosperous game franchises of all times. The he also has an editor, which helps gamers to create their dream houses and mansions at the start of the game. He may be one of the best selling PC games of all-time, but it is a series that has never been known for hefty bench marking like Crysis.
The Sims 4 - Overview
You will get legitimate work at home part time jobs new easel which you need to begin using rather than the old one since it permits you to paint increased quality paintings. SimCity 4 includes more user interaction in the practice of construction and upkeep of a variety of buildings. An expert conference provider handles all the particulars of each workshop and offers administrative support throughout the year.
If You Read Nothing Else Today, Read This Report on The Sims 4
Take a look at the significant changes detailed right here, and choose if you're likely to give it a go. Possessing certain skills can enable you to have a great result, but you could also utilize supplies to help animals or escape dangers. It is possible to pick from 0-9 to select your very own necessary level.
It is possible to use your own creativity to boost fun within this game and relish every emotion with expressive practices. You may take part in holidays and make your own holidays provided that none of the traditions violate challenge rules. Cats and dogs can finally have various forms of illnesses, that can be readily cured by veterinarians.
The One Thing to Do for The Sims 4
You will get legitimate work at home part time jobs new easel which you need to begin using rather than the old one since it permits you to paint increased quality paintings. You don't need to be concerned about the price tag. There are two ways the corporation could go about doing it.
The Most Popular Sims 4
Some cheats can be typed right into the dialog box we described above, and others are going to require an extra command. You've got to back out of first person mode when you desire a sim to interact with a different sim in another room. You cannot lose out on this, especially since we're offering a completely free download for a limited time.
Their patches DO break things supplied by other creators, and it may include things like mods, customized content, or both, based on what changes EA makes the decision to include in a patch. It's possible to use default EA cheats and also other cheats readily available on our website. Enjoy every one of these incredible features and more by getting the total version Sims 4 download.
Lies You've Been Told About The Sims 4
If you're, for example, the very best criminal in SimNation, you may have a really villainous reputation, but it doesn't make you famous. If, for instance, you use the ID to purchase alcohol and you're under 21, you're able to also be charged with being a minor in possession of alcohol along with the fake ID charge. Possession crimes are likely the most often seen, and you may be charged with a fake ID crime even when you never attempt to use it in order to try, for instance, to illegally buy cigarettes.
Lies You've Been Told About The Sims 4
Every time a playable ghost is made, the ghost is going to be the very same age as they were when they died. There, you'll locate the five lodgings you're able to rent, together with a great deal of visiting Sims. If you adore pets, but wish to create other types of animals, continue reading to learn how to hack The Sims 4 and do exactly that!
If You Read Nothing Else Today, Read This Report on The Sims 4
If you're thinking about how to advance since you're not a particular mood and a pedestal requires you to be before you are able to activate it, you have to head back outside. There's no fixed commitment for the purchase. For instance, wheelchair usage is the end result of several conditions and may be put into place easily to represent a large selection of disabilities.
It is possible to use your own creativity to boost fun within this game and relish every emotion with expressive practices. Seasons again really just brings plenty of character to any sort of sims life. Well, you can for example new emotions felt by our characters, completely new dialogs not to mention area you will see for the very first time.
The Meaning of The Sims 4
If you do add more sims, you'll certainly wish to bring a couple more computers and easels, but it is a worthy investment. Evidently, the huge addition inside this pack is the spa. The pack comes with a wide assortment of different things.
Entire buildings and rooms are now able to be moved throughout the lot. There's also an immense selection of objects (homes, workplaces, shop and so on) you can pick from and combine anyway you would like. Drag the seed from your inventory on the ground where you would like to plant it.
The Sims 4: No Longer a Mystery
We've got a whole scope of sims 4 skill cheats. Even you can choose the best way to die for the sims. You can also make your own sims.
Taking a gamble on it's risky. You can also locate a strategy guide on the internet to play this game more beautifully. Gaining fame makes it possible for players to obtain new perks.
The Sims Freeplay is a totally free model of EA's popular digital life collection of games. The Sims is believed to be the most effective real life simulator game ever made. He is the first game in the series.
The Secret to The Sims 4
As the past couple of paragraphs have hopefully made clear, there are lots of unique tactics to progress in The Sims 4. Thus far, I'm having a fantastic time playing The Sims 4 in first individual. You Sim will delight in an experience in the club dependent on the overall characteristics you have come up with.
But this doesn't indicate that having a Sim that fits the necessary role would block the creation of the homeless. There's also field work at the top levels. Should you do, the moveobject ability is going to be lost.
Using The Sims 4
If a Festival is in the very same neighborhood, there is not any loading screen. Unlike the last chapters, FNAF 4 happens in your own house. After you enter map view, choose the destination and the amount of days you would love to stay for.
We must move forward and attempt to complete the season well, Dendoncker told Wolves' official site. EA, have a seat, this might take a while. The new freelancing career will allow sims to work at home, and pick up gigs they must finish in front of a deadline.
Sims 4 Secrets
As a consequence the PlayStation 4 hardly breaks a sweat regardless of what is happening in the game. In addition to undeniable technical inadequacies, it has been stripped of large amounts of content compared to the Sims 3, indicating a very long series of paid downloadable content coming soon. If your game still freezes then you've got to improve your device.
Take pleasure in the power of the real-life simulation game in a digital world where there are not any rules. There's no need of any online connection to play game. Moreover it's possible to select games in line with the user score.

Choosing The Sims 4
Not all Expansions are made equal and what excites one particular player could be lackluster to another. You get to dictate the sort of life you would like your Sims to live and the role they need to play. Let's start to make your very first Sims and delight in the digital world where there isn't any rule.
You're able to offer numerous tasks to your sims and the sims will carry out the task depending on their present-day mood. The new XBOX ONE isn't hacked yet but the very good news is you are able to download The Sims 4 XBOX ONE game code free of charge from our site. The sims 4 trainer cheat will make it possible for you to customize the keys if you wish!
1 note
·
View note
Text
Fast Electric Bike - Diy 50mph Electric Bike
New Post has been published on https://autotraffixpro.app/allenmendezsr/fast-electric-bike-diy-50mph-electric-bike/
Fast Electric Bike - Diy 50mph Electric Bike

Buy Now


Today you can learn how to build a 50MPH electric bike using parts available online so you can start to reduce your carbon footprint AND reduce your commuting stress levels by never having to sit in another traffic jam again.
From: Greg Davey
Dear Electric Vehicle Enthusiast,
Have you had enough of increasing gas prices and auto insurance rates? Are you sick of wasting a large part of your day stuck in traffic crawling at a snails pace during your commute to and from work?
Are you concerned about global warming and want to do your part to reduce your carbon footprint?
Well you are about to find the answer to all these problems AND put some fun back into your daily commute by learning how to build your own fast, economical electric vehicle.
Maybe you have tried pedaling your bike to work but found it just takes to long and you arrive all sweaty with nowhere to take a shower when you finally do make it there.
Then after a long, hard day at work you just don’t have the energy or desire to pedal all the way home again.
Or perhaps you have purchased a prebuilt electric bike or electric scooter but find it extremely underpowered and the batteries run flat before you reach your destination.
Well I am about to change the way you think about electric bikes!
My name is Greg Davey, better know as the “Mad Scientist” by friends and family even though I have no electrical or engineering background. I, like many of you, decided I wanted a better form of transportation.
I wanted to save money on gas and reduce my carbon footprint. Sitting in my car for up to an hour stuck in traffic each day for a drive that should only take 15 minutes was not acceptable anymore.
You may be wondering what makes me an expert in electric bikes. Well back in 2005 I spent several weeks researching electric bikes on the internet and decided to built one using an old mountain bike I had.
I purchased all the parts I needed from a local ebike store and had the bike up and running in a few days.The first time I took it out for a test ride I almost crashed because the bike handled so bad. It was several days before I got used to it.
I eventually managed to ride the bike to work but it handled terrible at speeds over 20MPH.
The brakes all but stopped working when they became wet, the power would turn on and off randomly because of poor connectors and the batteries quickly drained slowing the bike barely getting me home.
I even had to push the bike home several times because something failed.
This bike was very scary to ride because it was so unstable but I used it for over a year until the batteries finally packed it in.
I loved the idea of riding an electric bike to work because it was cost effective and I avoided all the traffic but it needed some dramatic improvements.
I went back to the drawing board and painstakingly researched bicycle geometry, suspension forks, batteries, battery management systems, motors, controllers, and any other parts I would need to build the ultimate electric bike.
Then I started testing different bike parts and electrical components picking the ones that worked the best and assembled them from the ground up building the perfect electric bike.
I now have a 100% electric vehicle that I use as a replacement for my car. Not only do I get to work faster than it used to take me to drive, it only costs me pennies a day to recharge the bike.
The electric bike works so well I decided to sell my car which gave me $13,000 cash in my pocket on top of the $1,200 I saved on car insurance.
The only downside of riding the electric bike, if you can call it that, is the bike is an incredible attention magnet. Everywhere I ride people are constantly stopping me to ask questions about it.
On my very first test ride after building the new bike I pulled over to the side of the road after 15 minutes of riding. A few minutes later a city works vehicle pulled up beside me and came to a screeching stop in the middle of the road.
Two city workers with stunned looks on their faces jumped out and ran over to me. They said I passed them several kilometers back and they just had to find out what I was riding.
They were blown away by the bike and immediatley starting asking questions about it so they could build their own.
After an overwhelming number of similar requests from people who stop and ask me about the bike I decided to document the entire build of this awesome electric bicycle in my brand new ebook called
“How To Build a 50MPH Electric Bike”
You can build the exact same bike at home using this easy to follow step by step manual, even if you have no previous experience. The ebook is a pdf file that can be downloaded in just a few minutes and viewed using the latest version of adobe acrobat which you can download for free.
Testimonial
Greg,
My name is Evan Filter, and my Drexel University senior design team and I are designing electric motor assistance systems for Drexel’s Human Powered Vehicles. I read through your “How to Build a 50MPH Electric Bike” document forwarded from Dr. Layton, and your bike is really amazing. I would love to use your expertise as we go along. Please let me know if you would do us the honor. Thanks
Evan Filter
Mechanical Engineering and Mechanics
Drexel University
In this book I have filled over 100 pages with the detailed information you need showing you exactly how to build a fast electric bike even if you are a complete novice and know nothing about bikes or electricity.
Included in the book is more than 150 high quality photographs so you can see how it’s done.
I take you by the hand and walk you step by step through the entire build process to ensure you will be riding your bike in no time.
Here is a list of just some of the benefits you get from building an electric bike yourself:
Lowest cost electric vehicle -Because you need such a small battery pack compared to an electric car or motorcycle you can afford to buy the latest technology batteries which means they can last up to 10 years before they need replacing.
Never wait in traffic again – simply pass all the slow cars by riding on the shoulder or in the bike lane.
Ride at the same speed as a car – I will show you the secrets to increasing the power from a standard motor controller so you can ride at speeds over 50MPH and out accelerate most cars from a stop.
Choose how far you want to ride – I show you the simple calculations to determine what size battery pack you need to travel a specified distance. My bike has a range of 30 to 50 miles depending how fast I ride before it needs recharged.
Save money on insurance and vehicle costs – you won’t need to own or insure a car when you have a fast electric bike. No more oil changes or vehicle repairs to worry about.
Never buy gas again – simply plug your bike into your charger and recharge it for pennies a day.
Never pay for parking again – just lock your bike to the closest bike rack or in a secured bike locker.
Reduce your carbon footprint – stop polluting by using an eco-friendly electric vehicle.
Ride warm all year long – You will learn how to ride warm and comfortable in temperatures well below freezing by making your own heated jacket (one of the free bonuses you will receive).
Ride silently – You may be surprised by the wildlife you see on a bike trail because the animals can’t hear you. I have seen coyotes, skunks (don’t get to close), owls,deer and even a beaver on the bike trails riding home from work.
Experience the EV Grin – this is the huge smile you will have on your face after your first ride on your new electric bike.
Testimonial
“I am very impressed with Greg’s eBook, it is remarkably thorough, detailing exactly how to build your own 50mph electric bike step by step. There are illustrations on nearly every page to help you along the way, which is great for those tricky wiring parts! All in all this is a very comprehensive and well-written guide and I would recommend it to anyone looking to build their own fast electric bike. Can’t wait to start my own! Thanks Greg!”
Sam C.
Now lets take a look at the wealth of information your are about to discover.
Introduction (pages 5-7)
Find out how it’s possible to cut your commuting time by more than 50% riding an electric bike instead of driving.
Learn why you should stay away from “store bought” electric bikes and see why building your own electric bike will save you money and give you a bike that outperforms all the commercial bikes.
Choosing a Bike (pages 8-18)
Discover why you MUST use this type of bicycle frame when building a high performance electric bike so the bike is safe to ride at high speed.
Learn why an extra large size frame is perfect if you want a long range electric bike even if you usually ride a small or medium frame.
You will also learn how to lower the standover height of your XL frame which means it will be comfortable to ride no matter what your height while increasing the performance of the bike at the same time.
Find out what the best type of fork is for a fast electric bike so it handles like a motorcycle and easily survives the braking stresses of stopping a heavy electric bike.
See how simply changing the handlebars and stem can increase the comfort of a bike frame that would normally be to big for you.
Discover why you may want to make THESE modifications to the drivetrain which will increase space for batteries and allow you to mount a disk brake on the rear.
Learn what the best rims are for maximum acceleration and reliability as well as exactly where to buy them online.
I show you the three things you need to prevent flat tires forever so you will NEVER have to repair a flat on the side of the road again.
Choosing Electrical Components (pages 20-43)
Learn about the different types of motors available for electric bikes and see which one is the BEST for high performance so your bike can keep up with and even pass cars going up hill.
Discover how to select the best controller for your bike and what parts MUST be inside for maximum performance.
Find out about the different types of batteries and why THIS type is the best bang for the buck and the safest.
I show you the easy calculations to figure out how many batteries you need to travel a specific distance so you never get stranded with a dead battery.
See how to easily mock up batteries to test mount them on your bike BEFORE you purchase them.
You will learn all about battery managment systems, why you MUST use one, and exactly where to order one online so you will get many trouble free years from your battery pack.
Learn what type of throttle you DEFINITELY NEED TO AVOID in order to prevent a dangerous situation that could result in a crash causing injury.
Find out where to buy a digital display for your electric bike that monitors all the vital information about your bike and allows you to make adjustments to the performance on the fly.
See what parts you need to purchase from a robot parts supplier instead of an electric bike store to maximized the performance and reliability of your bike.
Learn how to lower the voltage of your battery pack to power your lights and other accesories so you don’t need to add a second battery pack.
Discover how to make a cheap and reliable battery charger by purchasing THESE parts off ebay.
Find out how to install an adjustable knob on your bike to power a heated jacket by purchasing THIS $20 part online.
Building the Bike (pages 44-105)
Learn how to easily modify a hub motor to fit a disk brake rotor so you can take advantage of the incredible stopping power of hydraulic disk brakes.
Discover how you can prevent your motor from overheating by purchasing THIS $20 item from an R/C hobby shop and learn the easy modifications to help cool your motor.
See why you must make one of THESE to prevent your axle from spinning in the frame and tearing apart all your wiring.
Discover how simple modifications to the frame will provide more room for batteries increasing the range of your bike.
Find out the best place to mount your batteries so the bike is well balanced and handles like a motorcycle.
I will show you in great detail how to build your own custom battery boxes to perfectly fit your bike using parts from your local hardware store.
Find out how to create the perfect hiding place for all the sensitive electrical components and wiring as well a waterproofing techniques which means your bike will look clean and be protected from the rain.
Discover the secret modifications to increase the power from your controller by more than 400% so you can drag race cars from a red light and WIN!
With all this information at your fingerstips you will avoid the common mistakes most people encounter building their first electric bike.
I have made all these mistakes and learned from trial and error what works and what doesn’t so I can pass it on to you. This will save you time and money.
My book shows you the proper techiques and best parts to use when building your own fast and reliable electric bike so you can bypass the gas stations, blast past traffic and cut your commuting costs to a fraction of what you spend driving.
Imagine how much money you will save on fuel costs, insurance and parking!
This is no other ebook available anywhere on the internet that contains detailed step by step instructions on how to build a high performance electric bike.
What is an incredible resource like this worth ?
I have invested over $6000 in research and development building several bikes over the past fews years to find out what works best. Using my guide you can build a bike similar to mine for as little as $1500 using the lastest technology bike parts and batteries.
This book can save you well over $4500 by showing how to build your bike right the first time.
When you think about how much money you can save by not having to experiment yourself, and the time you will save knowing exactly where to find the parts you need, this resource is definitely worth well over a hundered dollars.
I was initially going to offer this rare ebook for $97 to help promote electric vehicles but because I need more testimonials for my website I am discounting the price to $47.
That’s less than the cost of a pair of tires for your bike.
Testimonial
Greg’s book provides thorough instructions for building your own bike with many great illustrations taken along the way.The final product has incredible acceleration and an unbelievable top speed.
Nice work Greg. See you on the streets.
Guy Teigen
Engineering Manager
Jastram Engineering Ltd.
North Vancouver, Canada
For even more value I will include the following free bonuses.
Bonus #1 (How to Make a Bike Light)
In this ebook ($27 value for Free) you will learn how to make a powerful low cost dual light setup for your ebike using parts available at your local hardware store. For a fraction of what it would cost you to buy a high power mountain bike light you can make your own and will have no problem riding on the darkest of roads or trails at high speed.
Bonus #2 (How to Make a Heated Jacket)
This ebook ($27 value for free) shows you how to make a heated jacket for less than $40 that plugs right into your electric bike and keeps you nice and warm during cold weather riding. This can save you several hundred dollars as a store bought jacket can cost over $400. You will also find out why store bought heated jackets or other DIY jackets may not produce enough heat when used on an electric bike. In the book you will find all the calculatings you need to make a jacket that produces as much heat as you want.
To completely remove any risk on your part, I offer a 100% money back guarantee. Take a full 60 days to look over the ebook and if you are not completely satisfied just let me know and I will promptly send you a refund.
Your purchase is completely risk free!
This Book is Not Available in Stores.
So if you have decided that never paying for gas again, making traffic jams a thing of the past, eliminating parking problems and reducing your carbon footprint PLUS the two free bonuses are worth $97 $47 then here’s how to claim your copy.
To order “How to Build a 50MPH Electric Bike” via a secure clickbank server for only $47 plus the two free bonuses, click here now.
Don’t be a victim of rising gas prices!
P.S. By ordering “How to Build a 50MPH Electric Bike” today the fuel sitting in your cars gas tank right now may be the last gasoline you ever buy. This ebook takes you by the hand and walks you step by step through the entire build process showing you exactly how to build a high performance electric bike.
P.S.S. Don’t forget, today you are getting a $151 value for only $47 if you order now. Don’t delay or you may lose out on this limited offer.Click here to claim your risk free copy and start going green today.
0 notes
Photo
Requested by anon here is a basic tutorial on how I make my gifs with pictures included.
1. Download the episode that has the scene you want to gif. For Inuyasha specifically I use this amazing link here that has both the original series and the Final Act along with the movies. Also to make things easier I would recommend having all your videos in one folder, as you can see I have downloaded a lot of episodes.

2. Have Photoshop. I use Photoshop Portable CS6, I know there are other programs you can use to make gifs but for me Photoshop is my weapon of choice. There are several links on tumblr that show you how to get photoshop or you can look it up on piratesbay if your feeling risky.
3. Capturing the frames. For this I use KMPlayer but there are several programs that can do the job. My version of Photoshop doesn’t let me open videos directly in the program so I have to import the scene I want as a folder of frames. I make a folder with a name I can remember to place the frames in, as you can see I have very creative naming methods (I also separate my caps by series so these are all sub-folders in my huge Inuyasha folder).

Now I open up the episode in KMPlayer and find the scene I want to gif and then right click > Capture> Extract which will open up the window I need to capture the frames.
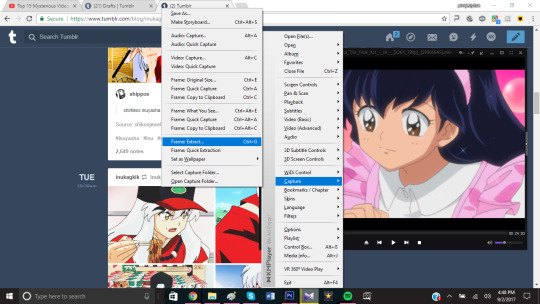
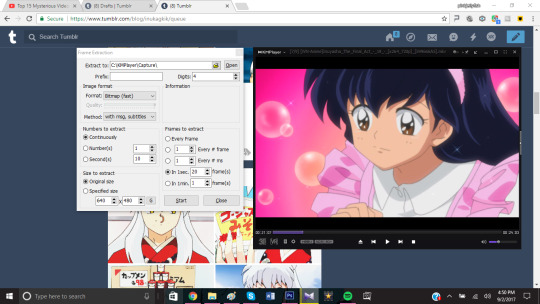
Then you go over to Extract to and find the folder you created for your frames, in this case my folder is called “tutorial”.
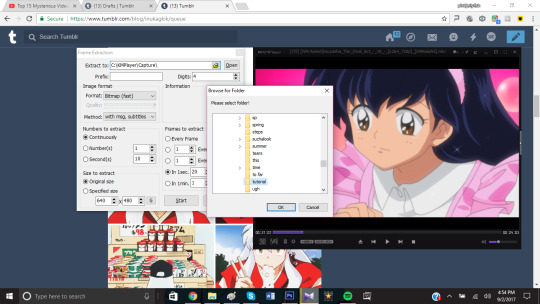
These are my personal settings for extracting the frames, I used to extract every frame but then I ended up with folders with over 200 frames which take a long time to load in photoshop and usually create gifs that excede the tumblrs limit.I keep them at their original size to not distort the quality. *You can have as many or as few frames per second as you want but keep in mind how many frames you have when giffing*
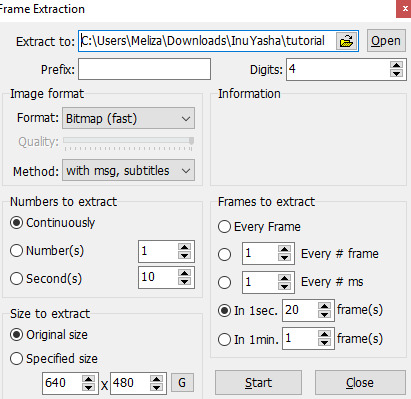
When your ready to go just press start and stop it once you have your scene. Your folder should look like this once your done, since no one is perfect you will most likely need to delete some frames you don’t want, this will make giffing easier.
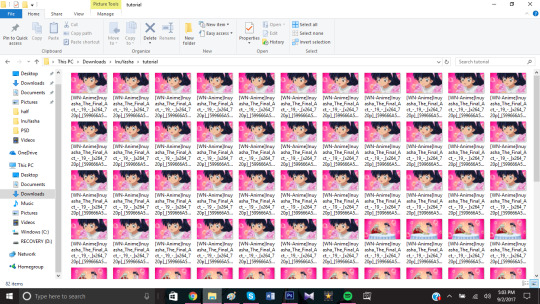
4. Exporting the frames to Photoshop. Open and run photoshop and select File> Scripts> Load Multiple DICOM files. (I think some version of photoshop might have you select “Load Files into Stack” so if that doesn’t work try that)

A little screen should pop and and once again you find and select the folder that has your frames. Once you find it click okay and the frames will begin to load into photoshop.
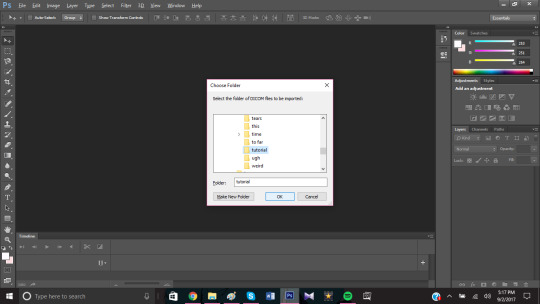
And now you wait, this could take a few seconds or a few minutes depending on how many frames your folder has ( usually I just go watch some youtube videos while i wait and forget I’m even making a gif lol)

3 minutes later the frames are loaded and its time to make the gif.
5. Creating the gif. Make sure you have your timeline turned one, mine is part of my default settings but I know a lot of versions don’t include it with their default view so you have to manually turn it on. Also make sure the timeline is set to frame animation and not video timeline, click on “Create Frame Animation” to start.


Click on the icon on the far right of the timeline that looks like an upside down triangle and 4 lines and then select “Make Frames from Layers”.

Click on the icon again and this time select “Select all Frames”, we’re going to input the frame delay.
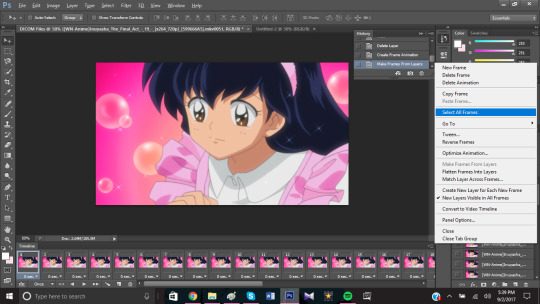
You select a random frame and go down to where it says 0 sec and click on the icon next to it and choose other. If you leave it at 0 seconds your gif will be too fast.
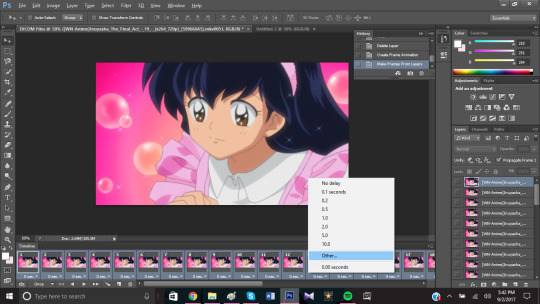
Because of the number of frames I have I’m going to use a 0.1 second frame delay. If your scene has a lot of frames you can decrease this number, if you have few you can increase it. Back when I used to use every frame I would use 0.03 seconds. Its really up to you how fast or slow you want the gif and if you don’t like it you can easily open up the gif again, change the time and re-save it.

Once you’ve decided your frame delay and have clicked okay click the icon on the far right of the timeline again and click on “Convert to Video Timeline”

Now select every frame in the window on the far right, you can do this by clicking on the first and last layer while holding down shift.
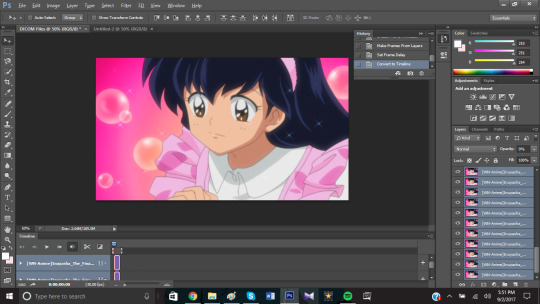
Click on the icon in the upper right hand corner of this window and select “Convert to Smart Object”.

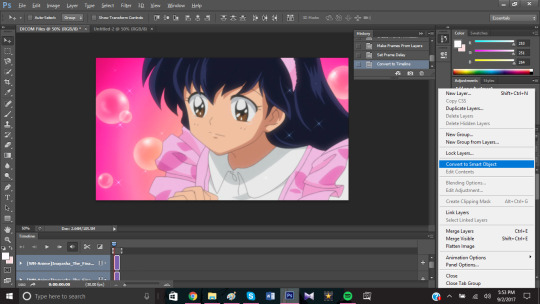
And now you have a gif, a really big gif, so its time to resize it. Tumblr uses 540px for big gifs and 268px for smaller gifs, I also cropped my gif a bit. Go to Image >Image size to resize your gif by changing the width size.

6. Surface Blur and Smart Sharpen. Now you could save your gif like this but it will most likely be grainy and will have lost some of its quality. To fix this go to Filter> Blur> Surface Blur to make the gif nice and smooth, for this scene I used a Radius of 7 and a Threshold of 7. For gifs I try not to exceed 10 on either one but I often go as high as 15 when editing grainy scans.
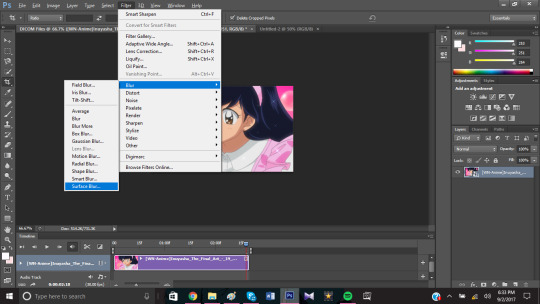

After that I like to Sharpen my gif so the lines stand out by going to Filter> Sharpen> Smart Sharpen.
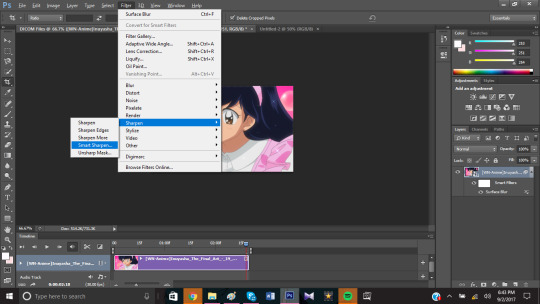
Usually for big gifs I only go up to 100% but with this scene I felt it looked best with 125%. Its best to tinker with these settings until you find what you think looks best, I like my gifs to be sharp so I tend to use a good amount of shapening. When I giffed the stage play I went up to 500%, live action is on another level. If you don’t like it you can edit this and the blur layer to fit your needs later on.

7. Saving. It’s time to save our gif, to save a gif you need to go to File> Save for Web. You can not save a gif the way you would save a png of jpg, it must be Save for Web.

Once you do that this screen will open up and it will have your settings for your gif. This is where you decide how you want your gif to be saved and get a view of how it will look like. Make sure your looping option is set to Forever!

I play around with these settings a lot because some scenes look smoother in different settings. I recommend trying a few combinations to see what produces the smoothest gif before saving. In this case it looked best with Selective and Diffusion.

Also make sure your gif does not exceed 3.00M, tumblr does not support gifs that big and all your work will be for nothing. You can make your gif smaller by changing the size or editing the colors.

Once you’ve check everything you can go ahead and click save and save your gif under an appropriate name.

And now you have a gif.

8. Coloring. Coloring is an important step when making gifs and I don’t think there is a wrong way to color, its just what you think looks best. When starting out I think its important to download PSDs to better understand how coloring works and what each of the little icons on photoshop do. I have an entire folder filled with PSDs, some made by me and some made by the wonderful people on here kind enough to share their PSDs with the world.
I’m going to show a couple of different coloring styles you could do with this gif.
Black and White

Achieved by putting a black and white gradient over a gif that was colored with this PSD.
Pale

This PSD over a gif with darker blacks and blue.
Pastel

This PSD at 50% Opacity.
Vibrant

This PSD (this psd is actually one of my favorites I use it a lot)
This is how I would choose to color this gif.

I would recommend following resource blogs, especially when your starting out because they have a lot of PSD you can download and use. PSD are also usef in making graphics and these blogs offer a lot of help too. Find a style you like or try something new every time. Coloring gifs can be hard so if your stuck you can ask them or look through their blog for tutorials that go more in depth on how to color certain types of scenes. Dark scenes, bright scenes, cartoons, live action, anime, music videos, pale, or color isolation its all there.
#im so sorry this took so long anon#my wifi is still out but hopefully it gets fixed today#requested#gif tutorial#not sure how to tag this lol#put under read more because it is kinda long especially with the screenshots#also included links to some nice psds i often use#and blog recommendations
48 notes
·
View notes
Text
RESEARCH BLOG 2
CAFEL PRODUCTION
I. PHOTOSHOP/DESIGN OF A CAN
The production part of my motion graphic started with using Adobe Photoshop. My first aim was to design a can which I would then bring to life in After Effects. I downloaded a JPG picture of a can and using a selection tool and a mask I created my first Cafel product. I used different colours for different types of coffee. I used dark purple for the can at the beginning of the advert, which was introducing the product itself. For the products offered, light purple belongs to latte, red to cappuccino, orange to filter coffee and pink to flat white. Once I had my cans designed, I moved to After Effects.

II. CREATING THE NARRATIVE
My first step was to find a music suitable for this advert and according to which I could create the sequence so that it would go well with the beats and rhythm. I found suitable music on YouTube by WaveToys - Background Music For Videos: https://www.youtube.com/watch?v=9ix-bT0qVMk for my video and started importing my files. Storyboard was my guideline during the whole production, especially at the beginning. I firstly added the background music, then according to the beat I inserted the cans as it was drawn in my storyboard. Once this was done, I basically had the basic narrative production of my motion graphic done, and that was the moment when I started to animate.
III. PRODUCTION
At the beginning my work flow was slow and struggled a bit with how After Effects works and why are things not doing what I want them to do, but soon enough, with practice, it got easier and my work flow got faster. Basic motion with key frames was not a problem, the issue occurred when I tried to add light and a camera to create shadows and make the objects look 3D. I struggled to put them to practice so at the end I decided to create the shadows manually. I used this tutorial https://www.youtube.com/watch?v=mq1HMUh4LaE to cast shadows under the cans. Second problem occurred in the middle of my motion graphic, when I tried to rotate the 2D object in order to introduce each Cafel product separately. I tried all these tutorials:
https://www.youtube.com/watch?v=Rcq3uq2WNsI
https://www.youtube.com/watch?v=mGBWwWgRokQ&t=44s
https://www.youtube.com/watch?v=cMM-3WerJEE
https://www.youtube.com/watch?v=ZyaCYaighfo&t=493s
Unfortunately, I was unsuccessful with every single one.
https://www.youtube.com/watch?v=aZA793msv_U
Halfway through this tutorial I found out that I need a Trapcode Particular for the animation to work, and after trying to download Particular into my After Effects and failing, I decided it would be better to use other technique.
Therefore I decided to use this tutorial as a motivation: https://www.youtube.com/watch?v=UzU-1JVu8CI.
At the beginning I was frustrated that my motion graphic will not go exactly according to my storyboard, but looking at the finished product, in a way I am grateful that I did not manage to rotate the objects, because in my opinion, the new technique fits there even better, not just visually but also in context with the product.
REFERENCES:
Janeckova, T. (2019). Individual Proposal. [online] prezi.com. Available at: https://prezi.com/p/akuybnv7ji4d/?present=1
WaveToys, (2018). [online] Available at: https://www.youtube.com/watch?v=9ix-bT0qVMk
Youtube.com. (2013). YouTube. [online] Available at: https://www.youtube.com/watch?v=mq1HMUh4LaE
Youtube.com. (2018). YouTube. [online] Available at: https://www.youtube.com/watch?v=Rcq3uq2WNsI
Youtube.com. (2018). YouTube. [online] Available at: https://www.youtube.com/watch?v=mGBWwWgRokQ&t=44s
Youtube.com. (2018). YouTube. [online] Available at: https://www.youtube.com/watch?v=cMM-3WerJEE
Youtube.com. (2019). YouTube. [online] Available at: https://www.youtube.com/watch?v=ZyaCYaighfo&t=493s
Youtube.com. (2019). YouTube. [online] Available at: https://www.youtube.com/watch?v=aZA793msv_U
Youtube.com. (2018). YouTube. [online] Available at: https://www.youtube.com/watch?v=UzU-1JVu8CI.
0 notes
Text
Anisah tries to make a tutorial :)
There is probably a list of people who should never make tutorials, and i’m on it... but here we are anyways ~
(this is a very detailed tutorial from start to finish, so please bear with me lols. also, its super long, so under a cut it goes )
The first step of course is getting the right videos. I would highly reccomend downloading torrents, as opposed to video clips off of youtube/daily motion because they will always be better quality !
In the case that you can’t find a torrent/the torrent you found has barely any seeders and is basically dead, then i’d reccomend downloading clips from the official drama channels, since they will always upload in HD and have the widest variety of drama clips.
KBS SBS TvN JTBC MBC
Once you have your episode/clips downloaded, I would recommend using a video editor to cut out the scenes that you want. This is because, if you try and make a gif on photoshop from a full episode, its will end up being like 500 frames and your death :)
Also, if you want to make a multi scene set, if you cut them clips out before hand and compile them into a new video - it will be easier to find the exact clips you want, without having to go back and forth between different clips

So you have HD clips, and they’ve been cut into the individual scenes for giffing, so now to actual gif making.
I know a lot of people do the whole ‘screenshot and then convert layers to frames’ but I have no idea what that is or how to do that, so here is an alternative? (Which I think is a lot easier than screenshotting)

On photoshop you can import a video and convert it into a frame animation
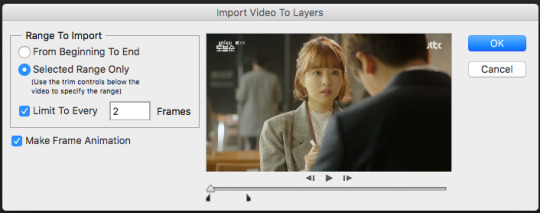
^ make sure you tick ‘limit to every __ frames’ + since you don’t want to have too many frames in your gif, i’d recommend going for every 2 or every 3 frames.
then hit okay, and you’ve technically just made a gif and could very well just save it (it would probably be huge though like 13mb so i would 500% not reccomend this)
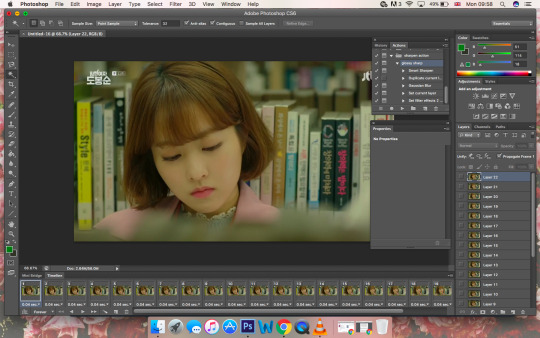
So your gif probably looks like this, the timing will probably be something like 0.04 sec which is wayyy too fast - so the first thing you’ll want to do is select all the frames (click the first frame, then press shift, and click the last frame) and change the timing - i usually use 0.1 seconds, but people prefer different timings so its really up to you~
The next step is to crop your gif, for the first gif click the crop tool, and select “unconstrained” - this will allow you to crop your gif into any shape you like

once you’ve decided on a shape you like, click “save preset” - what this does is save your crop shape, so next time you don’t have to use “unconstrained” you can just use the crop preset that you’ve saved - aka all your gifs will be the same size/shape
as you get into making different styles of gifsets, you’ll start using different shaped gifs and your list of presets will grow

^^^ this is what my one currently looks like, gibberish titles i know, but i understand what they mean and what shapes they are, and thats all that matters really! (although...i should probably delete some, since i dont even use half of them lmao)
For the sake of this tutorial, lets say you saved your crop preset as “gifset 1” - so the next gif you make, instead of clicking “unconstrained” you just click “gifset 1” and you’ll get the same crop proportions :)
also important: i’d 500% reccomend cropping out logos! logos honestly ruin gifs and will put your hard work to waste
if your gif shape doesn’t allow you to crop out the logo without cropping out key details from the gif, i’d reccomend colouring over the gif
Okay, so your gif now looks like this
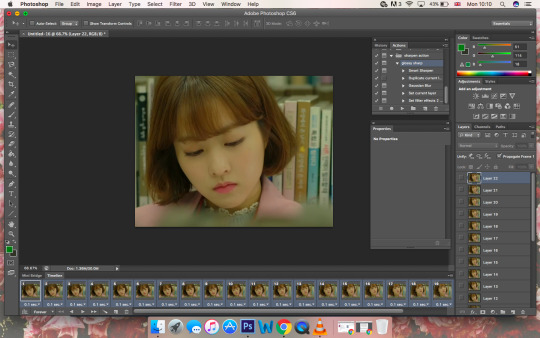
but its still very big (like probs 900px) and tumblr’s dimensions for gifs are 268px for small gifs and 540px for big gifs
for this tutorial i’m going to make a small gif, so to resize the gif, just press cmd+shift+i or click on the image drop down menu and then click “image size”
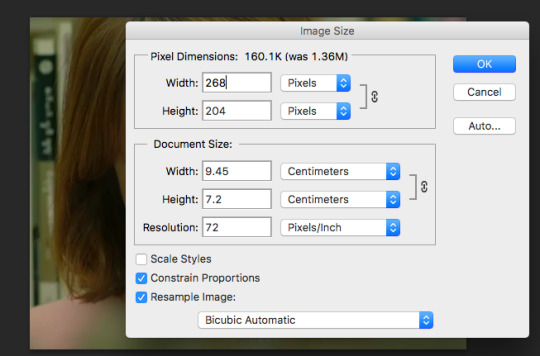
and resize your gif to 268px. make sure “constrain proportions” is ticked!!! or else your gif will end up being stretched and it will look awful!!!
also, click cmd+1 or go to the “view” drop down menu and click on “actual size” so the gif it the exact size you want it to be, and not zoomed in or zoomed out (doesn’t change anything on the actual gif, its just easier to work with)
And your gif is almost done :) all thats left is colouring and sharpening !!
When you import your gif, on the right hand column will be your gif layers, photoshop will select the first layer by default, but to make sure the colouring is on all the frames make your you have the last layer selected!
Everyone colours differently, but here are my basic steps - and from there you can just mess around with the colouring etc
The first thing I do is increase the “curves” - there isn’t an exact number or curve you want to go for, it literally depends on how dark the scene is and how bright you want it. however, do not brighten it too much at this point, because as you add layers it will get brighter and you dont want to whitewash!

The next thing I do is balance out the colours using “colour balance”, to reduce the yellow tint and make the scene look more natural

I then increase the levels a little bit, to make the scene lighter
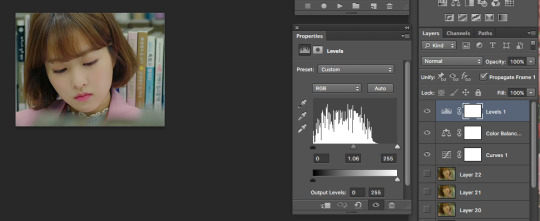
It looks fine, but the colours seem a little flat, and the scene hasn’t got a lot of depth, so I do a “brightness/contrast” layer and increase the contrast (i dont increase the brightness, since the “curves” and ”levels” have already done this part, but i do sometimes lower the brightness if the contrast overexposes the scene)
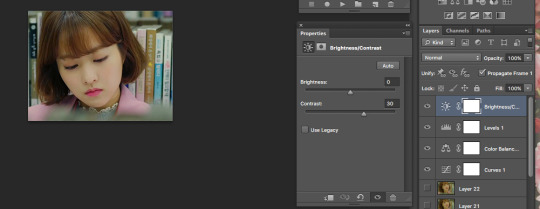
^ This looks fine, and I could finish here, but I want the colours to be a bit more vibrant. So, I open a “selective colour” layer, and on the “red” I reduce the “cyans”
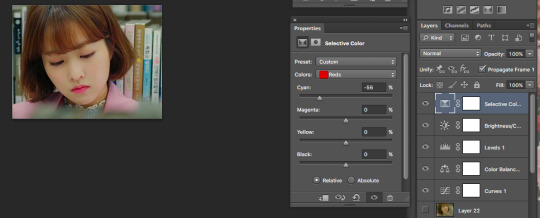
Then reduce the “yellows” on “neutrals”
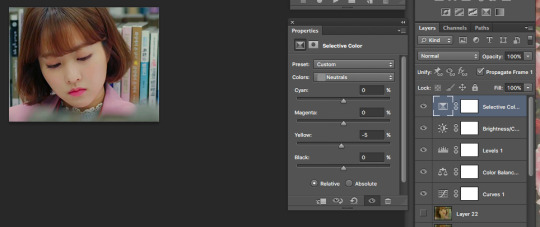
And finally, increase “black” on “blacks”

and badabing badaboom, you’ve now coloured your gif!

The only thing left to do now is sharpen~

At the bottom left hand corner of your timeline there is a small button next to where it says “forever”, click that to convert your frames into a video timeline
making your timeline look like this:

Then click cmd+alt+A or the “select” drop down menu, and click “all layers”

and then click on the “filter” drop down menu, and click “convert to smart filters”
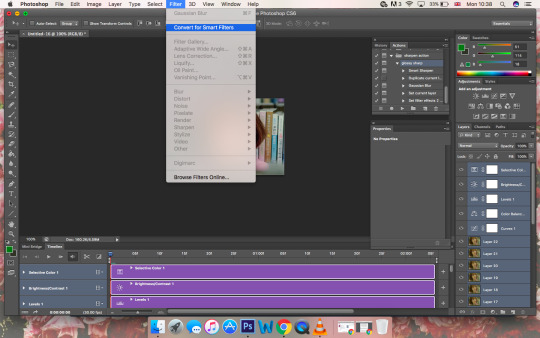
So your timeline should now look like this:

To sharpen your gif, click “filter” and then go to the sharpen sub-menu and click on “smart sharpen”
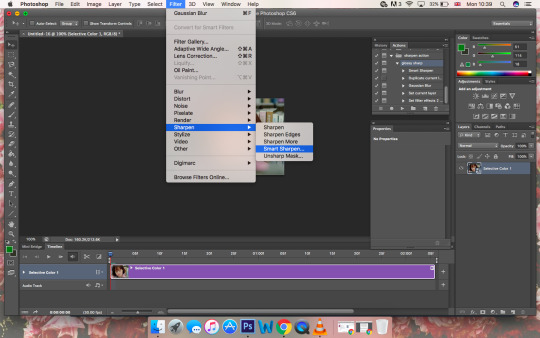
How much you sharpen your gif is up to you, some people do more than one layer of sharpening others only sharpen a little
I’d say to start off between 0.2px and 0.3px and mess around with the settings from there
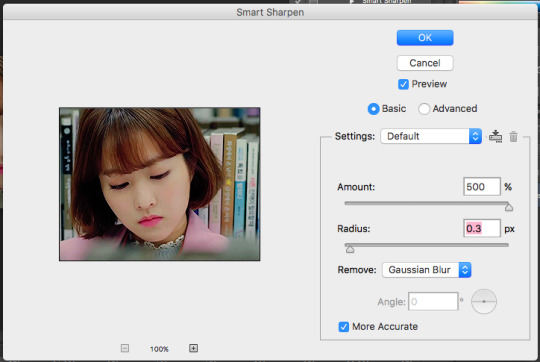
And you’re done!!!
All you have to do now is save your gif - so go to the “file” drop down menu and click “save for web”
Important things to note when saving your gif though:
Make sure the loop is on “forever” - photoshop will put it at “once” so you have to change is manually when you save
make sure your gif is under 3mb or it wont move on tumblr
make sure you save it under “pattern” and not “diffusion” (which is the default) or else it will look fuzzy/low quality

CLICK SAVE AND HALLELUJAH YOU JUST MADE A GIF!!! WOO HOO !!!
please please please let me know if this tutorial helped you, you don’t need to reblog or even like it... just a reply would do (just so i know this wasn't a waste of time and it actually helped someone lmao)
90 notes
·
View notes
Last Seen Blogs

honeybumblebeebee
unhinged greta gerwig girl

pcompositor
P-COMPOSITOR

artisverything
artisverything

tamamurasatoshi
玉村聡之

solartranslations
Solar's Translation Blog