#this watercolor brush is really fun to draw wings with also
Text
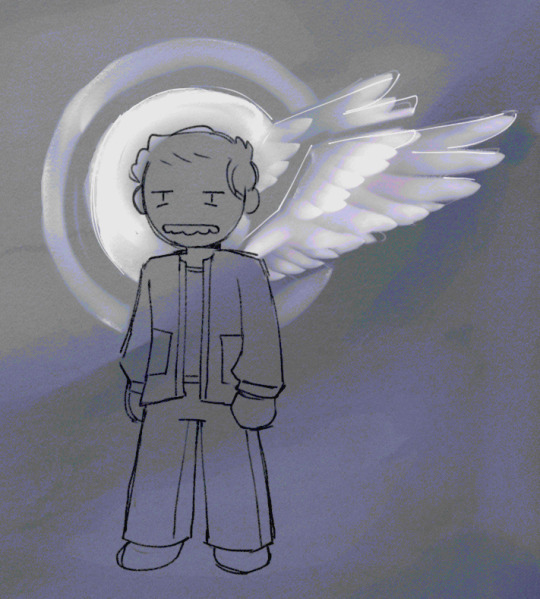
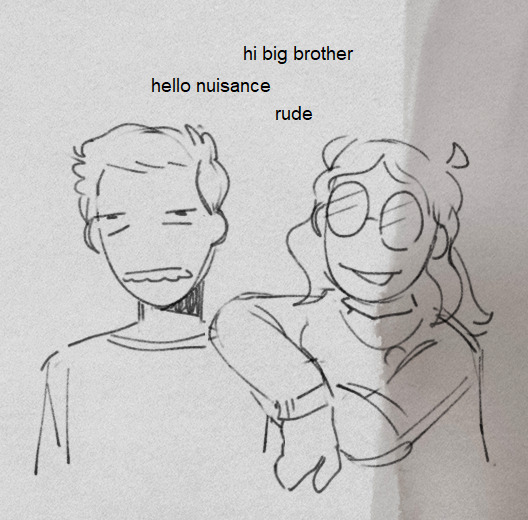

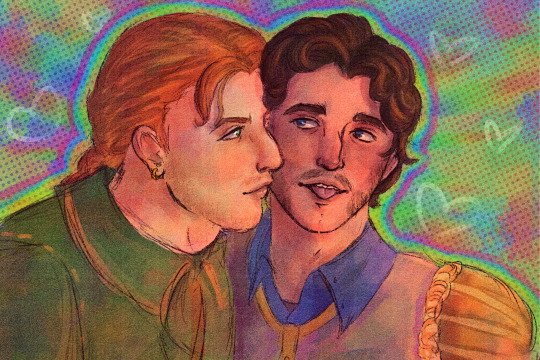
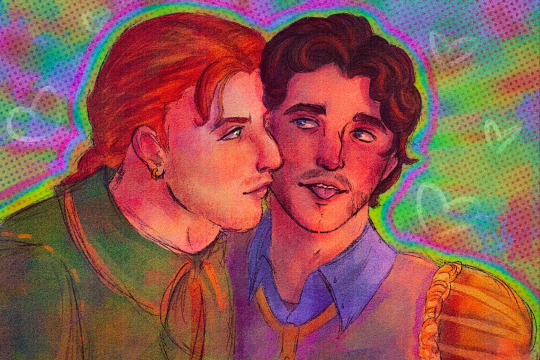
also sel and his sister . i mean all of the angels are siblings but them especially
#doodle#absenceposting#her design graciously donated by my friend#sel's job is to track down rogue angels also#this watercolor brush is really fun to draw wings with also#babsactualart
19 notes
·
View notes
Note
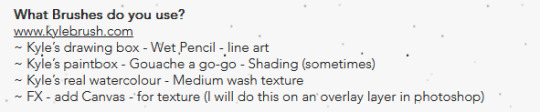
Hello :) Same brush anon as before. I actually forgot a few brushes! Silly me. I wrote that up at midnight and forgot to double-check. Let me amend that.
Watercolors used primarily for backgrounds/transitions (all found in Kyle's Watercolor pack)
Puddle Brush
Soft Irregular Wash Variant
Soft Wash Edgy
Splatter Versa (used in early LO episodes because they look like flower petals)
Pastel, Gouache, and other textured brushes (used either for FX or backgrounds):
Creamy and Creamy Variation (Kyle's Megapack) (These two were used for Eros' abstract wings in early LO)
Gouache Wet (Kyle's Megapack) (This would also be used for Eros' wings)
Gooey and Gooey C (Kyle's Megapack) (used sparingly to create abstract foliage in the background or to add background texture)
Gouache Supreme, Gouache Supreme Opaque, Natural Feel, and Natural Feel Super (all Kyle's Megapack) (used for background texture, the texture on Persephone's fur coat, and occasionally "painting" the clothing onto the characters)
Additional notes:
Any of the seasonal drops (the Fall, Winter, Spring, and Summer collections) include various one-off brushes she's used such as abstract shapes and a few additional foliage brushes. These are unnecessary for consistency but are fun to have if you want to experiment and/or to use for yourself!
Both Kyle's Impressionist pack and the Paintbox section of the Megapack have some interesting oil/impressionist brushes that were used once or twice as background textures in early LO. Again, they are not needed for consistency but can be useful to have on hand.
The Halftone pack is only used sparingly in LO as texture for clothing/fabric. Again, they are unneeded for consistency but can be useful to experiment/use for your own needs.
Happy drawing!
i'm literally so overwhelmed by this, all that time hunting down these brushes and speculating on what we were missing and you just. you have the LO brush manifesto. the holy grail of this community. hiding in plain sight.
i'm so grateful to you anon, please take all of my thanks for sharing all these in all your apparently infinite wisdom, this means so much to me and everyone in this community.
at the risk of asking god for too much, with all the brushes you've shared here paired with the brushes that we know of from what Rachel has shared herself ...
... does this mean it's done? we've found them all? the search is over?
because if that's what you're saying then all that leaves for us now is to just. create. and learn. and create more. and even if these aren't all of them, they're more than we've ever had access to before and you made that possible in ways you can't imagine. i know i'm sounding really fucking sentimental here over what's literally just a bunch of photoshop brushes but every find so far has been like digging up breadcrumbs one by one and you just. you just dropped the whole gingerbread house in our laps, right in time for the new year.
i don't know who you are and i don't know if i ever will, so from the bottom of my heart, thank you. thank you so fucking much.
#the anon who saved christmas#ama#ask me anything#anon ama#anon ask me anything#lore olympus critical#lo critical#anti lore olympus
170 notes
·
View notes
Text
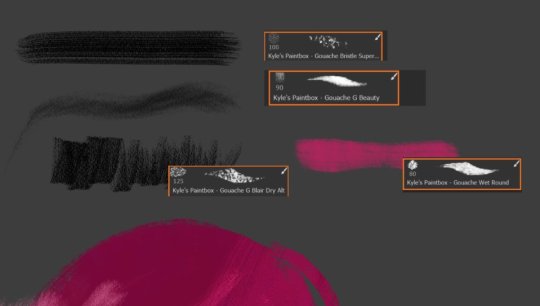
Art Masterpost: Solitudes
Story by: ilovehowyouletmefall (@angelinthefire)
Art by: sidewidner (@hawkland)
It's October and that means it's @deancasbigbang season once again! This year makes for my third time around for the event, although this year I only managed to participate as an artist (I'm still in a bit of writer's burnout since the summer). But, that meant I could put all of my focus and time into doing these four pieces for @angelinthefire's wonderful story "Solitudes."
I'm gonna talk a little bit about my ideas and process and share some progress pictures behind the cut in a way that might be kind of spoilery, so if you want, just go read the story now! And then you come back here later to find out more if you wish. All works were completed in watercolor with some digital effects and filtering after completion.
I was really drawn to the imagery of the architectural elements of where the story takes place (an abandoned brutalist mansion) vs. nature and decay...plus the way light and shadow seemed to play such important roles in the visual descriptions. Dean and Cas spend so much of the story separated by supernatural forces even when they are in the same room I wanted to focus on that as well: being so near yet so far apart, not quite connecting or even able to look at each other without barriers.
I started on the banner art right away, thinking of Dean in despair (for reasons in the story) and Cas yearning/wishing he could reach him. Behind them both is the concrete wall covered in mold and moss (which was a LOT of fun to paint). The actual final watercolor painting came out as so:
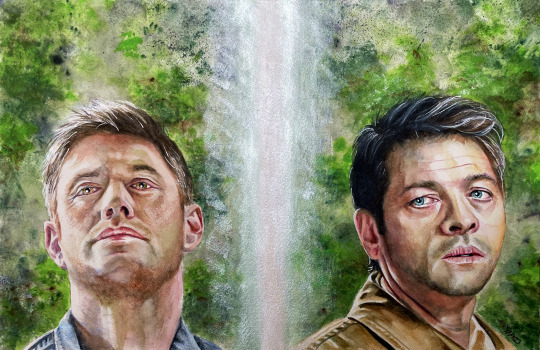
(This is one of my favorite Deans that I've painted. His face can be SO hard to get right!)
Working with angelinthefire's suggestions I ran some different digital filters on the photo to desaturate/emphasize the light and dark for the final banner, and then with that in mind tried to keep the other pieces in a similar color scheme and tonal range.
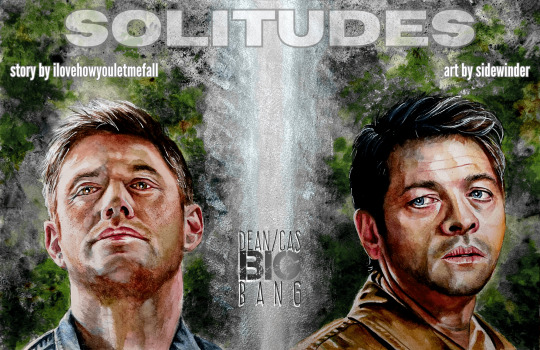
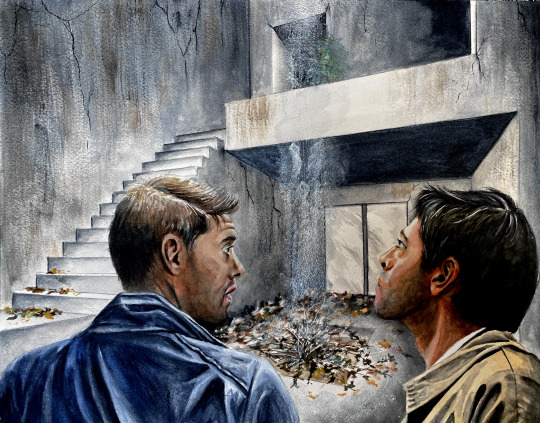
The atrium painting was the biggest challenge. I knew I wanted to do a piece to capture the feeling of the house, the light coming in from an open skylight falling on brambles growing out of an old fountain spot. I was thinking of the Roman villa ruins I've visited combined with some actual Brutalist/modern homes I looked up. My original drawing plan was a bit more complicated and simplifying/taking out some elements definitely makes it more creepy/mysterious looking and less like a funky modern home.

You can see the vanishing/perspective point is right where Dean is looking at Cas.
The light falling down from above was partially painted with some interference/shimmer watercolors, but I amplified it (along with the shadows) with some digital effects at the end. This was before doing any digital magic:
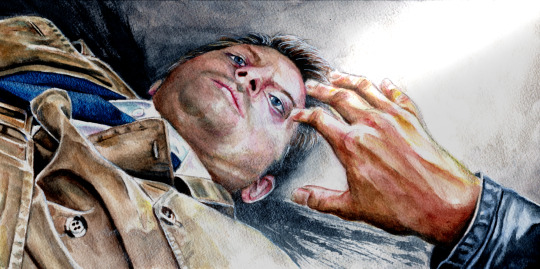
Dean reaching for Cas: I made myself so sad working on that piece! It was also quite the challenge to get the likeness right at that angle and do the lighting the way I wanted, so again I used some digital effects at the end to really intensify it. Painting before filters:
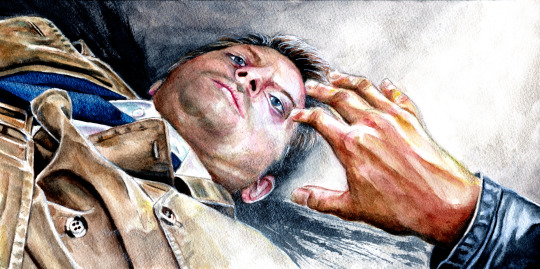
I think my favorite part of that one is how I dry-brushed the ash wings in one shot and they came out just how I wanted! My main reference was, heh, that old classic shot of unconscious Cas being poked with a stick. I used my own hand for Dean's reaching out to what he sees through the harsh angled light.

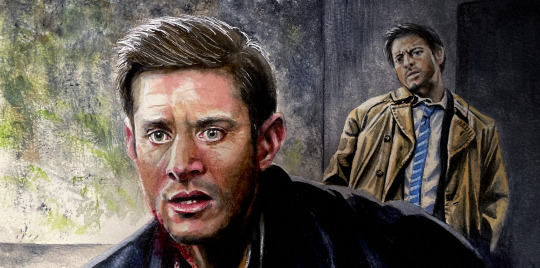
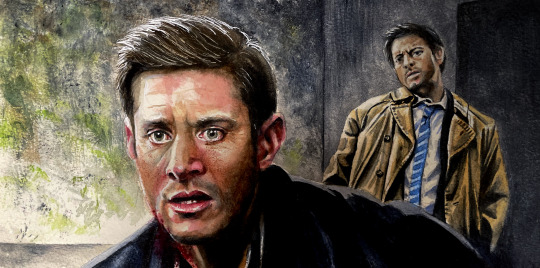
The final piece is a direct companion to the one above it, and one I'd been thinking about for weeks, trying to map it out mentally before tackling it. Dean's face can be so much more challenging for me to try to capture well compared to Cas's and I really wanted to get his shock and horror in that moment while also being able to show (the real) Cas in the background/shadows...this was the third drawing pass before I finally started painting it. There's only a light bit of filtering over the final piece to push Cas back in the shadows (I didn't want to do with the paints for fear of muddying the colors...plus I was already painting Cas so small any wrong brush stroke could shift his likeness/expression.)
Overall I really like how unified these pieces all ended up feeling and I hope they manage to complement the story in a way that it deserves!
#dcbb#dcbb2023#sidewinder art#hawkland art#my art#destiel art#dean winchester#castiel#spn fanart#watercolor#art masterpost
82 notes
·
View notes
Text
My Typical Art Process✨🌈
Was gonna reply to anon with this, but figured it was a bit too unrelated so I'll make a separate post! I do kinda wanna share my process anyway for anyone curious. I made something similar for twitter once but I no longer use twitter and my style has changed since then so here's a new one!
Tl;dr I draw for fun only and I have learned that textures and overlays and post-processing can do a LOT when it comes to making something look more "complete" while also not taking a lot of additional time. This is just my personal style spawned from my laziness and my love of harsh colors😆

I'll put it below the cut because it's long!
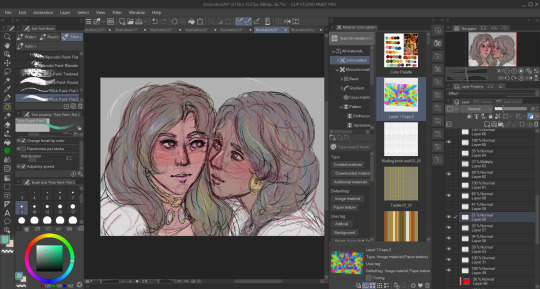
So to begin with, when I doodle (as opposed to a proper drawing that I take my time on) this is my typical "lineart":

I just draw the… what do you call it? The under parts… Like the circle and shapes, etc. to get the pose. Then lower the opacity and do another sketch on top of that. Then I lower the opacity of that and do ANOTHER sketch on top. 😆 I do that as many times as necessary until it looks like something. I don't worry a ton about anatomy or messiness or stray lines, it's just for fun to get an idea out of my head :)
Sometimes I also leave the under-sketches in or sometimes I turn the layer off. For this one I left them in.

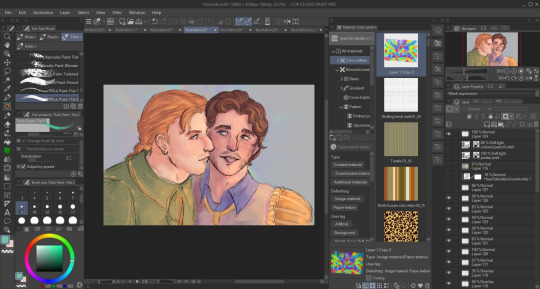
Then I turn on all my textures, overlays, and H/S/L correction layer and crank the saturation up. The selected colorful layer was something I made once and saved it as an image material so I can just slap it on any time as an overlay. You will see it in almost all of my art, she's my beloved crutch and also I just like it lol. Other than that, I sometimes use paper textures that CPS came with and sometimes I make a perlin noise layer with the smallest grain size and set it to 'soft light'.
I also have recently been using a manga screentone overlay that comes with CSP.
Then I start coloring underneath!
This is how it looks without all of the blinding colors and textures I put there to distract you from the mess lol
Even in ones where I DO put in effort and try to use better anatomy and clean up a lot of the scribbles I pretty much never use clean lineart simply because I cannot be bothered 🤷🏾♂️ I don't really do anything different here, I just spend more time one it:
Also, even then the overlays and textures do a lot of the heavy lifting. Some of the overlays and effects I draw myself like the rainbow boarders around them and of course the doodle hearts. I don't draw backgrounds very often but I don't like an empty background so overlays or little doodles or text effects typically go there.

I should also mentions that I use the lightroom mobile app to further enhance all of my art, as shown above in the before and afters. I don't really have much to say on this point. I used to use lightroom mobile a lot when I did doll photography and I pretty much just wing it based on what I learned doing that. I like to mess with the texture settings and do masking edits to change the foreground and background independently to get better color balances. Like a bozo I pay for the subscription but I bet you could use any old editing app.
Oh, and I do pretty much everything with these brushes here. I got them a while back when they were free for 48 hours but unfortunately they are no longer free and cost 80 clippy now :( Should also warn you that they saturate any color and idk how to stop it from doing that so I just adjust the color accordingly before using or edit in post. Very nice though!!
Some other (free) things I like and use a lot:
Warm color set
Watercolor paper texture (free)
Cloud brushes
Watercolor auto action
Real paper textures
Prism brushes
Freckle brush
Aaaaand that's basically it!
#eye strain tw#we do not discuss my 100+ layers...#long post#artists on tumblr#digital art#jun rambles
11 notes
·
View notes
Note
Thanks earlier for your advice on drawing Elfilis! If it’s ok to ask this next, what’s a good way to experiment with brushes for an art style? And may I ask how you draw the outline things you do? They’re really cute :)
Long post that got a little rambly. 😅
When I experiment with brushes, I'll generally open up the "all" tab for them and start picking out ones that look interesting. Just start scribbling things on the page!
Generally, when I'm looking through brushes, I have an effect I want to achieve in mind. For example, if I want to make a soft looking sky, I'll check out whatever blending brushes and airbrush type-things I have in stock.
Also, if you haven't already, you can go online and look for brush packs to add to your program. Download whatever looks neat, if you don't end up using it it's no big deal!
Don't be afraid to use brushes in ways they weren't intended for. Right now, my favorite brushes for line art are ones that seem meant for color blocking. (I'm using GDQuest's "Pixel Grunge" and Krita's default "Charcoal Rock Soft".) I like slightly fuzzy, gritty-ish line art, so these work well for that.
You can also try making your own brushes, either from scratch or by playing with existing ones from the program. Last summer, I made a brush out of a normal watercolor brush and a Paint 3D render of Elfilin. Here's something I drew with that. Please, don't be afraid to get silly with brushes!
In addition to experimenting with brushes, I love to play with filters, especially to make backgrounds more interesting. If you use Krita, you can go to Filters > Start G'MIC-Qt to play with a big list of powerful, fun ones. (I also reccomend playing some with Filters > Artistic > Halftone).
In regards to line art, I generally use the two previously mentioned brushes (GDQuest's "Pixel Grunge" and Krita's default "Charcoal Rock Soft" both scaled really small) to get a grungy, textured look. Like most people (I think?) I do my line art over a sketch layer which I've made semi-transparent.
I leave little gaps in my line art, which I've heard can contribute to an "illustrated" feel? Anyways, I color in between the gaps as if there was a continuous line there. (I do my colors on a layer below the lines, which I also think is common practice) Sometimes I'll tint my line dark brown or dark blue to add to the color palette of a drawing. It's also fun to set your lines to "alpha lock" and play with colored line art or airbrushing a gradient onto it.
The most important thing about your art style, though, is that YOU enjoy drawing in it! If drawing things a certain way is too hard or stresses you out, you're always allowed to draw it a different way. You're also always allowed to "cheat". I totally have templates made for things I know will be a pain to do (eg. Sectonia's wings) so that I can trace them when I need to draw them in a piece.
Good luck with your art! Have fun!
10 notes
·
View notes
Note
Yay! So glad you answered! I was hoping for tmnt? Im a chill person 99.9% of the time but i do have a bad temper, mostly when things are obviously unfair to anyone or theres an idiot in the midst. I like reading, writing, and drawing and i want to be a lawyer or possibly join animation (both different i know) i do like to cook and make stuff but it has to be on a good day. My favourite game is gta v and the underside of my head is dyed blue. Sorry dont know if this is like good or not. Lmk
BRO when I read your stuff I got so excited to match you up like abrbgnfkdkdk
I match you up with..
Michelangelo!

OK NO BUT HEAR ME OUT, you are perfect for him? For real, he needs someone he will have fun with but also someone who won’t back down when he hasn’t been taking care of himself, or when his brothers are giving him a hard time, I can totally see you defending him when they are just too hard on him ( and Mikey is brushing aside like he always does ) and you just, won’t take that shit, from anyone actually. And like he had a crush on you before? Yes, but after seeing you being so fierce to defending him on the spot out of 3 giant turtles, triple your size and strength, he legitimately fell in love, he couldn’t even react at the beginning bc he was seriously star struck, he will take it lightly when you are having a bad mood but will shift to wing more serious and “ok how can I help you then?” Approach when he realizes you are actually mad about something. Loves to play GTA with you, loves to go on missions with you there as well, have built many headquarters together in the game and you both are unstoppable, would beg for you to cook / bake with him, also to draw something together! Wants to do a graffiti with you, watercolor, digital art, play around with clay, everything! It doesn’t really matter what you are both doing he loves spending time with you, also I hope you don’t mind PDA cuz that’s just, mandatory with him, he will give more than 5 hugs and 7 kisses per visit on the lair when you are dating. He does get a bit ☹️🥺 over the fact you have dyed blue hair, is not that he thinks it isn’t cool ( it’s dope) but the blue color that bugs him, please dye it orange for him just once, he will be over the moon! The only “””bad””” thing about the relationship is that He wouldn’t really be able to help you decide with carrer would be good for you because he thinks you would be good at everything ahrbbtjdksos ( he’s just extremely supportive! But he is as indecisive as you, sorry 😅)
Hope you liked it! Matchups are closed
18 notes
·
View notes
Photo

4th picture DONE
Soooooo
Ink, then.
Can't say I'm a huge fan lmao
Okay so painting with ink was legitimately kinda fun, I liked painting the blank swan and the sky and water but everything else about ink was just ehhhhhhhhhh
But I guess it's pretty discouraging when you spill your ink container TWICE and the second time was on your drawing and you had to start over. :] Not a good first impression.
I used a calligraphy pen for the main outlines but maybe it's just my hand is unsteady but I had SUCH a hard time keeping the lines nice and smooth and consistent, and I swear I had to dip the pen back in WAAAY too often for the really short strokes I was making. Also the paper kept bending which I thought wasn't supposed to be an issue with watercolor paper but nope. The ink pooled in a couple places while I was painting so that doesn't look too great either. Also don't know if it was the brush I was using but I kept getting like...bubbles while I was trying to spread the ink around with water??? I couldn't get rid of them so there's a couple spots where they stand out. Might've used too much water but it's really hard to get those lighter grey tones when you start off with PITCH BLACK INK so diluting it was the only option I thought of.
Oh and I accidentally started erasing the pencil lines while the paper was still kinda wet and ended up ruining part of it by the wing so GREAT GOOD I'M SO GLAD
Y'know before I thought up this challenge I was thinking of doing Inktober with actual ink instead of my usual digital version but after this I'm pretty glad I didn't try that (that and the fact that the dude who started Inktober is apparently a jerk so don't wanna participate in that anymore).
Sooo painting with ink is kinda fun, I like getting those really dark tones and maybe something a little more abstract would be fun to paint instead of trying to paint within those lines.
BUT it honestly doesn't matter if I complain about how it turned out cuz these are just fun experiments and the process WAS kinda fun so that's all that matters. :D
2 notes
·
View notes
Photo
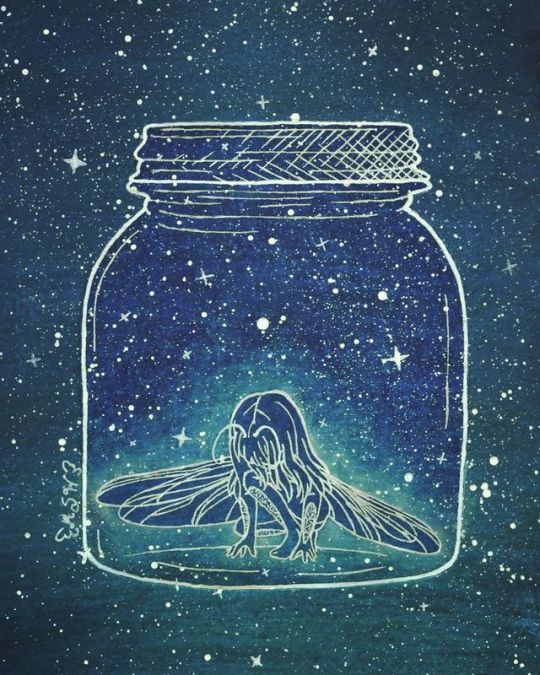
Bug Girl
My WIP Wednesday! piece is all finished!
(Warning: LOOOOOOONG description about the art process ahead! )
I don't think it's terribly obvious for a number of reasons (at least not at first), but this piece is actually a bit of fan art/inspired by How to make Friends with the Dark by Kathleen Glasgow, which I finished reading Monday night--Though I actually started this piece a couple of days before
There's a concept that gets brought up a few different times in the book of the main character Tiger imagining a "bug-girl" in a jar, usually to help visualize her emotions to us, the audience. This concept really resonates and stuck with me even before I finished the book, and thus I was compelled to draw it.
Technically the way I see that concept in my head looks different from what I've done here, so sometime in the future I may take another stab at it, but for this time I wanted to strengthen the connection between the bug-girl concept and the book, so visually I modeled the overall aesthetic largely off of the book's cover; white lines and white dots on a dark blue background that has a slight gradient at the bottom. The gradient on the cover is more subtle and is more on the lines than the background itself, but I took artistic liberty on that to make my life a little easier.
My original plan was to do the background with watercolor, do the lines digitally and print them out (since I had some kinks in the sketch I wanted to experiment with digitally instead of doing a lot of additional drawing and erasing) and then use my lightbox and a white gel pen to trace directly on top of the watercolor, then splatter away with some white ink. But of course, things can never be that simple.
The way I see it in my head, the bug-girl has, well, bug eyes, but for this piece, I didn't want to lean too heavily into the "creepy" factor, given it doesn't really fit with the content of the book (which is a great read if you like realistically heavy YA novels, by the way) so I angled her head down and her hair covering her face to keep from having to make the decision on whether or not I wanted to go with that look. And additionally to do proper bug eyes (at least the kind I was imagining) would've involved a lot of tiny circle/cell shapes, and I imagine that would've made things feel too crowded or would have blended into the splatters/background in an uncomfortable way.
Additionally, I was going to have her wings raised behind her, but after playing around with a few different references and positions in Photoshop (knowing full well I was not happy with the original wings from the sketch that I completely free-handed), I felt like this more asymmetrical, lowered position and dragonfly-type structure just looked better and fits better with some of the movements of the wings described in the book (using them to cover her eyes, etc.) which in most cases aren't technically plausible with normal bug wings.
My first real problem was with the jar. Realistically, it needed to be tall enough for the girl to stand at full height at least. And in theory, probably a little bit higher so it would be more comfortable overall and so that in theory she wouldn't just stand up and be able to push the lid off. But I was having issues with the sizing because the jar could only be so big so that A. it would fit comfortably on my paper and B. if it was too tall, the empty space between the top of the jar and the girl would noticeably awkward. So I fiddled with that for way too long and ultimately, it's probably too short, but the size balanced is more comfortable to the eyes, I think. (I also added the cross-hatching to the lid to make it more obvious there was a lid since originally it just kind of looked like the jar had a very wide lip.)
I also gave her a set of antennae, and after trying the concept of segmenting her whole body to be more bug-like (which was way too many lines everywhere) I decided to add some plates on the front of her forearms and calves. It's not much at all, but I didn't want to stick solely to traditionally "fairy" imagery since she's a bug-girl, not a fairy, but in this lines-only format, there was only so much I could do and still get the proper impact I was looking for.
Speaking of which...
I did a lot of swatching and testing of my various watercolors that I have on hand to A. get the colors I wanted right, B. practice my blending of two colors with more paint than water since I wanted very dark, opaque colors, and C. test if my lightbox would even work under the thick watercolor paper and the actual watercolor. However, I made two errors in judgment during the testing:
1. The areas I swatched to test were considerably smaller than the actual size of the area I wanted to cover and even with my biggest brush when I went to do a practice go I very quickly realized that was going to take an absurd amount of paint, time, effort, and I was very likely to run into some blending problems with the gradient. (So, in summary, half-pan-sized watercolors and mostly small brushes are not great for very large areas)
2. Once I realized the above, (and I had already done two very quick tests with alcohol markers and that idea almost immediately went out the window for the same issue) I had to switch course and ended up using some water-soluble pencils (one Arteza Woodless Watercolor Pencil for the dark blue and one Derwent Inktense pencil for the dark teal at the bottom) to lay down the color for the background and then wet them down to smooth out the color. Which turned out pretty nicely, especially once they dried. (I was a little worried at first since while still wet it was looking kind of patchy and weird )
The problem with number 2 is that after it had fully dried (aside from the paper curling pretty badly since it was in a sketchbook and I didn't think to tape the edges of the page down before taking water to it, which was mostly fixed pretty easily by wetting down the back of the page and sitting a very heavy box on it while it dried overnight) when I went to use the lightbox, the pigment from the water-soluble pencils was noticeably more opaque than the straight watercolor tests/swatched I had looked at previously. It wasn't so opaque that I couldn't see my lines underneath at all but it was opaque enough that a lot of the smaller details wear really hard to see. And thus I had a pretty big problem on my hands.
What I should have done was trace the lines in black on the blank paper first so they would be more likely to show through the pigment in the first place and there's a good chance that would've fixed the problem, even if I still needed the lightbox to see those lines perfectly. But hindsight is always 20/20 so that knowledge didn't really fix the matter at hand.
I knew pretty instantly that I didn't want to try tracing the lines onto another piece of watercolor paper and trying to color matter since I seem to always have majorly noticeable issues with that, especially when there's a gradient involved, and also because I knew when I scanned it in it would be fairly obviously there were two layers of paper instead of one because of how thick watercolor paper is. I also knew alcohol markers were out because, again, color matching issues with the selection available to me, and also from some of my much earlier testing with trying to get the specific gradient that I wanted.
That left me with colored pencils.
And thus I went through the five different sets I use enough to keep where I can easily access them (I have others I don't like as much that would've just been a waste of time) and started swatching colors on a piece of the same paper I had the lines on and then held them up to the background to color match as closely as possible. I ended up picking one dark blue and one dark teal each from both my Prismacolor and Polychromos sets since the blue from the Prismacolor was closer but the teal from the Polychromos was closer but they were both slightly off, so to keep the texture consistent I mixed both together for both colors. This ended up being a very good idea in hindsight because I finished off with a final layer of the Polychromos and that kept my white gel pen from having the problems it would normally have over straight-Prismacolor pigment. (Since Prismacolors are wax-based the wax usually clogs the pen tip very easily; the Polychromos are oil-based, so the oil created a slicker layer between the wax and the pen).
And all I did was use my lightbox to see the black printed lines through the colored pencil as easily as possible and went back over them with my white Sakura Gelly Roll, then I went back and outlined the jar and the lid specifically with my white Uni-Ball Signo, since the ink is slightly brighter and the nib is larger.
Once that was all done to my satisfaction, I cut out the girl in her jar and placed it on the watercolor background with some double-sided tape I picked up the day before from DollarTree, clipping a few edges so they'd be as flush with the edges of the paper as possible. And I figured that would be a better idea than glue because the glue had a very good potential of being very messy and leaving notable marks. The tape was just a safer bet. And fortunately, the paper laid pretty flat, save for a couple of spots I either missed because I applied the tape by lifting up the edges so I wouldn't totally lose my placement or up by some of the nooks and crannies that make up the ridges at the top of the jar that were just too small to do individually. And there is one spot where that tape wrinkled on me, but it's fortunately not terribly noticeable in the final product.
Then I made a paper mask for the girl inside the jar and got to move on to the slightly more fun part; I dipped a paintbrush in some white ink (white ink as opposed to white watercolor because I was concerned the water part might cause some reaction to the existing watercolor background that I didn't want and I was a little concerned it would make the non-watercolor paper that the girl and the jar were drawn on warp) and started tapped it against another paint brush to get splatters everywhere. I masked the girl since I was pretty sure she'd blend in too much if she got splattered too.
After the ink was dry, I removed the mask and went in with the white Gelly Roll again to make some stars here and there; mostly just because I wanted to since the original book cover only has dots.
I left it at that for the night since it was almost 3 and I was tired, but I came back to it the next day and racked my brain for a bit since it felt like it was missing something.
I ultimately ended up putting the mask back on the girl and used my pastel blue PanPastel to create a glow effect around her.
After that, I scanned it and did make some minor adjustments in Photoshop (mostly color correction, but there were a couple of black lines of shadow around the edge of the jar since it was still a separate piece of paper on top of the other one at the end of the day. And here we are.
It's still not perfection, but I am ultimately happy with it since I think I got the look I was after in the end. Plus, I think I capture the spirit of the original book cover's style pretty well
____
Artwork (c) me, MysticSparkleWings
I do not own How to make Friends with the Dark or the cover art
____
Where to find me & my artwork:
My Website | Commission Info + Prices | Ko-Fi | dA Print Shop | RedBubble | Twitter | Tumblr | Instagram
1 note
·
View note
Text
did i build a ship to wreck?

its a wonder what you can accomplish while playing florence & the machine on repeat while fucking around in cps. i think i finally figured out a method of shading that i like! which is cool because i do not like the texture of the watercolor brushes. the gouache ones are good though.
not much to this, just want to draw a really cool pose of malikite. fun fact: dragon blood is often the same color as their eyes :) just because mali’s scars are blue doesn’t mean he’s exempt from that rule either. i wonder who’s blood he has all over him...
also, he technically should have wing clips if he’s still in the pit with that collar but i got lazy and didn’t feel like drawing chains n shit. so let’s just say a good chunk of this is half of a study, half symbolism. twas really fun to draw though :)
#oc#oc art#oc artwork#oc drawing#oc illustration#art#artwork#drawing#illustration#digital art#digital artwork#digital illustration#dragon#dragon art#dragon artwork#dragon drawing#dragon illustration#fantasy#fantasy art#fantasy artwork#fantasy drawing#fantasy illustr#character study#original character#malikite
1 note
·
View note
Photo

I’m still extremely proud of how this piece turned out, so I’m just going to include my process on how I did this piece below for anyone that’s curious!
First step is the sketch
Now this is a heck of a lot more cleaned up as I needed to know precisely how I was going to line everything. At this point the wings and how I pieced out the hair weren’t really solidified and I didn’t actually decide on those things until I was in the process of lining.

The next step was the lining.
I always start off lining the face and then the body/clothes, and then line the hair. The hair is always last because I want to see how it’s going to move with the figure and how I’ll need to draw it if it’s going to rest on any body parts or the like. With Anthea’s hair I actually made the tighter curls look like roses unintentionally.

Base color and base shading.
This step is for me to plan and see where most of my light source is coming from and to also figure out how the shadows are going to fall. This is just a really rough sort of shading and the next step is where I’ll smooth and render things further. I use a combination of my regular brush and then follow up with my watercolor brush to help me get a soft shaded look.

Detailed shading
I used to just stop at the previous step for shading, however with this piece having such a dynamic light source, I felt it was necessary to go in with further detail on the shading. It really brought out more of the depth that I was looking for, such as the shadows on the faces from the hair interacting with it, the shadows on Felix’s arm from Anthea’s face, and just anywhere else there might be shadows.

Base highlights
This is where the fun happens for this piece and where the light source from the halo and the secondary light source really comes out to play. This was also here I added the tears to the piece. At this point I can see if I shaded too harshly or too little and can go back in and add or subtract any details.

Detailed highlights
This is where I put the finishing touches on things. and draw out any of the highlights further. and add shine to things that might need more illumination. On this piece I added more shine to the wings and a bit more shine to the hair and horns. I also go through each layer to ensure that things are cleaned up.

Finished
At this step I’ve added any other color filters along with my texture layer, and signature before posting.

Additional detail shots:


24 notes
·
View notes
Text
My name is Cheryl Hodges, and I’m primarily a botanical artist from Jerrabomberra, Australia, near Canberra. I’ve been painting plants in watercolour for 20 years. In recent years, I have also ‘branched out’ into insects. My work is fairly detailed, in fact I’ve always been a detail person, which is why I think I was drawn to botanical art in the first place. After many years of creative pursuits, I did a one-day workshop in botanical art and it was just like a perfect fit. Finally, I was not only ‘allowed’ but encouraged to embrace the detail in my subject.
Botanical art is a great way to show the life cycle of a plant, which you can’t usually capture in one photograph. I love getting to know my subjects – I don’t have a botanical background so I usually learn about the plant as I’m painting it. Even if I’m not painting a ‘scientific’ style painting, I will always aim for botanical accuracy.
I do like to try slightly different approaches to my botanical art. One of my most scientific paintings was of a Dianella plant from my garden. I was able to view it over many months, and take pieces, dissect them, view them through the microscope, and paint all the plant parts and different stages of the life cycle.
Another theme of my paintings is ‘collections’ and I’m drawn to the work of Joris Hoefnagel and Jan van Kessel, Flemish painters from the 16th and 17th centuries. My painting Australian Native Collection was inspired those artists. It is on calf-skin vellum, a tricky surface but has a certain ‘glow’ which is beautiful.
I really love painting Australian native plants, and I think art is a nice way to raise awareness of our incredible range of flora. I am a member of a painting group at our Australian National Botanic Gardens and we are fortunate to be able to paint specimens which the rangers have collected from the Gardens (you aren’t allowed to pick these yourself). The variety of plants we see is wonderful, and we also hold an exhibition so that the public can also be inspired by our native plants.
My Process
In botanical art, preparation is key. I research the plant, observe the plant, sketch it, work out the composition, finalise all of that before I even touch the watercolour paper.
I generally start my paintings with a wet-in-wet approach. This gives great coverage and beautiful blending, and I can build up a few layers this way, with different colours showing through the layers. Then I paint wet-on-dry, building up more colour and tone, while being careful to still keep the paint fairly wet.
When it comes to adding the detail, my paint is getting ‘dryer’ – less water, more pigment. When I get to the final details, I am using a very fine brush (down to 0000) and what is called ‘dry brush’ technique – which is actually a damp brush and the ‘dryer’ paint. The hardest part when adding all this detail, is knowing when to stop!
Materials
I like to paint on Arches 300gsm hot pressed paper (hot pressed, or smooth is very important for achieving the detail required for botanical art). I use mostly Winsor & Newton artist quality paints from a tube, and some Daniel Smith. I use sable brushes (Raphael brand) a lot but occasionally use synthetic, they are cheaper, but don’t tend to last as long.
Painting Insects
When I started painting insects a few years ago it was a steep learning curve for me – especially those shiny, iridescent beetles. When I’m painting the elytra (wing case) of a shiny beetle, it’s almost abstract and I get lost in the patterns, colours, and high contrast. I really love painting moths and butterflies, those scales and hairs require a lot of dry brushing, which I find very therapeutic.
Again, because I like the detail, I view my insects through a microscope. It’s really the best way to figure out what’s going – along with consulting reference books, websites. Also, Facebook groups are really useful for obtaining information from clever and generous individuals.
Many of the insects in my collection are found dead in my garden or when I go walking, and people bring me ‘dead bugs’ – I love it! Insects that we think are ‘boring’ are absolutely fascinating when you look at them through the microscope – I really think everyone should have one.
Teaching
I started teaching botanical and insect illustration a few years back. It is really rewarding seeing the students’ confidence grow, along with their skills. People are always better at painting than they think they will be.
Really, anyone can do it. The ‘I can’t draw a straight line’ doesn’t wash with me – I can’t draw a straight line either! And I’m really bad at Pictionary because I can’t draw quickly. There is so much information available to us now, such as Doodlewash and other online resources – people should just give it a go. And practice!
Online Tutorial
I have taken a break from teaching for a while, but I get a lot of enquiries about classes. For this reason (it’s been on the ‘to do’ list for a couple of years) I have created an online tutorial. Being in Australia I decided to focus the tutorial on our iconic Eucalyptus leaves.
They are a great subject for practising the different techniques, and I have a troubleshooting section which addresses common issues in watercolour painting. Eucalyptus leaves are a great subject for painters of all skill levels. A simple wet-in-wet leaf can look stunning, or you can take it all the way to a really detailed study. These leaves usually have some imperfections caused by disease or insects, and it’s actually quite fun to incorporate those into your painting. They don’t look real if they are ‘perfect’.
Be Inspired
Looking back over the last 20 years of painting, I have some great memories. Being involved in art committees, helping organise exhibitions, maintaining websites, designing promotional material, etc. There are always volunteers required in the art community and it’s a nice way to get involved and give back. I’ve met so many wonderful people interested in plants and art.
Once you start paying attention to the natural world around you, it’s impossible to stop. I’m inspired by most things in nature, from a pretty flower to a chewed leaf or tiny gumnut. Painting nature is a fantastic way to increase your appreciation of it. Be inspired!
It’s been fun sharing my story with you, and thanks to Charlie for giving me the opportunity. If you would like to know anything more, I’d love to hear from you. I hope I’ve inspired you to have a go at botanical painting!
Cheryl Hodges
Website
Instagram
Facebook
Youtube
Online Tutorial (on Udemy)
GUEST ARTIST: “The Perfection (and Imperfections) of Nature” by Cheryl Hodges - #doodlewash #WorldWatercolorGroup #watercolor #watercolour #botanical My name is Cheryl Hodges, and I’m primarily a botanical artist from Jerrabomberra, Australia, near Canberra. I’ve been painting plants in watercolour for 20 years.
#WorldWatercolorGroup#artist#botanical#botanical illustration#Botanical Painting#Botanical Painting Process#doodlewash#featured#Flower Botanical Painting#painting#watercolor#watercolour
0 notes
Text
In light of social distancing precautions, we all are ending up with some unexpected downtime. It can certainly be discouraging and frustrating, but we can also use this time to our advantage to bring something positive out of a negative situation. I will be posting some simple tutorials on a regular basis over the next couple weeks. The best thing to do when things are uncertain is to occupy your mind, especially with something creative. Let’s have some fun!
To create this owl, you will need:
Watercolor paper (I used a 6×6″ piece, but you can work bigger if you’d like as well)
3 Paint colors: Grey (or if using black add a lot more water to lighten it), Burnt Umber (or any dark brown), and Raw Sienna (or any bright, warm brown)
A large (I used size 8), medium (I used size 5), and detail (I used size 0) round brush (The brushes that come to a point at the end).
A medium size flat brush (The brushes with rectangular bristles, flat on the end).
A pencil
Optional: Black liner pen (Like a fine point Sharpie!)
Start with a light pencil outline made from basic shapes to guide your painting. Draw a circle for the head, a teardrop shape coming diagonally out from that circle for the body, and another smaller teardrop shape sticking out from the bottom center of the body for the tail feathers.
Using your large round brush, water down your raw sienna paint – you do not want this first layer too dark. Following the shape of the body keeping all your brushstrokes in the same direction flowing downward, fill in the wings, leaving the head and the chest white for now.
Using your detail brush, make some jagged up-and-down strokes with a watered down grey along the front of the chest, underneath the head, and along the back of the neck.
Rinse off your detail brush, and using the same brush strokes go over your grey you just added to the chest and neck with water. This will help blend the grey so your transition from grey to white is more gradual, and you end up with a soft, feathery look. Next, using your detail brush and watered down grey, outline a pointed “U” shape in the center of the face. Make some radial brush strokes sticking out from the top of the U where the eyes will be using your detail brush.
Still using your detail brush, add some radial strokes along the outside edge of the head, including one ray down the center from the top pointing to the beak. Add some grey to fill in the end of the beak. Rinse off your brush, and lightly brush over what you just added with a damp brush to blend it.
Continuing to use your detail brush, add a border around the head with raw sienna using short, radial strokes pointing inwards towards the face. Don’t forget the widow’s peak up top :)! Water down your raw sienna a bit more, and add some of this pale warm brown to the area where the eyes will be, using radial brush strokes again pointing outward from the top of the U shape.
Next, we are going to start adding texture to the feathers. Dip your medium round brush in some raw sienna with a little less water so the coverage is a bit darker than the base underneath. Stamp up and down over the entire area to create blots of color (This is called stippling.).
Do the same thing overtop while the raw sienna is still wet with the burnt umber on the top section of the wings. Add a bit of water to your umber first, but you still want it to be pretty dark.
Then, use your detail brush to create some thin outlines in burnt umber. Hold your brush at a 90 degree angle to your paper and use a light touch, hardly pressing down at all as you drag your brush to create thin lines. Create a darker outline around the inner edge of the raw sienna outline around the face. Outline the wing, and add some lines to the bottom section of the wing and tail feathers following the direction of the shape.
Still using your detail brush and burnt umber, make some groupings of short, vertical brush strokes to create striping in the wing and tail feathers in between the lines. Make them jagged and uneven for a more realistic feathery look.
Next, using your flat brush add some more water to your burnt umber. Using the width of your brush, drag a diagonal line underneath the owl starting at the bottom of the chest.
Go back to your detail brush, and grab some burnt umber with a little less water mixed in so you get a darker color. Add some short streaks of this darker shade over the post while it is still wet. Then, using the very tip of your brush, lightly add some speckled dots over the chest. Less is more! You still want to see mostly white.
Now for the finishing touches! Use your detail brush to create a hooked shape with the burnt umber for the talon. Use your medium round brush to add a dark burnt umber feather shape visible from behind, between the tail feathers and the post. The last step is the eyes. Create a downward slanted football shape in the area we shaded for the eyes. You may use your detail brush to fill in the eye in grey or black, but you can also use a black liner pen for a little extra control. Be sure to leave a small circle open near the top of each eye for the reflection – This is what really makes your owl look alive!
I hope you’ve enjoyed this tutorial! If it didn’t come out exactly how you expected the first time, remember it just takes practice and the goal is experimenting and fun. No matter the outcome, you know more than before you started!
You don’t have to use natural colors for this project either. I think it would be fun to try a whimsical, fantasy owl in wild colors like purples, oranges, magenta, lime green … There are no rules! If you feel like sharing, post a picture in the comments of how yours turned out and as always, if you have questions don’t hesitate to ask! Stay safe everyone!
Barn Owl Watercolor Tutorial In light of social distancing precautions, we all are ending up with some unexpected downtime. It can certainly be discouraging and frustrating, but we can also use this time to our advantage to bring something positive out of a negative situation.
#art#art lesson#barn owl#birds#how-to#nature#owl#painting#quarantine#social distancing#step by step#tutorial#watercolor
0 notes
Text
Hi guys!
I recently made a post about my experience at New York Fashion Week a few weeks ago and if you haven’t read it yet, visit the post here. For my last show of the season, I had the opportunity to borrow a bag from the brand Dooz, which is co-founded by Rachel Borghard and Mia Kazovsky who graduated from Pratt Institute Fashion Design. As a Pratt student myself, I felt that this collaboration was meant to be! I borrowed the Pisces Céleste Bag in lime green for the Hogan McLaughlin show. I talk more about how I met them and how I style the bag in an article on their brand blog called The Scope. The article is called A Day in the Life of a Pisces – Sophia Kountakis and I go through my experience during Fashion Week, explain makeup tips, and show how I style my outfits. Read the article here. I am super proud of this and I am very thankful for getting the opportunity to borrow this adorable bag and have an article published.
An excerpt of the article is below along with photos from the shoot I did with the bag.
____________________________________________________________________________________________
A Day in the Life of a Pisces – Sophia Kountakis
The morning of Saturday, September 7 is my first day attending NYFW. As a fashion and beauty micro-influencer, I am fortunate to attend a few fashion shows – something I’ve always dreamed about. I have my outfits planned out and the makeup looks to go with them. I am a Pisces, so naturally I gravitate towards sea and ocean-themed everything. My look for today is blue and green with neutral hues to balance out the colors. I recently found out my ascendant and moon signs are in Scorpio, which means I’m all water!
9AM – I wake up nervous – I have a lot to do before my first show at noon! First order of business: take photos for a Glossier giveaway and post it to instagram. I’m currently a Glossier Affiliate, which is super exciting because it’s a goal I have been working hard to achieve. I love what Glossier stands for, “Skin first, makeup second”, and I totally believe in that. I purchase a lot of Glossier on my own, so it’s nice to receive a small amount of revenue when people purchase through my links. I create weekly tutorials on Insta-stories and occasionally post tutorials on IGTV.
10AM – So, let’s get into it! I do a “Get Ready With Me” makeup tutorial via Instagram stories to show how I coordinate my beauty look with my first outfit. I use eyeliner to create a graphic blue shape that comes across my crease. My pro tip: draw small lines while looking straight ahead at the mirror. Don’t move the skin around your eyes or tilt your head too much, this distorts angles of the liner. If you have hooded eyes, draw over the fold of the eye while looking straight to create a continuous wing. I always ground my arms to a desk for stabilization and just take my time. If I mess up, I clean it with concealer or a Q-Tip.
Now, back to the outfit… My dress is from COS and has a blue and green watercolor print. My heels are from Marais USA and my bag is a pale blue Mansur Gavriel Lady Bag. My earrings are also pale blue and they are made from polymer clay from the brand Kitsu. In other words, I am a living, breathing, water sign for the first show – how Pisces of me.
11AM – I finish getting ready and head to Chelsea to see the Nolcha shows. As a creative person, it completely fulfills a part of me to witness design, fashion, and humans come together to create a piece of work that can be seen, touched, and interacted with.
12PM – The show starts! This particular show was from a Chinese designer. It’s so fascinating to see fashion trends from other countries because they see fashion through a completely different lens.
12:15PM – After the show, I go outside to take photos of my outfit with my trusty photographer, aka my boyfriend! My boyfriend is a fellow Pisces, and I feel lucky that we get to create images together. We see each other’s direction and he understands my vision for an outfit, while pushing me to try different things.
2PM- Finally back at my apartment in Brooklyn to eat a late lunch.
3PM – I get back on Instagram stories to transition my makeup for the next look. I fill in my eyeliner to create a very thick, blue, graphic, winged eyelid. I apply cobalt blue eyeshadow with a small flat brush and carefully fill in the lines from the eyeliner. I do this until the shadow is about half way through my lid, then I add some iridescent white eyeshadow and blend it with the blue shadow so to create a gradient across my lid. I touch up the rest of my makeup from the morning by going over it with some foundation powder to take away any oil or creasing. Simple as that!
4PM – I change into my next outfit, which is much more simple and sophisticated. My top is very formal and completely hides my figure. I love how fashion can distort the human body.
5PM – I head to the Target 20th Anniversary Pop-Up on the Upper East Side. Target brought back all of their designer collaborations from the past years, so I went shopping for some Missoni items.
7PM – I rush back downtown to Pier 59 to attend my last set of shows for the night at Oxford Collective Design Studio, where multiple designers show their collections at once. There were six different small designers, and the outfits were interesting and simple.
9PM – Dinner date with my boyfriend at Boucherie, a French restaurant, where we unwind, drink lots of wine, and reminisce about the busy day we had!
Sunday, September 8 is my day of rest. I really need some downtime to refuel my energy and collect my thoughts.
Monday, September 9 is my last day of NYFW!
9AM – I wake up and plan my outfit for the day. I want to wear something dreamy with a simple cut. When researching designer Hogan McLaughlin, whose show I’ll be attending tonight, I learn that he designs a lot of long hems and simple cuts. To compliment his aesthetic, I choose a simple, long t-shirt dress and pair it with some red croc-embossed boots for a fun pop of color.
Now for the fun part – makeup! I want to create a natural, feminine look for today. I start with a pink shadow for the base of my eyelid and then layer a shimmer shadow on top. I love shimmer tones in all colors and intensities because they make anyone’s eyes pop!
Processed with VSCO with au1 preset
Processed with VSCO with au1 preset
Processed with VSCO with au1 preset
Processed with VSCO with au1 preset
Processed with VSCO with au1 preset
Processed with VSCO with au1 preset
Processed with VSCO with au1 preset
Processed with VSCO with au1 preset
Processed with VSCO with au1 preset
Processed with VSCO with au1 preset
10AM – I head to pick up my Dooz Pisces Céleste Bag, which I’m borrowing for the show tonight! I’ve been eyeing this piece for a while – I love its lime green color because it matches all of my ensembles for the weekend. I meet up with Rachel and Mia, the co-founders of Dooz, at Cha Cha Matcha and I discover that they are Pratt Institute alumni. I’m currently a grad student at Pratt, so I think to myself, “this was meant to be!” We discuss our day, get to know each other’s zodiac signs, and talk about the show I am attending tonight. I can’t wait to showcase this bag!
12PM – Lunchtime with my friend. A creative mind has to eat!
2PM – 5PM – Back at school and time for my studio class at Higgins Hall, which is where all the architecture students design and construct. Right now in studio, we are doing research for a civic center. This year is the experimental studio, so we are diagramming our research instead of presenting it as a written survey. My professor is currently living in Switzerland, so we Skype call him for class – gotta love technology! The session is very quick, but we have lots of corrections to make before next studio class on Thursday.
6PM – I rush back to Manhattan to catch the Hogan McLaughlin show at Pier 59! I love every single outfit that comes down the runway. The collection has structure, color blocking, geometric cuts, and different materials pieced together. I get to meet some influencers I follow on Instagram and I even come face to face with Kelly Cutrone in the second row! I take photos of every runway show I attend because I find it fascinating to capture the movement within a split second.
7PM – Home and I cook myself some pasta to reward myself for a long weekend.
10PM – Ahh, bedtime at last! A Pisces needs to sleep well in order to take on the rest of the busy week.
____________________________________________________________________________________________
xx
Photos taken by Khue Trinh.
I was a #DoozMuse for Fashion Week! Hi guys! I recently made a post about my experience at New York Fashion Week a few weeks ago and if you haven't read it yet, visit the post…
0 notes
Photo


THE MIRIAM COLLEGE WOMEN’S GALLERY
Last Friday, September 29, 2017, we went to the MC Women’s Gallery for a visit. As we entered inside the building of Miriam College, I can say that the place is already old. Other than that, when we entered inside the MC Women’s Gallery, I can say that the place was rebuild for the little museum to take place. I think that they changed the wall color to white and fixed the place itself, so that the place would look presentable as if it was really a museum. The place of the MC Women’s Gallery have high ceilings, pillars and the wall color which is white, just fits well for a gallery. White is a very versatile color and I think because of that, the artworks in that place stood out very well.
When we went inside the MC Women’s Gallery, there’s actually another section who went there first before us, so we have to wait for a little bit so that the room is not that crowded. The space was very small for a gallery that the other artworks was not hanged properly on the wall, so they just have to put it on the floor. I think that if the place were a little bit wider, it would have been very comfortable. Moreover, the ambiance in that place is really calm, because it also has a perfect lighting depending on the place of each artworks displayed. Lighting also has a very important role in galleries, because it creates a calm vibe when you’re trying to look and understand the meaning of each artworks.
There is only one room for the exhibition. The artworks are also grouped together based on the classifications of its themes and types of work. I noticed that the artworks are not grouped together based on similar sizes or shapes, but instead they are grouped together based on the color, style, and the relation of the story behind each and every piecework. Some of the artworks are at an eye-level and some are not.
There are a total of 40 pieces of artworks inside the gallery and the common display is mainly about women.
Some of the five artists that were featured in the gallery are Katti Sta. Ana and the kind of her work is painting on the box. Some others are Jade Navarro Bengco and Joanne De Leon which they both did a watercolor on paper, while Brenda Fajardo same with Anita Magsaysay-Ho have a similar type of work which is a painting and drawing using of color pencils.
My favorite artist would probably be Jade Navarro Bengco who made the artwork using a watercolor on paper and is called “Guardian of the Islands.” I think that the artwork is all about a Filipina which is considered as the mother of the Philippines that also acts as the guardian of our country. The woman in the picture was wearing a Philippine flag inspired flow-y gown and have an ombré wings with the same color as the flag. Just by looking at the picture, it has its own captivating effect that none of the artworks inside the gallery have, just because the story behind the masterpiece is also beautiful and it can be easily understand by everyone. It actually caught my eye on how beautiful the colors are and how they matched very well together, how it has a very intricate design, and the different types of brush strokes used by the artist. It truly showed all the hardwork and effort the artist put, just to produce a very aesthetic and such a beautiful masterpiece that represents a Filipina which also acts an angel of the Philippines.
I think that they should also feature some artworks that represents the real epitome of a Filipina beauty. It is actually one of the most talked about issue in the Philippines right now, knowing that the generation today already have a different view of what the real Filipina beauty is, because it is being covered by the mixture of Eurocentric features of a woman like Liza Soberano.
Overall, my visit in the Miriam College Gallery of Women’s Art made me realize a lot of things. I realized once again that we have A LOT of genius, very talented and true artists that presents beautiful artworks and a world-class masterpiece. It is nice to know that just by visiting galleries and museums is very therapeutic and the place itself is also very Instagram-worthy. Truly, it was very fun and I am glad that I was able to see beautiful pieceworks by such talented people and that I experienced that moment with my classmates.
CN 19 • ROCHELE PERALTA
12 — Orosa
0 notes
Last Seen Blogs

pewpewae
Onion Zest With Garlic Zest
honestly-for-what
Pingu The Conqueror

nhathuoc24h
Untitled

pleasebitmytits
smoking nudes