#troubleshoot BitLocker protection
Explore tagged Tumblr posts
Visit Tumblr Blog
Explore Tumblr blogs with no restrictions, modern design and the best experience.
Last Seen Tumblr Blogs


Fun Fact
Forty percent of Tumblr users are between the ages of 18 to 25.
Text
BitLocker Protection off: Update UEFI/BIOS to fix issues
When BitLocker Protection is “off” means that BitLocker encryption is currently disabled on the drive. In my case, it is disabled and the encryption did not succeeded in the first place. Therefore, we will limit our solution to this use-case. In this article, we shall discuss “BitLocker Protection off: Update UEFI/BIOS to fix issues”. Please see How to Disable BitLocker on Windows 10, how to…
#BIOS firmware and BitLocker fix#BIOS update BitLocker error#BIOS update causes BitLocker issue#BitLocker issue after BIOS update#BitLocker protection off#BitLocker protection troubleshooting#disable BitLocker for BIOS update#enable BitLocker after BIOS update#fix BitLocker problems#resolve BitLocker and UEFI issues#secure UEFI BIOS update#troubleshoot BitLocker protection#UEFI BIOS update for BitLocker#update UEFI BIOS for BitLocker#Update UEFI/BIOS to fix issues#Windows#Windows 10#Windows 11#Windows Server#Windows Server 2012#Windows Server 2016#Windows Server 2019#Windows Server 2022
0 notes
Text
Revolutionize Your Workday with Windows 11 Pro
Embrace the Next Generation of Productivity with Windows 11 Pro
In today’s rapidly evolving digital landscape, staying ahead requires tools that are as innovative as the work you do. Windows 11 Pro stands at the forefront of this revolution, empowering modern professionals to achieve more with less effort. From enhanced security features to seamless collaboration tools, Windows 11 Pro is designed to elevate your productivity to unprecedented heights. buy windows 11 pro license key and unlock a new era of efficiency and security.
One of the standout features of Windows 11 Pro is its advanced security measures. With built-in support for BitLocker encryption, your data remains protected from unauthorized access, whether you're working remotely or in the office. Additionally, the operating system offers robust security protocols that safeguard your digital workspace against evolving threats, giving you peace of mind to focus on what truly matters.
Remote work has become an integral part of modern business operations. Windows 11 Pro simplifies this transition by providing seamless remote desktop capabilities, allowing you to connect to your work environment from anywhere in the world. This flexibility not only enhances productivity but also fosters a healthier work-life balance, empowering professionals to manage their tasks efficiently without being tied to a specific location.
Beyond security and remote access, Windows 11 Pro introduces a suite of productivity features tailored for the modern professional. The new Start menu design, integrated Microsoft Teams, and Snap Layouts enable you to organize your workspace effortlessly. Multitasking becomes a breeze, with features that allow you to switch between tasks swiftly and efficiently. Whether you're managing multiple projects or collaborating with team members, Windows 11 Pro streamlines your workflow to maximize output.
The operating system's intuitive interface and enhanced performance capabilities also mean that your applications run smoother and faster. This ensures that you spend less time troubleshooting and more time creating, innovating, and leading. For businesses looking to upgrade their systems, Windows 11 Pro offers a scalable solution that adapts to growth and changing needs.
Furthermore, Windows 11 Pro is optimized for the latest hardware technologies, including support for high-resolution displays and touch-enabled devices. This makes it an ideal choice for professionals who require versatility and responsiveness in their devices. Whether you're working on a sleek laptop or a robust desktop, Windows 11 Pro provides a consistent and reliable experience.
In conclusion, the future of work is here, and Windows 11 Pro is the catalyst for transforming your productivity landscape. With advanced security, remote connectivity, and innovative features, this operating system is tailored for the modern professional seeking efficiency and security. Don't miss out on the opportunity to supercharge your work environment—buy windows 11 pro license key today and step confidently into the future of work.
0 notes
Text
Maximize Business Performance with a Dedicated Server with Windows – Delivered by CloudMinister Technologies
In the era of digital transformation, having full control over your hosting environment is no longer optional—it’s essential. Businesses that prioritize security, speed, and customization are turning to Dedicated servers with Windows as their go-to infrastructure solution. When you choose CloudMinister Technologies, you get more than just a server—you get a strategic partner dedicated to your growth and uptime.
What is a Dedicated Server with Windows?
A Dedicated server with Windows is a physical server exclusively assigned to your organization, running on the Windows Server operating system. Unlike shared hosting or VPS, all the resources—CPU, RAM, disk space, and bandwidth—are reserved solely for your use. This ensures maximum performance, enhanced security, and total administrative control.
Key Benefits of a Dedicated Server with Windows
1. Total Resource Control
All server resources are 100% yours. No sharing, no interference—just consistent, high-speed performance tailored to your workload.
2. Full Administrative Access
You get full root/administrator access, giving you the freedom to install applications, manage databases, configure settings, and automate processes.
3. Better Compatibility with Microsoft Ecosystem
Run all Microsoft applications��SQL Server, Exchange, SharePoint, IIS, and ASP.NET—without compatibility issues.
4. Advanced Security Options
Use built-in Windows security features like BitLocker encryption, Windows Defender, and group policy enforcement to keep your data safe.
5. Remote Desktop Capability
Access your server from anywhere using Remote Desktop Protocol (RDP)—ideal for managing operations on the go.
6. Seamless Software Licensing
With CloudMinister Technologies, Windows licensing is bundled with your plan, ensuring legal compliance and cost savings.
7. Scalability Without Downtime
Need to upgrade? Add more RAM, switch to SSDs, or increase bandwidth—without migrating to another server or experiencing downtime.
Why Choose CloudMinister Technologies for Windows Dedicated Servers?
At CloudMinister Technologies, we combine performance with personalized service. Our infrastructure is engineered to support the demands of startups, growing businesses, and large enterprises a like.
Our Competitive Edge:
100% Custom Configurations Choose your ideal specs or consult with our engineers to build a server optimized for your application or business model.
Free Server Management We manage your OS, patches, updates, firewalls, backups, and security—so you can focus on your business, not your backend.
High Uptime Guarantee With our 99.99% uptime commitment and redundant systems, your server stays online—always.
Modern Data Centers All servers are housed in Tier III or higher data centers with 24/7 surveillance, redundant power, cooling, and robust firewalls.
Rapid Deployment Get your Dedicated server with Windows up and running quickly with pre-configured setups or same-day custom deployment.
Dedicated 24/7 Support Our expert team is available any time, day or night, to troubleshoot, consult, or provide emergency support.
Additional Features to Boost Your Operations
Automated Daily Backups Protect your data and ensure business continuity with secure, regular backups.
DDoS Protection Stay secure with advanced protection from distributed denial-of-service attacks.
Multiple OS Choices Prefer Windows 2016, 2019, or 2022? Choose what suits your stack best.
Control Panel Options Get support for cPanel, Plesk, or a custom dashboard for simplified server management.
Private VLAN and IPMI Access Enjoy better isolation and direct console access for advanced troubleshooting.
Call to Action: Start with CloudMinister Technologies Today
Your business deserves more than just a server—it deserves a partner who understands performance, uptime, and scalability. With a Dedicated server with Windows from CloudMinister Technologies, you're guaranteed a seamless hosting experience backed by unmatched support and reliability.
Don’t wait for slow speeds or security issues to hold you back.
Upgrade to a Dedicated Windows Server today.
Visit www.cloudminister.com to view plans Or contact our solutions team at [email protected] to discuss your custom setup.
0 notes
Text
Top Benefits of Dedicated Windows Servers for Enterprise-Level Hosting
In today’s fast-paced digital world, businesses are increasingly reliant on high-performance servers to ensure smooth operations and optimal customer experiences. For enterprises that require scalable, secure, and efficient hosting, dedicated Windows servers provide a range of advantages that can significantly enhance performance, security, and overall business efficiency. In this blog, we will explore the top benefits of dedicated Windows servers for enterprise-level hosting.
1. Unmatched Performance and Reliability
Dedicated Windows servers offer unmatched performance by allocating all of the server’s resources to your business operations. With dedicated resources such as CPU, RAM, and bandwidth, enterprises can achieve superior speed and efficiency compared to shared hosting options. This ensures that mission-critical applications, websites, and services run smoothly without disruptions, enhancing the overall reliability of your business’s IT infrastructure.
2. Enhanced Security
Security is a major concern for enterprises handling sensitive data, and a dedicated Windows server offers a higher level of protection. Since you are the only tenant on the server, there is no risk of data leakage or security breaches from other tenants, which is a common concern in shared hosting environments. Additionally, Windows servers come with advanced security features such as Windows Defender, BitLocker encryption, and integrated firewall protection, ensuring your data remains secure from cyber threats.
3. Customizability and Flexibility
Dedicated Windows servers offer a high degree of customizability to meet your business needs. Enterprises can install and configure software, applications, and tools to tailor the server environment according to specific requirements. Whether it’s deploying custom-built applications or running enterprise-level databases, Windows servers give you full control over your hosting environment. This flexibility ensures that your infrastructure can scale as your business grows.
4. Full Administrative Control
With dedicated Windows servers, you have full administrative control over the entire server environment. You can configure the operating system, install updates, manage security protocols, and make adjustments to your infrastructure without relying on a hosting provider. This level of control enables businesses to optimize their server’s performance and manage resources efficiently, offering an edge in performance management and troubleshooting.
5. Improved Data Privacy and Compliance
For enterprises in highly regulated industries, data privacy and compliance with legal standards such as GDPR, HIPAA, or PCI DSS are crucial. Dedicated Windows servers allow businesses to implement stringent privacy protocols and ensure compliance with industry regulations. With the ability to configure and monitor server settings, businesses can take steps to safeguard sensitive customer information, reducing the risk of legal liabilities.
6. Better Scalability
As enterprises grow, their hosting requirements often evolve. Dedicated Windows servers provide a scalable solution that can grow with your business. Whether you need more storage, additional CPU power, or enhanced memory, you can easily upgrade the server’s capabilities to meet changing demands. This scalability ensures that your IT infrastructure is prepared for growth and can handle increasing traffic, transactions, or data storage without performance degradation.
7. Optimal Software Compatibility
Many enterprises rely on specific software, such as Microsoft applications, enterprise resource planning (ERP) systems, and customer relationship management (CRM) tools. Dedicated Windows servers are designed to seamlessly integrate with these applications, providing optimal compatibility and performance. With a Windows-based server, enterprises can ensure that their software runs at its best and receive timely support from Microsoft when needed.
8. 24/7 Technical Support
Dedicated Windows servers often come with premium technical support from hosting providers. This support ensures that any issues or concerns are addressed promptly, minimizing downtime and disruptions to your business operations. Whether it’s a hardware issue, software configuration problem, or network disruption, expert support teams are available around the clock to resolve issues quickly, allowing your business to focus on core activities without worrying about server maintenance.
9. Cost-Effectiveness in the Long Run
While dedicated Windows servers can have higher upfront costs than shared hosting or cloud services, they can be more cost-effective in the long run. By providing you with more control over your resources, you can optimize server performance and reduce unnecessary costs. Additionally, dedicated servers can handle more traffic and data, potentially reducing the need for additional servers and associated maintenance costs. For enterprises with high traffic volumes or data-heavy applications, the return on investment is significant.
10. Improved User Experience
Performance, uptime, and security all play a crucial role in providing a positive user experience. With dedicated Windows servers, enterprises can ensure high availability and a seamless experience for users accessing websites, applications, or services. Faster load times, uninterrupted services, and secure transactions contribute to an enhanced experience, which in turn boosts customer satisfaction and loyalty.
Conclusion
For enterprises that require robust, secure, and scalable hosting solutions, dedicated Windows servers are an excellent choice. They offer superior performance, advanced security, full control, and the flexibility needed to support growing businesses and complex applications. By investing in a dedicated Windows server, enterprises can ensure their hosting infrastructure is prepared to meet the challenges of the digital age and provide a seamless experience to both employees and customers.
If your enterprise is ready to take advantage of these benefits, consider working with a trusted hosting provider to set up your dedicated Windows server.
0 notes
Text
How To Safeguard Your Laptop: Best Practices

How secure is your Laptop? We know today, that laptops are essential tools for work, study, and personal use. However, they are also vulnerable to cyber threats, data breaches, and physical theft. Whether you’re using your device at home or on the go, following security measures to protect your information is important.
Below are some crucial security tips to keep your laptop safe, especially if you require services like Real Expert Qatar, a trusted laptop service center Doha.
1. Use Strong Passwords
A strong password is the first line of defense against unauthorized access. Ensure your passwords are at least 12 characters long and include a mix of letters, numbers, and special characters. Regularly change your passwords, and avoid using easily guessed information like your name or birthdate.
2. Keep Your Software Updated
Outdated software can have vulnerabilities that hackers exploit. Regularly updating your operating system, antivirus software, and applications is essential to ensure your laptop is protected from the latest security threats. If you face any issues with updates, consider visiting Real Expert Qatar, a trusted Laptop Service center in Qatar for professional assistance.
3. Enable Two-Factor Authentication
Two-factor authentication (2FA) adds an extra layer of security by requiring a second form of verification, such as a text message code or an authentication app, in addition to your password. This reduces the risk of someone accessing your laptop even if they have your password.
4. Use Encryption
Encryption protects your sensitive data by converting it into a secure format that can only be read by authorized parties. You can enable encryption through built-in tools like BitLocker on Windows or FileVault on macOS. In case of any technical issues, Real Expert Qatar, a reputable laptop service center Doha can assist with configuration and troubleshooting.
5. Install Antivirus and Anti-Malware Software
Having robust antivirus and anti-malware software installed is essential for protecting your laptop from viruses, spyware, and other malicious threats. These programs regularly scan your laptop and quarantine any suspicious files. If you notice your laptop behaving unusually, it may be time to consult Real Expert Qatar-laptop repair center Doha for an in-depth inspection.
6. Avoid Public Wi-Fi Without a VPN
Public Wi-Fi networks are often unsecured, making it easy for hackers to intercept your data. If you must use public Wi-Fi, ensure you connect through a virtual private network (VPN) to encrypt your internet connection and protect your privacy.
7. Regular Backups
Backing up your data ensures that you don’t lose important information in case your laptop is lost, stolen, or compromised by malware. Use an external hard drive or a cloud storage solution for regular backups. In case you experience hardware failure, Real Expert Qatar, laptop repair center in Qatar can help with data recovery and getting your laptop back to optimal performance.
8. Physically Secure Your Laptop
When not in use, store your laptop in a safe location. Use a laptop lock to physically secure it if you leave it in public places like a café or library. This helps reduce the risk of theft, especially when traveling or working remotely.
Securing your laptop involves a combination of good digital habits and physical safeguards. By following these tips, you can minimize the risks of data breaches, malware attacks, and theft. For any technical support, whether it’s software updates or hardware repairs, Real Expert Services, a dependable Laptop service center in Doha can help ensure your laptop remains secure and functional.
Protect your laptop, protect your data!
1 note
·
View note
Text
AZ-801: Configuring Windows Server Hybrid Advanced Services
This course teaches IT professionals to configure advanced Windows Server services using on-premises, hybrid, and cloud technologies. The course teaches IT professionals how to take advantage of the hybrid capabilities of Azure, how to migrate physical and virtual server workloads to Azure IaaS, and how to secure Azure virtual machines running Windows Server. IT professionals are also taught to perform tasks related to high availability, troubleshooting, and disaster recovery. Administrative tools and technologies are highlighted, including Windows Admin Center, PowerShell, Azure Arc, Azure Automation Update Management, Microsoft Defender for Identity, Azure Security Center, Azure Migrate, and Azure Monitor. Course AZ-801: Configuring Windows Server Hybrid Advanced Services
Module 1: Windows Server security
This module discusses how to protect an Active Directory environment by securing user accounts to least privilege and placing them in the Protected Users group. The module covers how to limit authentication scope and remediate potentially insecure accounts. The module also describes how to harden the security configuration of a Windows Server operating system environment. In addition, the module discusses the use of Windows Server Update Services to deploy operating system updates to computers on the network. Finally, the module covers how to secure Windows Server DNS to help protect the network name resolution infrastructure. Hardening con Docker
Lesson
Secure Windows Sever user accounts
Hardening Windows Server
Windows Server Update Management
Secure Windows Server DNS
Lab : Configuring security in Windows Server
Configuring Windows Defender Credential Guard
Locating problematic accounts
Implementing LAPS
After completing this module, students will be able to:
Diagnose and remediate potential security vulnerabilities in Windows Server resources.
Harden the security configuration of the Windows Server operating system environment.
Deploy operating system updates to computers on a network by using Windows Server Update Services.
Secure Windows Server DNS to help protect the network name resolution infrastructure.
Implement DNS policies.
Module 2: Implementing security solutions in hybrid scenarios
This module describes how to secure on-premises Windows Server resources and Azure IaaS workloads. The module covers how to improve the network security for Windows Server infrastructure as a service (IaaS) VMs and how to diagnose network security issues with those VMs. In addition, the module introduces Azure Security Center and explains how to onboard Windows Server computers to Security Center. The module also describes how to enable Azure Update Management, deploy updates, review an update assessment, and manage updates for Azure VMs. The module explains how Adaptive application controls and BitLocker disk encryption are used to protect Windows Server IaaS VMs. Finally, the module explains how to monitor Windows Server Azure IaaS VMs for changes in files and the registry, as well as monitoring modifications made to application software.
Lesson
Implement Windows Server IaaS VM network security.
Audit the security of Windows Server IaaS Virtual Machines
Manage Azure updates
Create and implement application allowlists with adaptive application control
Configure BitLocker disk encryption for Windows IaaS Virtual Machines
Implement change tracking and file integrity monitoring for Windows Server IaaS VMs
Lab : Using Azure Security Center in hybrid scenarios
Provisioning Azure VMs running Windows Server
Configuring Azure Security Center
Onboarding on-premises Windows Server into Azure Security Center
Verifying the hybrid capabilities of Azure Security Center
Configuring Windows Server security in Azure VMs
After completing this module, students will be able to:
Diagnose network security issues in Windows Server IaaS virtual machines.
Onboard Windows Server computers to Azure Security Center.
Deploy and manage updates for Azure VMs by enabling Azure Automation Update Management.
Implement Adaptive application controls to protect Windows Server IaaS VMs.
Configure Azure Disk Encryption for Windows IaaS VMs.
Back up and recover encrypted data.
Monitor Windows Server Azure IaaS VMs for changes in files and the registry.
Module 3: Implementing high availability
This module describes technologies and options to create a highly available Windows Server environment. The module introduces Clustered Shared Volumes for shared storage access across multiple cluster nodes. The module also highlights failover clustering, stretch clusters, and cluster sets for implementing high availability of Windows Server workloads. The module then discusses high availability provisions for Hyper-V and Windows Server VMs, such as network load balancing, live migration, and storage migration. The module also covers high availability options for shares hosted on Windows Server file servers. Finally, the module describes how to implement scaling for virtual machine scale sets and load balanced VMs, and how to implement Azure Site Recovery.
Lesson
Introduction to Cluster Shared Volumes.
Implement Windows Server failover clustering.
Implement high availability of Windows Server VMs.
Implement Windows Server File Server high availability.
Implement scale and high availability with Windows Server VMs.
Lab : Implementing failover clustering
Configuring iSCSI storage
Configuring a failover cluster
Deploying and configuring a highly available file server
Validating the deployment of the highly available file server
After completing this module, students will be able to:
Implement highly available storage volumes by using Clustered Share Volumes.
Implement highly available Windows Server workloads using failover clustering.
Describe Hyper-V VMs load balancing.
Implement Hyper-V VMs live migration and Hyper-V VMs storage migration.
Describe Windows Server File Server high availablity options.
Implement scaling for virtual machine scale sets and load-balanced VMs.
Implement Azure Site Recovery.
Module 4: Disaster recovery in Windows Server
This module introduces Hyper-V Replica as a business continuity and disaster recovery solution for a virtual environment. The module discusses Hyper-V Replica scenarios and use cases, and prerequisites to use it. The module also discusses how to implement Azure Site Recovery in on-premises scenarios to recover from disasters.
Lesson
Implement Hyper-V Replica
Protect your on-premises infrastructure from disasters with Azure Site Recovery
Lab : Implementing Hyper-V Replica and Windows Server Backup
Implementing Hyper-V Replica
Implementing backup and restore with Windows Server Backup
After completing this module, students will be able to:
Describe Hyper-V Replica, pre-requisites for its use, and its high-level architecture and components
Describe Hyper-V Replica use cases and security considerations.
Configure Hyper-V Replica settings, health monitoring, and failover options.
Describe extended replication.
Replicate, failover, and failback virtual machines and physical servers with Azure Site Recovery.
0 notes
Text
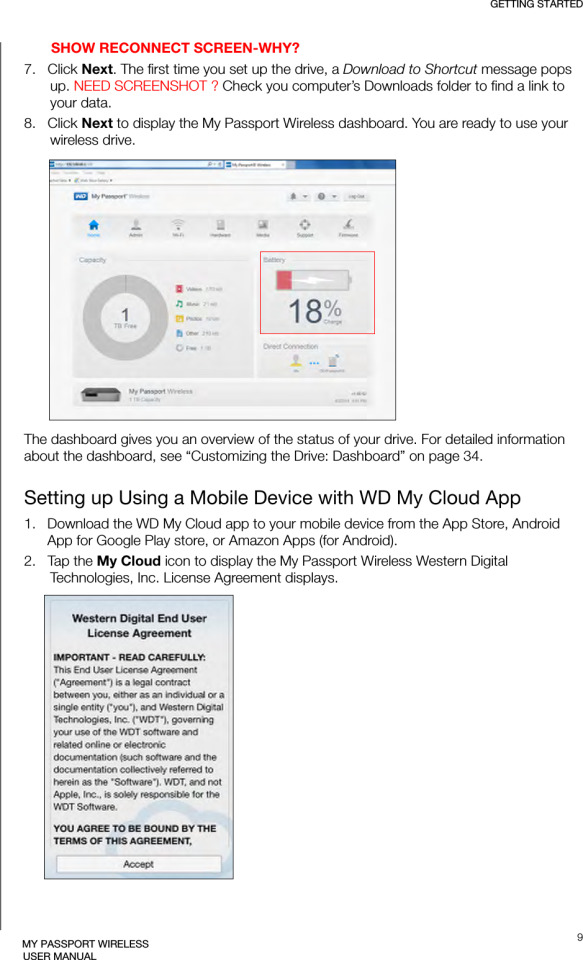
Wd My Passport Ultra Software Download Mac

I have eventually got my personal mac, the problem is I have a WD My Passport portable HD, with all my art, photos, and data I had done with the PC. I wish to copy files from my mac to the drive, it wont allow me. But when I open and copy files from the drive to the mac it works. How do I fix this without formatting the drive?

Summary: Have you received the error: 'The disk you inserted was not readable by this computer' on Mac? Don't worry, this article will focus on how to fix WD My Passport is corrupted or unreadable on Mac. To avoid the loss of important data, you'd better recover lost data from the unreadable WD My Passport with iBoysoft Data Recovery for Mac.
WD My Passport external hard drive is able to work on Mac and Windows for data transferring or backup. It is popular for its auto backup and passport protection features, keeping your files and folders safe. However, there are times that the WD My Passport becomes unreadable or corrupted on Mac. You may be greeted with errors like 'The disk you inserted was not readable by this computer', which prevents you from accessing all data stored on the drive.
Dec 04, 2018 Another difference is My Passport Ultra is USB-C ready, USB 3.0 compatible and formatted for Windows 10 to with plug-and-play storage out of the box. It also includes with NTFS driver for macOS so you can work on macOS operating system without reformatting. While you have to reformat My Passport into compatible file format in order to use it on.
My Passport; My Cloud Home; My Cloud; My Book; Internal Drives / SSDs; WD Elements / WD easystore; Embedded & Removable Flash; WD ReadyView; Legacy & Other Products; Downloads WD Software; Product Firmware; Product Downloads; Warranty & Returns Warranty Services; Warranty Policy; Data Recovery; Shipping Addresses.
List of all WD firmware and software available for download.
It's so frustrating when you meet this issue. If you are struggling to solve this issue, you will find a collection of verified troubleshooting steps.
Table of contents
1. Causes of WD My Passport not readable on Mac error
2. How to fix 'WD My Passport unreadable' on Mac error?
3. Conclusion
Note: If you received the disk not readable error with three options: Initialize, Ignore and Eject, please don't select 'Initialize'. Initializing the drive will erase all of the data that is currently sitting on the drive, which makes it difficult to recover lost data.
Causes of WD My Passport not readable on Mac error
Let's at first take a look at the complaint from community.wd.com:
'My WD My Passport 2TB Portable External Hard Drive has suddenly become unreadable on my laptop (MacBook Pro Server with macOS 10.12 Sierra) and I have tried on a MacBook Pro 2011 running 10.13 High Sierra with the same results. Any suggestions to fix my unreadable WD drive?'
The good news is, even though you have been prompted with an error message, at least your WD My Passport drive is recognized. There are many reasons that can lead to a drive not being readable, but essentially this is because the internal file system is damaged. Some of the possible reasons for this error are described as follow:
Mac malfunctions
Outdated drivers
Faulty connections
Write-protected drive
The WD My Passport is not formatted
An internal file system error or bad sectors
Virus/malware infection to your WD My Passport
Incompatibility issue between your WD My Passport and Mac machine
Accidental interruption or removal of your WD My Passport during transferring data
How to fix 'WD My Passport unreadable' on Mac error?
In most cases, the issue can be repaired with a simple initialize. But this operation will remove all data stored on this drive. Are there any other ways to fix WD My Passport unreadable issue on Mac? Of course, just try these solutions one by one:
Solution 1: Re-insert the WD My Passport
The first and foremost thing is to remove the WD My Passport safely from Mac and then re-plug it into the USB port properly. If the external hard drive mounts and appears on the left sidebar of Finder, then you can access the drive. However, if the WD drive still won't mount or the error persists, continue with the next method below.
Solution 2: Check the Mac computer
The next step is to check whether your Mac machine has a problem or not. Just connect a different storage device to your Mac. If this error still pops up, the problem may refer to your Mac machine, you can restart your Mac to see if everything works well. Otherwise, if you can see the other drive in Finder, the problem is associated with the previous WD My Passport.
Solution 3: Check if the WD My Passport is encrypted
The WD My Passport for Mac corrupted or readable issue can also happen if the drive is encrypted by BitLocker. By default, the Mac computers cannot recognize a BitLocker encrypted drive, which means you are unable to read or write BitLocker encrypted drive on Mac.
You can insert the drive in a PC and then turn off the BitLocker encryption so that it can be read on Mac. In addition, you can access a BitLocker encrypted drive with the help of a third party tool.
Solution 4: Update Mac drivers
Drivers enable one or more hardware devices to communicate with the computer's operating system. If drivers are out-of-date, a variety of issues will happen such as the disk not readable error. Apple handles all system and driver updates for your system. To check if any updates are available, please do the following:
Step 1: Go to Apple menu and select 'App Store'.
Step 2: Click on the 'Updates' button located on the top pane.
Step 3: Check available updates for your system and applications.
Solution 5: Repair the WD My Passport in Disk utility
Disk Utility is a built-in used to erase, format or manage internal disks and external storage devices. The most important feature of Disk Utility is First Aid, which helps detect and repair any issue with your disk. Here is how to run First Aid on your Mac to repair the unreadable WD My Passport:
Step 1: Open Disk Utility from your /Applications/Utilities folder.
Step 2: Select the unreadable WD My Passport in the left side bar.
Step 3: Select the 'First Aid' tab.
If Disk Utility tells you the disk is about to fail, back up your data and replace the disk. You can't repair the disk. Otherwise, continue to step 4.
Step 4: Click Run.
If Disk Utility reports that the disk appears to be OK or has been repaired, you're done. Otherwise, you have to back up as much of your data as possible.
Solution 6: Recover lost data and erase the WD My Passport
If the error still exists, you have no choice but erase the WD My Passport. But keep in mind that you will lose all data store on this disk. If you didn't back up important data, you should get lost data back with free Online data recovery software at first.
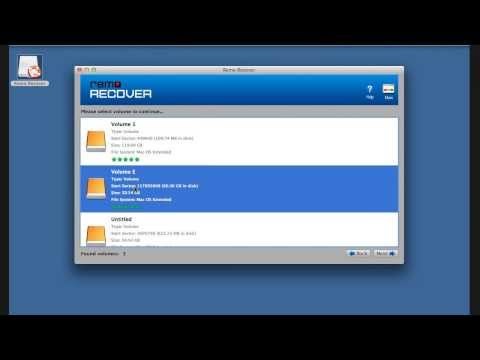
Step 1: Recover lost data from the unreadable WD My Password on Mac
If you are not sure which data recovery tool you can trust, iBoysoft Data Recovery for Mac is highly recommended to recover lost data from the unreadable or corrupted WD My Passport. This free Mac data recovery can scan and recover lost data from unreadable SD cards, internal Macintosh hard drives, external hard drives, USB flash drives, etc. iBoysoft Data Recovery for Mac provides a complete Mac data recovery solution even if your Mac won't boot/turn on, your device is failing, inaccessible or has lost a partition.
Moreover, iBoysoft Data Recovery for Mac can also recover recently or permanently deleted files, recover lost data from formatted hard drives, recover lost data from unmountable hard drives, and recover lost data from inaccessible drives, etc. This software supports recovering documents, photos, videos, emails, and music files. It's fully compatible with macOS Big Sur 11/Catalina 10.15/Mojave 10.14/High Sierra 10.13/Sierra 10.12 and Mac OS X 10.11/10.10/10.9/10.8/10.7.
1. Download and install iBoysoft Data Recovery for Mac on Mac.
2. Launch iBoysoft Data Recovery for Mac.
3. Select the unreadable WD My Passport and click 'Next' to search for lost files.
4. Preview the searching results, choose those you want and click 'Recover' to get them back.
5. Go over to ensure all lost files have been successfully restored.
Step 2: Erase the unreadable WD My Password in Disk Utility
After you get files off the WD My passport hard drive, you are safe to erase this external hard drive to make it work again. Reformatting will fix the unreadable error and the drive can be ready to use. Then you can copy the recovered data back.
• How to format external hard drive on Mac?
Solution 7: Ask data recovery service for help
However, if the solutions above don't fix the WD My Passport unreadable issue for you, or your WD My Passport even won't show up on Mac, it's probably the drive has been physically damaged. In that case, you should send it to a local data recovery service or replace it with a new one.

Wd My Passport Ultra Software
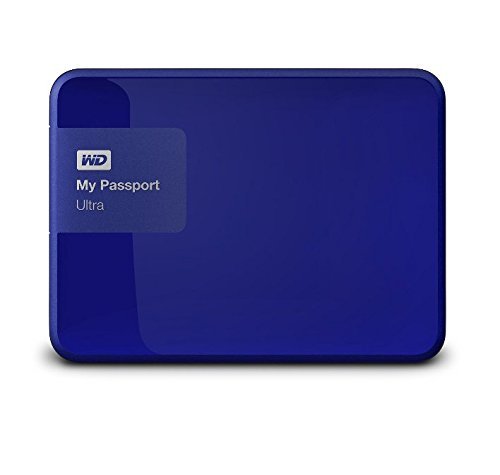
Wd My Passport Ultra Software Download Mac Version
Conclusion
Wd Passport Ultra Software Download
Hope these solutions have helped you fix the WD My Passport corrupted or unreadable issue. If you have any question about this article, stay in touch with us for further assistance. Specifically, we'd love to hear if you have other solutions for this issue.
1 note
·
View note
Text
Key Pieces of Bitlocker
At a while, you can want to switch off the encryption on your external encrypted drive. Briefly, encryption is fundamentally the procedure for making any data unreadable by anyone without proper authorization. After the encryption is done, you may see the status which indicates that BitLocker is on for drive C. The genuine encryption of the drive will be dependent on how large it is and the number of files are on it. There are a number of ways to run BitLocker Drive Encryption. It is a pretty advanced and useful feature of Windows and with the latest Windows 10, it's better than ever. After that, it will be turned off on the specific drive and the data is not protected by Bitlocker any more.
It is possible to get rid of a password only once you configure a new procedure of authentication. You will have to use a password you will provide when the system boots. The only issue is that you need to have a password to unlock the system that was specified when encrypt. The password shouldn't be our issue. Moreover, you must make certain you are utilizing a strong password and preferably multi-factor authentication. For passwords you have to create yourself, I prefer the DiceWare method to create strong passwords that are rather easy to remember and difficult to guess. For the reason, you wish to decide on a strong password for the account on your computer.
Your drive is going to be unlocked for as long as it's connected to your computer, but at some point, you might reboot, or will need to eject it. It is imperative to mention that if you wish to eject the USB drive, you want to click the Eject button in the computer software. Note, it is going to take a while particularly if it's a massive drive. If you wish to decrypt your hard disk, all you have to do is turn off BitLocker. So before you begin to encrypt the hard disk, you must do some particular TPM operations, which we are going to discuss in detail a bit later. With BitLocker, you make a digital hard disk, and encrypt it.
You are able to select several various ways of unlocking the drive. Then decide how you want to back up your recovery key, and last, choose how you want the drive encrypted. If you don't have either of them, it's necessary for you to erase the drive at the price of your experiment data. It's possible to also encrypt different drives than only the system drive. The operating system drive should not be encrypted with Symantec PGP or some other drive encryption technology.
The Unexpected Truth About Bitlocker
When the encryption procedure completes you'll be notified by means of a window. Depending on the size of the hard drive and the amount of data, it can take a long time so be patient. It will repartition the disk as necessary. When you discover that the encryption procedure is finished, the drive level should read BitLocker on. In addition, the procedure for establishing a personal VPN is a tiny complex.

When it's already being used, select the second option Encrypt entire drive. Being on the Internet you may take advantage of the absolute most up-to-date troubleshooters from the Windows on-line Troubleshooting Service. After encryption, nobody is going to gain access to such files till they sign in with your account. Read about the techniques you can utilize to restore access to a disk encrypted with BitLocker, and the way to restore data via an encrypted disk which you may no longer access. Also, if somebody else gains access to your passphrase or key, they will finally have the capacity to decrypt your filesso be certain to store it in a secure spot. Please note that anybody may use the recovery key to access the drive, even in case they do not know the password entered in the prior step, so please don't disclose it to others. To disable eDrive, you require physical accessibility to the drive so you may use the PSID printed on the label.
All About Bitlocker
On way it is possible to safeguard your data is by employing encryption. If you're interested in securing your data on your desktop computer or cellular devices, BitLocker is a wonderful option. DRA keys are used if you should get data off an encrypted drive and there's no wise cart readily available to decrypt. As an example, it refuses to encrypt data if you're using a weak password. The only means to guard your data completely is by utilizing encryption. In case the BitLocker metadata data on the drive is now corrupt, you must have the ability to supply a backup key package along with the recovery password or recovery key. It's now feasible to defeat the Windows Bitlocker with merely a very simple trick.
youtube
1 note
·
View note
Text
Windows 10 Insider Preview Build 18305 released
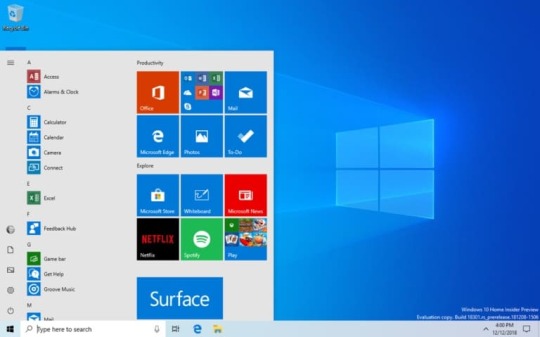
Windows 10 Insider Preview Build 18305 released. A simplified Start layout Tt=he simplified Start layout is part of an ongoing effort designed to enhance your Start experience in the upcoming release of Windows.
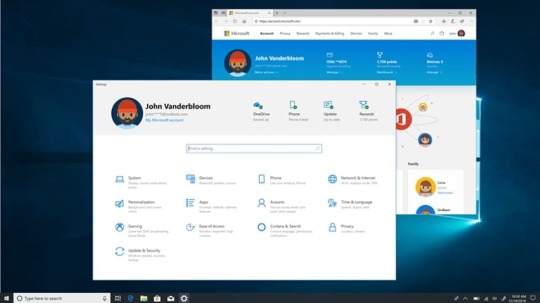
Windows Sandbox Windows Sandbox is a new lightweight desktop environment tailored for safely running applications in isolation. How many times have you downloaded an executable file, but were afraid to run it? Have you ever been in a situation which required a clean installation of Windows, but didn’t want to set up a virtual machine? An isolated desktop environment where you can run untrusted software without the fear of lasting impact to your device. Any software installed in Windows Sandbox stays only in the sandbox and cannot affect your host. Once Windows Sandbox is closed, all the software with all of its files and state are permanently deleted. Windows Sandbox has the following properties: Part of Windows – everything required for this feature ships with Windows 10 Pro and Enterprise. No need to download a VHD! Pristine – every time Windows Sandbox runs, it’s as clean as a brand-new installation of Windows Disposable – nothing persists on the device; everything is discarded after you close the application Secure – uses hardware-based virtualization for kernel isolation, which relies on the Microsoft Hypervisor to run a separate kernel which isolates Windows Sandbox from the host Efficient – uses integrated kernel scheduler, smart memory management, and virtual GPU To install Windows Sandbox, go to Settings > Apps > Apps & Features > Programs and Features > Turn Windows Features on or off, and then select Enable Windows Sandbox. Windows Security app improvements New Protection History experience: The new Protection History experience still shows you detections by Windows Defender Antivirus, but it’s now updated to also give more detailed and easier to understand information about threats and available actions. We have also added Controlled folder access blocks to history, along with any blocks which are made through organizational configuration of Attack Surface Reduction Rules. If you use the Windows Defender Offline scanning tool, any detections it makes will now also show in your history. Additionally, you will see any pending recommendations (red or yellow states from throughout the app) in the history list. We hope you like the changes we’ve made! Introducing Tamper Protection! Tamper Protection is a new setting from Windows Defender Antivirus, available in the Windows Security app, which when on, provides additional protections against changes to key security features, including limiting changes which are not made directly through the Windows Security app. You can find this setting under Windows Security > Virus & Threat Protection > Virus & Threat Protection Settings. Symbols and Kaomoji are now just a hotkey away! When you press WIN+(period) or WIN+(semicolon), in addition to emoji the picker that appears will now include symbols and kaomoji too! You may ask, what is kaomoji? Translated literally from Japanese, it means “face characters” – basically, it’s a way to create faces using only text. You may already use them, for example the one mentioned above is relatively popular: (╯°□°)╯︵ ┻━┻ This experience, originally introduced for Chinese (Simplified) during RS5 development, started rolling out to Insiders across all languages with Build 18252 – as of today’s it’s now available to all Insiders in Fast! Clipboard history gets a new look We originally opted to show bigger entries so there was space to show an image preview nicely, but when we looked at our data, we found 90% of items in the clipboard history were text. Based on that and your feedback, we now optimizing the design for text snippets – shrinking the height of each entry and thus giving you access to more entries without needing to scroll the view. Hope you like the change we made! Copy some text and press Windows logo key + V to check out the updated design. Signing in to Windows with password-less Microsoft accounts If you have a Microsoft account with your phone number, you can use an SMS code to sign in, and set up your account on Windows 10. Once you’ve setup your account, you can use Windows Hello Face, Fingerprint, or a PIN (depending on your device capabilities) to sign in to Windows 10. No password needed anywhere! Creating a password-less phone number account If you don’t already have a password-less phone number account, you can create one in a mobile app like Word to try it out. Simply go to Word and sign up with your phone number by entering your phone number under “Sign in or sign up for free”. Add your password-less phone number account to Windows Now that you’ve created a password-less phone number account, you can use it to sign in to Windows with the following steps: Add your account to Windows from Settings > Accounts > Family & other Users > “Add someone else to this PC”. Lock your device and select your phone number account from the Windows sign-in screen. Since your account doesn’t have a password, select ‘Sign in options’, click the alternative ‘PIN’ tile, and click ‘Sign in’. Go through web sign in and Windows Hello set up (this is what you’ll use to sign in to your account on subsequent sign ins) You can now enjoy the benefits of signing in to Windows with your password-less phone number account. Note: This experience is currently only available for Insiders on Home edition. We’ll let you know when it expands to more editions Streamlined Windows Hello PIN reset experience We know remembering a PIN can be tricky, so we wanted to provide our Microsoft account users with a revamped Windows Hello PIN reset experience with the same look and feel as signing in on the web. Check it out in today’s build by clicking the ‘I forgot my PIN’ link when signing in to Windows with a PIN. Note: This experience is currently only available for Insiders on Home edition. We’ll let you know when it expands to more editions. Keep your device running smoothly with recommended troubleshooting For example, we may recommend turning off a setting that sometimes causes an app or feature to crash unexpectedly until an update is available. We’ll let you know when we can help, and you can choose to run the troubleshooter or ignore it. You can also change how recommended troubleshooting is run on your device by opening Start > Settings > Privacy > Diagnostics & Feedback. You may see recommended troubleshooting from us while we test the feature. These tests, marked as “sample recommended troubleshooter”, are safe to run and will not make any changes to your device. The tests help to ensure that the feature is working as designed and give you an opportunity to give feedback, so we can help keep your device working at its best. Automatic Restart and Sign On (ARSO) for Enterprises Are you tired of seeing these flashing screens after every update? ARSO is a feature that automatically signs-in a user after an update to finish setting up and then locks the PC. This feature is part of our Seamless Update Story for Windows, and its goal is to reduce customer pain points around updates, including things such as post logon set up time and not being able to pick up where you left off. This feature will be enabled on Cloud Domain Joined devices that meet certain security requirements: BitLocker is enabled and is not suspended during the upgrade TPM 2.0 SecureBoot To check if your device will get ARSO go to Settings > Accounts > Sign-in options > Privacy: If the toggle is switched “On” and is not grayed out, then the device meets the security requirements for ARSO, and is enabled by default. If the toggle is grayed out and Enabled, this means that your IT Admin has explicitly enabled ARSO for you, irrespective of your device’s security requirements. If the toggle is grayed out and disabled, this means that you do not meet the minimum security requirements for Enterprise ARSO, or your IT Admin has explicitly disabled ARSO for you, irrespective of your device’s security requirements. Set a default Task Manager tab You can set your preferred tab via Options > Set default tab. Updated Settings Homepage Inspired by the Microsoft account homepage, the Settings home page now has a header at the top allowing you to take quick action for things like signing in and managing your Microsoft account, making the Windows and Microsoft experience better. It also gives you an easy to glance at system status, such as when updates are available.
Friendly Dates in File Explorer Based on your comments, in Build 18305, we’re making it a bit easier to turn off if it’s not your thing – you no longer have to dig through settings, you can now just right-click on the date modified column and toggle friendly dates on and off from there. Friendly dates isn’t yet available for everyone, so don’t worry if you don’t see it just yet – we’ll let you know when it’s live for all. Shadows are back! Shadows are part of our long-term vision of the evolution of Fluent Design, and we’re excited to bring them back to you today after addressing some of the feedback you shared with us following the initial rollout. Re-releasing the new Japanese IME The latest version of the IME has enhanced key customization options and improved candidate window reliability (fixing an issue where it wouldn’t show), and we’re looking forward to you trying it out. Because we want to ensure the best possible typing experience, this will be a staggered rollout – some Insiders will get it today, and we will carefully review both metrics and your comments before pushing the IME out to everyone. Note: We are aware of compatibility issues with some game applications and the team is working on them – we’ll let you know when this has been addressed. Introducing the Office app for Windows 10 The app is a great starting point for Office that helps you easily find all your files in one place or easily access any Office solution available to you. It knows to connect you to the Office rich clients if they are installed on your computer or it will send you to the web version of Office if they’re not. IT will also appreciate the ability to customize the app by integrating other line of business applications that use Azure Active Directory into the experience and apply corporate branding to the app. Get more done with Cortana and Microsoft To-Do Want just one to-do list that works twice as hard for you? Save time and stay organized – Cortana helps by adding your reminders and tasks to your lists in Microsoft To-Do with this feature preview, so you can stay on top of what matters most. Use your voice, your PC, your phone – your choice. Streamline your tasks – your lists and reminders from across Microsoft To-Do, Cortana, and tasks in Outlook can now become one, centrally located in your Microsoft To-Do app. Use Microsoft To-Do anywhere: on your Android or iPhone, with Cortana, or on your Windows 10 PC. You can also access it from the web. It’s automatically synced so you never miss a beat. With this integration, we are furthering efforts to seamlessly sync your to-do lists across Microsoft To-Do, Cortana, and your tasks in Outlook. Read the full article
1 note
·
View note
Text
Wonderful Southeast Asia Trip!
I am finally back from my international trip where I visited three areas, four hotels, and took a gazillion trains. The background: My daughter and I went to Okinawa Japan where my son is stationed with the Army to celebrate his birthday and decided to also visit the main island of Japan and South Korea. This post won’t be a travelogue but I am happy to say we had tremendous fun. I rarely travel internationally–the last time was when I toured the Soviet Union (now Russia et al)–so didn’t know what to expect as far as languages, customs, foreign money, and everything in between. Words can’t express how nervous the whole thing made me (I’m not a brave person) but with my kids’ support, I did it and am happy I did.
A few highlights:
We planned to carry on our luggage and do laundry in the hotels. That often didn’t work as there were strictly-enforced weight limits on flights.
We traveled Delta’s Comfort Plus to and from Japan. This cost more money than Main Cabin but much less than Business Class and turned out to be a wonderful balance of cost and comfort. Check it out next time you take a nine-hour flight.
I worried about phone charges but that was solved by leaving my phone in Airplane Mode the entire time. Luckily, my son had local phone service so we used his.
We stayed in US Military vacation housing. This is discounted luxury hotels they make available to Active and Retired military. It had everything I needed at a fourth of the price.
I bought a Scottevest for the trip with its dozen pockets and RFID protection for carrying my passport, military base passes, wallet, receipts, room keys, phone, headphones, rechargers, medication info, and incidentals. It was a life saver.
The first thing I noticed as I arrived in Narita (the Japanese airport that was our port of entry) was how quiet the terminal was. The people didn’t chatter endlessly as Americans do. That changed when we arrived at Customs and Immigration, thanks to all the foreigners.
Japan and South Korea have few trash cans and still no trash lying around on streets, on trains, on sidewalks. It seems that no one tosses their refuse on the ground. I ended carrying mine around until I came across the rare trash can or a restroom.
Japanese trains are clean, well-maintained, safe, dependable, affordable, and packed with riders.
As one who speaks neither Japanese or Korean, I gained an appreciation for symbols and hand motions. Most signs included a visual of what they meant which was all that save me from complete confusion many times.
The Japanese walk everywhere and do it quickly. Many people older than me passed me up and climbed multiple levels of stairs without slowing down (by the thrid flight, I was stopping to rest). I tracked my steps and floors on a health app and I often exceeded 17,000 steps and over 40 floors. Yikes!
There are trains to take you anywhere you need. Most people don’t commute to work in cars and taxis are horrendously expensive. But, once again–these folks don’t mind walking. The train we’d take to our tours were always at least a half mile from our hotel. Lots and lots and lots of walking.
Many restaurants didn’t offer napkins with the meal. When we asked at one of the eateries, they gave us a box of Kleenex because that was all she had.
I ate 50% more food than normal and lost one pound. Woot!
A few problems–not unexpected on a long international trip:
I lost my Surface Pro laptop on my Air Seoul flight. Multiple phone calls did no good, nor did visits to the airline and airport lost and found. My biggest worry was security. I spent 3-4 hours changing passwords, locking down accounts and the device itself, and then daily checked my Find My Laptop account. It never showed up, nor did anyone try to use it. I found out too late that I should have installed a program called BitLocker that would wipe the device as soon as someone tried to use it. I still had my phone so became adept at doing everything (like getting boarding passes) from my phone. Sigh.
‘Send’ stopping working on my phone. ‘Receive’ still worked (thankfully) but I couldn’t Reply or compose new emails. Troubleshooting, I found out that Gmail still worked as did my webmail. My workaround became to go directly to the mail sites (rather than my phone’s aggregation of all mail sites). From there, I could copy-paste any message I needed to and reply. Update: It works again, now that I’m home, so it must have had something to do with Japanese/South Korean internet settings. Hmm…
My son broke his Chromebook. By the end of the trip, we had only my daughter’s iPad and our phones.
OK, Debby (over at D.G. Kaye Writer)–you wrote the book on traveling. What did I do wrong that I should fix on my next trip?
–A note on the picture: That was taken at the DMZ. Clever those South Koreans.
More on traveling
I’m traveling!
I’m traveling today…
21 Tips on How to Write Remotely
Jacqui Murray has been teaching K-18 technology for 30 years. She is the editor/author of over a hundred tech ed resources including a K-12 technology curriculum, K-8 keyboard curriculum, K-8 Digital Citizenship curriculum. She is an adjunct professor in tech ed, Master Teacher, webmaster for four blogs, an Amazon Vine Voice reviewer, CSTA presentation reviewer, freelance journalist on tech ed topics, and a weekly contributor to NEA Today and TeachHUB. You can find her resources at Structured Learning. Read Jacqui’s tech thriller series, To Hunt a Sub and Twenty-four Days
Wonderful Southeast Asia Trip! published first on https://medium.com/@DLBusinessNow
0 notes
Text
Wonderful Southeast Asia Trip!
I am finally back from my international trip where I visited three areas, four hotels, and took a gazillion trains. The background: My daughter and I went to Okinawa Japan where my son is stationed with the Army to celebrate his birthday and decided to also visit the main island of Japan and South Korea. This post won’t be a travelogue but I am happy to say we had tremendous fun. I rarely travel internationally–the last time was when I toured the Soviet Union (now Russia et al)–so didn’t know what to expect as far as languages, customs, foreign money, and everything in between. Words can’t express how nervous the whole thing made me (I’m not a brave person) but with my kids’ support, I did it and am happy I did.
A few highlights:
We planned to carry on our luggage and do laundry in the hotels. That often didn’t work as there were strictly-enforced weight limits on flights.
We traveled Delta’s Comfort Plus to and from Japan. This cost more money than Main Cabin but much less than Business Class and turned out to be a wonderful balance of cost and comfort. Check it out next time you take a nine-hour flight.
I worried about phone charges but that was solved by leaving my phone in Airplane Mode the entire time. Luckily, my son had local phone service so we used his.
We stayed in US Military vacation housing. This is discounted luxury hotels they make available to Active and Retired military. It had everything I needed at a fourth of the price.
I bought a Scottevest for the trip with its dozen pockets and RFID protection for carrying my passport, military base passes, wallet, receipts, room keys, phone, headphones, rechargers, medication info, and incidentals. It was a life saver.
The first thing I noticed as I arrived in Narita (the Japanese airport that was our port of entry) was how quiet the terminal was. The people didn’t chatter endlessly as Americans do. That changed when we arrived at Customs and Immigration, thanks to all the foreigners.
Japan and South Korea have few trash cans and still no trash lying around on streets, on trains, on sidewalks. It seems that no one tosses their refuse on the ground. I ended carrying mine around until I came across the rare trash can or a restroom.
Japanese trains are clean, well-maintained, safe, dependable, affordable, and packed with riders.
As one who speaks neither Japanese or Korean, I gained an appreciation for symbols and hand motions. Most signs included a visual of what they meant which was all that save me from complete confusion many times.
The Japanese walk everywhere and do it quickly. Many people older than me passed me up and climbed multiple levels of stairs without slowing down (by the thrid flight, I was stopping to rest). I tracked my steps and floors on a health app and I often exceeded 17,000 steps and over 40 floors. Yikes!
There are trains to take you anywhere you need. Most people don’t commute to work in cars and taxis are horrendously expensive. But, once again–these folks don’t mind walking. The train we’d take to our tours were always at least a half mile from our hotel. Lots and lots and lots of walking.
Many restaurants didn’t offer napkins with the meal. When we asked at one of the eateries, they gave us a box of Kleenex because that was all she had.
I ate 50% more food than normal and lost one pound. Woot!
A few problems–not unexpected on a long international trip:
I lost my Surface Pro laptop on my Air Seoul flight. Multiple phone calls did no good, nor did visits to the airline and airport lost and found. My biggest worry was security. I spent 3-4 hours changing passwords, locking down accounts and the device itself, and then daily checked my Find My Laptop account. It never showed up, nor did anyone try to use it. I found out too late that I should have installed a program called BitLocker that would wipe the device as soon as someone tried to use it. I still had my phone so became adept at doing everything (like getting boarding passes) from my phone. Sigh.
‘Send’ stopping working on my phone. ‘Receive’ still worked (thankfully) but I couldn’t Reply or compose new emails. Troubleshooting, I found out that Gmail still worked as did my webmail. My workaround became to go directly to the mail sites (rather than my phone’s aggregation of all mail sites). From there, I could copy-paste any message I needed to and reply. Update: It works again, now that I’m home, so it must have had something to do with Japanese/South Korean internet settings. Hmm…
My son broke his Chromebook. By the end of the trip, we had only my daughter’s iPad and our phones.
OK, Debby (over at D.G. Kaye Writer)–you wrote the book on traveling. What did I do wrong that I should fix on my next trip?
–A note on the picture: That was taken at the DMZ. Clever those South Koreans.
More on traveling
I’m traveling!
I’m traveling today…
21 Tips on How to Write Remotely
Jacqui Murray has been teaching K-18 technology for 30 years. She is the editor/author of over a hundred tech ed resources including a K-12 technology curriculum, K-8 keyboard curriculum, K-8 Digital Citizenship curriculum. She is an adjunct professor in tech ed, Master Teacher, webmaster for four blogs, an Amazon Vine Voice reviewer, CSTA presentation reviewer, freelance journalist on tech ed topics, and a weekly contributor to NEA Today and TeachHUB. You can find her resources at Structured Learning. Read Jacqui’s tech thriller series, To Hunt a Sub and Twenty-four Days
Wonderful Southeast Asia Trip! published first on https://medium.com/@DigitalDLCourse
0 notes
Text
20411: Administering Windows Server 2012 (R2 Update), thailand
20411: Administering Windows Server 2012 (R2 Update)
20411: Administering Windows Server 2012 (R2 Update) Course Description
Duration: 5.00 days (40 hours).
This course is part two of a series of three courses, which provides hands-on instruction and practice administering Windows Server 2012, including Windows Server 2012 R2. The three courses in total will collectively cover implementing, managing, maintaining and provisioning services and infrastructure in a Windows Server 2012 environment. While there is some cross-over in skillset and tasks across the courses, this course will primarily cover the administration tasks necessary to maintain a Windows Server 2012 infrastructure, such as configuring and troubleshooting name resolution, user and group management with Active Directory Domain Services (AD DS) and Group Policy, implementing Remote Access solutions such as DirectAccess, VPNs and Web Application Proxy, implementing Network Policies and Network Access Protection, Data Security, deployment and maintenance of server images, as well as update management and monitoring of Windows Server 2012 environments.
This course maps directly to and is the preferred choice for hands-on preparation for Microsoft Certified Solutions Associate (MCSA): Exam 70411: Administering Windows Server 2012, which is the second of three exams required for MCSA: Windows Server 2012 credential.
Intended Audience For This 20411: Administering Windows Server 2012 (R2 Update) Course
» This course is intended for Information Technology (IT) Professionals with hands on experience working in a Windows server 2008 or Windows Server 2012 environment who wish to acquire the skills and knowledge necessary to be able to manage and maintain the core infrastructure required for a Windows Server 2012 and Windows Server 2012 R2 environment. The key focus for students is to broaden the initial deployment of Windows Server 2012 services and infrastructure and provide the skills necessary to Manage and Maintain a domain based Windows Server 2012 environment, providing skills in areas such as User and Group management, Network Access and Data Security.
20411: Administering Windows Server 2012 (R2 Update) Course Objectives
» Configure and Troubleshoot Domain Name System
» Maintain Active Directory Domain Services
» Manage User and Service Accounts
» Implement Group Policy Infrastructure
» Manage User Desktops using Group Policy
» Configure and Troubleshoot Remote Access
» Install, Configure and Troubleshoot Network Policy Server
» Implement Network Access Protection
» Optimize File Services
» Configure Encryption and Advanced Auditing
» Deploy and Maintain Server Images
» Implement Update Managements
» Monitor Windows Server 2012
20411: Administering Windows Server 2012 (R2 Update) Course Outline
Configuring and Troubleshooting Domain Name System
Configuring the DNS Server Role
Configuring DNS Zones
Configuring DNS Zone Transfers
Managing and Troubleshooting DNS
Lab : Configuring and Troubleshooting DNS
Maintaining Active Directory Domain Services
Overview of AD DS
Implementing Virtualized Domain Controllers
Implementing RODCs
Administering AD DS
Managing the AD DS Database
Lab : Maintaining AD DS
Managing User and Service Accounts
Configuring Password Policy and User Account Lockout Settings
Configuring Managed Service Accounts
Lab : Managing User and Service Accounts
Implementing a Group Policy Infrastructure
Introducing Group Policy
Implementing and Administering GPOs
Group Policy Scope and Group Policy Processing
Troubleshooting the Application of GPOs
Lab : Implementing a Group Policy Infrastructure
Managing User Desktops with Group Policy
Implementing Administrative Templates
Configuring Folder Redirection and Scripts
Configuring Group Policy Preferences
Managing Software with Group Policy
Lab : Managing User Desktops with Group Policy
Installing, Configuring, and Troubleshooting the Network Policy Server Role
Installing and Configuring a Network Policy Server
Configuring RADIUS Clients and Servers
NPS Authentication Methods
Monitoring and Troubleshooting a Network Policy Server
Lab : Installing and Configuring a Network Policy Server
Implementing Network Access Protection
Overview of Network Access Protection
Overview of NAP Enforcement Processes
Configuring NAP
Configuring IPSec Enforcement for NAP
Monitoring and Troubleshooting NAP
Lab : Implementing Network Access Protection
Implementing Remote Access
Overview of Remote Access
Implementing DirectAccess by Using the Getting Started Wizard
Implementing and Managing an Advanced DirectAccess Infrastructure
Implementing VPN
Implementing Web Application Proxy
Lab : Implementing DirectAccess by Using the Getting Started Wizard
Lab : Deploying an Advanced DirectAccess Solution
Lab : Implementing VPN
Lab : Implementing Web Application Proxy
Optimizing File Services
Overview of FSRM
Using FSRM to Manage Quotas, File Screens, and Storage Reports
Implementing Classification and File Management Tasks
Overview of DFS
Configuring DFS Namespaces
Configuring and Troubleshooting DFS Replication
Lab : Configuring Quotas and File Screening Using File Server Resource Manager
Lab : Implementing Distributed File System
Configuring Encryption and Advanced Auditing
Encrypting Drives by Using BitLocker
Encrypting Files by Using EFS
Configuring Advanced Auditing
Lab : Configuring Encryption and Advanced Auditing
Deploying and Maintaining Server Images
Overview of Windows Deployment Services
Managing Images
Implementing Deployment with Windows Deployment Services
Administering Windows Deployment Services
Lab : Using Windows Deployment Services to Deploy Windows Server 2012
Implementing Update Management
Overview of WSUS
Deploying Updates with WSUS
Lab : Implementing Update Management
Monitoring Windows Server 2012
Monitoring Tools
Using Performance Monitor
Monitoring Event Logs
Lab : Monitoring Windows Server 2012
0 notes
Text
AZ-801: Configuring Windows Server Hybrid Advanced Services
This course teaches IT professionals to configure advanced Windows Server services using on-premises, hybrid, and cloud technologies. The course teaches IT professionals how to take advantage of the hybrid capabilities of Azure, how to migrate physical and virtual server workloads to Azure IaaS, and how to secure Azure virtual machines running Windows Server. IT professionals are also taught to perform tasks related to high availability, troubleshooting, and disaster recovery. Administrative tools and technologies are highlighted, including Windows Admin Center, PowerShell, Azure Arc, Azure Automation Update Management, Microsoft Defender for Identity, Azure Security Center, Azure Migrate, and Azure Monitor. Course AZ-801: Configuring Windows Server Hybrid Advanced Services
This four-day course is intended for hybrid Windows Server administrators who have experience with Windows Server and want to extend the capabilities of their on-premises environments by combining on-premises and hybrid technologies. Hybrid Windows Server administrators who already deploy and manage on-premises core technologies want to secure their environments, migrate virtual and physical workloads to Azure IaaS, enable a highly available, fully redundant environment, and perform monitoring and troubleshooting. Docker Avanzado
Module 1: Windows Server security
This module discusses how to protect an Active Directory environment by securing user accounts to least privilege and placing them in the Protected Users group. The module covers how to limit authentication scope and remediate potentially insecure accounts. The module also describes how to harden the security configuration of a Windows Server operating system environment. In addition, the module discusses the use of Windows Server Update Services to deploy operating system updates to computers on the network. Finally, the module covers how to secure Windows Server DNS to help protect the network name resolution infrastructure.
Lesson
Secure Windows Sever user accounts
Hardening Windows Server
Windows Server Update Management
Secure Windows Server DNS
Lab : Configuring security in Windows Server
Configuring Windows Defender Credential Guard
Locating problematic accounts
Implementing LAPS
After completing this module, students will be able to:
Diagnose and remediate potential security vulnerabilities in Windows Server resources.
Harden the security configuration of the Windows Server operating system environment.
Deploy operating system updates to computers on a network by using Windows Server Update Services.
Secure Windows Server DNS to help protect the network name resolution infrastructure.
Implement DNS policies.
Module 2: Implementing security solutions in hybrid scenarios
This module describes how to secure on-premises Windows Server resources and Azure IaaS workloads. The module covers how to improve the network security for Windows Server infrastructure as a service (IaaS) VMs and how to diagnose network security issues with those VMs. In addition, the module introduces Azure Security Center and explains how to onboard Windows Server computers to Security Center. The module also describes how to enable Azure Update Management, deploy updates, review an update assessment, and manage updates for Azure VMs. The module explains how Adaptive application controls and BitLocker disk encryption are used to protect Windows Server IaaS VMs. Finally, the module explains how to monitor Windows Server Azure IaaS VMs for changes in files and the registry, as well as monitoring modifications made to application software.
Lesson
Implement Windows Server IaaS VM network security.
Audit the security of Windows Server IaaS Virtual Machines
Manage Azure updates
Create and implement application allowlists with adaptive application control
Configure BitLocker disk encryption for Windows IaaS Virtual Machines
Implement change tracking and file integrity monitoring for Windows Server IaaS VMs
Lab : Using Azure Security Center in hybrid scenarios
Provisioning Azure VMs running Windows Server
Configuring Azure Security Center
Onboarding on-premises Windows Server into Azure Security Center
Verifying the hybrid capabilities of Azure Security Center
Configuring Windows Server security in Azure VMs
After completing this module, students will be able to:
Diagnose network security issues in Windows Server IaaS virtual machines.
Onboard Windows Server computers to Azure Security Center.
Deploy and manage updates for Azure VMs by enabling Azure Automation Update Management.
Implement Adaptive application controls to protect Windows Server IaaS VMs.
Configure Azure Disk Encryption for Windows IaaS VMs.
Back up and recover encrypted data.
Monitor Windows Server Azure IaaS VMs for changes in files and the registry.
Module 3: Implementing high availability
This module describes technologies and options to create a highly available Windows Server environment. The module introduces Clustered Shared Volumes for shared storage access across multiple cluster nodes. The module also highlights failover clustering, stretch clusters, and cluster sets for implementing high availability of Windows Server workloads. The module then discusses high availability provisions for Hyper-V and Windows Server VMs, such as network load balancing, live migration, and storage migration. The module also covers high availability options for shares hosted on Windows Server file servers. Finally, the module describes how to implement scaling for virtual machine scale sets and load balanced VMs, and how to implement Azure Site Recovery.
Lesson
Introduction to Cluster Shared Volumes.
Implement Windows Server failover clustering.
Implement high availability of Windows Server VMs.
Implement Windows Server File Server high availability.
Implement scale and high availability with Windows Server VMs.
Lab : Implementing failover clustering
Configuring iSCSI storage
Configuring a failover cluster
Deploying and configuring a highly available file server
Validating the deployment of the highly available file server
After completing this module, students will be able to:
Implement highly available storage volumes by using Clustered Share Volumes.
Implement highly available Windows Server workloads using failover clustering.
Describe Hyper-V VMs load balancing.
Implement Hyper-V VMs live migration and Hyper-V VMs storage migration.
Describe Windows Server File Server high availablity options.
Implement scaling for virtual machine scale sets and load-balanced VMs.
Implement Azure Site Recovery.
Module 4: Disaster recovery in Windows Server
This module introduces Hyper-V Replica as a business continuity and disaster recovery solution for a virtual environment. The module discusses Hyper-V Replica scenarios and use cases, and prerequisites to use it. The module also discusses how to implement Azure Site Recovery in on-premises scenarios to recover from disasters.
Lesson
Implement Hyper-V Replica
Protect your on-premises infrastructure from disasters with Azure Site Recovery
Lab : Implementing Hyper-V Replica and Windows Server Backup
Implementing Hyper-V Replica
Implementing backup and restore with Windows Server Backup
After completing this module, students will be able to:
Describe Hyper-V Replica, pre-requisites for its use, and its high-level architecture and components
Describe Hyper-V Replica use cases and security considerations.
Configure Hyper-V Replica settings, health monitoring, and failover options.
Describe extended replication.
Replicate, failover, and failback virtual machines and physical servers with Azure Site Recovery.
Module 5: Implementing recovery services in hybrid scenarios
This module covers tools and technologies for implementing disaster recovery in hybrid scenarios, whereas the previous module focuses on BCDR solutions for on-premises scenarios. The module begins with Azure Backup as a service to protect files and folders before highlighting how to implement Recovery Vaults and Azure Backup Policies. The module describes how to recover Windows IaaS virtual machines, perform backup and restore of on-premises workloads, and manage Azure VM backups. The module also covers how to provide disaster recovery for Azure infrastructure by managing and orchestrating replication, failover, and failback of Azure virtual machines with Azure Site Recovery.
Lesson
Implement hybrid backup and recovery with Windows Server IaaS
Protect your Azure infrastructure with Azure Site Recovery
Protect your virtual machines by using Azure Backup
Lab : Implementing Azure-based recovery services
Implementing the lab environment
Creating and configuring an Azure Site Recovery vault
Implementing Hyper-V VM protection by using Azure Site Recovery vault
Implementing Azure Backup
After completing this module, students will be able to:
Recover Windows Server IaaS virtual machines by using Azure Backup.
Use Azure Backup to help protect the data for on-premises servers and virtualized workloads.
Implement Recovery Vaults and Azure Backup policies.
Protect Azure VMs with Azure Site Recovery.
Run a disaster recovery drill to validate protection.
Failover and failback Azure virtual machines.
0 notes
Text
Endpoint Security Analyst
The Oregon Health Authority is modernizing and expanding their IT infrastructure and currently has a fantastic opportunity for an Endpoint Security Analyst with Workstation Support and Security experience to join an excellent team and work to advance their IT operations. What you will do: The Oregon Health Authority is currently seeking an Endpoint Security Analyst. In this role, you will be responsible for designing and maintaining a secure workstation environment. This will include maintaining desktop anti-virus, anti-malware, anti-spyware, desktop intrusion prevention, and disk-at-rest encryption as well as responding to security incidents. You will manage and maintain workstation security infrastructure including: Microsoft SCCM Endpoint Protection, Microsoft Bitlocker and Microsoft Bitlocker Administration and Monitoring. You will also troubleshoot issues within the desktop security environment. This position will provide you opportunities to perform operating system and application vulnerability assessments and policy compliance checks to identify potential risk; Analyze vulnerabilities and weaknesses and prioritize based on criticality, exposure, and business impacts; Coordinate IT and business teams to remediate vulnerabilities and weaknesses; and Document test plans, findings, and remediation efforts. Additionally, you will respond to security alerts and incidents and work with existing tools to respond and resolve these issues; Log and provide documentation detailing security issues; and Perform information security research and trend analysis. What's in it for you? Collaboration in an open office with a team of bright individuals to work with and learn from. We offer full medical, vision and dental with paid sick leave, vacation, personal leave and ten paid holidays per year. If you are an IT Professional with Workstation Support and Security experience, don't delay, apply today!
MINIMUM QUALIFICATIONS: (a) Four (4) years of information systems experience in Workstation Support and Security. OR (b) An Associate's degree in Computer Science, Information Technology, or related field, OR completion of a two (2) year accredited vocational training program in information technology or related field; AND two (2) years of information systems experience in Workstation Support and Security. OR (c) A Bachelor's degree in Information Technology, Computer Science, or related field may substitute for all of the above.
REQUESTED SKILLS:
Experience working in the Patch Management Lifecycle including: testing, scheduling and deployment.
Experience conducting Forensic Analysis in a Windows environment.
Familiarity with tools and network applications that look for Malware.
Excellent technical knowledge of mainstream operating systems and a wide range of security technologies.
Experience with Anti-Malware solutions.
Experience with Vulnerability Management.
Experience using desktop security tools such as Microsoft Bitlocker.
Experience with remote out-of-band management technologies such as Intel AMT.
Experience promoting a culturally competent and diverse work environment.
TO APPLY:
Please follow the link below to submit an application.
http://www.governmentjobs.com/careers/oregon/jobs/1784156/endpoint-security-analyst-information-systems-specialist-5
0 notes
Text
0x8031002C -- Useful? / How Can I Prevent It?
What's The Meaning of 0x8031002C?
0x8031002C error occurs in various occasions and it is not rare question: whatever below operations will trigger it: startup, shut-down, installation or uninstallation or even windows-update. It's no doubt experienced windows users can repair by themselves, for normal users, it may be a little difficult to repair by oneself, in fact, those users no need to panic yet, turn to a 0x8031002C remover which can stop error automatically is feasible. Fix 0x8031002C with clicks.
Recommendation: SmartPCFixer -- Download to Remove Error Easily
Symptom
0x8031002C is undoubtedly an problem that appears when an unanticipated condition occurs or when an expected operation went wrong. In case you have a fault in Windows, it can be severe and lead your programs to freeze and crash or it could be apparently inoffensive yet exasperating.
How to Fix 0x8031002C
You may dramatically boost the speed of the machine when you address all of the problems just mentioned. So that you can correct your errors and boost the speed of your own computer, it is recommended that you download the 0x8031002C Fixing Tool. It is an advanced optimization tool which can prevent all the problems that are decreasing your pc speed or computer performance.
1. Click the below download button to get 0x8031002C Error Fixer. 2. Launch the the software, it will give your computer a full scan automatically, and it will generate a result of errors and threats which need to be troubleshooted on your computer. 3. With clicking on 'Fix All' button, the 0x8031002C error will be cured as well as other problems that was discovered in previous move.
Other Methods
Update Driver
To ensure and keep a fast running speed of your pc, it is necessary to update drivers in time. Don't know to how to update Reading steps below to learn update drivers by hand. Note: the updating process is for window 7 system. 1.Right-click on Computer icon on your desktop, choose Manage. 2.Locate and click on Device Manager on the Computer Management window appeared. 3.All the devices will be shown on the right side, double-click on the category of device and find the driver you wish to update. 4.Right click on the driver, and select Update Driver Software. 5.You will see a new window appears, select Search Automatically for updated driver software. 6.When the process is finished, click Close.
Tips: We highly recommend use SmartPCFixer to get rid of 0x8031002C issue and protect your computer system regularly.
Tags: 0x8031002a,0x8031002c bitlocker,0x80310027,0x8031002c
Related: Read More: Which is the best approach to fix 0x80280003 ?,Which's the best way to clear 0x80290100 ?,Feel Angry with 0x80280007 ? Follow The Guide to Prevent.,Correcting "0x8028400E" For Free,Resolve -- 0x80290219,0x8024C001,0x8024F003,0x80244006,0x80280035,0x8028004F
0 notes
Text
Course AZ-801: Configuring Windows Server Hybrid Advanced Services
This course teaches IT professionals to configure advanced Windows Server services using on-premises, hybrid, and cloud technologies. The course teaches IT professionals how to take advantage of the hybrid capabilities of Azure, how to migrate physical and virtual server workloads to Azure IaaS, and how to secure Azure virtual machines running Windows Server. IT professionals are also taught to perform tasks related to high availability, troubleshooting, and disaster recovery. Administrative tools and technologies are highlighted, including Windows Admin Center, PowerShell, Azure Arc, Azure Automation Update Management, Microsoft Defender for Identity, Azure Security Center, Azure Migrate, and Azure Monitor. Course AZ-801: Configuring Windows Server Hybrid Advanced Services
This four-day course is intended for hybrid Windows Server administrators who have experience with Windows Server and want to extend the capabilities of their on-premises environments by combining on-premises and hybrid technologies. Hybrid Windows Server administrators who already deploy and manage on-premises core technologies want to secure their environments, migrate virtual and physical workloads to Azure IaaS, enable a highly available, fully redundant environment, and perform monitoring and troubleshooting.
Module 1: Windows Server security
This module discusses how to protect an Active Directory environment by securing user accounts to least privilege and placing them in the Protected Users group. The module covers how to limit authentication scope and remediate potentially insecure accounts. The module also describes how to harden the security configuration of a Windows Server operating system environment. In addition, the module discusses the use of Windows Server Update Services to deploy operating system updates to computers on the network. Finally, the module covers how to secure Windows Server DNS to help protect the network name resolution infrastructure.
Lesson
Secure Windows Sever user accounts
Hardening Windows Server
Windows Server Update Management
Secure Windows Server DNS
Lab : Configuring security in Windows Server
Configuring Windows Defender Credential Guard
Locating problematic accounts
Implementing LAPS
After completing this module, students will be able to:
Diagnose and remediate potential security vulnerabilities in Windows Server resources.
Harden the security configuration of the Windows Server operating system environment.
Deploy operating system updates to computers on a network by using Windows Server Update Services.
Secure Windows Server DNS to help protect the network name resolution infrastructure.
Implement DNS policies.
Module 2: Implementing security solutions in hybrid scenarios
This module describes how to secure on-premises Windows Server resources and Azure IaaS workloads. The module covers how to improve the network security for Windows Server infrastructure as a service (IaaS) VMs and how to diagnose network security issues with those VMs. In addition, the module introduces Azure Security Center and explains how to onboard Windows Server computers to Security Center. The module also describes how to enable Azure Update Management, deploy updates, review an update assessment, and manage updates for Azure VMs. The module explains how Adaptive application controls and BitLocker disk encryption are used to protect Windows Server IaaS VMs. Finally, the module explains how to monitor Windows Server Azure IaaS VMs for changes in files and the registry, as well as monitoring modifications made to application software.
Lesson
Implement Windows Server IaaS VM network security.
Audit the security of Windows Server IaaS Virtual Machines
Manage Azure updates
Create and implement application allowlists with adaptive application control
Configure BitLocker disk encryption for Windows IaaS Virtual Machines
Implement change tracking and file integrity monitoring for Windows Server IaaS VMs
Lab : Using Azure Security Center in hybrid scenarios
Provisioning Azure VMs running Windows Server
Configuring Azure Security Center
Onboarding on-premises Windows Server into Azure Security Center
Verifying the hybrid capabilities of Azure Security Center
Configuring Windows Server security in Azure VMs
After completing this module, students will be able to:
Diagnose network security issues in Windows Server IaaS virtual machines.
Onboard Windows Server computers to Azure Security Center.
Deploy and manage updates for Azure VMs by enabling Azure Automation Update Management.
Implement Adaptive application controls to protect Windows Server IaaS VMs.
Configure Azure Disk Encryption for Windows IaaS VMs.
Back up and recover encrypted data.
Monitor Windows Server Azure IaaS VMs for changes in files and the registry.
Module 3: Implementing high availability
This module describes technologies and options to create a highly available Windows Server environment. The module introduces Clustered Shared Volumes for shared storage access across multiple cluster nodes. The module also highlights failover clustering, stretch clusters, and cluster sets for implementing high availability of Windows Server workloads. The module then discusses high availability provisions for Hyper-V and Windows Server VMs, such as network load balancing, live migration, and storage migration. The module also covers high availability options for shares hosted on Windows Server file servers. Finally, the module describes how to implement scaling for virtual machine scale sets and load balanced VMs, and how to implement Azure Site Recovery.
Lesson
Introduction to Cluster Shared Volumes.
Implement Windows Server failover clustering.
Implement high availability of Windows Server VMs.
Implement Windows Server File Server high availability.
Implement scale and high availability with Windows Server VMs.
Lab : Implementing failover clustering
Configuring iSCSI storage
Configuring a failover cluster
Deploying and configuring a highly available file server
Validating the deployment of the highly available file server
After completing this module, students will be able to:
Implement highly available storage volumes by using Clustered Share Volumes.
Implement highly available Windows Server workloads using failover clustering.
Describe Hyper-V VMs load balancing.
Implement Hyper-V VMs live migration and Hyper-V VMs storage migration.
Describe Windows Server File Server high availablity options.
Implement scaling for virtual machine scale sets and load-balanced VMs.
Implement Azure Site Recovery.
Module 4: Disaster recovery in Windows Server
This module introduces Hyper-V Replica as a business continuity and disaster recovery solution for a virtual environment. The module discusses Hyper-V Replica scenarios and use cases, and prerequisites to use it. The module also discusses how to implement Azure Site Recovery in on-premises scenarios to recover from disasters. Docker Owast Container
Lesson
Implement Hyper-V Replica
Protect your on-premises infrastructure from disasters with Azure Site Recovery
Lab : Implementing Hyper-V Replica and Windows Server Backup
Implementing Hyper-V Replica
Implementing backup and restore with Windows Server Backup
After completing this module, students will be able to:
Describe Hyper-V Replica, pre-requisites for its use, and its high-level architecture and components
Describe Hyper-V Replica use cases and security considerations.
Configure Hyper-V Replica settings, health monitoring, and failover options.
Describe extended replication.
Replicate, failover, and failback virtual machines and physical servers with Azure Site Recovery.
Module 5: Implementing recovery services in hybrid scenarios
This module covers tools and technologies for implementing disaster recovery in hybrid scenarios, whereas the previous module focuses on BCDR solutions for on-premises scenarios. The module begins with Azure Backup as a service to protect files and folders before highlighting how to implement Recovery Vaults and Azure Backup Policies. The module describes how to recover Windows IaaS virtual machines, perform backup and restore of on-premises workloads, and manage Azure VM backups. The module also covers how to provide disaster recovery for Azure infrastructure by managing and orchestrating replication, failover, and failback of Azure virtual machines with Azure Site Recovery.
Lesson
Implement hybrid backup and recovery with Windows Server IaaS
Protect your Azure infrastructure with Azure Site Recovery
Protect your virtual machines by using Azure Backup
Lab : Implementing Azure-based recovery services
Implementing the lab environment
Creating and configuring an Azure Site Recovery vault
Implementing Hyper-V VM protection by using Azure Site Recovery vault
Implementing Azure Backup
After completing this module, students will be able to:
Recover Windows Server IaaS virtual machines by using Azure Backup.
Use Azure Backup to help protect the data for on-premises servers and virtualized workloads.
Implement Recovery Vaults and Azure Backup policies.
Protect Azure VMs with Azure Site Recovery.
Run a disaster recovery drill to validate protection.
Failover and failback Azure virtual machines.
0 notes