#ts4 blender mini tutorial
Explore tagged Tumblr posts
Visit Tumblr Blog
Explore Tumblr blogs with no restrictions, modern design and the best experience.
Last Seen Tumblr Blogs


Fun Fact
Tumblr is available in 18 languages.
Note
Hello, I hope you're doing well. I had a question about how you were able to get that glowing outline on your death flower's hand?
Thank you <3
Hello! I'm doing well & hope you are too (:
The glowing outline/skeleton hand for my death flower sim is a bit of blender magic and is not achievable in game!
But basically I separated the mesh for my sim's body, "cutting" the hand and half of the chest away from the rest and applying a different texture to it. Then I added in a skeleton body & parented it to my sim's rig as well, so it would sit under the skin.
A full tutorial may come later (if there's enough interest) but here's some closeup screenshots of just her hand.
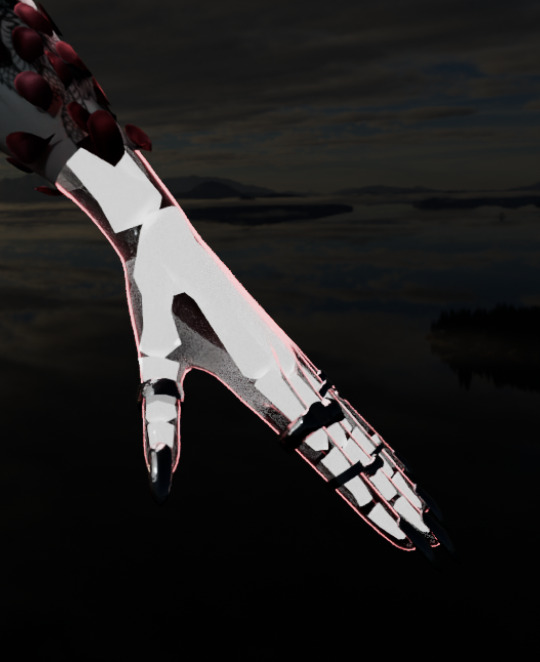
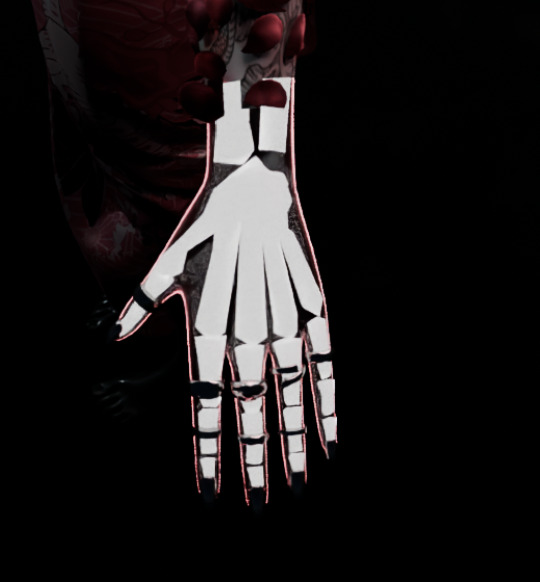
I set the skeleton hand to glow and admittedly I used and adjusted a material from blenderkit for the cut out hand (in this case a material called "green glowing toon shader", which I obviously adjusted to be pink lmao). Both node trees are below:
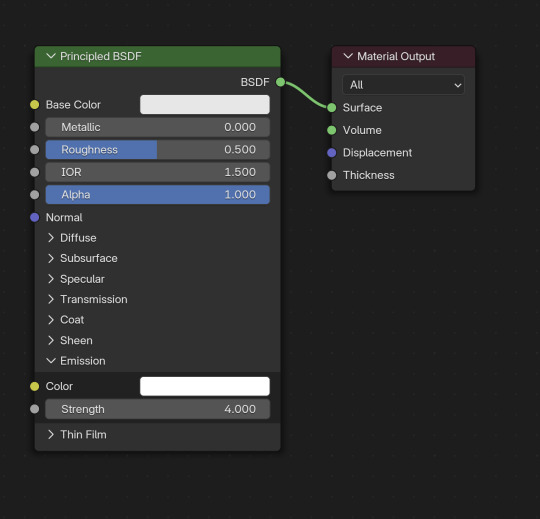
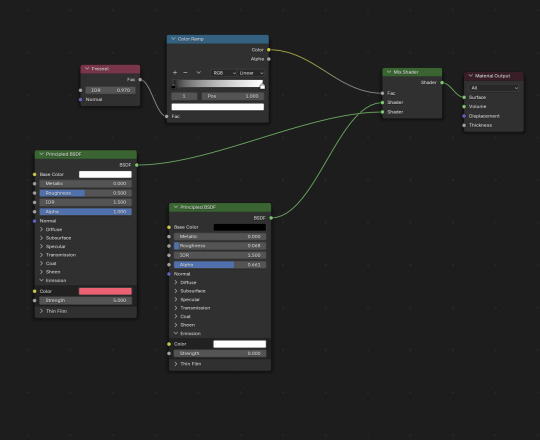
As long as all of these pieces are parented to your sim's rig, they'll pose as normal!
I hope this helps! <3
#replies#ask replies#ts4 blender mini tutorial#sims 4 blender mini tutorial#sims blender mini tutorial#ts4 blender#sims 4 blender#sims blender
9 notes
·
View notes
Note
hellooooo platasp !! I hope you're having a good day :]
well, I'm thinking about converting sims 4 hairs/clothes to sims 2, and I wanted to ask if you have any tips/tutorials that could help me, because I don't know how to start (lol)
and i wanted to say that your hair defaults are now a must have in my game, you did it very well <3
hey, jeuu!!
Well, that's a weighted ask haha. I'll do my best! Everything linked below pertains to clay hair and 4t2 eaxis clothing.
these can all be found @/sims2tutorials
Hair:
Resizing TS4 textures for 4t2 conversion | MDP Smooth hair bone assignments using Blender 🎥 | Redsimmer 4t2 Hair Conversion Workshop 🎥 | platinumaspiration ---- this is chaotic because...me, but I think it's the closest to how I do hair
Clothing:
4t2 Tips & Tricks Tutorial 🎥 | MDPthatsme Sims 4 to Sims 2 Pants Tutorial 🎥 | platinumaspiration Mini Tutorial - Using Unweld Radial to Fix Merging Errors | kaluxsims A lesson on Normals, Seams, Gaps, and Black Shadows 🛠 (technically S3 tutorial!) | Gruesim
The biggest tip I can give is don't give up. Your first conversion might be a stinker, but if you can get it in the game you've come a long way!
13 notes
·
View notes
Photo
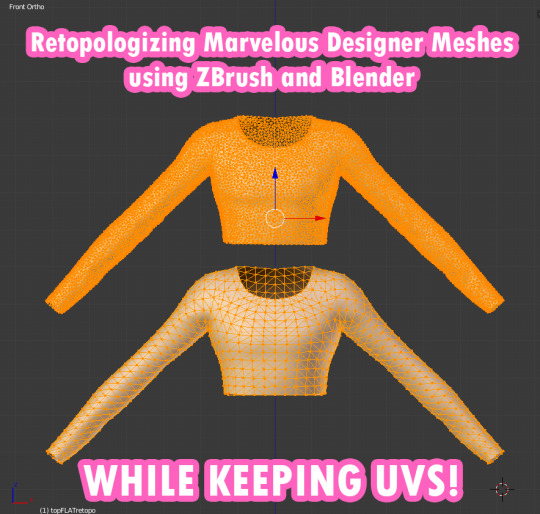
Okay guys, here’s a mini tutorial I thought I’d whip up in the dead of night. I’m very tired so sorry if there’s spelling errors. If you have any questions, just ask BTW. So, anyway, this quick tut is for retopo-ing MD meshes with Zbrush and Blender in a way that preserves the UV islands so you don’t lose the nice neat UV shape that MD generates. Ready? Okay.
You will need: Marvelous Designer Blender Zbrush
Note: This tut doesn’t cover how to use these programs. You have to already know that.
Okay, here we go.
1. Make your mesh as normal and export from MD. Make sure the mesh is unwelded in the export options. I’ve called mine top.obj. Here it is.
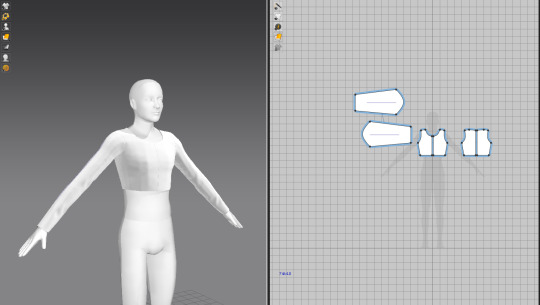
2. Now highlight all, right-click the 3D garment and chose Reset 3D Arrangement (selected) or Reset 2D Arrangement (selected) - either one of these commands should flatten your mesh into the pattern-shaped pieces you started with in MD.
3. Export this from MD, again make sure the mesh is unwelded in the export options. I called mine topFLAT.obj
4. Import FLAT version into Zbrush.
5. Under Geometry tab, ZRemesher, hit the ZRemesher button. Depending on your mesh, yours might be fine to export with the default settings. For mine, however I’m going to lower the Target Polygons Count to make it lower poly.

6. When you’re happy with the poly count, export your mesh. I called mine topFLATretopo.obj
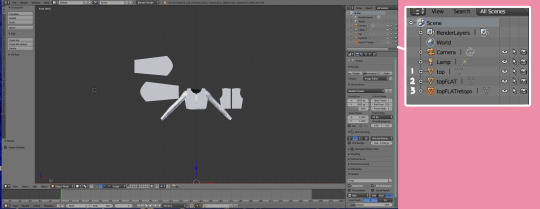
7. In Blender 2.79, import all three obj files. Sometimes the Zbrush mesh will be split into pieces, so you can go ahead and merge these pieces in Blender with CTR+J if that is the case. We want 3 meshes: the original MD mesh, the flat version, and the retopologised flat version. You can go ahead and tick the eye button to hide the original MD mesh and the FLAT version for now. First we will do things to the FLATretopo version.
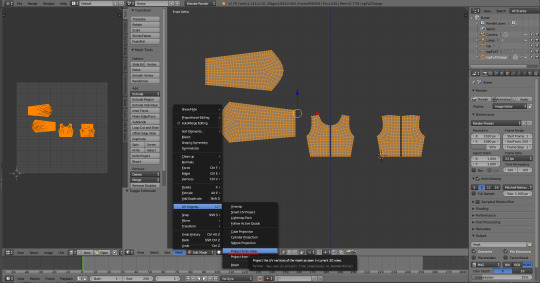
8. With the FLATretopo version selected, divide the window so that you have the 3D version to one side and the UV/Image Editor to the other side. Now you can ender Edit Mode, Mesh -> UV Unwrap and Project From View to get the same UV island shape that MD generated. Make sure you are in orthographic front view before doing this (hit 5 and 1) or your UVs might be skewed. With that done, return to object mode.
9. In the Modifier tab chose Surface Deform. Set the target as the FLAT version, turn the Interpolation falloff up as far as it will go (16) and hit the Bind button. Now you can hide the FLATretopo mesh.

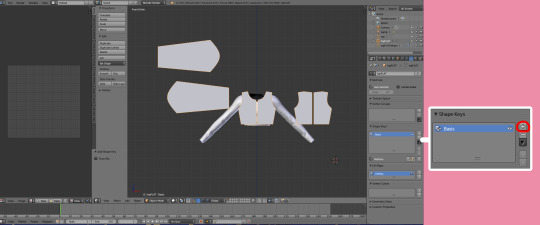
10. Unhide the original MD mesh and the FLAT version.
11. With the FLAT version selected, switch to the Object Data tab. Under Shape Keys, hit the plus sign. ‘Basis’ key should appear.
12. Now you must deselect everything, then select first the original MD mesh and second the FLAT version. It is important they are in that order. Once you have selected them, hit the little downwards arrow to the side of Shape Keys and chose Join as Shapes. Another key should appear, named the same as your original mesh.
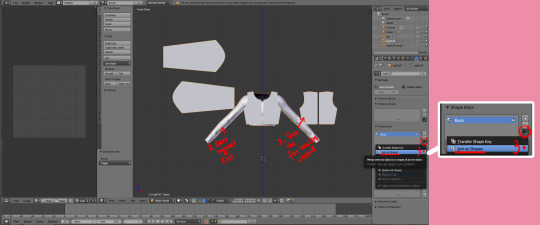

13. Unhide the FLATretopo mesh.
14. Click on the newest key and slide the Value slider all the way to the right. The FLAT mesh and the FLATretopo mesh should morph into the position and shape of the original MD mesh.
15. Select the FLATretopo mesh and hit Apply on the modifier to confirm the movement. Then you can delete both the original MD mesh and the FLAT version. You don’t need those anymore.
16. Now you should have a final mesh that has a nice topology from what we generated in Zbrush as well as a neat UV map, plus it’s still in the shape as the original garment you made. It isn’t finished yet, however. Now you need to close up the seams, fix the UVs for TS4 usage, and make everything pretty.
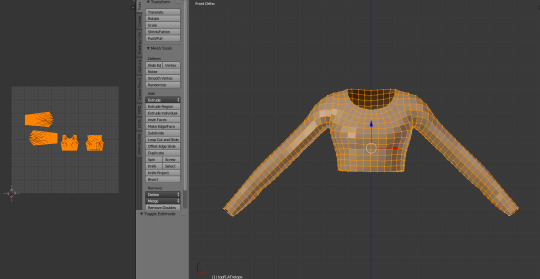
Note: I personally start this next step by Shading Smooth in the 3D window. This will highlight the seams that need fixing. If the item is symmetrical, I find it easier to just delete half of the mesh and use a mirror modifier while I work on it. It cuts the workload in half. Now I just go around the seams and close them manually. It doesn’t usually take very long once you get the hang of it. I also bind all my repetitive keys to shortcut keys (eg. Merge, rip, cut, loop select, etc) so it’s quicker.
When the FLAT version is still flat, you can also edit the topography directly onto the mesh to make sure the seam verts will match up. You can also remove any unnecessary loops easily as well as adding extras.
Anyway, that’s all for now. Hope it helps some people! :) Have a nice weekend. PS. thank you @bluecravingcc for the amendments.
#other#sims 4 tutorial#sims 4 clothing tutorial#blender tutorial#marvelous designer#marvelous designer tutorial#marvelous designer sims 4#sims 4
532 notes
·
View notes
Note
Hi Frankie! How are you today? I was wondering if when your not busy could you possibly do like a mini tutorial on how to convert accessories from sims 4 to sims 3 since that old one was deleted
Hey ho nonny! Watch the tutorial on converting clothes from TS4 and then when you have the mesh and texture exported and in blender, just continue on with the Accessories tutorial!
I may make a tutorial again at some point but I am super busy atm :D If you get stuck just IM me!
12 notes
·
View notes
Note
Hi PlatAsp! I've been trying to learn how to convert ts4 bodyshop cc to ts2. I've managed to get the meshing part down, but am running into issues with textures. Sice you are a super awesome and accomplished 4t2 converter, I figured you'd be the best person to ask - how do I map ts4 1024x2048 outfit textures to ts2 1024x1024 outfit textures? Thank you so much, and happy holidays!
Hi anon, MDP posted a mini tutorial here that includes a video of mapping in Milkshape. If you want me to talk through it, there's also my video and at about the 7:30 mark I talk about mapping in Milkshape.
When I've done it in Blender, to me, it's convoluted and takes much more time. If anyone has tips or a tutorial on blender uv mapping, please share!
7 notes
·
View notes