#sims blender mini tutorial
Explore tagged Tumblr posts
Visit Tumblr Blog
Explore Tumblr blogs with no restrictions, modern design and the best experience.
Last Seen Tumblr Blogs


Fun Fact
Tumblr’s website traffic is steadily declining.
Note
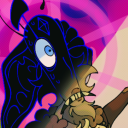
Hello, I hope you're doing well. I had a question about how you were able to get that glowing outline on your death flower's hand?
Thank you <3
Hello! I'm doing well & hope you are too (:
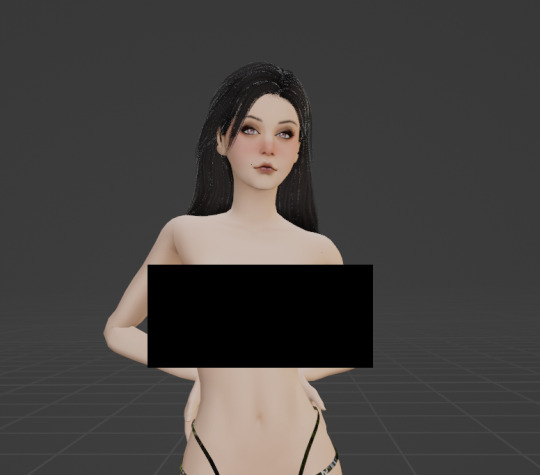
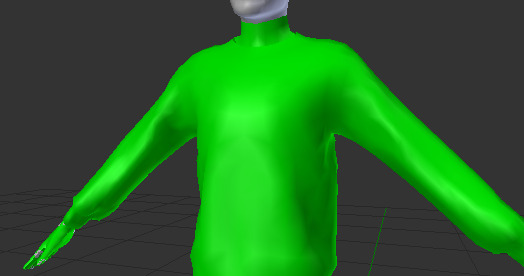
The glowing outline/skeleton hand for my death flower sim is a bit of blender magic and is not achievable in game!
But basically I separated the mesh for my sim's body, "cutting" the hand and half of the chest away from the rest and applying a different texture to it. Then I added in a skeleton body & parented it to my sim's rig as well, so it would sit under the skin.
A full tutorial may come later (if there's enough interest) but here's some closeup screenshots of just her hand.
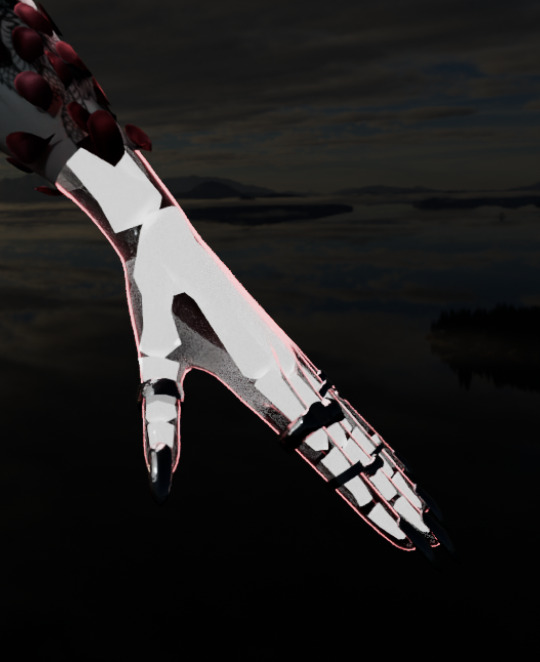
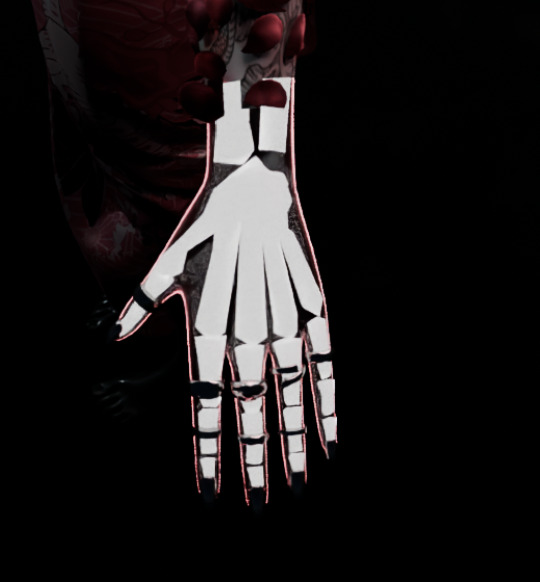
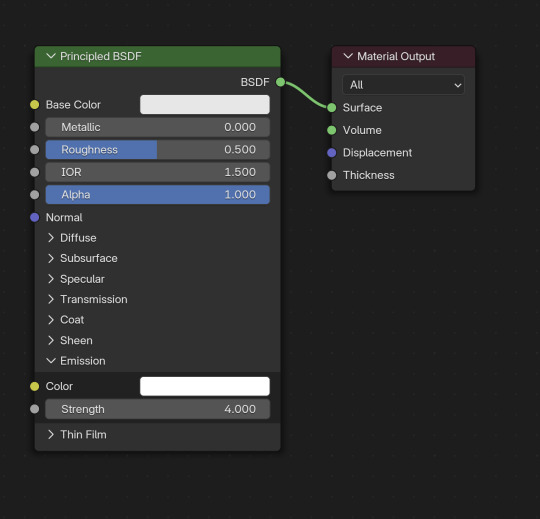
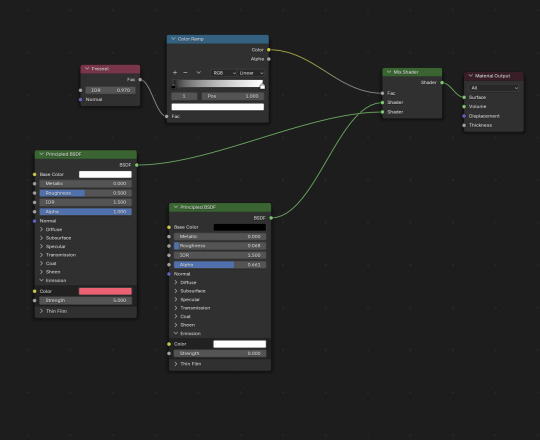
I set the skeleton hand to glow and admittedly I used and adjusted a material from blenderkit for the cut out hand (in this case a material called "green glowing toon shader", which I obviously adjusted to be pink lmao). Both node trees are below:
As long as all of these pieces are parented to your sim's rig, they'll pose as normal!
I hope this helps! <3
#replies#ask replies#ts4 blender mini tutorial#sims 4 blender mini tutorial#sims blender mini tutorial#ts4 blender#sims 4 blender#sims blender
9 notes
·
View notes
Text
This is another short tutorial lost when I accidentally deleted my Tumblr. It is a very simple guide on how to edit poses so they fit fat Sims, using a custom rig extracted from SimRipper and Blender. It's designed for people who've never made a pose before and who usually wouldn't, but would just LOVE to have poses actually fit their Sims. In a way it's basically like a really quick and dirty pose tutorial I guess. It only explains the dead basics of posemaking needed to edit a pose, not to actually make one from scratch. I hope this helps some people.
If you want to learn how to make poses from scratch, this is the tutorial that will explain everything.
28 notes
·
View notes
Text

Mini Blender Tutorial: Appending Hair & Clothes onto Posed Sims
I'm so sorry this has taken me so long.
Quite a while ago, @baobeisims requested this tutorial, and I'm sorry it's taken an age but I'm in the final stretch of planning before my wedding and it's got me stressed up to my eyeballs.
But without further ado, let's go!
Step 1: Import your sim into blender and pose
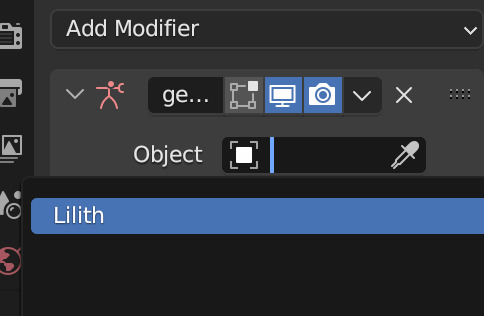
For this tutorial, I'm going to use my lovely Lilith! When appending clothing, it's best to use a mostly naked/fully naked sim. It can be hella weird having nude ripped sims on your computer but trust me, it'll make this process SO MUCH EASIER and your end results better if you don't have clothing on your sims. Why is this? Any clothing applied to your sim in game is permanently attached to their mesh in blender. Meaning you cannot delete off any piece of clothing that's already there. Because of this, I recommend fully nude sims free of any clothing, jewelry or other accessories. However, fully nude sims aren't Tumblr friendly so I'm using a topless, underwear-d Lilith 🤣
Here's Lilith, imported, nodes adjusted, and posed. I won't cover how to do this here, as I already have in THIS TUTORIAL (3 parts, all linked). So let's get on to the fun
Step Two: Adding Hair
Adding hair and clothing works the exact same way as appending a prop to your sim, with a few additional steps. Like with props, export the mesh and texture for your hair, then append them in blender. For this tutorial, I'm using Lamz' Katrina hair. Just like with anything else, append all of the studio meshes:

Once you import them, it'll look a bit messy.

But that's ok we're going to fix it! Like with any appended object, delete the bone_bone_shape and the rig, so. you're only left with your sim and the studio meshes. Add in your texture nodes and adjust like we do with any object. It should look like this:

Link the materials and join the meshes into one, and you should have something like this:
But as you can see, the hair isn't aligned. To fix this, navigate to the Modifiers tab (like we did with jewelry/props) and set the object to your sim, like this:
Now her hair should be... actually on her head! 😂
Let's add some clothing then I'll show you some handy tricks I use to achieve more realism in my renders. I'm going to use the same dress I used in her render here to keep things simple. It's Evellsims' Trapped Dress.
Step Three: Adding Clothing
We'll follow the exact same steps we did with the hair. Export the mesh and texture from Sims 4 Studio and append in blender.

Just like before, it's not in line and needs the nodes adjusted. Follow the same exact steps, adjust the nodes, link materials, join, and append. After following all those steps you should have something like this:

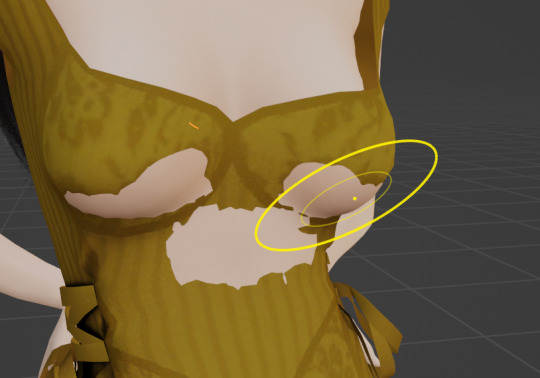
You might be wondering why I still have a censor bar here... That's because appending clothing doesn't automatically take the same shape as your sim's body like it does in cas. (I can't show it cause Tumblr but... her tits are out 🤣 just trust me) Different framed sims will require more or less work depending on their body shape. Curvy sims will require a lot, whereas petite ones like Lilith may only require a little bit of manipulation. Additionally, some poses and clothing aren't as compatible as you'd hope. Fabric can do some weird things, so sometimes you'll have to do more or less manipulation and it's a bit of a tossup. This makes appending clothing in blender a massive job, but for certain projects it works way better than dressing your sim in cas, particularly when you want to manipulate the clothing in some way (by mimicking a breeze, or gravity, etc) or if you're a masochist like me and you want to always do more work.
Step Four: Sculpting Hair & Clothes
By far my favorite part of the render process (even though it's tedious as fuck and takes an age) is sculpting. I use sculpting to fix clothing and hair and mimic gravity and weather. Here are a few examples of what sculpting can do (other than simply making clothes fit):


To use the sculpt tool, select from this dropdown:
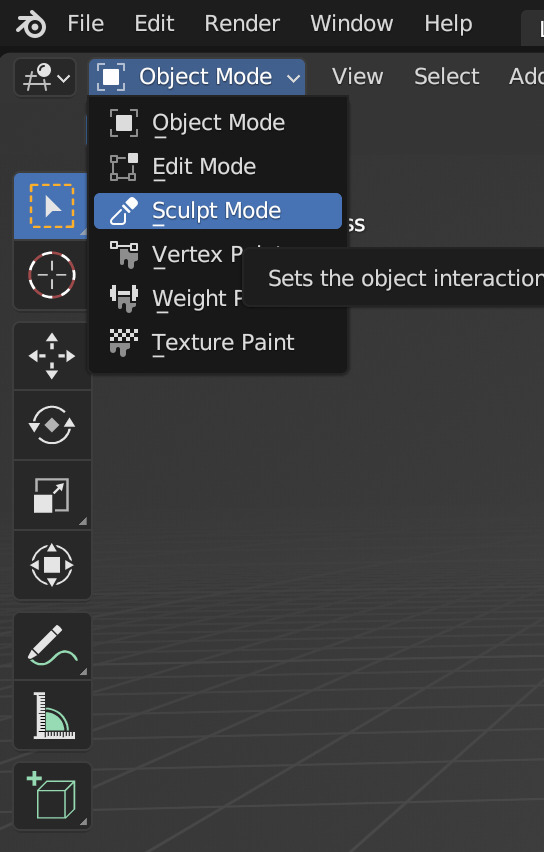
From the new sidebar tools, select Elastic Deform, here:

I've covered the Tumblr-sensitive bits so you can see what you'll be working with. It's not unusual to have gaps in the clothing that need filling or adjusting, like this:
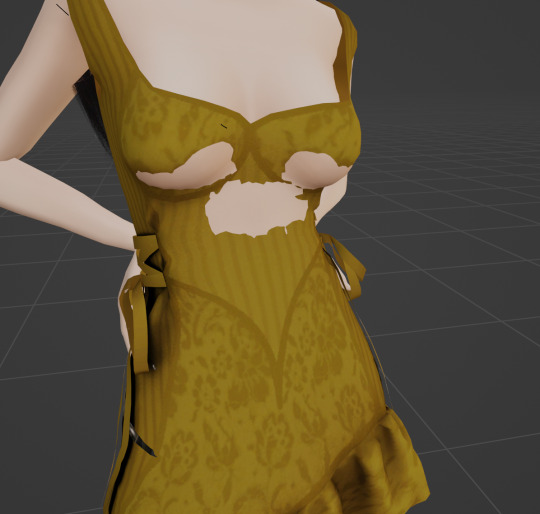
Using the sculpting tool set to elastic deform, you just have to click and drag the fabric to where you want it. Be sure you're editing the clothing mesh and not your sims body! Always select the mesh you want to sculpt from your outliner panel so you don't accidentally click and drag your sims skin! Here's a before and after, make sure you're putting your cursor against the right angles.
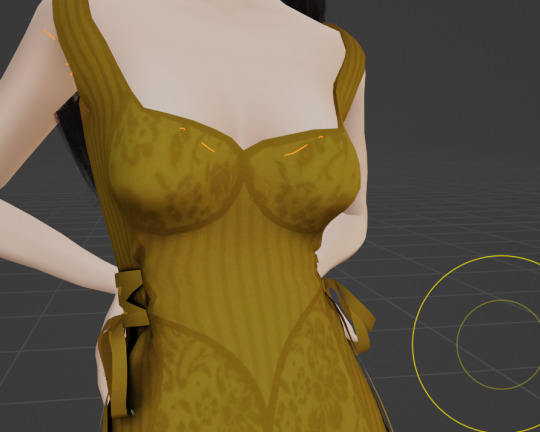
There are a few gaps on the back of her dress too. Here they are before and after sculpting:

It takes some time and practice to get good at this, but once you do there's no limit to what you can accomplish! There are other methods that yield similar results (like shrink-wrap, but I've never gotten it to work for me) but this is my favorite and what I'm most used to. You can sculpt any mesh, so go wild!
That's all I have for today.
Homework:
Your homework is to append hair and clothing in blender and post the final result! Tag me in it too I'd love to see! & As always if you have any questions please feel free to send them through to me either with an ask or the help desk!
#salemsims tutorial#render school tutorial#sims 4 render tutorial#sims 4 blender tutorial#render tutorial#blender tutorial#tutorial
67 notes
·
View notes
Note
Hi! So I’m in the process of learning how to make clothes CC. I’ve got MD and Blender down however I seem to be struggling with textures. No matter what unless its bright colours, the textures seem to look quite LQ in game. I was wondering if you had any tips regarding textures for clothes CC in Photoshop?
i'm going to be so so real but with this game, you can't really get super crisp textures without using HQ mod or some other mod. it's why a lot of creators go maxis match bc this game is very low spec.
i can offer some tips
try not to stretch out your uv maps. it will result in stretched out and distorted textures
you can try baking your textures at a higher size (2048x4096) but be sure to save a version that is standard size (1024x2048) for those who do not have high spec computers.
you can use photoshop's surface blur to add a slight sharp blur to your textures but again, it's the game, not you.
ONE LAST THING
if you do use marvelous designer, PLEASE LEARN TO RETOPOLOGIZE YOUR CLOTHING. a lot of creators use MD and import a 800K dress into a package file and it does NOT increase the quality. all you'll get is a piece of laggy mesh that'll slow down your game, cause last exceptions and won't weight or uv1 well.
you have options. you can
manually retopologize or use a blender add on to do so.
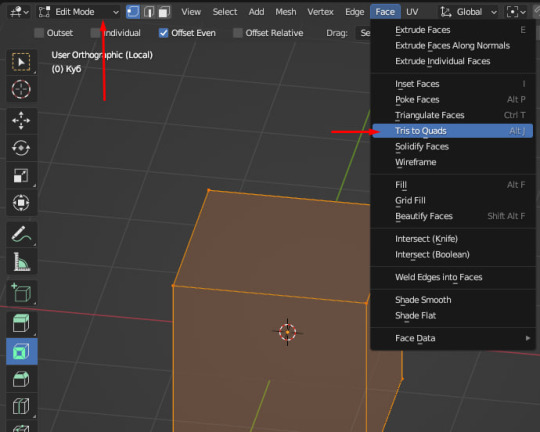
2. you can use MD's remesh option here (i am using MD10). it will turn your mesh into quads which are a bit easier to work with in blender. be sure to triangulate your mesh (ctrl + T) when you import into sims 4 studio

3. you can retrace the uv in blender via this method
youtube
4. or my preferred method, retrace and use shapekeys by @ts4eve. she knows what she's doing and i wish half of patreon simblr would read this tutorial.
good luck and if you have any more questions, my inbox is always open!
32 notes
·
View notes
Note
Hello! I love your creations! I'm very interested in the Blender sculpt and rigs you created! I would like to learn how to do something similar. Do you know of any tutorials on how to do it? Another big question I have is: how did you eliminate the triangulation from the default sim mesh? I hope it's okay to ask you for advice.
Hello and thank you! 😊 I cannot give specific lessons about all this because I searched as needed and did not save them. What exactly do you want to do? To work with the rig, I started by learning the poses. Then I simply studied how a rig was created for a finished model and how it could be modified. It’s the same with a sculpt, start small and depending on the degree of questions and actions that you need to take, contact google or yandex. Many mini lessons and tutorials are on youtube. Triangulation is removed like this:
Also, just a quick reminder: remove the triangles first, then do merge double vertices by distance. If you do the opposite, this can lead to a torn uv if the program removes the face that was the edge.
14 notes
·
View notes
Note
hellooooo platasp !! I hope you're having a good day :]
well, I'm thinking about converting sims 4 hairs/clothes to sims 2, and I wanted to ask if you have any tips/tutorials that could help me, because I don't know how to start (lol)
and i wanted to say that your hair defaults are now a must have in my game, you did it very well <3
hey, jeuu!!
Well, that's a weighted ask haha. I'll do my best! Everything linked below pertains to clay hair and 4t2 eaxis clothing.
these can all be found @/sims2tutorials
Hair:
Resizing TS4 textures for 4t2 conversion | MDP Smooth hair bone assignments using Blender 🎥 | Redsimmer 4t2 Hair Conversion Workshop 🎥 | platinumaspiration ---- this is chaotic because...me, but I think it's the closest to how I do hair
Clothing:
4t2 Tips & Tricks Tutorial 🎥 | MDPthatsme Sims 4 to Sims 2 Pants Tutorial 🎥 | platinumaspiration Mini Tutorial - Using Unweld Radial to Fix Merging Errors | kaluxsims A lesson on Normals, Seams, Gaps, and Black Shadows 🛠 (technically S3 tutorial!) | Gruesim
The biggest tip I can give is don't give up. Your first conversion might be a stinker, but if you can get it in the game you've come a long way!
13 notes
·
View notes
Text

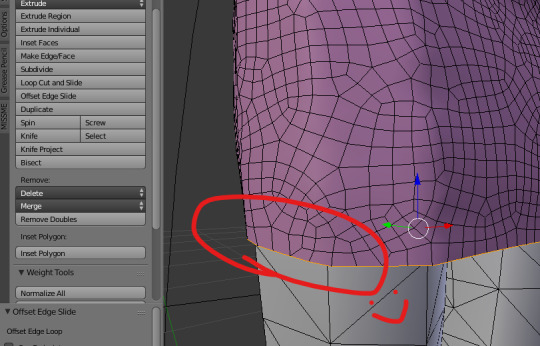
SIMS 4 - FIXING MESH HEMLINES IN BLENDER - MINI TUTORIAL
Any clothing creators out there wondering how to get rid of the dark, seemingly bent edges along a hemline? I found a tutorial and this was part of it. The following is in my own words but was discovered on CGCookie.com. Also, I ran through this in Blender 2.79. Hopefully, if you have a different version, it won't be too dissimilar.
Here's what to do:
1. Open your completed mesh in Blender, the one you thought was FINALLY FINISHED lol.
2. Use the Edge select tool, and click on one of the edges in the loop you want to fix. Alt-left click usually allows you to click the whole loop. If that doesn't work for whatever reason, click one edge, move along the loop a few spots over and CTRL+click another edge, and you should see that all the edges between the first one clicked and the second one CTRL+clicked are now selected. You can just keep on CTRL+clicking along the loop until you reach the first one again. If that doesn't work, you have to manually click each edge along the loop.
NOTE: I recommend doing each edge set separately, as I don't know what will happen otherwise. If anyone knows that it's possible to do more than one edge set at a time, pls comment and I'll update the tutorial with many thanks :D
3. Now, click on the Tools tab and find the Add: section. Within that section is a tab called Offset Edge Slide. Click that and immediately right click, which will stop the edges from moving with your mouse.
SAVE YOUR PROJECT
Your edges are now sharp again!
22 notes
·
View notes
Photo


Posepack #19: Hiding Behind A Rock
What an imaginative title, I blow myself away sometimes. Anyway; the second set of poses to come out of those I made for a recent story chapter, for your drunk or injured Sims who are - you guessed it - hiding behind a rock, talking with someone, and struggling to get up. Please take a look at the mini tutorial to see how to use this one!
Note: The top of the Sims’ heads can be seen from the other side of the rock, which might suit your storytelling purposes, but if not you can just pile some more rocks up behind/add in some shrubbery/etc.
Also note: The posepack only contains the poses for the two behind the boulder. I used @samssims for the third Sim in my preview pic.
ALSO (lmao): disregard the hoodie. It’s not required. I’m just dumb and didn’t know how to remove it from my low-quality renders.
This ought to work for femme and masc rigs but be aware of clipping depending on body type and clothing... you know, the usual. Please do not redistribute or claim as your own. I don’t mind alterations being made if you use them in Blender renders, but I’d appreciate a tag!
Download here (SFS)
#ts4-poses#ts4poses#ts4posepack#sims 4 pose pack#sims 4 cc#sims 4 story#sims 4 couple poses#sims 4 fantasy#herecirmposes
271 notes
·
View notes
Photo
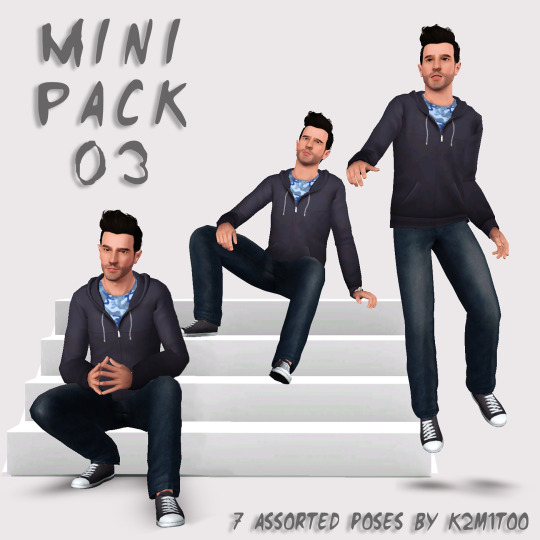
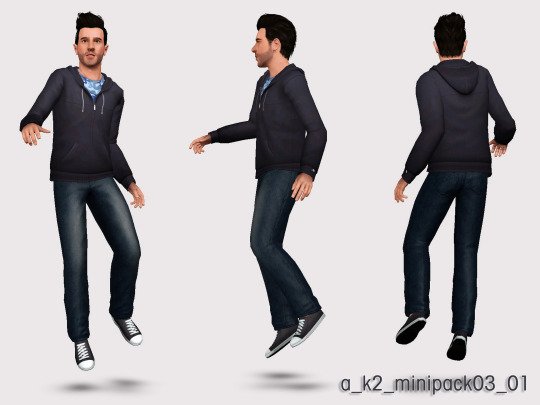
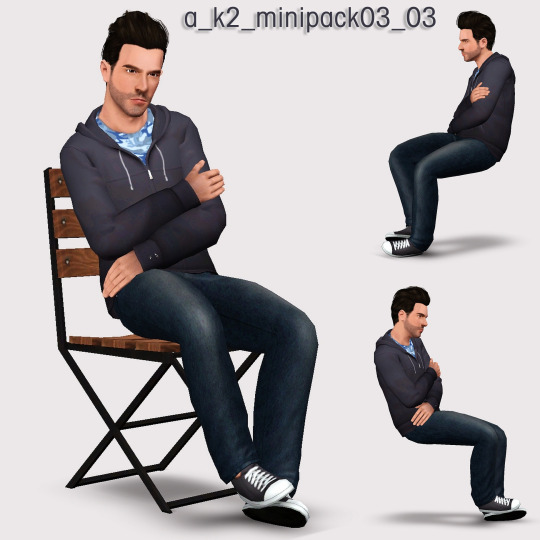


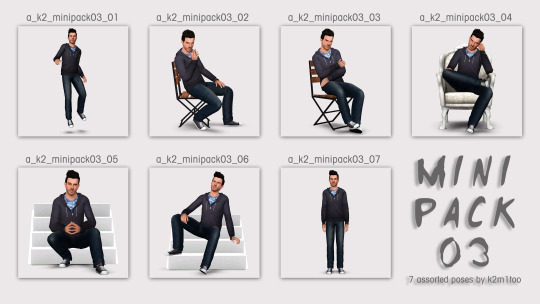
Mini Pose Pack 03
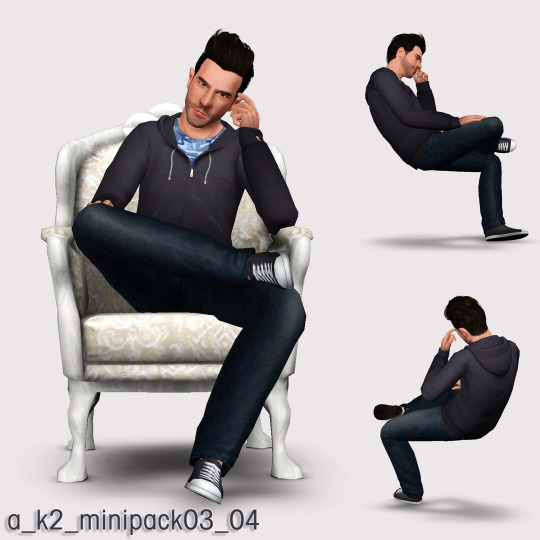
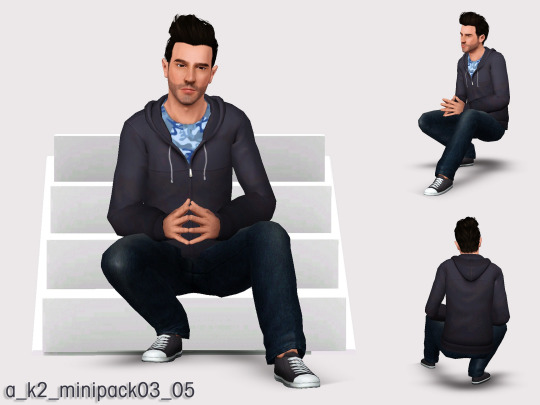
Another "mini pack" of poses I created in conjunction with a celebrity sim-alike. This time, the subject was Zachary Quinto. All of these poses were inspired by various photo shoots. I know #7 is super-basic, but I was trying to emulate Mr. Quinto's posture in a significant number of his red carpet photos.
POSE NAMES
a_k2_minipack03_01
a_k2_minipack03_02
a_k2_minipack03_03
a_k2_minipack03_04
a_k2_minipack03_05
a_k2_minipack03_06
a_k2_minipack03_07
NOTES
CC credits for the items used to create my Zachary Quinto sim are thoroughly documented on his download page. (I will update with a link to that page once he has escaped the moderation queue!)
ADDITIONAL CREDITS
Cmomoney : Pose Player and Pose Pack Creator
OrangeMittens : Complete Pose Tutorial Using Blender
A : Sims 3 Clip Tool for Blender
Inge and Peter Jones : s3pe
Amuhav : Updated Sims 3 Clip Tool for Blender 2.79
Muraono : Backdrop for Screenshots
DOWNLOAD (Poses) : SIMSFILESHARE | MTS
Download (Model) : (link pending)
61 notes
·
View notes
Note
Hello there! I'm Eden :D I LOVE your renders! I've been rendering for well over a year at this point, however I only stuck to the super basic stuff since it took me a year before that to even know how to do it at all. I've wanted to up my game and get to where you are now. I'm SO SORRY if this question was asked already (I haven't gotten too far in your posts yet), but;
How do you personally edit your renders? I understand you use photoshop, but how do you do it exactly? Your renders have that kind of digital art style, like you drew them yourself. Feel free to be as descriptive or brief as you'd like!
Hi Eden!!! Thank you so much! 🥹😍♥️
I've followed you back and glad we're moots! I'd love to see some of your work!
I'm not sure if I've answered this before but I'm happy to answer it again! Also I haven't advertised it in a while (and I really need to try to get up a new tut, maybe soon), but my alt account is a Render School where I post tutorials, with plans to post editing tutorials in the future!
But honestly as far as my editing, I really don't do much.
Actions are my secret weapon, and I have a few favorites/go-tos I'll link! A few are by simmers and a few are just action sets. I'm in a family of photographers, so I have access to a wealth of resources for my editing.
Sonder set by @intramoon
Cold Water set by @intramoon
Retro Prime photoshop actions
Indie camera photoshop actions
But my "secret weapon," as it were, and the set of actions that I think most helps me accomplish that digital art style is a set of actions that are sadly expensive and hard to find now.
My favorite set is by Totally Rad! and I think in recent years it's been folded in to this Pixel Sugar product on their website. I know that's a steep price point but it's possible you can find it around the corners of the Internet for less, or if you can't, you might be able to find "dupes" of the better ones, which imo are:
Technicolor dream world
Super Fun Happy
Bullet Tooth
Grandma's Tap Shoes
As for my method, I know a lot of simmers paint over their renders, and I've done that a few times but find I'm too impatient tbh. My goal is always to have to do only minor touchups over my renders and some color/vibe adjustments before the finished product. My "raw" files are always exactly what blender spits out for me, unaltered in any way except to resize them for Tumblr.
To get that digital art style, I'd recommend rendering with alpha details if you don't already. If your computer can't handle alpha cc in the game, DM me and I can give you some pointers (sneak peek info for a future tut lmao) on how to accomplish it without bogging down your game.
When I go into photoshop I adjust the brightness and contrast, as I tend to personally prefer high contrast pieces that contain dark subject matter but you can still see the details. Then I'll paint/blur/clone/adjust anything that needs it, then I'll "stack" and adjust a handful of actions before applying edge blur and vignette and any other color adjustments (levels, curves, etc).
That's a very oversimplified rundown of what I do, but really overall my editing process is simple. The bulk of my work happens in blender itself. I find that the more time I take to perfect the lighting and shadows and angles in blender, the less frustrating the editing process and the happier I am with the end result. So, that said, be sure you're spending a lot of time in blender getting the light and shadows to be exactly where you need/want them to be before running it.
I know this is a bit long I'm sorry! If any of it is super confusing or you'd like a more in-depth look at any of it please let me know! I do plan to do editing tutorials for my side blog, but the latter half of this year has kind of run over me like a train, and for now I'm just trying to get by day by day. But I'm happy to help if you have more specific questions!
& thank you again!! ♥️
#replies#thank you so much this literally made my day#I was having a bad one too ugh I needed this#mini blender tutorial#tutorial ish#sims 4 blender tutorial#sims 4 render tutorial#sims 4 editing tutorial#I can't tell yall how happy it makes me when yall love my work#legit holding back tears#♥️♥️♥️
39 notes
·
View notes
Text
Resources, Tutorials, presets & sliders list on my blog - Sims 4 (updated)
3ds Max
Actions
Blender
Building Tips & Builds
CAS related stuff
CC folders
Cheats
Cinema4D
Color Palettes
Fonts
Gimp Tutorials
Hq
Icons & Wallpapers
Lighting Mods
Marvelous Designer
Masterlists
Milkshape
Mods
PNGs
PSDs
Paint.Net
Photoshop Brushes
Photoshop Tutorials
Reshade
S4 Studio Tutorials & Tips
Templates
Textures
Topaz
Tumblr Themes Related Questions
Various Tips - Mini Tutorials
Presets
All Presets
Body
Cheeks
Chest
Chin
Ears
Eyes
Face
Head
Lips
Nose
Sliders
All Sliders
Back / Shoulders
Body
Cheeks
Chest
Chin
Eyes
Face
Feet
Hands / Arms
Head
Legs
Lips
Neck
Nose
Pets
If something doesn’t work, please let me know! Link for the resources and tutorials through my blog here. Link for the sliders & the presets here
888 notes
·
View notes
Text
@gildedgaiety submitted:
more than one sim in blender hi hi! this may be a silly question with a simple answer that i just cant see but i cant for the life of me figure out how to work couple poses in blender, i try adding the pose and it gives them both the same one and i just dont know enough to figure out how to fix it-
It's not a silly question at all and I'm sorry it's taken me a few days to reply to this!
I'll include a link to Part Two of my Basic Render Tutorial that covers posting HERE, but otherwise, let me jump right in to a mini tut:
Here I have my sims in blender, unposed and stacked in a very creepy way lmao:

I haven't yet set them up for posing, so let's do that now.


To do this, select the "pose" option in your outliner under ONE of your sims, then in your layout view, hit "i" on your keyboard and select "location and rotation"
Then you'll see that sim's track show up in your nonlinear animation window.
Do the same for your second sim! Then you should have this:

Now we need to append our poses! Follow the instructions in that basic render tutorial I linked above and export both of the posses.
MAKE SURE YOU EXPORT THE POSES WITH THE PROPER RIGS, I.e. if you're doing a couple pose like I am, make sure you export the female pose on the female rig and the male pose on the male rig.
Like this:

Once your poses are appended in blender, go to the nonlinear animation tab.

If I had to guess, the reason you're posing both at the same time is because you have both tracks selected (as in, both of them are highlighted like this at once).
We want to highlight ONLY ONE, I'm going to pose Ariss first.
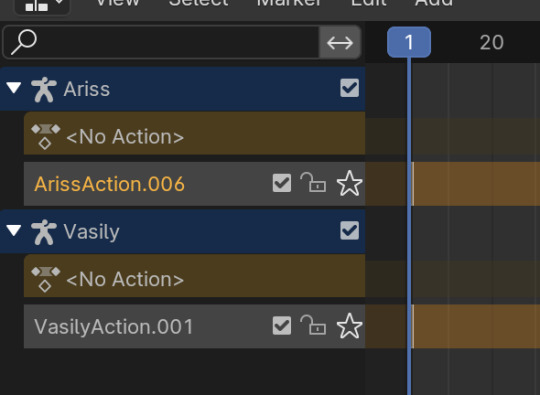
So I'll select her track (see how only hers is highlighted?) then Add the pose.

You can see, very creepily lmfao, that Ariss is the only one posed now!

Do the same for your other sim, selecting only their track, and voila:

They're both posed now!
I hope this helps! Please send any more questions my way! & I HAVE A DISCORD NOW!
Feel free to join (I'd love to have you!) with any other render questions and to share your work!
#salemsims tutorial#salemsims render tutorial#ts4 render tutorial#ts4 blender tutorial#sims 4 render tutorial#sims 4 blender tutorial#sims render tutorial#sims blender tutorial#ts4#sims 4#sims#help#replies
7 notes
·
View notes
Text
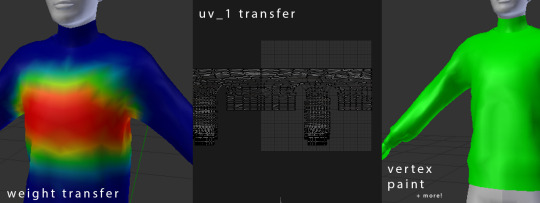
How to rig your mesh and make it game-ready (weight transfer, uv_1 & vertex paint)
Hi, I wanted to write this short tutorial on how make your CAS mesh game-ready using Sims 4 Studio & Blender, going over meshgroups, weight transfer, uv_1, and vertex paint. This tutorial assumes some knowledge about blender but it is beginner-friendly.
This applies to any mesh you can make in CAS, from clothes to accessories.
Prerequisites: You have a new mesh ready, with a UV+texture that fits within the Sims 4 body UV space, and you are using Blender 2.78 or Blender 2.7.
(1) Meshgroups/Cuts
In order for your mesh to show in studio, it has to have the same number of meshgroups/cuts as the .package you cloned has (these are the s4studio_mesh_x meshes in blender). You can check the cut number for a mesh on the scene tab in blender
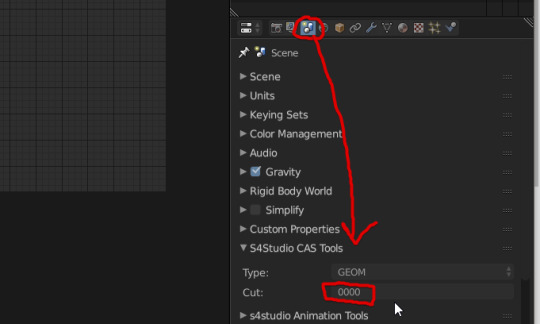
When creating a new package, I highly recommend cloning a clothing with one cut, as explained in this mini tutorial by @theslyd. This saves you from having to cut your mesh up into parts before importing and saves a lot of time.
For some accessories and other items there aren’t options you can clone with one cut, for which you just need to work with and keep the same number of cuts.
(2) Weight Transfer
STEP 1: Append either a nude top/bottom, or reference ea mesh into blender. Most of the time I use the nude meshes to transfer from because it’s easier/quicker. You can download this mesh pack I made that contains all the male and female nude meshes to save time.
You can delete any extra rigs and bone shapes.
STEP 2 (optional): Subdivide the EA mesh, especially important if your mesh is high poly. This isn’t neccessary to do but if your morphs aren’t looking smooth ingame, you need to do this,
STEP 3: Holding shift, select the EA mesh, and then your mesh, and go to weight paint, and on the left side bar (press T if it’s not open), on the tool tab, click the button ‘Transfer Weights’
Make sure ‘Auto Normalize’ is checked before you transfer weights!!!

Skip the next step if you’re using Blender 2.70
STEP 3: After clicking ‘Transfer Weights’, set the Source Layer to ‘By name’, and Destination to ‘All Layers’, and then Click the ‘Clean’ button, and set the Subset to ‘All groups’.
This procedure fully transfers all the weights, and deletes any weights that are set to 0 (these weights break the animations ingame).

Now your weights are transferred properly and your mesh is rigged to the skeleton, so it will move when your sim moves.
STEP 4 (optional): If your mesh is oversized or big there may be glitches/bad looking areas.
These are fixed via manual editing, @theslyd has tutorial that goes over this, but my advice is that the blur tool is your best friend. I recommend adding the armature modifier to your mesh if it’s not there and linking it to the rig, because then you can pose your mesh in Blender and check for weight glitches without entering the game.
(3) UV_1 Transfer
This REQUIRES Blender 2.78, older versions cannot be used for the uv_1 transfer.
This is also assuming your EA mesh (the one you appended earlier) is still in your blender file after weight transferring.
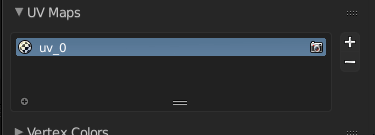
STEP 1: On the Data tab (the upside down triangle), scroll down to UV maps, create a new UV map and rename it to uv_0.
STEP 2: Select your mesh, go to the modifiers tab and add a Data Transfer modifier.

STEP 3: Make the Source Object the EA mesh, check ‘Face Corner Data Transfer’, click UVs, change All Layers to uv_1, change By Name to uv_1, and then click Apply.

Now your mesh will morph properly ingame when a sim is fat/thin. You can delete the EA mesh now if you don’t need to use it anymore.
For some accessories and parts of meshes, they do not need a uv_1 if you don’t want them to morph with the sim, like the pendant on a necklace, or zips on clothing.
For example, if there’s a zip on your clothes you don’t want to morph, go to the UV editor with the uv_1 selected, and then find where the zip is, press L to select that uv island and then size it down really small. This will make it not morph if a sim is fat/thin, with the rest of the clothing morphing like normal.
(4) Vertex Paint
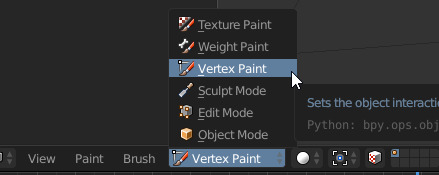
STEP 1: Select your mesh, and go to the vertex paint mode.
STEP 2: On the left side panel (press T if it’s not there), click the colour box and on the Hex tab, set the colour to 00FF00.

STEP 3: With the green colour entered, press shift+k to colour your entire mesh green. You don’t need any other colours like blue or yellow (as said in other tutorials), it won’t make a difference.
And that’s the vertex paint done! Vertex paint is crucial for your mesh to work ingame with sliders and for the other rigging parts to work, and with that the whole rigging process is finished.
Your mesh should be ready to use ingame, properly morphing and moving with the sim. I also have a tutorial on LODs if you want to continue finishing your CC for release. LODs are super important for making your CC optimised, and is the other step of making your creation completely game-ready.
If you need more info or help with common weight and uv_1 issues, I highly recommend @mauvemorn‘s tutorials. You can also post on the creator’s help section on the s4s forums if you need more specific help, I and other creators check there often to help people out.
Hopefully the helped! Feel free to ask any questions through asks/dms :)
285 notes
·
View notes
Text
MINI TUTORIAL: making shoes that make the sim taller
A tutorial on how to make high heels or high shoes make your sim taller and not sink into the ground.
1) create your shoes all the way to the end in TSRW
2) open your shoe mesh in Blender and make sure you are viewing them straight on (on your numpad toggle 5 to change the view, and 3 to view from the side) the green line shows the height of the floor, your shoes should go lower than it (sink into the floor)
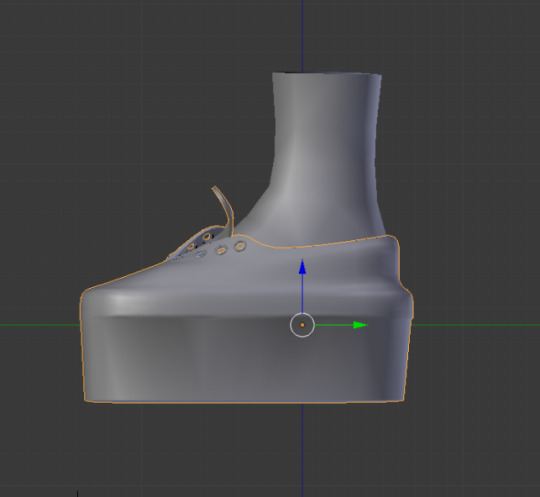
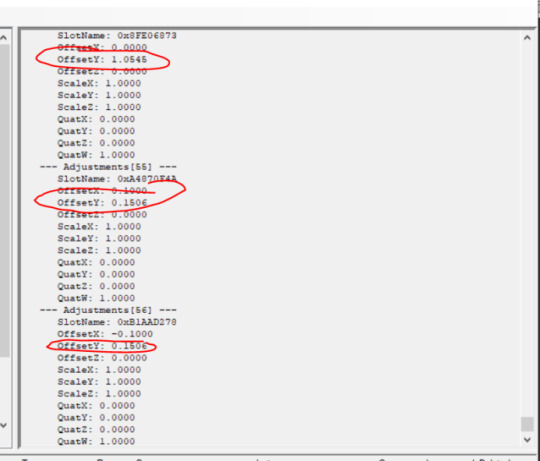
3) go into edit mode, select your entire shoe (A) and press G then Z (or use the blue up arrow) to pull the shoe up so that the bottom is on the green line. Do this is one go and write down the number on the side:
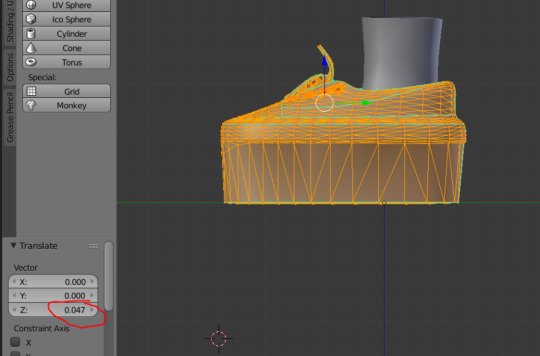
you can see my sim needs to go up 0.047 so that the shoe no longer sinks into the ground
4) open the S3PE file of the shoes you have made (that sink into the ground) and look for the BOND files there should be 5
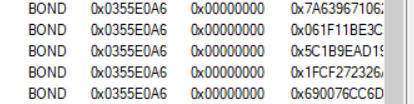
5) download the BOND that edits the height of a sim https://simfileshare.net/download/1551691/ (this file was taken from this tutorial: http://modthesims.info/t/536062)
6) open the downloaded BOND in the Bone Delta Editor (see S3tutorialhub resources, under sliders)
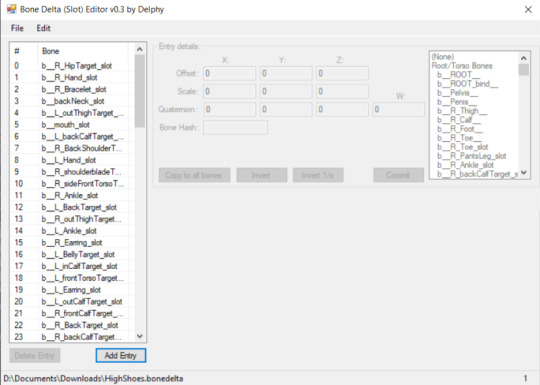
this BOND moves all the bones needed to move the entire sim up. We will just edit the feet, but should your heels need to go waaaay up you may also need to edit all the other bones to go up a little higher too)
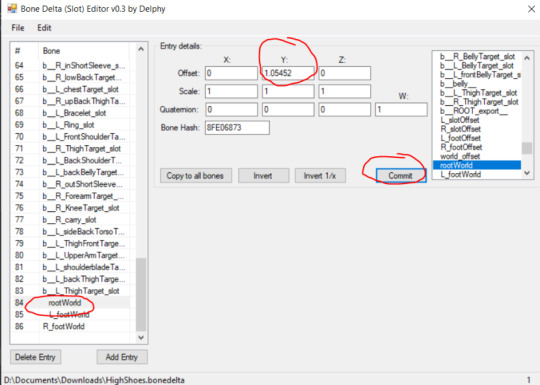
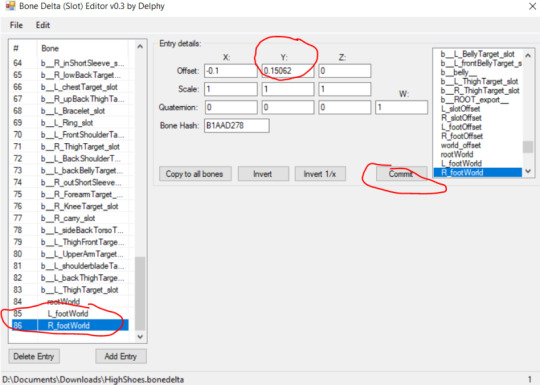
7) calculate how much you need to move your body: Blender gave us 0.047 for our value, lets call this M the move value (root) = ((M0.95)/0.0095)0.0116 + 1, so for me that is 1.05452 (paste the formular into google and just replace M with your value) we also need the feet move value: the move value (feet) = ((M0.95)/0.0095)0.0116 + 0.0961, so for me that is 0.15062 (paste the formular into google and just replace M with your value)
8) find the rootWorld bone in the delta editor (scroll down to the bottom) and change the Y value to your value (here 1.05452) and press commit
9) find the L_footWorld and R_footWorld Bones, and do the same but with your foot value (here 0.15062), make sure to press commit
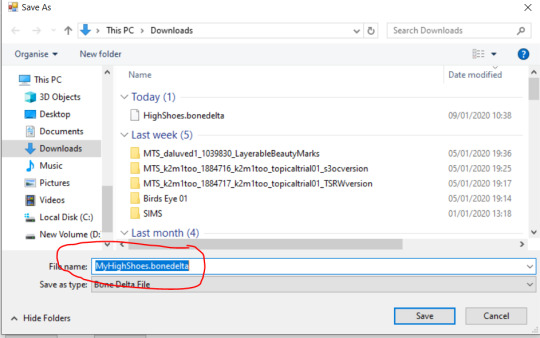
10) once you have completed that, save the BOND file as something that makes it clear it is for those shoes. Make sure the file name ends with ".bonedelta"
11) go back to S3PE and for every BOND file, right click, press "Replace" and choose your Bonedelta file

12) if you then scroll down on the preview window, you should see your numbers at the bottom
13) save and close s3pe, and test your file in game. Depending on your shoe you may have to fiddle with the values a bit, this is slightly trial and error. If your sim also looks odd, like their body position in CAS, you may have to fiddle with some of the other bone values too.
35 notes
·
View notes
Note
can you pleassseee consider making a “cc making” mini school or tutorial series? a lot of us would love to contribute to the community by making cc but tbh the information out there on S4S forums etc are all outdated/hard to follow if you don’t have techy knowledge. i would love to see or learn your process from start to finish. please consider it. yes, you are a beginner but a damn good one and i think beginners are great to learn from as you know the little things you wish you new sooner! 💓
Hi anon! Well this is very flattering, thank you! I actually would love some tutorials myself, haha! I still do a lot of trials and errors and sometimes it works and I am not sure why (same when it doesn't). I watched a lot of blender tutorials YouTube video (not sims necessarily sims related) that helped. S4S has great tutorials on basically everything you can imagine, but you also gotta do some work yourself, when it uses a more technical term you don't know, open google, and you will find everything you need. I don't think there are tutorials out there for exactly what you would like to do, but for sure all the information you need is out there (sometimes on 3 different tutorials, kind of thing). The reason I am not doing tutorials (for now) is that I don't think I could make it good enough, I don't have a good structured knowledge yet, that's all. BUT I think I am a nice enough person (I hope so) and if you feel comfortable with coming off anon, send me an inbox, maybe I can help with a particular problem you are having, or I will do my best to help. Sorry if this wasn't super helpful.
11 notes
·
View notes
Note
Hi Frankie! How are you today? I was wondering if when your not busy could you possibly do like a mini tutorial on how to convert accessories from sims 4 to sims 3 since that old one was deleted
Hey ho nonny! Watch the tutorial on converting clothes from TS4 and then when you have the mesh and texture exported and in blender, just continue on with the Accessories tutorial!
I may make a tutorial again at some point but I am super busy atm :D If you get stuck just IM me!
12 notes
·
View notes