#tumblr is restricting me to 10 images
Text
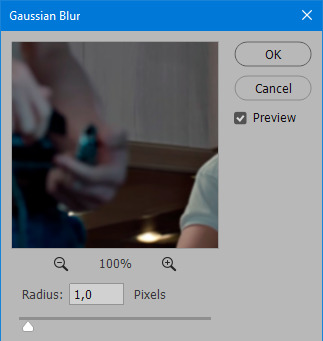
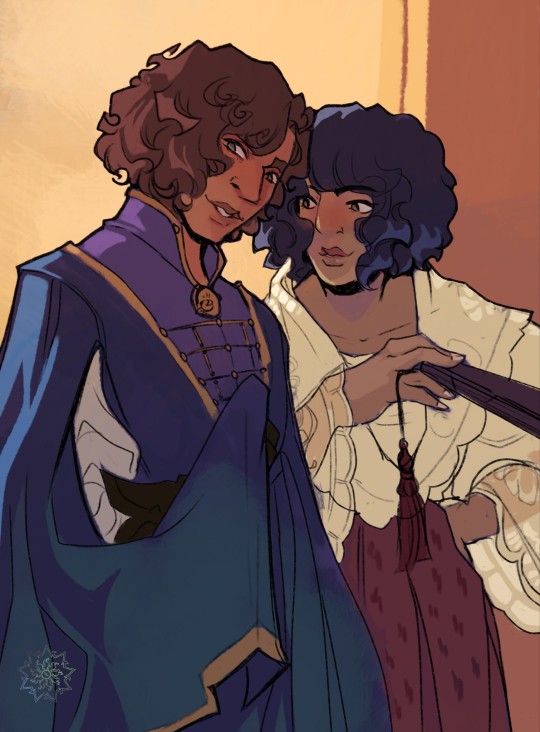
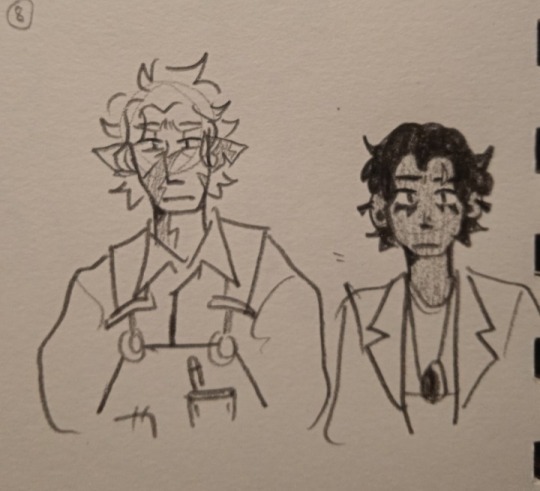
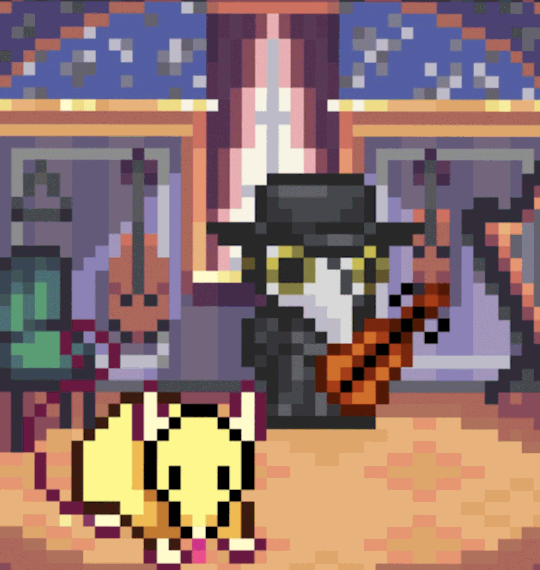
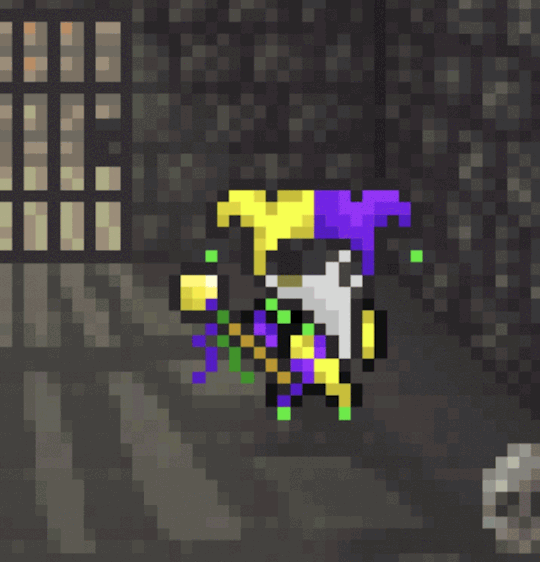
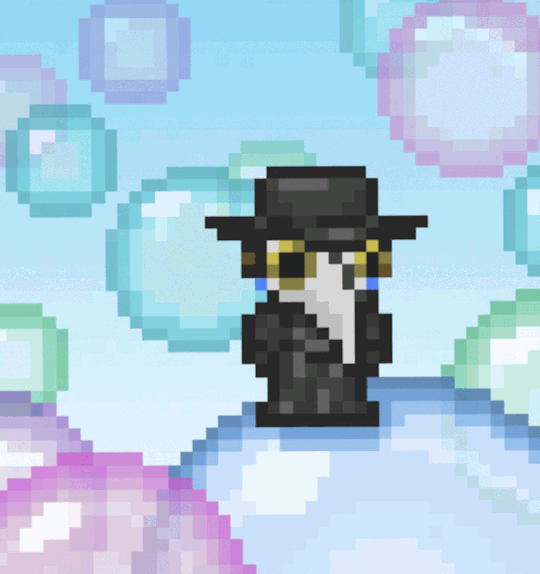
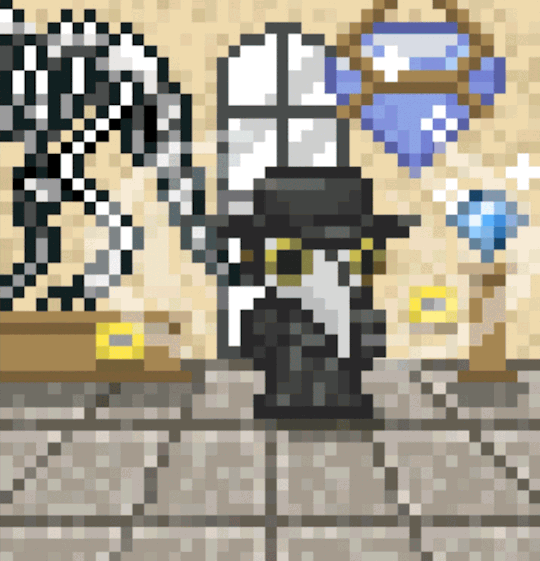
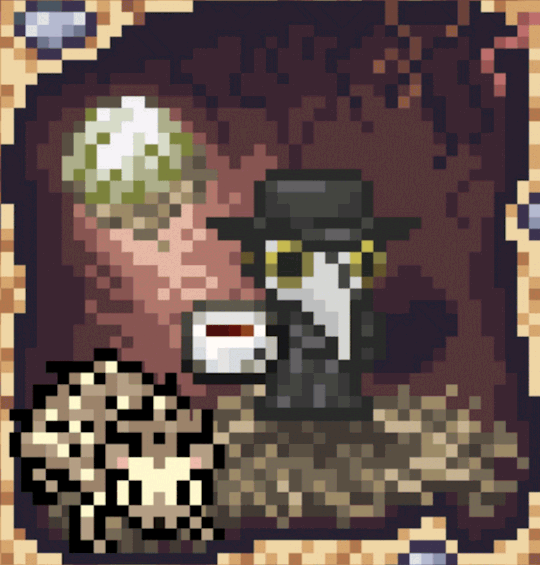
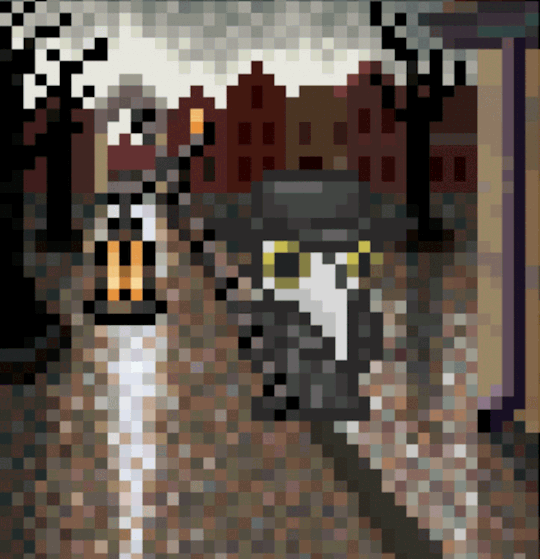
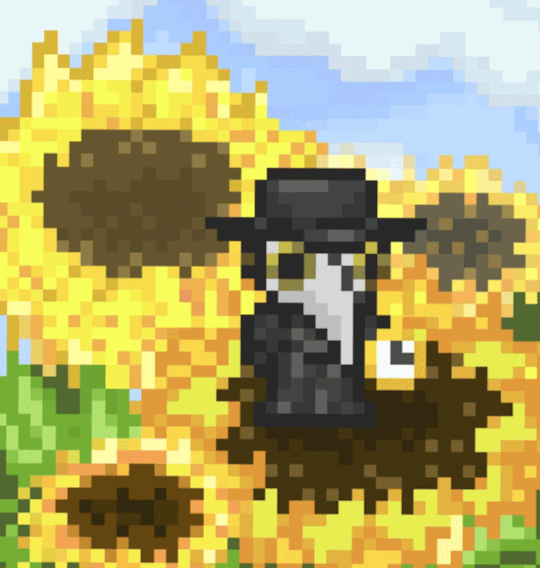
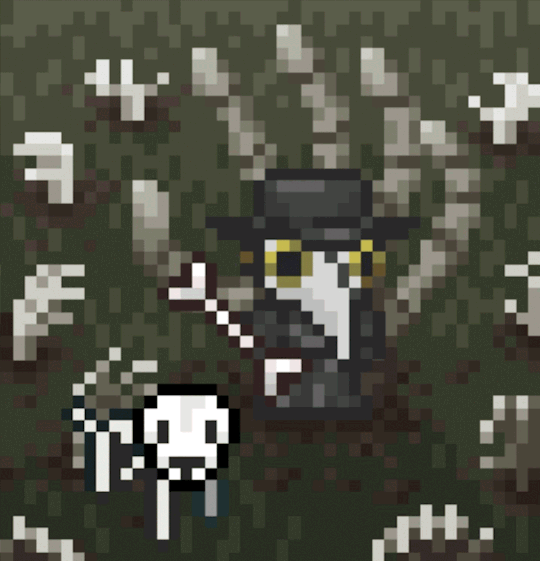
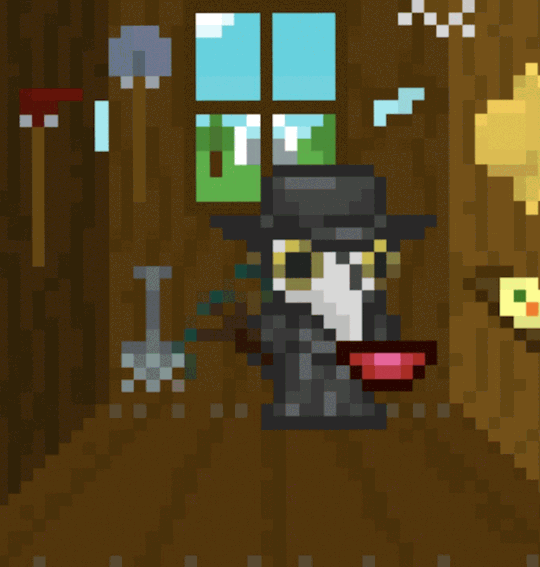
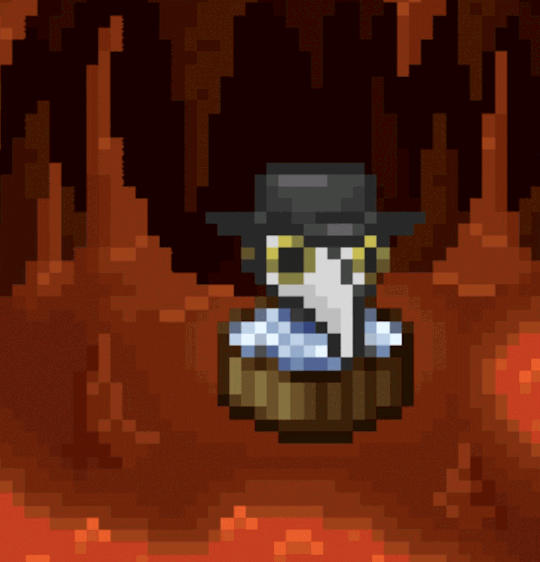
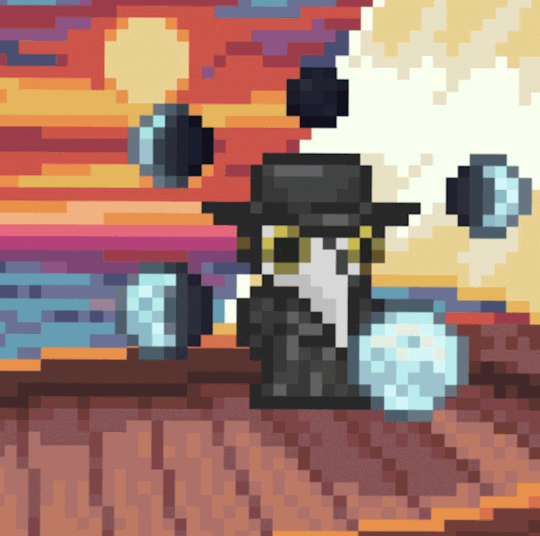
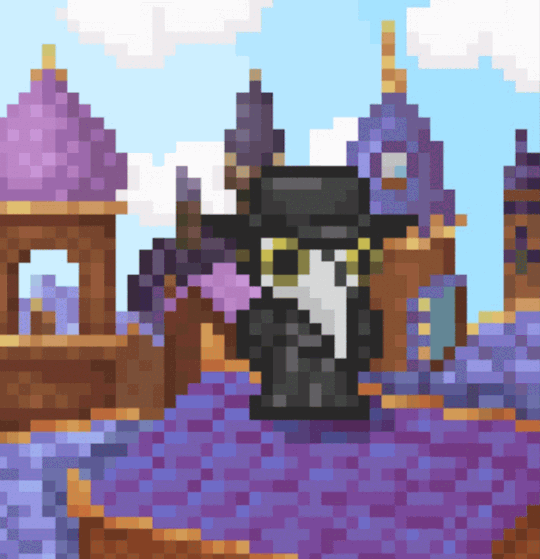
Part 1: Colder
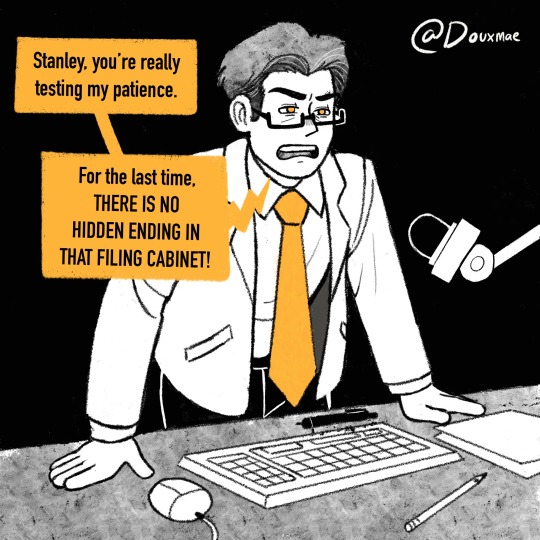
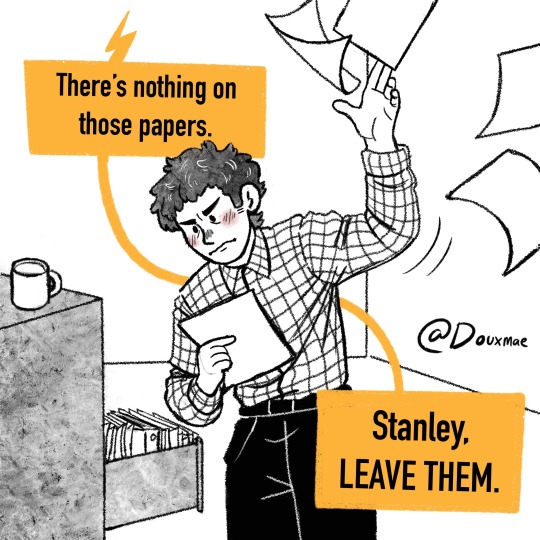
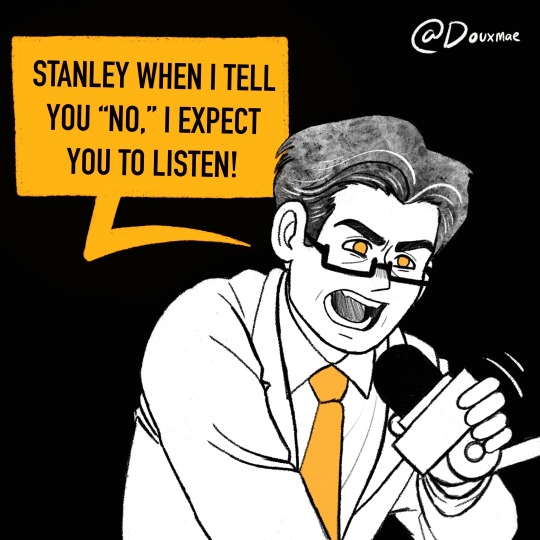

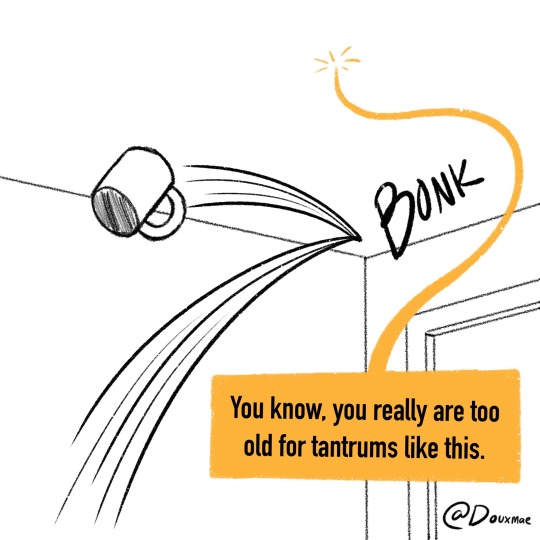
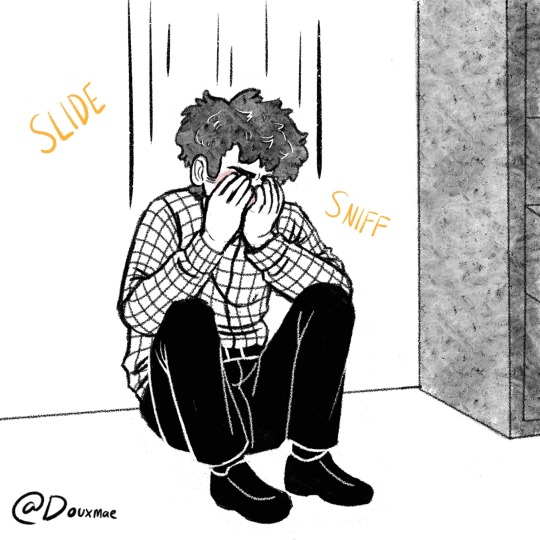
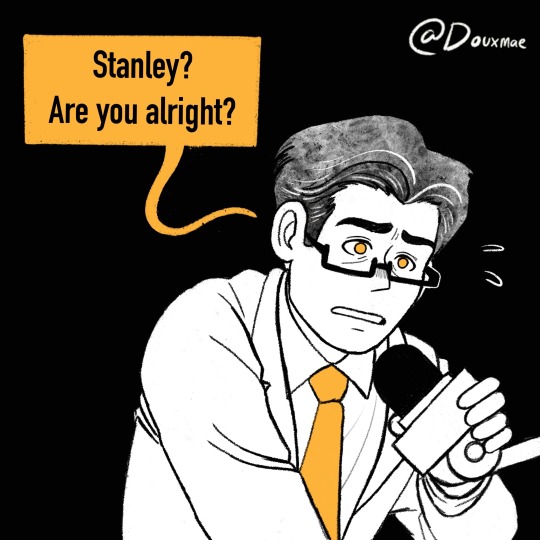
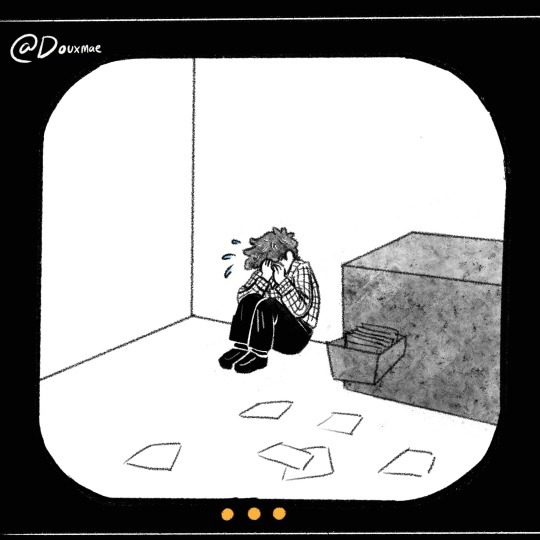
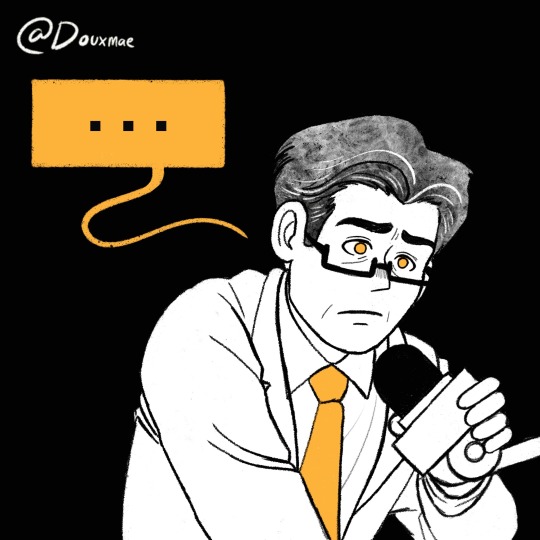
#i made a lot of people sad with my last tsp post so I had to make smth a little happier#I KNOW THIS LOOKS SUPER SAD RN BUT TRUST ME IN PART 2 ITS BETTER#tumblr is restricting me to 10 images#tsp#the Stanley parable#Stanley parable#tsp fanart#tsp fan art#the Stanley parable fanart#the Stanley parable fan art#tsp stanley fan art#tsp stanley fanart#tsp stanley#tsp narrator#tsp narrator fanart#tsp narrator fan art#the Stanley parable Stanley fanart#the Stanley parable Stanley fan art#the Stanley parable narrator fanart#the Stanley parable narrator fan art#the Stanley parable narrator#tspd#tspd fanart#tspd fan art#the Stanley parable deluxe#the Stanley parable deluxe fanart#the Stanley parable deluxe fan art
586 notes
·
View notes
Text
GIFMAKING TUTORIAL: PHOTOPEA (for Windows)

Screencapping
Gif Width/Size Limit/Ezgif
Loading Frames
Cropping and Resizing
Rasterize/Make Frames
Sharpening
Coloring (not detailed. Links to other tutorials included)
Exporting
Obligatory Mentions: @photopeablr ; @miwtual ; @benoitblanc ; @ashleysolsen
Definitely check out these blogs for tips, tutorials and resources, they're a gold mine. Finally I recommend browsing the PHOTOPEA TUTORIAL / PHOTOPEA TUTORIAL GIF tags.
DISCLAIMER: English is not my first language and I'm not an expert on what I'm going to discuss, so if anything's unclear feel free to drop another ask.
1. SCREENCAPPING -> PotPlayer (the one I use) or MVP or KMPlayer
INSTALL PotPlayer (tutorial)
Play your movie/episode and press Ctrl + G. The Consecutive Image Capturer window will pop up. Click Start to capture consecutive frames, Stop when you got what you needed.
Where it says "Image Type -> Format" I recommend picking PNG, for higher quality screencaps.
To access the folder where the screencaps are stored, type %appdata% in windows search, open the PotPlayerMini64 folder (or 32, depending on your system) and then the Capture folder. That's where you'll find your screencaps.

Admittedly MVP is a lot faster but I prefer Potplayer because it generates (at least in my case) higher quality screencaps. MVP kind of alters the hue and it made it harder for me to color my gifs. Still, if you're interested in how to use it, I recommend this tutorial.
As for KMPlayer, every tutorial out there is outdated and I couldn't figure out the new version of the software.
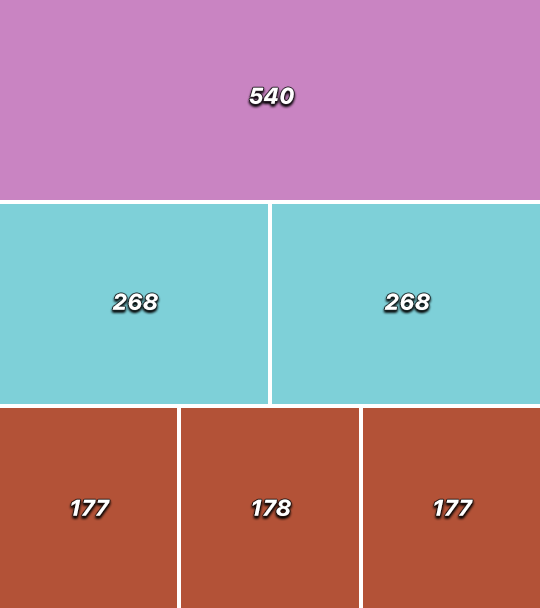
2. GIF WIDTH/HEIGHT, SIZE LIMIT, EZGIF OPTMIZER
At this point you should already know how big your gifs are going to be. Remember the ideal gif width(s) on tumblr are 540 px / 268 px / 177 px. These specific numbers take into account the 4 px space between the gifs. No restrictions on height. Here are some examples:
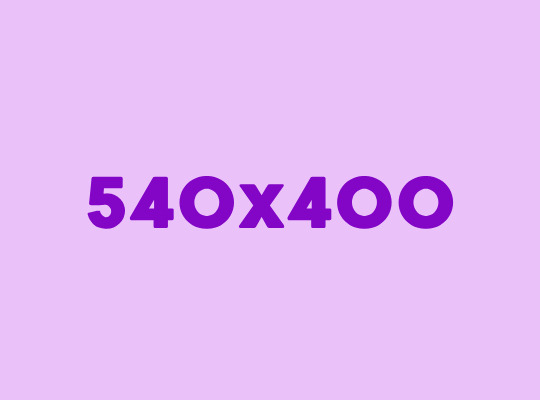
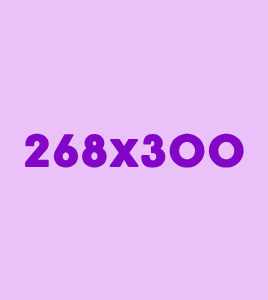

You can play around with the height (177x400, 177x540, 268x200, 268x268, 268x350, 268x400, 540x440, 540x500, 540x540 etc) but if you go over the 10 MB limit you'll either have to make your gifs smaller/delete some frames.
OR you can go on ezgif and optimize your gif, which is usually what I do. The quality might suffer a little, but I'm not really (that) obsessed with how crispy my gifs look, or I'd download photoshop.

Depending on the gif size, you can decrease the compression level. I've never had to go over 35. It's better to start at 5 (minimum) and then go from there until you reach your desired ( <10mb) gif size. Now that I think about it I should have included this passage at the end of the tutorial, I guess I'll just mention it again.
3. LOAD YOUR FRAMES
File -> Open... -> Pick one of your screencaps. The first one, the last one, a random one. Doesn't matter. That's your Background.
File -> Open & Place -> Select all the frames (including the one you already loaded in the previous passage) you need for your gif and load them.
(I recommend creating a specific folder for the screencaps of each gif you're going to make.)
WARNING: When you Place your screencaps make sure the Crop tool is NOT selected, especially if you've already used it and the width/height values have been entered. It will mess things up - I don't know why, could be a bug.
You can either select them all with Ctrl+A or with the method I explained in the ask: "when you want to select more than one frame or all frames at once select the first one, then scroll to the bottom and, while pressing Shift, select the last one. this way ALL your frames will be selected".
WARNING: Depending on how fast your computer is / on your RAM, this process may take a while. My old computer was old and slow af, while my new one can load even a 100 frames relatively fast, all things considered. Even so, I recommend ALWAYS saving your work before loading new frames for a new gif, because photopea might crash unexpectedly. Just save your work as often as you can, even while coloring or before exporting. Trust me, I speak from experience.
Now you can go ahead and delete the Background at the bottom, you won't need it anymore.
4. CROPPING AND RESIZING
Right now your screencaps are still smart objects. Before rasterizing and converting to frames, you need to crop your gif.
Technically you can rasterize/convert to frames and then crop, BUT if you do it in that order photopea will automatically delete the cropped pixels, even if you don't select the "Delete Cropped Pixels" Option. Might be another bug, unclear.
Basically, if you crop your gif and then realize you cropped a little too much to the left or the right, you can go ahead, select the Move Tool (shortcut: V) and, after selecting ALL YOUR FRAMES, move them around on your canvas until you are satisfied. You won't be able to do this if you rasterize first and then crop, the excess pixels will be deleted. I don't know why, I found out by accident lol.
CROPPING
(Cropped pixels: the gray/opaque area outside of the selected area. That area disappears once you press enter and crop, but the pixels are retained, so you can move the frames around and reposition them as you like. In this case I could move the frames to the left and include Silver's figure [curly guy in the foreground] in the crop)
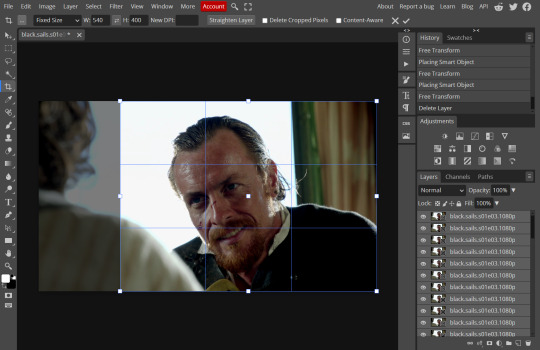
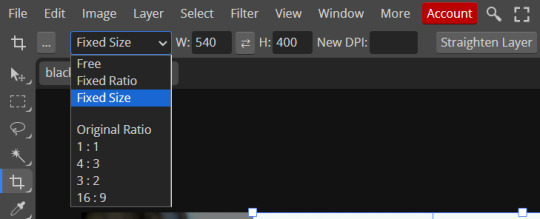
After deleting the Background, you will need to select all your frames (using the Shift key), use the C shortcut on your keyboard to choose the Crop tool. Or you can click on it, whatever's more convenient. Once you do that, a dropdown menu is going to appear. You need to select the "FIXED SIZE" option, as shown in the following screencap.
Once you do that, you can type in your desired width and height. Do not immediately press enter.

Your work area should now look like this. Now you can click on one of the white squares and enlarge the selected area until the edges are lined up. You can then move it around until it covers the area you wish to gif.
WARNING: to move the big rectangle around, you're gonna have to click on a random point of the work area, PREFERABLY not to close to the rectangle itself, or you might accidentally rotate it.

See? When your cursor is close to the selected area it turns into this rotating tool. Move it away until it reverts to your usual cursor, then you can start moving the rectangle. Press Enter when you're satisfied with the area you selected.
RESIZE
This isn't always necessary (pretty much never in my case) - and it's a passage I often forget myself - but it's mentioned in most of the tutorials I came across over the years, so I'd be remiss if I didn't include it in mine. After cropping, you'll want to resize your image.
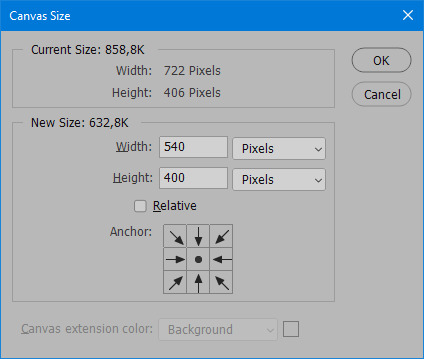
IMAGE -> Image Size...

This window will pop up. Now, should the values in the Width and Height space be anything other than 540 and 400 (or the values you entered yourself, whatever they might be) you need to correct that. They've always been correct in my case, but again. Had to mention it.
5. RASTERIZE & MAKE FRAMES
Now that your screencaps are cropped, you can go ahead and convert them.
LAYER -> Rasterize (if you skip this passage you won't be able to Sharpen (or use any filter) on your frames at once. You'll have to Sharpen your frames one by one.
Photopea doesn't feature a timeline and it's not a video editor, which makes this passage crucial. When you select all your smart objects and try to apply a filter, the filter will only by applied to ONE frame. Once you rasterize your smart objects and make them into frames, you can select them all and sharpen them at once.
Unfortunately this also means that you won't be able to - I don't know how to explain this properly so bear with me - use all smart filters/use them in the same way a photoshop user can. For example, you can sharpen / remove noise / add noise / unsharp mask... but you can't act on those filters in the same way a photoshop user can.
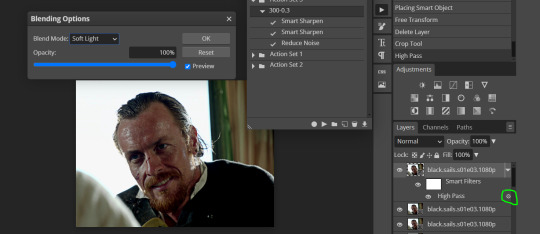
When you work on smart objects you can change the blend mode - which is critical if you decide to use a filter like High Pass. If you simply apply a high pass filter on photopea you won't be able to change the blend mode and your gif will look like this (following screencaps). Or rather, you will be able to change the blend mode by clicking on the little wheel next to "High pass" (circled in green in the 2nd screencap), but you'll have to apply the filter to each frame manually, one by one.

Then you can rasterize/make into frames, but it's extremely time consuming. I did it once or twice when I first started making gifs and it got old pretty soon haha.
Layer -> Animation -> Make frames. This passage will add "_a_" at the beginning of all your frames and it's what allows you to make a (moving) gif. As I said in the ask, if you skip this passage your gif will not move.
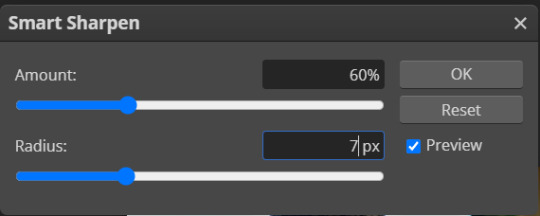
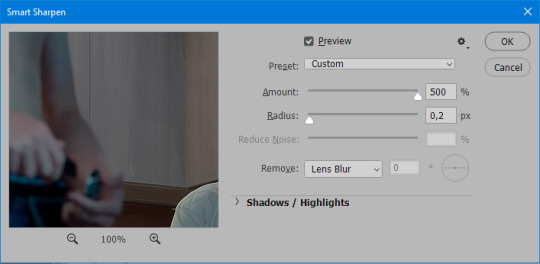
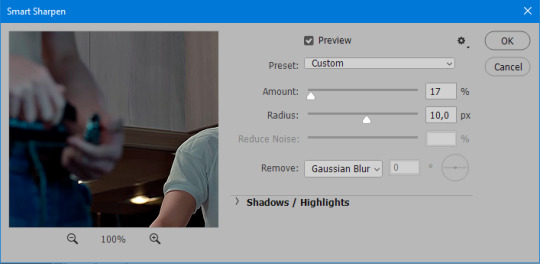
6. SHARPENING
Some people prefer to color first and sharpen later, but I found that sharpening filters (more or less) dramatically alter the aspect of your gif and already brighten it a bit (depending on your settings) and you may end up with an excessively bright gif.
Now, sharpening settings are not necessarily set in stone. The most popular ones are 500/0.4 + 10/10, which I use sometimes. But you may also need to take into account the quality of the files you're working with + the specific tv show you're giffing. I've been using different settings for pretty much every tv show I gif, especially in the last couple months. Some examples:

followed by
OR
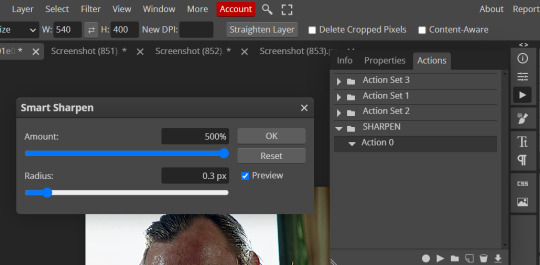
AMOUNT: 500% RADIUS 0.3px
followed by
AMOUNT: 20% (or 10%) RADIUS 10px
You'll just need to experiment and see what works best for your gifs.
Some gifmakers use the UNSHARP MASK filter as well (I think it's pretty popular among photopea users?) but it makes my gifs look extra grainy, makes the borders look super bright and it clashes with my coloring method(s), so I use it rarely and with very moderate settings. Something like this:

Again, depends on the gif and on what you like. I've seen it used with great results by other gifmakers!
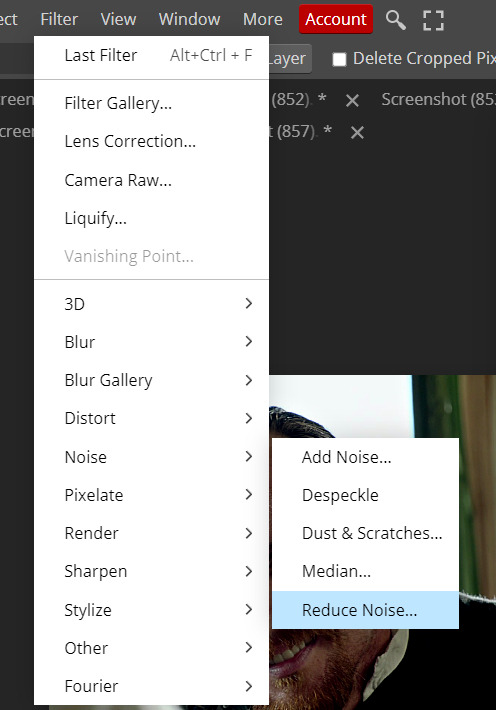
REDUCE NOISE
Sometimes - and this is especially the case for dark scenes - your gif may look excessively grainy, depending on how bright you want to make it. Reducing noise can help. Keep it mind, it can also make it worse and mess up the quality. BUT it also reduces the size of your gif. Obviously, the higher the settings, the more quality will suffer.

These are my standard settings (either 2/70% or 2/80%). It's almost imperceptible, but it helps with some of the trickier scenes.
ADDING NOISE
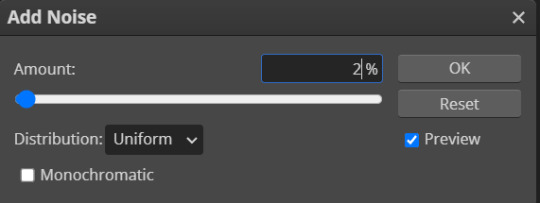
Adding noise (1% or 2% max) can sometimes help with quality (or make it worse, just like reduce noise) but it will make your gif so so so much bigger, and occasionally damage the frames, which means you won't be able to load your gif on tumblr, so I rarely use it.
You'll also want to create ACTIONS which will allow you to sharpen your gifs much faster.
HOW TO CREATE AN ACTION ON PHOTOPEA
The Action Button (shaped like a Play button as you can see in the following screencaps) may not be there if you're using photopea for the first time. If that's the case click on the magnifiying glass next to "Account" (in red) and type "actions". Press Enter and the button should immediately show up.
Once you do that, click on the Folder (circled in yellow)

and rename it however you like.

now click on New Action (circled in red). now you can press the Recording button (circled in green)

Now
FILTERS -> Smart Sharpen
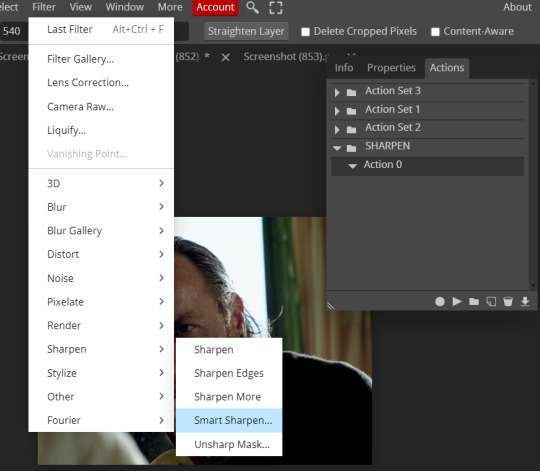
and you can enter your values. Then you repeat this passage (WITHOUT pressing rec, WITHOUT pressing new action or anything else, you just open the smart shapen window again) and, if you want, you can sharpen your gif some more (10%, 10px, or anything you want.)
Maybe, before creating an action, experiment with the settings first and see what works best.
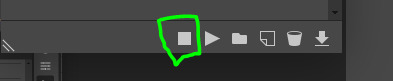
When you're satisfied, you can PRESS STOP (it's the rec button, which is now a square) and you can DOWNLOAD your action (downwards facing arrow, the last button next to the bin. Sorry, forgot to circle it) .
You need to download your action and then upload it on your photopea. When you do, a window will pop up and photopea will ask you whether you wish to load the action every time you open the program. You choose "Okay" and the action will be loaded in the storage.
When you want to sharpen your gif, you select all your frames, then you click on the Play button, and select the Action, NOT the folder, or it won't work.

Actions can also be created to more rapidly crop and convert your frames, but it doesn't always work on photopea (for me at least). The process is exactly the same, except once you start recording you 1) crop your gif as explained in step 4, 2) convert into frames. Then you stop the recording and download the action and upload it. This won't work for the Rasterize step by the way. Just the Animation -> Make Frame step.
7. COLORING
Now you can color your gif. I won't include a coloring tutorial simply because I use a different method for every tv show I gif for. You normally want to begin with a brightness or a curve layer, but sometimes I start with a Channel Mixer layer to immediately get rid of yellow/green filters (there's a tutorial for this particular tool which you will find in the list I mention in the link below)
[Plus I'm not really an authority on this matter as my method is generally... fuck around and find out. Two years of coloring and I still have no idea what I'm doing. 70% of the time.]
Simple Gif Coloring for Beginners -> very detailed + it includes a pretty handy list of tutorials at the bottom.
8. EXPORTING
Now you can export your gif. Some gifmakers export their (sharpened) gifs BEFORE coloring and then load the gifs on photopea to color them. I'm not sure it makes any difference.
FILE -> EXPORT AS -> GIF
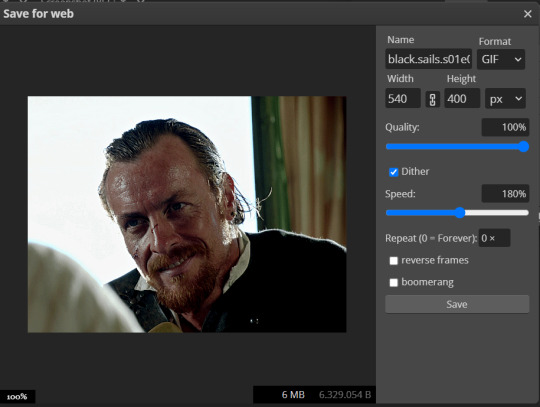
(not colored, just sharpened)
As you can see, unlike photoshop the exporting settings are pretty thread bare. The only option available is dither - it sometimes help with color banding - which, and I'm quoting from google for maximum clarity:
"refers to the method of simulating colors not available in the color display system of your computer. A higher dithering percentage creates the appearance of more colors and more detail in an image, but can also increase the file size."
SPEED
When you export your gif, it will play at a very decreased speed (100%). I usually set it at 180/190%, but as for every other tool, you might want to play around a little bit.
GIF SIZE/EZGIF OPTIMIZER (See Step 2)
And that's it.
P.S.: worth repeating
Save your work as often as you can, even while coloring or before exporting.
#photopea#my inbox is open if you have any questions <3#image heavy under the cut#photopeablr#tutorials#gif tutorial#allresources#photopea tutorial#completeresources#gifmaking
207 notes
·
View notes
Text
Domaystic 2023 is back!
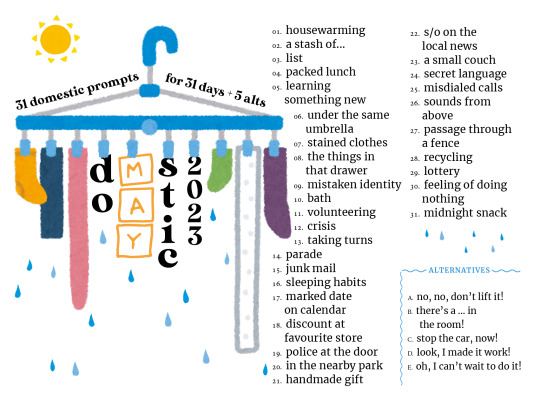
link to bigger image: click here
[Image description: a blue clothes hanger with clips where socks are drying under the sun; among the socks the word domyastic is separated in three parts and hanged as well. On the right side: the list of 31 prompts and 5 alternatives.]
Hello! This is THE post for DOMAYSTIC 2023 :D
Domaystic is the combination of “domestic” and “May” and it's a prompt event run on May based on the domestic trope: anything inside, outside, beside the house or that has that normalcy flavor of everyday life.
If any of these prompts inspire your muse, please, don’t hesitate and join!
Text prompts
01 Housewarming 02 A stash of... 03 List 04 Packed lunch
05 Learning something new 06 Under the same umbrella
07 Stained clothes 08 The things in that drawer
09 Mistaken identity 10 Bath 11 Volunteering 12 Crisis
13 Taking turns 14 Parade 15 Junkmail
16 Sleeping habits 17 Marked date on calendar
18 Discount at favourite store 19 Police at the door
20 In the nearby park 21 Handmade gift 22 S/o on the local news
23 Small couch 24 Secret language 25 Misdialed calls
26 Sounds from above 27 Passage through a fence
28 Recycling 29 Lottery 30 Feeling of doing nothing
31 Midnight snack
Alternatives
A. No, no, don't lift it! B. There's a ... in the room!
C. Stop the car, now! D. Look, I made it work!
E. Oh, I can't wait to do it!
Text prompts in German: click here
Text prompts in Spanish: click here
Text prompts in Italian: click here
Text prompts in French: click here
Lots of text under the cut!
General rules and guidelines
All fandoms or original content are welcome.
Any kind of media is welcome: fanfiction, fanart, fanmixes, puzzles, diy art, quizzes, podfics, edits, fic recs or whatever it is you feel like doing. That’s all good.
No restrictions in ships, size, min/max word count or the language you want to write into.
As last year, feel free to mix the domestic prompt with anything you like: more drama and lots of crying? YES! The thrill of an investigation for the disappearance of your characters’ fave socks? YES!
There's one prompt for each day for a total of 31 prompts + 5 alternatives with an exclamation point at the end (predictable!).
You can share your work on any platform you like. If you share it on tumblr and tag the blog, I’ll reblog it.
Combine more prompts together? That’s fine but I will reblog the entry only once here on tumblr.
Combine these prompts with another event? Fine too.
You don’t have to do all the prompts to join the event. Do the ones you enjoy.
The event is consistently checked upon during the month of May, but in case you want to share your creation at a later date, you can. I just reblog on a lower pace after May is over.
As for the reblogs, last year I gave myself a bit of an headache, so this time I’d like to try it this way: once the day of the corresponding prompt comes, people will post their work and then I’ll reblog it when that day comes for me too. Does it make sense? I hope so. I’ll miss the world clocks but let’s just trust each other.
AO3 collection
The domaystic2023 collection is open from May, 1st: click here - all the info and prompts are also on the profile page of the collection.
In your tumblr post I ask you to:
Mention the blog in your post @domaystic - tracked tag: #domaystic2023
State clearly the fandom name or if it is original content
State clearly if it is sfw or nsfw
State clearly which prompt you used
In case of lengthy posts, use the “read more option”: ctrl-shift-k on rich text; [[*MORE*]] on html (remove asterisks)
Please, TAG PROPERLY. If there are any trigger warnings, I will base my own reblog on your tags so, please, take even a moment longer to carefully tag it. I hope all participants to stay safe in this event.
Here’s an example:
blablabla my story is beautiful, look @domaystic !
#domaystic2023
#day1
#[extraA - E if alternative prompt is used]
#[fandom name or oc]
#[sfw or nsfw]
#[trigger warnings that I get from your post] tw
If you have any question feel free to send an ask, inbox is always open. :D
Hi, @thebigbangblogproject can you reblog this?
#domaystic#domaystic2023#post about the event#domestic trope#prompts#multifandom#prompt event#prompt list#fanfiction#fanart#edits#I hope all the essential infos are included ò_ò#edit of the 1:15pm NOPE I typed some link wrongly ... now everything should work ouch
361 notes
·
View notes
Note
love love LOVE your The Sign gifsets. im still a newbie in giffing lmao and your gifs are like reaaally pretty so i was wondering how you do your gifs? i really like how it's sharp and the colors pop up beautifully (only if you don't mind sharing ofcc <333)
bun this is the kindest thing you could have said to me, thank you so much <3 i wanted to write down my giffing process for a while in case anyone would find anything in it helpful, so thanks for giving me a push!
guzhu-furen's photoshop gifmaking process (kinda oriented on saving up time)
from

to
1. Downloading a video. i prefer to download video files instead of making screen recordings because the latter usually leaves watermarks/captions and makes image quality lower. i will not be linking the downloading websites themselves directly, but they are all easy to find through search engines if you know what to search for! i download ql dramas from:
youtube:
if the video you need is above 1080p quality, search for youtube4kdownloader
if the video is age restricted, search for 9xbuddy
both these websites work for normal videos too!
mkvdrama usually has 1080p episodes of most asian dramas.
dramacool also has downloading options in case the show is not available on other websites!
2. Screencapping (i learned it through this tutorial)
i screencap using KMPlayer. here is the installer i used, but you can find versions of this program on various websites and torrents too! install the program and proceed.
screencapping steps: open KMPlayer > press "CTRL + G" to summon the Frame Extraction window > set identical settings to these:
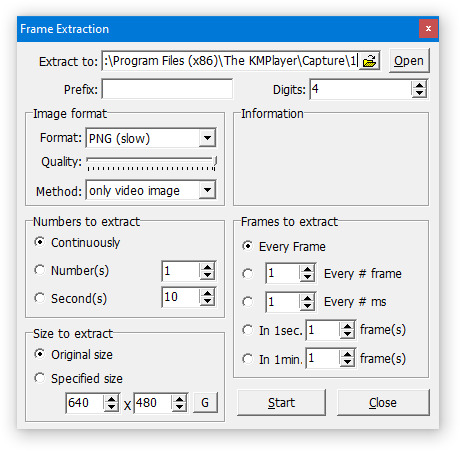
note which computer folder the screencaps will go to (it has a label "Extract to") > go to that folder on your computer and create a bunch of numbered folders there, for example ten folders named from 1 to 10, these would be our separate folders for ten gifs > write "1" or a name of another numbered folder after the backslash in "Extract to" bar in kmplayer > go the timestamp that will be the beginning of your gif in KMPlayer > press "Start" in the Frame Extraction window and press play on the video > when the moment you need to gif is over, press pause on the video and press "Stop" in the Frame Extraction window. great, you now have your folder of screencaps!
3. Importing screencaps to Photoshop
i use Adobe Photoshop 2023, but had used Adobe Photoshop CS5 for a long time before that, so you can use any version you have or find! it's available on various websites and torrents.
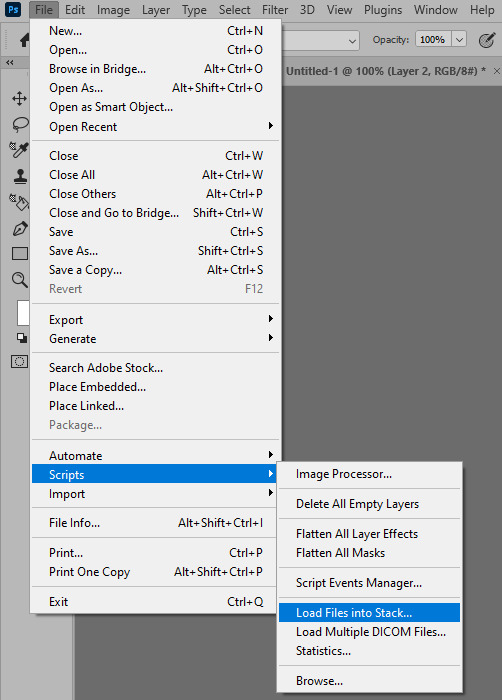
open Photoshop > Scripts > Load Files into Stack > press Browse in the "Load Layers" window that was opened
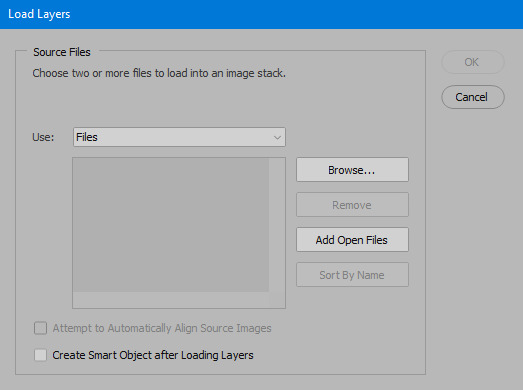
open your screencaps folder (and pin the KMPlayer Capture folder for faster future access) > pick the screencaps you want for your gif by clicking on the first one, and then clicking on the finishing one while pressing Shift on the keyboard > click OK and let them load for some time! i have 65 screencaps loading at the moment
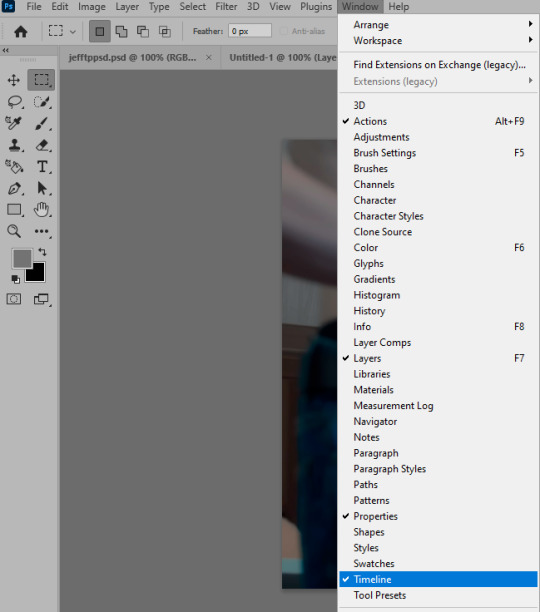
when the screencaps finish loading go to Window > press Timeline > press Create Video Timeline in the opened sidebar > press three dots that will say "Convert to frame animation"


4. Sizing & making the base of a gif
next part will be automatic. i use actions for almost everything from this moment. download the basic action pack here and my additional action pack that we will need here. load them in your photoshop actions window (Actions > Load Actions).
play the Script action to create frames.
now onto sizing your gif. these are tumblr's width dimensions for 3 types of gifs
my gifs are usually 540 px in width and 640, 400 or 345 px in height. i added a 400 px action (Sizing 400) in the action pack, you can use it! or you can follow the steps by hand:
Image > Image Size > put in the height you want and add 4-6 pixels there (mine will be 406 for a 400 px high gif) > OK

now we need to crop the gif for it to fit tumblr's dimensions:
Image > Canvas Size > change Width to 540 (or 268 or 177) and take away the 4-6 pixels that we left in the previous step in Height
when you figure out which gif dimensions work best for you, record an action and use it to save up time!
after sizing use the action Smart Object. now we have the base of our gif!

you can move your gif left or right if you want! i will be doing this because i would like to show more hips in the gif.
press Ctrl + T > move the layer however you need (not in height though) > press Enter to save
i moved it to the right and my gif looks like this now:
5. Sharpening (i use Tan's sharpening settings explained here)
i added two sharpening actions in the pack, they are called Sharpen Spicy and Sharpen Spicy 12. you can use one of them or you can sharpen your gif by hand, i will explain how to do it below.
Filter > Sharpen > Smart Sharpen > 500% amount, 0,2 px radius > OK
Filter > Sharpen > Smart Sharpen > 17% amount, 10,0 px radius > OK (you can change 17% to lesser or bigger, depending how intense you want your sharpening to look. i use 17% for 4k footage and 12% for 1080 px or less videos)
to smooth the sharpening a bit i use Gaussian Blur (this is optional, you can leave the sharpening as it is if you want your gif to be sharper).
Filter > Blur > Gaussian Blur > Radius 1,0 pixels > OK
now change blending intensity to let only a bit of the blurring effect stay (you need to change this by hand if you used the sharpening action also).
press Blending Options (the highlighted place) twice > change Opacity to 10%

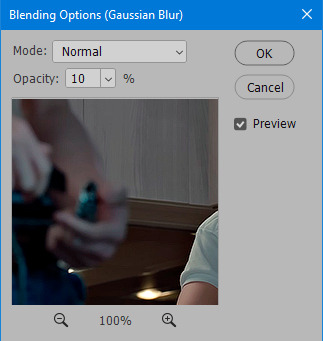
this is what my gifs looks like with sharpening now!

6. Colouring (i learned how to colour the way i do through this tutorial)
to make it easier for you to learn i will share my blank colouring file. i created it to save as much time while giffing as possible, so whenever i need to colour a gif i simply duplicate all the blank adjustment layers to the base of my every gif and start colouring! once you figure out which adjustment layers work for you best, i recommend creating a blank colouring file too to save time.
if you want to go the easy way, open my colouring file and duplicate selected layers to your gif file by Layer > Duplicate Layer > insert gif's document name

if you want to learn by hand, create the adjustment layers that i will be naming in the process on your own, you can find them all in Layer > New Adjustment Layer
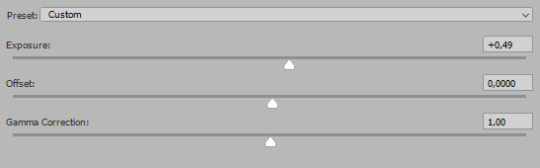
now we will use adjustment layers for our colouring from the bottom to the top! first, Exposure layer to add a bit of light to the gif. i don't always use Exposure because sometimes shots are bright enough on their own. i will, however, use it here. don't use it on your gif too much, because in the next few steps we will also be brightening the gif with other adjustment layers. i added +0,49:
next, Hue/Saturation layer. i use it in gifs with neon lighting to color correct overly bright colours. for example if your characters are standing in neon pink, you might want to lessen Saturation in Magentas and Reds to make the final gif less pixelated, and etc. i will not use Hue/Saturation on this gif, cause it doesn't need it.
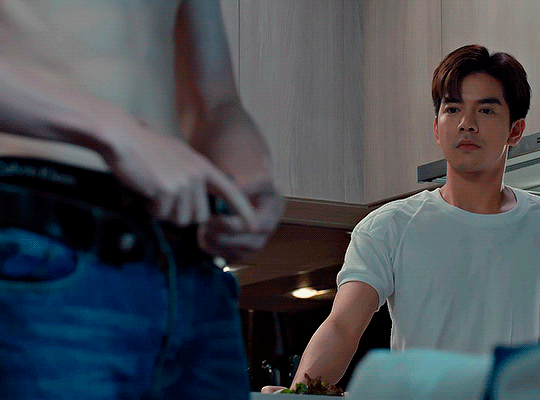
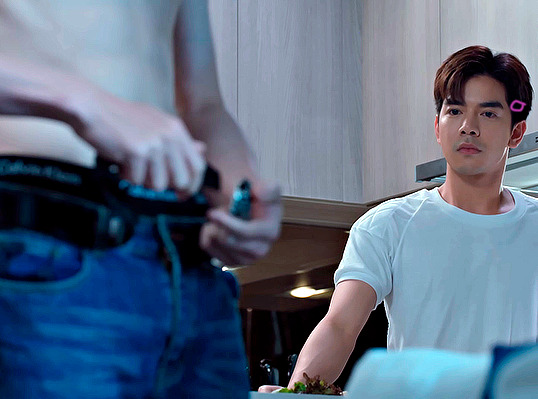
proceed to the layer Levels. this layer usually does most of my colouring. click on the lowest white dropper in your Levels window:
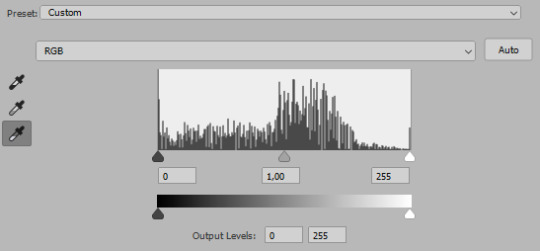
now choose a light place on your gif and click on it with the white dropper. it works especially well if you use the white dropper on the lightened parts of face skin. you can play around by choosing different bright spots and seeing what works best. here is the spot i chose and the resulting colouring:


this is too light, so now we need to balance it out with the black dropper:

choose one of the darkest places this time and click it with black dropper! once again, you can play around and click different spot to see what works best. i will be clicking the highlighted spot and you can see what my gif will look like with this Levels settings

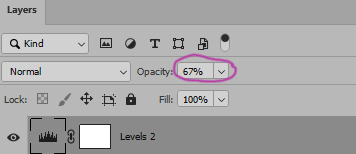
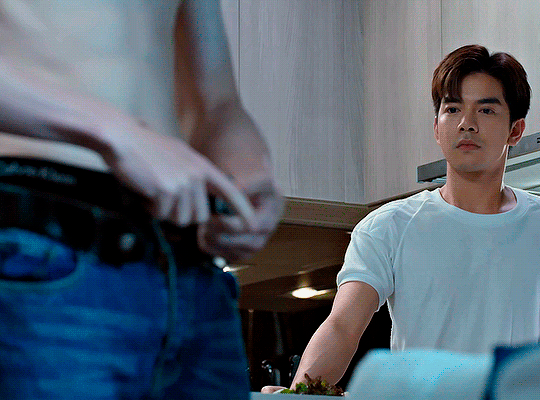
as you can see, darkest places became darker and other colours were corrected a bit! now, this is still too bright, so i will be decreasing the opacity of Levels layer from 100% to a smaller number:
i will have to continue in another post because tumblr only allows 30 pictures per one post in the new editor now and i'd like to explain everything in visuals. click to continue
79 notes
·
View notes
Text


( IMG TEXT UNDER THE CUT )
LOTITHEISM'S COMMISSIONS!
NOW OPEN (and on sale!)
Commissions are back! This time with a revamp, cheaper prices, & additional options.
I am currently unable to work a job due to physical health and personal reasons; so commissions are now my only source of income until things resolve.
Any little bit helps!
payment done through p*yp@l | contact thru @lotitheism on tumblr, instagram & discord.
--
all options come with colored lines and full shading.
complexity does not increase prices! all prices are set.
WILL DRAW:
ocs
fanart
anthros, furries & ferals
mecha
blood & gore
WON'T DRAW:
NSFW/suggestive work/fetishes
bigotry/hate speech
--
EMBLEM ICONS - $10 USD
small chibi-fied character heads with transparent backgrounds. i typically use them for folder icons and sorting purposes.
additionally, if you buy four you'll get a fifth for free.
CHIBIS - $20 USD
a chibi of a requested character!
always cell-shaded. typically given as a transparent png, but you can ask for a simple background if you want- free of charge.
--
CHARACTER ART
Bust: $35 USD
Half-body: $40 USD
Full-body: $50 USD
ADDONS --
FREE: simple, transparent or flat color background.
ADDITIONAL CHARACTERS: $20 per character, up to two characters outside of the first.
FULL ICON - $15 USD
a fully shaded icon with a simple or transparent background.
always either a bust or a half-body, depending on composition.
--
FULL RENDER / ILLUSTRATION
a fully rendered scene.
Half-body: $80 USD
Full-Body: $90 USD
ADDONS --
ADDITIONAL CHARACTERS: $40 per character, up to eight characters outside of the first.
--
CHARACTER DESIGN - $50 USD
a character reference with a front, side, and back view.
additional headshots may be given depending on specific design elements free of charge- though it is at my discretion.
ADDONS --
ADDITIONAL EXPRESSION SHEET: $30 USD for six expressions, and then an additional $15 USD for every consecutive one.
ADDITIONAL OUTFITS/DESIGNS: $40 USD each
--
CONTACT
contact is typically restricted to tumblr, instagram, and discord; as that is where i'm most active.
you can dm me on tiktok if you wish, though the process is made more difficult by the lack of image sharing.
please provide me a reference image and have at least some idea of what you want prior to contacting me.
all contact spots are under the handle @lotitheism
feel free to contact me with questions if need be!
#crownposting#art#artwork#digital art#heartz art#commissions open#commission art#commission work#commission#emergency commissions
40 notes
·
View notes
Text
Comissions open
Hello!
I'm Alex, or M(any pronouns) and am open for comissions!
Some samples:


Pricing
Lineart only:
Portrait: 10$
Half body: 20$
Full body: 30$
Any additional character in lineart: 20$
Color:
Portrait 15$
Half body 25$
Full body 50$
Every additional character for colored pieces 25$
Backgrounds with some detail:
20$ extra
Nsfw fee for lineart and colored is 10$
The Process:
Hit me up with a message on tumblr for a comission with request and references.
I hit you up with a rough sketch, and if you ok it, half of payment should be sent to the kofi (which will be linked to you at this point)
Next step entails clean lineart here you can request changes in details.
Afterwards I will send in flat color where we can change up general palette. No drastic changes will be made unless we renegotiate the terms of comision.
Finally, finished rendered illustration will be sent with warermark. Second half of payment will be made at this point after which you will recieve image without warermark (signature will still be there)
Due to my phones restrictions with processing capacity, image resolution will not be much bigger than 2000x3000 pixels.
Time estimate is 1-2 weeks unless life happens (but i will let you know if thats so)
I won't do:
Mecha
Vehicles
Extreme nsfw
Terms of use:
The art is personal use only. Print it for yourself, make a phone mask etc. Comercial use is strictly not allowed unless we discuss it.
I reserve right to decline a request.
102 notes
·
View notes
Text
List of improvements I'd like to see on Tumblr (in no particular order):
disclaimer: I really enjoy using Tumblr, I've been here for over a decade, and these are just my personal suggestions. For being a free website, we've got plenty of options available already. Staff, please don't shoot me, thank you.
Applying to both the browser and the app version:
a working tag search
restrictions that would allow gifs above 10Mb, more than 100 links and 1+ video per post
an archive for the like section
the option to like replies
improved refreshing rate of messages in dms
the ability to reply to specific messages in dms
decreased upload time and increased resolution of videos
being able to remove a portion of a thread without having to remove all of the rebloged additions (this comes in handy when deactivated blogs are involved and you can't reblog from them to remove reblogs connected to their reblog)
older posts displaying people's tags in the notes (I believe this is a bug rather than a missing option, they only show as plain reblogs now)
the option to edit share-created posts' tags in the same way as ones created directly in Tumblr (applying to videos)
being able to message from a password-protected side-blog
the option to choose who sees your likes and following in addition to the already available display and hide options
being able to add an admin/member to a main blog, not just the sides (for example, when you want to have access from two accounts)
being able to search by more than a single tag, write commas in tags
being able to reposition your pfp
the where were we? feature for the like section
App-specific:
an archive (for both posts and likes)
the option to choose from the full range of browser-available colour palettes
the ability to edit tags without having to delete and rewrite them
being able to search by post type (in a blog's refine search option) rather than having to type a tag first
refine search adding an ask option
the image limit per post (10) being closer to the browser one (30)
the option to add image description before posting
the linked source of a picture showing
being able to edit a blog's description containing HTML without losing the code
being able to block people from side blogs
shuffle working in the app
a text editor (I'll add a photo because I know some of you don't know we've got this option)
Browser-specific:
the option to crop a picture before posting
the trending list displaying all 9 categories instead of 8
the ability to view the tags of a post in the mass post editor before clicking on it to edit said tags (preferrably by hovering your cursor over said post)
being able to change the order of featured tags
I am certain I forgot a good few but these were the ones I could think of off top of my head. If you want to add to this, feel free.
11 notes
·
View notes
Text
Hello everyone so this is going to be a pretty big blog about the upcoming future of my life as a artist. So to try to shave off some time I will be copying and pasting the Twitter thread I made to here.
Startiiiing now:
“Hey everyone I got another update for you and it’s probably gonna sound like “she’s changing shit again” but I feel like a lot has been going on in my life and a lot of it is changing too and I think I discovered something about me and my artwork that I feel like is important.
The reason I started pumping out content before this new job I got was well after I lost my old caregiving job YouTube and commissions were my only source of income for the last 6 month and I honestly was making enough for bills at that point it was my family keeping me afloat.
So yeah, life was not kind to me and I got.. well extremely depressed. I kept applying and no one was accepted them the one job I wanted I did not get and I was lucky to just get by. My brain all the time for the past few months kept saying I was a failure Until I got lucky.
I just got done with shadowing and orientation and I’m now officially working at a job that yeah can be stressful but I fully enjoy. I’m feeling happy and I’m finally healing from this dark cloud that’s following me. And with this month coming to an end I realized something.
Growing up my art was the one thing that kept me happy it was my happiness from real life issues and it got me to meet the love of my life along with great people in online community’s. However, the more it became a stressor to live off my art… the less it made me happy.
Not to mention the reason I shared my art to begin with because even if it was cringe or my art was not the best in the past … I always loved to see people enjoy it. It killed me to ask people to give me money to draw for them. It’s just not me.
I allowed a online algorithm, and a few words from a small handful of people to make me second guess what I loved to do, I allowed money to make me decide what I should work on…I realized I secretly hated myself for it.
This new opportunity in my life is why I’m writing what I am today and it’s my own choices and it’s one I’m actually happy with.
Everything I draw will be free to view I’m going to build it up on Tapas and Tumblr just for the multiple image support plus they have better age restriction on there platforms because I’m a adult and do want to dabble in NSFW stuff.
The one animation I have on sale in my store I will be making it free to view. For the amazing person who did buy the pack I will be dming them so once my paycheck comes, they will be refunded.
And now for the big thing.
The next few months I will be saving my own money and working on Concept Art for the next few months along with working on comics because by next year I want to work and pay people to help me bring my comics to life as animated projects.
The first project will more then likely be Jackie’s Everyday Adventure because it has the least amount of characters and backgrounds and will dabble in the form of 3D animation. This will be a strictly animated series with some rewrites from the original comic version.
Homebrew… is honestly the biggest project since there is over 30 chapters and I’m not even halfway done writing scripts. I won’t Even considering working on animating that until at least chapter 10 is out.
Everything else will be explained over on Tumblr that will be where I blog about my projects since there’s not as tiny of a character limit on there. Thank you all for reading this and I will link the full update on Tumblr and I will share a link to it on here.”
And now here we are on Tumblr!
The only thing I will be keeping for any financial support will be Ko-fi but that’s only if people want to, I’m not going to have anything locked behind a pay wall.
Commissions will no longer be open because I will just be doing art trades or request. Since my new job is full time I don’t need to worry about the stress of not finishing something quickly.
Physical print books are still gonna be a thing however not for a long while. Since my old client liked my original books ill be printing a small handful of copies of them so I can give them to her to read at the nursing home. And leftover copies will be for contest prizes.
YouTube on the other hand… I’m going to be honest I’m not sure if I truly will bring back Pshattuckproductions. The most fun I have had with YouTube was building up lunar comics. I will honestly be focusing on that channel in terms of any uploads.
So far this is all for now. So see you soon everyone.
20 notes
·
View notes
Text
Writers - Where You Gonna Post?
Hey all, so the TL;DR of this is that I post on Wattpad, Tumblr and Ao3 - All have their pros and cons, and this post is going to get into those (with a neat little summary at the end).
Note this is not an endorsement or criticism of any of them. Just my personal understandings of each, the pros and cons I've noted, and a chance to put it all in one place.
We're going to touch on - Ease of Posting, Visibility, Tagging, Searching, Cost, Security & Visibility, Functionality, and less objectively - Vibe.
word count: 1,874
-:- Ease of Posting -:-
Wattpad: 7.5/10
Tumblr: 9/10
Ao3: 4/10
Wattpad and Tumblr have direct-from-source formatting, meaning your paragraphs, italics, bolds, etc. stay in place when you copy from Word, google docs, or - I assume, Scrivener.
Tumblr has more options for font size, color, and links within the body of the text, and so scores higher than Wattpad's more limited capacity (Wattpad does allow for centering, justified, etc. positioning of paragraphs.)
Ao3 has far more CAPACITY than both, but the ease isn't there. You have to know your HTML markups, and for so people that can be a pain. There's a very useful Google Doc markup template that can do a lot of the heavy lifting for you, but hyper linking, image inserting, and other functions that are available have to be done manually.
This is great, in terms of options, but lowers Ao3 on the whole "ease of use".
-:- Visibility -:-
Wattpad: 4/10
Tumblr: 3 or 9/10
Ao3: 9/10
Wattpad has an algorithm and their tagging system - compared to Tumblr and Ao3 is pathetic. I realize I said I was going to be objective, but that is being objective. It's a spaceless tagging system, so you get really awesome tags like roronoazoroxblacklegsanjixreader and... yeah. There's also a limit on the number of tags, so if you're doing a collection of one-shots it's hard to get everyone in there.
On the upside, their search function doesn't just search by tags (would that it did though.) So having information in your summary will help your visibility. What really gets your stuff visible are reader interactions - knowing someone established on Wattpad and having them give you some shoutouts when you start is your best bet for being seen.
Tumblr's visibility - tagging, searching, etc rely HEAVILY on what kind of writer you are. SFW items are far easier to search than NSFW ones, and the Mature label hides you from people who have opted in to see Mature content, which still boggles me. The in-site search function leaves a bit to be desired, but google searches in better enough to off-set that a bit. Tagging is far more robust on tumblr, but it's also a little hit or miss, especially with new users. (I had no clue how to "tag" properly when I started, believe you me).
There's a solid foundation of readers here, so that makes it a good place to get your feet under you without being on TikTo-- I mean Wattpad.
I'm not going to say much here, because let's be fair, Ao3 was BUILT for visibility. There's no algorithm and the tagging system is robust and customizable. Searching is easy - as long as writers are decent with their tagging, and it's not too hard to find what you want, fluffy or otherwise.
-:- Tagging -:-
Wattpad: 4/10
Tumblr: 7/10
Ao3: 9/10
I've touched on this already in the other sections. Wattpad has a lot of restrictions on its tagging system, and aside from using it to "rank" stories, I'm not entirely sure what else it does. I really don't think it comes into play with searching - key words pull from titles, user names, and summaries at the minimum.
Tumblr tagging is a bless - for the most part. The site deems some words "problematic" and doesn't let you search them, which is poor practice because it doesn't differentiate smut from sex ed. (Personally, not that I want it to block anything on my behalf. If I type it Tumblr, I mean to look for it.) Fortunately, as stated, you can use external search engines to get around this.
Ao3 has probably the most robust, and most customizable tagging system of all three. This is great, as long as you know what you're doing, and terribly confusing if you don't. There's primers out there for tagging in Ao3 and other general "good to know" type things, but it's not intuitive. You really do need the primers.
And Ao3 limits neither content nor tags, so take care when searching, and use the omission functionality if you need to - Ao3 won't hold back unless you tell it.
-:- Searching -:-
Wattpad: 6/10
Tumblr: 6/10
Ao3: 10/10
Smash visibility and tagging together and you get search ratings. Wattpad can be hit or miss because of the Tikto- er - algorithm, my best advice is don't be afraid of the results on page 2 and beyond. As much as it tries to "rate" works, rating is just too subjective. You're going to have to dig, just like you do on Tumblr and Ao3.
Having fan fic reader connections is really your best bet when searching, but slugging through the proverbial trenches yields gems too - and one man's quartz is another man's diamond, so I'm not putting any writing down when I say this - what we're looking for varies, and what's out there is multitudinous and variable.
Ao3 is your best place place for good hunting - it's literally built around it. The only hangups are the limitations of what an author puts in for tags vs what you think to search. Differences in how we perceive some words regionally can limit what bounces back - and sometimes a writer might not think of the word in the first place to add it.
-:- Cost -:-
Wattpad: 3 or 9/10
Tumblr: 10/10
Ao3: 10/10
Wattpad has ads - on the mobile app. You can pay for some stuff on the desktop too, but it's not in your face there like it tends to be on the mobile app. Still, you can use it for free.
Tumblr and Ao3 both request money and offer stuff in exchange for money. Sites need money to run, so it makes sense. Neither locks functionality behind cost (neither does Wattpad, not even on the mobile app), but it's easier to ignore ads on Tumblr than Wattpad's app (and no ads on desktop at all for Wattpad >.> just fyi).
-:- Security & Visibility -:-
Wattpad: ???
Tumblr: ???
Ao3: ???
What's important about security and visibility changes from person to person and I'm not really sure how to rate them numerically.
Tumblr and Ao3 let you make your works private - member or password access only, so there's a layer of visibility control with these platforms that does NOT exist on Wattpad.
Ao3 let's people download works to read offline. Technically you can copy/paste with Tumblr and do this as well. Wattpad does not allow this - you cannot download or copy/paste a work from Wattpad (you can copy/paste when in edit mode on things you own on WP, but readers cannot).
You don't need an account to interact with Ao3 and Tumblr - I *think* you do for Wattpad, but all three are free sign ups - Ao3 is just by invitation (when did that start, btw? I signed up years ago and missed that change).
Which is best, is up to you.
-:- Functionality -:-
Wattpad: 8/10
Tumblr: 7/10
Ao3: 10/10
Let me start by saying that Tumblr's functionality for Short Form Fiction is easily 10/10 - the search limitations notwithstanding. Tumblr's functionality for LONG Form Fiction can be a real pain in the ass, hence the 7/10 overall. Linking posts is a manual nightmare, and sometimes breaks between mobile and desktop for no reason.
Wattpad's limitations on some styles of formatting and linking aside, it does have an easy to use update process, and if there's a limit to how many words can be in a chapter, I haven't seen it, or heard of it.
Wattpad's mature settings are also more functional than Tumblr's, leaving the onus of if the reader is old enough on the reader by the words of their own ToS (I still block minors, personally, since you can see who votes and comments.) They do have stricter limitations, regarding "dark" content, and there is by no means any threat to be levied against minors allowed. Shonen levels of violence, sure, but you're not posting Juno the novel on the site without some issues.
All three sites - Wattpad most recently - have blocking functionality. Wattpad's recent changes allow for deleting comments as well as blocking users, which can be a cathartic ability to have.
One thing Wattpad and Tumblr have that I'd LOVE to see on Ao3 (and if it has it I've missed it) is the ability to schedule your posts and updates. Wattpad added this recently - it's only functional on the desktop, but it works.
For those of us who can write 10k words one day, and none the next two days, it's useful for spreading out your posts. Plus there's just something nice about being able to create a backlog of content, especially if you post on a schedule.
-:- Vibe -:-
No rankings, we die like blorbos.
One of the best things - to me - about Wattpad is a paragraph-by-paragraph ability to comment. Wattpad's readers have a similar vibe as Tumblr's readers - and I mean this affectionately.
You're all GREMLINS.
It gives me life and I love it.
Assholes exist everywhere, but my general vibe of who has the most goes:
Wattpad
Tumblr
Ao3
Maybe some of you aren't assholes, you just don't think about how your comments can be taken before you post.
Ao3 gives me the most Long Form Comments I get out of anywhere else, and I love them. Please, PLEASE, gush to me about what you loved. Feel free to toss in what you didn't vibe with - as long as you're not cruel about it, I can take it. I can't possibly write something everyone perceives flawlessly.
I post to all three, because I like the combined experience I get from them. Ao3 feeds me in ways Wattpad and Tumblr can't, and honestly you can exchange all three of those entirely.
Ao3 feels like I'm walking down the street perusing sex toy shops and someone stops me and goes "Oh I read your story and really liked it, please keep up the good work!" (sometimes maybe they throw a drink in my face.)
Tumblr feels like I'm at a rave with 500 other people and there's 50 blorbos people are doing body shots off of and we're all having fun - and occasionally some asshole comes in, but they're handled pretty quick.
Wattpad's like... being at a Barnes and Noble having coffee in the cafe that's inside the store, and there's a BDSM class being taught in the manga section that's upstairs, and sometimes people take the escalator up and right back down again cause oops.
That's my breakdown - I hope it's helped you, or at least made you laugh a little. Good luck out there, where ever, however, and whenever you post, I hope you find the words you're looking for.
(I do want to add that Wattpad does, as mentioned, have a bit of a TikTok vibe. If you don't vibe TikTok you're not gonna vibe Wattpad, flaws and all).
#quin muses#fan fiction#wattpad#ao3 writer#ao3#tumblr writers#writers of tumblr#platforms for writing
23 notes
·
View notes
Note
would genuinely love to see your process for sketching out your comics!! ive wanted to make my own but i have never really figured out the process and end up overwhelmed- and you're one of the folks who makes stuff in a style that I kinda draw close to, and u do ur comics with pencil and paper- so if you wouldn't mind in the future, it'd be really cool to see how you actually get everything planned :)
This ask is so cute :( probably genuinely the biggest compliment I've ever received! Well, no waiting in the future! I'll tell you now what happens behind the scenes! :)
SO FIRSTLY, I'd like to clarify I am in no way a professional or even close to one, I never even looked up how to do comics, I just kinda do them and use what I've read from DC comics and Pinterest tips.
But! Personally, I find that making comics is fun and that's what I strive on. I won't lie when I say my comics are pretty bland, the surroundings are empty and lame but I think the character's expressions and body language make up for it, and especially the script. So altogether in this post, I'll be breaking down how my comics are made!
↓↓↓ if you're interested, open up the full post!
1 - Scripting
In both dialogue and character detail/placing!
I use a notes app for when I get ideas!
* I usually don't do specific dialogue, only stating the idea and then coming up with dialogue in my head, but there are some exceptions where I do write down pre-thought-out dialogues you can see in the examples I put below!


With the idea / dialogue in tow, we can go to character detail / placing. I don't know the actual word for it but basically how the character acts in a specific scene / dialogue!
Character expression is especially important when it comes to any type of art, be it comics or animation as it can tell a story with little to no dialogue!
* panels taken from 1 and 2 for context

From here you can clearly tell their expressions well! Be sure to exaggerate!
2 - Limit planning
With Tumblr's 10 images limit, as well as Instagram if you post there, it's important to note that limit and know when to end the comic with a good panel where it doesn't feel like it's supposed to continue UNLESS you're making two parts!
I can't tell you how many times I've ruined my sketchbook papers trying to get a perfect script but I've been doing it long enough that my brain has adapted to the limit and every comic I've done since adapting had been a perfect ≤10.
But even if you decide to go with two (or maybe even more) parts, you should make sure it ends well still! Like a book! Those spaces between paragraphs and chapters and such!
Take these for examples too!
* panels taken from 1 and 2 for context


So treat it like a book! I guess ?
3 - Panel placement
This isn't a necessity, but my personal way of drawing each panel is having it scattered around randomly around my sketchbook. I don't use strips or anything like that as it restricts me because using strips on paper is a whole lot harder than on digital. Because I have such a wide area to draw, I'm less restricted from drawing any excess things I want to add in case my dialogue doesn't fit the panel or so!
4 - Draw
Now to put it all together and make the comic! I usually already have my vision in mind so I can just go draw it without a light sketch layer, but I do recommend it!
What that is is essentially a sketch but drawn like.. your pencil is hovered above the page? Like you don't press down on it or something like that. Basically a guideline! So do that if you need it, and when you're satisfied with how it looks, you can draw it! And make sure it's clear!
After that, it's just picture and post! (Make sure you crop it right tho!)
4.5 - BONUS / TIPS
When I started posting Belos drawings, I never expected it to get any attention or even end up as a whole AU 😭 I just drew him in a babygirl hoodie and people ate that shit up so now it's an AU 💀 and because of that you need to prepare personalized tags!
Tags like pitmdau or sharing caleb au ! Very very useful for navigation
More important than tags, make sure you have a Masterpost!
I'm aware mine are unfinished and very messy and I'm trying to work on that right now but it's very difficult but people really need it so when making Masterposts, YOU HAVE KEEP UP WITH IT. I slacked of for ONE POST and now it's a mess.
Also another important note you can only put 100 links in one post so you have to make more Masterposts to navigate through the comics 😭
5 - Have fun!
When getting into comic making, I think really the most important thing to keep in mind is your enjoyment in making said comics. Sometimes some things can burn you out very quickly so when you're getting into things like this, especially when you're not getting paid, you gotta make sure you have fun doing it. It doesn't matter if it doesn't get a lot of traction or not, it only matters that you are enjoying making and posting them!
I've experienced MULTIPLE burn outs from making too many comics for my TOH AUs that at some point I just completely died and lacked motivation. But what drives me into making them are other people's enjoyment! Their enjoyment gives me enjoyment which gives me motivation to make more. Someday I'll know the AUs I've created will inevitably be over, at some point, but right now I'm just having fun with the small community I've built!
So make comics, and have fun!
I hope this was helpful in any way. I just want to clarify that, again, this is my way of making comics, and you don't have to follow anything I put into the post. I'm mostly hoping this was easy to understand as well. I'm more of a visual learner so making up the words to make this was kinda hard so I'm sorry if some parts didn't make sense. If anything, feel free to hit me with another ask or a PM! I know me not posting seems like I'm inactive but I promise I check Tumblr frequently 😭
Happy posting!!! :3
13 notes
·
View notes
Text
My Flatland characters size comparisons and the main scene in the short story.
Anyways. Flatland is public domain, so you can download it or read it online for free here from Project Gutenberg.
And you can listen to an audiobook version here on the Web Archive.
And here's another audiobook version here on Youtube.
There's a lot more audiobook versions you can find, those are just the first two links that showed up.
Do not give your money to Amazon or anything buying ebook versions of this book. They're literally free. You should only be paying money if you're buying a physical copy.
Anyways I had just typed out a whole nice summary of Flatland's social structure for those who haven't read it yet but tumblr just ate it. And I have to redo the image descriptions too. Sigh.
Anyways. Long story short: The wider your angles, the higher your social status Under the Current Regime, which is super fascist and that's the point. It's a dystopia.
The lowest class is literally called the Criminal class. It is made up of Irregular shapes, aka, disabled people, and polygons with angles of less than 10 degrees. They have no rights at all. Lets just stop there.
The second lowest class is made up of Lines, who are classified as Women. They likewise have no rights, and have a ton of restrictions placed on them to control their movements.
Just above Lines are Isosceles triangles, who are forced to be Soldiers, aka canon fodder.
The lowest three classes are routinely murdered en-masse to stop them from revolting, with many schemes in place to keep them in-fighting instead of fighting together against their oppressors.
The middle class is made up of equal-sided triangles.
The upper-middle class is made up of squares.
The more sides you have, the higher your rank, the more money and privilege you have, until you get up to the circles, who have declared themselves the rulers.
That's the basics. Anyways.
It's very funny to me that the Kel-lite official website uses a free font I use to make neopronoun pins.
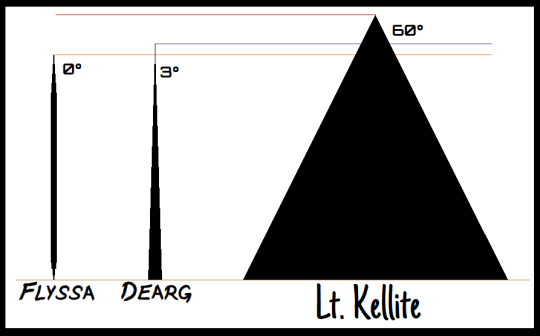
[ID: An MS Paint drawing showing three characters represented by solid black geometric shapes on a white background. Each is pointed upward, with thin colored lines crossing above them to mark their relative heights.
From left to right, they are:
Flyssa, a line with sharp points on either end, with an angle of zero degrees, who is the shortest.
Dearg, an isosceles triangle with an angle of three degrees, who is slightly taller than Flyssa.
Last in Leitenant Kellite, an equal-sided triangle with an angle of sixty degrees, who is the tallest.
Flyssa and Dearg's names are written in the font "Midnight", which is all caps, at a slight angle.
Lieutenant Kellite's name is written in the font "Just Another Hand", which is thin and curved like casual handwriting.
End ID.]

[ID: The same characters as above, now in a scene with a dark grey background. Rather than being solid black, their insides are now primarily red-purple, with dark blue and red lines and shapes for their stomachs and nerve endings. The rest of the drawing is in various shades of grey or black.
Around the edges of their bodies are thin cilia like cells have.
Lieutenant Kellite is sitting across a short table from Dearg in the center of the image, with Flyssa at the top, looking at Lieutenant Kellite.
On the table is an almost-empty, knocked over bottle, and a half-empty bowl of fruit gelletin. Lieutenant Kellite is using his cilia to pick up peices of fruit and throw them over his "shoulder" so they fall to the floor at the bottom of the image.
He is thinking to himself, "Who puts pineapple in pudding???". The bowl in front of him is half empty, with most of its contents in his stomach, where he ate two pieces of fruit before deciding he didn't like it. The wine from the empty bottle, and some other peices of food are also visible in his stomach above the dessert.
Dearg and Flyssa share the same thought bubble, thinking, "There goes all our rations for the month…" Dearg's stomach has some food visible in it. Flyssa's is too small to see.
There is a black border for a wall around the drawing, with a wide doorway leading off-screen on the left side, a very thin one on the right, and another thin one on the bottom right.
End ID.]
Yes this is a very long post for two small drawings. I'm incapable of not explaining things.
#Neopronouns in Action 062#Rjalker writes Neopronouns in Action 062#Flatland#Rjalker's OCs#Flatland OCs#Flyssa of Ib-Wa#Dearg of Ib-Wa#Lieutenant Kellite the Configurationist#described images#long post
9 notes
·
View notes
Text
Favorite Sebaciel Moments: Part 2
You can see the ask itself and the first 10 favorite moments here. Tumblr restricts the number of images in a post to 10, so I’ll be making several) Now on to moments 11-21.
11) A scene from BoC end credits. This is a ridiculously tender moment, with Sebastian bathing Ciel, wrapping him in the towel, holding him and then bending down to kiss the top of his head.

I can’t really pick a favorite moment from Book of Murder because this is my most favorite part. I love absolutely everything about it, every interaction between Ciel and Sebastian is gold.
12) Book of Atlantic… a lot of it, but especially the moment with Ciel and Sebastian reaching for each other. The silence, the despair, the fear, Sebastian being willing to risk it all just to save Ciel.

13) Back to S1: Ciel rejecting heaven and falling down, Sebastian catching him, voicing his admiration and calling him his soul, and then amending it to “No… my Young Master.” This made me swoon when I first watched this scene. This wording has so many meanings - Ciel is Sebastian’s soul because his soul literally belongs to Sebastian; he is his soul because it is Ciel who makes Sebastian human in many ways - from making him learn how to do things manually, one by one, as normal people do, to making him experience such emotions as worry, attachment, tenderness, jealousy - by demons’ standards, even love. Finally, he’s his soul because he’s the most important thing to Sebastian, defining him in numerous ways.

Gifs wouldn’t mean much here, so I’ll describe some moments with text alone: I love when Angela is torturing Sebastian yet he refuses to give Ciel up, saying that there is nothing he desires but his Master; Sebastian giving Ciel a chance at the afterlife by leaving him yet still being unable to stay away, watching him and over him.
14) The final moment of S1 (including as shown in S2 flashbacks). The almost-kiss, tender but hungry.

15) A moment from S2 opening. The perfect contrast between Ciel and Alois + Sebastian and Claude. Claude presses his hand to Alois’ mouth, looking emotionless, and Alois embraces it, holding it close. Sebastian attempts to do the same to Ciel and Ciel slaps his hand away. He walks toward the door, all proud and dignified, but then pauses to throw one haughty look at Sebastian, as if to say, “Well? Let’s go.” Sebastian smiles in a completely besotted way, clearly endeared by this.

16) E3 of S2. I love this small moment of Sebastian saving Ciel and looking freaked out.

17) I also love these occasional moments of Sebastian’s sadness. He tries to carefully nudge Ciel’s memory, hoping he’ll remember something, yet facing disappointment.

18) Ciel admiring how Sebastian is using Grell to avoid being burned, all fond and affectionate.

19) E4 of S2. Using my Mom’s words, “Sebastian is holding him like he would a beloved woman” :D

Can’t post all the gifs because there would be too many, but I love Sebastian fussing over Ciel protectively, being possessive of him with Claude, being referred to as having infatuation with Ciel, etc.
20) This particular moment in E7 of S2 of Sebastian freaking out, jerking Ciel away from Claude and shielding him like an overprotective demon he is))

21) From the same episode: Ciel feeling feverish with blood loss and delirious with anger. He doesn’t really control himself, so he’s half-hitting Sebastian like a petulant child. This is so ridiculous and funny.

E9 of S2, where Ciel believes that Sebastian killed his parents and sold him to the cult. The way he screams like it’s the biggest heartbreak of his life; the way Sebastian is so openly emotional in his reaction to being told to disappear and never see him again. He’s so devastated, though he maintains his quiet, respectful dignity.
116 notes
·
View notes
Text
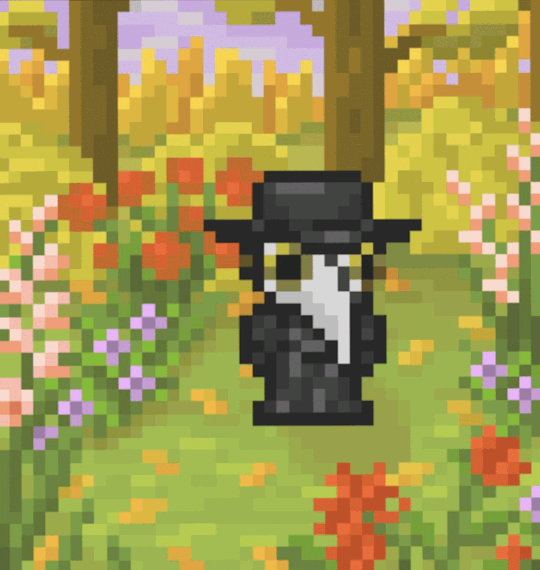
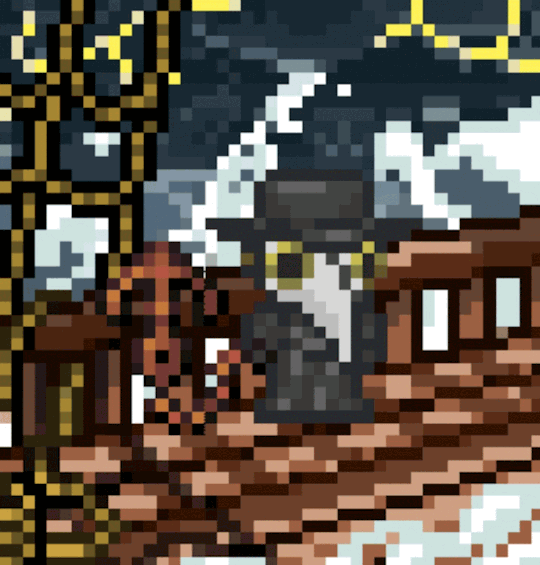
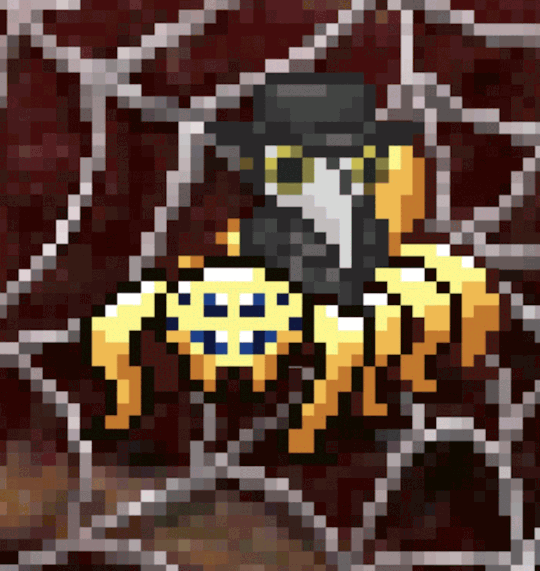

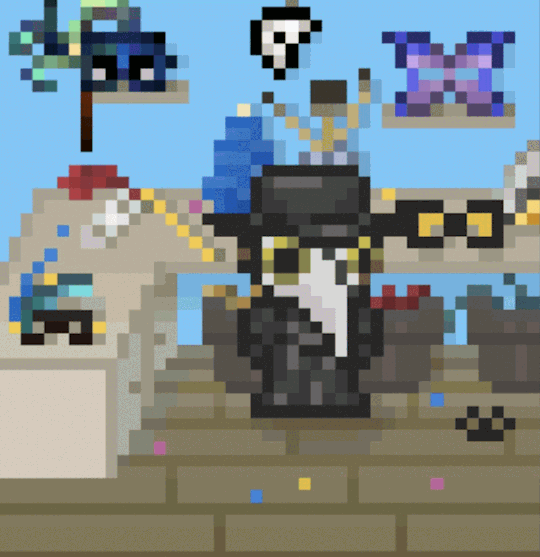
Plaguetober 2022 GIF roundup! Final GIF can be found here. (Have to link due to Tumblr image number restriction). Prompt list by the extremely excellent @plaguefairy. Captions below the readmore. (All credit to the original pixel art asset creators over at @habitica.)
Plaguetober Day 1: Garden -- Nothing could exceed the intentness with which this scientific gardener examined every shrub which grew in his path: it seemed as if he was looking into their inmost nature, making observations in regard to their creative essence, and discovering why one leaf grew in this shape and another in that, and wherefore such and such flowers differed among themselves in hue and perfume.
Plaguetober Day 2: Key -- Dr Athanasius considered himself an unofficial steward of the old mechanism, though it involved a considerable climb, requiring much stealth, ever since he first obtained the key.
Plaguetober Day 3: Familiar -- Whenever Dr Athanasius took up any of his instruments, Her Abdicated Former Majesty the Erstwhile Queen of Sweden (Erstwhile for short) was always sure to come running.
Plaguetober Day 4: Clover -- This is number eight, and the doctor’s at the gate…
Plaguetober Day 5: Rotten -- It might smell terrible to you, but it’s undeath-sustaining ambrosia to my hungry little friend here.
Plaguetober Day 6: Find -- After a bit of tricky fishing, he finally found it: The elusive Bone White Hippocamp! Her playful sea-horse woos her soft commands/Turns his quick ears, his webbed claws expands/His watery way with waving volutes wins/Or listening librates on unmoving fins.
Plaguetober Day 7: Jester -- In prison cell and dungeon vile/Our thoughts to them are winging. When friends by shame are undefiled/How can I keep from singing?
Plaguetober Day 8: Knot -- Now dash’d upon the billow/Our op'ning timbers creak/Each fears a wat'ry pillow/None stop the dreadful leak/To cling to slipp'ry shrouds/Each breathless seaman crowds/As she lay/Till the day/In the Bay of Biscay, O!
Plaguetober Day 9: Conundrum -- When one finds oneself in a sticky situation, it can sometimes be advisable to transform one’s foe from an adversary to a steed.
Plaguetober Day 10: Pie -- The venomous apples of the outer peninsula required some careful handling, but their flavor was truly beyond compare.
Plaguetober Day 11: Reveal -- I draw down/The open eye/That helped me see/Through the disguise. What’s concealed/Becomes revealed/And I am free.
Plaguetober Day 12: Circle -- Omnia nodis arcanis connexa quiescunt.
Plaguetober Day 13: Everlasting -- If the T. dohrnii jellyfish is exposed to environmental stress, physical assault, or is sick or old, it can revert to the polyp stage, forming a new polyp colony. It does this through the cell development process of transdifferentiation, which alters the differentiated state of the cells and transforms them into new types of cells. Theoretically, this process can go on indefinitely, effectively rendering the jellyfish biologically immortal.
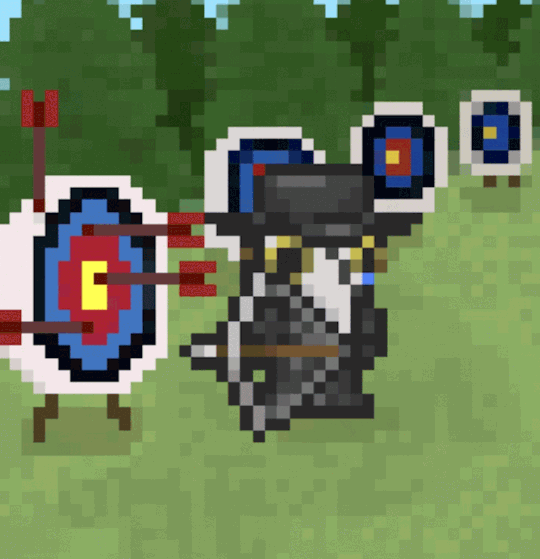
Plaguetober Day 14: Impale -- In retrospect, perhaps Dr Athanasius should have ascertained that the range was clear before attempting to collect his arrows.
Plaguetober Day 15: Play -- Govern these ventages with your fingers and thumb, give it breath with your mouth, and it will discourse most eloquent music.
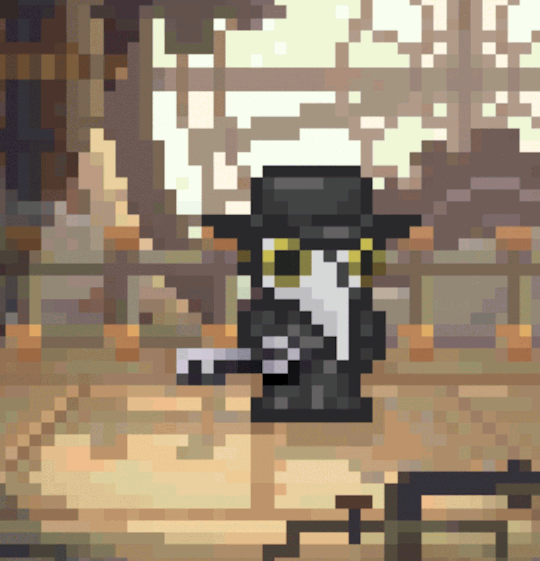
Plaguetober Day 16: Reminiscing -- Dr Athanasius in the Musaeum Kircherianum in Collegio Romano, the place of his creation, depicted next to the innermost segment of the speaking trumpet from which he had been lately disconnected.
Plaguetober Day 17: Maize -- Dr Athanasius suddenly realized that he had gone all-in on precisely the wrong sort of corn for the Autumn Festival and strove quickly to obliterate the evidence of his faux pas.
Plaguetober Day 18: Crime -- The cheaper the crook, the gaudier the patter.
Plaguetober Day 19: Jovial -- Fly agaric didn’t tend to have quite the same effect on Dr Athanasius as it had on others of his acquaintance, but he enjoyed the occasional nibble just the same.
Plaguetober Day 20: Awaken -- I was only wakened when I had reached the last light sleep which dissolves of itself, and it must have been very light, for it was an almost inaudible whistling noise that wakened me.
Plaguetober Day 21: Chatter -- Ordinarily, Dr Athanasius thought of himself as a sort of elevated flaneur, creeping along the rooftops of the city, the chatter and hum of its citizens in his ears. But occasionally he walks the streets themselves, on those rare wet nights when the city is quite, quite empty and quite, quite still.
Plaguetober Day 22: Lost -- Try as he might, Dr Athanasius could not reconstruct the plans for his Father’s sunflower clock. The secret to its mechanism seemed to have been forevermore lost.
Plaguetober Day 23: Greet -- Dr Athanasius’s reanimated lion adored taking walkies in the Lichgate of the Belimbed, because there he always found a friendly hand to greet him, pat him, throw his bone, and offer him skeletal scritches.
Plaguetober Day 24: Cobweb -- Once his friends the cobs were done with them, Dr Athanasius collected their webs for use in his armamentarium. They were particularly useful for staunching excessive bloodflow.
Plaguetober Day 25: Melancholy -- Whenever Dr Athanasius felt a bit down, he pulled out his trusty copy of D'Urfey’s Pills to Purge Melancholy, and his heart was immediately lighter.
Plaguetober Day 26: Rest -- You wouldn’t think a 17th Century automaton would dream, but you probably wouldn’t think a candle would stay lit in a giant clamshell either.
Plaguetober Day 27: Sheet -- That old sheet that Dr Athanasius had stumbled across turned out to have some unexpected properties.
Plaguetober Day 28: Cabinet -- Dr Athanasius inherited several things from his Father’s renowned Cabinet of Curiosities, among them the Ira Dei Dragon Balloon and the (slightly singed) Vesuvius Basket.
Plaguetober Day 29: Embark -- Fortified by a draft of Cosmiel’s celestial liquor, Dr Athanasius prepares to essay the heavens.
Plaguetober Day 30: Music -- Since his disconnection from his speaking trumpet, Dr Athanasius has lacked the power of speech, but from his perch atop the ramparts of the city, he strives always to embody the principles of the Musurgia Universalis.
Plaguetober Day 31: Goodnight -- And so the Dr Athanasius who lives in dreams – perhaps only in dreams; perhaps not – bids farewell to him that has harbored him.
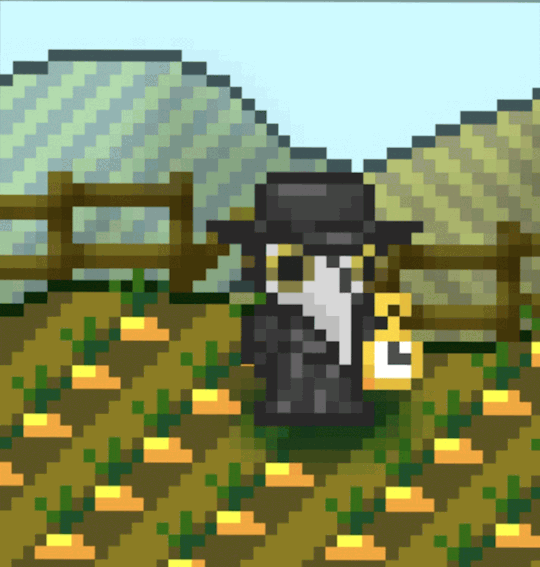
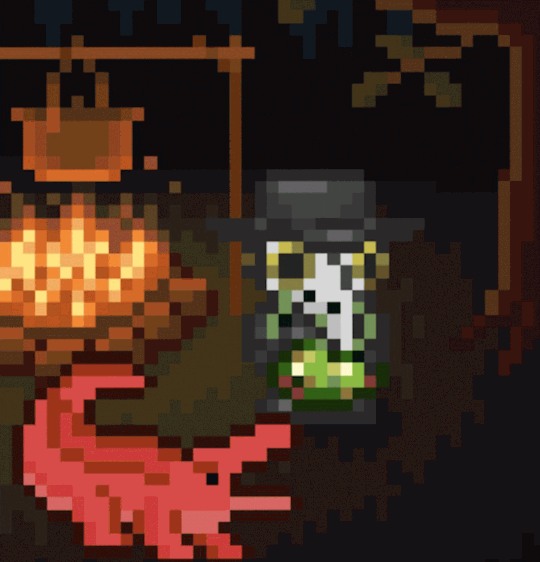
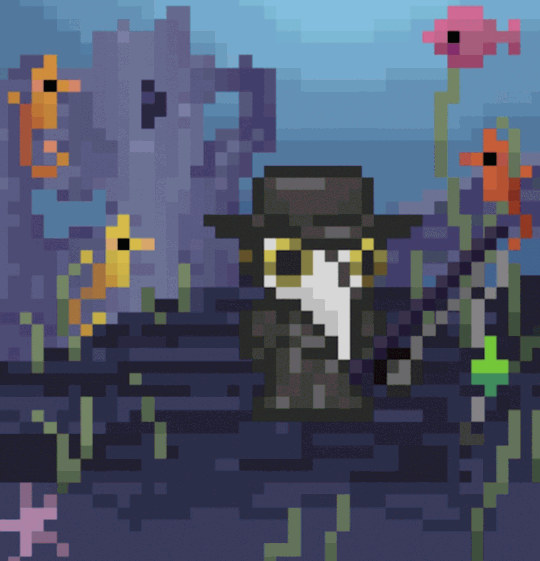
#plaguetober2022#plaguetober#plaguefairy#habitica#8-bit paper dolls#dr athanasius#kircher's automaton#plague doctor#plaguecore#plaguesona#plague doctor mask#kircher's automaton dreams 8-bit dreams
29 notes
·
View notes
Text

5 years is long enough…
For those who do or don’t remember, around this time 5 years ago, I organized and crowdfunded a project: A collection of pin-ups featuring my artwork, and interviews with the author’s original Inkling and Octoling characters, compiled into a PDF, dubbed Squid Boy.
The project was a success, and featured commissioned art work, along with original pieces by yours truly. Now, at the time of release of Splatoon 3, I want to produce a second volume — And I want to feature Your original characters!
How will this work?
For the price of a commission, you will have your OC featured in the book. You will have control over the theming and direction of the piece: A swimsuit pin-up, lingerie, cosplay, uniforms, nudity (censored or uncensored), etc…
The starting price is $70 for a full color illustration of your character, along with an interview, and assorted props to contextualize the piece
Additional characters will be an additional charge
For $140, you can have a double page spread of your character in a background of your choosing, along with any props you’d like, as well as an extended, featured interview
What are the specifications?
Pages will be 1600px x 2135px, with double page spreads up to 4270px x 2135px
Illustrations will be in full color, unless otherwise requested
Below are some images of the previous project, and I’ve included some sketches to show off the look of the new pieces:


Will this be an +18 restricted project?
No, all featured characters depicted will be SFW. Think of it like any fashion, lifestyle, or Sports Illustrated swimsuit magazine. NSFW variants will come at additional cost
Will this be printed?
Unfortunately, no. It will be assembled in to a PDF and put up for download.
Will you re-release the previous volume?
As of now, I lost the original PDFs. If there’s demand for it, I could reassemble it. Maybe a stretch goal?
Stretch Goal? Yes, there is a funding goal for this. My Goal is to reach $700 — For context, I’d only need to complete 10 illustrations to make the goal. You’d take part in a fun project celebrating the Splatoon fan community’s variety of OCs, you’d also be helping me fund my Christmas trip. I’m planning on flying to Brazil this December to visit my my girlfriend and spend the holidays with her family. We’ve been planning a trip like this for years, however, between travel restrictions, the pandemic, and the cost, we’ve had to postpone it — Until now!
I’ll provide updates and explore potential stretch goals as the project moves ahead. If you’re interested in participating, DM me across twitter, deviantArt, Tumblr, etc… for details!
It would be a privilege to showcase your squid! Until then, splat happy!
17 notes
·
View notes
Note
why only gluck?
It's not ONLY been Glück (see: Kaminsky, Young, Hughes, Kildegaard) but yes, I did admittedly go through a bit of a phase. Her poems work well for these kind of edits because:
They're compact. I can just about fit the entire narrative into the 10 images Tumblr restricts me to.
2. They have strong, emotional opening lines that immediately establish character & tone.
"In the story of Patroclus no one survives," or "He remembers the day the field burned, not, he thinks, by accident," or "Afterward, you go back to the old place,"
3. They're a little bit ambiguous.
“Poetry survives because it haunts and it haunts because it is simultaneously utterly clear and deeply mysterious; because it cannot be entirely accounted for, it cannot be exhausted.” - Glück
4. They tell one specific story, start to finish, which I can then layer on top of the life/career trajectory of whichever athlete I'm talking about. I personally prefer this over poems that don't follow a clear narrative arch & deal only with Feelings or larger, more general metaphysical concepts.
(& it is why I can't get the Marchand "Little Beast" Siken poem to work. Rip.)
5. I like her. I like her stuff.
My current poetry-obsession is actually Jack Gilbert, so expect to see more of his work in the next couple of weeks.
3 notes
·
View notes
Text
I posted 16,472 times in 2022
That's 5,290 more posts than 2021!
341 posts created (2%)
16,131 posts reblogged (98%)
Blogs I reblogged the most:
@itsmyturnonthegender
@yeetus-6942069
@the-mike-est-of-michaels
@kohak-u
@yharnamsnewslug
I tagged 3,155 of my posts in 2022
#cool art - 550 posts
#lucien - 271 posts
#the magnus archives - 137 posts
#luwucien - 101 posts
#long post - 100 posts
#unreality - 72 posts
#saving this - 69 posts
#image described - 58 posts
#the mistholme museum of mystery morbidity and mortality - 49 posts
#ofmd - 49 posts
Longest Tag: 138 characters
#so i figured i could power through the stress and fast-paced atmosphere if i got into a rhythm and worked out the back away from customers
My Top Posts in 2022:
#5
Okay most of the queer history and queer rights discussions/debates that cross my humble dash are US-centric, with the occasional terf bs from the UK, so here's some frustrations from an Australian queer kid
~homosexuality was legalised in 1994. That's right, a whopping 22 years ago
~gay marriage, however was only legalised in 2017. I remember when my parents voted on the issue– mum voted yes, dad voted no, and maintains his stance that legalising it was a mistake and impinges on his religious freedom
~conversion therapy was only outlawed in Queensland, the Australian Capital Territory and Victoria in 2021. My father signed a petition to overturn the bill. When confronted about this, he doubled down on his 'religious freedom' argument, saying that outlawing church-funded psychological torture of children was another step towards banning open practice of Christianity– gay marriage having been the first. Mum, a known bisexual, took his side in this argument and urged me later to apologise for raising my voice because 'it's the way he was raised' and 'you know he was abused by them'
~Whilst I can change my name without such restrictions, I will not be able to change my gender legally until I have undergone at least two gender-affirming surgeries, with certification from at least two medical professionals of such treatments, and to get these surgeries covered by Medicare, I'd need a diagnosis of 'persistent and severe' gender dysphoria, and well-documented treatment of such spanning at least 12 months. A diagnosis is also necessary to recieve hrt.
~If and when I am able to change my gender legally, it will not be simply corrected on relevant documents, rather my birth will be re-registered and a sex-change noted on my identity documents.
_______
We have a Long way to go.
95 notes - Posted June 16, 2022
#4
I'm listening to Mistholme again and I'm compiling a list of what the Mistholme Museum of Mystery, Morbidity and Mortality is not liable for

97 notes - Posted April 21, 2022
#3
The museum is not responsible for any injury, death or yassification that occurs during your tour
100 notes - Posted March 16, 2022
#2
Listening to Welcome to Night Vale now.
Positively unhinged vibes, convinced the writers were on something interesting, already invested, haven't the foggiest what's going on here, Wednesday has been cancelled due to a scheduling error, I think I'm gonna like it here
108 notes - Posted March 10, 2022
My #1 post of 2022
Hi hello
If your children address you like a commanding officer, I do not trust you.
229 notes - Posted April 24, 2022
Get your Tumblr 2022 Year in Review →
5 notes
·
View notes
Last Seen Blogs

aramajapan
ARAMA! JAPAN

starkfog
Mrs. Stark🐈⬛
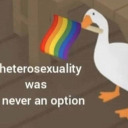
motherboard-messtm
Hi im Hal/ty and i wanna die :,D
trafalgarya
sasuke's husband

reviewbasedrefundproducts
Untitled