#v3 reconfigured
Text
Well...
After that,Tsumugi and i walked around and met the other students and i took some notes...

Rantaro Amami - He told us he didn't remember his talent...

Ryoma Hoshi - The Ultimate Tennis Pro...

Kirumi Toujo - The Ultimate Maid

Tenko Chabashira - The Ultimate Aikido Master

Angie Yonaga - The Ultimate Artist

Korekiyo Shinguji - The Ultimate Anthropologist

Miu Iruma - The Ultimate Inventor

Gonta Gokuhara - The Ultimate Anthropologist

Kokichi Ouma - He refused to tell me and Tsumugi his talent...

Kaito Momota - The Ultimate Astronaut...apparently

Kiibo or K1-B0 - The Ultimate Robot

Maki Harukawa - The Ultimate ChildCare Giver
and...

Himiko Yumeno - The Ultimate Magician
All of them were really interesting in my opinion...
and after that Tsumugi and I started going towards the Gym...
Oddly i didn't see Shuichi again the Whole time...
#danganronpa v3#dangan ronpa#danganronpa#dangan ronpa v3#danganronpa v3 reconfigured#kaede akamatsu#ultimate pianist#danganronpa v3 recalibrated#killing harmony#v3 reconfigured#Prologue#The Ultimate Recalibration#Ultimate Introduction#Tsumugi Shirogane#Rantaro Amami#Ryoma Hoshi#Kirumi Toujo#Tenko Chabashira#Angie Yonaga#Korekiyo Shinguji#Miu Iruma#Gonta Gokuhara#Kaito Momota#Kokichi Ouma#Maki Harukawa#Kiibo#K1-B0#Himiko Yumeno#Ultimate Cosplayer#Ultimate ???
11 notes
·
View notes
Text
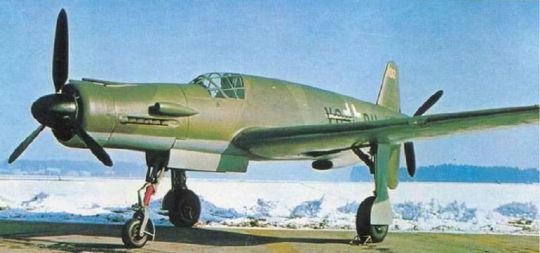
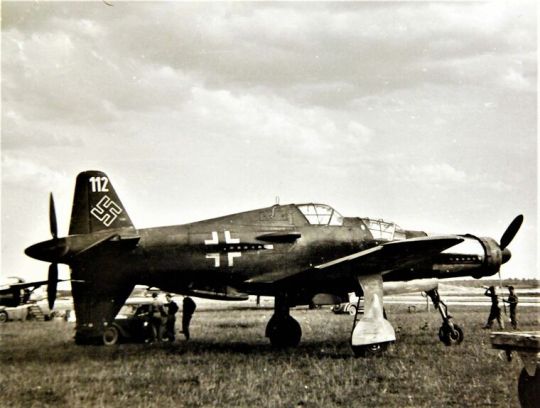
-A Dornier Do 335 Pfeil on a snowy runway, some time in 1944 or '45. | Photo: Luftwaffe
FLIGHTLINE: 181 - DORNIER DO 335 PFEIL ("ARROW")
Initially designed in response to a request for a Schnellbomber, the Do 335 was reconfigured into a multi-role aircraft, though only a few were completed before Germany surrendered.
Claude Dornier founded the Dornier Flugzeugwerke ("Aircraft factory") in 1914, and was renowned for building large, all-metal flying boats as well as land-based passenger aircraft between the Great War and WWII. These included the record-breaking Do 16 Wal ("Whale") of 1924, the Do X of 1929, and the Komet ("Comet") and Merkur ("Mercury"), a favorite of Lufthansa and SCADTA in Colombia, as well as several South American militaries. A feature of many Dornier aircraft were tandem engines, a tractor and a pusher motor placed back to back. This arrangement allowed an aircraft to enjoy the extra power of having multiple engines without the associated drag of having multiple tractor installations. It also alleviated the issue of asymmetric thrust in case of an engine failure.
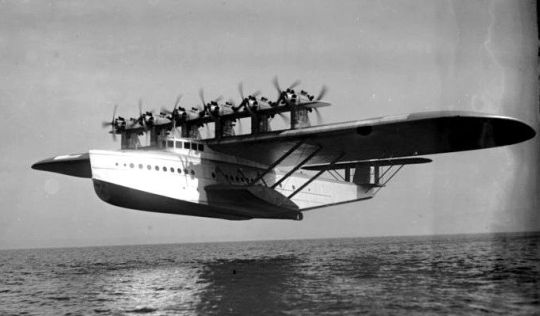
-A Do X in flight, circa January 1932. This was one of a number of Dornier flying boats to have a tandem engine configuration. | Photo: German Federal Archives
DEUTSCHLAND PFEILE
What became the Do 335 originated in 1939, while Dornier was working on the P.59 Schellbomber ("high-speed bomber"), which would have carried and equivalent load to a Ju 88 or Me 410, but featured a tandem engine arrangement. Work on the P.59 was cancelled in 1940, but Dornier had already commissioned a test aircraft, the Göppingen Gö 9, to test the feasibility of connecting a pusher prop via an extended drive shaft. The Go 9 was based on the Do 17 bomber, but scaled down 40% and with a cruciform tail. The test plane validated Dornier's designs, though the eventual fate of the Go 9 is not known (likely though, it was destroyed by Allied bombing or recycled).
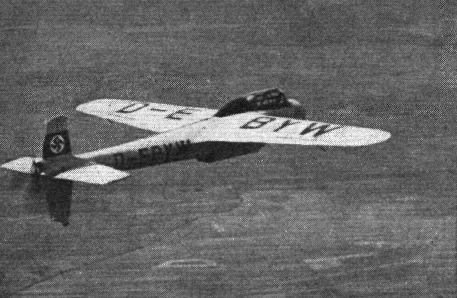
-The Göppingen Gö-9 motor glider, designed by Wolf Hirth. flying c.1941. | Photo: Flightglobal
The P.59's general design was resurrected in 1942 when the RLM requested a high-speed bomber with a 1,000kg payload. Dornier submission, designated the P.231, was awarded a development contract and the model number Do 335. Late in 1942, the requirements were changed from a Schnellbomber to a multirole fighter, which resulted in extensive delays while the designs were updated.
FLUGZEUGSPEZIFIKATIONEN
The Do 335 was 13.85m long, with a wingspan of 13.8m and a height of 5m. Empty, the plane weighed 7,260kg, while at max TO the weight was 9,600kg (10,000kg for the two-seat trainers and night fighter variants). Power was provided by two Daimler-Benz DB 603E-1 liquid-cooled V-12s developing 1,324kW each. Due to the situation in late-war Germany, the engines were fitted to run on 87 octane "B4" lignite-derived synthetic fuel, and MW50 boost was also available for additional speed. The basic fighter/bomber variant was armed with a singe 30mm MK 103 cannon firing through the spinner and two 20mm MG 151/20 autocannon mounted in the front engine cowl and synchronized to fire through the prop disc. A single 500kg bomb could be carried internally, and two pylons on the wings could be fitted with bombs, gun pods or drop tanks, with a total load of 100kg. During flight tests, the Do 335 hit 763kmh with boost (686kmh without), making it the fastest production fighter the Luftwaffe fielded during WWII. Under single-engine operations, the plane could still fly at 563kmh. Service ceiling was 11,400m, and under ideal conditions the plane could climb to 8,000m in 14 minutes 30 seconds. Due to concerns over a pilot striking the dorsal fin or the rear prop (a common concern in pusher designs before ejector seats became common), explosive charges would sever the fin and propeller before the pilot would bail out.
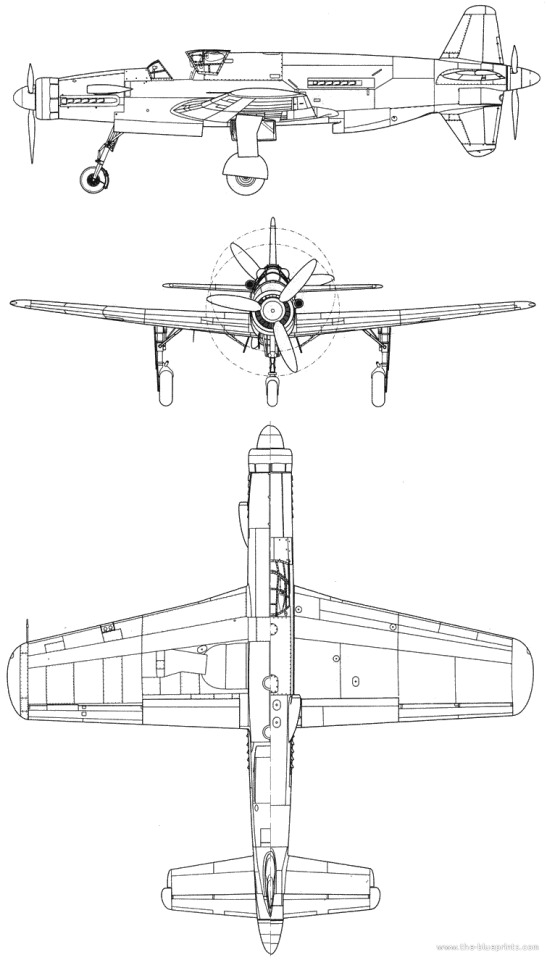
-Orthograph of the Do 335 A-1. | Illustration: Richard Ferriere

-Cutaway drawing of the Pfeil showing the engines, linkages, and landing gear actuators. | Illustration: Dornier
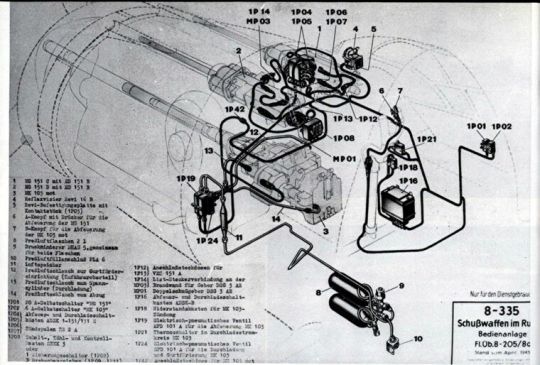
-Mounting locations of the 335's guns and associated equipment. | Illustration: Dornier
Maiden flight of the Do 335 V1 prototype was on 26 October 1943. A total of 27 flights were made with the V1, which uncovered a weakness in the landing gear, and issues with the main landing gear wheel-well doors saw them removed for the majority of the flights. The second aircraft, V2, first flew on 31 December 1943, and featured uprated DB 603A-2 engines as well as aerodynamic changes informed by the V1's test flights as well as wind tunnel tests. Maiden flight of the V3 pre-production aircraft was on 20 January 1944, which was fitted with DB 603G-0 engines, which produced 1,400kW at take off. The V3 was also fitted with two rear-view mirrors, alleviating blind spots caused by the location of the aft engine. A total of ten preproduction aircraft were then ordered, and in January the RLM ordered five more prototypes of the night fighter variant, later designated the A-6. By war's end, at least 16 prototypes of the Do 335 and related programs had flown, accumulating some 60 flight hours.
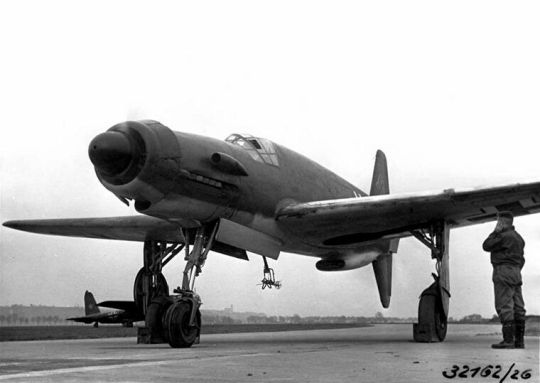
-The Do 335 V1 during testing in 1943 or '44. | Photo: Luftwaffe
Production of the Do 335 was given maximum priority under Hitler's Jägernotprogramm (Emergency Fighter Program), issued on 23 May 1944, and the competing He 219 Uhu ("eagle-owl") Nachtjäger theoretically freed up needed DB 603 engines for the Pfeil, but in practice Heinkel continued production of the 219A. Dornier's factories in Friedrichshafen and Munchen were anticipated to produce 120 and 2,000 Do 335s, of various configurations, by March 1946, but an Allied attack on Friedrichshafen destroyed tooling for the Pfeil, which resulted in a new line being set up in Oberpfaffenhofen. The first preproduction Do 335 A-0 model was delivered in July 1944, and construction of the first production A-1 model began in late 1944. As the war progressed, various models of the Do 335 proliferated (as happened often with late-war aircraft programs) as the Nazis sought to turn back the Allied forces:
Do 335 A-2: single-seat fighter-bomber aircraft with new weapon sights, later proposed longer wing and updated 1,471 kW (1,973 hp) DB603L engines.
Do 335 A-3: single-seat reconnaissance aircraft built from A-1 aircraft, later proposed with longer wing.
Do 335 A-4: single-seat reconnaissance aircraft with smaller cameras than the A-3
Do 335 A-5: single-seat night fighter aircraft, later night and bad weather fighter with enlarged wing and DB603L engines.
Do 335 A-6: two-seat night fighter aircraft, with completely separate second cockpit located above and behind the original.
Do 335 A-7: A-6 with longer wing.
Do 335 A-8: A-4 fitted with longer wing.
Do 335 A-9: A-4 fitted with longer wing, DB603L engines and pressurized cockpit.
Do 335 A-11/12: A-0 refitted with a second cockpit to serve as trainers.
-A Do 335 A-12 trainer, known as the Ameisenbär ("anteater"), late in the war. | Photo: Luftwaffe
Do 335 B-1: abandoned in development.
Do 335 B-2: single-seat destroyer aircraft. Fitted with 2 additional MK 103 in the wings and provision to carry two standard Luftwaffe 300 litre (80 US gal) drop tanks.
Do 335 B-3: updated B-1 but with longer wing.
Do 335 B-4: update of the B-1 with longer wing, DB603L engine.
Do 335 B-6: night fighter.
Do 335 B-12: dual-seat trainer version for the B-series aircraft.
Do 435: a Do 335 with the redesigned, longer wing. Allied intelligence reports from early May 1945 mention spotting a Do 435 at the Dornier factory airfield at Lowenthal.
Do 535: actually the He 535, once the Dornier P254 design was handed over to Heinkel in October 1944; fitted with jet engine in place of rear piston engine.
Do 635: twin-fuselaged long-range reconnaissance version. Also called Junkers Ju 635 or Do 335Z. Mock up only.
P 256: turbojet nightfighter version, with two podded HeS 011 turbojet engines; based on Do 335 airframe.
In April 1945 the Allies captured the Oberpfaffenhofen factory in late April 1945, capturing 11 A-1 fighter/bombers and 2 A-12 trainers. That same month, a flight of four RAF Hawker Tempests, led by French ace Pierre Clostermann, encountered an unknown model of Do 335 over northern Germany at low altitude. The Pfeil pilot began evasive maneuvers, but Clostermann opted to not give chase as the enemy plane displayed superior speed. At the time of the German capitulation in 1945, 22 Do 335A-0, A-1 and A-11/12 aircraft were known to have been completed.
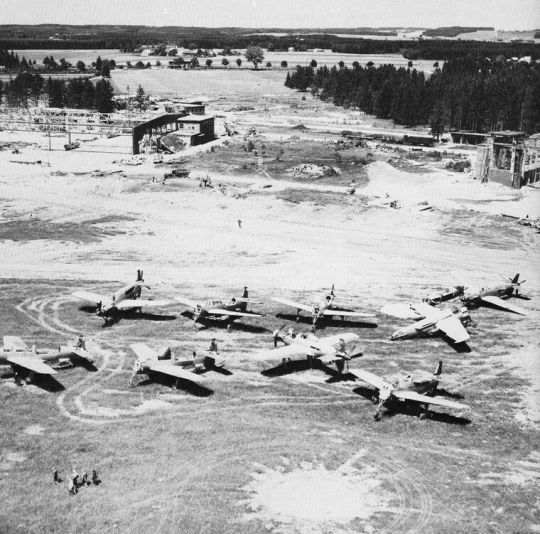
-Dornier Do 335 aircraft on the runway at Oberpfaffenhofen just after the end of the Second World War. | Photo: USAAF
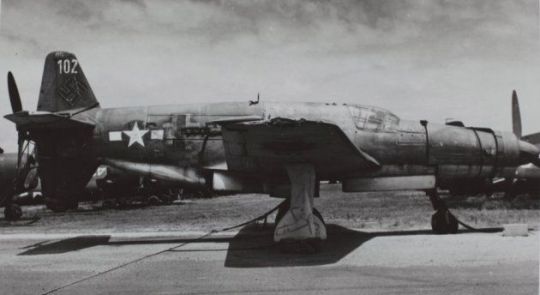
-A Do 335 after being captured by the US, with American markings painted over the Luftwaffe ones. | Photo: Charles Daniels Collection/SDASM Archives
At least two Do 335s were brought to the US under Operation LUSTY, with one, Do 335 A-0, designated A-02, with construction number (Werknummer) 240 102, and Stammkennzeichen ("factory radio code registration") VG+PH being claimed by the Navy for testing. The aircraft was transported on HMS Reaper along with other captured German aircraft, then shipped to the Navy's Test and Evaluation center at NAS Pax River. Another Pfeil was tested by the USAAF at Freeman Field in Indiana, but nothing is known about its fate. In 1961 VG+PH was transferred to the Smithsonian Institution, though it remained outside at NAS Oceana until 1974, when it was shipped back to the Dornier factory in Oberpfaffenhofen for restoration. Over the next year, volunteers from Dornier (some of whom worked on the aircraft originally) found that the explosive charges meant to sever the tail and aft prop were still installed and live, thirty years later. After work was completed the aircraft was placed on display at the Hannover Airshow from 1 to 9 May 1976, and afterwards it was on loan to the Deutsches Museum until 1988. The aircraft was shipped back the States after that, and is now on display at the Udvar-Hazy Center along with other German aircraft brought over during Lusty like the only known Ar 234 Blitz jet bomber and the partially restored He 219A Uhu.
#aircraft#aviation#avgeek#airplanes#airplane#aviation history#ww2 history#ww2 german aircraft#ww2 aircraft#ww2#ww 2 aircraft#ww 2#wwii history#wwii aircraft#wwiii#ww ii#ww ii aircraft#secret project#secret weapons of the Luftwaffe#luftwaffe#wonder weapons
38 notes
·
View notes
Text
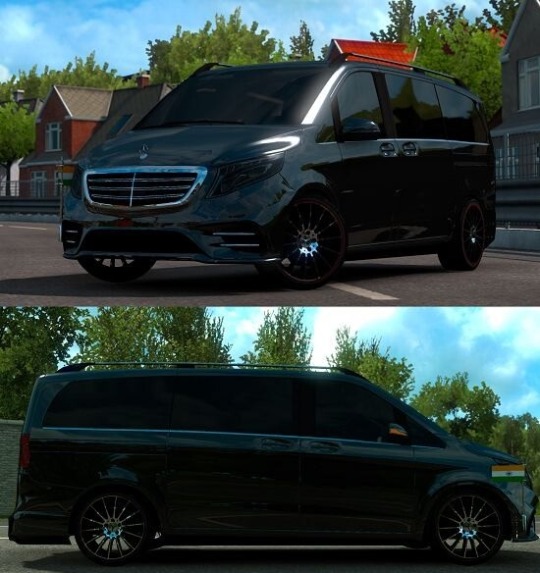
Mercedes-Benz Vito V-Class 2018 V3 1.39
Mercedes-Benz Vito V-Class 2018 V3 1.39
Description:– Fixed sound– Reconfigured headlights– Reconfigured engine (realistic specifications)– Reconfigured transmission (realistic specifications)– Reconfigured chassis (realistic specifications)– Chassis is now Rear-Wheel-Drive (RWD)– Reconfigured animation timing & delays– Major edits and fixes– Removed unnecessary files– New license plate– Added all available countries flags for flag…
View On WordPress
0 notes
Photo
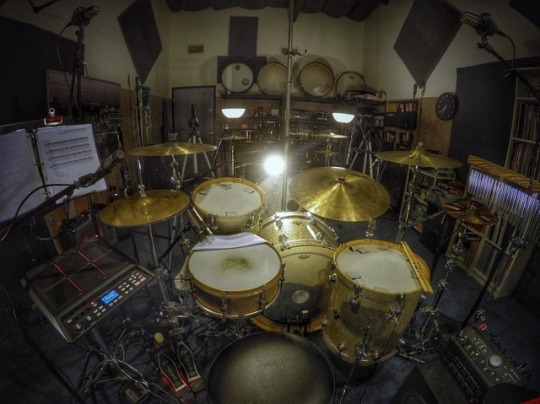
Workspace v3. • 12-hour reconfigure of Unleashed Drum Studio is done: better sound, more space, better videos! 🥁🎶 • #tone #author #create #drumlife #drummer #drumming #drums #drumset #gopro #groove #lesson #moderndrummer #music #musician #percussion #performance #performer #practice #recording #rehearsal #session #song #studio • @vicfirth @remopercussion @anfdrumco @dwdrums @bosphoruscymbals @humesandberg @ultimateearspro @sennheiser @avidtechnology @fabfilter @makemusic @gcpro @halleonard @alfredmusic @mogamicable (at Unleashed Drum Studio)
#music#recording#create#drummer#lesson#rehearsal#drumming#drums#practice#groove#studio#percussion#author#drumlife#drumset#gopro#tone#session#song#moderndrummer#musician#performance#performer
5 notes
·
View notes
Text
GERMANOPHONE- MANAGER IT
Nombre de postes : 1
Société
EOL Center est présent au Maroc depuis 6 ans. Nous sommes spécialisés dans le télémarketing (prise de rdv BtoB, vente directe BtoC/BtoB, conception et valorisation de programmes de fidélisation?) pour des clients principalement basés en Belgique dans le secteur des Télécoms. Acteur stable et compétitif, nous vous offrons un cadre ainsi qu?une ambiance de travail des plus optimales. Notre management prône une approche humaine et participative pour développer l?épanouissement professionnel de nos collaborateurs.
Poste
The Service Desk Manager’s role is to oversee all Service Desk staff and ensure that end users are receiving the appropriate assistance. This includes the responsibility of managing all procedures related to identification, prioritization and resolution of incidents, including the monitoring, tracking and coordination of Service Desk functions, while ensuring high levels of customer service quality and availability. This individual will develop, implement, and oversee policies and procedures to ensure consistent service levels and quick resolutions. The Service Desk Manager is also responsible for staffing capacity planning, ITSM Service Desk process design, performance analysis, and developing proactive resolution plans. The Service Desk Manager will also contribute to escalated problem resolution by giving in-person, hands-on support to end users when necessary.
Profil
Strategy & Planning? Develop Service Level Agreements (SLAs) to establish problem resolution expectations and timeframes.? Develop policies and procedures that outline how problems are identified, documented, assigned and corrected.? Analyse performance of Service Desk activities and documented resolutions, identify problem areas, and devise and deliver solutions to enhance quality of service and to prevent future problems. ? Plan and conduct performance appraisals of Service Desk staff, administer disciplinary action, raises, bonuses and promotions when necessary.Operational Management? Manage the processing of incoming calls to the Service Desk via both telephone and e-mail to ensure courteous, timely and effective resolution of end user issues.? Develop and enforce request handling and escalation policies and procedures.? Track and analyse trends in Service Desk requests and generate statistical reports.? Assess need for any system reconfigurations (minor or significant) based on request trends and make recommendations.? Identify, recommend, develop and implement end user training programs to increase computer literacy and self-sufficiency.? Oversee development and communication of help sheets, usage guides and FAQs for end users.? Attend as required training seminars, conferences and trade shows to broaden knowledge of current and future ITSM-based Service Desk issues and technologies.? Oversee the development, implementation and administration of Service Desk staff training procedures and policies.? Train, coach and mentor Service Desk Technicians and other junior staff.? Manage the overall desk activities and staff.? Contribute to escalated problem resolution by giving in-person, hands-on support to end users when necessary.? Attend Change Management and Steering Committee meetings as requested.? Monitor incident trends and anticipate potential problems for proactive resolution.Requirements Formal Education & Certification? College diploma or university degree in the field of computer science and a minimum of 5 years work experience.? ITIL v3 certification and/or formal training in ITIL/ITSM preferred, along with equivalent work experience.Knowledge & Experience? Extensive infrastructure and application support experience using Service Now or other ticketing and incident management systems. ? Extensive knowledge and support experience with common productivity applications.? Extensive knowledge of computer hardware, including PCs, phone and network equipment.? Working knowledge of a range of diagnostic utilities.? Experience with desktop operating systems, including Windows 7 and Windows 10. ? Familiarity and practical application of advanced principles of ITIL/ITSM.? Proven track record of developing and providing SLAs and Service Desk deliverables.? Demonstrated progressive experience in the management of a technical support team.Personal Attributes? Solid relationship management and performance management skills.? Ability to motivate and direct staff members and subordinates.? Strong customer service orientation.? Proven analytical and problem-solving abilities.? Ability to effectively prioritize and execute tasks in a high-pressure environment.? Good written, oral, and interpersonal communication skills.? Exceptional interpersonal skills, with a focus on listening and questioning skills.? Able to investigate and research retail industry point-of-sale and related computer and networking issues and products as required, and recommend solutions.? Ability to present ideas in business-friendly and user-friendly language.? Highly self-motivated and directed.? Keen attention to detail.? Team-oriented and skilled in working within a collaborative environment.? Fluent in GERMANY
Rémuneration
A négocier
from Maroc Emploi https://ift.tt/2rIEu6E
0 notes
Text
RIP Up Your Dynamic Routing With OSPF
What is dynamic routing? Why is Routing Information Protocol (RIP) horrible, and Open Shortest Path First (OSPF) ever so slightly less horrible? How does Linux handle OSPF, and what advantages does it bring over traditional networking gear in complex, intent-based, infrastructure-as-code environments?
RIP and OSPF are Interior Gateway Protocols (IGPs). IGPs are protocols designed to allow network routers and switches within an organization’s internal network to dynamically reconfigure the network to respond to changes. These changes may include the addition or removal of network equipment or network links between network devices.
The purpose of IGPs is to tell networking equipment which devices live where. While devices that are part of the same subnet can find one another, they require a router to communicate with devices on other subnets. Routers and switches keep routing tables of which devices are on which physical interface, and VLAN. These routing tables allow each device to know where to send a packet to reach a given system, and whether or not that packet needs to be encapsulated or tagged.
IGPs allow routers and switches to exchange some or all of their routing tables so that other devices within the network fabric know where to send packets that are bound for a specific device. The dissemination of routing table updates throughout a network is called “convergence.” The time it takes for network changes to converge increases in importance with the size of the network, and with the adoption of modern dynamic application development practices.
Routing Interface Protocol
RIP has been around for some time. It was already in widespread use before the standard was formalized in 1988. Its successor, RIPv2, was developed in 1994, and the standard was finalized in 1998.
When multiple possible paths between source and destination exist, RIP uses hop count as the metric to determine which network link should be used to send a packet. Hop count is the number of devices between a network device and its destination. RIP is limited to 15 hops, severely limiting the size of the network on which it can operate. RIPv2 retains RIPv1’s 15 hop limit. The big difference is that where RIP uses unicast, RIPv2 uses multicast.
With RIP, convergence is slow. Network routing table dissemination takes longer than alternative protocols, in part because RIP sends the entire routing table with each update. For all of the reasons listed earlier, RIP is an absolutely terrible routing protocol for the modern era, and should never be used on anything but the smallest networks.
RIP’s flaws have been known for some time. Cisco created the proprietary Interior Gateway Routing Protocol (IGRP) to replace RIP, which overcame many of RIP’s deficiencies. The proprietary nature of the protocol, however, limited its adoption.
Enhanced Interior Gateway Routing Protocol (EIGRP) is another Cisco proprietary protocols that aims to effectively replace RIP, RIP v2, and IGRP. Like RIP, IGRP and EIGRP are distance-vector routing protocols that use “distance” (i.e., hop count) to determine path; as a result, RIP, IGRP and EIGRP are often considered to be part of the same family of routing protocol.
EIGRP was made into an open standard in 2013. While adoption beyond Cisco’s sphere of influence is occurring, it’s been slow going, and OSPF is the open routing protocol that still dominates the data center.
OSPF
OSPF is a link-state routing protocol. This means that, instead of counting how many hops exist between sender and receiver, OSPF focuses on the total bandwidth available. As a result, OSPF has no hop count limit, and can handle much larger networks than RIP. OSPF convergence is fast, in part because OSPF sends only small updates, instead of the entire routing table.
The first version of OSPF was standardized in 1989, and OSPFv2 was standardized in 1998. OSPF networks can be subdivided into “areas,” which leads to most OSPF networks looking like a series of interconnected star topologies. OSPFv3 can be thought of as “OSPFv2 for IPv6,” and was standardized in 2008.
Intermediate System to Intermediate System (IS-IS) operates somewhat similarly to OSPF, in that it uses link state instead of hops as its metric. The first edition of the standard was published in 1992, and the second edition was published in 2002. It’s been widely implemented by service providers, but hasn’t seen wide use in smaller data centers.
Though IS-IS is generally the more capable of the two, there are some significant differences. Without delving too deep into the technical differences, OSPF networks more easily create star topology networks, whereas IS-IS more easily creates hierarchical backbone-style networks. This is one reason why IS-IS is very popular with service providers, while OSPF remains the de facto standard in the data center.
Another reason OSPF still dominates is because OSPF is a layer 3 protocol, while IS-IS is a layer 2 protocol. This means that OSPF information is exchanged using data packets that can be routed, while IS-IS is not.
Data packets from layer 3 protocols can traverse routers. TCP/IP is the most famous example of a Layer 3 protocol. It’s ability to be routed allows the communication between computers, even though they must transit multiple routers to cross the internet.
Layer 2 protocols, however, can only connect devices that do not need to transit a router. In the case of OSPF and IS-IS, OSPF allows routers to exchange information directly with routers located more than one hop away in the routing fabric, while IS-IS would only allow routers to exchange information with immediate neighbours.
Why Linux?
The short answer for why it’s useful to use network devices based on Linux when using either RIP or OSPF is that both routing protocols are ancient. Even OSPF v3, despite being relatively new, is a little long in the tooth at more than a decade old.
These protocols were designed for an era in which a “dynamic network” was one in which a cable failed, or an individual router was rebooted. None of these protocols, not even Cisco’s EIGRP, are really designed for a world in which DevOps teams can spin up tens of thousands of workloads – complete with virtual switches and virtual routers – with a single script, and then destroy them all just as easily.
Traditional networking equipment doesn’t allow for a lot of customization. With Linux, on the other hand, you can essentially do anything you can think of. If you wanted to create a series of filters so that only some routing information is propagated, it’s far easier in a Linux-based networking environment.
Similarly, Linux networking can pre-seed routing tables during the spin-up process of those thousands of DevOps-driven workloads, or send routing information based on any number of triggers that one might dream up.
Stretch Your Limits
In short: today’s networks are far more dynamic than was envisioned when these protocols were made. Traditional networking equipment, being rigidly standards-based, doesn’t allow for bending – let alone breaking – the rules. Linux does. While information exchange between network devices still has to use the standardized protocols, Linux allows administrators far greater flexibility in how, why and when those protocols are used.
This is the nature of the IT industry. We all wait for standards bodies to make the next great standard, and then wait even longer for those new protocols and standards to be supported by all devices (factoring in the time it takes equipment to age out of a data center).
In the meantime and between time, we stretch and bend the existing protocols to their limit. This is what Linux is great at, and why Linux should be at the core of your network.
RIP Up Your Dynamic Routing With OSPF published first on https://wdmsh.tumblr.com/
0 notes
Text
Best Camera Straps and Holsters of 2018
If you’re like me, even if you are proud to show off the branding of your shiny new camera, the strap that is generally included with most DSLRs just doesn’t cut it when it comes to your style, form, and function requirements. The strap you’ll need while shooting a red carpet or wedding will often be totally different from the one you use while hiking with friends & family. The good news is there are an incredible amount of third-party straps & holsters to choose from.
To help you decide which strap and/or holster is right for you, we’ve created our list of the Best Camera Straps and Holsters for Photographers, updated annually. These lists are based on our personal experience as working photographers combined with extensive research from other reputable sources online.
If we missed anything, or if you have any recommendations on what we should consider for next year, please comment below!
Best Camera Straps
Just like all of our other photo & video accessories, most photographers will have at least two different camera straps in their arsenal that gets switched out depending on the situation. Myself, I’ve got six different straps and holsters and I use each and every one of them. In fact, now that I’m writing this article, I realize that a few of them are due to be retired and replaced with updated versions.
Peak Design Slide Sling Strap (Our Choice)
Our Winner for Best Camera Strap.
The Peak Design Slide, (or Slide Lite), Camera Sling Strap is one of the favorites on the market and for most people we’ve spoken too. It’s a versatile strap that can be used as a standard neck strap as well as a sling or shoulder strap.
It comes with several attachments to work with a plethora of camera systems and integrates seamlessly with the Peak Design Bags & Clip System. The Slide strap is internally padded and both (the Slide and Slide Lite) are made from nylon webbing. There is a grippy side designed for when you’re wearing the strap as a shoulder/sling to help prevent slipping. Both straps have dual quick-adjusters to provide quick and easy adjustments to the length of the strap with easy reconfigurations.
Check the prices from our preferred retailers below:
Amazon
B&H
[REWIND: The Best Camera Bags In 2018 According To SLR Lounge]
BlackRapid Curve Breath Camera Strap
Our 2nd Place Winner for Best Camera Strap.
BlackRapid has quickly become one of the most trusted names in camera straps. The Curve Breath is an update to one of their original straps that improves upon its previous model with a new mesh material to improve airflow (or “breathability”) and still offer an incredibly comfortable padding.
The cross-body strap, which is optimized for female photographers, places the camera at waist level to give you quick and easy access while offering you the ability to go “hands free,” letting it hang safety and securely when you need a break or have to use your hands for something else.
Check the prices from our preferred retailers below:
Amazon
B&H
ONA Presidio Camera Strap
Our 3rd Place Winner for Best Camera Strap.
The Ona Presidio Camera Strap is our choice for a sleek and retro-looking camera strap to match the rest of your gear and style. Made with Italian Tanned Leather, this strap is also padded with soft neoprene and chrome buckles to allow for easy length adjustments.
The quality material in this strap will ensure that even the heaviest of gear won’t be too much of a strain over the course of a day. This strap is also available in a waxed-canvas design for $30 cheaper if you’re looking for a similar style on a budget.
Check the prices from our preferred retailers below:
Amazon
B&H
Best Camera Holsters
While some holsters are technically still a part of the strap category, they’ll provide you with some extra versatility and comfort that a “normal” camera strap can’t provide. Used on their own or in tandem with the camera straps mentioned above, the holster systems will give you a “quick draw” feel that you won’t soon forget.
Holdfast Gear Money Maker Holster (Our Choice)
Our Winner for Best Camera Holster.
The Holdfast Gear Money Maker is a sleek and stylish dual camera holster that not only looks fantastic but functions even better. If you’re a wedding or event photographer, you’re used to having to carry around multiple cameras and lenses, so back & neck pain are nothing new, but the Money Maker helps alleviate that.
This strap is designed to carry one, two, or three cameras all while evenly distributing the weight to reduce the pressure on your lower back.
Available in a variety of colors, (and materials now), the Holdfast Gear Money Maker also boasts a clip design used to attach a sail to a boat, giving you an extra sense of security for your gear.
Check the prices from our preferred retailers below:
Amazon
B&H
[REWIND: Camera Strap Review | Money Maker Camera Harness By HoldFast Gear]
Spider Camera SpiderPro Single Camera System V2 Holster
Our 2nd Place Winner for Best Camera Holster.
Spider Camera’s SpiderPro Single Camera System V2 Holster is a solid favorite among photographers who prefer to not wear straps for their system. On top of the comfort bonus, you no longer need to worry about neck burn and chafing from a full day of running around with one or more straps over your back. The hip holster system frees your upper body by making use of a “utility-belt” style with a quick draw locking system, giving you both quick access and secure safety for your gear.
The belt is padded for comfort and system wear prevention with a triple-action lock system to ensure it doesn’t unbuckle accidently. And for those concerned about the mounting plate preventing you from attaching additional accessories, fear not! The mounting plate system is designed so that you can attach tripod mount/plate or similar accessory as needed for quick shifts in your shoot.
Check the prices from our preferred retailers below:
Amazon
B&H
Peak Design Capture Pro Camera Clip V3
Our 3rd Place Winner for Best Camera Holster.
One of the great things about the Peak Design Capture Camera Clip V3 is you can attach your camera to pretty much any existing belt or strap in your arsenal. Strap onto your pants belt, your backpack straps, or some of the Peak Design bags have specific reinforced loops designed for the Clip.
This system uses an Arca Swiss style quick release plate that can withstand up to 200 lbs of force while still providing instant access to your camera with its quick-release lock. The plate can also be used directly as a tripod mount if needed, giving you some extra creative freedom.
Check the prices from our preferred retailers below:
Amazon
B&H
How to Choose The Best Camera Strap or Holster
The thing to keep in mind when choosing your strap and/or holster is the size of your camera, as well as the entire kit that you use on a day-to-day basis. While something like the Holdfast Gear Money Maker may catch your eye for its style and design, if you’re only using a single small mirrorless system, it may be a tad overkill for your current needs. Thankfully, the main part of the selection process will come down to how it fits on you, personally.
You’ll have to be mindful of the room your gear will need to sit properly in the strap/holster and on your body. If a particular belt or strap is too tight, it’ll be pretty hard to get to and use your camera quickly. If it’s too loose, you run the risk of bumping and damaging your gear.
Be sure to try these things on for yourself to find the right fit for you and then start evaluating what additional features you want based on your work and personal habits.
The other things to consider are the materials the straps and holsters are made from, how adjustable are they, if they can support attachments, and the number of cameras (or accessories) they can accommodate.
Summary
Here is a list of all the gear discussed in this article:
Peak Design Slide Sling Strap (Our Choice)
BlackRapid Curve Breath Camera Strap
ONA Presidio Camera Strap
Holdfast Gear Money Maker Holster (Our Choice)
Spider Camera SpiderPro Single Camera System V2 Holster
Peak Design Capture Pro Camera Clip V3
What did we miss? Please give us feedback so that we can check out other bags and keep this list up-to-date.
from SLR Lounge http://bit.ly/2CFx5ut
via IFTTT
0 notes
Note
Ask Shuichi if he remembers how he got here or what happened before he woke up here.
i was about to ask that anyways.

"Shuichi,do you by chance remember how you got here...?"

"Or...where this even is?"

"No...I've never been here before..."
"Sometimes i wish there were Cute color-coded mascots to explain things to us..."

"That...Doesn't sound very realistic."

"I know,but it sounds cool!"
#Danganronpa#Dangan ronpa#Danganronpa V3#Dangan Ronpa V3#Killing Harmony#Killing Game#Kaede Akamatsu#Ultimate Pianist#Shuichi Saihara#Ultimate Detective#Danganronpa V3 Reconfigured#Danganronpa V3 Recalibrated#V3 Reconfigured#V3 Recalibrated#SaiMatsu#Kaeichi
7 notes
·
View notes
Photo

独り Terraform 研究所 (1) 〜 Backend についてドキュメントを読んだり, チュートリアルしたり 〜 https://ift.tt/2DKc6ub
どうも
Backends
— ドキュメント
— 状態の管理
— メリット
— 設定諸々
— Backend Types
—– 二種類の Backend Type
—– Enhanced Backends
—– Standard Backends
State Locking
— ドキュメント
— State Locking とは
— 例えば…
Doctor Providor + Backend Type S3
— せっかくなので
— 簡単な main.tf
— コンテナ作成
— Backend を S3 に変える
現場から以上です
どうも
独り Terraform 研究所, 所長兼研究員のかっぱです.
以下のような Terraform に関する記事を書いてから, 2 年以上が経過して, すごく久しぶりに Terraform を触る機会を得たので 2 年のブランクを少しでも埋めるべく Terraform について, 自分が気になる部分を掻い摘んで研究していきたいと思います.
よかろうもん
terraform カテゴリーの記事一覧 - ようへいの日々精進XP - ようへいの日々精進XP
inokara.hateblo.jp
尚, 本記事で利用している環境は以下の通りとなります.
$ sw_vers ProductName: Mac OS X ProductVersion: 10.13.6 BuildVersion: 17G65 $ terraform --version Terraform v0.11.8
また, 英文の翻訳には Google 翻訳を利用しておりますが, 一部には自分による意訳が含まれている為, 実際の内容とは異なる可能性がある旨, 何卒ご了承の程よろしくお願い致します.
Backends
ドキュメント
A backend in Terraform determines how state is loaded and how an operation such as `apply` is executed. This abstraction enables non-local file state storage, remote execution, etc.
Backends - Terraform by HashiCorp - Terraform by HashiCorp
www.terraform.io
状態の管理
Terraform で構築したインフラの状態 (State) を管理する
Backend 自体は抽象レイヤーで, 実際にはリモートのオブジェクトストレージ等を選択して状態を保存することが出来る
デフォルトの設定は local Backend で状態はローカル PC に保存される
メリット
Backend のメリットについては, ドキュメントのおいては以下のように言及されています.
リモートに状態を保存した上で, その状態をロックすることで, 状態の破損を防ぐことが出来る
リモートストレージを利用することで, 機密情報をローカルディスクに保存する必要がなくなる
いくつかの Backend については, 遠隔操作が可能となる為, apply して放置ということが出来る (リモートストレージとロックを組み合わせる)
特にチームで Terraform を触る際にこれらのメリットの恩恵を受けることが出来ると思いますが, 個人だけで触る場合でも, Backend をうまく使いこなすことができれば, どこでも, いつでも同じ状態を簡単に構築, 再現することが出来ると思います.
設定諸々
terraform init を実行して, Backend を初期化する必要がある (init は Terraform を始めるにあたり, 必ず実行する必要がある)
設定自体は Terraform ファイルの terraform セクションに記述するか, init コマンドのオプションとして, コマンドラインからも指定することが出来る
以下は Amazon S3 を Backend として利用する場合の設定例です.
teraform { backend "s3" { bucket = "oreno-terraform-state" key = "terraform.tfstate.docker" region = "ap-northeast-1" } }
Backend を変更する (例えば, local から s3 に変更する) 場合にも init コマンドを使う
以下は init コマンドの実行例です.
$ terraform init Terraform has detected you're unconfiguring your previously set "s3" backend. Do you want to copy existing state to the new backend? Pre-existing state was found while migrating the previous "s3" backend to the newly configured "local" backend. No existing state was found in the newly configured "local" backend. Do you want to copy this state to the new "local" backend? Enter "yes" to copy and "no" to start with an empty state. Enter a value: yes Successfully unset the backend "s3". Terraform will now operate locally. ...
上記の例では, 従来は S3 Backend の利用を定義していたものを削除し, terraform init を実行しています.
workspace を利用している場合, 各 workspace 毎に状態 (tfstate) が作成される
以下は local Backend を用いて, test1 及び test2 という workspace を作成して plan や apply を行った結果です.
$ tree . . ├── main.tf ├── terraform.tfstate └── terraform.tfstate.d ├── test1 │ └── terraform.tfstate └── test2 └── terraform.tfstate 3 directories, 4 files
terraform.tfstate.d ディレクトリが作成され, その直下に各 workspace 名のディレクトリが作成され, その直下にそれぞれの tfstate ファイルが作成されています.
Backend Types
二種類の Backend Type
Backend Type は大きく, 提供する機能によって以下の二種類に分けられる.
Standard
状態の管理, 状態保存とロック機能を提供
Enhanced
Standard の機能に合わせて, リモート操作を提供
「リモート操作」については, ここでは大きくは触れないが, ドキュメントによると…
Some backends support the ability to run operations (refresh, plan, apply, etc.) remotely. Terraform will continue to look and behave as if they’re running locally while they in fact run on a remote machine.
と書かれており, Enhanced タイプの Backend を利用することで, Terraform の実行をリモートで行いつつ, あたかもローカル環境で実行されているかのように振る舞う機能が利用出来るようだ.
Enhanced Backends
Enhanced Backends には以下の二種類があります.
local
remote
local はデフォルトの Backend で明示的に path を指定しない場合にはカレントディレクトリに tfstate ファイルは保存されるようです. 以下は, 明示的に path の設定を行った例です.
terraform { backend "local" { path = "relative/path/to/terraform.tfstate" } }
Standard Backends
Standard Backends の中でも単体で locking をサポートするものとしないもので分けられているようです. (locking についてはこの後で触れる予定.)
タイプ locking サポート メモ artifactory no artifactory なんて初めて聞いたサービス. azurerm yes Azure Storage のネイティブ機能を使用した状態ロックと整合性チェックもサポートする. consul yes Consul のキー・バリューストアを利用, 状態ロックもサポートする etcd no etcd v2.x のパスを利用する. etcdv3 yes etcd v3 のキー・バリューストアを利用, 状態ロックもサポートする. gcs yes Google Cloud Storage を利用, 状態ロックもサポートする. http optional REST クライアントを利用して状態を保存する. manta yes manta というオブジェクトストレージを利用する. manta 内で状態ロックも行う. s3 DynamoDB を利用 Amazon S3 を利用, バージョニングを有効にすることを推奨, DynamoDB を利用して状態ロックと整合性チェックもサポートする. swift no オブジェクトストレージの swift を利用する. s3 同様にバージョニングを有効にすることを推奨. terraform enterprise no 旧 Atlas を利用, locking サポートしているかと思いきや…
State Locking
ドキュメント
Terraform stores state which caches the known state of the world the last time Terraform ran.
State: Locking - Terraform by HashiCorp - Terraform by HashiCorp
www.terraform.io
Backends are configured directly in Terraform files in the `terraform` section.
Backends: State Storage and Locking - Terraform by HashiCorp - Terraform by HashiCorp
www.terraform.io
State Locking とは
Backend でサポートされている場合, Terraformは状態を書き込む可能性があるすべての操作について状態をロックする
状態をロックすることにより, それぞれ別の変更を加えようとした際に tfstate が破壊されることを防ぐ
状態のロックは, tfstate に書き込みが発生する可能性のあるすべての操作で自動的に行われる
状態のロック自体が失敗すると, Terraform は処理を中断する
例えば…
Backend Type で Amazon S3 を選んだ場合には, S3 自体には状態をロックし, 整合性をチェックするような機能は提供されていない為, DynamoDB テーブルを利用してこれらの機能を提供することになります.
また, ロックの際に保存される情報は, 以下のコードで確認することが出来ます.
Terraform is a tool for building, changing, and combining infrastructure safely and efficiently. - hashicorp/terraform
hashicorp/terraform - GitHub
github.com
info := &LockInfo{ ID: id, Who: fmt.Sprintf("%s@%s", userName, host), Version: version.Version, Created: time.Now().UTC(), }
フムフム.
Docker Providor + Backend Type S3
せっかくなので
Docker Provider を使ってコンテナを作りつつ, Backend の挙動等について確認 (という名のチュートリアル) をしてみたい.
簡単な main.tf
基本となる Terraform ファイルは以下の通りです.
resource "docker_container" "hoge" { image = "${docker_image.centos.latest}" name = "hoge-${terraform.workspace}" hostname = "hoge-${terraform.workspace}" command = ["/bin/sh", "-c", "while true ; do sleep 1; hostname -s ; done"] } resource "docker_container" "fuga" { image = "${docker_image.centos.latest}" name = "fuga-${terraform.workspace}" hostname = "fuga-${terraform.workspace}" command = ["/bin/sh", "-c", "while true ; do sleep 1; hostname -s ; done"] } resource "docker_container" "popo" { image = "${docker_image.centos.latest}" name = "popo-${terraform.workspace}" hostname = "popo-${terraform.workspace}" command = ["/bin/sh", "-c", "while true ; do sleep 1; hostname -s ; done"] } resource "docker_image" "centos" { name = "centos:6" }
コンテナ作成
workspace を事前にいくつか作ってしまっていたので, 今回は default に戻した状態でコンテナを作成します.
$ terraform workspace select default $ terraform plan $ terraform apply ... docker_container.popo: Creation complete after 0s (ID: 69c652297dd3a7cfd30c91a428f0ae026ec8611090914bf8e6a0ba0eb937c796) docker_container.fuga: Creation complete after 0s (ID: f203969cd96e0de6e1eec8dee1dc866b87d0eeab2c3b0609304d9f575f63b0d2) docker_container.hoge: Creation complete after 0s (ID: f4a7331dd4e436920a28fcb9c98372c453f95f21d5e7718bf68170266a8bdff2) Apply complete! Resources: 4 added, 0 changed, 0 destroyed.
サクッと, コンテナが起動します.
$ docker ps | grep 'default' f4a7331dd4e4 b5e5ffb5cdea "/bin/sh -c 'while t…" About a minute ago Up About a minute hoge-default f203969cd96e b5e5ffb5cdea "/bin/sh -c 'while t…" About a minute ago Up About a minute fuga-default 69c652297dd3 b5e5ffb5cdea "/bin/sh -c 'while t…" About a minute ago Up About a minute popo-default
この時に tfstate ファイルは, main.tf が保存されているディレクトリと同じディレクトリに作成されています.
$ ls main.tf terraform.tfstate main.tf terraform.tfstate
Backend を S3 に変える
この状態から Backend を Amazon S3 (以後, S3) に変更してみたいので main.cf に以下を追記します.
terraform { backend "s3" { bucket = "oreno-terraform-state" key = "terraform.tfstate.docker" region = "ap-northeast-1" } }
順番はどちらでも良いけど, S3 バケットを作成します. この S3 バケット自体も terraform で作ることが出来るようですが, 今回は AWS CLI で作成します.
# バケットを作成 $ aws s3 mb s3://oreno-terraform-state # バケットバージョニングを有効 $ aws s3api put-bucket-versioning \ --bucket=oreno-terraform-state \ --versioning-configuration Status=Enabled # バケットを暗号化する $ aws s3api put-bucket-encryption --bucket=oreno-terraform-state \ --server-side-encryption-configuration '{ "Rules": [ { "ApplyServerSideEncryptionByDefault": { "SSEAlgorithm": "AES256" } } ] }'
作成したら, terraform init コマンドを --reconfigure オプションをつけて実行します.
$ terraform init --reconfigure Initializing the backend... Do you want to migrate all workspaces to "s3"? Both the existing "local" backend and the newly configured "s3" backend support workspaces. When migrating between backends, Terraform will copy all workspaces (with the same names). THIS WILL OVERWRITE any conflicting states in the destination. Terraform initialization doesn't currently migrate only select workspaces. If you want to migrate a select number of workspaces, you must manually pull and push those states. If you answer "yes", Terraform will migrate all states. If you answer "no", Terraform will abort. Enter a value: yes Successfully configured the backend "s3"! Terraform will automatically use this backend unless the backend configuration changes. ...
上記のように, tfstate ファイルは S3 にコピーする旨の確認メッセージが出力され, yes を入力すると S3 にコピーが完了します. 念の為, 確認してみると以下のように S3 にアップロードされていることが判ります.
# S3 上の tfstate ファイルを確認 $ aws s3 ls s3://oreno-terraform-state/ PRE env:/ 2018-09-08 14:51:53 5662 terraform.tfstate.docker # オブジェクト (tfstate ファイル) がバージョニングされていることを確認 $ aws s3api list-object-versions --bucket=oreno-terraform-state { "Versions": [ { "ETag": "\"64b530af2d748c77a5d68b5448ac76de\"", "Size": 5649, "StorageClass": "STANDARD", "Key": "env:/test1/terraform.tfstate.docker", "VersionId": "2.eNdgnznHlbxkc_hMJ6NEz9AIcibcwO", "IsLatest": true, "LastModified": "2018-09-08T05:51:57.000Z", "Owner": { "DisplayName": "kappaahoaho", "ID": "xxxxxxxxxxxxxxxxxxxxxxxxxxxxxxxxxxxxxxxxxxxxxxxxxxxxxxxxxxxxxxx" } } ... # オブジェクト (tfstate ファイル) が暗号化されていることを確認 $ aws s3api head-object --bucket=oreno-terraform-state --key=terraform.tfstate.docker { "AcceptRanges": "bytes", "LastModified": "Sat, 08 Sep 2018 05:51:53 GMT", "ContentLength": 5662, "ETag": "\"355017b22a2af13dff9581b638461897\"", "VersionId": "tAciP72ATbpem.sDjNueU3sw7iJswg0p", "ContentType": "application/json", "ServerSideEncryption": "AES256", "Metadata": {} }
そして, ローカルの tfstate ファイルを見てみると…
$ ls -l terraform.tfstate -rw-r--r-- 1 user group 0 9 8 14:51 terraform.tfstate
空になっていることが判ります.
この状態で terraform plan を実行すると, 以下のように出力されます.
$ terraform plan Refreshing Terraform state in-memory prior to plan... The refreshed state will be used to calculate this plan, but will not be persisted to local or remote state storage. docker_image.centos: Refreshing state... (ID: sha256:b5e5ffb5cdea24c637511e05e1bbe2c92207ae954559d4c7b32e36433035c368centos:6) docker_container.hoge: Refreshing state... (ID: f4a7331dd4e436920a28fcb9c98372c453f95f21d5e7718bf68170266a8bdff2) docker_container.popo: Refreshing state... (ID: 69c652297dd3a7cfd30c91a428f0ae026ec8611090914bf8e6a0ba0eb937c796) docker_container.fuga: Refreshing state... (ID: f203969cd96e0de6e1eec8dee1dc866b87d0eeab2c3b0609304d9f575f63b0d2) ------------------------------------------------------------------------ No changes. Infrastructure is up-to-date. This means that Terraform did not detect any differences between your configuration and real physical resources that exist. As a result, no actions need to be performed.
いい感じです.
現場から以上です
超駆け足ですが, Terraform の Backends について研究しつつ, 簡単なチュートリアルをやってみました. 状態ロックを併用することでチーム内で Terraform をいじる際に強力にサポートしてくれるものであることが解りました. また, Backend の実装にも興味が出てきましたので, HTTP のバックエンドサーバーを実装してみたいと考えています.
元記事はこちら
「独り Terraform 研究所 (1) 〜 Backend についてドキュメントを読んだり, チュートリアルしたり 〜」
October 01, 2018 at 02:00PM
0 notes
Text
ECCV 2018 conference recap
New NN Architectures
Group Norm
Group Norm (GN) is another normalisations scheme, in a way similar to BatchNorm (BN, widely used at Scortex).
BatchNorm has several failure cases:
small batch size (typically for segmentation of large images)
when the batch can vary or the notion of batch is ill posed:
Proposition of the authors is to do a normalisation that is independent of the batch size.
Here is a schema representing the different possible normalisations.
Basically,
While batch norm normalise over one feature map on the whole batch,
Group norm normalise on pre defined groups of features for each instance (image) separately.
Notice that other normalisation exists (Layer Norm - LN - or Instance Norm - IN), but their performances are not quite on par with BN and GN
ThoughBatch norm with batch size 32 tends to beat Group Norm on ImageNet dataset, it is less robust to batch size.
Group Norm seems to improve detection algorithms:
It's been used by the COCO 2018 winner
It enable good performances of from scratch training of Faster R-CNN (without ImageNet pretraining)
The authors found empirically that 32 groups per layer (of 16 channels each) leads to the best performances. They note that choosing a fixed number of groups per layers or same number of filter per group result in similar performances.
Nota Bene:
for more information, refer to the paper.
a keras implementation is available here.
One can learn a mix of group norm and batch norm (and other norms) by using: switchnorm
The Hourglass Network (not new but used everywhere)
Hourglass network is not new per se (first paper in 2016) but was extremely popular at ECCV so we thought it was a good idea to do a quick recap.
Originally introduced for human pose estimation, it is now used for other tasks such as detection (see CornerNet bellow, for instance).
Bellow we illustrate the module as depicted in the paper.
Note that the ressemblance with the classic encoder-decoder architecture close to an auto encoder or U-Net. One of the difference is that the authors use nearest neighbour upsampling instead of unpooling or transpose convolution. Another difference is that in each "skip layer" some computation is done.
Hourglass modules can be stacked together to create a deeper architecture. In this case, it's useful to add intermediate supervision.
Typically, if you want to predict maps (such as segmentation mask), you add a loss after each decoder part of the hourglass module.
The idea of concatenating these modules is to be able to refine at each step the prediction that you generated.
In the same way, if you do multi-task learning, both predictions feature maps can be merged with original image to refine the predictions.
Detection
Corner Net
There are two issues with single shot detectors:
anchor boxes don't match perfectly the shape of boxes
they add a lot of extra parameters to tune such as grid size and aspect ratio
Instead of predicting a score for every anchor boxes and apply non-max suppression, CornerNet tries to detect object as paired keypoints.
It predicts for each pixel if its a top left corner, if it is a right corner, the class, as well as an embedding that is used to match the complementary keypoint of the box.
They use the hourglass network as the backbone architecture with an intermediary supervision (between the two hourglass networks).
Predicting for each pixel would be to costly. Instead, the prediction is done at a lower resolution and offsets are predicted for a higher box precision (just like in the SSD paper).
More details are available in the paper.
Receptive Field Block Net (RFB Net)
The RFB block architecture is motivated by the human eye receptive field.
It is composed of the combinaison (concatenation + 1x1 convolution) of three branches:
1x1 convolution followed by a standard 3x3 convolution
3x3 convolution followed by a dilated convolution with rate 3
5x5 convolution followed by a dilated convolution with rate 5
A comparaison of the receptive field with common architectures is shown bellow.
It shows that while atrou / dilated convolution provide large receptive fields, the proposed RFB block leads to a smoother and more "human" receptive field.
The authors use their blocks in a SSD like approach depicted bellow.
They use a different version of the block in shallow layers
They obtain a very competitive architecture in terms of trading between speed and accuracy (faster than Retinanet for a same accuracy budget)
Notes:
the use of 5x5 convolution is interesting and goes against the trend of using only 3X3 convolutions. Maybe this 5x5 could be replaced by two successive 3x3 convolutions?
it's nice to see dilated convolution in detection architectures, given their success in segmentation tasks
the paper is available here.
Other detection papers
IOU-Net: the autors propose to output the IOU prediction as well as the confidence of the class. This enables a modified version of the Non max suppression that makes much more sense: choose the box of the highest predicted IOU and set the class probability as the max of the confidences.
Deep Featured Pyramid Reconfiguration: The authors improve the Feature Pyramid Network (introduced in FPN, used in RetinaNet) by using attention modules.
PFPNet: Another way to reconfigure FPN networks. They get better MAP for similar speed compared to YOLO V3.
Segmentation
BiseNet
A lightweight segmentation architecture.
The overall idea is simple: to have a good segmentation, we need fine grained details and global shapes.
In traditional architectures such as U-Net, global information is obtained through concatenation of convolution layers with stride or maxpooling. That is, we need to compute fine grained features to compute the global shapes. BiseNet separate the two components to increase the network speed.
As a result, BiseNet is composed of two branches:
a spatial path that keeps local features. It's composed of three 3x3 convolutions with stride 2 followed by batchnorm and relu
a context path that is designed to add a large receptive field for context. They are downsampling and using a "lightweight" model but it is not cristal clear how in the paper.
The paths are merged together with a concatenate operation followed by an attention-like mechanism.
BiseNet shows interesting performances for the speed it can achieve. The authors test it on relatively high resolution (1920x1080pixels), which is worth noting.
The paper is available here.
DeepLab v3+
The DeepLab team improved (again) their architecture by merging the best of two worlds, Atrou Spatial Pyramid Pooling (ASPP) and encoder-decoder approach (ex U-Net).
Instead of directly using a x8 upsampling, they merge information from low depth layer after a x4 upsampling.
Focus segment and Erase
The authors manage to get interesting performances in segmenting tumors on medical images with a sequential approach:
extract ROIs (Regions of Interest)
iteratively for several classifiers
segment the class
erase it: mutiply the image by a 1-segmentation mask
The idea is to be able to segment with good performances tiny regions of the brain such as necrosis.
Paper available here.
Pose Estimation
The second subject we wanted to detail is pose estilmation using only RGB and a 3D model. Pose estimation is important for us at Scortex because it enables us to position each defect / defect detections in a common referential for human verification.
Deep-6DPose: Recovering 6D Object Pose from a Single RGB Image
The paper presents an extension of the R-CNN network that also output the pose.
That is (cf. bellow), for each anchor box you predict the class, box, segmentation mask and pose coefficients.
It runs at 10 fps on 480x640pixels images.
They use Lie algebra for the pose to be regressed. This is the main different with other pose estimation papers from RGB images only.
One example to be compared with would be: "Fast Single Shot Detection and Pose Estimation"
The training was done on the linemod dataset. For more information, here is the paper.
DeepIM: Deep Iterative Matching for 6D Pose Estimation
Constatation:
Direct pose regression (example above) from images methods have limited accuracy.
matching rendered images of an object against an observed image can produce accurate results
→ let's iteratively refine a pose by matching rendered image with observed image. This leverages the additional 3D model knowledge.
Architecture
Inputs:
the 3D model (CAD)
the image
an initial pose estimation (typically obtained via direct pose regression)
The initial pose is used to render the 3D model in this pose.
A neural network takes the image and the rendered scene as input and outputs the delta of the pose
The pose estimation is updated with the delta of the pose
Repeat steps 2 to 4 until convergence
Training of the network
What's left to explain is how they get this delta pose network.
Since training would require annotated 6 pose estimation, the network is trained using synthetic data only.
The backbone of the architecture is FlowNet, a network that takes two images and output the optical flow.
The network takes as input (concatenated in a 8 channels tensor):
the image and its detection mask. During training these are fake simulated images. During inference, it's the image of interest
the rendered image and its segmentation mask
To make the trainings more stable, the authors propose also to predict segmentation mask of the first image as well as the optical flow.
For more information, check the paper (implementation can be found here).
Learning Implicit Representations of 3D Object Orientations from RGB
The original paper is here.
The authors propose a method to estimate the pose of an object. The method uses an encoder-decoder approach trained using only synthetic data from a 3D model.
Inference
At inference time:
detect objects on an image using a standard detection algorithm (YOLO, RCNN, etc.)
for each detection:
crop around the object
input the result in an encoder-decoder architecture
retrieve the bottleneck encoded values
compare them to a range of known poses encoded values the authors called the codex
→ the closest match give the pose estimation
What does mean codex ? The authors rendered images of the 3D model without background, centered and make their 3D pose vary.
Then, they feed it to the auto encoder to get a codex of latent vectors.
Training
The objective is to learn implicit representations of 3D object orientations.
Using only simulated data (collecting real pose data is very costly), the authors train the following auto encoder:
the input is randomly rendered scenes (with variable poses, positions, background, lights, crops to simulate occlusions, ...)
while the output is the rendered part without any background and centered (same as the codex construction).
This way, each entry is re-mapped to the simplest rendering of the 3D model.
Here are some reconstruction examples from real images.
The authors say that the latent representations are robust against occlusions, clutter and the differences between synthetic and real data.
One of the key advantage of the use of closest representations is that it prevents issues related to ambiguous object views (for example when an object contains symmetries).
To our knowledge, the implementation is not available yet on the internet.
Deep Model-Based 6D Pose Refinement in RGB
The goal of the authors is to propose a 6D pose estimation that
only uses RGB images (and 3D model)
is robust
is precise
is ambiguity free
Approach
The approach is similar to the DeepIM methodology:
The inputs are:
the image
the 3D model
an estimation of the pose
From the pose we extract a croped part of the image where the object lies
From the 3D model is rendered an image with the pose hypothesis
Both of these images are fed into a neural network that will predict a update (quaternions and translation).
The network is trained using simulated/rendered images only.
Note that the authors used as base feature extractors a model pretrained on Imagenet. This is to limit the gap between real images and the simulated data they use for training.
At the end the talk, one of the authors showed a video where the inference is done in real time and the results are quite impressive!
There implementation is available here. The paper is available here.
Conclusion
That's it! We hope you enjoyed this quick summary as much as we enjoyed going to this conference.
The next ECCV will take place in 2020 in Edinburgh. See you there!
DataTau published first on DataTau
0 notes
Text
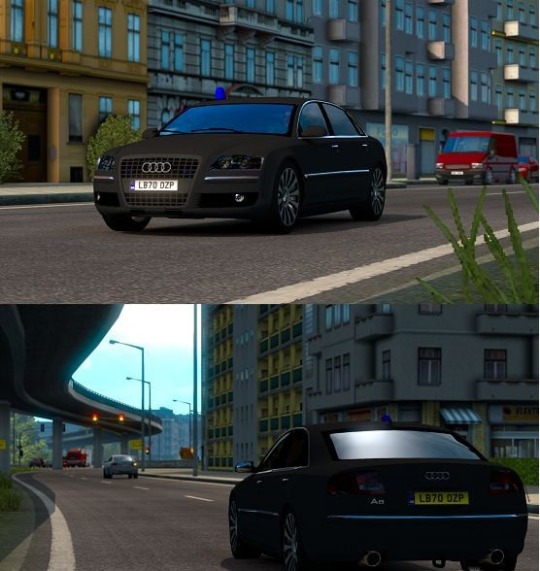
Audi A8 W12 V3 1.39
Audi A8 W12 V3 1.39


Description:
– Fixed sound
– Reconigured headlights
– Reconfigured animations timing
– Reconfigured engine (realistic specifications)
– Reconfigured transmissison (realistic specifications)
– Reconfigured chassis (realistic specifications)
– Minor edits in few models
DO NOT EDIT
DO NOT CHANGE LINK
DO NOT REUPLOAD
Credits:
Nimit, CentOS, PolishTruckDriver, Diablo
DOWNLOAD Audi_A8_V3_1.39.zip – 66.3 MB
Th…
View On WordPress
0 notes
Text
MagnetoSpeed XFR Interface for V3 and Sporter
https://click-click-boom.com/?p=181488
The XFR adapter and associated smartphone application allows users with Magnetospeed Sporter and V3 displays to download their current (un-archived) shot series to their Android or iOS device. Once synced, users can rename the current shot series (app-only), delete irrelevant shots (app-only), email the data, reconfigure the display settings (units and sensitivity level), and clear the display's current series. Additional features and improvements are on-going. XFR is NOT compatible with V1 or V2 displays. To use the XFR adapter with your V3 unit, please make sure your firmware is up to date.
0 notes
Text
New Post has been published on Superbike News
New Post has been published on http://superbike-news.co.uk/wordpress/alpinestars-tech-air-street-airbag/
Alpinestars - Tech-Air Street airbag
Product Name – Tech-Air Street airbag
(suggested retail price – € 1,199.95 Euro / £ 999.99 Sterling)
Category – All Weather Riding / Adventure Touring
Description – Tech-Air™ is a groundbreaking electronic airbag system that offers riders upper body protection and the freedom to ride both on and off road and in a wide range of weather conditions. The Tech-Air™ System incorporates the airbag’s electronic control unit, componentry and airbag, which when inflated covers the back, kidney areas, chest and shoulders.
The Tech-Air™ System, sold separately and completely self-contained, offers the possibility for the airbag to be used in conjunction with an Alpinestars airbag- compatible textile outer jacket, initially either the Valparaiso For Tech-Air™ or the Viper For Tech-Air™, for superb protection in all-weather and warm weather riding conditions.
The innovative and versatile Tech-Air™ street airbag system can be used with any type of motorcycle and/or scooter without the need to set-up, pair or reconfigure bike-to-rider or bike-to-passenger settings. The system is therefore immediately ready to be used at any time for any bike on any surface, and can be used equally for road riding and off road adventure touring.
TECH-AIR™SYSTEM
• The Tech-Air™ System has been designed to be used in conjunction with airbag-compatible outer jackets, which for the launch includes the Valparaiso For Tech-Air™ Jacket and the Viper For Tech-Air™ Jacket.
• Comprehensive inflatable upper body protection for back, shoulders, kidney area, chest and upper abdomen.
• Electronic sensors are securely and unobtrusively incorporated within the system’s chassis (in the shoulder area), meaning the vest is completely self-contained and allows it to be worn interchangeably between compatible jackets.
• Constructed from a strong and durable mesh main shell with stretch poly-fabric on shoulders and torso for a compact and secure fit that is close to the rider’s body while allowing complete freedom of movement.
• Incorporates removable inner mesh and elastic Velcro®waistband to position airbag system to customize fit and improve adjustability.
• Full internal back lining constructed from 3D mesh for optimized levels of ventilation and breathability.
• The Airbag Control Unit (ACU) of Tech-Air™ is incorporated within strong, lightweight polymer back protector, which features an ergonomic plate construction for structural strength and a fit to follow the natural contours of the back.
• Tech-Air™ ACU is seal-protected within vest to ensure its all-weather performance and the vest and componentry are certified to function between -10⁰C and +50⁰C.
• Tech-Air™ ACU includes two connector cables allowing the rider to quickly and easily connect up to the outer jacket. ACU has been homologated to ECE R10 04, which ensures the electromagnetic integrity and stability of the unit.
• Tech-Air™ uses an integrated, certified lithium ion battery, with a battery life of 25 hours and a recharge time of approximately 6 hours. Micro USB charger allows convenient recharging of system, with one hour of charging time giving four hours of riding coverage.
• Colour coded front YKK zippers allow for vest to be easily and securely attached to outer jacket.
• Argon inflator cartridges are CE certified to ISO 14451 standard, meaning that they will only fire if commanded by the electronic unit. It also certifies that the cartridges can be safely handled, assembled and transported.
• System’s firmware is upgradable and external service record will be managed by a custom-made data portal.
– Tech-Air™ is Category II CE Certified to the 686/89/EEC European PPE Directive, using a version of EN1621- 4:2013, which guarantees impact protection performance from 25 milliseconds to 5 seconds.
– Certified to function at -10°C and +50°C to guarantee system’s use in wide range of weather conditions.
– Tech-Air™ design and manufacture is CE certified to the 2007/23/EC pyrotechnic directive, guaranteeing it has been assembled following all pyrotechnic handling and safety regulations, which means the system can be transported by car, ship, train or airplane.
Tech-Air™ System two-yearly service and diagnostic check:
The recommended service interval of the Tech-Air™ System is every two years. The service is carried out by Alpinestars and it includes a full service and diagnostic check, including software updates, as well as cleaning and washing of the vest. (Note: Shipping charges to and from Alpinestars’ dealers are not included.)
Tech-Air™ System recharge service:
Following an airbag deployment this service is carried out by Alpinestars and will include: replacement of inflators and airbag, as well as a full system service, diagnostic check, as well as cleaning and washing of the vest. (Note: Repair or replacement of damaged components and materials, as well as shipping charges to and from Alpinestars’ dealers, are not included).
Biker Tshirts by Superbike News in UK/Europe, USA & Aus
Alpinestars – Atem V3 Leather Suit
0 notes
Text
Welcome to the Reconfigured World
Hello everyone,and welcome to our Interactive Killing Game experience!
this story will view different versions of our favorite Danganronpa V3 Characters living the killing game for their first time!
With an unknown ending...
Whatever happens will depend purely on your decisions!
After all...
This is everybody's Killing School Semester!
(Reminder,Only the Protagonist will be able to hear you all.)
-Yours truly,Team Danganronpa
#Danganronpa#Dangan ronpa#Danganronpa 53#Danganronpa V3#V3 Reconfigured#Danganronpa V3 Reconfigured#Team Danganronpa#AU#Ask Blog#Interactive Story#Ask our protagonist
2 notes
·
View notes
Note
Shuichi abandoned you? Rude. Explore this floor a little more before going downstairs.

"Hey,Tsumugi,Do you wanna look around with me?"

"Sure!"

"Tsumugi Joined your your party!"

"What...?"
#Danganronpa V3#Dangan ronpa V3#Danganronpa V3 Reconfigured#Danganronpa V3 Recalibrated#Dangan ronpa V3 Reconfigured#Dangan ronpa V3 Recalibrated#Prologue#The Ultimate Recalibration#V3 Reconfigured#V3 Recalibrated#Kaede Akamatsu#Ultimate Pianist#Tsumugi Shirogane#Ultimate Cosplayer
0 notes
Note
I'm having trouble remembering where the others are at. Look around on this floor more before heading downstairs.
Also, can you ask Tsumugi what she's doing? Why is she just standing next to the dragon statue?

"Hey,Tsumugi. Why were you just standing here?"

"I was thinking..."

"Isn't it kinda like what you'd see in a Mystery-Themed Visual novel?"

"There's probably a hidden passage somewhere around here!"

"Well...probably not here. Maybe on another floor"

"Right..."
and...it looks Shuichi abandoned me with Tsumugi....
How nice of him.
#Danganronpa V3#Dangan ronpa V3#Danganronpa V3 Reconfigured#Danganronpa V3 Recalibrated#Dangan ronpa V3 Reconfigured#Dangan ronpa V3 Recalibrated#V3 Recalibrated#V3 Reconfigured#Killing harmony#Killing game#Interactive Killing Game Experience#Kaede Akamatsu#Shuichi Saihara#Tsumugi Shirogane#Ultimate Pianist#Ultimate Cosplayer#Ultimate detective#Ultimate Despair#The Ultimate Recalibration#Prologue
0 notes
Last Seen Blogs

karenstokes
Katy Maid Service

zakiahrahmayanti-blog
a dream-CATcher

trilata-nizhegi
Trilata Nizhegi

courseworkwritingservice1us-blog
Сoursework writing service

konteinerby
Konteiner By