#AppDelegate
Explore tagged Tumblr posts
Visit Tumblr Blog
Explore Tumblr blogs with no restrictions, modern design and the best experience.
Last Seen Tumblr Blogs


Fun Fact
Users from the US are the majority of Tumblr visitors.
Text
Stream for Mac: Work Note, Menus and More
Yesterday was the second day this week I managed to work on Stream for Mac.

Some things are starting to gel but as is typical I figure something out and run head long into the next thing I need to figure out. It’s all good stuff though! I’m definitely not complaining as I’m learning a lot and at least I should have a solid — very basic — understanding about the assembly of a Mac App when I’m done with this release.
Yesterday I managed to get the File Menu items hooked up and I did a very basic implementation of Import Subscriptions which allows you to import an OPML file of all of your feeds. For the first test the file name was hard wired to a file in the Downloads folder. There was my first challenge. I had to learn a little bit about the sandbox and setup the app to allow for read only access to Downloads, then ask the user for permission to access it. Once that worked I was able to start the import process by stubbing out some of my protocols used by the process and just allowing it to run in the background. It ran to completion and I was able to add an additional 206 feeds to my list. It’s a great way to populate the app!
Next Task
I’m trying to instantiate a class early on in the AppDelegate and I want to pass it down through all the various layers ultimately to the Feed View Controller. That’s where I got stuck once again. That’s ok. I’m learning and I may be doing it wrong. Right now the data I’d like to instantiate at startup is instantiated in the Feed View Controller. The reason I’d like to get it in the App Delegate is I’d like access to it when a menu item is selected. Maybe this is just flat out the wrong way to look at it? I don’t know yet, I’m still trying to decide what’s best.
First off I’m using Storyboards, which is the way the project was created in 2021 when I made the target. So, given that I’d like to programmatically load the WindowController, Window, and finally ViewController myself so I can pass this data all the way down to the ViewController. On iOS it’s a very straight forward process. Load the ViewController and specify the init method you’d like to use and provide parameters. Done, easy.
On the Mac there are two extra layers to go through which has me questioning my whole reason for existence. It seems really dumb to pass through two extra layers just to get to the ViewController. Perhaps I do need to rethink my entire existence? Perhaps I just need to rethink the structure of my existing classes to better accommodate the Mac?
Why, Rob, Why?
I’m doing this because the thing that kicks off the refresh process also takes an instance of a protocol that’s used to update progress of the refresh. It’s what drives the progress indicator you see in the navigation bar of the iOS app.
When someone selects the Refresh menu item it’s handled in the App Delegate. That is removed from the UI where the update needs to happen by two layers; Window Controller and Window.
On iOS the UI interaction is handled by the View Controller which kicks the process off right at that layer and provides an implementation of the progress protocol I’ve defined so the UI updates properly. If I didn’t want to update the UI the way I do it would be much easier. 😃 Perhaps the Mac App should do something different, like display a spinner and disable the refresh buttons and menu item until the process is complete?
Anyway. This is leading me to rethink a lot of my iOS strategies from years and years gone by to better suit the Mac and iOS platforms.
These notes are also really good for me. They help me think through the process as I’m typing and also lead me to say “Rob, you’re doing it wrong” a lot, which is also helpful to my learning process.
Overall I’ve had frustrating moments and really great ah-ha moments and I must say that the Mac and iOS communities have been so supportive of me and my stupid questions.

The Core Intuition Slack has been amazing! Thanks y’all, you know who you are! 🙏🏼
0 notes
Text
Sending the Push Notification using APNS
First Open the project Step 1: Ask permission to allow the notifications
Add the import in App Delegate import UserNotifications
In AppDelegate --> create a method functions() --> Add the logic
func notifications() {
let notificationCenter = UNUserNotificationCenter.current()
notificationCenter.requestAuthorization(options: [.sound, .badge, .alert]) { s, err in logic }
}
Call this method in App Delegate didFinishLaunchingWithOptions()
Step 2: Open Terminal and go to the path where this apns file is saved
Type the following command which includes How to get deviceId: Xcode --> Windows --> Devices and simulators --> Simulators --> choose the running simulator --> copy the deviceid
xcrun simctl push deviceId bundleId apnsfilename xcrun simctl push DRCT74-GTYB-49BC-B023-C15632C131E com.encrytion.login apn.apns
0 notes
Text
How to lock orientation at runtime on iOS 16 with .NET MAUI and Xamarin.Forms
I just blogged: How to lock orientation at runtime on iOS 16 with .NET MAUI and Xamarin.Forms #iOS #iOS16 #iOSDev #dotNET #dotNETMAUI #XamarinForms #XamariniOS
The old way Before iOS 16, it was pretty easy to lock a Page into a certain orientation. It was basically just one line of code (if you don’t count the DependencyService boilerplate code in): UIDevice.CurrentDevice.SetValueForKey(new NSNumber((int)UIInterfaceOrientation.Portrait), new NSString("orientation")); By calling this method whenever the size of a page was allocated, we were able to…

View On WordPress
#.NET MAUI#AppDelegate#iOS#landscape#MAUI#mvvm#orientaion lock#orientation#override#portrait#Scene#ViewController#xamarin#xamarin forms
0 notes
Text
Cleaning AppDelegate or SceneDelegate Using ViewControllerFactory
Factory Design Pattern Illustration Overview AppDelegate or SceneDelegate is the main file that we as iOS developers know to configure, inject, or instantiate a global instance or frameworks. This place become essential, especially because it is actually the starting point of our app. Because it knows so many things, like configuring the frameworks, handling push notifications routing,…

View On WordPress
#AppDelegate#Design Pattern#Factory Design pattern#Factory in iOS#Good Programming Practice#iOS#Ios Development#SceneDelegate#Software Development#Software Engineering
0 notes
Link
original source : https://stackoverflow.com/questions/48723979/how-to-add-core-data-to-existing-xcode-9-swift-4-ios-11-project
프로젝트 시작시 core data 사용을 설정하지 않고 프로젝트를 진행하다가 나중에 core data를 사용하기로 결정한 경우에 대한 설명
best answer : https://stackoverflow.com/a/48724602/3151712
go to File > new file... select core Data under iOS and select Data Model you'll still need some code which xcode auto generates whenever you select core data during project creation. to get it, just create new project with core data option checked and copy all the code written under ** //Mark: - Core Data Stack** comment in AppDelegate.swift and add
import CoreData
above
OPTIONAL
and don't forget to change the name of the app after copying in the managedObjectModel function of the code you just copied
0 notes
Text
swift3 AppDelegate.swiftとは
アプリを作ったら必ずデフォルトでついてくるファイルの一つAppDelegate.swift 一体なにもの? AppDelegate.swiftとは アプリ全体のライフタイムイベントを管理するためのクラス AppDelegate.swiftファイル内容 [swift] import UIKit @UIApplicationMain class AppDelegate: UIResponder, UIApplicationDelegate { var window: UIWindow? func application(application: UIApplication, didFinishLaunchingWithOptions launchOptions: [NSObject: AnyObject]?) -> Bool { // Override point for…
View On WordPress
0 notes
Text
iOS 13, SwiftUI and older devices like the iPhone 6.
There's a lot of talk about iOS 13 and SwiftUI. It's a much more programatically pure way of building simple interfaces or initial interfaces in Swift. It's fantastic!
However, older Apple devices are not going to support iOS 13 or SwiftUI, at least that is the current rumor as of mid August 2019.
Have no fear though, you can have your apps know the difference and still use the existing UIView elements (which are in iOS 12) to be able to support them.
You'll first need to change the iOS Deployment target to 12.4 on both the Project Info and the Project Build Settings. Make sure it's also set that way in the Project Target Build Settings.
After that you'll need to exclude any declarations in your Swift code that use SwiftUI from being used when the iOS version is less than 13.0
Here's how to apply #available to differentiate between iOS versions.
if #available(iOS 13.0, *) { // code for iOS versions greater than 13.0 } else { // code for iOS versions less than 13.0 }
You can use it to include or exclude an entire func, struct, protocol, class or any other declaration.
You will need to use this in SceneDelegate, AppDelegate and of course any other swift files where you have declarations that use SwiftUI.
@available(iOS 13.0, *) struct ContentView: View { }
The last thing you'll have to do in order to have the project work on both iOS 12.4 and iOS >13.0 is remove the SwiftUI Framework and re-add it as optional rather than required.
In the left pane in XCode, right click on SwiftUI.framework within Frameworks and delete it. Then go to the Project Target Build Phases and open Link Binary With Libraries. Click the + to add a new library, select SwiftUI and click Add. Once it's added on the Build Phases page you'll see the Status is set to Required, change it to Optional.
Here are the devices iOS 13 runs on.
iPhones iPhone XS iPhone XS Max iPhone XR iPhone X iPhone 8 iPhone 8 Plus iPhone 7 iPhone 7 Plus iPhone 6s iPhone 6s Plus iPhone SE iPod touch (7th generation)
Apple has dropped support for iPhone 5s, iPhone 6, and iPhone 6 Plus.
iPads
12.9-inch iPad Pro 11-inch iPad Pro 10.5-inch iPad Pro 9.7-inch iPad Pro iPad (6th generation) iPad (5th generation) iPad mini (5th generation) iPad mini 4 iPad Air (3rd generation) iPad Air 2
Apple has dropped support for iPad mini 2, iPad mini 3, and the original iPad Air.
2 notes
·
View notes
Text
Hstracker on mac not working

#Hstracker on mac not working for mac#
#Hstracker on mac not working install#
#Hstracker on mac not working update#
Step 2: Launch Finder on your Mac, and click Applications in the Finder sidebar. Here’s the regular steps to uninstall HSTracker 1.3.2 on Mac: Step 1: Quit HSTracker 1.3.2 as well as its related process(es) if they are still running. In adjustForKeyboard function, as a negative y position. In most circumstances you can take the drag-and-drop way to delete HSTracker 1.3.2 from your computer. Let keyboardViewEndFrame = nvert(keyboardValue.cgRectValue, from: view.window) Until now, it has worked without any issues.
#Hstracker on mac not working update#
Furthermore, we’re currently working to update the Live App with the new ranked system, and hopefully we’ll return it to full functionality soon. There are many things we can do with more data, and we will also work to expand our ability to collect data. I have the following pattern peppered across my code base. New and fascinating metrics that are currently in the shelf, could be presented. I know that Apple is keen on attracting new developers who have time to learn whatever they put out, but I hope they still care about people like me, an iOS developer since 2009 who doesn't want to completely relearn iOS programming every three years. Why can't Apple just add a third option to create an empty project instead of making you start with Storyboards or SwiftUI? The following versions: 9.0 and 1.6 are the most frequently downloaded ones by the program. This Mac app is an intellectual property of Gal Consultancy. Using it when Hearthstone is locally on the mac works fine. I have a MacBookPro with HighSierra 10.13.6 Im using HSTracker 1.5.4 (1969) for mac. We cannot confirm if there is a freeload of this app available. Hi, I have Hearthstone installed on an external harddrive.
#Hstracker on mac not working for mac#
What happens if I want to change something that used to reside in ist, such as Bundle display name? Do I just go in and add it? The 9.0 version of HSTracker for Mac was available to download on the developers website when we last checked. What happened to all that stuff? Should I manually create it or copy it from an older project? Will iOS even still call the rest of the AppDelegate methods if I create them? With the current version of Xcode, I'm left with an app that has no other values in ist and no methods in AppDelegate except didFinishLaunchingWithOptions. With the addition of "Scene Delegates" (I don't know what they are and I don't care), I now have to remove some methods from AppDelegate and a key from ist. In order to get rid of the default storyboard, I have to both delete the file and then remove the word "Main" from Main Interface in the target, which is not obvious (you sort of have to backspace over it and hit Enter). With each subsequent version of Xcode, it seems to get harder and harder to set up a new project the way I prefer. I'm familiar with the steps necessary to create my own UIWindow in AppDelegate.
#Hstracker on mac not working install#
Download and install the best free apps for Video Capture Software on Windows, Mac, iOS, and Android from CNET, your trusted source for the top software picks. I don't really like to use Storyboards (I prefer individual XIB files) and I definitely don't want to use SwiftUI or "Scene Delegates". Low latency-Great for games-Theoretical 1-3 frame delay (not measured).
0 notes
Text
HackingWithSwift Day 33/34/35 - Project 7
Here introduce to UITabBarController
“Swift has built-in support for working with JSON using a protocol called Codable. When you say “my data conforms to Codable”, Swift will allow you to convert freely between that data and JSON using only a little code.”
Definition by the author, let’s see how powerful is this.
So it’s quite convenient to parse the json data into swift native support data type, instead of self declare and unwrap it layer by layer.
Only 1 thing is the window code to add a new tab, I think it’s time to update it using SceneDelegate since window is omitted from AppDelegate with the latest Xcode.
Seems like Codable usage is very wide, might need more research on this
0 notes
Text
Week 394
Happy Thursday! I wrote last week that Xcode 13 Beta 3 was released, and indeed it was. And then, two days later, it was re-released. According to @XcodeReleases it seems it's mostly the same, but the re-release fixes something related to Xcode Could (for those who were lucky to get access to the beta 🥺).
Marius Constantinescu
Tips from Twitter
Hacking with Swift: Live! diversity scholarship: Paul Hudson and his team are organizing the 3rd edition of Hacking with Swift: Live! and they have a huge batch of free diversity tickets, so if you're from an under-represented category in our community, reach out to Paul to apply.
Watch out for retain cycles: a reminder from Eneko Alonso to avoid retain cycles when working with Combine.
Articles
Benchmarking Swift Code Properly with Attabench, by @rockbruno_
Dependency Injection in Swift using latest Swift features, by @twannl
How to add an AppDelegate and a SceneDelegate to a SwiftUI app, by @zntfdr
Cooperative Task Cancellation, by @peterfriese
Experimenting with ShazamKit- Let’s Shazam Everything!, by @rudrankriyam
Fixing a hard-to-find bug in Dark Mode, by @jesse_squires
SwiftUI Swipe Actions, by @kharrison
Dynamic button configuration in iOS 15, by @sarunw
Tools/Controls
EUDCCKit - EU Digital COVID Certificate Kit for the Apple Platform (unofficial), by @SvenTiigi
Business/Career
Launching an Indie App - Part 13: Growing in Momentum, by @michael_tigas
Videos
Never use User Defaults to store sensitive data!, by @v_pradeilles
Contributors
zntfdr, peterfriese, SvenTiigi, mecid, michael_tigas, sarunw
0 notes
Text
Download Xcode 12

Build a Basic UI
This lesson gets you familiar with Xcode, the tool you use to write apps. You’ll become familiar with the structure of a project in Xcode and learn how to navigate between and use basic project components. In the lesson, you’ll start making a simple user interface (UI) for the FoodTracker app and view it in the simulator. When you’re finished, your app will have a label for the meal’s name, a text field to change the meal’s name, and a button for resetting the name.
Learning Objectives
At the end of the lesson, you’ll be able to:
Create a project in Xcode
Identify the purpose of key files that are created with an Xcode project template
Open and switch between files in a project
Run an app in iOS Simulator
Add, move, and resize UI elements in a storyboard
Edit the attributes of UI elements in a storyboard using the Attributes inspector
View and rearrange UI elements using the outline view
Preview a storyboard UI using the Assistant editor’s Preview mode
Use Auto Layout to lay out a UI that automatically adapts to the user’s device size
If it Linux OS, care must be taken while download Cydia Impactor for particular 32-Bit or 64-Bit. USB drivers must be installed in the case of Android device. The process may generate provision.cpp.150 error, so it is recommended to have the latest iOS version too. Download Cydia Impactor iOS11/12 for Windows, Mac, Linux. This guide is geared towards MacOS 10.13 High Sierra, 10.12 Sierra, OS X 10.11 El Capitan, OS X 10.10 Yosemite, and Mac OS X 10.9, and newer releases. Mac users running prior versions of OS X can continue to directly install Command Line Tools and gcc (without Xcode) through a package installer available through the Apple Developer website as.
Create a New Project
Xcode includes several built-in app templates for developing common types of iOS apps, such as games, apps with tab-based navigation, and table view-based apps. Most of these templates have preconfigured interface and source code files. For this lesson, you’ll start with the most basic template: Single View Application.
To create a new project
Open Xcode from the /Applications directory.
If this is the first time you’ve launched Xcode, it may ask you to agree to the user agreement and to download additional components. Follow the prompts through these screens until Xcode is completely set up and ready to launch.
As soon as Xcode launches, the welcome window appears.
If a project window appears instead of the welcome window, don’t worry—you probably created or opened a project in Xcode previously. Just use the menu item in the next step to create the project.
In the welcome window, click “Create a new Xcode project” (or choose File > New > Project).
Xcode opens a new window and displays a dialog in which you choose a template.
Select iOS at the top of the dialog.
In the Application section, select Single View Application and then click Next.
In the dialog that appears, use the following values to name your app and choose additional options for your project:
Product Name: FoodTracker
Xcode uses the product name you entered to name your project and the app.
Team: If this is not automatically filled in, set the team to None.
Organization Name: The name of your organization or your own name. You can leave this blank.
Organization Identifier: Your organization identifier, if you have one. If you don’t, use com.example.
Bundle Identifier: This value is automatically generated based on your product name and organization identifier.
Language: Swift
Devices: Universal
A Universal app is one that runs on both iPhone and iPad.
Use Core Data: Unselected.
Include Unit Tests: Selected.
Include UI Tests: Unselected.
Click Next.
In the dialog that appears, select a location to save your project and click Create.
Xcode opens your new project in the workspace window.
The workspace window may have an error icon with a message that says “Signing for FoodTracker requires a development team.” This warning means you haven’t set up Xcode for iOS development yet, but don’t worry, you can complete these lessons without doing that. You do not need a development team to run the app in the simulator.
Explore Further
Before you can run the app on an iOS device, you need to set a valid team so that the app can be signed. If you are an individual or part of an organization that is a member of the Apple Developer Program, you can select that team here. Otherwise, your Apple ID is assigned to a personal team that you can use to launch apps on devices. However, you will need to join the Apple Developer Program before you can submit your app to the App store.
For more information, select Help > Xcode Help and search for “Signing workflow.”
Get Familiar with Xcode
Xcode includes everything you need to create an app. It organizes all the files and resources that go into creating an app. It provides editors for both your code and your user interfaces. Also, Xcode lets you build, run, and debug your app—providing simulators for iOS devices and a powerful integrated debugger.
Take a few moments to familiarize yourself with the main sections of the Xcode workspace:
Navigator area. Provides quick access to the various parts of your project.
Editor area. Allows you to edit source code, user interfaces, and other resources.
Utility area. Provides information about selected items and access to ready-made resources. The Utility area is divided into two parts. The top is the inspector pane, where you view and edit information about items selected in the navigator or edit areas. The bottom is the library pane, where you access user interface elements, code snippets, and other resources.
Toolbar. Used to build and run your apps, view the progress of running tasks, and configure your work environment.
Don’t be overwhelmed by all of the pieces; each area is described in more detail when you need to use it.
Run iOS Simulator
Because you based your project on an Xcode template, the basic app environment is automatically set up for you. Even though you haven’t written any code, you can build and run the Single View Application template without any additional configuration.
To build and run your app, use the iOS Simulator app that’s included in Xcode. The simulator gives you an idea of how your app would look and behave if it were running on a device.
The simulator can model a number of different types of hardware—All the screen sizes and resolutions for both iPad and iPhone—so you can simulate your app on every device you’re developing for. In this lesson, use the iPhone 7 option.
To run your app in the simulator
In the Scheme pop-up menu in the Xcode toolbar, choose iPhone 7.
The Scheme pop-up menu lets you choose which simulator or device you’d like to run your app on. Make sure you select the iPhone 7 Simulator, not an iOS device.
Click the Run button, located in the top-left corner of the Xcode toolbar.
Alternatively, choose Product > Run (or press Command-R).
If you’re running an app for the first time, Xcode asks whether you’d like to enable developer mode on your Mac. Developer mode allows Xcode access to certain debugging features without requiring you to enter your password each time. Decide whether you’d like to enable developer mode and follow the prompts.
If you choose not to enable developer mode, you may be asked for your password later on. These lessons assume developer mode is enabled.
Watch the Xcode toolbar as the build process completes.
Xcode displays messages about the build process in the activity viewer, which is in the middle of the toolbar.
After Xcode finishes building your project, the simulator starts automatically. It may take a few moments to start up the first time.
The simulator opens in the iPhone mode you specified and then launches your app. Initially, the simulator displays your app’s launch screen, and then it transitions to your app’s main interface. In an unmodified Single View Application template, the launch screen and the main interface are identical.
Right now, the Single View Application template doesn’t do much—it just displays a white screen. Other templates have more complex behavior. It’s important to understand a template’s uses before you extend it to make your own app. Running your app in the simulator with no modifications is a good way to start developing that understanding.
Quit the simulator by choosing Simulator > Quit Simulator (or pressing Command-Q).
Review the Source Code
The Single View Application template comes with a few source code files that set up the app environment. First, take a look at the AppDelegate.swift file.

To look at the AppDelegate.swift source file
Make sure the project navigator is open in the navigator area.
The project navigator displays all the files in your project. If the project navigator isn’t open, click the leftmost button in the navigator selector bar. (Alternatively, choose View > Navigators > Show Project Navigator.)
If necessary, open the FoodTracker folder in the project navigator by clicking the disclosure triangle next to it.
Select AppDelegate.swift.
Xcode opens the source file in the main editor area of the window.
Alternatively, double-click the AppDelegate.swift file to open it in a separate window.
The App Delegate Source File
The AppDelegate.swift source file has two primary functions:
It defines your AppDelegate class. The app delegate creates the window where your app’s content is drawn and provides a place to respond to state transitions within the app.
It creates the entry point to your app and a run loop that delivers input events to your app. This work is done by the UIApplicationMain attribute (@UIApplicationMain), which appears toward the top of the file.
Using the UIApplicationMain attribute is equivalent to calling the UIApplicationMain function and passing your AppDelegate class’s name as the name of the delegate class. In response, the system creates an application object. The application object is responsible for managing the life cycle of the app. The system also creates an instance of your AppDelegate class, and assigns it to the application object. Finally, the system launches your app.
The AppDelegate class is automatically created whenever you create a new project. Unless you are doing something highly unusual, you should use this class provided by Xcode to initialize your app and respond to app-level events. The AppDelegate class adopts the UIApplicationDelegate protocol. This protocol defines a number of methods you use to set up your app, to respond to the app’s state changes, and to handle other app-level events.
The AppDelegate class contains a single property: window.
This property stores a reference to the app’s window. This window represents the root of your app’s view hierarchy. It is where all of your app content is drawn. Note that the window property is an optional, which means it may have no value (be nil) at some point.
The AppDelegate class also contains stub implementations of the following delegate methods:
funcapplication(_application: UIApplication, didFinishLaunchingWithOptionslaunchOptions: (UIApplicationLaunchOptionsKey: Any)?) -> Bool
funcapplicationWillResignActive(_application: UIApplication)
funcapplicationDidEnterBackground(_application: UIApplication)
funcapplicationWillEnterForeground(_application: UIApplication)
funcapplicationDidBecomeActive(_application: UIApplication)
funcapplicationWillTerminate(_application: UIApplication)
These methods let the application object communicate with the app delegate. During an app state transition—for example, app launch, transitioning to the background, and app termination—the application object calls the corresponding delegate method, giving your app an opportunity to respond. You don’t need to do anything special to make sure these methods get called at the correct time—the application object handles that job for you.
Each of the delegate methods has a default behavior. If you leave the template implementation empty or delete it from your AppDelegate class, you get the default behavior whenever that method is called. Alternatively, you can add your own code to the stub methods, defining custom behaviors that are executed when the methods are called.
The template also provides comments for each of the stub methods. These comments describe how these methods can be used by your app. You can use the stub methods and comments as a blueprint for designing many common app-level behaviors.
In this lesson, you won’t be using any custom app delegate code, so you don’t have to make any changes to the AppDelegate.swift file.
The View Controller Source File
Mac software update not showing. The Single View Application template has another source code file: ViewController.swift. Select ViewController.swift in the project navigator to view it.
This file defines a custom subclass of UIViewController named ViewController. Right now, this class simply inherits all the behavior defined by UIViewController. To override or extend that behavior, you override the methods defined on UIViewController.
As you can see in the ViewController.swift file, the template’s implementation overrides both the viewDidLoad() and didReceiveMemoryWarning() methods; however, the template’s stub implementation doesn’t do anything yet, except call the UIViewController version of these methods. You can add your own code to customize the view controller’s response to these events.
Although the template comes with the didReceiveMemoryWarning() method, you won’t need to implement it in these lessons, so go ahead and delete it.
At this point, your ViewController.swift code should look something like this:
importUIKit
classViewController: UIViewController (
overridefuncviewDidLoad() (
super.viewDidLoad()
// Do any additional setup after loading the view, typically from a nib.
)
)
You’ll start writing code in this source code file later in this lesson.
Open Your Storyboard
You’re ready to start working on a storyboard for your app. A storyboard is a visual representation of the app’s user interface, showing screens of content and the transitions between them. You use storyboards to lay out the flow—or story—that drives your app. You see exactly what you're building while you’re building it, get immediate feedback about what’s working and what’s not, and make instantly visible changes to your user interface.
To open your storyboard
In the project navigator, select Main.storyboard.
Xcode opens the storyboard in Interface Builder—its visual interface editor—in the editor area. The background of the storyboard is the canvas. You use the canvas to add and arrange user interface elements.
At this point, the storyboard in your app contains one scene, which represents a screen of content in your app. The arrow that points to the left side of the scene on the canvas is the storyboard entry point, which means that this scene is loaded first when the app starts. This scene contains a single view that’s managed by a view controller. You’ll learn more about the roles of views and view controllers soon.
When you ran your app in the iPhone 7 Simulator app, the view in this scene is what you saw on the device screen. However, the scene on the canvas may not have the same dimensions as the simulator’s screen. You can select the screen size and orientation at the bottom of the canvas. In this case, it’s set to iPhone 7 in a portrait orientation, so the canvas and the simulator are the same.
Even though the canvas shows a specific device and orientation, it is important to create an adaptive interface—an interface that automatically adjusts so that it looks good on any device and in any orientation. As you develop your interface, you can change the canvas’s view, letting you see how your interface adapts to different size screens.
Build the Basic UI
It’s time to build a basic interface. You’ll start by working on a user interface for the scene that lets you add a new meal to your meal tracking app, FoodTracker.
Xcode provides a library of objects that you can add to a storyboard file. Some of these are elements that appear in the user interface, such as buttons and text fields. Others, such as view controllers and gesture recognizers, define the behavior of your app but don’t appear onscreen.
The elements that appear in the user interface are known as views. Views display content to the user. They are the building blocks for constructing your user interface and presenting your content in a clear, elegant, and useful way. Views have a variety of useful built-in behaviors, including displaying themselves onscreen and reacting to user input.
All view objects in iOS are of type UIView or one of its subclasses. Many UIView subclasses are highly specialized in appearance and behavior. Start by adding a text field (UITextField), one such subclass of UIView, to your scene. A text field lets a user type in a single line of text, which you’ll use as the name of a meal.
To add a text field to your scene
Choose Editor > Canvas, and make sure Show Bounds Rectangles is selected.
This setting causes Interface Builder to draw a blue bounding box around all the views in the canvas. Many views and controls have transparent backgrounds, making it difficult to see their actual size. Layout bugs occur when the system resizes a view so that it’s either larger or smaller than you anticipate. Enabling this setting helps you understand exactly what’s going on in your view hierarchy.
Open the Object library.
The Object library appears at the bottom of the utility area on the right side of Xcode. If you don’t see the Object library, click its button, which is the third button from the left in the library selector bar. (Alternatively, choose View > Utilities > Show Object Library.)
A list appears showing each object’s name, description, and visual representation.
In the Object library, type text field in the filter field to find the Text Field object quickly.
Drag a Text Field object from the Object library to your scene.
If necessary, zoom in by choosing Editor > Canvas > Zoom.
Drag the text field so that it’s positioned in the top half of the scene and aligned with the left margin in the scene.
Stop dragging the text field when it snaps to the left margin.
The blue layout guides help you place the text field. Layout guides are visible only when you drag or resize objects next to them; they disappear when you let go of the text field.
If necessary, click the text field to reveal the resize handles.
You resize a user interface element by dragging its resize handles, which are small white squares that appear on the element’s borders. You reveal an element’s resize handles by selecting it. In this case, the text field should already be selected because you just stopped dragging it. If your text field looks like the one below, you’re ready to resize it; if it doesn’t, select it on the canvas.
Resize the left and right edges of the text field until you see three vertical layout guides: the left margin alignment, the horizontal center alignment, and the right margin alignment.
Although you have the text field in your scene, there’s no instruction to the user about what to enter in the field. Use the text field’s placeholder text to prompt the user to enter the name of a new meal.
To configure the text field’s placeholder text
With the text field selected, open the Attributes inspector in the utility area.
The Attributes inspector appears when you click the fourth button from the left in the inspector selector bar. It lets you edit the properties of an object in your storyboard.
In the Attributes inspector, find the field labeled Placeholder and type Enter meal name.
Explore Further
In a production app, any String that can be seen by the user (such as the text field’s placeholder text) should be localized. For more information, see Build Apps for the World.
Press Return to display the new placeholder text in the text field.
While you’re editing the text field’s attributes, you can also edit the attributes of the system keyboard that’s displayed when a user selects the text field.
To configure the text field’s keyboard
Make sure the text field is still selected.
In the Attributes inspector, find the field labeled Return Key and select Done (scroll down if necessary).
This change will make the default Return key on the keyboard more pronounced to the user by changing it into a Done key.
In the Attributes inspector, select the Auto-enable Return Key checkbox (again, scroll down if necessary).
This change makes it impossible for the user to tap the Done key before typing text into the text field, ensuring that users can never enter an empty string as a meal name.
Next, add a label (UILabel) at the top of the scene. A label isn’t interactive; it just displays static text in the user interface. To help you understand how to define interaction between elements in the user interface, you’ll configure this label to display the text the user enters into the text field. It’ll be a good way to test that the text field is taking the user input and processing it appropriately.
To add a label to your scene
In the Object library, type label in the filter field to find the Label object quickly.
Drag a Label object from the Object library to your scene.
Drag the label so that it’s right above the text field and aligned with the left margin in the scene.
Stop dragging the label when it snaps to the guidelines.
Double-click the label and type Meal Name.
Press Return to display the new text in the label.
Now, add a button (UIButton) to the scene. A button is interactive, so users can tap it to trigger an action that you define. Later, you’ll create an action to reset the label text to a default value.
To add a button to your scene
In the Object library, type button in the filter field to find the Button object quickly.
Drag a Button object from the Object library to your scene.
Drag the button so that it’s right below the text field and aligned with the left margin in the scene.
Stop dragging the button when it snaps to the guidelines.
Double-click the button and type Set Default Label Text.
Press Return to display the new text in the button.
Reposition the button, if necessary.
It’s good to understand how the elements you’ve added are actually arranged in the scene. Look at the outline view to see which user interface elements have been added to your scene.
To view the outline view
In your storyboard, find the outline view toggle.
If the outline view is collapsed, click the toggle to expand the outline view.
You can use the outline view toggle to collapse and expand the outline view as needed.
The outline view, which appears on the left side of the canvas, provides a hierarchical representation of the objects in your storyboard. You should be able to see the text field, label, and button you just added listed in the hierarchy. But why are the user interface elements you added nested under View?
Views not only display themselves onscreen and react to user input, they can serve as containers for other views. Views are arranged in a hierarchical structure called the view hierarchy. The view hierarchy defines the layout of views relative to other views. Within that hierarchy, views enclosed within a view are called subviews, and the parent view that encloses a view is called its superview. A view can have multiple subviews and only one superview.
In general, each scene has its own view hierarchy. At the top of each view hierarchy is a content view. In the current scene, the content view is named View, the top level view inside the View Controller. The text field, label, and button are subviews of the content view. All other views that you place in this scene will be subviews of this content view (although they themselves can have nested subviews).
Preview Your Interface
Preview your app periodically to check that everything is looking the way you expect. You can preview your app interface using the assistant editor, which displays a secondary editor side-by-side with your main one.
To preview your interface
Click the Assistant button in the Xcode toolbar near the top right corner of Xcode to open the assistant editor.
If you want more space to work, collapse the project navigator and utility area by clicking the Navigator and Utilities buttons in the Xcode toolbar.
You can also collapse the outline view.
In the editor selector bar, which appears at the top of the assistant editor, switch the assistant editor from Automatic to Preview > Main.storyboard (Preview).
As you see in the assistant editor, the preview looks almost identical to the canvas. However, this does not really tell you anything new. Both the canvas and the preview are showing the same size screen (iPhone 7) and the same orientation (portrait). If you want to check and see if your interface is adaptive, you need to preview different size screens and different orientations.
To preview the landscape orientation, click the Rotate button at the bottom of the preview.
Unfortunately, things no longer look quite right. The text field, label, and button keep the same size and position relative to the screen’s upper left corner. This means that the text field no longer fills the screen from margin to margin.
To preview a different screen size, click the Add button at the bottom of the assistant editor, and select iPhone SE.
Again, the text field, label, and button keep the same size and position relative to the screen’s upper left corner. This time, however, the text field extends past the screen’s right edge.
To create an adaptive interface, you’ll need to specify how the interface should adjust to different screen sizes. For example, when the interface is rotated into a landscape orientation, the text field should grow. When the interface is displayed on an iPhone SE, the text field should shrink. You can specify these kinds of interface rules easily using Auto Layout.
Adopt Auto Layout
Auto Layout is a powerful layout engine that helps you design adaptive layouts that dynamically respond to any changes to the scene’s size. You describe your layout using constraints—rules that explain where one element should be located relative to another, or what size the element should be. Auto Layout dynamically calculates the size and position of each element based on these constraints. Zoom download in mac shortcut.
One of the easiest ways to define your layout is using a stack view (UIStackView). A stack view provides a streamlined interface for laying out a collection of views in either a column or a row. The stack view uses Auto Layout under the hood to calculate the size and position of all the views that it manages. This lets you easily access the full power of Auto Layout, while greatly reducing the complexity of your layout.
To adopt Auto Layout, wrap your existing interface elements in a stack view, and then add the constraints needed to position the stack view in the scene.
To add Auto Layout constraints to the meal scene
Return to the standard editor by clicking the Standard button.
Expand the project navigator and utility area by clicking the Navigator and Utilities buttons in the Xcode toolbar.
While pressing the Shift key on your keyboard, select the text field, label, and button.
On the bottom right of the canvas, click the Embed In Stack button. (Alternatively, choose Editor > Embed In > Stack View.)
Xcode wraps the user interface elements in a stack view, stacking them together. Xcode analyzes your existing layout to figure out that the items should stack vertically, not horizontally.
If necessary, open the outline view. Select the Stack View object.
In the Attributes inspector, type 8 in the Spacing field. Press Return.
You’ll notice the user interface elements space out vertically, and the stack view grows with them.
On the bottom right of the canvas, open the Add New Constraints menu.
Above “Spacing to nearest neighbor,” click the two horizontal constraints and the top vertical constraint to select them. They become red when they are selected.
These constraints indicate spacing to the nearest leading, trailing, and top neighbors. In this context, the term nearest neighbor means the boundary of the closest user interface element, which can be the superview, another user interface element, or a margin. Because the “Constrain to margins” checkbox is selected, the stack view in this case will be constrained to the superview’s left and right margins. This provides space between the stack view and the edge of the scene.
On the other hand, the top of the stack is constrained relative to the scene’s top layout guide. The top layout guide is positioned at the bottom of the status bar, if the status bar is visible. If not, it is positioned at the top of the scene. Therefore, you need to add a little space between the stack view and the layout guide.
Type 0 in the left and right boxes, and type 20 spacing in the top box.
In the pop-up menu next to Update Frames, choose Items of New Constraints. This causes Interface Builder to automatically update the frames of the affected views when you create the constraints.
In the Add New Constraints menu, click the Add 3 Constraints button.
The label, text field, and button are now left aligned and laid out with appropriate spacing, but the text field still isn’t stretching to fill the screen’s width. To fix that, you’ll need to add an additional constraint.
To adjust the text field width within the stack
In your storyboard, select the text field in the meal scene.
On the bottom right of the canvas, open the Add New Constraints menu again.
Above “Spacing to nearest neighbor,” click the right horizontal constraint to select it. It becomes red when it is selected.
Type 0 in the right box.
In the pop-up menu next to Update Frames, choose Items of New Constraints.
In the Add New Constraints menu, click the Add 1 Constraint button.
Checkpoint: Run your app in iOS Simulator. Rotate the simulator by choosing Hardware > Rotate Left and Hardware > Rotate Right (or Command-Left Arrow and Command-Right Arrow). Notice how the text field grows and shrinks to the appropriate size depending on the device’s orientation and screen size. Also notice that the status bar disappears in landscape orientation.
Click inside the text field and enter text using the onscreen keyboard (if you’d like, you can use your computer’s keyboard by choosing Hardware > Keyboard > Connect Hardware Keyboard).
Debugging Auto layout
If you don’t get the behavior you expect, use the Auto Layout debugging features to help you. These features can be accessed using the Update Frames button and Resolve Auto Layout Issues menu.
If you are getting warnings about misplaced views, use the Update Frames button. This button updates the frames of the selected view and all of its subviews. Select the scene’s view controller to update all the views in the scene. You can also Option-click the Update Frames button to update only the selected view.
If the layout does not behave as you expect, click the Resolve Auto Layout Issues button to bring up a menu of debug commands. All the commands in this menu have two forms. One affects the currently selected view. The other affects all views in the current view controller. If all of the commands are grayed out, select the scene’s view controller or one of the views and open the menu again.
Choose Reset to Suggested Constraints to have Xcode update your interface with a valid set of constraints. Choose Clear Constraints to remove all constraints on the user interface elements, and then try following the previous instructions to set up the constraints again.
Wrapping Up
In this lesson, you’ve familiarized yourself with the contents of an Xcode project, and with many of the tools used to design and run an iOS app. You’ve also built a simple user interface.
Although the project’s scene doesn’t do much yet, the basic user interface is there and functional. Making sure your layout is robust and extensible from the start ensures that you have a solid foundation to build upon.
Download Xcode 12 For Mac
Note
Download Xcode 12.4
To see the completed sample project for this lesson, download the file and view it in Xcode.
Download Xcode 12.4 Dmg
Copyright © 2018 Apple Inc. All rights reserved. Terms of Use | Privacy Policy | Updated: 2016-12-08
0 notes
Text
Custom Controls For Ios Macos Tvos And Watchos Cocoa Controls

Custom Controls For Ios Macos Tvos And Watchos Cocoa Controls 1
Custom Controls For Ios Macos Tvos And Watchos Cocoa Controls 2
Custom Controls For Ios Macos Tvos And Watchos Cocoa Controls 8
iOS Design Themes
MacOS, iOS, tvOS, watchOS, Unix software development and consulting. Lead the engineering of an internal macOS / Cocoa retail store app based on an existing iOS app and shared data model. 1 day ago Xcode 8. This is a legacy document for Xcode 9 and migrating from Swift 3. Png files) or vectors (aka. 4 unbelievable provide quick and smooth while the editing large files. This version includes the SDKs for iOS 13, iPadOS 13, macOS Catalina, tvOS 13, and watchOS 6. Trusted Mac download Xcode 11. Com and create a new, free one. Official Sentry SDK for iOS / tvOS / macOS / watchOS (1). This SDK is written in Objective-C but also provides a nice Swift interface. Remember to call this as early in your application life cycle as possible Ideally in applicationDidFinishLaunching in AppDelegate. Import Sentry //. If you need to use a custom font, consider using it sparingly and be sure it's easy to read at a glance. It often works well to use a custom font for the large text in a widget and use SF Pro for the smaller text. For guidance, see Typography (iOS) and Typography (macOS). Always use text elements in a widget to ensure that your text scales well. It uses Objective-C and Swift for establishing watchOS, iOS, macOS, and tvOS. The exact development process has three stages: prototype, code, and deliver. (like CoCoa Controls and Cocoa Touch.
As an app designer, you have the opportunity to deliver an extraordinary product that rises to the top of the App Store charts. To do so, you'll need to meet high expectations for quality and functionality.
Three primary themes differentiate iOS from other platforms:
Clarity. Throughout the system, text is legible at every size, icons are precise and lucid, adornments are subtle and appropriate, and a sharpened focus on functionality motivates the design. Negative space, color, fonts, graphics, and interface elements subtly highlight important content and convey interactivity.
Deference. Fluid motion and a crisp, beautiful interface help people understand and interact with content while never competing with it. Content typically fills the entire screen, while translucency and blurring often hint at more. Minimal use of bezels, gradients, and drop shadows keep the interface light and airy, while ensuring that content is paramount.
Depth. Distinct visual layers and realistic motion convey hierarchy, impart vitality, and facilitate understanding. Touch and discoverability heighten delight and enable access to functionality and additional content without losing context. Transitions provide a sense of depth as you navigate through content.
Design Principles
To maximize impact and reach, keep the following principles in mind as you imagine your app’s identity.
Aesthetic Integrity
Aesthetic integrity represents how well an app’s appearance and behavior integrate with its function. For example, an app that helps people perform a serious task can keep them focused by using subtle, unobtrusive graphics, standard controls, and predictable behaviors. On the other hand, an immersive app, such as a game, can deliver a captivating appearance that promises fun and excitement, while encouraging discovery.
Consistency
A consistent app implements familiar standards and paradigms by using system-provided interface elements, well-known icons, standard text styles, and uniform terminology. The app incorporates features and behaviors in ways people expect.
Direct Manipulation
The direct manipulation of onscreen content engages people and facilitates understanding. Users experience direct manipulation when they rotate the device or use gestures to affect onscreen content. Through direct manipulation, they can see the immediate, visible results of their actions.
Feedback
Custom Controls For Ios Macos Tvos And Watchos Cocoa Controls 1
Feedback acknowledges actions and shows results to keep people informed. The built-in iOS apps provide perceptible feedback in response to every user action. Interactive elements are highlighted briefly when tapped, progress indicators communicate the status of long-running operations, and animation and sound help clarify the results of actions.
Metaphors

People learn more quickly when an app’s virtual objects and actions are metaphors for familiar experiences—whether rooted in the real or digital world. Metaphors work well in iOS because people physically interact with the screen. They move views out of the way to expose content beneath. They drag and swipe content. They toggle switches, move sliders, and scroll through picker values. They even flick through pages of books and magazines.
Custom Controls For Ios Macos Tvos And Watchos Cocoa Controls 2
User Control
Custom Controls For Ios Macos Tvos And Watchos Cocoa Controls 8
Throughout iOS, people—not apps—are in control. An app can suggest a course of action or warn about dangerous consequences, but it’s usually a mistake for the app to take over the decision-making. The best apps find the correct balance between enabling users and avoiding unwanted outcomes. An app can make people feel like they’re in control by keeping interactive elements familiar and predictable, confirming destructive actions, and making it easy to cancel operations, even when they’re already underway.
0 notes
Text
Free login and authentication for iOS apps using phone number
Free login and authentication for iOS apps using phone number
(No Ratings Yet) Loading...
Pham Van Hoang, [email protected], is the author of this article and he contributes to RobustTechHouse Blog
INTRODUCTION
As a developer, you may be familiar with the typical login system using emails, passwords and sign up forms.
However, have you ever found it cumbersome, repetitive and to a certain extent preventive of users from using your app? Perhaps you have a phone-based dating application and you want to tie user’s account to something that is unique: phone number – an identity that they already use every day without the hassle of dealing (remembering) with passwords. If this idea is so incredible, so why hasn’t anyone started to build a system as such?
But wait, it doesn’t seem that easy at all. To have that feature that I have described, we need to connect to the phone service provider to verify the number and get the confirmation SMS from user. In order to achieve that, we would first need to have SMS APIs to communicate with your app, which in turn connects to a SMS Aggregator system. Next the SMS Aggregator system will need to communicate with service provider in the country where we distribute the app to verify the number and send the confirmation SMS.
With every million verification, it is likely to cost thousands of dollars, not to mention the efforts to ensure reliability of this system as it scales.
On hind sight, that seems rather impossible. Luckily, there is Digits to solve the problem.
SO, WHAT IS DIGITS?
Digits is a brand-new way to log in to apps with just your phone number, which was announced by Twitter at its mobile developer conference in San Francisco, 2015. Moreover it is completely free and more importantly it is secure.
HOW DIGITS WORKS?
“Digits lets people create an account or sign into your app using nothing but their phone number on iOS and Android. Built using the same global, reliable infrastructure Twitter uses, Digits will verify the user’s phone number with a simple customizable user interface that easily integrates into your app.
Digits extends your existing user/profile database. A successful Digits account creation will return a stable userID to attach or match with your user record, and an oAuth token for the device”
Also Digits is available now in 216 countries and in 28 languages.
INTEGRATE DIGITS
Step 1: Register Fabric accounts, Fabric includes Digits and several other tools such as Crashlytics, the crash-reporting tool and MoPub, its advertising platform, and some other useful tools.
Step 2: Download and install Fabric for Xcode
Step 3: Select the project that you want to integrate Digits
Step 4: Install digits
Step 5: Copy and run the scripts in the instructions. If you don’t know where to run script build phase, click the question mark button. It’ll open up the detailed instructions for you.
Step 6: Follow each step in the instructions and imports Digits module in Appdelegate class
Step 7: Build and run your app to confirm that it’s working as expected
Now, Let’s Work With Some Codes
To initialize DigitsKit with your app’s credentials, pass them to startWithConsumerKey:consumerSecret: before passing the shared instance to Fabric in your app’s AppDelegate.
Calling startWithConsumerKey:consumerSecret: will override any keys which were automatically configured. Automatically configured keys resides in your app’s Info.plist under the key Fabric.
[[Digits sharedInstance] startWithConsumerKey:@"your_key" consumerSecret:@"your_secret"]; [Fabric with:@[[Digits sharedInstance]]]
Using the pre-configured button
// Objective-C - (void)viewDidLoad { DGTAuthenticateButton *digitsButton = [DGTAuthenticateButton buttonWithAuthenticationCompletion:^(DGTSession *session, NSError *error) { // Inspect session/error objects }]; [self.view addSubview:digitsButton]; }
In the view controller that will display the button, instantiate the pre-configured button DGTAuthenticateButton after the view is loaded (e.g. in the viewDidLoad method) and provide a completion block to handle the provided session object:
This will render a button looks like:
Using your own button
In the view controller that displays your custom button, capture a tap event as usual and call the authenticateWithCompletion: method with the completion block that handles the session object:
Digits let you customize the buttons and also the confirmation screen very easily.
// Objective-C - (void)didTapButton { [[Digits sharedInstance] authenticateWithCompletion:^(DGTSession *session, NSError *error) { // Inspect session/error objects }]; }
Authentication
Once users logged-in, digits will send the session which includes userID, authToken,authTokenSecret, phoneNumber for you to handle in your app. So simple, huh! There are a lot more awesome features in Digits, you can check them out on the Digits site.
If you have any questions, leave the comments below. Thanks for reading.
REFERENCE
Twitter Flight – Phone Number Sign In with Digits
https://get.digits.com
Brought to you by the RobustTechHouse team (A top app development company in Singapore). If you like our articles, please also check out our Facebook page.
Free login and authentication for iOS apps using phone number was originally published on RobustTechHouse - Mobile App Development Singapore
0 notes
Text
appdelegate 화일 안의 core data stack 정보
오래전에 만들어진 tutorial이나 블로그 포스트를 보면 요즘(2018 6 10) 과 appdelegate에 있는 코드가 다른것을 알수 있다. 최근의 코드에서는 persistentContainer 를 통해 managedObjectContext, managedObjectModel, persistentStoreCoordinator 에 접근할수 있게 되었다.
최근)
// MARK: - Core Data stack lazy var persistentContainer: NSPersistentContainer = { /* The persistent container for the application. This implementation creates and returns a container, having loaded the store for the application to it. This property is optional since there are legitimate error conditions that could cause the creation of the store to fail. */ let container = NSPersistentContainer(name: "test") container.loadPersistentStores(completionHandler: { (storeDescription, error) in if let error = error as NSError? { // Replace this implementation with code to handle the error appropriately. // fatalError() causes the application to generate a crash log and terminate. You should not use this function in a shipping application, although it may be useful during development. /* Typical reasons for an error here include: * The parent directory does not exist, cannot be created, or disallows writing. * The persistent store is not accessible, due to permissions or data protection when the device is locked. * The device is out of space. * The store could not be migrated to the current model version. Check the error message to determine what the actual problem was. */ fatalError("Unresolved error \(error), \(error.userInfo)") } }) return container }() // MARK: - Core Data Saving support func saveContext () { let context = persistentContainer.viewContext if context.hasChanges { do { try context.save() } catch { // Replace this implementation with code to handle the error appropriately. // fatalError() causes the application to generate a crash log and terminate. You should not use this function in a shipping application, although it may be useful during development. let nserror = error as NSError fatalError("Unresolved error \(nserror), \(nserror.userInfo)") } } }
예전)
import CoreData class CoreDataStack { // Applications default directory address lazy var applicationDocumentsDirectory: NSURL = { let urls = NSFileManager.defaultManager().URLsForDirectory(.DocumentDirectory, inDomains: .UserDomainMask) return urls[urls.count-1] }() lazy var managedObjectModel: NSManagedObjectModel = { // 1 let modelURL = NSBundle.mainBundle().URLForResource("Supercars", withExtension: "momd")! return NSManagedObjectModel(contentsOfURL: modelURL)! }() lazy var persistentStoreCoordinator: NSPersistentStoreCoordinator = { let coordinator = NSPersistentStoreCoordinator(managedObjectModel: self.managedObjectModel) let url = self.applicationDocumentsDirectory.URLByAppendingPathComponent("SuperCars.sqlite") do { // If your looking for any kind of migration then here is the time to pass it to the options try coordinator.addPersistentStoreWithType(NSSQLiteStoreType, configuration: nil, URL: url, options: nil) } catch let error as NSError { print("Ops there was an error \(error.localizedDescription)") abort() } return coordinator }() lazy var managedObjectContext: NSManagedObjectContext = { // Returns the managed object context for the application (which is already bound to the persistent store coordinator for the application.) This property is optional since there are legitimate error conditions that could cause the creation of the context to fail. let coordinator = self.persistentStoreCoordinator var context = NSManagedObjectContext(concurrencyType: .MainQueueConcurrencyType) context.persistentStoreCoordinator = coordinator return context }() // if there is any change in the context save it func saveContext() { if mangagedObjectContext.hasChanges { do { try managedObjectContext.save() } catch let error as NSError { print("Ops there was an error \(error.localizedDescription)") abort() } } } }
0 notes
Text
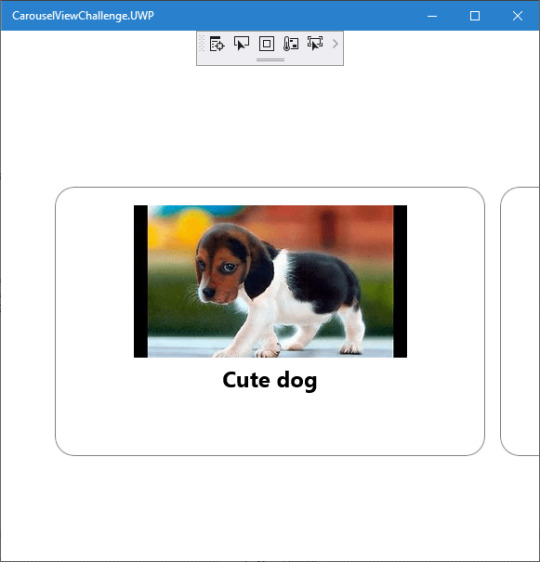
Working with CarouselView in Xamarin Forms
Xamarin.Forms code runs on multiple platforms – each of which has its own filesystem. This means that reading and writing files is most easily done using the native file APIs on each platform. Alternatively, embedded resources are a simpler solution to distribute data files with an app.
Run application on Windows10
CarouselView
CarouselView is available in Xamarin.Forms 4.3. However, it is currently experimental and can only be used by adding the following line of code to your AppDelegate class on iOS, or to your MainActivity class on Android, before calling Forms.Init:
Forms.SetFlags("CollectionView_Experimental");
Prerequisites
Visual Studio 2017 or later (Windows or Mac)
Xamarin.Forms 4.3 Updated
Setting up a Xamarin.Forms Project
Start by creating a new Xamarin.Forms project. You wíll learn more by going through the steps yourself.
Visual Studio 2019 has more options in the opening window. Clone or check out the code from any repository or, open a project or solution for your computer.
Now, you need to click “Create a new project”.
Now, filter by Project Type: Mobile
Choose the Mobile App (Xamarin. forms) project under C# and Mobile.
Name your app. You probably want your project and solution to use the same name as your app. Put it on your preferred location for projects and click “Create”.
Now, select the blank app and target platforms – Android, iOS and Windows (UWP).
Subsequently, go to the solution. In there, you get all the files and sources of your project (.NET Standard). Now, select the XAML page and double-click to open the MainPage.Xaml page.
You now have a basic Xamarin.Forms app. Click the Play button to try it out.
Android implementation
MainActivity.cs
protected override void OnCreate(Bundle savedInstanceState) { TabLayoutResource = Resource.Layout.Tabbar; ToolbarResource = Resource.Layout.Toolbar; base.OnCreate(savedInstanceState); global::Xamarin.Forms.Forms.SetFlags("CollectionView_Experimental"); Xamarin.Essentials.Platform.Init(this, savedInstanceState); global::Xamarin.Forms.Forms.Init(this, savedInstanceState); LoadApplication(new App()); }
iOS implementation
AppDelegate.cs
public override bool FinishedLaunching(UIApplication app, NSDictionary options) { global::Xamarin.Forms.Forms.SetFlags("CollectionView_Experimental"); global::Xamarin.Forms.Forms.Init(); LoadApplication(new App()); return base.FinishedLaunching(app, options); }
UWP
App.xaml.cs
protected override void OnLaunched(LaunchActivatedEventArgs e) { Frame rootFrame = Window.Current.Content as Frame; // Do not repeat app initialization when the Window already has content, // just ensure that the window is active if (rootFrame == null) { // Create a Frame to act as the navigation context and navigate to the first page rootFrame = new Frame(); rootFrame.NavigationFailed += OnNavigationFailed; Xamarin.Forms.Forms.SetFlags("Shell_UWP_Experimental", "CollectionView_Experimental"); Xamarin.Forms.Forms.Init(e); if (e.PreviousExecutionState == ApplicationExecutionState.Terminated) { //TODO: Load state from previously suspended application } // Place the frame in the current Window Window.Current.Content = rootFrame; } if (rootFrame.Content == null) { // When the navigation stack isn't restored navigate to the first page, // configuring the new page by passing required information as a navigation // parameter rootFrame.Navigate(typeof(MainPage), e.Arguments); } // Ensure the current window is active Window.Current.Activate(); }
Common project
Create a Model to Bind the Collections.
/// <summary> /// Class AnimalModel. /// </summary> public class AnimalModel { /// <summary> /// Gets or sets the title. /// </summary> /// <value>The title.</value> public string Title { get; set; } /// <summary> /// Gets or sets the image path. /// </summary> /// <value>The image path.</value> public ImageSource ImagePath { get; set; } /// <summary> /// Gets or sets the description. /// </summary> /// <value>The description.</value> public string Description { get; set; } }
Now, Bind the Collection to CarouselView. Similar CollectionView and ListView.
using CarouselViewChallenge.Models; using System; using System.Collections.Generic; using System.Collections.ObjectModel; using System.ComponentModel; using System.Text; namespace CarouselViewChallenge.ViewModels { /// <summary> /// Class CarouselPageViewModel. /// Implements the <see cref="System.ComponentModel.INotifyPropertyChanged" /> /// </summary> /// <seealso cref="System.ComponentModel.INotifyPropertyChanged" /> public class CarouselPageViewModel : INotifyPropertyChanged { /// <summary> /// Occurs when a property value changes. /// </summary> /// <returns></returns> public event PropertyChangedEventHandler PropertyChanged; /// <summary> /// The animal /// </summary> private ObservableCollection<AnimalModel> _animal; /// <summary> /// The page title /// </summary> private string _pageTitle; /// <summary> /// Initializes a new instance of the <see cref="CarouselPageViewModel"/> class. /// </summary> public CarouselPageViewModel() { _pageTitle = "CarouselViewChallege"; _animal = new ObservableCollection<AnimalModel>(); _animal.Add(new AnimalModel { Title = "Cute dog", ImagePath = "https://th.bing.com/th/id/OIP.iRjeVJfvve4N0MfUky12HgHaEK?w=294&h=164&c=7&o=5&pid=1.7" }); _animal.Add(new AnimalModel { Title = "Cute cat", ImagePath = "https://th.bing.com/th/id/OIP.__BpwPGRP9yjsUa8MaS5UQHaFj?w=217&h=163&c=7&o=5&pid=1.7" }); _animal.Add(new AnimalModel { Title = "Whahaha", ImagePath = "https://th.bing.com/th/id/OIP.rKSQ8lmDeHwH29L73NFsUAHaFj?w=242&h=178&c=7&o=5&pid=1.7" }); } /// <summary> /// Gets or sets the animals. /// </summary> /// <value>The animals.</value> public ObservableCollection<AnimalModel> Animals { get { return _animal; } set { if (_animal != value) { _animal = value; OnPropertyChanged(new PropertyChangedEventArgs("Birds")); } } } /// <summary> /// Gets or sets the title. /// </summary> /// <value>The title.</value> public string Title { get { return _pageTitle; } set { if (_pageTitle != value) { _pageTitle = value; OnPropertyChanged(new PropertyChangedEventArgs("Title")); } } } /// <summary> /// Handles the <see cref="E:PropertyChanged" /> event. /// </summary> /// <param name="eventArgs">The <see cref="PropertyChangedEventArgs"/> instance containing the event data.</param> private void OnPropertyChanged(PropertyChangedEventArgs eventArgs) { PropertyChanged?.Invoke(this, eventArgs); } } }
Create a new MainPage.xaml under View.
<?xml version="1.0" encoding="utf-8" ?> <ContentPage xmlns="http://xamarin.com/schemas/2014/forms" xmlns:x="http://schemas.microsoft.com/winfx/2009/xaml" xmlns:d="http://xamarin.com/schemas/2014/forms/design" xmlns:mc="http://schemas.openxmlformats.org/markup-compatibility/2006" mc:Ignorable="d" x:Class="CarouselViewChallenge.Views.MainPage"> <ContentPage.Content> <StackLayout> <CarouselView ItemsSource="{Binding Animals}" PeekAreaInsets="50"> <CarouselView.ItemTemplate> <DataTemplate> <StackLayout> <Frame BorderColor="Gray" Margin="8" HasShadow="True" HeightRequest="250" CornerRadius="20" VerticalOptions="CenterAndExpand"> <StackLayout> <Image Source="{Binding ImagePath}"/> <Label Text="{Binding Title}" FontSize="24" FontAttributes="Bold" HorizontalTextAlignment="Center"/> </StackLayout> </Frame> </StackLayout> </DataTemplate> </CarouselView.ItemTemplate> </CarouselView> </StackLayout> </ContentPage.Content> </ContentPage>
In the code behind bind the viewmodel with the page:
using CarouselViewChallenge.ViewModels; using System; using System.Collections.Generic; using System.Linq; using System.Text; using System.Threading.Tasks; using Xamarin.Forms; using Xamarin.Forms.Xaml; namespace CarouselViewChallenge.Views { [XamlCompilation(XamlCompilationOptions.Compile)] public partial class MainPage : ContentPage { CarouselPageViewModel vm; public MainPage() { InitializeComponent(); vm = new CarouselPageViewModel(); BindingContext = vm; } } }
The project is working for Android, iOS and UWP. The source code is available on Github.
The post Working with CarouselView in Xamarin Forms appeared first on PureSourceCode.
from WordPress https://www.puresourcecode.com/dotnet/xamarin/working-with-carouselview-in-xamarin-forms/
0 notes
Text
Giả lập Push Notification trên iOS Simulator
Phiên bản Xcode 11.4 đã cho phép giả lập push notification trên iOS Simulator. Sau đây là hướng dẫn của mình về tính năng mới này.
Yêu cầu
Xcode version >= 11.4
Sample app với chức năng request push notification permission
APNS (Apple Push Notification Service) Payload File
Giả lập push notification bằng cách kéo thả
1. Download Xcode 11.4
Vào thời điểm của bài viết này (23/2/2020), Xcode 11.4 mới ra bản beta, bạn có thể download ở đây.
Nếu bạn đọc được bài viết này vào khi Xcode 11.4 đã release bản chính thức, bạn lên Mac App Store mà download nhé
2. Tạo sample app và request permission để nhận push notification
Trong AppDelegate, import UserNotifications framework:
import UserNotifications
Request permission trong application(_:didFinishLaunchingWithOptions:):
UNUserNotificationCenter.current() .requestAuthorization(options: [.alert, .sound]) {(granted, error) in print("Permission is granted: \(granted)") }
Chạy app và grant permission khi hiện thông báo.
3. Đưa sample app vào background
Nhấn tổ hợp phím Shift + ⌘ + H để đưa app chạy ở background. Để banner của push notification hiển thị trên màn hình, bắt buộc phải thực hiện bước này.
Chúng ta sẽ thực hiện việc hiển thị push notification khi simulator ở foreground sau.
4. Tạo APNS payload file và kéo vào iOS Simulator
APNS payload file là một JSON file chứa các thông tin hiển thị của push notification. Tìm hiểu thêm ở đây.
Đây là file APNS mình tạo cho sample app này.
{ "aps": { "alert": { "title": "Hello", "body": "This is an push notification", "sound": "default" }, "badge": 10 }, "Simulator Target Bundle": "com.tumblr.whoistuanhai.PushNotificationDemo" }
Lưu ý: Giá trị của key Simulator Target Bundle chính là bundle identifier của project.
Giờ thì chỉ việc kéo thả file vừa tạo vào simulator thôi.
Giả lập push notification sử dụng Terminal
Đầu tiên, cần tìm identifier của simulator đang chạy. Trong Xcode, nhấn tổ hợp phím Shift + ⌘ + 2 để cửa sổ "Devices and Simulators". Right click vào simulator đang sử dụng trong list các simulator, chọn Copy Identifier.
Lấy được identifier rồi, chạy câu lệnh sau trong Termial:
xcrun simctl push <simulator-identifier><bundle-identifier><path-to-apns-payload-file>
Nếu muốn bỏ qua bước tìm identifier của simulator và simulator của bạn đang chạy, chạy lệnh sau:
xcrun simctl push --booted <bundle-identifier><path-to-apns-payload-file>
Lưu ý: Nếu APNS payload file đã có key Simulator Target Bundle thì có thể bỏ qua trong câu lệnh.
Ngoài ra, developer @twannl có viết ra Poes - một command line tool giúp ta dễ dàng giả lập push notification mà không cần phải tạo APNS payload file.
Cài đặt Poes sử dụng Mint:
mint install AvdLee/Poes
Send notification:
Poes --bundle-identifier <your-app-bundle-identifier> --verbose
Giả lập push notification khi app đang ở foreground
Implement userNotificationCenter(_:willPresent:withCompletionHandler:) function của UNUserNotificationCenterDelegate protocol trong AppDelegate:
func userNotificationCenter(_ center: UNUserNotificationCenter, willPresent notification: UNNotification, withCompletionHandler completionHandler: @escaping (UNNotificationPresentationOptions) -> Void) { print("Push notification received in foreground.") completionHandler([.alert, .sound, .badge]) }
Set AppDelegate là delegate của UNUserNotificationCenter trong application(_:didFinishLaunchingWithOptions:):
UNUserNotificationCenter.current().delegate = self
0 notes