#How to Create New an App for Beginners
Explore tagged Tumblr posts
Visit Tumblr Blog
Explore Tumblr blogs with no restrictions, modern design and the best experience.
Last Seen Tumblr Blogs


Fun Fact
Tumblr was named as a finalist in Lead411’s New York City Hot 125 in Aug 2010.
Text
BEGINNERS GUIDE TO BLUESKY
Hiya! Curious about joining bluesky but intimidated by all the features? Already on bluesky but want to learn more? Then welcome to my quick guide on getting started and navigating bluesky!~
What is Bluesky?
it’s a social media site that’s owned by no single person or company. it's aim is to bring back the early days of twitter before bots, elon musk or algorithms took over. Personally I find the site really cozy, wholesome, and engaging. my Bluesky account for example
What’s unique about Bluesky?
→ CUSTOMIZATION: your timeline is very easy to control. There’s tons of options, so be sure to go through each tab in your settings. some options include: turning off autoplay, changing the order in which threaded replies show, changing DM settings, content preferences and lots of visual app settings.
→ MODERATION LISTS: human made, mass blocklists. These are public lists of accounts that when you subscribe to you automatically block or mute everyone in that specific blocklist. A great way to avoid unwanted content, and interactions. ✦ Moderation lists I recommend will be below the cut
→ STARTER PACKS: recommendation lists on who to follow, made by users. You can even curate your own starter pack of recommendations! ✦ Starter pack recommendations will be below the cut
→ FEEDS: public timelines, basically. There are a lot of feeds you can join, or you can even create your own. I made a feed featuring just my pixel art so it doesn’t get cluttered with text posts or other photos in my media tab. ✦ I’ll post feeds I recommend below and link you to a tutorial on how to create your own feed
→ BLOCKING/MUTING: bluesky has a great blocking system. When you block someone they can no longer see, or interact with you. They also have a feature to make your blog inaccessible unless logged in. you can also mute specific people, delete post replies, and even detach your post from a reblog. You can also mute specific words, phrases, tags etc.
→ NSFW: bluesky allows NSFW content, including artwork, porn, lewds etc. They also have a great moderation page to avoid the content completely, censor the content, or show it if you’d wish. ✦ just go to settings > moderation > toggle on NSFW settings and it’ll let you heavily moderate.
→ LABELS: this is a really cool feature on the site, you can subscribe to certain pages that enable a lot of fun/useful labels that help you in different ways! (like pronoun tags, artist tags etc) ✦ Labels to browse will be posted below
→ COMMUNITIES: the vastly diverse communities really feel like the best parts of tumblr. since you can so heavily curate your experience, it can really feel like a calming oasis. Mine is mostly artists, and other creatives.
there’s also a large community of professional artists, art directors, authors, celebrities, and even the best shitposters from twitter. the app really is what you make of it but it’s thriving right now.
RECOMMENDATIONS & LINKS BELOW ⬎
→ MODERATION LISTS:
HATE SPEECH: NAZIS | MAGA | MAGAv2 | MAGAv3 | TRANSPHOBES & HOMOPHOBES | FAR RIGHT | FAR RIGHTv2 | FAR RIGHTv3 | ELON MUSK FANBOYS | ANTI-BLACK | ANTI-VAX
NFT/AI/CRYPTO: MASTERLIST | AI/NFT | AI/NFTv2 | AI FANBOYS | CRYPTO | NFTs
SPAM/SCAMMERS: SPAMBOTS | BOTS | CONTENT SCRAPERS | CONTENT FARMING
✦ to block or mute everyone in the blocklist at once, click subscribe in the top right corner:

→ STARTER PACKS:
ART: PIXEL ART | PIXEL ARTv2 | WOMEN OF PIXEL ART | BADASS DIGITAL ARTISTS | MAGIC THE GATHERING ARTIST | PAINTERS OF BLUESKY | INDIE COMIC CREATORS | LGBTQIA+ COMIC CREATORS | WEBCOMICS ULTIMATE COLLECTION
GENERAL: WOMEN OF BSKY | AUTHORS | LGBTQ NEWS
SHITPOSTERS: JUNIPER | JUNIPERv2 | MASTERLIST | SCIENCE SHITPOSTERS
✦ for more niche starter packs, use the search function. search your specific interest and ‘starter pack’ and you’ll find some!
→ FEEDS:
DISCOVER | WHATS TRENDING | MENTIONS | ART | TRENDING ART
THE GRAM: a timeline for exclusively image posts from those you follow. no textposts etc. ONLYPOST: similar to the gram, it shows a timeline of only those you follow. no reposts, just original posts. 📌: a way to bookmark posts. just reply with the pin emoji.
✦ there’s tons of others feeds as well! just use the feed tab and you can browse feeds or search for specific ones.
✦ TUTORIAL ON HOW TO CREATE A CUSTOM FEED FOR YOUR ART/POSTS
→ LABELS:
SKYWATCH: most popular label. Lots of useful labels!
AI Labels: identifies AI users, can also enable hiding the posters.
Pronouns: self explanatory but useful. can add a badge with your pronouns!
✦ you can search for additional label bots on bluesky!
OTHER RECOMMENDATIONS:
✦ EXPIRIENCE ENHANCING TOOLS RECS ✦ CLEARSKY: TRACK BLOCKS AND BLOCKLISTS ✦ SKYFEED: CREATE CUSTOM FEEDS EASILY ✦ use the block function often. do not entertain trolls or hate speech. ✦ as well as starter packs, there’s also lists! lists can be used in the same way to create curated lists of accounts. it’s a good way to keep track of specific genres of posters you’re interested in, and finding new ones! ✦ hashtags: use them! they’re beneficial in boosting your post. you can even link hashtags in your bio making you easier to find. another method of making you more visible is if you post an ‘interest’ post! basically just type things you’re interested in and it’ll help people find you / vice versa ! ✦ update your profile first thing, like bio avi etc. make a small post so people know you're real. interact and engage! the communities there are so welcoming!
I think that covers abt everything i wanted to cover! Hope this was helpful and thanks for reading lol
#bluesky#bluesky starter pack#bluesky social#bsky.app#bsky#bsky social#bluesky tutorial#bluesky walkthrough#bluesky app#ooooooooook that took forever lol hope its useful!!!!!!!!#long post#text post
6K notes
·
View notes
Text
𝓽hings to do instead of scrolling ౨ৎ


summer is here, school is over and you have way too much free time on your hands. so unless you want to spend your whole days with your eyes locked on a screen, here's an in- depth guide on what to do this summer, or whenever!!
learn a new language - trust me, speaking more than one language is a skill that everyone should have, and it always comes in handy. you can watch tv shows, movies or youtube videos in your target language, read beginner books, use apps (not duolingo though.. ) and even just listen to music!! just expose yourself to the language as much as you can, even better if you know anyone you can have conversations with. you could also learn sign language!!
journal or scrapbook - writing down your feelings really helps understanding your own self more. you can try doing shadow work to really dive deep, or just write whatever you feel in that moment. it doesn't have to become a chore, and remember, write for yourself and not as if someone else was going to read!! as for scrapbooking, just print out some nice photos and decorate the pages with stickers, drawings, fun colored paper.. whatever you want, just be creative!!
make art - it doesn't have to look perfect, remember that all art is beautiful in its own way. even if you think you're not good at it, just create, it will help you feel better & you'll also get better with time!! you can draw, paint, sculpt, do pottery, etc. you don't have to follow any guidelines, just buy a random sketchbook, bring out your inner child and do whatever you feel like doing
learn how to play an instrument - this can be a bit expensive, but if you have any instrument in your house that you've never used, it might be a great time to start learning it!! you don't necessarily need to take classes, you can easily find tutorials on youtube, even though it might be harder to learn by yourself. but making music is a really fun activity & good for the soul
reading and writing - i will never recommend reading enough !! everyone should read. it helps you learn new things, understand different perspectives, expand your vocabulary, and so much more. i know books can be expensive, but you can always try to buy them at flea markets, or ask a friend/family member to lend you some. and just in case, there are always some sites where you can read books online for free, like zlibrary!! you can read before going to bed instead of staying on your phone (which is sooo bad for your sleep), at the beach while tanning or outside while getting some fresh air. and if reading books inspires you, you can try to write something!! i'm not saying you have to write a 600 page book, but you can try to write small stories, or poetry, and who knows, someday you might actually write a book! if you want to get published, there are some small literary magazines you can find on social media that publish the works of small writers, it can be a great way to start. you can also always post your works here on tumblr, substack, or any social media platform!! you could also try to write the story for a movie and start screenwriting, if you're into cinematography
research interesting topics - now that school isn't forcing you to study things that maybe you don't care about, you can study whatever you want !! remember, knowledge is power, and with the internet, you basically have the world in your hands. you can watch a youtube video, read a book, or simply research on websites (make sure they're reliable though). you can also take online courses!! i might make a post on ideas for what to research??
start a new hobby - your life can't only be made of school/work, sleep, and a screen. you need hobbies that you actually like and that make you feel good. some of these can be: baking and cooking, crocheting, knitting, embroidery, jewelry making, nail art, makeup, photography, editing, blogging/vlogging, coloring, candle making, soap making, perfume making, modeling, origami, sewing, making diy stuff, chess, puzzles, acting, singing, flower arranging, meditating, lego building, trying new hairstyles or outfits, doing animations, discovering new music, sudoku, the things i previously wrote, and probably a million other activities i can't think of right now
stay active - moving you body is good for both your physical and mental health, i'm sure we all know that. you can go on walks or runs in the nature with your headpones on, or do any sport that you like- some ideas: swimming, dancing (ballet, hip hop, modern, ecc) , tennis, martial arts (judo, karate, taekwondo, ecc), volleyball, basketball, athletics, gymnastics, football, archery, fencing, table tennis, boxing, surfing, rowing, hockey, horseback riding, softball, golf, biking, figure skating, rollerblading, skating.. you don't need to do it competitively (unless you want to), as long as you're having fun and moving your body. you can also do workouts, like yoga or pilates, at home or outdoors, or go hiking.
watch movies, tv shows, or documentaries - it can always be a good learning experience, or just something fun and relaxing that isn't mindlessly scrolling. a bonus: after you've watched something, write a very long, detailed and in-depth review in your journal. you can also post it wherever you want (like letterboxd, to fight all the one liners)
hang out - with friends, family, or even by yourself !! (i know, i know, it can be scary). you can do anything, as long as you're with the right people everything is fun, but here's some ideas: have a picnic, go to the beach, go to a water park, have a baking contest, do temporary tattoos, go to a concert, go out to eat, do a one day trip, go on a road trip, take a walk in the nature, go hiking, go to a trampoline park, go to an amusement park, visit a museum, go thrifting or shopping, have a board games night, try out a new cute cafe or bakery, do an escape room, have a karaoke night, have a movie marathon, and so much more!!
i hope this helped!! ♡
#pinkpilatesprincess#self care#it girl#productivity#summer#that girl#girlblog#clean girl#wellness#pink pilates aesthetic#coquette#girlblogging#advice#wonyoungism#self improvement#dream girl#self love#health#hobbies#journaling#self care tips#summer goals#lifestyle#aestethic#it girl energy#glow up#wonyoung
768 notes
·
View notes
Text
How To Get Started Making Visual Novels
Wanna make a visual novel? Or maybe you've seen games like Our Life, Blooming Panic, Doki Doki Literature Club, etc. and wanna make something like that? Good news, here's a very basic beginners guide on how to get started in renpy and what you need to know going in! Before you start, I highly recommend looking at my last post about writing a script for renpy just to make it easier on you!
LONG POST AHEAD
Obviously, our first step is downloading it from their website

thankfully, its right on the home page of their site. Follow basica program installation steps and run the program. I highly recommend pinning it to your task bar to make it easier to access.
From there, you're met with the renpy app, it's a little daunting at first but let's talk about what all these buttons are for.

Projects
This part is simple, it just lists the current projects in the chosen directory. You probably won't have any in there of your own. You should still see Tutorial and The Question!
Both of those default projects are super helpful in their own ways, i highly recommend testing out the tutorial and playing around with it just to get comfortable with some of the basics.
Create New Project
The first step to actually making your game into a game!
You'll be met with a prompt letting you know that the project is being made in English and that you can change it. You can click Continue.
From here, you'll be asked to input a project name! Put in your games title, or even a placeholder title since this Information can be changed later! (this is also the title the folder will be in your file browser, be sure to name it something you won't overlook)

Now we get to choose our resolution!
If you have no idea what to choose, go for 1920x1080! This is the standard size for most computer monitors and laptops, but it will still display with moderately decent quality on 4k monitors too!
You can choose 3840x2160 as well. This is 2x the measurements of the default, with the same ration. These dimensions are considered 4k. Keep in mind, your image files will be bigger and can cause the game to have a larger size to download.

Now we get to choose our color scheme!
Renpy has some simple default options with the 'light mode' colors being the bottom two rows, and the 'dark mode' colors being the toop two rows.
You can pick anything here, but I like to choose something that matches my projects vibes/colors better. Mostly because depending on how in depth you go with the ui, it minimizes the amount of changes I need to make later.

Click continue and give it a minute. Note: If it says "not responding" wait a moment without clicking anything. It can sometimes freeze briefly during the process.
Now we should be back at our home screen, with our new project showing. Let's talk about allll that stuff on the right now.
Open Directory
This just opens that particular folder in your local file explorer!
game - is all the game files, so your folders for images, audio, saves, and your game files like your script, screens, and more.
base - this is the folder that the game folder is inside of. You can also find the errors and log txt files in here.
images - takes you to your main images folder. This is where you wanna put all of your NON gui images, like your sprites, backgrounds, and CGs. You can create folders inside of this and still call them in the script later. EX: a folder for backgrounds , a folder for sprites for character a, a seperate folder for spirtes for character b, etc.
audio - Takes you to the default audio folder. This is empty, but you can put all your music and sound effects here!
gui - brings up the folder containing all of the default renpy gui. It's a good place to start/ reference for sizes if you want to hand draw your UI pieces like your text box!
Edit File
Simple enough, this is just where you can open your code files in whatever text/code editor you have installed.
Script.rpy - where all of your story and characters live. This is the file you'll spend most of your time in at first
Options.rpy - Contains mostly simple information, like project name and version. There aren't a ton of things in here you need to look at. There is also some lines of code that help 'archive' certain files by file type so that they can't be seen by players digging in code however. Fun if you want to hide some images in there for later or if you just dont want someone seeing how messy your files are. We've all been there
Gui.rpy - where all of the easy customization happens. Here you can change font colors, hover colors, fonts, font sizes, and then the alignment and placement of all of your text! Like your dialogue and names, the height of text buttons, etc. It more or less sets the defaults for a lot of these unless you choose to change them later.
Screens.rpy - undeniably my favorite, this is where all of the UI is laid out for the different screens in your game, like the main menu, game menu, quick menu, choice menu, etc. You can add custom screens too if you want, but I always make my own seperate file for these.
Open Project - this just opens all of those files at once in the code editor. Super handy if you make extra files like I do for certain things.
Actions
last but not least, our actions.
Navigate Script - This feature is underrated in my honest opinion, it's super handy for help debugging! In renpy you can comment with # before a line. However, if you do #TODO and type something after it, it saves it as a note! You can view these TODO's here as well as easily navigate to when certain screens are called, where different labels are (super great if your game is long, and more. It saves some scrolling.
Check Script (Lint) - also super duper handy for debugging some basic things. It also tells you your word count! But its handy for letting you know about some errors that might throw up. I like using it to look for sprites I may or may not have mispelled, because they show up in there too.

Change/Update GUI - Nifty, though once you start customizing GUI on your own, it isn't as useful. You can reset the project at any point and regenerate the image files here. This updates all those defaults we talked about earlier.
Delete Persistent - this just helps you delete any persistent data between play throughs on your end. I like to use it when making a lot of changes while testing the game, so that I can reboot the game fresh.
Force Recompile - Full disclosure, as many games as I've made and as long as I've been using Renpy, i have never used this feature. I searched to see what it does and this is the general consesus: Normally renpy tries to be smart about compiling code (creating .rpyc files) and only compiles .rpy files with changes. This is to speed up the process since compiling takes time. Sometimes you can make changes that renpy don't pick up on and therefore won't recompile. In these cases you can run force recompile to force it. Another solution (if you know what file is affected) is to delete that specific. rpyc file.
The rest of your options on this right hand side are how you make executable builds for your game that people can download to extract and play later!

Sorry gang! that was a whole lot of text obviously the last button "Launch Project" launches an uncompiled version of the project for you to play and test as you go! Hang in tight because my next post is about how to utilize github for renpy, so you can collaborate easier!
611 notes
·
View notes
Text
2025 : #16 journal journal journal : all u need guide
By : a journaling addict girlie

Journaling is a tool for self-discovery mindfulness and creativity too But while many of us start with enthusiasm turning journaling into a consistent habit can feel like a battle or smthng cuz life gets busy u lose motivation and before you know it your journal is gathering dust
so !
This guide will help you build a sustainable journaling practice. Whether you’re a beginner or someone looking to rekindle the habit these practical tips will make journaling an effortless part of your daily routine.
how I found out abt journaling(storytime box)
[I used to feel like my world was tiny, trapped in a cycle of bullying and loneliness and a loot of stuff My social zone was practically nonexistent I had 2 friends but I didn't trusted them enough and the people around me just made things harder so I had a trust issue and I was constantly overthinking eveeeeerything. My mind was a mess, and I had no way to let it out (I can't tell my parents back then abt my problems) . One day, I came across a video about journaling. I saw someone pouring out their thoughts into a notebook (it was bestmess ig on YouTube ) and something clicked for me. Maybe this could be my way to escape all the noise in my head ??? So, I grabbed an old notebook and started writing.At first, it felt awkward—just random, messy thoughts. But as I kept going, I realized it helped. Writing became my safe space. I could say whatever I wanted, no judgment. It wasn’t just about venting; it helped me understand myself, organize my thoughts, and let go of some of the pain from the isolation.Over time, journaling turned into something much deeper. It became a way to reflect, dream, and grow. It taught me how to be kind to myself when no one else was, and helped me find clarity in the chaos. Journaling saved me it turned my mess into peace one page at a time then when the years roll I created a routine for it !]
Why Journaling Matters
☆ Journaling offers countless benefits:
-Reducing stress
-Boosting creativity
-Deepening self-awareness
☆ Yet, staying consistent can be a challenge. The key lies in making journaling enjoyable and rewarding. Here's how you can do just that.
The Science of Habit Formation
To build any habit, including journaling, you need three elements:
1. Cue: A trigger that reminds you to journal.
2. Routine: The act of journaling itself.
3. Reward: The positive feeling or benefit you experience afterward.
The secret is to keep the process simple and satisfying too
Steps to Turn Journaling into a Daily Habit
1. Start Small
Begin with just a sentence or two for example:
“Today, I felt grateful for…”
“The best part of my day was…”
—Starting small makes it less overwhelming and easier to stick with.
2. Anchor It to an Existing Habit
—Pair journaling with something you already do, like drinking coffee or winding down before bed. This "habit stacking" technique helps u remember to journal.
3. Set a Timer
Worried about time? Commit to just 5 minutes. Knowing there’s a limit makes starting feel less daunting.
4. Use Prompts
Struggling with what to write? Use prompts like:
“What made me smile today?”
“What’s a challenge I faced, and how did I handle it?”
—Prompts give your thoughts direction and beat blank-page syndrome. There's million of prompts idea on Pinterest u need just to take action
5. Celebrate Your Progress
Track your streaks or mark your journaling days on a calendar. Seeing your consistency builds motivation.
6. Create a Cozy Space ( not important )
Set up a comfortable spot for journaling—a comfy chair, your favorite pen, or soothing music. A cozy environment turns journaling into a ritual you look forward to.
7. Experiment with Formats
If traditional journaling feels stale, try something new:
☆ Bullet points
☆ Sketches
☆ Gratitude lists
☆ Digital journaling apps
Creative Ways to Journal
☆ Gratitude Journaling: Write down 3 things you’re grateful for each day.
☆ Habit Tracking: Combine journaling with habit tracking to monitor small goals.
☆ Morning Pages: Inspired by Julia Cameron’s The Artist’s Way, write 3 pages of free-flowing thoughts first thing in the morning.
☆ Reflection Logs: Reflect weekly or monthly on what went well, what you learned, and what you’d like to improve.
Overcoming Common Obstacles
1. “I Don’t Have Time.”
Journaling doesn’t need to take hours. Even a single sentence is progress.
2. “I Don’t Know What to Write.”
Start with prompts or simply answer: “What’s on my mind right now?”
3. “I Keep Forgetting.”
Set phone reminders or pair journaling with a daily habit.
4. “It Doesn’t Feel Useful.”
Journaling isn’t about perfection it’s a tool for you Over time you’ll notice its positive effects.
Journaling as a Tool for Self-Growth
— Journaling isn’t just about recording events or thoughts—it’s also a way to grow mentally, emotionally, and even spiritually. Here’s how you can take your journaling practice to the next level:
1. Use Journaling for Goal Setting
Journaling can help you identify and track your goals. Write down your short- and long-term objectives, and use your journal to reflect on progress, challenges, and adjustments.
Example:
☆ Weekly Goals: Write down 3 specific goals every Monday and reflect on them at the end of the week.
☆ Vision Journaling: Imagine your ideal future and describe it in vivid detail.
2. Practice Emotional Awareness
☆ Journaling is a powerful way to process emotions. Try these techniques:
☆ Emotion Check-Ins: At the end of the day, write about how you felt and why.
☆ Reframing Challenges: If something negative happened, write about it from a different perspective.
3. Develop Gratitude and Mindfulness
☆ Use your journal to cultivate mindfulness by focusing on the present moment:
☆ Mindful Observations: Write about your surroundings, the weather, or how your body feels.
☆ Gratitude Expansion: Instead of listing things you’re grateful for, write a short paragraph about why each one matters.
4. Uncover Patterns and Insights
Over time, your journal becomes a mirror of your habits, thoughts, and emotions. Regularly revisit old entries to:
- Identify recurring themes.
- Discover how you’ve grown or changed.
- Spot areas where you might need more balance or self-care.
FAQs
Q: How long does it take to build a journaling habit?
A: Experts say it takes 21–66 days. Consistency is key, even if it’s just a few minutes daily.
Q: Should I write by hand or use a digital tool?
A: Both work! Handwriting feels personal, while digital tools offer organization. ( In my opinion handwriting one are better !)
Q: What if my journaling feels repetitive?
A: Life has routines, and so will your journal. Use prompts or try new styles to keep it fresh.
Q: Can I journal if I’m not a good writer?
A: Absolutely! Journaling is about self-expression, not perfect prose. Bullet points or doodles work too.
Journaling is a gift you give yourself—a way to check in, reflect, and grow. Whether you’re jotting down a single sentence or filling pages, the act of journaling is what matters most.
@bloomzone 📇
#luckybloom#bloomivation#bloomdiary#wonyoungism#becoming that girl#glow up#wonyoung#dream life#it girl#creator of my reality#divine feminine#journaling#confidence#self growth#self confidence#self development#self improvement#self love#self care#self healing#stay focused
146 notes
·
View notes
Note
hi I really like your mb and I'm new here. Do u have any suggestions or tips to make mb? like where did u get the pics and the captions.
𝓜oodboards: a guide for beginner blogs!


I decided to bring here a small tutorial that can help other blogs that are starting out and still have questions that need clarification, with tips and links that you may need. I wrote this from my point of view of creating moodboards and I tried to be as brief as possible in my explanation, there may be errors in English as I'm not fluent in that language and everything here was translated using Google Translate, any questions you can contact me via asks or by message.
how do I find pics for moodboards?
Pinterest is where you'll find most of the images you'll use on your moodboards, so create boards on Pinterest separating by color and aesthetic to make it easier to find. On Tumblr there are some blogs with cool stuff too (like @/m0ney, @/angelicdewdrop, @/rkivo, @/ohimesama-okinawa and @/bambiiis for example), but in this case I recommend putting the credits in the alt text.
Some blogs have a pinned post or carrd where they put the link to their Pinterest account (my Pinterest here). You can follow them and save the pins they post/save on the app. I also suggest looking at the other profiles they follow on Pinterest to find more photos to use. By doing this, you will influence the Pinterest algorithm, which will recommend more related pins in the feed.
You can also search on Pinterest for the aesthetic and color you want (like hime gyaru, y2k, dollcore, coquette pink aesthetic, coconut girl e etc.).
how to make moodboards + tips:
Well, it's not such a complicated thing for me. I generally make moodboards with 6 or 9 images, taking inspiration from the moodboards of other blogs that I admire, so I can get an idea of how to make the captions and how to position the photos in a way that matches them.
To make it easier, first I create the moodboard and then I look for an icon of a kpop idol that can match the aesthetics and color of the moodboard. The reverse can also be done: first choose an icon and make a moodboard for that image, paying attention to the color palette and tonality (and for some reason, for me it's better to create moodboards in Tumblr's light mode instead of dark mode).
When I finish the moodboard, I add the caption, the hashtags (which will be very important for your post to reach other blogs) and a divider or blinkies. Dividers can be found on tumblr by searching for "dividers", on my blog there are some (other blogs with beautiful dividers that I recommend: @fairytopea, @v6que, @plutism, @h-aewo).
If you need png, I recommend these blogs here: @slipng, @pngcabinet, @heemeiji, @honeyluvsw, @hibscubus. Tip: If you want to add more than 10 photos in a single post, add it via Chrome.
tutorial on how to make this gif here


tutorial on how to make this gif here

tutorial on how to make this gif here
tutorial on how to make this gif here

tutorial on how to make these gif here

website to split a photo into two or more parts
how to create captions:
To make the captions, I use parts of songs that I like, but they can also be album or song names, movie names, a phrase you thought, etc. The symbols you will put in the caption can be found on this website or just by searching for "symbols", "kpop symbols", "kaomojis" on tumblr (blogs with cute symbols that I recommend: @v6que, @l-unitas)
If you want to use a different font for the letters, there are these two websites (01 and 02). And to change the color, there are also these two tutorials (01 and 02).
what to do to make your blog "popular":
Add popular hashtags that relate to the content you are posting. If you use almost the same tags as other big blogs, your posts will have more reach. Posting frequently and your account looking nice and organized helps too.
Ask several other popular blogs to promote your account. This was very important for my profile to grow in the number of followers and engagement, Also make friends with other blogs that make moodboards, reblog and comment on their posts and tag them in your own moodboards.
Join the events that some blogs do, as they offer good prizes like reblogs if you win and join some tumblr communities. And remember to have patience, as it often takes a while to get good engagement on Tumblr.
343 notes
·
View notes
Note
hi! I'm cissinglet and I'm sort of thinking I wanna transition to transplural of some sorts but I have absolutely no idea how to. can you please give me some tips? and by tips I mean completely beginner tips. thank you!
also I'm sorry if this is bothering you. .
also is 🍓 taken as a sign off?
Hello new anon! No, you are not a bother at all, I am more than happy to help you or anyone else :) As for tips, here are some tips of mine: Brainstorm what you want your system to look like! Google images or a creative game like Minecraft can help you design a headspace, and creating non-introject designs can be done in Gacha Club or Picrews! Set up Pluralkit or SimplyPlural! This can help with details, and the group functions can be used to organize parts of headspace or system roles if you so desire.
Install a notes app, this can help communication when you are offline for example! And most of all, treat your headmates like they're already there, and this will cause them to be able to respond surprisingly quickly! I hope these helped! Feel free to ask me any more specific questions!
#ᯤ Wireless Data Transfer#🍓 anon#pro rqc#radqueer#radq#transid safe#radqueer community#rq community#rq please interact#rq#rqc🌈🍓#rq 🌈🍓#rq safe#rqc#radqueer safe#pro radqueer#radq safe#radq please interact#radq interact#radq community#pro radq#pro rq 🌈🍓#pro transx#transplural#transid#transprogrammer#pro transid#rdq#pro transplural
21 notes
·
View notes
Text


RESOURCE DIRECTORY 2.0 + HOW TO NAVIGATE USERGIF
Hello! We hit 10k followers! I want to take this moment to thank all our wonderful followers and the talented members of usergif! We created this blog less than 2 years ago and are constantly blown away by your support and beautiful creations. As a thank-you, we're proud to announce our new and improved resource directory!!! Shout out to arithemes' custom page which allowed us to create a more streamlined and organized directory for everyone to use. Under the cut, you'll find a guide to help you find exactly the resource you're looking for on our blog. Happy gifmaking! :)

THE UPDATED DIRECTORY
All resources are in alphabetical order first by the creator's URL (at the time of entry), then by the resource's title. Each title is a clickable link that'll redirect you to the original post. Beneath that, you'll find the creator's URL and the resource's relevant filter tags:
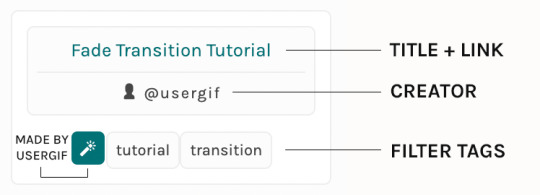
As always, whenever I add new entries to the directory, you'll see the last date listed on the right side of the blog here:
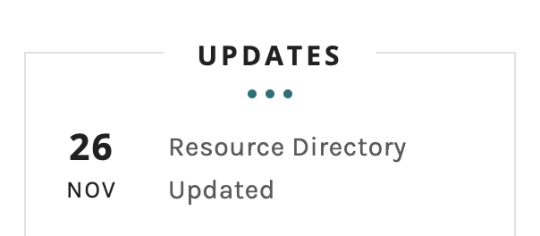
If you don't see one of your recent tutorials listed there, please be patient. I update the directory on a monthly basis, but only add resources that have already exited our queue.
THE FILTERS

Please note: the Source section has exclusive filters, meaning you can only select one at a time. In the Type and Effects sections, you can select as many filters as you want. However, if you select 2 filters in one section, like "animated" and "blending," it'll show results for any resource with either of those tags, not necessarily resources that include both of those tags.
Here's a breakdown of how we categorize our resources:
Source: ↳ all: posted by any creator ↳ usergif: posted by usergif
Type: ↳ all: click this to reset filter selections ��� action: pre-recorded photoshop functions that can be replayed ↳ basics: non-effects-related resources to help new gifmakers get their feet off the ground (please remember usergif is not a resource for beginner-level gifs and focuses on intermediate to advanced gif effects. however, we thought it would be helpful to keep some basic resources available) ↳ brush: various brush shapes like ripped paper edges or intricate textures ↳ fonts: names and links to fonts or font packs ↳ template: pre-made, downloadable layouts and designs ↳ texture: overlays that add a different finish to a gif such as Ben Day dots (retro comic dots) or glitter ↳ tutorial: any post that provides an explanation for a gif effects process ↳ other
Effect: ↳ all: click this to reset filter selections ↳ animated: an effect that applies movement to an element such as rotating text or wiggling shapes ↳ blending: aka double exposure, this effect combines two or more gifs layered on top of each other ↳ color: specifically for color manipulation, an effect in which the original colors are completely different (e.g. a blue sky colored to look pink) ↳ glitch: an effect where color channels are toggled and layered over the original gif to give a flickering effect ↳ layout: multiple gifs on one canvas like a collage (e.g. hexagon layout) or poster-style templates ↳ overlay: an added element layered above a gif (excluding text) such as a shape, another gif confined to a shape, a texture, etc. ↳ transition: an effect that stylizes the passage from one scene/clip into another, such as a fade, glitch, linear wipe, or motion blur transition ↳ typography: any kind of stylized text added over a gif (does not include basic captions)
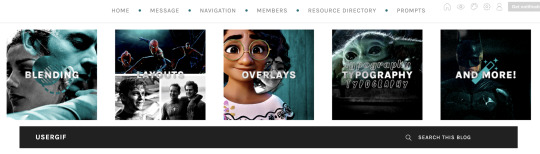
You can find examples of all these gif effects via their respective tags on our Nav!
THE SEARCH BAR

This search bar functions the same way as the search bar in the upper right corner of our main blog and the search function on Tumblr's mobile app.
Tumblr search allows you to generate results using keywords found in the body of the post or the tags. So, if you're looking for a post but can only remember it having the word "rotoscoping," you can type that in either in the directory's search or blog's search and find any post on our blog that mentions the exact keyword "rotoscoping."
THE NAV & TAGS
Tags function differently from search keywords as these relate to exact words and phrases found only in the tags, not the body of the post. Our members use tags to categorize original posts and reblogs. Some of our most frequently used tags are listed on our Navigation Page and saved in the mobile search function pictured below:
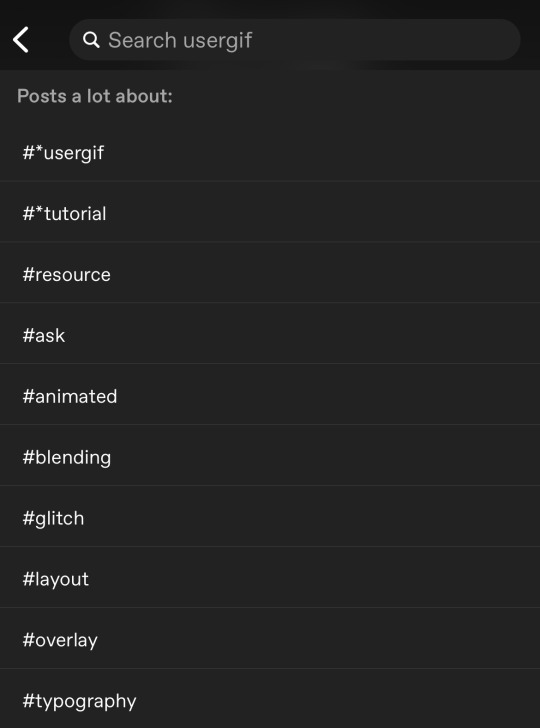
But if you ever want to quickly navigate a tag, simply add /tagged/word to the end of our url to find that tag! For example, if you want to see all the posts we've tagged as a #tutorial, just go to usergif.tumblr.com/tagged/tutorial.
BROKEN LINKS
Whether it's due to a creator frequently changing their url, the absence of an automatic blog redirect, or my own mistakes when coding the directory — you may stumble upon a broken link. Here's what to do:
If a creator has changed their username but their blog doesn't automatically redirect you to the new blog, check if they listed their new user name in the title of their old blog like I did:
In this case, simply replace the url you landed on with this new url. For example, https://sith-maul.tumblr.com/post/692130400398704640/how-to-make-an-animated-google-search-overlay-a → would become → https://cal-kestis.tumblr.com/post/692130400398704640/how-to-make-an-animated-google-search-overlay-a
However, if you can't figure out the creator's new url or in the case that I messed up the link due to human error, feel free to send us a message so I can help find the source or correct the mistake!
WHERE TO FIND THIS INFO AGAIN
If you ever need to access this guide while using the directory, simply click the "i" button here:

And that's it! We hope this revamped directory is a lot more efficient and helpful. Thank you again for all your support and for helping us reach this follower milestone!
#*usergif#*usergifdirectory#completeresources#usershreyu#userace#uservivaldi#userbecca#usertreena#userzaynab#alielook#usernanda#userhella#userelio#useraish#userabs#tuserabbie#tusermona#usersmia#tuserlucie#usercats
358 notes
·
View notes
Text
Basic Hypnos Devotee Starter Kit

So you're planning to get into the worship of Hypnos and don't know where to begin! No worries, this starter kit may be of some aid! This kit is best suited for those very new to Hellenism but will still be much help to those experienced with other deities! It also holds very basic info as a kickstart into worship. If you have any questions or anything you'd like to discuss/request, you may send an ask to us or dm!
Learn the mythology of Hypnos, knowing the history of the deity can greatly aid in knowing associations and impact your creative works.
2. Research on Hellenism but do be critical of what is read! There is much misinformation on Hellenism that may be toxic to beginners. Examples of this is the idea of certain gods not being beginner friendly. Hypnos loves you dearly, worship is not as strict as people want you to think it is. There is a barrier of respect, but worshipping Hypnos will become as easy as breathing. Hypnos loves you because you are love.
good advice post
prayer writing
3.Okay okay research research research, but how do you actually get into worshipping Hypnos?
Oh this my friend is the easiest part! Worshipping Hypnos can be anything you desire, it can be something as simple as just saying goodnight to Him before you sleep. You do not need some sort of initiation to worship Hypnos, you can do it right right now! Some forms of worshipping include but are not limited to:
devotional acts
creating art
creating poetry
praying to Him
thinking of Him
wearing clothes that reminds you of Him
It can be anything :) For any devotional acts ideas from us, you can check the links in our pinned!
4.Create/Find an Altar
Making a basic hellenic shrine <- this shrine can be adapted to Hypnos using these associations or these ones
You can also make a digital form of shrine using a tumblr blog, a pinterest board, or other forms of social media. Or you can also use a simple notes app or picture folder! All you need to do is reblog or put into these pictures or art that reminds you of them! You can return to these spots and pray to Hypnos!
We mentioned find because this temple may also be a place of refuge and worship to Hypnos! You are allowed to submit offerings, dream journal entries, art, and more! This temple is your altar!
Congrats! You have worshipped Hypnos just by reading this post! It is so easy, and Hypnos be along your side always!
#hypnos worship#hypnos deity#hellenic polytheism#hellenic pagan#hellenic deities#pagan#deity worship#hypnos devotee#helpol#hellenism#hellenic gods#hellenic polytheist#hellenic#paganblr#paganism#hypnos devotion#devotional act#devotional acts#theoi worship#theoi
101 notes
·
View notes
Text


Finished Art Academy (Nintendo 3DS) Introductory Course Lessons
In between projects, I've been doing some research for a video I want to produce on my YouTube Channel. Recently I have rediscovered my New Nintendo 3DS (yes, "New" was actually part of the name in the last line of 3DSes), fell in love with it, and wanted to experiment with Art Academy: Lessons for Everyone.
The thing that attracted me to Art Academy was that it was a game that promised to teach real world art techniques for beginners and experts to enjoy. Though my video idea is still in a valuable state, I want to see how well they translate over but, rather than jump in blind, I needed to do basic research and experience some of the lessons myself to help guide how I would do this. I'll probably speak more on this when production actually starts but for now, this is where I am at.
I wanted to share some of the pieces I created within the Art Academy game, following along with the lessons, and what I have found. The most difficult part for me was not so much the rather small screen size but how the screen is NOT pressure sensitive and I would have to stop myself from literally stabbing the stylus into the screen to make the brush stroked bigger/bolder.
That said, I am actually impressed with not only the lessons but how well the game performs as a digital art software. It is no Photoshop or Procreate but, in many ways, I almost prefer it over those programs. Rebelle 7 is probably the closest app to how Art Academy's drawing program functions. While in both Rebelle 7 and Art Academy you paint in a very real world way to get the color you want, Art academy allows you to add water directly to the paint where Rebelle 7 only allows you to increase or decrease the amount of water if using the watercolor brush tool. If there is a way to add water to paint using the Acrylic / Oil brushes, I haven't found how to yet.
#digital artist#digital art#digital painting#digital drawing#art#artwork#artists on tumblr#contemporary art#my art#still life#digital illustration#drawing#fuit#cherry#landscape#trees#mountains#nature#koi#koi pond#koi fish#ocean#seascape#beach#windmill#landscapes#tulip flower#tulips#flower#field
25 notes
·
View notes
Text
by Michael Brockbank
Reedsy Book Editor
Atticus
Scrivener 3
Campfire Writing
AutoCrit
Grammarly
What Features Do I Look For in Writing Apps?
Every author finds value in different features. The best writing apps are the ones that work for you. There’s absolutely nothing wrong with using programs like Word or LibreOffice to write a manuscript.
Yet, I chose the above based on the criteria I’m looking for in a writing tool.
Setting Writing Goals
I love creating goals and challenges in my writing. It’s one of the ways that I keep myself motivated and determined to finish certain projects and meet self-imposed deadlines.
Goals can also help you build confidence, especially if you’re consistently meeting them and then raising the bar.
Taking Notes and Storyboarding
The ability to have notes displayed on the same screen as the manuscript is wondrous, in my opinion. I often forget a lot of details as I write, and having a pinned note in plain site helps me remember.
In addition, any app that has some kind of storyboarding platform or background manuscript planning is incredibly useful.
Easy Sharing with Others
I like to share my work easily with beta readers or anyone who is helping me edit. Sure, I can copy and paste the manuscript into a Google Doc, but then that’s an extra step that I’ll forget to later delete.
When you’re as busy as I am, you want to simplify the process as much as possible.
Front & Back Matter and Chapter Setup
Writing apps that have pre-made, editable front and back matter are very beneficial. Especially for those who are new to self-publishing and not sure what to add to their books or how to format the pages.
If an app also has a quick and easy way to add, move, or delete entire chapters, all the better.
Export File Types Support
Although most eBook retailers and print-on-demand services support DOCX files, I prefer to have the option for ePub, MOBI, PDF, and other file types as well.
This is mostly because I plan on selling my books directly from my website. Not to mention I don’t like the idea of an editable doc floating around of my book.
Built-in Spellcheck or Support for Grammarly
No one is 100% accurate 100% of the time when it comes to spelling and grammar. Any app that has functionality for this is essentially a time saver.
If it doesn’t, then hopefully it supports the Grammarly Chrome extension. Otherwise, I’ll have to copy and paste the manuscript back and forth, which is a bit of a pain.
Affordability
Lastly, not everyone has a spare $4000 laying around for self-publishing fees. It’s my goal to find the most affordable platforms that offer the biggest bang for your buck while writing a book.
#writing software#writing tools#programs for writers#Reedsy Editor#Atticus#Scrivener#Campfire Writing#AutoCrit#Grammarly
15 notes
·
View notes
Text
Here are seven ways to make programming more engaging for beginners.
Introduction
For newcomers, programming might be frightening. For many, the new material's syntax, logic, and sheer amount might be depressing. Nonetheless, programming doesn't have to be very difficult or tiresome. Programming can be made more engaging and fulfilling by incorporating innovative, enjoyable, and useful methods. This article will examine seven methods for improving novice programmers' engagement, which will make learning programming easier and more pleasurable.
1. Start With Visual Programming Tools
Start with visual programming tools like Scratch, Blockly, or Tynker before writing complex code. Using these platforms, novices can drag and drop code blocks to construct simple programs, games, and animations. Visual tools make learning more interactive and enjoyable by breaking down complicated programming concepts and provide instantaneous visual feedback.
Benefits:
Improves understanding of programming fundamentals.
Allows newcomers to see the effects of their efforts immediately.
Encourages creativity through cartoons and games.
2. Focus On Interactive Learning Platforms
Students can write code directly in their browsers and see the results in real time with interactive classes offered by platforms like Codecademy, Khan Academy, and freeCodeCamp. These platforms often provide assistance or instant feedback and break down programming into manageable tasks. Interactive learning helps users solve difficulties and keeps the learning process moving forward while lowering irritation.
Benefits:
Immediate feedback allows for easy error correction.
Lessons are organised into convenient parts.
Gamified learning systems can help to sustain engagement.
3. Work On Real-Life Projects Early
Learning programming through real-world applications increases its relevance and fun factor. Novices can concentrate on projects that pique their interest, such creating a simple app, automating a tedious task, or creating a personal website. Students get a feeling of purpose from real-world projects, which piques their interest in coding and makes them more enthusiastic about it.
Benefits:
Improves understanding of theoretical concepts.
Increases confidence as students create actual things.
Offers a clear purpose and a sense of accomplishment.
4. Learn Through Games
Learning programming can be facilitated by creating or playing games. Some examples of platforms and games designed specifically for teaching programming are CodeCombat, Robocode, and CheckiO. Through the resolution of code puzzles, students advance in these games that transform coding assignments into adventures.
Benefits:
Creates a fun and competitive learning atmosphere.
Encourages critical thinking and problem-solving skills.
Engages students who may find standard lessons unappealing.
5. Incorporate Pair Programming
When two programmers work together on a single task, it's called pair programming. Real-time code reviews are performed by one person after it has been written. Through discussion and shared knowledge, this collaborative learning approach helps students acquire problem-solving methods while also making programming more socially engaging.
Benefits:
Promotes teamwork and communication skills.
Provides fast feedback and reduces errors.
Helps to overcome learning plateaus through shared expertise.
6. Celebrate Small Wins
Programming can occasionally seem like a laborious process with little payoff, especially when faced with challenging problems. It's crucial to acknowledge small accomplishments in order to stay motivated. Acknowledging successes, no matter how small, can give much-needed morale support.
Benefits:
Encourages an optimistic approach to learning.
Recognising progress helps to boost confidence.
Reinforces a growth mentality, increasing learners’ resilience.
7. Join Coding Communities
Learning to program could be more enjoyable if you're a part of a helpful group. Newcomers can participate in local coding meetings and online forums like Stack Overflow and GitHub. These websites offer opportunities for collaboration, mentoring, and inspiration from people who share similar interests.
Benefits:
Access to a plethora of common knowledge.
Promotes collaboration on open-source initiatives.
Creates a network of mentors and peers to share experiences and insights.
Conclusion
By using these suggestions, learning to program doesn't have to be a daunting task; instead, it can be interesting and fun. In order to keep beginners interested in programming and inspired, we at the School of Coding & AI employ a variety of strategies, including interactive tools, real-world projects, and community involvement.
#coding#programming#branding#marketing#python#commercial#graphic design#student life#study motivation
26 notes
·
View notes
Text
Advanced Mahou Outfit Guide 💫
Hi guys! I hope you all are excited for more posts to come– AP exams are over, and soon school will be out for the year! To those who have upcoming school exams, or are in the final stretch of school, good luck! We believe in you :)
Also, another reminder to join Mahou Planet! We have a couple of Summer events we’re planning, gamenights, challenges, etc! It’d be lovely to have you join our endeavors ^^
Now that that’s over, are you guys ready for today’s guide?
👗 INTRODUCTION TO MAHOU FASHION
If you’re no stranger to the world of magical heroes, you’ll know that they have different outfits whenever they transform. Strikingly different outfits compared to how most of us dress on the norm. Advanced magical heroes will likely know what they’re searching for in terms of outfits, however, beginner magical heroes may not know where to start– that’s what this guide is for! In this guide, I’ll be discussing a couple of tips and tricks to create your magical hero outfit!
👠 HOW DO I GET STARTED?
To get started, I recommend following some of the advice that I shared on my concept basics post– especially with making lists. I recommend making bulleted lists of what you want/don’t want, specifically in outfits. For example, writing down “I want to wear a skirt” and “I don’t want heels” already narrows down a LOT of possibilities you have for an outfit!
Another recommendation is to decide a couple of concept themes before you create an outfit, so you can correlate your concept with your outfit. Knowing the basics can help you more than you think– know your desired motifs, colors, etc.
One more important tip, think about what you are comfortable wearing and what you’d like to embody as a magical hero. You can experiment with this by playing dress-up in your bedroom, fitting rooms, etc! Experiment with what you feel comfortable wearing in real life, so you’ll get an idea of what you’d like to wear while doing magic. If you can’t do this, then think about what you would like to wear as a magical hero. Maybe you want to try a new style, or (my personal motivation) defy societal norms/the “dress code” you were raised with. Basically, go out there and experiment!
💄 BRAINSTORMING IDEAS
Now that you have these new ideas layed out, it’s time to brainstorm! Go out in the real world or on the wonderful world wide web and search for some outfit ideas! Here are some helpful sources for finding outfits:
Pinterest is a STAPLE for inspiration. Some keywords I recommend are “magical girl”, “magical girl oc”, “magical girl oc design”, “(your aesthetic)core outfit”, “runway outfit” and “stage outfit”!
Research some magical hero animes/games for outfit ideas! Some I recommend looking at are Madoka Magica (more specifically Magia Record since there’s like 1000 magical girls there), Precure, Girls x Heroine, Cocoppa Play, and Pripara!
tumblr (this platform teehee) is also a nice place to search for inspiration! You can use the same keywords above, just with tumblr hashtags!
Play around with dress-up apps like Gacha Life 2, Dolldivine, Everskies, Picrew, and ROBLOX (I know a couple of avatar editor games, if you want me to drop them, just ask!)
Go window shopping (or shopping if you have the money) and look at magical hero-esque outfits! You can go thrifting, to the mall, online shopping, or look at other people’s everyday outfits!
🎨 DESIGNING THE OUTFIT: SECTION 1
Now that you have inspiration and plenty of ideas to go off of, it’s time to DESIGN! You can design your outfit with any method, from creating collages off of images, to using dress-up games, drawing your design, commissioning an artist, there’s endless possibilities!
The only method I recommend you don’t use is AI art. AI art not only takes credit away from actual artists, but AI art is environmentally harmful and the algorithm searches every image on the internet, including medical records and illegal and problematic images. Mahou Planet has a rule against using AI art: “There will be no AI art usage in this server. This rule is non-negotiable. Accidentally sending AI art without knowing is understandable and can be corrected by deleting the message, however, do not promote the usage of/use AI art.” I will not be willing to argue with anyone about the morality of AI art– know it is not supported by us. There are many better alternatives that can get you a better design, and most importantly- it’s a design that you (for the most part) create yourself!
There are lots of different factors to consider for your outfit design, such as whether you have teammates, uniforms, shared outfit motifs, outfit rules, etc. We’ll go over those in this section!
TEAMMATES
If you have teammates, it may be a good idea to correlate your outfits together to show that you’re a team.
For example, the magical girls in each Precure season have shared outfit motifs to show their team harmony. I think the Precure season that does this well is GoPri. The Cures in Go Princess Precure each have a tiara with a charm representing their outfits motif, princess-like dresses, a back bow, and a golden gem on their outfits. You can easily look at them and tell that they are a team.
Another example of this is of Winx (specifically S1)! The simplicity of their designs, the glittery fabric, the small wings, and the boots are all correlated, even though the girls themselves all stand out with unique takes on these rules.

Something to take from these magical girls is that they each have something to tell that they’re a team. If you are a team and want you guys to have shared outfit motifs, make sure that someone can look at a picture of your team and can tell that you guys work together.
A simpler solution to this is uniforms! Uniforms are basically a simpler way to coordinate your teammate outfits. One of the most famous examples of this is Sailor Moon: their outfits, besides some accessories, are the same. The only difference is the color scheme. This is easy for those who don’t want to design unique outfits, or want outfits to stand out in terms of color.
Here’s a more simplified list of the pros and cons of having uniforms VS unique outfits:
Uniforms
Easy to design
Takes little to no thought
Colors easy to pick out
Can be either simple or complex
Colors may be hard to remember for each member
Limited freedom of expression
Unique Outfits
Harder to design, but a more satisfied finish
Outfit and colors may be hard to remember for each member
Usually complex but some can be simple
Freedom of expression, or much freedom if there are still rules
Harder to coordinate
As you can see, I have a little bit more pros under uniforms. However, do what you want with your designs! I personally always go for unique outfits– some of the unique outfits I’ve seen in the magical hero community look STUNNING!
If you want to have unique outfits or uniforms, a good thing to implement is outfit rules. Rules are basically what you can and can’t do in a design. When I’m designing teammates, I have rules listed under DO, DO NOT, and IT DEPENDS categories.
DO is of stuff you can change, add, modify, etc. For example: you can have a unique hairstyle.
DO NOT is stuff you cannot change, no exceptions! Example: you must keep a bow on your chest.
IT DEPENDS is stuff you can modify, but may be limited. Example: You can change the shape of a skirt, but it must keep white ruffles and be in the color of your theme color.
These rules can vary based on your kind of magical hero and what you want for your team. Remember: you are the designer! Design to your heart's content and what you think looks good for you and your team! 💫
SOLO
If you’re going solo, this section may be a bit more helpful than what I said in the teammates section. Solo outfits usually apply to just yourself, so you have so much more freedom in designing your outfit. When making an outfit, don’t just focus on what looks good. Remember to design an outfit that makes you comfortable, and you only!
If you want to have teammates in the future, or if you need more guidance on creating outfits, then it’s recommended to create outfit rules, just in case. Or if you’d like 100% freedom on outfit designs, do what you want! It’s your outfit!
THEME COLOR
Choosing a theme color is easier said than done. I see most magical heroes choose their favorite colors as their theme colors, and I have also seen magical heroes put more thought in their theme colors. Do what you want! Even if you don’t want a theme color or want multiple, you are still a valid magical hero!
For color palettes for an outfit, you can go on Pinterest for colors, or go to coolors.co to generate color palettes! A cool thing about coolors is that you can save color palettes for your magical form!
MOTIFS
Motifs are also important to decide on your outfit! To decide outfit motifs, repeating elements in your outfit, think about the theme your magical hero wants to display, or a moral lesson you’d like for whoever you’re fighting/the general public to learn. If you’re a magical hero of love, you can opt for adding heart shapes and motifs to your outfit. If you’re a magical hero of wishes, add some shooting stars on your outfit! It goes on and on for any motifs, it’s all up to you to determine how you use them.
🎨 DESIGNING THE OUTFIT: SECTION 2
For this section, I’ll go over the more detailed aspects of your design, from top to bottom! I’ll give advice on designing outfits, as well as some practical tips for your magical design.
HAIR
Probably the most famous– magical heroes are notorious for their crazy hair. Most magical heroes you see have long hair, either down or in some updo, and in the color of their theme color or an accent color. Some magical girls have their hair be a variation of their natural hair. You can have any kind of hair you’d like as a magical hero! Here are some of my tips:
Make sure your hair won’t hinder your fighting abilities- it won’t get caught in your outfit, you won’t trip on it, etc. Also, make sure your villains can’t grab your hair to pull you/catch you off guard! This is a common fighting technique and I’ve seen this absolutely destroy people in school fights. If crazy freshman can do it, your villains likely will as well.
Don’t worry about your hair being “easily recognizable” if you’re keeping your natural hair. You can always script in that no one recognizes you or use magic to ensure no one associates you with your secret identity.
As for personal recommendations, I recommend having your hair out of your face. I have bangs in real life and in my magical girl form; sometimes they’re a pain, especially on hot days. It’d kind of hinder your ability to see in your magical form. A good counter to this would be scripting the thickness or thinness of your bangs if you plan on having any, or to script that you see better once you transform (this is good for people with glasses!)
Also recommend to script that you don’t sweat when you transform. Sweat + hair = pain.
Choose a hairstyle you can fight in and feel comfortable with– if you’re not sure where to start, think about hairstyles you would like to try or hairstyles that flatter you. Even hairstyles you wear in real life would be a good start!
Don’t worry about damaging your hair with the color you choose, I’d like to imagine magic changes your hair color, and is completely damage-free! (Really wish this were the case in real life 😭)
HEADGEAR
I know a couple of magical heroes who plan on having hats or SOMETHING on their head in their magical hero form. If you’re interested in having headgear in your magical hero form, here are some precautions and tips:
I don’t want to say it’s a hindrance to have a hat (because I literally wear an ushanka in my magical hero form 💀), but try to find some way it’ll stay on your head while fighting. Unless you don’t anticipate doing crazy backflips, I’d recommend scripting that your headgear won’t fall off even in the craziest situations– or even better, it can only be taken off by your hands only.
Also script that your hat (or better: your entire mh outfit) is the exact size for you, and grows as you grow in civilian form!
Try to find some practicality in it! I see magical heroes go for goggles to replace their civilian form glasses. Some magical heroes wear hats to keep the sun out of their eyes. I had an old concept where my magic came from a top hat (if you know, you know). Hats don’t just have to be fashionable, but I wouldn’t blame you if you wanted something cool just to finish off your outfit.
If you’re looking for hat designs, a good game I recommend for inspiration is Genshin Impact! The creativity the characters have for their headgear is amazing, and I can imagine some magical hero designs based off of just hats alone. Pinterest is also a good place to look!
TOPS
Tops! This is one of my favorite parts of designing! Designing tops is always really fun. Here’s some advice:
I recommend looking up necklines or just pretty tops in general for inspiration!
Also recommend to have a built-in bra with your top, wearing one separately would be a hassle in my opinion.
One of my biggest pet peeves with strapless tops is it falling down every 5 seconds, so if you have a strapless top, make sure you script that it won’t fall while you’re fighting.
This is the same for sleeves in general! Script they won’t fall down.
If you have anything tied in your magical form, like ribbons, script that they won’t come out or loose.
Make sure you choose something you’re comfortable with! Script that you’re comfortable in your top, no matter what kind of top you’re going to wear in your magical form.
PSA for magical heroes who want gloves: script that you can use your phone while wearing them. I hate wearing gloves and then having to take them off just to use my phone :(
If you aren’t planning on wearing gloves, script that you don’t leave fingerprint traces on surfaces you touch, just for security reasons!
I’d hate to continue the “YOU DON’T NEED PAINTED NAILS IF YOU’RE WEARING GLOVES DUHHH!!!!” debate, do what you want with your nails! Pinterest has gorgeous nail designs! If you are wearing gloves, I’d recommend making the color of your nails change the natural color of your nails. Long nails would probably be more of a liability than shorter ones, or you could script your nails are immune to breaking, getting damaged, falling off, etc.
A smart idea would be incorporating your outfit into some kind of use with your magic. For example, if your main weapon is guns, then I’d recommend keeping ammunition on your body, on a sling or a belt. This takes a bit more thought to be put into it, but it’s so worth it and makes a great design in the end!
BOTTOMS
Bottoms are also fun to design! In my opinion, these are the most versatile. There are different directions you can take for bottoms, SO many different directions! Here’s my advice and suggestions:
Go for what makes you the most comfortable! You are 100% a valid magical hero if you go for pants or shorts over a skirt and vice versa! It’s your outfit! If someone has a problem with how you present your magical self, they can kiss your- 💥💥/JOKE /ok but fr ignore people who have problems with your outfit they’re just insecure (/srs)
If you are planning on wearing a skirt, please script safety shorts or opt for a skort instead! I don’t think I should explain why flashing people while you’re fighting is not only embarrassing but dangerous since there are terrible and disgusting weirdos out there.
If you’re wearing socks, script that they won’t slide down (another pet peeve of mine)
If you want to wear heels, or if your shoes are high heeled, PLEASE script that you know how to fight in heels and won’t fall or trip! Been there done that, it’s not fun. Also scripting that your feet won’t get blisters is a good precaution too!
Also, if you’re wearing a back bow/something on the back/a cape, or anything you’re scared will catch up into something while moving, script that you’re not going to get stuck or nothing will catch your clothes while you’re moving.
MAKEUP
I feel like makeup is a less commonly talked about thing when it comes to magical hero design. I think makeup is also important to consider when you’re transformed! Here are some considerations:
Make sure your makeup is sweat-proof, sensory friendly, and won’t wipe off or get ruined while fighting. Emphasis on sensory friendly, I avoid makeup in civilian form because foundation is absolutely PAINFUL.
Search for makeup styles you like, or go off of makeup you wear or would like to wear in real life! You can go for natural makeup, glamorous makeup, stage makeup, etc.
Royale High on ROBLOX is a good game to look for makeup styles! The makeup in faces (to my knowledge) is free to use! Everskies is also a good game to experiment with makeup!
Tear proof makeup works as well, just in case you end up crying in your magical hero form.
🎤 GENERAL TIPS
Keep in mind the environment you’ll be fighting in may change depending on where you go. You may fight in the rain, in snow, on the beach, etc. It’d be a nice idea to accommodate your outfit for such conditions, or to script that your outfit is weather-proof.
Speaking of accommodations, if you’re disabled, it’s always a great idea to script accommodations for your outfit! You can script that your outfit is sensory friendly, isn’t itchy, and (my favorite) there are no tags on your magical outfit.
I also like to script that my magical outfit is able to regulate heat/coolness! This can work for any outfit, even if you can’t find the logic behind it. It’s magic! That’s all the logic you need!
Make sure you’re able to find some way you can fight in your outfit. Even if you don’t plan on fighting, it’s a good precaution!
Kind of TMI, but if you get periods, script that your outfit is bleed-proof. This is also good if you end up getting hurt in your outfit. Also scripting that your outfit’s immune to tearing or getting injured is a great idea!
A fun way to experiment with how your magical hero outfit may look is to take a full body picture of yourself and then draw over it with your magical hero clothes. You can also dress in aspects of your magical hero outfit in real life with items you have at home (ex. wearing a top similar to the top in your magical hero form) to get a feel of what you’ll be wearing.
If you need design help, I suggest joining Mahou Planet! There are great magical hero designs there and talented designers willing to help you! Searching for inspiration, meshing different pictures of outfits together, and asking friends for help are also valid methods!
💫 CONCLUSION
In conclusion, there are about a gajillion different ways to create a magical outfit. There’s not one right or wrong way to design, or a “bad” or “good” design: what matters is that you’re comfortable in it and that it’s an outfit you love! Outfit changes are 100% valid, and I’d even recommend scripting variations of your outfit for weather/personal reasons!
At the end of the day, designing should be a fun process. I hope you guys learned a thing or two from this post, and have fun designing your magical hero outfit! Remember to join Mahou Planet to have a chance to choose the next article I write!
See you guys next post!
(idols: yeojin - loossemble, jinsoul, choerry, kim lip - artms, mina - twice, ella - pixy, gowon, hyeju - loossemble, gwsn ot7, stayc ot6)
#magical girl#manifestation#irl magical girl#magic#subliminals#mahou shoujo#mahoucore#manifesting#loa#magical girls
51 notes
·
View notes
Note
Hiii ,
I love your work so much I’m kind of new to tumblr and wanted to know how to add the animated boarders like the spinning one you’ve created. I apologize if it’s easily searched
Hii! No worries, tumblr can be a bit confusing for beginners. So, the answer varies ever so slightly depending on if you use mobile or web for tumblr.
More under the cut:
Mobile:
Hold down on the image and once the little drop down of options comes up, save it to your photos like this:

Then once you’re ready to use it just add it to the post with this button:

And bam! It should show up and you just put it wherever you want on the post.
Web Version:
So honestly, I rarely use the web version when I’m posting unless I have more than 10 images (the max you can add on mobile) just because I find the app easier. BUT it should be pretty similar on your phone if you’re using safari/chrome/opera etc.
The biggest difference is when you’re adding an image, you tap this little guy instead:

And then this:

I think it should be similar if you’re on desktop? But I’ve never tried it before because I use my phone or iPad for most of my graphics.
Anyway, I hope this helped a bit. I’m not the best at explaining things but I gave it a shot.
I’m gonna add this to my guide for making and using my (or other divider blog’s) graphics, in case anyone else needs help too. You’re definitely not alone in struggling to navigate tumblr out the gate. 💗💗
9 notes
·
View notes
Text
SysNotes devlog 2 - retrieving data from the database and NEW profile features!
Welcome back to my SysNotes update! SysNotes is a system management app for people with DID, OSDD, and those who are otherwise plural.
Today I will flesh out the backend of the application (which was completely missing in the first devlog) and add some new profile fields.
First Devlog (1) | Previous Devlog (1.5)
Pulling data from the database and populating the profiles
If you remember, in the first devlog I used hardcoded data to test the interface like so:

Storing data in code is not sustainable or maintainable, so in devlog 1.5 I have identified the most suitable database structure, created some tables, and filled them with test data. To populate the tables I generated dummy data using the Faker library which uses random Latin words to create sentences. This was the result for the Alter Profiles table:

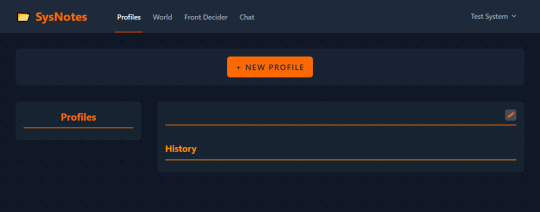
First, let's delete the hardcoded data from the code. Wow, the user interface is looking so empty now!
I already implemented the basic code for processing alter data and displaying it on the page in devlog 1. However, I had to make some tweaks to it due to the nature of database queries.
Firstly, when loading Alter Profiles for the side menu, I'm only selecting their name and ID, without the other fields (description, history, etc). A common mistake beginner developers make in simple cases like this is retrieving the entire DB record. But the side menu does not need the extra information, and loading it in alongside the name would make the page slower!
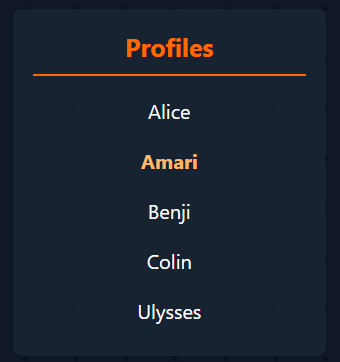
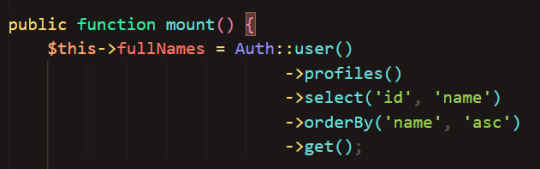
You may also notice that I'm getting the names in alphabetical order - I thought this would look nicer on the sidebar than if the names were all random, and make it easier to navigate. I'm only getting the profiles that belong to the current user.
When I get the actual profile data, I retrieve it with its status and characteristics, which are stored in separate tables:

And here we go, the profile page now uses the data stored in the database!
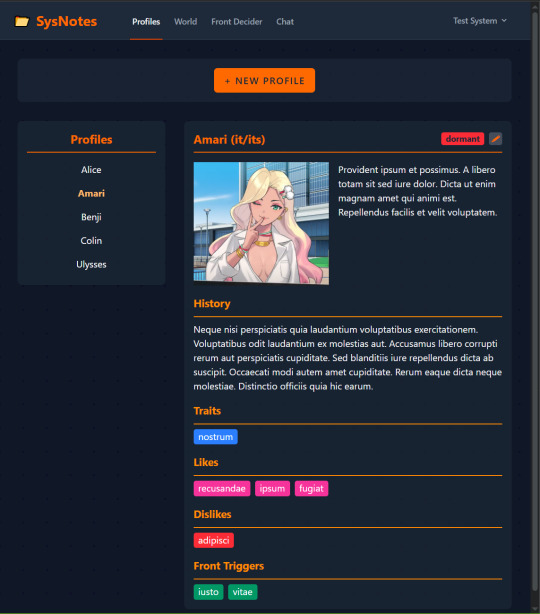
New profile features
But this is all just using the the proof of concept profile fields I mocked up in devlog 1. In this devlog, I want to add NEW fields to allow the profile page to do more powerful things, and better integrate with the future features of Inner World and Front Decider (still looking for a better name for it 😩).
(By the way, I assigned the Ulysses profile to a different user for testing, so you won't see that profile in the sidebar from now on)
Alter origins
One new profile field I've been wanting to add is an alter's origins. Some of my alters split from trauma, others from loneliness, and others through being AuDHD. I created a new table called "Alter Origins" with an optional owner ID. This means that some origins are universally available to all users, while others can be created by users themselves to customize their profile. In this example, "stressgenic" is a custom origin my user (Test System) created.
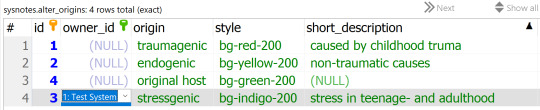
To use this table, I need to connect it to the Alter Profiles table using a foreign key:

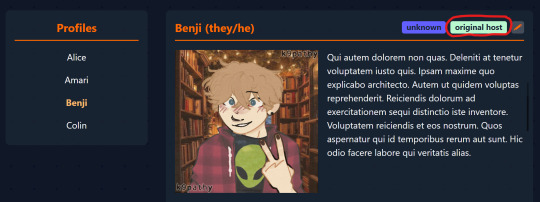
Now we can access it on the front end!
(It shows on the top line, highlighted red)
Side note: I had issues with most Tailwind v4 colors not working so I had to manually define the origin badge color classes based on the official Tailwind values 😓 I'm not sure how to fix it, I wanted to leverage Tailwind to allow users to select "custom colors" from the Tailwind palette... I'll look into it at another time.
Relationships
I wanted the ability to set up bidirectional relationships between alters and display them after the character traits area.
I created an Alter Relationships table with some relationships and their badge colors:
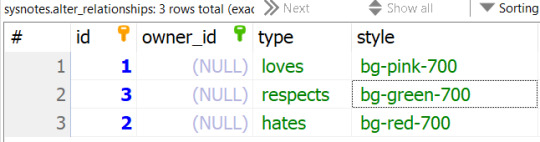
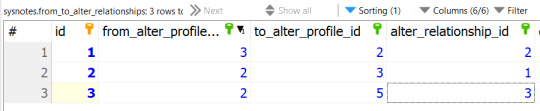
And then I created a pivot table where alter 2 is Alice, alter 3 is Amari, and alter 5 is Benji:
Now if we go to Alice's page, we will see:
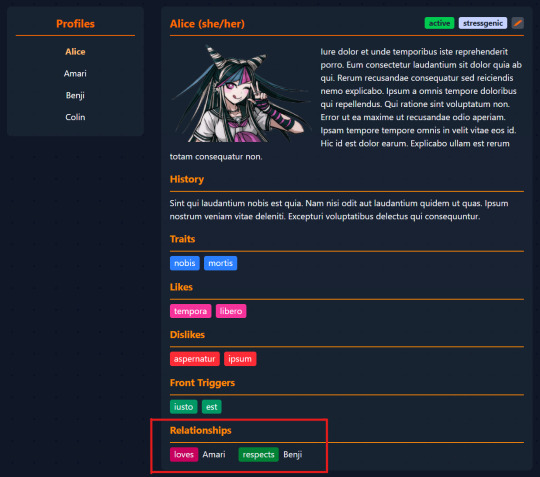
And Amari's will show:
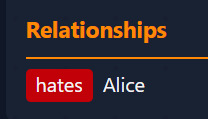
This feature took a long time to implement because I ran into some issues with the pivot table and model relationships. I'd be lying if I said I have a good grasp of Eloquent 😅
Alter categories
One last thing I want to add in this devlog is to add custom categories that the names in the sidebar could be sorted into, which would be helpful for systems with many alters (or those who want to store their alter data and OC data in one place but want to distinguish between them, like me).
I will add some default categories to the database - however, you will be able to add new custom categories to suit your needs. I also want each profile to have one OR MORE categories for flexible filtering. This means, annoyingly, that I have to tinker with yet another pivot table 😩
Here is my Alter Categories table. Like with origins and relationships, "owner_id" refers to the user who made the category, and NULL categories are available to all users.
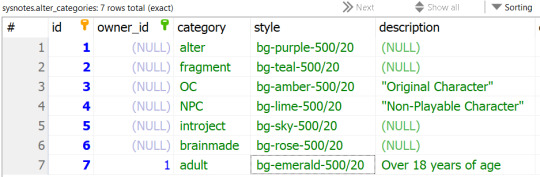
The pivot table looks like any standard pivot table so I'll omit it for this feature. I've had enough of pivot tables. Luckily, I got the model relationships correct the first time 😎
And now, Alice's profile shows her categories under her relationships:
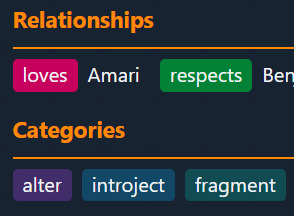
(And here are all the category badges so far)

But this isn't all! I want to be able to filter my profiles by category in the sidebar.
Let's create a drop down! I think this looks alright:
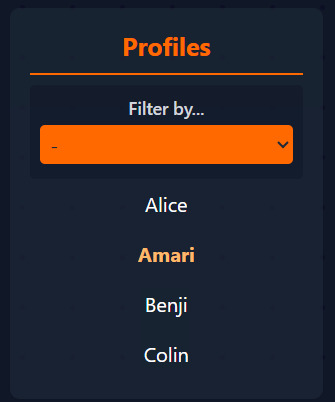
Now let's load the categories of our available profiles into the dropdown. For this, I will need to fetch the categories table when getting the profile names.
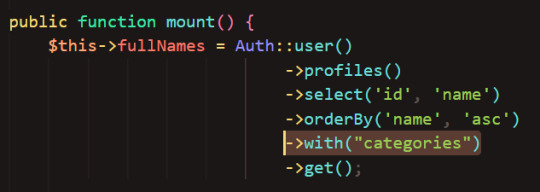
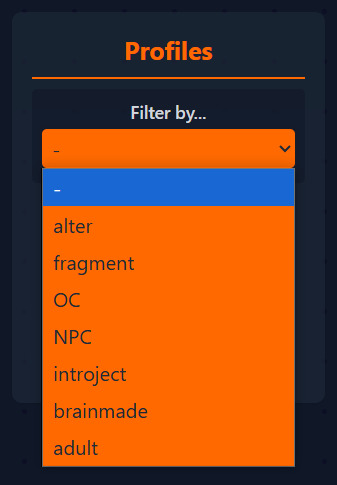
The dropdown code basically takes the array (list) of all profiles, compares each profile's category to the selected category, and adds them to the array of filtered profiles, then displays them. If the selected value is "-" it just displays the full list of profiles.
And here we go, our fragments are Alice and Colin:
I also wanted to add the ability to group profiles by their categories (e.g. grouping by Age will split the names in the side bar into "syskid" and "adult" boxes). But this devlog has gone on for quite a while, so I'll save that for another time ;)
What next?
I wanted to finish the whole Profile section and move on to the more exciting inner World and Front decider features, however the complexity of the profile section so far requires me to spend a few more devlogs on it, oops 😅 So here is what you can expect in the next few devlogs:
Rethink the User Interface of the Profile page (all these badge colors are getting messy! And is the current layout the best for displaying the data? Find out next on Dragon Ball Z!)
Add a way to create new profiles using the New Profile form
Add ability to edit the profile information and delete profiles
Do you have ideas on other fields and features I could add to SysNotes? Or maybe you have suggestions on how to clean up the UI? I'd love to hear your thoughts! Thanks for reading 🙌
6 notes
·
View notes
Note
Hey Q! Sorry for bothering you, but for some reason I can no longer find any of your tik tok accounts 😭 Did they get deleted or something?
Hi this is Q! I’m coming out of the woodwork to address this, since I did went radio silent out of the blue so it’s not a bother at all
The short answer is Yes, I deleted my tiktok
Yes delete not deactivate, I’m not coming back to That app or IG or Twt, I deleted my socials except here and YouTube, I honestly felt so overwhelmed with everything, I realized I’m not even posting for myself anymore there. A lots of people crossed my boundaries time and time again I felt so helpless, bitter with myself. I guess I was just overwhelmed with the attention I got; both positive and negatives ones.
Im done and I want to start over so that’s why I’m here and on YouTube, I already posted some of these on my community tab on YT but here’s what I have in mind for the future of the content I want to create: more detail under the cut, and also;
CW: very brief mention of spiraling, harm inflict oneself or others, paranoia, etc
•Long-form content: my attention span is a bit messed up from consuming and making short-form content to the point where I can’t focus in university. I want to create something meaningful. It’s not that my previous content was not meaningful, no. I had fun and no time is wasted when I have fun, it was warm… but as I mentioned earlier, I just felt this lingering bitterness the longer I stayed making those short-form content. It really felt like I was on the verge of losing it. Especially with how the bigger following I have the less people think of me as a person than just another content creator you see on the internet,
I want to create long-form content, I’m so tired of forcing myself to generate 15 second content. On tiktok it just feels like I’m just creating and not really connecting. I want to try something new, maybe create an open space for meaningful discussion in the comments. I don’t think I can stand another copy-paste tiktok comment anymore. You know what I meant if you’re frequent on that app.
•Art Content with Commentary: and don’t worry this won’t be those petty artist drama issue, but I will still cover anything serious
it could be love letters or video essays ranging from fan fictions, fandom culture, the art scene and so much more. I may even share a bit of my personal life, this will be self indulgent after all! I want to make it fun for myself and as well to those who comes across my channel. I really REALLY want to create a genuine following.
On tiktok it’s so easy to gain following but not so easy to retain them, it’s mostly because of the algorithm and the FYP feature there.
On Tiktok most content that would get featured as an artist there would be creative work has to be either; more than exceptional which is pressuring enough already to consistent posters, straight up suggestive content shown to minors (tiktok doesn’t really have a blocked keywords feature but it’s so disheartening to see these creators intentionally not using the sensitive warning since it could limit their reach significantly) oh yes we can’t forget the negativity surrounding beginner artists or “art lore”
All of this cesspool of negativity, it’s a whole can of worms but it will be one of my prominent topics that I wish to discuss in my future art commentaries. I hope you guys are looking forward to those! I might bring in a few people or so to talk about it with me
and finally;
•Streaming: I used to do a lot of streams during the weekends on the clock app and it was super fun! I want to bring that back but that would have to wait since I’m unfamiliar with some features on YouTube, and I’m aware that YT does not have a discoverable feature for stream but that’s alright, I want to start something small first.
In short; I’ll figure it out! just need some baby steps before I start streaming again.
.
I apologize for deleting everything out of the blue, if I’m gonna be honest it was partially planned because I’ve been thinking about deleting my tiktok, twitter and Instagram for a while now but how it happened? In my breakdown I realized that I don’t want anyone to see me spiral, especially now that I realized how young my audience are, I’m not sure how that happened but I guess posting fandom contents does attract the young ones somehow inevitably, even though my content is nowhere near as suggestive, but I do talk about serious topics from time to time… but I digress, its not fair for them to deal with me if they see me spiral publicly,
it is especially not fair to them to console me. When I was younger than 14, I’ve been in a position where I have to talk down someone who was older, maybe 4-5 years older than me, from harming themselves or anyone, it was traumatizing and unpleasant. I don’t wish for anyone to go through that, it’s very painful.
It’s been… hard for me to ground myself. Ive been seeing things through a kaleidoscope of emotions; I was trying to focus on everything but it’s just too overwhelming so eventually I cracked. But please don’t worry I’ve been doing better now, after some time away from my online persona, and of course spending time with my beloved girlfriend, I see things much more clearly now.
Thank you to anyone who read this and much so appreciate those who understand where I’m coming from
Also now that I think of it can my stuff be considered as lost media now? Amazing! But please don’t be sad the fun I had was genuine!

Thank you again to those who genuinely enjoyed my content on tiktok but it’s time for me to try my hand at something new, I will still be dwelling in my creative headspace just.. away from public for now,
if you’re looking forward for my future post, make sure to check out my YouTube! I still have a lot I need to cook hehe, this is one of the few!
More post soon, Bye bye! -Q
#vent#mental health#mentions of unhealthy habits#I’m not sure how to tag these but I’ll try my best!#social media#q myers#tiktok#burnt out#creative fatigue#sorry for the rant#rant#content creator#art community
91 notes
·
View notes
Text
Python for Beginners: Launch Your Tech Career with Coding Skills
Are you ready to launch your tech career but don’t know where to start? Learning Python is one of the best ways to break into the world of technology—even if you have zero coding experience.
In this guide, we’ll explore how Python for beginners can be your gateway to a rewarding career in software development, data science, automation, and more.
Why Python Is the Perfect Language for Beginners
Python has become the go-to programming language for beginners and professionals alike—and for good reason:
Simple syntax: Python reads like plain English, making it easy to learn.
High demand: Industries spanning the spectrum are actively seeking Python developers to fuel their technological advancements.
Versatile applications: Python's versatility shines as it powers everything from crafting websites to driving artificial intelligence and dissecting data.
Whether you want to become a software developer, data analyst, or AI engineer, Python lays the foundation.
What Can You Do With Python?
Python is not just a beginner language—it’s a career-building tool. Here are just a few career paths where Python is essential:
Web Development: Frameworks like Django and Flask make it easy to build powerful web applications. You can even enroll in a Python Course in Kochi to gain hands-on experience with real-world web projects.
Data Science & Analytics: For professionals tackling data analysis and visualization, the Python ecosystem, featuring powerhouses like Pandas, NumPy, and Matplotlib, sets the benchmark.
Machine Learning & AI: Spearheading advancements in artificial intelligence development, Python boasts powerful tools such as TensorFlow and scikit-learn.
Automation & Scripting: Simple yet effective Python scripts offer a pathway to amplified efficiency by automating routine workflows.
Cybersecurity & Networking: The application of Python is expanding into crucial domains such as ethical hacking, penetration testing, and the automation of network processes.
How to Get Started with Python
Starting your Python journey doesn't require a computer science degree. Success hinges on a focused commitment combined with a thoughtfully structured educational approach.
Step 1: Install Python
Download and install Python from python.org. It's free and available for all platforms.
Step 2: Choose an IDE
Use beginner-friendly tools like Thonny, PyCharm, or VS Code to write your code.
Step 3: Learn the Basics
Focus on:
Variables and data types
Conditional statements
Loops
Functions
Lists and dictionaries
If you prefer guided learning, a reputable Python Institute in Kochi can offer structured programs and mentorship to help you grasp core concepts efficiently.
Step 4: Build Projects
Learning by doing is key. Start small:
Build a calculator
Automate file organization
Create a to-do list app
As your skills grow, you can tackle more complex projects like data dashboards or web apps.
How Python Skills Can Boost Your Career
Adding Python to your resume instantly opens up new opportunities. Here's how it helps:
Higher employability: Python is one of the top 3 most in-demand programming languages.
Better salaries: Python developers earn competitive salaries across the globe.
Remote job opportunities: Many Python-related jobs are available remotely, offering flexibility.
Even if you're not aiming to be a full-time developer, Python skills can enhance careers in marketing, finance, research, and product management.
If you're serious about starting a career in tech, learning Python is the smartest first step you can take. It’s beginner-friendly, powerful, and widely used across industries.
Whether you're a student, job switcher, or just curious about programming, Python for beginners can unlock countless career opportunities. Invest time in learning today—and start building the future you want in tech.
Globally recognized as a premier educational hub, DataMites Institute delivers in-depth training programs across the pivotal fields of data science, artificial intelligence, and machine learning. They provide expert-led courses designed for both beginners and professionals aiming to boost their careers.
Python Modules Explained - Different Types and Functions - Python Tutorial
youtube
#python course#python training#python#learnpython#pythoncourseinindia#pythoncourseinkochi#pythoninstitute#python for data science#Youtube
3 notes
·
View notes