#vine growing and pruning tips
Text
Vine Training Tips

Vineyards are a symbol of sophistication and a source of delightful wines that have enchanted palates for centuries. However, a successful vineyard doesn't come about by mere chance; it requires meticulous planning, hard work, and expertise in vine training techniques. Vine training is the practice of guiding grapevines to grow in specific ways to optimize sunlight exposure, manage grape yields, and ultimately produce high-quality fruit. In this article, we will delve into essential vine training tips to help vineyard owners achieve a bountiful harvest and produce exceptional wines.
What is Vine Training?
Vine training is an ancient practice that involves shaping grapevines to grow in a particular pattern, ensuring the vines receive adequate sunlight and air circulation while preventing overcrowding. By guiding the vines' growth, vineyard owners can improve grape quality, disease resistance, and overall vineyard productivity.
Benefits of Vine Training
Advantages of Vine Training
Vine training offers numerous benefits to both the vines and the vineyard owners. Some of the advantages include:
Enhanced sun exposure: Properly trained vines allow sunlight to reach all parts of the plant, promoting even ripening of the grapes.
Disease prevention: Good airflow reduces the risk of fungal diseases, which can thrive in damp and shaded vine canopies.
Controlled grape yields: Vine training helps manage grape production, leading to better fruit concentration and flavor intensity.
Efficient vineyard management: Well-trained vines are easier to prune, harvest, and maintain, optimizing labor efficiency.
Aesthetically pleasing vineyards: Thoughtfully trained vines create a visually appealing landscape, adding to the vineyard's allure.
Types of Vine Training Techniques
Popular Vine Training Methods
There are several vine training techniques practiced worldwide, each with its unique characteristics. Some common methods include:
Cane Pruning: This method involves selecting one or two canes to train along the trellis wires, with other canes removed.
Spur Pruning: In this approach, short spurs with two to three buds are retained and trained along the trellis.
Guyot System: A variation of cane pruning, where one cane is trained horizontally, and another is pruned back to a spur.
Scott Henry System: This system uses vertically divided canopies, maximizing sun exposure for each vine.
Head Training: The vine is allowed to grow with little intervention, often used for bush vine or free-standing vines.
Selecting the Right Vine Training Method
Choosing the Best Method
The selection of a vine training method depends on various factors, such as grapevine variety, climate, soil type, and desired wine style. It is crucial to consider these elements to ensure the chosen method aligns with the vineyard's specific requirements and goals.
Preparing for Vine Training
Steps for Preparing the Vineyard
Before commencing vine training, adequate preparation is essential. Follow these steps to set the stage for successful vine training:
Soil Analysis: Conduct a thorough soil analysis to understand its nutrient composition and pH level.
Choosing the Right Site: Select a suitable location with proper drainage, sunlight exposure, and air circulation.
Installing Trellis Systems: Install the trellis system that complements the chosen training method.
Vineyard Layout: Plan the vineyard layout, accounting for row spacing and vine orientation.
Pruning Existing Vines: If the vineyard has established vines, prepare them by pruning to the desired form.
Implementing Vine Training
Applying the Training Techniques
Once the preparation is complete, it's time to implement the vine training technique. The process may differ based on the chosen method, but the following general principles apply:
Gentle Handling: Handle the vines with care to avoid damage and shock during the training process.
Tying and Training: Use soft ties to secure the vines to the trellis wires, guiding them along the desired path.
Removal of Suckers: Remove unwanted shoots that may divert energy away from the main vine.
Positioning of Shoots: Position the shoots to achieve optimal sunlight exposure and airflow.
Caring for Trained Vines
Maintenance of Trained Vines
Maintaining trained vines is vital to their long-term health and productivity. Here are some essential care practices:
Regular Pruning: Prune the vines during the dormant season to remove excess growth and promote fruiting wood.
Irrigation Management: Provide sufficient water to the vines, especially during critical growth stages.
Fertilization: Apply appropriate fertilizers to ensure the vines receive essential nutrients.
Pest and Disease Control: Monitor the vineyard regularly and take necessary measures to prevent and manage pests and diseases.
Troubleshooting Common Issues
Dealing with Vine Training Challenges
Despite the best efforts, vine training may encounter challenges. Some common issues and their solutions include:
Uneven Growth: Adjust vine positioning and trellis wires to ensure even exposure to sunlight.
0 notes
Text
I finally got around to writing a fic I’ve been thinking of for ages, based on my headcanon here about Amity visiting Manny’s grave. To anyone who’s missing their dad today: I’m so proud of you just for sticking it out. Please take good care of yourself.
Amity finds Willow in the garden, of course, but can’t bring herself to call out to her. She spends a minute, then two, going over things to say in her head, but everything sounds awkward or strange, and she doesn’t know how to ask, until—
“Amity?”
Willow turns around.
“Hey,” Amity says, lifting her hand in an awkward wave. “Can I ask you for a favor?”
Willow puts her pruning shears on the ground and nods. “Sure? What’s up?”
“Could you grow me a bouquet?”
The confusion melts from Willow’s face, replaced with glee. “Aww, is it for Luz?”
Amity opens her mouth. Pauses. Considers. “Sure,” she says finally.
Willow’s brow furrows, but it smooths again so quickly Amity wonders if she imagined it. “What kind of flowers would you like?” she asks.
Amity picks up the book of flowers and meanings on the little table by the back door, the one Luz got Willow from the library when she expressed an interest in growing human flowers but needed pictures for reference. She flips through it until she lands on the pages marked with matching Hecate and Azura bookmarks Luz made her and says, “blue hydrangeas and pink carnations.”
Willow looks over the pictures and calls a ring of beautiful blooms up from the ground, picking them one by one and handing them to Amity.
“They’re perfect,” Amity says sincerely. “Thank you.”
Willow smiles and rubs the back of her neck. “You know, if you ever want to learn how to grow them, I’d be happy to teach you.”
Amity blinks. She’s gotten used to glyphs, but the idea of learning another one of the official tracks feels new, and a little startling. She pictures growing a bunch of vines in front of her mom, reveling in the horror on Odalia’s face right before she smacks it off her, and finds herself smiling.
“I’d like that,” she says, and Willow smiles, too.
It’s on the tip of her tongue to offer to teach Willow about abomination magic, but she swallows the words. They would be sincere, unlike the other times she’s offered over the years, but she knows they would be less of a help than salt in a wound. Willow’s smile turns a little knowing, as if she can see the wheels turning in Amity’s head, and she pats her shoulder before turning back to her plants.
Amity scribbles a quick note saying she’s gone out on a walk and lets herself out the front door, starting down the road Camila drove them all down the day after she arrived, when she took them on a tour of the town. It had mostly been houses for the first few blocks before towering trees replaced them. A single road went through the forest, and though Camila didn’t drive down or even look at it, Amity had registered the words on the sign beside it: Gravesfield Cemetery.
It takes longer to walk to it, but Amity reaches it in about fifteen minutes. She shivers despite herself as she reaches the shade of the trees, the road feeling haunted already.
She shivers even harder when, between the trees, towering stones begin to appear. The path turns into more of a clearing, revealing rows and rows of graves that start out on dry land before descending into a sort of lake. His should be new enough to be close to the path, she decides, and begins moving row by row, scanning the names until she finds it.
His name was Manny.
She takes a deep breath, suddenly and inexplicably nervous, and kneels before his stone, gently setting the flowers down beneath the name. She opens her mouth, but her breath is coming too quickly for her to get any words out. She closes it. Forces herself to inhale deeply through her nose. Tries again.
“Hi, Mr. Noceda,” she says. “My name is Amity Blight. I’m Luz’s girlfriend. She’s… she’s probably the best thing that ever happened to me. And she only exists because of you. I wanted to thank you for that, and Luz mentioned you liked flowers, so…”
She trails off, unsure of where to go next, and jumps when another voice fills the void.
“Looks like we had the same idea.”
Amity gasps, brushing dirt off of her shorts and whipping around. Luz is smiling at her sadly, a bouquet of pink, purple, and blue flowers in her hands. Amity doesn’t know their names, but the colors are familiar; they’re the same ones on Luz’s flag.
“Luz! I’m so sorry, this was weird, wasn’t it—“
“No, no, no!” Luz shifts her flowers into one hand and takes Amity’s hand with her other one. “It’s sweet, really. I wanted to introduce you to him, I just… well, I know the whole coming-out thing made it harder than it had to be to tell my mom. I didn’t want to make you sad.”
Amity shakes her head. “Luz. Your dad is important to you. That means this is important to me.”
Luz smiles at her and blinks quickly, trying to dispel the tears in her eyes. She turns to face the grave and gently lowers her flowers to sit beside Amity’s.
“Hi, Dad. I’m bi.”
Her voice breaks on the last word, and Amity wraps her arms around her, lowering them both gently to the ground as Luz reaches up to wipe her eyes. She takes a few shaky breaths, then keeps talking.
“This is my girlfriend, Amity. You’d love her. She’s an Azura fan, too.”
Amity’s eyes widen. “Your dad liked The Good Witch Azura, too?”
“He’s the one that introduced me to it.”
“Seriously?”
“Yeah, he left me his copy of book one in his will.”
Amity smiles at the headstone. “You have wonderful taste,” she says, and Luz laughs a little, leaning her head on Amity’s shoulder.
Amity hears a sniffle, and at first she thinks it’s Luz— but the sound is too far away. She and Luz turn at the same moment and catch a flicker of red in the trees.
“Flapjack?” Luz calls uncertainly.
The bird cheeps once, fluttering out from the tree he was perched in— and then Hunter steps out behind him. His eyes are dry, confusing Amity— until Willow steps out from the tree beside Hunter’s, and Gus from the tree beside hers, both of them wiping their eyes.
“Did you all follow me here?”
“I’m sorry,” Willow says immediately. “You were acting weird, and I wondered if you were in some kind of trouble.”
“And we went with her, to keep her out of trouble,” Gus adds.
“Which we kind of failed at,” Hunter concludes.
Willow turns to Luz. “I’m sorry for prying.”
“We all are,” Gus adds.
Luz shakes her head. “This isn’t really a secret,” she says. “I’m not mad.”
“Why didn’t you tell us?” Gus asks quietly.
What composure Luz has managed to regain cracks, and she swallows. “It… well, it never really came up. It happened a long time ago, so it’s not a big deal.”
Willow’s eyes widen. “Of course it’s a big deal,” she says, coming to sit on Luz’s other side.
“Your dad is gone,” Gus adds, joining them on the ground. “Nothing makes that okay. I’m going out of my mind missing mine, and we’re doing everything we can to get back to him. I can’t imagine not having him at all.”
Luz is crying openly now, and between sobs, she manages, “that’s what people said for the first year. But after that… I was supposed to move on, you know? I was supposed to be okay. To not let myself be defined by loss.”
She sounds like Amity does when she’s paraphrasing a teacher, and Amity’s heart clenches.
“So,” Luz continues, “by not bringing it up, I thought that’s what I was doing.”
Hunter finally comes to complete their circle. He raises a hand, hesitates, and then rests it on Luz’s shoulder.
“It’s like Amity said,” he says. “He’s important to you, so he’s important to us.”
Luz sniffles loudly, but she gives him a true smile through the tears. She wipes her eyes, takes a deep breath, and looks at the headstone again.
“These are my friends, Dad,” she introduces.
“Hi.” Willow gives the headstone a tiny wave. “I’m Willow Park. Your daughter and I became friends when she pretended to be an unholy mound of goo to help me with my homework.”
Luz giggles.
“I’m Agustus Porter,” Gus adds. “I became friends with your daughter because she was friends with Willow, and also because she’s a human. And so are you! Which is so cool!”
“I’m Hunter. I became friends with your daughter after we went through my uncle… um, well, he said he was my uncle… after we went through my guardian’s mind and found out he was actually super evil. It was a bonding experience.”
Gus and Willow exchange an uncomfortable look, but Luz is still laughing. “Look at this, Papá! They’re as weird as we are!”
Amity smiles, squeezing Luz’s shoulders.
“Maybe even weirder, at least here. Because. You know. We’re witches.”
“Real witches, Papá.” Luz looks at all of them, her smile easier now. It still trembles, but it isn’t holding anything back. It’s one of the reasons Amity— and all of them, she knows— adore Luz as much as they do; because she’s so genuine. And so they’re happy to settle in beside her, happy to listen to the story and add their own embellishments, as she says, “let me tell you about a place called the Boiling Isles.”
#the owl house#toh#amity blight#luz noceda#lumity#manny noceda#camila noceda#willow park#gus porter#toh hunter#toh flapjack#odalia blight#grief#ray rambles#ray writes
38 notes
·
View notes
Text
Greening Your NYC Apartment: A Guide to Indoor Plants
New York City, a bustling metropolis known for its towering skyscrapers and vibrant culture, can sometimes feel overwhelming. Bringing nature indoors can create a calming and refreshing atmosphere in your apartment. Indoor plants not only add beauty but also contribute to improved air quality and overall well-being. This guide will explore popular indoor plants that thrive in New York City apartments, along with essential care tips.
Choosing the Right Plants
Selecting plants that are suitable for your apartment's light conditions, temperature, and humidity levels is crucial for their success. Consider the following factors:
Light: Determine whether your apartment receives ample natural light or if it is primarily shaded. Plants like snake plants and cast iron plants can tolerate low light conditions, while philodendrons and peace lilies thrive in brighter areas.
Temperature: New York City apartments can experience temperature fluctuations. Choose plants that can adapt to varying temperatures, such as spider plants and Boston ferns.
Humidity: Indoor air can be dry, especially during the winter months. Opt for plants that are tolerant of low humidity, such as succulents and cacti.
Popular Indoor Plants for NYC Apartments
Snake Plant (Sansevieria trifasciata): Known for its air-purifying properties, the snake plant is a low-maintenance option that can tolerate neglect.
Pothos (Epipremnum aureum): This versatile vine can be grown in hanging baskets or trained to climb a moss pole. It is relatively easy to care for and comes in various leaf varieties.
Spider Plant (Chlorophytum comosum): Spider plants are excellent air purifiers and produce baby plantlets that can be propagated.
Peace Lily (Spathiphyllum wallisii): This elegant plant blooms with white flowers and thrives in moderate light conditions.
Boston Fern (Nephrolepis exaltata bostoniensis): A classic choice for hanging baskets, Boston ferns prefer humid conditions and regular misting.
Succulents and Cacti: These low-maintenance plants are ideal for those with busy lifestyles. They come in various shapes, sizes, and colors.
Care Tips for Indoor Plants
Watering: Water plants when the top inch of soil is dry. Avoid overwatering, as this can lead to root rot.
Fertilizing: Feed your plants with a balanced liquid fertilizer during the growing season (spring and summer).
Repotting: Repot plants every two to three years to provide fresh soil and adequate space for root growth.
Pruning: Prune plants as needed to maintain their shape and remove dead or damaged leaves.
Benefits of Indoor Plants
Improved Air Quality: Indoor plants remove pollutants from the air, such as formaldehyde and benzene.
Reduced Stress: Studies have shown that plants can reduce stress and anxiety.
Increased Productivity: Having plants in your workspace can boost productivity and creativity.
Enhanced Aesthetics: Indoor plants add a touch of nature to your living space, creating a more inviting atmosphere.
Conclusion
Greening your NYC apartment with indoor plants in New York City can transform it into a more vibrant and healthy living space. By carefully selecting plants that suit your apartment's conditions and providing them with proper care, you can enjoy the many benefits of indoor gardening.
0 notes
Text
Optimal Spacing for Cucumber Plants: A Guide to Maximizing Growth and Yield

Growing tasty, crisp cucumbers in your backyard can be a rewarding experience, but knowing the proper cucumber planting spacing is key to a healthy and fruitful harvest. When cucumbers are too close, they can compete for light, water, and nutrients, affecting their growth and yield. Achieving the right distance between your cucumber plants not only ensures their survival but also helps optimize their productivity.Through this article, you'll gain a comprehensive understanding of the nuances and importance of appropriate cucumber planting spacing. Learn about different cucumber varieties and their specific requirements. Unearth the secret to garden layout maximizing space for your cucumber plants and get tips on how to prevent common gardening challenges.So whether you are a first-time gardener venturing into growing your cucumber patch, or a seasoned green thumb looking for improved crop performance, this detailed guide can serve as your trusted companion. Let's get started on the journey towards bountiful and healthy cucumber harvests!
How Should You Space Cucumber Plants?
When it comes to planting cucumbers, spacing is crucial for healthy growth and abundant harvests. I learned this the hard way during my first season of gardening.
**Proper spacing allows for adequate sunlight, airflow, and access to nutrients.**
For bush varieties, aim for 12-24 inches between plants, while vining types need 36-60 inches apart. Overcrowding can lead to disease and stunted growth.
Prepare the soil by adding compost for nutrient-rich conditions.
Plant seeds or seedlings in well-draining soil after the last frost date.
Water regularly, keeping the soil moist but not waterlogged.
**Pruning and trellising can help manage growth and maximize space utilization.** Remember to mulch to retain moisture and prevent weeds.
**Healthy plants mean bountiful cucumbers for salads, pickling, and snacking.**
Follow these spacing guidelines to enjoy a successful cucumber harvest and savor the fruits of your labor. Happy gardening!
For more tips on cucumber planting, check out my related article here.
Learn more about gardening with Taim.io!
0 notes
Video
Daily Care for My Growing Vegetable Garden Building a Bamboo Trellis for...
Daily Care for My Growing Vegetable Garden
Taking care of a vegetable garden requires consistency and attention to detail. Here’s a detailed guide to ensure your garden thrives:
1. Morning Watering Routine
Check Soil Moisture: Early in the morning, inspect the soil to see if it needs watering. Stick your finger an inch deep into the soil; if it feels dry, it’s time to water.
Watering: Use a watering can or hose with a gentle spray to avoid disturbing the soil. Water at the base of the plants to reduce the risk of fungal diseases that can occur when leaves stay wet for too long.
Mulching: Check the mulch layer around your plants. Add more organic mulch, such as straw or grass clippings, if needed. Mulch helps retain moisture and suppress weeds.
2. Regular Weeding
Spot Weeds Early: Pull out weeds as soon as they appear. Weeding is easiest when the soil is moist. Removing weeds early prevents them from competing with your vegetables for nutrients and water.
Use a Hoe: For larger areas, use a hoe to remove weeds while they are still small.
3. Pest and Disease Monitoring
Inspect Leaves: Look at the undersides of leaves for pests like aphids, caterpillars, or whiteflies. Remove any pests by hand or use organic insecticidal soap.
Check for Diseases: Look for signs of disease, such as yellowing leaves, spots, or mildew. Remove affected leaves immediately and consider applying an organic fungicide if necessary.
4. Pruning and Training
Prune Regularly: Trim off dead or yellowing leaves to encourage healthy growth. Pinch off the tips of plants that are growing too tall to encourage bushier growth.
Support Vines: If you have climbing plants like tomatoes or cucumbers, make sure they are properly supported by trellises or stakes. Tie them gently to the support structure as they grow.
5. Fertilizing
Weekly Feeding: Once a week, apply a balanced organic fertilizer to provide essential nutrients. Alternatively, use compost tea or diluted fish emulsion.
Side-Dressing: Apply compost or aged manure around the base of plants to provide a slow-release source of nutrients.
6. Harvesting
Harvest Regularly: Pick vegetables as soon as they are ripe to encourage the plant to produce more. For leafy greens, harvest the outer leaves first.
Handle with Care: Use sharp scissors or pruning shears to avoid damaging the plants when harvesting.
7. Evening Checks
Final Inspection: In the evening, do a quick walk-through of your garden to check for any issues that may have developed during the day, such as wilting plants or signs of pests.
Close the Day: If your garden is fenced, make sure gates are closed to keep out animals.
Building a Bamboo Trellis for Long Beans
Long beans, also known as yardlong beans, are vigorous climbers that require a sturdy support system to grow vertically. Building a bamboo trellis is a sustainable and effective solution.
Materials Needed:
Bamboo poles (6–8 feet long)
Twine or wire
Hammer and nails or a drill and screws
Measuring tape
Garden scissors
Step-by-Step Instructions:
1. Choose the Site
Location: Select a sunny spot in your garden where the long beans will receive at least 6–8 hours of sunlight daily.
Space: Ensure there is enough space for the trellis to stand securely and allow for the plants to climb.
2. Prepare the Bamboo Poles
Cut the Poles: If necessary, cut the bamboo poles to the desired length (6–8 feet is ideal for long beans).
Sharpen Ends: Sharpen one end of each pole to make it easier to drive them into the ground.
3. Set Up the Vertical Poles
Spacing: Measure and mark the locations for the vertical poles. Space them about 3 feet apart in a row.
Drive Poles into the Ground: Using a hammer, drive each bamboo pole about 1 foot deep into the soil to ensure stability.
4. Install the Horizontal Support
Top Crossbar: Place a horizontal bamboo pole across the top of the vertical poles, securing it with twine, wire, or nails.
Additional Crossbars: Depending on the height of your trellis, add one or two more horizontal poles lower down to provide extra support.
5. Create the Climbing Structure
Twine Grid: Tie twine horizontally and vertically between the poles to create a grid for the beans to climb.
Secure Twine: Make sure the twine is tight and securely tied at each intersection. This grid will support the vines as they grow.
6. Planting and Training
Planting: Plant the long bean seeds or seedlings at the base of each vertical pole.
Training: As the beans begin to grow, gently guide the vines toward the trellis. They will naturally start to climb, but early guidance ensures they follow the structure.
7. Maintenance
Check Stability: Periodically check the trellis for stability, especially after storms or strong winds.
Re-Tie Loose Twine: If any twine becomes loose, retie it to keep the structure firm.
Prune and Harvest: As the beans grow, prune any excessive foliage to ensure air circulation and easy harvesting.
Building a bamboo trellis not only provides strong support for your long beans but also adds a natural and aesthetic element to your garden. With proper care, your trellis will last through multiple growing seasons.
0 notes
Text
When to Pick Lemon Cucumbers to Have Them Perfect

So When to Harvest Lemon Cucumbers for Best?
Lemon cucumbers are a lot of fun with their rotund shape and sparkly yellow color in any garden. However, these fruits are best to savor at the right time. Lemon Cucumber PickingA discussion on when to pick comes courtesy of my daughter the other day as we attending a local farmers market, and saw these advertised.
Knowing the if Plant Moringa Last Long
Growing on vines that must have warm weather to flourish, lemon cucumbers (Cucumis sativus), also called "Lemon Ball Cucumbers," are rounded golden yellow fruits about the size of a tennis ball. When planted, they will take about 50 to 70 days. Only smaller lemon cucumbers should not be allowed to reach full size, or they will become bitter and mushy.
Indicators of Ripeness
1. Color: This is the best tell for ripeness. Lemons can be picked anytime they are solid bright yellow. And, of course, never pick them when they are still green or pale yellow (the plants' flavor hasn't quite rounded out). 1ColorUniform, no green dots or streaks
2. Size : Size of lemon cucumbers depends on a preference but typically, should be 2 -3 inches in diameter At this stage they will be juicy, but remain crunchy. Or if allowed to hang too long on the vine, they can become bigger and develop a thicker skin with less taste.
3. Texture: A ripe lemon cucumber will be hard with a tiny bit of waxiness to the skin. It should be (mildly flexible but firm ) and not too hard. Soft spots or wrinkling are signs of age, over-ripeness, and poor storage conditions.
4. Vine Health : Check the health of vine As the cucumbers begin to mature, leaves along the vine may yellow and wither. Although this is an indicator that the cucumbers may be ripe, keep in mind how colorful and firm the fruit itself looks.
Harvesting Tips
Lemon cucumbers can be harvested by cutting them from the vine with either a sharp knife or pruning shears. Gently so as not to disturb the vine or any nearby fruit. Take care when handling cucumbers because they bruise easily. If you are harvesting several cucumbers, make sure to check them often because they ripen quite fast in warm conditions.
Post-Harvest Handling
Lemon cucumbers are best stored in a cool, dry location after you pick them. Candies could be yummy in your fridge for approximately 2 weeks. GAME Ringed by grassy plains and located near to fresh water, there are few better-tasting fish than grayling freshly caught from the Tay, let alone those anguillis of as yet indeterminate proportions on offer at Chequers.
Read More
1 note
·
View note
Text
youtube
Jerry rescues plants from a redevelopment site and shares tips on how to relocate them.
What to Avoid:
Established gardens often have environmental weed species that were planted unknowingly. In Brisbane these include cocos palm, tradescantia zebrina, coral vine, morning glory and the creeping inch plant which are very hard to eradicate and are weeds you'd rather leave behind. Transporting weeds to a new location can also worsen their environmental impact, so check your local authority’s website to identify each plant’s weed status before taking it with you. Invasive pests, like fire ants, or pathogens and diseases can also be spread with the movement of garden materials. Check the roots to make sure they look clean, and if you live in a containment area contact your local bio–security agency for advice.
Sadly, some plants are simply not worth the effort. Australian native, Lomandra hystrix, while useful is easy to find and very cheap to buy. And a bird of paradise might be tempting but they’re notorious for having incredibly strong deep roots and dense tough growth. You’d need a bobcat to shift it, so save your back and look elsewhere.
Save Seeds:
Seeds are a perfect way for plants to move; they’re already a whole plant packed and ready to travel. Jerry finds a bottlebrush and the Queensland classic, bushmans poison. As the name indicates, all parts of this plant are toxic to ingest, but it's a favourite in gardens for its pretty, sweet-smelling spring flowers which bees adore. This survivor is growing on shale soil and can weather harsh conditions. They’re readily propagated from seed when ripe, just make sure to wear gloves to protect yourself.
Lift Bulbs:
Another group of plants that travel well are bulbs. Hippeastrum can be expensive to buy and slow to establish which makes them valuable to save. To transport, dig them up and let the soil fall away, then trim back the leaves and roots to conserve moisture, and it’s ready to go. The important part to conserve is the bulb itself because that is the energy storage, carrying flowers for next year.
Take Cuttings:
Dracaenas aren’t exactly uncommon; however, they offer instant size through maturity. To propagate a super-sized cutting, use a sharp saw to cut the trunks cleanly at the base. You can tie this against a fence with its base touching soil, and over summer it will take root and can be replanted where you want it. Alternatively, each branch tip will root in the same way offering you a whole garden bed worth of plants. Succulents and cacti can also easily be propagated by cuttings, such as the spineless, night-flowering orchid cactus, Epiphyllum hookeri.
An iconic Queensland combination is a clump of elkhorn ferns growing on the side of a frangipani. In winter, the frangipani loses its leaves, and the winter sunshine benefits the fern. In summer when the leaves return, they shade the fern from the hot summer sun. In return, the elkhorn fern gathers leaves, storing nutrients and moisture to drip feed the frangipani. It's a blissful marriage. To transplant an elkhorn, use a sharp pruning saw to remove individual plants and then pot them up with ordinary potting mix or mount them onto a new tree. Frangipani is best propagated in winter to help the long stems seal over seal before planting. In the summer, there's a risk they may rot before establishing.
Re-potting:
The cast iron plant, Aspidistra, are tough as nails and are often found growing happily in the shadiest of spots. They’re permanently lush and green and can be dug up whole or broken into smaller clumps before re-potting. Ferns such as the native kangaroo fern, exotic rabbit foot fern and Boston fern can be repurposed in the same way but need some extra care. To transplant a fern, line an old hanging basket with a plastic bag with holes in it to conserve moisture during transit. You can disguise the bag with coconut fibre, then plant the fern in with potting mix. Keep it damp and in the shade so that it doesn’t drop any fronds, and eventually it will grow into a living sphere of foliage.
#gardening australia#solarpunk#australia#garden#gardening#moving a garden#how to#how to move a garden#established gardens#Brisbane#weeds#invasive species#invasive plants#invasive insects#seed saving#bulbs#plant cuttings#potted plants#Youtube
1 note
·
View note
Text
Gardening Tips
This guide provides a step-by-step guide to growing tomatoes in your garden. The first step is to choose the right variety, such as cherry tomatoes, beefsteak tomatoes, or heirloom varieties, considering your climate and space. The soil should be well-drained, nutrient-rich, and pH of 6.0 to 6.8. Mix compost or organic fertilizer into the soil to improve its quality.
A sunny spot with at least 6-8 hours of direct sunlight is essential for tomato growth. Sow seeds indoors 6-8 weeks before the last expected frost, and transplant them into the garden when the outdoor temperature is consistently above 50°F (10°C). Water the plants regularly, keeping the soil moist but not waterlogged. Apply a 2-3 inch layer of mulch around the base to retain moisture, suppress weeds, and regulate soil temperature.
Support the plants by installing tomato cages or stakes to keep the fruit off the ground and prevent sprawling. Fertilize as needed with a balanced fertilizer or compost every 4-6 weeks throughout the growing season, avoiding high-nitrogen fertilizers that promote leafy growth rather than fruit production. Prune and maintain the suckers to direct the plant's energy toward fruit production, and check for pests and diseases regularly.
Harvest the tomatoes when they are fully colored and slightly firm to the touch, gently twist or cut the fruit from the vine. Continue harvesting as the fruit ripens to encourage more production. Enjoy the fruits of your labor by using fresh tomatoes in salads, sauces, sandwiches, or as snacks.
youtube
(Bonus song because BTS got this one stuck in my head)
0 notes
Text

Essential Vine Training and Pruning Tips
vine training tips
As springtime approaches, winemakers and vineyard experts turn their attention to the crucial task of training and pruning their vines. Proper training and pruning ensure the health and longevity of the vines and contribute to the quality of the grapes. This post explores types of vine training methods to help make informed decisions on how to train your vines.
0 notes
Text
Winter Tree Care Tips
Tree Care refers to a number of different activities that help maintain and improve the structure, appearance and vitality of trees and shrubs. This often starts before the plant is planted, with proper species selection and installation, which can minimize many future issues. It also includes regularly checking plants for potential problems and taking steps to proactively address them before they become serious issues.
Proper watering is critical to both the health and growth of your trees. Newly planted trees typically require one inch of water per week during the first growing season or two, while mature trees should receive about a half-inch of water per week throughout the year. It is important to water deeply, not shallowly, and to do so in the early morning, when a plant is most able to absorb it.
Mulching is also important for a plant’s health. It insulates roots, keeps weeds out and prevents dry soil that can harm tree roots. It is best to mulch about 2 to 4 inches deep, but don’t cover the base of the trunk.
Insect and disease management is another vital component of tree care. An ISA Certified Arborist can spot red flags, like discolored leaves, insect holes and other signs of problems, and provide targeted treatments to stop these issues before they spread.
Regularly examining your landscape for invasive plants, such as vines, is also an important part of plant health care. Invasive plants can choke out a tree’s root system, interfere with its ability to grow and thrive, and even cause the tree to die.
Winter is a great time to examine your landscape and make sure the trees are prepared for the colder temperatures, snow, and wind. Taking the following actions is a good start:
Pruning – Removing branches and limbs that are dead, diseased or damaged can help promote healthy growth, as well as reduce the risk of damage from winter storms. It’s a good idea to prune a few times a year, and in the fall before the harsh weather sets in.
Fertilizing – A soil test is a good way to determine if your trees need fertilizer, and what type. It’s important not to over-fertilize, which can do more harm than good.
Before hiring a tree service, ask about their certification and background, as well as proof of insurance. It is also a good idea to hire a company that is an International Society of Arboriculture (ISA) certified, a Tree Care Industry Association (TCIA) Accredited Business and/or employs a Certified Tree Care Safety Professional. This will ensure that the tree service is qualified, experienced and carries liability coverage for property damage and worker’s compensation, should an accident occur. This is especially important if the work involves working in close proximity to power lines or other hazards. Also, be sure to request a detailed work contract that specifies all tasks and costs. This will protect you from any misunderstandings or disputes down the road.
via https://ontimetreelopping.wordpress.com/2024/06/25/winter-tree-care-tips/
0 notes
Text
https://gardenersschool.com/wisteria-flowers/
Wisteria is a stunning, fragrant vine that can add a touch of elegance and charm to any garden or outdoor space. With its cascading clusters of purple, white or pink flowers, wisteria is a true showstopper. This comprehensive guide covers everything you need to know about growing and caring for these beautiful plants, from selecting the right variety to planting, pruning and troubleshooting common issues. Whether you’re a seasoned gardener or a novice, this article will provide you with the knowledge and tips to cultivate a healthy and vibrant wisteria that will be the envy of your neighborhood.
#indoor plants#gardening#plants#gardevoir#gardenersworld#garlic#garden#gardeners on tumblr#planting#indoor garden
0 notes
Text
Tips for Successfully Cultivating Hardy Kiwi in Your Garden

Growing hardy kiwi is an exciting venture for any home gardener looking to enjoy a delicious and unique fruit. Not only are they full of essential vitamins and minerals, kiwis are also attractive, self-pollinating plants that require minimal space or effort to maintain. While growing hardy kiwi may seem like an intimidating task for someone with no gardening experience, this blog post will outline the essential steps and techniques to ensure your kiwi vines bear sweet and healthy fruits in no time!
How To Grow Hardy Kiwi In Your Garden
When it comes to growing hardy kiwi in your garden, it's important to choose a sunny spot with well-draining soil. I've found that these plants thrive in slightly acidic soil, so consider adding some peat moss or pine needles to the mix.
Plant your hardy kiwi vines in a trellis system to support their growth and encourage fruit production. Regular pruning is key to keeping these vines under control and promoting healthy yields. I've had success using organic fertilizers to provide the necessary nutrients for my kiwi plants.
Remember, hardy kiwi plants are dioecious, meaning you will need both male and female plants for fruit production. Be sure to plant at least one male for every eight female plants to ensure pollination.
Water your hardy kiwi plants regularly, especially during dry spells, to keep them happy and healthy.
Harvest your kiwi fruits when they are firm but slightly yielding to the touch. A gentle squeeze will let you know when they are ripe and ready to enjoy!
Consider using bird netting to protect your ripe kiwi fruits from hungry critters who may also have a taste for these delicious treats.
For more in-depth tips and tricks on growing hardy kiwi in your garden, check out my related article on Medium.com. Happy gardening!
Learn more about gardening with Taim.io!
0 notes
Text
Bougainvillea plant online, Great plants for balconies

Title: Enhance Your Balcony with Bougainvillea Plant online: A Spectacular Addition to Your Outdoor Space
Introduction:
Transforming your balcony into a vibrant oasis is made easy with the addition of bougainvillea plants. Renowned for their stunning beauty and versatility, bougainvilleas are a popular choice among gardening enthusiasts for balcony adornment. In this article, we delve into why these magnificent plants are ideal for balconies and how you can cultivate their splendor in your outdoor haven.
Body:

1. *Bougainvillea: The Balcony's Best Companion*
- Explore the allure of bougainvillea's: Their vivid colors and lush foliage make them a standout choice for balcony gardens.
- Versatility in design: Whether you have a small or spacious balcony, bougainvillea's can be adapted to suit various settings and styles.
- Low-maintenance charm: Ideal for urban dwellers or those with busy lifestyles, bougainvilleas require minimal upkeep while offering maximum visual impact.
2. *Benefits of Bougainvilleas for Balconies*
- Aesthetic appeal: Elevate the ambiance of your balcony with bougainvilleas' vibrant hues and cascading blooms.
- Privacy and screening: Create a natural barrier and enhance privacy on your balcony with strategically placed bougainvillea vines.
- Attracts pollinators: Invite butterflies and bees to your outdoor space, promoting biodiversity and ecological balance.
3. *Cultivating Bougainvilleas on Your Balcony*
- Selecting the right variety: Choose from a range of bougainvillea cultivars, considering factors such as size, color, and growth habit.
- Container gardening tips: Opt for well-draining soil and adequate sunlight exposure to ensure healthy growth in containers or hanging baskets.
- Pruning and maintenance: Learn how to prune bougainvilleas to maintain shape and encourage prolific blooming throughout the growing season.
4. *Design Inspirations with Bougainvilleas*
- Vertical gardening: Utilize trellises or pergolas to showcase bougainvilleas' climbing capabilities, adding dimension to your balcony space.
- Mix and match: Combine bougainvilleas with other balcony plants to create visually appealing compositions and seasonal interest.
- Creative container arrangements: Experiment with different container sizes and arrangements to unleash your balcony's full decorative potential.
Conclusion:
Bougainvillea Plant online offer a plethora of benefits for balcony gardening enthusiasts, from their striking beauty to their adaptability and ease of maintenance. By incorporating these stunning plants into your balcony design, you can create a captivating outdoor retreat that delights the senses and uplifts the spirit. Embrace the charm of bougainvilleas and embark on a journey to transform your balcony into a botanical haven like no other.
#bougainvillea plant online#best outdoor plants in india#great plants for balconies#best outdoor plants for balcony#best low maintenance outdoor plantslow maintenance outdoor plants india#low maintenance outdoor plants india
1 note
·
View note
Video
Daily Care for My Growing Vegetable Garden Building a Bamboo Trellis for...
Introduction
A well-maintained vegetable garden not only provides fresh produce but also enhances your outdoor space. Long beans, known for their vigorous growth, benefit greatly from a sturdy bamboo trellis. Here’s a detailed guide on daily care tips and constructing a bamboo trellis to support your long beans.
Daily Care Tips
Watering:
Frequency: Water deeply, especially during dry spells, ensuring the soil remains consistently moist but not waterlogged.
Timing: Water in the morning to minimize evaporation and allow foliage to dry during the day, reducing the risk of fungal diseases.
Weeding:
Regular Maintenance: Remove weeds regularly to prevent them from competing with your long beans for nutrients and water.
Mulching: Apply mulch around plants to suppress weeds and retain moisture.
Fertilizing:
Types: Use a balanced fertilizer or organic compost to promote healthy growth and fruit production.
Application: Apply fertilizer according to package instructions or compost around the base of plants every few weeks.
Pest and Disease Management:
Monitoring: Regularly inspect plants for signs of pests such as aphids or diseases like powdery mildew.
Natural Remedies: Use natural methods like neem oil spray for pests or a baking soda solution for fungal diseases.
Pruning and Training:
Purpose: Prune to remove damaged or diseased parts and to encourage bushier growth.
Training Long Beans: As beans grow, gently guide them onto the trellis to prevent tangling and ensure maximum exposure to sunlight.
Building a Bamboo Trellis for Long BeansMaterials Needed:
Bamboo poles (6-8 feet long)
Garden twine or strong string
Hammer or mallet
Pruning shears
Construction Steps:
Step 1: Choose a Location: Select a sunny spot with well-drained soil for optimal bean growth.
Step 2: Positioning the Poles: Place bamboo poles 1-2 feet apart in a row, ensuring they are firmly anchored in the ground.
Step 3: Tying the Horizontal Supports: Use garden twine to tie horizontal support strings between the poles at various heights (e.g., 1 foot intervals) to support bean vines as they grow.
Step 4: Training the Vines: As your long beans grow, gently guide them to climb the trellis using the twine, ensuring they have sufficient support to reach their full potential.
Maintenance:
Check Regularly: Inspect the trellis periodically to ensure it remains stable and securely anchored.
Replace as Needed: Bamboo is durable but may need occasional replacement of poles or twine over time.
Conclusion
By following these daily care tips and constructing a sturdy bamboo trellis, you can ensure your long beans thrive and provide a bountiful harvest throughout the growing season. Enjoy the rewards of your efforts as you watch your vegetable garden flourish!
0 notes
Text
5/21/24
Typing up last week's notes for reference of pre-digital style. Notes added as I type are in italics and purple:
5.14.24.
Clean up side porch/sweep, dust, prune sick honeysuckle.
Figure out where and plant fagiolina (requires trellis and soaking), maybe where leaves have left bare soil in the back? Later added: soaking them, without clear sense yet of where they ought to go.
Mound potatoes.
Front beds - clean up, consider removing the bushes. Later added: Much more could be done, but I started/implemented basic clean up.
On 5.16 I side dress veg garden and artichokes and peach tree with blood and bone meal 50/50 mix I still have from J's dad's house. I acquired it in 2020, who knows how old it was before that, but seems I might as well use it up if I got it, as I assume like anything powdered it kinda looses potency after time? Is that true: Is it, like herbs, gradually turning itself into dust? Dry decomposition? (Seems like at least blood meal has indefinite lifespan if kept dry and not super hot. I guess nutrients don't turn themselves into dust, they are patiently waiting for something to absorb and cycle them.)
One perennial kale seems to be acting perennialized (producing new big leaves)! All others may have been other varieties and are simply going to seed and not producing more leaves. Get more EFN perennial kale seed to see if I can start more for the fall. Trying to follow its lifecycle, like that guy said on that Seeds and their People pod. Same with arugula - feels nice to be more aware of cycles that actually work for me. (rather than ones I've read about)
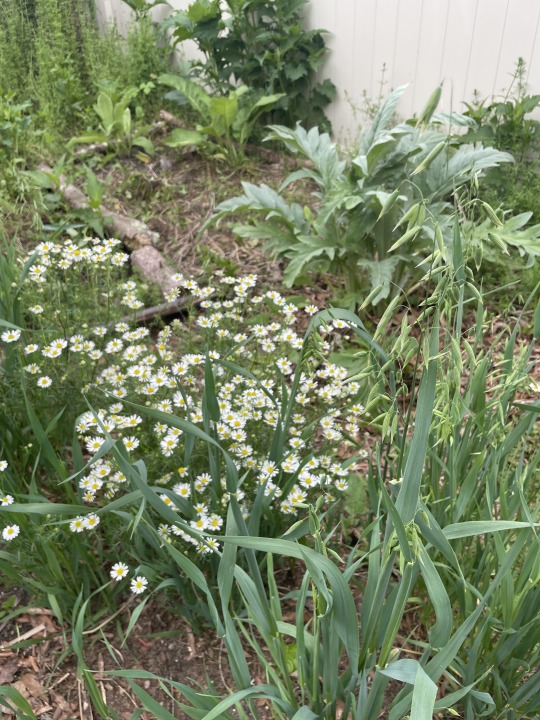
Chamomiles I don't remember seeding look gorgeous amongst oats that birds ate lots of upon seeding. "Tall girl" garden, with apologies to that sunflower (cup plant) the gold finches like (do they like the artichokes too?)
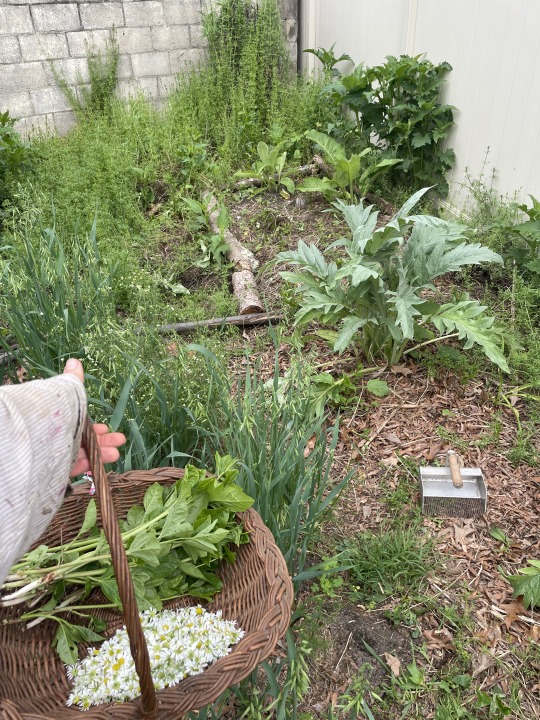
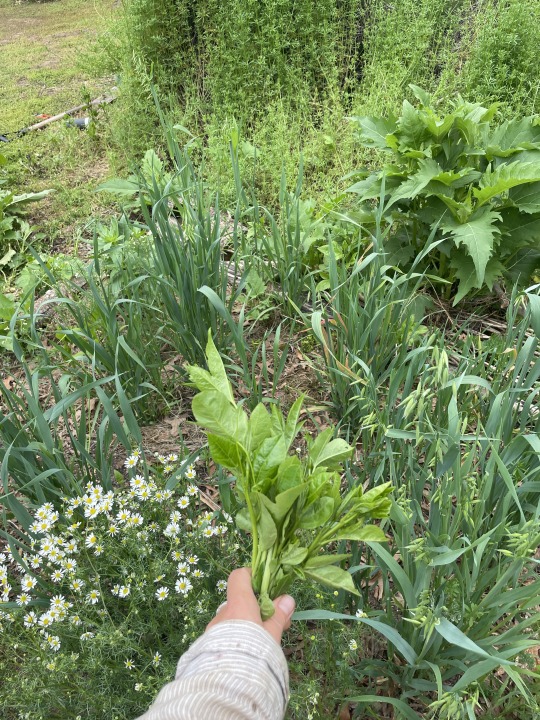
What I'm holding in my hand in the above pics are passionflower vine shoots. This plant is very prolific here, and I have trellises for it to grow on, but I'm constantly pulling it out of places where I'd like other things to grow. The young shoots and vine tips have a good tender texture and nutty taste and are nice to snack on in the garden. S + G put them on sandwiches. I sauteed these ones with garlic and they were very tasty and spinach like. Although growing kale and other garden greens is fairly unsatisfying here (sandy soil, small leaves, lots of competition for eating from bugs), I am very grateful for a seemingly endless supply of this other type of nutritious green.
J and I defoliated all peach leaf curl leaves and I sprayed a couple times with yogurt although it keeps raining or misting, so not sure how much is wearing off. Don't want to overdo it but may spray again when we get a stretch of confirmed dry. What I observe is, very little fungus on new growth (now like 5 or 6 generations of leaves); a little gelatinous stuff on fruit here and there, and some smaller fruit that knock off easily, and then some fruit that is getting (slowly) larger. We want sun! I've watered the tree (roots) with diluted pee twice now, and did the blood and bone meal today plus some half finished compost from the pile, which I dug gently to avoid bothering the elecampanes that emerged from the pile. Starting to think about floating compost "areas" instead of compost "piles", did I write about this already?
0 notes
Text
May Gardening Tips for Vegetable Production and Outdoor Flower Plants

Expert Advice for Maximizing Your Garden's Potential
As the month of May approaches, it's time to gear up for a successful gardening season. Whether you're a seasoned gardener or a beginner, these May gardening tips will help you make the most of your vegetable production and outdoor flower plants. With advice from University of Missouri Extension Horticulturist, Dr. Dhruba Dhakal, you'll be equipped with the knowledge to ensure a bountiful harvest and vibrant blooms.
youtube
Vegetable Production
When it comes to growing vegetables, there are several key considerations to keep in mind. Dr. Dhakal suggests the following tips:
- Growing lettuce under screening materials can help slow bolting and extend harvests into hot weather.
- To protect young transplants from cutworms, create collars using strips of cardboard.
- Tomatoes should be planted in warm soils, with mulch and support stakes or cages to promote healthy growth.
- Control caterpillars on broccoli and cabbage plants by handpicking or using biological sprays like B.T. or Spinosad.
- When planting squash and cucumbers in hills, place a stake or flag to easily locate the root zone watering site once the vines have spread.
- Watch out for striped and spotted cucumber beetles, as they can spread wilt and mosaic diseases to squash and cucumber plants.
- Remove rhubarb seed stalks as they appear to redirect energy towards foliage growth.
- Plant peppers and eggplants once the soil has warmed up.
- Begin planting sweet corn at two-week intervals, ensuring good pollination by planting in a block formation with a minimum of four rows.
- Plant multiple plantings of cilantro or keep bloom heads cut off to prevent premature seeding.
- Avoid over-fertilizing herbs planted in average soils, as it may reduce flavor and quality at harvest.
- Regularly scout for insect and disease problems in the garden and follow pesticide directions if necessary.
Outdoor Flower Plants and Ornamentals
Cultivating beautiful flower plants and ornamentals requires attention to detail. Dr. Dhakal shares the following advice:
- Pinch azaleas and rhododendron blossoms as they fade and fertilize them with an azalea or blueberry fertilizer after blooming.
- Avoid removing foliage from spring bulbs too soon, as it can hinder flowering next spring.
- Pinch back mums to promote compact, bushy growth.
- Lightly side-dress perennials, including spring bulbs, with a 5-10-10 or 10-10-10 fertilizer, avoiding the center or crown of the plant.
- Opt for low-maintenance plants that do not require deadheading, such as begonias, impatiens, alyssum, ageratum, lobelia, vinca, and salvia.
- Prune blooming shrubs right after flowers have faded, if necessary.
- Consider ground covers like Ajuga, creeping phlox, and creeping juniper for sunny locations, but be cautious of their invasive nature.
- Start planting gladiolus, caladiums, dahlias, cannas, and elephant ears for a stunning display.
- If you have a tub or garden pool, plant hardy water lilies to add a touch of elegance.
- Regularly inspect your plants for scale crawlers and other insects, following the recommended guidelines for control.
- Keep an eye out for newly hatched bagworms on evergreens and conifers, taking appropriate action to prevent damage.
- Avoid removing spring bulb foliage prematurely, as it can impact next year's flower production. Leave the foliage to feed the bulb and consider marking bulbs for fall transplanting and division.
With these expert tips from Dr. Dhruba Dhakal, you can ensure a successful gardening season in May. By implementing these strategies for vegetable production and outdoor flower plants, you'll be on your way to a bountiful harvest and a garden filled with vibrant blooms. Remember to stay vigilant in monitoring for pests and diseases, and always follow recommended guidelines for control.
Happy gardening!
0 notes
Last Seen Blogs

bubblesoccerboston-blog
MA Sports Leagues

jtloper1
Untitled

stephenmurt
Untitled

buckaye
bucky mondel

spicynuts
Untitled