#vue axios is not defined
Explore tagged Tumblr posts
Visit Tumblr Blog
Explore Tumblr blogs with no restrictions, modern design and the best experience.
Last Seen Tumblr Blogs


Fun Fact
Tumblr was acquired by Yahoo for $1.1B in 2013.
Text

The journey to mastering full-stack development often begins with choosing the right combination of technologies. For many developers, Python, Vue.js, and PostgreSQL form a powerful and versatile stack. This trio provides a robust backend, a dynamic front end, and a reliable database. Whether you’re a budding developer enrolled in an FSD Python course or a seasoned programmer exploring new frameworks, this guide will provide the foundational steps to set up a full-stack project.
Why Choose Python, Vue.js, and PostgreSQL?
Python: Known for its simplicity and versatility, Python is a favorite for backend development. Frameworks like Flask and Django make it easy to build scalable APIs and web applications.
Vue.js: Vue.js is a progressive JavaScript framework for building user interfaces. Its simplicity, flexibility, and reactive components make it ideal for crafting modern, dynamic frontends.
PostgreSQL: As one of the most advanced open-source relational database systems, PostgreSQL is renowned for its scalability, reliability, and extensive feature set.
Step 1: Plan Your Project Structure
In a standard full-stack project using Python, Vue.js, and PostgreSQL, the project structure is typically organized into several main directories. The backend directory contains the Python-based backend code, which could use frameworks like Django or Flask. The frontend directory holds the Vue.js frontend code and is responsible for the user interface. The database directory includes scripts and configuration files for setting up and managing the PostgreSQL database. The environment directory stores configuration files, such as environment variables and deployment settings. Finally, the docs directory is dedicated to documentation and notes related to the project. This structure ensures clarity and separation of concerns, making the project easier to manage and scale.
Step 2: Set Up the Backend with Python
Choose a Python Framework:
Flask: Lightweight and flexible for simple APIs.
Django: A full-fledged web framework with built-in features for authentication, ORM, and more.
Create the Virtual Environment:
Using virtual environments ensures project dependencies remain isolated, a key concept covered in any Python FSD curriculum.
Install Necessary Packages:
For Flask: Flask, Flask-Cors, and SQLAlchemy.
For Django, use core Django packages and DRF (Django Rest Framework) for API handling.
API Design:
Develop RESTful endpoints to handle CRUD operations.
Implement authentication mechanisms like JWT for user management.
Step 3: Develop the Frontend with Vue.js
Set Up the Vue.js Environment:
Use Vue CLI to scaffold your application. This creates a starter project with essential configurations.
Design Components:
Break down your application into modular components (e.g., header, footer, forms).
Use Vue’s data-binding and state management to handle user interactions.
API Integration:
Axios or Fetch can be used to connect the Vue.js frontend with your Python backend.
Styling:
Choose between frameworks like Vuetify, Tailwind CSS, or Bootstrap to style your application.
Step 4: Configure the PostgreSQL Database
Install PostgreSQL:
Ensure PostgreSQL is installed and running on your system. Tools like pgAdmin simplify database management.
Set Up the Database:
Define your schema and relationships. Django’s ORM or Flask’s SQLAlchemy can streamline this process.
Database Connection:
Configure your backend to connect to PostgreSQL using libraries like psycopg2.
Migrations:
Use migration tools provided by your framework (e.g., Django’s migrate command) to keep your database schema synchronized.
Step 5: Link the Frontend and Backend
Cross-Origin Resource Sharing (CORS):
Enable CORS in your backend to allow API requests from your frontend.
Environment Variables:
Use .env files to securely manage API keys, database credentials, and other sensitive information.
Serve the Frontend:
Deploy your Vue.js application and configure the backend to serve the frontend (or use a separate web server).
Step 6: Deployment
Containerization:
Use Docker to containerize your application for consistent deployment across environments.
Hosting Platforms:
For the backend, consider platforms like Heroku, AWS, or Azure.
For the front end, platforms like Vercel or Netlify are excellent choices.
Database Hosting:
Host PostgreSQL on cloud platforms like AWS RDS or DigitalOcean for better scalability.
Conclusion
Setting up a full-stack project with Python, Vue.js, and PostgreSQL may seem complex initially, but with proper guidance and practice, it becomes a manageable and rewarding process. Whether you’re enrolled in a Python Full Stack Development Course or self-learning, this stack equips you with the tools to build modern, scalable web applications.
Each step in this guide provides a foundation for exploring and implementing advanced features like authentication, real-time updates, or cloud deployment. With persistence and curiosity, you’ll be well on your way to mastering full-stack development.
Contact Us:
Phone
+917338811773
+918925903732
Email: [email protected]
0 notes
Text
Vue-js Post request example
Vue-js Post request example
We will Learn the below things in this Blog Article. How we install axios via npm ?How to install node modules ?What is axios ?How to import Axios ?Sending post request via AxiosCompiling assest. we will learn about how we can send post requests by using Axios, if Axios is not present in your comoper.json file then you can use the below command to install the Axios npm install axios Before…

View On WordPress
#axios npm#fetching data from a third party api with vue js and axios#install axios in vue#nuxt axios post example#vue axios cdn#vue axios example#vue axios is not defined#vue axios plugin#vue axios post#vue axios post json data#vue js axios post example#vue js post request example
1 note
·
View note
Text
Libraries And Tools You Should Consider For Your Next React Native App Setup

React Native is such a technology that has changed the mobile app development process. It was introduced by Facebook to build cross-platform mobile apps. React Native used a JavaScript library and is built by an awesome open source community, which will help in accelerating the development process.
Today in this article, we will discuss several libraries and tools to use for your next react native app setup and I hope this helps you make the right decision.
1. React-native Base Framework
On the react-native official website, you will get two ways of setting up your react native app: Expo CLI or React native CLI.
Expo CLI
Quick to start writing the first screen.
Quick distribution and installation of the app.
Great for demo or POC apps.
React Native CLI
Easy to add android and iOS native code.
For large-scale applications.

2. Static Typing
If you are a JavaScript developer, you understand the need for strict typing for the code. React Native use type checking that helps with early error detection and increases code readability. Typescript is a strict syntactical superset of JavaScript because it is an open-source programming language.
Typescript
Huge community and widely used in the backend and front end frameworks like NodeJs, Angular 2+, Vue Js, etc.
Faster than flow.
Flow
Flow is not a programming language, it’s just a static type checker for JavaScript.
Premium React support.
3. HTTP Request Client
As most of the applications require to call APIs that is why you need one HTTP client with the help of Axios.
Axios
A well-tested and classic way of doing it.
Graphql Appolo client
It helps in caching the data.
One client for REST APIs and Graphql APIs.
4. Managing Reusable UI Components
React Native provides you reuse of code features. You can simply maintain a codebase and keep a consistent UI, you’ll need to make use of cloud component hubs.
Bit. dev
Continuously publish components from any codebase.
Easily import/install components into any repository.
Document and organize components, all in one place.
Excellent support for React Native.
5. Unit Testing Setup
We all love a quality website or in simple words a website with fewer bugs. For this quality, unit testing is super important.
Jest And Enzyme
It is a very simple testing framework and works with multiple platforms such as Typescript, Node, React, Angular and Vue.
Comes with a mocking framework as well.
Huge community.
6. Navigation
Through React Native you can manage more than a couple of screens then you need to define routing and navigation which is scalable and easy to maintain.
React-navigation
Huge community
Most of the use cases covered name-based routing, passing data from routes, Tab navigation, authentication flows, deep linking, analytics trigger, etc.
You can also use pre-defined navigation react hooks
7. Forms
The native forms in React are not fun writing, I have struggled in most of the scenarios, hence we need a better way of doing forms which is easy to write, maintainable, and importantly developer-friendly. You can consider the following options:
Formik
Huge community.
React hook form
Better performance compared to formik.
It is developer-friendly and easy to use with React-hook-form.
8. Config Loader
You required a nice framework to set up for configs. Try to make your app portable across environments, scalable, enabled for continuous deployment.
You can use react-native-config.
9. Internationalization (i18n)
React Context API
Uses the context APIs from the React.
Simple to use.
React i18 Next
Huge community and widely used.
It has many rich features like plurals, context, etc.

10. Dynamic App Update
React Native App Development Services has a great module that helps you to fix the bug. For this, you can use Microsoft code push for dynamic updates.
11. Analytics
Analytics is an important way to know and monitor the behavior of your customers. For the basic use case module, you can use Firebase Google analytics. If you need support and have specific use cases like analyzing ads and their reach or you are seeking analysis in terms of marketing channels, also use Clever tap, Appsflyer.
Final Words:
Eventually, I hope the above all topics will be helpful to you. Today every business has used react-native to their native app development, as the platform provides you many benefits that save your time and cost as well. Hire Dedicated React Native App Developers from Shiv Technolabs. It is one of the Best React Native App Development companies with well-experienced developers.
1 note
·
View note
Link
Features of VueJS
Features of vuejs : Vue is called as a progressive JavaScript framework with various features for building user interfaces. The following are the major features available with VueJS.
Improvement & Bug Fixes: In the supplement to providing these new features, vue.js further comes with several improvements and bug fixes.
Improved Typescript Support & Integration: The most modern version of VueJS render stable support to TypeScript. The improved integration improves the type of declaration process.
Better Error Handling & Reporting: Whilst using earlier versions of vuejs, programmers have to manipulate with the unexpected errors all through either config.errorHandler option or render an appropriate error component.
Better Functional Component Support: VueJs renders more considerate assistance to the functional components which are described as a single-file component (SFC). Here, the developers can now appropriate the vue-loader to represent functional components in an individual vue.js file.
Environment-Agnostic Server-Side Rendering: Unlike the other JS libraries, VueJS appears with built-in streaming server-side rendering. The hallmark makes it quite more accessible for the programmers to execute server-side rendering asynchronously.
VueJS Installing Steps
1. npm install -g @vue/cli 2. vue --version for check version 3. vue create {projectname} 4. need dependency a. vue-router b. dart-sass c. babel d. pwa 5. sudo npm install --save axios vue-axios { dipendency for ajax request} 6. npm install vue-easysession --save {dipendency for session}
Base Example
Here’s an example of a Vue component: // Define a new component called button-counter.

0 notes
Text
Don’t Wait! Mock the API
Today we have a loose coupling between the front end and the back end of web applications. They are usually developed by separate teams, and keeping those teams and the technology in sync is not easy. To solve part of this problem, we can “fake” the API server that the back end tech would normally create and develop as if the API or endpoints already exist.
The most common term used for creating simulated or “faking” a component is mocking. Mocking allows you to simulate the API without (ideally) changing the front end. There are many ways to achieve mocking, and this is what makes it so scary for most people, at least in my opinion.
Let’s cover what a good API mocking should look like and how to implement a mocked API into a new or existing application.
Note, the implementation that I am about to show is framework agnostic — so it can be used with any framework or vanilla JavaScript application.
Mirage: The mocking framework
The mocking approach we are going to use is called Mirage, which is somewhat new. I have tested many mocking frameworks and just recently discovered this one, and it’s been a game changer for me.
Mirage is marketed as a front-end-friendly framework that comes with a modern interface. It works in your browser, client-side, by intercepting XMLHttpRequest and Fetch requests.
We will go through creating a simple application with mocked API and cover some common problems along the way.
Mirage setup
Let’s create one of those standard to-do applications to demonstrate mocking. I will be using Vue as my framework of choice but of course, you can use something else since we’re working with a framework-agnostic approach.
So, go ahead and install Mirage in your project:
# Using npm npm i miragejs -D
# Using Yarn yarn add miragejs -D
To start using Mirage, we need to setup a “server” (in quotes, because it’s a fake server). Before we jump into the setup, I will cover the folder structure I found works best.
/ ├── public ├── src │ ├── api │ │ └── mock │ │ ├── fixtures │ │ │ └── get-tasks.js │ │ └── index.js │ └── main.js ├── package.json └── package-lock.json
In a mock directory, open up a new index.js file and define your mock server:
// api/mock/index.js import { Server } from 'miragejs';
export default function ({ environment = 'development' } = {}) { return new Server({ environment,
routes() { // We will add our routes here }, }); }
The environment argument we’re adding to the function signature is just a convention. We can pass in a different environment as needed.
Now, open your app bootstrap file. In our case, this is he src/main.js file since we are working with Vue. Import your createServer function, and call it in the development environment.
// main.js import createServer from './mock'
if (process.env.NODE_ENV === 'development') { createServer(); }
We’re using the process.env.NODE_ENV environment variable here, which is a common global variable. The conditional allows Mirage to be tree-shaken in production, therefore, it won’t affect your production bundle.
That is all we need to set up Mirage! It’s this sort of ease that makes the DX of Mirage so nice.
Our createServer function is defaulting it to development environment for the sake of making this article simple. In most cases, this will default to test since, in most apps, you’ll call createServer once in development mode but many times in test files.
How it works
Before we make our first request, let’s quickly cover how Mirage works.
Mirage is a client-side mocking framework, meaning all the mocking will happen in the browser, which Mirage does using the Pretender library. Pretender will temporarily replace native XMLHttpRequest and Fetch configurations, intercept all requests, and direct them to a little pretend service that the Mirage hooks onto.
If you crack open DevTools and head into the Network tab, you won’t see any Mirage requests. That’s because the request is intercepted and handled by Mirage (via Pretender in the back end). Mirage logs all requests, which we’ll get to in just a bit.
Let’s make requests!
Let’s create a request to an /api/tasks endpoint that will return a list of tasks that we are going to show in our to-do app. Note that I’m using axios to fetch the data. That’s just my personal preference. Again, Mirage works with native XMLHttpRequest, Fetch, and any other library.
// components/tasks.vue export default { async created() { try { const { data } = await axios.get('/api/tasks'); // Fetch the data this.tasks = data.tasks; } catch(e) { console.error(e); } } };
Opening your JavaScript console — there should be an error from Mirage in there:
Mirage: Your app tried to GET '/api/tasks', but there was no route defined to handle this request.
This means Mirage is running, but the router hasn’t been mocked out yet. Let’s solve this by adding that route.
Mocking requests
Inside our mock/index.js file, there is a routes() hook. Route handlers allow us to define which URLs should be handled by the Mirage server.
To define a router handler, we need to add it inside the routes() function.
// mock/index.js export default function ({ environment = 'development' } = {}) { // ... routes() { this.get('/api/tasks', () => ({ tasks: [ { id: 1, text: "Feed the cat" }, { id: 2, text: "Wash the dishes" }, //... ], })) }, }); }
The routes() hook is the way we define our route handlers. Using a this.get() method lets us mock GET requests. The first argument of all request functions is the URL we are handling, and the second argument is a function that responds with some data.
As a note, Mirage accepts any HTTP request type, and each type has the same signature:
this.get('/tasks', (schema, request) => { ... }); this.post('/tasks', (schema, request) => { ... }); this.patch('/tasks/:id', (schema, request) => { ... }); this.put('/tasks/:id', (schema, request) => { ... }); this.del('/tasks/:id', (schema, request) => { ... }); this.options('/tasks', (schema, request) => { ... });
We will discuss the schema and request parameters of the callback function in a moment.
With this, we have successfully mocked our route and we should see inside our console a successful response from Mirage.

Working with dynamic data
Trying to add a new to-do in our app won’t be possible because our data in the GET response has hardcoded values. Mirage’s solution to this is that they provide a lightweight data layer that acts as a database. Let’s fix what we have so far.
Like the routes() hook, Mirage defines a seeds() hook. It allows us to create initial data for the server. I’m going to move the GET data to the seeds() hook where I will push it to the Mirage database.
seeds(server) { server.db.loadData({ tasks: [ { id: 1, text: "Feed the cat" }, { id: 2, text: "Wash the dishes" }, ], }) },
I moved our static data from the GET method to seeds() hook, where that data is loaded into a faux database. Now, we need to refactor our GET method to return data from that database. This is actually pretty straightforward — the first argument of the callback function of any route() method is the schema.
this.get('/api/tasks', (schema) => { return schema.db.tasks; })
Now we can add new to-do items to our app by making a POST request:
async addTask() { const { data } = await axios.post('/api/tasks', { data: this.newTask }); this.tasks.push(data); this.newTask = {}; },
We mock this route in Mirage by creating a POST /api/tasks route handler:
this.post('/tasks', (schema, request) => {})
Using the second parameter of the callback function, we can see the sent request.
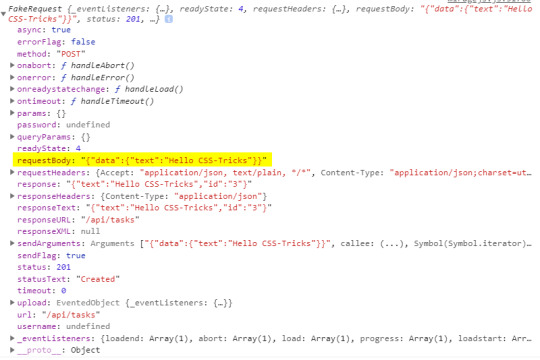
Inside the requestBody property is the data that we sent. That means it’s now available for us to create a new task.
this.post('/api/tasks', (schema, request) => { // Take the send data from axios. const task = JSON.parse(request.requestBody).data
return schema.db.tasks.insert(task) })
The id of the task will be set by the Mirage’s database by default. Thus, there is no need to keep track of ids and send them with your request — just like a real server.
Dynamic routes? Sure!
The last thing to cover is dynamic routes. They allow us to use a dynamic segment in our URL, which is useful for deleting or updating a single to-do item in our app.
Our delete request should go to /api/tasks/1, /api/tasks/2, and so on. Mirage provides a way for us to define a dynamic segment in the URL, like this:
this.delete('/api/tasks/:id', (schema, request) => { // Return the ID from URL. const id = request.params.id;
return schema.db.tasks.remove(id); })
Using a colon (:) in the URL is how we define a dynamic segment in our URL. After the colon, we specify the name of the segment which, in our case, is called id and maps to the ID of a specific to-do item. We can access the value of the segment via the request.params object, where the property name corresponds to the segment name — request.params.id. Then we use the schema to remove an item with that same ID from the Mirage database.
If you’ve noticed, all of my routes so far are prefixed with api/. Writing this over and over can be cumbersome and you may want to make it easier. Mirage offers the namespace property that can help. Inside the routes hook, we can define the namespace property so we don’t have to write that out each time.
routes() { // Prefix for all routes. this.namespace = '/api';
this.get('/tasks', () => { ... }) this.delete('/tasks/:id', () => { ... }) this.post('/tasks', () => { ... }) }
OK, let’s integrate this into an existing app
So far, everything we’ve looked at integrates Mirage into a new app. But what about adding Mirage to an existing application? Mirage has you covered so you don’t have to mock your entire API.
The first thing to note is that adding Mirage to an existing application will throw an error if the site makes a request that isn’t handled by Mirage. To avoid this, we can tell Mirage to pass through all unhandled requests.
routes() { this.get('/tasks', () => { ... }) // Pass through all unhandled requests. this.passthrough() }
Now we can develop on top of an existing API with Mirage handling only the missing parts of our API.
Mirage can even change the base URL of which it captures the requests. This is useful because, usually, a server won’t live on localhost:3000 but rather on a custom domain.
routes() { // Set the base route. this.urlPrefix = 'https://devenv.ourapp.example';
this.get('/tasks', () => { ... }) }
Now, all of our requests will point to the real API server, but Mirage will intercept them like it did when we set it up with a new app. This means that the transition from Mirage to the real API is pretty darn seamless — delete the route from the mock server and things are good to go.
Wrapping up
Over the course of five years, I have used many mocking frameworks, yet I never truly liked any of the solutions out there. That was until recently, when my team was faced with a need for a mocking solution and I found out about Mirage.
Other solutions, like the commonly used JSON-Server, are external processes that need to run alongside the front end. Furthermore, they are often nothing more than an Express server with utility functions on top. The result is that front-end developers like us need to know about middleware, NodeJS, and how servers work… things many of us probably don’t want to handle. Other attempts, like Mockoon, have a complex interface while lacking much-needed features. There’s another group of frameworks that are only used for testing, like the popular SinonJS. Unfortunately, these frameworks can’t be used to mock the regular behavior.
My team managed to create a functioning server that enables us to write front-end code as if we were working with a real back-end. We did it by writing the front-end codebase without any external processes or servers that are needed to run. This is why I love Mirage. It is really simple to set up, yet powerful enough to handle anything that’s thrown at it. You can use it for basic applications that return a static array to full-blown back-end apps alike — regardless of whether it’s a new or existing app.
There’s a lot more to Mirage beyond the implementations we covered here. A working example of what we covered can be found on GitHub. (Fun fact: Mirage also works with GraphQL!) Mirage has well-written documentation that includes a bunch of step-by-step tutorials, so be sure to check it out.
The post Don’t Wait! Mock the API appeared first on CSS-Tricks.
You can support CSS-Tricks by being an MVP Supporter.
Don’t Wait! Mock the API published first on https://deskbysnafu.tumblr.com/
0 notes
Link
Nuxt.js provides an Axios module for easy integration with your application. Axios is a promise-based HTTP client that works in the browser and Node.js environment or, in simpler terms, it is a tool for making requests (e.g API calls) in client-side applications and Node.js environment. In this tutorial, we’re going to learn how to use the Axios module and how to make a request on the server-side using asyncData and fetch. These two methods make a request on the server-side but they have some differences which we’re also going to cover. Finally, we’ll learn how to perform authentication and secure pages/routes using the auth module and auth middleware. This article requires basic knowledge of Nuxtjs and Vuejs as we’ll be building on top of that. For those without experience with Vuejs, I recommend you start from their official documentation and the Nuxt official page before continuing with this article.
What Is The Nuxt.js Axios Module?
According to the official Documentation,
“It is a Secure and easy Axios integration with Nuxt.js.”
Here are some of its features:
Automatically set base URL for client-side & server-side.
Proxy request headers in SSR (Useful for auth).
Fetch Style requests.
Integrated with Nuxt.js Progressbar while making requests.
To use the axios module in your application, you will have to first install it by using either npm or yarn. YARN
yarn add @nuxtjs/axios
NPM
npm install @nuxtjs/axios
Add it into your nuxt.config.js file:
modules: [ '@nuxtjs/axios', ], axios: { // extra config e.g // BaseURL: 'https://link-to-API' }
The modules array accepts a list of Nuxt.js modules such as dotenv, auth and in this case, Axios. What we’ve done is to inform our application that we would be using the Axios module, which we reference using @nuxtjs/axios. This is then followed by the axios property which is an object of configurations like the baseURL for both client-side and server-side. Now, you can access Axios from anywhere in your application by calling this.$axios.method or this.$axios.$method. Where method can be get, post, or delete.
Making Your First Request Using Axios
For this tutorial, I’ve put together a simple application on Github. The repository contains two folders, start and finish, the start folder contains all you need to get right into the tutorial. The finish folder contains a completed version of what we would be building. After cloning the repo and opening the start folder, we would need to install all our packages in the package.json file so open your terminal and run the following command:
npm install
Once that is done, we can start our app using the npm run dev command. This is what you should see when you go to localhost:3000.
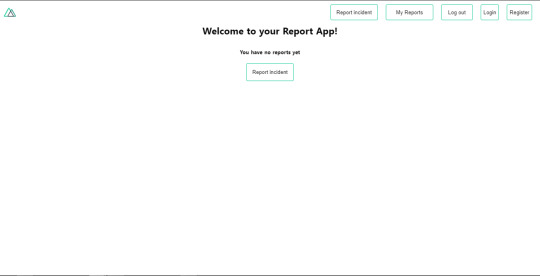
Our application’s landing page. (Large preview)
The next thing we have to do is to create a .env file in the root folder of our application and add our API URL to it. For this tutorial, we’ll be using a sample API built to collect reports from users.
API_URL=https://ireporter-endpoint.herokuapp.com/api/v2/
This way, we do not have to hard code our API into our app which is useful for working with two APIs (development and production). The next step would be to open our nuxt.config.js file and add the environmental variable to our axios config that we added above.
/* ** Axios module configuration */ axios: { // See https://github.com/nuxt-community/axios-module#options baseURL: process.env.API_URL, },
Here, we tell Nuxt.js to use this baseURL for both our client-side and server-side requests whenever we use this Axios module. Now, to fetch a list of reports, let us open the index.vue file and add the following method to the script section.
async getIncidents() { let res = await this.$store.dispatch("getIncidents"); this.incidents = res.data.data.incidents; }
What we have done is to create an async function that we call getIncidents() and we can tell what it does from the name — it fetches a list of incidents using the Vuex store action method this.$store.dispatch. We assign the response from this action to our incidents property so we can be able to make use of it in the component. We want to call the getIncidents() method whenever the component mounts. We can do that using the mounted hook.
mounted() { this.getIncidents() }
mounted() is a lifecycle hook that gets called when the component mounts. That will cause the call to the API to happen when the component mounts. Now, let us go into our index.js file in our store and create this action where we’ll be making our Axios request from.
export const actions = { async getIncidents() { let res = await this.$axios.get('/incidents') return res; } }
Here, we created the action called getIncidents which is an async function, then we await a response from the server and return this response. The response from this action is sent back to our getIncidents() method in our index.vue file. If we refresh our application, we should now be able to see a long list of incidents rendered on the page.
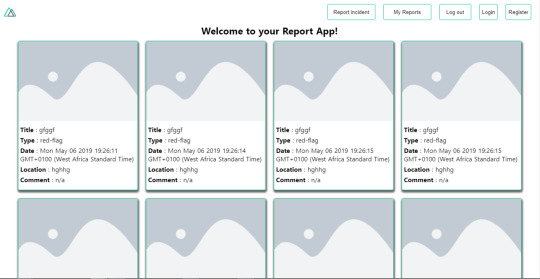
List of incidents on landing page. (Large preview)
We have made our first request using Axios but we won’t stop there, we are going to be trying out asyncData and fetch to see the differences between them and using Axios.
AsyncData
AsyncData fetches data on the server-side and it’s called before loading the page component. It does not have access to this because it is called before your page component data is created. this is only available after the created hook has been called so Nuxt.js automatically merges the returned data into the component’s data. Using asyncData is good for SEO because it fetches your site’s content on the server-side and also helps in loading content faster. Note that asyncData method can only be used in the pages folder of your application as it would not work in the components folder. This is because asyncData hook gets called before your component is created.
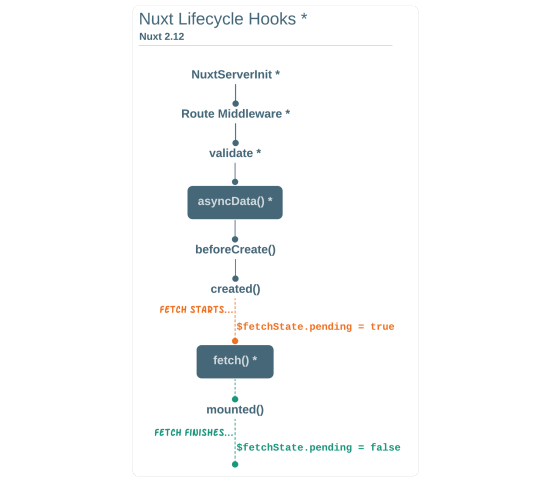
Image from Nuxt blog. (Large preview)
Let us add asyncData to our index.vue file and observe how fast our incidents data loads. Add the following code after our components property and let us get rid of our mounted hook.
async asyncData({ $axios }) { let { data } = await $axios.get("/incidents"); return { incidents: data.data.incidents }; }, // mounted() { // this.getIncidents(); // },
Here, the asyncData method accepts a property from the context $axios. We use this property to fetch the list of incidents and the value is then returned. This value is automatically injected into our component. Now, you can notice how fast your content loads if you refresh the page and at no time is there no incident to render.
Fetch
The Fetch method is also used to make requests on the server-side. It is called after the created hook in the life cycle which means it has access to the component’s data. Unlike the asyncData method, the fetch method can be used in all .vue files and be used with the Vuex store. This means that if you have the following in your data function.
data() { return { incidents: [], id: 5, gender: 'male' }; }
You can easily modify id or gender by calling this.id or this.gender.
Using Axios As A Plugin
During the process of development with Axios, you might find that you need extra configuration like creating instances and interceptors for your request so your application can work as intended and thankfully, we can do that by extending our Axios into a plugin. To extend axios, you have to create a plugin (e.g. axios.js) in your plugins folder.
export default function ({ $axios, store, redirect }) { $axios.onError(error => { if (error.response && error.response.status === 500) { redirect('/login') } }) $axios.interceptors.response.use( response => { if (response.status === 200) { if (response.request.responseURL && response.request.responseURL.includes('login')) { store.dispatch("setUser", response); } } return response } ) }
This is an example of a plugin I wrote for a Nuxt application. Here, your function takes in a context object of $axios, store and redirect which we would use in configuring the plugin. The first thing we do is to listen for an error with a status of 500 using $axios.onError and redirect the user to the login page. We also have an interceptor that intercepts every request response we make in our application checks if the status of the response we get is 200. If that is true we proceed and check that there is a response.request.responseURL and if it includes login. If this checks out to be true, we then send this response using our store’s dispatch method where it then mutated in our state. Add this plugin to your nuxt.config.js file:
plugins: [ '~/plugins/axios' ]
After doing this, your Axios plugin would intercept any request you make and check if you have defined a special case for it.
Introduction To The Auth Module
The auth module is used for performing authentication for your Nuxt application and can be accessed from anywhere in your application using $this.auth. It is also available in fetch, asyncData, middleware and NuxtInitServer from the context object as $auth. The context provides additional objects/params from Nuxt to Vue components and is available in special nuxt lifecycle areas like those mentioned above. To use the auth module in your application, you would have to install it using yarn or npm. YARN
yarn add @nuxtjs/auth
NPM
npm install @nuxtjs/auth
Add it to your nuxt.config.js file.
modules: [ '@nuxtjs/auth' ], auth: { // Options }
The auth property accepts a list of properties such as strategies and redirect. Here, strategies accepts your preferred authentication method which can be:
local For username/email and password-based flow.
facebook For using Facebook accounts as a means of authentication.
Github For authenticating users with Github accounts.
Google For authenticating users with Google accounts.
Auth0
Laravel Passport
The redirect property accepts an object of links for:
login Users would be redirected to this link if login is required.
logout Users would be redirected here if after logout current route is protected.
home Users would be redirected here after login.
Now, let us add the following to our nuxt.config.js file.
/* ** Auth module configuration */ auth: { redirect: { login: '/login', logout: '/', home: '/my-reports' }, strategies: { local: { endpoints: { login: { url: "/user/login", method: "post", propertyName: "data.token", }, logout: false, user: false, }, tokenType: '', tokenName: 'x-auth', autoFetchUser: false }, }, }
Please note that the auth method works best when there is a user endpoint provided in the option above. Inside the auth config object, we have a redirect option in which we set our login route to /login, logout route to / and home route to /my-reports which would all behave as expected. We also have a tokenType property which represents the Authorization type in the header of our Axios request. It is set to Bearer by default and can be changed to work with your API. For our API, there is no token type and this is why we’re going to leave it as an empty string. The tokenName represents the Authorization name (or the header property you want to attach your token to) inside your header in your Axios request. By default, it is set to Authorization but for our API, the Authorization name is x-auth. The autoFetchUser property is used to enable user fetch object using the user endpoint property after login. It is true by default but our API does not have a user endpoint so we have set that to false. For this tutorial, we would be using the local strategy. In our strategies, we have the local option with endpoints for login, user and logout but in our case, we would only use the *login* option because our demo API does not have a *logout* endpoint and our user object is being returned when *login* is successful. Note: The auth module does not have a register endpoint option so that means we’re going to register the traditional way and redirect the user to the login page where we will perform the authentication using this.$auth.loginWith. This is the method used in authenticating your users. It accepts a ‘strategy’ (e.g local) as a first argument and then an object to perform this authentication with. Take a look at the following example.
let data { email: '[email protected]', password: '123456' } this.$auth.loginWith('local', { data })
Using The Auth Module
Now that we have configured our auth module, we can proceed to our registration page. If you visit the /register page, you should see a registration form.
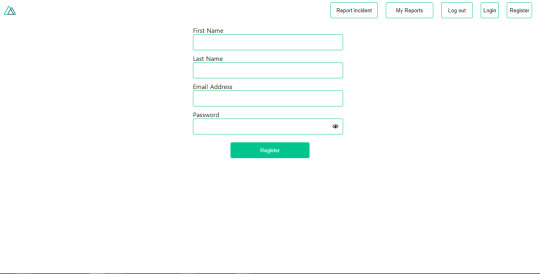
Register page. (Large preview)
Let us make this form functional by adding the following code:
methods: { async registerUser() { this.loading = true; let data = this.register; try { await this.$axios.post("/user/create", data); this.$router.push("/login"); this.loading = false; this.$notify({ group: "success", title: "Success!", text: "Account created successfully" }); } catch (error) { this.loading = false; this.$notify({ group: "error", title: "Error!", text: error.response ? error.response.data.error : "Sorry an error occured, check your internet" }); } } }
Here, we have an async function called registerUser which is tied to a click event in our template and makes an Axios request wrapped in a try/catch block to an endpoint /user/create. This redirects to the /login page and notifies the user of a successful registration. We also have a catch block that alerts the user of any error if the request is not successful. If the registration is successful, you would be redirected to the login page.
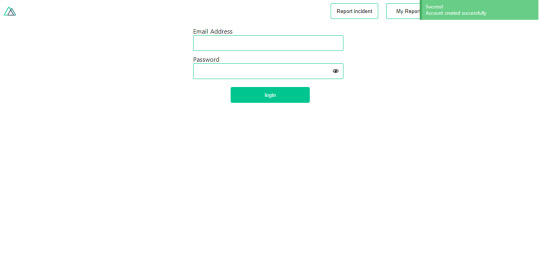
Login page with notification component. (Large preview)
Here, we’re going to make use of auth authentication method this.$auth.loginWith('local', loginData) after which we would use the this.$auth.setUser(userObj) to set the user in our auth instance. To get the login page working, let’s add the following code to our login.vue file.
methods: { async logIn() { let data = this.login; this.loading = true; try { let res = await this.$auth.loginWith("local", { data }); this.loading = false; let user = res.data.data.user; this.$auth.setUser(user); this.$notify({ group: "success", title: "Success!", text: "Welcome!" }); } catch (error) { this.loading = false; this.$notify({ group: "error", title: "Error!", text: error.response ? error.response.data.error : "Sorry an error occured, check your internet" }); } } }
We created an async function called logIn using the auth method this.$auth.loginWith('local, loginData). If this login attempt is successful, we then assign the user data to our auth instance using this.$auth.setUser(userInfo) and redirect the user to the /my-report page. You can now get user data using this.$auth.user or with Vuex using this.$store.state.auth.user but that’s not all. The auth instance contains some other properties which you can see if you log in or check your state using your Vue dev tools. If you log this.$store.state.auth to the console, you’ll see this:
{ "auth": { "user": { "id": "d7a5efdf-0c29-48aa-9255-be818301d602", "email": "[email protected]", "lastName": "Xo", "firstName": "Tm", "othernames": null, "isAdmin": false, "phoneNumber": null, "username": null }, "loggedIn": true, "strategy": "local", "busy": false } }
The auth instance contains a loggedIn property that is useful in switching between authenticated links in the nav/header section of your application. It also contains a strategy method that states the type of strategy the instance is running (e.g local). Now, we will make use of this loggedIn property to arrange our nav links. Update your navBar component to the following:
<template> <header class="header"> <div class="logo"> <nuxt-link to="/"> <Logo /> </nuxt-link> </div> <nav class="nav"> <div class="nav__user" v-if="auth.loggedIn"> <p></p> <button class="nav__link nav__link--long"> <nuxt-link to="/report-incident">Report incident</nuxt-link> </button> <button class="nav__link nav__link--long"> <nuxt-link to="/my-reports">My Reports</nuxt-link> </button> <button class="nav__link" @click.prevent="logOut">Log out</button> </div> <button class="nav__link" v-if="!auth.loggedIn"> <nuxt-link to="/login">Login</nuxt-link> </button> <button class="nav__link" v-if="!auth.loggedIn"> <nuxt-link to="/register">Register</nuxt-link> </button> </nav> </header> </template> <script> import { mapState } from "vuex"; import Logo from "@/components/Logo"; export default { name: "nav-bar", data() { return {}; }, computed: { ...mapState(["auth"]) }, methods: { logOut() { this.$store.dispatch("logOut"); this.$router.push("/login"); } }, components: { Logo } }; </script> <style></style>
In our template section, we have several links to different parts of the application in which we are now using auth.loggedIn to display the appropriate links depending on the authentication status. We have a logout button that has a click event with a logOut() function attached to it. We also display the user’s email gotten from the auth property which is accessed from our Vuex store using the mapState method which maps our state auth to the computed property of the nav component. We also have a logout method that calls our Vuex action logOut and redirects the user to the login page. Now, let us go ahead and update our store to have a logOut action.
export const actions = { // .... logOut() { this.$auth.logout(); } }
The logOut action calls the auth logout method which clears user data, deletes tokens from localStorage and sets loggedIn to false. Routes like /my-reports and report-incident should not be visible to guests but at this point in our app, that is not the case. Nuxt does not have a navigation guard that can protect your routes, but it has is the auth middleware. It gives you the freedom to create your own middleware so you can configure it to work the way you want. It can be set in two ways:
Per route.
Globally for the whole app in your nuxt.config.js file.
router: { middleware: ['auth'] }
This auth middleware works with your auth instance so you do not need to create an auth.js file in your middleware folder. Let us now add this middleware to our my-reports.vue and report-incident.vue files. Add the following lines of code to the script section of each file.
middleware: 'auth'
Now, our application would check if the user trying to access these routes has an auth.loggedIn value of true. It’ll redirect them to the login page using our redirect option in our auth config file — if you’re not logged in and you try to visit either /my-report or report-incident, you would be redirected to /login. If you go to /report-incidents, this is what you should see.
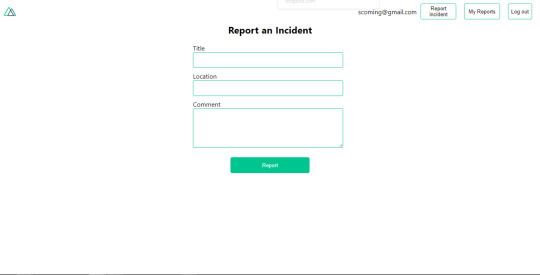
Report incident page. (Large preview)
This page is for adding incidents but that right now the form does not send incident to our server because we are not making the call to the server when the user attempts to submit the form. To solve this, we will add a reportIncident method which will be called when the user clicks on Report. We’ll have this in the script section of the component. This method will send the form data to the server. Update your report-incident.vue file with the following:
<template> <section class="report"> <h1 class="report__heading">Report an Incident</h1> <form class="report__form"> <div class="input__container"> <label for="title" class="input__label">Title</label> <input type="text" name="title" id="title" v-model="incident.title" class="input__field" required /> </div> <div class="input__container"> <label for="location" class="input__label">Location</label> <input type="text" name="location" id="location" v-model="incident.location" required class="input__field" /> </div> <div class="input__container"> <label for="comment" class="input__label">Comment</label> <textarea name="comment" id="comment" v-model="incident.comment" class="input__area" cols="30" rows="10" required ></textarea> </div> <input type="submit" value="Report" class="input__button" @click.prevent="reportIncident" /> <p class="loading__indicator" v-if="loading">Please wait....</p> </form> </section> </template> <script> export default { name: "report-incident", middleware: "auth", data() { return { loading: false, incident: { type: "red-flag", title: "", location: "", comment: "" } }; }, methods: { async reportIncident() { let data = this.incident; let formData = new FormData(); formData.append("title", data.title); formData.append("type", data.type); formData.append("location", data.location); formData.append("comment", data.comment); this.loading = true; try { let res = await this.$store.dispatch("reportIncident", formData); this.$notify({ group: "success", title: "Success", text: "Incident reported successfully!" }); this.loading = false; this.$router.push("/my-reports"); } catch (error) { this.loading = false; this.$notify({ group: "error", title: "Error!", text: error.response ? error.response.data.error : "Sorry an error occured, check your internet" }); } } } }; </script> <style> </style>
Here, we have a form with input fields for title, location, and comment with two-way data binding using v-model. We also have a submit button with a click event. In the script section, we have a reportIncident method that collects all the information provided in the form and is sent to our server using FormData because the API is designed to also accept images and videos. This formData is attached to a Vuex action using the dispatch method, if the request is successful, you get redirected to /my-reports with a notification informing you that this request was successful otherwise, you would be notified of an error with the error message. At this point, we don’t have reportIncident action in our store yet so in your browser console, you would see an error if you try to click submit on this page.

Vuex error message. (Large preview)
To fix this, add the reportIncident action your index.js file.
export const actions = { // ... async reportIncident({}, data) { let res = await this.$axios.post('/incident/create', data) return res; } }
Here, we have a reportIncident function that takes in an empty context object and the data we’re sending from our form. This data is then attached to a post request that creates an incident and returns back to our report-incident.vue file. At this point, you should be able to add a report using the form after which you would be redirected to /my-reports page.
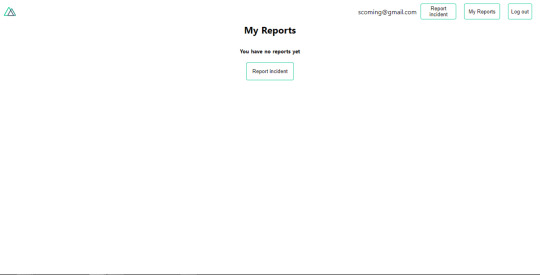
My reports page empty. (Large preview)
This page should display a list of incidents created by the user but right now it only shows what we see above, let’s go ahead to fix that. We’re going to be using the fetch method we learned about to get this list. Update your my-reports.vue file with the following:
<script> import incidentCard from "@/components/incidentCard.vue"; export default { middleware: "auth", name: "my-reports", data() { return { incidents: [] }; }, components: { incidentCard }, async fetch() { let { data } = await this.$axios.get("/user/incidents"); this.incidents = data.data; } }; </script>
Here, we use fetch method to get user-specific incidents and assign the response to our incidents array. If you refresh your page after adding an incident, you should see something like this.
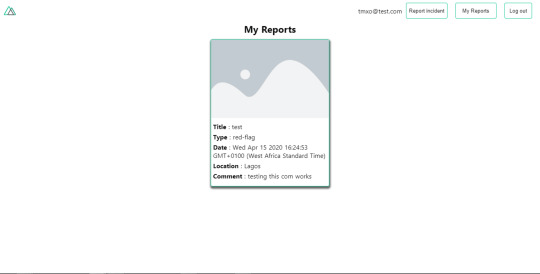
My Reports page with a report. (Large preview)
At this point, we would notice a difference in how fetch method and asyncData loads our data.
Conclusion
So far, we have learned about the Axios module and all of its features. We have also learned more about asyncData, and how we can fetch both of them together despite their differences. We’ve also learned how to perform authentication in our application using the auth module and how to use the auth middleware to protect our routes. Here are some useful resources that talk more about all we’ve covered.
Getting started with meta tags in Nuxjs.
Using the dotenv module in Nuxt.
Using Fetch in your Nuxt app.
Getting started with asyncData.
0 notes
Text
Let’s Build a JAMstack E-Commerce Store with Netlify Functions
A lot of people are confused about what JAMstack is. The acronym stands for JavaScript, APIs, and Markup, but truly, JAMstack doesn’t have to include all three. What defines JAMstack is that it’s served without web servers. If you consider the history of computing, this type of abstraction isn’t unnatural; rather it’s the inevitable progression this industry has been moving towards.
So, if JAMstack tends to be static by definition, it can’t have dynamic functionality, server-side events, or use a JavaScript framework, right? Thankfully, not so. In this tutorial, we’ll set up a JAMstack e-commerce app and add some serverless functionality with Netlify Functions (which abstract AWS Lambda, and are super dope in my opinion).
I'll show more directly how the Nuxt/Vue part was set up in a follow-up post, but for now we're going to focus on the Stripe serverless function. I'll show you how I set this one up, and we'll even talk about how to connect to other static site generators such as Gatsby.
This site and repo should get you started if you’d like to set something like this up yourself:
Demo Site
GitHub Repo
Scaffold our app
The very first step is to set up our app. This one is built with Nuxt to create a Vue app, but you can replace these commands with your tech stack of choice:
yarn create nuxt-app hub create git add -A git commit -m “initial commit” git push -u origin master
I am using yarn, hub (which allows me to create repos from the command line) and Nuxt. You may need to install these tools locally or globally before proceeding.
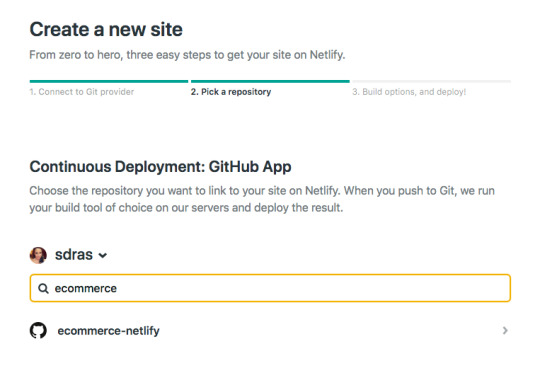
With these few commands, following the prompts, we can set up an entirely new Nuxt project as well as the repo.
If we log into Netlify and authenticate, it will ask us to pick a repo:
I'll use yarn generate to create the project. With that, I can add in the site settings for Nuxt in the dist directory and hit feploy! That's all it takes to set up CI/CD and deploy the site! Now every time I push to the master branch, not only will I deploy, but I'll be given a unique link for that particular deploy as well. So awesome.
A basic serverless function with Netlify
So here's the exciting part, because the setup for this kind of functionality is so quick! If you’re unfamiliar with Serverless, you can think of it like the same JavaScript functions you know and love, but executed on the server. Serverless functions are event-driven logic and their pricing is extremely low (not just on Netlify, but industry-wide) and scales with your usage. And yes, we have to add the qualifier here: serverless still uses servers, but babysitting them is no longer your job. Let’s get started.
Our very basic function looks like this. I stored mine in a folder named functions, and just called it index.js. You can truly call the folder and function what you want.
// functions/index.js exports.handler = async (event, context) => { return { statusCode: 200, body: JSON.stringify({ message: "Hi there Tacos", event }) } }
We’ll also need to create a netlify.toml file at the root of the project and let it know which directory to find the function in, which in this case, is "functions."
// netlify.toml [build] functions = "functions"
If we push to master and go into the dashboard, you can see it pick up the function!

If you look at the endpoint listed above it’s stored here: https://ecommerce-netlify.netlify.com/.netlify/functions/index
Really, for any site you give it, the URL will follow this pattern: https:/<yoursiteurlhere>/.netlify/functions/<functionname>
When we hit that endpoint, it provides us with the message we passed in, as well as all the event data we logged as well:

I love how few steps that is! This small bit of code gives us infinite power and capabilities for rich, dynamic functionality on our sites.
Hook up Stripe
Pairing with Stripe is extremely fun because it's easy to use, sophisticated, has great docs, and works well with serverless functions. I have other tutorials where I used Stripe because I enjoy using their service so much.
Here’s a bird’s eye view of the app we’ll be building:

First we’ll go to the Stripe dashboard and get our keys. For anyone totally scandalized right now, it's OK, these are testing keys. You can use them, too, but you’ll learn more if you set them up on your own. (It’s two clicks and I promise it’s not hard to follow along from here.)
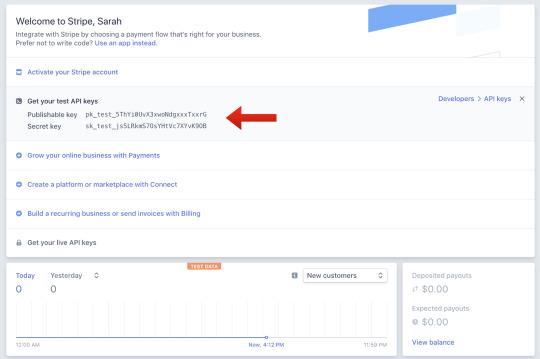
We’ll install a package called dotenv which will help us store our key and test it locally. Then, we’ll store our Stripe secret key to a Stripe variable. (You can call it anything, but here I’ve called it STRIPE_SECRET_KEY, and that’s pretty much industry standard.)
yarn add dotenv
require("dotenv").config() const stripe = require("stripe")(process.env.STRIPE_SECRET_KEY)
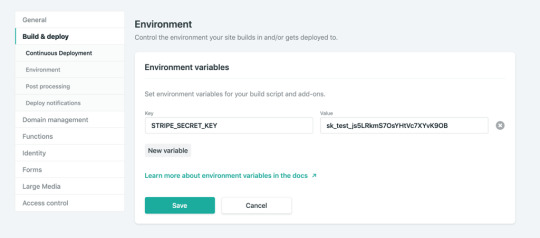
In the Netlify dashboard, we’ll go to "Build & deploy," then "Environment" to add in Environment variables, where the STRIPE_SECRET_KEY is key, and the value will be the key that starts with sk.
We’ll also add in some headers so we don’t run into CORS issues. We’ll use these headers throughout the function we’re going to build.
const headers = { "Access-Control-Allow-Origin": "*", "Access-Control-Allow-Headers": "Content-Type" }
So, now we’ll create the functionality for talking to Stripe. We’ll make sure we’ll handle the cases that it’s not the HTTP method we’re expecting, and also that we’re getting the information we expect.
You can already see here, what data we’re going to be needing to send to stripe by what we check for. We’ll need the token, the total amount, and an idempotency key.
If you're unfamiliar with idempotency keys, they are unique values that are generated by a client and sent to an API along with a request in case the connection is disrupted. If the server receives a call that it realizes is a duplicate, it ignores the request and responds with a successful status code. Oh, and it's an impossible word to pronounce.
exports.handler = async (event, context) => { if (!event.body || event.httpMethod !== "POST") { return { statusCode: 400, headers, body: JSON.stringify({ status: "invalid http method" }) } } const data = JSON.parse(event.body) if (!data.stripeToken || !data.stripeAmt || !data.stripeIdempotency) { console.error("Required information is missing.") return { statusCode: 400, headers, body: JSON.stringify({ status: "missing information" }) } }
Now, we’ll kick off the Stripe payment processing! We’ll create a Stripe customer using the email and token, do a little logging, and then create the Stripe charge. We’ll specify the currency, amount, email, customer ID, and give a description while we're at it. Finally, we’ll provide the idempotency key (pronounced eye-dem-po-ten-see), and log that it was successful.
(While it's not shown here, we’ll also do some error handling.)
// stripe payment processing begins here try { await stripe.customers .create({ email: data.stripeEmail, source: data.stripeToken }) .then(customer => { console.log( `starting the charges, amt: ${data.stripeAmt}, email: ${data.stripeEmail}` ) return stripe.charges .create( { currency: "usd", amount: data.stripeAmt, receipt_email: data.stripeEmail, customer: customer.id, description: "Sample Charge" }, { idempotency_key: data.stripeIdempotency } ) .then(result => { console.log(`Charge created: ${result}`) }) })
Hook it up to Nuxt

If we look back at our application, you can see we have pages and components that live inside the pages. The Vuex store is like the brain of our application. It will hold the state of the app, and that's what will communicate with Stripe. However, we still need to communicate with our user via the client. We'll collect the credit card data in a component called AppCard.vue that will live on the cart page.
First, we'll install a package called vue-stripe-elements-plus, that gives us some Stripe form elements that allow us to collect credit card data, and even sets us up with a pay method that allows us to create tokens for stripe payment processing. We'll also add a library called uuid that will allow us to generate unique keys, which we'll use for the idempotency key.
yarn add vue-stripe-elements-plus uuid
The default setup they give us to work with vue-stripe-elements-plus looks like this:
<template> <div id='app'> <h1>Please give us your payment details:</h1> <card class='stripe-card' :class='{ complete }' stripe='pk_test_XXXXXXXXXXXXXXXXXXXXXXXX' :options='stripeOptions' @change='complete = $event.complete' /> <button class='pay-with-stripe' @click='pay' :disabled='!complete'>Pay with credit card</button> </div> </template>
<script> import { stripeKey, stripeOptions } from './stripeConfig.json' import { Card, createToken } from 'vue-stripe-elements-plus' export default { data () { return { complete: false, stripeOptions: { // see https://stripe.com/docs/stripe.js#element-options for details } } }, components: { Card }, methods: { pay () { // createToken returns a Promise which resolves in a result object with // either a token or an error key. // See https://stripe.com/docs/api#tokens for the token object. // See https://stripe.com/docs/api#errors for the error object. // More general https://stripe.com/docs/stripe.js#stripe-create-token. createToken().then(data => console.log(data.token)) } } } </script>
So here's what we're going to do. We're going to update the form to store the customer email, and update the pay method to send that and the token or error key to the Vuex store. We'll dispatch an action to do so.
data() { return { ... stripeEmail: "" }; }, methods: { pay() { createToken().then(data => { const stripeData = { data, stripeEmail: this.stripeEmail }; this.$store.dispatch("postStripeFunction", stripeData); }); }, ...
That postStripeFunction action we dispatched looks like this:
// Vuex store export const actions = { async postStripeFunction({ getters, commit }, payload) { commit("updateCartUI", "loading") try { await axios .post( "https://ecommerce-netlify.netlify.com/.netlify/functions/index", { stripeEmail: payload.stripeEmail, stripeAmt: Math.floor(getters.cartTotal * 100), //it expects the price in cents stripeToken: "tok_visa", //testing token, later we would use payload.data.token stripeIdempotency: uuidv1() //we use this library to create a unique id }, { headers: { "Content-Type": "application/json" } } ) .then(res => { if (res.status === 200) { commit("updateCartUI", "success") setTimeout(() => commit("clearCart"), 3000) …
We're going to update the UI state to loading while we're processing. Then we'll use axios to post to our function endpoint (the URL you saw earlier in the post when we set up our function). We'll send over the email, the amt, the token and the unique key that we built the function to expect.
Then if it was successful, we'll update the UI state to reflect that.
One last note I'll give is that I store the UI state in a string, rather than a boolean. I usually start it with something like "idle" and, in this case, I'll also have "loading," "success," and "failure." I don't use boolean states because I've rarely encountered a situation where UI state only has two states. When you work with booleans for this purpose, you tend to need to break it out into more and more states, and checking for all of them can get increasingly complicated.
As it stands, I can reflect changes in the UI on the cart page with legible conditionals, like this:
<section v-if="cartUIStatus === 'idle'"> <app-cart-display /> </section> <section v-else-if="cartUIStatus === 'loading'" class="loader"> <app-loader /> </section> <section v-else-if="cartUIStatus === 'success'" class="success"> <h2>Success!</h2> <p>Thank you for your purchase. You'll be receiving your items in 4 business days.</p> <p>Forgot something?</p> <button class="pay-with-stripe"> <nuxt-link exact to="/">Back to Home</nuxt-link> </button> </section> <section v-else-if="cartUIStatus === 'failure'"> <p>Oops, something went wrong. Redirecting you to your cart to try again.</p> </section>
And there you have it! We’re all set up and running to accept payments with stripe on a Nuxt, Vue site with a Netlify function, and it wasn’t even that complicated to set up!
Gatsby Applications
We used Nuxt in this instance but if you wanted to set up the same kind of functionality with something that uses React such as Gatsby, there's a plugin for that. (Everything is plugin in Gatsby. ☺️)
You would install it with this command:
yarn add gatsby-plugin-netlify-functions
...and add the plugin to your application like this:
plugins: [ { resolve: `gatsby-plugin-netlify-functions`, options: { functionsSrc: `${__dirname}/src/functions`, functionsOutput: `${__dirname}/functions`, }, }, ]
The serverless function used in this demo is straight up JavaScript, so it's also portable to React applications. There's a plugin to add the Stripe script to your Gatsby app (again, everything is a plugin). Fair warning: this adds the script to every page on the site. To collect the credit card information on the client, you would use React Stripe Elements, which is similar to the Vue one we used above.
Just make sure that you're collecting from the client and passing all the information the function is expecting:
The user email
The total amount, in cents
The token
The idempotency key
Demo Site
GitHub Repo
With such a low barrier to entry, you can see how you can make really dynamic experiences with JAMstack applications. It's amazing how much you can accomplish without any maintenance costs from servers. Stripe and Netlify Functions make setting up payment processing in a static application such a smooth developer experience!
The post Let’s Build a JAMstack E-Commerce Store with Netlify Functions appeared first on CSS-Tricks.
via CSS-Tricks https://ift.tt/2z8RO8E
0 notes
Text
Building Mobile Apps With Ionic And React
Building Mobile Apps With Ionic And React
Ahmed Bouchefra
2019-08-07T12:30:00+02:002019-08-07T10:36:12+00:00
Ionic has recently added support for React; so now, React developers can get the advantages of Ionic to build hybrid mobile apps and progressive web apps (PWAs). In this post, we’ll show you how to get started using Ionic with React by building a simple demo app from scratch.
Prerequisites
In order to properly follow this tutorial, you’ll need the following prerequisites:
recent versions of Node.js and npm installed on your system,
working knowledge of TypeScript and React.
You can check that you have the latest Node.js version (v10) installed by running the following command:
$ node -v
Introducing React And Ionic
Let’s start with brief introductions to both React and Ionic.
According to the official website:
“React is a declarative, efficient, and flexible JavaScript library for building user interfaces. It lets you compose complex UIs from small and isolated pieces of code called ‘components’.”
React focuses on building UIs and doesn’t provide any built-in tools for the common tasks required in web development, such as fetching remote data and routing, so you’ll need to use some existing third-party libraries for these tasks.
According to the Ionic website:
“Ionic Framework is the free, open-source mobile UI toolkit for developing high-quality cross-platform apps for native iOS, Android, and the web — all from a single codebase.”
Basically, it’s a set of UI components that you can use with plain JavaScript or any popular front-end framework or library, such as Angular, React or Vue, to build a hybrid mobile app and PWA.
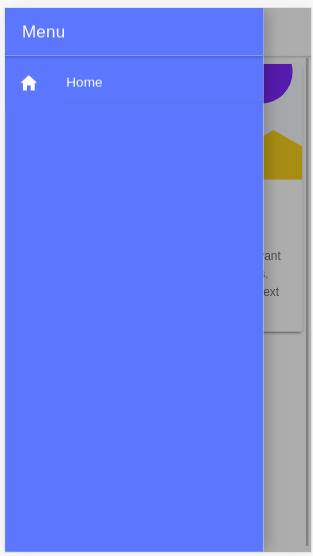
In this tutorial, we’ll see and use some Ionic UI components such as the following:
IonMenu: With this, a navigation drawer will slide in from the side of the current view.
IonToolbar: These top bars are positioned above or below the content.
IonHeader: This parent component holds the toolbar component.
IonContent: This component provides a content area, with methods to control the scrollable area and other things. You need only one content component inside a single view.
IonList: This component contains items with similar data content, such as images and text. It’s made up of IonItem objects.
IonItem: This component may contain text, icons, avatars, images, inputs and any other native or custom element.
IonButton: This component provides a clickable element, which can be used in a form or anywhere that needs simple, standard button functionality.
Installing Ionic CLI v5
Ionic’s command line interface (CLI), version 5, has support for creating Ionic projects based on React. So, let’s get started by installing the tool from npm.
Open a CLI, and run the following command:
$ npm install -g ionic
At the time of writing, Ionic’s CLI v5.2.3 is the latest.
Note: *According to how you installed Node.js in your system, you may need to add sudo before your command in macOS or Linux or run the command prompt as administrator in Windows if you get any permission errors. You can also simply fix your npm permissions or use a tool such as nvm.*
Next, install Cordova Resources (which is used to generate Cordova resources locally) and Native Run (used to deploy app binaries to devices):
$ npm install -g cordova-res native-run
These are required only if you want to test your application on a real mobile device or emulator.
Creating An Ionic And React Project
Now, let’s create a project based on React. Go back to your terminal, make sure you are in your working directory, and run the following command:
$ ionic start myApp --type=react
We use --type=react to generate a project based on React. You’ll next need to choose a starter template from the available ones. Let’s pick sidemenu for a starter template with a side menu and navigation.
After generating the project and installing the dependencies, you can serve your app locally using the following commands:
$ cd ./myApp $ ionic serve
Your app will be available from the http://localhost:8100 address, and you can actually use your web browser to start playing with it.
Ionic is called a hybrid mobile framework because it makes use of web technologies that were originally designed to create web apps, along with a native container (Cordova or Capacitor), to build mobile apps without using native technologies for the target platforms, such as Java or Kotlin for Android or Swift for iOS.
Because your mobile app is actually a web application, you can do most development by testing in a web browser without using an emulator or a real mobile device, except for testing native device features such as the camera or the SQLite storage, in case you’ve used them in your app. In fact, it’s even possible to use certain techniques to mimic the plugins that provide the native features and do the entire testing during development in your web browser.
Cleaning Our Project
We have the app’s basic structure, with two pages (home and list) and a menu. Let’s remove the list page since it’s just boilerplate code.
First, remove the src/pages/List.tsx file, then open the src/App.tsx file, and remove the entry for the list page from the appPages array:
const appPages: AppPage[] = [ { title: 'Home', url: '/home', icon: home } ];
Also, remove the import of the list page from the file:
import List from './pages/List';
Next, remove <Route path="/:tab(home)/list" component={List} exact={true} /> from the App component:
const App: React.FunctionComponent = () => ( <IonApp> <IonReactRouter> <IonSplitPane contentId="main"> <Menu appPages={appPages} /> <IonPage id="main"> <IonRouterOutlet> <Route path="/:tab(home)" component={Home} exact={true} /> <Route exact path="/" render={() => <Redirect to="/home" />} /> </IonRouterOutlet> </IonPage> </IonSplitPane> </IonReactRouter> </IonApp> ); export default App;
The App component is the root component that gets rendered by our application. If you open the src/index.tsx file, you’ll find the following code:
import React from 'react'; import ReactDOM from 'react-dom'; import App from './App'; ReactDOM.render(<App />, document.getElementById('root'));
The render() method is used to render a React element into the DOM in the supplied root element.
Theming The App
Having created, served and cleaned our Ionic project, let’s now see how we can change the colors of the UI so that it looks more professional.
Let’s get started with the side menu. Open the src/components/Menu.tsx file, and add a color attribute with a primary value to the IonToolbar, IonContent, IonList and IonItem UI components:
const Menu: React.FunctionComponent = ({ appPages }) => ( <IonMenu contentId="main"> <IonHeader> <IonToolbar color="primary"> <IonTitle>Menu</IonTitle> </IonToolbar> </IonHeader> <IonContent color="primary"> <IonList style= color="primary"> {appPages.map((appPage, index) => { return ( <IonMenuToggle key={index} auto-hide="false"> <IonItem color="primary" href={appPage.url}> <IonIcon slot="start" icon={appPage.icon} /> <IonLabel>{appPage.title}</IonLabel> </IonItem> </IonMenuToggle> ); })} </IonList> </IonContent> </IonMenu> );
Ionic provides some default colors (primary, secondary, tertiary, success, warning, danger, light, medium and dark) that can be used to change the color of UI components. A color can be applied to an Ionic component in order to change the default colors using the color attribute. See “Colors” for more information.
These colors have default values, but you can customize them via some predefined CSS variables. See “Modifying Colors“.
This is a screenshot of our menu:
Ionic menu. (Large preview)
Next, let’s change the color of the Home page. Open the src/pages/Home.tsx file, and set the color attribute of the IonToolbar and IonContent components to primary:
const HomePage: React.FunctionComponent = () => { return ( <> <IonHeader> <IonToolbar color="primary"> <IonButtons slot="start"> <IonMenuButton /> </IonButtons> <IonTitle>Home</IonTitle> </IonToolbar> </IonHeader> <IonContent color="primary" > </IonContent> </> ); };
This is a screenshot of the page:

Ionic home. (Large preview)
Installing Axios And Consuming A REST API
We’ll see how to install Axios and consume a third-party RESTful API in our application, and we’ll also see how to display the fetched data using Ionic card and list components.
Having themed our application, let’s now see how to fetch data using Axios. We’ll use the third-party API available from NewsAPI.org.
First, we need to grab an API key, so that we can communicate with the API. Go to the registration page, enter your information, and register an account. You’ll be given an API key; note it, and let’s continue.
Head back to your terminal, and run the following command to install Axios:
$ npm install axios --save
Next, open the src/pages/Home.tsx file, and start by importing Axios and IonButton:
import { IonButton } from '@ionic/react'; import axios from 'axios';
Next, define the API_KEY and URL constant variables:
const API_KEY = "<YOUR_API_KEY_HERE>"; const URL = `https://newsapi.org/v2/top-headlines?sources=techcrunch&apiKey=${API_KEY}`;
In the URL variable, we’ll add an endpoint to get the top headlines from our source, TechCrunch. You can use any source you want from the available sources.
Note: Make sure to put your own API key in the API_KEY variable.
Next, define the fetchArticles() method as follows:
const fetchArticles = () => { return axios({ url: URL, method: 'get' }).then(response => { console.log(response); return response.data; }) };
We simply call the axios() method to send a GET request to the news endpoint, and the result from the method is a promise that needs to be resolved in order to get the news data.
Next, update the HomePage component as follows to call the fetchArticles() method and resolve the returned promise:
const HomePage: React.FunctionComponent = () => { const [articles, setArticles] = React.useState([]); const items: any[] = []; React.useEffect(() => { fetchArticles().then(data => setArticles(data.articles)); }, []); return ( <> <IonHeader> <IonToolbar color="primary"> <IonButtons slot="start"> <IonMenuButton /> </IonButtons> <IonTitle>Home</IonTitle> </IonToolbar> </IonHeader> <IonContent color="primary" > <IonList color="primary"> { articles.map(a => { return ( <IonItem> {a['title']} <IonButton href={a['url']} color="primary" slot="end">Read</IonButton> </IonItem> ); }) } </IonList> </IonContent> </> ); };
In our function component, we first call the useState() hook of React to create the articles state variable, which will hold the news articles after we fetch them from the API.
useState() returns the state variable, which has the empty array as its initial value and a function that we can use to change the value of the variable. We use destructuring assignment to unpack the values from the returned pair into distinct variables (i.e. articles and setArticles()).
Next, we call the useEffect() hook to perform a side effect in our component. In our case, the side effect is to fetch data from the news API using the fetchArticles() method, which returns a promise. Once the promise is resolved, we call the setArticles() method to assign the news data to the articles variable.
Both useState() and useEffect() are built-in React hooks that were introduced in React 16.8; they simply let you use state and other React features without having to write a class. The useEffect() hook is equivalent to calling the componentDidMount, componentDidUpdate and componentWillUnmount lifecycle methods combined in class-based components.
Finally, in the view template, we iterate over the articles array using the map() method, and we display the title of each news article inside an IonItem element of the IonList component, and also a button that takes us to the page of the full article.
This is a screenshot of the page:
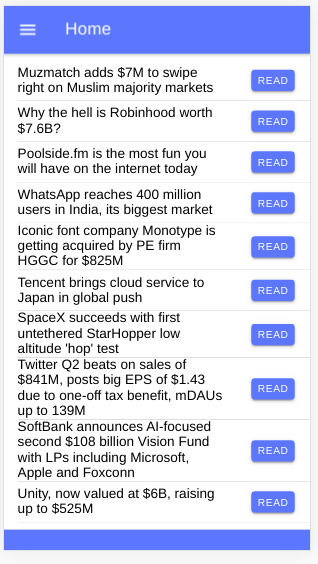
Ionic news app (Large preview)
You can find the source code in this GitHub repository.
Conclusion
In this tutorial, we have started using both Ionic and React and used them to build a simple mobile application that fetches and displays news data from a third-party API using the Axios client. We have also seen how to use hooks in React — namely, the useState() and useEffect() hooks — to create state and perform side effects inside React function components. With Ionic, we’ve seen how easy it is to generate a project based on React and how we can theme the application using the color attributes of components.

(dm, al, yk, ra, il)
0 notes
Photo

An Introduction to Data Visualization with Vue and D3.js
Web applications are normally data-driven and oftentimes the need arises to visualize this data. That’s where charts and graphs come in. They make it easier to convey information, as well as demonstrate correlations or statistical relationships. Information presented in the form of a chart or a graph is also easier for a non-native speaker to understand.
In this tutorial, we’ll learn how to visualize data in a Vue project. For this, we’ll be using the popular D3.js library, which combines powerful visualization components and a data-driven approach to DOM manipulation.
Let’s get started.
Note: the code for this tutorial can be found on GitHub.
What is D3?
As you can read on the project’s home page, D3.js is a JavaScript library for manipulating documents based on data. D3 helps you bring data to life using HTML, SVG, and CSS. Its emphasis on web standards gives you the full capabilities of modern browsers without tying yourself to a proprietary framework.
Whereas most people will refer to D3.js as a data visualization library, it’s not. D3 is more of a framework comprising different parts — such as jQuery parts (which help us select and manipulate DOM elements), Lodash parts, animation parts, data analysis parts, and data visualization parts.
In this tutorial, we’ll be working with the visualization aspect of D3. The real meat of D3 when visualizing data is:
the availability of functions for decorating data with drawing instructions
creating new drawable data from source data
generating SVG paths
creating data visualization elements (like an axis) in the DOM from your data and methods
What We’ll Be Building
We want to create an app that lets users search for a repo on GitHub, then get a visual representation of issues opened in the past week that are still open. The end result will look like this:

Prerequisites
This tutorial assumes you have a working knowledge of Vue. Previous knowledge of D3.js isn’t required, but if you’d like to get up to speed quickly, you might want to read our D3 by example tutorial.
You’ll also need to have Node installed on your system. You can do this by downloading the binaries for your system from the official website, or using a version manager.
Finally, we’ll be using the following packages to build our app:
Vue CLI — to scaffold out the project
D3.js — to visualize our data
Lodash — which provides a handful of utility methods
Moment JS — for date and time formatting
axios — an HTTP client to help us make requests to an external API
New Vue Project
I prefer creating new Vue projects using Vue CLI. (If you’re not familiar with Vue CLI, our beginner’s guide in this Vue series gives a full introduction.) Vue CLI provides a nice folder structure for placing different sections of the code, such as styles, components, and so on.
Make sure that the CLI is installed on your machine:
npm install -g @vue/cli
Then create a new project with the following command:
vue create issues-visualization
Note: while creating a new project using Vue CLI, you’ll be prompted to pick a preset. For this particular project, we’ll just stick with the default (Babel + ESLint).
Once our new Vue project has been created, we cd into the project folder and add the various node modules we’ll need:
npm install lodash d3 axios moment
Even though this is a simple app that doesn’t have many running parts, we’ll still take the components approach instead of dumping all the code inside the App.vue file. We’re going to have two components, the App component and a Chart component that we’re yet to create.
The App component will handle fetching data from GitHub, then pass this data to the Chart component as props. The actual drawing of the chart will happen inside the Chart component. Structuring things this way has the advantage that, if you want to use a library other than axios to fetch the data, it’ll be easier to swap it out. Also, if you want to swap D3 for a different charting library, that’ll be easier too.
Building the Search Interface
We’ll start by building a search interface that lets users enter the name of the repo they want to see visualized.
In src/App.vue, get rid of everything inside the <template> tag and replace the content with this:
<template> <div id="app"> <form action="#" @submit.prevent="getIssues"> <div class="form-group"> <input type="text" placeholder="owner/repo Name" v-model="repository" class="col-md-2 col-md-offset-5" > </div> </form> </div> </template>
Here we have a form which, upon submission, prevents the browser’s default submission action, then calls a getIssues method that we’re yet to define. We’re also using a v-model directive to bind the input from the form to a repository property inside the data model of our Vue instance. Let’s declare that property repository as an empty string. We’ll also add a startDate property, which we’ll later use as the first date in our time range:
import moment from "moment"; import axios from "axios"; export default { name: "app", data() { return { issues: [], repository: "", startDate: null }; }, methods: { getIssues() { // code goes in here } } };
Now on to creating the getIssues method:
getIssues() { this.startDate = moment() .subtract(6, "days") .format("YYYY-MM-DD"); axios .get( `https://api.github.com/search/issues?q=repo:${this.repository}+is:issue+is:open+created:>=${this.startDate}`, { params: { per_page: 100 } } ) .then(response => { const payload = this.getDateRange(); response.data.items.forEach(item => { const key = moment(item.created_at).format("MMM Do YY"); const obj = payload.filter(o => o.day === key)[0]; obj.issues += 1; }); this.issues = payload; console.log(this.issues); }); }
In the above block of code, we start by setting the startDate data property to six days ago and formatting it for use with the GitHub API.
We then use axios to make an API request to GitHub to get all issues for a particular repository that were opened in the past week and that are still open. You can refer to GitHub’s search API if you need more examples on how to come up with query string parameters.
When making the HTTP request, we set the results count to 100 per page (the max possible). There are hardly any repositories with over 100 new issues per week, so this should be fine for our purposes. By default, the per_page value is 30.
If the request completes successfully, we use a custom getDateRange method to initialize a payload variable that we will be able to pass to the Chart component. This payload is an array of objects that will like so:
[ {day: "Dec 7th 18", issues: 0}, {day: "Dec 8th 18", issues: 0}, {day: "Dec 9th 18", issues: 0}, {day: "Dec 10th 18", issues: 0}, {day: "Dec 11th 18", issues: 0}, {day: "Dec 12th 18", issues: 0}, {day: "Dec 13th 18", issues: 0} ]
After that, we iterate over the API’s response. The data we’re interested in is in an items key on a data property on the response object. From this, we take the created_at key (which is a timestamp) and format it as the day property in our objects above. From there, we then look up the corresponding date in the payload array and increment the issues count for that date by one.
Finally, we assign the payload array to our issues data property and log the response.
Next, let’s add in the getDateRange method:
methods: { getDateRange() { const startDate = moment().subtract(6, 'days'); const endDate = moment(); const dates = []; while (startDate.isSameOrBefore(endDate)) { dates.push({ day: startDate.format('MMM Do YY'), issues: 0 }); startDate.add(1, 'days'); } return dates; }, getIssues() { ... } }
Before we get to the visualization bit, let’s also log any errors we might encounter when making our request to the console (for debugging purposes):
axios .get( ...) .then(response => { ... }) .catch(error => { console.error(error); });
We’ll add some UX for informing the user in the case that something went wrong later.
So far, we have an input field that lets the user enter the organization/repository name they wish to search issues for. Upon form submission, all issues opened in the past one week are logged to the console.
Below is an example of what was logged on the console for the facebook/react repo:

If you start up the Vue dev server using npm run serve and enter some different repos, you should see something similar. If you’re stuck for inspiration, check out GitHub’s Trending page.
Next comes the fun bit — visualizing this data.
Drawing a Bar Chart Using D3
Earlier on, we mentioned that all the drawing will be handled inside a Chart component. Let’s create the component:
touch src/components/Chart.vue
D3 works on SVG elements, and for us to draw anything with D3, we need to have an SVG element on the page. In our newly created component (src/components/Chart.vue), let’s create an SVG tag:
<template> <div> <svg></svg> </div> </template>
For this particular tutorial, we’ll visualize our data using a bar chart. I picked a bar chart because it represents a low complexity visual element while it teaches the basic application of D3.js itself. The bar chart is also a good intro to the most important D3 concepts, while still having fun!
Before proceeding, let’s update our App component to include the newly created Chart component below the form:
<template> <div id="app"> <form action="#" @submit.prevent="getIssues"> ... </form> <chart :issues="issues"></chart> </div> </template>
Let’s also register it as a component:
import Chart from './components/Chart.vue'; export default { name: "app", components: { Chart }, ... }
Notice how we’re passing the value of the issues data property to the Chart component as a prop:
<chart :issues="issues"></chart>
Let’s now update our Chart component to make use of that data:
<script> import * as d3 from "d3"; import _ from "lodash"; export default { props: ["issues"], data() { return { chart: null }; }, watch: { issues(val) { if (this.chart != null) this.chart.remove(); this.renderChart(val); } }, methods: { renderChart(issues_val) { // Chart will be drawn here } } }; </script>
In the above code block, we’re importing D3 and Lodash. We then instantiate a chart data property as null. We’ll assign a value to this when we start drawing later on.
Since we want to draw the chart every time the value of issues changes, we’ve created a watcher for issues. Each time this value changes, we’ll destroy the old chart and then draw a new chart.
Drawing will happen inside the renderChart method. Let’s start fleshing that out:
renderChart(issues_val) { const margin = 60; const svg_width = 1000; const svg_height = 600; const chart_width = 1000 - 2 * margin; const chart_height = 600 - 2 * margin; const svg = d3 .select("svg") .attr("width", svg_width) .attr("height", svg_height); }
Here, we set the height and width of the SVG element we just created. The margin attribute is what we’ll use to give our chart some padding.
D3 comes with DOM selection and manipulation capabilities. Throughout the tutorial, you’ll see lot’s of d3.select and d3.selectAll statements. The difference is that select will return the first matching element while selectAll returns all matching elements.
The post An Introduction to Data Visualization with Vue and D3.js appeared first on SitePoint.
by Christopher Vundi via SitePoint https://ift.tt/2KdTjHU
0 notes
Text
How To Do More With Vue Router
About The Author
Front-end developer based in Lagos, Nigeria. He enjoys converting designs into code and building things for the web. More about Timi …
Vue Router is the official router for Vue that is mostly used for creating multiple pages living on different routes (/home, /profile) in your application but has some features that some people do not know about. In this tutorial, we’re going to learn about some amazing features the Vue Router has and how we can make use of them in our app.
Vue Router is the official router for Vue. It deeply integrates with Vue core to make building Single Page Applications with Vue a breeze. Some of its popular features include:
Dynamic Route matching.
Named Routes.
Named views.
Programmatic navigation.
These features are heavily used when developing with Vue and this is because they are part of the basics you need to understand to efficiently use the Router. But the Vue Router has some very useful features that can be very helpful in development and in this article, we’re going to take a look at them.
For the purpose of this tutorial, we’re going to be building a simple application that would help in understanding some of the concepts covered in this article. You can find all the code used in this article on GitHub. If you are interested in doing more with the router, you’ll benefit from this tutorial.
Note: This article requires a basic understanding of Vuejs and Vue Router.
Scroll Behaviour
This is the behavior that is observed when navigating from one page to another. The default behavior of Vue router is only noticeable after scrolling to a position that isn’t the top of the page. This is because, by default, the scroll position when navigating away from a page is maintained on a new page. What this means is, if you click on a link that leads to a new route ( i.e from /home to /about) in a position that is let’s say close to the footer of the current page, the new page would start from that same position instead of starting from the top of the page.
I have created a Vue application using the Vue CLI command vue create vue-router-demo, I also selected Vue Router as part of the options while setting up my app because we will be using it throughout this tutorial.
We will also need to make API calls to JSONPlaceholder, to illustrate some of the concepts using Vue router. For this, we will be using Axios. To install Axios:
# using YARN yarn add axios # or NPM npm install axios
After installing Axios, we can update our Home.vue to look like this:
<template> <div class="home"> <p v-if="loading" class="post--empty">Loading....</p> <ul v-else> <li v-for="post in posts" :key="post.id"> <router-link :to="{ name: 'Post', params: { id: post.id, post: post } }" > </router-link> </li> </ul> </div> </template> <script> // @ is an alias to /src import axios from "axios"; export default { name: "Home", data() { return { posts: null, loading: false, }; }, mounted() { this.getPosts(); }, methods: { async getPosts() { this.loading = true; try { let res = await axios({ url: "https://jsonplaceholder.typicode.com/posts", method: "GET", }); let posts = res.data; this.posts = posts; this.loading = false; } catch (error) { this.loading = false; } }, }, }; </script> <style> .home { padding: 0 30px; max-width: 800px; margin: 0 auto; } @keyframes blink { from { opacity: 1; } to { opacity: 0; } } .post--empty { height: 250px; margin-top: 30px; animation: blink 0.8s ease-in-out infinite alternate both; display: flex; align-items: center; justify-content: center; font-family: "Lobster", cursive; } ul { text-align: left; } a { color: inherit; } </style>
Here, we’re importing axios and using it to fetch a list of posts from JSONPlaceholder in the getPost method. We’re also assigning the array of posts gotten from this API call to posts from the data function from this page, this is because we want to use this data in our template section. After this, we loop through the array of posts in a list ( <ul></ul>) and also attach a link to each post using id of each post as the link param (this is called dynamic route matching). We have also added a paragraph that would serve as a loading indicator.
At this point, here’s what this page looks like:
List of posts from JSONPlaceholder. (Large preview)
The next thing would be to create the page that will display the info for each post and create a link for it in the router of our app.
Post.vue
<template> <div class="about"> <div class="post"> <h1></h1> <p v-html="post.body"></p> </div> <p>End of page</p> </div> </template> <script> export default { name: "Post", props: ["id", "post"], }; </script> <style> .post { padding: 0 30px; height: 110vh; margin: 0 auto; } p { margin: 10px 0; } </style>
Here, we make use of passing props to route components to define id and post which we’re passing from the previous page in the form of route params. This is a neat way of accessing route params and query as opposed to doing this:
Post.vue
<script> export default { name: "Post", data() { return { post: this.$route.post, }; }, }; </script>
We then make use of this post value in the template section to display post title and body. Finally, we add a paragraph to the end of the page. We also add styling for the page in the styling section, which includes defining a height of 110vh. This is because we need the page to have a height that is more than the default height 100vh so we can observe the default scroll behavior of the router.
The next thing would be to create a route that would display each post. Update your index.js file in the /router folder ( or router.js file) to look like this:
import Vue from 'vue' import VueRouter from 'vue-router' import Home from '../views/Home.vue' Vue.use(VueRouter) const routes = [{ path: '/', name: 'Home', component: Home }, { path: '/:id', name: 'Post', props: true, component: () => import ( /* webpackChunkName: "post" */ '../views/Post.vue') } ] const router = new VueRouter({ mode: 'history', base: process.env.BASE_URL, routes }) export default router
Here, we define a new route that makes use of id that would be passed to this route from the homepage. We’re also decoupling the router param (in this case, post and id) using props.
The top of this page looks like this:
Top of post page. (Large preview)
If we click on any of the posts on the home page that does not require us to scroll, we would not notice any weird behavior scroll wise, but if we scroll down a little and click on the last post in this list, this should be the position the /post page would land on:
Default scroll position. (Large preview)
This is bad for UX and this is because the user isn’t expecting this behavior and they might need to start from the top of a page to get the full information on the said page.
Vue Router comes with the option to customize this behavior to individual preferences, an example would be saving scroll position of a previous route when trying to move back/forward. To fix the current issue in our app, we would update our router file to include the following:
import Vue from 'vue' import VueRouter from 'vue-router' import Home from '../views/Home.vue' Vue.use(VueRouter) const routes = [...] const router = new VueRouter({ mode: 'history', base: process.env.BASE_URL, routes, //add this scrollBehavior(to, from, savedPosition) { return { x: 0, y: 0 } } }) export default router
Now, if we scroll to the bottom of the home page and click on the last post, you should notice that it now starts from the top of the page.
New scroll position. (Large preview)
Data Fetching
When fetching data from an API, we either call the method in the mounted or created lifecycle hook, these are by far the most popular methods people use when developing in Vue. Vue router comes with another method in which we make this API request before navigating to a new route by making this request using the beforeRouterEnter guard in such a component. Here is an example of how to fetch data from JSONPlaceholder using this method:
beforeRouteEnter(to, from, next) { axios .get("https://jsonplaceholder.typicode.com/posts") .then((res) => { next((vm) => vm.fetchData(res)); }) .catch((err) => { console.error(err); }); }, methods: { fetchData(res) { let post = res.data; this.posts = post; }, },
Here, we’re fetching a list of posts from an API using Axios and when this request is complete, we call next. At this point in the lifecycle of this component, this is not available because the component has not been created but we have access to vm which gives us access to the component’s instance. Inside this function, we pass the response from the API request res to our method fetchData which we’ve created to assign the value from this response to post so we can use it in our template. Now, if we refresh our / route, we would notice that the data gets updated very fast and at no time is there a blank or page ( provided the request is successful).
Transitions
Vue comes with a <transition></ transition> component that enables easy implementation of CSS transitions and animations. This feature can be extended to work for navigation between routes in Vue. Here’s an example:
<template> <div id="app"> <div id="nav"> <router-link to="/">Home</router-link> </div> <transition name="slide-fade"> <router-view /> </transition> </div> </template> <style> #app { font-family: Avenir, Helvetica, Arial, sans-serif; -webkit-font-smoothing: antialiased; -moz-osx-font-smoothing: grayscale; text-align: center; color: #2c3e50; } #nav { padding: 30px; } #nav a { font-weight: bold; color: #2c3e50; } #nav a.router-link-exact-active { color: #42b983; } .slide-fade-enter-active { transition: transform 0.3s cubic-bezier(1, 0.5, 0.8, 1), color 0.5s cubic-bezier(1, 0.5, 0.8, 1); } .slide-fade-leave-active { transition: transform 1s cubic-bezier(1, 0.5, 0.8, 1), color 1s cubic-bezier(1, 0.5, 0.8, 1); } .slide-fade-enter { color: mediumblue; transform: translateY(20px); } .slide-fade-leave-to { transform: translateX(100px); color: cyan; } </style>
Here, we’re adding a transition with the name slide-fade to our application and wrapping it around all the route navigation that would take place in the app. We’re also adding a set of styles that control/define the way the transitions would work in our app. Without these rules, there would be no visible transition taking place. Now, if we try to navigate from the homepage to the individual posts, we would notice a sliding and fading transition taking place during the navigation process.
There are two types of route based transitions.
1. Per-route Transition
This type of transition is defined in the component that renders a route and so, it only affects the navigation to and from such a page. This gives us the ability to define a special transition for individual routes if we want. Here is an example of how to do that.
<template> // add a transition component with name and mode props <transition name="slide-fade" mode="in-out"> <div class="about"> <div class="post"> <h1></h1> <p v-html="post.body"></p> </div> <p>End of page</p> </div> </transition> </template> <script> export default { name: "Post", props: ["id", "post"], }; </script> <style> //... .slide-fade-enter-active { transition: transform 2s cubic-bezier(1, 0.5, 0.8, 1), opacity 2s ease-in; } .slide-fade-leave-active { transition: transform 2s cubic-bezier(1, 0.5, 0.8, 1), opacity 2s ease-out; } .slide-fade-enter { opacity: 1; transform: skewY(20deg); } .slide-fade-leave-to { transform: skewY(-45deg); opacity: 0.5; } </style>
If you try to navigate away from this page, we would notice the page gets skewed and fades for a duration of 2s as the navigation changes.
2. Route-Based Dynamic Transition
This is similar to the general method of adding transitions to all routes in your application but it has one major difference, that is, it accepts a dynamic transition name prop which gives you the ability to change the transition type any way you want. Let us create an example of how to do this.
We’re going to update our App.vue file with a dynamic name prop and configure it to choose a transition name depending on a value.
<template> <div id="app"> <div id="nav"> <router-link to="/">Home</router-link> </div> <transition :name="transitionName"> <router-view /> </transition> </div> </template> <script> export default { data() { return { transitionName: "slide-fade", }; }, watch: { $route(to, from, params) { const toParam = to.params && to.params.id ? to.params.id : 0; this.transitionName = toParam % 2 === 0 ? "slide-left" : "slide-fade"; }, }, }; </script> <style> /* add transition styles */ .slide-fade-enter-active { transition: transform 0.3s cubic-bezier(1, 0.5, 0.8, 1), color 0.5s cubic-bezier(1, 0.5, 0.8, 1); } .slide-fade-leave-active { transition: transform 1s cubic-bezier(1, 0.5, 0.8, 1), color 1s cubic-bezier(1, 0.5, 0.8, 1); } .slide-fade-enter { color: mediumblue; transform: translateY(20px); } .slide-fade-leave-to { transform: translateX(100px); color: cyan; } .slide-left-enter-active { transition: transform 0.3s cubic-bezier(1, 0.5, 0.8, 1), color 0.5s cubic-bezier(1, 0.5, 0.8, 1); } .slide-left-leave-active { transition: transform 1s cubic-bezier(1, 0.5, 0.8, 1), color 1s cubic-bezier(1, 0.5, 0.8, 1); } .slide-left-enter { color: mediumblue; transform: translateY(20px); } .slide-left-leave-to { transform: skewY(90deg); color: cyan; } </style>
Here, we’re adding a dynamic transition name which is defined in the script section of our app. We’re also watching the $route so that whenever it changes, we run the function that checks if the current route has a param of id otherwise, we give it a value of 0. We also determine the transition name based on the type of number the id is (i.e even or odd number). Now, if we navigate between the landing page and the different posts available, we would observe there are two types of transitions occurring as we navigate.
Meta Fields And Navigation Guards
Meta Fields
Meta fields help provide extra context to a certain route. An example of such context would be if a user needs to be authenticated to access such route or not. Here’s what this looks like:
import Vue from 'vue' import VueRouter from 'vue-router' import Home from '../views/Home.vue' Vue.use(VueRouter) const routes = [{ path: '/', name: 'Home', component: Home, // add meta to this route meta: { requiresAuth: true } }, ] const router = new VueRouter({ mode: 'history', base: process.env.BASE_URL, routes }) export default router
Here, we’ve added a meta property requiresAuth to the / route meaning we want users to be authenticated before they can access that route. Note that ‘requiresAuth’ is not a standard property, so you can choose any name you prefer. Whatever value you select at the end can be accessible in the $route object. This meta field at this point would not prevent unauthorized users from accessing that route, we need to hook it up to the Navigation guard.
Navigation Guard
Just as the name implies, the navigation guard helps protect and guard routes based on your preferences (i.e redirect to another page or preventing the navigation). This feature works together with the Route Meta Fields to effectively guard the routes of your application. There are 3 ways of adding router guard in our app:
1. In-component
Vue offers the option to configure your router guard for a particular route directly inside your components. Here’s an example in our Home.vue file:
<template> <div class="home"> <p v-if="loading" class="post--empty">Loading....</p> <ol v-else> <!-- add this text to your template --> <p v-if="guest">Hi Guest</p> <li v-for="post in posts" :key="post.id"> <router-link :to="{ name: 'Post', params: { id: post.id, post: post } }" > </router-link> </li> </ol> </div> </template> <script> // @ is an alias to /src import axios from "axios"; export default { name: "Home", data() { return { posts: null, // add this property guest: false, loading: false, }; }, // add this function beforeRouteEnter(to, from, next) { if (to.matched.some((record) => record.meta.requiresAuth)) { // this route requires auth, check if logged in // if not, display guest greeting. const loggedIn = JSON.parse(localStorage.getItem("loggedIn")); if (!loggedIn) { next((vm) => { vm.guest = true; }); } else { next(); } } else { next(); // make sure to always call next()! } }, methods: {...} }; </script> <style>...</style>
Here, we’re adding a paragraph that is only visible to unauthenticated users. We also add a property that controls the visibility of this text. Finally we have a router method beforeRouteEnter in which we also connect the router guard and check if the user is authenticated or not using a value that would be manually added later. We also have an if/else statement, and inside this statement, we change the value of guest depending on the authentication of the user.
And in your App.vue, add this lifecycle to the file.
export default { mounted() { localStorage.setItem("loggedIn", false); } };
So if you refresh your app, we should see the text we added in the Home.vue file.
Guest text visible. (Large preview)
2. Per-route
We can also add a router guard to our apps per-route in our router file as another property inside the specific route object. Here’s an example:
{ path: '/', name: 'Home', component: Home, // add meta to this route meta: { requiresAuth: true }, beforeEnter: (to, from, next) => { if (to.name !== 'Home') { console.log('Per-Route navigation guard ti wa online'); next() } else next() } }
Here, we add a router guard to the / route and we’re currently just logging a random text to the console but we can do a couple of things inside this guard. Now, each time you visit the home page, you would see this in your console:
Message printed in terminal. (Large preview)
3. Globally
We also have the option of creating a router guard that works globally for every part of the app (provided it meets the guard condition). This global guard is created in the router file just like the per-route guard but instead of defining it inside a specific route object, it is defined as a method of the router instance. For an example of how it works, we’re going to create a new file and route in our app and name it guest.vue, then add the following lines of code to the file.
<template> <div> <h1>Guest page</h1> <p>You're seeing this page because you are not logged in</p> </div> </template> <script> </script> <style></style>
Next, we create a /login route with this newly created page and add a meta property to other existing routes.
// create new route { path: '/login', name: 'login', component: () => import ( /* webpackChunkName: "auth" */ '../views/guest.vue') }, { path: '/:id', name: 'Post', props: true,a // add meta property meta: { requiresAuth: true }, component: () => import ( /* webpackChunkName: "post" */ '../views/Post.vue') }
The next thing would be to create the global navigation guard for all routes that require authentication and check the user’s authentication using localStorage (previously created). We would redirect users that have a loggedIn value of false to /login.
router.beforeEach((to, from, next) => { if (to.matched.some((record) => record.meta.requiresAuth)) { // this route requires auth, check if logged in // if not, display guest greeting. const loggedIn = JSON.parse(localStorage.getItem("loggedIn")); if (!loggedIn) { next({ path: '/login' }); } else { next(); } } else { next(); // make sure to always call next()! } })
So if you check your app in your browser, you would notice it is currently on this page:
Guest page. (Large preview)
If we try to navigate to any of the existing routes, we would automatically get redirected to this page no what we do and that means our router guard is effectively guarding those routes.
Conclusion
We can see that the Vue Router is a very powerful tool that can be used for more than just creating routes in your application. We have learned how to configure the scroll behavior of routes in our application, the different ways to add transitions to routes in our app, how to fetch data from an API before a component gets mounted, how to use meta property for our routes and the different ways to set up router guard.
Resources
Vue Router
CSS Transitions In Vuejs And Nuxtjs
(ks, ra, yk, il)
Website Design & SEO Delray Beach by DBL07.co
Delray Beach SEO
source http://www.scpie.org/how-to-do-more-with-vue-router/ source https://scpie.tumblr.com/post/628084272888184832
0 notes
Text
How to Set Up a Full Stack Project with Python, Vue.js, and PostgreSQL

The journey to mastering full-stack development often begins with choosing the right combination of technologies. For many developers, Python, Vue.js, and PostgreSQL form a powerful and versatile stack. This trio provides a robust backend, a dynamic front end, and a reliable database. Whether you’re a budding developer enrolled in an FSD Python course or a seasoned programmer exploring new frameworks, this guide will provide the foundational steps to set up a full-stack project.
Why Choose Python, Vue.js, and PostgreSQL?
Python: Known for its simplicity and versatility, Python is a favorite for backend development. Frameworks like Flask and Django make it easy to build scalable APIs and web applications.
Vue.js: Vue.js is a progressive JavaScript framework for building user interfaces. Its simplicity, flexibility, and reactive components make it ideal for crafting modern, dynamic frontends.
PostgreSQL: As one of the most advanced open-source relational database systems, PostgreSQL is renowned for its scalability, reliability, and extensive feature set.
Step 1: Plan Your Project Structure
In a standard full-stack project using Python, Vue.js, and PostgreSQL, the project structure is typically organized into several main directories. The backend directory contains the Python-based backend code, which could use frameworks like Django or Flask. The frontend directory holds the Vue.js frontend code and is responsible for the user interface. The database directory includes scripts and configuration files for setting up and managing the PostgreSQL database. The environment directory stores configuration files, such as environment variables and deployment settings. Finally, the docs directory is dedicated to documentation and notes related to the project. This structure ensures clarity and separation of concerns, making the project easier to manage and scale.
Step 2: Set Up the Backend with Python
Choose a Python Framework:
Flask: Lightweight and flexible for simple APIs.
Django: A full-fledged web framework with built-in features for authentication, ORM, and more.
Create the Virtual Environment:
Using virtual environments ensures project dependencies remain isolated, a key concept covered in any Python FSD curriculum.
Install Necessary Packages:
For Flask: Flask, Flask-Cors, and SQLAlchemy.
For Django, use core Django packages and DRF (Django Rest Framework) for API handling.
API Design:
Develop RESTful endpoints to handle CRUD operations.
Implement authentication mechanisms like JWT for user management.
Step 3: Develop the Frontend with Vue.js
Set Up the Vue.js Environment:
Use Vue CLI to scaffold your application. This creates a starter project with essential configurations.
Design Components:
Break down your application into modular components (e.g., header, footer, forms).
Use Vue’s data-binding and state management to handle user interactions.
API Integration:
Axios or Fetch can be used to connect the Vue.js frontend with your Python backend.
Styling:
Choose between frameworks like Vuetify, Tailwind CSS, or Bootstrap to style your application.
Step 4: Configure the PostgreSQL Database
Install PostgreSQL:
Ensure PostgreSQL is installed and running on your system. Tools like pgAdmin simplify database management.
Set Up the Database:
Define your schema and relationships. Django’s ORM or Flask’s SQLAlchemy can streamline this process.
Database Connection:
Configure your backend to connect to PostgreSQL using libraries like psycopg2.
Migrations:
Use migration tools provided by your framework (e.g., Django’s migrate command) to keep your database schema synchronized.
Step 5: Link the Frontend and Backend
Cross-Origin Resource Sharing (CORS):
Enable CORS in your backend to allow API requests from your frontend.
Environment Variables:
Use .env files to securely manage API keys, database credentials, and other sensitive information.
Serve the Frontend:
Deploy your Vue.js application and configure the backend to serve the frontend (or use a separate web server).
Step 6: Deployment
Containerization:
Use Docker to containerize your application for consistent deployment across environments.
Hosting Platforms:
For the backend, consider platforms like Heroku, AWS, or Azure.
For the front end, platforms like Vercel or Netlify are excellent choices.
Database Hosting:
Host PostgreSQL on cloud platforms like AWS RDS or DigitalOcean for better scalability.
Conclusion
Setting up a full-stack project with Python, Vue.js, and PostgreSQL may seem complex initially, but with proper guidance and practice, it becomes a manageable and rewarding process. Whether you’re enrolled in a Python Full Stack Development Course or self-learning, this stack equips you with the tools to build modern, scalable web applications.
Each step in this guide provides a foundation for exploring and implementing advanced features like authentication, real-time updates, or cloud deployment. With persistence and curiosity, you’ll be well on your way to mastering full-stack development.
Contact Us:
Phone
+917338811773
+918925903732
Email: [email protected]
0 notes
Text
How To Do More With Vue Router
About The Author
Front-end developer based in Lagos, Nigeria. He enjoys converting designs into code and building things for the web. More about Timi …
Vue Router is the official router for Vue that is mostly used for creating multiple pages living on different routes (/home, /profile) in your application but has some features that some people do not know about. In this tutorial, we’re going to learn about some amazing features the Vue Router has and how we can make use of them in our app.
Vue Router is the official router for Vue. It deeply integrates with Vue core to make building Single Page Applications with Vue a breeze. Some of its popular features include:
Dynamic Route matching.
Named Routes.
Named views.
Programmatic navigation.
These features are heavily used when developing with Vue and this is because they are part of the basics you need to understand to efficiently use the Router. But the Vue Router has some very useful features that can be very helpful in development and in this article, we’re going to take a look at them.
For the purpose of this tutorial, we’re going to be building a simple application that would help in understanding some of the concepts covered in this article. You can find all the code used in this article on GitHub. If you are interested in doing more with the router, you’ll benefit from this tutorial.
Note: This article requires a basic understanding of Vuejs and Vue Router.
Scroll Behaviour
This is the behavior that is observed when navigating from one page to another. The default behavior of Vue router is only noticeable after scrolling to a position that isn’t the top of the page. This is because, by default, the scroll position when navigating away from a page is maintained on a new page. What this means is, if you click on a link that leads to a new route ( i.e from /home to /about) in a position that is let’s say close to the footer of the current page, the new page would start from that same position instead of starting from the top of the page.
I have created a Vue application using the Vue CLI command vue create vue-router-demo, I also selected Vue Router as part of the options while setting up my app because we will be using it throughout this tutorial.
We will also need to make API calls to JSONPlaceholder, to illustrate some of the concepts using Vue router. For this, we will be using Axios. To install Axios:
# using YARN yarn add axios # or NPM npm install axios
After installing Axios, we can update our Home.vue to look like this:
<template> <div class="home"> <p v-if="loading" class="post--empty">Loading....</p> <ul v-else> <li v-for="post in posts" :key="post.id"> <router-link :to="{ name: 'Post', params: { id: post.id, post: post } }" > </router-link> </li> </ul> </div> </template> <script> // @ is an alias to /src import axios from "axios"; export default { name: "Home", data() { return { posts: null, loading: false, }; }, mounted() { this.getPosts(); }, methods: { async getPosts() { this.loading = true; try { let res = await axios({ url: "https://jsonplaceholder.typicode.com/posts", method: "GET", }); let posts = res.data; this.posts = posts; this.loading = false; } catch (error) { this.loading = false; } }, }, }; </script> <style> .home { padding: 0 30px; max-width: 800px; margin: 0 auto; } @keyframes blink { from { opacity: 1; } to { opacity: 0; } } .post--empty { height: 250px; margin-top: 30px; animation: blink 0.8s ease-in-out infinite alternate both; display: flex; align-items: center; justify-content: center; font-family: "Lobster", cursive; } ul { text-align: left; } a { color: inherit; } </style>
Here, we’re importing axios and using it to fetch a list of posts from JSONPlaceholder in the getPost method. We’re also assigning the array of posts gotten from this API call to posts from the data function from this page, this is because we want to use this data in our template section. After this, we loop through the array of posts in a list ( <ul></ul>) and also attach a link to each post using id of each post as the link param (this is called dynamic route matching). We have also added a paragraph that would serve as a loading indicator.
At this point, here’s what this page looks like:
List of posts from JSONPlaceholder. (Large preview)
The next thing would be to create the page that will display the info for each post and create a link for it in the router of our app.
Post.vue
<template> <div class="about"> <div class="post"> <h1></h1> <p v-html="post.body"></p> </div> <p>End of page</p> </div> </template> <script> export default { name: "Post", props: ["id", "post"], }; </script> <style> .post { padding: 0 30px; height: 110vh; margin: 0 auto; } p { margin: 10px 0; } </style>
Here, we make use of passing props to route components to define id and post which we’re passing from the previous page in the form of route params. This is a neat way of accessing route params and query as opposed to doing this:
Post.vue
<script> export default { name: "Post", data() { return { post: this.$route.post, }; }, }; </script>
We then make use of this post value in the template section to display post title and body. Finally, we add a paragraph to the end of the page. We also add styling for the page in the styling section, which includes defining a height of 110vh. This is because we need the page to have a height that is more than the default height 100vh so we can observe the default scroll behavior of the router.
The next thing would be to create a route that would display each post. Update your index.js file in the /router folder ( or router.js file) to look like this:
import Vue from 'vue' import VueRouter from 'vue-router' import Home from '../views/Home.vue' Vue.use(VueRouter) const routes = [{ path: '/', name: 'Home', component: Home }, { path: '/:id', name: 'Post', props: true, component: () => import ( /* webpackChunkName: "post" */ '../views/Post.vue') } ] const router = new VueRouter({ mode: 'history', base: process.env.BASE_URL, routes }) export default router
Here, we define a new route that makes use of id that would be passed to this route from the homepage. We’re also decoupling the router param (in this case, post and id) using props.
The top of this page looks like this:
Top of post page. (Large preview)
If we click on any of the posts on the home page that does not require us to scroll, we would not notice any weird behavior scroll wise, but if we scroll down a little and click on the last post in this list, this should be the position the /post page would land on:
Default scroll position. (Large preview)
This is bad for UX and this is because the user isn’t expecting this behavior and they might need to start from the top of a page to get the full information on the said page.
Vue Router comes with the option to customize this behavior to individual preferences, an example would be saving scroll position of a previous route when trying to move back/forward. To fix the current issue in our app, we would update our router file to include the following:
import Vue from 'vue' import VueRouter from 'vue-router' import Home from '../views/Home.vue' Vue.use(VueRouter) const routes = [...] const router = new VueRouter({ mode: 'history', base: process.env.BASE_URL, routes, //add this scrollBehavior(to, from, savedPosition) { return { x: 0, y: 0 } } }) export default router
Now, if we scroll to the bottom of the home page and click on the last post, you should notice that it now starts from the top of the page.
New scroll position. (Large preview)
Data Fetching
When fetching data from an API, we either call the method in the mounted or created lifecycle hook, these are by far the most popular methods people use when developing in Vue. Vue router comes with another method in which we make this API request before navigating to a new route by making this request using the beforeRouterEnter guard in such a component. Here is an example of how to fetch data from JSONPlaceholder using this method:
beforeRouteEnter(to, from, next) { axios .get("https://jsonplaceholder.typicode.com/posts") .then((res) => { next((vm) => vm.fetchData(res)); }) .catch((err) => { console.error(err); }); }, methods: { fetchData(res) { let post = res.data; this.posts = post; }, },
Here, we’re fetching a list of posts from an API using Axios and when this request is complete, we call next. At this point in the lifecycle of this component, this is not available because the component has not been created but we have access to vm which gives us access to the component’s instance. Inside this function, we pass the response from the API request res to our method fetchData which we’ve created to assign the value from this response to post so we can use it in our template. Now, if we refresh our / route, we would notice that the data gets updated very fast and at no time is there a blank or page ( provided the request is successful).
Transitions
Vue comes with a <transition></ transition> component that enables easy implementation of CSS transitions and animations. This feature can be extended to work for navigation between routes in Vue. Here’s an example:
<template> <div id="app"> <div id="nav"> <router-link to="/">Home</router-link> </div> <transition name="slide-fade"> <router-view /> </transition> </div> </template> <style> #app { font-family: Avenir, Helvetica, Arial, sans-serif; -webkit-font-smoothing: antialiased; -moz-osx-font-smoothing: grayscale; text-align: center; color: #2c3e50; } #nav { padding: 30px; } #nav a { font-weight: bold; color: #2c3e50; } #nav a.router-link-exact-active { color: #42b983; } .slide-fade-enter-active { transition: transform 0.3s cubic-bezier(1, 0.5, 0.8, 1), color 0.5s cubic-bezier(1, 0.5, 0.8, 1); } .slide-fade-leave-active { transition: transform 1s cubic-bezier(1, 0.5, 0.8, 1), color 1s cubic-bezier(1, 0.5, 0.8, 1); } .slide-fade-enter { color: mediumblue; transform: translateY(20px); } .slide-fade-leave-to { transform: translateX(100px); color: cyan; } </style>
Here, we’re adding a transition with the name slide-fade to our application and wrapping it around all the route navigation that would take place in the app. We’re also adding a set of styles that control/define the way the transitions would work in our app. Without these rules, there would be no visible transition taking place. Now, if we try to navigate from the homepage to the individual posts, we would notice a sliding and fading transition taking place during the navigation process.
There are two types of route based transitions.
1. Per-route Transition
This type of transition is defined in the component that renders a route and so, it only affects the navigation to and from such a page. This gives us the ability to define a special transition for individual routes if we want. Here is an example of how to do that.
<template> // add a transition component with name and mode props <transition name="slide-fade" mode="in-out"> <div class="about"> <div class="post"> <h1></h1> <p v-html="post.body"></p> </div> <p>End of page</p> </div> </transition> </template> <script> export default { name: "Post", props: ["id", "post"], }; </script> <style> //... .slide-fade-enter-active { transition: transform 2s cubic-bezier(1, 0.5, 0.8, 1), opacity 2s ease-in; } .slide-fade-leave-active { transition: transform 2s cubic-bezier(1, 0.5, 0.8, 1), opacity 2s ease-out; } .slide-fade-enter { opacity: 1; transform: skewY(20deg); } .slide-fade-leave-to { transform: skewY(-45deg); opacity: 0.5; } </style>
If you try to navigate away from this page, we would notice the page gets skewed and fades for a duration of 2s as the navigation changes.
2. Route-Based Dynamic Transition
This is similar to the general method of adding transitions to all routes in your application but it has one major difference, that is, it accepts a dynamic transition name prop which gives you the ability to change the transition type any way you want. Let us create an example of how to do this.
We’re going to update our App.vue file with a dynamic name prop and configure it to choose a transition name depending on a value.
<template> <div id="app"> <div id="nav"> <router-link to="/">Home</router-link> </div> <transition :name="transitionName"> <router-view /> </transition> </div> </template> <script> export default { data() { return { transitionName: "slide-fade", }; }, watch: { $route(to, from, params) { const toParam = to.params && to.params.id ? to.params.id : 0; this.transitionName = toParam % 2 === 0 ? "slide-left" : "slide-fade"; }, }, }; </script> <style> /* add transition styles */ .slide-fade-enter-active { transition: transform 0.3s cubic-bezier(1, 0.5, 0.8, 1), color 0.5s cubic-bezier(1, 0.5, 0.8, 1); } .slide-fade-leave-active { transition: transform 1s cubic-bezier(1, 0.5, 0.8, 1), color 1s cubic-bezier(1, 0.5, 0.8, 1); } .slide-fade-enter { color: mediumblue; transform: translateY(20px); } .slide-fade-leave-to { transform: translateX(100px); color: cyan; } .slide-left-enter-active { transition: transform 0.3s cubic-bezier(1, 0.5, 0.8, 1), color 0.5s cubic-bezier(1, 0.5, 0.8, 1); } .slide-left-leave-active { transition: transform 1s cubic-bezier(1, 0.5, 0.8, 1), color 1s cubic-bezier(1, 0.5, 0.8, 1); } .slide-left-enter { color: mediumblue; transform: translateY(20px); } .slide-left-leave-to { transform: skewY(90deg); color: cyan; } </style>
Here, we’re adding a dynamic transition name which is defined in the script section of our app. We’re also watching the $route so that whenever it changes, we run the function that checks if the current route has a param of id otherwise, we give it a value of 0. We also determine the transition name based on the type of number the id is (i.e even or odd number). Now, if we navigate between the landing page and the different posts available, we would observe there are two types of transitions occurring as we navigate.
Meta Fields And Navigation Guards
Meta Fields
Meta fields help provide extra context to a certain route. An example of such context would be if a user needs to be authenticated to access such route or not. Here’s what this looks like:
import Vue from 'vue' import VueRouter from 'vue-router' import Home from '../views/Home.vue' Vue.use(VueRouter) const routes = [{ path: '/', name: 'Home', component: Home, // add meta to this route meta: { requiresAuth: true } }, ] const router = new VueRouter({ mode: 'history', base: process.env.BASE_URL, routes }) export default router
Here, we’ve added a meta property requiresAuth to the / route meaning we want users to be authenticated before they can access that route. Note that ‘requiresAuth’ is not a standard property, so you can choose any name you prefer. Whatever value you select at the end can be accessible in the $route object. This meta field at this point would not prevent unauthorized users from accessing that route, we need to hook it up to the Navigation guard.
Navigation Guard
Just as the name implies, the navigation guard helps protect and guard routes based on your preferences (i.e redirect to another page or preventing the navigation). This feature works together with the Route Meta Fields to effectively guard the routes of your application. There are 3 ways of adding router guard in our app:
1. In-component
Vue offers the option to configure your router guard for a particular route directly inside your components. Here’s an example in our Home.vue file:
<template> <div class="home"> <p v-if="loading" class="post--empty">Loading....</p> <ol v-else> <!-- add this text to your template --> <p v-if="guest">Hi Guest</p> <li v-for="post in posts" :key="post.id"> <router-link :to="{ name: 'Post', params: { id: post.id, post: post } }" > </router-link> </li> </ol> </div> </template> <script> // @ is an alias to /src import axios from "axios"; export default { name: "Home", data() { return { posts: null, // add this property guest: false, loading: false, }; }, // add this function beforeRouteEnter(to, from, next) { if (to.matched.some((record) => record.meta.requiresAuth)) { // this route requires auth, check if logged in // if not, display guest greeting. const loggedIn = JSON.parse(localStorage.getItem("loggedIn")); if (!loggedIn) { next((vm) => { vm.guest = true; }); } else { next(); } } else { next(); // make sure to always call next()! } }, methods: {...} }; </script> <style>...</style>
Here, we’re adding a paragraph that is only visible to unauthenticated users. We also add a property that controls the visibility of this text. Finally we have a router method beforeRouteEnter in which we also connect the router guard and check if the user is authenticated or not using a value that would be manually added later. We also have an if/else statement, and inside this statement, we change the value of guest depending on the authentication of the user.
And in your App.vue, add this lifecycle to the file.
export default { mounted() { localStorage.setItem("loggedIn", false); } };
So if you refresh your app, we should see the text we added in the Home.vue file.
Guest text visible. (Large preview)
2. Per-route
We can also add a router guard to our apps per-route in our router file as another property inside the specific route object. Here’s an example:
{ path: '/', name: 'Home', component: Home, // add meta to this route meta: { requiresAuth: true }, beforeEnter: (to, from, next) => { if (to.name !== 'Home') { console.log('Per-Route navigation guard ti wa online'); next() } else next() } }
Here, we add a router guard to the / route and we’re currently just logging a random text to the console but we can do a couple of things inside this guard. Now, each time you visit the home page, you would see this in your console:
Message printed in terminal. (Large preview)
3. Globally
We also have the option of creating a router guard that works globally for every part of the app (provided it meets the guard condition). This global guard is created in the router file just like the per-route guard but instead of defining it inside a specific route object, it is defined as a method of the router instance. For an example of how it works, we’re going to create a new file and route in our app and name it guest.vue, then add the following lines of code to the file.
<template> <div> <h1>Guest page</h1> <p>You're seeing this page because you are not logged in</p> </div> </template> <script> </script> <style></style>
Next, we create a /login route with this newly created page and add a meta property to other existing routes.
// create new route { path: '/login', name: 'login', component: () => import ( /* webpackChunkName: "auth" */ '../views/guest.vue') }, { path: '/:id', name: 'Post', props: true,a // add meta property meta: { requiresAuth: true }, component: () => import ( /* webpackChunkName: "post" */ '../views/Post.vue') }
The next thing would be to create the global navigation guard for all routes that require authentication and check the user’s authentication using localStorage (previously created). We would redirect users that have a loggedIn value of false to /login.
router.beforeEach((to, from, next) => { if (to.matched.some((record) => record.meta.requiresAuth)) { // this route requires auth, check if logged in // if not, display guest greeting. const loggedIn = JSON.parse(localStorage.getItem("loggedIn")); if (!loggedIn) { next({ path: '/login' }); } else { next(); } } else { next(); // make sure to always call next()! } })
So if you check your app in your browser, you would notice it is currently on this page:
Guest page. (Large preview)
If we try to navigate to any of the existing routes, we would automatically get redirected to this page no what we do and that means our router guard is effectively guarding those routes.
Conclusion
We can see that the Vue Router is a very powerful tool that can be used for more than just creating routes in your application. We have learned how to configure the scroll behavior of routes in our application, the different ways to add transitions to routes in our app, how to fetch data from an API before a component gets mounted, how to use meta property for our routes and the different ways to set up router guard.
Resources
Vue Router
CSS Transitions In Vuejs And Nuxtjs
(ks, ra, yk, il)
Website Design & SEO Delray Beach by DBL07.co
Delray Beach SEO
source http://www.scpie.org/how-to-do-more-with-vue-router/
0 notes
Text
How To Do More With Vue Router
About The Author
Front-end developer based in Lagos, Nigeria. He enjoys converting designs into code and building things for the web. More about Timi …
Vue Router is the official router for Vue that is mostly used for creating multiple pages living on different routes (/home, /profile) in your application but has some features that some people do not know about. In this tutorial, we’re going to learn about some amazing features the Vue Router has and how we can make use of them in our app.
Vue Router is the official router for Vue. It deeply integrates with Vue core to make building Single Page Applications with Vue a breeze. Some of its popular features include:
Dynamic Route matching.
Named Routes.
Named views.
Programmatic navigation.
These features are heavily used when developing with Vue and this is because they are part of the basics you need to understand to efficiently use the Router. But the Vue Router has some very useful features that can be very helpful in development and in this article, we’re going to take a look at them.
For the purpose of this tutorial, we’re going to be building a simple application that would help in understanding some of the concepts covered in this article. You can find all the code used in this article on GitHub. If you are interested in doing more with the router, you’ll benefit from this tutorial.
Note: This article requires a basic understanding of Vuejs and Vue Router.
Scroll Behaviour
This is the behavior that is observed when navigating from one page to another. The default behavior of Vue router is only noticeable after scrolling to a position that isn’t the top of the page. This is because, by default, the scroll position when navigating away from a page is maintained on a new page. What this means is, if you click on a link that leads to a new route ( i.e from /home to /about) in a position that is let’s say close to the footer of the current page, the new page would start from that same position instead of starting from the top of the page.
I have created a Vue application using the Vue CLI command vue create vue-router-demo, I also selected Vue Router as part of the options while setting up my app because we will be using it throughout this tutorial.
We will also need to make API calls to JSONPlaceholder, to illustrate some of the concepts using Vue router. For this, we will be using Axios. To install Axios:
# using YARN yarn add axios # or NPM npm install axios
After installing Axios, we can update our Home.vue to look like this:
<template> <div class="home"> <p v-if="loading" class="post--empty">Loading....</p> <ul v-else> <li v-for="post in posts" :key="post.id"> <router-link :to="{ name: 'Post', params: { id: post.id, post: post } }" > </router-link> </li> </ul> </div> </template> <script> // @ is an alias to /src import axios from "axios"; export default { name: "Home", data() { return { posts: null, loading: false, }; }, mounted() { this.getPosts(); }, methods: { async getPosts() { this.loading = true; try { let res = await axios({ url: "https://jsonplaceholder.typicode.com/posts", method: "GET", }); let posts = res.data; this.posts = posts; this.loading = false; } catch (error) { this.loading = false; } }, }, }; </script> <style> .home { padding: 0 30px; max-width: 800px; margin: 0 auto; } @keyframes blink { from { opacity: 1; } to { opacity: 0; } } .post--empty { height: 250px; margin-top: 30px; animation: blink 0.8s ease-in-out infinite alternate both; display: flex; align-items: center; justify-content: center; font-family: "Lobster", cursive; } ul { text-align: left; } a { color: inherit; } </style>
Here, we’re importing axios and using it to fetch a list of posts from JSONPlaceholder in the getPost method. We’re also assigning the array of posts gotten from this API call to posts from the data function from this page, this is because we want to use this data in our template section. After this, we loop through the array of posts in a list ( <ul></ul>) and also attach a link to each post using id of each post as the link param (this is called dynamic route matching). We have also added a paragraph that would serve as a loading indicator.
At this point, here’s what this page looks like:
List of posts from JSONPlaceholder. (Large preview)
The next thing would be to create the page that will display the info for each post and create a link for it in the router of our app.
Post.vue
<template> <div class="about"> <div class="post"> <h1></h1> <p v-html="post.body"></p> </div> <p>End of page</p> </div> </template> <script> export default { name: "Post", props: ["id", "post"], }; </script> <style> .post { padding: 0 30px; height: 110vh; margin: 0 auto; } p { margin: 10px 0; } </style>
Here, we make use of passing props to route components to define id and post which we’re passing from the previous page in the form of route params. This is a neat way of accessing route params and query as opposed to doing this:
Post.vue
<script> export default { name: "Post", data() { return { post: this.$route.post, }; }, }; </script>
We then make use of this post value in the template section to display post title and body. Finally, we add a paragraph to the end of the page. We also add styling for the page in the styling section, which includes defining a height of 110vh. This is because we need the page to have a height that is more than the default height 100vh so we can observe the default scroll behavior of the router.
The next thing would be to create a route that would display each post. Update your index.js file in the /router folder ( or router.js file) to look like this:
import Vue from 'vue' import VueRouter from 'vue-router' import Home from '../views/Home.vue' Vue.use(VueRouter) const routes = [{ path: '/', name: 'Home', component: Home }, { path: '/:id', name: 'Post', props: true, component: () => import ( /* webpackChunkName: "post" */ '../views/Post.vue') } ] const router = new VueRouter({ mode: 'history', base: process.env.BASE_URL, routes }) export default router
Here, we define a new route that makes use of id that would be passed to this route from the homepage. We’re also decoupling the router param (in this case, post and id) using props.
The top of this page looks like this:
Top of post page. (Large preview)
If we click on any of the posts on the home page that does not require us to scroll, we would not notice any weird behavior scroll wise, but if we scroll down a little and click on the last post in this list, this should be the position the /post page would land on:
Default scroll position. (Large preview)
This is bad for UX and this is because the user isn’t expecting this behavior and they might need to start from the top of a page to get the full information on the said page.
Vue Router comes with the option to customize this behavior to individual preferences, an example would be saving scroll position of a previous route when trying to move back/forward. To fix the current issue in our app, we would update our router file to include the following:
import Vue from 'vue' import VueRouter from 'vue-router' import Home from '../views/Home.vue' Vue.use(VueRouter) const routes = [...] const router = new VueRouter({ mode: 'history', base: process.env.BASE_URL, routes, //add this scrollBehavior(to, from, savedPosition) { return { x: 0, y: 0 } } }) export default router
Now, if we scroll to the bottom of the home page and click on the last post, you should notice that it now starts from the top of the page.
New scroll position. (Large preview)
Data Fetching
When fetching data from an API, we either call the method in the mounted or created lifecycle hook, these are by far the most popular methods people use when developing in Vue. Vue router comes with another method in which we make this API request before navigating to a new route by making this request using the beforeRouterEnter guard in such a component. Here is an example of how to fetch data from JSONPlaceholder using this method:
beforeRouteEnter(to, from, next) { axios .get("https://jsonplaceholder.typicode.com/posts") .then((res) => { next((vm) => vm.fetchData(res)); }) .catch((err) => { console.error(err); }); }, methods: { fetchData(res) { let post = res.data; this.posts = post; }, },
Here, we’re fetching a list of posts from an API using Axios and when this request is complete, we call next. At this point in the lifecycle of this component, this is not available because the component has not been created but we have access to vm which gives us access to the component’s instance. Inside this function, we pass the response from the API request res to our method fetchData which we’ve created to assign the value from this response to post so we can use it in our template. Now, if we refresh our / route, we would notice that the data gets updated very fast and at no time is there a blank or page ( provided the request is successful).
Transitions
Vue comes with a <transition></ transition> component that enables easy implementation of CSS transitions and animations. This feature can be extended to work for navigation between routes in Vue. Here’s an example:
<template> <div id="app"> <div id="nav"> <router-link to="/">Home</router-link> </div> <transition name="slide-fade"> <router-view /> </transition> </div> </template> <style> #app { font-family: Avenir, Helvetica, Arial, sans-serif; -webkit-font-smoothing: antialiased; -moz-osx-font-smoothing: grayscale; text-align: center; color: #2c3e50; } #nav { padding: 30px; } #nav a { font-weight: bold; color: #2c3e50; } #nav a.router-link-exact-active { color: #42b983; } .slide-fade-enter-active { transition: transform 0.3s cubic-bezier(1, 0.5, 0.8, 1), color 0.5s cubic-bezier(1, 0.5, 0.8, 1); } .slide-fade-leave-active { transition: transform 1s cubic-bezier(1, 0.5, 0.8, 1), color 1s cubic-bezier(1, 0.5, 0.8, 1); } .slide-fade-enter { color: mediumblue; transform: translateY(20px); } .slide-fade-leave-to { transform: translateX(100px); color: cyan; } </style>
Here, we’re adding a transition with the name slide-fade to our application and wrapping it around all the route navigation that would take place in the app. We’re also adding a set of styles that control/define the way the transitions would work in our app. Without these rules, there would be no visible transition taking place. Now, if we try to navigate from the homepage to the individual posts, we would notice a sliding and fading transition taking place during the navigation process.
There are two types of route based transitions.
1. Per-route Transition
This type of transition is defined in the component that renders a route and so, it only affects the navigation to and from such a page. This gives us the ability to define a special transition for individual routes if we want. Here is an example of how to do that.
<template> // add a transition component with name and mode props <transition name="slide-fade" mode="in-out"> <div class="about"> <div class="post"> <h1></h1> <p v-html="post.body"></p> </div> <p>End of page</p> </div> </transition> </template> <script> export default { name: "Post", props: ["id", "post"], }; </script> <style> //... .slide-fade-enter-active { transition: transform 2s cubic-bezier(1, 0.5, 0.8, 1), opacity 2s ease-in; } .slide-fade-leave-active { transition: transform 2s cubic-bezier(1, 0.5, 0.8, 1), opacity 2s ease-out; } .slide-fade-enter { opacity: 1; transform: skewY(20deg); } .slide-fade-leave-to { transform: skewY(-45deg); opacity: 0.5; } </style>
If you try to navigate away from this page, we would notice the page gets skewed and fades for a duration of 2s as the navigation changes.
2. Route-Based Dynamic Transition
This is similar to the general method of adding transitions to all routes in your application but it has one major difference, that is, it accepts a dynamic transition name prop which gives you the ability to change the transition type any way you want. Let us create an example of how to do this.
We’re going to update our App.vue file with a dynamic name prop and configure it to choose a transition name depending on a value.
<template> <div id="app"> <div id="nav"> <router-link to="/">Home</router-link> </div> <transition :name="transitionName"> <router-view /> </transition> </div> </template> <script> export default { data() { return { transitionName: "slide-fade", }; }, watch: { $route(to, from, params) { const toParam = to.params && to.params.id ? to.params.id : 0; this.transitionName = toParam % 2 === 0 ? "slide-left" : "slide-fade"; }, }, }; </script> <style> /* add transition styles */ .slide-fade-enter-active { transition: transform 0.3s cubic-bezier(1, 0.5, 0.8, 1), color 0.5s cubic-bezier(1, 0.5, 0.8, 1); } .slide-fade-leave-active { transition: transform 1s cubic-bezier(1, 0.5, 0.8, 1), color 1s cubic-bezier(1, 0.5, 0.8, 1); } .slide-fade-enter { color: mediumblue; transform: translateY(20px); } .slide-fade-leave-to { transform: translateX(100px); color: cyan; } .slide-left-enter-active { transition: transform 0.3s cubic-bezier(1, 0.5, 0.8, 1), color 0.5s cubic-bezier(1, 0.5, 0.8, 1); } .slide-left-leave-active { transition: transform 1s cubic-bezier(1, 0.5, 0.8, 1), color 1s cubic-bezier(1, 0.5, 0.8, 1); } .slide-left-enter { color: mediumblue; transform: translateY(20px); } .slide-left-leave-to { transform: skewY(90deg); color: cyan; } </style>
Here, we’re adding a dynamic transition name which is defined in the script section of our app. We’re also watching the $route so that whenever it changes, we run the function that checks if the current route has a param of id otherwise, we give it a value of 0. We also determine the transition name based on the type of number the id is (i.e even or odd number). Now, if we navigate between the landing page and the different posts available, we would observe there are two types of transitions occurring as we navigate.
Meta Fields And Navigation Guards
Meta Fields
Meta fields help provide extra context to a certain route. An example of such context would be if a user needs to be authenticated to access such route or not. Here’s what this looks like:
import Vue from 'vue' import VueRouter from 'vue-router' import Home from '../views/Home.vue' Vue.use(VueRouter) const routes = [{ path: '/', name: 'Home', component: Home, // add meta to this route meta: { requiresAuth: true } }, ] const router = new VueRouter({ mode: 'history', base: process.env.BASE_URL, routes }) export default router
Here, we’ve added a meta property requiresAuth to the / route meaning we want users to be authenticated before they can access that route. Note that ‘requiresAuth’ is not a standard property, so you can choose any name you prefer. Whatever value you select at the end can be accessible in the $route object. This meta field at this point would not prevent unauthorized users from accessing that route, we need to hook it up to the Navigation guard.
Navigation Guard
Just as the name implies, the navigation guard helps protect and guard routes based on your preferences (i.e redirect to another page or preventing the navigation). This feature works together with the Route Meta Fields to effectively guard the routes of your application. There are 3 ways of adding router guard in our app:
1. In-component
Vue offers the option to configure your router guard for a particular route directly inside your components. Here’s an example in our Home.vue file:
<template> <div class="home"> <p v-if="loading" class="post--empty">Loading....</p> <ol v-else> <!-- add this text to your template --> <p v-if="guest">Hi Guest</p> <li v-for="post in posts" :key="post.id"> <router-link :to="{ name: 'Post', params: { id: post.id, post: post } }" > </router-link> </li> </ol> </div> </template> <script> // @ is an alias to /src import axios from "axios"; export default { name: "Home", data() { return { posts: null, // add this property guest: false, loading: false, }; }, // add this function beforeRouteEnter(to, from, next) { if (to.matched.some((record) => record.meta.requiresAuth)) { // this route requires auth, check if logged in // if not, display guest greeting. const loggedIn = JSON.parse(localStorage.getItem("loggedIn")); if (!loggedIn) { next((vm) => { vm.guest = true; }); } else { next(); } } else { next(); // make sure to always call next()! } }, methods: {...} }; </script> <style>...</style>
Here, we’re adding a paragraph that is only visible to unauthenticated users. We also add a property that controls the visibility of this text. Finally we have a router method beforeRouteEnter in which we also connect the router guard and check if the user is authenticated or not using a value that would be manually added later. We also have an if/else statement, and inside this statement, we change the value of guest depending on the authentication of the user.
And in your App.vue, add this lifecycle to the file.
export default { mounted() { localStorage.setItem("loggedIn", false); } };
So if you refresh your app, we should see the text we added in the Home.vue file.
Guest text visible. (Large preview)
2. Per-route
We can also add a router guard to our apps per-route in our router file as another property inside the specific route object. Here’s an example:
{ path: '/', name: 'Home', component: Home, // add meta to this route meta: { requiresAuth: true }, beforeEnter: (to, from, next) => { if (to.name !== 'Home') { console.log('Per-Route navigation guard ti wa online'); next() } else next() } }
Here, we add a router guard to the / route and we’re currently just logging a random text to the console but we can do a couple of things inside this guard. Now, each time you visit the home page, you would see this in your console:
Message printed in terminal. (Large preview)
3. Globally
We also have the option of creating a router guard that works globally for every part of the app (provided it meets the guard condition). This global guard is created in the router file just like the per-route guard but instead of defining it inside a specific route object, it is defined as a method of the router instance. For an example of how it works, we’re going to create a new file and route in our app and name it guest.vue, then add the following lines of code to the file.
<template> <div> <h1>Guest page</h1> <p>You're seeing this page because you are not logged in</p> </div> </template> <script> </script> <style></style>
Next, we create a /login route with this newly created page and add a meta property to other existing routes.
// create new route { path: '/login', name: 'login', component: () => import ( /* webpackChunkName: "auth" */ '../views/guest.vue') }, { path: '/:id', name: 'Post', props: true,a // add meta property meta: { requiresAuth: true }, component: () => import ( /* webpackChunkName: "post" */ '../views/Post.vue') }
The next thing would be to create the global navigation guard for all routes that require authentication and check the user’s authentication using localStorage (previously created). We would redirect users that have a loggedIn value of false to /login.
router.beforeEach((to, from, next) => { if (to.matched.some((record) => record.meta.requiresAuth)) { // this route requires auth, check if logged in // if not, display guest greeting. const loggedIn = JSON.parse(localStorage.getItem("loggedIn")); if (!loggedIn) { next({ path: '/login' }); } else { next(); } } else { next(); // make sure to always call next()! } })
So if you check your app in your browser, you would notice it is currently on this page:
Guest page. (Large preview)
If we try to navigate to any of the existing routes, we would automatically get redirected to this page no what we do and that means our router guard is effectively guarding those routes.
Conclusion
We can see that the Vue Router is a very powerful tool that can be used for more than just creating routes in your application. We have learned how to configure the scroll behavior of routes in our application, the different ways to add transitions to routes in our app, how to fetch data from an API before a component gets mounted, how to use meta property for our routes and the different ways to set up router guard.
Resources
Vue Router
CSS Transitions In Vuejs And Nuxtjs
(ks, ra, yk, il)
Website Design & SEO Delray Beach by DBL07.co
Delray Beach SEO
source http://www.scpie.org/how-to-do-more-with-vue-router/ source https://scpie1.blogspot.com/2020/09/how-to-do-more-with-vue-router.html
0 notes
Link
Vue is called as a progressive JavaScript framework with various features for building user interfaces. The following are the major features of VueJS.
Improvement & Bug Fixes: In the supplement to providing these new features, vue.js further comes with several improvements and bug fixes.
Improved Typescript Support & Integration: The most modern version of VueJS render stable support to TypeScript. The improved integration improves the type of declaration process
Better Error Handling & Reporting: Whilst using earlier versions of vuejs, programmers have to manipulate with the unexpected errors all through either config.errorHandler option or render an appropriate error component.
Better Functional Component Support: VueJs renders more considerate assistance to the functional components which are described as a single-file component (SFC). Here, the developers can now appropriate the vue-loader to represent functional components in an individual vue.js file.
Environment-Agnostic Server-Side Rendering: Unlike the other JS libraries, VueJS appears with built-in streaming server-side rendering. The hallmark makes it quite more accessible for the programmers to execute server-side rendering asynchronously.
VueJS Installing Steps
1. npm install -g @vue/cli 2. vue --version for check version 3. vue create {projectname} 4. need dependency a. vue-router b. dart-sass c. babel d. pwa 5. sudo npm install --save axios vue-axios { dipendency for ajax request} 6. npm install vue-easysession --save {dipendency for session} Base Example Here’s an example of a Vue component: // Define a new component called button-counter
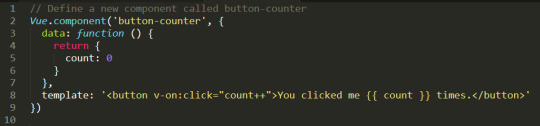
0 notes
Text
Don’t Wait! Mock the API
Today we have a loose coupling between the front end and the back end of web applications. They are usually developed by separate teams, and keeping those teams and the technology in sync is not easy. To solve part of this problem, we can “fake” the API server that the back end tech would normally create and develop as if the API or endpoints already exist.
The most common term used for creating simulated or “faking” a component is mocking. Mocking allows you to simulate the API without (ideally) changing the front end. There are many ways to achieve mocking, and this is what makes it so scary for most people, at least in my opinion.
Let’s cover what a good API mocking should look like and how to implement a mocked API into a new or existing application.
Note, the implementation that I am about to show is framework agnostic — so it can be used with any framework or vanilla JavaScript application.
Mirage: The mocking framework
The mocking approach we are going to use is called Mirage, which is somewhat new. I have tested many mocking frameworks and just recently discovered this one, and it’s been a game changer for me.
Mirage is marketed as a front-end-friendly framework that comes with a modern interface. It works in your browser, client-side, by intercepting XMLHttpRequest and Fetch requests.
We will go through creating a simple application with mocked API and cover some common problems along the way.
Mirage setup
Let’s create one of those standard to-do applications to demonstrate mocking. I will be using Vue as my framework of choice but of course, you can use something else since we’re working with a framework-agnostic approach.
So, go ahead and install Mirage in your project:
# Using npm npm i miragejs -D
# Using Yarn yarn add miragejs -D
To start using Mirage, we need to setup a “server” (in quotes, because it’s a fake server). Before we jump into the setup, I will cover the folder structure I found works best.
/ ├── public ├── src │ ├── api │ │ └── mock │ │ ├── fixtures │ │ │ └── get-tasks.js │ │ └── index.js │ └── main.js ├── package.json └── package-lock.json
In a mock directory, open up a new index.js file and define your mock server:
// api/mock/index.js import { Server } from 'miragejs';
export default function ({ environment = 'development' } = {}) { return new Server({ environment,
routes() { // We will add our routes here }, }); }
The environment argument we’re adding to the function signature is just a convention. We can pass in a different environment as needed.
Now, open your app bootstrap file. In our case, this is he src/main.js file since we are working with Vue. Import your createServer function, and call it in the development environment.
// main.js import createServer from './mock'
if (process.env.NODE_ENV === 'development') { createServer(); }
We’re using the process.env.NODE_ENV environment variable here, which is a common global variable. The conditional allows Mirage to be tree-shaken in production, therefore, it won’t affect your production bundle.
That is all we need to set up Mirage! It’s this sort of ease that makes the DX of Mirage so nice.
Our createServer function is defaulting it to development environment for the sake of making this article simple. In most cases, this will default to test since, in most apps, you’ll call createServer once in development mode but many times in test files.
How it works
Before we make our first request, let’s quickly cover how Mirage works.
Mirage is a client-side mocking framework, meaning all the mocking will happen in the browser, which Mirage does using the Pretender library. Pretender will temporarily replace native XMLHttpRequest and Fetch configurations, intercept all requests, and direct them to a little pretend service that the Mirage hooks onto.
If you crack open DevTools and head into the Network tab, you won’t see any Mirage requests. That’s because the request is intercepted and handled by Mirage (via Pretender in the back end). Mirage logs all requests, which we’ll get to in just a bit.
Let’s make requests!
Let’s create a request to an /api/tasks endpoint that will return a list of tasks that we are going to show in our to-do app. Note that I’m using axios to fetch the data. That’s just my personal preference. Again, Mirage works with native XMLHttpRequest, Fetch, and any other library.
// components/tasks.vue export default { async created() { try { const { data } = await axios.get('/api/tasks'); // Fetch the data this.tasks = data.tasks; } catch(e) { console.error(e); } } };
Opening your JavaScript console — there should be an error from Mirage in there:
Mirage: Your app tried to GET '/api/tasks', but there was no route defined to handle this request.
This means Mirage is running, but the router hasn’t been mocked out yet. Let’s solve this by adding that route.
Mocking requests
Inside our mock/index.js file, there is a routes() hook. Route handlers allow us to define which URLs should be handled by the Mirage server.
To define a router handler, we need to add it inside the routes() function.
// mock/index.js export default function ({ environment = 'development' } = {}) { // ... routes() { this.get('/api/tasks', () => ({ tasks: [ { id: 1, text: "Feed the cat" }, { id: 2, text: "Wash the dishes" }, //... ], })) }, }); }
The routes() hook is the way we define our route handlers. Using a this.get() method lets us mock GET requests. The first argument of all request functions is the URL we are handling, and the second argument is a function that responds with some data.
As a note, Mirage accepts any HTTP request type, and each type has the same signature:
this.get('/tasks', (schema, request) => { ... }); this.post('/tasks', (schema, request) => { ... }); this.patch('/tasks/:id', (schema, request) => { ... }); this.put('/tasks/:id', (schema, request) => { ... }); this.del('/tasks/:id', (schema, request) => { ... }); this.options('/tasks', (schema, request) => { ... });
We will discuss the schema and request parameters of the callback function in a moment.
With this, we have successfully mocked our route and we should see inside our console a successful response from Mirage.
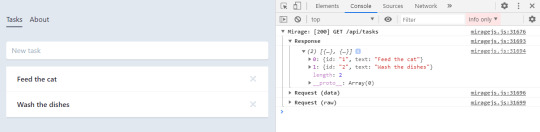
Working with dynamic data
Trying to add a new to-do in our app won’t be possible because our data in the GET response has hardcoded values. Mirage’s solution to this is that they provide a lightweight data layer that acts as a database. Let’s fix what we have so far.
Like the routes() hook, Mirage defines a seeds() hook. It allows us to create initial data for the server. I’m going to move the GET data to the seeds() hook where I will push it to the Mirage database.
seeds(server) { server.db.loadData({ tasks: [ { id: 1, text: "Feed the cat" }, { id: 2, text: "Wash the dishes" }, ], }) },
I moved our static data from the GET method to seeds() hook, where that data is loaded into a faux database. Now, we need to refactor our GET method to return data from that database. This is actually pretty straightforward — the first argument of the callback function of any route() method is the schema.
this.get('/api/tasks', (schema) => { return schema.db.tasks; })
Now we can add new to-do items to our app by making a POST request:
async addTask() { const { data } = await axios.post('/api/tasks', { data: this.newTask }); this.tasks.push(data); this.newTask = {}; },
We mock this route in Mirage by creating a POST /api/tasks route handler:
this.post('/tasks', (schema, request) => {})
Using the second parameter of the callback function, we can see the sent request.

Inside the requestBody property is the data that we sent. That means it’s now available for us to create a new task.
this.post('/api/tasks', (schema, request) => { // Take the send data from axios. const task = JSON.parse(request.requestBody).data
return schema.db.tasks.insert(task) })
The id of the task will be set by the Mirage’s database by default. Thus, there is no need to keep track of ids and send them with your request — just like a real server.
Dynamic routes? Sure!
The last thing to cover is dynamic routes. They allow us to use a dynamic segment in our URL, which is useful for deleting or updating a single to-do item in our app.
Our delete request should go to /api/tasks/1, /api/tasks/2, and so on. Mirage provides a way for us to define a dynamic segment in the URL, like this:
this.delete('/api/tasks/:id', (schema, request) => { // Return the ID from URL. const id = request.params.id;
return schema.db.tasks.remove(id); })
Using a colon (:) in the URL is how we define a dynamic segment in our URL. After the colon, we specify the name of the segment which, in our case, is called id and maps to the ID of a specific to-do item. We can access the value of the segment via the request.params object, where the property name corresponds to the segment name — request.params.id. Then we use the schema to remove an item with that same ID from the Mirage database.
If you’ve noticed, all of my routes so far are prefixed with api/. Writing this over and over can be cumbersome and you may want to make it easier. Mirage offers the namespace property that can help. Inside the routes hook, we can define the namespace property so we don’t have to write that out each time.
routes() { // Prefix for all routes. this.namespace = '/api';
this.get('/tasks', () => { ... }) this.delete('/tasks/:id', () => { ... }) this.post('/tasks', () => { ... }) }
OK, let’s integrate this into an existing app
So far, everything we’ve looked at integrates Mirage into a new app. But what about adding Mirage to an existing application? Mirage has you covered so you don’t have to mock your entire API.
The first thing to note is that adding Mirage to an existing application will throw an error if the site makes a request that isn’t handled by Mirage. To avoid this, we can tell Mirage to pass through all unhandled requests.
routes() { this.get('/tasks', () => { ... }) // Pass through all unhandled requests. this.passthrough() }
Now we can develop on top of an existing API with Mirage handling only the missing parts of our API.
Mirage can even change the base URL of which it captures the requests. This is useful because, usually, a server won’t live on localhost:3000 but rather on a custom domain.
routes() { // Set the base route. this.urlPrefix = 'https://devenv.ourapp.example';
this.get('/tasks', () => { ... }) }
Now, all of our requests will point to the real API server, but Mirage will intercept them like it did when we set it up with a new app. This means that the transition from Mirage to the real API is pretty darn seamless — delete the route from the mock server and things are good to go.
Wrapping up
Over the course of five years, I have used many mocking frameworks, yet I never truly liked any of the solutions out there. That was until recently, when my team was faced with a need for a mocking solution and I found out about Mirage.
Other solutions, like the commonly used JSON-Server, are external processes that need to run alongside the front end. Furthermore, they are often nothing more than an Express server with utility functions on top. The result is that front-end developers like us need to know about middleware, NodeJS, and how servers work… things many of us probably don’t want to handle. Other attempts, like Mockoon, have a complex interface while lacking much-needed features. There’s another group of frameworks that are only used for testing, like the popular SinonJS. Unfortunately, these frameworks can’t be used to mock the regular behavior.
My team managed to create a functioning server that enables us to write front-end code as if we were working with a real back-end. We did it by writing the front-end codebase without any external processes or servers that are needed to run. This is why I love Mirage. It is really simple to set up, yet powerful enough to handle anything that’s thrown at it. You can use it for basic applications that return a static array to full-blown back-end apps alike — regardless of whether it’s a new or existing app.
There’s a lot more to Mirage beyond the implementations we covered here. A working example of what we covered can be found on GitHub. (Fun fact: Mirage also works with GraphQL!) Mirage has well-written documentation that includes a bunch of step-by-step tutorials, so be sure to check it out.
The post Don’t Wait! Mock the API appeared first on CSS-Tricks.
You can support CSS-Tricks by being an MVP Supporter.
Don’t Wait! Mock the API published first on https://deskbysnafu.tumblr.com/
0 notes
Text
Stay DRY Using axios for API Requests
HTTP requests are a crucial part of any web application that’s communicating with a back-end server. The front end needs some data, so it asks for it via a network HTTP request (or Ajax, as it tends to be called), and the server returns an answer. Almost every website these days does this in some fashion.
With a larger site, we can expect to see more of this. More data, more APIs, and more special circumstances. As sites grow like this, it is important to stay organized. One classic concept is DRY (short for Don’t Repeat Yourself), which is the process of abstracting code to prevent repeating it over and over. This is ideal because it often allows us to write something once, use it in multiple places, and update in a single place rather than each instance.
We might also reach for libraries to help us. For Ajax, axios is a popular choice. You might already be familiar with it, and even use it for things like independent POST and GET requests while developing.
Installation and the basics
It can be installed using npm (or yarn):
npm install axios
An independent POST request using Axios looks like this:
axios.post('https://axios-app.firebaseio.com/users.json', formData) .then(res => console.log(res)) .catch(error => console.log(error))
Native JavaScript has multiple ways of doing JavaScript too. Notably, fetch(). So why use a library at all? Well, for one, error handling in fetch is pretty wonky. You’ll have a better time with axios right out of the gate with that. If you’d like to see a comparison, we have an article that covers both and an article that talks about the value of abstraction with stuff like this.
Another reason to reach for axios? It gives us more opportunities for DRYness, so let’s look into that.
Global config
We can set up a global configuration (e.g. in our main.js file) that handles all application requests using a standard configuration that is set through a default object that ships with axios.
This object contains:
baseURL: A relative URL that acts as a prefix to all requests, and each request can append the URL
headers: Custom headers that can be set based on the requests
timeout: The point at which the request is aborted, usually measured in milliseconds. The default value is 0, meaning it’s not applicable.
withCredentials: Indicates whether or not cross-site Access-Control requests should be made using credentials. The default is false.
responseType: Indicates the type of data that the server will return, with options including json (default), arraybuffer, document, text, and stream.
responseEncoding: Indicates encoding to use for decoding responses. The default value is utf8.
xsrfCookieName: The name of the cookie to use as a value for XSRF token, the default value is XSRF-TOKEN.
xsrfHeaderName: The name of the HTTP header that carries the XSRF token value. The default value is X-XSRF-TOKEN.
maxContentLength: Defines the max size of the HTTP response content in bytes allowed
maxBodyLength: Defines the max size of the HTTP request content in bytes allowed
Most of time, you’ll only be using baseURL, header, and maybe timeout. The rest of them are less frequently needed as they have smart defaults, but it’s nice to know there are there in case you need to fix up requests.
This is the DRYness at work. For each request, we don’t have to repeat the baseURL of our API or repeat important headers that we might need on every request.
Here’s an example where our API has a base, but it also has multiple different endpoints. First, we set up some defaults:
/ main.js import axios from 'axios';
axios.defaults.baseURL = 'https://axios-app.firebaseio.com' // the prefix of the URL axios.defaults.headers.get['Accept'] = 'application.json' // default header for all get request axios.defaults.headers.post['Accept'] = 'application.json' // default header for all POST request
Then, in a component, we can use axios more succinctly, not needing to set those headers, but still having an opportunity to customize the final URL endpoint:
// form.js component import axios from 'axios';
export default { methods : { onSubmit () { // The URL is now https://axios-app.firebaseio.com/users.json axios.post('/users.json', formData) .then(res => console.log(res)) .catch(error => console.log(error)) } } }
Note: This example is in Vue, but the concept extends to any JavaScript situation.
Custom instance
Setting up a “custom instance” is similar to a global config, but scoped to specified components. So, it’s still a DRY technique, but with hierarchy.
We’ll set up our custom instance in a new file (let’s call it authAxios.js) and import it into the “concern” components.
// authAxios.js import axios from 'axios'
const customInstance = axios.create ({ baseURL : 'https://axios-app.firebaseio.com' }) customInstance.defaults.headers.post['Accept'] = 'application.json'
// Or like this...
const customInstance = axios.create ({ baseURL : 'https://axios-app.firebaseio.com', headers: {'Accept': 'application.json'} })
And then we import this file into the form components:
// form.js component
// import from our custom instance import axios from './authAxios'
export default { methods : { onSubmit () { axios.post('/users.json', formData) .then(res => console.log(res)) .catch(error => console.log(error)) } } }
Interceptors
Interceptors helps with cases where the global config or custom instance might be too generic, in the sense that if you set up an header within their objects, it applies to the header of every request within the affected components. Interceptors have the ability to change any object properties on the fly. For instance, we can send a different header (even if we have set one up in the object) based on any condition we choose within the interceptor.
Interceptors can be in the main.js file or a custom instance file. Requests are intercepted after they’ve been sent out and allow us to change how the response is handled.
// Add a request interceptor axios.interceptors.request.use(function (config) { // Do something before request is sent, like we're inserting a timeout for only requests with a particular baseURL if (config.baseURL === 'https://axios-app.firebaseio.com/users.json') { config.timeout = 4000 } else { return config } console.log (config) return config; }, function (error) { // Do something with request error return Promise.reject(error); }); // Add a response interceptor axios.interceptors.response.use(function (response) { // Do something with response data like console.log, change header, or as we did here just added a conditional behaviour, to change the route or pop up an alert box, based on the reponse status if (response.status === 200 || response.status 201) { router.replace('homepage') } else { alert('Unusual behaviour') } console.log(response) return response; }, function (error) { // Do something with response error return Promise.reject(error); });
Interceptors, as the name implies, intercept both requests and responses to act differently based on whatever conditions are provided. For instance, in the request interceptor above, we inserted a conditional timeout only if the requests have a particular baseURL. For the response, we can intercept it and modify what we get back, like change the route or have an alert box, depending on the status code. We can even provide multiple conditions based on different error codes.
Interceptors will prove useful as your project becomes larger and you start to have lots of routes and nested routes all communicating to servers based on different triggers. Beyond the conditions I set above, there are many other situations that can warrant the use of interceptors, based on your project.
Interestingly, we can eject an interceptor to prevent it from having any effect at all. We’ll have to assign the interceptor to a variable and eject it using the appropriately named eject method.
const reqInterceptor = axios.interceptors.request.use(function (config) { // Do something before request is sent, like we're inserting a timeout for only requests with a particular baseURL if (config.baseURL === 'https://axios-app.firebaseio.com/users.json') { config.timeout = 4000 } else { return config } console.log (config) return config; }, function (error) { // Do something with request error return Promise.reject(error); }); // Add a response interceptor const resInterceptor = axios.interceptors.response.use(function (response) { // Do something with response data like console.log, change header, or as we did here just added a conditional behaviour, to change the route or pop up an alert box, based on the reponse status if (response.status === 200 || response.status 201) { router.replace('homepage') } else { alert('Unusual behaviour') } console.log(response) return response; }, function (error) { // Do something with response error return Promise.reject(error); });
axios.interceptors.request.eject(reqInterceptor); axios.interceptors.request.eject(resInterceptor);
Although it’s less commonly used, it’s possible to put and interceptor into a conditional statement or remove one based on some event.
Hopefully this gives you a good idea about the way axios works as well as how it can be used to keep API requests DRY in an application. While we scratched the surface by calling out common use cases and configurations, axis has so many other advantages you can explore in the documentation, including the ability to cancel requests and protect against cross-site request forgery , among other awesome possibilities.
The post Stay DRY Using axios for API Requests appeared first on CSS-Tricks.
source https://css-tricks.com/stay-dry-using-axios-for-api-requests/
from WordPress https://ift.tt/2Cl7URu via IFTTT
0 notes